
1. บทนำ
สวัสดี คุณคงชอบแนวคิดเรื่องเอเจนต์ ซึ่งเป็นผู้ช่วยตัวน้อยที่จะช่วยคุณทำสิ่งต่างๆ ให้สำเร็จได้โดยที่คุณไม่ต้องลงมือทำเองใช่ไหม ยอดเยี่ยม! แต่ในความเป็นจริงแล้ว เอเจนต์คนเดียวอาจไม่เพียงพอ โดยเฉพาะเมื่อคุณต้องรับมือกับโปรเจ็กต์ที่ใหญ่ขึ้นและซับซ้อนมากขึ้น คุณอาจต้องมีทีมผู้เชี่ยวชาญทั้งหมด ตรงนี้เองที่ระบบหลายเอเจนต์จะเข้ามามีบทบาท
เมื่อใช้ LLM ตัวแทนจะช่วยให้คุณมีความยืดหยุ่นอย่างมากเมื่อเทียบกับการเขียนโค้ดแบบฮาร์ดโค้ดแบบเดิม แต่ก็มีข้อควรระวังเสมอ นั่นคือการใช้งานฟีเจอร์เหล่านี้อาจมีความท้าทายที่ซับซ้อน และนี่คือสิ่งที่เราจะเจาะลึกในเวิร์กช็อปนี้

สิ่งที่คุณจะได้รับจากการเรียนรู้มีดังนี้ ซึ่งถือเป็นการยกระดับความสามารถในการเป็นเอเจนต์
สร้าง Agent ตัวแรกด้วย LangGraph: เราจะลงมือสร้าง Agent ของคุณเองโดยใช้ LangGraph ซึ่งเป็นเฟรมเวิร์กยอดนิยม คุณจะได้เรียนรู้วิธีสร้างเครื่องมือที่เชื่อมต่อกับฐานข้อมูล ใช้ประโยชน์จาก Gemini 2 API ล่าสุดเพื่อค้นหาข้อมูลบนอินเทอร์เน็ต และเพิ่มประสิทธิภาพพรอมต์และคำตอบ เพื่อให้เอเจนต์โต้ตอบได้ไม่เพียงแค่กับ LLM แต่ยังรวมถึงบริการที่มีอยู่ด้วย นอกจากนี้ เราจะแสดงวิธีการทำงานของการเรียกใช้ฟังก์ชันด้วย
การประสานงานเอเจนต์ในแบบของคุณ: เราจะสำรวจวิธีต่างๆ ในการประสานงานเอเจนต์ ตั้งแต่เส้นทางตรงแบบง่ายๆ ไปจนถึงสถานการณ์แบบหลายเส้นทางที่ซับซ้อนมากขึ้น ซึ่งก็เหมือนกับการกํากับการไหลเวียนของทีมตัวแทน
ระบบแบบหลายเอเจนต์: คุณจะได้เรียนรู้วิธีตั้งค่าระบบที่เอเจนต์สามารถทำงานร่วมกันและทำสิ่งต่างๆ ให้เสร็จสิ้นได้ด้วยกัน ซึ่งทั้งหมดนี้เป็นผลมาจากสถาปัตยกรรมที่ขับเคลื่อนด้วยเหตุการณ์
อิสระของ LLM: ใช้สิ่งที่ดีที่สุดสำหรับงาน: เราไม่ได้ยึดติดกับ LLM เพียงตัวเดียว คุณจะได้เห็นวิธีใช้ LLM หลายรายการ โดยกำหนดบทบาทที่แตกต่างกันเพื่อเพิ่มประสิทธิภาพการแก้ปัญหาโดยใช้ "โมเดลการคิด" ที่น่าสนใจ
เนื้อหาแบบไดนามิกคืออะไร ก็ไม่มีปัญหา: ลองนึกภาพเอเจนต์ของคุณสร้างเนื้อหาแบบไดนามิกที่ปรับแต่งมาสำหรับผู้ใช้แต่ละรายโดยเฉพาะแบบเรียลไทม์ เราจะแสดงวิธีให้คุณ
ย้ายข้อมูลไปยังระบบคลาวด์ด้วย Google Cloud: ไม่ใช่แค่การทดลองใน Notebook เราจะแสดงวิธีออกแบบและติดตั้งใช้งานระบบแบบหลายเอเจนต์ใน Google Cloud เพื่อให้พร้อมใช้งานในโลกแห่งความเป็นจริง
โปรเจ็กต์นี้จะเป็นตัวอย่างที่ดีของวิธีใช้เทคนิคทั้งหมดที่เราพูดถึง
2. สถาปัตยกรรม
การเป็นครูหรือทำงานด้านการศึกษาอาจเป็นเรื่องที่คุ้มค่ามาก แต่ก็ต้องยอมรับว่าภาระงาน โดยเฉพาะงานเตรียมการทั้งหมด อาจเป็นเรื่องที่ท้าทาย นอกจากนี้ มักจะมีเจ้าหน้าที่ไม่เพียงพอและค่าติวอาจมีราคาสูง เราจึงขอเสนอผู้ช่วยสอนที่ทำงานด้วยระบบ AI เครื่องมือนี้จะช่วยลดภาระของนักการศึกษาและช่วยลดช่องว่างที่เกิดจากการขาดแคลนเจ้าหน้าที่และไม่มีการสอนพิเศษราคาไม่แพง
ผู้ช่วยการสอน AI ของเราสามารถสร้างแผนการสอนแบบละเอียด แบบทดสอบสนุกๆ สรุปแบบเสียงที่ทำตามได้ง่าย และงานที่ปรับให้เหมาะกับแต่ละบุคคล ซึ่งจะช่วยให้ครูสามารถมุ่งเน้นสิ่งที่ตนทำได้ดีที่สุด นั่นคือการเชื่อมต่อกับนักเรียนและช่วยให้นักเรียนรักการเรียนรู้
ระบบมี 2 เว็บไซต์ ได้แก่ เว็บไซต์สำหรับครูเพื่อสร้างแผนการสอนสำหรับสัปดาห์ที่จะมาถึง

และอีกอันสำหรับนักเรียน/นักศึกษาเพื่อเข้าถึงแบบทดสอบ สรุปเสียง และงาน 
มาดูสถาปัตยกรรมที่ขับเคลื่อนผู้ช่วยการสอนของเราอย่าง Aidemy กัน ดังที่เห็น เราได้แบ่งออกเป็นองค์ประกอบสำคัญหลายอย่าง ซึ่งทั้งหมดทำงานร่วมกันเพื่อให้สิ่งนี้เกิดขึ้น

องค์ประกอบและเทคโนโลยีหลักของสถาปัตยกรรม
Google Cloud Platform (GCP): เป็นศูนย์กลางของทั้งระบบ
- Vertex AI: เข้าถึง LLM ของ Gemini จาก Google
- Cloud Run: แพลตฟอร์มแบบ Serverless สำหรับการทำให้เอเจนต์และฟังก์ชันที่สร้างโดยใช้คอนเทนเนอร์ใช้งานได้
- Cloud SQL: ฐานข้อมูล PostgreSQL สำหรับข้อมูลหลักสูตร
- Pub/Sub และ Eventarc: พื้นฐานของสถาปัตยกรรมที่ขับเคลื่อนด้วยเหตุการณ์ ซึ่งช่วยให้การสื่อสารแบบไม่พร้อมกันระหว่างคอมโพเนนต์
- Cloud Storage: จัดเก็บสรุปเสียงและไฟล์งาน
- Secret Manager: จัดการข้อมูลเข้าสู่ระบบของฐานข้อมูลอย่างปลอดภัย
- Artifact Registry: จัดเก็บอิมเมจ Docker สำหรับเอเจนต์
- Compute Engine: เพื่อติดตั้งใช้งาน LLM ที่โฮสต์ด้วยตนเองแทนที่จะใช้โซลูชันของผู้ให้บริการ
LLM: "สมอง" ของระบบ
- โมเดล Gemini ของ Google: (Gemini x Pro, Gemini x Flash, Gemini x Flash Thinking) ใช้สำหรับการวางแผนบทเรียน การสร้างเนื้อหา การสร้าง HTML แบบไดนามิก การอธิบายแบบทดสอบ และการรวมงาน
- DeepSeek: ใช้สำหรับงานเฉพาะด้านในการสร้างงานที่มอบหมายให้ศึกษาด้วยตนเอง
LangChain และ LangGraph: เฟรมเวิร์กสำหรับการพัฒนาแอปพลิเคชัน LLM
- ช่วยให้สร้างเวิร์กโฟลว์แบบหลายเอเจนต์ที่ซับซ้อนได้
- เปิดใช้การจัดระเบียบเครื่องมืออัจฉริยะ (การเรียก API, การค้นหาฐานข้อมูล, การค้นหาเว็บ)
- ใช้สถาปัตยกรรมที่ขับเคลื่อนด้วยเหตุการณ์เพื่อความสามารถในการปรับขนาดและความยืดหยุ่นของระบบ
โดยพื้นฐานแล้ว สถาปัตยกรรมของเราผสานรวมความสามารถของ LLM กับข้อมูลที่มีโครงสร้างและการสื่อสารที่ขับเคลื่อนด้วยเหตุการณ์ ซึ่งทั้งหมดนี้ทำงานบน Google Cloud ซึ่งช่วยให้เราสร้างผู้ช่วยสอนที่ปรับขนาดได้ เชื่อถือได้ และมีประสิทธิภาพ
3. ก่อนเริ่มต้น
ใน Google Cloud Console ให้เลือกหรือสร้างโปรเจ็กต์ Google Cloud ในหน้าตัวเลือกโปรเจ็กต์ ตรวจสอบว่าได้เปิดใช้การเรียกเก็บเงินสำหรับโปรเจ็กต์ Cloud แล้ว ดูวิธีตรวจสอบว่าได้เปิดใช้การเรียกเก็บเงินในโปรเจ็กต์แล้วหรือไม่
เปิดใช้ Gemini Code Assist ใน Cloud Shell IDE
👉 ในคอนโซล Google Cloud ให้ไปที่เครื่องมือ Gemini Code Assist แล้วเปิดใช้ Gemini Code Assist โดยไม่มีค่าใช้จ่ายด้วยการยอมรับข้อกำหนดและเงื่อนไข
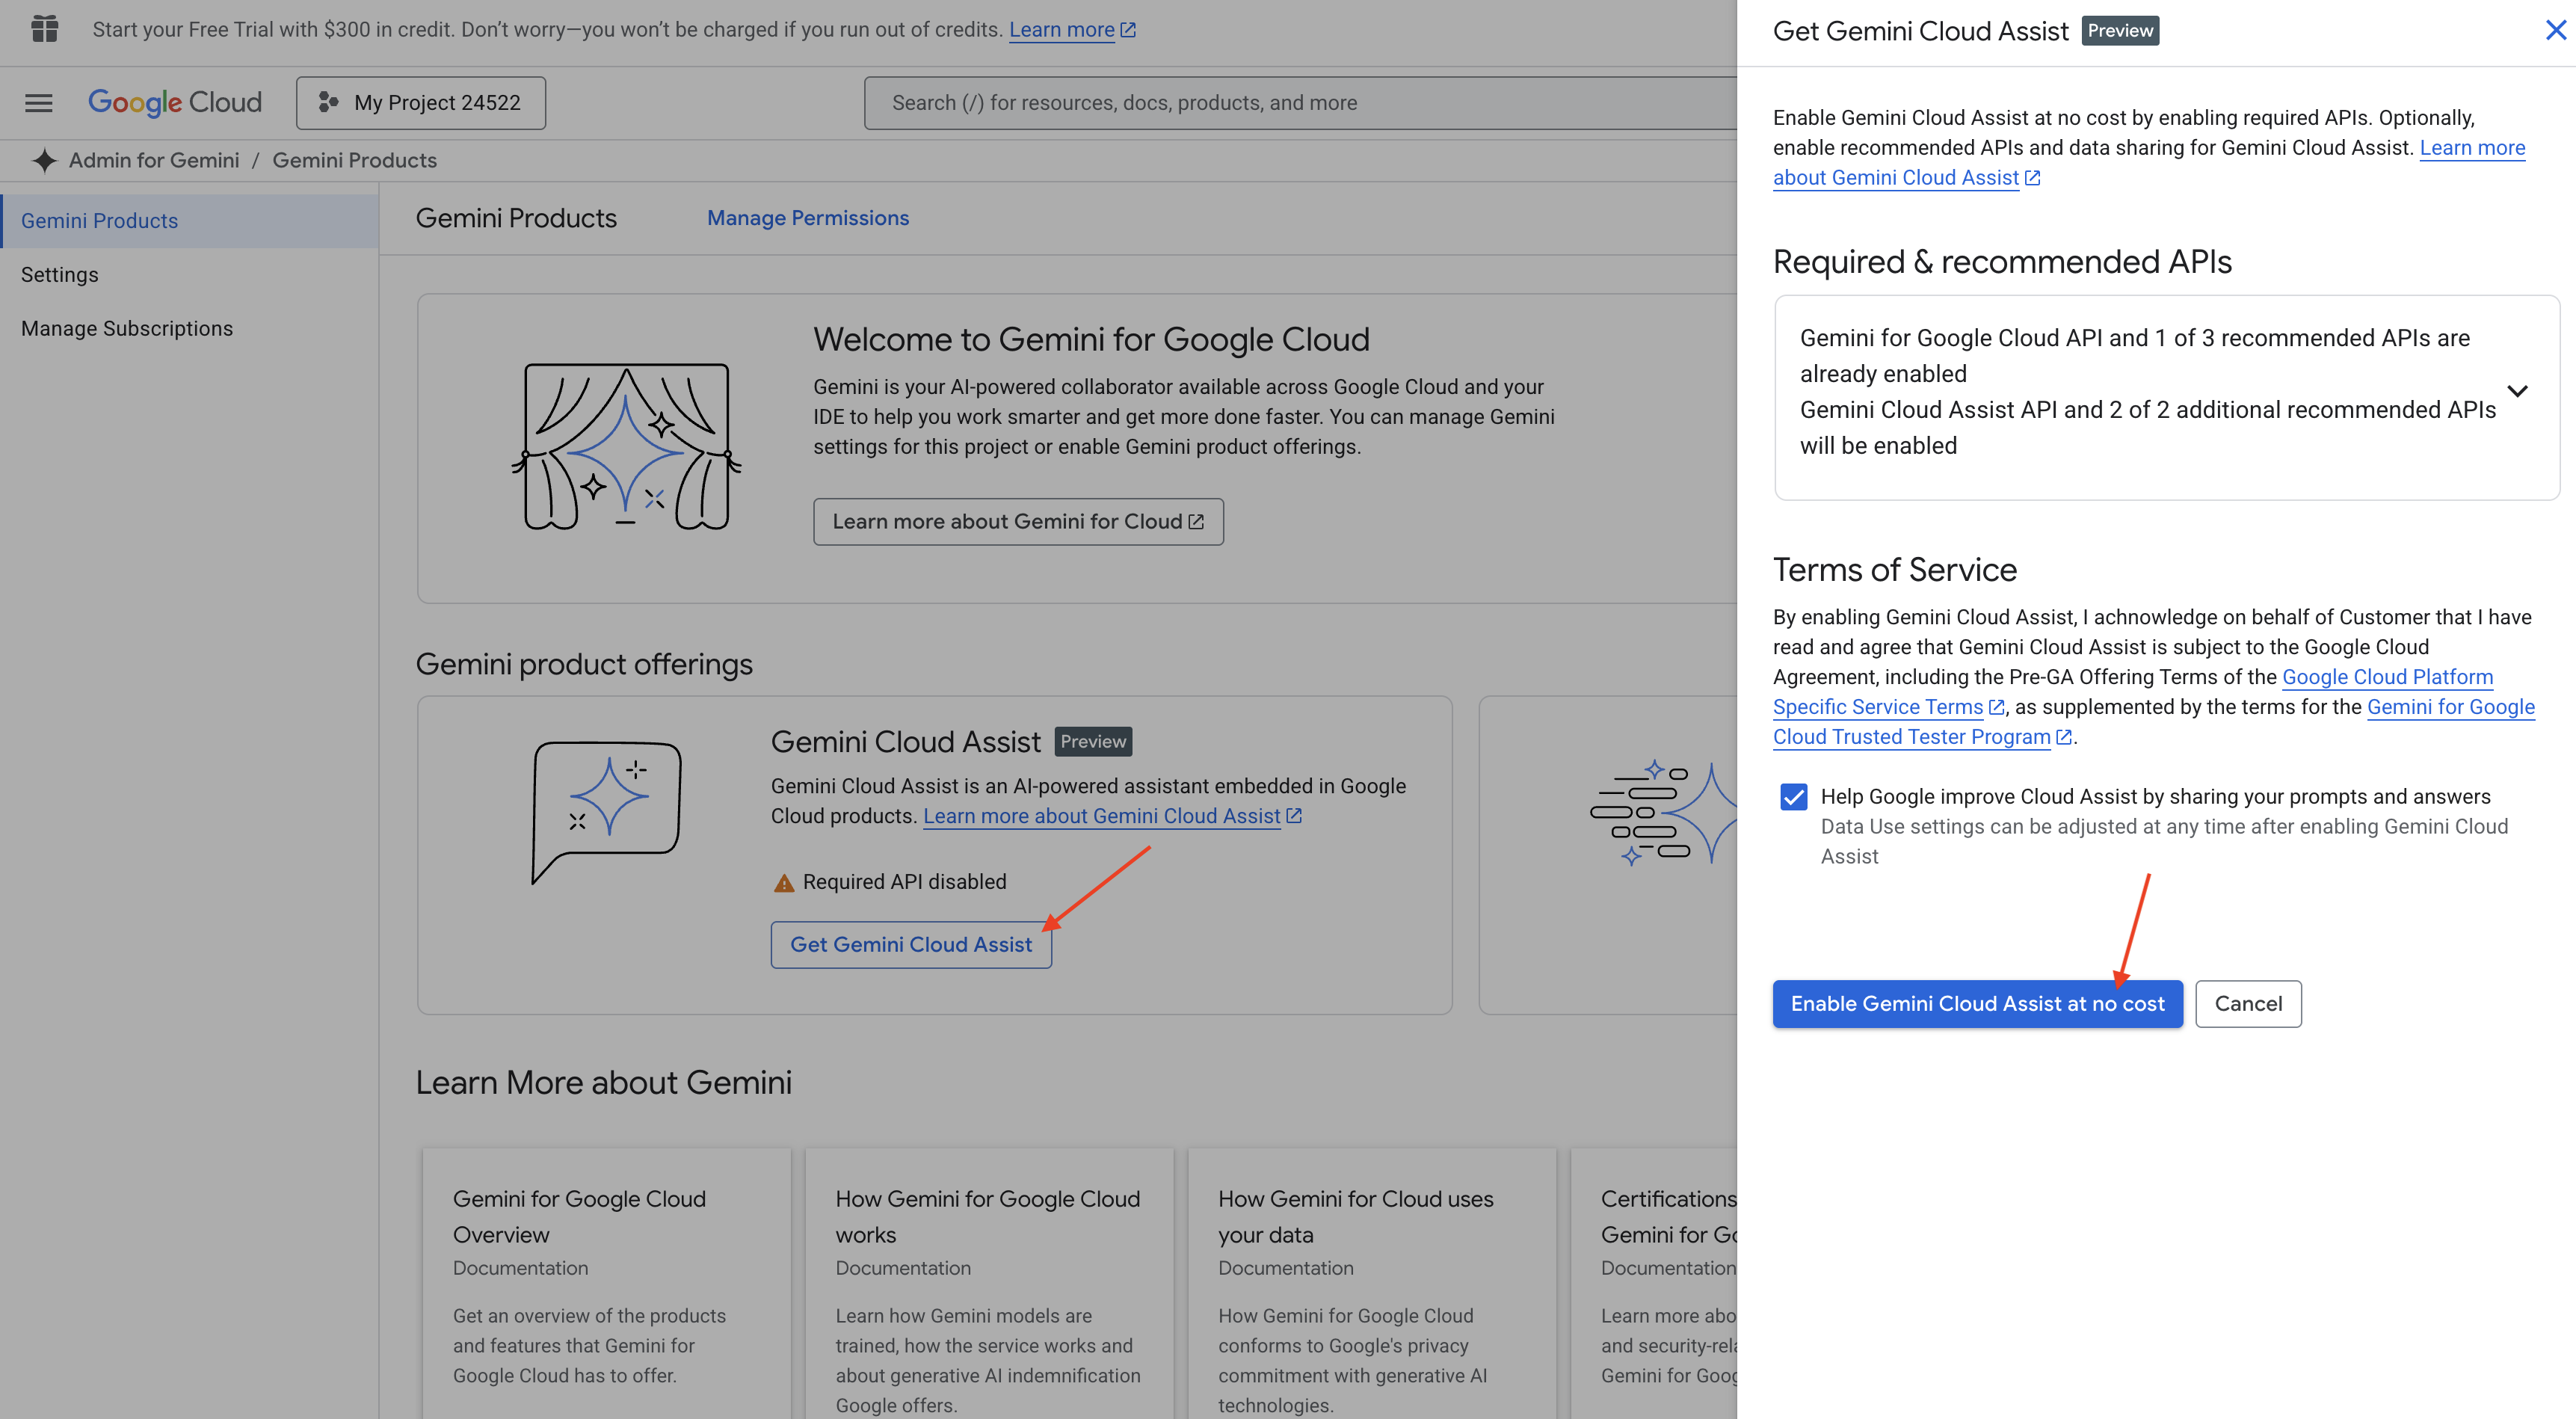
ไม่ต้องตั้งค่าสิทธิ์และออกจากหน้านี้
ทำงานใน Cloud Shell Editor
👉คลิกเปิดใช้งาน Cloud Shell ที่ด้านบนของคอนโซล Google Cloud (เป็นไอคอนรูปเทอร์มินัลที่ด้านบนของแผง Cloud Shell) แล้วคลิกปุ่ม "เปิดโปรแกรมแก้ไข" (มีลักษณะเป็นโฟลเดอร์ที่เปิดอยู่พร้อมดินสอ) ซึ่งจะเปิดตัวแก้ไขโค้ด Cloud Shell ในหน้าต่าง คุณจะเห็น File Explorer ทางด้านซ้าย

👉คลิกปุ่มลงชื่อเข้าใช้ Cloud Code ในแถบสถานะด้านล่างตามที่แสดง ให้สิทธิ์ปลั๊กอินตามวิธีการ หากเห็น Cloud Code - ไม่มีโปรเจ็กต์ในแถบสถานะ ให้เลือกข้อความดังกล่าว จากนั้นเลือก "เลือกโปรเจ็กต์ Google Cloud" ในเมนูแบบเลื่อนลง แล้วเลือกโปรเจ็กต์ Google Cloud ที่เฉพาะเจาะจงจากรายการโปรเจ็กต์ที่คุณสร้าง

👉เปิดเทอร์มินัลใน Cloud IDE,  หรือ
หรือ 
👉ในเทอร์มินัล ให้ตรวจสอบว่าคุณได้รับการตรวจสอบสิทธิ์แล้วและตั้งค่าโปรเจ็กต์เป็นรหัสโปรเจ็กต์โดยใช้คำสั่งต่อไปนี้
gcloud auth list
👉และอย่าลืมแทนที่ <YOUR_PROJECT_ID> ด้วยรหัสโปรเจ็กต์ของคุณ
echo <YOUR_PROJECT_ID> > ~/project_id.txt
gcloud config set project $(cat ~/project_id.txt)
👉เรียกใช้คำสั่งต่อไปนี้เพื่อเปิดใช้ Google Cloud APIs ที่จำเป็น
gcloud services enable compute.googleapis.com  \
                        storage.googleapis.com  \
                        run.googleapis.com  \
                        artifactregistry.googleapis.com  \
                        aiplatform.googleapis.com \
                        eventarc.googleapis.com \
                        sqladmin.googleapis.com \
                        secretmanager.googleapis.com \
                        cloudbuild.googleapis.com \
                        cloudresourcemanager.googleapis.com \
                        cloudfunctions.googleapis.com \
                        cloudaicompanion.googleapis.com
การดำเนินการนี้อาจใช้เวลาสักครู่
การตั้งค่าสิทธิ์
👉ตั้งค่าสิทธิ์ของบัญชีบริการ ในเทอร์มินัล ให้เรียกใช้คำสั่งต่อไปนี้
gcloud config set project $(cat ~/project_id.txt)
export PROJECT_ID=$(gcloud config get project)
export SERVICE_ACCOUNT_NAME=$(gcloud compute project-info describe --format="value(defaultServiceAccount)")

echo "Here's your SERVICE_ACCOUNT_NAME $SERVICE_ACCOUNT_NAME"
👉 ให้สิทธิ์ ในเทอร์มินัล ให้เรียกใช้คำสั่งต่อไปนี้
#Cloud Storage (Read/Write):
gcloud projects add-iam-policy-binding $PROJECT_ID \
  --member="serviceAccount:$SERVICE_ACCOUNT_NAME" \
  --role="roles/storage.objectAdmin"

#Pub/Sub (Publish/Receive):
gcloud projects add-iam-policy-binding $PROJECT_ID \
  --member="serviceAccount:$SERVICE_ACCOUNT_NAME" \
  --role="roles/pubsub.publisher"

gcloud projects add-iam-policy-binding $PROJECT_ID \
  --member="serviceAccount:$SERVICE_ACCOUNT_NAME" \
  --role="roles/pubsub.subscriber"


#Cloud SQL (Read/Write):
gcloud projects add-iam-policy-binding $PROJECT_ID \
  --member="serviceAccount:$SERVICE_ACCOUNT_NAME" \
  --role="roles/cloudsql.editor"


#Eventarc (Receive Events):
gcloud projects add-iam-policy-binding $PROJECT_ID \
  --member="serviceAccount:$SERVICE_ACCOUNT_NAME" \
  --role="roles/iam.serviceAccountTokenCreator"

gcloud projects add-iam-policy-binding $PROJECT_ID \
  --member="serviceAccount:$SERVICE_ACCOUNT_NAME" \
  --role="roles/eventarc.eventReceiver"

#Vertex AI (User):
gcloud projects add-iam-policy-binding $PROJECT_ID \
  --member="serviceAccount:$SERVICE_ACCOUNT_NAME" \
  --role="roles/aiplatform.user"

#Secret Manager (Read):
gcloud projects add-iam-policy-binding $PROJECT_ID \
  --member="serviceAccount:$SERVICE_ACCOUNT_NAME" \
  --role="roles/secretmanager.secretAccessor"
👉ตรวจสอบผลลัพธ์ในคอนโซล IAM
👉เรียกใช้คำสั่งต่อไปนี้ในเทอร์มินัลเพื่อสร้างอินสแตนซ์ Cloud SQL ชื่อ aidemy เราจะต้องใช้ข้อมูลนี้ในภายหลัง แต่เนื่องจากกระบวนการนี้อาจใช้เวลาสักพัก เราจึงจะดำเนินการตอนนี้
gcloud sql instances create aidemy \
    --database-version=POSTGRES_14 \
    --cpu=2 \
    --memory=4GB \
    --region=us-central1 \
    --root-password=1234qwer \
    --storage-size=10GB \
    --storage-auto-increase
4. การสร้างเอเจนต์ตัวแรก
ก่อนที่จะเจาะลึกระบบหลายเอเจนต์ที่ซับซ้อน เราต้องสร้างองค์ประกอบพื้นฐาน นั่นคือเอเจนต์เดียวที่ใช้งานได้ ในส่วนนี้ เราจะเริ่มขั้นตอนแรกด้วยการสร้างเอเจนต์ "ผู้ให้บริการหนังสือ" อย่างง่าย เอเจนต์ผู้ให้บริการหนังสือจะรับหมวดหมู่เป็นอินพุตและใช้ LLM ของ Gemini เพื่อสร้างการแสดงหนังสือในรูปแบบ JSON ภายในหมวดหมู่นั้น จากนั้นจะแสดงคำแนะนำหนังสือเหล่านี้เป็นปลายทาง REST API

👉เปิด Google Cloud Console ในเว็บเบราว์เซอร์ในแท็บเบราว์เซอร์อื่น ในเมนูการนำทาง (☰) ให้ไปที่ "Cloud Run" คลิกปุ่ม "+ ... เขียนฟังก์ชัน"

👉จากนั้นเราจะกำหนดค่าการตั้งค่าพื้นฐานของฟังก์ชัน Cloud Run ดังนี้
- ชื่อบริการ:
book-provider - ภูมิภาค:
us-central1 - รันไทม์:
Python 3.12 - การตรวจสอบสิทธิ์:
Allow unauthenticated invocationsเป็นเปิดใช้
👉ปล่อยให้การตั้งค่าอื่นๆ เป็นค่าเริ่มต้น แล้วคลิกสร้าง ระบบจะนำคุณไปยังโปรแกรมแก้ไขซอร์สโค้ด
คุณจะเห็นไฟล์ main.py และ requirements.txt ที่ป้อนข้อมูลไว้ล่วงหน้า
main.py จะมีตรรกะทางธุรกิจของฟังก์ชัน ส่วน requirements.txt จะมีแพ็กเกจที่จำเป็น
👉ตอนนี้เราก็พร้อมที่จะเขียนโค้ดแล้ว แต่ก่อนที่จะเจาะลึกไปในรายละเอียด มาดูกันว่า Gemini Code Assist จะช่วยให้เราเริ่มต้นได้ไหม กลับไปที่ Cloud Shell Editor แล้วคลิกไอคอน Gemini Code Assist ที่ด้านบน ซึ่งควรจะเปิดแชทของ Gemini Code Assist

👉 วางคำขอต่อไปนี้ลงในช่องพรอมต์
Use the functions_framework library to be deployable as an HTTP function.
Accept a request with category and number_of_book parameters (either in JSON body or query string).
Use langchain and gemini to generate the data for book with fields bookname, author, publisher, publishing_date.
Use pydantic to define a Book model with the fields: bookname (string, description: "Name of the book"), author (string, description: "Name of the author"), publisher (string, description: "Name of the publisher"), and publishing_date (string, description: "Date of publishing").
Use langchain and gemini model to generate book data. the output should follow the format defined in Book model.

The logic should use JsonOutputParser from langchain to enforce output format defined in Book Model.
Have a function get_recommended_books(category) that internally uses langchain and gemini to return a single book object.
The main function, exposed as the Cloud Function, should call get_recommended_books() multiple times (based on number_of_book) and return a JSON list of the generated book objects.
Handle the case where category or number_of_book are missing by returning an error JSON response with a 400 status code.
return a JSON string representing the recommended books. use os library to retrieve GOOGLE_CLOUD_PROJECT env var. Use ChatVertexAI from langchain for the LLM call
จากนั้น Code Assist จะสร้างโซลูชันที่เป็นไปได้ โดยจะให้ทั้งซอร์สโค้ดและไฟล์การอ้างอิง requirements.txt (อย่าใช้รหัสนี้)
เราขอแนะนำให้คุณเปรียบเทียบโค้ดที่สร้างโดย Code Assist กับโซลูชันที่ผ่านการทดสอบและถูกต้องซึ่งระบุไว้ด้านล่าง ซึ่งจะช่วยให้คุณประเมินประสิทธิภาพของเครื่องมือและระบุความคลาดเคลื่อนที่อาจเกิดขึ้นได้ แม้ว่าไม่ควรเชื่อ LLM โดยไม่ไตร่ตรอง แต่ Code Assist ก็เป็นเครื่องมือที่ยอดเยี่ยมสำหรับการสร้างต้นแบบอย่างรวดเร็วและการสร้างโครงสร้างโค้ดเริ่มต้น และควรใช้เพื่อเริ่มต้นได้อย่างราบรื่น
เนื่องจากนี่คือเวิร์กช็อป เราจะดำเนินการกับโค้ดที่ยืนยันแล้วซึ่งระบุไว้ด้านล่าง อย่างไรก็ตาม คุณสามารถทดลองใช้โค้ดที่ Code Assist สร้างขึ้นได้ทุกเมื่อเพื่อทำความเข้าใจความสามารถและข้อจำกัดของฟีเจอร์นี้ให้ดียิ่งขึ้น
👉กลับไปที่ตัวแก้ไขซอร์สโค้ดของฟังก์ชัน Cloud Run (ในแท็บเบราว์เซอร์อื่น) แทนที่เนื้อหาที่มีอยู่ของ main.py ด้วยโค้ดที่ระบุไว้ด้านล่างอย่างระมัดระวัง
import functions_framework
import json
from flask import Flask, jsonify, request
from langchain_google_vertexai import ChatVertexAI
from langchain_core.output_parsers import JsonOutputParser
from langchain_core.prompts import PromptTemplate
from pydantic import BaseModel, Field
import os

class Book(BaseModel):
    bookname: str = Field(description="Name of the book")
    author: str = Field(description="Name of the author")
    publisher: str = Field(description="Name of the publisher")
    publishing_date: str = Field(description="Date of publishing")


project_id = os.environ.get("GOOGLE_CLOUD_PROJECT")

llm = ChatVertexAI(model_name="gemini-2.0-flash-lite-001")

def get_recommended_books(category):
    """
    A simple book recommendation function.

    Args:
        category (str): category

    Returns:
        str: A JSON string representing the recommended books.
    """
    parser = JsonOutputParser(pydantic_object=Book)
    question = f"Generate a random made up book on {category} with bookname, author and publisher and publishing_date"

    prompt = PromptTemplate(
        template="Answer the user query.\n{format_instructions}\n{query}\n",
        input_variables=["query"],
        partial_variables={"format_instructions": parser.get_format_instructions()},
    )

    chain = prompt | llm | parser
    response = chain.invoke({"query": question})

    return  json.dumps(response)


@functions_framework.http
def recommended(request):
    request_json = request.get_json(silent=True) # Get JSON data
    if request_json and 'category' in request_json and 'number_of_book' in request_json:
        category = request_json['category']
        number_of_book = int(request_json['number_of_book'])
    elif request.args and 'category' in request.args and 'number_of_book' in request.args:
        category = request.args.get('category')
        number_of_book = int(request.args.get('number_of_book'))

    else:
        return jsonify({'error': 'Missing category or number_of_book parameters'}), 400


    recommendations_list = []
    for i in range(number_of_book):
        book_dict = json.loads(get_recommended_books(category))
        print(f"book_dict=======>{book_dict}")

        recommendations_list.append(book_dict)


    return jsonify(recommendations_list)
👉แทนที่เนื้อหาของ requirements.txt ด้วยเนื้อหาต่อไปนี้
functions-framework==3.*
google-genai==1.0.0
flask==3.1.0
jsonify==0.5
langchain_google_vertexai==2.0.13
langchain_core==0.3.34
pydantic==2.10.5
👉เราจะตั้งค่าจุดแรกเข้าของฟังก์ชัน: recommended

👉คลิกบันทึกและติดตั้งใช้งาน (หรือบันทึกและติดตั้งใช้งานอีกครั้ง) เพื่อติดตั้งใช้งานฟังก์ชัน รอให้กระบวนการติดตั้งใช้งานเสร็จสมบูรณ์ Cloud Console จะแสดงสถานะ การดำเนินการนี้อาจใช้เวลาสักครู่
 👉เมื่อติดตั้งใช้งานแล้ว ให้กลับไปที่ Cloud Shell Editor แล้วเรียกใช้คำสั่งต่อไปนี้ในเทอร์มินัล
gcloud config set project $(cat ~/project_id.txt)
export PROJECT_ID=$(gcloud config get project)
export BOOK_PROVIDER_URL=$(gcloud run services describe book-provider --region=us-central1 --project=$PROJECT_ID --format="value(status.url)")

curl -X POST -H "Content-Type: application/json" -d '{"category": "Science Fiction", "number_of_book": 2}' $BOOK_PROVIDER_URL
ซึ่งควรแสดงข้อมูลหนังสือบางส่วนในรูปแบบ JSON
[
  {"author":"Anya Sharma","bookname":"Echoes of the Singularity","publisher":"NovaLight Publishing","publishing_date":"2077-03-15"},
  {"author":"Anya Sharma","bookname":"Echoes of the Quantum Dawn","publisher":"Nova Genesis Publishing","publishing_date":"2077-03-15"}
]
ยินดีด้วย คุณทำให้ฟังก์ชัน Cloud Run ใช้งานได้เรียบร้อยแล้ว นี่เป็นหนึ่งในบริการที่เราจะผสานรวมเมื่อพัฒนาเอเจนต์ Aidemy
5. เครื่องมือสร้าง: การเชื่อมต่อ Agent กับบริการ RESTFUL และข้อมูล
มาดาวน์โหลดโปรเจ็กต์โครงร่าง Bootstrap กันเลย โดยตรวจสอบว่าคุณอยู่ใน Cloud Shell Editor ในเทอร์มินัล ให้เรียกใช้
git clone https://github.com/weimeilin79/aidemy-bootstrap.git
หลังจากเรียกใช้คำสั่งนี้แล้ว ระบบจะสร้างโฟลเดอร์ใหม่ชื่อ aidemy-bootstrap ในสภาพแวดล้อม Cloud Shell
ในแผง Explorer ของ Cloud Shell Editor (โดยปกติจะอยู่ทางด้านซ้าย) คุณควรเห็นโฟลเดอร์ที่สร้างขึ้นเมื่อโคลนที่เก็บ Git aidemy-bootstrap เปิดโฟลเดอร์รูทของโปรเจ็กต์ใน Explorer คุณจะเห็นplannerโฟลเดอร์ย่อยภายในโฟลเดอร์นั้น ให้เปิดโฟลเดอร์ย่อยด้วย 
มาเริ่มสร้างเครื่องมือที่เอเจนต์จะใช้เพื่อเป็นประโยชน์อย่างแท้จริงกัน อย่างที่ทราบกันดีว่า LLM ทำได้ดีในการให้เหตุผลและการสร้างข้อความ แต่ต้องมีสิทธิ์เข้าถึงแหล่งข้อมูลภายนอกเพื่อทำงานในโลกแห่งความเป็นจริงและให้ข้อมูลที่ถูกต้องและเป็นปัจจุบัน ให้คิดว่าเครื่องมือเหล่านี้เป็น "มีดพับสวิส" ของเอเจนต์ ซึ่งช่วยให้เอเจนต์โต้ตอบกับโลกได้
เมื่อสร้างเอเจนต์ คุณอาจเผลอฮาร์ดโค้ดรายละเอียดจำนวนมากได้ง่ายๆ ซึ่งจะสร้างเอเจนต์ที่ไม่มีความยืดหยุ่น แต่การสร้างและใช้เครื่องมือจะช่วยให้เอเจนต์เข้าถึงตรรกะหรือระบบภายนอกได้ ซึ่งจะทำให้ได้รับประโยชน์ทั้งจาก LLM และการเขียนโปรแกรมแบบดั้งเดิม
ในส่วนนี้ เราจะสร้างรากฐานสำหรับเอเจนต์วางแผน ซึ่งครูจะใช้เพื่อสร้างแผนการสอน ก่อนที่เอเจนต์จะเริ่มสร้างแผน เราต้องการกำหนดขอบเขตโดยให้รายละเอียดเพิ่มเติมเกี่ยวกับวิชาและหัวข้อ เราจะสร้างเครื่องมือ 3 อย่าง ได้แก่
- การเรียกใช้ RESTful API: การโต้ตอบกับ API ที่มีอยู่แล้วเพื่อดึงข้อมูล
- การค้นหาฐานข้อมูล: ดึงข้อมูลที่มีโครงสร้างจากฐานข้อมูล Cloud SQL
- Google Search: เข้าถึงข้อมูลแบบเรียลไทม์จากเว็บ
ดึงข้อมูลหนังสือแนะนำจาก API
ก่อนอื่น มาสร้างเครื่องมือที่ดึงข้อมูลคำแนะนำเกี่ยวกับหนังสือจาก API ของผู้ให้บริการหนังสือที่เราติดตั้งใช้งานในส่วนก่อนหน้ากัน ซึ่งแสดงให้เห็นว่าเอเจนต์จะใช้ประโยชน์จากบริการที่มีอยู่ได้อย่างไร

ใน Cloud Shell Editor ให้เปิดโปรเจ็กต์ aidemy-bootstrap ที่คุณโคลนไว้ในส่วนก่อนหน้า
👉แก้ไข book.py ในโฟลเดอร์ planner และวางโค้ดต่อไปนี้ที่ส่วนท้ายของไฟล์
def recommend_book(query: str):
    """
    Get a list of recommended book from an API endpoint

    Args:
        query: User's request string
    """

    region = get_next_region();
    llm = VertexAI(model_name="gemini-1.5-pro", location=region)

    query = f"""The user is trying to plan a education course, you are the teaching assistant. Help define the category of what the user requested to teach, respond the categroy with no more than two word.

    user request:   {query}
    """
    print(f"-------->{query}")
    response = llm.invoke(query)
    print(f"CATEGORY RESPONSE------------>: {response}")

    # call this using python and parse the json back to dict
    category = response.strip()

    headers = {"Content-Type": "application/json"}
    data = {"category": category, "number_of_book": 2}

    books = requests.post(BOOK_PROVIDER_URL, headers=headers, json=data)

    return books.text

if __name__ == "__main__":
    print(recommend_book("I'm doing a course for my 5th grade student on Math Geometry, I'll need to recommend few books come up with a teach plan, few quizes and also a homework assignment."))
คำอธิบาย:
- recommend_book(query: str): ฟังก์ชันนี้รับคำค้นหาของผู้ใช้เป็นอินพุต
- การโต้ตอบกับ LLM: ใช้ LLM เพื่อดึงหมวดหมู่จากการค้นหา ซึ่งแสดงให้เห็นว่าคุณใช้ LLM เพื่อช่วยสร้างพารามิเตอร์สำหรับเครื่องมือได้อย่างไร
- การเรียก API: ส่งคำขอ POST ไปยัง API ของผู้ให้บริการหนังสือ โดยส่งหมวดหมู่และจำนวนหนังสือที่ต้องการ
👉หากต้องการทดสอบฟังก์ชันใหม่นี้ ให้ตั้งค่าตัวแปรสภาพแวดล้อมโดยเรียกใช้คำสั่งต่อไปนี้
gcloud config set project $(cat ~/project_id.txt)
export PROJECT_ID=$(gcloud config get project)
cd ~/aidemy-bootstrap/planner/
export BOOK_PROVIDER_URL=$(gcloud run services describe book-provider --region=us-central1 --project=$PROJECT_ID --format="value(status.url)")
👉ติดตั้งทรัพยากร Dependency และเรียกใช้โค้ดเพื่อให้แน่ใจว่าใช้งานได้โดยเรียกใช้คำสั่งต่อไปนี้
cd ~/aidemy-bootstrap/planner/
python -m venv env
source env/bin/activate
gcloud config set project $(cat ~/project_id.txt)
export PROJECT_ID=$(gcloud config get project)
pip install -r requirements.txt
python book.py
คุณควรเห็นสตริง JSON ที่มีหนังสือแนะนำซึ่งดึงมาจาก API ของผู้ให้บริการหนังสือ ระบบจะสร้างผลลัพธ์แบบสุ่ม หนังสือที่คุณได้รับอาจไม่เหมือนกัน แต่คุณควรได้รับหนังสือแนะนำ 2 รายการในรูปแบบ JSON
[{"author":"Anya Sharma","bookname":"Echoes of the Singularity","publisher":"NovaLight Publishing","publishing_date":"2077-03-15"},{"author":"Anya Sharma","bookname":"Echoes of the Quantum Dawn","publisher":"Nova Genesis Publishing","publishing_date":"2077-03-15"}]
หากเห็นข้อความนี้ แสดงว่าเครื่องมือแรกทำงานได้อย่างถูกต้อง
แทนที่จะสร้างการเรียกใช้ RESTful API อย่างชัดเจนด้วยพารามิเตอร์ที่เฉพาะเจาะจง เราจะใช้ภาษาธรรมชาติ ("ฉันกำลังเรียนหลักสูตร...") จากนั้นเอเจนต์จะดึงพารามิเตอร์ที่จำเป็น (เช่น หมวดหมู่) อย่างชาญฉลาดโดยใช้ NLP ซึ่งจะเน้นให้เห็นว่าเอเจนต์ใช้ความเข้าใจภาษาธรรมชาติเพื่อโต้ตอบกับ API อย่างไร

👉นำโค้ดทดสอบต่อไปนี้ออกจาก book.py
if __name__ == "__main__":
    print(recommend_book("I'm doing a course for my 5th grade student on Math Geometry, I'll need to recommend few books come up with a teach plan, few quizes and also a homework assignment."))
การรับข้อมูลหลักสูตรจากฐานข้อมูล
จากนั้นเราจะสร้างเครื่องมือที่ดึงข้อมูลหลักสูตรที่มีโครงสร้างจากฐานข้อมูล Cloud SQL PostgreSQL ซึ่งช่วยให้ตัวแทนเข้าถึงแหล่งข้อมูลที่เชื่อถือได้สำหรับการวางแผนบทเรียน

คุณยังจำอินสแตนซ์ Cloud SQL ของ aidemy ที่สร้างไว้ในขั้นตอนก่อนหน้าได้ไหม โดยจะใช้ในกรณีต่อไปนี้
👉 ในเทอร์มินัล ให้เรียกใช้คำสั่งต่อไปนี้เพื่อสร้างฐานข้อมูลชื่อ aidemy-db ในอินสแตนซ์ใหม่
gcloud sql databases create aidemy-db \
    --instance=aidemy
มาตรวจสอบอินสแตนซ์ใน Cloud SQL ใน Google Cloud Console กัน คุณควรเห็นอินสแตนซ์ Cloud SQL ที่ชื่อ aidemy แสดงอยู่
👉 คลิกชื่ออินสแตนซ์เพื่อดูรายละเอียด 👉 ในหน้ารายละเอียดอินสแตนซ์ Cloud SQL ให้คลิก Cloud SQL Studio ในเมนูการนำทางด้านซ้าย ซึ่งจะเป็นการเปิดแท็บใหม่
เลือก aidemy-db เป็นฐานข้อมูล ป้อน postgres เป็นผู้ใช้ และ 1234qwer เป็นรหัสผ่าน
คลิกตรวจสอบสิทธิ์

👉ในเครื่องมือแก้ไขการค้นหา SQL Studio ให้ไปที่แท็บเครื่องมือแก้ไข 1 แล้ววางโค้ด SQL ต่อไปนี้
CREATE TABLE curriculums (
    id SERIAL PRIMARY KEY,
    year INT,
    subject VARCHAR(255),
    description TEXT
);

-- Inserting detailed curriculum data for different school years and subjects
INSERT INTO curriculums (year, subject, description) VALUES
-- Year 5
(5, 'Mathematics', 'Introduction to fractions, decimals, and percentages, along with foundational geometry and problem-solving techniques.'),
(5, 'English', 'Developing reading comprehension, creative writing, and basic grammar, with a focus on storytelling and poetry.'),
(5, 'Science', 'Exploring basic physics, chemistry, and biology concepts, including forces, materials, and ecosystems.'),
(5, 'Computer Science', 'Basic coding concepts using block-based programming and an introduction to digital literacy.'),

-- Year 6
(6, 'Mathematics', 'Expanding on fractions, ratios, algebraic thinking, and problem-solving strategies.'),
(6, 'English', 'Introduction to persuasive writing, character analysis, and deeper comprehension of literary texts.'),
(6, 'Science', 'Forces and motion, the human body, and introductory chemical reactions with hands-on experiments.'),
(6, 'Computer Science', 'Introduction to algorithms, logical reasoning, and basic text-based programming (Python, Scratch).'),

-- Year 7
(7, 'Mathematics', 'Algebraic expressions, geometry, and introduction to statistics and probability.'),
(7, 'English', 'Analytical reading of classic and modern literature, essay writing, and advanced grammar skills.'),
(7, 'Science', 'Introduction to cells and organisms, chemical reactions, and energy transfer in physics.'),
(7, 'Computer Science', 'Building on programming skills with Python, introduction to web development, and cyber safety.');
โค้ด SQL นี้สร้างตารางชื่อ curriculums และแทรกข้อมูลตัวอย่างบางส่วน
👉 คลิกเรียกใช้เพื่อดำเนินการกับโค้ด SQL คุณควรเห็นข้อความยืนยันที่ระบุว่าคำสั่งดำเนินการสำเร็จแล้ว
👉 ขยาย Explorer ค้นหาตารางที่สร้างขึ้นใหม่ curriculums แล้วคลิกคำค้นหา ระบบจะเปิดแท็บเอดิเตอร์ใหม่พร้อม SQL ที่สร้างขึ้นให้คุณ

SELECT * FROM
  "public"."curriculums" LIMIT 1000;
👉คลิกเรียกใช้
ตารางผลลัพธ์ควรแสดงแถวของข้อมูลที่คุณแทรกในขั้นตอนก่อนหน้า ซึ่งเป็นการยืนยันว่าระบบได้สร้างตารางและข้อมูลอย่างถูกต้อง
ตอนนี้คุณสร้างฐานข้อมูลที่มีข้อมูลหลักสูตรตัวอย่างเรียบร้อยแล้ว เราจะสร้างเครื่องมือเพื่อดึงข้อมูลดังกล่าว
👉ในตัวแก้ไขโค้ดของ Cloud ให้แก้ไขไฟล์ curriculums.py ในโฟลเดอร์ aidemy-bootstrap แล้ววางโค้ดต่อไปนี้ที่ส่วนท้ายของไฟล์
def connect_with_connector() -> sqlalchemy.engine.base.Engine:

    db_user = os.environ["DB_USER"]
    db_pass = os.environ["DB_PASS"]
    db_name = os.environ["DB_NAME"]

    print(f"--------------------------->db_user: {db_user!r}")
    print(f"--------------------------->db_pass: {db_pass!r}")
    print(f"--------------------------->db_name: {db_name!r}")

    connector = Connector()

    pool = sqlalchemy.create_engine(
        "postgresql+pg8000://",
        creator=lambda: connector.connect(
            instance_connection_name,
            "pg8000",
            user=db_user,
            password=db_pass,
            db=db_name,
        ),
        pool_size=2,
        max_overflow=2,
        pool_timeout=30,  # 30 seconds
        pool_recycle=1800,  # 30 minutes
    )
    return pool

def get_curriculum(year: int, subject: str):
    """
    Get school curriculum

    Args:
        subject: User's request subject string
        year: User's request year int
    """
    try:
        stmt = sqlalchemy.text(
            "SELECT description FROM curriculums WHERE year = :year AND subject = :subject"
        )

        with db.connect() as conn:
            result = conn.execute(stmt, parameters={"year": year, "subject": subject})
            row = result.fetchone()
        if row:
            return row[0]
        else:
            return None

    except Exception as e:
        print(e)
        return None

db = connect_with_connector()
คำอธิบาย:
- ตัวแปรสภาพแวดล้อม: โค้ดจะดึงข้อมูลเข้าสู่ระบบฐานข้อมูลและข้อมูลการเชื่อมต่อจากตัวแปรสภาพแวดล้อม (ดูข้อมูลเพิ่มเติมด้านล่าง)
- connect_with_connector(): ฟังก์ชันนี้ใช้ตัวเชื่อมต่อ Cloud SQL เพื่อสร้างการเชื่อมต่อที่ปลอดภัยกับฐานข้อมูล
- get_curriculum(year: int, subject: str): ฟังก์ชันนี้รับปีและวิชาเป็นอินพุต ค้นหาตารางหลักสูตร และแสดงคำอธิบายหลักสูตรที่เกี่ยวข้อง
👉ก่อนที่จะเรียกใช้โค้ดได้ เราต้องตั้งค่าตัวแปรสภาพแวดล้อมบางอย่าง ในเทอร์มินัล ให้เรียกใช้คำสั่งต่อไปนี้
gcloud config set project $(cat ~/project_id.txt)
export PROJECT_ID=$(gcloud config get project)
export INSTANCE_NAME="aidemy"
export REGION="us-central1"
export DB_USER="postgres"
export DB_PASS="1234qwer"
export DB_NAME="aidemy-db"
👉หากต้องการทดสอบ ให้เพิ่มโค้ดต่อไปนี้ที่ส่วนท้ายของ curriculums.py
if __name__ == "__main__":
    print(get_curriculum(6, "Mathematics"))
👉เรียกใช้โค้ด
cd ~/aidemy-bootstrap/planner/
source env/bin/activate
python curriculums.py
คุณควรเห็นคำอธิบายหลักสูตรคณิตศาสตร์สำหรับชั้นประถมศึกษาปีที่ 6 พิมพ์ลงในคอนโซล
Expanding on fractions, ratios, algebraic thinking, and problem-solving strategies.
หากเห็นคำอธิบายหลักสูตร แสดงว่าเครื่องมือฐานข้อมูลทำงานอย่างถูกต้อง โปรดหยุดสคริปต์โดยกด Ctrl+C หากสคริปต์ยังทำงานอยู่
👉นำโค้ดทดสอบต่อไปนี้ออกจาก curriculums.py
if __name__ == "__main__":
    print(get_curriculum(6, "Mathematics"))
👉ออกจากสภาพแวดล้อมเสมือนจริงโดยเรียกใช้คำสั่งต่อไปนี้ในเทอร์มินัล
deactivate
6. เครื่องมือสร้าง: เข้าถึงข้อมูลแบบเรียลไทม์จากเว็บ
สุดท้าย เราจะสร้างเครื่องมือที่ใช้การผสานรวม Gemini 2 และ Google Search เพื่อเข้าถึงข้อมูลแบบเรียลไทม์จากเว็บ ซึ่งจะช่วยให้ตัวแทนได้รับข้อมูลล่าสุดและแสดงผลลัพธ์ที่เกี่ยวข้อง
การผสานรวม Gemini 2 กับ Google Search API จะช่วยเพิ่มความสามารถของเอเจนต์ด้วยการให้ผลการค้นหาที่แม่นยำและเกี่ยวข้องกับบริบทมากขึ้น ซึ่งจะช่วยให้ตัวแทนเข้าถึงข้อมูลล่าสุดและยึดโยงคำตอบกับข้อมูลในโลกแห่งความเป็นจริงได้ ซึ่งจะช่วยลดอาการหลอนได้ การผสานรวม API ที่ได้รับการปรับปรุงยังช่วยให้การค้นหาด้วยภาษาที่เป็นธรรมชาติมากขึ้น ซึ่งช่วยให้ตัวแทนสามารถสร้างคำขอค้นหาที่ซับซ้อนและละเอียดได้

ฟังก์ชันนี้รับคำค้นหา หลักสูตร วิชา และปีเป็นข้อมูลนำเข้า แล้วใช้ Gemini API และเครื่องมือ Google Search เพื่อดึงข้อมูลที่เกี่ยวข้องจากอินเทอร์เน็ต หากสังเกตดีๆ คุณจะเห็นว่าแอปนี้ใช้ SDK ของ Generative AI ของ Google เพื่อเรียกใช้ฟังก์ชันโดยไม่ต้องใช้เฟรมเวิร์กอื่นๆ
👉แก้ไข search.py ในโฟลเดอร์ aidemy-bootstrap และวางโค้ดต่อไปนี้ที่ส่วนท้ายของไฟล์
model_id = "gemini-2.0-flash-001"

google_search_tool = Tool(
    google_search = GoogleSearch()
)

def search_latest_resource(search_text: str, curriculum: str, subject: str, year: int):
    """
    Get latest information from the internet

    Args:
        search_text: User's request category   string
        subject: "User's request subject" string
        year: "User's request year"  integer
    """
    search_text = "%s in the context of year %d and subject %s with following curriculum detail %s " % (search_text, year, subject, curriculum)
    region = get_next_region()
    client = genai.Client(vertexai=True, project=PROJECT_ID, location=region)
    print(f"search_latest_resource text-----> {search_text}")
    response = client.models.generate_content(
        model=model_id,
        contents=search_text,
        config=GenerateContentConfig(
            tools=[google_search_tool],
            response_modalities=["TEXT"],
        )
    )
    print(f"search_latest_resource response-----> {response}")
    return response

if __name__ == "__main__":
  response = search_latest_resource("What are the syllabus for Year 6 Mathematics?", "Expanding on fractions, ratios, algebraic thinking, and problem-solving strategies.", "Mathematics", 6)
  for each in response.candidates[0].content.parts:
    print(each.text)
คำอธิบาย:
- เครื่องมือการกำหนด - google_search_tool: การรวมออบเจ็กต์ GoogleSearch ไว้ในเครื่องมือ
- search_latest_resource(search_text: str, subject: str, year: int): ฟังก์ชันนี้รับคำค้นหา วิชา และปีเป็นอินพุต แล้วใช้ Gemini API เพื่อทำการค้นหาใน Google
- GenerateContentConfig: ระบุว่ามีสิทธิ์เข้าถึงเครื่องมือ GoogleSearch
โมเดล Gemini จะวิเคราะห์ search_text ภายในและพิจารณาว่าจะตอบคำถามได้โดยตรงหรือไม่ หรือต้องใช้เครื่องมือ GoogleSearch นี่เป็นขั้นตอนสำคัญที่เกิดขึ้นในกระบวนการให้เหตุผลของ LLM โมเดลได้รับการฝึกให้จดจำสถานการณ์ที่จำเป็นต้องใช้เครื่องมือภายนอก หากโมเดลตัดสินใจใช้เครื่องมือ GoogleSearch ทาง Google Generative AI SDK จะจัดการการเรียกใช้จริง SDK จะใช้การตัดสินใจของโมเดลและพารามิเตอร์ที่สร้างขึ้น แล้วส่งไปยัง Google Search API ส่วนนี้จะซ่อนจากผู้ใช้ในโค้ด
จากนั้นโมเดล Gemini จะผสานรวมผลการค้นหาเข้ากับคำตอบ โดยสามารถใช้ข้อมูลดังกล่าวเพื่อตอบคำถามของผู้ใช้ สร้างข้อมูลสรุป หรือทำงานอื่นๆ ได้
👉หากต้องการทดสอบ ให้เรียกใช้โค้ดโดยทำดังนี้
cd ~/aidemy-bootstrap/planner/
gcloud config set project $(cat ~/project_id.txt)
export PROJECT_ID=$(gcloud config get project)
source env/bin/activate
python search.py
คุณควรเห็นการตอบกลับของ Gemini Search API ที่มีผลการค้นหาที่เกี่ยวข้องกับ "หลักสูตรคณิตศาสตร์สำหรับปีที่ 5" เอาต์พุตที่แน่นอนจะขึ้นอยู่กับผลการค้นหา แต่จะเป็นออบเจ็กต์ JSON ที่มีข้อมูลเกี่ยวกับการค้นหา
หากเห็นผลการค้นหา แสดงว่าเครื่องมือ Google Search ทำงานได้อย่างถูกต้อง คุณหยุดสคริปต์ได้โดยกด Ctrl+C หากสคริปต์ยังทำงานอยู่
👉และนำส่วนสุดท้ายในโค้ดออก
if __name__ == "__main__":
  response = search_latest_resource("What are the syllabus for Year 6 Mathematics?", "Expanding on fractions, ratios, algebraic thinking, and problem-solving strategies.", "Mathematics", 6)
  for each in response.candidates[0].content.parts:
    print(each.text)
👉ออกจากสภาพแวดล้อมเสมือนจริงโดยเรียกใช้คำสั่งต่อไปนี้ในเทอร์มินัล
deactivate
ยินดีด้วย ตอนนี้คุณได้สร้างเครื่องมือที่มีประสิทธิภาพ 3 อย่างสำหรับตัวแทนวางแผนแล้ว ได้แก่ เครื่องมือเชื่อมต่อ API, เครื่องมือเชื่อมต่อฐานข้อมูล และเครื่องมือ Google Search เครื่องมือเหล่านี้จะช่วยให้ตัวแทนเข้าถึงข้อมูลและความสามารถที่จำเป็นต่อการสร้างแผนการสอนที่มีประสิทธิภาพ
7. การประสานงานด้วย LangGraph
ตอนนี้เราได้สร้างเครื่องมือแต่ละอย่างแล้ว ก็ถึงเวลาที่จะประสานงานเครื่องมือเหล่านั้นโดยใช้ LangGraph ซึ่งจะช่วยให้เราสร้างเอเจนต์ "วางแผน" ที่ซับซ้อนมากขึ้นได้ ซึ่งจะตัดสินใจได้อย่างชาญฉลาดว่าจะใช้เครื่องมือใดและเมื่อใด โดยอิงตามคำขอของผู้ใช้
LangGraph คือไลบรารี Python ที่ออกแบบมาเพื่อให้สร้างแอปพลิเคชันแบบมีสถานะและมีหลายผู้ใช้ได้ง่ายขึ้นโดยใช้โมเดลภาษาขนาดใหญ่ (LLM) ให้คิดว่านี่คือเฟรมเวิร์กสำหรับการประสานงานการสนทนาและเวิร์กโฟลว์ที่ซับซ้อนซึ่งเกี่ยวข้องกับ LLM, เครื่องมือ และเอเจนต์อื่นๆ
แนวคิดหลัก
- โครงสร้างกราฟ: LangGraph แสดงตรรกะของแอปพลิเคชันเป็นกราฟแบบมีทิศทาง โหนดแต่ละรายการในกราฟแสดงถึงขั้นตอนในกระบวนการ (เช่น การเรียก LLM, การเรียกใช้เครื่องมือ, การตรวจสอบแบบมีเงื่อนไข) ขอบกำหนดลำดับการดำเนินการระหว่างโหนด
- สถานะ: LangGraph จัดการสถานะของแอปพลิเคชันขณะที่แอปพลิเคชันเคลื่อนที่ผ่านกราฟ สถานะนี้อาจรวมถึงตัวแปรต่างๆ เช่น ข้อมูลที่ผู้ใช้ป้อน ผลลัพธ์ของการเรียกใช้เครื่องมือ เอาต์พุตกลางจาก LLM และข้อมูลอื่นๆ ที่ต้องเก็บไว้ระหว่างขั้นตอนต่างๆ
- โหนด: โหนดแต่ละรายการแสดงถึงการคำนวณหรือการโต้ตอบ โดยอาจเป็นได้ดังนี้
- โหนดเครื่องมือ: ใช้เครื่องมือ (เช่น ทำการค้นหาเว็บ ค้นหาฐานข้อมูล)
- โหนดฟังก์ชัน: เรียกใช้ฟังก์ชัน Python
- ขอบ: เชื่อมต่อโหนดเพื่อกำหนดโฟลว์การดำเนินการ โดยอาจเป็นได้ดังนี้
- ขอบโดยตรง: การไหลแบบไม่มีเงื่อนไขอย่างง่ายจากโหนดหนึ่งไปยังอีกโหนดหนึ่ง
- ขอบแบบมีเงื่อนไข: โฟลว์จะขึ้นอยู่กับผลลัพธ์ของโหนดแบบมีเงื่อนไข

เราจะใช้ LangGraph เพื่อใช้การจัดระเบียบ มาแก้ไขไฟล์ aidemy.py ในโฟลเดอร์ aidemy-bootstrap เพื่อกำหนดตรรกะ LangGraph กัน
👉 เพิ่มโค้ดต่อไปนี้ที่ส่วนท้ายของ
aidemy.py:
tools = [get_curriculum, search_latest_resource, recommend_book]

def determine_tool(state: MessagesState):
    llm = ChatVertexAI(model_name="gemini-2.0-flash-001", location=get_next_region())
    sys_msg = SystemMessage(
                    content=(
                        f"""You are a helpful teaching assistant that helps gather all needed information.
                            Your ultimate goal is to create a detailed 3-week teaching plan.
                            You have access to tools that help you gather information.
                            Based on the user request, decide which tool(s) are needed.

                        """
                    )
                )

    llm_with_tools = llm.bind_tools(tools)
    return {"messages": llm_with_tools.invoke([sys_msg] + state["messages"])}
ฟังก์ชันนี้มีหน้าที่รับสถานะปัจจุบันของการสนทนา ส่งข้อความระบบไปยัง LLM แล้วขอให้ LLM สร้างคำตอบ LLM สามารถตอบกลับผู้ใช้โดยตรงหรือเลือกใช้เครื่องมือที่มีอยู่
เครื่องมือ : รายการนี้แสดงชุดเครื่องมือที่ตัวแทนมีให้ใช้งาน ซึ่งประกอบด้วยฟังก์ชันเครื่องมือ 3 รายการที่เรากำหนดไว้ในขั้นตอนก่อนหน้า ได้แก่ get_curriculum, search_latest_resource และ recommend_book llm.bind_tools(tools): "เชื่อมโยง" รายการเครื่องมือกับออบเจ็กต์ LLM การเชื่อมโยงเครื่องมือจะบอก LLM ว่าเครื่องมือเหล่านี้พร้อมใช้งาน และให้ข้อมูลแก่ LLM เกี่ยวกับวิธีใช้เครื่องมือ (เช่น ชื่อเครื่องมือ พารามิเตอร์ที่ยอมรับ และสิ่งที่เครื่องมือทำ)
เราจะใช้ LangGraph เพื่อใช้การจัดระเบียบ
👉 เพิ่มโค้ดต่อไปนี้ที่ส่วนท้ายของ
aidemy.py:
def prep_class(prep_needs):

    builder = StateGraph(MessagesState)
    builder.add_node("determine_tool", determine_tool)
    builder.add_node("tools", ToolNode(tools))

    builder.add_edge(START, "determine_tool")
    builder.add_conditional_edges("determine_tool",tools_condition)
    builder.add_edge("tools", "determine_tool")


    memory = MemorySaver()
    graph = builder.compile(checkpointer=memory)

    config = {"configurable": {"thread_id": "1"}}
    messages = graph.invoke({"messages": prep_needs},config)
    print(messages)
    for m in messages['messages']:
        m.pretty_print()
    teaching_plan_result = messages["messages"][-1].content


    return teaching_plan_result

if __name__ == "__main__":
  prep_class("I'm doing a course for  year 5 on subject Mathematics in Geometry, , get school curriculum, and come up with few books recommendation plus  search latest resources on the internet base on the curriculum outcome. And come up with a 3 week teaching plan")
คำอธิบาย:
StateGraph(MessagesState): สร้างออบเจ็กต์StateGraphStateGraphเป็นแนวคิดหลักใน LangGraph โดยจะแสดงเวิร์กโฟลว์ของเอเจนต์เป็นกราฟ ซึ่งแต่ละโหนดในกราฟจะแสดงขั้นตอนในกระบวนการ โดยให้คิดว่าเป็นการกำหนดพิมพ์เขียวสำหรับวิธีที่เอเจนต์จะให้เหตุผลและดำเนินการ- Edge แบบมีเงื่อนไข: อาร์กิวเมนต์
tools_conditionที่มาจากโหนด"determine_tool"มักจะเป็นฟังก์ชันที่กำหนดว่าควรใช้ Edge ใดโดยอิงตามเอาต์พุตของฟังก์ชันdetermine_toolขอบแบบมีเงื่อนไขช่วยให้กราฟแยกสาขาได้ตามการตัดสินใจของ LLM เกี่ยวกับเครื่องมือที่จะใช้ (หรือว่าจะตอบกลับผู้ใช้โดยตรงหรือไม่) ซึ่งเป็นจุดที่ "ความฉลาด" ของเอเจนต์เข้ามามีบทบาท โดยสามารถปรับลักษณะการทำงานแบบไดนามิกตามสถานการณ์ได้ - วนซ้ำ: เพิ่มขอบไปยังกราฟที่เชื่อมต่อโหนด
"tools"กลับไปยังโหนด"determine_tool"ซึ่งจะสร้างลูปในกราฟ ทำให้เอเจนต์ใช้เครื่องมือซ้ำๆ ได้จนกว่าจะรวบรวมข้อมูลได้เพียงพอที่จะทำงานให้เสร็จและให้คำตอบที่น่าพอใจ ลูปนี้มีความสําคัญอย่างยิ่งสําหรับงานที่ซับซ้อนซึ่งต้องใช้การให้เหตุผลและการรวบรวมข้อมูลหลายขั้นตอน
ตอนนี้มาทดสอบเอเจนต์วางแผนเพื่อดูวิธีประสานงานเครื่องมือต่างๆ กัน
โค้ดนี้จะเรียกใช้ฟังก์ชัน prep_class โดยมีอินพุตของผู้ใช้ที่เฉพาะเจาะจง ซึ่งจำลองคำขอเพื่อสร้างแผนการสอนวิชาคณิตศาสตร์ชั้นประถมศึกษาปีที่ 5 ในเรื่องเรขาคณิต โดยใช้หลักสูตร คำแนะนำเกี่ยวกับหนังสือ และแหล่งข้อมูลล่าสุดบนอินเทอร์เน็ต
👉 ในเทอร์มินัล หากคุณปิดเทอร์มินัลหรือไม่ได้ตั้งค่าตัวแปรสภาพแวดล้อมแล้ว ให้เรียกใช้คำสั่งต่อไปนี้อีกครั้ง
export BOOK_PROVIDER_URL=$(gcloud run services describe book-provider --region=us-central1 --project=$PROJECT_ID --format="value(status.url)")
gcloud config set project $(cat ~/project_id.txt)
export PROJECT_ID=$(gcloud config get project)
export INSTANCE_NAME="aidemy"
export REGION="us-central1"
export DB_USER="postgres"
export DB_PASS="1234qwer"
export DB_NAME="aidemy-db"
👉เรียกใช้โค้ด
cd ~/aidemy-bootstrap/planner/
source env/bin/activate
pip install -r requirements.txt
python aidemy.py
ดูบันทึกในเทอร์มินัล คุณควรเห็นหลักฐานว่าเอเจนต์เรียกใช้เครื่องมือทั้ง 3 อย่าง (รับหลักสูตรของโรงเรียน รับคำแนะนำเกี่ยวกับหนังสือ และค้นหาแหล่งข้อมูลล่าสุด) ก่อนที่จะให้แผนการสอนขั้นสุดท้าย ซึ่งแสดงให้เห็นว่าการจัดระเบียบ LangGraph ทำงานได้อย่างถูกต้อง และเอเจนต์ใช้เครื่องมือทั้งหมดที่มีอย่างชาญฉลาดเพื่อตอบสนองคำขอของผู้ใช้
================================ Human Message =================================

I'm doing a course for  year 5 on subject Mathematics in Geometry, , get school curriculum, and come up with few books recommendation plus  search latest resources on the internet base on the curriculum outcome. And come up with a 3 week teaching plan
================================== Ai Message ==================================
Tool Calls:
  get_curriculum (xxx)
 Call ID: xxx
  Args:
    year: 5.0
    subject: Mathematics
================================= Tool Message =================================
Name: get_curriculum

Introduction to fractions, decimals, and percentages, along with foundational geometry and problem-solving techniques.
================================== Ai Message ==================================
Tool Calls:
  search_latest_resource (xxxx)
 Call ID: xxxx
  Args:
    year: 5.0
    search_text: Geometry
    curriculum: {"content": "Introduction to fractions, decimals, and percentages, along with foundational geometry and problem-solving techniques."}
    subject: Mathematics
================================= Tool Message =================================
Name: search_latest_resource

candidates=[Candidate(content=Content(parts=[Part(.....) automatic_function_calling_history=[] parsed=None
================================== Ai Message ==================================
Tool Calls:
  recommend_book (93b48189-4d69-4c09-a3bd-4e60cdc5f1c6)
 Call ID: 93b48189-4d69-4c09-a3bd-4e60cdc5f1c6
  Args:
    query: Mathematics Geometry Year 5
================================= Tool Message =================================
Name: recommend_book

[{.....}]

================================== Ai Message ==================================

Based on the curriculum outcome, here is a 3-week teaching plan for year 5 Mathematics Geometry:

**Week 1: Introduction to Shapes and Properties**
.........
หยุดสคริปต์โดยกด Ctrl+C หากสคริปต์ยังทำงานอยู่
👉 (ขั้นตอนนี้ไม่บังคับ) แทนที่โค้ดการทดสอบด้วยพรอมต์อื่น ซึ่งต้องเรียกใช้เครื่องมืออื่น
if __name__ == "__main__":
  prep_class("I'm doing a course for year 5 on subject Mathematics in Geometry, search latest resources on the internet base on the subject. And come up with a 3 week teaching plan")
👉 หากปิดเทอร์มินัลหรือไม่ได้ตั้งค่าตัวแปรสภาพแวดล้อมแล้ว ให้เรียกใช้คำสั่งต่อไปนี้อีกครั้ง
gcloud config set project $(cat ~/project_id.txt)
export BOOK_PROVIDER_URL=$(gcloud run services describe book-provider --region=us-central1 --project=$PROJECT_ID --format="value(status.url)")
export PROJECT_ID=$(gcloud config get project)
export INSTANCE_NAME="aidemy"
export REGION="us-central1"
export DB_USER="postgres"
export DB_PASS="1234qwer"
export DB_NAME="aidemy-db"
👉 (ขั้นตอนนี้ไม่บังคับ ให้ทำเฉพาะในกรณีที่คุณทำขั้นตอนก่อนหน้า) เรียกใช้โค้ดอีกครั้ง
cd ~/aidemy-bootstrap/planner/
source env/bin/activate
python aidemy.py
ครั้งนี้คุณสังเกตเห็นอะไรบ้าง ตัวแทนเรียกใช้เครื่องมือใด คุณควรเห็นว่าตัวแทนจะเรียกใช้เครื่องมือ search_latest_resource ในครั้งนี้เท่านั้น เนื่องจากพรอมต์ไม่ได้ระบุว่าต้องใช้เครื่องมืออีก 2 อย่าง และ LLM ของเราก็ฉลาดพอที่จะไม่เรียกใช้เครื่องมืออื่นๆ
================================ Human Message =================================

I'm doing a course for  year 5 on subject Mathematics in Geometry, search latest resources on the internet base on the subject. And come up with a 3 week teaching plan
================================== Ai Message ==================================
Tool Calls:
  get_curriculum (xxx)
 Call ID: xxx
  Args:
    year: 5.0
    subject: Mathematics
================================= Tool Message =================================
Name: get_curriculum

Introduction to fractions, decimals, and percentages, along with foundational geometry and problem-solving techniques.
================================== Ai Message ==================================
Tool Calls:
  search_latest_resource (xxx)
 Call ID: xxxx
  Args:
    year: 5.0
    subject: Mathematics
    curriculum: {"content": "Introduction to fractions, decimals, and percentages, along with foundational geometry and problem-solving techniques."}
    search_text: Geometry
================================= Tool Message =================================
Name: search_latest_resource

candidates=[Candidate(content=Content(parts=[Part(.......token_count=40, total_token_count=772) automatic_function_calling_history=[] parsed=None
================================== Ai Message ==================================

Based on the information provided, a 3-week teaching plan for Year 5 Mathematics focusing on Geometry could look like this:

**Week 1:  Introducing 2D Shapes**
........
* Use visuals, manipulatives, and real-world examples to make the learning experience engaging and relevant.
หยุดสคริปต์โดยกด Ctrl+C
👉 (อย่าข้ามขั้นตอนนี้!) นำโค้ดทดสอบออกเพื่อให้ไฟล์ aidemy.py สะอาด
if __name__ == "__main__":
  prep_class("I'm doing a course for  year 5 on subject Mathematics in Geometry, search latest resources on the internet base on the subject. And come up with a 3 week teaching plan")
เมื่อกำหนดตรรกะของเอเจนต์แล้ว ให้เปิดใช้เว็บแอปพลิเคชัน Flask ซึ่งจะช่วยให้ครูมีอินเทอร์เฟซแบบฟอร์มที่คุ้นเคยในการโต้ตอบกับเอเจนต์ แม้ว่าการโต้ตอบกับแชทบอทจะเป็นเรื่องปกติสำหรับ LLM แต่เราเลือกใช้ UI การส่งแบบฟอร์มแบบเดิม เนื่องจากอาจใช้งานง่ายกว่าสำหรับนักการศึกษาหลายๆ คน
👉 หากปิดเทอร์มินัลหรือไม่ได้ตั้งค่าตัวแปรสภาพแวดล้อมแล้ว ให้เรียกใช้คำสั่งต่อไปนี้อีกครั้ง
export BOOK_PROVIDER_URL=$(gcloud run services describe book-provider --region=us-central1 --project=$PROJECT_ID --format="value(status.url)")
gcloud config set project $(cat ~/project_id.txt)
export PROJECT_ID=$(gcloud config get project)
export INSTANCE_NAME="aidemy"
export REGION="us-central1"
export DB_USER="postgres"
export DB_PASS="1234qwer"
export DB_NAME="aidemy-db"
👉 ตอนนี้ให้เริ่ม UI บนเว็บ
cd ~/aidemy-bootstrap/planner/
source env/bin/activate
python app.py
มองหาข้อความเริ่มต้นในเอาต์พุตเทอร์มินัลของ Cloud Shell โดยปกติแล้ว Flask จะพิมพ์ข้อความที่ระบุว่ากำลังทำงานและทำงานบนพอร์ตใด
Running on http://127.0.0.1:8080
Running on http://127.0.0.1:8080
The application needs to keep running to serve requests.
👉 จากเมนู "ตัวอย่างเว็บ" ที่มุมขวาบน ให้เลือกแสดงตัวอย่างบนพอร์ต 8080 Cloud Shell จะเปิดแท็บหรือหน้าต่างเบราว์เซอร์ใหม่พร้อมตัวอย่างเว็บของแอปพลิเคชัน

ในอินเทอร์เฟซของแอปพลิเคชัน ให้เลือก 5 สำหรับปี เลือกวิชา Mathematics และพิมพ์ Geometry ในคำขอส่วนเสริม
👉 หากออกจาก UI ของแอปพลิเคชันแล้ว ให้กลับไปที่ UI แล้วคุณจะเห็นเอาต์พุตที่สร้างขึ้น
👉 ในเทอร์มินัล ให้หยุดสคริปต์โดยกด Ctrl+C
👉 ในเทอร์มินัล ให้ออกจากสภาพแวดล้อมเสมือนโดยใช้คำสั่งต่อไปนี้
deactivate
8. การติดตั้งใช้งานเอเจนต์วางแผนในระบบคลาวด์
สร้างและพุชอิมเมจไปยังรีจิสทรี

ได้เวลาติดตั้งใช้งานในระบบคลาวด์แล้ว
👉 ในเทอร์มินัล ให้สร้างที่เก็บอาร์ติแฟกต์เพื่อจัดเก็บอิมเมจ Docker ที่เราจะสร้าง
gcloud artifacts repositories create agent-repository \
    --repository-format=docker \
    --location=us-central1 \
    --description="My agent repository"
คุณควรเห็นข้อความ "สร้างที่เก็บ [agent-repository] แล้ว"
👉 เรียกใช้คำสั่งต่อไปนี้เพื่อสร้างอิมเมจ Docker
cd ~/aidemy-bootstrap/planner/
gcloud config set project $(cat ~/project_id.txt)
export PROJECT_ID=$(gcloud config get project)
docker build -t gcr.io/${PROJECT_ID}/aidemy-planner .
👉 เราต้องติดแท็กรูปภาพใหม่เพื่อให้โฮสต์ใน Artifact Registry แทน GCR และพุชรูปภาพที่ติดแท็กไปยัง Artifact Registry
gcloud config set project $(cat ~/project_id.txt)
export PROJECT_ID=$(gcloud config get project)
docker tag gcr.io/${PROJECT_ID}/aidemy-planner us-central1-docker.pkg.dev/${PROJECT_ID}/agent-repository/aidemy-planner
docker push us-central1-docker.pkg.dev/${PROJECT_ID}/agent-repository/aidemy-planner
เมื่อการพุชเสร็จสมบูรณ์แล้ว คุณจะยืนยันได้ว่าระบบจัดเก็บอิมเมจใน Artifact Registry เรียบร้อยแล้ว
👉 ไปที่ Artifact Registry ใน Google Cloud Console คุณควรจะเห็นaidemy-plannerรูปภาพภายในagent-repositoryที่เก็บ 
การรักษาความปลอดภัยของข้อมูลเข้าสู่ระบบของฐานข้อมูลด้วย Secret Manager
เราจะใช้ Google Cloud Secret Manager เพื่อจัดการและเข้าถึงข้อมูลเข้าสู่ระบบฐานข้อมูลอย่างปลอดภัย ซึ่งจะช่วยป้องกันไม่ให้มีการฮาร์ดโค้ดข้อมูลที่ละเอียดอ่อนในโค้ดแอปพลิเคชันของเราและเพิ่มความปลอดภัย
เราจะสร้างข้อมูลลับแต่ละรายการสำหรับชื่อผู้ใช้ รหัสผ่าน และชื่อฐานข้อมูล แนวทางนี้ช่วยให้เราจัดการข้อมูลเข้าสู่ระบบแต่ละรายการได้อย่างอิสระ
👉 เรียกใช้คำสั่งต่อไปนี้ในเทอร์มินัล
gcloud secrets create db-user
printf "postgres" | gcloud secrets versions add db-user --data-file=-

gcloud secrets create db-pass
printf "1234qwer" | gcloud secrets versions add db-pass --data-file=-

gcloud secrets create db-name
printf "aidemy-db" | gcloud secrets versions add db-name --data-file=-
การใช้ Secret Manager เป็นขั้นตอนสำคัญในการรักษาความปลอดภัยของแอปพลิเคชันและป้องกันการเปิดเผยข้อมูลเข้าสู่ระบบที่ละเอียดอ่อนโดยไม่ตั้งใจ โดยทำตามแนวทางปฏิบัติแนะนำด้านความปลอดภัยสำหรับการติดตั้งใช้งานระบบคลาวด์
ทำให้ใช้งานได้กับ Cloud Run
Cloud Run เป็นแพลตฟอร์มแบบ Serverless ที่มีการจัดการครบวงจรซึ่งช่วยให้คุณสามารถทำให้แอปพลิเคชันที่มีคอนเทนเนอร์ใช้งานได้อย่างรวดเร็วและง่ายดาย ซึ่งตัดการจัดการโครงสร้างพื้นฐานออก เพื่อให้คุณมุ่งเน้นเฉพาะการเขียนและการติดตั้งใช้งานโค้ดเท่านั้น เราจะทำให้เครื่องวางแผนใช้งานได้เป็นบริการ Cloud Run
👉ไปที่ "Cloud Run" ใน Google Cloud Console คลิก DEPLOY CONTAINER แล้วเลือก SERVICE กำหนดค่าบริการ Cloud Run ดังนี้

- อิมเมจคอนเทนเนอร์: คลิก "เลือก" ในช่อง URL ค้นหา URL ของรูปภาพที่คุณพุชไปยัง Artifact Registry (เช่น us-central1-docker.pkg.dev/YOUR_PROJECT_ID/agent-repository/aidemy-planner/YOUR_IMG)
- ชื่อบริการ:
aidemy-planner - ภูมิภาค: เลือกภูมิภาค
us-central1 - การตรวจสอบสิทธิ์: สำหรับเวิร์กช็อปนี้ คุณสามารถเลือก "อนุญาตการเรียกใช้ที่ไม่ผ่านการตรวจสอบสิทธิ์" สำหรับเวอร์ชันที่ใช้งานจริง คุณอาจต้องจำกัดการเข้าถึง
- ขยายส่วนคอนเทนเนอร์ ปริมาณข้อมูล เครือข่าย และความปลอดภัย แล้วตั้งค่าต่อไปนี้ในแท็บคอนเทนเนอร์ (:
- แท็บการตั้งค่า:
- แหล่งข้อมูล
- หน่วยความจำ : 2GiB
- แหล่งข้อมูล
- แท็บตัวแปรและข้อมูลลับ:
- ตัวแปรสภาพแวดล้อม ให้เพิ่มตัวแปรต่อไปนี้โดยคลิกปุ่ม + เพิ่มตัวแปร
- เพิ่มชื่อ:
GOOGLE_CLOUD_PROJECTและค่า: <YOUR_PROJECT_ID> - เพิ่มชื่อ:
BOOK_PROVIDER_URLและตั้งค่าเป็น URL ฟังก์ชันของผู้ให้บริการหนังสือ ซึ่งคุณกำหนดได้โดยใช้คำสั่งต่อไปนี้ในเทอร์มินัลgcloud config set project $(cat ~/project_id.txt) gcloud run services describe book-provider \ --region=us-central1 \ --project=$PROJECT_ID \ --format="value(status.url)"
- เพิ่มชื่อ:
- ในส่วนข้อมูลลับที่แสดงเป็นตัวแปรสภาพแวดล้อม ให้เพิ่มข้อมูลลับต่อไปนี้โดยคลิกปุ่ม + อ้างอิงเป็นข้อมูลลับ
- เพิ่มชื่อ:
DB_USER, ข้อมูลลับ: เลือกdb-userและเวอร์ชัน:latest - เพิ่มชื่อ:
DB_PASS, ข้อมูลลับ: เลือกdb-passและเวอร์ชัน:latest - เพิ่มชื่อ:
DB_NAME, ข้อมูลลับ: เลือกdb-nameและเวอร์ชัน:latest
- เพิ่มชื่อ:
- ตัวแปรสภาพแวดล้อม ให้เพิ่มตัวแปรต่อไปนี้โดยคลิกปุ่ม + เพิ่มตัวแปร
- แท็บการตั้งค่า:

ปล่อยให้ค่าอื่นๆ เป็นค่าเริ่มต้น
👉 คลิกสร้าง
Cloud Run จะทำให้บริการใช้งานได้
เมื่อติดตั้งใช้งานแล้ว หากคุณยังไม่ได้อยู่ในหน้ารายละเอียด ให้คลิกชื่อบริการเพื่อไปยังหน้ารายละเอียด คุณจะเห็น URL ที่ติดตั้งใช้งานได้ที่ด้านบน

👉 ในอินเทอร์เฟซของแอปพลิเคชัน ให้เลือก 7 สำหรับปี เลือก Mathematics เป็นเรื่อง และป้อน Algebra ในช่องคำขอส่วนเสริม
👉 คลิกสร้างแผน ซึ่งจะช่วยให้ Agent มีบริบทที่จำเป็นในการสร้างแผนการสอนที่ปรับแต่งแล้ว
ยินดีด้วย คุณสร้างแผนการสอนโดยใช้เอเจนต์ AI ที่ทรงพลังของเราเรียบร้อยแล้ว ซึ่งแสดงให้เห็นถึงศักยภาพของเอเจนต์ในการลดภาระงานและเพิ่มประสิทธิภาพของงานได้อย่างมาก ซึ่งจะช่วยปรับปรุงประสิทธิภาพและทำให้ชีวิตของนักการศึกษาง่ายขึ้นในที่สุด
9. ระบบแบบหลายเอเจนต์
ตอนนี้เราได้ติดตั้งใช้งานเครื่องมือสร้างแผนการสอนเรียบร้อยแล้ว มาเปลี่ยนไปมุ่งเน้นที่การสร้างพอร์ทัลนักเรียนกัน พอร์ทัลนี้จะช่วยให้นักเรียนเข้าถึงแบบทดสอบ สรุปเสียง และงานที่เกี่ยวข้องกับหลักสูตรได้ เนื่องจากขอบเขตของฟังก์ชันนี้ เราจะใช้ประโยชน์จากระบบหลายเอเจนต์เพื่อสร้างโซลูชันแบบโมดูลาร์ที่ปรับขนาดได้
ดังที่เราได้กล่าวไปก่อนหน้านี้ แทนที่จะพึ่งพา Agent รายเดียวในการจัดการทุกอย่าง ระบบแบบหลาย Agent ช่วยให้เราแบ่งภาระงานออกเป็นงานเฉพาะทางขนาดเล็ก ซึ่งแต่ละงานจะได้รับการจัดการโดย Agent ที่รับผิดชอบโดยเฉพาะ แนวทางนี้มีข้อดีที่สำคัญหลายประการ ดังนี้
ความสามารถในการแยกส่วนและการบำรุงรักษา: แทนที่จะสร้างเอเจนต์เดียวที่ทำทุกอย่าง ให้สร้างเอเจนต์ขนาดเล็กที่เชี่ยวชาญเฉพาะทางซึ่งมีหน้าที่รับผิดชอบที่กำหนดไว้อย่างชัดเจน ความสามารถในการแยกส่วนนี้ทำให้ระบบเข้าใจ ดูแลรักษา และแก้ไขข้อบกพร่องได้ง่ายขึ้น เมื่อเกิดปัญหา คุณสามารถแยกปัญหาไปยังเอเจนต์ที่เฉพาะเจาะจงได้ แทนที่จะต้องกรองโค้ดเบสจำนวนมาก
ความสามารถในการปรับขนาด: การปรับขนาดเอเจนต์ที่ซับซ้อนเพียงตัวเดียวอาจเป็นคอขวดได้ ระบบแบบหลายเอเจนต์ช่วยให้คุณปรับขนาดเอเจนต์แต่ละรายตามความต้องการเฉพาะได้ เช่น หากตัวแทนรายหนึ่งจัดการคำขอจำนวนมาก คุณก็สามารถสร้างอินสแตนซ์ของตัวแทนนั้นเพิ่มเติมได้อย่างง่ายดายโดยไม่ส่งผลกระทบต่อส่วนอื่นๆ ของระบบ
ความเชี่ยวชาญเฉพาะของทีม: ลองคิดในแง่ที่ว่าคุณคงไม่ขอให้วิศวกรคนเดียวสร้างแอปพลิเคชันทั้งแอปตั้งแต่ต้น แต่คุณจะรวบรวมทีมผู้เชี่ยวชาญที่แต่ละคนมีความเชี่ยวชาญในด้านใดด้านหนึ่ง ในทำนองเดียวกัน ระบบแบบหลายเอเจนต์ช่วยให้คุณใช้ประโยชน์จากจุดแข็งของ LLM และเครื่องมือต่างๆ ได้ โดยมอบหมายให้เอเจนต์ที่เหมาะสมที่สุดสำหรับงานที่เฉพาะเจาะจง
การพัฒนาแบบคู่ขนาน: ทีมต่างๆ สามารถทำงานกับเอเจนต์ที่แตกต่างกันได้พร้อมกัน ซึ่งจะช่วยเร่งกระบวนการพัฒนา เนื่องจากเอเจนต์ทำงานอย่างอิสระ การเปลี่ยนแปลงที่เกิดขึ้นกับเอเจนต์รายหนึ่งจึงมีแนวโน้มน้อยที่จะส่งผลกระทบต่อเอเจนต์รายอื่นๆ
สถาปัตยกรรมที่ขับเคลื่อนด้วยเหตุการณ์
เราจะใช้สถาปัตยกรรมที่ขับเคลื่อนด้วยเหตุการณ์เพื่อให้ตัวแทนเหล่านี้สื่อสารและประสานงานกันได้อย่างมีประสิทธิภาพ ซึ่งหมายความว่าเอเจนต์จะตอบสนองต่อ "เหตุการณ์" ที่เกิดขึ้นภายในระบบ
เอเจนต์จะติดตามประเภทเหตุการณ์ที่เฉพาะเจาะจง (เช่น "สร้างแผนการสอนแล้ว" "สร้างงานแล้ว") เมื่อเกิดเหตุการณ์ขึ้น เจ้าหน้าที่ที่เกี่ยวข้องจะได้รับการแจ้งเตือนและสามารถดำเนินการตามนั้นได้ การแยกส่วนนี้ช่วยเพิ่มความยืดหยุ่น ความสามารถในการปรับขนาด และการตอบสนองแบบเรียลไทม์

ตอนนี้เราต้องมีวิธีออกอากาศเหตุการณ์เหล่านี้เพื่อเริ่มต้น โดยเราจะตั้งค่าหัวข้อ Pub/Sub เพื่อดำเนินการนี้ มาเริ่มสร้างหัวข้อที่ชื่อว่าแผนกัน
👉 ไปที่ Pub/Sub ของ Google Cloud Console
👉 คลิกปุ่มสร้างหัวข้อ
👉 กำหนดค่าหัวข้อด้วยรหัส/ชื่อ plan และยกเลิกการเลือก Add a default subscription ใช้ค่าเริ่มต้นสำหรับส่วนที่เหลือ แล้วคลิกสร้าง
หน้า Pub/Sub จะรีเฟรช และคุณควรเห็นหัวข้อที่สร้างใหม่ปรากฏในตาราง 
ตอนนี้เรามาผสานรวมฟังก์ชันการเผยแพร่เหตุการณ์ Pub/Sub เข้ากับเอเจนต์วางแผนกัน เราจะเพิ่มเครื่องมือใหม่ที่จะส่งเหตุการณ์ "plan" ไปยังหัวข้อ Pub/Sub ที่เราเพิ่งสร้าง เหตุการณ์นี้จะส่งสัญญาณไปยังตัวแทนอื่นๆ ในระบบ (เช่น ตัวแทนในพอร์ทัลนักเรียน) ว่ามีแผนการสอนใหม่พร้อมใช้งาน
👉กลับไปที่ Cloud Code Editor แล้วเปิดไฟล์ app.py ที่อยู่ในโฟลเดอร์ planner เราจะเพิ่มฟังก์ชันที่เผยแพร่กิจกรรม แทนที่
##ADD SEND PLAN EVENT FUNCTION HERE
โดยใช้รหัสดังต่อไปนี้
def send_plan_event(teaching_plan:str):
    """
    Send the teaching event to the topic called plan

    Args:
        teaching_plan: teaching plan
    """
    publisher = pubsub_v1.PublisherClient()
    print(f"-------------> Sending event to topic plan: {teaching_plan}")
    topic_path = publisher.topic_path(PROJECT_ID, "plan")

    message_data = {"teaching_plan": teaching_plan}
    data = json.dumps(message_data).encode("utf-8")

    future = publisher.publish(topic_path, data)

    return f"Published message ID: {future.result()}"
- send_plan_event: ฟังก์ชันนี้รับแผนการสอนที่สร้างขึ้นเป็นอินพุต สร้างไคลเอ็นต์ผู้เผยแพร่ Pub/Sub สร้างเส้นทางหัวข้อ แปลงแผนการสอนเป็นสตริง JSON และเผยแพร่ข้อความไปยังหัวข้อ
ในไฟล์ app.py เดียวกัน
👉อัปเดตพรอมต์เพื่อสั่งให้ตัวแทนส่งเหตุการณ์แผนการสอนไปยังหัวข้อ Pub/Sub หลังจากสร้างแผนการสอน *แทนที่
### ADD send_plan_event CALL
โดยมีข้อมูลต่อไปนี้
send_plan_event(teaching_plan)
การเพิ่มเครื่องมือ send_plan_event และการแก้ไขพรอมต์ทำให้เราสามารถเปิดใช้เอเจนต์วางแผนเพื่อเผยแพร่เหตุการณ์ไปยัง Pub/Sub ซึ่งช่วยให้คอมโพเนนต์อื่นๆ ของระบบตอบสนองต่อการสร้างแผนการสอนใหม่ได้ ตอนนี้เราจะมีระบบแบบหลายเอเจนต์ที่ใช้งานได้ในส่วนต่อไปนี้
10. ส่งเสริมศักยภาพนักเรียนด้วยแบบทดสอบตามคำขอ
ลองนึกถึงสภาพแวดล้อมการเรียนรู้ที่นักเรียนมีสิทธิ์เข้าถึงแบบทดสอบมากมายที่ปรับให้เหมาะกับแผนการเรียนรู้ของตนเองโดยเฉพาะ แบบทดสอบเหล่านี้จะให้ความคิดเห็นทันที ซึ่งรวมถึงคำตอบและคำอธิบาย เพื่อส่งเสริมความเข้าใจในเนื้อหาให้ดียิ่งขึ้น นี่คือศักยภาพที่เรามุ่งมั่นที่จะปลดล็อกด้วยพอร์ทัลแบบทดสอบที่ทำงานด้วยระบบ AI
เราจะสร้างคอมโพเนนต์การสร้างแบบทดสอบที่สามารถสร้างคำถามแบบหลายตัวเลือกตามเนื้อหาของแผนการสอน เพื่อให้วิสัยทัศน์นี้เป็นจริง

👉 ในแผง Explorer ของ Cloud Code Editor ให้ไปที่โฟลเดอร์ portal เปิดสำเนาไฟล์ quiz.py แล้วคัดลอกโค้ดต่อไปนี้ไปวางที่ท้ายไฟล์
def generate_quiz_question(file_name: str, difficulty: str, region:str ):
    """Generates a single multiple-choice quiz question using the LLM.

    ```json
    {
      "question": "The question itself",
      "options": ["Option A", "Option B", "Option C", "Option D"],
      "answer": "The correct answer letter (A, B, C, or D)"
    }
    ```
    """

    print(f"region: {region}")
    # Connect to resourse needed from Google Cloud
    llm = VertexAI(model_name="gemini-2.5-flash-preview-04-17", location=region)


    plan=None
    #load the file using file_name and read content into string call plan
    with open(file_name, 'r') as f:
        plan = f.read()

    parser = JsonOutputParser(pydantic_object=QuizQuestion)


    instruction = f"You'll provide one question with difficulty level of {difficulty}, 4 options as multiple choices and provide the anwsers, the quiz needs to be related to the teaching plan {plan}"

    prompt = PromptTemplate(
        template="Generates a single multiple-choice quiz question\n {format_instructions}\n  {instruction}\n",
        input_variables=["instruction"],
        partial_variables={"format_instructions": parser.get_format_instructions()},
    )

    chain = prompt | llm | parser
    response = chain.invoke({"instruction": instruction})

    print(f"{response}")
    return  response
ในเอเจนต์จะสร้างตัวแยกวิเคราะห์เอาต์พุต JSON ที่ออกแบบมาโดยเฉพาะเพื่อทำความเข้าใจและจัดโครงสร้างเอาต์พุตของ LLM โดยใช้โมเดล QuizQuestion ที่เรากำหนดไว้ก่อนหน้านี้เพื่อให้แน่ใจว่าเอาต์พุตที่แยกวิเคราะห์เป็นไปตามรูปแบบที่ถูกต้อง (คำถาม ตัวเลือก และคำตอบ)
👉 ในเทอร์มินัล ให้เรียกใช้คำสั่งต่อไปนี้เพื่อตั้งค่าสภาพแวดล้อมเสมือน ติดตั้งการอ้างอิง และเริ่ม Agent
gcloud config set project $(cat ~/project_id.txt)
cd ~/aidemy-bootstrap/portal/
python -m venv env
source env/bin/activate
pip install -r requirements.txt
python app.py
👉 จากเมนู "ตัวอย่างเว็บ" ที่มุมขวาบน ให้เลือกแสดงตัวอย่างบนพอร์ต 8080 Cloud Shell จะเปิดแท็บหรือหน้าต่างเบราว์เซอร์ใหม่พร้อมตัวอย่างเว็บของแอปพลิเคชัน
👉 ในเว็บแอปพลิเคชัน ให้คลิกลิงก์ "แบบทดสอบ" ในแถบนำทางด้านบนหรือจากการ์ดในหน้าดัชนี คุณควรเห็นแบบทดสอบที่สร้างขึ้นแบบสุ่ม 3 รายการแสดงต่อนักเรียน แบบทดสอบเหล่านี้อิงตามแผนการสอนและแสดงให้เห็นถึงประสิทธิภาพของระบบสร้างแบบทดสอบที่ทำงานด้วยระบบ AI

👉หากต้องการหยุดกระบวนการที่ทำงานในเครื่อง ให้กด Ctrl+C ในเทอร์มินัล
Gemini 2 กำลังคิดหาคำอธิบาย
โอเค ตอนนี้เรามีแบบทดสอบแล้ว ซึ่งเป็นจุดเริ่มต้นที่ดี แต่จะเกิดอะไรขึ้นหากนักเรียนทำผิด เพราะการเรียนรู้ที่แท้จริงเกิดขึ้นตรงนี้ใช่ไหม หากเราอธิบายได้ว่าทำไมคำตอบของนักเรียนจึงไม่ถูกต้องและวิธีหาคำตอบที่ถูกต้อง นักเรียนก็มีแนวโน้มที่จะจดจำคำตอบนั้นได้มากขึ้น นอกจากนี้ ยังช่วยขจัดความสับสนและเพิ่มความมั่นใจให้ผู้ใช้ด้วย
ด้วยเหตุนี้ เราจึงจะนำเครื่องมือที่ทรงพลังที่สุดมาใช้ นั่นก็คือโมเดล "การคิด" ของ Gemini 2 ซึ่งก็เหมือนกับการให้เวลา AI เพิ่มขึ้นเล็กน้อยในการคิดให้รอบคอบก่อนอธิบาย ซึ่งจะช่วยให้ AI ให้ความคิดเห็นที่ละเอียดและดีขึ้นได้
เราอยากรู้ว่าโมเดลนี้จะช่วยนักเรียนได้ไหมด้วยการให้ความช่วยเหลือ ตอบคำถาม และอธิบายรายละเอียด เราจะเริ่มทดสอบด้วยวิชาแคลคูลัส ซึ่งเป็นวิชาที่ขึ้นชื่อว่ายาก

👉ก่อนอื่น ให้ไปที่ Cloud Code Editor ใน answer.py ภายในโฟลเดอร์ portal แทนที่โค้ดฟังก์ชันต่อไปนี้
def answer_thinking(question, options, user_response, answer, region):
    return ""
โดยใช้ข้อมูลโค้ดต่อไปนี้
def answer_thinking(question, options, user_response, answer, region):
    try:
        llm = VertexAI(model_name="gemini-2.0-flash-001",location=region)

        input_msg = HumanMessage(content=[f"Here the question{question}, here are the available options {options}, this student's answer {user_response}, whereas the correct answer is {answer}"])
        prompt_template = ChatPromptTemplate.from_messages(
            [
                SystemMessage(
                    content=(
                        "You are a helpful teacher trying to teach the student on question, you were given the question and a set of multiple choices "
                        "what's the correct answer. use friendly tone"
                    )
                ),
                input_msg,
            ]
        )

        prompt = prompt_template.format()

        response = llm.invoke(prompt)
        print(f"response: {response}")

        return response
    except Exception as e:
        print(f"Error sending message to chatbot: {e}") # Log this error too!
        return f"Unable to process your request at this time. Due to the following reason: {str(e)}"


if __name__ == "__main__":
    question = "Evaluate the limit: lim (x→0) [(sin(5x) - 5x) / x^3]"
    options = ["A) -125/6", "B) -5/3 ", "C) -25/3", "D) -5/6"]
    user_response = "B"
    answer = "A"
    region = "us-central1"
    result = answer_thinking(question, options, user_response, answer, region)
นี่คือแอป Langchain ที่เรียบง่ายมาก ซึ่งจะเริ่มต้นโมเดล Gemini 2 Flash โดยที่เราสั่งให้ทำหน้าที่เป็นครูที่ให้ความช่วยเหลือและให้คำอธิบาย
👉เรียกใช้คำสั่งต่อไปนี้ในเทอร์มินัล
gcloud config set project $(cat ~/project_id.txt)
cd ~/aidemy-bootstrap/portal/
source env/bin/activate
python answer.py
คุณควรเห็นเอาต์พุตคล้ายกับตัวอย่างที่ระบุไว้ในวิธีการเดิม โมเดลปัจจุบันอาจไม่ได้ให้คำอธิบายที่ละเอียด
Okay, I see the question and the choices. The question is to evaluate the limit:

lim (x→0) [(sin(5x) - 5x) / x^3]

You chose option B, which is -5/3, but the correct answer is A, which is -125/6.

It looks like you might have missed a step or made a small error in your calculations. This type of limit often involves using L'Hôpital's Rule or Taylor series expansion. Since we have the form 0/0, L'Hôpital's Rule is a good way to go! You need to apply it multiple times. Alternatively, you can use the Taylor series expansion of sin(x) which is:
sin(x) = x - x^3/3! + x^5/5! - ...
So, sin(5x) = 5x - (5x)^3/3! + (5x)^5/5! - ...
Then,  (sin(5x) - 5x) = - (5x)^3/3! + (5x)^5/5! - ...
Finally, (sin(5x) - 5x) / x^3 = - 5^3/3! + (5^5 * x^2)/5! - ...
Taking the limit as x approaches 0, we get -125/6.

Keep practicing, you'll get there!
👉 ในไฟล์ answer.py ให้แทนที่
model_name จาก gemini-2.0-flash-001 ถึง gemini-2.0-flash-thinking-exp-01-21 ในฟังก์ชัน answer_thinking
ซึ่งจะเปลี่ยน LLM เป็นตัวอื่นที่ให้เหตุผลได้ดีกว่า ซึ่งจะช่วยให้โมเดลสร้างคำอธิบายได้ดียิ่งขึ้น
👉 เรียกใช้สคริปต์ answer.py อีกครั้งเพื่อทดสอบโมเดลการคิดแบบใหม่
gcloud config set project $(cat ~/project_id.txt)
cd ~/aidemy-bootstrap/portal/
source env/bin/activate
python answer.py
ต่อไปนี้คือตัวอย่างการตอบกลับจากโมเดลการคิดที่มีความละเอียดและครอบคลุมมากขึ้น โดยจะอธิบายทีละขั้นตอนเกี่ยวกับวิธีแก้โจทย์แคลคูลัส ซึ่งแสดงให้เห็นถึงความสามารถของโมเดล "การคิด" ในการสร้างคำอธิบายคุณภาพสูง คุณควรเห็นเอาต์พุตในลักษณะนี้
Hey there! Let's take a look at this limit problem together. You were asked to evaluate:

lim (x→0) [(sin(5x) - 5x) / x^3]

and you picked option B, -5/3, but the correct answer is actually A, -125/6. Let's figure out why!

It's a tricky one because if we directly substitute x=0, we get (sin(0) - 0) / 0^3 = (0 - 0) / 0 = 0/0, which is an indeterminate form. This tells us we need to use a more advanced technique like L'Hopital's Rule or Taylor series expansion.

Let's use the Taylor series expansion for sin(y) around y=0. Do you remember it?  It looks like this:

sin(y) = y - y^3/3! + y^5/5! - ...
where 3! (3 factorial) is 3 × 2 × 1 = 6, 5! is 5 × 4 × 3 × 2 × 1 = 120, and so on.

In our problem, we have sin(5x), so we can substitute y = 5x into the Taylor series:

sin(5x) = (5x) - (5x)^3/3! + (5x)^5/5! - ...
sin(5x) = 5x - (125x^3)/6 + (3125x^5)/120 - ...

Now let's plug this back into our limit expression:

[(sin(5x) - 5x) / x^3] =  [ (5x - (125x^3)/6 + (3125x^5)/120 - ...) - 5x ] / x^3
Notice that the '5x' and '-5x' cancel out!  So we are left with:
= [ - (125x^3)/6 + (3125x^5)/120 - ... ] / x^3
Now, we can divide every term in the numerator by x^3:
= -125/6 + (3125x^2)/120 - ...

Finally, let's take the limit as x approaches 0.  As x gets closer and closer to zero, terms with x^2 and higher powers will become very, very small and approach zero.  So, we are left with:
lim (x→0) [ -125/6 + (3125x^2)/120 - ... ] = -125/6

Therefore, the correct answer is indeed **A) -125/6**.

It seems like your answer B, -5/3, might have come from perhaps missing a factor somewhere during calculation or maybe using an incorrect simplification. Double-check your steps when you were trying to solve it!

Don't worry, these limit problems can be a bit tricky sometimes! Keep practicing and you'll get the hang of it.  Let me know if you want to go through another similar example or if you have any more questions! 😊


Now that we have confirmed it works, let's use the portal.
👉นำโค้ดทดสอบต่อไปนี้ออกจาก answer.py
if __name__ == "__main__":
    question = "Evaluate the limit: lim (x→0) [(sin(5x) - 5x) / x^3]"
    options = ["A) -125/6", "B) -5/3 ", "C) -25/3", "D) -5/6"]
    user_response = "B"
    answer = "A"
    region = "us-central1"
    result = answer_thinking(question, options, user_response, answer, region)
👉เรียกใช้คำสั่งต่อไปนี้ในเทอร์มินัลเพื่อตั้งค่าสภาพแวดล้อมเสมือน ติดตั้งการอ้างอิง และเริ่ม Agent
gcloud config set project $(cat ~/project_id.txt)
cd ~/aidemy-bootstrap/portal/
source env/bin/activate
python app.py
👉 จากเมนู "ตัวอย่างเว็บ" ที่มุมขวาบน ให้เลือกแสดงตัวอย่างบนพอร์ต 8080 Cloud Shell จะเปิดแท็บหรือหน้าต่างเบราว์เซอร์ใหม่พร้อมตัวอย่างเว็บของแอปพลิเคชัน
👉 ในเว็บแอปพลิเคชัน ให้คลิกลิงก์ "แบบทดสอบ" ในแถบนำทางด้านบนหรือจากการ์ดในหน้าดัชนี
👉 ตอบแบบทดสอบทั้งหมดและตอบผิดอย่างน้อย 1 ข้อ แล้วคลิกส่ง

แทนที่จะนั่งรอการตอบกลับเฉยๆ ให้เปลี่ยนไปใช้เทอร์มินัลของ Cloud Editor คุณสามารถดูความคืบหน้าและเอาต์พุตหรือข้อความแสดงข้อผิดพลาดที่ฟังก์ชันสร้างขึ้นได้ในเทอร์มินัลของโปรแกรมจำลอง 😁
👉 ในเทอร์มินัล ให้หยุดกระบวนการที่ทำงานในเครื่องโดยกด Ctrl+C ในเทอร์มินัล
11. ไม่บังคับ: จัดการ Agent ด้วย Eventarc
ที่ผ่านมา พอร์ทัลนักเรียนได้สร้างแบบทดสอบตามชุดแผนการสอนเริ่มต้น ซึ่งมีประโยชน์ แต่หมายความว่าเอเจนต์วางแผนและเอเจนต์แบบทดสอบของพอร์ทัลไม่ได้สื่อสารกันจริงๆ คุณยังจำได้ไหมว่าเราได้เพิ่มฟีเจอร์ที่ตัวแทนวางแผนจะเผยแพร่แผนการสอนที่สร้างขึ้นใหม่ไปยังหัวข้อ Pub/Sub ถึงเวลาเชื่อมต่อกับเอเจนต์พอร์ทัลแล้ว

เราต้องการให้พอร์ทัลอัปเดตเนื้อหาแบบทดสอบโดยอัตโนมัติทุกครั้งที่มีการสร้างแผนการสอนใหม่ โดยเราจะสร้างปลายทางในพอร์ทัลที่รับแผนใหม่เหล่านี้ได้
👉 ในแผง Explorer ของ Cloud Code Editor ให้ไปที่โฟลเดอร์ portal
👉 เปิดไฟล์ app.py เพื่อแก้ไข แทนที่บรรทัด REPLACE ## REPLACE ME! NEW TEACHING PLAN ด้วยโค้ดต่อไปนี้
@app.route('/new_teaching_plan', methods=['POST'])
def new_teaching_plan():
    try:

        # Get data from Pub/Sub message delivered via Eventarc
        envelope = request.get_json()
        if not envelope:
            return jsonify({'error': 'No Pub/Sub message received'}), 400

        if not isinstance(envelope, dict) or 'message' not in envelope:
            return jsonify({'error': 'Invalid Pub/Sub message format'}), 400

        pubsub_message = envelope['message']
        print(f"data: {pubsub_message['data']}")

        data = pubsub_message['data']
        data_str = base64.b64decode(data).decode('utf-8')
        data = json.loads(data_str)

        teaching_plan = data['teaching_plan']

        print(f"File content: {teaching_plan}")

        with open("teaching_plan.txt", "w") as f:
            f.write(teaching_plan)

        print(f"Teaching plan saved to local file: teaching_plan.txt")

        return jsonify({'message': 'File processed successfully'})


    except Exception as e:
        print(f"Error processing file: {e}")
        return jsonify({'error': 'Error processing file'}), 500
สร้างใหม่และทำให้ใช้งานได้กับ Cloud Run
คุณจะต้องอัปเดตและทำให้ทั้งเอเจนต์วางแผนและเอเจนต์พอร์ทัลใช้งานได้อีกครั้งใน Cloud Run ซึ่งจะช่วยให้แน่ใจได้ว่าโค้ดเป็นเวอร์ชันล่าสุดและได้รับการกำหนดค่าให้สื่อสารผ่านเหตุการณ์

👉ก่อนอื่นเราจะสร้างใหม่และพุชอิมเมจเอเจนต์ planner กลับไปที่เทอร์มินัลโดยเรียกใช้คำสั่งต่อไปนี้
cd ~/aidemy-bootstrap/planner/
gcloud config set project $(cat ~/project_id.txt)
export PROJECT_ID=$(gcloud config get project)
docker build -t gcr.io/${PROJECT_ID}/aidemy-planner .
export PROJECT_ID=$(gcloud config get project)
docker tag gcr.io/${PROJECT_ID}/aidemy-planner us-central1-docker.pkg.dev/${PROJECT_ID}/agent-repository/aidemy-planner
docker push us-central1-docker.pkg.dev/${PROJECT_ID}/agent-repository/aidemy-planner
👉เราจะทำเช่นเดียวกัน คือสร้างและพุชอิมเมจของเอเจนต์ portal
cd ~/aidemy-bootstrap/portal/
gcloud config set project $(cat ~/project_id.txt)
export PROJECT_ID=$(gcloud config get project)
docker build -t gcr.io/${PROJECT_ID}/aidemy-portal .
export PROJECT_ID=$(gcloud config get project)
docker tag gcr.io/${PROJECT_ID}/aidemy-portal us-central1-docker.pkg.dev/${PROJECT_ID}/agent-repository/aidemy-portal
docker push us-central1-docker.pkg.dev/${PROJECT_ID}/agent-repository/aidemy-portal
👉 ไปที่ Artifact Registry คุณควรเห็นอิมเมจคอนเทนเนอร์ทั้ง aidemy-planner และ aidemy-portal แสดงอยู่ในส่วน agent-repository

👉กลับไปที่เทอร์มินัล แล้วเรียกใช้คำสั่งนี้เพื่ออัปเดตอิมเมจ Cloud Run สำหรับ Agent วางแผน
gcloud config set project $(cat ~/project_id.txt)
export PROJECT_ID=$(gcloud config get project)
gcloud run services update aidemy-planner \
    --region=us-central1 \
    --image=us-central1-docker.pkg.dev/${PROJECT_ID}/agent-repository/aidemy-planner:latest
คุณควรเห็นเอาต์พุตในลักษณะนี้
OK Deploying... Done.
  OK Creating Revision...
  OK Routing traffic...
Done.
Service [aidemy-planner] revision [aidemy-planner-xxxxx] has been deployed and is serving 100 percent of traffic.
Service URL: https://aidemy-planner-xxx.us-central1.run.app
จดบันทึก URL ของบริการ ซึ่งเป็นลิงก์ไปยังเอเจนต์วางแผนที่ติดตั้งใช้งาน หากต้องการกำหนด URL ของบริการตัวแทนวางแผนในภายหลัง ให้ใช้คำสั่งนี้
gcloud config set project $(cat ~/project_id.txt)
export PROJECT_ID=$(gcloud config get project)
gcloud run services describe aidemy-planner \
    --region=us-central1 \
    --format 'value(status.url)'
👉เรียกใช้คำสั่งนี้เพื่อสร้างอินสแตนซ์ Cloud Run สำหรับเอเจนต์พอร์ทัล
gcloud config set project $(cat ~/project_id.txt)
export PROJECT_ID=$(gcloud config get project)
gcloud run deploy aidemy-portal \
  --image=us-central1-docker.pkg.dev/${PROJECT_ID}/agent-repository/aidemy-portal:latest \
  --region=us-central1 \
  --platform=managed \
  --allow-unauthenticated \
  --memory=2Gi \
  --cpu=2 \
  --set-env-vars=GOOGLE_CLOUD_PROJECT=${PROJECT_ID}
คุณควรเห็นเอาต์พุตในลักษณะนี้
Deploying container to Cloud Run service [aidemy-portal] in project [xxxx] region [us-central1]
OK Deploying new service... Done.
  OK Creating Revision...
  OK Routing traffic...
  OK Setting IAM Policy...
Done.
Service [aidemy-portal] revision [aidemy-portal-xxxx] has been deployed and is serving 100 percent of traffic.
Service URL: https://aidemy-portal-xxxx.us-central1.run.app
จด URL ของบริการ ซึ่งเป็นลิงก์ไปยังพอร์ทัลนักเรียนที่ใช้งาน หากต้องการกำหนด URL ของบริการพอร์ทัลนักเรียน/นักศึกษาในภายหลัง ให้ใช้คำสั่งต่อไปนี้
gcloud config set project $(cat ~/project_id.txt)
export PROJECT_ID=$(gcloud config get project)
gcloud run services describe aidemy-portal \
    --region=us-central1 \
    --format 'value(status.url)'
สร้างทริกเกอร์ Eventarc
แต่คำถามสำคัญคือปลายทางนี้จะได้รับการแจ้งเตือนได้อย่างไรเมื่อมีแผนใหม่รออยู่ในหัวข้อ Pub/Sub Eventarc จึงเข้ามาช่วยกอบกู้สถานการณ์
Eventarc ทำหน้าที่เป็นสะพาน โดยจะรอฟังเหตุการณ์ที่เฉพาะเจาะจง (เช่น ข้อความใหม่ที่เข้ามาในหัวข้อ Pub/Sub) และทริกเกอร์การดำเนินการโดยอัตโนมัติเพื่อตอบสนอง ในกรณีของเรา ระบบจะตรวจหาเมื่อมีการเผยแพร่แผนการสอนใหม่ แล้วส่งสัญญาณไปยังปลายทางของพอร์ทัลเพื่อแจ้งให้ทราบว่าถึงเวลาอัปเดตแล้ว
Eventarc จะจัดการการสื่อสารที่อิงตามเหตุการณ์ ทำให้เราเชื่อมต่อเอเจนต์วางแผนและเอเจนต์พอร์ทัลได้อย่างราบรื่น ซึ่งจะสร้างระบบการเรียนรู้แบบไดนามิกและตอบสนองได้อย่างแท้จริง ซึ่งก็เหมือนกับการมีผู้ส่งสารอัจฉริยะที่ส่งแผนการสอนล่าสุดไปยังที่ที่ถูกต้องโดยอัตโนมัติ
👉ไปที่ Eventarc ในคอนโซล
👉คลิกปุ่ม "+ สร้างทริกเกอร์"
กำหนดค่าทริกเกอร์ (พื้นฐาน):
- ชื่อทริกเกอร์:
plan-topic-trigger - ประเภททริกเกอร์: แหล่งที่มาของ Google
- ผู้ให้บริการเหตุการณ์: Cloud Pub/Sub
- ประเภทกิจกรรม:
google.cloud.pubsub.topic.v1.messagePublished - หัวข้อ Cloud Pub/Sub: เลือก
projects/PROJECT_ID/topics/plan - ภูมิภาค:
us-central1 - บัญชีบริการ:
- ให้สิทธิ์บัญชีบริการที่มีบทบาท
roles/iam.serviceAccountTokenCreator - ใช้ค่าเริ่มต้น: บัญชีบริการ Compute เริ่มต้น
- ให้สิทธิ์บัญชีบริการที่มีบทบาท
- ปลายทางของเหตุการณ์: Cloud Run
- บริการ Cloud Run:
aidemy-portal - Ignore error message: Permission denied on ‘locations/me-central2' (or it may not exist).
- เส้นทาง URL บริการ:
/new_teaching_plan
👉 คลิก "สร้าง"
หน้าทริกเกอร์ Eventarc จะรีเฟรช และคุณควรเห็นทริกเกอร์ที่สร้างใหม่แสดงอยู่ในตาราง
ตอนนี้ ให้เข้าถึงเอเจนต์วางแผนโดยใช้ URL ของบริการเพื่อขอแผนการสอนใหม่
👉 เรียกใช้คำสั่งนี้ในเทอร์มินัลเพื่อกำหนด URL ของบริการตัวแทนวางแผน
gcloud config set project $(cat ~/project_id.txt)
export PROJECT_ID=$(gcloud config get project)
gcloud run services list --platform=managed --region=us-central1 --format='value(URL)' | grep planner
👉 ไปที่ URL ที่แสดงผล แล้วลองใช้ปี 5, วิชา Science และคำขอส่วนเสริม atoms ในครั้งนี้
จากนั้นรอ 1-2 นาที การหน่วงเวลานี้เกิดขึ้นเนื่องจากข้อจำกัดในการเรียกเก็บเงินของ Lab นี้ แต่ในสภาวะปกติไม่ควรมีการหน่วงเวลา
สุดท้าย ให้เข้าถึงพอร์ทัลของนักเรียนโดยใช้ URL ของบริการ
เรียกใช้คำสั่งนี้ในเทอร์มินัลเพื่อกำหนด URL ของบริการตัวแทนพอร์ทัลนักเรียน/นักศึกษา
gcloud config set project $(cat ~/project_id.txt)
export PROJECT_ID=$(gcloud config get project)
gcloud run services list --platform=managed --region=us-central1 --format='value(URL)' | grep portal
คุณจะเห็นว่าแบบทดสอบได้รับการอัปเดตและสอดคล้องกับแผนการสอนใหม่ที่คุณเพิ่งสร้างแล้ว ซึ่งแสดงให้เห็นถึงการผสานรวม Eventarc ในระบบ Aidemy ที่ประสบความสำเร็จ

ยินดีด้วย คุณสร้างระบบแบบหลายเอเจนต์บน Google Cloud ได้สำเร็จแล้ว โดยใช้ประโยชน์จากสถาปัตยกรรมที่ขับเคลื่อนด้วยเหตุการณ์เพื่อเพิ่มความสามารถในการปรับขนาดและความยืดหยุ่น คุณได้วางรากฐานที่มั่นคงแล้ว แต่ก็ยังมีอีกมากมายให้สำรวจ หากต้องการเจาะลึกถึงประโยชน์ที่แท้จริงของสถาปัตยกรรมนี้ ค้นพบประสิทธิภาพของ Multimodal Live API ของ Gemini 2 และดูวิธีใช้การจัดระเบียบแบบเส้นทางเดียวด้วย LangGraph โปรดอ่านต่อใน 2 บทถัดไป
12. ไม่บังคับ: สรุปความทรงจำด้วยเสียงด้วย Gemini
Gemini สามารถทำความเข้าใจและประมวลผลข้อมูลจากแหล่งที่มาต่างๆ เช่น ข้อความ รูปภาพ และแม้แต่เสียง ซึ่งจะเปิดโอกาสใหม่ๆ ในการเรียนรู้และการสร้างเนื้อหา ความสามารถของ Gemini ในการ "มองเห็น" "ได้ยิน" และ "อ่าน" จะช่วยปลดล็อกประสบการณ์ของผู้ใช้ที่สร้างสรรค์และน่าสนใจได้อย่างแท้จริง
นอกเหนือจากการสร้างภาพหรือข้อความแล้ว อีกขั้นตอนสำคัญในการเรียนรู้คือการสรุปและทบทวนอย่างมีประสิทธิภาพ ลองคิดดูว่าคุณจำเนื้อเพลงที่ติดหูได้ง่ายกว่าสิ่งที่อ่านในตำราเรียนบ่อยแค่ไหน เสียงเป็นสิ่งที่น่าจดจำอย่างยิ่ง ด้วยเหตุนี้ เราจึงจะใช้ประโยชน์จากความสามารถแบบมัลติโมดัลของ Gemini เพื่อสร้างสรุปเสียงของแผนการสอน ซึ่งจะช่วยให้นักเรียนได้ทบทวนเนื้อหาอย่างสะดวกและน่าสนใจ รวมถึงอาจช่วยเพิ่มการจดจำและความเข้าใจผ่านพลังของการเรียนรู้ผ่านการฟัง

เราต้องมีพื้นที่จัดเก็บไฟล์เสียงที่สร้างขึ้น Cloud Storage มีโซลูชันที่เชื่อถือได้และปรับขนาดได้
👉ไปที่พื้นที่เก็บข้อมูลในคอนโซล คลิก "Buckets" ในเมนูด้านซ้าย คลิกปุ่ม "+ สร้าง" ที่ด้านบน
👉กำหนดค่าที่เก็บข้อมูลใหม่
- ชื่อที่เก็บข้อมูล:
aidemy-recap-UNIQUE_NAME- สำคัญ: โปรดกำหนดชื่อที่เก็บข้อมูลที่ไม่ซ้ำกันซึ่งขึ้นต้นด้วย
aidemy-recap-คำนำหน้าที่ไม่ซ้ำกันนี้มีความสำคัญอย่างยิ่งในการหลีกเลี่ยงการตั้งชื่อที่ซ้ำกันเมื่อสร้างที่เก็บข้อมูล Cloud Storage
- สำคัญ: โปรดกำหนดชื่อที่เก็บข้อมูลที่ไม่ซ้ำกันซึ่งขึ้นต้นด้วย
- ภูมิภาค:
us-central1 - คลาสพื้นที่เก็บข้อมูล: "Standard" มาตรฐานเหมาะสำหรับข้อมูลที่มีการเข้าถึงบ่อย
- การควบคุมการเข้าถึง: เลือกการควบคุมการเข้าถึง "แบบเดียวกัน" เริ่มต้นไว้ ซึ่งจะช่วยให้การควบคุมการเข้าถึงระดับที่เก็บข้อมูลสอดคล้องกัน
- ตัวเลือกขั้นสูง: สำหรับเวิร์กช็อปนี้ โดยปกติแล้วการตั้งค่าเริ่มต้นก็เพียงพอแล้ว
คลิกปุ่มสร้างเพื่อสร้างที่เก็บข้อมูล
- คุณอาจเห็นป๊อปอัปเกี่ยวกับการป้องกันการเข้าถึงแบบสาธารณะ ทำเครื่องหมายในช่อง "บังคับใช้การป้องกันการเข้าถึงแบบสาธารณะในที่เก็บข้อมูลนี้" แล้วคลิก
Confirm
ตอนนี้คุณจะเห็นที่เก็บข้อมูลที่สร้างขึ้นใหม่ในรายการที่เก็บข้อมูล โปรดจำชื่อที่เก็บข้อมูลไว้เพื่อใช้งานในภายหลัง
👉ในเทอร์มินัลของโปรแกรมแก้ไข Cloud Code ให้เรียกใช้คำสั่งต่อไปนี้เพื่อให้สิทธิ์เข้าถึงที่เก็บข้อมูลแก่บัญชีบริการ
gcloud config set project $(cat ~/project_id.txt)
export PROJECT_ID=$(gcloud config get project)
export COURSE_BUCKET_NAME=$(gcloud storage buckets list --format="value(name)" | grep aidemy-recap)
export SERVICE_ACCOUNT_NAME=$(gcloud compute project-info describe --format="value(defaultServiceAccount)")
gcloud storage buckets add-iam-policy-binding gs://$COURSE_BUCKET_NAME \
    --member "serviceAccount:$SERVICE_ACCOUNT_NAME" \
    --role "roles/storage.objectViewer"

gcloud storage buckets add-iam-policy-binding gs://$COURSE_BUCKET_NAME \
    --member "serviceAccount:$SERVICE_ACCOUNT_NAME" \
    --role "roles/storage.objectCreator"
👉ใน Cloud Code Editor ให้เปิด audio.py ภายในโฟลเดอร์ courses วางโค้ดต่อไปนี้ที่ส่วนท้ายของไฟล์
config = LiveConnectConfig(
    response_modalities=["AUDIO"],
    speech_config=SpeechConfig(
        voice_config=VoiceConfig(
            prebuilt_voice_config=PrebuiltVoiceConfig(
                voice_name="Charon",
            )
        )
    ),
)

async def process_weeks(teaching_plan: str):
    region = "us-east5" #To workaround onRamp quota limits
    client = genai.Client(vertexai=True, project=PROJECT_ID, location=region)

    clientAudio = genai.Client(vertexai=True, project=PROJECT_ID, location="us-central1")
    async with clientAudio.aio.live.connect(
        model=MODEL_ID,
        config=config,
    ) as session:
        for week in range(1, 4):
            response = client.models.generate_content(
                model="gemini-2.0-flash-001",
                contents=f"Given the following teaching plan: {teaching_plan}, Extrace content plan for week {week}. And return just the plan, nothingh else  " # Clarified prompt
            )

            prompt = f"""
                Assume you are the instructor.
                Prepare a concise and engaging recap of the key concepts and topics covered.
                This recap should be suitable for generating a short audio summary for students.
                Focus on the most important learnings and takeaways, and frame it as a direct address to the students.
                Avoid overly formal language and aim for a conversational tone, tell a few jokes.

                Teaching plan: {response.text} """
            print(f"prompt --->{prompt}")

            await session.send(input=prompt, end_of_turn=True)
            with open(f"temp_audio_week_{week}.raw", "wb") as temp_file:
                async for message in session.receive():
                    if message.server_content.model_turn:
                        for part in message.server_content.model_turn.parts:
                            if part.inline_data:
                                temp_file.write(part.inline_data.data)

            data, samplerate = sf.read(f"temp_audio_week_{week}.raw", channels=1, samplerate=24000, subtype='PCM_16', format='RAW')
            sf.write(f"course-week-{week}.wav", data, samplerate)

            storage_client = storage.Client()
            bucket = storage_client.bucket(BUCKET_NAME)
            blob = bucket.blob(f"course-week-{week}.wav")  # Or give it a more descriptive name
            blob.upload_from_filename(f"course-week-{week}.wav")
            print(f"Audio saved to GCS: gs://{BUCKET_NAME}/course-week-{week}.wav")
    await session.close()


def breakup_sessions(teaching_plan: str):
    asyncio.run(process_weeks(teaching_plan))
- การเชื่อมต่อสตรีมมิง: ขั้นแรก ระบบจะสร้างการเชื่อมต่อแบบถาวรกับปลายทาง Live API การเชื่อมต่อนี้จะเปิดอยู่เพื่อแลกเปลี่ยนข้อมูลอย่างต่อเนื่อง ซึ่งแตกต่างจากการเรียก API มาตรฐานที่คุณส่งคำขอและรับการตอบกลับ
- การกำหนดค่ามัลติโมดัล: ใช้การกำหนดค่าเพื่อระบุประเภทเอาต์พุตที่ต้องการ (ในกรณีนี้คือเสียง) และคุณยังระบุพารามิเตอร์ที่ต้องการใช้ได้ด้วย (เช่น การเลือกเสียง การเข้ารหัสเสียง)
- การประมวลผลแบบอะซิงโครนัส: API นี้ทำงานแบบอะซิงโครนัส ซึ่งหมายความว่าจะไม่บล็อกเทรดหลักขณะรอให้การสร้างเสียงเสร็จสมบูรณ์ การประมวลผลข้อมูลแบบเรียลไทม์และการส่งเอาต์พุตเป็นกลุ่มจะช่วยให้ผู้ใช้ได้รับประสบการณ์การใช้งานที่รวดเร็ว
ตอนนี้คำถามสำคัญคือกระบวนการสร้างเสียงนี้ควรทำงานเมื่อใด เราต้องการให้สรุปเสียงพร้อมใช้งานทันทีที่มีการสร้างแผนการสอนใหม่ เนื่องจากเราได้ใช้สถาปัตยกรรมที่ขับเคลื่อนด้วยเหตุการณ์โดยการเผยแพร่แผนการสอนไปยังหัวข้อ Pub/Sub แล้ว เราจึงเพียงแค่ติดตามหัวข้อนั้น
อย่างไรก็ตาม เราไม่ได้สร้างแผนการสอนใหม่บ่อยนัก การให้เอเจนต์ทำงานและรอแพ็กเกจใหม่ๆ อยู่ตลอดเวลาคงไม่ใช่วิธีที่มีประสิทธิภาพ ด้วยเหตุนี้ การติดตั้งใช้งานตรรกะการสร้างเสียงนี้เป็นฟังก์ชัน Cloud Run จึงเป็นเรื่องที่สมเหตุสมผล
การติดตั้งใช้งานเป็นฟังก์ชันจะทำให้ฟังก์ชันอยู่ในสถานะไม่ได้ใช้งานจนกว่าจะมีการเผยแพร่ข้อความใหม่ไปยังหัวข้อ Pub/Sub เมื่อเกิดเหตุการณ์ดังกล่าว ระบบจะทริกเกอร์ฟังก์ชันโดยอัตโนมัติ ซึ่งจะสร้างสรุปเสียงและจัดเก็บไว้ในที่เก็บข้อมูลของเรา
👉ในโฟลเดอร์ courses ในไฟล์ main.py ไฟล์นี้จะกำหนดฟังก์ชัน Cloud Run ที่จะทริกเกอร์เมื่อมีแผนการสอนใหม่ โดยจะรับแพ็กเกจและเริ่มสร้างสรุปเสียง เพิ่มข้อมูลโค้ดต่อไปนี้ที่ส่วนท้ายของไฟล์
@functions_framework.cloud_event
def process_teaching_plan(cloud_event):
    print(f"CloudEvent received: {cloud_event.data}")
    time.sleep(60)
    try:
        if isinstance(cloud_event.data.get('message', {}).get('data'), str):  # Check for base64 encoding
            data = json.loads(base64.b64decode(cloud_event.data['message']['data']).decode('utf-8'))
            teaching_plan = data.get('teaching_plan') # Get the teaching plan
        elif 'teaching_plan' in cloud_event.data: # No base64
            teaching_plan = cloud_event.data["teaching_plan"]
        else:
            raise KeyError("teaching_plan not found") # Handle error explicitly

        #Load the teaching_plan as string and from cloud event, call audio breakup_sessions
        breakup_sessions(teaching_plan)

        return "Teaching plan processed successfully", 200

    except (json.JSONDecodeError, AttributeError, KeyError) as e:
        print(f"Error decoding CloudEvent data: {e} - Data: {cloud_event.data}")
        return "Error processing event", 500

    except Exception as e:
        print(f"Error processing teaching plan: {e}")
        return "Error processing teaching plan", 500
@functions_framework.cloud_event: ตัวตกแต่งนี้จะทำเครื่องหมายฟังก์ชันเป็นฟังก์ชัน Cloud Run ที่จะทริกเกอร์โดย CloudEvents
การทดสอบในเครื่อง
👉เราจะเรียกใช้คำสั่งนี้ในสภาพแวดล้อมเสมือนและติดตั้งไลบรารี Python ที่จำเป็นสำหรับฟังก์ชัน Cloud Run
cd ~/aidemy-bootstrap/courses
gcloud config set project $(cat ~/project_id.txt)
export PROJECT_ID=$(gcloud config get project)
export COURSE_BUCKET_NAME=$(gcloud storage buckets list --format="value(name)" | grep aidemy-recap)
python -m venv env
source env/bin/activate
pip install -r requirements.txt
👉โปรแกรมจำลองฟังก์ชัน Cloud Run ช่วยให้เราทดสอบฟังก์ชันภายในเครื่องได้ก่อนที่จะทำให้ใช้งานได้ใน Google Cloud เริ่มโปรแกรมจำลองในเครื่องโดยเรียกใช้คำสั่งต่อไปนี้
functions-framework --target process_teaching_plan --signature-type=cloudevent --source main.py
👉ขณะที่โปรแกรมจำลองทำงานอยู่ คุณสามารถส่ง CloudEvent ทดสอบไปยังโปรแกรมจำลองเพื่อจำลองการเผยแพร่แผนการสอนใหม่ได้ ในเทอร์มินัลใหม่ ให้ทำดังนี้

👉เรียกใช้
  curl -X POST \
  http://localhost:8080/ \
  -H "Content-Type: application/json" \
  -H "ce-id: event-id-01" \
  -H "ce-source: planner-agent" \
  -H "ce-specversion: 1.0" \
  -H "ce-type: google.cloud.pubsub.topic.v1.messagePublished" \
  -d '{
    "message": {
      "data": "eyJ0ZWFjaGluZ19wbGFuIjogIldlZWsgMTogMkQgU2hhcGVzIGFuZCBBbmdsZXMgLSBEYXkgMTogUmV2aWV3IG9mIGJhc2ljIDJEIHNoYXBlcyAoc3F1YXJlcywgcmVjdGFuZ2xlcywgdHJpYW5nbGVzLCBjaXJjbGVzKS4gRGF5IDI6IEV4cGxvcmluZyBkaWZmZXJlbnQgdHlwZXMgb2YgdHJpYW5nbGVzIChlcXVpbGF0ZXJhbCwgaXNvc2NlbGVzLCBzY2FsZW5lLCByaWdodC1hbmdsZWQpLiBEYXkgMzogRXhwbG9yaW5nIHF1YWRyaWxhdGVyYWxzIChzcXVhcmUsIHJlY3RhbmdsZSwgcGFyYWxsZWxvZ3JhbSwgcmhvbWJ1cywgdHJhcGV6aXVtKS4gRGF5IDQ6IEludHJvZHVjdGlvbiB0byBhbmdsZXM6IHJpZ2h0IGFuZ2xlcywgYWN1dGUgYW5nbGVzLCBhbmQgb2J0dXNlIGFuZ2xlcy4gRGF5IDU6IE1lYXN1cmluZyBhbmdsZXMgdXNpbmcgYSBwcm90cmFjdG9yLiBXZWVrIDI6IDNEIFNoYXBlcyBhbmQgU3ltbWV0cnkgLSBEYXkgNjogSW50cm9kdWN0aW9uIHRvIDNEIHNoYXBlczogY3ViZXMsIGN1Ym9pZHMsIHNwaGVyZXMsIGN5bGluZGVycywgY29uZXMsIGFuZCBweXJhbWlkcy4gRGF5IDc6IERlc2NyaWJpbmcgM0Qgc2hhcGVzIHVzaW5nIGZhY2VzLCBlZGdlcywgYW5kIHZlcnRpY2VzLiBEYXkgODogUmVsYXRpbmcgMkQgc2hhcGVzIHRvIDNEIHNoYXBlcy4gRGF5IDk6IElkZW50aWZ5aW5nIGxpbmVzIG9mIHN5bW1ldHJ5IGluIDJEIHNoYXBlcy4gRGF5IDEwOiBDb21wbGV0aW5nIHN5bW1ldHJpY2FsIGZpZ3VyZXMuIFdlZWsgMzogUG9zaXRpb24sIERpcmVjdGlvbiwgYW5kIFByb2JsZW0gU29sdmluZyAtIERheSAxMTogRGVzY3JpYmluZyBwb3NpdGlvbiB1c2luZyBjb29yZGluYXRlcyBpbiB0aGUgZmlyc3QgcXVhZHJhbnQuIERheSAxMjogUGxvdHRpbmcgY29vcmRpbmF0ZXMgdG8gZHJhdyBzaGFwZXMuIERheSAxMzogVW5kZXJzdGFuZGluZyB0cmFuc2xhdGlvbiAoc2xpZGluZyBhIHNoYXBlKS4gRGF5IDE0OiBVbmRlcnN0YW5kaW5nIHJlZmxlY3Rpb24gKGZsaXBwaW5nIGEgc2hhcGUpLiBEYXkgMTU6IFByb2JsZW0tc29sdmluZyBhY3Rpdml0aWVzIGludm9sdmluZyBwZXJpbWV0ZXIsIGFyZWEsIGFuZCBtaXNzaW5nIGFuZ2xlcy4ifQ=="
    }
  }'
แทนที่จะนั่งรอคำตอบอย่างเดียว ให้เปลี่ยนไปใช้เทอร์มินัล Cloud Shell อื่น คุณสามารถดูความคืบหน้าและเอาต์พุตหรือข้อความแสดงข้อผิดพลาดที่ฟังก์ชันสร้างขึ้นได้ในเทอร์มินัลของโปรแกรมจำลอง 😁
ในเทอร์มินัลที่ 2 คุณควรเห็นว่าระบบส่งคืน OK
👉คุณจะยืนยันข้อมูลในที่เก็บข้อมูลได้โดยไปที่ Cloud Storage แล้วเลือกแท็บ "ที่เก็บข้อมูล" จากนั้นเลือก aidemy-recap-UNIQUE_NAME

👉ในเทอร์มินัลที่เรียกใช้โปรแกรมจำลอง ให้พิมพ์ ctrl+c เพื่อออก แล้วปิดเทอร์มินัลที่ 2 จากนั้นปิดเทอร์มินัลที่ 2 แล้วเรียกใช้ deactivate เพื่อออกจากสภาพแวดล้อมเสมือน
deactivate
การทำให้ใช้งานได้กับ Google Cloud
 👉หลังจากทดสอบในเครื่องแล้ว ก็ถึงเวลาที่จะทำให้เอเจนต์หลักสูตรใช้งานได้ใน Google Cloud เรียกใช้คำสั่งต่อไปนี้ในเทอร์มินัล
cd ~/aidemy-bootstrap/courses
gcloud config set project $(cat ~/project_id.txt)
export PROJECT_ID=$(gcloud config get project)
export COURSE_BUCKET_NAME=$(gcloud storage buckets list --format="value(name)" | grep aidemy-recap)
gcloud functions deploy courses-agent \
  --region=us-central1 \
  --gen2 \
  --source=. \
  --runtime=python312 \
  --trigger-topic=plan \
  --entry-point=process_teaching_plan \
  --set-env-vars=GOOGLE_CLOUD_PROJECT=${PROJECT_ID},COURSE_BUCKET_NAME=$COURSE_BUCKET_NAME
ยืนยันการติดตั้งใช้งานโดยไปที่ Cloud Run ใน Google Cloud Console คุณควรเห็นบริการใหม่ชื่อ courses-agent แสดงอยู่

หากต้องการตรวจสอบการกำหนดค่าทริกเกอร์ ให้คลิกบริการ courses-agent เพื่อดูรายละเอียด ไปที่แท็บ "ทริกเกอร์"
คุณควรเห็นทริกเกอร์ที่กำหนดค่าให้รอรับข้อความที่เผยแพร่ไปยังหัวข้อของแพ็กเกจ

สุดท้าย มาดูการทำงานแบบครบวงจรกัน
👉เราต้องกำหนดค่าเอเจนต์พอร์ทัลเพื่อให้ทราบตำแหน่งของไฟล์เสียงที่สร้างขึ้น ในเทอร์มินัล ให้เรียกใช้คำสั่งต่อไปนี้
export COURSE_BUCKET_NAME=$(gcloud storage buckets list --format="value(name)" | grep aidemy-recap)
gcloud config set project $(cat ~/project_id.txt)
export PROJECT_ID=$(gcloud config get project)
gcloud run services update aidemy-portal \
    --region=us-central1 \
    --set-env-vars=GOOGLE_CLOUD_PROJECT=${PROJECT_ID},COURSE_BUCKET_NAME=$COURSE_BUCKET_NAME
👉ลองสร้างแผนการสอนใหม่โดยใช้หน้าเว็บของเอเจนต์วางแผน การเริ่มต้นอาจใช้เวลา 2-3 นาที โปรดอย่าตกใจ เนื่องจากเป็นบริการแบบไร้เซิร์ฟเวอร์
หากต้องการเข้าถึงตัวแทนวางแผน ให้รับ URL ของบริการโดยเรียกใช้คำสั่งนี้ในเทอร์มินัล
gcloud run services list \
    --platform=managed \
    --region=us-central1 \
    --format='value(URL)' | grep planner
หลังจากสร้างแผนใหม่แล้ว ให้รอ 2-3 นาทีเพื่อให้ระบบสร้างเสียง ซึ่งอาจใช้เวลาอีก 2-3 นาทีเนื่องจากข้อจำกัดในการเรียกเก็บเงินของบัญชี Lab นี้
คุณตรวจสอบได้ว่าcourses-agentได้รับแผนการสอนหรือไม่โดยดูที่แท็บ "ทริกเกอร์" ของฟังก์ชัน รีเฟรชหน้าเว็บเป็นระยะๆ คุณจะเห็นว่าฟังก์ชันได้รับการเรียกใช้แล้ว หากฟังก์ชันยังไม่ได้รับการเรียกใช้หลังจากผ่านไปนานกว่า 2 นาที คุณสามารถลองสร้างแผนการสอนอีกครั้งได้ อย่างไรก็ตาม โปรดหลีกเลี่ยงการสร้างแผนซ้ำๆ อย่างรวดเร็ว เนื่องจากเอเจนต์จะใช้และประมวลผลแต่ละแผนที่สร้างขึ้นตามลำดับ ซึ่งอาจทำให้เกิดงานค้างได้

👉ไปที่พอร์ทัลแล้วคลิก "หลักสูตร" คุณควรเห็นการ์ด 3 ใบ ซึ่งแต่ละใบจะแสดงสรุปเสียง วิธีค้นหา URL ของตัวแทนพอร์ทัล
gcloud run services list \
    --platform=managed \
    --region=us-central1 \
    --format='value(URL)' | grep portal
คลิก "เล่น" ในแต่ละหลักสูตรเพื่อให้แน่ใจว่าสรุปเสียงสอดคล้องกับแผนการสอนที่คุณเพิ่งสร้าง 
ออกจากสภาพแวดล้อมเสมือน
deactivate
13. ไม่บังคับ: การทำงานร่วมกันตามบทบาทด้วย Gemini และ DeepSeek
การมีมุมมองที่หลากหลายมีคุณค่าอย่างยิ่ง โดยเฉพาะอย่างยิ่งเมื่อสร้างงานที่น่าสนใจและรอบคอบ ตอนนี้เราจะสร้างระบบแบบหลายเอเจนต์ที่ใช้ประโยชน์จากโมเดล 2 แบบที่มีบทบาทแตกต่างกันเพื่อสร้างงาน โดยโมเดลหนึ่งส่งเสริมการทำงานร่วมกัน และอีกโมเดลหนึ่งส่งเสริมการศึกษาด้วยตนเอง เราจะใช้สถาปัตยกรรม "ครั้งเดียว" ซึ่งเวิร์กโฟลว์จะทำตามเส้นทางที่กำหนด
เครื่องมือสร้างงานของ Gemini
 เราจะเริ่มต้นด้วยการตั้งค่าฟังก์ชัน Gemini เพื่อสร้างงานโดยเน้นการทำงานร่วมกัน แก้ไขไฟล์
 gemini.py ที่อยู่ในโฟลเดอร์ assignment
👉วางโค้ดต่อไปนี้ที่ส่วนท้ายของไฟล์ gemini.py
def gen_assignment_gemini(state):
    region=get_next_region()
    client = genai.Client(vertexai=True, project=PROJECT_ID, location=region)
    print(f"---------------gen_assignment_gemini")
    response = client.models.generate_content(
        model=MODEL_ID, contents=f"""
        You are an instructor

        Develop engaging and practical assignments for each week, ensuring they align with the teaching plan's objectives and progressively build upon each other.

        For each week, provide the following:

        * **Week [Number]:** A descriptive title for the assignment (e.g., "Data Exploration Project," "Model Building Exercise").
        * **Learning Objectives Assessed:** List the specific learning objectives from the teaching plan that this assignment assesses.
        * **Description:** A detailed description of the task, including any specific requirements or constraints.  Provide examples or scenarios if applicable.
        * **Deliverables:** Specify what students need to submit (e.g., code, report, presentation).
        * **Estimated Time Commitment:**  The approximate time students should dedicate to completing the assignment.
        * **Assessment Criteria:** Briefly outline how the assignment will be graded (e.g., correctness, completeness, clarity, creativity).

        The assignments should be a mix of individual and collaborative work where appropriate.  Consider different learning styles and provide opportunities for students to apply their knowledge creatively.

        Based on this teaching plan: {state["teaching_plan"]}
        """
    )

    print(f"---------------gen_assignment_gemini answer {response.text}")

    state["model_one_assignment"] = response.text

    return state


import unittest

class TestGenAssignmentGemini(unittest.TestCase):
    def test_gen_assignment_gemini(self):
        test_teaching_plan = "Week 1: 2D Shapes and Angles - Day 1: Review of basic 2D shapes (squares, rectangles, triangles, circles). Day 2: Exploring different types of triangles (equilateral, isosceles, scalene, right-angled). Day 3: Exploring quadrilaterals (square, rectangle, parallelogram, rhombus, trapezium). Day 4: Introduction to angles: right angles, acute angles, and obtuse angles. Day 5: Measuring angles using a protractor. Week 2: 3D Shapes and Symmetry - Day 6: Introduction to 3D shapes: cubes, cuboids, spheres, cylinders, cones, and pyramids. Day 7: Describing 3D shapes using faces, edges, and vertices. Day 8: Relating 2D shapes to 3D shapes. Day 9: Identifying lines of symmetry in 2D shapes. Day 10: Completing symmetrical figures. Week 3: Position, Direction, and Problem Solving - Day 11: Describing position using coordinates in the first quadrant. Day 12: Plotting coordinates to draw shapes. Day 13: Understanding translation (sliding a shape). Day 14: Understanding reflection (flipping a shape). Day 15: Problem-solving activities involving perimeter, area, and missing angles."

        initial_state = {"teaching_plan": test_teaching_plan, "model_one_assignment": "", "model_two_assigmodel_one_assignmentnment": "", "final_assignment": ""}

        updated_state = gen_assignment_gemini(initial_state)

        self.assertIn("model_one_assignment", updated_state)
        self.assertIsNotNone(updated_state["model_one_assignment"])
        self.assertIsInstance(updated_state["model_one_assignment"], str)
        self.assertGreater(len(updated_state["model_one_assignment"]), 0)
        print(updated_state["model_one_assignment"])


if __name__ == '__main__':
    unittest.main()
โดยใช้โมเดล Gemini เพื่อสร้างงาน
เราพร้อมที่จะทดสอบ Gemini Agent แล้ว
👉เรียกใช้คำสั่งต่อไปนี้ในเทอร์มินัลเพื่อตั้งค่าสภาพแวดล้อม
cd ~/aidemy-bootstrap/assignment
gcloud config set project $(cat ~/project_id.txt)
export PROJECT_ID=$(gcloud config get project)
python -m venv env
source env/bin/activate
pip install -r requirements.txt
👉คุณสามารถเรียกใช้เพื่อทดสอบได้โดยทำดังนี้
python gemini.py
คุณควรเห็นงานที่มีการทำงานกลุ่มมากขึ้นในผลลัพธ์ การทดสอบการยืนยันที่ส่วนท้ายจะแสดงผลลัพธ์ด้วย
Here are some engaging and practical assignments for each week, designed to build progressively upon the teaching plan's objectives:

**Week 1: Exploring the World of 2D Shapes**

* **Learning Objectives Assessed:**
    * Identify and name basic 2D shapes (squares, rectangles, triangles, circles).
    * .....

* **Description:**
    * **Shape Scavenger Hunt:** Students will go on a scavenger hunt in their homes or neighborhoods, taking pictures of objects that represent different 2D shapes. They will then create a presentation or poster showcasing their findings, classifying each shape and labeling its properties (e.g., number of sides, angles, etc.).
    * **Triangle Trivia:** Students will research and create a short quiz or presentation about different types of triangles, focusing on their properties and real-world examples.
    * **Angle Exploration:** Students will use a protractor to measure various angles in their surroundings, such as corners of furniture, windows, or doors. They will record their measurements and create a chart categorizing the angles as right, acute, or obtuse.
....

**Week 2: Delving into the World of 3D Shapes and Symmetry**

* **Learning Objectives Assessed:**
    * Identify and name basic 3D shapes.
    * ....

* **Description:**
    * **3D Shape Construction:** Students will work in groups to build 3D shapes using construction paper, cardboard, or other materials. They will then create a presentation showcasing their creations, describing the number of faces, edges, and vertices for each shape.
    * **Symmetry Exploration:** Students will investigate the concept of symmetry by creating a visual representation of various symmetrical objects (e.g., butterflies, leaves, snowflakes) using drawing or digital tools. They will identify the lines of symmetry and explain their findings.
    * **Symmetry Puzzles:** Students will be given a half-image of a symmetrical figure and will be asked to complete the other half, demonstrating their understanding of symmetry. This can be done through drawing, cut-out activities, or digital tools.

**Week 3: Navigating Position, Direction, and Problem Solving**

* **Learning Objectives Assessed:**
    * Describe position using coordinates in the first quadrant.
    * ....

* **Description:**
    * **Coordinate Maze:** Students will create a maze using coordinates on a grid paper. They will then provide directions for navigating the maze using a combination of coordinate movements and translation/reflection instructions.
    * **Shape Transformations:** Students will draw shapes on a grid paper and then apply transformations such as translation and reflection, recording the new coordinates of the transformed shapes.
    * **Geometry Challenge:** Students will solve real-world problems involving perimeter, area, and angles. For example, they could be asked to calculate the perimeter of a room, the area of a garden, or the missing angle in a triangle.
....
หยุดด้วย ctl+c และเพื่อล้างโค้ดทดสอบ นำโค้ดต่อไปนี้ออกจาก gemini.py
import unittest

class TestGenAssignmentGemini(unittest.TestCase):
    def test_gen_assignment_gemini(self):
        test_teaching_plan = "Week 1: 2D Shapes and Angles - Day 1: Review of basic 2D shapes (squares, rectangles, triangles, circles). Day 2: Exploring different types of triangles (equilateral, isosceles, scalene, right-angled). Day 3: Exploring quadrilaterals (square, rectangle, parallelogram, rhombus, trapezium). Day 4: Introduction to angles: right angles, acute angles, and obtuse angles. Day 5: Measuring angles using a protractor. Week 2: 3D Shapes and Symmetry - Day 6: Introduction to 3D shapes: cubes, cuboids, spheres, cylinders, cones, and pyramids. Day 7: Describing 3D shapes using faces, edges, and vertices. Day 8: Relating 2D shapes to 3D shapes. Day 9: Identifying lines of symmetry in 2D shapes. Day 10: Completing symmetrical figures. Week 3: Position, Direction, and Problem Solving - Day 11: Describing position using coordinates in the first quadrant. Day 12: Plotting coordinates to draw shapes. Day 13: Understanding translation (sliding a shape). Day 14: Understanding reflection (flipping a shape). Day 15: Problem-solving activities involving perimeter, area, and missing angles."

        initial_state = {"teaching_plan": test_teaching_plan, "model_one_assignment": "", "model_two_assigmodel_one_assignmentnment": "", "final_assignment": ""}

        updated_state = gen_assignment_gemini(initial_state)

        self.assertIn("model_one_assignment", updated_state)
        self.assertIsNotNone(updated_state["model_one_assignment"])
        self.assertIsInstance(updated_state["model_one_assignment"], str)
        self.assertGreater(len(updated_state["model_one_assignment"]), 0)
        print(updated_state["model_one_assignment"])


if __name__ == '__main__':
    unittest.main()
กำหนดค่าเครื่องมือสร้างงานของ DeepSeek
แม้ว่าแพลตฟอร์ม AI บนระบบคลาวด์จะสะดวก แต่การโฮสต์ LLM ด้วยตนเองอาจเป็นสิ่งสำคัญในการปกป้องความเป็นส่วนตัวของข้อมูลและรับประกันอธิปไตยของข้อมูล เราจะติดตั้งใช้งานโมเดล DeepSeek ที่เล็กที่สุด (พารามิเตอร์ 1.5 พันล้านรายการ) ในอินสแตนซ์ Cloud Compute Engine นอกจากนี้ยังมีวิธีอื่นๆ เช่น การโฮสต์บนแพลตฟอร์ม Vertex AI ของ Google หรือการโฮสต์บนอินสแตนซ์ GKE แต่เนื่องจากนี่เป็นเพียงเวิร์กช็อปเกี่ยวกับเอเจนต์ AI และฉันไม่ต้องการให้คุณอยู่ที่นี่ตลอดไป เราจึงมาใช้วิธีที่ง่ายที่สุดกัน แต่หากคุณสนใจและต้องการดูตัวเลือกอื่นๆ โปรดดูdeepseek-vertexai.pyในโฟลเดอร์งาน ซึ่งมีตัวอย่างโค้ดวิธีโต้ตอบกับโมเดลที่ใช้งานใน Vertex AI

👉เรียกใช้คำสั่งนี้ในเทอร์มินัลเพื่อสร้างแพลตฟอร์ม LLM ที่โฮสต์ด้วยตนเอง Ollama
cd ~/aidemy-bootstrap/assignment
gcloud config set project $(cat ~/project_id.txt)
gcloud compute instances create ollama-instance \
    --image-family=ubuntu-2204-lts \
    --image-project=ubuntu-os-cloud \
    --machine-type=e2-standard-4 \
    --zone=us-central1-a \
    --metadata-from-file startup-script=startup.sh \
    --boot-disk-size=50GB \
    --tags=ollama \
    --scopes=https://www.googleapis.com/auth/cloud-platform
วิธียืนยันว่าอินสแตนซ์ Compute Engine ทำงานอยู่
ไปที่ Compute Engine > "อินสแตนซ์ VM" ใน Google Cloud Console คุณควรเห็น ollama-instance แสดงพร้อมเครื่องหมายถูกสีเขียวซึ่งบ่งบอกว่ากำลังทำงานอยู่ หากไม่เห็น ให้ตรวจสอบว่าโซนเป็น us-central1 หากไม่พบ คุณอาจต้องค้นหา

👉เราจะติดตั้งโมเดล DeepSeek ที่เล็กที่สุดและทดสอบใน Cloud Shell Editor โดยในเทอร์มินัลใหม่ ให้เรียกใช้คำสั่งต่อไปนี้เพื่อใช้ SSH เข้าถึงอินสแตนซ์ GCE
gcloud compute ssh ollama-instance --zone=us-central1-a
เมื่อสร้างการเชื่อมต่อ SSH แล้ว ระบบอาจแจ้งให้คุณทำสิ่งต่อไปนี้
"ต้องการดำเนินการต่อไหม (Y/n)"
เพียงพิมพ์ Y(ไม่คำนึงถึงตัวพิมพ์เล็กและตัวพิมพ์ใหญ่) แล้วกด Enter เพื่อดำเนินการต่อ
จากนั้น ระบบอาจขอให้คุณสร้างรหัสผ่านสำหรับคีย์ SSH หากไม่ต้องการใช้รหัสผ่าน ให้กด Enter 2 ครั้งเพื่อยอมรับค่าเริ่มต้น (ไม่มีรหัสผ่าน)
👉ตอนนี้คุณอยู่ในเครื่องเสมือนแล้ว ให้ดึงโมเดล DeepSeek R1 ที่เล็กที่สุด แล้วทดสอบว่าใช้งานได้หรือไม่
ollama pull deepseek-r1:1.5b
ollama run deepseek-r1:1.5b "who are you?"
👉ออกจากอินสแตนซ์ GCE โดยป้อนคำสั่งต่อไปนี้ในเทอร์มินัล SSH
exit
👉จากนั้นตั้งค่านโยบายเครือข่ายเพื่อให้บริการอื่นๆ เข้าถึง LLM ได้ โปรดจำกัดการเข้าถึงอินสแตนซ์หากต้องการดำเนินการนี้สำหรับการใช้งานจริง ไม่ว่าจะใช้การเข้าสู่ระบบที่ปลอดภัยสำหรับบริการหรือจำกัดการเข้าถึง IP เรียกใช้
gcloud compute firewall-rules create allow-ollama-11434 \
    --allow=tcp:11434 \
    --target-tags=ollama \
    --description="Allow access to Ollama on port 11434"
👉หากต้องการยืนยันว่านโยบายไฟร์วอลล์ทํางานอย่างถูกต้องหรือไม่ ให้ลองเรียกใช้คําสั่งต่อไปนี้
export OLLAMA_HOST=http://$(gcloud compute instances describe ollama-instance --zone=us-central1-a --format='value(networkInterfaces[0].accessConfigs[0].natIP)'):11434
curl -X POST "${OLLAMA_HOST}/api/generate" \
     -H "Content-Type: application/json" \
     -d '{
          "prompt": "Hello, what are you?",
          "model": "deepseek-r1:1.5b",
          "stream": false
        }'
จากนั้นเราจะทำงานกับฟังก์ชัน Deepseek ในเอเจนต์งานเพื่อสร้างงานโดยเน้นที่งานของแต่ละบุคคล
👉แก้ไข deepseek.py ในโฟลเดอร์ assignment เพิ่มข้อมูลโค้ดต่อไปนี้ที่ส่วนท้าย
def gen_assignment_deepseek(state):
    print(f"---------------gen_assignment_deepseek")

    template = """
        You are an instructor who favor student to focus on individual work.

        Develop engaging and practical assignments for each week, ensuring they align with the teaching plan's objectives and progressively build upon each other.

        For each week, provide the following:

        * **Week [Number]:** A descriptive title for the assignment (e.g., "Data Exploration Project," "Model Building Exercise").
        * **Learning Objectives Assessed:** List the specific learning objectives from the teaching plan that this assignment assesses.
        * **Description:** A detailed description of the task, including any specific requirements or constraints.  Provide examples or scenarios if applicable.
        * **Deliverables:** Specify what students need to submit (e.g., code, report, presentation).
        * **Estimated Time Commitment:**  The approximate time students should dedicate to completing the assignment.
        * **Assessment Criteria:** Briefly outline how the assignment will be graded (e.g., correctness, completeness, clarity, creativity).

        The assignments should be a mix of individual and collaborative work where appropriate.  Consider different learning styles and provide opportunities for students to apply their knowledge creatively.

        Based on this teaching plan: {teaching_plan}
        """


    prompt = ChatPromptTemplate.from_template(template)

    model = OllamaLLM(model="deepseek-r1:1.5b",
                   base_url=OLLAMA_HOST)

    chain = prompt | model


    response = chain.invoke({"teaching_plan":state["teaching_plan"]})
    state["model_two_assignment"] = response

    return state

import unittest

class TestGenAssignmentDeepseek(unittest.TestCase):
    def test_gen_assignment_deepseek(self):
        test_teaching_plan = "Week 1: 2D Shapes and Angles - Day 1: Review of basic 2D shapes (squares, rectangles, triangles, circles). Day 2: Exploring different types of triangles (equilateral, isosceles, scalene, right-angled). Day 3: Exploring quadrilaterals (square, rectangle, parallelogram, rhombus, trapezium). Day 4: Introduction to angles: right angles, acute angles, and obtuse angles. Day 5: Measuring angles using a protractor. Week 2: 3D Shapes and Symmetry - Day 6: Introduction to 3D shapes: cubes, cuboids, spheres, cylinders, cones, and pyramids. Day 7: Describing 3D shapes using faces, edges, and vertices. Day 8: Relating 2D shapes to 3D shapes. Day 9: Identifying lines of symmetry in 2D shapes. Day 10: Completing symmetrical figures. Week 3: Position, Direction, and Problem Solving - Day 11: Describing position using coordinates in the first quadrant. Day 12: Plotting coordinates to draw shapes. Day 13: Understanding translation (sliding a shape). Day 14: Understanding reflection (flipping a shape). Day 15: Problem-solving activities involving perimeter, area, and missing angles."

        initial_state = {"teaching_plan": test_teaching_plan, "model_one_assignment": "", "model_two_assignment": "", "final_assignment": ""}

        updated_state = gen_assignment_deepseek(initial_state)

        self.assertIn("model_two_assignment", updated_state)
        self.assertIsNotNone(updated_state["model_two_assignment"])
        self.assertIsInstance(updated_state["model_two_assignment"], str)
        self.assertGreater(len(updated_state["model_two_assignment"]), 0)
        print(updated_state["model_two_assignment"])


if __name__ == '__main__':
    unittest.main()
👉มาทดสอบโดยการเรียกใช้คำสั่งต่อไปนี้
cd ~/aidemy-bootstrap/assignment
source env/bin/activate
gcloud config set project $(cat ~/project_id.txt)
export PROJECT_ID=$(gcloud config get project)
export OLLAMA_HOST=http://$(gcloud compute instances describe ollama-instance --zone=us-central1-a --format='value(networkInterfaces[0].accessConfigs[0].natIP)'):11434
python deepseek.py
คุณควรเห็นงานที่มีแบบฝึกหัดเพิ่มเติม
**Assignment Plan for Each Week**

---

### **Week 1: 2D Shapes and Angles**
- **Week Title:** "Exploring 2D Shapes"
Assign students to research and present on various 2D shapes. Include a project where they create models using straws and tape for triangles, draw quadrilaterals with specific measurements, and compare their properties.

### **Week 2: 3D Shapes and Symmetry**
Assign students to create models or nets for cubes and cuboids. They will also predict how folding these nets form the 3D shapes. Include a project where they identify symmetrical properties using mirrors or folding techniques.

### **Week 3: Position, Direction, and Problem Solving**

Assign students to use mirrors or folding techniques for reflections. Include activities where they measure angles, use a protractor, solve problems involving perimeter/area, and create symmetrical designs.
....
👉หยุด ctl+c และล้างข้อมูลโค้ดทดสอบ นำโค้ดต่อไปนี้ออกจาก deepseek.py
import unittest

class TestGenAssignmentDeepseek(unittest.TestCase):
    def test_gen_assignment_deepseek(self):
        test_teaching_plan = "Week 1: 2D Shapes and Angles - Day 1: Review of basic 2D shapes (squares, rectangles, triangles, circles). Day 2: Exploring different types of triangles (equilateral, isosceles, scalene, right-angled). Day 3: Exploring quadrilaterals (square, rectangle, parallelogram, rhombus, trapezium). Day 4: Introduction to angles: right angles, acute angles, and obtuse angles. Day 5: Measuring angles using a protractor. Week 2: 3D Shapes and Symmetry - Day 6: Introduction to 3D shapes: cubes, cuboids, spheres, cylinders, cones, and pyramids. Day 7: Describing 3D shapes using faces, edges, and vertices. Day 8: Relating 2D shapes to 3D shapes. Day 9: Identifying lines of symmetry in 2D shapes. Day 10: Completing symmetrical figures. Week 3: Position, Direction, and Problem Solving - Day 11: Describing position using coordinates in the first quadrant. Day 12: Plotting coordinates to draw shapes. Day 13: Understanding translation (sliding a shape). Day 14: Understanding reflection (flipping a shape). Day 15: Problem-solving activities involving perimeter, area, and missing angles."

        initial_state = {"teaching_plan": test_teaching_plan, "model_one_assignment": "", "model_two_assignment": "", "final_assignment": ""}

        updated_state = gen_assignment_deepseek(initial_state)

        self.assertIn("model_two_assignment", updated_state)
        self.assertIsNotNone(updated_state["model_two_assignment"])
        self.assertIsInstance(updated_state["model_two_assignment"], str)
        self.assertGreater(len(updated_state["model_two_assignment"]), 0)
        print(updated_state["model_two_assignment"])


if __name__ == '__main__':
    unittest.main()
ตอนนี้เราจะใช้โมเดล Gemini เดียวกันเพื่อรวมงานทั้ง 2 อย่างเป็นงานใหม่ แก้ไขไฟล์ gemini.py ที่อยู่ในโฟลเดอร์ assignment
👉วางโค้ดต่อไปนี้ที่ส่วนท้ายของไฟล์ gemini.py
def combine_assignments(state):
    print(f"---------------combine_assignments ")
    region=get_next_region()
    client = genai.Client(vertexai=True, project=PROJECT_ID, location=region)
    response = client.models.generate_content(
        model=MODEL_ID, contents=f"""
        Look at all the proposed assignment so far {state["model_one_assignment"]} and {state["model_two_assignment"]}, combine them and come up with a final assignment for student.
        """
    )

    state["final_assignment"] = response.text

    return state
เราจะประสานงานเวิร์กโฟลว์ที่กำหนดโดยใช้ LangGraph เพื่อรวมจุดแข็งของทั้ง 2 โมเดล เวิร์กโฟลว์นี้มี 3 ขั้นตอน ขั้นแรก โมเดล Gemini จะสร้างงานที่เน้นการทำงานร่วมกัน ขั้นที่ 2 โมเดล DeepSeek จะสร้างงานที่เน้นการทำงานแบบบุคคล และสุดท้าย Gemini จะสังเคราะห์งานทั้ง 2 นี้เป็นงานที่ครอบคลุมเพียงงานเดียว เนื่องจากเรากำหนดลำดับขั้นตอนไว้ล่วงหน้าโดยไม่มีการตัดสินใจของ LLM จึงถือเป็นการจัดระเบียบแบบเส้นทางเดียวที่ผู้ใช้กำหนด

👉วางโค้ดต่อไปนี้ที่ส่วนท้ายของmain.pyไฟล์ในโฟลเดอร์ assignment
def create_assignment(teaching_plan: str):
    print(f"create_assignment---->{teaching_plan}")
    builder = StateGraph(State)
    builder.add_node("gen_assignment_gemini", gen_assignment_gemini)
    builder.add_node("gen_assignment_deepseek", gen_assignment_deepseek)
    builder.add_node("combine_assignments", combine_assignments)

    builder.add_edge(START, "gen_assignment_gemini")
    builder.add_edge("gen_assignment_gemini", "gen_assignment_deepseek")
    builder.add_edge("gen_assignment_deepseek", "combine_assignments")
    builder.add_edge("combine_assignments", END)

    graph = builder.compile()
    state = graph.invoke({"teaching_plan": teaching_plan})

    return state["final_assignment"]


import unittest

class TestCreateAssignment(unittest.TestCase):
    def test_create_assignment(self):
        test_teaching_plan = "Week 1: 2D Shapes and Angles - Day 1: Review of basic 2D shapes (squares, rectangles, triangles, circles). Day 2: Exploring different types of triangles (equilateral, isosceles, scalene, right-angled). Day 3: Exploring quadrilaterals (square, rectangle, parallelogram, rhombus, trapezium). Day 4: Introduction to angles: right angles, acute angles, and obtuse angles. Day 5: Measuring angles using a protractor. Week 2: 3D Shapes and Symmetry - Day 6: Introduction to 3D shapes: cubes, cuboids, spheres, cylinders, cones, and pyramids. Day 7: Describing 3D shapes using faces, edges, and vertices. Day 8: Relating 2D shapes to 3D shapes. Day 9: Identifying lines of symmetry in 2D shapes. Day 10: Completing symmetrical figures. Week 3: Position, Direction, and Problem Solving - Day 11: Describing position using coordinates in the first quadrant. Day 12: Plotting coordinates to draw shapes. Day 13: Understanding translation (sliding a shape). Day 14: Understanding reflection (flipping a shape). Day 15: Problem-solving activities involving perimeter, area, and missing angles."
        initial_state = {"teaching_plan": test_teaching_plan, "model_one_assignment": "", "model_two_assignment": "", "final_assignment": ""}
        updated_state = create_assignment(initial_state)

        print(updated_state)


if __name__ == '__main__':
    unittest.main()
👉หากต้องการทดสอบฟังก์ชัน create_assignment ในเบื้องต้นและยืนยันว่าเวิร์กโฟลว์ที่รวม Gemini และ DeepSeek ทำงานได้ ให้เรียกใช้คำสั่งต่อไปนี้
cd ~/aidemy-bootstrap/assignment
source env/bin/activate
pip install -r requirements.txt
python main.py
คุณควรเห็นสิ่งที่รวมทั้ง 2 โมเดลเข้าด้วยกันโดยมีมุมมองของแต่ละโมเดลสำหรับการศึกษาของนักเรียนและงานกลุ่มของนักเรียน
**Tasks:**

1. **Clue Collection:** Gather all the clues left by the thieves. These clues will include:
    * Descriptions of shapes and their properties (angles, sides, etc.)
    * Coordinate grids with hidden messages
    * Geometric puzzles requiring transformation (translation, reflection, rotation)
    * Challenges involving area, perimeter, and angle calculations

2. **Clue Analysis:** Decipher each clue using your geometric knowledge. This will involve:
    * Identifying the shape and its properties
    * Plotting coordinates and interpreting patterns on the grid
    * Solving geometric puzzles by applying transformations
    * Calculating area, perimeter, and missing angles

3. **Case Report:** Create a comprehensive case report outlining your findings. This report should include:
    * A detailed explanation of each clue and its solution
    * Sketches and diagrams to support your explanations
    * A step-by-step account of how you followed the clues to locate the artifact
    * A final conclusion about the thieves and their motives
👉หยุด ctl+c และล้างข้อมูลโค้ดทดสอบ นำโค้ดต่อไปนี้ออกจาก main.py
import unittest

class TestCreateAssignment(unittest.TestCase):
    def test_create_assignment(self):
        test_teaching_plan = "Week 1: 2D Shapes and Angles - Day 1: Review of basic 2D shapes (squares, rectangles, triangles, circles). Day 2: Exploring different types of triangles (equilateral, isosceles, scalene, right-angled). Day 3: Exploring quadrilaterals (square, rectangle, parallelogram, rhombus, trapezium). Day 4: Introduction to angles: right angles, acute angles, and obtuse angles. Day 5: Measuring angles using a protractor. Week 2: 3D Shapes and Symmetry - Day 6: Introduction to 3D shapes: cubes, cuboids, spheres, cylinders, cones, and pyramids. Day 7: Describing 3D shapes using faces, edges, and vertices. Day 8: Relating 2D shapes to 3D shapes. Day 9: Identifying lines of symmetry in 2D shapes. Day 10: Completing symmetrical figures. Week 3: Position, Direction, and Problem Solving - Day 11: Describing position using coordinates in the first quadrant. Day 12: Plotting coordinates to draw shapes. Day 13: Understanding translation (sliding a shape). Day 14: Understanding reflection (flipping a shape). Day 15: Problem-solving activities involving perimeter, area, and missing angles."
        initial_state = {"teaching_plan": test_teaching_plan, "model_one_assignment": "", "model_two_assignment": "", "final_assignment": ""}
        updated_state = create_assignment(initial_state)

        print(updated_state)


if __name__ == '__main__':
    unittest.main()

เราจะใช้ประโยชน์จากสถาปัตยกรรมที่ขับเคลื่อนด้วยเหตุการณ์ที่มีอยู่เพื่อให้กระบวนการสร้างงานเป็นไปโดยอัตโนมัติและตอบสนองต่อแผนการสอนใหม่ๆ โค้ดต่อไปนี้กำหนดฟังก์ชัน Cloud Run (generate_assignment) ที่จะทริกเกอร์เมื่อใดก็ตามที่มีการเผยแพร่แผนการสอนใหม่ไปยังหัวข้อ Pub/Sub ‘plan’
👉เพิ่มโค้ดต่อไปนี้ที่ส่วนท้ายของ main.py ในโฟลเดอร์ assignment
@functions_framework.cloud_event
def generate_assignment(cloud_event):
    print(f"CloudEvent received: {cloud_event.data}")

    try:
        if isinstance(cloud_event.data.get('message', {}).get('data'), str):
            data = json.loads(base64.b64decode(cloud_event.data['message']['data']).decode('utf-8'))
            teaching_plan = data.get('teaching_plan')
        elif 'teaching_plan' in cloud_event.data:
            teaching_plan = cloud_event.data["teaching_plan"]
        else:
            raise KeyError("teaching_plan not found")

        assignment = create_assignment(teaching_plan)

        print(f"Assignment---->{assignment}")

        #Store the return assignment into bucket as a text file
        storage_client = storage.Client()
        bucket = storage_client.bucket(ASSIGNMENT_BUCKET)
        file_name = f"assignment-{random.randint(1, 1000)}.txt"
        blob = bucket.blob(file_name)
        blob.upload_from_string(assignment)

        return f"Assignment generated and stored in {ASSIGNMENT_BUCKET}/{file_name}", 200

    except (json.JSONDecodeError, AttributeError, KeyError) as e:
        print(f"Error decoding CloudEvent data: {e} - Data: {cloud_event.data}")
        return "Error processing event", 500

    except Exception as e:
        print(f"Error generate assignment: {e}")
        return "Error generate assignment", 500
การทดสอบในเครื่อง
ก่อนที่จะทำให้ใช้งานได้ใน Google Cloud แนวทางปฏิบัติแนะนำคือการทดสอบฟังก์ชัน Cloud Run ในเครื่อง ซึ่งจะช่วยให้ทำซ้ำได้เร็วขึ้นและแก้ไขข้อบกพร่องได้ง่ายขึ้น
ก่อนอื่น ให้สร้างที่เก็บข้อมูล Cloud Storage เพื่อจัดเก็บไฟล์งานที่สร้างขึ้น และให้สิทธิ์เข้าถึงที่เก็บข้อมูลแก่บัญชีบริการ เรียกใช้คำสั่งต่อไปนี้ในเทอร์มินัล
👉สำคัญ: ตรวจสอบว่าคุณได้กำหนดชื่อ ASSIGNMENT_BUCKET ที่ไม่ซ้ำกันซึ่งขึ้นต้นด้วย "aidemy-assignment-" ชื่อที่ไม่ซ้ำกันนี้มีความสำคัญอย่างยิ่งในการหลีกเลี่ยงความขัดแย้งในการตั้งชื่อเมื่อสร้างที่เก็บข้อมูล Cloud Storage (แทนที่ <YOUR_NAME> ด้วยคำแบบสุ่ม)
export ASSIGNMENT_BUCKET=aidemy-assignment-<YOUR_NAME> #Name must be unqiue
👉แล้วเรียกใช้
gcloud config set project $(cat ~/project_id.txt)
export PROJECT_ID=$(gcloud config get project)
export SERVICE_ACCOUNT_NAME=$(gcloud compute project-info describe --format="value(defaultServiceAccount)")
gsutil mb -p $PROJECT_ID -l us-central1 gs://$ASSIGNMENT_BUCKET

gcloud storage buckets add-iam-policy-binding gs://$ASSIGNMENT_BUCKET \
    --member "serviceAccount:$SERVICE_ACCOUNT_NAME" \
    --role "roles/storage.objectViewer"

gcloud storage buckets add-iam-policy-binding gs://$ASSIGNMENT_BUCKET \
    --member "serviceAccount:$SERVICE_ACCOUNT_NAME" \
    --role "roles/storage.objectCreator"
👉ตอนนี้ ให้เริ่มโปรแกรมจำลองฟังก์ชัน Cloud Run โดยทำดังนี้
cd ~/aidemy-bootstrap/assignment
functions-framework \
    --target generate_assignment \
    --signature-type=cloudevent \
    --source main.py
👉ขณะที่โปรแกรมจำลองทำงานในเทอร์มินัลหนึ่ง ให้เปิดเทอร์มินัลที่ 2 ใน Cloud Shell ในเทอร์มินัลที่ 2 ให้ส่ง CloudEvent ทดสอบไปยังโปรแกรมจำลองเพื่อจำลองการเผยแพร่แผนการสอนใหม่
  curl -X POST \
  http://localhost:8080/ \
  -H "Content-Type: application/json" \
  -H "ce-id: event-id-01" \
  -H "ce-source: planner-agent" \
  -H "ce-specversion: 1.0" \
  -H "ce-type: google.cloud.pubsub.topic.v1.messagePublished" \
  -d '{
    "message": {
      "data": "eyJ0ZWFjaGluZ19wbGFuIjogIldlZWsgMTogMkQgU2hhcGVzIGFuZCBBbmdsZXMgLSBEYXkgMTogUmV2aWV3IG9mIGJhc2ljIDJEIHNoYXBlcyAoc3F1YXJlcywgcmVjdGFuZ2xlcywgdHJpYW5nbGVzLCBjaXJjbGVzKS4gRGF5IDI6IEV4cGxvcmluZyBkaWZmZXJlbnQgdHlwZXMgb2YgdHJpYW5nbGVzIChlcXVpbGF0ZXJhbCwgaXNvc2NlbGVzLCBzY2FsZW5lLCByaWdodC1hbmdsZWQpLiBEYXkgMzogRXhwbG9yaW5nIHF1YWRyaWxhdGVyYWxzIChzcXVhcmUsIHJlY3RhbmdsZSwgcGFyYWxsZWxvZ3JhbSwgcmhvbWJ1cywgdHJhcGV6aXVtKS4gRGF5IDQ6IEludHJvZHVjdGlvbiB0byBhbmdsZXM6IHJpZ2h0IGFuZ2xlcywgYWN1dGUgYW5nbGVzLCBhbmQgb2J0dXNlIGFuZ2xlcy4gRGF5IDU6IE1lYXN1cmluZyBhbmdsZXMgdXNpbmcgYSBwcm90cmFjdG9yLiBXZWVrIDI6IDNEIFNoYXBlcyBhbmQgU3ltbWV0cnkgLSBEYXkgNjogSW50cm9kdWN0aW9uIHRvIDNEIHNoYXBlczogY3ViZXMsIGN1Ym9pZHMsIHNwaGVyZXMsIGN5bGluZGVycywgY29uZXMsIGFuZCBweXJhbWlkcy4gRGF5IDc6IERlc2NyaWJpbmcgM0Qgc2hhcGVzIHVzaW5nIGZhY2VzLCBlZGdlcywgYW5kIHZlcnRpY2VzLiBEYXkgODogUmVsYXRpbmcgMkQgc2hhcGVzIHRvIDNEIHNoYXBlcy4gRGF5IDk6IElkZW50aWZ5aW5nIGxpbmVzIG9mIHN5bW1ldHJ5IGluIDJEIHNoYXBlcy4gRGF5IDEwOiBDb21wbGV0aW5nIHN5bW1ldHJpY2FsIGZpZ3VyZXMuIFdlZWsgMzogUG9zaXRpb24sIERpcmVjdGlvbiwgYW5kIFByb2JsZW0gU29sdmluZyAtIERheSAxMTogRGVzY3JpYmluZyBwb3NpdGlvbiB1c2luZyBjb29yZGluYXRlcyBpbiB0aGUgZmlyc3QgcXVhZHJhbnQuIERheSAxMjogUGxvdHRpbmcgY29vcmRpbmF0ZXMgdG8gZHJhdyBzaGFwZXMuIERheSAxMzogVW5kZXJzdGFuZGluZyB0cmFuc2xhdGlvbiAoc2xpZGluZyBhIHNoYXBlKS4gRGF5IDE0OiBVbmRlcnN0YW5kaW5nIHJlZmxlY3Rpb24gKGZsaXBwaW5nIGEgc2hhcGUpLiBEYXkgMTU6IFByb2JsZW0tc29sdmluZyBhY3Rpdml0aWVzIGludm9sdmluZyBwZXJpbWV0ZXIsIGFyZWEsIGFuZCBtaXNzaW5nIGFuZ2xlcy4ifQ=="
    }
  }'
แทนที่จะนั่งรอคำตอบอย่างเดียว ให้เปลี่ยนไปใช้เทอร์มินัล Cloud Shell อื่น คุณสามารถดูความคืบหน้าและเอาต์พุตหรือข้อความแสดงข้อผิดพลาดที่ฟังก์ชันสร้างขึ้นได้ในเทอร์มินัลของโปรแกรมจำลอง 😁
คำสั่ง curl ควรพิมพ์ "OK" (โดยไม่มีบรรทัดใหม่ ดังนั้น "OK" อาจปรากฏในบรรทัดเดียวกับพรอมต์เชลล์ของเทอร์มินัล)
หากต้องการยืนยันว่าระบบสร้างและจัดเก็บการกำหนดเรียบร้อยแล้ว ให้ไปที่ Google Cloud Console แล้วไปที่ Storage > "Cloud Storage" เลือกaidemy-assignmentที่เก็บข้อมูลที่คุณสร้างไว้ คุณควรเห็นไฟล์ข้อความชื่อ assignment-{random number}.txt ในที่เก็บข้อมูล คลิกไฟล์เพื่อดาวน์โหลดและยืนยันเนื้อหา ซึ่งจะยืนยันว่าไฟล์ใหม่มีงานใหม่ที่เพิ่งสร้างขึ้น

👉ในเทอร์มินัลที่เรียกใช้โปรแกรมจำลอง ให้พิมพ์ ctrl+c เพื่อออก แล้วปิดเทอร์มินัลที่ 2 👉นอกจากนี้ ในเทอร์มินัลที่เรียกใช้โปรแกรมจำลอง ให้ออกจากสภาพแวดล้อมเสมือน
deactivate
👉จากนั้น เราจะติดตั้งใช้งานตัวแทนการมอบหมายในระบบคลาวด์
cd ~/aidemy-bootstrap/assignment
export ASSIGNMENT_BUCKET=$(gcloud storage buckets list --format="value(name)" | grep aidemy-assignment)
export OLLAMA_HOST=http://$(gcloud compute instances describe ollama-instance --zone=us-central1-a --format='value(networkInterfaces[0].accessConfigs[0].natIP)'):11434
gcloud config set project $(cat ~/project_id.txt)
export PROJECT_ID=$(gcloud config get project)
gcloud functions deploy assignment-agent \
 --gen2 \
 --timeout=540 \
 --memory=2Gi \
 --cpu=1 \
 --set-env-vars="ASSIGNMENT_BUCKET=${ASSIGNMENT_BUCKET}" \
 --set-env-vars=GOOGLE_CLOUD_PROJECT=${GOOGLE_CLOUD_PROJECT} \
 --set-env-vars=OLLAMA_HOST=${OLLAMA_HOST} \
 --region=us-central1 \
 --runtime=python312 \
 --source=. \
 --entry-point=generate_assignment \
 --trigger-topic=plan
ยืนยันการติดตั้งใช้งานโดยไปที่ Google Cloud Console แล้วไปที่ Cloud Run คุณควรเห็นบริการใหม่ชื่อ courses-agent ปรากฏขึ้น 
ตอนนี้เราได้นำเวิร์กโฟลว์การสร้างงานไปใช้ ทดสอบ และติดตั้งใช้งานแล้ว จึงสามารถไปยังขั้นตอนถัดไปได้ นั่นคือการทำให้งานเหล่านี้เข้าถึงได้ภายในพอร์ทัลนักเรียน
14. ไม่บังคับ: การทำงานร่วมกันตามบทบาทด้วย Gemini และ DeepSeek - ต่อ
การสร้างเว็บไซต์แบบไดนามิก
เราจะใช้การสร้าง HTML แบบไดนามิกสำหรับหน้างานเพื่อปรับปรุงพอร์ทัลนักเรียนและทำให้น่าสนใจยิ่งขึ้น เป้าหมายคือการอัปเดตพอร์ทัลโดยอัตโนมัติด้วยการออกแบบใหม่ที่ดึงดูดสายตาเมื่อใดก็ตามที่มีการสร้างงานใหม่ ซึ่งใช้ประโยชน์จากความสามารถในการเขียนโค้ดของ LLM เพื่อสร้างประสบการณ์ของผู้ใช้ที่น่าสนใจและเป็นไดนามิกมากขึ้น

👉ใน Cloud Shell Editor ให้แก้ไขไฟล์ render.py ภายในโฟลเดอร์ portal โดยแทนที่
def render_assignment_page():
    return ""
โดยใช้ข้อมูลโค้ดต่อไปนี้
def render_assignment_page(assignment: str):
    try:
        region=get_next_region()
        llm = VertexAI(model_name="gemini-2.0-flash-001", location=region)
        input_msg = HumanMessage(content=[f"Here the assignment {assignment}"])
        prompt_template = ChatPromptTemplate.from_messages(
            [
                SystemMessage(
                    content=(
                        """
                        As a frontend developer, create HTML to display a student assignment with a creative look and feel. Include the following navigation bar at the top:
                        ```
                        <nav>
                            <a href="/">Home</a>
                            <a href="/quiz">Quizzes</a>
                            <a href="/courses">Courses</a>
                            <a href="/assignment">Assignments</a>
                        </nav>
                        ```
                        Also include these links in the <head> section:
                        ```
                        <link rel="stylesheet" href="{{ url_for('static', filename='style.css') }}">
                        <link rel="preconnect" href="https://fonts.googleapis.com">
                        <link rel="preconnect" href="https://fonts.gstatic.com" crossorigin>
                        <link href="https://fonts.googleapis.com/css2?family=Roboto:wght@400;500&display=swap" rel="stylesheet">

                        ```
                        Do not apply inline styles to the navigation bar.
                        The HTML should display the full assignment content. In its CSS, be creative with the rainbow colors and aesthetic.
                        Make it creative and pretty
                        The assignment content should be well-structured and easy to read.
                        respond with JUST the html file
                        """
                    )
                ),
                input_msg,
            ]
        )

        prompt = prompt_template.format()

        response = llm.invoke(prompt)

        response = response.replace("```html", "")
        response = response.replace("```", "")
        with open("templates/assignment.html", "w") as f:
            f.write(response)


        print(f"response: {response}")

        return response
    except Exception as e:
        print(f"Error sending message to chatbot: {e}") # Log this error too!
        return f"Unable to process your request at this time. Due to the following reason: {str(e)}"
โดยจะใช้โมเดล Gemini เพื่อสร้าง HTML สำหรับงานแบบไดนามิก โดยจะใช้เนื้อหาของงานเป็นข้อมูลนำเข้าและใช้พรอมต์เพื่อสั่งให้ Gemini สร้างหน้า HTML ที่ดึงดูดสายตาด้วยสไตล์ที่สร้างสรรค์
จากนั้นเราจะสร้างปลายทางที่จะทริกเกอร์ทุกครั้งที่มีการเพิ่มเอกสารใหม่ลงในที่เก็บข้อมูลของงาน
👉ภายในโฟลเดอร์พอร์ทัล ให้แก้ไขไฟล์ app.py และแทนที่บรรทัด ## REPLACE ME! RENDER ASSIGNMENT ด้วยโค้ดต่อไปนี้
@app.route('/render_assignment', methods=['POST'])
def render_assignment():
    try:
        data = request.get_json()
        file_name = data.get('name')
        bucket_name = data.get('bucket')

        if not file_name or not bucket_name:
            return jsonify({'error': 'Missing file name or bucket name'}), 400

        storage_client = storage.Client()
        bucket = storage_client.bucket(bucket_name)
        blob = bucket.blob(file_name)
        content = blob.download_as_text()

        print(f"File content: {content}")

        render_assignment_page(content)

        return jsonify({'message': 'Assignment rendered successfully'})

    except Exception as e:
        print(f"Error processing file: {e}")
        return jsonify({'error': 'Error processing file'}), 500
เมื่อทริกเกอร์แล้ว ฟังก์ชันจะดึงชื่อไฟล์และชื่อที่เก็บข้อมูลจากข้อมูลคำขอ ดาวน์โหลดเนื้อหางานจาก Cloud Storage และเรียกใช้ฟังก์ชัน render_assignment_page เพื่อสร้าง HTML
👉เราจะเรียกใช้ในเครื่อง
cd ~/aidemy-bootstrap/portal
source env/bin/activate
python app.py
👉จากเมนู "ตัวอย่างเว็บ" ที่ด้านบนของหน้าต่าง Cloud Shell ให้เลือก "แสดงตัวอย่างบนพอร์ต 8080" ซึ่งจะเป็นการเปิดแอปพลิเคชันในแท็บเบราว์เซอร์ใหม่ ไปที่ลิงก์งานในแถบนำทาง คุณควรเห็นหน้าว่างในตอนนี้ ซึ่งเป็นลักษณะการทำงานที่คาดไว้เนื่องจากเรายังไม่ได้สร้างสะพานการสื่อสารระหว่างตัวแทนการมอบหมายกับพอร์ทัลเพื่อแสดงเนื้อหาแบบไดนามิก

ไปที่ส่วนนี้และหยุดสคริปต์โดยกด Ctrl+C
👉หากต้องการรวมการเปลี่ยนแปลงเหล่านี้และติดตั้งใช้งานโค้ดที่อัปเดตแล้ว ให้สร้างใหม่และพุชรูปภาพของเอเจนต์พอร์ทัล
cd ~/aidemy-bootstrap/portal/
gcloud config set project $(cat ~/project_id.txt)
export PROJECT_ID=$(gcloud config get project)
docker build -t gcr.io/${PROJECT_ID}/aidemy-portal .
docker tag gcr.io/${PROJECT_ID}/aidemy-portal us-central1-docker.pkg.dev/${PROJECT_ID}/agent-repository/aidemy-portal
docker push us-central1-docker.pkg.dev/${PROJECT_ID}/agent-repository/aidemy-portal
👉หลังจากพุชอิมเมจใหม่แล้ว ให้ทำให้บริการ Cloud Run ใช้งานได้อีกครั้ง เรียกใช้สคริปต์ต่อไปนี้เพื่อบังคับให้อัปเดต Cloud Run
gcloud config set project $(cat ~/project_id.txt)
export PROJECT_ID=$(gcloud config get project)
export COURSE_BUCKET_NAME=$(gcloud storage buckets list --format="value(name)" | grep aidemy-recap)
gcloud run services update aidemy-portal \
    --region=us-central1 \
    --set-env-vars=GOOGLE_CLOUD_PROJECT=${PROJECT_ID},COURSE_BUCKET_NAME=$COURSE_BUCKET_NAME
👉ตอนนี้เราจะติดตั้งใช้งานทริกเกอร์ Eventarc ที่คอยตรวจสอบออบเจ็กต์ใหม่ที่สร้างขึ้น (เสร็จสมบูรณ์) ในที่เก็บข้อมูลของงาน ทริกเกอร์นี้จะเรียกใช้ปลายทาง /render_assignment ในบริการพอร์ทัลโดยอัตโนมัติเมื่อมีการสร้างไฟล์งานใหม่
gcloud config set project $(cat ~/project_id.txt)
export PROJECT_ID=$(gcloud config get project)
gcloud projects add-iam-policy-binding $PROJECT_ID \
  --member="serviceAccount:$(gcloud storage service-agent --project $PROJECT_ID)" \
  --role="roles/pubsub.publisher"
export SERVICE_ACCOUNT_NAME=$(gcloud compute project-info describe --format="value(defaultServiceAccount)")
gcloud eventarc triggers create portal-assignment-trigger \
--location=us-central1 \
--service-account=$SERVICE_ACCOUNT_NAME \
--destination-run-service=aidemy-portal \
--destination-run-region=us-central1 \
--destination-run-path="/render_assignment" \
--event-filters="bucket=$ASSIGNMENT_BUCKET" \
--event-filters="type=google.cloud.storage.object.v1.finalized"
หากต้องการยืนยันว่าสร้างทริกเกอร์สำเร็จแล้ว ให้ไปที่หน้าทริกเกอร์ Eventarc ใน Google Cloud Console คุณควรเห็น portal-assignment-trigger แสดงในตาราง คลิกชื่อทริกเกอร์เพื่อดูรายละเอียด 
ระบบอาจใช้เวลา 2-3 นาทีเพื่อให้ทริกเกอร์ใหม่ทำงาน
หากต้องการดูการสร้างการมอบหมายแบบไดนามิกในการดำเนินการ ให้เรียกใช้คำสั่งต่อไปนี้เพื่อค้นหา URL ของตัวแทนวางแผน (หากคุณไม่มี URL อยู่ในมือ)
gcloud run services list --platform=managed --region=us-central1 --format='value(URL)' | grep planner
ค้นหา URL ของตัวแทนพอร์ทัลโดยทำดังนี้
gcloud run services list --platform=managed --region=us-central1 --format='value(URL)' | grep portal
สร้างแผนการสอนใหม่ในเอเจนต์วางแผน

หลังจากผ่านไป 2-3 นาที (เพื่อให้ระบบสร้างเสียง สร้างงาน และแสดงผล HTML เสร็จสมบูรณ์) ให้ไปที่พอร์ทัลนักเรียน/นักศึกษา
👉คลิกลิงก์ "งาน" ในแถบนำทาง คุณควรเห็นงานที่สร้างขึ้นใหม่พร้อม HTML ที่สร้างขึ้นแบบไดนามิก ทุกครั้งที่สร้างแผนการสอน แผนการสอนนั้นควรเป็นงานแบบไดนามิก

ขอแสดงความยินดีที่เรียนจบระบบหลายเอเจนต์ของ Aidemy คุณได้รับประสบการณ์จริงและข้อมูลเชิงลึกที่มีประโยชน์ในเรื่องต่อไปนี้
- ประโยชน์ของระบบหลายเอเจนต์ ซึ่งรวมถึงความสามารถในการแยกส่วน ความสามารถในการปรับขนาด ความเชี่ยวชาญ และการบำรุงรักษาที่ง่ายขึ้น
- ความสำคัญของสถาปัตยกรรมที่ขับเคลื่อนด้วยเหตุการณ์ในการสร้างแอปพลิเคชันที่ตอบสนองและเชื่อมต่อกันอย่างหลวมๆ
- การใช้ LLM อย่างมีกลยุทธ์ การจับคู่โมเดลที่เหมาะสมกับงาน และการผสานรวมโมเดลกับเครื่องมือเพื่อสร้างผลลัพธ์ในโลกแห่งความเป็นจริง
- แนวทางปฏิบัติในการพัฒนาที่ดำเนินการบนระบบคลาวด์โดยใช้บริการของ Google Cloud เพื่อสร้างโซลูชันที่ปรับขนาดได้และเชื่อถือได้
- ความสำคัญของการพิจารณารูปแบบความเป็นส่วนตัวของข้อมูลและการโฮสต์ด้วยตนเองเป็นทางเลือกแทนโซลูชันของผู้ให้บริการ
ตอนนี้คุณมีรากฐานที่มั่นคงสำหรับการสร้างแอปพลิเคชันที่ทำงานด้วยระบบ AI ที่ซับซ้อนใน Google Cloud แล้ว
15. ความท้าทายและขั้นตอนถัดไป
ขอแสดงความยินดีกับการสร้างระบบแบบหลายเอเจนต์ของ Aidemy คุณได้วางรากฐานที่แข็งแกร่งสำหรับการศึกษาที่ทำงานด้วยระบบ AI แล้ว ตอนนี้มาดูความท้าทายและการปรับปรุงที่อาจเกิดขึ้นในอนาคตเพื่อขยายความสามารถและตอบสนองความต้องการในโลกแห่งความเป็นจริงกัน
การเรียนรู้แบบอินเทอร์แอกทีฟด้วยช่วงถามและตอบแบบสด:
- ความท้าทาย: คุณใช้ประโยชน์จาก Live API ของ Gemini 2 เพื่อสร้างฟีเจอร์ถามและตอบแบบเรียลไทม์สำหรับนักเรียนได้ไหม ลองนึกภาพห้องเรียนเสมือนที่นักเรียนสามารถถามคำถามและรับคำตอบที่ขับเคลื่อนด้วย AI ได้ทันที
การส่งและการให้คะแนนงานอัตโนมัติ:
- ความท้าทาย: ออกแบบและติดตั้งใช้งานระบบที่ช่วยให้นักเรียนส่งงานแบบดิจิทัลและให้ AI ให้คะแนนโดยอัตโนมัติ พร้อมกลไกในการตรวจจับและป้องกันการลอกผลงาน ความท้าทายนี้เป็นโอกาสอันดีในการสำรวจการสร้างข้อความโดยใช้การดึงข้อมูล (Retrieval Augmented Generation หรือ RAG) เพื่อเพิ่มความแม่นยำและความน่าเชื่อถือของกระบวนการให้คะแนนและการตรวจหาการลอกเลียนผลงาน

16. ล้างข้อมูล
ตอนนี้เราได้สร้างและสำรวจระบบมัลติเอเจนต์ Aidemy แล้ว ก็ถึงเวลาทำความสะอาดสภาพแวดล้อม Google Cloud
👉ลบบริการ Cloud Run
gcloud run services delete aidemy-planner --region=us-central1 --quiet
gcloud run services delete aidemy-portal --region=us-central1 --quiet
gcloud run services delete courses-agent --region=us-central1 --quiet
gcloud run services delete book-provider --region=us-central1 --quiet
gcloud run services delete assignment-agent --region=us-central1 --quiet
👉ลบทริกเกอร์ Eventarc
gcloud eventarc triggers delete portal-assignment-trigger --location=us --quiet
gcloud eventarc triggers delete plan-topic-trigger --location=us-central1 --quiet
gcloud eventarc triggers delete portal-assignment-trigger --location=us-central1 --quiet
ASSIGNMENT_AGENT_TRIGGER=$(gcloud eventarc triggers list --project="$PROJECT_ID" --location=us-central1 --filter="name:assignment-agent" --format="value(name)")
COURSES_AGENT_TRIGGER=$(gcloud eventarc triggers list --project="$PROJECT_ID" --location=us-central1 --filter="name:courses-agent" --format="value(name)")
gcloud eventarc triggers delete $ASSIGNMENT_AGENT_TRIGGER --location=us-central1 --quiet
gcloud eventarc triggers delete $COURSES_AGENT_TRIGGER --location=us-central1 --quiet
👉ลบหัวข้อ Pub/Sub
gcloud pubsub topics delete plan --project="$PROJECT_ID" --quiet
👉ลบอินสแตนซ์ Cloud SQL
gcloud sql instances delete aidemy --quiet
👉ลบที่เก็บ Artifact Registry
gcloud artifacts repositories delete agent-repository --location=us-central1 --quiet
👉ลบข้อมูลลับใน Secret Manager
gcloud secrets delete db-user --quiet
gcloud secrets delete db-pass --quiet
gcloud secrets delete db-name --quiet
👉ลบอินสแตนซ์ Compute Engine (หากสร้างขึ้นสำหรับ Deepseek)
gcloud compute instances delete ollama-instance --zone=us-central1-a --quiet
👉ลบกฎไฟร์วอลล์สำหรับอินสแตนซ์ Deepseek
gcloud compute firewall-rules delete allow-ollama-11434 --quiet
👉ลบที่เก็บข้อมูล Cloud Storage
export COURSE_BUCKET_NAME=$(gcloud storage buckets list --format="value(name)" | grep aidemy-recap)
export ASSIGNMENT_BUCKET=$(gcloud storage buckets list --format="value(name)" | grep aidemy-assignment)
gsutil rm -r gs://$COURSE_BUCKET_NAME
gsutil rm -r gs://$ASSIGNMENT_BUCKET
