
1. 소개
안녕하세요. 손가락 하나 까딱하지 않아도 작업을 처리해 주는 작은 도우미인 에이전트가 마음에 드시나요? 좋습니다. 하지만 특히 더 크고 복잡한 프로젝트를 다루는 경우 상담사 한 명으로는 충분하지 않은 경우가 많습니다. 전체 팀이 필요할 수도 있습니다. 이때 멀티 에이전트 시스템이 필요합니다.
LLM으로 구동되는 에이전트는 기존의 하드 코딩에 비해 엄청난 유연성을 제공합니다. 하지만 항상 그렇듯이 나름의 까다로운 문제가 있습니다. 이번 워크숍에서 바로 이 내용을 자세히 살펴볼 예정입니다.

다음과 같은 내용을 배우게 됩니다. 상담사의 실력을 한 단계 업그레이드한다고 생각하세요.
LangGraph로 첫 번째 에이전트 빌드하기: 인기 있는 프레임워크인 LangGraph를 사용하여 나만의 에이전트를 빌드합니다. 데이터베이스에 연결하고, 최신 Gemini 2 API를 활용하여 인터넷을 검색하고, 프롬프트와 대답을 최적화하여 에이전트가 LLM뿐만 아니라 기존 서비스와도 상호작용할 수 있는 도구를 만드는 방법을 알아봅니다. 함수 호출이 작동하는 방식도 보여드립니다.
내 방식대로 에이전트 오케스트레이션: 간단한 직선 경로에서 더 복잡한 다중 경로 시나리오에 이르기까지 다양한 에이전트 오케스트레이션 방법을 살펴봅니다. 상담사 팀의 흐름을 지시하는 것으로 생각하면 됩니다.
멀티 에이전트 시스템: 이벤트 기반 아키텍처를 통해 에이전트가 공동작업하고 함께 작업을 완료할 수 있는 시스템을 설정하는 방법을 알아봅니다.
LLM 자유도: 작업에 가장 적합한 도구 사용: 하나의 LLM에만 국한되지 않습니다. 여러 LLM을 사용하여 다양한 역할을 할당하여 멋진 '사고 모델'을 통해 문제 해결 능력을 향상하는 방법을 알아봅니다.
동적 콘텐츠? 문제없습니다. 에이전트가 각 사용자에 맞게 맞춤설정된 동적 콘텐츠를 실시간으로 만든다고 가정해 보세요. 방법을 알려드리겠습니다.
Google Cloud로 클라우드에 적용하기: 노트북에서 간단히 실행하는 것은 잊으세요. Google Cloud에서 멀티 에이전트 시스템을 설계하고 배포하여 실제 환경에 대비하는 방법을 알아봅니다.
이 프로젝트는 앞에서 설명한 모든 기법을 사용하는 방법을 보여주는 좋은 예가 될 것입니다.
2. 아키텍처
교사나 교육 분야에서 일하는 것은 매우 보람 있는 일이지만, 특히 준비 작업과 같은 업무량이 많을 수 있습니다. 또한 직원이 부족한 경우가 많고 튜터링 비용이 비쌀 수 있습니다. 그래서 Google은 AI 기반 교육 어시스턴트를 제안합니다. 이 도구는 교육자의 부담을 줄여주고 직원 부족과 저렴한 튜터링 부족으로 인한 격차를 해소하는 데 도움이 됩니다.
AI 교육 어시스턴트는 자세한 수업 계획, 재미있는 퀴즈, 따라하기 쉬운 오디오 요약, 맞춤형 과제를 빠르게 만들 수 있습니다. 이를 통해 교사는 학생과 소통하고 학습에 흥미를 느낄 수 있도록 돕는 등 가장 잘하는 일에 집중할 수 있습니다.
이 시스템에는 두 개의 사이트가 있습니다. 하나는 교사가 다음 주 수업 계획을 만드는 사이트이고,

학생이 퀴즈, 오디오 요약, 과제에 액세스할 수 있는 계정 1개 
그럼 Google의 교육 어시스턴트인 Aidemy를 지원하는 아키텍처를 살펴보겠습니다. 보시다시피 이 기능을 구현하기 위해 여러 주요 구성요소가 함께 작동합니다.

주요 아키텍처 요소 및 기술:
Google Cloud Platform (GCP): 전체 시스템의 중심입니다.
- Vertex AI: Google의 Gemini LLM에 액세스합니다.
- Cloud Run: 컨테이너화된 에이전트와 함수를 배포하기 위한 서버리스 플랫폼입니다.
- Cloud SQL: 커리큘럼 데이터를 위한 PostgreSQL 데이터베이스입니다.
- Pub/Sub 및 Eventarc: 이벤트 기반 아키텍처의 기반으로, 구성요소 간의 비동기 통신을 지원합니다.
- Cloud Storage: 오디오 요약 및 과제 파일을 저장합니다.
- Secret Manager: 데이터베이스 사용자 인증 정보를 안전하게 관리합니다.
- Artifact Registry: 에이전트의 Docker 이미지를 저장합니다.
- Compute Engine: 공급업체 솔루션에 의존하지 않고 자체 호스팅 LLM을 배포하려는 경우
LLM: 시스템의 '두뇌'입니다.
- Google의 Gemini 모델(Gemini x Pro, Gemini x Flash, Gemini x Flash Thinking): 수업 계획, 콘텐츠 생성, 동적 HTML 생성, 퀴즈 설명, 과제 결합에 사용됩니다.
- DeepSeek: 자체 학습 과제를 생성하는 전문 작업에 활용
LangChain 및 LangGraph: LLM 애플리케이션 개발을 위한 프레임워크
- 복잡한 멀티 에이전트 워크플로의 생성을 지원합니다.
- 도구 (API 호출, 데이터베이스 쿼리, 웹 검색)의 지능형 오케스트레이션을 지원합니다.
- 시스템 확장성과 유연성을 위해 이벤트 기반 아키텍처를 구현합니다.
기본적으로 Google의 아키텍처는 LLM의 강력한 기능과 구조화된 데이터, 이벤트 기반 커뮤니케이션을 결합하며, 이 모든 것이 Google Cloud에서 실행됩니다. 이를 통해 확장 가능하고 안정적이며 효과적인 학습 도우미를 구축할 수 있습니다.
3. 시작하기 전에
Google Cloud 콘솔의 프로젝트 선택기 페이지에서 Google Cloud 프로젝트를 선택하거나 만듭니다. Cloud 프로젝트에 결제가 사용 설정되어 있는지 확인합니다. 프로젝트에 결제가 사용 설정되어 있는지 확인하는 방법을 알아보세요.
Cloud Shell IDE에서 Gemini Code Assist 사용 설정
👉 Google Cloud 콘솔에서 Gemini Code Assist 도구로 이동하여 약관에 동의하여 Gemini Code Assist를 무료로 사용 설정합니다.
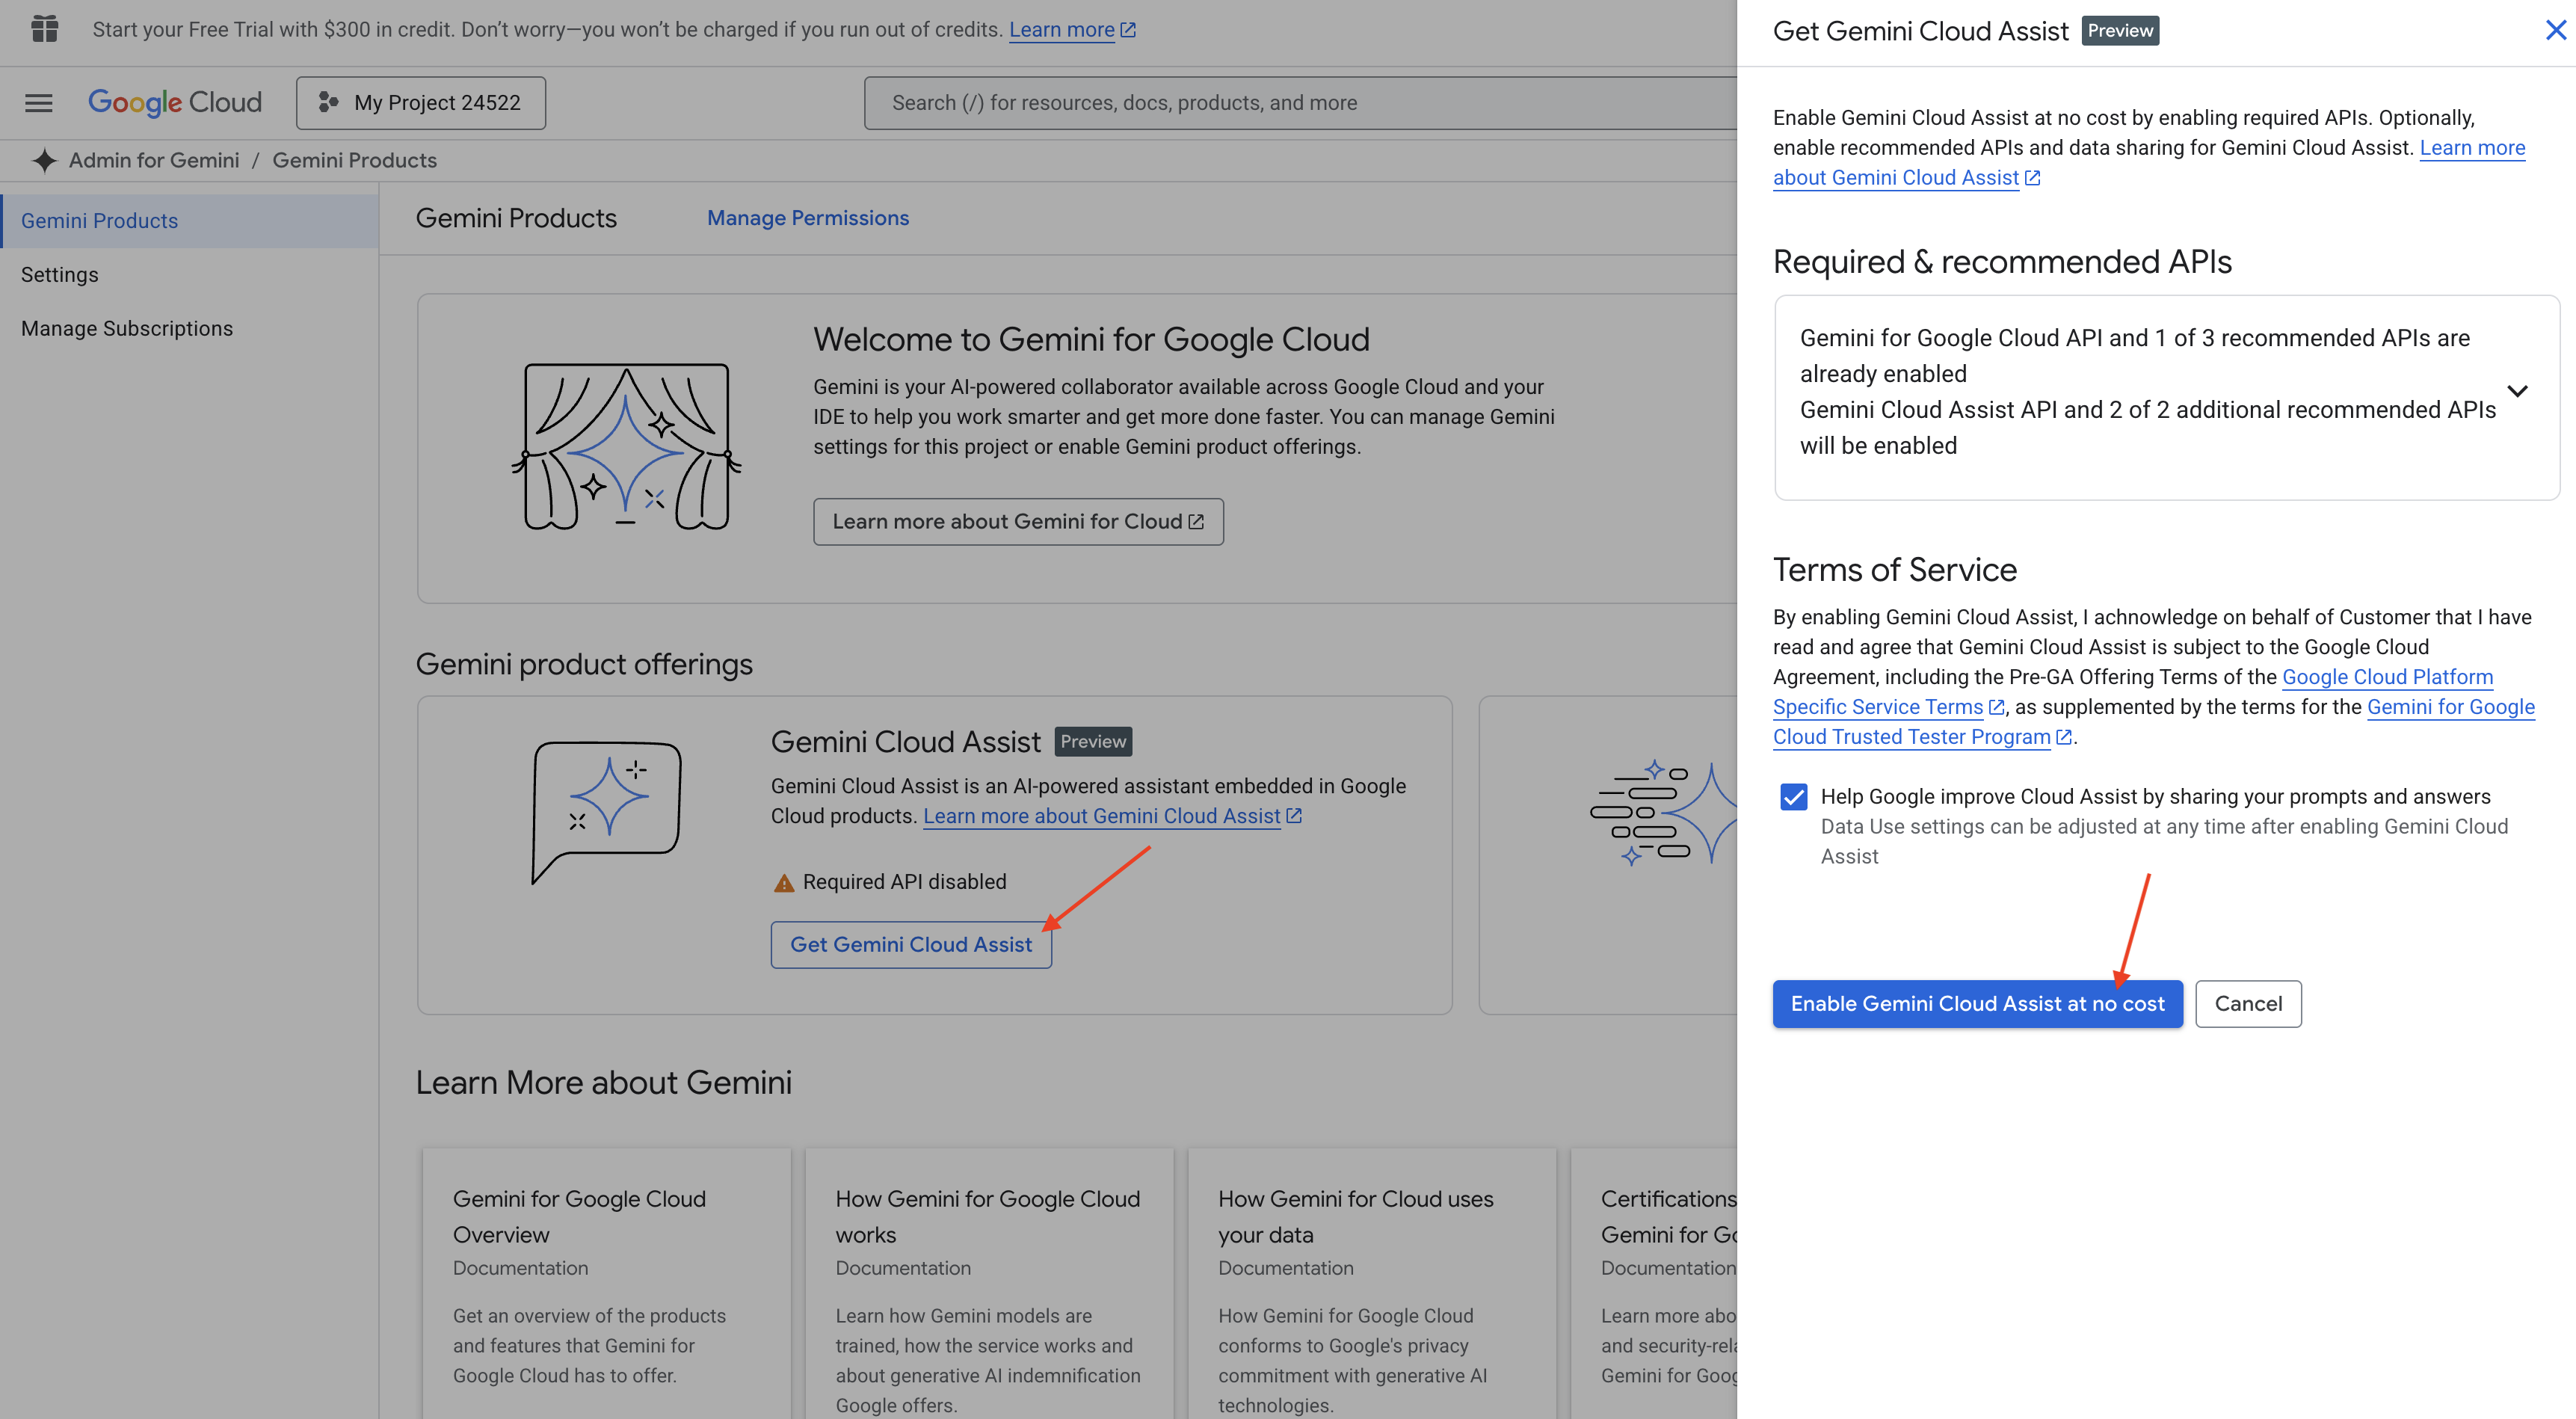
권한 설정을 무시하고 이 페이지를 나갑니다.
Cloud Shell 편집기에서 작업하기
👉Google Cloud 콘솔 상단에서 Cloud Shell 활성화를 클릭하고 (Cloud Shell 창 상단의 터미널 모양 아이콘) '편집기 열기' 버튼 (연필이 있는 열린 폴더 모양)을 클릭합니다. 그러면 창에 Cloud Shell 코드 편집기가 열립니다. 왼쪽에 파일 탐색기가 표시됩니다.

👉그림과 같이 하단 상태 표시줄에서 Cloud Code 로그인 버튼을 클릭합니다. 안내에 따라 플러그인을 승인합니다. 상태 표시줄에 Cloud Code - 프로젝트 없음이 표시되면 이를 선택한 다음 드롭다운에서 'Google Cloud 프로젝트 선택'을 선택하고 생성한 프로젝트 목록에서 특정 Google Cloud 프로젝트를 선택합니다.

👉클라우드 IDE에서 터미널을 엽니다( 또는
또는  ).
).
👉터미널에서 다음 명령어를 사용하여 이미 인증되었는지, 프로젝트가 프로젝트 ID로 설정되어 있는지 확인합니다.
gcloud auth list
👉<YOUR_PROJECT_ID>를 프로젝트 ID로 바꿔서 실행합니다.
echo <YOUR_PROJECT_ID> > ~/project_id.txt
gcloud config set project $(cat ~/project_id.txt)
👉다음 명령어를 실행하여 필요한 Google Cloud API를 사용 설정합니다.
gcloud services enable compute.googleapis.com  \
                        storage.googleapis.com  \
                        run.googleapis.com  \
                        artifactregistry.googleapis.com  \
                        aiplatform.googleapis.com \
                        eventarc.googleapis.com \
                        sqladmin.googleapis.com \
                        secretmanager.googleapis.com \
                        cloudbuild.googleapis.com \
                        cloudresourcemanager.googleapis.com \
                        cloudfunctions.googleapis.com \
                        cloudaicompanion.googleapis.com
몇 분 정도 걸릴 수 있습니다.
권한 설정
👉서비스 계정 권한을 설정합니다. 터미널에서 다음을 실행합니다.
gcloud config set project $(cat ~/project_id.txt)
export PROJECT_ID=$(gcloud config get project)
export SERVICE_ACCOUNT_NAME=$(gcloud compute project-info describe --format="value(defaultServiceAccount)")

echo "Here's your SERVICE_ACCOUNT_NAME $SERVICE_ACCOUNT_NAME"
👉 권한 부여 터미널에서 다음을 실행합니다.
#Cloud Storage (Read/Write):
gcloud projects add-iam-policy-binding $PROJECT_ID \
  --member="serviceAccount:$SERVICE_ACCOUNT_NAME" \
  --role="roles/storage.objectAdmin"

#Pub/Sub (Publish/Receive):
gcloud projects add-iam-policy-binding $PROJECT_ID \
  --member="serviceAccount:$SERVICE_ACCOUNT_NAME" \
  --role="roles/pubsub.publisher"

gcloud projects add-iam-policy-binding $PROJECT_ID \
  --member="serviceAccount:$SERVICE_ACCOUNT_NAME" \
  --role="roles/pubsub.subscriber"


#Cloud SQL (Read/Write):
gcloud projects add-iam-policy-binding $PROJECT_ID \
  --member="serviceAccount:$SERVICE_ACCOUNT_NAME" \
  --role="roles/cloudsql.editor"


#Eventarc (Receive Events):
gcloud projects add-iam-policy-binding $PROJECT_ID \
  --member="serviceAccount:$SERVICE_ACCOUNT_NAME" \
  --role="roles/iam.serviceAccountTokenCreator"

gcloud projects add-iam-policy-binding $PROJECT_ID \
  --member="serviceAccount:$SERVICE_ACCOUNT_NAME" \
  --role="roles/eventarc.eventReceiver"

#Vertex AI (User):
gcloud projects add-iam-policy-binding $PROJECT_ID \
  --member="serviceAccount:$SERVICE_ACCOUNT_NAME" \
  --role="roles/aiplatform.user"

#Secret Manager (Read):
gcloud projects add-iam-policy-binding $PROJECT_ID \
  --member="serviceAccount:$SERVICE_ACCOUNT_NAME" \
  --role="roles/secretmanager.secretAccessor"
👉IAM 콘솔에서 결과를 검증합니다.
👉터미널에서 다음 명령어를 실행하여 aidemy라는 Cloud SQL 인스턴스를 만듭니다. 이 정보는 나중에 필요하지만 이 프로세스에 시간이 걸릴 수 있으므로 지금 진행하겠습니다.
gcloud sql instances create aidemy \
    --database-version=POSTGRES_14 \
    --cpu=2 \
    --memory=4GB \
    --region=us-central1 \
    --root-password=1234qwer \
    --storage-size=10GB \
    --storage-auto-increase
4. 첫 번째 에이전트 빌드
복잡한 멀티 에이전트 시스템을 살펴보기 전에 기본 구성요소인 단일 기능 에이전트를 설정해야 합니다. 이 섹션에서는 간단한 '도서 제공업체' 에이전트를 만들어 첫 단계를 밟아 보겠습니다. 도서 제공업체 에이전트는 카테고리를 입력으로 받아 Gemini LLM을 사용하여 해당 카테고리 내에서 JSON 표현 도서를 생성합니다. 그런 다음 이러한 도서 추천을 REST API 엔드포인트로 제공합니다 .

👉다른 브라우저 탭에서 웹브라우저의 Google Cloud 콘솔을 엽니다. 탐색 메뉴 (☰)에서 'Cloud Run'으로 이동합니다. '+ ... 함수 작성' 버튼을 클릭합니다.

👉다음으로 Cloud Run 함수의 기본 설정을 구성합니다.
- 서비스 이름:
book-provider - 리전:
us-central1 - 런타임:
Python 3.12 - 인증:
Allow unauthenticated invocations을 사용 설정으로 변경합니다.
👉다른 설정은 기본값으로 두고 만들기를 클릭합니다. 그러면 소스 코드 편집기로 이동합니다.
자동으로 입력된 main.py 및 requirements.txt 파일이 표시됩니다.
main.py에는 함수의 비즈니스 로직이 포함되고 requirements.txt에는 필요한 패키지가 포함됩니다.
👉이제 코드를 작성할 준비가 되었습니다. 하지만 시작하기 전에 Gemini Code Assist가 시작하는 데 도움이 되는지 살펴보겠습니다. Cloud Shell 편집기로 돌아가기를 클릭하고 상단에 있는 Gemini Code Assist 아이콘을 클릭하면 Gemini Code Assist 채팅이 열립니다.

👉 프롬프트 상자에 다음 요청을 붙여넣습니다.
Use the functions_framework library to be deployable as an HTTP function.
Accept a request with category and number_of_book parameters (either in JSON body or query string).
Use langchain and gemini to generate the data for book with fields bookname, author, publisher, publishing_date.
Use pydantic to define a Book model with the fields: bookname (string, description: "Name of the book"), author (string, description: "Name of the author"), publisher (string, description: "Name of the publisher"), and publishing_date (string, description: "Date of publishing").
Use langchain and gemini model to generate book data. the output should follow the format defined in Book model.

The logic should use JsonOutputParser from langchain to enforce output format defined in Book Model.
Have a function get_recommended_books(category) that internally uses langchain and gemini to return a single book object.
The main function, exposed as the Cloud Function, should call get_recommended_books() multiple times (based on number_of_book) and return a JSON list of the generated book objects.
Handle the case where category or number_of_book are missing by returning an error JSON response with a 400 status code.
return a JSON string representing the recommended books. use os library to retrieve GOOGLE_CLOUD_PROJECT env var. Use ChatVertexAI from langchain for the LLM call
그러면 Code Assist에서 소스 코드와 requirements.txt 종속 항목 파일을 모두 제공하는 잠재적인 솔루션을 생성합니다. (이 코드를 사용하지 마세요)
아래에 제공된 테스트를 거친 올바른 솔루션과 코드 어시스턴트에서 생성된 코드를 비교해 보세요. 이를 통해 도구의 효과를 평가하고 잠재적인 불일치를 식별할 수 있습니다. LLM을 무조건 신뢰해서는 안 되지만, Code Assist는 신속한 프로토타이핑과 초기 코드 구조 생성에 유용한 도구이므로 좋은 시작을 위해 사용해야 합니다.
워크숍이므로 아래에 제공된 확인된 코드를 사용합니다. 하지만 시간을 내어 Code Assist에서 생성된 코드를 직접 실험해 보면서 기능과 제한사항을 자세히 알아보세요.
👉다른 브라우저 탭에서 Cloud Run 함수의 소스 코드 편집기로 돌아갑니다. main.py의 기존 콘텐츠를 아래 제공된 코드로 주의 깊게 바꿉니다.
import functions_framework
import json
from flask import Flask, jsonify, request
from langchain_google_vertexai import ChatVertexAI
from langchain_core.output_parsers import JsonOutputParser
from langchain_core.prompts import PromptTemplate
from pydantic import BaseModel, Field
import os

class Book(BaseModel):
    bookname: str = Field(description="Name of the book")
    author: str = Field(description="Name of the author")
    publisher: str = Field(description="Name of the publisher")
    publishing_date: str = Field(description="Date of publishing")


project_id = os.environ.get("GOOGLE_CLOUD_PROJECT")

llm = ChatVertexAI(model_name="gemini-2.0-flash-lite-001")

def get_recommended_books(category):
    """
    A simple book recommendation function.

    Args:
        category (str): category

    Returns:
        str: A JSON string representing the recommended books.
    """
    parser = JsonOutputParser(pydantic_object=Book)
    question = f"Generate a random made up book on {category} with bookname, author and publisher and publishing_date"

    prompt = PromptTemplate(
        template="Answer the user query.\n{format_instructions}\n{query}\n",
        input_variables=["query"],
        partial_variables={"format_instructions": parser.get_format_instructions()},
    )

    chain = prompt | llm | parser
    response = chain.invoke({"query": question})

    return  json.dumps(response)


@functions_framework.http
def recommended(request):
    request_json = request.get_json(silent=True) # Get JSON data
    if request_json and 'category' in request_json and 'number_of_book' in request_json:
        category = request_json['category']
        number_of_book = int(request_json['number_of_book'])
    elif request.args and 'category' in request.args and 'number_of_book' in request.args:
        category = request.args.get('category')
        number_of_book = int(request.args.get('number_of_book'))

    else:
        return jsonify({'error': 'Missing category or number_of_book parameters'}), 400


    recommendations_list = []
    for i in range(number_of_book):
        book_dict = json.loads(get_recommended_books(category))
        print(f"book_dict=======>{book_dict}")

        recommendations_list.append(book_dict)


    return jsonify(recommendations_list)
👉requirements.txt의 내용을 다음으로 바꿉니다.
functions-framework==3.*
google-genai==1.0.0
flask==3.1.0
jsonify==0.5
langchain_google_vertexai==2.0.13
langchain_core==0.3.34
pydantic==2.10.5
👉함수 진입점을 recommended로 설정합니다.

👉저장 및 배포 (또는 저장 및 재배포)를 클릭하여 함수를 배포합니다. 배포가 완료될 때까지 기다립니다. Cloud Console에 상태가 표시됩니다. 몇 분 정도 걸릴 수 있습니다.
 👉배포가 완료되면 Cloud Shell 편집기로 돌아가 터미널에서 다음을 실행합니다.
gcloud config set project $(cat ~/project_id.txt)
export PROJECT_ID=$(gcloud config get project)
export BOOK_PROVIDER_URL=$(gcloud run services describe book-provider --region=us-central1 --project=$PROJECT_ID --format="value(status.url)")

curl -X POST -H "Content-Type: application/json" -d '{"category": "Science Fiction", "number_of_book": 2}' $BOOK_PROVIDER_URL
JSON 형식으로 된 책 데이터가 표시됩니다.
[
  {"author":"Anya Sharma","bookname":"Echoes of the Singularity","publisher":"NovaLight Publishing","publishing_date":"2077-03-15"},
  {"author":"Anya Sharma","bookname":"Echoes of the Quantum Dawn","publisher":"Nova Genesis Publishing","publishing_date":"2077-03-15"}
]
축하합니다. Cloud Run 함수를 배포했습니다. 이는 Aidemy 에이전트를 개발할 때 통합할 서비스 중 하나입니다.
5. 빌드 도구: 에이전트를 RESTFUL 서비스 및 데이터에 연결
Cloud Shell 편집기에 있는지 확인하고 Bootstrap 스켈레톤 프로젝트를 다운로드합니다. 터미널에서 다음을 실행합니다.
git clone https://github.com/weimeilin79/aidemy-bootstrap.git
이 명령어를 실행하면 Cloud Shell 환경에 aidemy-bootstrap이라는 새 폴더가 생성됩니다.
이제 Cloud Shell 편집기의 탐색기 창 (일반적으로 왼쪽)에 Git 저장소 aidemy-bootstrap를 복제할 때 생성된 폴더가 표시됩니다. 탐색기에서 프로젝트의 루트 폴더를 엽니다. planner 하위 폴더가 표시됩니다. 이 폴더도 엽니다. 
에이전트가 진정으로 유용해지는 데 사용할 도구를 빌드해 보겠습니다. 아시다시피 LLM은 추론과 텍스트 생성에 탁월하지만, 실제 작업을 수행하고 정확한 최신 정보를 제공하려면 외부 리소스에 액세스해야 합니다. 이러한 도구는 에이전트의 '맥가이버 칼'과 같아서 에이전트가 외부 세계와 상호작용할 수 있도록 지원합니다.
에이전트를 빌드할 때 세부정보를 많이 하드 코딩하기 쉽습니다. 이렇게 하면 유연하지 않은 에이전트가 생성됩니다. 대신 도구를 만들어 사용하면 에이전트가 외부 로직이나 시스템에 액세스할 수 있으므로 LLM과 기존 프로그래밍의 이점을 모두 누릴 수 있습니다.
이 섹션에서는 교사가 수업 계획을 생성하는 데 사용할 플래너 에이전트의 기반을 만듭니다. 에이전트가 계획을 생성하기 전에 주제와 주제에 관한 세부정보를 제공하여 경계를 설정하려고 합니다. 다음 세 가지 도구를 빌드합니다.
- Restful API 호출: 기존 API와 상호작용하여 데이터를 가져옵니다.
- 데이터베이스 쿼리: Cloud SQL 데이터베이스에서 구조화된 데이터를 가져옵니다.
- Google 검색: 웹에서 실시간 정보에 액세스
API에서 도서 추천 가져오기
먼저 이전 섹션에서 배포한 book-provider API에서 도서 추천을 가져오는 도구를 만들어 보겠습니다. 이는 에이전트가 기존 서비스를 활용하는 방법을 보여줍니다.

Cloud Shell 편집기에서 이전 섹션에서 클론한 aidemy-bootstrap 프로젝트를 엽니다.
👉planner 폴더에서 book.py를 수정하고 파일 끝에 다음 코드를 붙여넣습니다.
def recommend_book(query: str):
    """
    Get a list of recommended book from an API endpoint

    Args:
        query: User's request string
    """

    region = get_next_region();
    llm = VertexAI(model_name="gemini-1.5-pro", location=region)

    query = f"""The user is trying to plan a education course, you are the teaching assistant. Help define the category of what the user requested to teach, respond the categroy with no more than two word.

    user request:   {query}
    """
    print(f"-------->{query}")
    response = llm.invoke(query)
    print(f"CATEGORY RESPONSE------------>: {response}")

    # call this using python and parse the json back to dict
    category = response.strip()

    headers = {"Content-Type": "application/json"}
    data = {"category": category, "number_of_book": 2}

    books = requests.post(BOOK_PROVIDER_URL, headers=headers, json=data)

    return books.text

if __name__ == "__main__":
    print(recommend_book("I'm doing a course for my 5th grade student on Math Geometry, I'll need to recommend few books come up with a teach plan, few quizes and also a homework assignment."))
설명:
- recommend_book(query: str): 이 함수는 사용자의 질문을 입력으로 사용합니다.
- LLM 상호작용: LLM을 사용하여 질문에서 카테고리를 추출합니다. LLM을 사용하여 도구의 매개변수를 만드는 방법을 보여줍니다.
- API 호출: 카테고리와 원하는 도서 수를 전달하여 도서 제공업체 API에 POST 요청을 보냅니다.
👉이 새로운 기능을 테스트하려면 환경 변수를 설정하고 다음을 실행하세요.
gcloud config set project $(cat ~/project_id.txt)
export PROJECT_ID=$(gcloud config get project)
cd ~/aidemy-bootstrap/planner/
export BOOK_PROVIDER_URL=$(gcloud run services describe book-provider --region=us-central1 --project=$PROJECT_ID --format="value(status.url)")
👉종속 항목을 설치하고 코드를 실행하여 작동하는지 확인하려면 다음을 실행하세요.
cd ~/aidemy-bootstrap/planner/
python -m venv env
source env/bin/activate
gcloud config set project $(cat ~/project_id.txt)
export PROJECT_ID=$(gcloud config get project)
pip install -r requirements.txt
python book.py
책 제공업체 API에서 가져온 책 추천이 포함된 JSON 문자열이 표시됩니다. 결과는 무작위로 생성됩니다. 책이 동일하지 않을 수도 있지만 JSON 형식으로 두 권의 책 추천이 표시됩니다.
[{"author":"Anya Sharma","bookname":"Echoes of the Singularity","publisher":"NovaLight Publishing","publishing_date":"2077-03-15"},{"author":"Anya Sharma","bookname":"Echoes of the Quantum Dawn","publisher":"Nova Genesis Publishing","publishing_date":"2077-03-15"}]
이 이미지가 표시되면 첫 번째 도구가 올바르게 작동하는 것입니다.
특정 매개변수를 사용하여 RESTful API 호출을 명시적으로 작성하는 대신 자연어 ('I'm doing a course...')를 사용합니다. 그런 다음 에이전트는 NLP를 사용하여 필요한 매개변수 (예: 카테고리)를 지능적으로 추출하여 에이전트가 자연어 이해를 활용하여 API와 상호작용하는 방법을 강조합니다.

👉book.py에서 다음 테스트 코드를 삭제합니다.
if __name__ == "__main__":
    print(recommend_book("I'm doing a course for my 5th grade student on Math Geometry, I'll need to recommend few books come up with a teach plan, few quizes and also a homework assignment."))
데이터베이스에서 커리큘럼 데이터 가져오기
다음으로 Cloud SQL PostgreSQL 데이터베이스에서 구조화된 커리큘럼 데이터를 가져오는 도구를 빌드합니다. 이를 통해 상담사는 수업 계획을 위한 신뢰할 수 있는 정보 소스에 액세스할 수 있습니다.

이전 단계에서 만든 aidemy Cloud SQL 인스턴스를 기억하시나요? 여기에서 사용됩니다.
👉 터미널에서 다음 명령어를 실행하여 새 인스턴스에 aidemy-db라는 데이터베이스를 만듭니다.
gcloud sql databases create aidemy-db \
    --instance=aidemy
Google Cloud 콘솔의 Cloud SQL에서 인스턴스를 확인합니다. aidemy라는 Cloud SQL 인스턴스가 표시됩니다.
👉 인스턴스 이름을 클릭하여 세부정보를 확인합니다. 👉 Cloud SQL 인스턴스 세부정보 페이지의 왼쪽 탐색 메뉴에서 Cloud SQL Studio를 클릭합니다. 그러면 새 탭이 열립니다.
aidemy-db를 데이터베이스로 선택하고 postgres을 사용자로, 1234qwer을 비밀번호로 입력합니다.
인증을 클릭합니다.

👉SQL Studio 쿼리 편집기에서 Editor 1 탭으로 이동하여 다음 SQL 코드를 붙여넣습니다.
CREATE TABLE curriculums (
    id SERIAL PRIMARY KEY,
    year INT,
    subject VARCHAR(255),
    description TEXT
);

-- Inserting detailed curriculum data for different school years and subjects
INSERT INTO curriculums (year, subject, description) VALUES
-- Year 5
(5, 'Mathematics', 'Introduction to fractions, decimals, and percentages, along with foundational geometry and problem-solving techniques.'),
(5, 'English', 'Developing reading comprehension, creative writing, and basic grammar, with a focus on storytelling and poetry.'),
(5, 'Science', 'Exploring basic physics, chemistry, and biology concepts, including forces, materials, and ecosystems.'),
(5, 'Computer Science', 'Basic coding concepts using block-based programming and an introduction to digital literacy.'),

-- Year 6
(6, 'Mathematics', 'Expanding on fractions, ratios, algebraic thinking, and problem-solving strategies.'),
(6, 'English', 'Introduction to persuasive writing, character analysis, and deeper comprehension of literary texts.'),
(6, 'Science', 'Forces and motion, the human body, and introductory chemical reactions with hands-on experiments.'),
(6, 'Computer Science', 'Introduction to algorithms, logical reasoning, and basic text-based programming (Python, Scratch).'),

-- Year 7
(7, 'Mathematics', 'Algebraic expressions, geometry, and introduction to statistics and probability.'),
(7, 'English', 'Analytical reading of classic and modern literature, essay writing, and advanced grammar skills.'),
(7, 'Science', 'Introduction to cells and organisms, chemical reactions, and energy transfer in physics.'),
(7, 'Computer Science', 'Building on programming skills with Python, introduction to web development, and cyber safety.');
이 SQL 코드는 curriculums라는 테이블을 만들고 샘플 데이터를 삽입합니다.
👉 실행을 클릭하여 SQL 코드를 실행합니다. 문이 성공적으로 실행되었음을 나타내는 확인 메시지가 표시됩니다.
👉 탐색기를 펼치고 새로 만든 테이블 curriculums를 찾아 쿼리를 클릭합니다. SQL이 생성된 새 편집기 탭이 열립니다.

SELECT * FROM
  "public"."curriculums" LIMIT 1000;
👉실행을 클릭합니다.
결과 표에 이전 단계에서 삽입한 데이터 행이 표시되어 테이블과 데이터가 올바르게 생성되었는지 확인할 수 있습니다.
샘플 커리큘럼 데이터가 채워진 데이터베이스를 만들었으므로 이제 이를 검색하는 도구를 빌드합니다.
👉Cloud Code 편집기에서 aidemy-bootstrap 폴더의 curriculums.py 파일을 수정하고 파일 끝에 다음 코드를 붙여넣습니다.
def connect_with_connector() -> sqlalchemy.engine.base.Engine:

    db_user = os.environ["DB_USER"]
    db_pass = os.environ["DB_PASS"]
    db_name = os.environ["DB_NAME"]

    print(f"--------------------------->db_user: {db_user!r}")
    print(f"--------------------------->db_pass: {db_pass!r}")
    print(f"--------------------------->db_name: {db_name!r}")

    connector = Connector()

    pool = sqlalchemy.create_engine(
        "postgresql+pg8000://",
        creator=lambda: connector.connect(
            instance_connection_name,
            "pg8000",
            user=db_user,
            password=db_pass,
            db=db_name,
        ),
        pool_size=2,
        max_overflow=2,
        pool_timeout=30,  # 30 seconds
        pool_recycle=1800,  # 30 minutes
    )
    return pool

def get_curriculum(year: int, subject: str):
    """
    Get school curriculum

    Args:
        subject: User's request subject string
        year: User's request year int
    """
    try:
        stmt = sqlalchemy.text(
            "SELECT description FROM curriculums WHERE year = :year AND subject = :subject"
        )

        with db.connect() as conn:
            result = conn.execute(stmt, parameters={"year": year, "subject": subject})
            row = result.fetchone()
        if row:
            return row[0]
        else:
            return None

    except Exception as e:
        print(e)
        return None

db = connect_with_connector()
설명:
- 환경 변수: 코드는 환경 변수에서 데이터베이스 사용자 인증 정보와 연결 정보를 가져옵니다 (자세한 내용은 아래 참고).
- connect_with_connector(): 이 함수는 Cloud SQL Connector를 사용하여 데이터베이스에 보안 연결을 설정합니다.
- get_curriculum(year: int, subject: str): 이 함수는 연도와 과목을 입력으로 받아 커리큘럼 테이블을 쿼리하고 해당 커리큘럼 설명을 반환합니다.
👉코드를 실행하기 전에 터미널에서 다음 명령어를 실행하여 일부 환경 변수를 설정해야 합니다.
gcloud config set project $(cat ~/project_id.txt)
export PROJECT_ID=$(gcloud config get project)
export INSTANCE_NAME="aidemy"
export REGION="us-central1"
export DB_USER="postgres"
export DB_PASS="1234qwer"
export DB_NAME="aidemy-db"
👉테스트하려면 다음 코드를 curriculums.py 끝에 추가하세요.
if __name__ == "__main__":
    print(get_curriculum(6, "Mathematics"))
👉코드를 실행합니다.
cd ~/aidemy-bootstrap/planner/
source env/bin/activate
python curriculums.py
콘솔에 6학년 수학 커리큘럼 설명이 출력됩니다.
Expanding on fractions, ratios, algebraic thinking, and problem-solving strategies.
커리큘럼 설명이 표시되면 데이터베이스 도구가 올바르게 작동하는 것입니다. 스크립트가 아직 실행 중이면 Ctrl+C를 눌러 중지합니다.
👉curriculums.py에서 다음 테스트 코드를 삭제합니다.
if __name__ == "__main__":
    print(get_curriculum(6, "Mathematics"))
👉가상 환경을 종료하려면 터미널에서 다음을 실행합니다.
deactivate
6. 빌드 도구: 웹에서 실시간 정보에 액세스
마지막으로 Gemini 2와 Google 검색 통합을 사용하여 웹의 실시간 정보에 액세스하는 도구를 빌드합니다. 이렇게 하면 상담사가 최신 정보를 파악하고 관련 결과를 제공할 수 있습니다.
Google 검색 API와의 Gemini 2 통합은 더 정확하고 맥락에 맞는 검색 결과를 제공하여 에이전트 기능을 향상합니다. 이를 통해 상담사는 최신 정보에 액세스하고 실제 데이터를 기반으로 대답하여 할루시네이션을 최소화할 수 있습니다. 또한 개선된 API 통합을 통해 자연어 쿼리가 더 쉬워져 상담사가 복잡하고 미묘한 검색 요청을 공식화할 수 있습니다.

이 함수는 검색어, 교육 과정, 주제, 연도를 입력으로 받아 Gemini API와 Google 검색 도구를 사용하여 인터넷에서 관련 정보를 검색합니다. 자세히 살펴보면 다른 프레임워크를 사용하지 않고 Google 생성형 AI SDK를 사용하여 함수 호출을 실행하고 있습니다.
👉aidemy-bootstrap 폴더에서 search.py를 수정하고 파일 끝에 다음 코드를 붙여넣습니다.
model_id = "gemini-2.0-flash-001"

google_search_tool = Tool(
    google_search = GoogleSearch()
)

def search_latest_resource(search_text: str, curriculum: str, subject: str, year: int):
    """
    Get latest information from the internet

    Args:
        search_text: User's request category   string
        subject: "User's request subject" string
        year: "User's request year"  integer
    """
    search_text = "%s in the context of year %d and subject %s with following curriculum detail %s " % (search_text, year, subject, curriculum)
    region = get_next_region()
    client = genai.Client(vertexai=True, project=PROJECT_ID, location=region)
    print(f"search_latest_resource text-----> {search_text}")
    response = client.models.generate_content(
        model=model_id,
        contents=search_text,
        config=GenerateContentConfig(
            tools=[google_search_tool],
            response_modalities=["TEXT"],
        )
    )
    print(f"search_latest_resource response-----> {response}")
    return response

if __name__ == "__main__":
  response = search_latest_resource("What are the syllabus for Year 6 Mathematics?", "Expanding on fractions, ratios, algebraic thinking, and problem-solving strategies.", "Mathematics", 6)
  for each in response.candidates[0].content.parts:
    print(each.text)
설명:
- 도구 정의 - google_search_tool: GoogleSearch 객체를 도구 내에 래핑
- search_latest_resource(search_text: str, subject: str, year: int): 이 함수는 검색어, 주제, 연도를 입력으로 받아 Gemini API를 사용하여 Google 검색을 실행합니다.
- GenerateContentConfig: GoogleSearch 도구에 액세스할 수 있다고 정의합니다.
Gemini 모델은 내부적으로 search_text를 분석하여 질문에 직접 답변할 수 있는지 또는 GoogleSearch 도구를 사용해야 하는지 판단합니다. 이는 LLM의 추론 프로세스 내에서 발생하는 중요한 단계입니다. 모델은 외부 도구가 필요한 상황을 인식하도록 학습되었습니다. 모델이 GoogleSearch 도구를 사용하기로 결정하면 Google 생성형 AI SDK가 실제 호출을 처리합니다. SDK는 모델의 결정과 생성된 파라미터를 가져와 Google 검색 API로 전송합니다. 이 부분은 코드에서 사용자에게 숨겨져 있습니다.
그러면 Gemini 모델이 검색 결과를 대답에 통합합니다. 이 정보를 사용하여 사용자의 질문에 답변하거나, 요약을 생성하거나, 다른 작업을 수행할 수 있습니다.
👉테스트하려면 다음 코드를 실행하세요.
cd ~/aidemy-bootstrap/planner/
gcloud config set project $(cat ~/project_id.txt)
export PROJECT_ID=$(gcloud config get project)
source env/bin/activate
python search.py
'5학년 수학 강의 계획서'와 관련된 검색 결과가 포함된 Gemini 검색 API 응답이 표시됩니다. 정확한 출력은 검색 결과에 따라 다르지만 검색에 관한 정보가 포함된 JSON 객체입니다.
검색 결과가 표시되면 Google 검색 도구가 올바르게 작동하는 것입니다. 스크립트가 아직 실행 중인 경우 Ctrl+C를 눌러 스크립트를 중지합니다.
👉코드의 마지막 부분을 삭제합니다.
if __name__ == "__main__":
  response = search_latest_resource("What are the syllabus for Year 6 Mathematics?", "Expanding on fractions, ratios, algebraic thinking, and problem-solving strategies.", "Mathematics", 6)
  for each in response.candidates[0].content.parts:
    print(each.text)
👉가상 환경을 종료하려면 터미널에서 다음을 실행하세요.
deactivate
축하합니다. 이제 플래너 에이전트를 위한 강력한 도구 3가지(API 커넥터, 데이터베이스 커넥터, Google 검색 도구)를 빌드했습니다. 이러한 도구를 통해 에이전트는 효과적인 수업 계획을 만드는 데 필요한 정보와 기능에 액세스할 수 있습니다.
7. LangGraph를 사용한 오케스트레이션
이제 개별 도구를 빌드했으므로 LangGraph를 사용하여 오케스트레이션할 차례입니다. 이를 통해 사용자의 요청에 따라 사용할 도구와 시기를 지능적으로 결정할 수 있는 더 정교한 '계획자' 에이전트를 만들 수 있습니다.
LangGraph는 대규모 언어 모델 (LLM)을 사용하여 상태 저장 다중 행위자 애플리케이션을 더 쉽게 빌드할 수 있도록 설계된 Python 라이브러리입니다. LLM, 도구, 기타 에이전트가 포함된 복잡한 대화와 워크플로를 오케스트레이션하기 위한 프레임워크라고 생각하면 됩니다.
주요 개념
- 그래프 구조: LangGraph는 애플리케이션의 로직을 방향 그래프로 나타냅니다. 그래프의 각 노드는 프로세스의 단계를 나타냅니다 (예: LLM 호출, 도구 호출, 조건부 검사). 에지는 노드 간 실행 흐름을 정의합니다.
- 상태: LangGraph는 그래프를 통과할 때 애플리케이션의 상태를 관리합니다. 이 상태에는 사용자의 입력, 도구 호출 결과, LLM의 중간 출력, 단계 간에 보존해야 하는 기타 정보와 같은 변수가 포함될 수 있습니다.
- 노드: 각 노드는 계산 또는 상호작용을 나타냅니다. 다음과 같을 수 있습니다.
- 도구 노드: 도구 사용 (예: 웹 검색 실행, 데이터베이스 쿼리)
- 함수 노드: Python 함수를 실행합니다.
- 에지: 노드를 연결하여 실행 흐름을 정의합니다. 다음과 같을 수 있습니다.
- 직접 에지: 한 노드에서 다른 노드로의 간단한 무조건적 흐름입니다.
- 조건부 에지: 흐름은 조건부 노드의 결과에 따라 달라집니다.

LangGraph를 사용하여 오케스트레이션을 구현합니다. aidemy-bootstrap 폴더 아래의 aidemy.py 파일을 수정하여 LangGraph 로직을 정의해 보겠습니다.
👉 다음 코드를 끝에 추가 합니다.
aidemy.py:
tools = [get_curriculum, search_latest_resource, recommend_book]

def determine_tool(state: MessagesState):
    llm = ChatVertexAI(model_name="gemini-2.0-flash-001", location=get_next_region())
    sys_msg = SystemMessage(
                    content=(
                        f"""You are a helpful teaching assistant that helps gather all needed information.
                            Your ultimate goal is to create a detailed 3-week teaching plan.
                            You have access to tools that help you gather information.
                            Based on the user request, decide which tool(s) are needed.

                        """
                    )
                )

    llm_with_tools = llm.bind_tools(tools)
    return {"messages": llm_with_tools.invoke([sys_msg] + state["messages"])}
이 함수는 대화의 현재 상태를 가져와 LLM에 시스템 메시지를 제공한 다음 LLM에 응답을 생성하도록 요청합니다. LLM은 사용자에게 직접 응답하거나 사용 가능한 도구 중 하나를 선택할 수 있습니다.
tools : 이 목록은 에이전트가 사용할 수 있는 도구 집합을 나타냅니다. 여기에는 이전 단계에서 정의한 세 가지 도구 함수(get_curriculum, search_latest_resource, recommend_book)가 포함되어 있습니다. llm.bind_tools(tools): 도구 목록을 llm 객체에 '바인딩'합니다. 도구를 바인딩하면 LLM에 이러한 도구를 사용할 수 있다는 사실이 전달되고 도구 사용 방법 (예: 도구 이름, 허용되는 매개변수, 도구의 기능)에 관한 정보가 제공됩니다.
LangGraph를 사용하여 오케스트레이션을 구현합니다.
👉 다음 코드를 끝에 추가 합니다.
aidemy.py:
def prep_class(prep_needs):

    builder = StateGraph(MessagesState)
    builder.add_node("determine_tool", determine_tool)
    builder.add_node("tools", ToolNode(tools))

    builder.add_edge(START, "determine_tool")
    builder.add_conditional_edges("determine_tool",tools_condition)
    builder.add_edge("tools", "determine_tool")


    memory = MemorySaver()
    graph = builder.compile(checkpointer=memory)

    config = {"configurable": {"thread_id": "1"}}
    messages = graph.invoke({"messages": prep_needs},config)
    print(messages)
    for m in messages['messages']:
        m.pretty_print()
    teaching_plan_result = messages["messages"][-1].content


    return teaching_plan_result

if __name__ == "__main__":
  prep_class("I'm doing a course for  year 5 on subject Mathematics in Geometry, , get school curriculum, and come up with few books recommendation plus  search latest resources on the internet base on the curriculum outcome. And come up with a 3 week teaching plan")
설명:
StateGraph(MessagesState):StateGraph객체를 만듭니다.StateGraph는 LangGraph의 핵심 개념입니다. 에이전트의 워크플로를 그래프로 나타내며, 그래프의 각 노드는 프로세스의 단계를 나타냅니다. 에이전트가 추론하고 행동하는 방식의 청사진을 정의하는 것으로 생각하면 됩니다.- 조건부 에지:
"determine_tool"노드에서 시작되는tools_condition인수는determine_tool함수의 출력을 기반으로 따라야 할 에지를 결정하는 함수일 가능성이 높습니다. 조건부 에지를 사용하면 LLM이 사용할 도구 (또는 사용자에게 직접 응답할지 여부)에 관한 결정을 기반으로 그래프를 분기할 수 있습니다. 여기에서 에이전트의 '지능'이 작동합니다. 상황에 따라 동작을 동적으로 조정할 수 있습니다. - 루프:
"tools"노드를"determine_tool"노드에 다시 연결하는 가장자리를 그래프에 추가합니다. 이렇게 하면 그래프에 루프가 생성되어 에이전트가 작업을 완료하고 만족스러운 답변을 제공할 만큼 충분한 정보를 수집할 때까지 도구를 반복적으로 사용할 수 있습니다. 이 루프는 여러 단계의 추론과 정보 수집이 필요한 복잡한 작업에 매우 중요합니다.
이제 플래너 에이전트를 테스트하여 다양한 도구를 어떻게 오케스트레이션하는지 확인해 보겠습니다.
이 코드는 특정 사용자 입력으로 prep_class 함수를 실행하여 커리큘럼, 도서 추천, 최신 인터넷 리소스를 사용하여 5학년 기하학 수업 계획을 만드는 요청을 시뮬레이션합니다.
👉 터미널을 닫았거나 환경 변수가 더 이상 설정되어 있지 않은 경우 터미널에서 다음 명령어를 다시 실행합니다.
export BOOK_PROVIDER_URL=$(gcloud run services describe book-provider --region=us-central1 --project=$PROJECT_ID --format="value(status.url)")
gcloud config set project $(cat ~/project_id.txt)
export PROJECT_ID=$(gcloud config get project)
export INSTANCE_NAME="aidemy"
export REGION="us-central1"
export DB_USER="postgres"
export DB_PASS="1234qwer"
export DB_NAME="aidemy-db"
👉코드를 실행합니다.
cd ~/aidemy-bootstrap/planner/
source env/bin/activate
pip install -r requirements.txt
python aidemy.py
터미널에서 로그를 확인합니다. 최종 교육 계획을 제공하기 전에 에이전트가 세 가지 도구 (학교 커리큘럼 가져오기, 도서 추천 받기, 최신 리소스 검색)를 모두 호출한다는 증거가 표시되어야 합니다. 이는 LangGraph 오케스트레이션이 올바르게 작동하고 에이전트가 사용 가능한 모든 도구를 지능적으로 사용하여 사용자의 요청을 처리하고 있음을 보여줍니다.
================================ Human Message =================================

I'm doing a course for  year 5 on subject Mathematics in Geometry, , get school curriculum, and come up with few books recommendation plus  search latest resources on the internet base on the curriculum outcome. And come up with a 3 week teaching plan
================================== Ai Message ==================================
Tool Calls:
  get_curriculum (xxx)
 Call ID: xxx
  Args:
    year: 5.0
    subject: Mathematics
================================= Tool Message =================================
Name: get_curriculum

Introduction to fractions, decimals, and percentages, along with foundational geometry and problem-solving techniques.
================================== Ai Message ==================================
Tool Calls:
  search_latest_resource (xxxx)
 Call ID: xxxx
  Args:
    year: 5.0
    search_text: Geometry
    curriculum: {"content": "Introduction to fractions, decimals, and percentages, along with foundational geometry and problem-solving techniques."}
    subject: Mathematics
================================= Tool Message =================================
Name: search_latest_resource

candidates=[Candidate(content=Content(parts=[Part(.....) automatic_function_calling_history=[] parsed=None
================================== Ai Message ==================================
Tool Calls:
  recommend_book (93b48189-4d69-4c09-a3bd-4e60cdc5f1c6)
 Call ID: 93b48189-4d69-4c09-a3bd-4e60cdc5f1c6
  Args:
    query: Mathematics Geometry Year 5
================================= Tool Message =================================
Name: recommend_book

[{.....}]

================================== Ai Message ==================================

Based on the curriculum outcome, here is a 3-week teaching plan for year 5 Mathematics Geometry:

**Week 1: Introduction to Shapes and Properties**
.........
스크립트가 아직 실행 중인 경우 Ctrl+C를 눌러 스크립트를 중지합니다.
👉 (이 단계는 선택사항임) 테스트 코드를 다른 프롬프트로 대체합니다. 이 프롬프트는 다른 도구를 호출해야 합니다.
if __name__ == "__main__":
  prep_class("I'm doing a course for year 5 on subject Mathematics in Geometry, search latest resources on the internet base on the subject. And come up with a 3 week teaching plan")
👉 터미널을 닫았거나 환경 변수가 더 이상 설정되어 있지 않으면 다음 명령어를 다시 실행하세요.
gcloud config set project $(cat ~/project_id.txt)
export BOOK_PROVIDER_URL=$(gcloud run services describe book-provider --region=us-central1 --project=$PROJECT_ID --format="value(status.url)")
export PROJECT_ID=$(gcloud config get project)
export INSTANCE_NAME="aidemy"
export REGION="us-central1"
export DB_USER="postgres"
export DB_PASS="1234qwer"
export DB_NAME="aidemy-db"
👉 (이 단계는 선택사항이며, 이전 단계를 실행한 경우에만 실행하세요) 코드를 다시 실행합니다.
cd ~/aidemy-bootstrap/planner/
source env/bin/activate
python aidemy.py
이번에는 무엇을 발견했나요? 에이전트가 호출한 도구는 무엇인가요? 이번에는 에이전트가 search_latest_resource 도구만 호출하는 것을 확인할 수 있습니다. 프롬프트에서 다른 두 도구가 필요하다고 지정하지 않았기 때문입니다. Google LLM은 다른 도구를 호출하지 않을 만큼 똑똑합니다.
================================ Human Message =================================

I'm doing a course for  year 5 on subject Mathematics in Geometry, search latest resources on the internet base on the subject. And come up with a 3 week teaching plan
================================== Ai Message ==================================
Tool Calls:
  get_curriculum (xxx)
 Call ID: xxx
  Args:
    year: 5.0
    subject: Mathematics
================================= Tool Message =================================
Name: get_curriculum

Introduction to fractions, decimals, and percentages, along with foundational geometry and problem-solving techniques.
================================== Ai Message ==================================
Tool Calls:
  search_latest_resource (xxx)
 Call ID: xxxx
  Args:
    year: 5.0
    subject: Mathematics
    curriculum: {"content": "Introduction to fractions, decimals, and percentages, along with foundational geometry and problem-solving techniques."}
    search_text: Geometry
================================= Tool Message =================================
Name: search_latest_resource

candidates=[Candidate(content=Content(parts=[Part(.......token_count=40, total_token_count=772) automatic_function_calling_history=[] parsed=None
================================== Ai Message ==================================

Based on the information provided, a 3-week teaching plan for Year 5 Mathematics focusing on Geometry could look like this:

**Week 1:  Introducing 2D Shapes**
........
* Use visuals, manipulatives, and real-world examples to make the learning experience engaging and relevant.
Ctrl+C를 눌러 스크립트를 중지합니다.
👉 (이 단계를 건너뛰지 마세요!) aidemy.py 파일을 깔끔하게 유지하려면 테스트 코드를 삭제하세요.
if __name__ == "__main__":
  prep_class("I'm doing a course for  year 5 on subject Mathematics in Geometry, search latest resources on the internet base on the subject. And come up with a 3 week teaching plan")
이제 에이전트 로직이 정의되었으므로 Flask 웹 애플리케이션을 실행해 보겠습니다. 이렇게 하면 교사가 에이전트와 상호작용할 수 있는 익숙한 양식 기반 인터페이스가 제공됩니다. 챗봇 상호작용은 LLM에서 흔히 사용되지만, 많은 교육자에게 더 직관적일 수 있으므로 기존 양식 제출 UI를 선택합니다.
👉 터미널을 닫았거나 환경 변수가 더 이상 설정되어 있지 않으면 다음 명령어를 다시 실행하세요.
export BOOK_PROVIDER_URL=$(gcloud run services describe book-provider --region=us-central1 --project=$PROJECT_ID --format="value(status.url)")
gcloud config set project $(cat ~/project_id.txt)
export PROJECT_ID=$(gcloud config get project)
export INSTANCE_NAME="aidemy"
export REGION="us-central1"
export DB_USER="postgres"
export DB_PASS="1234qwer"
export DB_NAME="aidemy-db"
👉 이제 웹 UI를 시작합니다.
cd ~/aidemy-bootstrap/planner/
source env/bin/activate
python app.py
Cloud Shell 터미널 출력에서 시작 메시지를 찾습니다. Flask는 일반적으로 실행 중이며 어떤 포트에서 실행 중인지 나타내는 메시지를 출력합니다.
Running on http://127.0.0.1:8080
Running on http://127.0.0.1:8080
The application needs to keep running to serve requests.
👉 오른쪽 상단의 '웹 미리보기' 메뉴에서 포트 8080에서 미리보기를 선택합니다. Cloud Shell에서 애플리케이션의 웹 미리보기가 표시된 새 브라우저 탭 또는 창이 열립니다.

애플리케이션 인터페이스에서 연도 5를 선택하고, 주제 Mathematics를 선택하고, 부가기능 요청에 Geometry를 입력합니다.
👉 애플리케이션 UI에서 벗어난 경우 다시 탐색하면 생성된 출력이 표시됩니다.
👉 터미널에서 Ctrl+C를 눌러 스크립트를 중지합니다.
👉 터미널에서 가상 환경을 종료합니다.
deactivate
8. 플래너 에이전트를 클라우드에 배포
이미지를 빌드하고 레지스트리에 푸시

이제 클라우드에 배포할 시간입니다.
👉 터미널에서 빌드할 Docker 이미지를 저장할 아티팩트 저장소를 만듭니다.
gcloud artifacts repositories create agent-repository \
    --repository-format=docker \
    --location=us-central1 \
    --description="My agent repository"
'Created repository [agent-repository]'가 표시됩니다.
👉 다음 명령어를 실행하여 Docker 이미지를 빌드합니다.
cd ~/aidemy-bootstrap/planner/
gcloud config set project $(cat ~/project_id.txt)
export PROJECT_ID=$(gcloud config get project)
docker build -t gcr.io/${PROJECT_ID}/aidemy-planner .
👉 GCR 대신 Artifact Registry에서 호스팅되도록 이미지에 다시 태그를 지정하고 태그가 지정된 이미지를 Artifact Registry에 푸시해야 합니다.
gcloud config set project $(cat ~/project_id.txt)
export PROJECT_ID=$(gcloud config get project)
docker tag gcr.io/${PROJECT_ID}/aidemy-planner us-central1-docker.pkg.dev/${PROJECT_ID}/agent-repository/aidemy-planner
docker push us-central1-docker.pkg.dev/${PROJECT_ID}/agent-repository/aidemy-planner
푸시가 완료되면 이미지가 Artifact Registry에 성공적으로 저장되었는지 확인할 수 있습니다.
👉 Google Cloud 콘솔에서 Artifact Registry로 이동합니다. agent-repository 저장소 내에 aidemy-planner 이미지가 있습니다. 
Secret Manager로 데이터베이스 사용자 인증 정보 보호
데이터베이스 사용자 인증 정보를 안전하게 관리하고 액세스하기 위해 Google Cloud Secret Manager를 사용합니다. 이렇게 하면 애플리케이션 코드에 민감한 정보가 하드 코딩되는 것을 방지하고 보안을 강화할 수 있습니다.
데이터베이스 사용자 이름, 비밀번호, 데이터베이스 이름에 대한 개별 보안 비밀을 만듭니다. 이 접근 방식을 사용하면 각 사용자 인증 정보를 독립적으로 관리할 수 있습니다.
👉 터미널에서 다음을 실행합니다.
gcloud secrets create db-user
printf "postgres" | gcloud secrets versions add db-user --data-file=-

gcloud secrets create db-pass
printf "1234qwer" | gcloud secrets versions add db-pass --data-file=-

gcloud secrets create db-name
printf "aidemy-db" | gcloud secrets versions add db-name --data-file=-
Secret Manager를 사용하는 것은 애플리케이션을 보호하고 민감한 사용자 인증 정보가 실수로 노출되지 않도록 하는 데 중요한 단계입니다. 클라우드 배포를 위한 보안 권장사항을 따릅니다.
Cloud Run에 배포
Cloud Run은 컨테이너화된 애플리케이션을 빠르고 쉽게 배포할 수 있는 완전 관리형 서버리스 플랫폼입니다. 인프라 관리를 추상화하여 코드 작성 및 배포에 집중할 수 있습니다. 플래너를 Cloud Run 서비스로 배포합니다.
👉Google Cloud 콘솔에서 'Cloud Run'으로 이동합니다. 컨테이너 배포를 클릭하고 SERVICE를 선택합니다. Cloud Run 서비스를 구성합니다.

- 컨테이너 이미지: URL 필드에서 '선택'을 클릭합니다. Artifact Registry에 푸시한 이미지 URL (예: us-central1-docker.pkg.dev/YOUR_PROJECT_ID/agent-repository/aidemy-planner/YOUR_IMG)을 찾습니다.
- 서비스 이름:
aidemy-planner - 리전:
us-central1리전을 선택합니다. - 인증: 이 워크숍에서는 '인증되지 않은 호출 허용'을 허용해도 됩니다. 프로덕션의 경우 액세스를 제한하는 것이 좋습니다.
- '컨테이너, 볼륨, 네트워킹, 보안' 섹션을 펼치고 컨테이너 탭에서 다음을 설정합니다.
- 설정 탭:
- 리소스
- memory : 2GiB
- 리소스
- 변수 및 보안 비밀 탭:
- 환경 변수에서 + 변수 추가 버튼을 클릭하여 다음 변수를 추가합니다.
- 이름:
GOOGLE_CLOUD_PROJECT, 값: <YOUR_PROJECT_ID> 추가 - 이름을
BOOK_PROVIDER_URL로 추가하고 값을 책 제공업체 함수 URL로 설정합니다. 터미널에서 다음 명령어를 사용하여 확인할 수 있습니다.gcloud config set project $(cat ~/project_id.txt) gcloud run services describe book-provider \ --region=us-central1 \ --project=$PROJECT_ID \ --format="value(status.url)"
- 이름:
- 환경 변수로 노출된 보안 비밀 섹션에서 + 보안 비밀로 참조 버튼을 클릭하여 다음 보안 비밀을 추가합니다.
- 이름 추가:
DB_USER, 보안 비밀:db-user선택, 버전:latest - 이름 추가:
DB_PASS, 보안 비밀:db-pass선택, 버전:latest - 이름 추가:
DB_NAME, 보안 비밀:db-name선택, 버전:latest
- 이름 추가:
- 환경 변수에서 + 변수 추가 버튼을 클릭하여 다음 변수를 추가합니다.
- 설정 탭:

다른 값은 기본값을 유지합니다.
👉 만들기를 클릭합니다.
Cloud Run에서 서비스를 배포합니다.
배포가 완료되면 세부정보 페이지가 아직 표시되지 않은 경우 서비스 이름을 클릭하여 세부정보 페이지로 이동합니다. 배포된 URL은 상단에서 확인할 수 있습니다.

👉 애플리케이션 인터페이스에서 연도로 7를 선택하고, 주제로 Mathematics를 선택하고, 부가기능 요청 필드에 Algebra를 입력합니다.
👉 계획 생성을 클릭합니다. 이렇게 하면 맞춤형 수업 계획을 생성하는 데 필요한 컨텍스트가 상담사에게 제공됩니다.
축하합니다. 강력한 AI 에이전트를 사용하여 수업 계획을 만들었습니다. 이를 통해 에이전트가 워크로드를 크게 줄이고 작업을 간소화하여 궁극적으로 효율성을 개선하고 교육자의 삶을 더 쉽게 만들 수 있다는 것을 알 수 있습니다.
9. 멀티 에이전트 시스템
이제 수업 계획 생성 도구를 성공적으로 구현했으므로 학생 포털을 구축하는 데 집중해 보겠습니다. 이 포털을 통해 학생들은 수업과 관련된 퀴즈, 오디오 요약, 과제에 액세스할 수 있습니다. 이 기능의 범위를 고려할 때 멀티 에이전트 시스템의 기능을 활용하여 모듈식의 확장 가능한 솔루션을 만들 것입니다.
앞서 설명한 것처럼 멀티 에이전트 시스템을 사용하면 모든 작업을 처리하기 위해 단일 에이전트에 의존하는 대신 워크로드를 더 작고 전문화된 작업으로 분류할 수 있으며, 각 작업은 전담 에이전트가 처리합니다. 이 접근 방식은 다음과 같은 몇 가지 주요 이점을 제공합니다.
모듈성 및 유지보수 가능성: 모든 작업을 수행하는 단일 에이전트를 만드는 대신 책임이 명확하게 정의된 더 작은 특화된 에이전트를 빌드합니다. 이러한 모듈화로 인해 시스템을 더 쉽게 이해하고 유지관리하고 디버그할 수 있습니다. 문제가 발생하면 대규모 코드베이스를 뒤져야 하는 대신 특정 에이전트로 문제를 격리할 수 있습니다.
확장성: 복잡한 단일 에이전트를 확장하면 병목 현상이 발생할 수 있습니다. 멀티 에이전트 시스템을 사용하면 특정 요구사항에 따라 개별 에이전트를 확장할 수 있습니다. 예를 들어 한 상담사가 많은 요청을 처리하는 경우 시스템의 나머지 부분에 영향을 주지 않고 해당 상담사의 인스턴스를 쉽게 늘릴 수 있습니다.
팀 전문화: 한 엔지니어에게 처음부터 전체 애플리케이션을 빌드해 달라고 요청하지 않는다고 생각하면 됩니다. 대신 각자 특정 분야에 전문 지식을 갖춘 전문가로 팀을 구성합니다. 마찬가지로 멀티 에이전트 시스템을 사용하면 다양한 LLM과 도구의 강점을 활용하여 특정 작업에 가장 적합한 에이전트에 할당할 수 있습니다.
동시 개발: 여러 팀이 서로 다른 에이전트에서 동시에 작업하여 개발 프로세스를 가속화할 수 있습니다. 상담사는 독립적이므로 한 상담사의 변경사항이 다른 상담사에게 영향을 미칠 가능성이 적습니다.
이벤트 기반 아키텍처
이러한 에이전트 간의 효과적인 커뮤니케이션과 조정을 위해 이벤트 기반 아키텍처를 사용합니다. 즉, 상담사는 시스템 내에서 발생하는 '이벤트'에 반응합니다.
에이전트는 특정 이벤트 유형 (예: '수업 계획 생성됨', '과제 생성됨') 이벤트가 발생하면 관련 상담사에게 알림이 전송되며 상담사는 이에 따라 대응할 수 있습니다. 이러한 분리를 통해 유연성, 확장성, 실시간 응답성이 향상됩니다.

이제 시작하려면 이러한 이벤트를 브로드캐스트할 방법이 필요합니다. 이를 위해 Pub/Sub 주제를 설정합니다. 먼저 plan이라는 주제를 만들어 보겠습니다.
👉 Google Cloud Console pub/sub로 이동합니다.
👉 주제 만들기 버튼을 클릭합니다.
👉 ID/이름이 plan인 주제를 구성하고 Add a default subscription을 선택 해제한 후 나머지는 기본값으로 두고 만들기를 클릭합니다.
Pub/Sub 페이지가 새로고침되고 이제 새로 만든 주제가 표에 표시됩니다. 
이제 Pub/Sub 이벤트 게시 기능을 플래너 에이전트에 통합해 보겠습니다. 방금 만든 Pub/Sub 주제에 '계획' 이벤트를 전송하는 새 도구를 추가합니다. 이 이벤트는 시스템의 다른 상담사 (예: 학생 포털의 상담사)에게 새로운 학습 계획이 제공됨을 알립니다.
👉Cloud Code 편집기로 돌아가서 planner 폴더에 있는 app.py 파일을 엽니다. 이벤트를 게시하는 함수를 추가할 것입니다. 바꾸기:
##ADD SEND PLAN EVENT FUNCTION HERE
아래와 같이 바꿉니다.
def send_plan_event(teaching_plan:str):
    """
    Send the teaching event to the topic called plan

    Args:
        teaching_plan: teaching plan
    """
    publisher = pubsub_v1.PublisherClient()
    print(f"-------------> Sending event to topic plan: {teaching_plan}")
    topic_path = publisher.topic_path(PROJECT_ID, "plan")

    message_data = {"teaching_plan": teaching_plan}
    data = json.dumps(message_data).encode("utf-8")

    future = publisher.publish(topic_path, data)

    return f"Published message ID: {future.result()}"
- send_plan_event: 이 함수는 생성된 교육 계획을 입력으로 가져와 Pub/Sub 게시자 클라이언트를 만들고, 주제 경로를 구성하고, 교육 계획을 JSON 문자열로 변환하고, 주제에 메시지를 게시합니다.
동일한 app.py 파일
👉프롬프트를 업데이트하여 에이전트가 학습 계획을 생성한 후 Pub/Sub 주제에 학습 계획 이벤트를 전송하도록 안내합니다. *바꾸기
### ADD send_plan_event CALL
다음과 함께
send_plan_event(teaching_plan)
send_plan_event 도구를 추가하고 프롬프트를 수정하여 플래너 에이전트가 Pub/Sub에 이벤트를 게시할 수 있도록 했습니다. 이를 통해 시스템의 다른 구성요소가 새로운 교육 계획의 생성에 반응할 수 있습니다. 이제 다음 섹션에서 작동하는 멀티 에이전트 시스템을 살펴보겠습니다.
10. 주문형 퀴즈로 학생의 역량 강화
학생이 자신의 구체적인 학습 계획에 맞게 맞춤설정된 무한한 퀴즈에 액세스할 수 있는 학습 환경을 상상해 보세요. 이러한 퀴즈는 답변과 설명을 포함한 즉각적인 피드백을 제공하여 자료에 대한 더 깊은 이해를 촉진합니다. 이것이 바로 Google의 AI 기반 퀴즈 포털을 통해 실현하고자 하는 잠재력입니다.
이 비전을 실현하기 위해 교육 계획의 내용을 기반으로 객관식 질문을 만들 수 있는 퀴즈 생성 구성요소를 빌드할 것입니다.

👉 Cloud Code 편집기의 탐색기 창에서 portal 폴더로 이동합니다. quiz.py 파일을 열고 다음 코드를 파일 끝에 복사하여 붙여넣습니다.
def generate_quiz_question(file_name: str, difficulty: str, region:str ):
    """Generates a single multiple-choice quiz question using the LLM.

    ```json
    {
      "question": "The question itself",
      "options": ["Option A", "Option B", "Option C", "Option D"],
      "answer": "The correct answer letter (A, B, C, or D)"
    }
    ```
    """

    print(f"region: {region}")
    # Connect to resourse needed from Google Cloud
    llm = VertexAI(model_name="gemini-2.5-flash-preview-04-17", location=region)


    plan=None
    #load the file using file_name and read content into string call plan
    with open(file_name, 'r') as f:
        plan = f.read()

    parser = JsonOutputParser(pydantic_object=QuizQuestion)


    instruction = f"You'll provide one question with difficulty level of {difficulty}, 4 options as multiple choices and provide the anwsers, the quiz needs to be related to the teaching plan {plan}"

    prompt = PromptTemplate(
        template="Generates a single multiple-choice quiz question\n {format_instructions}\n  {instruction}\n",
        input_variables=["instruction"],
        partial_variables={"format_instructions": parser.get_format_instructions()},
    )

    chain = prompt | llm | parser
    response = chain.invoke({"instruction": instruction})

    print(f"{response}")
    return  response
에이전트에서는 LLM의 출력을 이해하고 구조화하도록 특별히 설계된 JSON 출력 파서를 만듭니다. 앞서 정의한 QuizQuestion 모델을 사용하여 파싱된 출력이 올바른 형식 (질문, 선택사항, 답변)을 준수하는지 확인합니다.
👉 터미널에서 다음 명령어를 실행하여 가상 환경을 설정하고, 종속 항목을 설치하고, 에이전트를 시작합니다.
gcloud config set project $(cat ~/project_id.txt)
cd ~/aidemy-bootstrap/portal/
python -m venv env
source env/bin/activate
pip install -r requirements.txt
python app.py
👉 오른쪽 상단의 '웹 미리보기' 메뉴에서 포트 8080에서 미리보기를 선택합니다. Cloud Shell에서 애플리케이션의 웹 미리보기가 표시된 새 브라우저 탭 또는 창이 열립니다.
👉 웹 애플리케이션에서 상단 탐색 메뉴 또는 색인 페이지의 카드에서 '퀴즈' 링크를 클릭합니다. 학생에게 무작위로 생성된 퀴즈 3개가 표시됩니다. 이 퀴즈는 교육 계획을 기반으로 하며 Google의 AI 기반 퀴즈 생성 시스템의 성능을 보여줍니다.

👉로컬에서 실행 중인 프로세스를 중지하려면 터미널에서 Ctrl+C를 누릅니다.
설명을 위한 Gemini 2 Thinking
퀴즈가 있으니 시작하기에 좋습니다. 하지만 학생이 틀리면 어떻게 될까요? 그때 진정한 학습이 이루어지죠? 답이 틀린 이유와 올바른 답을 얻는 방법을 설명하면 사용자가 이를 기억할 가능성이 훨씬 높아집니다. 또한 혼란을 해소하고 자신감을 높이는 데도 도움이 됩니다.
그래서 Gemini 2의 '사고 모드' 모델이라는 강력한 도구를 도입할 예정입니다. AI가 설명하기 전에 생각을 정리할 시간을 조금 더 주는 것과 같습니다. 이를 통해 더 자세하고 나은 피드백을 제공할 수 있습니다.
학생을 지원하고, 답변하고, 자세히 설명하여 학생에게 도움이 될 수 있는지 확인하고 싶습니다. 테스트를 위해 악명 높은 까다로운 주제인 미적분학부터 시작해 보겠습니다.

👉먼저 portal 폴더 내의 answer.py에 있는 Cloud Code 편집기로 이동합니다. 다음 함수 코드를 바꿉니다.
def answer_thinking(question, options, user_response, answer, region):
    return ""
다음 코드 스니펫:
def answer_thinking(question, options, user_response, answer, region):
    try:
        llm = VertexAI(model_name="gemini-2.0-flash-001",location=region)

        input_msg = HumanMessage(content=[f"Here the question{question}, here are the available options {options}, this student's answer {user_response}, whereas the correct answer is {answer}"])
        prompt_template = ChatPromptTemplate.from_messages(
            [
                SystemMessage(
                    content=(
                        "You are a helpful teacher trying to teach the student on question, you were given the question and a set of multiple choices "
                        "what's the correct answer. use friendly tone"
                    )
                ),
                input_msg,
            ]
        )

        prompt = prompt_template.format()

        response = llm.invoke(prompt)
        print(f"response: {response}")

        return response
    except Exception as e:
        print(f"Error sending message to chatbot: {e}") # Log this error too!
        return f"Unable to process your request at this time. Due to the following reason: {str(e)}"


if __name__ == "__main__":
    question = "Evaluate the limit: lim (x→0) [(sin(5x) - 5x) / x^3]"
    options = ["A) -125/6", "B) -5/3 ", "C) -25/3", "D) -5/6"]
    user_response = "B"
    answer = "A"
    region = "us-central1"
    result = answer_thinking(question, options, user_response, answer, region)
Gemini 2 Flash 모델을 초기화하는 매우 간단한 Langchain 앱입니다. 여기서는 유용한 교사 역할을 하고 설명을 제공하도록 지시합니다.
👉터미널에서 다음 명령어를 실행합니다.
gcloud config set project $(cat ~/project_id.txt)
cd ~/aidemy-bootstrap/portal/
source env/bin/activate
python answer.py
원래 안내에 제공된 예와 비슷한 출력이 표시됩니다. 현재 모델은 자세한 설명을 제공하지 않을 수 있습니다.
Okay, I see the question and the choices. The question is to evaluate the limit:

lim (x→0) [(sin(5x) - 5x) / x^3]

You chose option B, which is -5/3, but the correct answer is A, which is -125/6.

It looks like you might have missed a step or made a small error in your calculations. This type of limit often involves using L'Hôpital's Rule or Taylor series expansion. Since we have the form 0/0, L'Hôpital's Rule is a good way to go! You need to apply it multiple times. Alternatively, you can use the Taylor series expansion of sin(x) which is:
sin(x) = x - x^3/3! + x^5/5! - ...
So, sin(5x) = 5x - (5x)^3/3! + (5x)^5/5! - ...
Then,  (sin(5x) - 5x) = - (5x)^3/3! + (5x)^5/5! - ...
Finally, (sin(5x) - 5x) / x^3 = - 5^3/3! + (5^5 * x^2)/5! - ...
Taking the limit as x approaches 0, we get -125/6.

Keep practicing, you'll get there!
👉 answer.py 파일에서 다음을 바꿉니다 .
answer_thinking 함수의 gemini-2.0-flash-001에서 gemini-2.0-flash-thinking-exp-01-21로 model_name
이렇게 하면 추론에 더 적합한 다른 LLM으로 변경됩니다. 이렇게 하면 모델이 더 나은 설명을 생성할 수 있습니다.
👉 answer.py 스크립트를 다시 실행하여 새로운 사고 모델을 테스트합니다.
gcloud config set project $(cat ~/project_id.txt)
cd ~/aidemy-bootstrap/portal/
source env/bin/activate
python answer.py
다음은 사고 모델의 응답 예시로, 미적분 문제를 푸는 방법을 단계별로 설명하는 훨씬 철저하고 자세한 응답을 제공합니다. 이는 고품질 설명을 생성하는 데 있어 '사고' 모델의 강력한 기능을 보여줍니다. 다음과 비슷한 출력이 표시됩니다.
Hey there! Let's take a look at this limit problem together. You were asked to evaluate:

lim (x→0) [(sin(5x) - 5x) / x^3]

and you picked option B, -5/3, but the correct answer is actually A, -125/6. Let's figure out why!

It's a tricky one because if we directly substitute x=0, we get (sin(0) - 0) / 0^3 = (0 - 0) / 0 = 0/0, which is an indeterminate form. This tells us we need to use a more advanced technique like L'Hopital's Rule or Taylor series expansion.

Let's use the Taylor series expansion for sin(y) around y=0. Do you remember it?  It looks like this:

sin(y) = y - y^3/3! + y^5/5! - ...
where 3! (3 factorial) is 3 × 2 × 1 = 6, 5! is 5 × 4 × 3 × 2 × 1 = 120, and so on.

In our problem, we have sin(5x), so we can substitute y = 5x into the Taylor series:

sin(5x) = (5x) - (5x)^3/3! + (5x)^5/5! - ...
sin(5x) = 5x - (125x^3)/6 + (3125x^5)/120 - ...

Now let's plug this back into our limit expression:

[(sin(5x) - 5x) / x^3] =  [ (5x - (125x^3)/6 + (3125x^5)/120 - ...) - 5x ] / x^3
Notice that the '5x' and '-5x' cancel out!  So we are left with:
= [ - (125x^3)/6 + (3125x^5)/120 - ... ] / x^3
Now, we can divide every term in the numerator by x^3:
= -125/6 + (3125x^2)/120 - ...

Finally, let's take the limit as x approaches 0.  As x gets closer and closer to zero, terms with x^2 and higher powers will become very, very small and approach zero.  So, we are left with:
lim (x→0) [ -125/6 + (3125x^2)/120 - ... ] = -125/6

Therefore, the correct answer is indeed **A) -125/6**.

It seems like your answer B, -5/3, might have come from perhaps missing a factor somewhere during calculation or maybe using an incorrect simplification. Double-check your steps when you were trying to solve it!

Don't worry, these limit problems can be a bit tricky sometimes! Keep practicing and you'll get the hang of it.  Let me know if you want to go through another similar example or if you have any more questions! 😊


Now that we have confirmed it works, let's use the portal.
👉answer.py에서 다음 테스트 코드를 삭제합니다.
if __name__ == "__main__":
    question = "Evaluate the limit: lim (x→0) [(sin(5x) - 5x) / x^3]"
    options = ["A) -125/6", "B) -5/3 ", "C) -25/3", "D) -5/6"]
    user_response = "B"
    answer = "A"
    region = "us-central1"
    result = answer_thinking(question, options, user_response, answer, region)
👉터미널에서 다음 명령어를 실행하여 가상 환경을 설정하고, 종속 항목을 설치하고, 에이전트를 시작합니다.
gcloud config set project $(cat ~/project_id.txt)
cd ~/aidemy-bootstrap/portal/
source env/bin/activate
python app.py
👉 오른쪽 상단의 '웹 미리보기' 메뉴에서 포트 8080에서 미리보기를 선택합니다. Cloud Shell에서 애플리케이션의 웹 미리보기가 표시된 새 브라우저 탭 또는 창이 열립니다.
👉 웹 애플리케이션에서 상단 탐색 메뉴 또는 색인 페이지의 카드에서 '퀴즈' 링크를 클릭합니다.
👉 모든 퀴즈에 답하고 하나 이상의 답이 틀린지 확인한 다음 제출을 클릭합니다.

응답을 기다리는 동안 멍하니 있지 말고 Cloud Editor의 터미널로 전환하세요. 에뮬레이터의 터미널에서 함수의 진행 상황과 생성된 출력 또는 오류 메시지를 확인할 수 있습니다. 😁
👉 터미널에서 Ctrl+C를 눌러 로컬에서 실행 중인 프로세스를 중지합니다.
11. 선택사항: Eventarc로 에이전트 조정
지금까지 학생 포털은 기본 교육 계획을 기반으로 퀴즈를 생성했습니다. 이는 유용하지만 계획 에이전트와 포털의 퀴즈 에이전트가 서로 소통하지 않는다는 의미입니다. 계획 수립 에이전트가 새로 생성된 교육 계획을 Pub/Sub 주제에 게시하는 기능을 추가한 것을 기억하시나요? 이제 포털 에이전트에 연결할 차례입니다.

새 교육 계획이 생성될 때마다 포털에서 퀴즈 콘텐츠를 자동으로 업데이트하도록 하겠습니다. 이를 위해 이러한 새 요금제를 수신할 수 있는 엔드포인트를 포털에 만듭니다.
👉 Cloud Code 편집기의 탐색기 창에서 portal 폴더로 이동합니다.
👉 수정할 app.py 파일을 엽니다. ## REPLACE ME! NEW TEACHING PLAN 줄을 다음 코드로 바꿉니다 .
@app.route('/new_teaching_plan', methods=['POST'])
def new_teaching_plan():
    try:

        # Get data from Pub/Sub message delivered via Eventarc
        envelope = request.get_json()
        if not envelope:
            return jsonify({'error': 'No Pub/Sub message received'}), 400

        if not isinstance(envelope, dict) or 'message' not in envelope:
            return jsonify({'error': 'Invalid Pub/Sub message format'}), 400

        pubsub_message = envelope['message']
        print(f"data: {pubsub_message['data']}")

        data = pubsub_message['data']
        data_str = base64.b64decode(data).decode('utf-8')
        data = json.loads(data_str)

        teaching_plan = data['teaching_plan']

        print(f"File content: {teaching_plan}")

        with open("teaching_plan.txt", "w") as f:
            f.write(teaching_plan)

        print(f"Teaching plan saved to local file: teaching_plan.txt")

        return jsonify({'message': 'File processed successfully'})


    except Exception as e:
        print(f"Error processing file: {e}")
        return jsonify({'error': 'Error processing file'}), 500
Cloud Run에 다시 빌드 및 배포
플래너와 포털 에이전트를 모두 업데이트하고 Cloud Run에 다시 배포해야 합니다. 이렇게 하면 최신 코드가 있고 이벤트를 통해 통신하도록 구성됩니다.

👉먼저 planner 에이전트 이미지를 다시 빌드하고 푸시합니다. 터미널에서 다음을 실행하세요.
cd ~/aidemy-bootstrap/planner/
gcloud config set project $(cat ~/project_id.txt)
export PROJECT_ID=$(gcloud config get project)
docker build -t gcr.io/${PROJECT_ID}/aidemy-planner .
export PROJECT_ID=$(gcloud config get project)
docker tag gcr.io/${PROJECT_ID}/aidemy-planner us-central1-docker.pkg.dev/${PROJECT_ID}/agent-repository/aidemy-planner
docker push us-central1-docker.pkg.dev/${PROJECT_ID}/agent-repository/aidemy-planner
👉마찬가지로 portal 에이전트 이미지를 빌드하고 푸시합니다.
cd ~/aidemy-bootstrap/portal/
gcloud config set project $(cat ~/project_id.txt)
export PROJECT_ID=$(gcloud config get project)
docker build -t gcr.io/${PROJECT_ID}/aidemy-portal .
export PROJECT_ID=$(gcloud config get project)
docker tag gcr.io/${PROJECT_ID}/aidemy-portal us-central1-docker.pkg.dev/${PROJECT_ID}/agent-repository/aidemy-portal
docker push us-central1-docker.pkg.dev/${PROJECT_ID}/agent-repository/aidemy-portal
👉 Artifact Registry로 이동하면 agent-repository 아래에 aidemy-planner 및 aidemy-portal 컨테이너 이미지가 모두 표시됩니다.

👉터미널로 돌아가 다음을 실행하여 플래너 에이전트의 Cloud Run 이미지를 업데이트합니다.
gcloud config set project $(cat ~/project_id.txt)
export PROJECT_ID=$(gcloud config get project)
gcloud run services update aidemy-planner \
    --region=us-central1 \
    --image=us-central1-docker.pkg.dev/${PROJECT_ID}/agent-repository/aidemy-planner:latest
다음과 비슷한 출력이 표시됩니다.
OK Deploying... Done.
  OK Creating Revision...
  OK Routing traffic...
Done.
Service [aidemy-planner] revision [aidemy-planner-xxxxx] has been deployed and is serving 100 percent of traffic.
Service URL: https://aidemy-planner-xxx.us-central1.run.app
서비스 URL을 기록해 둡니다. 이는 배포된 플래너 에이전트로 연결되는 링크입니다. 나중에 플래너 에이전트 서비스 URL을 확인해야 하는 경우 다음 명령어를 사용하세요.
gcloud config set project $(cat ~/project_id.txt)
export PROJECT_ID=$(gcloud config get project)
gcloud run services describe aidemy-planner \
    --region=us-central1 \
    --format 'value(status.url)'
👉다음 명령어를 실행하여 portal 에이전트의 Cloud Run 인스턴스를 만듭니다.
gcloud config set project $(cat ~/project_id.txt)
export PROJECT_ID=$(gcloud config get project)
gcloud run deploy aidemy-portal \
  --image=us-central1-docker.pkg.dev/${PROJECT_ID}/agent-repository/aidemy-portal:latest \
  --region=us-central1 \
  --platform=managed \
  --allow-unauthenticated \
  --memory=2Gi \
  --cpu=2 \
  --set-env-vars=GOOGLE_CLOUD_PROJECT=${PROJECT_ID}
다음과 비슷한 출력이 표시됩니다.
Deploying container to Cloud Run service [aidemy-portal] in project [xxxx] region [us-central1]
OK Deploying new service... Done.
  OK Creating Revision...
  OK Routing traffic...
  OK Setting IAM Policy...
Done.
Service [aidemy-portal] revision [aidemy-portal-xxxx] has been deployed and is serving 100 percent of traffic.
Service URL: https://aidemy-portal-xxxx.us-central1.run.app
서비스 URL을 기록해 둡니다. 이는 배포된 학생 포털로 연결되는 링크입니다. 나중에 학생 포털 서비스 URL을 확인해야 하는 경우 다음 명령어를 사용하세요.
gcloud config set project $(cat ~/project_id.txt)
export PROJECT_ID=$(gcloud config get project)
gcloud run services describe aidemy-portal \
    --region=us-central1 \
    --format 'value(status.url)'
Eventarc 트리거 만들기
하지만 여기서 중요한 질문이 있습니다. Pub/Sub 주제에 새 계획이 대기 중일 때 이 엔드포인트는 어떻게 알림을 받을까요? 이때 Eventarc가 등장하여 문제를 해결합니다.
Eventarc는 Pub/Sub 주제에 도착하는 새 메시지와 같은 특정 이벤트를 수신하고 이에 대한 응답으로 작업을 자동으로 트리거하는 브리지 역할을 합니다. 이 경우 새 교육 계획이 게시되면 이를 감지한 후 포털의 엔드포인트에 업데이트할 때임을 알리는 신호를 보냅니다.
Eventarc에서 이벤트 기반 커뮤니케이션을 처리하므로 플래너 에이전트와 포털 에이전트를 원활하게 연결하여 진정으로 역동적이고 반응성이 뛰어난 학습 시스템을 만들 수 있습니다. 최신 수업 계획을 적절한 위치에 자동으로 전달하는 스마트 메신저가 있는 것과 같습니다.
👉콘솔에서 Eventarc로 이동합니다.
👉'+ 트리거 만들기' 버튼을 클릭합니다.
트리거 구성 (기본사항):
- 트리거 이름:
plan-topic-trigger - 트리거 유형: Google 소스
- 이벤트 제공자: Cloud Pub/Sub
- 이벤트 유형:
google.cloud.pubsub.topic.v1.messagePublished - Cloud Pub/Sub 주제:
projects/PROJECT_ID/topics/plan선택 - 리전:
us-central1 - 서비스 계정:
roles/iam.serviceAccountTokenCreator역할이 있는 서비스 계정에 권한 부여- 기본값 사용: 기본 컴퓨팅 서비스 계정
- 이벤트 대상: Cloud Run
- Cloud Run 서비스:
aidemy-portal - 오류 메시지 무시: 'locations/me-central2'에 대한 권한이 거부됨(또는 존재하지 않는 리소스일 수도 있음)
- 서비스 URL 경로:
/new_teaching_plan
👉 '만들기'를 클릭합니다.
Eventarc 트리거 페이지가 새로고침되고 이제 새로 만든 트리거가 표에 표시됩니다.
이제 서비스 URL을 사용하여 planner 에이전트에 액세스하여 새로운 교육 계획을 요청합니다.
👉 터미널에서 다음을 실행하여 플래너 에이전트 서비스 URL을 확인합니다.
gcloud config set project $(cat ~/project_id.txt)
export PROJECT_ID=$(gcloud config get project)
gcloud run services list --platform=managed --region=us-central1 --format='value(URL)' | grep planner
👉 출력된 URL로 이동하여 이번에는 Year 5, Subject Science, Add-on Request atoms를 시도해 보세요.
그런 다음 1~2분 정도 기다립니다. 이 지연은 이 실습의 청구 제한으로 인해 발생한 것으로, 정상적인 조건에서는 지연이 발생하지 않습니다.
마지막으로 서비스 URL을 사용하여 학생 포털에 액세스합니다.
터미널에서 다음을 실행하여 학생 포털 에이전트 서비스 URL을 확인합니다.
gcloud config set project $(cat ~/project_id.txt)
export PROJECT_ID=$(gcloud config get project)
gcloud run services list --platform=managed --region=us-central1 --format='value(URL)' | grep portal
퀴즈가 업데이트되어 방금 생성한 새 교육 계획과 일치하는 것을 확인할 수 있습니다. Aidemy 시스템에 Eventarc가 성공적으로 통합되었음을 보여줍니다.

축하합니다. 확장성과 유연성을 향상하기 위해 이벤트 기반 아키텍처를 활용하여 Google Cloud에서 멀티 에이전트 시스템을 성공적으로 구축했습니다. 견고한 기반을 마련했지만 아직 살펴볼 사항이 더 있습니다. 이 아키텍처의 실제 이점을 자세히 알아보고, Gemini 2의 멀티모달 Live API의 강력한 기능을 살펴보고, LangGraph를 사용하여 단일 경로 오케스트레이션을 구현하는 방법을 알아보려면 다음 두 챕터를 계속 진행하세요.
12. 선택사항: Gemini를 사용한 오디오 요약
Gemini는 텍스트, 이미지, 오디오 등 다양한 소스의 정보를 이해하고 처리할 수 있어 학습과 콘텐츠 제작에 있어 완전히 새로운 가능성을 열어줍니다. Gemini의 '보기', '듣기', '읽기' 기능은 창의적이고 몰입도 높은 사용자 환경을 구현합니다.
시각적 요소나 텍스트를 만드는 것 외에도 학습의 중요한 단계는 효과적인 요약과 복습입니다. 교과서에서 읽은 내용보다 중독성 있는 노래 가사를 더 쉽게 기억하는 경우가 얼마나 많았나요? 소리는 매우 기억에 남을 수 있습니다. 이러한 이유로 Google은 Gemini의 멀티모달 기능을 활용하여 교육 계획의 오디오 요약을 생성할 예정입니다. 이를 통해 학생들은 편리하고 흥미로운 방식으로 자료를 검토할 수 있으며, 청각 학습의 힘을 통해 기억력과 이해력을 높일 수 있습니다.

생성된 오디오 파일을 저장할 위치가 필요합니다. Cloud Storage는 확장 가능하고 안정적인 솔루션을 제공합니다.
👉콘솔에서 스토리지로 이동합니다. 왼쪽 메뉴에서 '버킷'을 클릭합니다. 상단의 '+ 만들기' 버튼을 클릭합니다.
👉새 버킷을 구성합니다.
- 버킷 이름:
aidemy-recap-UNIQUE_NAME- 중요:
aidemy-recap-로 시작하는 고유한 버킷 이름을 정의해야 합니다. 이 고유한 접두사는 Cloud Storage 버킷을 만들 때 이름 충돌을 방지하는 데 중요합니다.
- 중요:
- 리전:
us-central1 - 스토리지 클래스: 'Standard' Standard는 자주 액세스하는 데이터에 적합합니다.
- 액세스 제어: 기본 '균일' 액세스 제어를 선택된 상태로 둡니다. 이렇게 하면 일관된 버킷 수준 액세스 제어가 제공됩니다.
- 고급 옵션: 이 워크숍에서는 기본 설정으로 충분합니다.
만들기 버튼을 클릭하여 버킷을 만듭니다.
- 공개 액세스 방지에 관한 팝업이 표시될 수 있습니다. '이 버킷에 공개 액세스 방지 적용' 체크박스를 선택된 상태로 두고
Confirm을 클릭합니다.
이제 버킷 목록에 새로 만든 버킷이 표시됩니다. 나중에 필요하므로 버킷 이름을 기억해 둡니다.
👉Cloud Code 편집기의 터미널에서 다음 명령어를 실행하여 서비스 계정에 버킷 액세스 권한을 부여합니다.
gcloud config set project $(cat ~/project_id.txt)
export PROJECT_ID=$(gcloud config get project)
export COURSE_BUCKET_NAME=$(gcloud storage buckets list --format="value(name)" | grep aidemy-recap)
export SERVICE_ACCOUNT_NAME=$(gcloud compute project-info describe --format="value(defaultServiceAccount)")
gcloud storage buckets add-iam-policy-binding gs://$COURSE_BUCKET_NAME \
    --member "serviceAccount:$SERVICE_ACCOUNT_NAME" \
    --role "roles/storage.objectViewer"

gcloud storage buckets add-iam-policy-binding gs://$COURSE_BUCKET_NAME \
    --member "serviceAccount:$SERVICE_ACCOUNT_NAME" \
    --role "roles/storage.objectCreator"
👉Cloud Code 편집기에서 courses 폴더 내의 audio.py 파일을 엽니다. 파일 끝에 다음 코드를 붙여넣습니다.
config = LiveConnectConfig(
    response_modalities=["AUDIO"],
    speech_config=SpeechConfig(
        voice_config=VoiceConfig(
            prebuilt_voice_config=PrebuiltVoiceConfig(
                voice_name="Charon",
            )
        )
    ),
)

async def process_weeks(teaching_plan: str):
    region = "us-east5" #To workaround onRamp quota limits
    client = genai.Client(vertexai=True, project=PROJECT_ID, location=region)

    clientAudio = genai.Client(vertexai=True, project=PROJECT_ID, location="us-central1")
    async with clientAudio.aio.live.connect(
        model=MODEL_ID,
        config=config,
    ) as session:
        for week in range(1, 4):
            response = client.models.generate_content(
                model="gemini-2.0-flash-001",
                contents=f"Given the following teaching plan: {teaching_plan}, Extrace content plan for week {week}. And return just the plan, nothingh else  " # Clarified prompt
            )

            prompt = f"""
                Assume you are the instructor.
                Prepare a concise and engaging recap of the key concepts and topics covered.
                This recap should be suitable for generating a short audio summary for students.
                Focus on the most important learnings and takeaways, and frame it as a direct address to the students.
                Avoid overly formal language and aim for a conversational tone, tell a few jokes.

                Teaching plan: {response.text} """
            print(f"prompt --->{prompt}")

            await session.send(input=prompt, end_of_turn=True)
            with open(f"temp_audio_week_{week}.raw", "wb") as temp_file:
                async for message in session.receive():
                    if message.server_content.model_turn:
                        for part in message.server_content.model_turn.parts:
                            if part.inline_data:
                                temp_file.write(part.inline_data.data)

            data, samplerate = sf.read(f"temp_audio_week_{week}.raw", channels=1, samplerate=24000, subtype='PCM_16', format='RAW')
            sf.write(f"course-week-{week}.wav", data, samplerate)

            storage_client = storage.Client()
            bucket = storage_client.bucket(BUCKET_NAME)
            blob = bucket.blob(f"course-week-{week}.wav")  # Or give it a more descriptive name
            blob.upload_from_filename(f"course-week-{week}.wav")
            print(f"Audio saved to GCS: gs://{BUCKET_NAME}/course-week-{week}.wav")
    await session.close()


def breakup_sessions(teaching_plan: str):
    asyncio.run(process_weeks(teaching_plan))
- 스트리밍 연결: 먼저 Live API 엔드포인트와 영구 연결이 설정됩니다. 요청을 보내고 응답을 받는 표준 API 호출과 달리 이 연결은 지속적인 데이터 교환을 위해 열린 상태로 유지됩니다.
- 구성 멀티모달: 구성을 사용하여 원하는 출력 유형 (이 경우 오디오)을 지정하고 사용할 매개변수 (예: 음성 선택, 오디오 인코딩)를 지정할 수도 있습니다.
- 비동기 처리: 이 API는 비동기적으로 작동합니다. 즉, 오디오 생성이 완료될 때까지 기다리는 동안 기본 스레드를 차단하지 않습니다. 데이터를 실시간으로 처리하고 출력을 청크로 전송하여 거의 즉각적인 환경을 제공합니다.
이제 핵심 질문은 이 오디오 생성 프로세스를 언제 실행해야 하는가입니다. 새 학습 계획이 생성되는 즉시 오디오 요약이 제공되는 것이 좋습니다. Pub/Sub 주제에 교육 계획을 게시하여 이미 이벤트 기반 아키텍처를 구현했으므로 해당 주제를 구독하기만 하면 됩니다.
하지만 새로운 수업 계획은 자주 생성하지 않습니다. 에이전트가 새 계획을 기다리며 계속 실행되는 것은 효율적이지 않습니다. 따라서 이 오디오 생성 로직을 Cloud Run 함수로 배포하는 것이 좋습니다.
함수로 배포하면 새 메시지가 Pub/Sub 주제에 게시될 때까지 휴면 상태로 유지됩니다. 이 경우 오디오 요약을 생성하고 버킷에 저장하는 함수가 자동으로 트리거됩니다.
👉main.py 파일의 courses 폴더에서 이 파일은 새 교육 계획이 제공될 때 트리거되는 Cloud Run 함수를 정의합니다. 계획을 수신하고 오디오 요약 생성을 시작합니다. 파일 끝에 다음 코드 스니펫을 추가합니다.
@functions_framework.cloud_event
def process_teaching_plan(cloud_event):
    print(f"CloudEvent received: {cloud_event.data}")
    time.sleep(60)
    try:
        if isinstance(cloud_event.data.get('message', {}).get('data'), str):  # Check for base64 encoding
            data = json.loads(base64.b64decode(cloud_event.data['message']['data']).decode('utf-8'))
            teaching_plan = data.get('teaching_plan') # Get the teaching plan
        elif 'teaching_plan' in cloud_event.data: # No base64
            teaching_plan = cloud_event.data["teaching_plan"]
        else:
            raise KeyError("teaching_plan not found") # Handle error explicitly

        #Load the teaching_plan as string and from cloud event, call audio breakup_sessions
        breakup_sessions(teaching_plan)

        return "Teaching plan processed successfully", 200

    except (json.JSONDecodeError, AttributeError, KeyError) as e:
        print(f"Error decoding CloudEvent data: {e} - Data: {cloud_event.data}")
        return "Error processing event", 500

    except Exception as e:
        print(f"Error processing teaching plan: {e}")
        return "Error processing teaching plan", 500
@functions_framework.cloud_event: 이 데코레이터는 함수를 CloudEvents에 의해 트리거되는 Cloud Run 함수로 표시합니다.
로컬에서 테스트
👉가상 환경에서 이를 실행하고 Cloud Run 함수에 필요한 Python 라이브러리를 설치합니다.
cd ~/aidemy-bootstrap/courses
gcloud config set project $(cat ~/project_id.txt)
export PROJECT_ID=$(gcloud config get project)
export COURSE_BUCKET_NAME=$(gcloud storage buckets list --format="value(name)" | grep aidemy-recap)
python -m venv env
source env/bin/activate
pip install -r requirements.txt
👉Cloud Run Functions 에뮬레이터를 사용하면 Google Cloud에 배포하기 전에 로컬에서 함수를 테스트할 수 있습니다. 다음을 실행하여 로컬 에뮬레이터를 시작합니다.
functions-framework --target process_teaching_plan --signature-type=cloudevent --source main.py
👉에뮬레이터가 실행되는 동안 테스트 CloudEvent를 에뮬레이터로 전송하여 새 교육 계획이 게시되는 것을 시뮬레이션할 수 있습니다. 새 터미널에서 다음을 실행합니다.

👉실행:
  curl -X POST \
  http://localhost:8080/ \
  -H "Content-Type: application/json" \
  -H "ce-id: event-id-01" \
  -H "ce-source: planner-agent" \
  -H "ce-specversion: 1.0" \
  -H "ce-type: google.cloud.pubsub.topic.v1.messagePublished" \
  -d '{
    "message": {
      "data": "eyJ0ZWFjaGluZ19wbGFuIjogIldlZWsgMTogMkQgU2hhcGVzIGFuZCBBbmdsZXMgLSBEYXkgMTogUmV2aWV3IG9mIGJhc2ljIDJEIHNoYXBlcyAoc3F1YXJlcywgcmVjdGFuZ2xlcywgdHJpYW5nbGVzLCBjaXJjbGVzKS4gRGF5IDI6IEV4cGxvcmluZyBkaWZmZXJlbnQgdHlwZXMgb2YgdHJpYW5nbGVzIChlcXVpbGF0ZXJhbCwgaXNvc2NlbGVzLCBzY2FsZW5lLCByaWdodC1hbmdsZWQpLiBEYXkgMzogRXhwbG9yaW5nIHF1YWRyaWxhdGVyYWxzIChzcXVhcmUsIHJlY3RhbmdsZSwgcGFyYWxsZWxvZ3JhbSwgcmhvbWJ1cywgdHJhcGV6aXVtKS4gRGF5IDQ6IEludHJvZHVjdGlvbiB0byBhbmdsZXM6IHJpZ2h0IGFuZ2xlcywgYWN1dGUgYW5nbGVzLCBhbmQgb2J0dXNlIGFuZ2xlcy4gRGF5IDU6IE1lYXN1cmluZyBhbmdsZXMgdXNpbmcgYSBwcm90cmFjdG9yLiBXZWVrIDI6IDNEIFNoYXBlcyBhbmQgU3ltbWV0cnkgLSBEYXkgNjogSW50cm9kdWN0aW9uIHRvIDNEIHNoYXBlczogY3ViZXMsIGN1Ym9pZHMsIHNwaGVyZXMsIGN5bGluZGVycywgY29uZXMsIGFuZCBweXJhbWlkcy4gRGF5IDc6IERlc2NyaWJpbmcgM0Qgc2hhcGVzIHVzaW5nIGZhY2VzLCBlZGdlcywgYW5kIHZlcnRpY2VzLiBEYXkgODogUmVsYXRpbmcgMkQgc2hhcGVzIHRvIDNEIHNoYXBlcy4gRGF5IDk6IElkZW50aWZ5aW5nIGxpbmVzIG9mIHN5bW1ldHJ5IGluIDJEIHNoYXBlcy4gRGF5IDEwOiBDb21wbGV0aW5nIHN5bW1ldHJpY2FsIGZpZ3VyZXMuIFdlZWsgMzogUG9zaXRpb24sIERpcmVjdGlvbiwgYW5kIFByb2JsZW0gU29sdmluZyAtIERheSAxMTogRGVzY3JpYmluZyBwb3NpdGlvbiB1c2luZyBjb29yZGluYXRlcyBpbiB0aGUgZmlyc3QgcXVhZHJhbnQuIERheSAxMjogUGxvdHRpbmcgY29vcmRpbmF0ZXMgdG8gZHJhdyBzaGFwZXMuIERheSAxMzogVW5kZXJzdGFuZGluZyB0cmFuc2xhdGlvbiAoc2xpZGluZyBhIHNoYXBlKS4gRGF5IDE0OiBVbmRlcnN0YW5kaW5nIHJlZmxlY3Rpb24gKGZsaXBwaW5nIGEgc2hhcGUpLiBEYXkgMTU6IFByb2JsZW0tc29sdmluZyBhY3Rpdml0aWVzIGludm9sdmluZyBwZXJpbWV0ZXIsIGFyZWEsIGFuZCBtaXNzaW5nIGFuZ2xlcy4ifQ=="
    }
  }'
응답을 기다리는 동안 멍하니 있지 말고 다른 Cloud Shell 터미널로 전환하세요. 에뮬레이터의 터미널에서 함수의 진행 상황과 생성된 출력 또는 오류 메시지를 확인할 수 있습니다. 😁
두 번째 터미널로 돌아가면 OK가 반환된 것을 확인할 수 있습니다.
👉버킷의 데이터를 확인하려면 Cloud Storage로 이동하여 '버킷' 탭을 선택한 다음 aidemy-recap-UNIQUE_NAME를 선택합니다.

👉에뮬레이터를 실행하는 터미널에서 ctrl+c를 입력하여 종료합니다. 두 번째 터미널을 닫습니다. 두 번째 터미널을 닫고 deactivate를 실행하여 가상 환경을 종료합니다.
deactivate
Google Cloud에 배포
 👉로컬에서 테스트한 후에는 과정 에이전트를 Google Cloud에 배포해야 합니다. 터미널에서 다음 명령어를 실행합니다.
cd ~/aidemy-bootstrap/courses
gcloud config set project $(cat ~/project_id.txt)
export PROJECT_ID=$(gcloud config get project)
export COURSE_BUCKET_NAME=$(gcloud storage buckets list --format="value(name)" | grep aidemy-recap)
gcloud functions deploy courses-agent \
  --region=us-central1 \
  --gen2 \
  --source=. \
  --runtime=python312 \
  --trigger-topic=plan \
  --entry-point=process_teaching_plan \
  --set-env-vars=GOOGLE_CLOUD_PROJECT=${PROJECT_ID},COURSE_BUCKET_NAME=$COURSE_BUCKET_NAME
Google Cloud 콘솔에서 Cloud Run으로 이동하여 배포를 확인합니다.courses-agent라는 새 서비스가 표시됩니다.

트리거 구성을 확인하려면 courses-agent 서비스를 클릭하여 세부정보를 확인합니다. '트리거' 탭으로 이동합니다.
계획 주제에 게시된 메시지를 수신 대기하도록 구성된 트리거가 표시됩니다.

마지막으로 엔드 투 엔드로 실행되는 것을 확인해 보겠습니다.
👉생성된 오디오 파일을 찾을 수 있도록 포털 에이전트를 구성해야 합니다. 터미널에서 다음을 실행합니다.
export COURSE_BUCKET_NAME=$(gcloud storage buckets list --format="value(name)" | grep aidemy-recap)
gcloud config set project $(cat ~/project_id.txt)
export PROJECT_ID=$(gcloud config get project)
gcloud run services update aidemy-portal \
    --region=us-central1 \
    --set-env-vars=GOOGLE_CLOUD_PROJECT=${PROJECT_ID},COURSE_BUCKET_NAME=$COURSE_BUCKET_NAME
👉계획 도구 에이전트 웹페이지를 사용하여 새로운 교육 계획을 생성해 보세요. 시작하는 데 몇 분 정도 걸릴 수 있습니다. 서버리스 서비스이므로 걱정하지 마세요.
플래너 에이전트에 액세스하려면 터미널에서 다음을 실행하여 서비스 URL을 가져옵니다.
gcloud run services list \
    --platform=managed \
    --region=us-central1 \
    --format='value(URL)' | grep planner
새 계획을 생성한 후 오디오가 생성될 때까지 2~3분 정도 기다립니다. 이 실습 계정의 결제 제한으로 인해 몇 분 정도 더 걸립니다.
함수의 '트리거' 탭을 확인하여 courses-agent 함수가 학습 계획을 수신했는지 모니터링할 수 있습니다. 페이지를 주기적으로 새로고침하면 함수가 호출된 것을 확인할 수 있습니다. 2분이 지나도 함수가 호출되지 않으면 학습 계획을 다시 생성해 보세요. 하지만 생성된 각 계획은 에이전트가 순차적으로 사용하고 처리하므로 백로그가 발생할 수 있으므로 계획을 연속으로 반복해서 생성하지 마세요.

👉포털을 방문하여 '강의'를 클릭합니다. 오디오 요약이 표시된 카드 3개가 표시됩니다. 포털 에이전트의 URL을 찾으려면 다음 단계를 따르세요.
gcloud run services list \
    --platform=managed \
    --region=us-central1 \
    --format='value(URL)' | grep portal
각 강의에서 '재생'을 클릭하여 오디오 요약이 방금 생성한 교육 계획과 일치하는지 확인하세요. 
가상 환경을 종료합니다.
deactivate
13. 선택사항: Gemini 및 DeepSeek를 사용한 역할 기반 공동작업
다양한 관점을 갖는 것은 특히 흥미롭고 사려 깊은 과제를 만들 때 매우 유용합니다. 이제 서로 다른 역할을 가진 두 가지 모델을 활용하여 과제를 생성하는 멀티 에이전트 시스템을 빌드합니다. 하나는 협업을 촉진하고 다른 하나는 자기 학습을 장려합니다. 워크플로가 고정된 경로를 따르는 '단일 샷' 아키텍처를 사용합니다.
Gemini 과제 생성기
 먼저 공동작업을 강조하는 과제를 생성하도록 Gemini 기능을 설정합니다.
 assignment 폴더에 있는 gemini.py 파일을 수정합니다.
👉다음 코드를 gemini.py 파일 끝에 붙여넣습니다.
def gen_assignment_gemini(state):
    region=get_next_region()
    client = genai.Client(vertexai=True, project=PROJECT_ID, location=region)
    print(f"---------------gen_assignment_gemini")
    response = client.models.generate_content(
        model=MODEL_ID, contents=f"""
        You are an instructor

        Develop engaging and practical assignments for each week, ensuring they align with the teaching plan's objectives and progressively build upon each other.

        For each week, provide the following:

        * **Week [Number]:** A descriptive title for the assignment (e.g., "Data Exploration Project," "Model Building Exercise").
        * **Learning Objectives Assessed:** List the specific learning objectives from the teaching plan that this assignment assesses.
        * **Description:** A detailed description of the task, including any specific requirements or constraints.  Provide examples or scenarios if applicable.
        * **Deliverables:** Specify what students need to submit (e.g., code, report, presentation).
        * **Estimated Time Commitment:**  The approximate time students should dedicate to completing the assignment.
        * **Assessment Criteria:** Briefly outline how the assignment will be graded (e.g., correctness, completeness, clarity, creativity).

        The assignments should be a mix of individual and collaborative work where appropriate.  Consider different learning styles and provide opportunities for students to apply their knowledge creatively.

        Based on this teaching plan: {state["teaching_plan"]}
        """
    )

    print(f"---------------gen_assignment_gemini answer {response.text}")

    state["model_one_assignment"] = response.text

    return state


import unittest

class TestGenAssignmentGemini(unittest.TestCase):
    def test_gen_assignment_gemini(self):
        test_teaching_plan = "Week 1: 2D Shapes and Angles - Day 1: Review of basic 2D shapes (squares, rectangles, triangles, circles). Day 2: Exploring different types of triangles (equilateral, isosceles, scalene, right-angled). Day 3: Exploring quadrilaterals (square, rectangle, parallelogram, rhombus, trapezium). Day 4: Introduction to angles: right angles, acute angles, and obtuse angles. Day 5: Measuring angles using a protractor. Week 2: 3D Shapes and Symmetry - Day 6: Introduction to 3D shapes: cubes, cuboids, spheres, cylinders, cones, and pyramids. Day 7: Describing 3D shapes using faces, edges, and vertices. Day 8: Relating 2D shapes to 3D shapes. Day 9: Identifying lines of symmetry in 2D shapes. Day 10: Completing symmetrical figures. Week 3: Position, Direction, and Problem Solving - Day 11: Describing position using coordinates in the first quadrant. Day 12: Plotting coordinates to draw shapes. Day 13: Understanding translation (sliding a shape). Day 14: Understanding reflection (flipping a shape). Day 15: Problem-solving activities involving perimeter, area, and missing angles."

        initial_state = {"teaching_plan": test_teaching_plan, "model_one_assignment": "", "model_two_assigmodel_one_assignmentnment": "", "final_assignment": ""}

        updated_state = gen_assignment_gemini(initial_state)

        self.assertIn("model_one_assignment", updated_state)
        self.assertIsNotNone(updated_state["model_one_assignment"])
        self.assertIsInstance(updated_state["model_one_assignment"], str)
        self.assertGreater(len(updated_state["model_one_assignment"]), 0)
        print(updated_state["model_one_assignment"])


if __name__ == '__main__':
    unittest.main()
Gemini 모델을 사용하여 과제를 생성합니다.
Gemini Agent를 테스트할 준비가 되었습니다.
👉터미널에서 다음 명령어를 실행하여 환경을 설정합니다.
cd ~/aidemy-bootstrap/assignment
gcloud config set project $(cat ~/project_id.txt)
export PROJECT_ID=$(gcloud config get project)
python -m venv env
source env/bin/activate
pip install -r requirements.txt
👉다음 명령어를 실행하여 테스트할 수 있습니다.
python gemini.py
출력에 그룹 작업이 더 많은 과제가 표시됩니다. 마지막의 어설트 테스트에서도 결과가 출력됩니다.
Here are some engaging and practical assignments for each week, designed to build progressively upon the teaching plan's objectives:

**Week 1: Exploring the World of 2D Shapes**

* **Learning Objectives Assessed:**
    * Identify and name basic 2D shapes (squares, rectangles, triangles, circles).
    * .....

* **Description:**
    * **Shape Scavenger Hunt:** Students will go on a scavenger hunt in their homes or neighborhoods, taking pictures of objects that represent different 2D shapes. They will then create a presentation or poster showcasing their findings, classifying each shape and labeling its properties (e.g., number of sides, angles, etc.).
    * **Triangle Trivia:** Students will research and create a short quiz or presentation about different types of triangles, focusing on their properties and real-world examples.
    * **Angle Exploration:** Students will use a protractor to measure various angles in their surroundings, such as corners of furniture, windows, or doors. They will record their measurements and create a chart categorizing the angles as right, acute, or obtuse.
....

**Week 2: Delving into the World of 3D Shapes and Symmetry**

* **Learning Objectives Assessed:**
    * Identify and name basic 3D shapes.
    * ....

* **Description:**
    * **3D Shape Construction:** Students will work in groups to build 3D shapes using construction paper, cardboard, or other materials. They will then create a presentation showcasing their creations, describing the number of faces, edges, and vertices for each shape.
    * **Symmetry Exploration:** Students will investigate the concept of symmetry by creating a visual representation of various symmetrical objects (e.g., butterflies, leaves, snowflakes) using drawing or digital tools. They will identify the lines of symmetry and explain their findings.
    * **Symmetry Puzzles:** Students will be given a half-image of a symmetrical figure and will be asked to complete the other half, demonstrating their understanding of symmetry. This can be done through drawing, cut-out activities, or digital tools.

**Week 3: Navigating Position, Direction, and Problem Solving**

* **Learning Objectives Assessed:**
    * Describe position using coordinates in the first quadrant.
    * ....

* **Description:**
    * **Coordinate Maze:** Students will create a maze using coordinates on a grid paper. They will then provide directions for navigating the maze using a combination of coordinate movements and translation/reflection instructions.
    * **Shape Transformations:** Students will draw shapes on a grid paper and then apply transformations such as translation and reflection, recording the new coordinates of the transformed shapes.
    * **Geometry Challenge:** Students will solve real-world problems involving perimeter, area, and angles. For example, they could be asked to calculate the perimeter of a room, the area of a garden, or the missing angle in a triangle.
....
ctl+c로 중지하고 테스트 코드를 정리합니다. gemini.py에서 다음 코드를 삭제합니다.
import unittest

class TestGenAssignmentGemini(unittest.TestCase):
    def test_gen_assignment_gemini(self):
        test_teaching_plan = "Week 1: 2D Shapes and Angles - Day 1: Review of basic 2D shapes (squares, rectangles, triangles, circles). Day 2: Exploring different types of triangles (equilateral, isosceles, scalene, right-angled). Day 3: Exploring quadrilaterals (square, rectangle, parallelogram, rhombus, trapezium). Day 4: Introduction to angles: right angles, acute angles, and obtuse angles. Day 5: Measuring angles using a protractor. Week 2: 3D Shapes and Symmetry - Day 6: Introduction to 3D shapes: cubes, cuboids, spheres, cylinders, cones, and pyramids. Day 7: Describing 3D shapes using faces, edges, and vertices. Day 8: Relating 2D shapes to 3D shapes. Day 9: Identifying lines of symmetry in 2D shapes. Day 10: Completing symmetrical figures. Week 3: Position, Direction, and Problem Solving - Day 11: Describing position using coordinates in the first quadrant. Day 12: Plotting coordinates to draw shapes. Day 13: Understanding translation (sliding a shape). Day 14: Understanding reflection (flipping a shape). Day 15: Problem-solving activities involving perimeter, area, and missing angles."

        initial_state = {"teaching_plan": test_teaching_plan, "model_one_assignment": "", "model_two_assigmodel_one_assignmentnment": "", "final_assignment": ""}

        updated_state = gen_assignment_gemini(initial_state)

        self.assertIn("model_one_assignment", updated_state)
        self.assertIsNotNone(updated_state["model_one_assignment"])
        self.assertIsInstance(updated_state["model_one_assignment"], str)
        self.assertGreater(len(updated_state["model_one_assignment"]), 0)
        print(updated_state["model_one_assignment"])


if __name__ == '__main__':
    unittest.main()
DeepSeek 과제 생성기 구성
클라우드 기반 AI 플랫폼은 편리하지만 데이터 개인 정보 보호 및 데이터 주권 보장을 위해서는 LLM을 자체 호스팅하는 것이 중요할 수 있습니다. Cloud Compute Engine 인스턴스에 가장 작은 DeepSeek 모델 (15억 개의 매개변수)을 배포합니다. Google의 Vertex AI 플랫폼에서 호스팅하거나 GKE 인스턴스에서 호스팅하는 등 다른 방법도 있지만, AI 에이전트에 관한 워크숍일 뿐이고 여러분을 계속 붙잡아 두고 싶지 않으므로 가장 간단한 방법을 사용하겠습니다. 하지만 관심이 있고 다른 옵션을 자세히 살펴보고 싶다면 할당 폴더의 deepseek-vertexai.py 파일을 참고하세요. 여기에는 VertexAI에 배포된 모델과 상호작용하는 방법의 샘플 코드가 제공됩니다.

👉터미널에서 다음 명령어를 실행하여 자체 호스팅 LLM 플랫폼 Ollama를 만듭니다.
cd ~/aidemy-bootstrap/assignment
gcloud config set project $(cat ~/project_id.txt)
gcloud compute instances create ollama-instance \
    --image-family=ubuntu-2204-lts \
    --image-project=ubuntu-os-cloud \
    --machine-type=e2-standard-4 \
    --zone=us-central1-a \
    --metadata-from-file startup-script=startup.sh \
    --boot-disk-size=50GB \
    --tags=ollama \
    --scopes=https://www.googleapis.com/auth/cloud-platform
Compute Engine 인스턴스가 실행 중인지 확인하려면 다음 단계를 따르세요.
Google Cloud 콘솔에서 Compute Engine > 'VM 인스턴스'로 이동합니다. ollama-instance가 실행 중임을 나타내는 녹색 체크표시와 함께 표시됩니다. 표시되지 않으면 영역이 us-central1인지 확인하세요. 표시되지 않으면 검색해야 할 수도 있습니다.

👉가장 작은 DeepSeek 모델을 설치하고 테스트합니다. Cloud Shell 편집기에서 새 터미널을 열고 다음 명령어를 실행하여 GCE 인스턴스에 SSH로 연결합니다.
gcloud compute ssh ollama-instance --zone=us-central1-a
SSH 연결을 설정하면 다음 메시지가 표시될 수 있습니다.
'계속하시겠어요 (Y/n)?'
Y(대소문자 구분 안 함)를 입력하고 Enter 키를 눌러 계속 진행합니다.
다음으로 SSH 키의 암호를 만들라는 메시지가 표시될 수 있습니다. 암호를 사용하지 않으려면 Enter 키를 두 번 눌러 기본값 (암호 없음)을 수락하면 됩니다.
👉이제 가상 머신에서 가장 작은 DeepSeek R1 모델을 가져와 작동하는지 테스트합니다.
ollama pull deepseek-r1:1.5b
ollama run deepseek-r1:1.5b "who are you?"
👉GCE 인스턴스를 종료하고 SSH 터미널에 다음을 입력합니다.
exit
👉다음으로 다른 서비스가 LLM에 액세스할 수 있도록 네트워크 정책을 설정합니다. 프로덕션 환경에서 이 작업을 수행하려면 서비스의 보안 로그인을 구현하거나 IP 액세스를 제한하여 인스턴스에 대한 액세스를 제한하세요. 실행:
gcloud compute firewall-rules create allow-ollama-11434 \
    --allow=tcp:11434 \
    --target-tags=ollama \
    --description="Allow access to Ollama on port 11434"
👉방화벽 정책이 올바르게 작동하는지 확인하려면 다음을 실행해 보세요.
export OLLAMA_HOST=http://$(gcloud compute instances describe ollama-instance --zone=us-central1-a --format='value(networkInterfaces[0].accessConfigs[0].natIP)'):11434
curl -X POST "${OLLAMA_HOST}/api/generate" \
     -H "Content-Type: application/json" \
     -d '{
          "prompt": "Hello, what are you?",
          "model": "deepseek-r1:1.5b",
          "stream": false
        }'
다음으로 과제 에이전트의 Deepseek 함수를 사용하여 개별 작업에 중점을 둔 과제를 생성합니다.
👉assignment 폴더에서 deepseek.py을 수정하고 다음 스니펫을 끝에 추가합니다.
def gen_assignment_deepseek(state):
    print(f"---------------gen_assignment_deepseek")

    template = """
        You are an instructor who favor student to focus on individual work.

        Develop engaging and practical assignments for each week, ensuring they align with the teaching plan's objectives and progressively build upon each other.

        For each week, provide the following:

        * **Week [Number]:** A descriptive title for the assignment (e.g., "Data Exploration Project," "Model Building Exercise").
        * **Learning Objectives Assessed:** List the specific learning objectives from the teaching plan that this assignment assesses.
        * **Description:** A detailed description of the task, including any specific requirements or constraints.  Provide examples or scenarios if applicable.
        * **Deliverables:** Specify what students need to submit (e.g., code, report, presentation).
        * **Estimated Time Commitment:**  The approximate time students should dedicate to completing the assignment.
        * **Assessment Criteria:** Briefly outline how the assignment will be graded (e.g., correctness, completeness, clarity, creativity).

        The assignments should be a mix of individual and collaborative work where appropriate.  Consider different learning styles and provide opportunities for students to apply their knowledge creatively.

        Based on this teaching plan: {teaching_plan}
        """


    prompt = ChatPromptTemplate.from_template(template)

    model = OllamaLLM(model="deepseek-r1:1.5b",
                   base_url=OLLAMA_HOST)

    chain = prompt | model


    response = chain.invoke({"teaching_plan":state["teaching_plan"]})
    state["model_two_assignment"] = response

    return state

import unittest

class TestGenAssignmentDeepseek(unittest.TestCase):
    def test_gen_assignment_deepseek(self):
        test_teaching_plan = "Week 1: 2D Shapes and Angles - Day 1: Review of basic 2D shapes (squares, rectangles, triangles, circles). Day 2: Exploring different types of triangles (equilateral, isosceles, scalene, right-angled). Day 3: Exploring quadrilaterals (square, rectangle, parallelogram, rhombus, trapezium). Day 4: Introduction to angles: right angles, acute angles, and obtuse angles. Day 5: Measuring angles using a protractor. Week 2: 3D Shapes and Symmetry - Day 6: Introduction to 3D shapes: cubes, cuboids, spheres, cylinders, cones, and pyramids. Day 7: Describing 3D shapes using faces, edges, and vertices. Day 8: Relating 2D shapes to 3D shapes. Day 9: Identifying lines of symmetry in 2D shapes. Day 10: Completing symmetrical figures. Week 3: Position, Direction, and Problem Solving - Day 11: Describing position using coordinates in the first quadrant. Day 12: Plotting coordinates to draw shapes. Day 13: Understanding translation (sliding a shape). Day 14: Understanding reflection (flipping a shape). Day 15: Problem-solving activities involving perimeter, area, and missing angles."

        initial_state = {"teaching_plan": test_teaching_plan, "model_one_assignment": "", "model_two_assignment": "", "final_assignment": ""}

        updated_state = gen_assignment_deepseek(initial_state)

        self.assertIn("model_two_assignment", updated_state)
        self.assertIsNotNone(updated_state["model_two_assignment"])
        self.assertIsInstance(updated_state["model_two_assignment"], str)
        self.assertGreater(len(updated_state["model_two_assignment"]), 0)
        print(updated_state["model_two_assignment"])


if __name__ == '__main__':
    unittest.main()
👉다음을 실행하여 테스트해 보겠습니다.
cd ~/aidemy-bootstrap/assignment
source env/bin/activate
gcloud config set project $(cat ~/project_id.txt)
export PROJECT_ID=$(gcloud config get project)
export OLLAMA_HOST=http://$(gcloud compute instances describe ollama-instance --zone=us-central1-a --format='value(networkInterfaces[0].accessConfigs[0].natIP)'):11434
python deepseek.py
자기 학습 작업이 더 많은 과제가 표시됩니다.
**Assignment Plan for Each Week**

---

### **Week 1: 2D Shapes and Angles**
- **Week Title:** "Exploring 2D Shapes"
Assign students to research and present on various 2D shapes. Include a project where they create models using straws and tape for triangles, draw quadrilaterals with specific measurements, and compare their properties.

### **Week 2: 3D Shapes and Symmetry**
Assign students to create models or nets for cubes and cuboids. They will also predict how folding these nets form the 3D shapes. Include a project where they identify symmetrical properties using mirrors or folding techniques.

### **Week 3: Position, Direction, and Problem Solving**

Assign students to use mirrors or folding techniques for reflections. Include activities where they measure angles, use a protractor, solve problems involving perimeter/area, and create symmetrical designs.
....
👉ctl+c를 중지하고 테스트 코드를 정리합니다. deepseek.py에서 다음 코드를 삭제합니다.
import unittest

class TestGenAssignmentDeepseek(unittest.TestCase):
    def test_gen_assignment_deepseek(self):
        test_teaching_plan = "Week 1: 2D Shapes and Angles - Day 1: Review of basic 2D shapes (squares, rectangles, triangles, circles). Day 2: Exploring different types of triangles (equilateral, isosceles, scalene, right-angled). Day 3: Exploring quadrilaterals (square, rectangle, parallelogram, rhombus, trapezium). Day 4: Introduction to angles: right angles, acute angles, and obtuse angles. Day 5: Measuring angles using a protractor. Week 2: 3D Shapes and Symmetry - Day 6: Introduction to 3D shapes: cubes, cuboids, spheres, cylinders, cones, and pyramids. Day 7: Describing 3D shapes using faces, edges, and vertices. Day 8: Relating 2D shapes to 3D shapes. Day 9: Identifying lines of symmetry in 2D shapes. Day 10: Completing symmetrical figures. Week 3: Position, Direction, and Problem Solving - Day 11: Describing position using coordinates in the first quadrant. Day 12: Plotting coordinates to draw shapes. Day 13: Understanding translation (sliding a shape). Day 14: Understanding reflection (flipping a shape). Day 15: Problem-solving activities involving perimeter, area, and missing angles."

        initial_state = {"teaching_plan": test_teaching_plan, "model_one_assignment": "", "model_two_assignment": "", "final_assignment": ""}

        updated_state = gen_assignment_deepseek(initial_state)

        self.assertIn("model_two_assignment", updated_state)
        self.assertIsNotNone(updated_state["model_two_assignment"])
        self.assertIsInstance(updated_state["model_two_assignment"], str)
        self.assertGreater(len(updated_state["model_two_assignment"]), 0)
        print(updated_state["model_two_assignment"])


if __name__ == '__main__':
    unittest.main()
이제 동일한 Gemini 모델을 사용하여 두 과제를 하나의 새로운 과제로 결합합니다. assignment 폴더에 있는 gemini.py 파일을 수정합니다.
👉다음 코드를 gemini.py 파일 끝에 붙여넣습니다.
def combine_assignments(state):
    print(f"---------------combine_assignments ")
    region=get_next_region()
    client = genai.Client(vertexai=True, project=PROJECT_ID, location=region)
    response = client.models.generate_content(
        model=MODEL_ID, contents=f"""
        Look at all the proposed assignment so far {state["model_one_assignment"]} and {state["model_two_assignment"]}, combine them and come up with a final assignment for student.
        """
    )

    state["final_assignment"] = response.text

    return state
두 모델의 강점을 결합하기 위해 LangGraph를 사용하여 정의된 워크플로를 오케스트레이션합니다. 이 워크플로는 세 단계로 구성됩니다. 첫째, Gemini 모델이 공동작업에 중점을 둔 과제를 생성합니다. 둘째, DeepSeek 모델이 개인 작업에 중점을 둔 과제를 생성합니다. 마지막으로 Gemini가 이 두 과제를 하나의 포괄적인 과제로 통합합니다. LLM 의사결정 없이 단계의 순서를 미리 정의하므로 단일 경로, 사용자 정의 오케스트레이션이 됩니다.

👉assignment 폴더 아래의 main.py 파일 끝에 다음 코드를 붙여넣습니다.
def create_assignment(teaching_plan: str):
    print(f"create_assignment---->{teaching_plan}")
    builder = StateGraph(State)
    builder.add_node("gen_assignment_gemini", gen_assignment_gemini)
    builder.add_node("gen_assignment_deepseek", gen_assignment_deepseek)
    builder.add_node("combine_assignments", combine_assignments)

    builder.add_edge(START, "gen_assignment_gemini")
    builder.add_edge("gen_assignment_gemini", "gen_assignment_deepseek")
    builder.add_edge("gen_assignment_deepseek", "combine_assignments")
    builder.add_edge("combine_assignments", END)

    graph = builder.compile()
    state = graph.invoke({"teaching_plan": teaching_plan})

    return state["final_assignment"]


import unittest

class TestCreateAssignment(unittest.TestCase):
    def test_create_assignment(self):
        test_teaching_plan = "Week 1: 2D Shapes and Angles - Day 1: Review of basic 2D shapes (squares, rectangles, triangles, circles). Day 2: Exploring different types of triangles (equilateral, isosceles, scalene, right-angled). Day 3: Exploring quadrilaterals (square, rectangle, parallelogram, rhombus, trapezium). Day 4: Introduction to angles: right angles, acute angles, and obtuse angles. Day 5: Measuring angles using a protractor. Week 2: 3D Shapes and Symmetry - Day 6: Introduction to 3D shapes: cubes, cuboids, spheres, cylinders, cones, and pyramids. Day 7: Describing 3D shapes using faces, edges, and vertices. Day 8: Relating 2D shapes to 3D shapes. Day 9: Identifying lines of symmetry in 2D shapes. Day 10: Completing symmetrical figures. Week 3: Position, Direction, and Problem Solving - Day 11: Describing position using coordinates in the first quadrant. Day 12: Plotting coordinates to draw shapes. Day 13: Understanding translation (sliding a shape). Day 14: Understanding reflection (flipping a shape). Day 15: Problem-solving activities involving perimeter, area, and missing angles."
        initial_state = {"teaching_plan": test_teaching_plan, "model_one_assignment": "", "model_two_assignment": "", "final_assignment": ""}
        updated_state = create_assignment(initial_state)

        print(updated_state)


if __name__ == '__main__':
    unittest.main()
👉create_assignment 함수를 처음 테스트하고 Gemini와 DeepSeek를 결합한 워크플로가 작동하는지 확인하려면 다음 명령어를 실행하세요.
cd ~/aidemy-bootstrap/assignment
source env/bin/activate
pip install -r requirements.txt
python main.py
학생 학습과 학생 그룹 활동을 위한 개별 관점을 모두 결합한 내용을 확인할 수 있습니다.
**Tasks:**

1. **Clue Collection:** Gather all the clues left by the thieves. These clues will include:
    * Descriptions of shapes and their properties (angles, sides, etc.)
    * Coordinate grids with hidden messages
    * Geometric puzzles requiring transformation (translation, reflection, rotation)
    * Challenges involving area, perimeter, and angle calculations

2. **Clue Analysis:** Decipher each clue using your geometric knowledge. This will involve:
    * Identifying the shape and its properties
    * Plotting coordinates and interpreting patterns on the grid
    * Solving geometric puzzles by applying transformations
    * Calculating area, perimeter, and missing angles

3. **Case Report:** Create a comprehensive case report outlining your findings. This report should include:
    * A detailed explanation of each clue and its solution
    * Sketches and diagrams to support your explanations
    * A step-by-step account of how you followed the clues to locate the artifact
    * A final conclusion about the thieves and their motives
👉ctl+c를 중지하고 테스트 코드를 정리합니다. main.py에서 다음 코드를 삭제합니다.
import unittest

class TestCreateAssignment(unittest.TestCase):
    def test_create_assignment(self):
        test_teaching_plan = "Week 1: 2D Shapes and Angles - Day 1: Review of basic 2D shapes (squares, rectangles, triangles, circles). Day 2: Exploring different types of triangles (equilateral, isosceles, scalene, right-angled). Day 3: Exploring quadrilaterals (square, rectangle, parallelogram, rhombus, trapezium). Day 4: Introduction to angles: right angles, acute angles, and obtuse angles. Day 5: Measuring angles using a protractor. Week 2: 3D Shapes and Symmetry - Day 6: Introduction to 3D shapes: cubes, cuboids, spheres, cylinders, cones, and pyramids. Day 7: Describing 3D shapes using faces, edges, and vertices. Day 8: Relating 2D shapes to 3D shapes. Day 9: Identifying lines of symmetry in 2D shapes. Day 10: Completing symmetrical figures. Week 3: Position, Direction, and Problem Solving - Day 11: Describing position using coordinates in the first quadrant. Day 12: Plotting coordinates to draw shapes. Day 13: Understanding translation (sliding a shape). Day 14: Understanding reflection (flipping a shape). Day 15: Problem-solving activities involving perimeter, area, and missing angles."
        initial_state = {"teaching_plan": test_teaching_plan, "model_one_assignment": "", "model_two_assignment": "", "final_assignment": ""}
        updated_state = create_assignment(initial_state)

        print(updated_state)


if __name__ == '__main__':
    unittest.main()

과제 생성 프로세스를 자동화하고 새로운 교육 계획에 대응하기 위해 기존 이벤트 기반 아키텍처를 활용할 예정입니다. 다음 코드는 새 교육 계획이 Pub/Sub 주제 'plan'에 게시될 때마다 트리거되는 Cloud Run 함수 (generate_assignment)를 정의합니다.
👉assignment 폴더의 main.py 끝에 다음 코드를 추가합니다.
@functions_framework.cloud_event
def generate_assignment(cloud_event):
    print(f"CloudEvent received: {cloud_event.data}")

    try:
        if isinstance(cloud_event.data.get('message', {}).get('data'), str):
            data = json.loads(base64.b64decode(cloud_event.data['message']['data']).decode('utf-8'))
            teaching_plan = data.get('teaching_plan')
        elif 'teaching_plan' in cloud_event.data:
            teaching_plan = cloud_event.data["teaching_plan"]
        else:
            raise KeyError("teaching_plan not found")

        assignment = create_assignment(teaching_plan)

        print(f"Assignment---->{assignment}")

        #Store the return assignment into bucket as a text file
        storage_client = storage.Client()
        bucket = storage_client.bucket(ASSIGNMENT_BUCKET)
        file_name = f"assignment-{random.randint(1, 1000)}.txt"
        blob = bucket.blob(file_name)
        blob.upload_from_string(assignment)

        return f"Assignment generated and stored in {ASSIGNMENT_BUCKET}/{file_name}", 200

    except (json.JSONDecodeError, AttributeError, KeyError) as e:
        print(f"Error decoding CloudEvent data: {e} - Data: {cloud_event.data}")
        return "Error processing event", 500

    except Exception as e:
        print(f"Error generate assignment: {e}")
        return "Error generate assignment", 500
로컬에서 테스트
Google Cloud에 배포하기 전에 Cloud Run Functions를 로컬에서 테스트하는 것이 좋습니다. 이를 통해 더 빠르게 반복하고 더 쉽게 디버깅할 수 있습니다.
먼저 생성된 과제 파일을 저장할 Cloud Storage 버킷을 만들고 서비스 계정에 버킷 액세스 권한을 부여합니다. 터미널에서 다음 명령어를 실행합니다.
👉중요: 'aidemy-assignment-'로 시작하는 고유한 ASSIGNMENT_BUCKET 이름을 정의해야 합니다. 이 고유한 이름은 Cloud Storage 버킷을 만들 때 이름 충돌을 방지하는 데 중요합니다. (<YOUR_NAME>을 임의의 단어로 바꿉니다.)
export ASSIGNMENT_BUCKET=aidemy-assignment-<YOUR_NAME> #Name must be unqiue
👉다음을 실행합니다.
gcloud config set project $(cat ~/project_id.txt)
export PROJECT_ID=$(gcloud config get project)
export SERVICE_ACCOUNT_NAME=$(gcloud compute project-info describe --format="value(defaultServiceAccount)")
gsutil mb -p $PROJECT_ID -l us-central1 gs://$ASSIGNMENT_BUCKET

gcloud storage buckets add-iam-policy-binding gs://$ASSIGNMENT_BUCKET \
    --member "serviceAccount:$SERVICE_ACCOUNT_NAME" \
    --role "roles/storage.objectViewer"

gcloud storage buckets add-iam-policy-binding gs://$ASSIGNMENT_BUCKET \
    --member "serviceAccount:$SERVICE_ACCOUNT_NAME" \
    --role "roles/storage.objectCreator"
👉이제 Cloud Run Functions 에뮬레이터를 시작합니다.
cd ~/aidemy-bootstrap/assignment
functions-framework \
    --target generate_assignment \
    --signature-type=cloudevent \
    --source main.py
👉에뮬레이터가 한 터미널에서 실행되는 동안 Cloud Shell에서 두 번째 터미널을 엽니다. 두 번째 터미널에서 에뮬레이터로 테스트 CloudEvent를 전송하여 새 교육 계획이 게시되는 상황을 시뮬레이션합니다.
  curl -X POST \
  http://localhost:8080/ \
  -H "Content-Type: application/json" \
  -H "ce-id: event-id-01" \
  -H "ce-source: planner-agent" \
  -H "ce-specversion: 1.0" \
  -H "ce-type: google.cloud.pubsub.topic.v1.messagePublished" \
  -d '{
    "message": {
      "data": "eyJ0ZWFjaGluZ19wbGFuIjogIldlZWsgMTogMkQgU2hhcGVzIGFuZCBBbmdsZXMgLSBEYXkgMTogUmV2aWV3IG9mIGJhc2ljIDJEIHNoYXBlcyAoc3F1YXJlcywgcmVjdGFuZ2xlcywgdHJpYW5nbGVzLCBjaXJjbGVzKS4gRGF5IDI6IEV4cGxvcmluZyBkaWZmZXJlbnQgdHlwZXMgb2YgdHJpYW5nbGVzIChlcXVpbGF0ZXJhbCwgaXNvc2NlbGVzLCBzY2FsZW5lLCByaWdodC1hbmdsZWQpLiBEYXkgMzogRXhwbG9yaW5nIHF1YWRyaWxhdGVyYWxzIChzcXVhcmUsIHJlY3RhbmdsZSwgcGFyYWxsZWxvZ3JhbSwgcmhvbWJ1cywgdHJhcGV6aXVtKS4gRGF5IDQ6IEludHJvZHVjdGlvbiB0byBhbmdsZXM6IHJpZ2h0IGFuZ2xlcywgYWN1dGUgYW5nbGVzLCBhbmQgb2J0dXNlIGFuZ2xlcy4gRGF5IDU6IE1lYXN1cmluZyBhbmdsZXMgdXNpbmcgYSBwcm90cmFjdG9yLiBXZWVrIDI6IDNEIFNoYXBlcyBhbmQgU3ltbWV0cnkgLSBEYXkgNjogSW50cm9kdWN0aW9uIHRvIDNEIHNoYXBlczogY3ViZXMsIGN1Ym9pZHMsIHNwaGVyZXMsIGN5bGluZGVycywgY29uZXMsIGFuZCBweXJhbWlkcy4gRGF5IDc6IERlc2NyaWJpbmcgM0Qgc2hhcGVzIHVzaW5nIGZhY2VzLCBlZGdlcywgYW5kIHZlcnRpY2VzLiBEYXkgODogUmVsYXRpbmcgMkQgc2hhcGVzIHRvIDNEIHNoYXBlcy4gRGF5IDk6IElkZW50aWZ5aW5nIGxpbmVzIG9mIHN5bW1ldHJ5IGluIDJEIHNoYXBlcy4gRGF5IDEwOiBDb21wbGV0aW5nIHN5bW1ldHJpY2FsIGZpZ3VyZXMuIFdlZWsgMzogUG9zaXRpb24sIERpcmVjdGlvbiwgYW5kIFByb2JsZW0gU29sdmluZyAtIERheSAxMTogRGVzY3JpYmluZyBwb3NpdGlvbiB1c2luZyBjb29yZGluYXRlcyBpbiB0aGUgZmlyc3QgcXVhZHJhbnQuIERheSAxMjogUGxvdHRpbmcgY29vcmRpbmF0ZXMgdG8gZHJhdyBzaGFwZXMuIERheSAxMzogVW5kZXJzdGFuZGluZyB0cmFuc2xhdGlvbiAoc2xpZGluZyBhIHNoYXBlKS4gRGF5IDE0OiBVbmRlcnN0YW5kaW5nIHJlZmxlY3Rpb24gKGZsaXBwaW5nIGEgc2hhcGUpLiBEYXkgMTU6IFByb2JsZW0tc29sdmluZyBhY3Rpdml0aWVzIGludm9sdmluZyBwZXJpbWV0ZXIsIGFyZWEsIGFuZCBtaXNzaW5nIGFuZ2xlcy4ifQ=="
    }
  }'
응답을 기다리는 동안 멍하니 있지 말고 다른 Cloud Shell 터미널로 전환하세요. 에뮬레이터의 터미널에서 함수의 진행 상황과 생성된 출력 또는 오류 메시지를 확인할 수 있습니다. 😁
curl 명령어는 'OK'를 출력해야 합니다(줄바꿈 없음). 따라서 'OK'가 터미널 셸 프롬프트와 동일한 줄에 표시될 수 있습니다.
할당이 성공적으로 생성되고 저장되었는지 확인하려면 Google Cloud 콘솔로 이동하여 스토리지 > 'Cloud Storage'로 이동합니다. 만든 aidemy-assignment 버킷을 선택합니다. 버킷에 assignment-{random number}.txt라는 텍스트 파일이 표시됩니다. 파일을 클릭하여 다운로드하고 콘텐츠를 확인합니다. 이렇게 하면 새로 생성된 할당이 새 파일에 포함되어 있는지 확인할 수 있습니다.

👉에뮬레이터를 실행하는 터미널에서 ctrl+c를 입력하여 종료합니다. 두 번째 터미널을 닫습니다. 👉또한 에뮬레이터를 실행하는 터미널에서 가상 환경을 종료합니다.
deactivate
👉다음으로 할당 에이전트를 클라우드에 배포합니다.
cd ~/aidemy-bootstrap/assignment
export ASSIGNMENT_BUCKET=$(gcloud storage buckets list --format="value(name)" | grep aidemy-assignment)
export OLLAMA_HOST=http://$(gcloud compute instances describe ollama-instance --zone=us-central1-a --format='value(networkInterfaces[0].accessConfigs[0].natIP)'):11434
gcloud config set project $(cat ~/project_id.txt)
export PROJECT_ID=$(gcloud config get project)
gcloud functions deploy assignment-agent \
 --gen2 \
 --timeout=540 \
 --memory=2Gi \
 --cpu=1 \
 --set-env-vars="ASSIGNMENT_BUCKET=${ASSIGNMENT_BUCKET}" \
 --set-env-vars=GOOGLE_CLOUD_PROJECT=${GOOGLE_CLOUD_PROJECT} \
 --set-env-vars=OLLAMA_HOST=${OLLAMA_HOST} \
 --region=us-central1 \
 --runtime=python312 \
 --source=. \
 --entry-point=generate_assignment \
 --trigger-topic=plan
Google Cloud 콘솔로 이동하여 Cloud Run으로 이동하여 배포를 확인합니다. courses-agent라는 새 서비스가 표시됩니다. 
이제 과제 생성 워크플로가 구현되고 테스트되고 배포되었으므로 다음 단계로 넘어갈 수 있습니다. 학생 포털 내에서 이러한 과제에 액세스할 수 있도록 하는 것입니다.
14. 선택사항: Gemini 및 DeepSeek을 사용한 역할 기반 공동작업 - 계속
동적 웹사이트 생성
학생 포털을 개선하고 참여도를 높이기 위해 과제 페이지에 동적 HTML 생성을 구현할 예정입니다. 목표는 새로운 과제가 생성될 때마다 신선하고 시각적으로 매력적인 디자인으로 포털을 자동으로 업데이트하는 것입니다. 이를 통해 LLM의 코딩 기능을 활용하여 더욱 역동적이고 흥미로운 사용자 경험을 만들 수 있습니다.

👉Cloud Shell 편집기에서 portal 폴더 내의 render.py 파일을 수정하고
def render_assignment_page():
    return ""
다음 코드 스니펫을 사용합니다.
def render_assignment_page(assignment: str):
    try:
        region=get_next_region()
        llm = VertexAI(model_name="gemini-2.0-flash-001", location=region)
        input_msg = HumanMessage(content=[f"Here the assignment {assignment}"])
        prompt_template = ChatPromptTemplate.from_messages(
            [
                SystemMessage(
                    content=(
                        """
                        As a frontend developer, create HTML to display a student assignment with a creative look and feel. Include the following navigation bar at the top:
                        ```
                        <nav>
                            <a href="/">Home</a>
                            <a href="/quiz">Quizzes</a>
                            <a href="/courses">Courses</a>
                            <a href="/assignment">Assignments</a>
                        </nav>
                        ```
                        Also include these links in the <head> section:
                        ```
                        <link rel="stylesheet" href="{{ url_for('static', filename='style.css') }}">
                        <link rel="preconnect" href="https://fonts.googleapis.com">
                        <link rel="preconnect" href="https://fonts.gstatic.com" crossorigin>
                        <link href="https://fonts.googleapis.com/css2?family=Roboto:wght@400;500&display=swap" rel="stylesheet">

                        ```
                        Do not apply inline styles to the navigation bar.
                        The HTML should display the full assignment content. In its CSS, be creative with the rainbow colors and aesthetic.
                        Make it creative and pretty
                        The assignment content should be well-structured and easy to read.
                        respond with JUST the html file
                        """
                    )
                ),
                input_msg,
            ]
        )

        prompt = prompt_template.format()

        response = llm.invoke(prompt)

        response = response.replace("```html", "")
        response = response.replace("```", "")
        with open("templates/assignment.html", "w") as f:
            f.write(response)


        print(f"response: {response}")

        return response
    except Exception as e:
        print(f"Error sending message to chatbot: {e}") # Log this error too!
        return f"Unable to process your request at this time. Due to the following reason: {str(e)}"
Gemini 모델을 사용하여 과제의 HTML을 동적으로 생성합니다. 과제 콘텐츠를 입력으로 사용하고 프롬프트를 사용하여 Gemini에게 창의적인 스타일로 시각적으로 매력적인 HTML 페이지를 만들도록 지시합니다.
다음으로 과제 버킷에 새 문서가 추가될 때마다 트리거되는 엔드포인트를 만듭니다.
👉포털 폴더 내에서 app.py 파일을 수정하고 ## REPLACE ME! RENDER ASSIGNMENT 줄을 다음 코드로 바꿉니다.
@app.route('/render_assignment', methods=['POST'])
def render_assignment():
    try:
        data = request.get_json()
        file_name = data.get('name')
        bucket_name = data.get('bucket')

        if not file_name or not bucket_name:
            return jsonify({'error': 'Missing file name or bucket name'}), 400

        storage_client = storage.Client()
        bucket = storage_client.bucket(bucket_name)
        blob = bucket.blob(file_name)
        content = blob.download_as_text()

        print(f"File content: {content}")

        render_assignment_page(content)

        return jsonify({'message': 'Assignment rendered successfully'})

    except Exception as e:
        print(f"Error processing file: {e}")
        return jsonify({'error': 'Error processing file'}), 500
트리거되면 요청 데이터에서 파일 이름과 버킷 이름을 가져오고, Cloud Storage에서 과제 콘텐츠를 다운로드하고, render_assignment_page 함수를 호출하여 HTML을 생성합니다.
👉로컬에서 실행합니다.
cd ~/aidemy-bootstrap/portal
source env/bin/activate
python app.py
👉Cloud Shell 창 상단의 '웹 미리보기' 메뉴에서 '포트 8080에서 미리보기'를 선택합니다. 그러면 새 브라우저 탭에서 애플리케이션이 열립니다. 탐색 메뉴에서 과제 링크로 이동합니다. 이 시점에는 빈 페이지가 표시되어야 합니다. 과제 에이전트와 포털 간에 콘텐츠를 동적으로 채우기 위한 통신 브리지를 아직 설정하지 않았으므로 예상되는 동작입니다.

Ctrl+C를 눌러 스크립트를 중지합니다.
👉이러한 변경사항을 통합하고 업데이트된 코드를 배포하려면 포털 에이전트 이미지를 재빌드하고 푸시하세요.
cd ~/aidemy-bootstrap/portal/
gcloud config set project $(cat ~/project_id.txt)
export PROJECT_ID=$(gcloud config get project)
docker build -t gcr.io/${PROJECT_ID}/aidemy-portal .
docker tag gcr.io/${PROJECT_ID}/aidemy-portal us-central1-docker.pkg.dev/${PROJECT_ID}/agent-repository/aidemy-portal
docker push us-central1-docker.pkg.dev/${PROJECT_ID}/agent-repository/aidemy-portal
👉새 이미지를 푸시한 후 Cloud Run 서비스를 재배포합니다. 다음 스크립트를 실행하여 Cloud Run 업데이트를 강제 적용합니다.
gcloud config set project $(cat ~/project_id.txt)
export PROJECT_ID=$(gcloud config get project)
export COURSE_BUCKET_NAME=$(gcloud storage buckets list --format="value(name)" | grep aidemy-recap)
gcloud run services update aidemy-portal \
    --region=us-central1 \
    --set-env-vars=GOOGLE_CLOUD_PROJECT=${PROJECT_ID},COURSE_BUCKET_NAME=$COURSE_BUCKET_NAME
👉이제 과제 버킷에 생성 (완료)된 새 객체를 수신하는 Eventarc 트리거를 배포합니다. 이 트리거는 새 과제 파일이 생성되면 포털 서비스에서 /render_assignment 엔드포인트를 자동으로 호출합니다.
gcloud config set project $(cat ~/project_id.txt)
export PROJECT_ID=$(gcloud config get project)
gcloud projects add-iam-policy-binding $PROJECT_ID \
  --member="serviceAccount:$(gcloud storage service-agent --project $PROJECT_ID)" \
  --role="roles/pubsub.publisher"
export SERVICE_ACCOUNT_NAME=$(gcloud compute project-info describe --format="value(defaultServiceAccount)")
gcloud eventarc triggers create portal-assignment-trigger \
--location=us-central1 \
--service-account=$SERVICE_ACCOUNT_NAME \
--destination-run-service=aidemy-portal \
--destination-run-region=us-central1 \
--destination-run-path="/render_assignment" \
--event-filters="bucket=$ASSIGNMENT_BUCKET" \
--event-filters="type=google.cloud.storage.object.v1.finalized"
트리거가 성공적으로 생성되었는지 확인하려면 Google Cloud 콘솔에서 Eventarc 트리거 페이지로 이동합니다. 표에 portal-assignment-trigger이 표시됩니다. 트리거 이름을 클릭하여 세부정보를 확인합니다. 
새 트리거가 활성화되려면 최대 2~3분이 걸릴 수 있습니다.
동적 할당 생성 기능을 실제로 확인하려면 다음 명령어를 실행하여 플래너 에이전트의 URL을 찾으세요 (URL이 없는 경우).
gcloud run services list --platform=managed --region=us-central1 --format='value(URL)' | grep planner
포털 에이전트의 URL을 찾습니다.
gcloud run services list --platform=managed --region=us-central1 --format='value(URL)' | grep portal
플래너 에이전트에서 새로운 교육 계획을 생성합니다.

오디오 생성, 과제 생성, HTML 렌더링이 완료될 때까지 몇 분 정도 기다린 후 학생 포털로 이동합니다.
👉탐색 메뉴에서 '과제' 링크를 클릭합니다. 동적으로 생성된 HTML이 포함된 새로 생성된 과제가 표시됩니다. 수업 계획이 생성될 때마다 동적 과제여야 합니다.

Aidemy 멀티 에이전트 시스템을 완료하신 것을 축하드립니다. 다음과 같은 분야에서 실무 경험과 유용한 통계를 얻었습니다.
- 모듈성, 확장성, 전문성, 간소화된 유지보수 등 멀티 에이전트 시스템의 이점
- 반응성이 뛰어나고 느슨하게 결합된 애플리케이션을 빌드하기 위한 이벤트 기반 아키텍처의 중요성
- LLM을 전략적으로 사용하여 작업에 적합한 모델을 선택하고 실제 영향을 미치는 도구와 통합합니다.
- Google Cloud 서비스를 사용하여 확장 가능하고 안정적인 솔루션을 만드는 클라우드 네이티브 개발 방식
- 데이터 개인 정보 보호 및 공급업체 솔루션의 대안으로 자체 호스팅 모델을 고려하는 것의 중요성
이제 Google Cloud에서 정교한 AI 기반 애플리케이션을 빌드하기 위한 탄탄한 기반을 갖추었습니다.
15. 과제 및 다음 단계
Aidemy 멀티 에이전트 시스템을 빌드하신 것을 축하드립니다. AI 기반 교육을 위한 탄탄한 기반을 마련했습니다. 이제 기능을 더욱 확장하고 실제 요구사항을 해결하기 위한 몇 가지 과제와 향후 개선사항을 살펴보겠습니다.
실시간 Q&A를 통한 대화형 학습:
- 챌린지: Gemini 2의 Live API를 활용하여 학생들을 위한 실시간 Q&A 기능을 만들 수 있나요? 학생들이 질문하고 즉각적인 AI 기반 답변을 받을 수 있는 가상 교실을 상상해 보세요.
자동 과제 제출 및 채점:
- 과제: 학생이 디지털 방식으로 과제를 제출하고 AI가 자동으로 채점하며 표절을 감지하고 방지하는 메커니즘이 있는 시스템을 설계하고 구현하세요. 이 챌린지는 검색 증강 생성 (RAG)을 살펴보고 평가 및 표절 감지 프로세스의 정확성과 신뢰성을 향상할 수 있는 좋은 기회를 제공합니다.

16. 삭제
이제 Aidemy 멀티 에이전트 시스템을 빌드하고 살펴봤으므로 Google Cloud 환경을 정리할 시간입니다.
👉Cloud Run 서비스 삭제
gcloud run services delete aidemy-planner --region=us-central1 --quiet
gcloud run services delete aidemy-portal --region=us-central1 --quiet
gcloud run services delete courses-agent --region=us-central1 --quiet
gcloud run services delete book-provider --region=us-central1 --quiet
gcloud run services delete assignment-agent --region=us-central1 --quiet
👉Eventarc 트리거 삭제
gcloud eventarc triggers delete portal-assignment-trigger --location=us --quiet
gcloud eventarc triggers delete plan-topic-trigger --location=us-central1 --quiet
gcloud eventarc triggers delete portal-assignment-trigger --location=us-central1 --quiet
ASSIGNMENT_AGENT_TRIGGER=$(gcloud eventarc triggers list --project="$PROJECT_ID" --location=us-central1 --filter="name:assignment-agent" --format="value(name)")
COURSES_AGENT_TRIGGER=$(gcloud eventarc triggers list --project="$PROJECT_ID" --location=us-central1 --filter="name:courses-agent" --format="value(name)")
gcloud eventarc triggers delete $ASSIGNMENT_AGENT_TRIGGER --location=us-central1 --quiet
gcloud eventarc triggers delete $COURSES_AGENT_TRIGGER --location=us-central1 --quiet
👉Pub/Sub 주제 삭제
gcloud pubsub topics delete plan --project="$PROJECT_ID" --quiet
👉Cloud SQL 인스턴스 삭제
gcloud sql instances delete aidemy --quiet
👉Artifact Registry 저장소 삭제
gcloud artifacts repositories delete agent-repository --location=us-central1 --quiet
👉Secret Manager 보안 비밀 삭제
gcloud secrets delete db-user --quiet
gcloud secrets delete db-pass --quiet
gcloud secrets delete db-name --quiet
👉Compute Engine 인스턴스 삭제 (Deepseek용으로 생성된 경우)
gcloud compute instances delete ollama-instance --zone=us-central1-a --quiet
👉Deepseek 인스턴스의 방화벽 규칙 삭제
gcloud compute firewall-rules delete allow-ollama-11434 --quiet
👉Cloud Storage 버킷 삭제
export COURSE_BUCKET_NAME=$(gcloud storage buckets list --format="value(name)" | grep aidemy-recap)
export ASSIGNMENT_BUCKET=$(gcloud storage buckets list --format="value(name)" | grep aidemy-assignment)
gsutil rm -r gs://$COURSE_BUCKET_NAME
gsutil rm -r gs://$ASSIGNMENT_BUCKET
