
1. はじめに
こんにちは。エージェントとは、ユーザーが指一本動かすことなく、ユーザーの代わりにタスクをこなしてくれる小さなヘルパーのことです。ところ、しかし、特に大規模で複雑なプロジェクトに取り組む場合は、1 つのエージェントでは十分でないことがよくあります。おそらく、チーム全体が必要になるでしょう。そこでマルチエージェント システムの出番です。
LLM を活用したエージェントは、従来のハードコーディングと比較して、非常に柔軟性が高いです。ただし、常に課題が伴います。このワークショップでは、まさにこの点について詳しく説明します。

エージェントのゲームをレベルアップさせるような、以下のような内容を学ぶことができます。
LangGraph を使用して最初のエージェントを構築する: 人気のフレームワークである LangGraph を使用して、独自のエージェントを構築します。このコースでは、データベースに接続するツールを作成する方法、最新の Gemini 2 API を活用してインターネット検索を行う方法、プロンプトとレスポンスを最適化してエージェントが LLM だけでなく既存のサービスともやり取りできるようにする方法について学びます。また、関数の呼び出しの仕組みについても説明します。
エージェントのオーケストレーションを自分のやり方で: 単純な直線パスから複雑なマルチパス シナリオまで、エージェントをオーケストレートするさまざまな方法について説明します。これは、エージェント チームのフローを指示するようなものです。
マルチエージェント システム: イベント ドリブン アーキテクチャを使用して、エージェントが連携してタスクを完了できるシステムを構築する方法を学びます。
LLM の自由度: 最適な LLM を使用: 1 つの LLM に限定されません。複数の LLM を使用して、それぞれに異なる役割を割り当て、優れた「思考モデル」を使用して問題解決能力を高める方法について説明します。
動的コンテンツとは?問題ありません。: エージェントが各ユーザーに合わせてカスタマイズされた動的コンテンツをリアルタイムで作成する様子を想像してみてください。その方法をご紹介します。
Google Cloud でクラウドに移行する: ノートブックで遊ぶだけではありません。Google Cloud でマルチエージェント システムを設計してデプロイし、実環境で利用できるようにする方法を説明します。
このプロジェクトは、これまで説明してきたすべてのテクニックを使用する方法を示す良い例となります。
2. アーキテクチャ
教師や教育関係の仕事はやりがいがありますが、特に準備作業など、仕事の負担が大きいことも事実です。また、スタッフが不足していることが多く、チューターの費用も高額になることがあります。そこで、AI を活用したティーチング アシスタントを提案します。このツールは、教育者の負担を軽減し、スタッフ不足や手頃な価格の個別指導の不足によって生じるギャップを埋めるのに役立ちます。
AI ティーチング アシスタントは、詳細な授業計画、楽しいクイズ、わかりやすい音声による要約、パーソナライズされた課題を簡単に作成できます。これにより、教師は生徒とのつながりを深め、学習の楽しさを伝えるという本来の業務に集中できます。
このシステムには 2 つのサイトがあります。1 つは教師が今後数週間の授業計画を作成するためのサイト、

生徒がテスト、音声による要約、課題にアクセスするためのタブも用意されています。
では、Aidemy の基盤となるアーキテクチャについて説明します。ご覧のとおり、この実現には、いくつかの主要なコンポーネントが連携して動作しています。

主なアーキテクチャ要素とテクノロジー:
Google Cloud Platform(GCP): システム全体の中核:
- Vertex AI: Google の Gemini LLM にアクセスします。
- Cloud Run: コンテナ化されたエージェントと関数をデプロイするためのサーバーレス プラットフォーム。
- Cloud SQL: カリキュラム データの PostgreSQL データベース。
- Pub/Sub と Eventarc: イベント ドリブン アーキテクチャの基盤であり、コンポーネント間の非同期通信を可能にします。
- Cloud Storage: 音声の要約と課題ファイルを保存します。
- Secret Manager: データベース認証情報を安全に管理します。
- Artifact Registry: エージェントの Docker イメージを保存します。
- Compute Engine: ベンダー ソリューションに依存するのではなく、セルフホスト LLM をデプロイする
LLM: システムの「頭脳」です。
- Google の Gemini モデル(Gemini x Pro、Gemini x Flash、Gemini x Flash Thinking): 授業計画、コンテンツ生成、動的 HTML の作成、クイズの説明、課題の統合に使用されます。
- DeepSeek: 自習課題の生成という専門的なタスクに使用
LangChain と LangGraph: LLM アプリケーション開発用のフレームワーク
- 複雑なマルチエージェント ワークフローの作成を容易にします。
- ツール(API 呼び出し、データベース クエリ、ウェブ検索)のインテリジェントなオーケストレーションを可能にします。
- システムの拡張性と柔軟性を実現するイベント ドリブン アーキテクチャを実装します。
基本的に、このアーキテクチャは LLM の能力と構造化データ、イベント ドリブン通信を組み合わせたもので、すべて Google Cloud で実行されます。これにより、スケーラブルで信頼性が高く、効果的なティーチング アシスタントを構築できます。
3. 始める前に
Google Cloud コンソールのプロジェクト選択ページで、Google Cloud プロジェクトを選択または作成します。Cloud プロジェクトに対して課金が有効になっていることを確認します。プロジェクトで課金が有効になっているかどうかを確認する方法をご覧ください。
Cloud Shell IDE で Gemini Code Assist を有効にする
👉 Google Cloud コンソールで、Gemini Code Assist ツールに移動し、利用規約に同意して Gemini Code Assist を無料で有効にします。
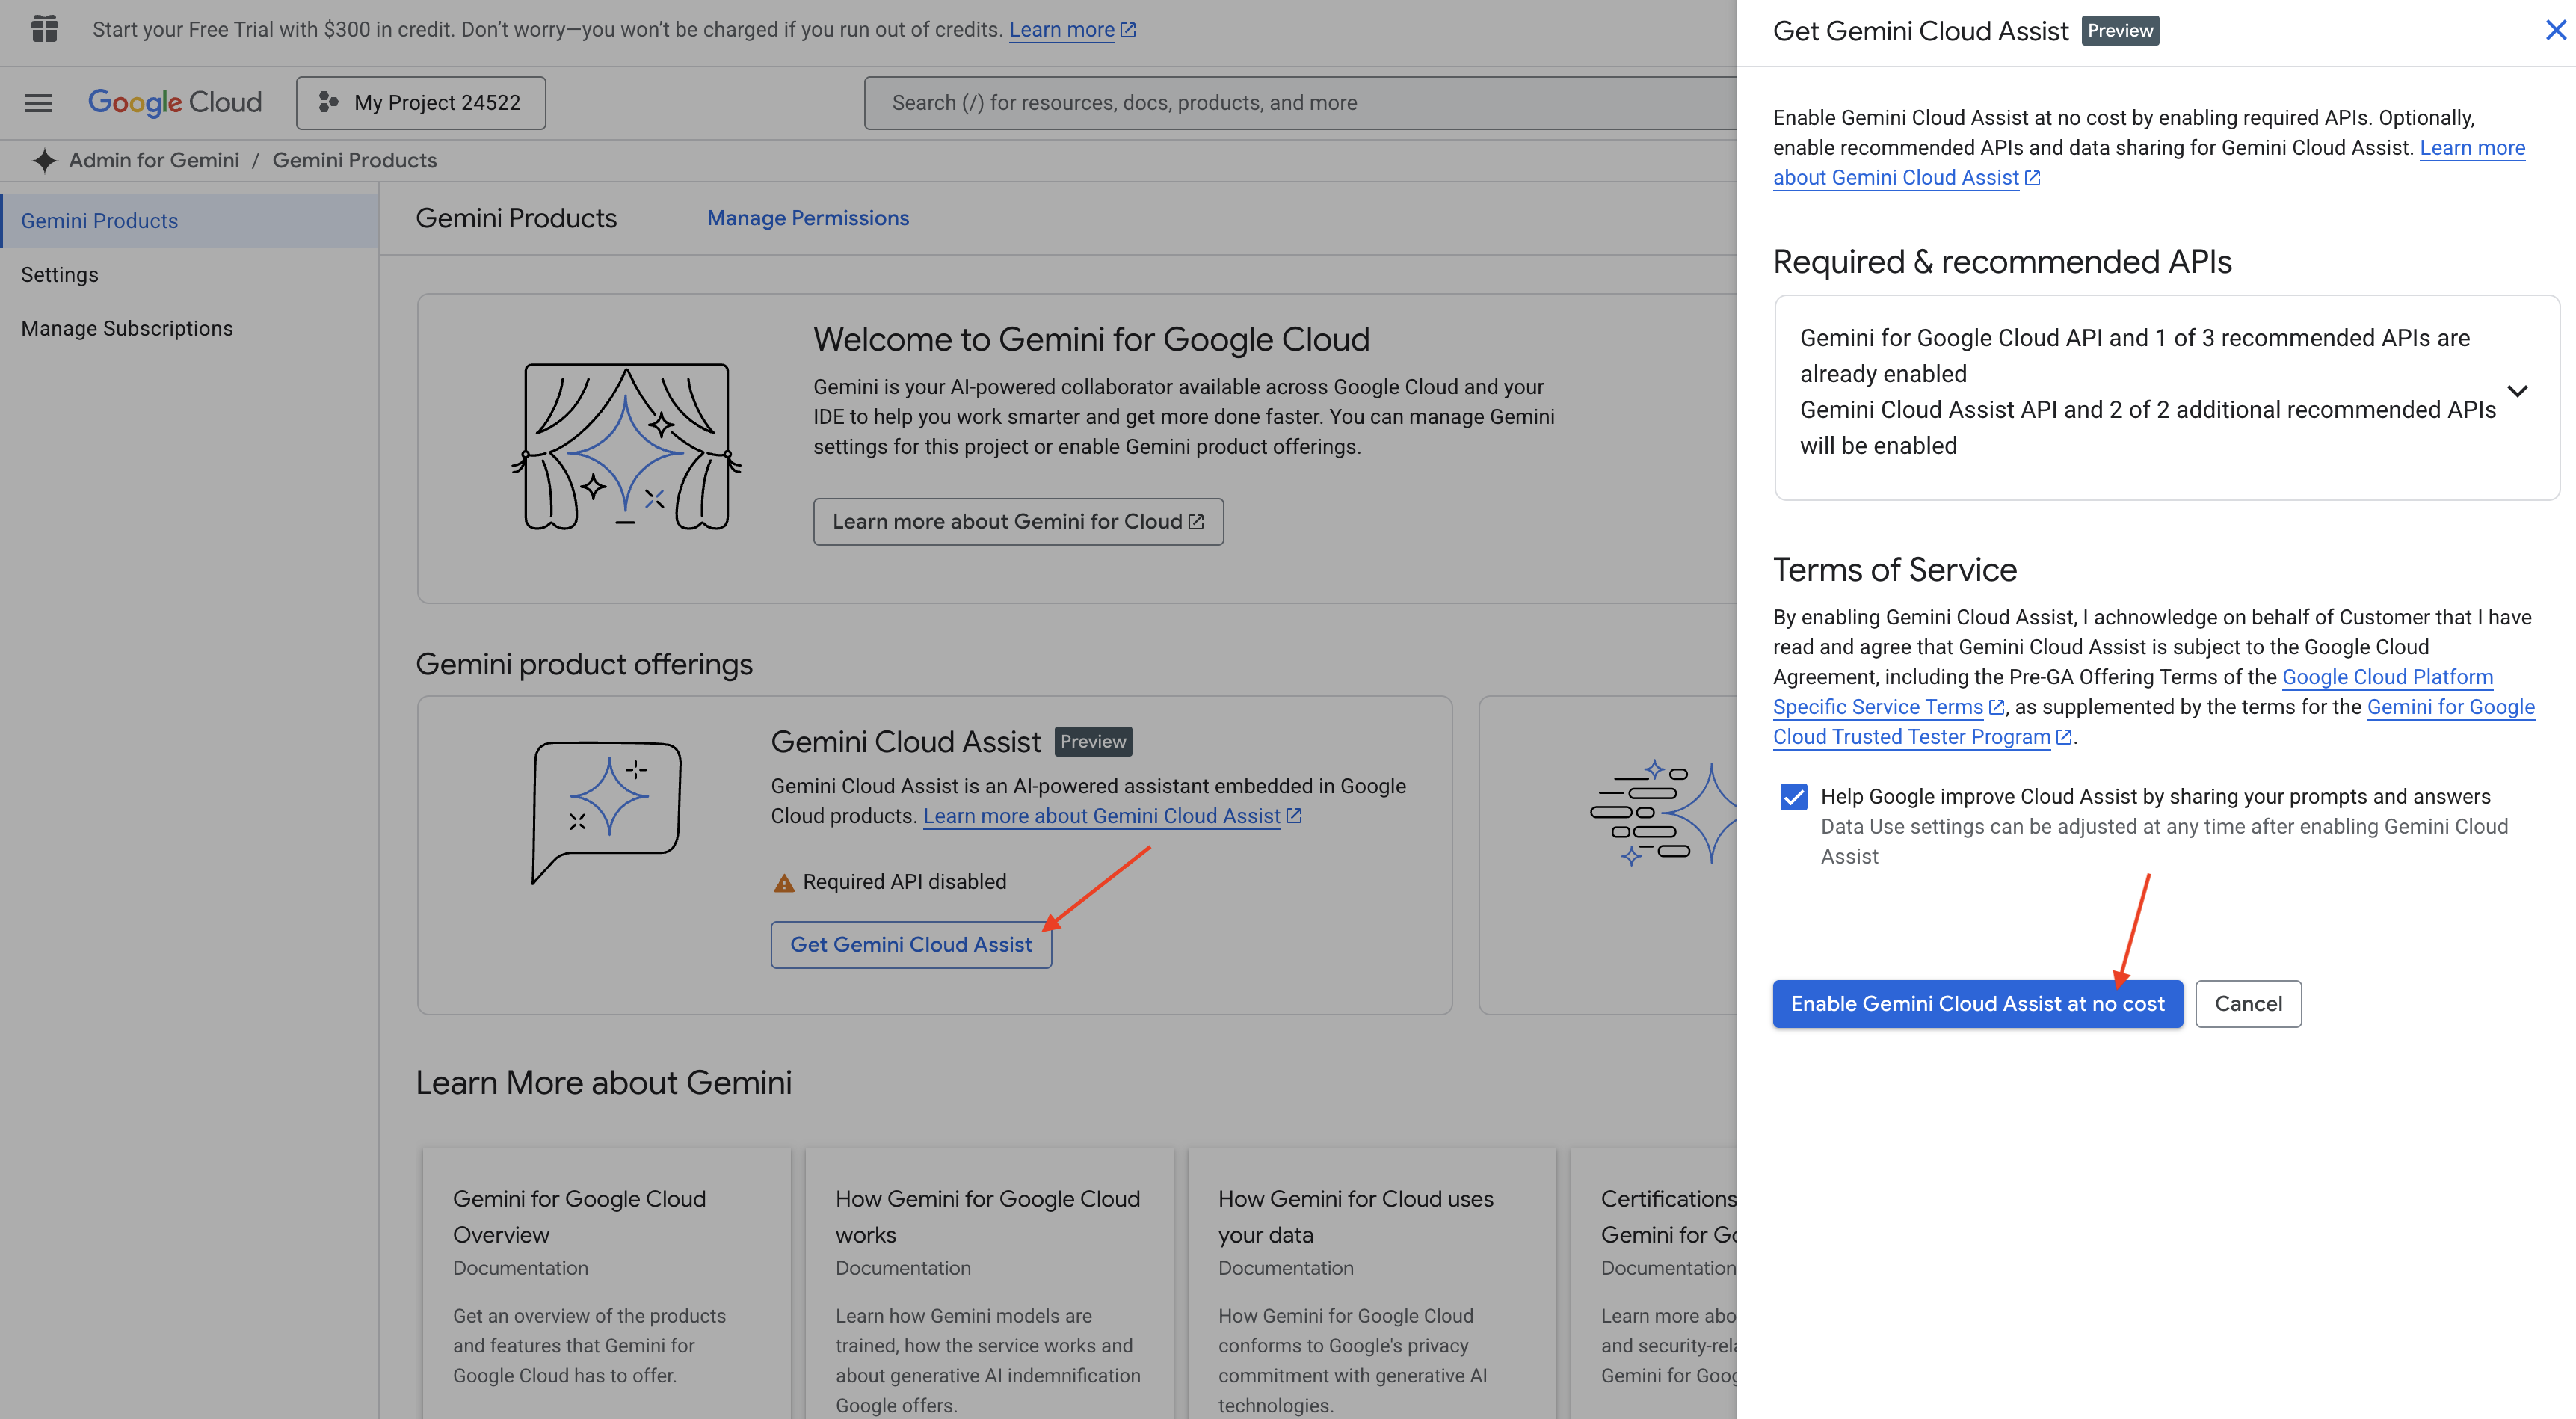
権限の設定を無視して、このページを離れます。
Cloud Shell エディタで作業する
👉Google Cloud コンソールの最上部にある [Cloud Shell をアクティブにする](Cloud Shell ペインの最上部にあるターミナル型のアイコン)をクリックし、[エディタを開く] ボタン(鉛筆の付いた開いたフォルダのようなアイコン)をクリックします。ウィンドウに Cloud Shell コードエディタが開きます。左側にファイル エクスプローラが表示されます。

👉下のステータスバーにある [Cloud Code Sign-in] ボタンをクリックします。指示に従ってプラグインを承認します。ステータスバーに「Cloud Code - no project」と表示されている場合は、それを選択し、プルダウンの [Google Cloud プロジェクトを選択] で、作成したプロジェクトのリストから特定の Google Cloud プロジェクトを選択します。

👉クラウド IDE でターミナルを開く: 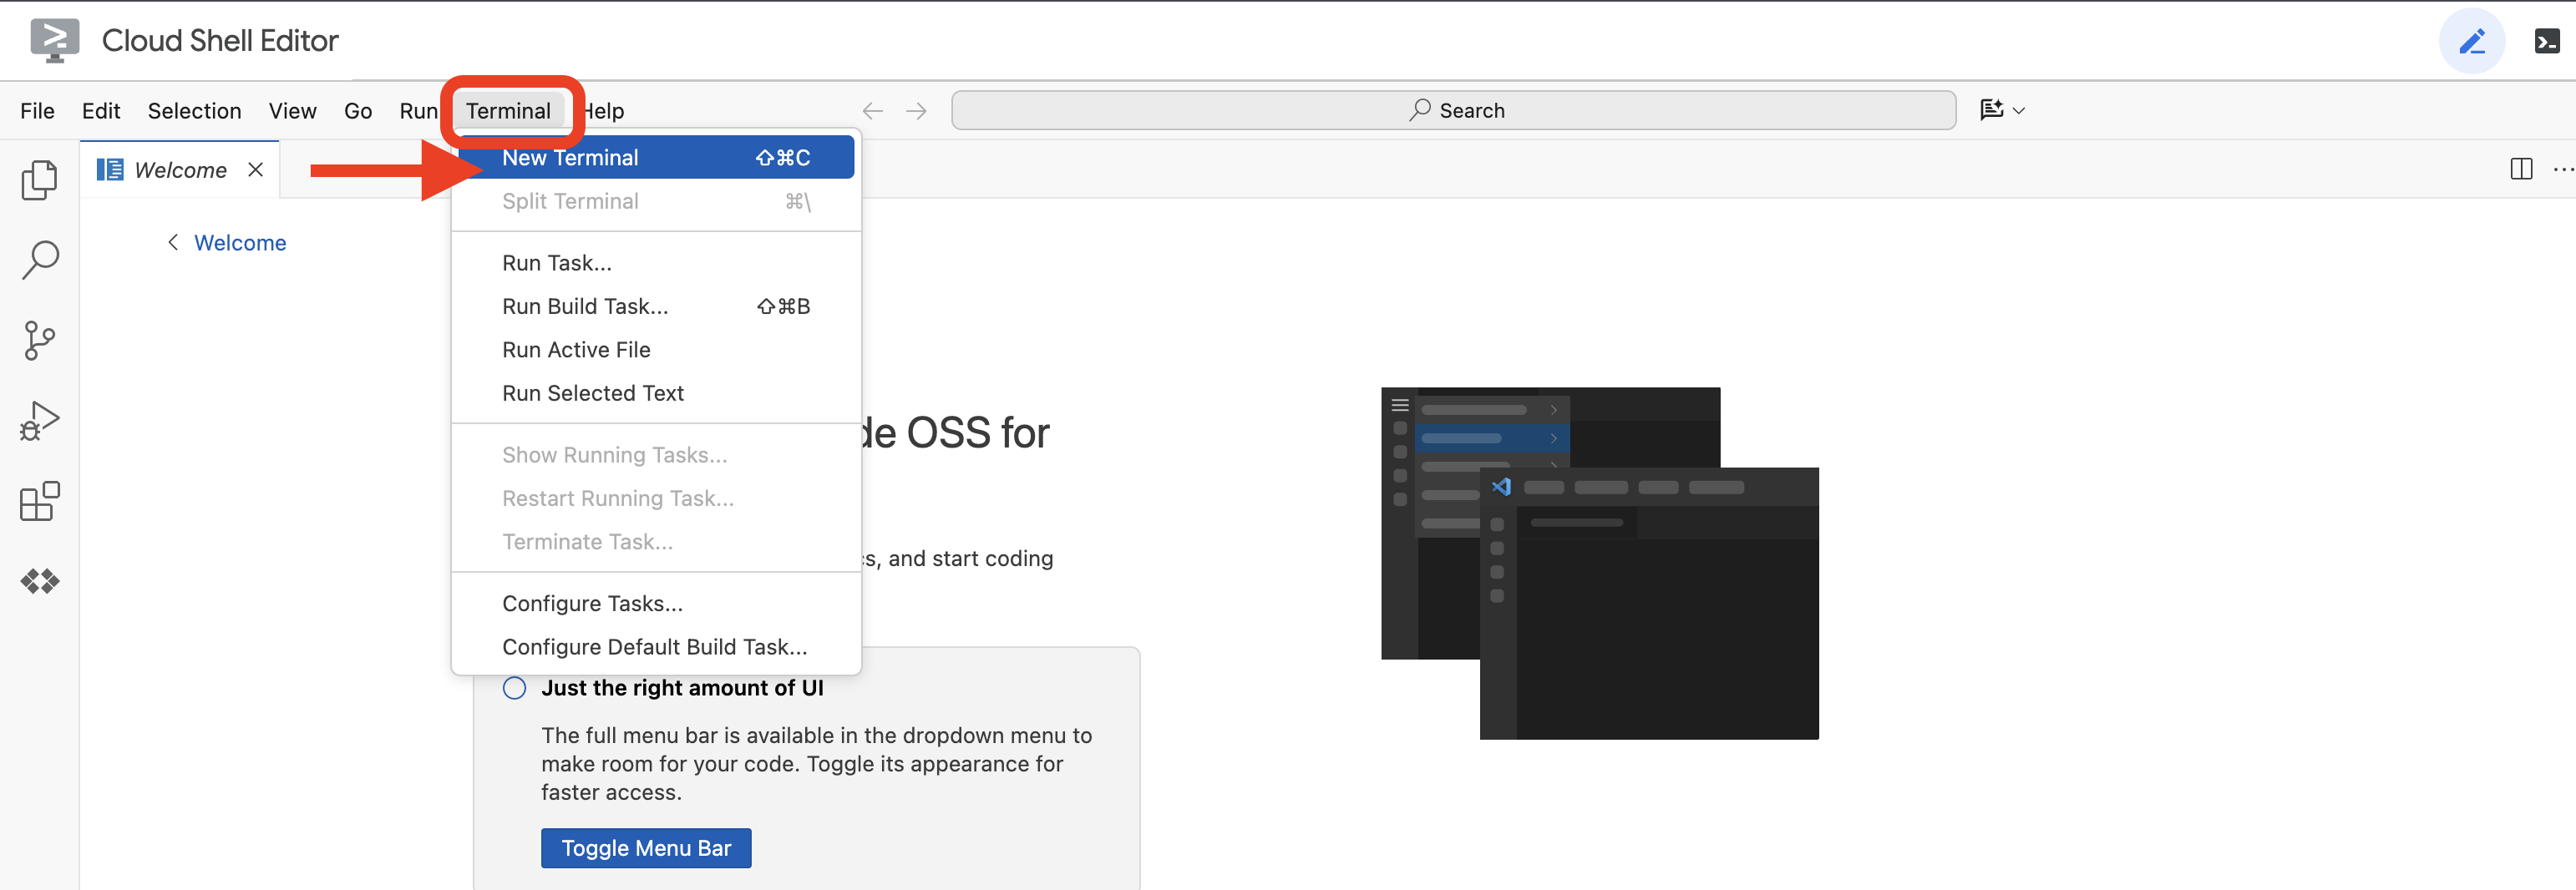 または
または 
👉ターミナルで、次のコマンドを使用して、すでに認証済みであることと、プロジェクトがプロジェクト ID に設定されていることを確認します。
gcloud auth list
👉 実行します。<YOUR_PROJECT_ID> は実際のプロジェクト ID に置き換えてください。
echo <YOUR_PROJECT_ID> > ~/project_id.txt
gcloud config set project $(cat ~/project_id.txt)
👉次のコマンドを実行して、必要な Google Cloud API を有効にします。
gcloud services enable compute.googleapis.com  \
                        storage.googleapis.com  \
                        run.googleapis.com  \
                        artifactregistry.googleapis.com  \
                        aiplatform.googleapis.com \
                        eventarc.googleapis.com \
                        sqladmin.googleapis.com \
                        secretmanager.googleapis.com \
                        cloudbuild.googleapis.com \
                        cloudresourcemanager.googleapis.com \
                        cloudfunctions.googleapis.com \
                        cloudaicompanion.googleapis.com
これには数分かかることがあります。
権限の設定
👉サービス アカウントの権限を設定します。ターミナルで次のコマンドを実行します。
gcloud config set project $(cat ~/project_id.txt)
export PROJECT_ID=$(gcloud config get project)
export SERVICE_ACCOUNT_NAME=$(gcloud compute project-info describe --format="value(defaultServiceAccount)")

echo "Here's your SERVICE_ACCOUNT_NAME $SERVICE_ACCOUNT_NAME"
👉 権限を付与します。ターミナルで次のコマンドを実行します。
#Cloud Storage (Read/Write):
gcloud projects add-iam-policy-binding $PROJECT_ID \
  --member="serviceAccount:$SERVICE_ACCOUNT_NAME" \
  --role="roles/storage.objectAdmin"

#Pub/Sub (Publish/Receive):
gcloud projects add-iam-policy-binding $PROJECT_ID \
  --member="serviceAccount:$SERVICE_ACCOUNT_NAME" \
  --role="roles/pubsub.publisher"

gcloud projects add-iam-policy-binding $PROJECT_ID \
  --member="serviceAccount:$SERVICE_ACCOUNT_NAME" \
  --role="roles/pubsub.subscriber"


#Cloud SQL (Read/Write):
gcloud projects add-iam-policy-binding $PROJECT_ID \
  --member="serviceAccount:$SERVICE_ACCOUNT_NAME" \
  --role="roles/cloudsql.editor"


#Eventarc (Receive Events):
gcloud projects add-iam-policy-binding $PROJECT_ID \
  --member="serviceAccount:$SERVICE_ACCOUNT_NAME" \
  --role="roles/iam.serviceAccountTokenCreator"

gcloud projects add-iam-policy-binding $PROJECT_ID \
  --member="serviceAccount:$SERVICE_ACCOUNT_NAME" \
  --role="roles/eventarc.eventReceiver"

#Vertex AI (User):
gcloud projects add-iam-policy-binding $PROJECT_ID \
  --member="serviceAccount:$SERVICE_ACCOUNT_NAME" \
  --role="roles/aiplatform.user"

#Secret Manager (Read):
gcloud projects add-iam-policy-binding $PROJECT_ID \
  --member="serviceAccount:$SERVICE_ACCOUNT_NAME" \
  --role="roles/secretmanager.secretAccessor"
👉IAM コンソールで結果を検証します。
👉ターミナルで次のコマンドを実行して、aidemy という名前の Cloud SQL インスタンスを作成します。この処理は後で必要になりますが、時間がかかる可能性があるため、ここで実行します。
gcloud sql instances create aidemy \
    --database-version=POSTGRES_14 \
    --cpu=2 \
    --memory=4GB \
    --region=us-central1 \
    --root-password=1234qwer \
    --storage-size=10GB \
    --storage-auto-increase
4. 最初のエージェントを構築する
複雑なマルチエージェント システムに入る前に、単一の機能的なエージェントという基本的な構成要素を確立する必要があります。このセクションでは、簡単な「書籍プロバイダ」エージェントを作成して、最初の手順を踏みます。書籍プロバイダ エージェントはカテゴリを入力として受け取り、Gemini LLM を使用してそのカテゴリ内の書籍の JSON 表現を生成します。次に、これらの書籍の推奨事項を REST API エンドポイントとして提供します。

👉別のブラウザタブで、ウェブブラウザで Google Cloud コンソールを開きます。ナビゲーション メニュー(☰)で、[Cloud Run] に移動します。[+ ... 関数を作成] ボタンをクリックします。

👉次に、Cloud Run 関数の基本設定を構成します。
- サービス名:
book-provider - リージョン:
us-central1 - ランタイム:
Python 3.12 - 認証:
Allow unauthenticated invocationsを [有効] に設定します。
👉その他の設定はデフォルトのままにして、[作成] をクリックします。ソースコード エディタが表示されます。
自動入力された main.py ファイルと requirements.txt ファイルが表示されます。
main.py には関数のビジネス ロジックが含まれ、requirements.txt には必要なパッケージが含まれます。
👉これで、コードを記述する準備が整いました。しかし、その前に Gemini Code Assist を使って、作業を始めることができるかどうかを確認しましょう。Cloud Shell エディタに戻り、上部にある Gemini Code Assist アイコンをクリックします。Gemini Code Assist のチャットが開きます。

👉 次のリクエストをプロンプト ボックスに貼り付けます。
Use the functions_framework library to be deployable as an HTTP function.
Accept a request with category and number_of_book parameters (either in JSON body or query string).
Use langchain and gemini to generate the data for book with fields bookname, author, publisher, publishing_date.
Use pydantic to define a Book model with the fields: bookname (string, description: "Name of the book"), author (string, description: "Name of the author"), publisher (string, description: "Name of the publisher"), and publishing_date (string, description: "Date of publishing").
Use langchain and gemini model to generate book data. the output should follow the format defined in Book model.

The logic should use JsonOutputParser from langchain to enforce output format defined in Book Model.
Have a function get_recommended_books(category) that internally uses langchain and gemini to return a single book object.
The main function, exposed as the Cloud Function, should call get_recommended_books() multiple times (based on number_of_book) and return a JSON list of the generated book objects.
Handle the case where category or number_of_book are missing by returning an error JSON response with a 400 status code.
return a JSON string representing the recommended books. use os library to retrieve GOOGLE_CLOUD_PROJECT env var. Use ChatVertexAI from langchain for the LLM call
Code Assist は、ソースコードと requirements.txt 依存関係ファイルの両方を含む、考えられる解決策を生成します。(このコードは使用しないでください)
Code Assist で生成されたコードと、以下に示すテスト済みの正しいソリューションを比較することをおすすめします。これにより、ツールの有効性を評価し、潜在的な不一致を特定できます。LLM を盲目的に信頼することは避けるべきですが、Code Assist は迅速なプロトタイピングや初期コード構造の生成に最適なツールであり、良いスタートを切るために使用する必要があります。
これはワークショップなので、以下に示す確認済みのコードで進めます。ただし、Code Assist で生成されたコードを独自に試して、その機能と制限事項をより深く理解することは可能です。
👉(別のブラウザタブで)Cloud Run 関数のソースコード エディタに戻ります。main.py の既存の内容を次のコードに置き換えます。
import functions_framework
import json
from flask import Flask, jsonify, request
from langchain_google_vertexai import ChatVertexAI
from langchain_core.output_parsers import JsonOutputParser
from langchain_core.prompts import PromptTemplate
from pydantic import BaseModel, Field
import os

class Book(BaseModel):
    bookname: str = Field(description="Name of the book")
    author: str = Field(description="Name of the author")
    publisher: str = Field(description="Name of the publisher")
    publishing_date: str = Field(description="Date of publishing")


project_id = os.environ.get("GOOGLE_CLOUD_PROJECT")

llm = ChatVertexAI(model_name="gemini-2.0-flash-lite-001")

def get_recommended_books(category):
    """
    A simple book recommendation function.

    Args:
        category (str): category

    Returns:
        str: A JSON string representing the recommended books.
    """
    parser = JsonOutputParser(pydantic_object=Book)
    question = f"Generate a random made up book on {category} with bookname, author and publisher and publishing_date"

    prompt = PromptTemplate(
        template="Answer the user query.\n{format_instructions}\n{query}\n",
        input_variables=["query"],
        partial_variables={"format_instructions": parser.get_format_instructions()},
    )

    chain = prompt | llm | parser
    response = chain.invoke({"query": question})

    return  json.dumps(response)


@functions_framework.http
def recommended(request):
    request_json = request.get_json(silent=True) # Get JSON data
    if request_json and 'category' in request_json and 'number_of_book' in request_json:
        category = request_json['category']
        number_of_book = int(request_json['number_of_book'])
    elif request.args and 'category' in request.args and 'number_of_book' in request.args:
        category = request.args.get('category')
        number_of_book = int(request.args.get('number_of_book'))

    else:
        return jsonify({'error': 'Missing category or number_of_book parameters'}), 400


    recommendations_list = []
    for i in range(number_of_book):
        book_dict = json.loads(get_recommended_books(category))
        print(f"book_dict=======>{book_dict}")

        recommendations_list.append(book_dict)


    return jsonify(recommendations_list)
👉requirements.txt の内容を次のように置き換えます。
functions-framework==3.*
google-genai==1.0.0
flask==3.1.0
jsonify==0.5
langchain_google_vertexai==2.0.13
langchain_core==0.3.34
pydantic==2.10.5
👉[関数のエントリ ポイント] を recommended に設定します。

👉[保存してデプロイ](または [保存して再デプロイ])をクリックして、関数をデプロイします。デプロイ プロセスが完了するまで待ちます。Cloud Console にステータスが表示されます。この処理には数分かかることがあります。
 👉デプロイが完了したら、Cloud Shell エディタに戻り、ターミナルで次のコマンドを実行します。
gcloud config set project $(cat ~/project_id.txt)
export PROJECT_ID=$(gcloud config get project)
export BOOK_PROVIDER_URL=$(gcloud run services describe book-provider --region=us-central1 --project=$PROJECT_ID --format="value(status.url)")

curl -X POST -H "Content-Type: application/json" -d '{"category": "Science Fiction", "number_of_book": 2}' $BOOK_PROVIDER_URL
JSON 形式で書籍データが表示されます。
[
  {"author":"Anya Sharma","bookname":"Echoes of the Singularity","publisher":"NovaLight Publishing","publishing_date":"2077-03-15"},
  {"author":"Anya Sharma","bookname":"Echoes of the Quantum Dawn","publisher":"Nova Genesis Publishing","publishing_date":"2077-03-15"}
]
おめでとうございます!Cloud Run 関数が正常にデプロイされました。これは、Aidemy エージェントの開発時に統合するサービスの 1 つです。
5. 構築ツール: エージェントを RESTFUL サービスとデータに接続する
Bootstrap スケルトン プロジェクトをダウンロードします。Cloud Shell エディタにいることを確認してください。ターミナルで次のコマンドを実行します。
git clone https://github.com/weimeilin79/aidemy-bootstrap.git
このコマンドを実行すると、Cloud Shell 環境に aidemy-bootstrap という名前の新しいフォルダが作成されます。
Cloud Shell エディタのエクスプローラ ペイン(通常は左側)に、Git リポジトリ aidemy-bootstrap のクローンを作成したときに作成されたフォルダが表示されます。エクスプローラでプロジェクトのルートフォルダを開きます。その中に planner サブフォルダがあるので、それも開きます。
エージェントが真に役立つようになるために使用するツールを構築しましょう。ご存じのとおり、LLM は推論とテキスト生成に優れていますが、実世界のタスクを実行して正確で最新の情報を提供するには、外部リソースにアクセスする必要があります。これらのツールは、エージェントが外部世界とやり取りする能力を与える「スイス アーミーナイフ」のようなものと考えてください。
エージェントを構築する際は、多くの詳細をハードコードしがちです。これにより、柔軟性のないエージェントが作成されます。代わりに、ツールを作成して使用することで、エージェントは外部ロジックまたはシステムにアクセスできるようになり、LLM と従来のプログラミングの両方のメリットが得られます。
このセクションでは、教師が指導案の作成に使用するプランナー エージェントの基盤を作成します。エージェントがプランの作成を開始する前に、教科とトピックの詳細を指定して境界を設定します。3 つのツールを作成します。
- Restful API 呼び出し: 既存の API とやり取りしてデータを取得します。
- データベース クエリ: Cloud SQL データベースから構造化データを取得します。
- Google 検索: ウェブからリアルタイムの情報にアクセスします。
API から書籍のおすすめを取得する
まず、前のセクションでデプロイした book-provider API から書籍の推奨事項を取得するツールを作成しましょう。これは、エージェントが既存のサービスを活用する方法を示しています。

Cloud Shell エディタで、前のセクションでクローンを作成した aidemy-bootstrap プロジェクトを開きます。
👉planner フォルダの book.py を編集し、ファイルの最後に次のコードを貼り付けます。
def recommend_book(query: str):
    """
    Get a list of recommended book from an API endpoint

    Args:
        query: User's request string
    """

    region = get_next_region();
    llm = VertexAI(model_name="gemini-1.5-pro", location=region)

    query = f"""The user is trying to plan a education course, you are the teaching assistant. Help define the category of what the user requested to teach, respond the categroy with no more than two word.

    user request:   {query}
    """
    print(f"-------->{query}")
    response = llm.invoke(query)
    print(f"CATEGORY RESPONSE------------>: {response}")

    # call this using python and parse the json back to dict
    category = response.strip()

    headers = {"Content-Type": "application/json"}
    data = {"category": category, "number_of_book": 2}

    books = requests.post(BOOK_PROVIDER_URL, headers=headers, json=data)

    return books.text

if __name__ == "__main__":
    print(recommend_book("I'm doing a course for my 5th grade student on Math Geometry, I'll need to recommend few books come up with a teach plan, few quizes and also a homework assignment."))
説明:
- recommend_book(query: str): この関数は、ユーザーのクエリを入力として受け取ります。
- LLM インタラクション: LLM を使用してクエリからカテゴリを抽出します。これは、LLM を使用してツールのパラメータを作成する方法を示しています。
- API 呼び出し: book-provider API に POST リクエストを送信し、カテゴリと必要な書籍の数を渡します。
👉この新しい関数をテストするには、環境変数を設定して、次のコマンドを実行します。
gcloud config set project $(cat ~/project_id.txt)
export PROJECT_ID=$(gcloud config get project)
cd ~/aidemy-bootstrap/planner/
export BOOK_PROVIDER_URL=$(gcloud run services describe book-provider --region=us-central1 --project=$PROJECT_ID --format="value(status.url)")
👉依存関係をインストールしてコードを実行し、動作することを確認するには、次のコマンドを実行します。
cd ~/aidemy-bootstrap/planner/
python -m venv env
source env/bin/activate
gcloud config set project $(cat ~/project_id.txt)
export PROJECT_ID=$(gcloud config get project)
pip install -r requirements.txt
python book.py
book-provider API から取得した書籍のおすすめ情報を含む JSON 文字列が表示されます。結果はランダムに生成されます。書籍は同じではないかもしれませんが、JSON 形式で 2 冊の書籍のおすすめが返されます。
[{"author":"Anya Sharma","bookname":"Echoes of the Singularity","publisher":"NovaLight Publishing","publishing_date":"2077-03-15"},{"author":"Anya Sharma","bookname":"Echoes of the Quantum Dawn","publisher":"Nova Genesis Publishing","publishing_date":"2077-03-15"}]
このメッセージが表示された場合は、最初のツールが正しく動作しています。
特定のパラメータを使用して RESTful API 呼び出しを明示的に作成する代わりに、自然言語(「コースを受講しています...」)を使用しています。次に、エージェントは NLP を使用して必要なパラメータ(カテゴリなど)をインテリジェントに抽出し、エージェントが自然言語理解を活用して API とやり取りする方法をハイライト表示します。

👉 book.py から次のテストコードを削除します。
if __name__ == "__main__":
    print(recommend_book("I'm doing a course for my 5th grade student on Math Geometry, I'll need to recommend few books come up with a teach plan, few quizes and also a homework assignment."))
データベースからカリキュラム データを取得する
次に、Cloud SQL PostgreSQL データベースから構造化されたカリキュラム データを取得するツールを構築します。これにより、エージェントは信頼できる情報源にアクセスして、授業計画を立てることができます。

前の手順で作成した aidemy Cloud SQL インスタンスを覚えていますか?この値は次の場所で使用されます。
👉 ターミナルで次のコマンドを実行して、新しいインスタンスに aidemy-db という名前のデータベースを作成します。
gcloud sql databases create aidemy-db \
    --instance=aidemy
Google Cloud コンソールの Cloud SQL でインスタンスを確認します。aidemy という名前の Cloud SQL インスタンスが表示されます。
👉 インスタンス名をクリックして、詳細を表示します。👉 Cloud SQL インスタンスの詳細ページで、左側のナビゲーション メニューの [Cloud SQL Studio] をクリックします。新しいタブが開きます。
データベースとして aidemy-db を選択し、ユーザーとして postgres、パスワードとして 1234qwer を入力します。
[認証] をクリックします。

👉SQL Studio のクエリエディタで、[エディタ 1] タブに移動し、次の SQL コードを貼り付けます。
CREATE TABLE curriculums (
    id SERIAL PRIMARY KEY,
    year INT,
    subject VARCHAR(255),
    description TEXT
);

-- Inserting detailed curriculum data for different school years and subjects
INSERT INTO curriculums (year, subject, description) VALUES
-- Year 5
(5, 'Mathematics', 'Introduction to fractions, decimals, and percentages, along with foundational geometry and problem-solving techniques.'),
(5, 'English', 'Developing reading comprehension, creative writing, and basic grammar, with a focus on storytelling and poetry.'),
(5, 'Science', 'Exploring basic physics, chemistry, and biology concepts, including forces, materials, and ecosystems.'),
(5, 'Computer Science', 'Basic coding concepts using block-based programming and an introduction to digital literacy.'),

-- Year 6
(6, 'Mathematics', 'Expanding on fractions, ratios, algebraic thinking, and problem-solving strategies.'),
(6, 'English', 'Introduction to persuasive writing, character analysis, and deeper comprehension of literary texts.'),
(6, 'Science', 'Forces and motion, the human body, and introductory chemical reactions with hands-on experiments.'),
(6, 'Computer Science', 'Introduction to algorithms, logical reasoning, and basic text-based programming (Python, Scratch).'),

-- Year 7
(7, 'Mathematics', 'Algebraic expressions, geometry, and introduction to statistics and probability.'),
(7, 'English', 'Analytical reading of classic and modern literature, essay writing, and advanced grammar skills.'),
(7, 'Science', 'Introduction to cells and organisms, chemical reactions, and energy transfer in physics.'),
(7, 'Computer Science', 'Building on programming skills with Python, introduction to web development, and cyber safety.');
この SQL コードは、curriculums という名前のテーブルを作成し、サンプルデータを挿入します。
👉 [実行] をクリックして、SQL コードを実行します。ステートメントが正常に実行されたことを示す確認メッセージが表示されます。
👉 エクスプローラを開き、新しく作成したテーブル curriculums を見つけて [クエリ] をクリックします。新しいエディタタブが開き、SQL が生成されます。

SELECT * FROM
  "public"."curriculums" LIMIT 1000;
👉[実行] をクリックします。
結果テーブルには、前の手順で挿入したデータ行が表示されます。これにより、テーブルとデータが正しく作成されたことを確認できます。
サンプル カリキュラム データが入力されたデータベースが正常に作成されたので、次はデータを取得するツールを作成します。
👉Cloud Code エディタで、aidemy-bootstrap フォルダの curriculums.py ファイルを編集し、次のコードをファイルの末尾に貼り付けます。
def connect_with_connector() -> sqlalchemy.engine.base.Engine:

    db_user = os.environ["DB_USER"]
    db_pass = os.environ["DB_PASS"]
    db_name = os.environ["DB_NAME"]

    print(f"--------------------------->db_user: {db_user!r}")
    print(f"--------------------------->db_pass: {db_pass!r}")
    print(f"--------------------------->db_name: {db_name!r}")

    connector = Connector()

    pool = sqlalchemy.create_engine(
        "postgresql+pg8000://",
        creator=lambda: connector.connect(
            instance_connection_name,
            "pg8000",
            user=db_user,
            password=db_pass,
            db=db_name,
        ),
        pool_size=2,
        max_overflow=2,
        pool_timeout=30,  # 30 seconds
        pool_recycle=1800,  # 30 minutes
    )
    return pool

def get_curriculum(year: int, subject: str):
    """
    Get school curriculum

    Args:
        subject: User's request subject string
        year: User's request year int
    """
    try:
        stmt = sqlalchemy.text(
            "SELECT description FROM curriculums WHERE year = :year AND subject = :subject"
        )

        with db.connect() as conn:
            result = conn.execute(stmt, parameters={"year": year, "subject": subject})
            row = result.fetchone()
        if row:
            return row[0]
        else:
            return None

    except Exception as e:
        print(e)
        return None

db = connect_with_connector()
説明:
- 環境変数: コードは、環境変数からデータベースの認証情報と接続情報を取得します(詳細については後述)。
- connect_with_connector(): この関数は、Cloud SQL Connector を使用してデータベースへの安全な接続を確立します。
- get_curriculum(year: int, subject: str): この関数は、年と科目を入力として受け取り、カリキュラム テーブルをクエリして、対応するカリキュラムの説明を返します。
👉コードを実行する前に、いくつかの環境変数を設定する必要があります。ターミナルで次のコマンドを実行します。
gcloud config set project $(cat ~/project_id.txt)
export PROJECT_ID=$(gcloud config get project)
export INSTANCE_NAME="aidemy"
export REGION="us-central1"
export DB_USER="postgres"
export DB_PASS="1234qwer"
export DB_NAME="aidemy-db"
👉テストするには、curriculums.py の末尾に次のコードを追加します。
if __name__ == "__main__":
    print(get_curriculum(6, "Mathematics"))
👉コードを実行します。
cd ~/aidemy-bootstrap/planner/
source env/bin/activate
python curriculums.py
6 年生の数学のカリキュラムの説明がコンソールに出力されます。
Expanding on fractions, ratios, algebraic thinking, and problem-solving strategies.
カリキュラムの説明が表示されたら、データベース ツールは正しく動作しています。スクリプトがまだ実行されている場合は、Ctrl+C を押して停止します。
👉 curriculums.py から次のテストコードを削除します。
if __name__ == "__main__":
    print(get_curriculum(6, "Mathematics"))
👉仮想環境を終了します。ターミナルで次のコマンドを実行します。
deactivate
6. ツールを作成する: ウェブからリアルタイムの情報にアクセスする
最後に、Gemini 2 と Google 検索の統合を使用してウェブからリアルタイム情報にアクセスするツールを構築します。これにより、エージェントは最新情報を把握し、関連性の高い結果を提供できます。
Gemini 2 と Google Search API の統合により、より正確でコンテキストに関連性の高い検索結果が提供され、エージェントの機能が強化されます。これにより、エージェントは最新の情報にアクセスし、現実世界のデータに基づいて回答することで、ハルシネーションを最小限に抑えることができます。API 統合の改善により、自然言語クエリも容易になり、エージェントは複雑でニュアンスのある検索リクエストを作成できるようになります。

この関数は、検索クエリ、カリキュラム、科目、年をインプットとして受け取り、Gemini API と Google 検索ツールを使用してインターネットから関連情報を取得します。よく見ると、他のフレームワークを使用せずに Google 生成 AI SDK を使用して関数呼び出しを行っています。
👉aidemy-bootstrap フォルダの search.py を編集し、ファイルの最後に次のコードを貼り付けます。
model_id = "gemini-2.0-flash-001"

google_search_tool = Tool(
    google_search = GoogleSearch()
)

def search_latest_resource(search_text: str, curriculum: str, subject: str, year: int):
    """
    Get latest information from the internet

    Args:
        search_text: User's request category   string
        subject: "User's request subject" string
        year: "User's request year"  integer
    """
    search_text = "%s in the context of year %d and subject %s with following curriculum detail %s " % (search_text, year, subject, curriculum)
    region = get_next_region()
    client = genai.Client(vertexai=True, project=PROJECT_ID, location=region)
    print(f"search_latest_resource text-----> {search_text}")
    response = client.models.generate_content(
        model=model_id,
        contents=search_text,
        config=GenerateContentConfig(
            tools=[google_search_tool],
            response_modalities=["TEXT"],
        )
    )
    print(f"search_latest_resource response-----> {response}")
    return response

if __name__ == "__main__":
  response = search_latest_resource("What are the syllabus for Year 6 Mathematics?", "Expanding on fractions, ratios, algebraic thinking, and problem-solving strategies.", "Mathematics", 6)
  for each in response.candidates[0].content.parts:
    print(each.text)
説明:
- ツールを定義する - google_search_tool: GoogleSearch オブジェクトを Tool 内にラップする
- search_latest_resource(search_text: str, subject: str, year: int): この関数は、検索クエリ、科目、年を入力として受け取り、Gemini API を使用して Google 検索を実行します。
- GenerateContentConfig: GoogleSearch ツールにアクセスできることを定義します
Gemini モデルは内部で search_text を分析し、質問に直接回答できるかどうか、または GoogleSearch ツールを使用する必要があるかどうかを判断します。これは、LLM の推論プロセス内で行われる重要なステップです。モデルは、外部ツールが必要な状況を認識するようにトレーニングされています。モデルが GoogleSearch ツールを使用すると判断した場合、Google 生成 AI SDK が実際の呼び出しを処理します。SDK は、モデルの決定と生成されたパラメータを取得し、Google Search API に送信します。この部分はコード内でユーザーに表示されません。
Gemini モデルは、検索結果を回答に統合します。この情報を使用して、ユーザーの質問に回答したり、要約を生成したり、他のタスクを実行したりできます。
👉テストするには、次のコードを実行します。
cd ~/aidemy-bootstrap/planner/
gcloud config set project $(cat ~/project_id.txt)
export PROJECT_ID=$(gcloud config get project)
source env/bin/activate
python search.py
「5 年生の数学のシラバス」に関連する検索結果を含む Gemini Search API レスポンスが表示されます。正確な出力は検索結果によって異なりますが、検索に関する情報を含む JSON オブジェクトになります。
検索結果が表示されたら、Google 検索ツールは正しく動作しています。スクリプトがまだ実行されている場合は、Ctrl+C を押してスクリプトを停止します。
👉コードの最後の部分を削除します。
if __name__ == "__main__":
  response = search_latest_resource("What are the syllabus for Year 6 Mathematics?", "Expanding on fractions, ratios, algebraic thinking, and problem-solving strategies.", "Mathematics", 6)
  for each in response.candidates[0].content.parts:
    print(each.text)
👉仮想環境を終了します。ターミナルで次のコマンドを実行します。
deactivate
おめでとうございます!これで、プランナー エージェント用の 3 つの強力なツール(API コネクタ、データベース コネクタ、Google 検索ツール)が構築されました。これらのツールを使用すると、エージェントは効果的な指導案を作成するために必要な情報と機能にアクセスできます。
7. LangGraph を使用したオーケストレーション
個々のツールの構築が完了したので、LangGraph を使用してオーケストレーションします。これにより、ユーザーのリクエストに基づいて、どのツールをいつ使用するかをインテリジェントに決定できる、より高度な「プランナー」エージェントを作成できます。
LangGraph は、大規模言語モデル(LLM)を使用してステートフルなマルチアクター アプリケーションを簡単に構築できるように設計された Python ライブラリです。これは、LLM、ツール、その他のエージェントを含む複雑な会話とワークフローをオーケストレートするためのフレームワークです。
主なコンセプト:
- グラフ構造: LangGraph は、アプリケーションのロジックを有向グラフとして表します。グラフ内の各ノードは、プロセス内のステップ(LLM の呼び出し、ツールの呼び出し、条件チェックなど)を表します。エッジは、ノード間の実行フローを定義します。
- 状態: LangGraph は、グラフを移動するアプリケーションの状態を管理します。この状態には、ユーザーの入力、ツール呼び出しの結果、LLM からの中間出力、ステップ間で保持する必要があるその他の情報などの変数を含めることができます。
- ノード: 各ノードは計算またはインタラクションを表します。次の種類があります。
- ツールノード: ツールを使用します(ウェブ検索の実行、データベースのクエリなど)。
- 関数ノード: Python 関数を実行します。
- エッジ: ノードを接続し、実行フローを定義します。次の種類があります。
- 直接エッジ: あるノードから別のノードへの単純な無条件フロー。
- 条件付きエッジ: フローは条件付きノードの結果によって異なります。

LangGraph を使用してオーケストレーションを実装します。aidemy-bootstrap フォルダの aidemy.py ファイルを編集して、LangGraph ロジックを定義しましょう。
👉 次のコードを の末尾に追加します。
aidemy.py:
tools = [get_curriculum, search_latest_resource, recommend_book]

def determine_tool(state: MessagesState):
    llm = ChatVertexAI(model_name="gemini-2.0-flash-001", location=get_next_region())
    sys_msg = SystemMessage(
                    content=(
                        f"""You are a helpful teaching assistant that helps gather all needed information.
                            Your ultimate goal is to create a detailed 3-week teaching plan.
                            You have access to tools that help you gather information.
                            Based on the user request, decide which tool(s) are needed.

                        """
                    )
                )

    llm_with_tools = llm.bind_tools(tools)
    return {"messages": llm_with_tools.invoke([sys_msg] + state["messages"])}
この関数は、会話の現在の状態を取得し、LLM にシステム メッセージを提供してから、LLM にレスポンスの生成を依頼します。LLM は、ユーザーに直接応答することも、利用可能なツールのいずれかを使用することもできます。
tools : エージェントが利用できるツールのセットを表すリスト。これには、前の手順で定義した 3 つのツール関数(get_curriculum、search_latest_resource、recommend_book)が含まれています。llm.bind_tools(tools): ツールリストを llm オブジェクトにバインドします。ツールをバインドすると、これらのツールが利用可能であることを LLM に伝え、ツールの使用方法(ツールの名前、受け入れるパラメータ、実行する処理など)に関する情報が LLM に提供されます。
LangGraph を使用してオーケストレーションを実装します。
👉 次のコードを の末尾に追加します。
aidemy.py:
def prep_class(prep_needs):

    builder = StateGraph(MessagesState)
    builder.add_node("determine_tool", determine_tool)
    builder.add_node("tools", ToolNode(tools))

    builder.add_edge(START, "determine_tool")
    builder.add_conditional_edges("determine_tool",tools_condition)
    builder.add_edge("tools", "determine_tool")


    memory = MemorySaver()
    graph = builder.compile(checkpointer=memory)

    config = {"configurable": {"thread_id": "1"}}
    messages = graph.invoke({"messages": prep_needs},config)
    print(messages)
    for m in messages['messages']:
        m.pretty_print()
    teaching_plan_result = messages["messages"][-1].content


    return teaching_plan_result

if __name__ == "__main__":
  prep_class("I'm doing a course for  year 5 on subject Mathematics in Geometry, , get school curriculum, and come up with few books recommendation plus  search latest resources on the internet base on the curriculum outcome. And come up with a 3 week teaching plan")
説明:
StateGraph(MessagesState):StateGraphオブジェクトを作成します。StateGraphは LangGraph の中核となるコンセプトです。エージェントのワークフローをグラフで表します。グラフの各ノードは、プロセスのステップを表します。エージェントがどのように推論し、行動するかについてのブループリントを定義すると考えてください。- 条件付きエッジ:
"determine_tool"ノードから発信されるtools_condition引数は、determine_tool関数の出力に基づいてどのエッジをたどるかを決定する関数である可能性があります。条件付きエッジを使用すると、LLM が使用するツールを決定した(またはユーザーに直接応答するかどうかを決定した)ことに基づいて、グラフを分岐させることができます。ここで、エージェントの「インテリジェンス」が機能します。エージェントは状況に応じて動作を動的に適応させることができます。 - ループ:
"tools"ノードを"determine_tool"ノードに接続するエッジをグラフに追加します。これにより、グラフにループが作成され、エージェントはタスクを完了して満足のいく回答を提供するために十分な情報を収集するまで、ツールを繰り返し使用できます。このループは、複数の推論ステップと情報収集を必要とする複雑なタスクに不可欠です。
それでは、プランナー エージェントをテストして、さまざまなツールをどのようにオーケストレートするかを確認しましょう。
このコードは、特定のユーザー入力を使用して prep_class 関数を実行し、カリキュラム、書籍の推奨事項、最新のインターネット リソースを使用して、5 年生の幾何学の指導計画を作成するリクエストをシミュレートします。
👉 ターミナルを閉じた場合や、環境変数が設定されていない場合は、ターミナルで次のコマンドを再実行します。
export BOOK_PROVIDER_URL=$(gcloud run services describe book-provider --region=us-central1 --project=$PROJECT_ID --format="value(status.url)")
gcloud config set project $(cat ~/project_id.txt)
export PROJECT_ID=$(gcloud config get project)
export INSTANCE_NAME="aidemy"
export REGION="us-central1"
export DB_USER="postgres"
export DB_PASS="1234qwer"
export DB_NAME="aidemy-db"
👉コードを実行します。
cd ~/aidemy-bootstrap/planner/
source env/bin/activate
pip install -r requirements.txt
python aidemy.py
ターミナルでログを確認します。最終的な指導計画を提供する前に、エージェントが 3 つのツール(学校のカリキュラムの取得、書籍のおすすめの取得、最新のリソースの検索)をすべて呼び出している証拠が表示されます。これは、LangGraph オーケストレーションが正しく機能しており、エージェントが利用可能なすべてのツールをインテリジェントに使用してユーザーのリクエストを満たしていることを示しています。
================================ Human Message =================================

I'm doing a course for  year 5 on subject Mathematics in Geometry, , get school curriculum, and come up with few books recommendation plus  search latest resources on the internet base on the curriculum outcome. And come up with a 3 week teaching plan
================================== Ai Message ==================================
Tool Calls:
  get_curriculum (xxx)
 Call ID: xxx
  Args:
    year: 5.0
    subject: Mathematics
================================= Tool Message =================================
Name: get_curriculum

Introduction to fractions, decimals, and percentages, along with foundational geometry and problem-solving techniques.
================================== Ai Message ==================================
Tool Calls:
  search_latest_resource (xxxx)
 Call ID: xxxx
  Args:
    year: 5.0
    search_text: Geometry
    curriculum: {"content": "Introduction to fractions, decimals, and percentages, along with foundational geometry and problem-solving techniques."}
    subject: Mathematics
================================= Tool Message =================================
Name: search_latest_resource

candidates=[Candidate(content=Content(parts=[Part(.....) automatic_function_calling_history=[] parsed=None
================================== Ai Message ==================================
Tool Calls:
  recommend_book (93b48189-4d69-4c09-a3bd-4e60cdc5f1c6)
 Call ID: 93b48189-4d69-4c09-a3bd-4e60cdc5f1c6
  Args:
    query: Mathematics Geometry Year 5
================================= Tool Message =================================
Name: recommend_book

[{.....}]

================================== Ai Message ==================================

Based on the curriculum outcome, here is a 3-week teaching plan for year 5 Mathematics Geometry:

**Week 1: Introduction to Shapes and Properties**
.........
スクリプトがまだ実行中の場合は、Ctrl+C を押して停止します。
👉 (この手順は省略可)テストコードを別のプロンプトに置き換えます。別のプロンプトでは、別のツールを呼び出す必要があります。
if __name__ == "__main__":
  prep_class("I'm doing a course for year 5 on subject Mathematics in Geometry, search latest resources on the internet base on the subject. And come up with a 3 week teaching plan")
👉 ターミナルを閉じた場合や、環境変数が設定されていない場合は、次のコマンドを再度実行します。
gcloud config set project $(cat ~/project_id.txt)
export BOOK_PROVIDER_URL=$(gcloud run services describe book-provider --region=us-central1 --project=$PROJECT_ID --format="value(status.url)")
export PROJECT_ID=$(gcloud config get project)
export INSTANCE_NAME="aidemy"
export REGION="us-central1"
export DB_USER="postgres"
export DB_PASS="1234qwer"
export DB_NAME="aidemy-db"
👉 (この手順は省略可能です。前の手順を実行した場合のみ行ってください) コードを再度実行します。
cd ~/aidemy-bootstrap/planner/
source env/bin/activate
python aidemy.py
今回は何に気付きましたか?エージェントはどのツールを呼び出しましたか?今回は、エージェントが search_latest_resource ツールのみを呼び出していることがわかります。これは、プロンプトで他の 2 つのツールが必要であることを指定していないため、LLM が他のツールを呼び出さないほど賢いからです。
================================ Human Message =================================

I'm doing a course for  year 5 on subject Mathematics in Geometry, search latest resources on the internet base on the subject. And come up with a 3 week teaching plan
================================== Ai Message ==================================
Tool Calls:
  get_curriculum (xxx)
 Call ID: xxx
  Args:
    year: 5.0
    subject: Mathematics
================================= Tool Message =================================
Name: get_curriculum

Introduction to fractions, decimals, and percentages, along with foundational geometry and problem-solving techniques.
================================== Ai Message ==================================
Tool Calls:
  search_latest_resource (xxx)
 Call ID: xxxx
  Args:
    year: 5.0
    subject: Mathematics
    curriculum: {"content": "Introduction to fractions, decimals, and percentages, along with foundational geometry and problem-solving techniques."}
    search_text: Geometry
================================= Tool Message =================================
Name: search_latest_resource

candidates=[Candidate(content=Content(parts=[Part(.......token_count=40, total_token_count=772) automatic_function_calling_history=[] parsed=None
================================== Ai Message ==================================

Based on the information provided, a 3-week teaching plan for Year 5 Mathematics focusing on Geometry could look like this:

**Week 1:  Introducing 2D Shapes**
........
* Use visuals, manipulatives, and real-world examples to make the learning experience engaging and relevant.
Ctrl+C を押してスクリプトを停止します。
👉 (この手順は省略しないでください)aidemy.py ファイルをクリーンに保つために、テストコードを削除します。
if __name__ == "__main__":
  prep_class("I'm doing a course for  year 5 on subject Mathematics in Geometry, search latest resources on the internet base on the subject. And come up with a 3 week teaching plan")
エージェント ロジックが定義されたので、Flask ウェブ アプリケーションを起動しましょう。これにより、教師がエージェントを操作するための使い慣れたフォームベースのインターフェースが提供されます。LLM ではチャットボットのやり取りが一般的ですが、多くの教育関係者にとってより直感的な従来のフォーム送信 UI を選択しています。
👉 ターミナルを閉じた場合や、環境変数が設定されていない場合は、次のコマンドを再度実行します。
export BOOK_PROVIDER_URL=$(gcloud run services describe book-provider --region=us-central1 --project=$PROJECT_ID --format="value(status.url)")
gcloud config set project $(cat ~/project_id.txt)
export PROJECT_ID=$(gcloud config get project)
export INSTANCE_NAME="aidemy"
export REGION="us-central1"
export DB_USER="postgres"
export DB_PASS="1234qwer"
export DB_NAME="aidemy-db"
👉 ウェブ UI を起動します。
cd ~/aidemy-bootstrap/planner/
source env/bin/activate
python app.py
Cloud Shell ターミナルの出力で起動メッセージを探します。通常、Flask は実行中であることと、どのポートで実行されているかを示すメッセージを出力します。
Running on http://127.0.0.1:8080
Running on http://127.0.0.1:8080
The application needs to keep running to serve requests.
👉 右上にある [ウェブでプレビュー] メニューから、[ポート 8080 でプレビュー] を選択します。Cloud Shell で、アプリケーションのウェブ プレビューが新しいブラウザタブまたはブラウザ ウィンドウで開きます。

アプリケーション インターフェースで、[Year] に 5 を選択し、[Subject] に Mathematics を選択して、[Add-on Request] に Geometry と入力します。
👉 アプリケーション UI から移動した場合は、戻って生成された出力を確認します。
👉 ターミナルで、Ctrl+C を押してスクリプトを停止します。
👉 ターミナルで、仮想環境を終了します。
deactivate
8. プランナー エージェントをクラウドにデプロイする
イメージをビルドしてレジストリに push する

これをクラウドにデプロイします。
👉 ターミナルで、ビルドする Docker イメージを保存するアーティファクト リポジトリを作成します。
gcloud artifacts repositories create agent-repository \
    --repository-format=docker \
    --location=us-central1 \
    --description="My agent repository"
「Created repository [agent-repository]」と表示されます。
👉 次のコマンドを実行して、Docker イメージをビルドします。
cd ~/aidemy-bootstrap/planner/
gcloud config set project $(cat ~/project_id.txt)
export PROJECT_ID=$(gcloud config get project)
docker build -t gcr.io/${PROJECT_ID}/aidemy-planner .
👉 GCR ではなく Artifact Registry でホストされるようにイメージに再タグ付けし、タグ付けされたイメージを Artifact Registry に push する必要があります。
gcloud config set project $(cat ~/project_id.txt)
export PROJECT_ID=$(gcloud config get project)
docker tag gcr.io/${PROJECT_ID}/aidemy-planner us-central1-docker.pkg.dev/${PROJECT_ID}/agent-repository/aidemy-planner
docker push us-central1-docker.pkg.dev/${PROJECT_ID}/agent-repository/aidemy-planner
push が完了したら、イメージが Artifact Registry に正常に保存されたことを確認できます。
👉 Google Cloud コンソールで Artifact Registry に移動します。agent-repository リポジトリに aidemy-planner イメージがあることを確認します。
Secret Manager を使用してデータベース認証情報を保護する
データベース認証情報を安全に管理してアクセスするために、Google Cloud Secret Manager を使用します。これにより、アプリケーション コードに機密情報をハードコードすることを防ぎ、セキュリティを強化できます。
データベースのユーザー名、パスワード、データベース名に個別のシークレットを作成します。このアプローチにより、各認証情報を個別に管理できます。
👉 ターミナルで次のコマンドを実行します。
gcloud secrets create db-user
printf "postgres" | gcloud secrets versions add db-user --data-file=-

gcloud secrets create db-pass
printf "1234qwer" | gcloud secrets versions add db-pass --data-file=-

gcloud secrets create db-name
printf "aidemy-db" | gcloud secrets versions add db-name --data-file=-
Secret Manager の使用は、アプリケーションを保護し、機密性の高い認証情報の誤った公開を防ぐための重要なステップです。クラウド デプロイのセキュリティ ベスト プラクティスに準拠しています。
Cloud Run へのデプロイ
Cloud Run は、コンテナ化されたアプリケーションを迅速かつ簡単にデプロイできるフルマネージドのサーバーレス プラットフォームです。インフラストラクチャ管理が抽象化されるため、コードの作成とデプロイに集中できます。プランナーは Cloud Run サービスとしてデプロイします。
👉Google Cloud コンソールで、[Cloud Run] に移動します。[コンテナをデプロイ] をクリックし、[SERVICE] を選択します。Cloud Run サービスを構成します。

- コンテナ イメージ: URL フィールドで [選択] をクリックします。Artifact Registry に push したイメージの URL(例: us-central1-docker.pkg.dev/YOUR_PROJECT_ID/agent-repository/aidemy-planner/YOUR_IMG)を見つけます。
- サービス名:
aidemy-planner - リージョン:
us-central1リージョンを選択します。 - 認証: このワークショップでは、[未認証の呼び出しを許可] を選択できます。本番環境では、アクセスを制限することが望ましいでしょう。
- [コンテナ、ボリューム、ネットワーキング、セキュリティ] セクションを開き、[コンテナ] タブで次の設定を行います。
- 設定タブ:
- リソース
- メモリ : 2 GiB
- リソース
- [変数とシークレット] タブ:
- 環境変数: [+ 変数を追加] ボタンをクリックして、次の変数を追加します。
- 名前:
GOOGLE_CLOUD_PROJECT、値: <YOUR_PROJECT_ID> を追加します。 - 名前
BOOK_PROVIDER_URLを追加し、値を book-provider 関数の URL に設定します。これは、ターミナルで次のコマンドを使用して確認できます。gcloud config set project $(cat ~/project_id.txt) gcloud run services describe book-provider \ --region=us-central1 \ --project=$PROJECT_ID \ --format="value(status.url)"
- 名前:
- [環境変数として公開されているシークレット] セクションで、[+ シークレットとして参照] ボタンをクリックして、次のシークレットを追加します。
- 名前:
DB_USER、シークレット:db-userを選択、バージョン:latestを追加します。 - 名前:
DB_PASS、シークレット:db-passを選択、バージョン:latestを追加します。 - 名前:
DB_NAME、シークレット:db-nameを選択、バージョン:latestを追加します。
- 名前:
- 環境変数: [+ 変数を追加] ボタンをクリックして、次の変数を追加します。
- 設定タブ:

その他の値はデフォルトのままにします。
👉 [作成] をクリックします。
Cloud Run がサービスをデプロイします。
デプロイが完了したら、詳細ページが表示されていない場合は、サービス名をクリックして詳細ページに移動します。デプロイされた URL は上部に表示されます。

👉 アプリケーション インターフェースで、[Year] に 7 を選択し、[Subject] に Mathematics を選択して、[Add-on Request] フィールドに Algebra と入力します。
👉 [プランを生成] をクリックします。これにより、エージェントはカスタマイズされたレッスン プランを生成するために必要なコンテキストを取得できます。
おめでとうございます!強力な AI エージェントを使用して、指導計画を作成できました。これにより、エージェントがワークロードを大幅に削減し、タスクを効率化して、最終的に効率を向上させ、教育者の負担を軽減できる可能性が示されました。
9. マルチエージェント システム
授業計画作成ツールの実装が完了したので、次は生徒用ポータルの構築に注力しましょう。このポータルでは、生徒はコースワークに関連するクイズ、音声による要約、課題にアクセスできます。この機能の範囲を考慮して、マルチエージェント システムの力を活用して、モジュール化されたスケーラブルなソリューションを作成します。
前述のように、マルチエージェント システムでは、単一のエージェントにすべてを処理させるのではなく、ワークロードをより小さな専門タスクに分割し、それぞれを専用のエージェントに処理させることができます。このアプローチには次のような重要なメリットがあります。
モジュール性と保守性: すべてを行う単一のエージェントを作成するのではなく、明確に定義された責任を持つ、より小さな専門エージェントを構築します。このモジュール性により、システムの理解、保守、デバッグが容易になります。問題が発生した場合は、大規模なコードベースを精査するのではなく、特定のエージェントに問題を切り分けることができます。
スケーラビリティ: 単一の複雑なエージェントのスケーリングはボトルネックになる可能性があります。マルチエージェント システムを使用すると、個々のエージェントを固有のニーズに基づいてスケーリングできます。たとえば、1 つのエージェントが大量のリクエストを処理している場合、システムの残りの部分に影響を与えることなく、そのエージェントのインスタンスを簡単にスピンアップできます。
チームの専門性: 1 人のエンジニアにアプリケーション全体をゼロから構築させることはありません。代わりに、各分野の専門家で構成されるチームを編成します。同様に、マルチエージェント システムでは、さまざまな LLM とツールの強みを活用し、特定のタスクに最適なエージェントに割り当てることができます。
並行開発: 異なるチームが異なるエージェントを同時に作業できるため、開発プロセスを高速化できます。エージェントは独立しているため、1 つのエージェントの変更が他のエージェントに影響する可能性は低くなります。
イベント ドリブン アーキテクチャ
これらのエージェント間の効果的なコミュニケーションと調整を実現するために、イベント ドリブン アーキテクチャを採用します。つまり、エージェントはシステム内で発生する「イベント」に対応します。
エージェントは特定のイベントタイプ(「指導案が生成されました」、「課題が作成されました」など)。イベントが発生すると、関連するエージェントに通知が送信され、エージェントはそれに応じて対応できます。この分離により、柔軟性、スケーラビリティ、リアルタイムの応答性が向上します。

まず、これらのイベントをブロードキャストする方法が必要です。これを行うには、Pub/Sub トピックを設定します。まず、plan というトピックを作成しましょう。
👉 Google Cloud コンソールの Pub/Sub に移動します。
👉 [トピックを作成] ボタンをクリックします。
👉 ID/名前 plan でトピックを構成し、Add a default subscription のチェックを外します。残りはデフォルトのままにして、[作成] をクリックします。
Pub/Sub ページが更新され、新しく作成したトピックが表に表示されます。
次に、Pub/Sub イベント パブリッシュ機能をプランナー エージェントに統合しましょう。作成した Pub/Sub トピックに「プラン」イベントを送信する新しいツールを追加します。このイベントは、システム内の他のエージェント(生徒用ポータルなど)に新しい指導計画が利用可能になったことを通知します。
👉Cloud Code エディタに戻り、planner フォルダにある app.py ファイルを開きます。イベントを公開する関数を追加します。次のように置き換えます。
##ADD SEND PLAN EVENT FUNCTION HERE
変更後のコード
def send_plan_event(teaching_plan:str):
    """
    Send the teaching event to the topic called plan

    Args:
        teaching_plan: teaching plan
    """
    publisher = pubsub_v1.PublisherClient()
    print(f"-------------> Sending event to topic plan: {teaching_plan}")
    topic_path = publisher.topic_path(PROJECT_ID, "plan")

    message_data = {"teaching_plan": teaching_plan}
    data = json.dumps(message_data).encode("utf-8")

    future = publisher.publish(topic_path, data)

    return f"Published message ID: {future.result()}"
- send_plan_event: この関数は、生成された指導計画を入力として受け取り、Pub/Sub パブリッシャー クライアントを作成し、トピックパスを構築し、指導計画を JSON 文字列に変換して、メッセージをトピックに公開します。
同じ app.py ファイルで次のようにします。
👉プロンプトを更新して、エージェントに、指導計画の生成後に指導計画イベントを Pub/Sub トピックに送信するよう指示します。*置き換える
### ADD send_plan_event CALL
次のとおりです。
send_plan_event(teaching_plan)
send_plan_event ツールを追加してプロンプトを変更することで、プランナー エージェントが Pub/Sub にイベントを公開できるようになり、システムの他のコンポーネントが新しい指導計画の作成に対応できるようになりました。次のセクションでは、機能するマルチエージェント システムを構築します。
10. オンデマンド テストで生徒を支援する
生徒がそれぞれの学習プランに合わせてカスタマイズされたクイズを無制限に利用できる学習環境を想像してみてください。これらのクイズでは、解答や解説などのフィードバックがすぐに提供され、教材に対する理解を深めることができます。AI を活用したクイズ ポータルで、この可能性を引き出すことを目指しています。
このビジョンを実現するために、授業計画の内容に基づいて多肢選択式の質問を作成できるクイズ生成コンポーネントを構築します。

👉 Cloud Code エディタの [エクスプローラ] ペインで、portal フォルダに移動します。quiz.py ファイルを開き、次のコードをコピーしてファイルの末尾に貼り付けます。
def generate_quiz_question(file_name: str, difficulty: str, region:str ):
    """Generates a single multiple-choice quiz question using the LLM.

    ```json
    {
      "question": "The question itself",
      "options": ["Option A", "Option B", "Option C", "Option D"],
      "answer": "The correct answer letter (A, B, C, or D)"
    }
    ```
    """

    print(f"region: {region}")
    # Connect to resourse needed from Google Cloud
    llm = VertexAI(model_name="gemini-2.5-flash-preview-04-17", location=region)


    plan=None
    #load the file using file_name and read content into string call plan
    with open(file_name, 'r') as f:
        plan = f.read()

    parser = JsonOutputParser(pydantic_object=QuizQuestion)


    instruction = f"You'll provide one question with difficulty level of {difficulty}, 4 options as multiple choices and provide the anwsers, the quiz needs to be related to the teaching plan {plan}"

    prompt = PromptTemplate(
        template="Generates a single multiple-choice quiz question\n {format_instructions}\n  {instruction}\n",
        input_variables=["instruction"],
        partial_variables={"format_instructions": parser.get_format_instructions()},
    )

    chain = prompt | llm | parser
    response = chain.invoke({"instruction": instruction})

    print(f"{response}")
    return  response
エージェントでは、LLM の出力を理解して構造化するために特別に設計された JSON 出力パーサーが作成されます。これは、前に定義した QuizQuestion モデルを使用して、解析された出力が正しい形式(質問、選択肢、回答)に準拠していることを確認します。
👉 ターミナルで、次のコマンドを実行して仮想環境を設定し、依存関係をインストールして、エージェントを起動します。
gcloud config set project $(cat ~/project_id.txt)
cd ~/aidemy-bootstrap/portal/
python -m venv env
source env/bin/activate
pip install -r requirements.txt
python app.py
👉 右上にある [ウェブでプレビュー] メニューから、[ポート 8080 でプレビュー] を選択します。Cloud Shell で、アプリケーションのウェブ プレビューが新しいブラウザタブまたはブラウザ ウィンドウで開きます。
👉 ウェブ アプリケーションで、上部のナビゲーション バーまたはインデックス ページのカードにある [クイズ] リンクをクリックします。生徒には、ランダムに生成された 3 つのクイズが表示されます。これらのクイズは、指導計画に基づいており、AI を活用したクイズ生成システムの能力を示しています。

👉ローカルで実行中のプロセスを停止するには、ターミナルで Ctrl+C を押します。
Gemini 2 Thinking for Explanations
クイズは、良いスタートです。生徒が間違った回答をした場合はどうなりますか?それが真の学習につながるのです。回答が間違っていた理由と正しい回答にたどり着く方法を説明すれば、ユーザーはそれを記憶しやすくなります。また、疑問を解消し、自信を高めることもできます。
そこで、Gemini 2 の「思考」モデルという強力なツールを導入します。AI が説明する前に、少し時間をかけて考えられるようにするようなものです。これにより、より詳細で質の高いフィードバックを提供できるようになります。
この機能が、生徒の学習を支援し、質問に答え、詳細な説明を提供することで、生徒の役に立つかどうかを確認したいと考えています。テストとして、微積分という難しいテーマから始めましょう。

👉まず、portal フォルダ内の answer.py にある Cloud コードエディタに移動します。変更前の関数コード
def answer_thinking(question, options, user_response, answer, region):
    return ""
次のコード スニペットを使用します。
def answer_thinking(question, options, user_response, answer, region):
    try:
        llm = VertexAI(model_name="gemini-2.0-flash-001",location=region)

        input_msg = HumanMessage(content=[f"Here the question{question}, here are the available options {options}, this student's answer {user_response}, whereas the correct answer is {answer}"])
        prompt_template = ChatPromptTemplate.from_messages(
            [
                SystemMessage(
                    content=(
                        "You are a helpful teacher trying to teach the student on question, you were given the question and a set of multiple choices "
                        "what's the correct answer. use friendly tone"
                    )
                ),
                input_msg,
            ]
        )

        prompt = prompt_template.format()

        response = llm.invoke(prompt)
        print(f"response: {response}")

        return response
    except Exception as e:
        print(f"Error sending message to chatbot: {e}") # Log this error too!
        return f"Unable to process your request at this time. Due to the following reason: {str(e)}"


if __name__ == "__main__":
    question = "Evaluate the limit: lim (x→0) [(sin(5x) - 5x) / x^3]"
    options = ["A) -125/6", "B) -5/3 ", "C) -25/3", "D) -5/6"]
    user_response = "B"
    answer = "A"
    region = "us-central1"
    result = answer_thinking(question, options, user_response, answer, region)
これは、Gemini 2 Flash モデルを初期化する非常にシンプルな Langchain アプリです。このモデルに、親切な教師として説明を提供するよう指示しています。
👉ターミナルで次のコマンドを実行します。
gcloud config set project $(cat ~/project_id.txt)
cd ~/aidemy-bootstrap/portal/
source env/bin/activate
python answer.py
元の手順で示されている例と同様の出力が表示されます。現在のモデルでは、十分な説明が得られない場合があります。
Okay, I see the question and the choices. The question is to evaluate the limit:

lim (x→0) [(sin(5x) - 5x) / x^3]

You chose option B, which is -5/3, but the correct answer is A, which is -125/6.

It looks like you might have missed a step or made a small error in your calculations. This type of limit often involves using L'Hôpital's Rule or Taylor series expansion. Since we have the form 0/0, L'Hôpital's Rule is a good way to go! You need to apply it multiple times. Alternatively, you can use the Taylor series expansion of sin(x) which is:
sin(x) = x - x^3/3! + x^5/5! - ...
So, sin(5x) = 5x - (5x)^3/3! + (5x)^5/5! - ...
Then,  (sin(5x) - 5x) = - (5x)^3/3! + (5x)^5/5! - ...
Finally, (sin(5x) - 5x) / x^3 = - 5^3/3! + (5^5 * x^2)/5! - ...
Taking the limit as x approaches 0, we get -125/6.

Keep practicing, you'll get there!
👉 answer.py ファイルで、
answer_thinking 関数で、gemini-2.0-flash-001 から gemini-2.0-flash-thinking-exp-01-21 までの model_name。
これにより、LLM が推論に優れた別の LLM に変更されます。これにより、モデルがより優れた説明を生成できるようになります。
👉 answer.py スクリプトを再度実行して、新しい思考モデルをテストします。
gcloud config set project $(cat ~/project_id.txt)
cd ~/aidemy-bootstrap/portal/
source env/bin/activate
python answer.py
思考モデルからのレスポンスの例を次に示します。このレスポンスは、微積分の問題を解く方法をステップごとに説明する、より詳細で徹底的なものです。これは、高品質の説明を生成する「思考」モデルの能力を強調しています。次のような出力が表示されます。
Hey there! Let's take a look at this limit problem together. You were asked to evaluate:

lim (x→0) [(sin(5x) - 5x) / x^3]

and you picked option B, -5/3, but the correct answer is actually A, -125/6. Let's figure out why!

It's a tricky one because if we directly substitute x=0, we get (sin(0) - 0) / 0^3 = (0 - 0) / 0 = 0/0, which is an indeterminate form. This tells us we need to use a more advanced technique like L'Hopital's Rule or Taylor series expansion.

Let's use the Taylor series expansion for sin(y) around y=0. Do you remember it?  It looks like this:

sin(y) = y - y^3/3! + y^5/5! - ...
where 3! (3 factorial) is 3 × 2 × 1 = 6, 5! is 5 × 4 × 3 × 2 × 1 = 120, and so on.

In our problem, we have sin(5x), so we can substitute y = 5x into the Taylor series:

sin(5x) = (5x) - (5x)^3/3! + (5x)^5/5! - ...
sin(5x) = 5x - (125x^3)/6 + (3125x^5)/120 - ...

Now let's plug this back into our limit expression:

[(sin(5x) - 5x) / x^3] =  [ (5x - (125x^3)/6 + (3125x^5)/120 - ...) - 5x ] / x^3
Notice that the '5x' and '-5x' cancel out!  So we are left with:
= [ - (125x^3)/6 + (3125x^5)/120 - ... ] / x^3
Now, we can divide every term in the numerator by x^3:
= -125/6 + (3125x^2)/120 - ...

Finally, let's take the limit as x approaches 0.  As x gets closer and closer to zero, terms with x^2 and higher powers will become very, very small and approach zero.  So, we are left with:
lim (x→0) [ -125/6 + (3125x^2)/120 - ... ] = -125/6

Therefore, the correct answer is indeed **A) -125/6**.

It seems like your answer B, -5/3, might have come from perhaps missing a factor somewhere during calculation or maybe using an incorrect simplification. Double-check your steps when you were trying to solve it!

Don't worry, these limit problems can be a bit tricky sometimes! Keep practicing and you'll get the hang of it.  Let me know if you want to go through another similar example or if you have any more questions! 😊


Now that we have confirmed it works, let's use the portal.
👉 answer.py から次のテストコードを削除します。
if __name__ == "__main__":
    question = "Evaluate the limit: lim (x→0) [(sin(5x) - 5x) / x^3]"
    options = ["A) -125/6", "B) -5/3 ", "C) -25/3", "D) -5/6"]
    user_response = "B"
    answer = "A"
    region = "us-central1"
    result = answer_thinking(question, options, user_response, answer, region)
👉ターミナルで次のコマンドを実行して、仮想環境を設定し、依存関係をインストールして、エージェントを起動します。
gcloud config set project $(cat ~/project_id.txt)
cd ~/aidemy-bootstrap/portal/
source env/bin/activate
python app.py
👉 右上にある [ウェブでプレビュー] メニューから、[ポート 8080 でプレビュー] を選択します。Cloud Shell で、アプリケーションのウェブ プレビューが新しいブラウザタブまたはブラウザ ウィンドウで開きます。
👉 ウェブ アプリケーションで、上部のナビゲーション バーまたはインデックス ページのカードにある [クイズ] リンクをクリックします。
👉 すべてのクイズに回答し、少なくとも 1 つの回答を間違えて、[送信] をクリックします。

レスポンスを待っている間、ぼんやりと見つめるのではなく、Cloud エディタのターミナルに切り替えます。エミュレータのターミナルで、関数の進行状況と、関数によって生成された出力やエラー メッセージを確認できます。😁
👉 ターミナルで Ctrl+C を押して、ローカルで実行中のプロセスを停止します。
11. 省略可: Eventarc を使用してエージェントをオーケストレートする
これまでのところ、生徒用ポータルはデフォルトの教材プランに基づいてクイズを生成していました。これは便利ですが、プランナー エージェントとポータルのクイズ エージェントが実際には連携していないことを意味します。プランナー エージェントが新しく生成した指導計画を Pub/Sub トピックに公開する機能を追加したことを思い出してください。次に、これをポータル エージェントに接続します。

新しい指導計画が生成されるたびに、ポータルのクイズ コンテンツが自動的に更新されるようにしたいと考えています。そのため、これらの新しいプランを受け取ることができるエンドポイントをポータルに作成します。
👉 Cloud Code エディタのエクスプローラ ペインで、portal フォルダに移動します。
👉 app.py ファイルを開いて編集します。 ## REPLACE ME! NEW TEACHING PLAN 行を次のコードに置き換えます。
@app.route('/new_teaching_plan', methods=['POST'])
def new_teaching_plan():
    try:

        # Get data from Pub/Sub message delivered via Eventarc
        envelope = request.get_json()
        if not envelope:
            return jsonify({'error': 'No Pub/Sub message received'}), 400

        if not isinstance(envelope, dict) or 'message' not in envelope:
            return jsonify({'error': 'Invalid Pub/Sub message format'}), 400

        pubsub_message = envelope['message']
        print(f"data: {pubsub_message['data']}")

        data = pubsub_message['data']
        data_str = base64.b64decode(data).decode('utf-8')
        data = json.loads(data_str)

        teaching_plan = data['teaching_plan']

        print(f"File content: {teaching_plan}")

        with open("teaching_plan.txt", "w") as f:
            f.write(teaching_plan)

        print(f"Teaching plan saved to local file: teaching_plan.txt")

        return jsonify({'message': 'File processed successfully'})


    except Exception as e:
        print(f"Error processing file: {e}")
        return jsonify({'error': 'Error processing file'}), 500
Cloud Run への再ビルドとデプロイ
プランナー エージェントとポータル エージェントの両方を更新して Cloud Run に再デプロイする必要があります。これにより、最新のコードが使用され、イベントを介して通信するように構成されます。

👉まず、planner エージェント イメージを再ビルドして push します。ターミナルで次のコマンドを実行します。
cd ~/aidemy-bootstrap/planner/
gcloud config set project $(cat ~/project_id.txt)
export PROJECT_ID=$(gcloud config get project)
docker build -t gcr.io/${PROJECT_ID}/aidemy-planner .
export PROJECT_ID=$(gcloud config get project)
docker tag gcr.io/${PROJECT_ID}/aidemy-planner us-central1-docker.pkg.dev/${PROJECT_ID}/agent-repository/aidemy-planner
docker push us-central1-docker.pkg.dev/${PROJECT_ID}/agent-repository/aidemy-planner
👉同様に、ポータル エージェント イメージをビルドして push します。
cd ~/aidemy-bootstrap/portal/
gcloud config set project $(cat ~/project_id.txt)
export PROJECT_ID=$(gcloud config get project)
docker build -t gcr.io/${PROJECT_ID}/aidemy-portal .
export PROJECT_ID=$(gcloud config get project)
docker tag gcr.io/${PROJECT_ID}/aidemy-portal us-central1-docker.pkg.dev/${PROJECT_ID}/agent-repository/aidemy-portal
docker push us-central1-docker.pkg.dev/${PROJECT_ID}/agent-repository/aidemy-portal
👉 Artifact Registry に移動すると、agent-repository に aidemy-planner と aidemy-portal の両方のコンテナ イメージが表示されます。

👉ターミナルに戻り、次のコマンドを実行してプランナー エージェントの Cloud Run イメージを更新します。
gcloud config set project $(cat ~/project_id.txt)
export PROJECT_ID=$(gcloud config get project)
gcloud run services update aidemy-planner \
    --region=us-central1 \
    --image=us-central1-docker.pkg.dev/${PROJECT_ID}/agent-repository/aidemy-planner:latest
次のような出力が表示されます。
OK Deploying... Done.
  OK Creating Revision...
  OK Routing traffic...
Done.
Service [aidemy-planner] revision [aidemy-planner-xxxxx] has been deployed and is serving 100 percent of traffic.
Service URL: https://aidemy-planner-xxx.us-central1.run.app
サービス URL をメモします。これは、デプロイされたプランナー エージェントへのリンクです。後でプランナー エージェントのサービス URL を確認する必要がある場合は、次のコマンドを使用します。
gcloud config set project $(cat ~/project_id.txt)
export PROJECT_ID=$(gcloud config get project)
gcloud run services describe aidemy-planner \
    --region=us-central1 \
    --format 'value(status.url)'
👉これを実行して、ポータル エージェントの Cloud Run インスタンスを作成します。
gcloud config set project $(cat ~/project_id.txt)
export PROJECT_ID=$(gcloud config get project)
gcloud run deploy aidemy-portal \
  --image=us-central1-docker.pkg.dev/${PROJECT_ID}/agent-repository/aidemy-portal:latest \
  --region=us-central1 \
  --platform=managed \
  --allow-unauthenticated \
  --memory=2Gi \
  --cpu=2 \
  --set-env-vars=GOOGLE_CLOUD_PROJECT=${PROJECT_ID}
次のような出力が表示されます。
Deploying container to Cloud Run service [aidemy-portal] in project [xxxx] region [us-central1]
OK Deploying new service... Done.
  OK Creating Revision...
  OK Routing traffic...
  OK Setting IAM Policy...
Done.
Service [aidemy-portal] revision [aidemy-portal-xxxx] has been deployed and is serving 100 percent of traffic.
Service URL: https://aidemy-portal-xxxx.us-central1.run.app
サービス URL をメモします。これは、デプロイされた生徒用ポータルへのリンクです。後で生徒用ポータルのサービス URL を確認する必要がある場合は、次のコマンドを使用します。
gcloud config set project $(cat ~/project_id.txt)
export PROJECT_ID=$(gcloud config get project)
gcloud run services describe aidemy-portal \
    --region=us-central1 \
    --format 'value(status.url)'
Eventarc トリガーの作成
ここで大きな疑問が生じます。Pub/Sub トピックに新しいプランが待機している場合、このエンドポイントはどのようにして通知を受け取るのでしょうか?そこで Eventarc が登場します。
Eventarc はブリッジとして機能し、特定のイベント(Pub/Sub トピックに新しいメッセージが到着するなど)をリッスンし、それに応じてアクションを自動的にトリガーします。この例では、新しい指導計画が公開されたときに検出され、ポータルのエンドポイントに更新のタイミングを知らせるシグナルが送信されます。
Eventarc がイベント ドリブン型の通信を処理することで、プランナー エージェントとポータル エージェントをシームレスに接続し、真に動的で応答性の高い学習システムを構築できます。これは、最新の授業計画を適切な場所に自動的に配信するスマート メッセンジャーのようなものです。
👉コンソールで Eventarc に移動します。
👉[+ トリガーを作成] ボタンをクリックします。
トリガー(基本)を構成します。
- トリガー名:
plan-topic-trigger - トリガーのタイプ: Google ソース
- イベント プロバイダ: Cloud Pub/Sub
- イベントタイプ:
google.cloud.pubsub.topic.v1.messagePublished - Cloud Pub/Sub トピック:
projects/PROJECT_ID/topics/planを選択します。 - リージョン:
us-central1。 - サービス アカウント:
- ロール
roles/iam.serviceAccountTokenCreatorを持つサービス アカウントに GRANT - デフォルト値(デフォルトのコンピューティング サービス アカウント)を使用する
- ロール
- イベントの宛先: Cloud Run
- Cloud Run サービス:
aidemy-portal - エラー メッセージ「Permission denied on ‘locations/me-central2' (or it may not exist)」を無視します。
- サービス URL パス:
/new_teaching_plan
👉 [作成] をクリックします。
[Eventarc トリガー] ページが更新され、新しく作成したトリガーが表に表示されます。
次に、サービス URL を使用してプランナー エージェントにアクセスし、新しい指導計画をリクエストします。
👉 ターミナルで次のコマンドを実行して、プランナー エージェントのサービス URL を確認します。
gcloud config set project $(cat ~/project_id.txt)
export PROJECT_ID=$(gcloud config get project)
gcloud run services list --platform=managed --region=us-central1 --format='value(URL)' | grep planner
👉 出力された URL に移動し、今度は Year 5、Subject Science、Add-on Request atoms を試します。
1 ~ 2 分待ちます。この遅延は、このラボの課金制限により発生しています。通常は遅延が発生しません。
最後に、サービス URL を使用して生徒のポータルにアクセスします。
ターミナルで次のコマンドを実行して、生徒用ポータル エージェントのサービス URL を確認します。
gcloud config set project $(cat ~/project_id.txt)
export PROJECT_ID=$(gcloud config get project)
gcloud run services list --platform=managed --region=us-central1 --format='value(URL)' | grep portal
クイズが更新され、生成した新しい指導計画に沿った内容になっていることを確認します。これにより、Aidemy システムへの Eventarc の統合が成功したことが実証されました。

おめでとうございます!これで、Google Cloud でマルチエージェント システムを構築し、イベント ドリブン アーキテクチャを活用してスケーラビリティと柔軟性を高めることができました。確固たる基盤を築きましたが、さらに多くのことを学ぶことができます。このアーキテクチャの実際のメリットを詳しく知りたい場合、Gemini 2 のマルチモーダル Live API の機能を確認したい場合、LangGraph を使用して単一パス オーケストレーションを実装する方法を学びたい場合は、次の 2 つの章に進んでください。
12. 省略可: Gemini による音声ハイライト
Gemini は、テキスト、画像、音声など、さまざまなソースからの情報を理解して処理できるため、学習やコンテンツ作成の可能性が大きく広がります。Gemini の「見る」「聞く」「読む」機能は、クリエイティブで魅力的なユーザー エクスペリエンスを真に実現します。
学習において、ビジュアルやテキストを作成するだけでなく、効果的な要約と復習も重要なステップです。考えてみてください。教科書で読んだことよりも、キャッチーな歌の歌詞の方が覚えやすいことはよくあります。音は非常に記憶に残るものです。そこで、Gemini のマルチモーダル機能を活用して、授業計画の音声要約を生成します。これにより、生徒は便利で魅力的な方法で教材を復習できるようになり、聴覚学習の力を通じて定着率と理解度を高めることができます。

生成された音声ファイルを保存する場所が必要です。Cloud Storage は、スケーラブルで信頼性の高いソリューションを提供します。
👉コンソールの [ストレージ] に移動します。左側のメニューで [バケット] をクリックします。上部の [+ 作成] ボタンをクリックします。
👉新しいバケットを構成します。
- バケット名:
aidemy-recap-UNIQUE_NAME。- 重要:
aidemy-recap-で始まる一意のバケット名を定義してください。この一意の接頭辞は、Cloud Storage バケットを作成する際に名前の競合を回避するために重要です。
- 重要:
- リージョン:
us-central1。 - ストレージ クラス: 「Standard」。Standard は、頻繁にアクセスされるデータに適しています。
- アクセス制御: デフォルトの [均一] アクセス制御を選択したままにします。これにより、一貫したバケットレベルのアクセス制御が提供されます。
- 詳細オプション: このワークショップでは、通常はデフォルト設定で十分です。
[作成] ボタンをクリックしてバケットを作成します。
- 公開アクセスの防止に関するポップアップが表示されることがあります。[このバケットに対する公開アクセス禁止を適用する] チェックボックスをオンのままにして、
Confirmをクリックします。
これで、新しく作成したバケットがバケットのリストに表示されるようになります。バケット名は後で必要になるため、覚えておいてください。
👉Cloud Code エディタのターミナルで、次のコマンドを実行して、サービス アカウントにバケットへのアクセス権を付与します。
gcloud config set project $(cat ~/project_id.txt)
export PROJECT_ID=$(gcloud config get project)
export COURSE_BUCKET_NAME=$(gcloud storage buckets list --format="value(name)" | grep aidemy-recap)
export SERVICE_ACCOUNT_NAME=$(gcloud compute project-info describe --format="value(defaultServiceAccount)")
gcloud storage buckets add-iam-policy-binding gs://$COURSE_BUCKET_NAME \
    --member "serviceAccount:$SERVICE_ACCOUNT_NAME" \
    --role "roles/storage.objectViewer"

gcloud storage buckets add-iam-policy-binding gs://$COURSE_BUCKET_NAME \
    --member "serviceAccount:$SERVICE_ACCOUNT_NAME" \
    --role "roles/storage.objectCreator"
👉Cloud Code エディタで、courses フォルダ内の audio.py を開きます。次のコードをファイルの末尾に貼り付けます。
config = LiveConnectConfig(
    response_modalities=["AUDIO"],
    speech_config=SpeechConfig(
        voice_config=VoiceConfig(
            prebuilt_voice_config=PrebuiltVoiceConfig(
                voice_name="Charon",
            )
        )
    ),
)

async def process_weeks(teaching_plan: str):
    region = "us-east5" #To workaround onRamp quota limits
    client = genai.Client(vertexai=True, project=PROJECT_ID, location=region)

    clientAudio = genai.Client(vertexai=True, project=PROJECT_ID, location="us-central1")
    async with clientAudio.aio.live.connect(
        model=MODEL_ID,
        config=config,
    ) as session:
        for week in range(1, 4):
            response = client.models.generate_content(
                model="gemini-2.0-flash-001",
                contents=f"Given the following teaching plan: {teaching_plan}, Extrace content plan for week {week}. And return just the plan, nothingh else  " # Clarified prompt
            )

            prompt = f"""
                Assume you are the instructor.
                Prepare a concise and engaging recap of the key concepts and topics covered.
                This recap should be suitable for generating a short audio summary for students.
                Focus on the most important learnings and takeaways, and frame it as a direct address to the students.
                Avoid overly formal language and aim for a conversational tone, tell a few jokes.

                Teaching plan: {response.text} """
            print(f"prompt --->{prompt}")

            await session.send(input=prompt, end_of_turn=True)
            with open(f"temp_audio_week_{week}.raw", "wb") as temp_file:
                async for message in session.receive():
                    if message.server_content.model_turn:
                        for part in message.server_content.model_turn.parts:
                            if part.inline_data:
                                temp_file.write(part.inline_data.data)

            data, samplerate = sf.read(f"temp_audio_week_{week}.raw", channels=1, samplerate=24000, subtype='PCM_16', format='RAW')
            sf.write(f"course-week-{week}.wav", data, samplerate)

            storage_client = storage.Client()
            bucket = storage_client.bucket(BUCKET_NAME)
            blob = bucket.blob(f"course-week-{week}.wav")  # Or give it a more descriptive name
            blob.upload_from_filename(f"course-week-{week}.wav")
            print(f"Audio saved to GCS: gs://{BUCKET_NAME}/course-week-{week}.wav")
    await session.close()


def breakup_sessions(teaching_plan: str):
    asyncio.run(process_weeks(teaching_plan))
- ストリーミング接続: まず、Live API エンドポイントとの永続的な接続が確立されます。リクエストを送信してレスポンスを取得する標準の API 呼び出しとは異なり、この接続は継続的なデータ交換のために開いたままになります。
- 構成マルチモーダル: 構成を使用して、必要な出力のタイプ(この場合は音声)を指定します。使用するパラメータ(音声の選択、音声エンコードなど)を指定することもできます。
- 非同期処理: この API は非同期で動作します。つまり、音声生成の完了を待機している間、メインスレッドをブロックしません。データをリアルタイムで処理し、出力をチャンク単位で送信することで、ほぼ瞬時のエクスペリエンスを実現します。
ここで重要なのは、この音声生成プロセスをいつ実行すべきかということです。理想としては、新しい指導案が作成されたらすぐに音声による要約を利用できるようにしたいと考えています。Pub/Sub トピックに教育プランを公開することで、イベント ドリブン アーキテクチャをすでに実装しているため、そのトピックをサブスクライブするだけで済みます。
ただし、新しい指導案が頻繁に生成されることはありません。エージェントが常に実行され、新しいプランを待機している状態は効率的ではありません。そのため、この音声生成ロジックを Cloud Run 関数としてデプロイすることは理にかなっています。
関数としてデプロイすると、新しいメッセージが Pub/Sub トピックに公開されるまで休止状態になります。このイベントが発生すると、関数が自動的にトリガーされ、音声要約が生成されてバケットに保存されます。
👉main.py ファイルの courses フォルダにあるこのファイルは、新しい指導計画が利用可能になったときにトリガーされる Cloud Run 関数を定義します。プランを受け取り、音声要約の生成を開始します。次のコード スニペットをファイルの末尾に追加します。
@functions_framework.cloud_event
def process_teaching_plan(cloud_event):
    print(f"CloudEvent received: {cloud_event.data}")
    time.sleep(60)
    try:
        if isinstance(cloud_event.data.get('message', {}).get('data'), str):  # Check for base64 encoding
            data = json.loads(base64.b64decode(cloud_event.data['message']['data']).decode('utf-8'))
            teaching_plan = data.get('teaching_plan') # Get the teaching plan
        elif 'teaching_plan' in cloud_event.data: # No base64
            teaching_plan = cloud_event.data["teaching_plan"]
        else:
            raise KeyError("teaching_plan not found") # Handle error explicitly

        #Load the teaching_plan as string and from cloud event, call audio breakup_sessions
        breakup_sessions(teaching_plan)

        return "Teaching plan processed successfully", 200

    except (json.JSONDecodeError, AttributeError, KeyError) as e:
        print(f"Error decoding CloudEvent data: {e} - Data: {cloud_event.data}")
        return "Error processing event", 500

    except Exception as e:
        print(f"Error processing teaching plan: {e}")
        return "Error processing teaching plan", 500
@functions_framework.cloud_event: このデコレータは、CloudEvents によってトリガーされる Cloud Run 関数として関数をマークします。
ローカルでのテスト
👉 このコマンドを仮想環境で実行し、Cloud Run 関数に必要な Python ライブラリをインストールします。
cd ~/aidemy-bootstrap/courses
gcloud config set project $(cat ~/project_id.txt)
export PROJECT_ID=$(gcloud config get project)
export COURSE_BUCKET_NAME=$(gcloud storage buckets list --format="value(name)" | grep aidemy-recap)
python -m venv env
source env/bin/activate
pip install -r requirements.txt
👉Cloud Run Function エミュレータを使用すると、関数を Google Cloud にデプロイする前にローカルでテストできます。次のコマンドを実行して、ローカル エミュレータを起動します。
functions-framework --target process_teaching_plan --signature-type=cloudevent --source main.py
👉エミュレータの実行中に、テスト CloudEvent をエミュレータに送信して、新しい指導計画が公開されることをシミュレートできます。新しいターミナルで、次の操作を行います。

👉実行:
  curl -X POST \
  http://localhost:8080/ \
  -H "Content-Type: application/json" \
  -H "ce-id: event-id-01" \
  -H "ce-source: planner-agent" \
  -H "ce-specversion: 1.0" \
  -H "ce-type: google.cloud.pubsub.topic.v1.messagePublished" \
  -d '{
    "message": {
      "data": "eyJ0ZWFjaGluZ19wbGFuIjogIldlZWsgMTogMkQgU2hhcGVzIGFuZCBBbmdsZXMgLSBEYXkgMTogUmV2aWV3IG9mIGJhc2ljIDJEIHNoYXBlcyAoc3F1YXJlcywgcmVjdGFuZ2xlcywgdHJpYW5nbGVzLCBjaXJjbGVzKS4gRGF5IDI6IEV4cGxvcmluZyBkaWZmZXJlbnQgdHlwZXMgb2YgdHJpYW5nbGVzIChlcXVpbGF0ZXJhbCwgaXNvc2NlbGVzLCBzY2FsZW5lLCByaWdodC1hbmdsZWQpLiBEYXkgMzogRXhwbG9yaW5nIHF1YWRyaWxhdGVyYWxzIChzcXVhcmUsIHJlY3RhbmdsZSwgcGFyYWxsZWxvZ3JhbSwgcmhvbWJ1cywgdHJhcGV6aXVtKS4gRGF5IDQ6IEludHJvZHVjdGlvbiB0byBhbmdsZXM6IHJpZ2h0IGFuZ2xlcywgYWN1dGUgYW5nbGVzLCBhbmQgb2J0dXNlIGFuZ2xlcy4gRGF5IDU6IE1lYXN1cmluZyBhbmdsZXMgdXNpbmcgYSBwcm90cmFjdG9yLiBXZWVrIDI6IDNEIFNoYXBlcyBhbmQgU3ltbWV0cnkgLSBEYXkgNjogSW50cm9kdWN0aW9uIHRvIDNEIHNoYXBlczogY3ViZXMsIGN1Ym9pZHMsIHNwaGVyZXMsIGN5bGluZGVycywgY29uZXMsIGFuZCBweXJhbWlkcy4gRGF5IDc6IERlc2NyaWJpbmcgM0Qgc2hhcGVzIHVzaW5nIGZhY2VzLCBlZGdlcywgYW5kIHZlcnRpY2VzLiBEYXkgODogUmVsYXRpbmcgMkQgc2hhcGVzIHRvIDNEIHNoYXBlcy4gRGF5IDk6IElkZW50aWZ5aW5nIGxpbmVzIG9mIHN5bW1ldHJ5IGluIDJEIHNoYXBlcy4gRGF5IDEwOiBDb21wbGV0aW5nIHN5bW1ldHJpY2FsIGZpZ3VyZXMuIFdlZWsgMzogUG9zaXRpb24sIERpcmVjdGlvbiwgYW5kIFByb2JsZW0gU29sdmluZyAtIERheSAxMTogRGVzY3JpYmluZyBwb3NpdGlvbiB1c2luZyBjb29yZGluYXRlcyBpbiB0aGUgZmlyc3QgcXVhZHJhbnQuIERheSAxMjogUGxvdHRpbmcgY29vcmRpbmF0ZXMgdG8gZHJhdyBzaGFwZXMuIERheSAxMzogVW5kZXJzdGFuZGluZyB0cmFuc2xhdGlvbiAoc2xpZGluZyBhIHNoYXBlKS4gRGF5IDE0OiBVbmRlcnN0YW5kaW5nIHJlZmxlY3Rpb24gKGZsaXBwaW5nIGEgc2hhcGUpLiBEYXkgMTU6IFByb2JsZW0tc29sdmluZyBhY3Rpdml0aWVzIGludm9sdmluZyBwZXJpbWV0ZXIsIGFyZWEsIGFuZCBtaXNzaW5nIGFuZ2xlcy4ifQ=="
    }
  }'
応答を待っている間、ぼんやりと見つめるのではなく、別の Cloud Shell ターミナルに切り替えます。エミュレータのターミナルで、関数の進行状況と、関数によって生成された出力やエラー メッセージを確認できます。😁
2 番目のターミナルに戻ると、OK が返されていることがわかります。
👉バケット内のデータを確認するには、[Cloud Storage] に移動して [バケット] タブを選択し、aidemy-recap-UNIQUE_NAME を選択します。

👉エミュレータを実行しているターミナルで、ctrl+c と入力して終了します。2 つ目のターミナルを閉じます。2 つ目のターミナルを閉じ、deactivate を実行して仮想環境を終了します。
deactivate
Google Cloud へのデプロイ
 👉ローカルでテストしたら、コース エージェントを Google Cloud にデプロイします。ターミナルで次のコマンドを実行します。
cd ~/aidemy-bootstrap/courses
gcloud config set project $(cat ~/project_id.txt)
export PROJECT_ID=$(gcloud config get project)
export COURSE_BUCKET_NAME=$(gcloud storage buckets list --format="value(name)" | grep aidemy-recap)
gcloud functions deploy courses-agent \
  --region=us-central1 \
  --gen2 \
  --source=. \
  --runtime=python312 \
  --trigger-topic=plan \
  --entry-point=process_teaching_plan \
  --set-env-vars=GOOGLE_CLOUD_PROJECT=${PROJECT_ID},COURSE_BUCKET_NAME=$COURSE_BUCKET_NAME
Google Cloud コンソールの Cloud Run に移動して、デプロイを確認します。courses-agent という名前の新しいサービスが表示されます。

トリガー構成を確認するには、courses-agent サービスをクリックして詳細を表示します。[トリガー] タブに移動します。
プラン トピックにパブリッシュされたメッセージをリッスンするように構成されたトリガーが表示されます。

最後に、エンドツーエンドで実行してみましょう。
👉生成された音声ファイルの場所を認識するように、ポータル エージェントを構成する必要があります。ターミナルで次のコマンドを実行します。
export COURSE_BUCKET_NAME=$(gcloud storage buckets list --format="value(name)" | grep aidemy-recap)
gcloud config set project $(cat ~/project_id.txt)
export PROJECT_ID=$(gcloud config get project)
gcloud run services update aidemy-portal \
    --region=us-central1 \
    --set-env-vars=GOOGLE_CLOUD_PROJECT=${PROJECT_ID},COURSE_BUCKET_NAME=$COURSE_BUCKET_NAME
👉プランナー エージェントのウェブページを使用して、新しい指導計画を生成してみましょう。開始するまでに数分かかることがあります。サーバーレス サービスなので、ご安心ください。
プランナー エージェントにアクセスするには、ターミナルで次のコマンドを実行してサービス URL を取得します。
gcloud run services list \
    --platform=managed \
    --region=us-central1 \
    --format='value(URL)' | grep planner
新しいプランを生成したら、音声が生成されるまで 2 ~ 3 分待ちます。このラボアカウントの課金制限により、この処理には数分かかります。
courses-agent 関数が指導計画を受信したかどうかは、関数の [トリガー] タブで確認できます。ページを定期的に更新します。最終的に、関数が呼び出されたことが表示されます。2 分以上経過しても関数が呼び出されない場合は、指導計画の再生成を試してください。ただし、生成された各プランはエージェントによって順番に消費され、処理されるため、バックログが発生する可能性があります。そのため、プランを連続して繰り返し生成することは避けてください。

👉ポータルにアクセスして、[コース] をクリックします。3 つのカードが表示され、それぞれに音声の要約が表示されます。ポータル エージェントの URL を確認するには:
gcloud run services list \
    --platform=managed \
    --region=us-central1 \
    --format='value(URL)' | grep portal
各コースの [再生] をクリックして、生成したばかりの指導計画と音声の要約が一致していることを確認します。
仮想環境を終了します。
deactivate
13. 省略可: Gemini と DeepSeek を使用したロールベースのコラボレーション
複数の視点を持つことは、特に魅力的で思慮深い課題を作成する際に非常に重要です。ここでは、役割の異なる 2 つのモデルを活用して課題を生成するマルチエージェント システムを構築します。1 つはコラボレーションを促進し、もう 1 つは自習を促します。ワークフローが固定ルートをたどる「シングルショット」アーキテクチャを使用します。
Gemini 課題生成ツール
 まず、共同作業を重視した課題を生成するように Gemini 関数を設定します。
assignment フォルダにある gemini.py ファイルを編集します。
👉次のコードを gemini.py ファイルの末尾に貼り付けます。
def gen_assignment_gemini(state):
    region=get_next_region()
    client = genai.Client(vertexai=True, project=PROJECT_ID, location=region)
    print(f"---------------gen_assignment_gemini")
    response = client.models.generate_content(
        model=MODEL_ID, contents=f"""
        You are an instructor

        Develop engaging and practical assignments for each week, ensuring they align with the teaching plan's objectives and progressively build upon each other.

        For each week, provide the following:

        * **Week [Number]:** A descriptive title for the assignment (e.g., "Data Exploration Project," "Model Building Exercise").
        * **Learning Objectives Assessed:** List the specific learning objectives from the teaching plan that this assignment assesses.
        * **Description:** A detailed description of the task, including any specific requirements or constraints.  Provide examples or scenarios if applicable.
        * **Deliverables:** Specify what students need to submit (e.g., code, report, presentation).
        * **Estimated Time Commitment:**  The approximate time students should dedicate to completing the assignment.
        * **Assessment Criteria:** Briefly outline how the assignment will be graded (e.g., correctness, completeness, clarity, creativity).

        The assignments should be a mix of individual and collaborative work where appropriate.  Consider different learning styles and provide opportunities for students to apply their knowledge creatively.

        Based on this teaching plan: {state["teaching_plan"]}
        """
    )

    print(f"---------------gen_assignment_gemini answer {response.text}")

    state["model_one_assignment"] = response.text

    return state


import unittest

class TestGenAssignmentGemini(unittest.TestCase):
    def test_gen_assignment_gemini(self):
        test_teaching_plan = "Week 1: 2D Shapes and Angles - Day 1: Review of basic 2D shapes (squares, rectangles, triangles, circles). Day 2: Exploring different types of triangles (equilateral, isosceles, scalene, right-angled). Day 3: Exploring quadrilaterals (square, rectangle, parallelogram, rhombus, trapezium). Day 4: Introduction to angles: right angles, acute angles, and obtuse angles. Day 5: Measuring angles using a protractor. Week 2: 3D Shapes and Symmetry - Day 6: Introduction to 3D shapes: cubes, cuboids, spheres, cylinders, cones, and pyramids. Day 7: Describing 3D shapes using faces, edges, and vertices. Day 8: Relating 2D shapes to 3D shapes. Day 9: Identifying lines of symmetry in 2D shapes. Day 10: Completing symmetrical figures. Week 3: Position, Direction, and Problem Solving - Day 11: Describing position using coordinates in the first quadrant. Day 12: Plotting coordinates to draw shapes. Day 13: Understanding translation (sliding a shape). Day 14: Understanding reflection (flipping a shape). Day 15: Problem-solving activities involving perimeter, area, and missing angles."

        initial_state = {"teaching_plan": test_teaching_plan, "model_one_assignment": "", "model_two_assigmodel_one_assignmentnment": "", "final_assignment": ""}

        updated_state = gen_assignment_gemini(initial_state)

        self.assertIn("model_one_assignment", updated_state)
        self.assertIsNotNone(updated_state["model_one_assignment"])
        self.assertIsInstance(updated_state["model_one_assignment"], str)
        self.assertGreater(len(updated_state["model_one_assignment"]), 0)
        print(updated_state["model_one_assignment"])


if __name__ == '__main__':
    unittest.main()
Gemini モデルを使用して課題を生成します。
Gemini エージェントをテストする準備が整いました。
👉ターミナルで次のコマンドを実行して、環境をセットアップします。
cd ~/aidemy-bootstrap/assignment
gcloud config set project $(cat ~/project_id.txt)
export PROJECT_ID=$(gcloud config get project)
python -m venv env
source env/bin/activate
pip install -r requirements.txt
👉次のコマンドを実行してテストできます。
python gemini.py
出力に、グループワークの多い課題が表示されます。最後のアサート テストでも結果が出力されます。
Here are some engaging and practical assignments for each week, designed to build progressively upon the teaching plan's objectives:

**Week 1: Exploring the World of 2D Shapes**

* **Learning Objectives Assessed:**
    * Identify and name basic 2D shapes (squares, rectangles, triangles, circles).
    * .....

* **Description:**
    * **Shape Scavenger Hunt:** Students will go on a scavenger hunt in their homes or neighborhoods, taking pictures of objects that represent different 2D shapes. They will then create a presentation or poster showcasing their findings, classifying each shape and labeling its properties (e.g., number of sides, angles, etc.).
    * **Triangle Trivia:** Students will research and create a short quiz or presentation about different types of triangles, focusing on their properties and real-world examples.
    * **Angle Exploration:** Students will use a protractor to measure various angles in their surroundings, such as corners of furniture, windows, or doors. They will record their measurements and create a chart categorizing the angles as right, acute, or obtuse.
....

**Week 2: Delving into the World of 3D Shapes and Symmetry**

* **Learning Objectives Assessed:**
    * Identify and name basic 3D shapes.
    * ....

* **Description:**
    * **3D Shape Construction:** Students will work in groups to build 3D shapes using construction paper, cardboard, or other materials. They will then create a presentation showcasing their creations, describing the number of faces, edges, and vertices for each shape.
    * **Symmetry Exploration:** Students will investigate the concept of symmetry by creating a visual representation of various symmetrical objects (e.g., butterflies, leaves, snowflakes) using drawing or digital tools. They will identify the lines of symmetry and explain their findings.
    * **Symmetry Puzzles:** Students will be given a half-image of a symmetrical figure and will be asked to complete the other half, demonstrating their understanding of symmetry. This can be done through drawing, cut-out activities, or digital tools.

**Week 3: Navigating Position, Direction, and Problem Solving**

* **Learning Objectives Assessed:**
    * Describe position using coordinates in the first quadrant.
    * ....

* **Description:**
    * **Coordinate Maze:** Students will create a maze using coordinates on a grid paper. They will then provide directions for navigating the maze using a combination of coordinate movements and translation/reflection instructions.
    * **Shape Transformations:** Students will draw shapes on a grid paper and then apply transformations such as translation and reflection, recording the new coordinates of the transformed shapes.
    * **Geometry Challenge:** Students will solve real-world problems involving perimeter, area, and angles. For example, they could be asked to calculate the perimeter of a room, the area of a garden, or the missing angle in a triangle.
....
ctl+c で停止し、テストコードをクリーンアップします。gemini.py から次のコードを削除します。
import unittest

class TestGenAssignmentGemini(unittest.TestCase):
    def test_gen_assignment_gemini(self):
        test_teaching_plan = "Week 1: 2D Shapes and Angles - Day 1: Review of basic 2D shapes (squares, rectangles, triangles, circles). Day 2: Exploring different types of triangles (equilateral, isosceles, scalene, right-angled). Day 3: Exploring quadrilaterals (square, rectangle, parallelogram, rhombus, trapezium). Day 4: Introduction to angles: right angles, acute angles, and obtuse angles. Day 5: Measuring angles using a protractor. Week 2: 3D Shapes and Symmetry - Day 6: Introduction to 3D shapes: cubes, cuboids, spheres, cylinders, cones, and pyramids. Day 7: Describing 3D shapes using faces, edges, and vertices. Day 8: Relating 2D shapes to 3D shapes. Day 9: Identifying lines of symmetry in 2D shapes. Day 10: Completing symmetrical figures. Week 3: Position, Direction, and Problem Solving - Day 11: Describing position using coordinates in the first quadrant. Day 12: Plotting coordinates to draw shapes. Day 13: Understanding translation (sliding a shape). Day 14: Understanding reflection (flipping a shape). Day 15: Problem-solving activities involving perimeter, area, and missing angles."

        initial_state = {"teaching_plan": test_teaching_plan, "model_one_assignment": "", "model_two_assigmodel_one_assignmentnment": "", "final_assignment": ""}

        updated_state = gen_assignment_gemini(initial_state)

        self.assertIn("model_one_assignment", updated_state)
        self.assertIsNotNone(updated_state["model_one_assignment"])
        self.assertIsInstance(updated_state["model_one_assignment"], str)
        self.assertGreater(len(updated_state["model_one_assignment"]), 0)
        print(updated_state["model_one_assignment"])


if __name__ == '__main__':
    unittest.main()
DeepSeek 割り当てジェネレータを構成する
クラウドベースの AI プラットフォームは便利ですが、LLM のセルフホスティングは、データ プライバシーの保護とデータ主権の確保に不可欠です。最小の DeepSeek モデル(15 億個のパラメータ)を Cloud Compute Engine インスタンスにデプロイします。Google の Vertex AI プラットフォームでホストしたり、GKE インスタンスでホストしたりする方法もありますが、今回は AI エージェントのワークショップなので、最も簡単な方法を使用します。ただし、他のオプションに関心があり、詳しく調べたい場合は、割り当てフォルダの deepseek-vertexai.py ファイルをご覧ください。このファイルには、VertexAI にデプロイされたモデルを操作する方法のサンプルコードが記載されています。

👉ターミナルで次のコマンドを実行して、セルフホスト LLM プラットフォーム Ollama を作成します。
cd ~/aidemy-bootstrap/assignment
gcloud config set project $(cat ~/project_id.txt)
gcloud compute instances create ollama-instance \
    --image-family=ubuntu-2204-lts \
    --image-project=ubuntu-os-cloud \
    --machine-type=e2-standard-4 \
    --zone=us-central1-a \
    --metadata-from-file startup-script=startup.sh \
    --boot-disk-size=50GB \
    --tags=ollama \
    --scopes=https://www.googleapis.com/auth/cloud-platform
Compute Engine インスタンスが実行されていることを確認するには:
Google Cloud コンソールで、[Compute Engine] > [VM インスタンス] に移動します。実行中であることを示す緑色のチェックマークが付いた ollama-instance が表示されます。表示されない場合は、ゾーンが us-central1 であることを確認してください。表示されていない場合は、検索が必要になることがあります。

👉最小の DeepSeek モデルをインストールしてテストします。Cloud Shell エディタに戻り、[新規] ターミナルで次のコマンドを実行して、GCE インスタンスに SSH 接続します。
gcloud compute ssh ollama-instance --zone=us-central1-a
SSH 接続を確立すると、次のメッセージが表示されることがあります。
「Do you want to continue (Y/n)?」
「Y」(大文字と小文字は区別されません)と入力して Enter キーを押すと、処理が続行されます。
次に、SSH 認証鍵のパスフレーズの作成を求められることがあります。パスフレーズを使用しない場合は、Enter キーを 2 回押してデフォルト(パスフレーズなし)をそのまま使用します。
👉仮想マシンにログインして、最小の DeepSeek R1 モデルを pull し、動作するかどうかをテストします。
ollama pull deepseek-r1:1.5b
ollama run deepseek-r1:1.5b "who are you?"
👉GCE インスタンスを終了し、SSH ターミナルに次のコマンドを入力します。
exit
👉次に、他のサービスが LLM にアクセスできるようにネットワーク ポリシーを設定します。本番環境でこれを行う場合は、サービスにセキュリティ ログインを実装するか、IP アクセスを制限して、インスタンスへのアクセスを制限してください。次のコマンドを実行します。
gcloud compute firewall-rules create allow-ollama-11434 \
    --allow=tcp:11434 \
    --target-tags=ollama \
    --description="Allow access to Ollama on port 11434"
👉ファイアウォール ポリシーが正しく動作しているかどうかを確認するには、次のコマンドを実行します。
export OLLAMA_HOST=http://$(gcloud compute instances describe ollama-instance --zone=us-central1-a --format='value(networkInterfaces[0].accessConfigs[0].natIP)'):11434
curl -X POST "${OLLAMA_HOST}/api/generate" \
     -H "Content-Type: application/json" \
     -d '{
          "prompt": "Hello, what are you?",
          "model": "deepseek-r1:1.5b",
          "stream": false
        }'
次に、割り当てエージェントの Deepseek 関数を使用して、個々の作業の重点を置いた割り当てを生成します。
👉assignment フォルダの deepseek.py を編集し、次のスニペットを最後に追加します。
def gen_assignment_deepseek(state):
    print(f"---------------gen_assignment_deepseek")

    template = """
        You are an instructor who favor student to focus on individual work.

        Develop engaging and practical assignments for each week, ensuring they align with the teaching plan's objectives and progressively build upon each other.

        For each week, provide the following:

        * **Week [Number]:** A descriptive title for the assignment (e.g., "Data Exploration Project," "Model Building Exercise").
        * **Learning Objectives Assessed:** List the specific learning objectives from the teaching plan that this assignment assesses.
        * **Description:** A detailed description of the task, including any specific requirements or constraints.  Provide examples or scenarios if applicable.
        * **Deliverables:** Specify what students need to submit (e.g., code, report, presentation).
        * **Estimated Time Commitment:**  The approximate time students should dedicate to completing the assignment.
        * **Assessment Criteria:** Briefly outline how the assignment will be graded (e.g., correctness, completeness, clarity, creativity).

        The assignments should be a mix of individual and collaborative work where appropriate.  Consider different learning styles and provide opportunities for students to apply their knowledge creatively.

        Based on this teaching plan: {teaching_plan}
        """


    prompt = ChatPromptTemplate.from_template(template)

    model = OllamaLLM(model="deepseek-r1:1.5b",
                   base_url=OLLAMA_HOST)

    chain = prompt | model


    response = chain.invoke({"teaching_plan":state["teaching_plan"]})
    state["model_two_assignment"] = response

    return state

import unittest

class TestGenAssignmentDeepseek(unittest.TestCase):
    def test_gen_assignment_deepseek(self):
        test_teaching_plan = "Week 1: 2D Shapes and Angles - Day 1: Review of basic 2D shapes (squares, rectangles, triangles, circles). Day 2: Exploring different types of triangles (equilateral, isosceles, scalene, right-angled). Day 3: Exploring quadrilaterals (square, rectangle, parallelogram, rhombus, trapezium). Day 4: Introduction to angles: right angles, acute angles, and obtuse angles. Day 5: Measuring angles using a protractor. Week 2: 3D Shapes and Symmetry - Day 6: Introduction to 3D shapes: cubes, cuboids, spheres, cylinders, cones, and pyramids. Day 7: Describing 3D shapes using faces, edges, and vertices. Day 8: Relating 2D shapes to 3D shapes. Day 9: Identifying lines of symmetry in 2D shapes. Day 10: Completing symmetrical figures. Week 3: Position, Direction, and Problem Solving - Day 11: Describing position using coordinates in the first quadrant. Day 12: Plotting coordinates to draw shapes. Day 13: Understanding translation (sliding a shape). Day 14: Understanding reflection (flipping a shape). Day 15: Problem-solving activities involving perimeter, area, and missing angles."

        initial_state = {"teaching_plan": test_teaching_plan, "model_one_assignment": "", "model_two_assignment": "", "final_assignment": ""}

        updated_state = gen_assignment_deepseek(initial_state)

        self.assertIn("model_two_assignment", updated_state)
        self.assertIsNotNone(updated_state["model_two_assignment"])
        self.assertIsInstance(updated_state["model_two_assignment"], str)
        self.assertGreater(len(updated_state["model_two_assignment"]), 0)
        print(updated_state["model_two_assignment"])


if __name__ == '__main__':
    unittest.main()
👉次のコマンドを実行してテストしてみましょう。
cd ~/aidemy-bootstrap/assignment
source env/bin/activate
gcloud config set project $(cat ~/project_id.txt)
export PROJECT_ID=$(gcloud config get project)
export OLLAMA_HOST=http://$(gcloud compute instances describe ollama-instance --zone=us-central1-a --format='value(networkInterfaces[0].accessConfigs[0].natIP)'):11434
python deepseek.py
自主学習の課題が追加された課題が表示されます。
**Assignment Plan for Each Week**

---

### **Week 1: 2D Shapes and Angles**
- **Week Title:** "Exploring 2D Shapes"
Assign students to research and present on various 2D shapes. Include a project where they create models using straws and tape for triangles, draw quadrilaterals with specific measurements, and compare their properties.

### **Week 2: 3D Shapes and Symmetry**
Assign students to create models or nets for cubes and cuboids. They will also predict how folding these nets form the 3D shapes. Include a project where they identify symmetrical properties using mirrors or folding techniques.

### **Week 3: Position, Direction, and Problem Solving**

Assign students to use mirrors or folding techniques for reflections. Include activities where they measure angles, use a protractor, solve problems involving perimeter/area, and create symmetrical designs.
....
👉ctl+c を停止し、テストコードをクリーンアップします。deepseek.py から次のコードを削除します。
import unittest

class TestGenAssignmentDeepseek(unittest.TestCase):
    def test_gen_assignment_deepseek(self):
        test_teaching_plan = "Week 1: 2D Shapes and Angles - Day 1: Review of basic 2D shapes (squares, rectangles, triangles, circles). Day 2: Exploring different types of triangles (equilateral, isosceles, scalene, right-angled). Day 3: Exploring quadrilaterals (square, rectangle, parallelogram, rhombus, trapezium). Day 4: Introduction to angles: right angles, acute angles, and obtuse angles. Day 5: Measuring angles using a protractor. Week 2: 3D Shapes and Symmetry - Day 6: Introduction to 3D shapes: cubes, cuboids, spheres, cylinders, cones, and pyramids. Day 7: Describing 3D shapes using faces, edges, and vertices. Day 8: Relating 2D shapes to 3D shapes. Day 9: Identifying lines of symmetry in 2D shapes. Day 10: Completing symmetrical figures. Week 3: Position, Direction, and Problem Solving - Day 11: Describing position using coordinates in the first quadrant. Day 12: Plotting coordinates to draw shapes. Day 13: Understanding translation (sliding a shape). Day 14: Understanding reflection (flipping a shape). Day 15: Problem-solving activities involving perimeter, area, and missing angles."

        initial_state = {"teaching_plan": test_teaching_plan, "model_one_assignment": "", "model_two_assignment": "", "final_assignment": ""}

        updated_state = gen_assignment_deepseek(initial_state)

        self.assertIn("model_two_assignment", updated_state)
        self.assertIsNotNone(updated_state["model_two_assignment"])
        self.assertIsInstance(updated_state["model_two_assignment"], str)
        self.assertGreater(len(updated_state["model_two_assignment"]), 0)
        print(updated_state["model_two_assignment"])


if __name__ == '__main__':
    unittest.main()
次に、同じ Gemini モデルを使用して、両方の割り当てを新しい割り当てに結合します。assignment フォルダにある gemini.py ファイルを編集します。
👉次のコードを gemini.py ファイルの末尾に貼り付けます。
def combine_assignments(state):
    print(f"---------------combine_assignments ")
    region=get_next_region()
    client = genai.Client(vertexai=True, project=PROJECT_ID, location=region)
    response = client.models.generate_content(
        model=MODEL_ID, contents=f"""
        Look at all the proposed assignment so far {state["model_one_assignment"]} and {state["model_two_assignment"]}, combine them and come up with a final assignment for student.
        """
    )

    state["final_assignment"] = response.text

    return state
両方のモデルの強みを組み合わせるために、LangGraph を使用して定義されたワークフローをオーケストレートします。このワークフローは 3 つのステップで構成されています。まず、Gemini モデルがコラボレーションに重点を置いた課題を生成します。次に、DeepSeek モデルが個々の作業に重点を置いた課題を生成します。最後に、Gemini がこれら 2 つの課題を 1 つの包括的な課題に統合します。LLM の意思決定なしでステップのシーケンスを事前に定義するため、これは単一パスのユーザー定義オーケストレーションになります。

👉次のコードを assignment フォルダの main.py ファイルの末尾に貼り付けます。
def create_assignment(teaching_plan: str):
    print(f"create_assignment---->{teaching_plan}")
    builder = StateGraph(State)
    builder.add_node("gen_assignment_gemini", gen_assignment_gemini)
    builder.add_node("gen_assignment_deepseek", gen_assignment_deepseek)
    builder.add_node("combine_assignments", combine_assignments)

    builder.add_edge(START, "gen_assignment_gemini")
    builder.add_edge("gen_assignment_gemini", "gen_assignment_deepseek")
    builder.add_edge("gen_assignment_deepseek", "combine_assignments")
    builder.add_edge("combine_assignments", END)

    graph = builder.compile()
    state = graph.invoke({"teaching_plan": teaching_plan})

    return state["final_assignment"]


import unittest

class TestCreateAssignment(unittest.TestCase):
    def test_create_assignment(self):
        test_teaching_plan = "Week 1: 2D Shapes and Angles - Day 1: Review of basic 2D shapes (squares, rectangles, triangles, circles). Day 2: Exploring different types of triangles (equilateral, isosceles, scalene, right-angled). Day 3: Exploring quadrilaterals (square, rectangle, parallelogram, rhombus, trapezium). Day 4: Introduction to angles: right angles, acute angles, and obtuse angles. Day 5: Measuring angles using a protractor. Week 2: 3D Shapes and Symmetry - Day 6: Introduction to 3D shapes: cubes, cuboids, spheres, cylinders, cones, and pyramids. Day 7: Describing 3D shapes using faces, edges, and vertices. Day 8: Relating 2D shapes to 3D shapes. Day 9: Identifying lines of symmetry in 2D shapes. Day 10: Completing symmetrical figures. Week 3: Position, Direction, and Problem Solving - Day 11: Describing position using coordinates in the first quadrant. Day 12: Plotting coordinates to draw shapes. Day 13: Understanding translation (sliding a shape). Day 14: Understanding reflection (flipping a shape). Day 15: Problem-solving activities involving perimeter, area, and missing angles."
        initial_state = {"teaching_plan": test_teaching_plan, "model_one_assignment": "", "model_two_assignment": "", "final_assignment": ""}
        updated_state = create_assignment(initial_state)

        print(updated_state)


if __name__ == '__main__':
    unittest.main()
👉 create_assignment 関数を最初にテストし、Gemini と DeepSeek を組み合わせたワークフローが機能していることを確認するには、次のコマンドを実行します。
cd ~/aidemy-bootstrap/assignment
source env/bin/activate
pip install -r requirements.txt
python main.py
生徒の学習とグループワークの両方で、両方のモデルを個々の視点から組み合わせたものが表示されます。
**Tasks:**

1. **Clue Collection:** Gather all the clues left by the thieves. These clues will include:
    * Descriptions of shapes and their properties (angles, sides, etc.)
    * Coordinate grids with hidden messages
    * Geometric puzzles requiring transformation (translation, reflection, rotation)
    * Challenges involving area, perimeter, and angle calculations

2. **Clue Analysis:** Decipher each clue using your geometric knowledge. This will involve:
    * Identifying the shape and its properties
    * Plotting coordinates and interpreting patterns on the grid
    * Solving geometric puzzles by applying transformations
    * Calculating area, perimeter, and missing angles

3. **Case Report:** Create a comprehensive case report outlining your findings. This report should include:
    * A detailed explanation of each clue and its solution
    * Sketches and diagrams to support your explanations
    * A step-by-step account of how you followed the clues to locate the artifact
    * A final conclusion about the thieves and their motives
👉ctl+c を停止し、テストコードをクリーンアップします。main.py から次のコードを削除します。
import unittest

class TestCreateAssignment(unittest.TestCase):
    def test_create_assignment(self):
        test_teaching_plan = "Week 1: 2D Shapes and Angles - Day 1: Review of basic 2D shapes (squares, rectangles, triangles, circles). Day 2: Exploring different types of triangles (equilateral, isosceles, scalene, right-angled). Day 3: Exploring quadrilaterals (square, rectangle, parallelogram, rhombus, trapezium). Day 4: Introduction to angles: right angles, acute angles, and obtuse angles. Day 5: Measuring angles using a protractor. Week 2: 3D Shapes and Symmetry - Day 6: Introduction to 3D shapes: cubes, cuboids, spheres, cylinders, cones, and pyramids. Day 7: Describing 3D shapes using faces, edges, and vertices. Day 8: Relating 2D shapes to 3D shapes. Day 9: Identifying lines of symmetry in 2D shapes. Day 10: Completing symmetrical figures. Week 3: Position, Direction, and Problem Solving - Day 11: Describing position using coordinates in the first quadrant. Day 12: Plotting coordinates to draw shapes. Day 13: Understanding translation (sliding a shape). Day 14: Understanding reflection (flipping a shape). Day 15: Problem-solving activities involving perimeter, area, and missing angles."
        initial_state = {"teaching_plan": test_teaching_plan, "model_one_assignment": "", "model_two_assignment": "", "final_assignment": ""}
        updated_state = create_assignment(initial_state)

        print(updated_state)


if __name__ == '__main__':
    unittest.main()

課題の生成プロセスを自動化し、新しい指導計画に対応できるようにするため、既存のイベント駆動型アーキテクチャを活用します。次のコードは、新しい指導計画が Pub/Sub トピック「plan」に公開されるたびにトリガーされる Cloud Run 関数(generate_assignment)を定義します。
👉assignment フォルダの main.py の末尾に次のコードを追加します。
@functions_framework.cloud_event
def generate_assignment(cloud_event):
    print(f"CloudEvent received: {cloud_event.data}")

    try:
        if isinstance(cloud_event.data.get('message', {}).get('data'), str):
            data = json.loads(base64.b64decode(cloud_event.data['message']['data']).decode('utf-8'))
            teaching_plan = data.get('teaching_plan')
        elif 'teaching_plan' in cloud_event.data:
            teaching_plan = cloud_event.data["teaching_plan"]
        else:
            raise KeyError("teaching_plan not found")

        assignment = create_assignment(teaching_plan)

        print(f"Assignment---->{assignment}")

        #Store the return assignment into bucket as a text file
        storage_client = storage.Client()
        bucket = storage_client.bucket(ASSIGNMENT_BUCKET)
        file_name = f"assignment-{random.randint(1, 1000)}.txt"
        blob = bucket.blob(file_name)
        blob.upload_from_string(assignment)

        return f"Assignment generated and stored in {ASSIGNMENT_BUCKET}/{file_name}", 200

    except (json.JSONDecodeError, AttributeError, KeyError) as e:
        print(f"Error decoding CloudEvent data: {e} - Data: {cloud_event.data}")
        return "Error processing event", 500

    except Exception as e:
        print(f"Error generate assignment: {e}")
        return "Error generate assignment", 500
ローカルでのテスト
Google Cloud にデプロイする前に、Cloud Run 関数をローカルでテストすることをおすすめします。これにより、イテレーションを迅速に行い、デバッグを容易に行うことができます。
まず、生成された割り当てファイルを保存する Cloud Storage バケットを作成し、サービス アカウントにバケットへのアクセス権を付与します。ターミナルで次のコマンドを実行します。
👉重要: 「aidemy-assignment-」で始まる一意の ASSIGNMENT_BUCKET 名を定義してください。この一意の名前は、Cloud Storage バケットの作成時に名前の競合を回避するために不可欠です。(<YOUR_NAME> は任意のランダムな単語に置き換えてください)
export ASSIGNMENT_BUCKET=aidemy-assignment-<YOUR_NAME> #Name must be unqiue
👉次のコマンドを実行します。
gcloud config set project $(cat ~/project_id.txt)
export PROJECT_ID=$(gcloud config get project)
export SERVICE_ACCOUNT_NAME=$(gcloud compute project-info describe --format="value(defaultServiceAccount)")
gsutil mb -p $PROJECT_ID -l us-central1 gs://$ASSIGNMENT_BUCKET

gcloud storage buckets add-iam-policy-binding gs://$ASSIGNMENT_BUCKET \
    --member "serviceAccount:$SERVICE_ACCOUNT_NAME" \
    --role "roles/storage.objectViewer"

gcloud storage buckets add-iam-policy-binding gs://$ASSIGNMENT_BUCKET \
    --member "serviceAccount:$SERVICE_ACCOUNT_NAME" \
    --role "roles/storage.objectCreator"
👉Cloud Run 関数エミュレータを起動します。
cd ~/aidemy-bootstrap/assignment
functions-framework \
    --target generate_assignment \
    --signature-type=cloudevent \
    --source main.py
👉エミュレータが 1 つのターミナルで実行されている間に、Cloud Shell で 2 つ目のターミナルを開きます。2 番目のターミナルで、テスト CloudEvent をエミュレータに送信して、新しい教育プランが公開されたことをシミュレートします。
  curl -X POST \
  http://localhost:8080/ \
  -H "Content-Type: application/json" \
  -H "ce-id: event-id-01" \
  -H "ce-source: planner-agent" \
  -H "ce-specversion: 1.0" \
  -H "ce-type: google.cloud.pubsub.topic.v1.messagePublished" \
  -d '{
    "message": {
      "data": "eyJ0ZWFjaGluZ19wbGFuIjogIldlZWsgMTogMkQgU2hhcGVzIGFuZCBBbmdsZXMgLSBEYXkgMTogUmV2aWV3IG9mIGJhc2ljIDJEIHNoYXBlcyAoc3F1YXJlcywgcmVjdGFuZ2xlcywgdHJpYW5nbGVzLCBjaXJjbGVzKS4gRGF5IDI6IEV4cGxvcmluZyBkaWZmZXJlbnQgdHlwZXMgb2YgdHJpYW5nbGVzIChlcXVpbGF0ZXJhbCwgaXNvc2NlbGVzLCBzY2FsZW5lLCByaWdodC1hbmdsZWQpLiBEYXkgMzogRXhwbG9yaW5nIHF1YWRyaWxhdGVyYWxzIChzcXVhcmUsIHJlY3RhbmdsZSwgcGFyYWxsZWxvZ3JhbSwgcmhvbWJ1cywgdHJhcGV6aXVtKS4gRGF5IDQ6IEludHJvZHVjdGlvbiB0byBhbmdsZXM6IHJpZ2h0IGFuZ2xlcywgYWN1dGUgYW5nbGVzLCBhbmQgb2J0dXNlIGFuZ2xlcy4gRGF5IDU6IE1lYXN1cmluZyBhbmdsZXMgdXNpbmcgYSBwcm90cmFjdG9yLiBXZWVrIDI6IDNEIFNoYXBlcyBhbmQgU3ltbWV0cnkgLSBEYXkgNjogSW50cm9kdWN0aW9uIHRvIDNEIHNoYXBlczogY3ViZXMsIGN1Ym9pZHMsIHNwaGVyZXMsIGN5bGluZGVycywgY29uZXMsIGFuZCBweXJhbWlkcy4gRGF5IDc6IERlc2NyaWJpbmcgM0Qgc2hhcGVzIHVzaW5nIGZhY2VzLCBlZGdlcywgYW5kIHZlcnRpY2VzLiBEYXkgODogUmVsYXRpbmcgMkQgc2hhcGVzIHRvIDNEIHNoYXBlcy4gRGF5IDk6IElkZW50aWZ5aW5nIGxpbmVzIG9mIHN5bW1ldHJ5IGluIDJEIHNoYXBlcy4gRGF5IDEwOiBDb21wbGV0aW5nIHN5bW1ldHJpY2FsIGZpZ3VyZXMuIFdlZWsgMzogUG9zaXRpb24sIERpcmVjdGlvbiwgYW5kIFByb2JsZW0gU29sdmluZyAtIERheSAxMTogRGVzY3JpYmluZyBwb3NpdGlvbiB1c2luZyBjb29yZGluYXRlcyBpbiB0aGUgZmlyc3QgcXVhZHJhbnQuIERheSAxMjogUGxvdHRpbmcgY29vcmRpbmF0ZXMgdG8gZHJhdyBzaGFwZXMuIERheSAxMzogVW5kZXJzdGFuZGluZyB0cmFuc2xhdGlvbiAoc2xpZGluZyBhIHNoYXBlKS4gRGF5IDE0OiBVbmRlcnN0YW5kaW5nIHJlZmxlY3Rpb24gKGZsaXBwaW5nIGEgc2hhcGUpLiBEYXkgMTU6IFByb2JsZW0tc29sdmluZyBhY3Rpdml0aWVzIGludm9sdmluZyBwZXJpbWV0ZXIsIGFyZWEsIGFuZCBtaXNzaW5nIGFuZ2xlcy4ifQ=="
    }
  }'
応答を待っている間、ぼんやりと見つめるのではなく、別の Cloud Shell ターミナルに切り替えます。エミュレータのターミナルで、関数の進行状況と、関数によって生成された出力やエラー メッセージを確認できます。😁
curl コマンドは「OK」を出力します(改行なし。そのため、「OK」はターミナル シェル プロンプトと同じ行に表示されることがあります)。
割り当てが正常に生成されて保存されたことを確認するには、Google Cloud コンソールに移動して、[ストレージ] > [Cloud Storage] に移動します。作成した aidemy-assignment バケットを選択します。バケットに assignment-{random number}.txt という名前のテキスト ファイルが表示されます。ファイルをクリックしてダウンロードし、内容を確認します。これにより、新しいファイルに新しく生成された割り当てが含まれていることを確認します。

👉エミュレータを実行しているターミナルで、ctrl+c と入力して終了します。2 つ目のターミナルを閉じます。👉また、エミュレータを実行しているターミナルで、仮想環境を終了します。
deactivate
👉次に、割り当てエージェントをクラウドにデプロイします
cd ~/aidemy-bootstrap/assignment
export ASSIGNMENT_BUCKET=$(gcloud storage buckets list --format="value(name)" | grep aidemy-assignment)
export OLLAMA_HOST=http://$(gcloud compute instances describe ollama-instance --zone=us-central1-a --format='value(networkInterfaces[0].accessConfigs[0].natIP)'):11434
gcloud config set project $(cat ~/project_id.txt)
export PROJECT_ID=$(gcloud config get project)
gcloud functions deploy assignment-agent \
 --gen2 \
 --timeout=540 \
 --memory=2Gi \
 --cpu=1 \
 --set-env-vars="ASSIGNMENT_BUCKET=${ASSIGNMENT_BUCKET}" \
 --set-env-vars=GOOGLE_CLOUD_PROJECT=${GOOGLE_CLOUD_PROJECT} \
 --set-env-vars=OLLAMA_HOST=${OLLAMA_HOST} \
 --region=us-central1 \
 --runtime=python312 \
 --source=. \
 --entry-point=generate_assignment \
 --trigger-topic=plan
Google Cloud コンソールに移動して Cloud Run に移動し、デプロイを確認します。courses-agent という名前の新しいサービスが表示されます。
課題生成ワークフローが実装、テスト、デプロイされたので、次のステップに進みます。生徒ポータル内でこれらの課題にアクセスできるようにします。
14. 省略可: Gemini と DeepSeek を使用したロールベースのコラボレーション - 続き
動的ウェブサイトの生成
生徒用ポータルを強化し、より魅力的なものにするため、課題ページに動的 HTML 生成を実装します。目標は、新しい割り当てが生成されるたびに、新鮮で視覚的に魅力的なデザインでポータルを自動的に更新することです。これにより、LLM のコーディング機能を活用して、よりダイナミックで興味深いユーザー エクスペリエンスを実現できます。

👉Cloud Shell エディタで、portal フォルダ内の render.py ファイルを編集し、
def render_assignment_page():
    return ""
次のコード スニペットを使用します。
def render_assignment_page(assignment: str):
    try:
        region=get_next_region()
        llm = VertexAI(model_name="gemini-2.0-flash-001", location=region)
        input_msg = HumanMessage(content=[f"Here the assignment {assignment}"])
        prompt_template = ChatPromptTemplate.from_messages(
            [
                SystemMessage(
                    content=(
                        """
                        As a frontend developer, create HTML to display a student assignment with a creative look and feel. Include the following navigation bar at the top:
                        ```
                        <nav>
                            <a href="/">Home</a>
                            <a href="/quiz">Quizzes</a>
                            <a href="/courses">Courses</a>
                            <a href="/assignment">Assignments</a>
                        </nav>
                        ```
                        Also include these links in the <head> section:
                        ```
                        <link rel="stylesheet" href="{{ url_for('static', filename='style.css') }}">
                        <link rel="preconnect" href="https://fonts.googleapis.com">
                        <link rel="preconnect" href="https://fonts.gstatic.com" crossorigin>
                        <link href="https://fonts.googleapis.com/css2?family=Roboto:wght@400;500&display=swap" rel="stylesheet">

                        ```
                        Do not apply inline styles to the navigation bar.
                        The HTML should display the full assignment content. In its CSS, be creative with the rainbow colors and aesthetic.
                        Make it creative and pretty
                        The assignment content should be well-structured and easy to read.
                        respond with JUST the html file
                        """
                    )
                ),
                input_msg,
            ]
        )

        prompt = prompt_template.format()

        response = llm.invoke(prompt)

        response = response.replace("```html", "")
        response = response.replace("```", "")
        with open("templates/assignment.html", "w") as f:
            f.write(response)


        print(f"response: {response}")

        return response
    except Exception as e:
        print(f"Error sending message to chatbot: {e}") # Log this error too!
        return f"Unable to process your request at this time. Due to the following reason: {str(e)}"
Gemini モデルを使用して、課題の HTML を動的に生成します。課題のコンテンツを入力として受け取り、プロンプトを使用して Gemini に指示し、クリエイティブなスタイルで視覚的に魅力的な HTML ページを作成します。
次に、割り当てバケットに新しいドキュメントが追加されるたびにトリガーされるエンドポイントを作成します。
👉ポータル フォルダ内で、app.py ファイルを編集し、## REPLACE ME! RENDER ASSIGNMENT 行を次のコードに置き換えます。
@app.route('/render_assignment', methods=['POST'])
def render_assignment():
    try:
        data = request.get_json()
        file_name = data.get('name')
        bucket_name = data.get('bucket')

        if not file_name or not bucket_name:
            return jsonify({'error': 'Missing file name or bucket name'}), 400

        storage_client = storage.Client()
        bucket = storage_client.bucket(bucket_name)
        blob = bucket.blob(file_name)
        content = blob.download_as_text()

        print(f"File content: {content}")

        render_assignment_page(content)

        return jsonify({'message': 'Assignment rendered successfully'})

    except Exception as e:
        print(f"Error processing file: {e}")
        return jsonify({'error': 'Error processing file'}), 500
トリガーされると、リクエスト データからファイル名とバケット名を取得し、Cloud Storage から課題のコンテンツをダウンロードして、render_assignment_page 関数を呼び出して HTML を生成します。
👉ローカルで実行します。
cd ~/aidemy-bootstrap/portal
source env/bin/activate
python app.py
👉Cloud Shell ウィンドウの上部にある [ウェブでプレビュー] メニューから、[ポート 8080 でプレビュー] を選択します。新しいブラウザタブでアプリケーションが開きます。ナビゲーション バーの [課題] リンクに移動します。この時点で空白のページが表示されます。これは、割り当てエージェントとポータル間の通信ブリッジをまだ確立していないため、コンテンツが動的に入力されないという想定どおりの動作です。

Ctrl+C を押してスクリプトを停止します。
👉これらの変更を組み込んで更新されたコードをデプロイするには、ポータル エージェント イメージを再ビルドして push します。
cd ~/aidemy-bootstrap/portal/
gcloud config set project $(cat ~/project_id.txt)
export PROJECT_ID=$(gcloud config get project)
docker build -t gcr.io/${PROJECT_ID}/aidemy-portal .
docker tag gcr.io/${PROJECT_ID}/aidemy-portal us-central1-docker.pkg.dev/${PROJECT_ID}/agent-repository/aidemy-portal
docker push us-central1-docker.pkg.dev/${PROJECT_ID}/agent-repository/aidemy-portal
👉新しいイメージを push したら、Cloud Run サービスを再デプロイします。次のスクリプトを実行して、Cloud Run の更新を強制します。
gcloud config set project $(cat ~/project_id.txt)
export PROJECT_ID=$(gcloud config get project)
export COURSE_BUCKET_NAME=$(gcloud storage buckets list --format="value(name)" | grep aidemy-recap)
gcloud run services update aidemy-portal \
    --region=us-central1 \
    --set-env-vars=GOOGLE_CLOUD_PROJECT=${PROJECT_ID},COURSE_BUCKET_NAME=$COURSE_BUCKET_NAME
👉次に、課題バケットで作成(ファイナライズ)された新しいオブジェクトをリッスンする Eventarc トリガーをデプロイします。このトリガーは、新しい課題ファイルが作成されると、ポータル サービスの /render_assignment エンドポイントを自動的に呼び出します。
gcloud config set project $(cat ~/project_id.txt)
export PROJECT_ID=$(gcloud config get project)
gcloud projects add-iam-policy-binding $PROJECT_ID \
  --member="serviceAccount:$(gcloud storage service-agent --project $PROJECT_ID)" \
  --role="roles/pubsub.publisher"
export SERVICE_ACCOUNT_NAME=$(gcloud compute project-info describe --format="value(defaultServiceAccount)")
gcloud eventarc triggers create portal-assignment-trigger \
--location=us-central1 \
--service-account=$SERVICE_ACCOUNT_NAME \
--destination-run-service=aidemy-portal \
--destination-run-region=us-central1 \
--destination-run-path="/render_assignment" \
--event-filters="bucket=$ASSIGNMENT_BUCKET" \
--event-filters="type=google.cloud.storage.object.v1.finalized"
トリガーが正常に作成されたことを確認するには、Google Cloud コンソールの [Eventarc トリガー] ページに移動します。表に portal-assignment-trigger が表示されます。トリガー名をクリックして、詳細を表示します。
新しいトリガーが有効になるまで 2 ~ 3 分ほどかかることがあります。
動的割り当ての生成を実際に確認するには、次のコマンドを実行して、プランナー エージェントの URL を見つけます(手元にない場合)。
gcloud run services list --platform=managed --region=us-central1 --format='value(URL)' | grep planner
ポータル エージェントの URL を確認します。
gcloud run services list --platform=managed --region=us-central1 --format='value(URL)' | grep portal
プランナー エージェントで、新しい指導計画を生成します。

数分後(音声の生成、割り当ての生成、HTML のレンダリングが完了するまで)、生徒用ポータルに移動します。
👉ナビゲーション バーの [課題] リンクをクリックします。動的に生成された HTML を含む新しい課題が表示されます。指導計画が生成されるたびに、動的割り当てにする必要があります。

Aidemy マルチエージェント システムの完了おめでとうございます。実践的な経験を積み、以下についての貴重な分析情報を得ました。
- モジュール性、スケーラビリティ、専門性、メンテナンスの簡素化など、マルチエージェント システムのメリット。
- 応答性が高く疎結合のアプリケーションを構築するためのイベント ドリブン アーキテクチャの重要性。
- LLM の戦略的な使用、タスクに適したモデルの選択、現実世界に影響を与えるツールとの統合。
- Google Cloud サービスを使用してスケーラブルで信頼性の高いソリューションを作成するクラウドネイティブ開発プラクティス。
- ベンダー ソリューションの代替として、データ プライバシーとセルフホスティング モデルを検討することの重要性。
これで、Google Cloud で高度な AI 搭載アプリケーションを構築するための強固な基盤ができました。
15. 課題と次のステップ
Aidemy マルチエージェント システムの構築、お疲れ様でした。AI を活用した教育の基盤をしっかりと構築しました。次に、機能をさらに拡張し、現実世界のニーズに対応するための課題と将来の潜在的な機能強化について考えてみましょう。
ライブ Q&A を活用したインタラクティブな学習:
- チャレンジ: Gemini 2 の Live API を活用して、生徒向けのリアルタイムの Q&A 機能を作成できますか?生徒が質問すると、AI による回答がすぐに返ってくる仮想教室を想像してみてください。
課題の自動提出と採点:
- 課題: 生徒が課題をデジタルで提出し、AI によって自動的に採点されるシステムを設計、実装します。盗用を検出して防止するメカニズムも必要です。この課題は、検索拡張生成(RAG)を検討し、採点と剽窃検出のプロセスの精度と信頼性を高める絶好の機会となります。

16. クリーンアップ
Aidemy マルチエージェント システムを構築して確認したので、Google Cloud 環境をクリーンアップします。
👉Cloud Run サービスを削除する
gcloud run services delete aidemy-planner --region=us-central1 --quiet
gcloud run services delete aidemy-portal --region=us-central1 --quiet
gcloud run services delete courses-agent --region=us-central1 --quiet
gcloud run services delete book-provider --region=us-central1 --quiet
gcloud run services delete assignment-agent --region=us-central1 --quiet
👉Eventarc トリガーを削除する
gcloud eventarc triggers delete portal-assignment-trigger --location=us --quiet
gcloud eventarc triggers delete plan-topic-trigger --location=us-central1 --quiet
gcloud eventarc triggers delete portal-assignment-trigger --location=us-central1 --quiet
ASSIGNMENT_AGENT_TRIGGER=$(gcloud eventarc triggers list --project="$PROJECT_ID" --location=us-central1 --filter="name:assignment-agent" --format="value(name)")
COURSES_AGENT_TRIGGER=$(gcloud eventarc triggers list --project="$PROJECT_ID" --location=us-central1 --filter="name:courses-agent" --format="value(name)")
gcloud eventarc triggers delete $ASSIGNMENT_AGENT_TRIGGER --location=us-central1 --quiet
gcloud eventarc triggers delete $COURSES_AGENT_TRIGGER --location=us-central1 --quiet
👉Pub/Sub トピックを削除する
gcloud pubsub topics delete plan --project="$PROJECT_ID" --quiet
👉Cloud SQL インスタンスを削除する
gcloud sql instances delete aidemy --quiet
👉Artifact Registry リポジトリを削除する
gcloud artifacts repositories delete agent-repository --location=us-central1 --quiet
👉Secret Manager シークレットを削除する
gcloud secrets delete db-user --quiet
gcloud secrets delete db-pass --quiet
gcloud secrets delete db-name --quiet
👉Compute Engine インスタンスを削除する(Deepseek 用に作成した場合)
gcloud compute instances delete ollama-instance --zone=us-central1-a --quiet
👉Deepseek インスタンスのファイアウォール ルールを削除する
gcloud compute firewall-rules delete allow-ollama-11434 --quiet
👉Cloud Storage バケットを削除する
export COURSE_BUCKET_NAME=$(gcloud storage buckets list --format="value(name)" | grep aidemy-recap)
export ASSIGNMENT_BUCKET=$(gcloud storage buckets list --format="value(name)" | grep aidemy-assignment)
gsutil rm -r gs://$COURSE_BUCKET_NAME
gsutil rm -r gs://$ASSIGNMENT_BUCKET
