
1. 簡介

你是否曾經感到挫折,懶得管理所有個人支出?我也是!因此,在本程式碼研究室中,我們將建構個人支出管理助理,由 Gemini 2.5 提供支援,為我們完成所有雜務!從管理上傳的收據,到分析你是否花費太多買咖啡!
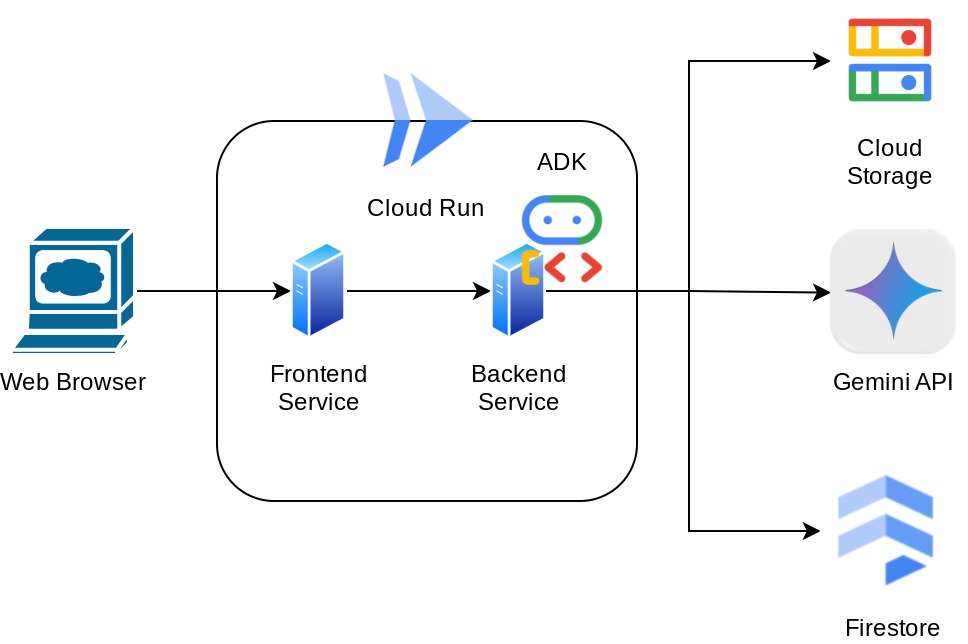
你可以透過網路瀏覽器使用這項服務,以即時通訊網頁介面形式與這項服務互動,在其中與服務互動、上傳一些收據圖片並要求服務儲存這些圖片,或者搜尋一些收據以取得檔案並進行一些費用分析。所有這些功能都是以 Google Agent Development Kit 架構為基礎建構
應用程式本身分為兩項服務:前端和後端,讓您快速建構原型,體驗實際運作情形,並瞭解 API 合約如何整合這兩項服務。
您將透過程式碼研究室,按照以下步驟操作:
- 準備 Google Cloud 專案,並啟用其中所有必要的 API
- 在 Google Cloud Storage 上設定值區,在 Firestore 上設定資料庫
- 建立 Firestore 索引
- 設定程式設計環境的工作區
- 結構化 ADK 代理程式原始碼、工具、提示等
- 使用 ADK 本機 Web Development UI 測試代理
- 使用 Gradio 程式庫建構前端服務 - 聊天介面,以便傳送查詢並上傳收據圖片
- 使用 FastAPI 建構後端服務 - HTTP 伺服器,其中包含 ADK 代理程式程式碼、SessionService 和 Artifact Service
- 管理環境變數,並設定將應用程式部署至 Cloud Run 所需的檔案
- 將應用程式部署至 Cloud Run
架構總覽
必要條件
- 熟悉 Python 作業
- 瞭解使用 HTTP 服務的基本全堆疊架構
課程內容
- 使用 Gradio 進行前端網頁原型設計
- 使用 FastAPI 和 Pydantic 開發後端服務
- 在使用 ADK Agent 的多項功能時,同時進行架構設計
- 使用工具
- 工作階段和構件管理
- 在傳送至 Gemini 之前,回呼用於輸入內容修改
- 利用 BuiltInPlanner 進行規劃,以改善工作執行作業
- 透過 ADB 本機網頁介面快速偵錯
- 透過資訊剖析和擷取,以及使用 ADK 回呼修改 Gemini 要求,藉此最佳化多模態互動
- 使用 Firestore 做為向量資料庫的代理檢索增強生成
- 使用 Pydantic-settings 管理 YAML 檔案中的環境變數
- 使用 Dockerfile 將應用程式部署至 Cloud Run,並透過 YAML 檔案提供環境變數
軟硬體需求
- Chrome 網路瀏覽器
- Gmail 帳戶
- 已啟用計費功能的 Cloud 專案
本程式碼研究室專為各級別 (包括初學者) 的開發人員設計,範例應用程式會使用 Python。不過,您不必具備 Python 知識,也能瞭解本文介紹的概念。
2. 事前準備
在 Cloud 控制台中選取有效專案
本程式碼研究室假設您已擁有已啟用計費功能的 Google Cloud 專案。如果您還沒有這個帳戶,請按照下方說明操作。
- 在 Google Cloud 控制台的專案選取器頁面中,選取或建立 Google Cloud 專案。
- 確認 Cloud 專案已啟用計費功能。瞭解如何檢查專案是否已啟用計費功能。

準備 Firestore 資料庫
接下來,我們也需要建立 Firestore 資料庫。Firestore (原生模式) 是專為自動調整資源配置、發揮高效能及協助開發應用程式所打造的 NoSQL 文件資料庫。它也可以做為向量資料庫,支援實驗室的檢索增強生成技術。
- 在搜尋列中搜尋「firestore」,然後按一下 Firestore 產品

- 然後按一下「建立 Firestore 資料庫」按鈕
- 使用「(預設)」做為資料庫 ID 名稱,並保留「Standard Edition」。為了進行本實驗室的示範,請使用Firestore Native 搭配開放安全性規則。
- 您也會注意到,這個資料庫實際上有免費方案用量 YEAY! 接著,按一下「Create Database Button」

完成這些步驟後,系統應會將您重新導向至剛建立的 Firestore 資料庫
在 Cloud Shell 終端機中設定 Cloud 專案
- 您將使用 Cloud Shell,這是在 Google Cloud 中運作的指令列環境,並已預先載入 bq。按一下 Google Cloud 主控台頂端的「啟用 Cloud Shell」。

- 連線至 Cloud Shell 後,請使用下列指令確認您已通過驗證,且專案已設為您的專案 ID:
gcloud auth list
- 在 Cloud Shell 中執行下列指令,確認 gcloud 指令知道您的專案。
gcloud config list project
- 如果未設定專案,請使用下列指令進行設定:
gcloud config set project <YOUR_PROJECT_ID>
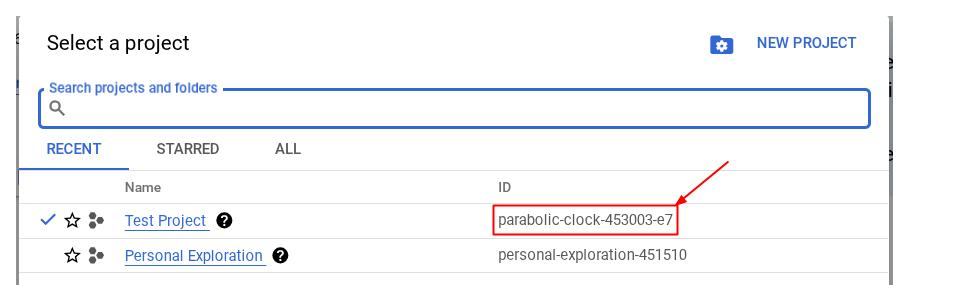
或者,您也可以在控制台中查看 PROJECT_ID ID

按一下該按鈕,所有專案和專案 ID 就會顯示在右側
- 請透過下方指令啟用必要的 API。這可能需要幾分鐘的時間,請耐心等候。
gcloud services enable aiplatform.googleapis.com \
                       firestore.googleapis.com \
                       run.googleapis.com \
                       cloudbuild.googleapis.com \
                       cloudresourcemanager.googleapis.com
指令執行成功後,您應該會看到類似以下的訊息:
Operation "operations/..." finished successfully.
您可以透過主控台搜尋每項產品,或使用這個連結,來代替 gcloud 指令。
如果遺漏任何 API,您隨時可以在導入期間啟用。
如要瞭解 gcloud 指令和用法,請參閱說明文件。
準備 Google Cloud Storage 值區
接下來,我們需要在同一個終端機中準備 GCS 值區,用於儲存上傳的檔案。執行下列指令建立值區
gsutil mb -l us-central1 gs://personal-expense-assistant-receipts
輸出結果如下:
Creating gs://personal-expense-assistant-receipts/...
如要確認這項設定,請前往瀏覽器左上方的導覽選單,然後依序選取「Cloud Storage」>「值區」

建立搜尋用 Firestore 索引
Firestore 是原生 NoSQL 資料庫,可提供卓越的效能和資料模型彈性,但在複雜查詢方面有其限制。由於我們打算使用一些複合多欄查詢和向量搜尋,因此需要先建立一些索引。如要進一步瞭解詳細資訊,請參閱這份說明文件
- 執行下列指令,建立索引以支援複合查詢
gcloud firestore indexes composite create \
        --collection-group=personal-expense-assistant-receipts \
        --field-config field-path=total_amount,order=ASCENDING \
        --field-config field-path=transaction_time,order=ASCENDING \
        --field-config field-path=__name__,order=ASCENDING \
        --database="(default)"
- 並執行這個指令碼,以支援向量搜尋
gcloud firestore indexes composite create \
        --collection-group="personal-expense-assistant-receipts" \
        --query-scope=COLLECTION \
        --field-config field-path="embedding",vector-config='{"dimension":"768", "flat": "{}"}' \
        --database="(default)"
如要查看已建立的索引,請前往雲端控制台中的 Firestore,按一下「(預設)」資料庫執行個體,然後選取導覽列中的「索引」

前往 Cloud Shell 編輯器並設定應用程式工作目錄
我們現在可以設定程式碼編輯器,執行一些程式設計作業。我們將使用 Cloud Shell 編輯器進行這項操作
- 按一下「開啟編輯器」按鈕,即可開啟 Cloud Shell 編輯器,並在其中編寫程式碼

- 請確認 Cloud Code 專案已設在 Cloud Shell 編輯器的左下角 (狀態列),如下圖所示,並設為已啟用計費功能的有效 Google Cloud 專案。如果出現提示訊息,請點按「授權」。如果您已按照先前的指令操作,按鈕可能會直接指向已啟用的專案,而非登入按鈕

- 接下來,我們將從 GitHub 複製本程式碼研究室的範本工作目錄,並執行下列指令。系統會在 personal-expense-assistant 目錄中建立工作目錄
git clone https://github.com/alphinside/personal-expense-assistant-adk-codelab-starter.git personal-expense-assistant
- 接著,前往 Cloud Shell 編輯器的頂端部分,依序點選「File」>「Open Folder」,找出您的 使用者名稱目錄,然後找到「personal-expense-assistant」目錄,然後按一下「OK」按鈕。這會將所選目錄設為主要工作目錄。在本範例中,使用者名稱為 alvinprayuda,因此目錄路徑如下所示


您的 Cloud Shell 編輯器現在應如下所示:

環境設定
準備 Python 虛擬環境
下一步是準備開發環境。您目前使用的終端機應位於 personal-expense-assistant 工作目錄中。我們會在本程式碼研究室中使用 Python 3.12,並使用 uv Python 專案管理工具,簡化 Python 版本和虛擬環境的建立及管理作業
- 如果尚未開啟終端機,請依序點選「Terminal」->「New Terminal」,或使用「Ctrl + Shift + C」鍵盤快速鍵,在瀏覽器底部開啟終端機視窗

- 下載
uv,然後使用下列指令安裝 Python 3.12
curl -LsSf https://astral.sh/uv/0.6.16/install.sh | sh && \
source $HOME/.local/bin/env && \
uv python install 3.12
- 接下來,我們將使用
uv初始化虛擬環境,請執行下列指令
uv sync --frozen
這會建立 .venv 目錄並安裝依附元件。快速查看 pyproject.toml 可提供依附元件相關資訊,如下所示:
dependencies = [
    "datasets>=3.5.0",
    "google-adk>=0.2.0",
    "google-cloud-firestore>=2.20.1",
    "gradio>=5.23.1",
    "pydantic>=2.10.6",
    "pydantic-settings[yaml]>=2.8.1",
]
- 如要測試虛擬環境,請建立新檔案 main.py,並複製下列程式碼
def main():
   print("Hello from personal-expense-assistant-adk!")

if __name__ == "__main__":
   main()
- 然後執行下列指令
uv run main.py
您會看到如下所示的輸出內容
Using CPython 3.12
Creating virtual environment at: .venv
Hello from personal-expense-assistant-adk!
這表示 Python 專案已正確設定。
設定設定檔
接下來,我們需要為這個專案設定設定檔。我們使用 pydantic-settings 從 YAML 檔案讀取設定。
建立名為 settings.yaml 的檔案,並加入下列設定。依序按一下「File」>「New Text File」,然後填入以下程式碼。然後儲存為 settings.yaml
GCLOUD_LOCATION: "us-central1"
GCLOUD_PROJECT_ID: "your_gcloud_project_id"
BACKEND_URL: "http://localhost:8081/chat"
STORAGE_BUCKET_NAME: "personal-expense-assistant-receipts"
DB_COLLECTION_NAME: "personal-expense-assistant-receipts"
在本程式碼研究室中,我們會使用 GCLOUD_LOCATION, BACKEND_URL, STORAGE_BUCKET_NAME, DB_COLLECTION_NAME 和 BACKEND_URL 的預先設定值。
我們現在可以繼續下一個步驟,建構服務專員,然後建構服務
3. 使用 Google ADK 和 Gemini 2.5 建構代理程式
簡介 ADK 目錄結構
首先,我們來探索 ADK 提供的功能,以及如何建構代理程式。如需 ADK 完整說明文件,請前往這個網址。ADK 在執行 CLI 指令時提供許多公用程式。其中一些是:
- 設定代理程式目錄結構
- 透過 CLI 輸入輸出功能快速嘗試互動
- 快速設定本機開發 UI 網頁介面
接下來,我們來使用 CLI 指令建立代理程式目錄結構。執行下列指令
uv run adk create expense_manager_agent \
   --model gemini-2.5-flash-preview-04-17 \
   --project {your-project-id} \
   --region us-central1
系統會建立下列代理程式目錄架構
expense_manager_agent/
├── __init__.py
├── .env
├── agent.py
檢查 init.py 和 agent.py 時,您會看到這段程式碼
# __init__.py

from . import agent
# agent.py

from google.adk.agents import Agent

root_agent = Agent(
    model='gemini-2.5-flash-preview-04-17',
    name='root_agent',
    description='A helpful assistant for user questions.',
    instruction='Answer user questions to the best of your knowledge',
)
建構「Expense Manager」虛擬服務專員
讓我們建構費用管理員代理程式!開啟 expense_manager_agent/agent.py 檔案,然後複製下方含有 root_agent 的程式碼。
# expense_manager_agent/agent.py

from google.adk.agents import Agent
from expense_manager_agent.tools import (
    store_receipt_data,
    search_receipts_by_metadata_filter,
    search_relevant_receipts_by_natural_language_query,
    get_receipt_data_by_image_id,
)
from expense_manager_agent.callbacks import modify_image_data_in_history
import os
from settings import get_settings
from google.adk.planners import BuiltInPlanner
from google.genai import types

SETTINGS = get_settings()
os.environ["GOOGLE_CLOUD_PROJECT"] = SETTINGS.GCLOUD_PROJECT_ID
os.environ["GOOGLE_CLOUD_LOCATION"] = SETTINGS.GCLOUD_LOCATION
os.environ["GOOGLE_GENAI_USE_VERTEXAI"] = "TRUE"

# Get the code file directory path and read the task prompt file
current_dir = os.path.dirname(os.path.abspath(__file__))
prompt_path = os.path.join(current_dir, "task_prompt.md")
with open(prompt_path, "r") as file:
    task_prompt = file.read()

root_agent = Agent(
    name="expense_manager_agent",
    model="gemini-2.5-flash-preview-04-17",
    description=(
        "Personal expense agent to help user track expenses, analyze receipts, and manage their financial records"
    ),
    instruction=task_prompt,
    tools=[
        store_receipt_data,
        get_receipt_data_by_image_id,
        search_receipts_by_metadata_filter,
        search_relevant_receipts_by_natural_language_query,
    ],
    planner=BuiltInPlanner(
        thinking_config=types.ThinkingConfig(
            thinking_budget=2048,
        )
    ),
    before_model_callback=modify_image_data_in_history,
)
程式碼說明
這個指令碼包含我們的代理程式啟動程序,我們會在這個程序中初始化下列項目:
- 將要使用的模型設為
gemini-2.5-flash-preview-04-17 - 將代理程式說明和操作說明設為系統提示,並從
task_prompt.md讀取 - 提供必要工具,支援服務機器人功能
- 在產生最終回覆或使用 Gemini 2.5 Flash 思考功能執行前,先啟用規劃功能
- 在傳送要求給 Gemini 之前設定回呼攔截,以便限制在預測前傳送的圖片資料數量
4. 設定代理程式工具
我們的費用管理員服務會具備下列功能:
- 從收據圖片中擷取資料,並儲存資料和檔案
- 在費用資料中進行完全比對搜尋
- 在費用資料上進行內容比對搜尋
因此,我們需要適當的工具來支援這項功能。在 expense_manager_agent 目錄下建立新檔案,並將其命名為 tools.py,然後複製下方程式碼
# expense_manager_agent/tools.py

import datetime
from typing import Dict, List, Any
from google.cloud import firestore
from google.cloud.firestore_v1.vector import Vector
from google.cloud.firestore_v1 import FieldFilter
from google.cloud.firestore_v1.base_query import And
from google.cloud.firestore_v1.base_vector_query import DistanceMeasure
from settings import get_settings
from google import genai

SETTINGS = get_settings()
DB_CLIENT = firestore.Client(
    project=SETTINGS.GCLOUD_PROJECT_ID
)  # Will use "(default)" database
COLLECTION = DB_CLIENT.collection(SETTINGS.DB_COLLECTION_NAME)
GENAI_CLIENT = genai.Client(
    vertexai=True, location=SETTINGS.GCLOUD_LOCATION, project=SETTINGS.GCLOUD_PROJECT_ID
)
EMBEDDING_DIMENSION = 768
EMBEDDING_FIELD_NAME = "embedding"
INVALID_ITEMS_FORMAT_ERR = """
Invalid items format. Must be a list of dictionaries with 'name', 'price', and 'quantity' keys."""
RECEIPT_DESC_FORMAT = """
Store Name: {store_name}
Transaction Time: {transaction_time}
Total Amount: {total_amount}
Currency: {currency}
Purchased Items:
{purchased_items}
Receipt Image ID: {receipt_id}
"""


def sanitize_image_id(image_id: str) -> str:
    """Sanitize image ID by removing any leading/trailing whitespace."""
    if image_id.startswith("[IMAGE-"):
        image_id = image_id.split("ID ")[1].split("]")[0]

    return image_id.strip()


def store_receipt_data(
    image_id: str,
    store_name: str,
    transaction_time: str,
    total_amount: float,
    purchased_items: List[Dict[str, Any]],
    currency: str = "IDR",
) -> str:
    """
    Store receipt data in the database.

    Args:
        image_id (str): The unique identifier of the image. For example IMAGE-POSITION 0-ID 12345,
            the ID of the image is 12345.
        store_name (str): The name of the store.
        transaction_time (str): The time of purchase, in ISO format ("YYYY-MM-DDTHH:MM:SS.ssssssZ").
        total_amount (float): The total amount spent.
        purchased_items (List[Dict[str, Any]]): A list of items purchased with their prices. Each item must have:
            - name (str): The name of the item.
            - price (float): The price of the item.
            - quantity (int, optional): The quantity of the item. Defaults to 1 if not provided.
        currency (str, optional): The currency of the transaction, can be derived from the store location.
            If unsure, default is "IDR".

    Returns:
        str: A success message with the receipt ID.

    Raises:
        Exception: If the operation failed or input is invalid.
    """
    try:
        # In case of it provide full image placeholder, extract the id string
        image_id = sanitize_image_id(image_id)

        # Check if the receipt already exists
        doc = get_receipt_data_by_image_id(image_id)

        if doc:
            return f"Receipt with ID {image_id} already exists"

        # Validate transaction time
        if not isinstance(transaction_time, str):
            raise ValueError(
                "Invalid transaction time: must be a string in ISO format 'YYYY-MM-DDTHH:MM:SS.ssssssZ'"
            )
        try:
            datetime.datetime.fromisoformat(transaction_time.replace("Z", "+00:00"))
        except ValueError:
            raise ValueError(
                "Invalid transaction time format. Must be in ISO format 'YYYY-MM-DDTHH:MM:SS.ssssssZ'"
            )

        # Validate items format
        if not isinstance(purchased_items, list):
            raise ValueError(INVALID_ITEMS_FORMAT_ERR)

        for _item in purchased_items:
            if (
                not isinstance(_item, dict)
                or "name" not in _item
                or "price" not in _item
            ):
                raise ValueError(INVALID_ITEMS_FORMAT_ERR)

            if "quantity" not in _item:
                _item["quantity"] = 1

        # Create a combined text from all receipt information for better embedding
        result = GENAI_CLIENT.models.embed_content(
            model="text-embedding-004",
            contents=RECEIPT_DESC_FORMAT.format(
                store_name=store_name,
                transaction_time=transaction_time,
                total_amount=total_amount,
                currency=currency,
                purchased_items=purchased_items,
                receipt_id=image_id,
            ),
        )

        embedding = result.embeddings[0].values

        doc = {
            "receipt_id": image_id,
            "store_name": store_name,
            "transaction_time": transaction_time,
            "total_amount": total_amount,
            "currency": currency,
            "purchased_items": purchased_items,
            EMBEDDING_FIELD_NAME: Vector(embedding),
        }

        COLLECTION.add(doc)

        return f"Receipt stored successfully with ID: {image_id}"
    except Exception as e:
        raise Exception(f"Failed to store receipt: {str(e)}")


def search_receipts_by_metadata_filter(
    start_time: str,
    end_time: str,
    min_total_amount: float = -1.0,
    max_total_amount: float = -1.0,
) -> str:
    """
    Filter receipts by metadata within a specific time range and optionally by amount.

    Args:
        start_time (str): The start datetime for the filter (in ISO format, e.g. 'YYYY-MM-DDTHH:MM:SS.ssssssZ').
        end_time (str): The end datetime for the filter (in ISO format, e.g. 'YYYY-MM-DDTHH:MM:SS.ssssssZ').
        min_total_amount (float): The minimum total amount for the filter (inclusive). Defaults to -1.
        max_total_amount (float): The maximum total amount for the filter (inclusive). Defaults to -1.

    Returns:
        str: A string containing the list of receipt data matching all applied filters.

    Raises:
        Exception: If the search failed or input is invalid.
    """
    try:
        # Validate start and end times
        if not isinstance(start_time, str) or not isinstance(end_time, str):
            raise ValueError("start_time and end_time must be strings in ISO format")
        try:
            datetime.datetime.fromisoformat(start_time.replace("Z", "+00:00"))
            datetime.datetime.fromisoformat(end_time.replace("Z", "+00:00"))
        except ValueError:
            raise ValueError("start_time and end_time must be strings in ISO format")

        # Start with the base collection reference
        query = COLLECTION

        # Build the composite query by properly chaining conditions
        # Notes that this demo assume 1 user only,
        # need to refactor the query for multiple user
        filters = [
            FieldFilter("transaction_time", ">=", start_time),
            FieldFilter("transaction_time", "<=", end_time),
        ]

        # Add optional filters
        if min_total_amount != -1:
            filters.append(FieldFilter("total_amount", ">=", min_total_amount))

        if max_total_amount != -1:
            filters.append(FieldFilter("total_amount", "<=", max_total_amount))

        # Apply the filters
        composite_filter = And(filters=filters)
        query = query.where(filter=composite_filter)

        # Execute the query and collect results
        search_result_description = "Search by Metadata Results:\n"
        for doc in query.stream():
            data = doc.to_dict()
            data.pop(
                EMBEDDING_FIELD_NAME, None
            )  # Remove embedding as it's not needed for display

            search_result_description += f"\n{RECEIPT_DESC_FORMAT.format(**data)}"

        return search_result_description
    except Exception as e:
        raise Exception(f"Error filtering receipts: {str(e)}")


def search_relevant_receipts_by_natural_language_query(
    query_text: str, limit: int = 5
) -> str:
    """
    Search for receipts with content most similar to the query using vector search.
    This tool can be use for user query that is difficult to translate into metadata filters.
    Such as store name or item name which sensitive to string matching.
    Use this tool if you cannot utilize the search by metadata filter tool.

    Args:
        query_text (str): The search text (e.g., "coffee", "dinner", "groceries").
        limit (int, optional): Maximum number of results to return (default: 5).

    Returns:
        str: A string containing the list of contextually relevant receipt data.

    Raises:
        Exception: If the search failed or input is invalid.
    """
    try:
        # Generate embedding for the query text
        result = GENAI_CLIENT.models.embed_content(
            model="text-embedding-004", contents=query_text
        )
        query_embedding = result.embeddings[0].values

        # Notes that this demo assume 1 user only,
        # need to refactor the query for multiple user
        vector_query = COLLECTION.find_nearest(
            vector_field=EMBEDDING_FIELD_NAME,
            query_vector=Vector(query_embedding),
            distance_measure=DistanceMeasure.EUCLIDEAN,
            limit=limit,
        )

        # Execute the query and collect results
        search_result_description = "Search by Contextual Relevance Results:\n"
        for doc in vector_query.stream():
            data = doc.to_dict()
            data.pop(
                EMBEDDING_FIELD_NAME, None
            )  # Remove embedding as it's not needed for display
            search_result_description += f"\n{RECEIPT_DESC_FORMAT.format(**data)}"

        return search_result_description
    except Exception as e:
        raise Exception(f"Error searching receipts: {str(e)}")


def get_receipt_data_by_image_id(image_id: str) -> Dict[str, Any]:
    """
    Retrieve receipt data from the database using the image_id.

    Args:
        image_id (str): The unique identifier of the receipt image. For example, if the placeholder is
            [IMAGE-ID 12345], the ID to use is 12345.

    Returns:
        Dict[str, Any]: A dictionary containing the receipt data with the following keys:
            - receipt_id (str): The unique identifier of the receipt image.
            - store_name (str): The name of the store.
            - transaction_time (str): The time of purchase in UTC.
            - total_amount (float): The total amount spent.
            - currency (str): The currency of the transaction.
            - purchased_items (List[Dict[str, Any]]): List of items purchased with their details.
        Returns an empty dictionary if no receipt is found.
    """
    # In case of it provide full image placeholder, extract the id string
    image_id = sanitize_image_id(image_id)

    # Query the receipts collection for documents with matching receipt_id (image_id)
    # Notes that this demo assume 1 user only,
    # need to refactor the query for multiple user
    query = COLLECTION.where(filter=FieldFilter("receipt_id", "==", image_id)).limit(1)
    docs = list(query.stream())

    if not docs:
        return {}

    # Get the first matching document
    doc_data = docs[0].to_dict()
    doc_data.pop(EMBEDDING_FIELD_NAME, None)

    return doc_data
程式碼說明
在這個工具函式實作中,我們以這兩個主要概念設計工具:
- 使用圖片 ID 字串預留位置
[IMAGE-ID <hash-of-image-1>]剖析收據資料,並對應至原始檔案 - 使用 Firestore 資料庫儲存及擷取資料
工具「store_receipt_data」

這項工具是光學字元辨識工具,會從圖片資料中剖析所需資訊,並一併辨識圖片 ID 字串,然後將這些資訊對應起來,儲存在 Firestore 資料庫中。
此外,這項工具也會使用 text-embedding-004 將收據內容轉換為內嵌內容,以便將所有中繼資料和內嵌內容一起儲存及建立索引。讓您能透過查詢或內容搜尋靈活擷取資料。
執行這項工具後,您會發現收據資料已在 Firestore 資料庫中建立索引,如下所示

工具「search_receipts_by_metadata_filter」

這項工具會將使用者查詢轉換為中繼資料查詢篩選器,支援依日期範圍和/或總交易量進行搜尋。系統會傳回所有符合條件的收據資料,在這個過程中,我們會捨棄嵌入欄位,因為這對服務機器人來說並非必要的上下文理解資訊
工具「search_relevant_receipts_by_natural_language_query」

這是我們的檢索增強生成 (RAG) 工具。我們的服務代理程式可以自行設計查詢,從向量資料庫中擷取相關的收據,也可以選擇何時使用這項工具。允許服務專員自行決定是否使用此 RAG 工具,並設計自己的查詢,這正是 Agentic RAG 方法的定義之一。
不僅可讓它建立自己的查詢,還可讓它選取要擷取的相關文件數量。搭配適當的提示工程,例如
# Example prompt

Always filter the result from tool
search_relevant_receipts_by_natural_language_query as the returned
result may contain irrelevant information
這項工具可搜尋幾乎任何內容,但由於最鄰近搜尋的特性並非完全精確,因此可能不會傳回所有預期結果。
5. 透過回呼修改對話內容
Google ADK 可讓我們在不同層級「攔截」介面代理程式執行階段。如要進一步瞭解這項功能的詳細資訊,請參閱這份說明文件。在本實驗室中,我們會利用 before_model_callback 修改要求,然後再傳送至 LLM,以便移除舊對話記錄情境中的圖片資料 ( 只包含最近 3 次使用者互動中的圖片資料),以提高效率
不過,我們仍希望服務專員在必要時能取得圖片資料背景資訊。因此,我們新增了一種機制,可在對話中的每個圖片位元資料後方加入字串圖片 ID 預留位置。這有助於讓服務代理人將圖片 ID 連結至實際的檔案資料,以便在圖片儲存或擷取時使用。結構如下所示
<image-byte-data-1>
[IMAGE-ID <hash-of-image-1>]
<image-byte-data-2>
[IMAGE-ID <hash-of-image-2>]
And so on..
當對話記錄中的位元資料過時,字串 ID 仍會保留,以便在使用工具時存取資料。移除圖片資料後的歷史記錄結構範例
[IMAGE-ID <hash-of-image-1>]
[IMAGE-ID <hash-of-image-2>]
And so on..
開始吧!在 expense_manager_agent 目錄下建立新檔案,並將其命名為 callbacks.py,然後複製下方程式碼
# expense_manager_agent/callbacks.py

import hashlib
from google.genai import types
from google.adk.agents.callback_context import CallbackContext
from google.adk.models.llm_request import LlmRequest


def modify_image_data_in_history(
    callback_context: CallbackContext, llm_request: LlmRequest
) -> None:
    # The following code will modify the request sent to LLM
    # We will only keep image data in the last 3 user messages using a reverse and counter approach

    # Count how many user messages we've processed
    user_message_count = 0

    # Process the reversed list
    for content in reversed(llm_request.contents):
        # Only count for user manual query, not function call
        if (content.role == "user") and (content.parts[0].function_response is None):
            user_message_count += 1
            modified_content_parts = []

            # Check any missing image ID placeholder for any image data
            # Then remove image data from conversation history if more than 3 user messages
            for idx, part in enumerate(content.parts):
                if part.inline_data is None:
                    modified_content_parts.append(part)
                    continue

                if (
                    (idx + 1 >= len(content.parts))
                    or (content.parts[idx + 1].text is None)
                    or (not content.parts[idx + 1].text.startswith("[IMAGE-ID "))
                ):
                    # Generate hash ID for the image and add a placeholder
                    image_data = part.inline_data.data
                    hasher = hashlib.sha256(image_data)
                    image_hash_id = hasher.hexdigest()[:12]
                    placeholder = f"[IMAGE-ID {image_hash_id}]"

                    # Only keep image data in the last 3 user messages
                    if user_message_count <= 3:
                        modified_content_parts.append(part)

                    modified_content_parts.append(types.Part(text=placeholder))

                else:
                    # Only keep image data in the last 3 user messages
                    if user_message_count <= 3:
                        modified_content_parts.append(part)

            # This will modify the contents inside the llm_request
            content.parts = modified_content_parts
6. 提示
設計具備複雜互動和功能的服務機器人時,我們必須找到足夠好的提示,引導服務機器人做出我們想要的行為。
我們先前有一個機制,可處理對話記錄中的圖片資料,但也有一些工具可能不容易使用,例如 search_relevant_receipts_by_natural_language_query.。我們也希望客服專員能夠搜尋並擷取正確的收據圖片,提供給我們。這表示我們需要在適當的提示結構中,正確傳達所有這類資訊
我們會要求服務專員將輸出內容以下列 Markdown 格式建構,以便剖析思考過程、最終回覆和附件 ( 如有)
# THINKING PROCESS

Thinking process here

# FINAL RESPONSE

Response to the user here

Attachments put inside json block

{
    "attachments": [
      "[IMAGE-ID <hash-id-1>]",
      "[IMAGE-ID <hash-id-2>]",
      ...
    ]
}
我們先從下列提示開始,以便達成我們對費用管理員服務機器人行為的初步期望。task_prompt.md 檔案應該已存在現有工作目錄中,但我們需要將其移至 expense_manager_agent 目錄下。執行下列指令來移動
mv task_prompt.md expense_manager_agent/task_prompt.md
7. 測試代理程式
接下來,我們嘗試透過 CLI 與代理程式通訊,請執行下列指令
uv run adk run expense_manager_agent
系統會顯示類似以下的輸出內容,您可以輪流與服務專員進行即時通訊,但只能透過這個介面傳送文字
Log setup complete: /tmp/agents_log/agent.xxxx_xxx.log
To access latest log: tail -F /tmp/agents_log/agent.latest.log
Running agent root_agent, type exit to exit.
user: hello
[root_agent]: Hello there! How can I help you today?
user:
除了 CLI 互動之外,ADT 還可讓我們使用開發 UI 進行互動,並檢查互動期間的情況。執行下列指令,啟動本機開發 UI 伺服器
uv run adk web --port 8080
這會產生類似以下範例的輸出內容,表示我們已可存取網頁介面
INFO:     Started server process [xxxx]
INFO:     Waiting for application startup.

+-----------------------------------------------------------------------------+
| ADK Web Server started                                                      |
|                                                                             |
| For local testing, access at http://localhost:8080.                         |
+-----------------------------------------------------------------------------+

INFO:     Application startup complete.
INFO:     Uvicorn running on http://0.0.0.0:8080 (Press CTRL+C to quit)
如要確認,請按一下 Cloud Shell 編輯器頂端的「Web Preview」(網頁預覽) 按鈕,然後選取「Preview on port 8080」(透過以下通訊埠預覽:8080)。

您會看到下列網頁,請在左上角的下拉式選單中選取可用的服務專員 ( 在本例中應為 expense_manager_agent),然後與機器人互動。您會在左側視窗中看到許多代理程式執行階段的記錄詳細資料

我們來試試幾個動作!請上傳這 2 張收據範例 ( 來源:Hugging Face 資料集 mousserlane/id_receipt_dataset)。在每張圖片上按一下滑鼠右鍵,然後選擇「另存圖片」( 系統會下載收據圖片),然後點選「剪貼」圖示,並說明你要儲存這些收據,將檔案上傳至聊天機器人


之後,請嘗試使用下列查詢執行搜尋或檔案擷取作業
- 「提供 2023 年支出明細和總額」
- 「請提供 Indomaret 的收據檔案」
使用某些工具時,您可以檢查開發人員使用者介面中的情況

查看對話方塊的回應,並確認對話方塊是否遵守 task_prompt.py 提示中提供的所有規則。恭喜!您現在已擁有完整且可運作的開發代理程式。
接下來,我們要使用適當且美觀的 UI 完成這個步驟,並提供上傳及下載圖片檔案的功能。
8. 使用 Gradio 建構前端服務
我們將建構如下所示的即時通訊網頁介面
這項服務包含一個對話介面,其中包含輸入欄位,供使用者傳送文字及上傳收據圖片檔案。
我們將使用 Gradio 建構前端服務。
建立新檔案,按一下「File」>「New Text File」,並將檔案命名為「frontend.py」,然後複製下列程式碼並儲存
import mimetypes
import gradio as gr
import requests
import base64
from typing import List, Dict, Any
from settings import get_settings
from PIL import Image
import io
from schema import ImageData, ChatRequest, ChatResponse


SETTINGS = get_settings()


def encode_image_to_base64_and_get_mime_type(image_path: str) -> ImageData:
    """Encode a file to base64 string and get MIME type.

    Reads an image file and returns the base64-encoded image data and its MIME type.

    Args:
        image_path: Path to the image file to encode.

    Returns:
        ImageData object containing the base64 encoded image data and its MIME type.
    """
    # Read the image file
    with open(image_path, "rb") as file:
        image_content = file.read()

    # Get the mime type
    mime_type = mimetypes.guess_type(image_path)[0]

    # Base64 encode the image
    base64_data = base64.b64encode(image_content).decode("utf-8")

    # Return as ImageData object
    return ImageData(serialized_image=base64_data, mime_type=mime_type)


def decode_base64_to_image(base64_data: str) -> Image.Image:
    """Decode a base64 string to PIL Image.

    Converts a base64-encoded image string back to a PIL Image object
    that can be displayed or processed further.

    Args:
        base64_data: Base64 encoded string of the image.

    Returns:
        PIL Image object of the decoded image.
    """
    # Decode the base64 string and convert to PIL Image
    image_data = base64.b64decode(base64_data)
    image_buffer = io.BytesIO(image_data)
    image = Image.open(image_buffer)

    return image


def get_response_from_llm_backend(
    message: Dict[str, Any],
    history: List[Dict[str, Any]],
) -> List[str | gr.Image]:
    """Send the message and history to the backend and get a response.

    Args:
        message: Dictionary containing the current message with 'text' and optional 'files' keys.
        history: List of previous message dictionaries in the conversation.

    Returns:
        List containing text response and any image attachments from the backend service.
    """
    # Extract files and convert to base64
    image_data = []
    if uploaded_files := message.get("files", []):
        for file_path in uploaded_files:
            image_data.append(encode_image_to_base64_and_get_mime_type(file_path))

    # Prepare the request payload
    payload = ChatRequest(
        text=message["text"],
        files=image_data,
        session_id="default_session",
        user_id="default_user",
    )

    # Send request to backend
    try:
        response = requests.post(SETTINGS.BACKEND_URL, json=payload.model_dump())
        response.raise_for_status()  # Raise exception for HTTP errors

        result = ChatResponse(**response.json())
        if result.error:
            return [f"Error: {result.error}"]

        chat_responses = []

        if result.thinking_process:
            chat_responses.append(
                gr.ChatMessage(
                    role="assistant",
                    content=result.thinking_process,
                    metadata={"title": "🧠 Thinking Process"},
                )
            )

        chat_responses.append(gr.ChatMessage(role="assistant", content=result.response))

        if result.attachments:
            for attachment in result.attachments:
                image_data = attachment.serialized_image
                chat_responses.append(gr.Image(decode_base64_to_image(image_data)))

        return chat_responses
    except requests.exceptions.RequestException as e:
        return [f"Error connecting to backend service: {str(e)}"]


if __name__ == "__main__":
    demo = gr.ChatInterface(
        get_response_from_llm_backend,
        title="Personal Expense Assistant",
        description="This assistant can help you to store receipts data, find receipts, and track your expenses during certain period.",
        type="messages",
        multimodal=True,
        textbox=gr.MultimodalTextbox(file_count="multiple", file_types=["image"]),
    )

    demo.launch(
        server_name="0.0.0.0",
        server_port=8080,
    )
接著,我們可以嘗試使用下列指令執行前端服務。別忘了將 main.py 檔案重新命名為 frontend.py。
uv run frontend.py
您會在 Cloud 控制台中看到類似以下的輸出內容
* Running on local URL:  http://0.0.0.0:8080

To create a public link, set `share=True` in `launch()`.
完成後,您可以按住 Ctrl 鍵點選本機網址連結,查看網路介面。或者,您也可以按一下 Cloud 編輯器右上方的「網頁預覽」按鈕,然後選取「透過以下通訊埠預覽:8080」,即可存取前端應用程式。

您會看到網頁介面,但由於後端服務尚未設定,因此嘗試提交即時通訊時會收到預期錯誤

請讓服務執行,暫時不要終止服務。我們會在另一個終端機分頁中執行後端服務
程式碼說明
在這個前端程式碼中,我們首先讓使用者能夠傳送文字和上傳多個檔案。Gradio 可讓我們透過 gr.ChatInterface 方法搭配 gr.MultimodalTextbox 建立這類功能。
在將檔案和文字傳送至後端之前,我們需要找出檔案的 mimetype,因為後端需要這個資訊。我們也需要將圖片檔案位元組編碼為 base64,並與 mimetype 一併傳送。
class ImageData(BaseModel):
    """Model for image data with hash identifier.

    Attributes:
        serialized_image: Optional Base64 encoded string of the image content.
        mime_type: MIME type of the image.
    """

    serialized_image: str
    mime_type: str
用於前端 - 後端互動的結構定義在 schema.py 中定義。我們使用 Pydantic BaseModel 在結構定義中強制執行資料驗證
收到回覆時,我們已將思考過程、最終回覆和附件分開。因此,我們可以利用 Gradio 元件,搭配 UI 元件顯示每個元件。
class ChatResponse(BaseModel):
    """Model for a chat response.

    Attributes:
        response: The text response from the model.
        thinking_process: Optional thinking process of the model.
        attachments: List of image data to be displayed to the user.
        error: Optional error message if something went wrong.
    """

    response: str
    thinking_process: str = ""
    attachments: List[ImageData] = []
    error: Optional[str] = None
9. 使用 FastAPI 建構後端服務
接下來,我們需要建構後端,讓代理程式與其他元件一同初始化,以便執行代理程式執行階段。
建立新檔案,按一下「File」>「New Text File」,然後複製並貼上以下程式碼,並儲存為「backend.py」
from expense_manager_agent.agent import root_agent as expense_manager_agent
from google.adk.sessions import InMemorySessionService
from google.adk.runners import Runner
from google.adk.events import Event
from fastapi import FastAPI, Body, Depends
from typing import AsyncIterator
from types import SimpleNamespace
import uvicorn
from contextlib import asynccontextmanager
import asyncio
from utils import (
    extract_attachment_ids_and_sanitize_response,
    download_image_from_gcs,
    extract_thinking_process,
    format_user_request_to_adk_content_and_store_artifacts,
)
from schema import ImageData, ChatRequest, ChatResponse
import logger
from google.adk.artifacts import GcsArtifactService
from settings import get_settings

SETTINGS = get_settings()
APP_NAME = "expense_manager_app"


# Application state to hold service contexts
class AppContexts(SimpleNamespace):
    """A class to hold application contexts with attribute access"""

    session_service: InMemorySessionService = None
    artifact_service: GcsArtifactService = None
    expense_manager_agent_runner: Runner = None


# Initialize application state
app_contexts = AppContexts()


@asynccontextmanager
async def lifespan(app: FastAPI):
    # Initialize service contexts during application startup
    app_contexts.session_service = InMemorySessionService()
    app_contexts.artifact_service = GcsArtifactService(
        bucket_name=SETTINGS.STORAGE_BUCKET_NAME
    )
    app_contexts.expense_manager_agent_runner = Runner(
        agent=expense_manager_agent,  # The agent we want to run
        app_name=APP_NAME,  # Associates runs with our app
        session_service=app_contexts.session_service,  # Uses our session manager
        artifact_service=app_contexts.artifact_service,  # Uses our artifact manager
    )

    logger.info("Application started successfully")
    yield
    logger.info("Application shutting down")
    # Perform cleanup during application shutdown if necessary


# Helper function to get application state as a dependency
async def get_app_contexts() -> AppContexts:
    return app_contexts


# Create FastAPI app
app = FastAPI(title="Personal Expense Assistant API", lifespan=lifespan)


@app.post("/chat", response_model=ChatResponse)
async def chat(
    request: ChatRequest = Body(...),
    app_context: AppContexts = Depends(get_app_contexts),
) -> ChatResponse:
    """Process chat request and get response from the agent"""

    # Prepare the user's message in ADK format and store image artifacts
    content = await asyncio.to_thread(
        format_user_request_to_adk_content_and_store_artifacts,
        request=request,
        app_name=APP_NAME,
        artifact_service=app_context.artifact_service,
    )

    final_response_text = "Agent did not produce a final response."  # Default

    # Use the session ID from the request or default if not provided
    session_id = request.session_id
    user_id = request.user_id

    # Create session if it doesn't exist
    if not app_context.session_service.get_session(
        app_name=APP_NAME, user_id=user_id, session_id=session_id
    ):
        app_context.session_service.create_session(
            app_name=APP_NAME, user_id=user_id, session_id=session_id
        )

    try:
        # Process the message with the agent
        # Type annotation: runner.run_async returns an AsyncIterator[Event]
        events_iterator: AsyncIterator[Event] = (
            app_context.expense_manager_agent_runner.run_async(
                user_id=user_id, session_id=session_id, new_message=content
            )
        )
        async for event in events_iterator:  # event has type Event
            # Key Concept: is_final_response() marks the concluding message for the turn
            if event.is_final_response():
                if event.content and event.content.parts:
                    # Extract text from the first part
                    final_response_text = event.content.parts[0].text
                elif event.actions and event.actions.escalate:
                    # Handle potential errors/escalations
                    final_response_text = f"Agent escalated: {event.error_message or 'No specific message.'}"
                break  # Stop processing events once the final response is found

        logger.info(
            "Received final response from agent", raw_final_response=final_response_text
        )

        # Extract and process any attachments and thinking process in the response
        base64_attachments = []
        sanitized_text, attachment_ids = extract_attachment_ids_and_sanitize_response(
            final_response_text
        )
        sanitized_text, thinking_process = extract_thinking_process(sanitized_text)

        # Download images from GCS and replace hash IDs with base64 data
        for image_hash_id in attachment_ids:
            # Download image data and get MIME type
            result = await asyncio.to_thread(
                download_image_from_gcs,
                artifact_service=app_context.artifact_service,
                image_hash=image_hash_id,
                app_name=APP_NAME,
                user_id=user_id,
                session_id=session_id,
            )
            if result:
                base64_data, mime_type = result
                base64_attachments.append(
                    ImageData(serialized_image=base64_data, mime_type=mime_type)
                )

        logger.info(
            "Processed response with attachments",
            sanitized_response=sanitized_text,
            thinking_process=thinking_process,
            attachment_ids=attachment_ids,
        )

        return ChatResponse(
            response=sanitized_text,
            thinking_process=thinking_process,
            attachments=base64_attachments,
        )

    except Exception as e:
        logger.error("Error processing chat request", error_message=str(e))
        return ChatResponse(
            response="", error=f"Error in generating response: {str(e)}"
        )


# Only run the server if this file is executed directly
if __name__ == "__main__":
    uvicorn.run(app, host="0.0.0.0", port=8081)
完成後,我們可以嘗試執行後端服務。請注意,在前一個步驟中,我們已正確執行前端服務,現在我們需要開啟新的終端機,並嘗試執行這個後端服務
- 建立新的終端機。前往底部區域的終端機,然後找出「+」按鈕來建立新的終端機。或者,您也可以按 Ctrl + Shift + C 鍵開啟新的終端機

- 接著,請確認您位於工作目錄 personal-expense-assistant 中,然後執行下列指令
uv run backend.py
- 如果成功,系統會顯示類似以下的輸出內容
INFO:     Started server process [xxxxx]
INFO:     Waiting for application startup.
INFO:     Application startup complete.
INFO:     Uvicorn running on http://0.0.0.0:8081 (Press CTRL+C to quit)
程式碼說明
初始化 ADK 代理程式、SessionService 和 ArtifactService
為了在後端服務中執行這個代理程式,我們需要建立Runner,同時使用 SessionService 和代理程式。SessionService 會管理對話記錄和狀態,因此在與 Runner 整合後,我們的服務機器人就能接收目前對話的內容。
我們也會使用 ArtifactService 處理上傳的檔案。如要進一步瞭解 ADK 工作階段和構件,請參閱相關文章。
...

@asynccontextmanager
async def lifespan(app: FastAPI):
    # Initialize service contexts during application startup
    app_contexts.session_service = InMemorySessionService()
    app_contexts.artifact_service = GcsArtifactService(
        bucket_name=SETTINGS.STORAGE_BUCKET_NAME
    )
    app_contexts.expense_manager_agent_runner = Runner(
        agent=expense_manager_agent,  # The agent we want to run
        app_name=APP_NAME,  # Associates runs with our app
        session_service=app_contexts.session_service,  # Uses our session manager
        artifact_service=app_contexts.artifact_service,  # Uses our artifact manager
    )

    logger.info("Application started successfully")
    yield
    logger.info("Application shutting down")
    # Perform cleanup during application shutdown if necessary

...
在這個示範中,我們使用 InMemorySessionService 和 GcsArtifactService 整合代理程式 Runner。由於對話記錄會儲存在記憶體中,因此後端服務終止或重新啟動時,這些記錄就會遺失。我們會在 FastAPI 應用程式生命週期中初始化這些項目,以便在 /chat 路徑中以依附元件形式插入。
使用 GcsArtifactService 上傳及下載圖片
所有上傳的圖片都會由 GcsArtifactService 儲存為構件,您可以在 utils.py 中的 format_user_request_to_adk_content_and_store_artifacts 函式中查看這項資訊
...

# Prepare the user's message in ADK format and store image artifacts
content = await asyncio.to_thread(
    format_user_request_to_adk_content_and_store_artifacts,
    request=request,
    app_name=APP_NAME,
    artifact_service=app_context.artifact_service,
)

...
所有由代理程式執行緒處理的要求,都必須以 types.Content 類型格式化。在函式中,我們也會處理每個圖片資料,並擷取其 ID,以便替換成圖片 ID 預留位置。
使用正規表示式擷取圖片 ID 後,系統會使用類似的機制下載附件:
...
sanitized_text, attachment_ids = extract_attachment_ids_and_sanitize_response(
    final_response_text
)
sanitized_text, thinking_process = extract_thinking_process(sanitized_text)

# Download images from GCS and replace hash IDs with base64 data
for image_hash_id in attachment_ids:
    # Download image data and get MIME type
    result = await asyncio.to_thread(
        download_image_from_gcs,
        artifact_service=app_context.artifact_service,
        image_hash=image_hash_id,
        app_name=APP_NAME,
        user_id=user_id,
        session_id=session_id,
    )
...
10. 整合測試
您現在應該會在不同的雲端控制台分頁中執行多項服務:
- 前端服務在通訊埠 8080 上執行
* Running on local URL:  http://0.0.0.0:8080

To create a public link, set `share=True` in `launch()`.
- 在通訊埠 8081 上執行的後端服務
INFO:     Started server process [xxxxx]
INFO:     Waiting for application startup.
INFO:     Application startup complete.
INFO:     Uvicorn running on http://0.0.0.0:8081 (Press CTRL+C to quit)
在目前狀態下,您應該可以上傳收據圖片,並透過通訊埠 8080 上的網路應用程式,與 Google 助理進行即時通訊。
按一下 Cloud Shell 編輯器頂端的「網頁預覽」按鈕,然後選取「透過以下通訊埠預覽:8080」
接下來,我們來與 Google 助理互動!
請下載下列收據。這些收據資料的日期範圍是 2023 年至 2024 年,並要求 Google 助理儲存/上傳這些資料
- Receipt Drive ( 來源:Hugging Face 資料集
mousserlane/id_receipt_dataset)
詢問各種問題
- 「請提供 2023 年至 2024 年的月度支出明細」
- 「請出示咖啡交易的收據」
- 「請提供 Yakiniku Like 的收據檔案」
- 等等
以下是成功互動的部分程式碼片段


11. 部署至 Cloud Run
當然,我們希望隨時隨地都能使用這個出色的應用程式。為此,我們可以封裝這個應用程式,並將其部署至 Cloud Run。為了方便示範,這項服務會以可供他人存取的公開服務形式提供。不過請注意,這並非這類應用程式的最佳做法,因為這類做法更適合個人應用程式
在本程式碼研究室中,我們會將前端和後端服務都放入 1 個容器。我們需要supervisord的協助,才能管理這兩項服務。您可以檢查 supervisord.conf 檔案,並查看我們將 supervisord 設為進入點的 Dockerfile。
此時,我們已取得將應用程式部署至 Cloud Run 所需的所有檔案,現在就來部署吧!前往 Cloud Shell 終端機,確認目前的專案已設為有效專案,如果沒有,請使用 gcloud configure 指令設定專案 ID:
gcloud config set project [PROJECT_ID]
接著執行下列指令,將應用程式部署至 Cloud Run。
gcloud run deploy personal-expense-assistant \
                  --source . \
                  --port=8080 \
                  --allow-unauthenticated \
                  --env-vars-file=settings.yaml \
                  --memory 1024Mi \
                  --region us-central1
如果系統提示您確認建立 Docker 存放區的構件登錄,請回答「Y」。請注意,由於這是示範應用程式,因此我們允許未經驗證的存取權。建議您為企業和正式版應用程式使用適當的驗證機制。
部署完成後,您應該會收到類似以下的連結:
https://personal-expense-assistant-*******.us-central1.run.app
您可以繼續在無痕式視窗或行動裝置上使用應用程式。應該已經上線了。
12. 挑戰
大展長才的機會來了,也能磨練探索技能。您是否有改變程式碼的必要,以便後端能容納多位使用者?哪些元件需要更新?
13. 清理
如要避免系統向您的 Google Cloud 帳戶收取本程式碼研究室所用資源的費用,請按照下列步驟操作:
- 在 Google Cloud 控制台中前往「管理資源」頁面。
- 在專案清單中選取要刪除的專案,然後點按「刪除」。
- 在對話方塊中輸入專案 ID,然後按一下「Shut down」(關閉) 即可刪除專案。
- 或者,您也可以前往控制台的 Cloud Run,選取剛部署的服務並刪除。