
۱. 📖 مقدمه

Have you ever been frustrated and too lazy to manage all of your personal expenses? Me too! Thus why in this codelab, we will build a personal expense manager assistant - powered by Gemini 2.5 to do all the chores for us! From managing the uploaded receipts to analyze whether you already spent too much to buy a coffee!
This assistant will be accessible via web browser in the form of a chat web interface, in which you can communicate with it, upload some receipt images and ask the assistant to store them, or maybe want to search some receipts to get the file and do some expense analysis. And all of this built on top of Google Agent Development Kit framework
The application itself is separated into 2 services: frontend and backend; enabling you to build a quick prototype and try what it feels like, and also understand how the API contract looks to integrate both of them.
Through the codelab, you will employ a step by step approach as follows:
- Prepare your Google Cloud project and Enable all the required API on it
- Setup bucket on Google Cloud Storage and database on Firestore
- ایجاد فهرست بندی Firestore
- فضای کاری را برای محیط کدنویسی خود تنظیم کنید
- Structuring ADK agent source code, tools, prompt, etc.
- Testing the agent using ADK local Web Development UI
- Build the frontend service - chat interface using Gradio library, to send some query and upload receipt images
- Build the backend service - HTTP server using FastAPI which where our ADK agent code, SessionService, and Artifact Service reside
- Manage environment variables and setup required files needed to deploy the application to the Cloud Run
- برنامه را روی Cloud Run مستقر کنید
نمای کلی معماری

پیشنیازها
- کار راحت با پایتون
- An understanding of basic full-stack architecture using HTTP service
آنچه یاد خواهید گرفت
- نمونهسازی اولیه وب فرانتاند با Gradio
- Backend service development with FastAPI and Pydantic
- Architecting ADK Agent while utilizing it's several capabilities
- Tool usage
- مدیریت جلسه و مصنوعات
- Callback utilization for input modification before sent to Gemini
- Utilizing BuiltInPlanner to improve task execution by doing planning
- اشکالزدایی سریع از طریق رابط وب محلی ADK
- Strategy to optimize multimodal interaction via information parsing and retrieval via prompt engineering and Gemini request modification using ADK callback
- Agentic Retrieval Augmented Generation using Firestore as Vector Database
- Manage environment variables in YAML file with Pydantic-settings
- Deploy application to Cloud Run using Dockerfile and provide environment variables with YAML file
آنچه نیاز دارید
- مرورگر وب کروم
- A Gmail account
- یک پروژه ابری با قابلیت پرداخت صورتحساب
This codelab, designed for developers of all levels (including beginners), uses Python in its sample application. However, Python knowledge isn't required for understanding the concepts presented.
۲. 🚀 قبل از شروع
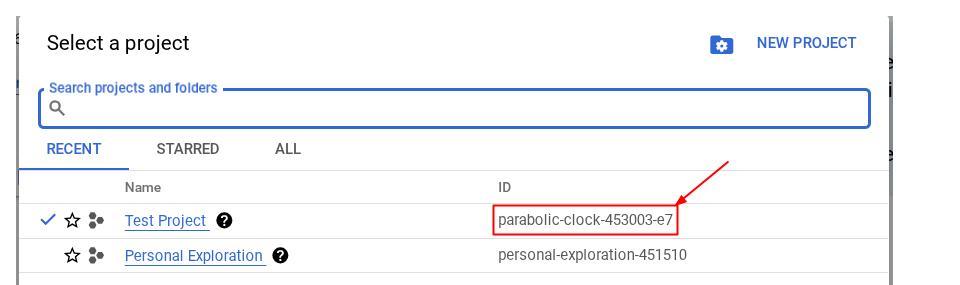
پروژه فعال را در کنسول ابری انتخاب کنید
This codelab assumes that you already have a Google Cloud project with billing enabled. If you do not have it yet, you can follow the instructions below to get started.
- در کنسول گوگل کلود ، در صفحه انتخاب پروژه، یک پروژه گوگل کلود را انتخاب یا ایجاد کنید.
- مطمئن شوید که صورتحساب برای پروژه ابری شما فعال است. یاد بگیرید که چگونه بررسی کنید که آیا صورتحساب در یک پروژه فعال است یا خیر .

آماده سازی پایگاه داده فایراستور
Next, we will also need to create a Firestore Database. Firestore in Native mode is a NoSQL document database built for automatic scaling, high performance, and ease of application development. It can also act as a vector database which can support Retrieval Augmented Generation technique for our lab.
- Search " firestore" on the search bar, and click the Firestore product

- Then, click the Create A Firestore Database button
- Use the (default) as the database ID name and keep the Standard Edition selected. For the sake of this lab demo, use the Firestore Native with Open security rules.
- You'll also notice that this database actually has the Free-tier Usage YEAY! After that, click the Create Database Button

After these steps, you should already be redirected to the Firestore Database that you just created
Setup Cloud Project in Cloud Shell Terminal
- You'll use Cloud Shell , a command-line environment running in Google Cloud that comes preloaded with bq. Click Activate Cloud Shell at the top of the Google Cloud console.

- Once connected to Cloud Shell, you check that you're already authenticated and that the project is set to your project ID using the following command:
gcloud auth list
- Run the following command in Cloud Shell to confirm that the gcloud command knows about your project.
gcloud config list project
- If your project is not set, use the following command to set it:
gcloud config set project <YOUR_PROJECT_ID>
Alternatively, you also can see the PROJECT_ID id in the console

Click it and you will all of your project and the project ID on the right side
- Enable the required APIs via the command shown below. This could take a few minutes, so please be patient.
gcloud services enable aiplatform.googleapis.com \
                       firestore.googleapis.com \
                       run.googleapis.com \
                       cloudbuild.googleapis.com \
                       cloudresourcemanager.googleapis.com
در صورت اجرای موفقیتآمیز دستور، باید پیامی مشابه آنچه در زیر نشان داده شده است را مشاهده کنید:
Operation "operations/..." finished successfully.
The alternative to the gcloud command is through the console by searching for each product or using this link .
If any API is missed, you can always enable it during the course of the implementation.
برای دستورات و نحوهی استفاده از gcloud به مستندات مراجعه کنید.
Prepare Google Cloud Storage Bucket
Next, from the same terminal, we will need to prepare the GCS bucket to store the uploaded file. Run the following command to create the bucket, a unique yet relevant bucket name relevant to personal expense assistant receipts will be needed, hence we will utilize the following bucket name combined with your project id
gsutil mb -l us-central1 gs://personal-expense-{your-project-id}
It will show this output
Creating gs://personal-expense-{your-project-id}
You can verify this by going to the Navigation Menu on top left of the browser and select Cloud Storage -> Bucket

ایجاد فهرست Firestore برای جستجو
Firestore is a NoSQL database natively, which offers superior performance and flexibility in data model, but has limitations when it comes to complex queries. As we plan to utilize some compound multi field queries and vector search we will need to create some index first. You can read more about the details in this documentation
- Run the following command to create index to support compound queries
gcloud firestore indexes composite create \
        --collection-group=personal-expense-assistant-receipts \
        --field-config field-path=total_amount,order=ASCENDING \
        --field-config field-path=transaction_time,order=ASCENDING \
        --field-config field-path=__name__,order=ASCENDING \
        --database="(default)"
- And run this one to support vector search
gcloud firestore indexes composite create \
        --collection-group="personal-expense-assistant-receipts" \
        --query-scope=COLLECTION \
        --field-config field-path="embedding",vector-config='{"dimension":"768", "flat": "{}"}' \
        --database="(default)"
You can check the created index by visiting Firestore in the cloud console and click the (default) database instance and select Indexes on the navigation bar

Go to Cloud Shell Editor and Setup Application Working Directory
Now, we can set up our code editor to do some coding stuff. We will use the Cloud Shell Editor for this
- Click on the Open Editor button, this will open a Cloud Shell Editor, we can write our code here

- Next, we also need to check whether the shell is already configured to the correct PROJECT ID that you have, if you see there is value inside ( ) before the $ icon in the terminal ( in below screenshot, the value is "adk-multimodal-tool" ) this value shows the configured project for your active shell session.

If the shown value is already correct , you can skip the next command . However if it's not correct or missing, run the following command
gcloud config set project <YOUR_PROJECT_ID>
- Next, let's clone the template working directory for this codelab from Github, run the following command. It will create the working directory in the personal-expense-assistant directory
git clone https://github.com/alphinside/personal-expense-assistant-adk-codelab-starter.git personal-expense-assistant
- After that, go to the top section of the Cloud Shell Editor and click File->Open Folder, find your username directory and find the personal-expense-assistant directory then click OK button. This will make the chosen directory as the main working directory. In this example, the username is alvinprayuda , hence the directory path is shown below


Now, your Cloud Shell Editor should look like this

Environment Setup
Prepare Python Virtual Environment
The next step is to prepare the development environment. Your current active terminal should be inside the personal-expense-assistant working directory. We will utilize Python 3.12 in this codelab and we will use uv python project manager to simplify the need of creating and managing python version and virtual environment
- اگر هنوز ترمینال را باز نکردهاید، با کلیک روی ترمینال -> ترمینال جدید ، یا با استفاده از Ctrl + Shift + C آن را باز کنید، این کار یک پنجره ترمینال در قسمت پایین مرورگر باز میکند.

- حالا بیایید محیط مجازی را با استفاده از
uvمقداردهی اولیه کنیم، این دستورات را اجرا کنید
cd ~/personal-expense-assistant
uv sync --frozen
این دستور دایرکتوری .venv را ایجاد کرده و وابستگیها را نصب میکند. نگاهی سریع به فایل pyproject.toml اطلاعاتی در مورد وابستگیها به شما میدهد که به این صورت نشان داده شده است.
dependencies = [
    "datasets>=3.5.0",
    "google-adk==1.18",
    "google-cloud-firestore>=2.20.1",
    "gradio>=5.23.1",
    "pydantic>=2.10.6",
    "pydantic-settings[yaml]>=2.8.1",
]
Setup Configuration Files
حالا باید فایلهای پیکربندی این پروژه را تنظیم کنیم. ما از pydantic-settings برای خواندن پیکربندی از فایل YAML استفاده میکنیم.
ما قبلاً قالب فایل را درون settings.yaml.example ارائه کردهایم، باید فایل را کپی کرده و نام آن را به settings.yaml تغییر دهیم. برای ایجاد فایل، این دستور را اجرا کنید
cp settings.yaml.example settings.yaml
Then, copy the following value into the file
GCLOUD_LOCATION: "us-central1"
GCLOUD_PROJECT_ID: "your-project-id"
BACKEND_URL: "http://localhost:8081/chat"
STORAGE_BUCKET_NAME: "personal-expense-{your-project-id}"
DB_COLLECTION_NAME: "personal-expense-assistant-receipts"
برای این آزمایشگاه کد، ما از مقادیر از پیش تنظیمشده برای GCLOUD_LOCATION , BACKEND_URL , DB_COLLECTION_NAME استفاده میکنیم.
حالا میتوانیم به مرحله بعدی برویم، ساخت عامل و سپس سرویسها
۳. 🚀 ساخت عامل با استفاده از Google ADK و Gemini 2.5
Introduction to ADK Directory Structure
Let's start by exploring what ADK has to offer and how to build the agent. ADK complete documentation can be accessed in this URL . ADK offers us many utilities within its CLI command execution. Some of them are the following :
- Setup the agent directory structure
- Quickly try interaction via CLI input output
- Quickly setup local development UI web interface
حالا، بیایید ساختار دایرکتوری agent را با استفاده از دستور CLI ایجاد کنیم. دستور زیر را اجرا کنید.
uv run adk create expense_manager_agent
When asked, choose the model gemini-2.5-flash and the Vertex AI backend. The wizard will then ask for the project ID and location. You can accept the default options by pressing enter, or change them as necessary. Just double check that you are using the correct project ID created earlier in this lab. The output will look like this:
Choose a model for the root agent:
1. gemini-2.5-flash
2. Other models (fill later)
Choose model (1, 2): 1
1. Google AI
2. Vertex AI
Choose a backend (1, 2): 2

You need an existing Google Cloud account and project, check out this link for details:
https://google.github.io/adk-docs/get-started/quickstart/#gemini---google-cloud-vertex-ai

Enter Google Cloud project ID [going-multimodal-lab]:
Enter Google Cloud region [us-central1]:

Agent created in /home/username/personal-expense-assistant/expense_manager_agent:
- .env
- __init__.py
- agent.py
ساختار دایرکتوری agent زیر را ایجاد خواهد کرد.
expense_manager_agent/
├── __init__.py
├── .env
├── agent.py
و اگر init.py و agent.py را بررسی کنید، این کد را خواهید دید.
# __init__.py

from . import agent
# agent.py

from google.adk.agents import Agent

root_agent = Agent(
    model='gemini-2.5-flash',
    name='root_agent',
    description='A helpful assistant for user questions.',
    instruction='Answer user questions to the best of your knowledge',
)
Now you can test it by running
uv run adk run expense_manager_agent
هر زمان که آزمایش شما تمام شد، میتوانید با تایپ کردن exit یا فشردن کلیدهای Ctrl+D از عامل خارج شوید.
Building Our Expense Manager Agent
بیایید عامل مدیریت هزینه خود را بسازیم! فایل cost_manager_agent / agent.py را باز کنید و کد زیر را که شامل root_agent است، کپی کنید.
# expense_manager_agent/agent.py

from google.adk.agents import Agent
from expense_manager_agent.tools import (
    store_receipt_data,
    search_receipts_by_metadata_filter,
    search_relevant_receipts_by_natural_language_query,
    get_receipt_data_by_image_id,
)
from expense_manager_agent.callbacks import modify_image_data_in_history
import os
from settings import get_settings
from google.adk.planners import BuiltInPlanner
from google.genai import types

SETTINGS = get_settings()
os.environ["GOOGLE_CLOUD_PROJECT"] = SETTINGS.GCLOUD_PROJECT_ID
os.environ["GOOGLE_CLOUD_LOCATION"] = SETTINGS.GCLOUD_LOCATION
os.environ["GOOGLE_GENAI_USE_VERTEXAI"] = "TRUE"

# Get the code file directory path and read the task prompt file
current_dir = os.path.dirname(os.path.abspath(__file__))
prompt_path = os.path.join(current_dir, "task_prompt.md")
with open(prompt_path, "r") as file:
    task_prompt = file.read()

root_agent = Agent(
    name="expense_manager_agent",
    model="gemini-2.5-flash",
    description=(
        "Personal expense agent to help user track expenses, analyze receipts, and manage their financial records"
    ),
    instruction=task_prompt,
    tools=[
        store_receipt_data,
        get_receipt_data_by_image_id,
        search_receipts_by_metadata_filter,
        search_relevant_receipts_by_natural_language_query,
    ],
    planner=BuiltInPlanner(
        thinking_config=types.ThinkingConfig(
            thinking_budget=2048,
        )
    ),
    before_model_callback=modify_image_data_in_history,
)
Code Explanation
این اسکریپت شامل راهاندازی عامل ما است که در آن موارد زیر را مقداردهی اولیه میکنیم:
- Set the model to be used to
gemini-2.5-flash - توضیحات و دستورالعملهای عامل را به عنوان اعلان سیستم که از
task_prompt.mdخوانده میشود، تنظیم کنید. - ابزارهای لازم را برای پشتیبانی از عملکرد عامل فراهم کنید
- فعال کردن برنامهریزی قبل از تولید پاسخ نهایی یا اجرا با استفاده از قابلیتهای تفکر Gemini 2.5 Flash
- قبل از ارسال درخواست به Gemini، رهگیری پاسخ به تماس را تنظیم کنید تا تعداد دادههای تصویری ارسالی قبل از انجام پیشبینی محدود شود.
4. 🚀 Configuring the Agent Tools
نماینده مدیریت هزینه ما قابلیتهای زیر را خواهد داشت:
- استخراج دادهها از تصویر رسید و ذخیره دادهها و فایل
- جستجوی دقیق روی دادههای هزینه
- جستجوی متنی روی دادههای هزینه
از این رو به ابزارهای مناسبی برای پشتیبانی از این قابلیت نیاز داریم. یک فایل جدید در پوشه cost_manager_agent ایجاد کنید و نام آن را tools.py بگذارید.
touch expense_manager_agent/tools.py
فایل cost_manage_agent/tools.py را باز کنید، سپس کد زیر را کپی کنید.
# expense_manager_agent/tools.py

import datetime
from typing import Dict, List, Any
from google.cloud import firestore
from google.cloud.firestore_v1.vector import Vector
from google.cloud.firestore_v1 import FieldFilter
from google.cloud.firestore_v1.base_query import And
from google.cloud.firestore_v1.base_vector_query import DistanceMeasure
from settings import get_settings
from google import genai

SETTINGS = get_settings()
DB_CLIENT = firestore.Client(
    project=SETTINGS.GCLOUD_PROJECT_ID
)  # Will use "(default)" database
COLLECTION = DB_CLIENT.collection(SETTINGS.DB_COLLECTION_NAME)
GENAI_CLIENT = genai.Client(
    vertexai=True, location=SETTINGS.GCLOUD_LOCATION, project=SETTINGS.GCLOUD_PROJECT_ID
)
EMBEDDING_DIMENSION = 768
EMBEDDING_FIELD_NAME = "embedding"
INVALID_ITEMS_FORMAT_ERR = """
Invalid items format. Must be a list of dictionaries with 'name', 'price', and 'quantity' keys."""
RECEIPT_DESC_FORMAT = """
Store Name: {store_name}
Transaction Time: {transaction_time}
Total Amount: {total_amount}
Currency: {currency}
Purchased Items:
{purchased_items}
Receipt Image ID: {receipt_id}
"""


def sanitize_image_id(image_id: str) -> str:
    """Sanitize image ID by removing any leading/trailing whitespace."""
    if image_id.startswith("[IMAGE-"):
        image_id = image_id.split("ID ")[1].split("]")[0]

    return image_id.strip()


def store_receipt_data(
    image_id: str,
    store_name: str,
    transaction_time: str,
    total_amount: float,
    purchased_items: List[Dict[str, Any]],
    currency: str = "IDR",
) -> str:
    """
    Store receipt data in the database.

    Args:
        image_id (str): The unique identifier of the image. For example IMAGE-POSITION 0-ID 12345,
            the ID of the image is 12345.
        store_name (str): The name of the store.
        transaction_time (str): The time of purchase, in ISO format ("YYYY-MM-DDTHH:MM:SS.ssssssZ").
        total_amount (float): The total amount spent.
        purchased_items (List[Dict[str, Any]]): A list of items purchased with their prices. Each item must have:
            - name (str): The name of the item.
            - price (float): The price of the item.
            - quantity (int, optional): The quantity of the item. Defaults to 1 if not provided.
        currency (str, optional): The currency of the transaction, can be derived from the store location.
            If unsure, default is "IDR".

    Returns:
        str: A success message with the receipt ID.

    Raises:
        Exception: If the operation failed or input is invalid.
    """
    try:
        # In case of it provide full image placeholder, extract the id string
        image_id = sanitize_image_id(image_id)

        # Check if the receipt already exists
        doc = get_receipt_data_by_image_id(image_id)

        if doc:
            return f"Receipt with ID {image_id} already exists"

        # Validate transaction time
        if not isinstance(transaction_time, str):
            raise ValueError(
                "Invalid transaction time: must be a string in ISO format 'YYYY-MM-DDTHH:MM:SS.ssssssZ'"
            )
        try:
            datetime.datetime.fromisoformat(transaction_time.replace("Z", "+00:00"))
        except ValueError:
            raise ValueError(
                "Invalid transaction time format. Must be in ISO format 'YYYY-MM-DDTHH:MM:SS.ssssssZ'"
            )

        # Validate items format
        if not isinstance(purchased_items, list):
            raise ValueError(INVALID_ITEMS_FORMAT_ERR)

        for _item in purchased_items:
            if (
                not isinstance(_item, dict)
                or "name" not in _item
                or "price" not in _item
            ):
                raise ValueError(INVALID_ITEMS_FORMAT_ERR)

            if "quantity" not in _item:
                _item["quantity"] = 1

        # Create a combined text from all receipt information for better embedding
        result = GENAI_CLIENT.models.embed_content(
            model="text-embedding-004",
            contents=RECEIPT_DESC_FORMAT.format(
                store_name=store_name,
                transaction_time=transaction_time,
                total_amount=total_amount,
                currency=currency,
                purchased_items=purchased_items,
                receipt_id=image_id,
            ),
        )

        embedding = result.embeddings[0].values

        doc = {
            "receipt_id": image_id,
            "store_name": store_name,
            "transaction_time": transaction_time,
            "total_amount": total_amount,
            "currency": currency,
            "purchased_items": purchased_items,
            EMBEDDING_FIELD_NAME: Vector(embedding),
        }

        COLLECTION.add(doc)

        return f"Receipt stored successfully with ID: {image_id}"
    except Exception as e:
        raise Exception(f"Failed to store receipt: {str(e)}")


def search_receipts_by_metadata_filter(
    start_time: str,
    end_time: str,
    min_total_amount: float = -1.0,
    max_total_amount: float = -1.0,
) -> str:
    """
    Filter receipts by metadata within a specific time range and optionally by amount.

    Args:
        start_time (str): The start datetime for the filter (in ISO format, e.g. 'YYYY-MM-DDTHH:MM:SS.ssssssZ').
        end_time (str): The end datetime for the filter (in ISO format, e.g. 'YYYY-MM-DDTHH:MM:SS.ssssssZ').
        min_total_amount (float): The minimum total amount for the filter (inclusive). Defaults to -1.
        max_total_amount (float): The maximum total amount for the filter (inclusive). Defaults to -1.

    Returns:
        str: A string containing the list of receipt data matching all applied filters.

    Raises:
        Exception: If the search failed or input is invalid.
    """
    try:
        # Validate start and end times
        if not isinstance(start_time, str) or not isinstance(end_time, str):
            raise ValueError("start_time and end_time must be strings in ISO format")
        try:
            datetime.datetime.fromisoformat(start_time.replace("Z", "+00:00"))
            datetime.datetime.fromisoformat(end_time.replace("Z", "+00:00"))
        except ValueError:
            raise ValueError("start_time and end_time must be strings in ISO format")

        # Start with the base collection reference
        query = COLLECTION

        # Build the composite query by properly chaining conditions
        # Notes that this demo assume 1 user only,
        # need to refactor the query for multiple user
        filters = [
            FieldFilter("transaction_time", ">=", start_time),
            FieldFilter("transaction_time", "<=", end_time),
        ]

        # Add optional filters
        if min_total_amount != -1:
            filters.append(FieldFilter("total_amount", ">=", min_total_amount))

        if max_total_amount != -1:
            filters.append(FieldFilter("total_amount", "<=", max_total_amount))

        # Apply the filters
        composite_filter = And(filters=filters)
        query = query.where(filter=composite_filter)

        # Execute the query and collect results
        search_result_description = "Search by Metadata Results:\n"
        for doc in query.stream():
            data = doc.to_dict()
            data.pop(
                EMBEDDING_FIELD_NAME, None
            )  # Remove embedding as it's not needed for display

            search_result_description += f"\n{RECEIPT_DESC_FORMAT.format(**data)}"

        return search_result_description
    except Exception as e:
        raise Exception(f"Error filtering receipts: {str(e)}")


def search_relevant_receipts_by_natural_language_query(
    query_text: str, limit: int = 5
) -> str:
    """
    Search for receipts with content most similar to the query using vector search.
    This tool can be use for user query that is difficult to translate into metadata filters.
    Such as store name or item name which sensitive to string matching.
    Use this tool if you cannot utilize the search by metadata filter tool.

    Args:
        query_text (str): The search text (e.g., "coffee", "dinner", "groceries").
        limit (int, optional): Maximum number of results to return (default: 5).

    Returns:
        str: A string containing the list of contextually relevant receipt data.

    Raises:
        Exception: If the search failed or input is invalid.
    """
    try:
        # Generate embedding for the query text
        result = GENAI_CLIENT.models.embed_content(
            model="text-embedding-004", contents=query_text
        )
        query_embedding = result.embeddings[0].values

        # Notes that this demo assume 1 user only,
        # need to refactor the query for multiple user
        vector_query = COLLECTION.find_nearest(
            vector_field=EMBEDDING_FIELD_NAME,
            query_vector=Vector(query_embedding),
            distance_measure=DistanceMeasure.EUCLIDEAN,
            limit=limit,
        )

        # Execute the query and collect results
        search_result_description = "Search by Contextual Relevance Results:\n"
        for doc in vector_query.stream():
            data = doc.to_dict()
            data.pop(
                EMBEDDING_FIELD_NAME, None
            )  # Remove embedding as it's not needed for display
            search_result_description += f"\n{RECEIPT_DESC_FORMAT.format(**data)}"

        return search_result_description
    except Exception as e:
        raise Exception(f"Error searching receipts: {str(e)}")


def get_receipt_data_by_image_id(image_id: str) -> Dict[str, Any]:
    """
    Retrieve receipt data from the database using the image_id.

    Args:
        image_id (str): The unique identifier of the receipt image. For example, if the placeholder is
            [IMAGE-ID 12345], the ID to use is 12345.

    Returns:
        Dict[str, Any]: A dictionary containing the receipt data with the following keys:
            - receipt_id (str): The unique identifier of the receipt image.
            - store_name (str): The name of the store.
            - transaction_time (str): The time of purchase in UTC.
            - total_amount (float): The total amount spent.
            - currency (str): The currency of the transaction.
            - purchased_items (List[Dict[str, Any]]): List of items purchased with their details.
        Returns an empty dictionary if no receipt is found.
    """
    # In case of it provide full image placeholder, extract the id string
    image_id = sanitize_image_id(image_id)

    # Query the receipts collection for documents with matching receipt_id (image_id)
    # Notes that this demo assume 1 user only,
    # need to refactor the query for multiple user
    query = COLLECTION.where(filter=FieldFilter("receipt_id", "==", image_id)).limit(1)
    docs = list(query.stream())

    if not docs:
        return {}

    # Get the first matching document
    doc_data = docs[0].to_dict()
    doc_data.pop(EMBEDDING_FIELD_NAME, None)

    return doc_data
توضیح کد
در این پیادهسازی تابع ابزارها، ما ابزارها را حول این دو ایده اصلی طراحی میکنیم:
- تجزیه دادههای رسید و نگاشت به فایل اصلی با استفاده از شناسه تصویر
[IMAGE-ID <hash-of-image-1>] - ذخیره و بازیابی دادهها با استفاده از پایگاه داده Firestore
ابزار "store_receipt_data"

This tool is the Optical Character Recognition tool, it will parse the required information from the image data, together with recognizing the Image ID string and map them together to be stored in the Firestore database.
علاوه بر این، این ابزار محتوای رسید را با استفاده از text-embedding-004 به جاسازی تبدیل میکند تا تمام فرادادهها و جاسازی با هم ذخیره و فهرستبندی شوند. این امر انعطافپذیری را برای بازیابی از طریق پرسوجو یا جستجوی متنی فراهم میکند.
پس از اجرای موفقیتآمیز این ابزار، میتوانید مشاهده کنید که دادههای رسید از قبل در پایگاه داده Firestore مانند شکل زیر فهرستبندی شدهاند.

ابزار "جستجوی رسیدها بر اساس فیلتر فراداده"

این ابزار، پرسوجوی کاربر را به یک فیلتر پرسوجوی فراداده تبدیل میکند که از جستجو بر اساس محدوده تاریخ و/یا کل تراکنش پشتیبانی میکند. این ابزار تمام دادههای رسید منطبق را برمیگرداند، که در این فرآیند، فیلد جاسازی را حذف میکنیم زیرا برای درک زمینهای توسط عامل مورد نیاز نیست.
ابزار "جستجوی_رسیدهای_مرتبط_با_زبان_طبیعی_پرسش"

این ابزار بازیابی افزوده نسل (RAG) ماست. عامل ما این قابلیت را دارد که پرسوجوی خود را برای بازیابی رسیدهای مربوطه از پایگاه داده برداری طراحی کند و همچنین میتواند زمان استفاده از این ابزار را انتخاب کند. مفهوم اجازه دادن به عامل برای تصمیمگیری مستقل در مورد اینکه آیا از این ابزار RAG استفاده خواهد کرد یا خیر و طراحی پرسوجوی خود، یکی از تعاریف رویکرد Agentic RAG است.
ما نه تنها به آن اجازه میدهیم که پرسوجوی خودش را بسازد، بلکه به آن اجازه میدهیم که تعداد اسناد مرتبطی را که میخواهد بازیابی کند، انتخاب کند. همراه با یک مهندسی سریع مناسب، مثلاً
# Example prompt

Always filter the result from tool
search_relevant_receipts_by_natural_language_query as the returned
result may contain irrelevant information
این امر این ابزار را به ابزاری قدرتمند تبدیل میکند که قادر به جستجوی تقریباً هر چیزی است، اگرچه ممکن است به دلیل ماهیت غیردقیق جستجوی نزدیکترین همسایه ، تمام نتایج مورد انتظار را برنگرداند.
۵. 🚀 اصلاح متن مکالمه از طریق فراخوانیهای برگشتی
Google ADK ما را قادر میسازد تا زمان اجرای عامل را در سطوح مختلف "رهگیری" کنیم. میتوانید اطلاعات بیشتر در مورد این قابلیت دقیق را در این مستندات بخوانید. در این آزمایشگاه، ما از before_model_callback برای اصلاح درخواست قبل از ارسال به LLM استفاده میکنیم تا دادههای تصویر را در زمینه تاریخچه مکالمات قدیمی حذف کنیم (فقط دادههای تصویر را در 3 تعامل آخر کاربر لحاظ کنیم) تا کارایی افزایش یابد.
However, we still want the agent to have the image data context when needed. Hence we add a mechanism to add a string image ID placeholder after each image byte data in the conversation. This will help the agent to link the image ID to its actual file data which can be utilized both at image storing or retrieval time. The structure will look like this
<image-byte-data-1>
[IMAGE-ID <hash-of-image-1>]
<image-byte-data-2>
[IMAGE-ID <hash-of-image-2>]
And so on..
و هنگامی که دادههای بایتی در تاریخچه مکالمه منسوخ میشوند، شناسه رشته هنوز وجود دارد تا با کمک ابزار، دسترسی به دادهها را فعال کند. ساختار تاریخچه نمونه پس از حذف دادههای تصویر
[IMAGE-ID <hash-of-image-1>]
[IMAGE-ID <hash-of-image-2>]
And so on..
بیایید شروع کنیم! یک فایل جدید در دایرکتوری cost_manager_agent ایجاد کنید و نام آن را callbacks.py بگذارید.
touch expense_manager_agent/callbacks.py
فایل cost_manager_agent/callbacks.py را باز کنید، سپس کد زیر را در آن کپی کنید.
# expense_manager_agent/callbacks.py

import hashlib
from google.genai import types
from google.adk.agents.callback_context import CallbackContext
from google.adk.models.llm_request import LlmRequest


def modify_image_data_in_history(
    callback_context: CallbackContext, llm_request: LlmRequest
) -> None:
    # The following code will modify the request sent to LLM
    # We will only keep image data in the last 3 user messages using a reverse and counter approach

    # Count how many user messages we've processed
    user_message_count = 0

    # Process the reversed list
    for content in reversed(llm_request.contents):
        # Only count for user manual query, not function call
        if (content.role == "user") and (content.parts[0].function_response is None):
            user_message_count += 1
            modified_content_parts = []

            # Check any missing image ID placeholder for any image data
            # Then remove image data from conversation history if more than 3 user messages
            for idx, part in enumerate(content.parts):
                if part.inline_data is None:
                    modified_content_parts.append(part)
                    continue

                if (
                    (idx + 1 >= len(content.parts))
                    or (content.parts[idx + 1].text is None)
                    or (not content.parts[idx + 1].text.startswith("[IMAGE-ID "))
                ):
                    # Generate hash ID for the image and add a placeholder
                    image_data = part.inline_data.data
                    hasher = hashlib.sha256(image_data)
                    image_hash_id = hasher.hexdigest()[:12]
                    placeholder = f"[IMAGE-ID {image_hash_id}]"

                    # Only keep image data in the last 3 user messages
                    if user_message_count <= 3:
                        modified_content_parts.append(part)

                    modified_content_parts.append(types.Part(text=placeholder))

                else:
                    # Only keep image data in the last 3 user messages
                    if user_message_count <= 3:
                        modified_content_parts.append(part)

            # This will modify the contents inside the llm_request
            content.parts = modified_content_parts
۶. 🚀 نکتهی کلیدی
طراحی عاملی با تعاملات و قابلیتهای پیچیده، مستلزم آن است که ما یک راهنمای به اندازه کافی خوب برای هدایت عامل پیدا کنیم تا بتواند آنطور که ما میخواهیم رفتار کند.
پیش از این، ما مکانیزمی در مورد نحوه مدیریت دادههای تصویر در تاریخچه مکالمه داشتیم و همچنین ابزارهایی داشتیم که ممکن است استفاده از آنها ساده نباشد، مانند search_relevant_receipts_by_natural_language_query. ما همچنین میخواهیم که اپراتور بتواند تصویر صحیح رسید را جستجو و بازیابی کند. این بدان معناست که ما باید تمام این اطلاعات را به درستی در یک ساختار سریع و مناسب منتقل کنیم.
از عامل میخواهیم که خروجی را به فرمت markdown زیر ساختار دهد تا فرآیند تفکر، پاسخ نهایی و پیوست (در صورت وجود) تجزیه و تحلیل شود.
# THINKING PROCESS

Thinking process here

# FINAL RESPONSE

Response to the user here

Attachments put inside json block

{
    "attachments": [
      "[IMAGE-ID <hash-id-1>]",
      "[IMAGE-ID <hash-id-2>]",
      ...
    ]
}
بیایید با اعلان زیر شروع کنیم تا به انتظارات اولیه خود از رفتار عامل مدیریت هزینه دست یابیم. فایل task_prompt.md باید از قبل در دایرکتوری کاری فعلی ما وجود داشته باشد، اما باید آن را به دایرکتوری cost_manager_agent منتقل کنیم. دستور زیر را برای انتقال آن اجرا کنید.
mv task_prompt.md expense_manager_agent/task_prompt.md
۷. 🚀 آزمایش عامل
حالا بیایید سعی کنیم از طریق CLI با agent ارتباط برقرار کنیم، دستور زیر را اجرا کنید
uv run adk run expense_manager_agent
خروجی مانند این را نشان میدهد، که در آن میتوانید به نوبت با اپراتور چت کنید، با این حال فقط میتوانید از طریق این رابط متن ارسال کنید.
Log setup complete: /tmp/agents_log/agent.xxxx_xxx.log
To access latest log: tail -F /tmp/agents_log/agent.latest.log
Running agent root_agent, type exit to exit.
user: hello
[root_agent]: Hello there! How can I help you today?
user:
اکنون، علاوه بر تعامل با رابط خط فرمان (CLI)، ADK به ما امکان میدهد یک رابط کاربری توسعه (Development UI) نیز برای تعامل و بررسی اتفاقات در طول تعامل داشته باشیم. دستور زیر را برای شروع سرور رابط کاربری توسعه محلی اجرا کنید.
uv run adk web --port 8080
خروجی مانند مثال زیر تولید میشود، به این معنی که ما از قبل میتوانیم به رابط وب دسترسی داشته باشیم.
INFO:     Started server process [xxxx]
INFO:     Waiting for application startup.

+-----------------------------------------------------------------------------+
| ADK Web Server started                                                      |
|                                                                             |
| For local testing, access at http://localhost:8080.                         |
+-----------------------------------------------------------------------------+

INFO:     Application startup complete.
INFO:     Uvicorn running on http://0.0.0.0:8080 (Press CTRL+C to quit)
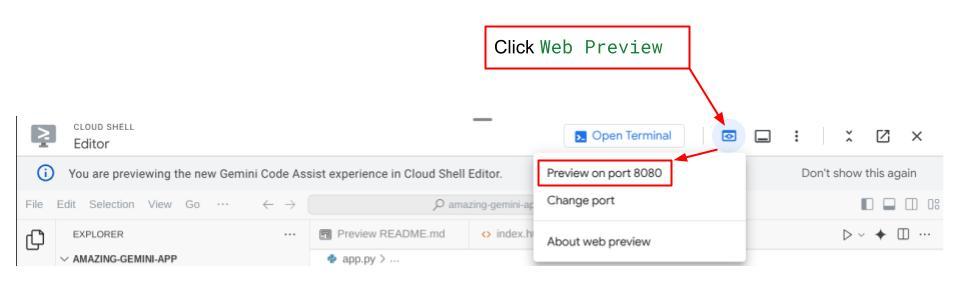
اکنون، برای بررسی آن، روی دکمه پیشنمایش وب در قسمت بالای ویرایشگر Cloud Shell خود کلیک کنید و پیشنمایش را روی پورت ۸۰۸۰ انتخاب کنید.

صفحه وب زیر را مشاهده خواهید کرد که در آن میتوانید عاملهای موجود را از طریق دکمه کشویی بالا سمت چپ انتخاب کنید (در مورد ما باید cost_manager_agent باشد) و با ربات تعامل داشته باشید. در پنجره سمت چپ، اطلاعات زیادی در مورد جزئیات گزارش در طول زمان اجرای عامل مشاهده خواهید کرد.

بیایید چند کار را امتحان کنیم! این دو نمونه رسید را آپلود کنید (منبع: مجموعه دادههای چهره در آغوش گرفته mousserlane/id_receipt_dataset ). روی هر تصویر کلیک راست کرده و گزینه Save Image as.. را انتخاب کنید (این کار تصویر رسید را دانلود میکند)، سپس با کلیک روی آیکون "clip" فایل را در ربات آپلود کنید و بگویید که میخواهید این رسیدها را ذخیره کنید.


پس از آن، کوئریهای زیر را برای جستجو یا بازیابی فایل امتحان کنید.
- «جزئیات هزینهها و مجموع آنها را در طول سال ۲۰۲۳ ارائه دهید»
- «فایل رسید از Indomaret را به من بدهید»
وقتی از برخی ابزارها استفاده میکند، میتوانید بررسی کنید که در رابط کاربری توسعه چه اتفاقی میافتد.

ببینید که عامل چگونه به شما پاسخ میدهد و بررسی کنید که آیا با تمام قوانین ارائه شده در prompt داخل task_prompt.py مطابقت دارد یا خیر. تبریک میگویم! اکنون شما یک عامل توسعهی کاملاً فعال دارید.
حالا وقتشه که اون رو با رابط کاربری مناسب و زیبا و قابلیتهای آپلود و دانلود فایل تصویر تکمیل کنیم.
۸. 🚀 ساخت سرویس فرانتاند با استفاده از Gradio
ما یک رابط وب چت خواهیم ساخت که به این شکل است
این شامل یک رابط چت با یک فیلد ورودی برای کاربران است تا متن ارسال کنند و فایل(های) تصویر رسید را آپلود کنند.
ما سرویس frontend را با استفاده از Gradio خواهیم ساخت.
یک فایل جدید ایجاد کنید و نام آن را frontend.py بگذارید.
touch frontend.py
سپس کد زیر را کپی کرده و ذخیره کنید
import mimetypes
import gradio as gr
import requests
import base64
from typing import List, Dict, Any
from settings import get_settings
from PIL import Image
import io
from schema import ImageData, ChatRequest, ChatResponse


SETTINGS = get_settings()


def encode_image_to_base64_and_get_mime_type(image_path: str) -> ImageData:
    """Encode a file to base64 string and get MIME type.

    Reads an image file and returns the base64-encoded image data and its MIME type.

    Args:
        image_path: Path to the image file to encode.

    Returns:
        ImageData object containing the base64 encoded image data and its MIME type.
    """
    # Read the image file
    with open(image_path, "rb") as file:
        image_content = file.read()

    # Get the mime type
    mime_type = mimetypes.guess_type(image_path)[0]

    # Base64 encode the image
    base64_data = base64.b64encode(image_content).decode("utf-8")

    # Return as ImageData object
    return ImageData(serialized_image=base64_data, mime_type=mime_type)


def decode_base64_to_image(base64_data: str) -> Image.Image:
    """Decode a base64 string to PIL Image.

    Converts a base64-encoded image string back to a PIL Image object
    that can be displayed or processed further.

    Args:
        base64_data: Base64 encoded string of the image.

    Returns:
        PIL Image object of the decoded image.
    """
    # Decode the base64 string and convert to PIL Image
    image_data = base64.b64decode(base64_data)
    image_buffer = io.BytesIO(image_data)
    image = Image.open(image_buffer)

    return image


def get_response_from_llm_backend(
    message: Dict[str, Any],
    history: List[Dict[str, Any]],
) -> List[str | gr.Image]:
    """Send the message and history to the backend and get a response.

    Args:
        message: Dictionary containing the current message with 'text' and optional 'files' keys.
        history: List of previous message dictionaries in the conversation.

    Returns:
        List containing text response and any image attachments from the backend service.
    """
    # Extract files and convert to base64
    image_data = []
    if uploaded_files := message.get("files", []):
        for file_path in uploaded_files:
            image_data.append(encode_image_to_base64_and_get_mime_type(file_path))

    # Prepare the request payload
    payload = ChatRequest(
        text=message["text"],
        files=image_data,
        session_id="default_session",
        user_id="default_user",
    )

    # Send request to backend
    try:
        response = requests.post(SETTINGS.BACKEND_URL, json=payload.model_dump())
        response.raise_for_status()  # Raise exception for HTTP errors

        result = ChatResponse(**response.json())
        if result.error:
            return [f"Error: {result.error}"]

        chat_responses = []

        if result.thinking_process:
            chat_responses.append(
                gr.ChatMessage(
                    role="assistant",
                    content=result.thinking_process,
                    metadata={"title": "🧠 Thinking Process"},
                )
            )

        chat_responses.append(gr.ChatMessage(role="assistant", content=result.response))

        if result.attachments:
            for attachment in result.attachments:
                image_data = attachment.serialized_image
                chat_responses.append(gr.Image(decode_base64_to_image(image_data)))

        return chat_responses
    except requests.exceptions.RequestException as e:
        return [f"Error connecting to backend service: {str(e)}"]


if __name__ == "__main__":
    demo = gr.ChatInterface(
        get_response_from_llm_backend,
        title="Personal Expense Assistant",
        description="This assistant can help you to store receipts data, find receipts, and track your expenses during certain period.",
        type="messages",
        multimodal=True,
        textbox=gr.MultimodalTextbox(file_count="multiple", file_types=["image"]),
    )

    demo.launch(
        server_name="0.0.0.0",
        server_port=8080,
    )
پس از آن، میتوانیم سرویس frontend را با دستور زیر اجرا کنیم. فراموش نکنید که نام فایل main.py را به frontend.py تغییر دهید.
uv run frontend.py
خروجی مشابه این را در کنسول ابری خود مشاهده خواهید کرد.
* Running on local URL:  http://0.0.0.0:8080

To create a public link, set `share=True` in `launch()`.
پس از آن میتوانید با نگه داشتن کلید Ctrl و کلیک روی لینک URL محلی، رابط وب را بررسی کنید. همچنین میتوانید با کلیک روی دکمه پیشنمایش وب در سمت راست بالای ویرایشگر ابری و انتخاب پیشنمایش روی پورت ۸۰۸۰، به برنامه frontend دسترسی پیدا کنید.
رابط وب را مشاهده خواهید کرد، با این حال هنگام تلاش برای ارسال چت به دلیل عدم راهاندازی سرویس backend، خطای مورد انتظار را دریافت خواهید کرد.

حالا، اجازه دهید سرویس اجرا شود و فعلاً آن را متوقف نکنید. ما سرویس backend را در یک تب ترمینال دیگر اجرا خواهیم کرد.
توضیح کد
در این کد frontend، ابتدا به کاربر امکان ارسال متن و آپلود چندین فایل را میدهیم. Gradio به ما این امکان را میدهد که این نوع قابلیت را با متد gr.ChatInterface همراه با gr.MultimodalTextbox ایجاد کنیم.
حالا قبل از ارسال فایل و متن به backend، باید mimetype فایل را همانطور که backend به آن نیاز دارد، تشخیص دهیم. همچنین باید بایت فایل تصویر را به base64 کدگذاری کرده و آن را همراه با mimetype ارسال کنیم.
class ImageData(BaseModel):
    """Model for image data with hash identifier.

    Attributes:
        serialized_image: Optional Base64 encoded string of the image content.
        mime_type: MIME type of the image.
    """

    serialized_image: str
    mime_type: str
طرحواره مورد استفاده برای تعامل frontend و backend در schema.py تعریف شده است. ما از Pydantic BaseModel برای اعمال اعتبارسنجی دادهها در طرحواره استفاده میکنیم.
هنگام دریافت پاسخ، ما از قبل بخش فرآیند تفکر، پاسخ نهایی و پیوست را از هم جدا کردهایم. بنابراین میتوانیم از کامپوننت Gradio برای نمایش هر کامپوننت به همراه کامپوننت UI استفاده کنیم.
class ChatResponse(BaseModel):
    """Model for a chat response.

    Attributes:
        response: The text response from the model.
        thinking_process: Optional thinking process of the model.
        attachments: List of image data to be displayed to the user.
        error: Optional error message if something went wrong.
    """

    response: str
    thinking_process: str = ""
    attachments: List[ImageData] = []
    error: Optional[str] = None
۹. 🚀 ساخت سرویس بکاند با استفاده از FastAPI
در مرحله بعد، باید backend را بسازیم که بتواند Agent ما را به همراه سایر اجزا مقداردهی اولیه کند تا بتواند زمان اجرای agent را اجرا کند.
یک فایل جدید ایجاد کنید و نام آن را backend.py بگذارید.
touch backend.py
و کد زیر را کپی کنید
from expense_manager_agent.agent import root_agent as expense_manager_agent
from google.adk.sessions import InMemorySessionService
from google.adk.runners import Runner
from google.adk.events import Event
from fastapi import FastAPI, Body, Depends
from typing import AsyncIterator
from types import SimpleNamespace
import uvicorn
from contextlib import asynccontextmanager
from utils import (
    extract_attachment_ids_and_sanitize_response,
    download_image_from_gcs,
    extract_thinking_process,
    format_user_request_to_adk_content_and_store_artifacts,
)
from schema import ImageData, ChatRequest, ChatResponse
import logger
from google.adk.artifacts import GcsArtifactService
from settings import get_settings

SETTINGS = get_settings()
APP_NAME = "expense_manager_app"


# Application state to hold service contexts
class AppContexts(SimpleNamespace):
    """A class to hold application contexts with attribute access"""

    session_service: InMemorySessionService = None
    artifact_service: GcsArtifactService = None
    expense_manager_agent_runner: Runner = None


# Initialize application state
app_contexts = AppContexts()


@asynccontextmanager
async def lifespan(app: FastAPI):
    # Initialize service contexts during application startup
    app_contexts.session_service = InMemorySessionService()
    app_contexts.artifact_service = GcsArtifactService(
        bucket_name=SETTINGS.STORAGE_BUCKET_NAME
    )
    app_contexts.expense_manager_agent_runner = Runner(
        agent=expense_manager_agent,  # The agent we want to run
        app_name=APP_NAME,  # Associates runs with our app
        session_service=app_contexts.session_service,  # Uses our session manager
        artifact_service=app_contexts.artifact_service,  # Uses our artifact manager
    )

    logger.info("Application started successfully")
    yield
    logger.info("Application shutting down")
    # Perform cleanup during application shutdown if necessary


# Helper function to get application state as a dependency
async def get_app_contexts() -> AppContexts:
    return app_contexts


# Create FastAPI app
app = FastAPI(title="Personal Expense Assistant API", lifespan=lifespan)


@app.post("/chat", response_model=ChatResponse)
async def chat(
    request: ChatRequest = Body(...),
    app_context: AppContexts = Depends(get_app_contexts),
) -> ChatResponse:
    """Process chat request and get response from the agent"""

    # Prepare the user's message in ADK format and store image artifacts
    content = await format_user_request_to_adk_content_and_store_artifacts(
        request=request,
        app_name=APP_NAME,
        artifact_service=app_context.artifact_service,
    )

    final_response_text = "Agent did not produce a final response."  # Default

    # Use the session ID from the request or default if not provided
    session_id = request.session_id
    user_id = request.user_id

    # Create session if it doesn't exist
    if not await app_context.session_service.get_session(
        app_name=APP_NAME, user_id=user_id, session_id=session_id
    ):
        await app_context.session_service.create_session(
            app_name=APP_NAME, user_id=user_id, session_id=session_id
        )

    try:
        # Process the message with the agent
        # Type annotation: runner.run_async returns an AsyncIterator[Event]
        events_iterator: AsyncIterator[Event] = (
            app_context.expense_manager_agent_runner.run_async(
                user_id=user_id, session_id=session_id, new_message=content
            )
        )
        async for event in events_iterator:  # event has type Event
            # Key Concept: is_final_response() marks the concluding message for the turn
            if event.is_final_response():
                if event.content and event.content.parts:
                    # Extract text from the first part
                    final_response_text = event.content.parts[0].text
                elif event.actions and event.actions.escalate:
                    # Handle potential errors/escalations
                    final_response_text = f"Agent escalated: {event.error_message or 'No specific message.'}"
                break  # Stop processing events once the final response is found

        logger.info(
            "Received final response from agent", raw_final_response=final_response_text
        )

        # Extract and process any attachments and thinking process in the response
        base64_attachments = []
        sanitized_text, attachment_ids = extract_attachment_ids_and_sanitize_response(
            final_response_text
        )
        sanitized_text, thinking_process = extract_thinking_process(sanitized_text)

        # Download images from GCS and replace hash IDs with base64 data
        for image_hash_id in attachment_ids:
            # Download image data and get MIME type
            result = await download_image_from_gcs(
                artifact_service=app_context.artifact_service,
                image_hash=image_hash_id,
                app_name=APP_NAME,
                user_id=user_id,
                session_id=session_id,
            )
            if result:
                base64_data, mime_type = result
                base64_attachments.append(
                    ImageData(serialized_image=base64_data, mime_type=mime_type)
                )

        logger.info(
            "Processed response with attachments",
            sanitized_response=sanitized_text,
            thinking_process=thinking_process,
            attachment_ids=attachment_ids,
        )

        return ChatResponse(
            response=sanitized_text,
            thinking_process=thinking_process,
            attachments=base64_attachments,
        )

    except Exception as e:
        logger.error("Error processing chat request", error_message=str(e))
        return ChatResponse(
            response="", error=f"Error in generating response: {str(e)}"
        )


# Only run the server if this file is executed directly
if __name__ == "__main__":
    uvicorn.run(app, host="0.0.0.0", port=8081)
بعد از آن میتوانیم سرویس backend را اجرا کنیم. به یاد داشته باشید که در مرحله قبل سرویس frontend را درست اجرا کردیم، حالا باید یک ترمینال جدید باز کنیم و سعی کنیم این سرویس backend را اجرا کنیم.
- یک ترمینال جدید ایجاد کنید. در قسمت پایین به ترمینال خود بروید و دکمه "+" را برای ایجاد یک ترمینال جدید پیدا کنید. همچنین میتوانید Ctrl + Shift + C را برای باز کردن ترمینال جدید فشار دهید.

- پس از آن، مطمئن شوید که در دایرکتوری کاری personal-expense-assistant هستید، سپس دستور زیر را اجرا کنید
uv run backend.py
- در صورت موفقیت، خروجی مانند این نمایش داده خواهد شد
INFO:     Started server process [xxxxx]
INFO:     Waiting for application startup.
INFO:     Application startup complete.
INFO:     Uvicorn running on http://0.0.0.0:8081 (Press CTRL+C to quit)
توضیح کد
مقداردهی اولیه ADK Agent، SessionService و ArtifactService
برای اجرای عامل در سرویس backend، باید یک Runner ایجاد کنیم که هم SessionService و هم عامل ما را دریافت کند. SessionService تاریخچه و وضعیت مکالمه را مدیریت میکند، از این رو وقتی با Runner ادغام شود، به عامل ما این قابلیت را میدهد که زمینه مکالمات جاری را دریافت کند.
ما همچنین از ArtifactService برای مدیریت فایل آپلود شده استفاده میکنیم. میتوانید جزئیات بیشتر در مورد ADK Session و Artifacts را اینجا بخوانید.
...

@asynccontextmanager
async def lifespan(app: FastAPI):
    # Initialize service contexts during application startup
    app_contexts.session_service = InMemorySessionService()
    app_contexts.artifact_service = GcsArtifactService(
        bucket_name=SETTINGS.STORAGE_BUCKET_NAME
    )
    app_contexts.expense_manager_agent_runner = Runner(
        agent=expense_manager_agent,  # The agent we want to run
        app_name=APP_NAME,  # Associates runs with our app
        session_service=app_contexts.session_service,  # Uses our session manager
        artifact_service=app_contexts.artifact_service,  # Uses our artifact manager
    )

    logger.info("Application started successfully")
    yield
    logger.info("Application shutting down")
    # Perform cleanup during application shutdown if necessary

...
در این نسخه آزمایشی، ما از InMemorySessionService و GcsArtifactService برای ادغام با agent Runner خود استفاده میکنیم. از آنجایی که تاریخچه مکالمات در حافظه ذخیره میشود، پس از بسته شدن یا راهاندازی مجدد سرویس backend از بین میرود. ما این موارد را در چرخه حیات برنامه FastAPI مقداردهی اولیه میکنیم تا به عنوان وابستگی در مسیر /chat تزریق شوند.
آپلود و دانلود تصویر با GcsArtifactService
تمام تصاویر آپلود شده توسط GcsArtifactService به عنوان مصنوع ذخیره میشوند، میتوانید این را در داخل تابع format_user_request_to_adk_content_and_store_artifacts در utils.py بررسی کنید.
...

# Prepare the user's message in ADK format and store image artifacts
content = await asyncio.to_thread(
    format_user_request_to_adk_content_and_store_artifacts,
    request=request,
    app_name=APP_NAME,
    artifact_service=app_context.artifact_service,
)

...
تمام درخواستهایی که توسط اجراکنندهی عامل پردازش میشوند، باید به صورت types.Content type قالببندی شوند. درون تابع، ما همچنین هر دادهی تصویر را پردازش میکنیم و شناسهی آن را استخراج میکنیم تا با یک شناسهی تصویر جایگزین شود.
مکانیزم مشابهی برای دانلود پیوستها پس از استخراج شناسههای تصویر با استفاده از regex به کار گرفته میشود:
...
sanitized_text, attachment_ids = extract_attachment_ids_and_sanitize_response(
    final_response_text
)
sanitized_text, thinking_process = extract_thinking_process(sanitized_text)

# Download images from GCS and replace hash IDs with base64 data
for image_hash_id in attachment_ids:
    # Download image data and get MIME type
    result = await asyncio.to_thread(
        download_image_from_gcs,
        artifact_service=app_context.artifact_service,
        image_hash=image_hash_id,
        app_name=APP_NAME,
        user_id=user_id,
        session_id=session_id,
    )
...
۱۰. 🚀 آزمون ادغام
اکنون، باید چندین سرویس را در تبهای مختلف کنسول ابری اجرا کنید:
- سرویس frontend روی پورت ۸۰۸۰ اجرا میشود
* Running on local URL:  http://0.0.0.0:8080

To create a public link, set `share=True` in `launch()`.
- سرویس بکاند روی پورت ۸۰۸۱ اجرا میشود
INFO:     Started server process [xxxxx]
INFO:     Waiting for application startup.
INFO:     Application startup complete.
INFO:     Uvicorn running on http://0.0.0.0:8081 (Press CTRL+C to quit)
در وضعیت فعلی، شما باید بتوانید تصاویر رسید خود را آپلود کنید و از طریق برنامه وب روی پورت ۸۰۸۰ به طور یکپارچه با دستیار چت کنید.
روی دکمه پیشنمایش وب در قسمت بالای ویرایشگر Cloud Shell خود کلیک کنید و پیشنمایش را روی پورت ۸۰۸۰ انتخاب کنید.
حالا بیایید کمی با دستیار تعامل داشته باشیم!
رسیدهای زیر را دانلود کنید. محدوده تاریخ دادههای این رسیدها بین سالهای ۲۰۲۳-۲۰۲۴ است و از دستیار بخواهید آن را ذخیره/آپلود کند.
- رسید درایو (منبع مجموعه دادههای چهره در آغوش گرفته
mousserlane/id_receipt_dataset)
چیزهای مختلفی بپرسید
- «هزینههای ماهانه را در طول سالهای ۲۰۲۳-۲۰۲۴ به صورت تفکیکی به من بدهید»
- «رسید تراکنش قهوه را به من نشان بده»
- «فایل رسید یاکینیکو لایک را به من بده»
- و غیره
در اینجا بخشی از تعامل موفق آورده شده است


۱۱. 🚀 استقرار در Cloud Run
حالا، البته که میخواهیم از هر جایی به این برنامهی شگفتانگیز دسترسی داشته باشیم. برای انجام این کار، میتوانیم این برنامه را بستهبندی کرده و در Cloud Run مستقر کنیم. برای این دمو، این سرویس به عنوان یک سرویس عمومی نمایش داده میشود که دیگران میتوانند به آن دسترسی داشته باشند. با این حال، به خاطر داشته باشید که این بهترین روش برای این نوع برنامه نیست زیرا برای برنامههای شخصی مناسبتر است.
در این کدلب، ما هر دو سرویس frontend و backend را در یک کانتینر قرار خواهیم داد. برای مدیریت هر دو سرویس به کمک supervisord نیاز خواهیم داشت. میتوانید فایل supervisord.conf را بررسی کنید و Dockerfile را بررسی کنید که در آن supervisord را به عنوان نقطه ورود تنظیم کردهایم.
در این مرحله، ما تمام فایلهای مورد نیاز برای استقرار برنامههایمان در Cloud Run را داریم، بیایید آن را مستقر کنیم. به ترمینال Cloud Shell بروید و مطمئن شوید که پروژه فعلی با پروژه فعال شما پیکربندی شده است، در غیر این صورت از دستور gcloud configure برای تنظیم شناسه پروژه استفاده کنید:
gcloud config set project [PROJECT_ID]
سپس، دستور زیر را برای استقرار آن در Cloud Run اجرا کنید.
gcloud run deploy personal-expense-assistant \
                  --source . \
                  --port=8080 \
                  --allow-unauthenticated \
                  --env-vars-file=settings.yaml \
                  --memory 1024Mi \
                  --region us-central1
اگر از شما خواسته شد که ایجاد یک رجیستری مصنوعات برای مخزن داکر را تأیید کنید، فقط با Y پاسخ دهید. توجه داشته باشید که ما در اینجا به افراد غیرمجاز اجازه دسترسی میدهیم زیرا این یک برنامه آزمایشی است. توصیه میشود از احراز هویت مناسب برای برنامههای سازمانی و تولیدی خود استفاده کنید.
پس از اتمام نصب، باید لینکی مشابه لینک زیر دریافت کنید:
https://personal-expense-assistant-*******.us-central1.run.app
میتوانید از پنجره ناشناس یا دستگاه همراه خود از برنامه استفاده کنید. باید از قبل فعال باشد.
۱۲. چالش🎯
حالا وقت آن رسیده که مهارتهای اکتشافی خود را تقویت کنید. آیا توانایی لازم برای تغییر کد به گونهای که backend بتواند چندین کاربر را در خود جای دهد را دارید؟ چه اجزایی نیاز به بهروزرسانی دارند؟
۱۳. 🧹 تمیز کردن
برای جلوگیری از تحمیل هزینه به حساب Google Cloud خود برای منابع استفاده شده در این codelab، این مراحل را دنبال کنید:
- در کنسول گوگل کلود، به صفحه مدیریت منابع بروید.
- در لیست پروژهها، پروژهای را که میخواهید حذف کنید انتخاب کنید و سپس روی «حذف» کلیک کنید.
- در کادر محاورهای، شناسه پروژه را تایپ کنید و سپس برای حذف پروژه، روی خاموش کردن کلیک کنید.
- روش دیگر این است که به Cloud Run در کنسول بروید، سرویسی را که اخیراً مستقر کردهاید انتخاب کرده و حذف کنید.