
1. 📖 소개

개인 지출을 모두 관리하기가 귀찮았던 적이 있나요? 저도 마찬가지고요. 따라서 이 Codelab에서는 Gemini 2.5로 구동되는 개인 비용 관리 어시스턴트를 빌드하여 모든 작업을 대신 처리합니다. 업로드된 영수증을 관리하여 커피를 구매하는 데 이미 너무 많은 돈을 썼는지 분석할 수 있습니다.
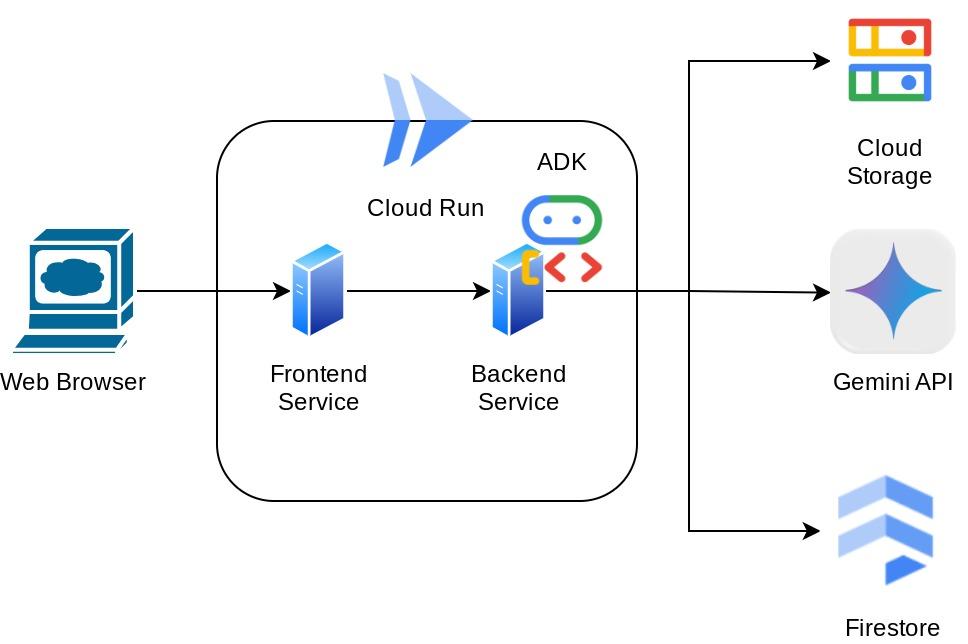
이 어시스턴트는 채팅 웹 인터페이스 형태로 웹브라우저를 통해 액세스할 수 있으며, 여기에서 어시스턴트와 소통하고, 영수증 이미지를 업로드하여 어시스턴트에 저장하도록 요청하거나, 영수증을 검색하여 파일을 가져와 비용 분석을 할 수 있습니다. 이 모든 것이 Google 에이전트 개발 키트 프레임워크를 기반으로 빌드됩니다.
애플리케이션 자체는 프런트엔드와 백엔드라는 두 서비스로 분리되어 있으므로 빠른 프로토타입을 빌드하고 어떤 느낌인지 시도해 볼 수 있으며, 두 서비스를 통합하기 위한 API 계약이 어떻게 보이는지 이해할 수도 있습니다.
Codelab을 통해 다음과 같이 단계별 접근 방식을 사용합니다.
- Google Cloud 프로젝트를 준비하고 필요한 API를 모두 사용 설정합니다.
- Google Cloud Storage에 버킷 설정 및 Firestore에 데이터베이스 설정
- Firestore 색인 생성
- 코딩 환경의 작업공간 설정
- ADK 에이전트 소스 코드, 도구, 프롬프트 등을 구조화합니다.
- ADK 로컬 웹 개발 UI를 사용하여 에이전트 테스트
- Gradio 라이브러리를 사용하여 프런트엔드 서비스(채팅 인터페이스)를 빌드하여 쿼리를 전송하고 영수증 이미지를 업로드합니다.
- ADK 에이전트 코드, SessionService, Artifact Service가 상주하는 FastAPI를 사용하여 백엔드 서비스(HTTP 서버)를 빌드합니다.
- 환경 변수를 관리하고 애플리케이션을 Cloud Run에 배포하는 데 필요한 파일을 설정합니다.
- Cloud Run에 애플리케이션 배포
아키텍처 개요
기본 요건
- Python 사용에 능숙함
- HTTP 서비스를 사용한 기본 풀 스택 아키텍처에 대한 이해
학습할 내용
- Gradio를 사용한 프런트엔드 웹 프로토타입 제작
- FastAPI 및 Pydantic을 사용한 백엔드 서비스 개발
- 여러 기능을 활용하면서 ADK 에이전트 설계
- 도구 사용
- 세션 및 아티팩트 관리
- Gemini에 전송되기 전 입력 수정 콜백 활용
- BuiltInPlanner를 활용하여 계획을 수립해 작업 실행 개선
- ADK 로컬 웹 인터페이스를 통한 빠른 디버깅
- ADK 콜백을 사용하여 프롬프트 엔지니어링 및 Gemini 요청 수정으로 정보 파싱 및 검색을 통해 멀티모달 상호작용을 최적화하는 전략
- Firestore를 벡터 데이터베이스로 사용하는 에이전트 검색 증강 생성
- Pydantic-settings로 YAML 파일의 환경 변수 관리
- Dockerfile을 사용하여 Cloud Run에 애플리케이션을 배포하고 YAML 파일로 환경 변수 제공
필요한 항목
- Chrome 웹브라우저
- Gmail 계정
- 결제가 사용 설정된 Cloud 프로젝트
이 Codelab은 초보자를 포함한 모든 수준의 개발자를 대상으로 하며 샘플 애플리케이션에서 Python을 사용합니다. 하지만 제시된 개념을 이해하는 데 Python 지식이 필요하지는 않습니다.
2. 🚀 시작하기 전에
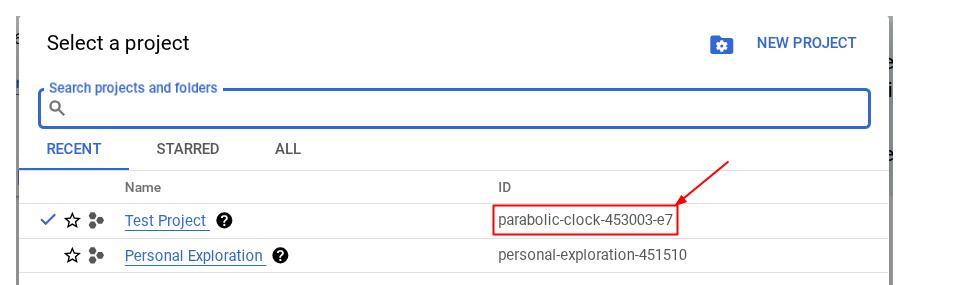
Cloud 콘솔에서 활성 프로젝트 선택
이 Codelab에서는 결제가 사용 설정된 Google Cloud 프로젝트가 이미 있다고 가정합니다. 아직 설치하지 않았다면 아래 안내에 따라 시작하세요.
- Google Cloud 콘솔의 프로젝트 선택기 페이지에서 Google Cloud 프로젝트를 선택하거나 만듭니다.
- Cloud 프로젝트에 결제가 사용 설정되어 있어야 하므로 프로젝트에 결제가 사용 설정되어 있는지 확인하는 방법을 알아보세요.

Firestore 데이터베이스 준비
다음으로 Firestore 데이터베이스도 만들어야 합니다. 네이티브 모드의 Firestore는 자동 확장, 고성능, 간편한 애플리케이션 개발을 위해 설계된 NoSQL 문서 데이터베이스입니다. 또한 실험실의 검색 증강 생성 기법을 지원할 수 있는 벡터 데이터베이스로도 작동할 수 있습니다.
- 검색창에서 'firestore'를 검색하고 Firestore 제품을 클릭합니다.

- 그런 다음 Firestore 데이터베이스 만들기 버튼을 클릭합니다.
- (기본값)을 데이터베이스 ID 이름으로 사용하고 Standard Edition을 선택된 상태로 유지합니다. 이 실습 데모에서는 보안 규칙이 열려 있는 Firestore 네이티브를 사용합니다.
- 또한 이 데이터베이스에는 무료 등급 사용량 YEAY! 그런 다음 데이터베이스 만들기 버튼을 클릭합니다.

이 단계를 완료하면 방금 만든 Firestore 데이터베이스로 리디렉션됩니다.
Cloud Shell 터미널에서 Cloud 프로젝트 설정
- bq가 미리 로드되어 제공되는 Google Cloud에서 실행되는 명령줄 환경인 Cloud Shell을 사용합니다. Google Cloud 콘솔 상단에서 Cloud Shell 활성화를 클릭합니다.

- Cloud Shell에 연결되면 다음 명령어를 사용하여 이미 인증되었는지, 프로젝트가 프로젝트 ID로 설정되었는지 확인합니다.
gcloud auth list
- Cloud Shell에서 다음 명령어를 실행하여 gcloud 명령어가 프로젝트를 알고 있는지 확인합니다.
gcloud config list project
- 프로젝트가 설정되지 않은 경우 다음 명령어를 사용하여 설정합니다.
gcloud config set project <YOUR_PROJECT_ID>
또는 콘솔에서 PROJECT_ID ID를 확인할 수도 있습니다.

클릭하면 오른쪽에 모든 프로젝트와 프로젝트 ID가 표시됩니다.
- 아래에 표시된 명령어를 통해 필수 API를 사용 설정합니다. 몇 분 정도 걸릴 수 있으니 잠시 기다려 주세요.
gcloud services enable aiplatform.googleapis.com \
                       firestore.googleapis.com \
                       run.googleapis.com \
                       cloudbuild.googleapis.com \
                       cloudresourcemanager.googleapis.com
명령어가 성공적으로 실행되면 아래와 비슷한 메시지가 표시됩니다.
Operation "operations/..." finished successfully.
gcloud 명령의 대안은 콘솔을 통해 각 제품을 검색하거나 이 링크를 사용하는 것입니다.
API가 누락된 경우 구현 과정에서 언제든지 사용 설정할 수 있습니다.
gcloud 명령어 및 사용법은 문서를 참조하세요.
Google Cloud Storage 버킷 준비
다음으로 동일한 터미널에서 업로드된 파일을 저장할 GCS 버킷을 준비해야 합니다. 다음 명령어를 실행하여 버킷을 만듭니다. 개인 비용 도우미 영수증과 관련된 고유하면서도 적절한 버킷 이름이 필요하므로 프로젝트 ID와 결합된 다음 버킷 이름을 사용합니다.
gsutil mb -l us-central1 gs://personal-expense-{your-project-id}
다음과 같은 출력이 표시됩니다.
Creating gs://personal-expense-{your-project-id}
브라우저 왼쪽 상단의 탐색 메뉴로 이동하여 Cloud Storage -> Bucket을 선택하면 이를 확인할 수 있습니다.

검색을 위한 Firestore 색인 만들기
Firestore는 기본적으로 NoSQL 데이터베이스로, 데이터 모델에서 뛰어난 성능과 유연성을 제공하지만 복잡한 쿼리에는 제한이 있습니다. 복합 다중 필드 쿼리와 벡터 검색을 활용할 계획이므로 먼저 색인을 만들어야 합니다. 자세한 내용은 이 문서를 참고하세요.
- 다음 명령어를 실행하여 복합 쿼리를 지원하는 색인을 만듭니다.
gcloud firestore indexes composite create \
        --collection-group=personal-expense-assistant-receipts \
        --field-config field-path=total_amount,order=ASCENDING \
        --field-config field-path=transaction_time,order=ASCENDING \
        --field-config field-path=__name__,order=ASCENDING \
        --database="(default)"
- 벡터 검색을 지원하려면 다음을 실행하세요.
gcloud firestore indexes composite create \
        --collection-group="personal-expense-assistant-receipts" \
        --query-scope=COLLECTION \
        --field-config field-path="embedding",vector-config='{"dimension":"768", "flat": "{}"}' \
        --database="(default)"
Cloud 콘솔에서 Firestore를 방문하여 생성된 색인을 확인할 수 있습니다. (기본값) 데이터베이스 인스턴스를 클릭하고 탐색 메뉴에서 색인을 선택합니다.

Cloud Shell 편집기로 이동하여 애플리케이션 작업 디렉터리 설정
이제 코드 편집기를 설정하여 코딩 작업을 할 수 있습니다. 이를 위해 Cloud Shell 편집기를 사용합니다.
- 편집기 열기 버튼을 클릭하면 Cloud Shell 편집기가 열립니다. 여기에 코드를 작성할 수 있습니다.

- 다음으로, 셸이 이미 보유한 올바른 프로젝트 ID로 구성되어 있는지 확인해야 합니다. 터미널에서 $아이콘 앞에 괄호 안에 값이 표시되면(아래 스크린샷에서 값은 'adk-multimodal-tool'임) 이 값은 활성 셸 세션에 구성된 프로젝트를 보여줍니다.

표시된 값이 이미 올바른 경우 다음 명령어를 건너뛸 수 있습니다. 하지만 올바르지 않거나 누락된 경우 다음 명령어를 실행합니다.
gcloud config set project <YOUR_PROJECT_ID>
- 다음으로 GitHub에서 이 Codelab의 템플릿 작업 디렉터리를 클론하고 다음 명령어를 실행합니다. personal-expense-assistant 디렉터리에 작업 디렉터리가 생성됩니다.
git clone https://github.com/alphinside/personal-expense-assistant-adk-codelab-starter.git personal-expense-assistant
- 그런 다음 Cloud Shell 편집기의 상단 섹션으로 이동하여 파일->폴더 열기를 클릭하고 사용자 이름 디렉터리를 찾아 personal-expense-assistant 디렉터리를 찾은 다음 확인 버튼을 클릭합니다. 이렇게 하면 선택한 디렉터리가 기본 작업 디렉터리가 됩니다. 이 예시에서 사용자 이름은 alvinprayuda이므로 디렉터리 경로는 아래와 같습니다.


이제 Cloud Shell 편집기가 다음과 같이 표시됩니다.

환경 설정
Python 가상 환경 준비
다음 단계는 개발 환경을 준비하는 것입니다. 현재 활성 터미널은 personal-expense-assistant 작업 디렉터리 내에 있어야 합니다. 이 Codelab에서는 Python 3.12를 사용하고 uv python 프로젝트 관리자를 사용하여 Python 버전과 가상 환경을 만들고 관리할 필요성을 간소화합니다.
- 터미널을 아직 열지 않은 경우 터미널 -> 새 터미널을 클릭하여 열거나 Ctrl + Shift + C를 사용합니다. 그러면 브라우저 하단에 터미널 창이 열립니다.

- 이제
uv를 사용하여 가상 환경을 초기화합니다. 다음 명령어를 실행하세요.
cd ~/personal-expense-assistant
uv sync --frozen
이렇게 하면 .venv 디렉터리가 생성되고 종속 항목이 설치됩니다. pyproject.toml을 간단히 살펴보면 다음과 같이 표시된 종속 항목에 관한 정보를 확인할 수 있습니다.
dependencies = [
    "datasets>=3.5.0",
    "google-adk==1.18",
    "google-cloud-firestore>=2.20.1",
    "gradio>=5.23.1",
    "pydantic>=2.10.6",
    "pydantic-settings[yaml]>=2.8.1",
]
설정 구성 파일
이제 이 프로젝트의 구성 파일을 설정해야 합니다. YAML 파일에서 구성을 읽기 위해 pydantic-settings를 사용합니다.
settings.yaml.example 내에 파일 템플릿이 이미 제공되어 있으므로 파일을 복사하고 settings.yaml로 이름을 바꿔야 합니다. 다음 명령어를 실행하여 파일을 만듭니다.
cp settings.yaml.example settings.yaml
그런 다음 다음 값을 파일에 복사합니다.
GCLOUD_LOCATION: "us-central1"
GCLOUD_PROJECT_ID: "your-project-id"
BACKEND_URL: "http://localhost:8081/chat"
STORAGE_BUCKET_NAME: "personal-expense-{your-project-id}"
DB_COLLECTION_NAME: "personal-expense-assistant-receipts"
이 Codelab에서는 GCLOUD_LOCATION, BACKEND_URL, 및 DB_COLLECTION_NAME의 사전 구성된 값을 사용합니다 .
이제 다음 단계인 에이전트와 서비스 빌드로 넘어갈 수 있습니다.
3. 🚀 Google ADK 및 Gemini 2.5를 사용하여 에이전트 빌드
ADK 디렉터리 구조 소개
먼저 ADK에서 제공하는 기능과 에이전트를 빌드하는 방법을 살펴보겠습니다. ADK 전체 문서는 이 URL에서 확인할 수 있습니다 . ADK는 CLI 명령어 실행 내에서 다양한 유틸리티를 제공합니다. 일부 예는 다음과 같습니다.
- 에이전트 디렉터리 구조 설정
- CLI 입력 출력을 통해 상호작용을 빠르게 시도해 보세요.
- 로컬 개발 UI 웹 인터페이스를 빠르게 설정
이제 CLI 명령어를 사용하여 에이전트 디렉터리 구조를 만들어 보겠습니다. 다음 명령어를 실행합니다.
uv run adk create expense_manager_agent
메시지가 표시되면 모델 gemini-2.5-flash 및 Vertex AI 백엔드를 선택합니다. 그러면 마법사에서 프로젝트 ID와 위치를 묻습니다. Enter 키를 눌러 기본 옵션을 수락하거나 필요에 따라 변경할 수 있습니다. 이 실습의 앞부분에서 만든 올바른 프로젝트 ID를 사용하고 있는지 다시 한번 확인하세요. 출력은 다음과 같습니다.
Choose a model for the root agent:
1. gemini-2.5-flash
2. Other models (fill later)
Choose model (1, 2): 1
1. Google AI
2. Vertex AI
Choose a backend (1, 2): 2

You need an existing Google Cloud account and project, check out this link for details:
https://google.github.io/adk-docs/get-started/quickstart/#gemini---google-cloud-vertex-ai

Enter Google Cloud project ID [going-multimodal-lab]:
Enter Google Cloud region [us-central1]:

Agent created in /home/username/personal-expense-assistant/expense_manager_agent:
- .env
- __init__.py
- agent.py
다음 에이전트 디렉터리 구조가 생성됩니다.
expense_manager_agent/
├── __init__.py
├── .env
├── agent.py
init.py 및 agent.py를 검사하면 다음 코드가 표시됩니다.
# __init__.py

from . import agent
# agent.py

from google.adk.agents import Agent

root_agent = Agent(
    model='gemini-2.5-flash',
    name='root_agent',
    description='A helpful assistant for user questions.',
    instruction='Answer user questions to the best of your knowledge',
)
이제 다음을 실행하여 테스트할 수 있습니다.
uv run adk run expense_manager_agent
테스트를 완료하면 exit를 입력하거나 Ctrl+D를 눌러 에이전트를 종료할 수 있습니다.
지출 관리자 에이전트 빌드
지출 관리 에이전트를 빌드해 보겠습니다. expense_manager_agent/agent.py 파일을 열고 root_agent가 포함된 아래 코드를 복사합니다.
# expense_manager_agent/agent.py

from google.adk.agents import Agent
from expense_manager_agent.tools import (
    store_receipt_data,
    search_receipts_by_metadata_filter,
    search_relevant_receipts_by_natural_language_query,
    get_receipt_data_by_image_id,
)
from expense_manager_agent.callbacks import modify_image_data_in_history
import os
from settings import get_settings
from google.adk.planners import BuiltInPlanner
from google.genai import types

SETTINGS = get_settings()
os.environ["GOOGLE_CLOUD_PROJECT"] = SETTINGS.GCLOUD_PROJECT_ID
os.environ["GOOGLE_CLOUD_LOCATION"] = SETTINGS.GCLOUD_LOCATION
os.environ["GOOGLE_GENAI_USE_VERTEXAI"] = "TRUE"

# Get the code file directory path and read the task prompt file
current_dir = os.path.dirname(os.path.abspath(__file__))
prompt_path = os.path.join(current_dir, "task_prompt.md")
with open(prompt_path, "r") as file:
    task_prompt = file.read()

root_agent = Agent(
    name="expense_manager_agent",
    model="gemini-2.5-flash",
    description=(
        "Personal expense agent to help user track expenses, analyze receipts, and manage their financial records"
    ),
    instruction=task_prompt,
    tools=[
        store_receipt_data,
        get_receipt_data_by_image_id,
        search_receipts_by_metadata_filter,
        search_relevant_receipts_by_natural_language_query,
    ],
    planner=BuiltInPlanner(
        thinking_config=types.ThinkingConfig(
            thinking_budget=2048,
        )
    ),
    before_model_callback=modify_image_data_in_history,
)
코드 설명
이 스크립트에는 다음 항목을 초기화하는 에이전트 초기화가 포함되어 있습니다.
- 사용할 모델을
gemini-2.5-flash로 설정합니다. task_prompt.md에서 읽어오는 시스템 프롬프트로 에이전트 설명과 요청 사항을 설정합니다.- 에이전트 기능을 지원하는 데 필요한 도구 제공
- Gemini 2.5 Flash 사고 능력을 사용하여 최종 응답 또는 실행을 생성하기 전에 계획을 수립합니다.
- 예측을 하기 전에 전송되는 이미지 데이터 수를 제한하기 위해 Gemini에 요청을 보내기 전에 콜백 인터셉트 설정
4. 🚀 에이전트 도구 구성
비용 관리자 에이전트는 다음 기능을 갖습니다.
- 영수증 이미지에서 데이터를 추출하고 데이터와 파일을 저장합니다.
- 비용 데이터에 대한 정확한 검색
- 비용 데이터에 대한 컨텍스트 검색
따라서 이 기능을 지원하는 적절한 도구가 필요합니다. expense_manager_agent 디렉터리 아래에 새 파일을 만들고 이름을 tools.py로 지정합니다.
touch expense_manager_agent/tools.py
expense_manage_agent/tools.py를 열고 아래 코드를 복사합니다.
# expense_manager_agent/tools.py

import datetime
from typing import Dict, List, Any
from google.cloud import firestore
from google.cloud.firestore_v1.vector import Vector
from google.cloud.firestore_v1 import FieldFilter
from google.cloud.firestore_v1.base_query import And
from google.cloud.firestore_v1.base_vector_query import DistanceMeasure
from settings import get_settings
from google import genai

SETTINGS = get_settings()
DB_CLIENT = firestore.Client(
    project=SETTINGS.GCLOUD_PROJECT_ID
)  # Will use "(default)" database
COLLECTION = DB_CLIENT.collection(SETTINGS.DB_COLLECTION_NAME)
GENAI_CLIENT = genai.Client(
    vertexai=True, location=SETTINGS.GCLOUD_LOCATION, project=SETTINGS.GCLOUD_PROJECT_ID
)
EMBEDDING_DIMENSION = 768
EMBEDDING_FIELD_NAME = "embedding"
INVALID_ITEMS_FORMAT_ERR = """
Invalid items format. Must be a list of dictionaries with 'name', 'price', and 'quantity' keys."""
RECEIPT_DESC_FORMAT = """
Store Name: {store_name}
Transaction Time: {transaction_time}
Total Amount: {total_amount}
Currency: {currency}
Purchased Items:
{purchased_items}
Receipt Image ID: {receipt_id}
"""


def sanitize_image_id(image_id: str) -> str:
    """Sanitize image ID by removing any leading/trailing whitespace."""
    if image_id.startswith("[IMAGE-"):
        image_id = image_id.split("ID ")[1].split("]")[0]

    return image_id.strip()


def store_receipt_data(
    image_id: str,
    store_name: str,
    transaction_time: str,
    total_amount: float,
    purchased_items: List[Dict[str, Any]],
    currency: str = "IDR",
) -> str:
    """
    Store receipt data in the database.

    Args:
        image_id (str): The unique identifier of the image. For example IMAGE-POSITION 0-ID 12345,
            the ID of the image is 12345.
        store_name (str): The name of the store.
        transaction_time (str): The time of purchase, in ISO format ("YYYY-MM-DDTHH:MM:SS.ssssssZ").
        total_amount (float): The total amount spent.
        purchased_items (List[Dict[str, Any]]): A list of items purchased with their prices. Each item must have:
            - name (str): The name of the item.
            - price (float): The price of the item.
            - quantity (int, optional): The quantity of the item. Defaults to 1 if not provided.
        currency (str, optional): The currency of the transaction, can be derived from the store location.
            If unsure, default is "IDR".

    Returns:
        str: A success message with the receipt ID.

    Raises:
        Exception: If the operation failed or input is invalid.
    """
    try:
        # In case of it provide full image placeholder, extract the id string
        image_id = sanitize_image_id(image_id)

        # Check if the receipt already exists
        doc = get_receipt_data_by_image_id(image_id)

        if doc:
            return f"Receipt with ID {image_id} already exists"

        # Validate transaction time
        if not isinstance(transaction_time, str):
            raise ValueError(
                "Invalid transaction time: must be a string in ISO format 'YYYY-MM-DDTHH:MM:SS.ssssssZ'"
            )
        try:
            datetime.datetime.fromisoformat(transaction_time.replace("Z", "+00:00"))
        except ValueError:
            raise ValueError(
                "Invalid transaction time format. Must be in ISO format 'YYYY-MM-DDTHH:MM:SS.ssssssZ'"
            )

        # Validate items format
        if not isinstance(purchased_items, list):
            raise ValueError(INVALID_ITEMS_FORMAT_ERR)

        for _item in purchased_items:
            if (
                not isinstance(_item, dict)
                or "name" not in _item
                or "price" not in _item
            ):
                raise ValueError(INVALID_ITEMS_FORMAT_ERR)

            if "quantity" not in _item:
                _item["quantity"] = 1

        # Create a combined text from all receipt information for better embedding
        result = GENAI_CLIENT.models.embed_content(
            model="text-embedding-004",
            contents=RECEIPT_DESC_FORMAT.format(
                store_name=store_name,
                transaction_time=transaction_time,
                total_amount=total_amount,
                currency=currency,
                purchased_items=purchased_items,
                receipt_id=image_id,
            ),
        )

        embedding = result.embeddings[0].values

        doc = {
            "receipt_id": image_id,
            "store_name": store_name,
            "transaction_time": transaction_time,
            "total_amount": total_amount,
            "currency": currency,
            "purchased_items": purchased_items,
            EMBEDDING_FIELD_NAME: Vector(embedding),
        }

        COLLECTION.add(doc)

        return f"Receipt stored successfully with ID: {image_id}"
    except Exception as e:
        raise Exception(f"Failed to store receipt: {str(e)}")


def search_receipts_by_metadata_filter(
    start_time: str,
    end_time: str,
    min_total_amount: float = -1.0,
    max_total_amount: float = -1.0,
) -> str:
    """
    Filter receipts by metadata within a specific time range and optionally by amount.

    Args:
        start_time (str): The start datetime for the filter (in ISO format, e.g. 'YYYY-MM-DDTHH:MM:SS.ssssssZ').
        end_time (str): The end datetime for the filter (in ISO format, e.g. 'YYYY-MM-DDTHH:MM:SS.ssssssZ').
        min_total_amount (float): The minimum total amount for the filter (inclusive). Defaults to -1.
        max_total_amount (float): The maximum total amount for the filter (inclusive). Defaults to -1.

    Returns:
        str: A string containing the list of receipt data matching all applied filters.

    Raises:
        Exception: If the search failed or input is invalid.
    """
    try:
        # Validate start and end times
        if not isinstance(start_time, str) or not isinstance(end_time, str):
            raise ValueError("start_time and end_time must be strings in ISO format")
        try:
            datetime.datetime.fromisoformat(start_time.replace("Z", "+00:00"))
            datetime.datetime.fromisoformat(end_time.replace("Z", "+00:00"))
        except ValueError:
            raise ValueError("start_time and end_time must be strings in ISO format")

        # Start with the base collection reference
        query = COLLECTION

        # Build the composite query by properly chaining conditions
        # Notes that this demo assume 1 user only,
        # need to refactor the query for multiple user
        filters = [
            FieldFilter("transaction_time", ">=", start_time),
            FieldFilter("transaction_time", "<=", end_time),
        ]

        # Add optional filters
        if min_total_amount != -1:
            filters.append(FieldFilter("total_amount", ">=", min_total_amount))

        if max_total_amount != -1:
            filters.append(FieldFilter("total_amount", "<=", max_total_amount))

        # Apply the filters
        composite_filter = And(filters=filters)
        query = query.where(filter=composite_filter)

        # Execute the query and collect results
        search_result_description = "Search by Metadata Results:\n"
        for doc in query.stream():
            data = doc.to_dict()
            data.pop(
                EMBEDDING_FIELD_NAME, None
            )  # Remove embedding as it's not needed for display

            search_result_description += f"\n{RECEIPT_DESC_FORMAT.format(**data)}"

        return search_result_description
    except Exception as e:
        raise Exception(f"Error filtering receipts: {str(e)}")


def search_relevant_receipts_by_natural_language_query(
    query_text: str, limit: int = 5
) -> str:
    """
    Search for receipts with content most similar to the query using vector search.
    This tool can be use for user query that is difficult to translate into metadata filters.
    Such as store name or item name which sensitive to string matching.
    Use this tool if you cannot utilize the search by metadata filter tool.

    Args:
        query_text (str): The search text (e.g., "coffee", "dinner", "groceries").
        limit (int, optional): Maximum number of results to return (default: 5).

    Returns:
        str: A string containing the list of contextually relevant receipt data.

    Raises:
        Exception: If the search failed or input is invalid.
    """
    try:
        # Generate embedding for the query text
        result = GENAI_CLIENT.models.embed_content(
            model="text-embedding-004", contents=query_text
        )
        query_embedding = result.embeddings[0].values

        # Notes that this demo assume 1 user only,
        # need to refactor the query for multiple user
        vector_query = COLLECTION.find_nearest(
            vector_field=EMBEDDING_FIELD_NAME,
            query_vector=Vector(query_embedding),
            distance_measure=DistanceMeasure.EUCLIDEAN,
            limit=limit,
        )

        # Execute the query and collect results
        search_result_description = "Search by Contextual Relevance Results:\n"
        for doc in vector_query.stream():
            data = doc.to_dict()
            data.pop(
                EMBEDDING_FIELD_NAME, None
            )  # Remove embedding as it's not needed for display
            search_result_description += f"\n{RECEIPT_DESC_FORMAT.format(**data)}"

        return search_result_description
    except Exception as e:
        raise Exception(f"Error searching receipts: {str(e)}")


def get_receipt_data_by_image_id(image_id: str) -> Dict[str, Any]:
    """
    Retrieve receipt data from the database using the image_id.

    Args:
        image_id (str): The unique identifier of the receipt image. For example, if the placeholder is
            [IMAGE-ID 12345], the ID to use is 12345.

    Returns:
        Dict[str, Any]: A dictionary containing the receipt data with the following keys:
            - receipt_id (str): The unique identifier of the receipt image.
            - store_name (str): The name of the store.
            - transaction_time (str): The time of purchase in UTC.
            - total_amount (float): The total amount spent.
            - currency (str): The currency of the transaction.
            - purchased_items (List[Dict[str, Any]]): List of items purchased with their details.
        Returns an empty dictionary if no receipt is found.
    """
    # In case of it provide full image placeholder, extract the id string
    image_id = sanitize_image_id(image_id)

    # Query the receipts collection for documents with matching receipt_id (image_id)
    # Notes that this demo assume 1 user only,
    # need to refactor the query for multiple user
    query = COLLECTION.where(filter=FieldFilter("receipt_id", "==", image_id)).limit(1)
    docs = list(query.stream())

    if not docs:
        return {}

    # Get the first matching document
    doc_data = docs[0].to_dict()
    doc_data.pop(EMBEDDING_FIELD_NAME, None)

    return doc_data
코드 설명
이 도구 기능 구현에서는 다음 두 가지 주요 아이디어를 중심으로 도구를 설계합니다.
- 영수증 데이터를 파싱하고 이미지 ID 문자열 자리표시자
[IMAGE-ID <hash-of-image-1>]를 사용하여 원본 파일에 매핑 - Firestore 데이터베이스를 사용한 데이터 저장 및 검색
도구 'store_receipt_data'

이 도구는 광학 문자 인식 도구로, 이미지 데이터에서 필수 정보를 파싱하고 이미지 ID 문자열을 인식하여 Firestore 데이터베이스에 저장되도록 함께 매핑합니다.
또한 이 도구는 text-embedding-004를 사용하여 영수증의 콘텐츠를 임베딩으로 변환하므로 모든 메타데이터와 임베딩이 함께 저장되고 색인이 생성됩니다. 유연성을 통해 쿼리 또는 컨텍스트 검색으로 검색할 수 있습니다.
이 도구를 성공적으로 실행하면 아래와 같이 Firestore 데이터베이스에 이미 색인이 생성된 영수증 데이터를 확인할 수 있습니다.

도구 'search_receipts_by_metadata_filter'

이 도구는 사용자 쿼리를 기간 또는 총 거래액을 기준으로 검색을 지원하는 메타데이터 쿼리 필터로 변환합니다. 일치하는 모든 영수증 데이터를 반환합니다. 이 과정에서 에이전트가 맥락을 이해하는 데 필요하지 않으므로 삽입 필드는 삭제됩니다.
'search_relevant_receipts_by_natural_language_query' 도구

검색 증강 생성 (RAG) 도구입니다. 에이전트는 벡터 데이터베이스에서 관련 영수증을 가져오기 위한 자체 쿼리를 설계할 수 있으며 이 도구를 사용할 시점을 선택할 수도 있습니다. 에이전트가 이 RAG 도구를 사용할지 여부를 독립적으로 결정하고 자체 쿼리를 설계하도록 허용한다는 개념은 에이전트 RAG 접근 방식의 정의 중 하나입니다.
AI 모델이 자체 쿼리를 빌드할 수 있을 뿐만 아니라 검색할 관련 문서의 수를 선택할 수도 있습니다. 적절한 프롬프트 엔지니어링과 결합하면 다음과 같은 결과를 얻을 수 있습니다.
# Example prompt

Always filter the result from tool
search_relevant_receipts_by_natural_language_query as the returned
result may contain irrelevant information
이로 인해 이 도구는 거의 모든 것을 검색할 수 있는 강력한 도구가 되지만 최근접 이웃 검색의 정확하지 않은 특성으로 인해 예상되는 결과가 모두 반환되지 않을 수 있습니다.
5. 🚀 콜백을 통한 대화 컨텍스트 수정
Google ADK를 사용하면 다양한 수준에서 에이전트 런타임을 '인터셉트'할 수 있습니다. 이 상세 기능에 관한 자세한 내용은 이 문서를 참고하세요 . 이 실습에서는 before_model_callback를 활용하여 LLM으로 전송되기 전에 요청을 수정하여 효율성을 위해 이전 대화 기록 컨텍스트에서 이미지 데이터를 삭제합니다 ( 마지막 3개의 사용자 상호작용에만 이미지 데이터 포함).
하지만 필요할 때 상담사가 이미지 데이터 컨텍스트를 사용할 수 있도록 하고자 합니다. 따라서 대화의 각 이미지 바이트 데이터 뒤에 문자열 이미지 ID 자리표시자를 추가하는 메커니즘을 추가합니다. 이렇게 하면 상담사가 이미지 ID를 실제 파일 데이터에 연결할 수 있으며, 이미지 저장 또는 검색 시 모두 활용할 수 있습니다. 구조는 다음과 같습니다.
<image-byte-data-1>
[IMAGE-ID <hash-of-image-1>]
<image-byte-data-2>
[IMAGE-ID <hash-of-image-2>]
And so on..
또한 대화 기록에서 바이트 데이터가 오래되어도 문자열 식별자는 계속 남아 있어 도구 사용을 통해 데이터 액세스를 계속 지원합니다. 이미지 데이터가 삭제된 후의 기록 구조 예
[IMAGE-ID <hash-of-image-1>]
[IMAGE-ID <hash-of-image-2>]
And so on..
시작 expense_manager_agent 디렉터리에 새 파일을 만들고 이름을 callbacks.py로 지정합니다.
touch expense_manager_agent/callbacks.py
expense_manager_agent/callbacks.py 파일을 열고 아래 코드를 복사합니다.
# expense_manager_agent/callbacks.py

import hashlib
from google.genai import types
from google.adk.agents.callback_context import CallbackContext
from google.adk.models.llm_request import LlmRequest


def modify_image_data_in_history(
    callback_context: CallbackContext, llm_request: LlmRequest
) -> None:
    # The following code will modify the request sent to LLM
    # We will only keep image data in the last 3 user messages using a reverse and counter approach

    # Count how many user messages we've processed
    user_message_count = 0

    # Process the reversed list
    for content in reversed(llm_request.contents):
        # Only count for user manual query, not function call
        if (content.role == "user") and (content.parts[0].function_response is None):
            user_message_count += 1
            modified_content_parts = []

            # Check any missing image ID placeholder for any image data
            # Then remove image data from conversation history if more than 3 user messages
            for idx, part in enumerate(content.parts):
                if part.inline_data is None:
                    modified_content_parts.append(part)
                    continue

                if (
                    (idx + 1 >= len(content.parts))
                    or (content.parts[idx + 1].text is None)
                    or (not content.parts[idx + 1].text.startswith("[IMAGE-ID "))
                ):
                    # Generate hash ID for the image and add a placeholder
                    image_data = part.inline_data.data
                    hasher = hashlib.sha256(image_data)
                    image_hash_id = hasher.hexdigest()[:12]
                    placeholder = f"[IMAGE-ID {image_hash_id}]"

                    # Only keep image data in the last 3 user messages
                    if user_message_count <= 3:
                        modified_content_parts.append(part)

                    modified_content_parts.append(types.Part(text=placeholder))

                else:
                    # Only keep image data in the last 3 user messages
                    if user_message_count <= 3:
                        modified_content_parts.append(part)

            # This will modify the contents inside the llm_request
            content.parts = modified_content_parts
6. 🚀 프롬프트
복잡한 상호작용과 기능을 갖춘 에이전트를 설계하려면 에이전트가 원하는 방식으로 작동할 수 있도록 안내하는 적절한 프롬프트를 찾아야 합니다.
이전에는 대화 기록에서 이미지 데이터를 처리하는 방법에 관한 메커니즘이 있었고 search_relevant_receipts_by_natural_language_query.와 같이 사용하기 쉽지 않은 도구도 있었습니다. 또한 에이전트가 올바른 영수증 이미지를 검색하여 Google에 제공할 수 있기를 바랍니다. 즉, 적절한 프롬프트 구조로 이 모든 정보를 적절하게 전달해야 합니다.
사고 과정, 최종 대답, 첨부파일 ( 있는 경우)을 파싱하기 위해 에이전트에게 출력을 다음 마크다운 형식으로 구조화하도록 요청합니다.
# THINKING PROCESS

Thinking process here

# FINAL RESPONSE

Response to the user here

Attachments put inside json block

{
    "attachments": [
      "[IMAGE-ID <hash-id-1>]",
      "[IMAGE-ID <hash-id-2>]",
      ...
    ]
}
비용 관리자 에이전트 동작에 대한 초기 기대치를 달성하기 위해 다음 프롬프트로 시작해 보겠습니다. task_prompt.md 파일은 기존 작업 디렉터리에 이미 있어야 하지만 expense_manager_agent 디렉터리 아래로 이동해야 합니다. 다음 명령어를 실행하여 이동합니다.
mv task_prompt.md expense_manager_agent/task_prompt.md
7. 🚀 에이전트 테스트
이제 CLI를 통해 에이전트와 통신해 보겠습니다. 다음 명령어를 실행하세요.
uv run adk run expense_manager_agent
다음과 같은 출력이 표시되며, 여기서 에이전트와 번갈아 채팅할 수 있습니다. 하지만 이 인터페이스를 통해서는 텍스트만 전송할 수 있습니다.
Log setup complete: /tmp/agents_log/agent.xxxx_xxx.log
To access latest log: tail -F /tmp/agents_log/agent.latest.log
Running agent root_agent, type exit to exit.
user: hello
[root_agent]: Hello there! How can I help you today?
user:
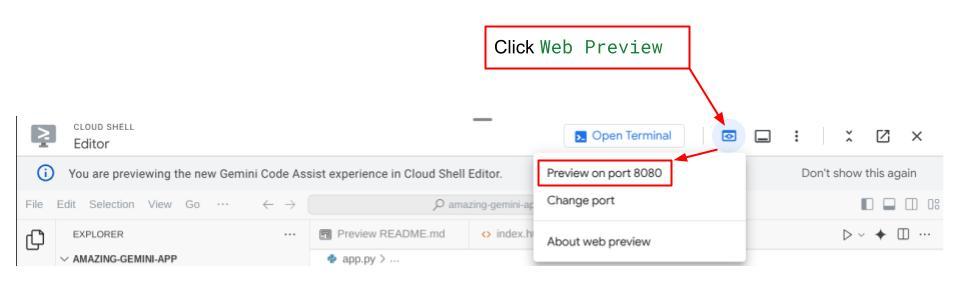
이제 CLI 상호작용 외에도 ADK를 사용하면 상호작용 중에 발생하는 상황을 상호작용하고 검사할 수 있는 개발 UI를 사용할 수 있습니다. 다음 명령어를 실행하여 로컬 개발 UI 서버를 시작합니다.
uv run adk web --port 8080
다음 예와 같은 출력이 생성됩니다. 이는 웹 인터페이스에 이미 액세스할 수 있음을 의미합니다.
INFO:     Started server process [xxxx]
INFO:     Waiting for application startup.

+-----------------------------------------------------------------------------+
| ADK Web Server started                                                      |
|                                                                             |
| For local testing, access at http://localhost:8080.                         |
+-----------------------------------------------------------------------------+

INFO:     Application startup complete.
INFO:     Uvicorn running on http://0.0.0.0:8080 (Press CTRL+C to quit)
이제 이를 확인하려면 Cloud Shell 편집기의 상단 영역에 있는 웹 미리보기 버튼을 클릭하고 포트 8080에서 미리보기를 선택합니다.

다음 웹페이지가 표시됩니다. 여기에서 왼쪽 상단의 드롭다운 버튼 ( 이 경우 expense_manager_agent)에서 사용 가능한 에이전트를 선택하고 봇과 상호작용할 수 있습니다. 왼쪽 창에는 에이전트 런타임 중 로그 세부정보에 관한 많은 정보가 표시됩니다.

몇 가지 작업을 시도해 보겠습니다. 이 두 가지 영수증 예시를 업로드합니다 ( 출처 : Hugging Face 데이터 세트 mousserlane/id_receipt_dataset) . 각 이미지를 마우스 오른쪽 버튼으로 클릭하고 이미지를 다른 이름으로 저장을 선택합니다. ( 영수증 이미지가 다운로드됨) 그런 다음 '클립' 아이콘을 클릭하여 파일을 봇에 업로드하고 이 영수증을 저장하고 싶다고 말합니다.


그런 다음 다음 쿼리를 사용하여 검색 또는 파일 검색을 시도합니다.
- '2023년의 지출 내역과 총액을 알려 줘'
- 'Indomaret의 영수증 파일을 보여 줘'
일부 도구를 사용하면 개발 UI에서 어떤 일이 일어나고 있는지 검사할 수 있습니다.

에이전트가 어떻게 대답하는지 확인하고 task_prompt.py 안의 프롬프트에 제공된 모든 규칙을 준수하는지 확인합니다. 축하합니다! 이제 완전하게 작동하는 개발 에이전트가 준비되었습니다.
이제 적절하고 멋진 UI와 이미지 파일을 업로드 및 다운로드하는 기능으로 이를 완성할 차례입니다.
8. 🚀 Gradio를 사용하여 프런트엔드 서비스 빌드
다음과 같은 채팅 웹 인터페이스를 빌드합니다.
여기에는 사용자가 텍스트를 보내고 영수증 이미지 파일을 업로드할 수 있는 입력란이 있는 채팅 인터페이스가 포함되어 있습니다.
Gradio를 사용하여 프런트엔드 서비스를 빌드합니다.
새 파일을 만들고 이름을 frontend.py로 지정합니다.
touch frontend.py
그런 다음 다음 코드를 복사하여 저장합니다.
import mimetypes
import gradio as gr
import requests
import base64
from typing import List, Dict, Any
from settings import get_settings
from PIL import Image
import io
from schema import ImageData, ChatRequest, ChatResponse


SETTINGS = get_settings()


def encode_image_to_base64_and_get_mime_type(image_path: str) -> ImageData:
    """Encode a file to base64 string and get MIME type.

    Reads an image file and returns the base64-encoded image data and its MIME type.

    Args:
        image_path: Path to the image file to encode.

    Returns:
        ImageData object containing the base64 encoded image data and its MIME type.
    """
    # Read the image file
    with open(image_path, "rb") as file:
        image_content = file.read()

    # Get the mime type
    mime_type = mimetypes.guess_type(image_path)[0]

    # Base64 encode the image
    base64_data = base64.b64encode(image_content).decode("utf-8")

    # Return as ImageData object
    return ImageData(serialized_image=base64_data, mime_type=mime_type)


def decode_base64_to_image(base64_data: str) -> Image.Image:
    """Decode a base64 string to PIL Image.

    Converts a base64-encoded image string back to a PIL Image object
    that can be displayed or processed further.

    Args:
        base64_data: Base64 encoded string of the image.

    Returns:
        PIL Image object of the decoded image.
    """
    # Decode the base64 string and convert to PIL Image
    image_data = base64.b64decode(base64_data)
    image_buffer = io.BytesIO(image_data)
    image = Image.open(image_buffer)

    return image


def get_response_from_llm_backend(
    message: Dict[str, Any],
    history: List[Dict[str, Any]],
) -> List[str | gr.Image]:
    """Send the message and history to the backend and get a response.

    Args:
        message: Dictionary containing the current message with 'text' and optional 'files' keys.
        history: List of previous message dictionaries in the conversation.

    Returns:
        List containing text response and any image attachments from the backend service.
    """
    # Extract files and convert to base64
    image_data = []
    if uploaded_files := message.get("files", []):
        for file_path in uploaded_files:
            image_data.append(encode_image_to_base64_and_get_mime_type(file_path))

    # Prepare the request payload
    payload = ChatRequest(
        text=message["text"],
        files=image_data,
        session_id="default_session",
        user_id="default_user",
    )

    # Send request to backend
    try:
        response = requests.post(SETTINGS.BACKEND_URL, json=payload.model_dump())
        response.raise_for_status()  # Raise exception for HTTP errors

        result = ChatResponse(**response.json())
        if result.error:
            return [f"Error: {result.error}"]

        chat_responses = []

        if result.thinking_process:
            chat_responses.append(
                gr.ChatMessage(
                    role="assistant",
                    content=result.thinking_process,
                    metadata={"title": "🧠 Thinking Process"},
                )
            )

        chat_responses.append(gr.ChatMessage(role="assistant", content=result.response))

        if result.attachments:
            for attachment in result.attachments:
                image_data = attachment.serialized_image
                chat_responses.append(gr.Image(decode_base64_to_image(image_data)))

        return chat_responses
    except requests.exceptions.RequestException as e:
        return [f"Error connecting to backend service: {str(e)}"]


if __name__ == "__main__":
    demo = gr.ChatInterface(
        get_response_from_llm_backend,
        title="Personal Expense Assistant",
        description="This assistant can help you to store receipts data, find receipts, and track your expenses during certain period.",
        type="messages",
        multimodal=True,
        textbox=gr.MultimodalTextbox(file_count="multiple", file_types=["image"]),
    )

    demo.launch(
        server_name="0.0.0.0",
        server_port=8080,
    )
그런 다음 다음 명령어를 사용하여 프런트엔드 서비스를 실행해 볼 수 있습니다. main.py 파일을 frontend.py로 이름을 바꾸는 것을 잊지 마세요.
uv run frontend.py
클라우드 콘솔에 다음과 비슷한 출력이 표시됩니다.
* Running on local URL:  http://0.0.0.0:8080

To create a public link, set `share=True` in `launch()`.
그런 다음 로컬 URL 링크를 Ctrl+클릭하면 웹 인터페이스를 확인할 수 있습니다. 또는 Cloud Editor의 오른쪽 상단에 있는 웹 미리보기 버튼을 클릭하고 포트 8080에서 미리보기를 선택하여 프런트엔드 애플리케이션에 액세스할 수도 있습니다.
웹 인터페이스는 표시되지만 아직 설정되지 않은 백엔드 서비스로 인해 채팅을 제출하려고 하면 예상된 오류가 표시됩니다.

이제 서비스가 실행되도록 하고 아직 종료하지 마세요. 다른 터미널 탭에서 백엔드 서비스를 실행합니다.
코드 설명
이 프런트엔드 코드에서는 먼저 사용자가 텍스트를 전송하고 여러 파일을 업로드할 수 있도록 합니다. Gradio를 사용하면 gr.MultimodalTextbox와 결합된 gr.ChatInterface 메서드를 사용하여 이러한 종류의 기능을 만들 수 있습니다.
이제 파일과 텍스트를 백엔드로 전송하기 전에 백엔드에 필요한 파일의 MIME 유형을 파악해야 합니다. 이미지 파일 바이트를 base64로 인코딩하고 mimetype과 함께 전송해야 합니다.
class ImageData(BaseModel):
    """Model for image data with hash identifier.

    Attributes:
        serialized_image: Optional Base64 encoded string of the image content.
        mime_type: MIME type of the image.
    """

    serialized_image: str
    mime_type: str
프런트엔드-백엔드 상호작용에 사용되는 스키마는 schema.py에 정의되어 있습니다. 스키마에서 데이터 유효성 검사를 적용하기 위해 Pydantic BaseModel을 사용합니다.
대답을 받을 때 사고 과정, 최종 대답, 첨부파일이 이미 구분되어 있습니다. 따라서 Gradio 구성요소를 활용하여 UI 구성요소와 함께 각 구성요소를 표시할 수 있습니다.
class ChatResponse(BaseModel):
    """Model for a chat response.

    Attributes:
        response: The text response from the model.
        thinking_process: Optional thinking process of the model.
        attachments: List of image data to be displayed to the user.
        error: Optional error message if something went wrong.
    """

    response: str
    thinking_process: str = ""
    attachments: List[ImageData] = []
    error: Optional[str] = None
9. 🚀 FastAPI를 사용하여 백엔드 서비스 빌드
다음으로 에이전트 런타임을 실행할 수 있도록 다른 구성요소와 함께 에이전트를 초기화할 수 있는 백엔드를 빌드해야 합니다.
새 파일을 만들고 이름을 backend.py로 지정합니다.
touch backend.py
다음 코드를 복사합니다.
from expense_manager_agent.agent import root_agent as expense_manager_agent
from google.adk.sessions import InMemorySessionService
from google.adk.runners import Runner
from google.adk.events import Event
from fastapi import FastAPI, Body, Depends
from typing import AsyncIterator
from types import SimpleNamespace
import uvicorn
from contextlib import asynccontextmanager
from utils import (
    extract_attachment_ids_and_sanitize_response,
    download_image_from_gcs,
    extract_thinking_process,
    format_user_request_to_adk_content_and_store_artifacts,
)
from schema import ImageData, ChatRequest, ChatResponse
import logger
from google.adk.artifacts import GcsArtifactService
from settings import get_settings

SETTINGS = get_settings()
APP_NAME = "expense_manager_app"


# Application state to hold service contexts
class AppContexts(SimpleNamespace):
    """A class to hold application contexts with attribute access"""

    session_service: InMemorySessionService = None
    artifact_service: GcsArtifactService = None
    expense_manager_agent_runner: Runner = None


# Initialize application state
app_contexts = AppContexts()


@asynccontextmanager
async def lifespan(app: FastAPI):
    # Initialize service contexts during application startup
    app_contexts.session_service = InMemorySessionService()
    app_contexts.artifact_service = GcsArtifactService(
        bucket_name=SETTINGS.STORAGE_BUCKET_NAME
    )
    app_contexts.expense_manager_agent_runner = Runner(
        agent=expense_manager_agent,  # The agent we want to run
        app_name=APP_NAME,  # Associates runs with our app
        session_service=app_contexts.session_service,  # Uses our session manager
        artifact_service=app_contexts.artifact_service,  # Uses our artifact manager
    )

    logger.info("Application started successfully")
    yield
    logger.info("Application shutting down")
    # Perform cleanup during application shutdown if necessary


# Helper function to get application state as a dependency
async def get_app_contexts() -> AppContexts:
    return app_contexts


# Create FastAPI app
app = FastAPI(title="Personal Expense Assistant API", lifespan=lifespan)


@app.post("/chat", response_model=ChatResponse)
async def chat(
    request: ChatRequest = Body(...),
    app_context: AppContexts = Depends(get_app_contexts),
) -> ChatResponse:
    """Process chat request and get response from the agent"""

    # Prepare the user's message in ADK format and store image artifacts
    content = await format_user_request_to_adk_content_and_store_artifacts(
        request=request,
        app_name=APP_NAME,
        artifact_service=app_context.artifact_service,
    )

    final_response_text = "Agent did not produce a final response."  # Default

    # Use the session ID from the request or default if not provided
    session_id = request.session_id
    user_id = request.user_id

    # Create session if it doesn't exist
    if not await app_context.session_service.get_session(
        app_name=APP_NAME, user_id=user_id, session_id=session_id
    ):
        await app_context.session_service.create_session(
            app_name=APP_NAME, user_id=user_id, session_id=session_id
        )

    try:
        # Process the message with the agent
        # Type annotation: runner.run_async returns an AsyncIterator[Event]
        events_iterator: AsyncIterator[Event] = (
            app_context.expense_manager_agent_runner.run_async(
                user_id=user_id, session_id=session_id, new_message=content
            )
        )
        async for event in events_iterator:  # event has type Event
            # Key Concept: is_final_response() marks the concluding message for the turn
            if event.is_final_response():
                if event.content and event.content.parts:
                    # Extract text from the first part
                    final_response_text = event.content.parts[0].text
                elif event.actions and event.actions.escalate:
                    # Handle potential errors/escalations
                    final_response_text = f"Agent escalated: {event.error_message or 'No specific message.'}"
                break  # Stop processing events once the final response is found

        logger.info(
            "Received final response from agent", raw_final_response=final_response_text
        )

        # Extract and process any attachments and thinking process in the response
        base64_attachments = []
        sanitized_text, attachment_ids = extract_attachment_ids_and_sanitize_response(
            final_response_text
        )
        sanitized_text, thinking_process = extract_thinking_process(sanitized_text)

        # Download images from GCS and replace hash IDs with base64 data
        for image_hash_id in attachment_ids:
            # Download image data and get MIME type
            result = await download_image_from_gcs(
                artifact_service=app_context.artifact_service,
                image_hash=image_hash_id,
                app_name=APP_NAME,
                user_id=user_id,
                session_id=session_id,
            )
            if result:
                base64_data, mime_type = result
                base64_attachments.append(
                    ImageData(serialized_image=base64_data, mime_type=mime_type)
                )

        logger.info(
            "Processed response with attachments",
            sanitized_response=sanitized_text,
            thinking_process=thinking_process,
            attachment_ids=attachment_ids,
        )

        return ChatResponse(
            response=sanitized_text,
            thinking_process=thinking_process,
            attachments=base64_attachments,
        )

    except Exception as e:
        logger.error("Error processing chat request", error_message=str(e))
        return ChatResponse(
            response="", error=f"Error in generating response: {str(e)}"
        )


# Only run the server if this file is executed directly
if __name__ == "__main__":
    uvicorn.run(app, host="0.0.0.0", port=8081)
그런 다음 백엔드 서비스를 실행해 볼 수 있습니다. 이전 단계에서 프런트엔드 서비스를 올바르게 실행했으므로 이제 새 터미널을 열고 이 백엔드 서비스를 실행해야 합니다.
- 새 터미널을 만듭니다. 하단 영역의 터미널로 이동하여 '+' 버튼을 찾아 새 터미널을 만듭니다. 또는 Ctrl + Shift + C를 눌러 새 터미널을 열 수 있습니다.

- 그런 다음 작업 디렉터리 personal-expense-assistant에 있는지 확인하고 다음 명령어를 실행합니다.
uv run backend.py
- 성공하면 다음과 같은 출력이 표시됩니다.
INFO:     Started server process [xxxxx]
INFO:     Waiting for application startup.
INFO:     Application startup complete.
INFO:     Uvicorn running on http://0.0.0.0:8081 (Press CTRL+C to quit)
코드 설명
ADK 에이전트, SessionService, ArtifactService 초기화
백엔드 서비스에서 에이전트를 실행하려면 SessionService와 에이전트를 모두 사용하는 Runner를 만들어야 합니다. SessionService는 대화 기록과 상태를 관리하므로 Runner와 통합되면 에이전트가 진행 중인 대화 컨텍스트를 수신할 수 있습니다.
업로드된 파일을 처리하기 위해 ArtifactService도 활용합니다. ADK 세션 및 아티팩트에 관한 자세한 내용은 여기를 참고하세요.
...

@asynccontextmanager
async def lifespan(app: FastAPI):
    # Initialize service contexts during application startup
    app_contexts.session_service = InMemorySessionService()
    app_contexts.artifact_service = GcsArtifactService(
        bucket_name=SETTINGS.STORAGE_BUCKET_NAME
    )
    app_contexts.expense_manager_agent_runner = Runner(
        agent=expense_manager_agent,  # The agent we want to run
        app_name=APP_NAME,  # Associates runs with our app
        session_service=app_contexts.session_service,  # Uses our session manager
        artifact_service=app_contexts.artifact_service,  # Uses our artifact manager
    )

    logger.info("Application started successfully")
    yield
    logger.info("Application shutting down")
    # Perform cleanup during application shutdown if necessary

...
이 데모에서는 InMemorySessionService 및 GcsArtifactService를 사용하여 에이전트 Runner와 통합합니다. 대화 기록은 메모리에 저장되므로 백엔드 서비스가 종료되거나 다시 시작되면 손실됩니다. FastAPI 애플리케이션 수명 주기 내에서 이를 초기화하여 /chat 경로에 종속 항목으로 삽입합니다.
GcsArtifactService를 사용하여 이미지 업로드 및 다운로드
업로드된 모든 이미지는 GcsArtifactService에 의해 아티팩트로 저장됩니다. utils.py 내의 format_user_request_to_adk_content_and_store_artifacts 함수에서 이를 확인할 수 있습니다.
...

# Prepare the user's message in ADK format and store image artifacts
content = await asyncio.to_thread(
    format_user_request_to_adk_content_and_store_artifacts,
    request=request,
    app_name=APP_NAME,
    artifact_service=app_context.artifact_service,
)

...
에이전트 러너에서 처리할 모든 요청은 types.Content 유형으로 형식을 지정해야 합니다. 함수 내에서 각 이미지 데이터를 처리하고 이미지 ID 자리표시자로 대체할 ID를 추출합니다.
정규식을 사용하여 이미지 ID를 추출한 후 첨부파일을 다운로드하는 데도 유사한 메커니즘이 사용됩니다.
...
sanitized_text, attachment_ids = extract_attachment_ids_and_sanitize_response(
    final_response_text
)
sanitized_text, thinking_process = extract_thinking_process(sanitized_text)

# Download images from GCS and replace hash IDs with base64 data
for image_hash_id in attachment_ids:
    # Download image data and get MIME type
    result = await asyncio.to_thread(
        download_image_from_gcs,
        artifact_service=app_context.artifact_service,
        image_hash=image_hash_id,
        app_name=APP_NAME,
        user_id=user_id,
        session_id=session_id,
    )
...
10. 🚀 통합 테스트
이제 서로 다른 Cloud 콘솔 탭에서 여러 서비스가 실행됩니다.
- 포트 8080에서 실행되는 프런트엔드 서비스
* Running on local URL:  http://0.0.0.0:8080

To create a public link, set `share=True` in `launch()`.
- 포트 8081에서 실행되는 백엔드 서비스
INFO:     Started server process [xxxxx]
INFO:     Waiting for application startup.
INFO:     Application startup complete.
INFO:     Uvicorn running on http://0.0.0.0:8081 (Press CTRL+C to quit)
현재 상태에서는 영수증 이미지를 업로드하고 포트 8080의 웹 애플리케이션에서 어시스턴트와 원활하게 채팅할 수 있습니다.
Cloud Shell 편집기의 상단 영역에서 웹 미리보기 버튼을 클릭하고 포트 8080에서 미리보기를 선택합니다.
이제 어시스턴트와 상호작용해 보겠습니다.
다음 영수증을 다운로드합니다. 이 영수증 데이터의 기간은 2023~2024년이며, 어시스턴트에게 저장/업로드해 달라고 요청합니다.
- 영수증 Drive ( 소스 Hugging Face 데이터 세트
mousserlane/id_receipt_dataset)
다양한 질문하기
- '2023~2024년 월별 지출 내역을 알려 줘'
- '커피 거래 영수증 보여 줘'
- '야키니쿠 라이크의 영수증 파일을 줘'
- 기타
다음은 성공적인 상호작용의 스니펫입니다.


11. 🚀 Cloud Run에 배포
이제 어디서나 이 멋진 앱에 액세스할 수 있습니다. 이렇게 하려면 이 애플리케이션을 패키징하여 Cloud Run에 배포하면 됩니다. 이 데모에서는 이 서비스가 다른 사용자가 액세스할 수 있는 공개 서비스로 노출됩니다. 하지만 이는 개인 애플리케이션에 더 적합하므로 이러한 종류의 애플리케이션에는 권장사항이 아닙니다.
이 Codelab에서는 프런트엔드와 백엔드 서비스를 모두 하나의 컨테이너에 넣습니다. 두 서비스를 모두 관리하려면 supervisord의 도움이 필요합니다. supervisord.conf 파일을 검사하고 supervisord를 진입점으로 설정한 Dockerfile을 확인할 수 있습니다.
이제 Cloud Run에 애플리케이션을 배포하는 데 필요한 모든 파일이 준비되었으므로 배포해 보겠습니다. Cloud Shell 터미널로 이동하여 현재 프로젝트가 활성 프로젝트로 구성되어 있는지 확인합니다. 그렇지 않은 경우 gcloud configure 명령어를 사용하여 프로젝트 ID를 설정해야 합니다.
gcloud config set project [PROJECT_ID]
그런 다음 다음 명령어를 실행하여 Cloud Run에 배포합니다.
gcloud run deploy personal-expense-assistant \
                  --source . \
                  --port=8080 \
                  --allow-unauthenticated \
                  --env-vars-file=settings.yaml \
                  --memory 1024Mi \
                  --region us-central1
Docker 저장소용 Artifact Registry를 만들 것인지 묻는 메시지가 표시되면 Y라고 답합니다. 데모 애플리케이션이므로 여기서는 인증되지 않은 액세스를 허용합니다. 엔터프라이즈 및 프로덕션 애플리케이션에 적절한 인증을 사용하는 것이 좋습니다.
배포가 완료되면 다음과 비슷한 링크가 표시됩니다.
https://personal-expense-assistant-*******.us-central1.run.app
시크릿 창이나 휴대기기에서 애플리케이션을 사용하세요. 이미 게시되었을 것입니다.
12. 🎯 도전
이제 탐색 기술을 연마하고 빛을 발할 때입니다. 백엔드에서 여러 사용자를 수용할 수 있도록 코드를 변경할 수 있나요? 어떤 구성요소를 업데이트해야 하나요?
13. 🧹 정리
이 Codelab에서 사용한 리소스의 비용이 Google Cloud 계정에 청구되지 않도록 하려면 다음 단계를 따르세요.