
1. 簡介
在本程式碼研究室中,您將使用 MCP Toolbox for Databases,開放存取 BigQuery 資料集。
在本程式碼研究室中,您將逐步完成下列步驟:
- 從 BigQuery 公開資料集計畫中找出特定 BigQuery 資料集 (「Google Cloud 版本資訊」)。
- 設定 MCP Toolbox for Databases,並連結至 BigQuery 資料集。
- 使用 Agent Development Kit (ADK) 開發代理,並運用 MCP Toolbox 回答使用者有關 Google Cloud 版本資訊的查詢
執行步驟
- 設定 MCP Toolbox for Databases,向其他 MCP 用戶端 (IDE、工具等) 公開 Google Cloud 版本資訊 (公開 BigQuery 資料集),做為 MCP 介面。
課程內容
- 探索 BigQuery 公開資料集,然後選擇特定資料集。
- 為要提供給 MCP 用戶端的 BigQuery 公開資料集設定 MCP Toolbox for Databases。
- 使用 Agent Development Kit (ADK) 設計及開發代理,回答使用者查詢。
- 在本機環境中測試代理程式和 MCP Toolbox for Databases。
軟硬體需求
- Chrome 網路瀏覽器。
- 本機 Python 開發環境。
2. 事前準備
建立專案
- 在 Google Cloud 控制台的專案選取器頁面中,選取或建立 Google Cloud 專案。
- 確認 Cloud 專案已啟用計費功能。瞭解如何檢查專案是否已啟用計費功能。
- 您將使用 Cloud Shell,這是 Google Cloud 中執行的指令列環境,預先載入了 bq。點選 Google Cloud 控制台頂端的「啟用 Cloud Shell」。

- 連至 Cloud Shell 後,請使用下列指令確認驗證已完成,專案也已設為獲派的專案 ID:
gcloud auth list
- 在 Cloud Shell 中執行下列指令,確認 gcloud 指令已瞭解您的專案。
gcloud config list project
- 如果未設定專案,請使用下列指令來設定:
gcloud config set project <YOUR_PROJECT_ID>
- 透過下列指令啟用必要的 API。這可能需要幾分鐘的時間,請耐心等候。
gcloud services enable cloudresourcemanager.googleapis.com \
                       servicenetworking.googleapis.com \
                       run.googleapis.com \
                       cloudbuild.googleapis.com \
                       cloudfunctions.googleapis.com \
                       aiplatform.googleapis.com \
                       sqladmin.googleapis.com \
                       compute.googleapis.com
成功執行指令後,您應該會看到類似下方的訊息:
Operation "operations/..." finished successfully.
除了使用 gcloud 指令,您也可以透過控制台搜尋各項產品,或使用這個連結。
如果遺漏任何 API,您隨時可以在實作過程中啟用。
如要瞭解 gcloud 指令和用法,請參閱說明文件。
3. Google 版本資訊資料集和 MCP 用戶端
首先,請前往官方 Google Cloud 版本資訊網頁,查看定期更新的 Google Cloud 版本資訊。以下是該網頁的螢幕截圖:

你可能會訂閱動態消息網址,但如果我們可以在 Agent Chat 中詢問這些版本資訊,會怎麼樣呢?例如「Google Cloud 版本資訊的最新消息」。
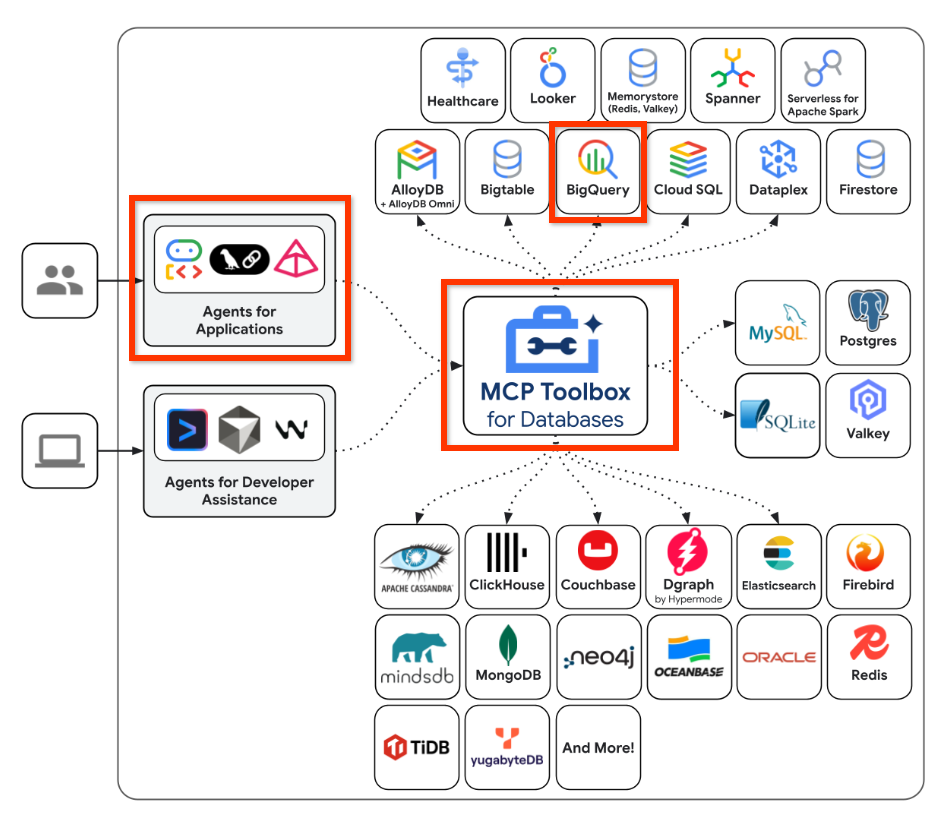
4. MCP Toolbox for Databases
MCP Toolbox for Databases 是資料庫專用的開放原始碼 MCP 伺服器,專為企業級和生產品質而設計。這項服務可處理連線集區和驗證等複雜作業,讓您更輕鬆、快速且安全地開發工具。
您可以透過 Toolbox 建構生成式 AI 工具,讓代理程式存取資料庫中的資料。工具箱提供:
- 簡化開發作業:在不到 10 行的程式碼中將工具整合至代理程式、在多個代理程式或架構之間重複使用工具,以及更輕鬆地部署新版工具。
- 提升效能:連線集區、驗證等最佳做法。
- 強化安全性:整合式驗證機制,可更安全地存取資料
- 端對端觀測能力:內建 OpenTelemetry 支援,可直接使用指標和追蹤記錄功能。
- 透過 Toolbox,您可以輕鬆將資料庫連結至任何支援 MCP 的 AI 助理,包括 IDE 中的助理。
Toolbox 位於應用程式的協調架構和資料庫之間,提供用於修改、發布或叫用工具的控制層。這項功能提供集中式位置來儲存及更新工具,方便您管理工具,並在代理程式和應用程式之間共用工具,以及更新工具,不必重新部署應用程式。

簡單來說:
- MCP Toolbox 提供二進位檔和容器映像檔,您也可以從來源建構。
- 這項工具會公開一組工具,您可透過 tools.yaml 檔案進行設定。這些工具可視為連結資料來源。您可以查看支援的各種資料來源:AlloyDB、BigQuery 等。
- 這個工具箱現在支援 MCP,因此您會自動擁有 MCP 伺服器端點,可供代理 (IDE) 使用,或在您使用各種架構 (例如 Agent Development Kit (ADK)) 開發代理應用程式時使用。
本網誌文章將著重於以下重點區域:
總而言之,我們將在 MCP Toolbox for Databases 中建立設定,瞭解如何連線至 BigQuery 資料集。接著,我們將使用 Agent Development Kit (ADK) 開發代理,與 MCP Toolbox 端點整合,並傳送自然查詢來詢問資料集。您可以將其視為您開發的代理應用程式,這類應用程式知道如何與 BigQuery 資料集互動,並執行一些查詢。
5. Google Cloud 版本資訊的 BigQuery 資料集
Google Cloud 公開資料集計畫提供一系列資料集,供您在應用程式中使用。其中一個資料集是 Google Cloud 版本資訊資料庫。這個資料集提供的資訊與官方 Google Cloud 版本資訊網頁相同,而且可公開查詢。
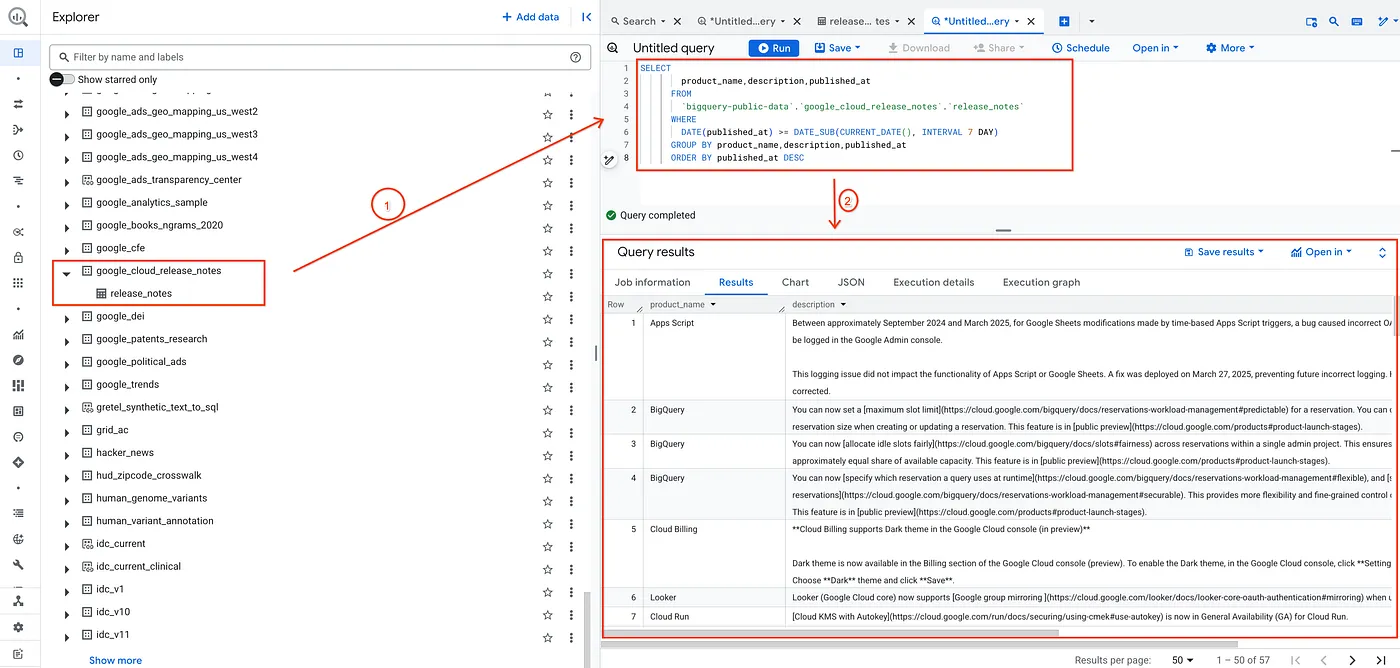
做為測試,我只需執行下列簡單查詢,即可驗證資料集:
SELECT
       product_name,description,published_at
     FROM
       `bigquery-public-data`.`google_cloud_release_notes`.`release_notes`
     WHERE
       DATE(published_at) >= DATE_SUB(CURRENT_DATE(), INTERVAL 7 DAY)
     GROUP BY product_name,description,published_at
     ORDER BY published_at DESC
這樣一來,我就可以取得過去 7 天內發布的「版本資訊」資料集記錄清單。
您可以改用任何其他資料集,以及您想使用的相關查詢和參數。現在只要在 MCP Toolbox for Databases 中,將其設為資料來源和工具即可。我們來看看如何操作。
6. 安裝 MCP Toolbox for Databases
在本機上開啟終端機,並建立名為 mcp-toolbox 的資料夾。
mkdir mcp-toolbox
透過下列指令前往 mcp-toolbox 資料夾:
cd mcp-toolbox
透過下列指令碼安裝 MCP Toolbox for Databases 的二進位版本。下列指令適用於 Linux,但如果您使用 Mac 或 Windows,請務必下載正確的二進位檔。請查看作業系統和架構的發布頁面,並下載正確的二進位檔。
export VERSION=0.23.0
curl -O https://storage.googleapis.com/genai-toolbox/v$VERSION/linux/amd64/toolbox
chmod +x toolbox
現在我們已準備好工具箱的二進位版本,下一步是使用資料來源和其他設定來設定工具箱。
7. 設定 MCP Toolbox for Databases
現在,我們需要在 tools.yaml 檔案中定義 MCP Toolbox for Database 服務所需的 BigQuery 資料集和工具。tools.yaml 檔案是設定 Toolbox 的主要方式。
在同一個資料夾 (即 mcp-toolbox) 中建立名為 tools.yaml 的檔案,內容如下所示。
您可以使用 Cloud Shell 提供的 nano 編輯器。nano 指令如下:「nano tools.yaml」。
請記得將 YOUR_PROJECT_ID 值替換為您的 Google Cloud 專案 ID。
sources:
 my-bq-source:
   kind: bigquery
   project: YOUR_PROJECT_ID

tools:
 search_release_notes_bq:
   kind: bigquery-sql
   source: my-bq-source
   statement: |
    SELECT
     product_name,description,published_at
    FROM
      `bigquery-public-data`.`google_cloud_release_notes`.`release_notes`
    WHERE
     DATE(published_at) >= DATE_SUB(CURRENT_DATE(), INTERVAL 7 DAY)
    GROUP BY product_name,description,published_at
    ORDER BY published_at DESC
   description: |
    Use this tool to get information on Google Cloud Release Notes.

toolsets:
 my_bq_toolset:
   - search_release_notes_bq
簡要瞭解檔案:
- 來源代表工具可互動的不同資料來源。來源代表工具可互動的資料來源。您可以在 tools.yaml 檔案的來源區段中,將來源定義為對應。一般來說,來源設定會包含連線至資料庫及與資料庫互動所需的任何資訊。在本例中,我們已定義 BigQuery 來源
my-bq-source,您需要提供 Google Cloud 專案 ID。詳情請參閱「來源」參考資料。 - 工具會定義代理程式可執行的動作,例如讀取及寫入來源。工具代表代理程式可執行的動作,例如執行 SQL 陳述式。您可以在 tools.yaml 檔案的 tools 區段中,將工具定義為對應。一般來說,工具需要來源才能執行動作。在本範例中,我們定義單一工具
search_release_notes_bq。這會參照我們在第一個步驟中定義的 BigQuery 來源my-bq-source。其中也包含 AI 代理程式用戶端會使用的陳述內容和指令。詳情請參閱「工具」參考資料。 - 最後是「工具集」,可讓您定義要一起載入的工具群組。這項功能有助於根據代理程式或應用程式定義不同群組。在本例中,我們有一個工具集定義,目前只定義了一個現有工具
search_release_notes_bq。您可以有多個工具集,每個工具集都包含不同的工具組合。
因此目前我們只定義了一項工具,可根據查詢取得過去 7 天的發行說明。但您也可以使用各種參數組合。
在 MCP Toolbox for Databases 中,查看 BigQuery 資料來源設定的更多設定詳細資料 ( 來源、工具)。
8. 測試 MCP Toolbox for Databases
我們已使用 mcp-toolbox 資料夾中的 tools.yaml 檔案,下載並設定 Toolbox。請先在本機執行。
執行下列指令:
./toolbox --tools-file="tools.yaml"
執行成功後,您應該會看到伺服器啟動,並顯示類似下方的輸出範例:
2025-12-09T08:27:02.777619+05:30 INFO "Initialized 1 sources: my-bq-source"
2025-12-09T08:27:02.777695+05:30 INFO "Initialized 0 authServices: "
2025-12-09T08:27:02.777707+05:30 INFO "Initialized 1 tools: search_release_notes_bq"
2025-12-09T08:27:02.777716+05:30 INFO "Initialized 2 toolsets: my_bq_toolset, default"
2025-12-09T08:27:02.777719+05:30 INFO "Initialized 0 prompts: "
2025-12-09T08:27:02.777723+05:30 INFO "Initialized 1 promptsets: default"
2025-12-09T08:27:02.77773+05:30 WARN "wildcard (`*`) allows all origin to access the resource and is not secure. Use it with cautious for public, non-sensitive data, or during local development. Recommended to use `--allowed-origins` flag to prevent DNS rebinding attacks"
2025-12-09T08:27:02.777839+05:30 INFO "Server ready to serve!"
MCP Toolbox 伺服器預設會在通訊埠 5000 上執行。如果發現通訊埠 5000 已在使用中,請隨意使用其他通訊埠 (例如 7000),如下列指令所示。請在後續指令中使用 7000,而非 5000 連接埠。
./toolbox --tools-file "tools.yaml" --port 7000
我們將使用 Cloud Shell 測試這項功能。
在 Cloud Shell 中點選「網頁預覽」,如下所示:
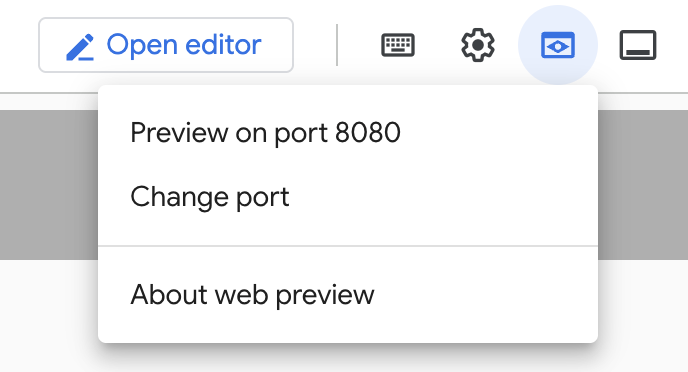
按一下「變更通訊埠」,將通訊埠設為 5000 (如下所示),然後按一下「變更並預覽」。
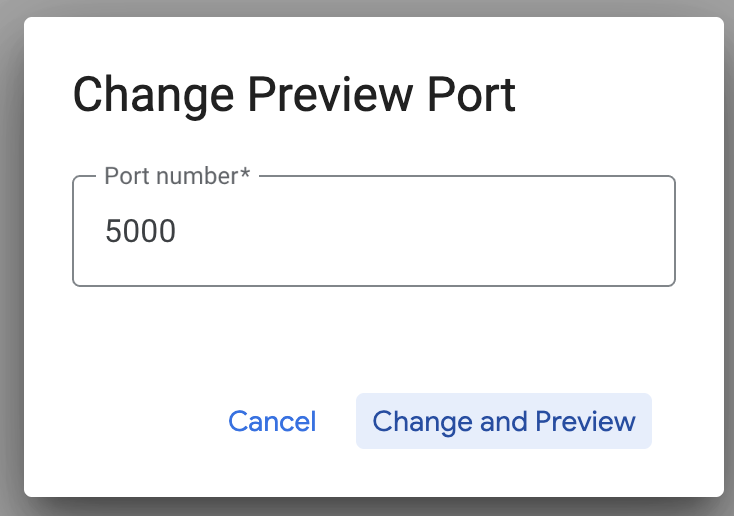
這應該會產生下列輸出內容:

在瀏覽器網址中,於網址末端加入下列內容:
/api/toolset
這時應該會顯示目前設定的工具。輸出範例如下所示:
{
  "serverVersion": "0.22.0+binary.linux.amd64.1a6dfe8d37d0f42fb3fd3f75c50988534dbc1b85",
  "tools": {
    "search_release_notes_bq": {
      "description": "Use this tool to get information on Google Cloud Release Notes.\n",
      "parameters": [],
      "authRequired": []
    }
  }
}
透過 MCP Toolbox for Databases 使用者介面測試工具
工具箱提供視覺化介面 (工具箱 UI),可直接與工具互動,方法是在簡單的網頁 UI 中修改參數、管理標頭及執行呼叫。
如要測試,請執行先前用來啟動 Toolbox 伺服器的指令,並加上 --ui 選項。
如要這麼做,請關閉先前可能正在執行的 MCP Toolbox for Databases 伺服器執行個體,然後輸入下列指令:
./toolbox --tools-file "tools.yaml" --ui
理想情況下,您應該會看到伺服器已連線至資料來源,並載入工具集和工具的輸出內容。以下是輸出範例,您會發現其中提到 Toolbox UI 正在運作。
2025-12-09T08:28:07.479989+05:30 INFO "Initialized 1 sources: my-bq-source"
2025-12-09T08:28:07.480065+05:30 INFO "Initialized 0 authServices: "
2025-12-09T08:28:07.480079+05:30 INFO "Initialized 1 tools: search_release_notes_bq"
2025-12-09T08:28:07.480087+05:30 INFO "Initialized 2 toolsets: my_bq_toolset, default"
2025-12-09T08:28:07.48009+05:30 INFO "Initialized 0 prompts: "
2025-12-09T08:28:07.480094+05:30 INFO "Initialized 1 promptsets: default"
2025-12-09T08:28:07.4801+05:30 WARN "wildcard (`*`) allows all origin to access the resource and is not secure. Use it with cautious for public, non-sensitive data, or during local development. Recommended to use `--allowed-origins` flag to prevent DNS rebinding attacks"
2025-12-09T08:28:07.480214+05:30 INFO "Server ready to serve!"
2025-12-09T08:28:07.480218+05:30 INFO "Toolbox UI is up and running at: http://127.0.0.1:5000/ui"
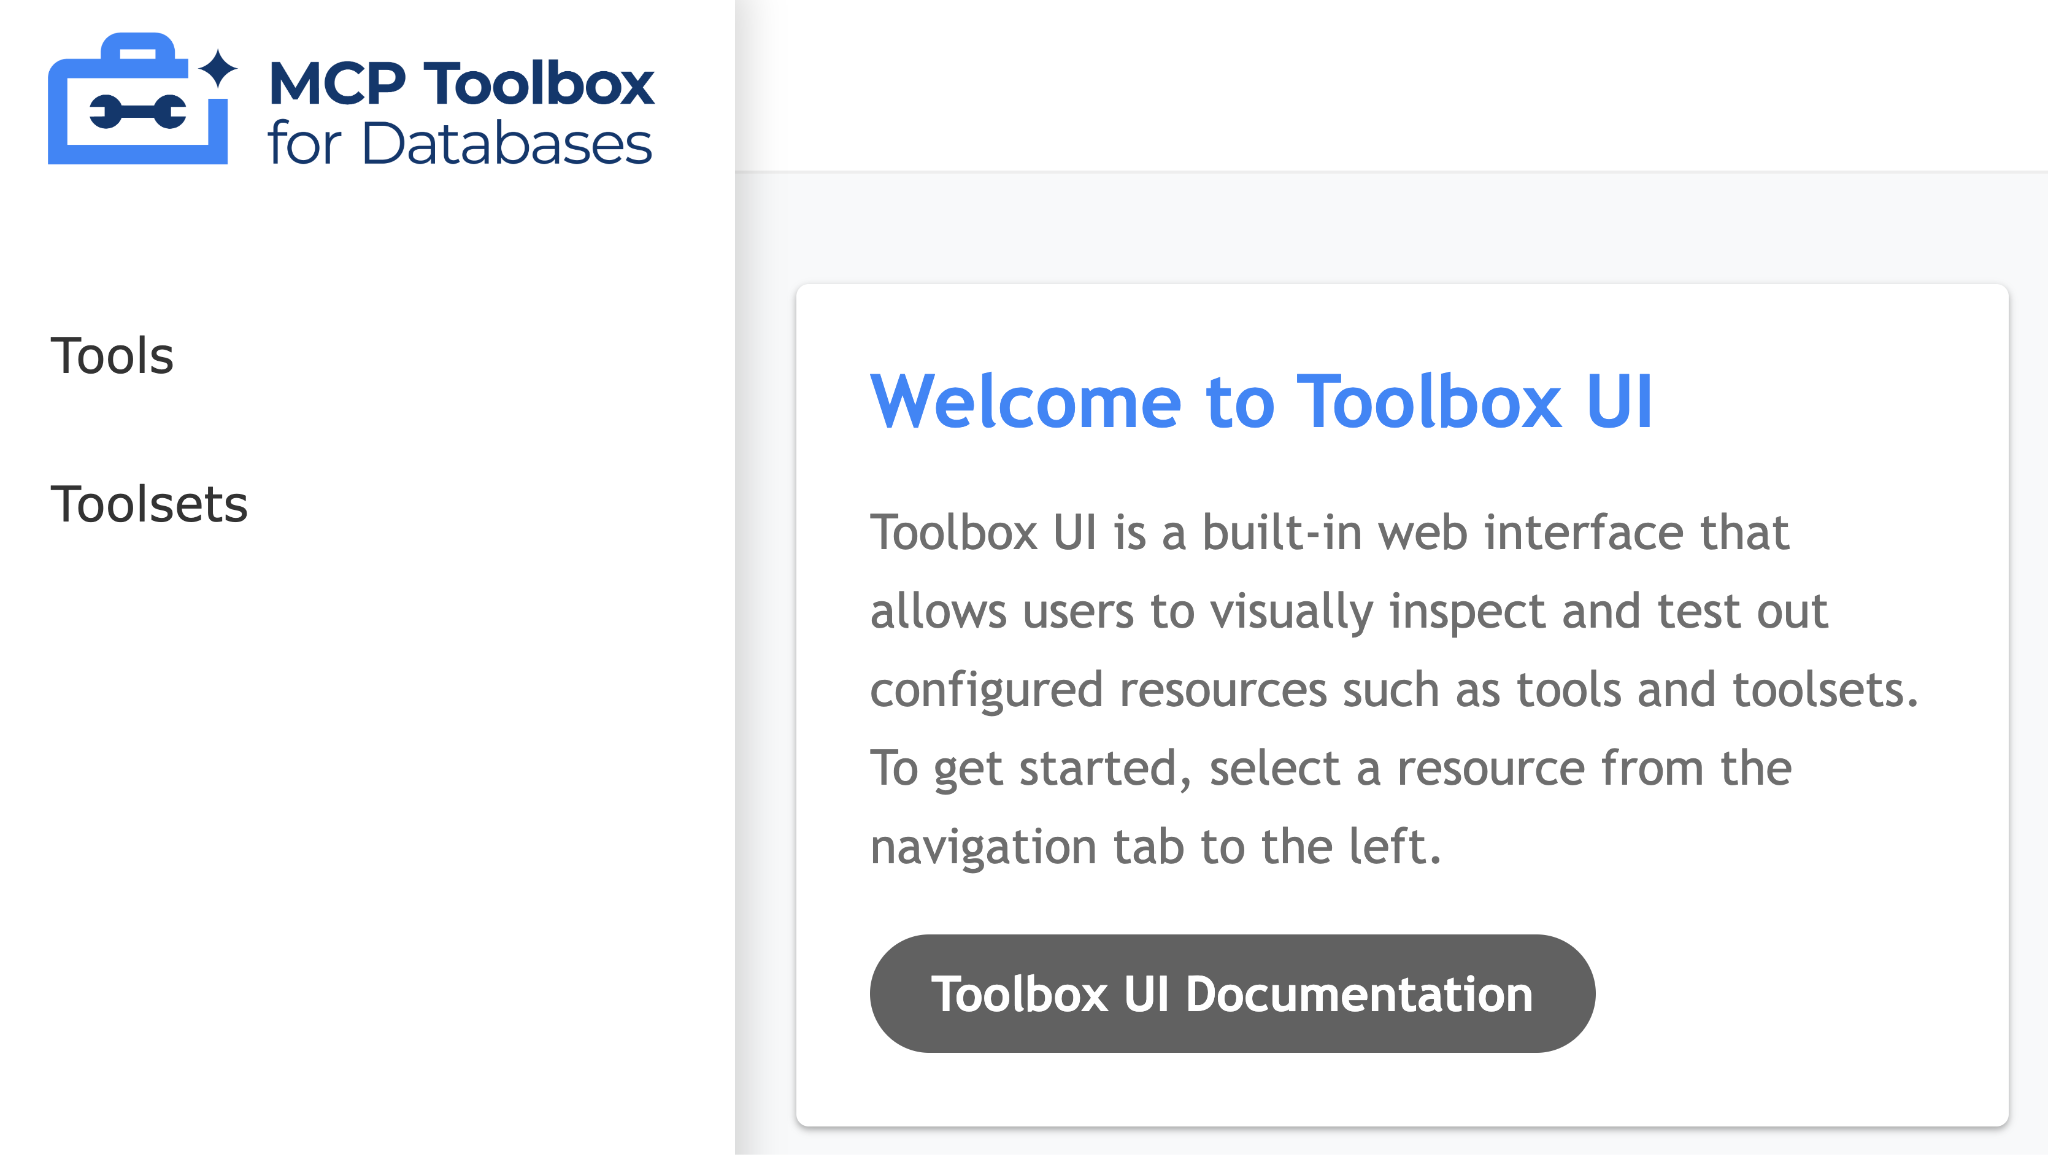
按一下使用者介面網址,確認網址結尾有 /ui。系統會顯示如下所示的 UI:
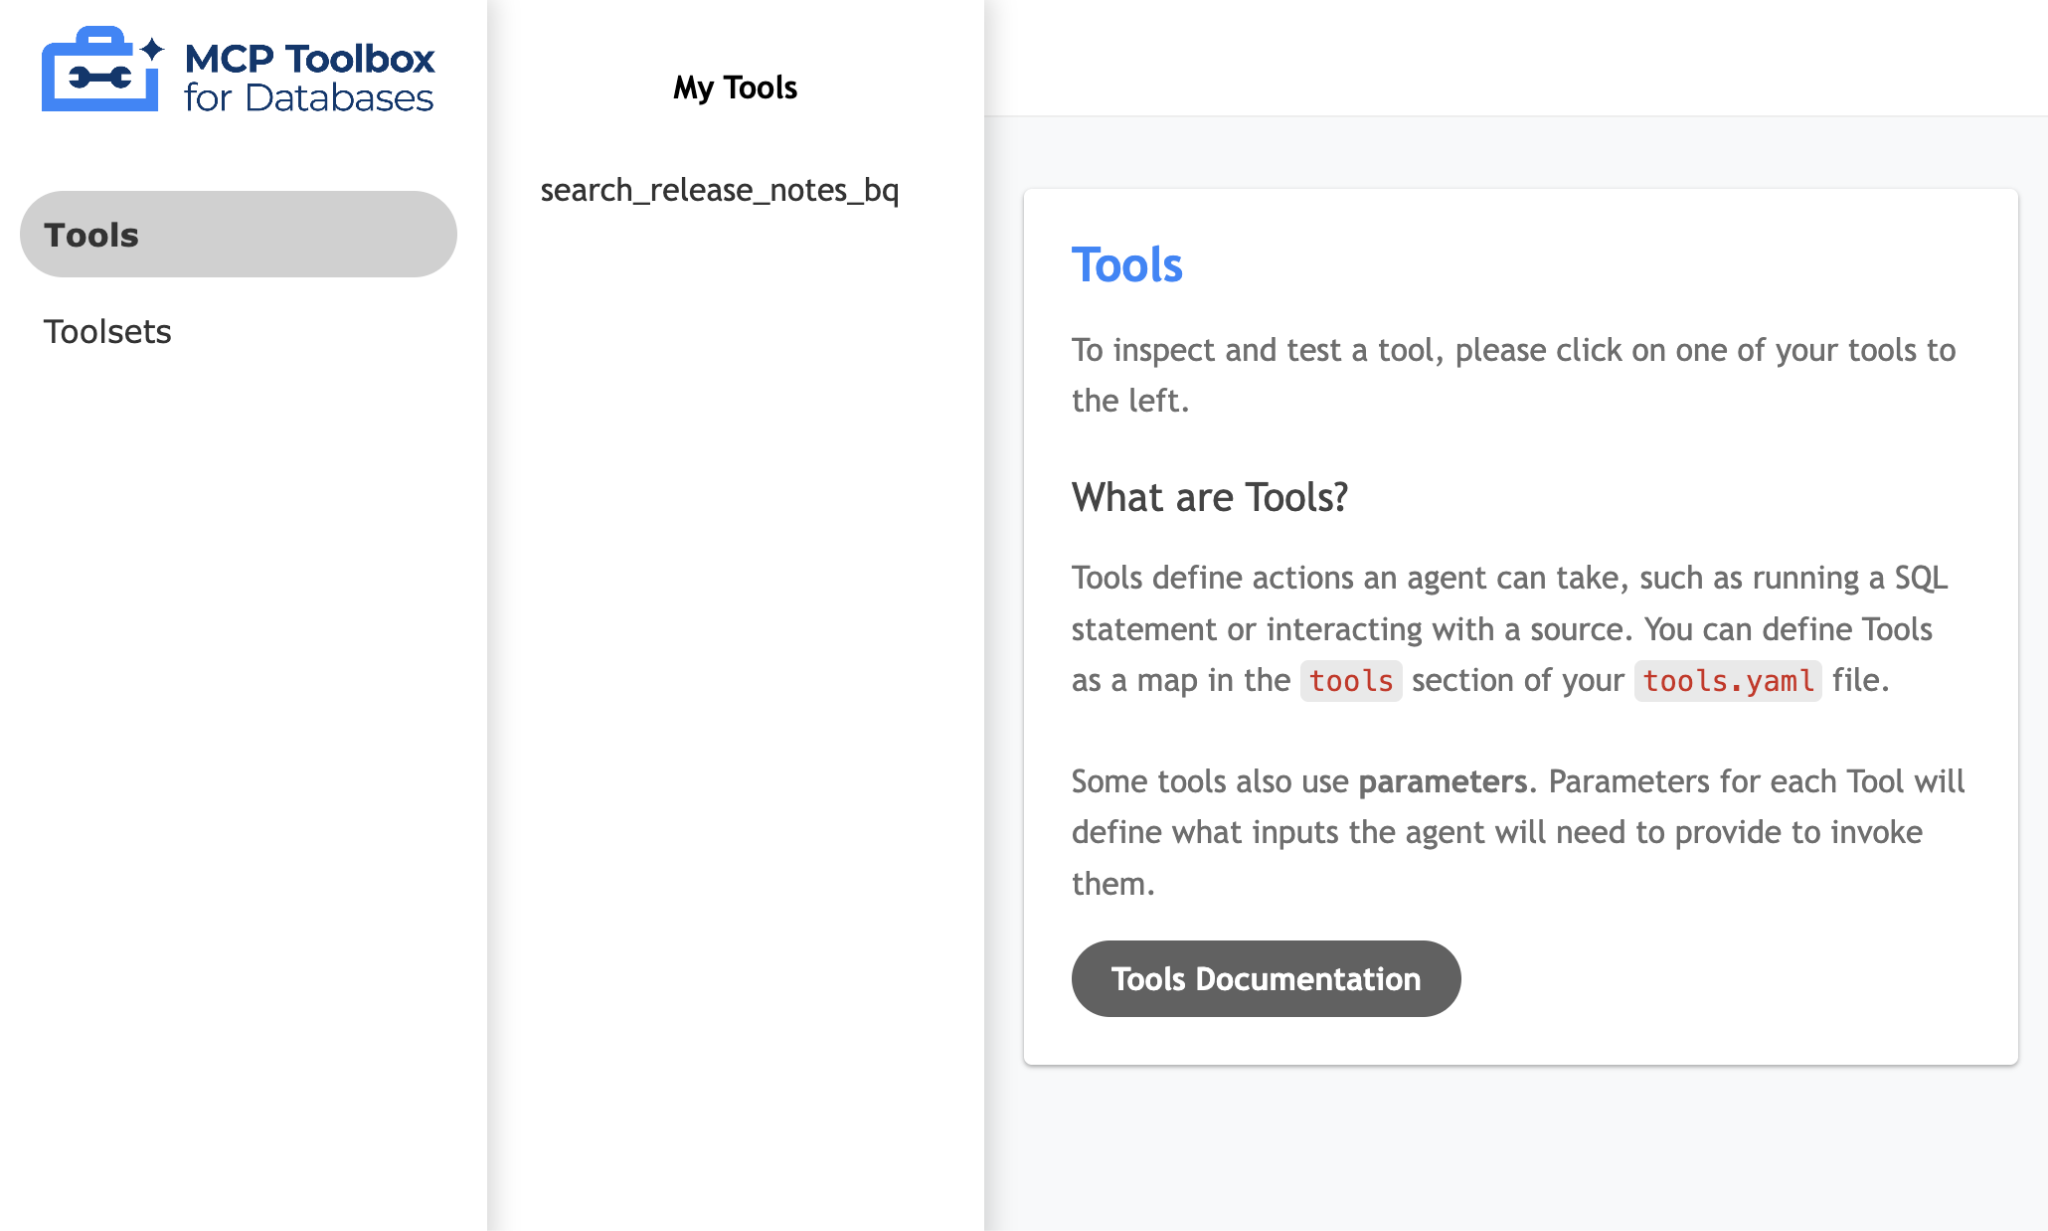
按一下左側的「工具」選項,即可查看已設定的工具。在本例中,應該只有一個工具,即 search_release_notes_bq,如下所示:
只要按一下工具 (search_release_notes_bq),系統就會顯示頁面,供您測試工具。由於不需要提供任何參數,只要按一下「執行工具」即可查看結果。以下是執行範例:

MCP Toolkit for Databases 也說明瞭以 Python 驗證及測試工具的方法,詳情請參閱這篇文章。我們將略過這個步驟,直接進入下一節的 Agent Development Kit (ADK),並使用這些工具。
9. 使用 Agent Development Kit (ADK) 編寫 AI 代理
安裝 Agent Development Kit (ADK)
在 Cloud Shell 中開啟新的終端機分頁,然後建立名為 my-agents 的資料夾,如下所示。前往 my-agents 資料夾。
mkdir my-agents
cd my-agents
現在,讓我們使用 venv 建立虛擬 Python 環境,如下所示:
python -m venv .venv
按照下列步驟啟動虛擬環境:
source .venv/bin/activate
安裝 ADK 和 MCP Toolbox for Databases 套件,以及 langchain 依附元件,如下所示:
pip install google-adk toolbox-core
現在可以按照下列方式叫用 adk 公用程式。
adk
系統會顯示指令清單。
$ adk
Usage: adk [OPTIONS] COMMAND [ARGS]...

  Agent Development Kit CLI tools.

Options:
  --help  Show this message and exit.

Commands:
  api_server  Starts a FastAPI server for agents.
  create      Creates a new app in the current folder with prepopulated agent template.
  deploy      Deploys agent to hosted environments.
  eval        Evaluates an agent given the eval sets.
  run         Runs an interactive CLI for a certain agent.
  web         Starts a FastAPI server with Web UI for agents.
建立第一個代理程式應用程式
現在我們要使用 adk,透過 adk create 指令,為 Google Cloud 版本資訊代理程式應用程式建立架構,並將應用程式名稱設為 **(gcp_releasenotes_agent_app)**,如下所示。
adk create gcp_releasenotes_agent_app
按照步驟選取下列項目:
- Gemini 模型,用於為根代理程式選擇模型。
- 選擇 Vertex AI 做為後端。
- 畫面上會顯示預設的 Google 專案 ID 和區域。選取預設值本身。
Choose a model for the root agent:
1. gemini-2.5-flash
2. Other models (fill later)

Choose model (1, 2): 1
1. Google AI
2. Vertex AI
Choose a backend (1, 2): 2

You need an existing Google Cloud account and project, check out this link for details:
https://google.github.io/adk-docs/get-started/quickstart/#gemini---google-cloud-vertex-ai

Enter Google Cloud project ID [YOUR_GOOGLE_PROJECT_ID]:
Enter Google Cloud region [us-central1]:

Agent created in ../my-agents/gcp_releasenotes_agent_app:
- .env
- __init__.py
- agent.py
觀察系統為 Agent 建立預設範本和必要檔案的資料夾。
首先是 .env 檔案。內容如下所示:
GOOGLE_GENAI_USE_VERTEXAI=1
GOOGLE_CLOUD_PROJECT=YOUR_GOOGLE_PROJECT_ID
GOOGLE_CLOUD_LOCATION=YOUR_GOOGLE_PROJECT_REGION
這些值表示我們將透過 Vertex AI 使用 Gemini,以及 Google Cloud 專案 ID 和位置的相應值。
接著是 __init__.py 檔案,這個檔案會將資料夾標示為模組,並包含從 agent.py 檔案匯入代理程式的單一陳述式。
from . import agent
最後,我們來看看 agent.py 檔案。內容如下所示:
from google.adk.agents import Agent

root_agent = Agent(
    model='gemini-2.5-flash',
    name='root_agent',
    description='A helpful assistant for user questions.',
    instruction='Answer user questions to the best of your knowledge',
)
這是您可以使用 ADK 撰寫的最簡單代理程式。根據 ADK 說明文件頁面,代理程式是獨立的執行單元,可自主運作以達成特定目標。代理程式可以執行工作、與使用者互動、使用外部工具,以及與其他代理程式協調。
具體來說,LLMAgent (通常別名為 Agent) 會以大型語言模型 (LLM) 做為核心引擎,理解自然語言、推論、規劃、生成回覆,並動態決定後續步驟或要使用的工具,因此非常適合以語言為中心、需要彈性的工作。如要進一步瞭解 LLM 代理程式,請參閱這篇文章。
這樣就完成架構,可使用 Agent Development Kit (ADK) 生成基本代理。接下來,我們要將代理連結至 MCP 工具箱,讓代理使用該工具回答使用者查詢 (在本例中為 Google Cloud 版本資訊)。
10. 將代理程式連結至工具
我們現在要將這個代理程式連結至工具。在 ADK 架構中,工具代表賦予 AI 代理的特定能力,使其能執行各種動作並與世界互動,而不侷限於核心的文字生成和推論能力。
在本例中,我們現在要為代理提供在 MCP Toolbox for Databases 中設定的工具。
使用下列程式碼修改 agent.py 檔案。請注意,我們在程式碼中使用預設通訊埠 5000,但如果您使用其他通訊埠號碼,請使用該號碼。
from google.adk.agents import Agent
from toolbox_core import ToolboxSyncClient

toolbox = ToolboxSyncClient("http://127.0.0.1:5000")

# Load all the tools
tools = toolbox.load_toolset('my_bq_toolset')

root_agent = Agent(
    name="gcp_releasenotes_agent",
    model="gemini-2.5-flash",
    description=(
        "Agent to answer questions about Google Cloud Release notes."
    ),
    instruction=(
        "You are a helpful agent who can answer user questions about the Google Cloud Release notes. Use the tools to answer the question"
    ),
    tools=tools,
)
現在可以測試代理程式,從已透過 MCP Toolbox for Databases 設定的 BigQuery 資料集擷取實際資料。
如要執行這項操作,請依序完成下列步驟:
在 Cloud Shell 的其中一個終端機中,啟動 MCP Toolbox for Databases。如先前測試時一樣,您可能已在本機的 5000 埠執行此服務。如果沒有,請執行下列指令 (從 mcp-toolbox 資料夾) 啟動伺服器:
./toolbox --tools_file "tools.yaml"
理想情況下,您應該會看到伺服器已連線至資料來源,並載入工具集和工具的輸出內容。
MCP 伺服器成功啟動後,請在另一個終端機中,透過下列 adk run (來自 my-agents 資料夾) 指令啟動代理程式。您也可以視需要使用 adk web 指令。
$ adk run gcp_releasenotes_agent_app/

Log setup complete: /tmp/agents_log/agent.20250423_170001.log
To access latest log: tail -F /tmp/agents_log/agent.latest.log
Running agent gcp_releasenotes_agent, type exit to exit.

[user]: get me the google cloud release notes


[gcp_releasenotes_agent]: Here are the Google Cloud Release Notes.

Google SecOps SOAR: Release 6.3.49 is being rolled out to the first phase of regions. This release contains internal and customer bug fixes. Published: 2025-06-14

Compute Engine: Dynamic NICs let you add or remove network interfaces to or from an instance without having to restart or recreate the instance. You can also use Dynamic NICs when you need more network interfaces. The maximum number of vNICs for most machine types in Google Cloud is 10; however, you can configure up to 16 total interfaces by using Dynamic NICs. Published: 2025-06-13

Compute Engine: General purpose C4D machine types, powered by the fifth generation AMD EPYC processors (Turin) and Google Titanium, are generally available. Published: 2025-06-13

Google Agentspace: Google Agentspace Enterprise: App-level feature management. As an Agentspace administrator, you can choose to turn the following features on or off for your end users in the web app: Agents gallery, Prompt gallery, No-code agent, NotebookLM Enterprise. Published: 2025-06-13

Cloud Load Balancing: Cloud Load Balancing supports load balancing to multi-NIC instances that use Dynamic NICs. This capability is in Preview. Published: 2025-06-13

Virtual Private Cloud: Dynamic Network Interfaces (NICs) are available in Preview. Dynamic NICs let you update an instance to add or remove network interfaces without having to restart or recreate the instance. Published: 2025-06-13

Security Command Center: The following Event Threat Detection detectors for Vertex AI have been released to Preview:
- `Persistence: New Geography for AI Service`
- `Privilege Escalation: Anomalous Multistep Service Account Delegation for AI Admin Activity`
- `Privilege Escalation: Anomalous Multistep Service Account Delegation for AI Data Access`
- `Privilege Escalation: Anomalous Service Account Impersonator for AI Admin Activity`
- `Privilege Escalation: Anomalous Service Account Impersonator for AI Data Access`
- `Privilege Escalation: Anomalous Impersonation of Service Account for AI Admin Activity`
- `Persistence: New AI API Method`
......
......
請注意,代理程式會使用我們在 MCP Toolbox for Databases 中設定的工具 (search_release_notes_bq),並從 BigQuery 資料集擷取資料,然後相應地設定回應格式。
11. 恭喜
恭喜!您已成功設定 MCP Toolbox for Databases,並設定 BigQuery 資料集,供 MCP 用戶端存取。