
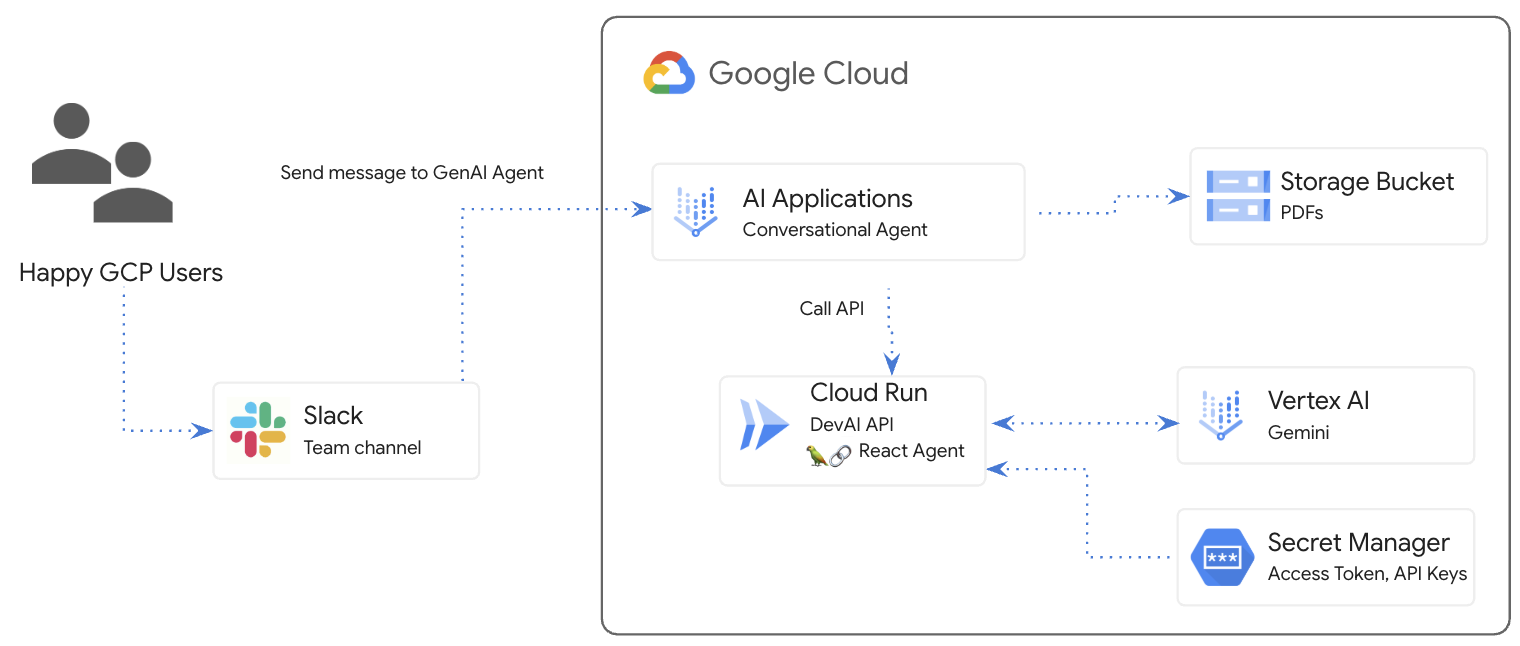
1. Overview
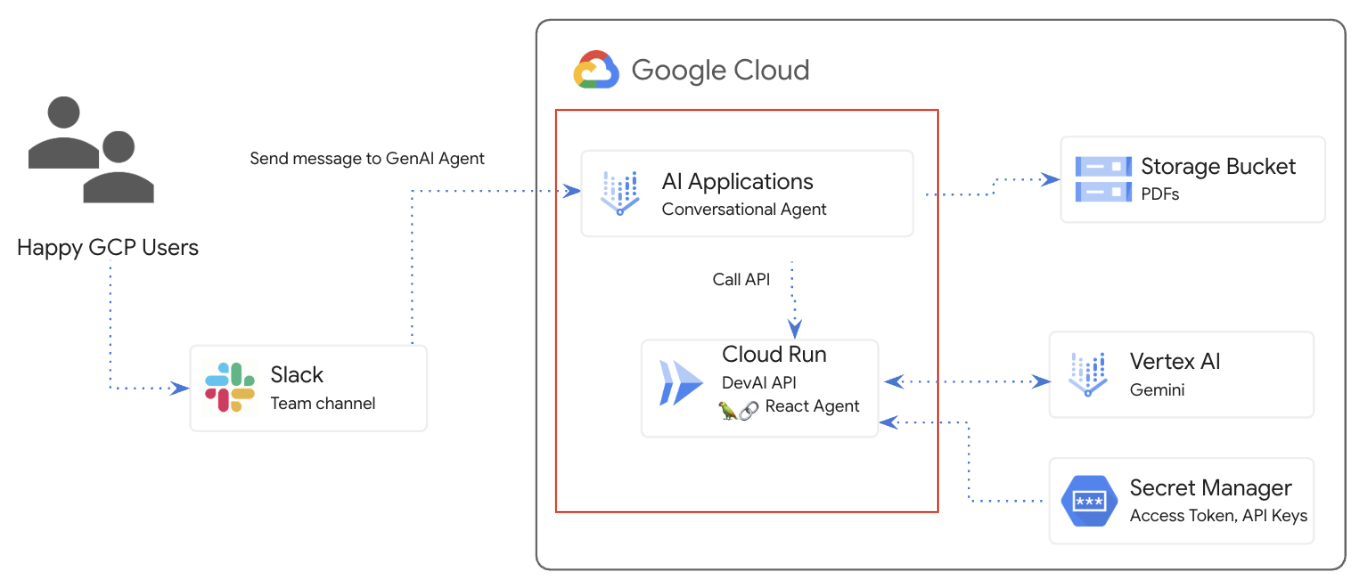
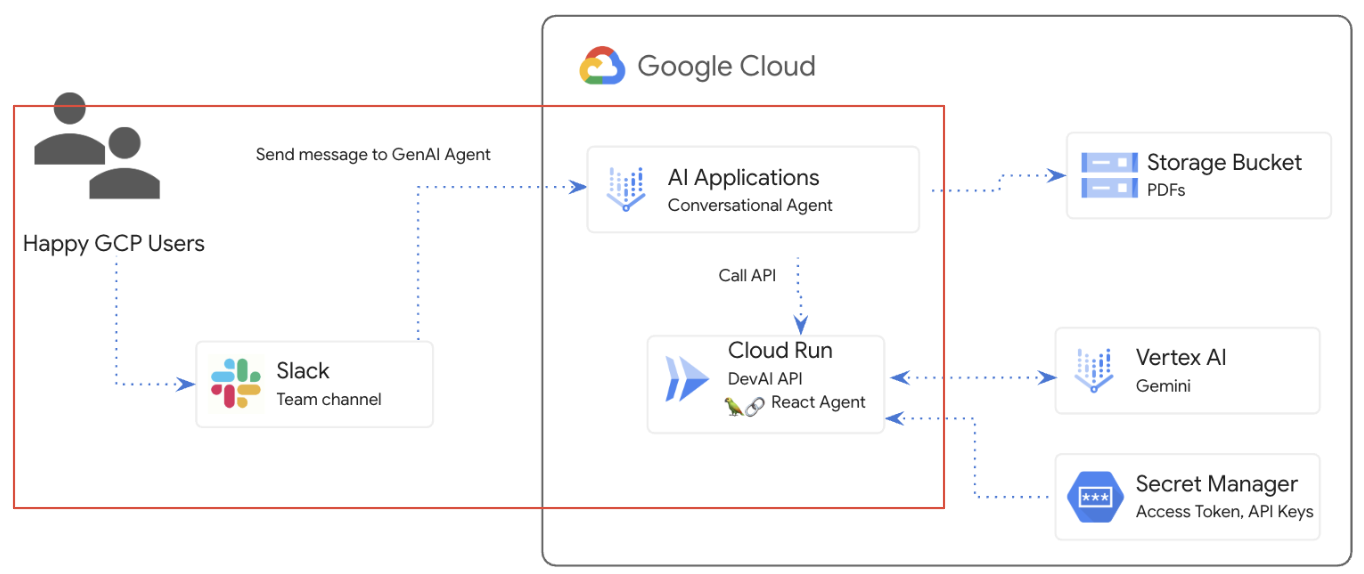
In this lab, you will create a GenAI Agent, connect it to the Cloud Run application and integrate the agent into the Slack workspace.
What you will learn
There are several main parts to the lab:
- Deploy Cloud Run application to integrate with Gemini APIs
- Create and deploy Conversational Agent in AI Applications
- Integrate Agent into Slack
- Configure data store for Q&A over PDF documents
Prerequisites
- This lab assumes familiarity with the Cloud Console and Cloud Shell environments.
2. Setup and Requirements
Cloud Project setup
- Sign-in to the Google Cloud Console and create a new project or reuse an existing one. If you don't already have a Gmail or Google Workspace account, you must create one.


- The Project name is the display name for this project's participants. It is a character string not used by Google APIs. You can always update it.
- The Project ID is unique across all Google Cloud projects and is immutable (cannot be changed after it has been set). The Cloud Console auto-generates a unique string; usually you don't care what it is. In most codelabs, you'll need to reference your Project ID (typically identified as
PROJECT_ID). If you don't like the generated ID, you might generate another random one. Alternatively, you can try your own, and see if it's available. It can't be changed after this step and remains for the duration of the project. - For your information, there is a third value, a Project Number, which some APIs use. Learn more about all three of these values in the documentation.
- Next, you'll need to enable billing in the Cloud Console to use Cloud resources/APIs. Running through this codelab won't cost much, if anything at all. To shut down resources to avoid incurring billing beyond this tutorial, you can delete the resources you created or delete the project. New Google Cloud users are eligible for the $300 USD Free Trial program.
Environment Setup
Open Gemini chat.

Enable Gemini for Google Cloud API:


Click "Start chatting" and follow one of the sample questions or type your own prompt to try it out.

Prompts to try:
- Explain Cloud Run in 5 key points.
- You are Google Cloud Run Product Manager, explain Cloud Run to a student in 5 short key points.
- You are Google Cloud Run Product Manager, explain Cloud Run to a Certified Kubernetes Developer in 5 short key points.
- You are Google Cloud Run Product Manager, explain when you would use Cloud Run versus GKE to a Senior Developer in 5 short key points.
Check out the Prompt Guide to learn more about writing better prompts.
How Gemini for Google Cloud uses your data
Google's privacy commitment
Google was one of the first in the industry to publish an AI/ML privacy commitment, which outlines our belief that customers should have the highest level of security and control over their data that's stored in the cloud.
Data you submit and receive
The questions that you ask Gemini, including any input information or code that you submit to Gemini to analyze or complete, are called prompts. The answers or code completions that you receive from Gemini are called responses. Gemini doesn't use your prompts or its responses as data to train its models.
Encryption of prompts
When you submit prompts to Gemini, your data is encrypted in-transit as input to the underlying model in Gemini.
Program data generated from Gemini
Gemini is trained on first-party Google Cloud code as well as selected third-party code. You're responsible for the security, testing, and effectiveness of your code, including any code completion, generation, or analysis that Gemini offers you.
Learn more how Google handles your prompts.
3. Options to test prompts
You have several options to test prompts.
Vertex AI Studio is a part of Google Cloud's Vertex AI platform, specifically designed to simplify and accelerate the development and use of generative AI models.
Google AI Studio is a web-based tool for prototyping and experimenting with prompt engineering and the Gemini API.
- Gemini Web App (gemini.google.com)
The Google Gemini web app (gemini.google.com) is a web-based tool designed to help you explore and utilize the power of Google's Gemini AI models.
- Google Gemini mobile app for Android and Google app on iOS
4. Clone the repo
Return to Google Cloud Console and activate Cloud Shell by clicking on the icon to the right of the search bar.

If prompted to authorize, click "Authorize" to continue.

In the opened terminal, run following commands
git clone https://github.com/GoogleCloudPlatform/genai-for-developers.git

cd genai-for-developers

git checkout slack-agent-jira-lab
Click "Open Editor"

Using the "File / Open Folder" menu item, open "genai-for-developers".

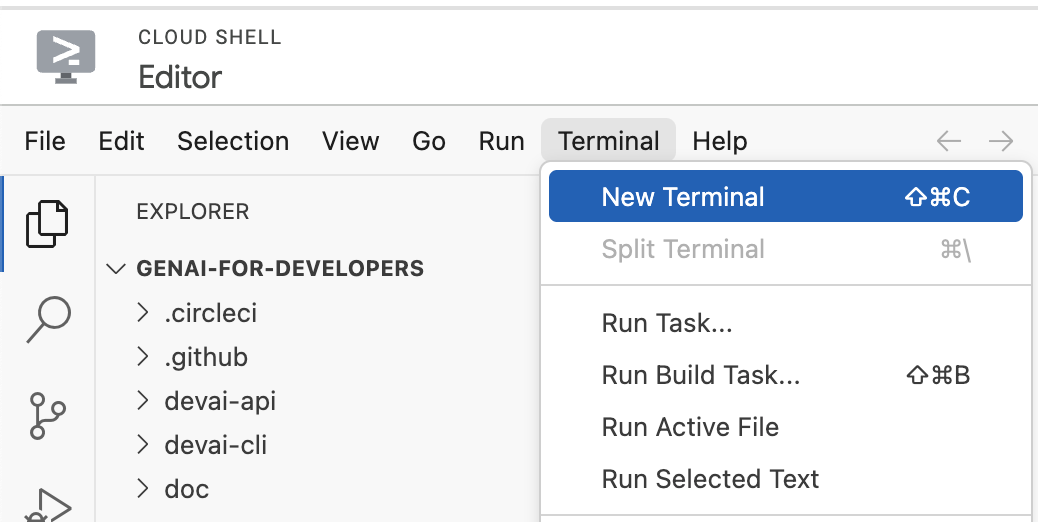
Open a new terminal
5. Create Service Account
Create a new service account. You will use this service account to make API calls to Vertex AI Gemini API from Cloud Run application.
Configure project details using your qwiklabs project details.
Example: qwiklabs-gcp-00-2c10937585bb
gcloud config set project YOUR_QWIKLABS_PROJECT_ID
Create a service account.
export LOCATION=us-central1
export PROJECT_ID=$(gcloud config get-value project)
export SERVICE_ACCOUNT_NAME='vertex-client'
export DISPLAY_NAME='Vertex Client'

gcloud iam service-accounts create $SERVICE_ACCOUNT_NAME --project $PROJECT_ID --display-name "$DISPLAY_NAME"
Grant roles.
gcloud projects add-iam-policy-binding $PROJECT_ID --member="serviceAccount:$SERVICE_ACCOUNT_NAME@$PROJECT_ID.iam.gserviceaccount.com" --role="roles/aiplatform.admin"

gcloud projects add-iam-policy-binding $PROJECT_ID --member="serviceAccount:$SERVICE_ACCOUNT_NAME@$PROJECT_ID.iam.gserviceaccount.com" --role="roles/aiplatform.user"

gcloud projects add-iam-policy-binding $PROJECT_ID --member="serviceAccount:$SERVICE_ACCOUNT_NAME@$PROJECT_ID.iam.gserviceaccount.com" --role="roles/cloudbuild.builds.editor"

gcloud projects add-iam-policy-binding $PROJECT_ID --member="serviceAccount:$SERVICE_ACCOUNT_NAME@$PROJECT_ID.iam.gserviceaccount.com" --role="roles/artifactregistry.admin"

gcloud projects add-iam-policy-binding $PROJECT_ID --member="serviceAccount:$SERVICE_ACCOUNT_NAME@$PROJECT_ID.iam.gserviceaccount.com" --role="roles/storage.admin"

gcloud projects add-iam-policy-binding $PROJECT_ID --member="serviceAccount:$SERVICE_ACCOUNT_NAME@$PROJECT_ID.iam.gserviceaccount.com" --role="roles/run.admin"

gcloud projects add-iam-policy-binding $PROJECT_ID --member="serviceAccount:$SERVICE_ACCOUNT_NAME@$PROJECT_ID.iam.gserviceaccount.com" --role="roles/secretmanager.secretAccessor"
Enable required services to use Vertex AI APIs and Gemini chat.
gcloud services enable \
    generativelanguage.googleapis.com \
    aiplatform.googleapis.com \
    cloudaicompanion.googleapis.com \
    dialogflow.googleapis.com \
    run.googleapis.com \
    cloudresourcemanager.googleapis.com \
    discoveryengine.googleapis.com
Enable required services to use Vertex AI APIs and Gemini chat.
gcloud services enable \
    artifactregistry.googleapis.com \
    cloudbuild.googleapis.com \
    runapps.googleapis.com \
    workstations.googleapis.com \
    servicemanagement.googleapis.com \
    secretmanager.googleapis.com \
    containerscanning.googleapis.com
Use Gemini Code Assist for code explanation
Open file "devai-api/app/routes.py" and then right click anywhere in the file and select "Gemini Code Assist > Explain this" from the context menu.
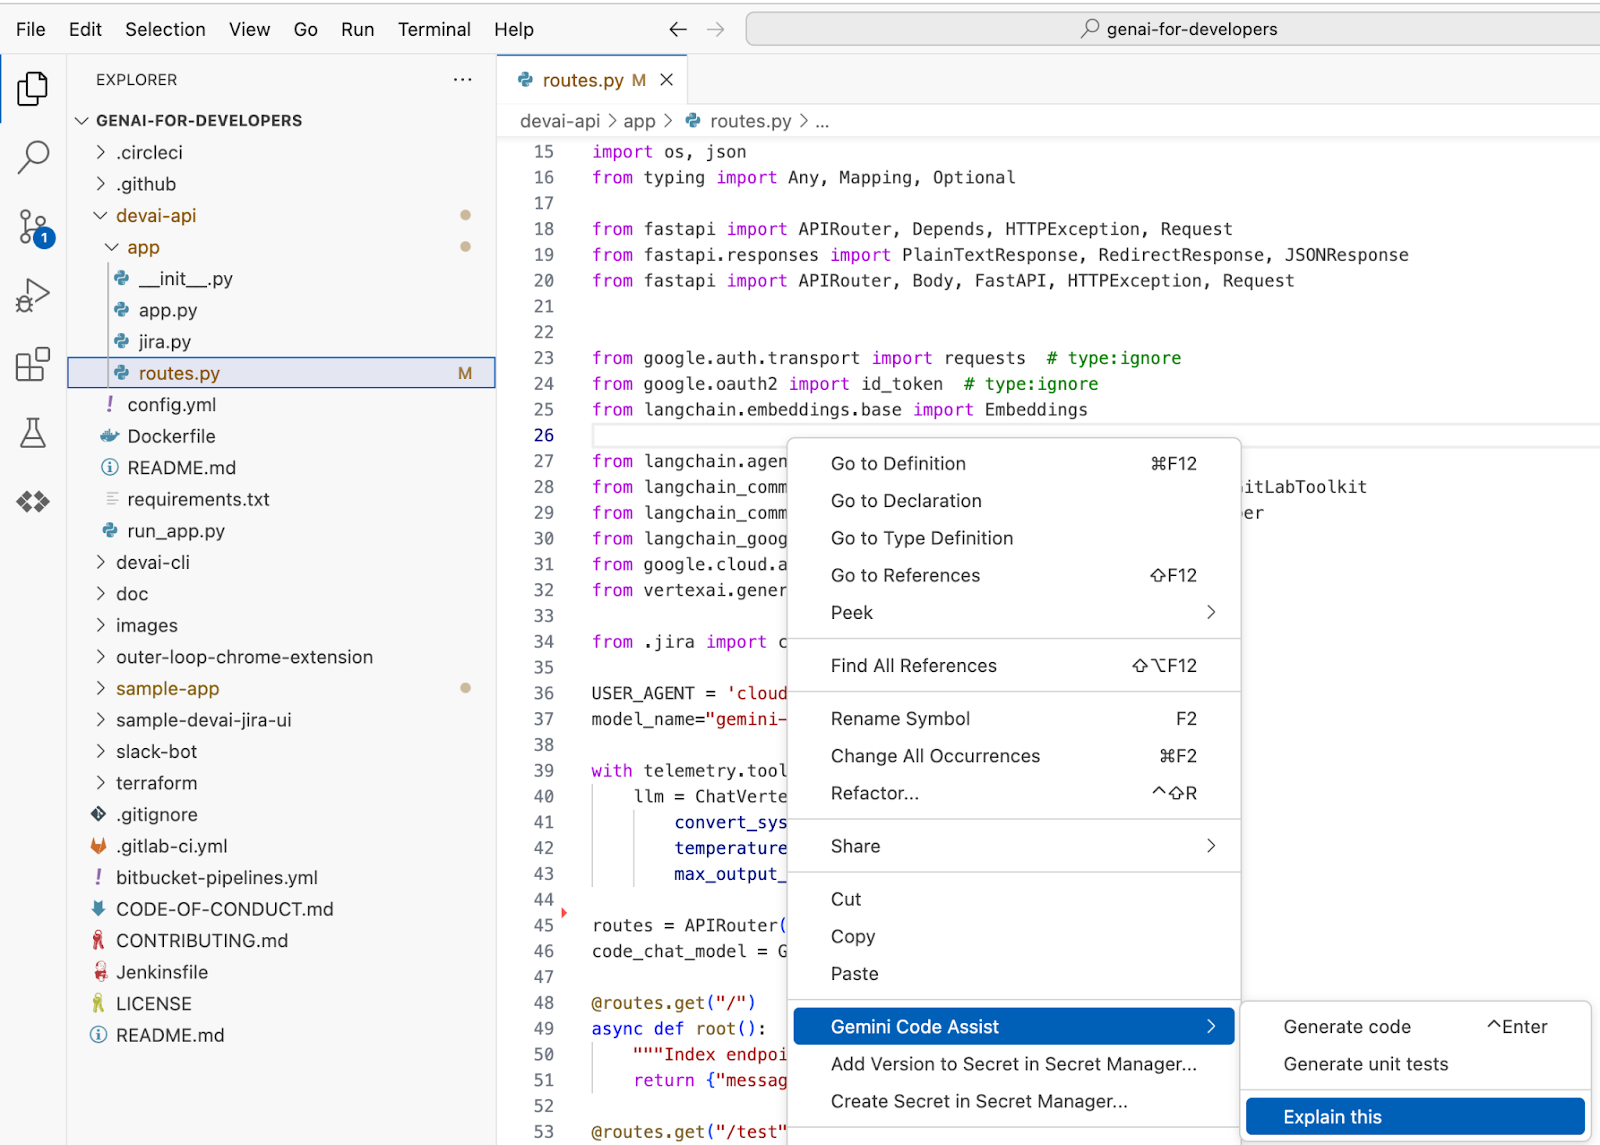
Review Gemini's explanation for the selected file.

6. Deploy Devai-API to Cloud Run
Check that you are in the right folder.
cd ~/genai-for-developers/devai-api
For this lab, we follow best practices and use Secret Manager to store and reference the Access Token and LangChain API Key values in Cloud Run.
Set environment variables. Run this command as is without any changes.
export JIRA_API_TOKEN=your-jira-token
export JIRA_USERNAME="YOUR-EMAIL"
export JIRA_INSTANCE_URL="https://YOUR-JIRA-PROJECT.atlassian.net"
export JIRA_PROJECT_KEY="YOUR-JIRA-PROJECT-KEY"
export JIRA_CLOUD=true

export GITLAB_PERSONAL_ACCESS_TOKEN=your-gitlab-token
export GITLAB_URL="https://gitlab.com"
export GITLAB_BRANCH="devai"
export GITLAB_BASE_BRANCH="main"
export GITLAB_REPOSITORY="GITLAB-USERID/GITLAB-REPO"

export LANGCHAIN_API_KEY=your-langchain-key
export LANGCHAIN_TRACING_V2=true
export LANGCHAIN_ENDPOINT="https://api.smith.langchain.com"
Create and store several secrets in the Secret Manager.
echo -n $JIRA_API_TOKEN | \
 gcloud secrets create JIRA_API_TOKEN \
 --data-file=-

echo -n $GITLAB_PERSONAL_ACCESS_TOKEN | \
 gcloud secrets create GITLAB_PERSONAL_ACCESS_TOKEN \
 --data-file=-

echo -n $LANGCHAIN_API_KEY | \
 gcloud secrets create LANGCHAIN_API_KEY \
 --data-file=-
Deploy application to Cloud Run.
gcloud run deploy devai-api \
  --source=. \
  --region="$LOCATION" \
  --allow-unauthenticated \
  --service-account vertex-client \
  --set-env-vars PROJECT_ID="$PROJECT_ID" \
  --set-env-vars LOCATION="$LOCATION" \
  --set-env-vars GITLAB_URL="$GITLAB_URL" \
  --set-env-vars GITLAB_REPOSITORY="$GITLAB_REPOSITORY" \
  --set-env-vars GITLAB_BRANCH="$GITLAB_BRANCH" \
  --set-env-vars GITLAB_BASE_BRANCH="$GITLAB_BASE_BRANCH" \
  --set-env-vars JIRA_USERNAME="$JIRA_USERNAME" \
  --set-env-vars JIRA_INSTANCE_URL="$JIRA_INSTANCE_URL" \
  --set-env-vars JIRA_PROJECT_KEY="$JIRA_PROJECT_KEY" \
  --set-env-vars JIRA_CLOUD="$JIRA_CLOUD" \
  --set-env-vars LANGCHAIN_TRACING_V2="$LANGCHAIN_TRACING_V2" \
  --update-secrets="LANGCHAIN_API_KEY=LANGCHAIN_API_KEY:latest" \
  --update-secrets="GITLAB_PERSONAL_ACCESS_TOKEN=GITLAB_PERSONAL_ACCESS_TOKEN:latest" \
  --update-secrets="JIRA_API_TOKEN=JIRA_API_TOKEN:latest" \
  --min-instances=1 \
  --max-instances=3
Answer Y to create Artifact Registry Docker repository.
Deploying from source requires an Artifact Registry Docker repository to store built containers. A repository named [cloud-run-source-deploy] in
region [us-central1] will be created.

Do you want to continue (Y/n)?  y
Ask Gemini to explain the command:
What does this command do?

gcloud run deploy devai-api \
  --source=. \
  --region="$LOCATION" \
  --allow-unauthenticated \
  --service-account vertex-client \
  --set-env-vars PROJECT_ID="$PROJECT_ID" \
  --set-env-vars LOCATION="$LOCATION" \
  --set-env-vars GITLAB_URL="$GITLAB_URL" \
  --set-env-vars GITLAB_REPOSITORY="$GITLAB_REPOSITORY" \
  --set-env-vars GITLAB_BRANCH="$GITLAB_BRANCH" \
  --set-env-vars GITLAB_BASE_BRANCH="$GITLAB_BASE_BRANCH" \
  --set-env-vars JIRA_USERNAME="$JIRA_USERNAME" \
  --set-env-vars JIRA_INSTANCE_URL="$JIRA_INSTANCE_URL" \
  --set-env-vars JIRA_PROJECT_KEY="$JIRA_PROJECT_KEY" \
  --set-env-vars JIRA_CLOUD="$JIRA_CLOUD" \
  --set-env-vars LANGCHAIN_TRACING_V2="$LANGCHAIN_TRACING_V2" \
  --update-secrets="LANGCHAIN_API_KEY=LANGCHAIN_API_KEY:latest" \
  --update-secrets="GITLAB_PERSONAL_ACCESS_TOKEN=GITLAB_PERSONAL_ACCESS_TOKEN:latest" \
  --update-secrets="JIRA_API_TOKEN=JIRA_API_TOKEN:latest" \
  --min-instances=1 \
  --max-instances=3
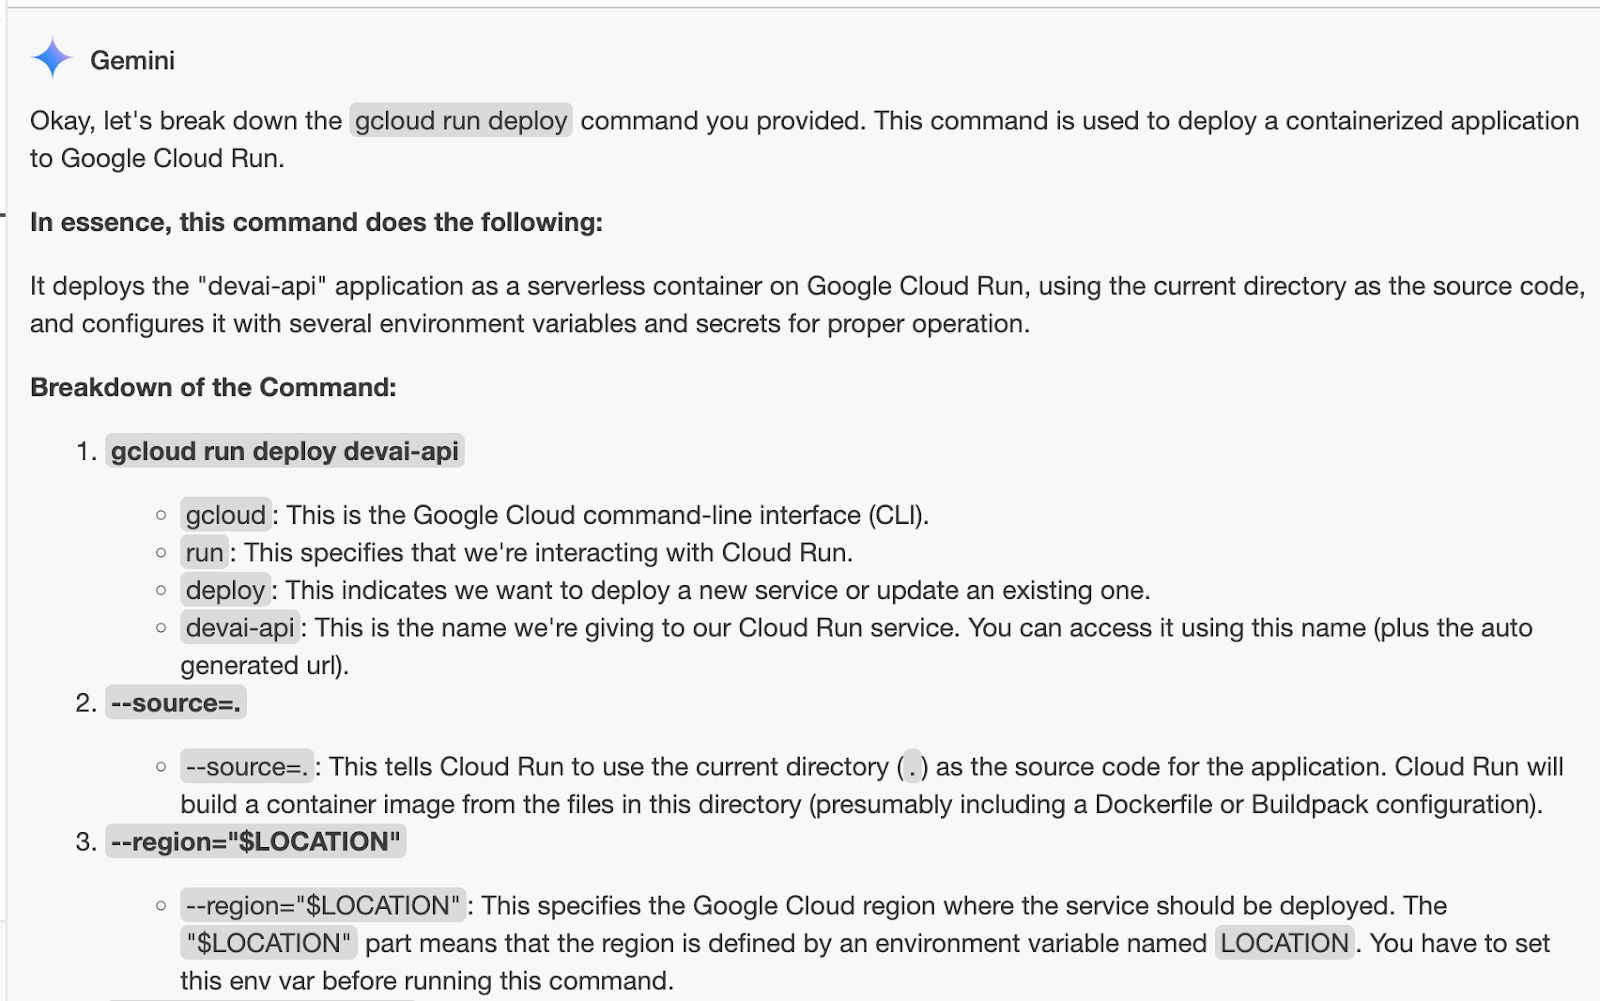
Review gcloud run deploy SERVICE_NAME --source=. flow below. Learn more.

Behind the scenes, this command uses Google Cloud's buildpacks and Cloud Build to automatically build container images from your source code without having to install Docker on your machine or set up buildpacks or Cloud Build. That is, the single command described above does what would otherwise require the gcloud builds submit and the gcloud run deploy commands.
If you have provided Dockerfile(which we did in this repository) then Cloud Build will use it to build container images vs relying on the buildpacks to automatically detect and build container images. To learn more about buildpacks check out documentation.
Review Cloud Build logs in the Console.
Review created Docker image in Artifact Registry.
Review Cloud Run instance details in the Cloud Console.
Test endpoint by running curl command.
curl -X POST \
   -H "Content-Type: application/json" \
   -d '{"prompt": "PROJECT-100"}' \
   $(gcloud  run services list --filter="(devai-api)" --format="value(URL)")/generate
The response will be in markdown format. Displaying in preview mode for better readability.

7. AI Applications
In the Google Cloud Console search bar, type and open "AI Applications".

Create Conversational Agent app:

Select "Build your own".
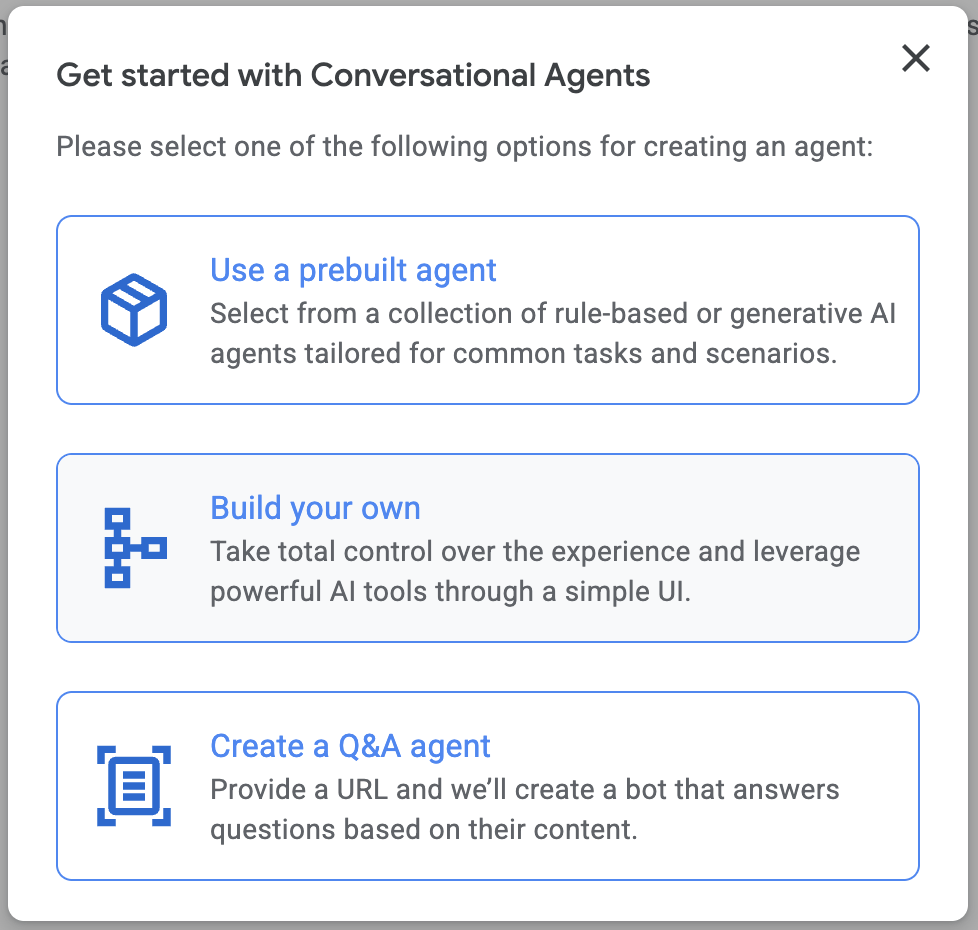
Type "Agent" for Display name and click "Create".

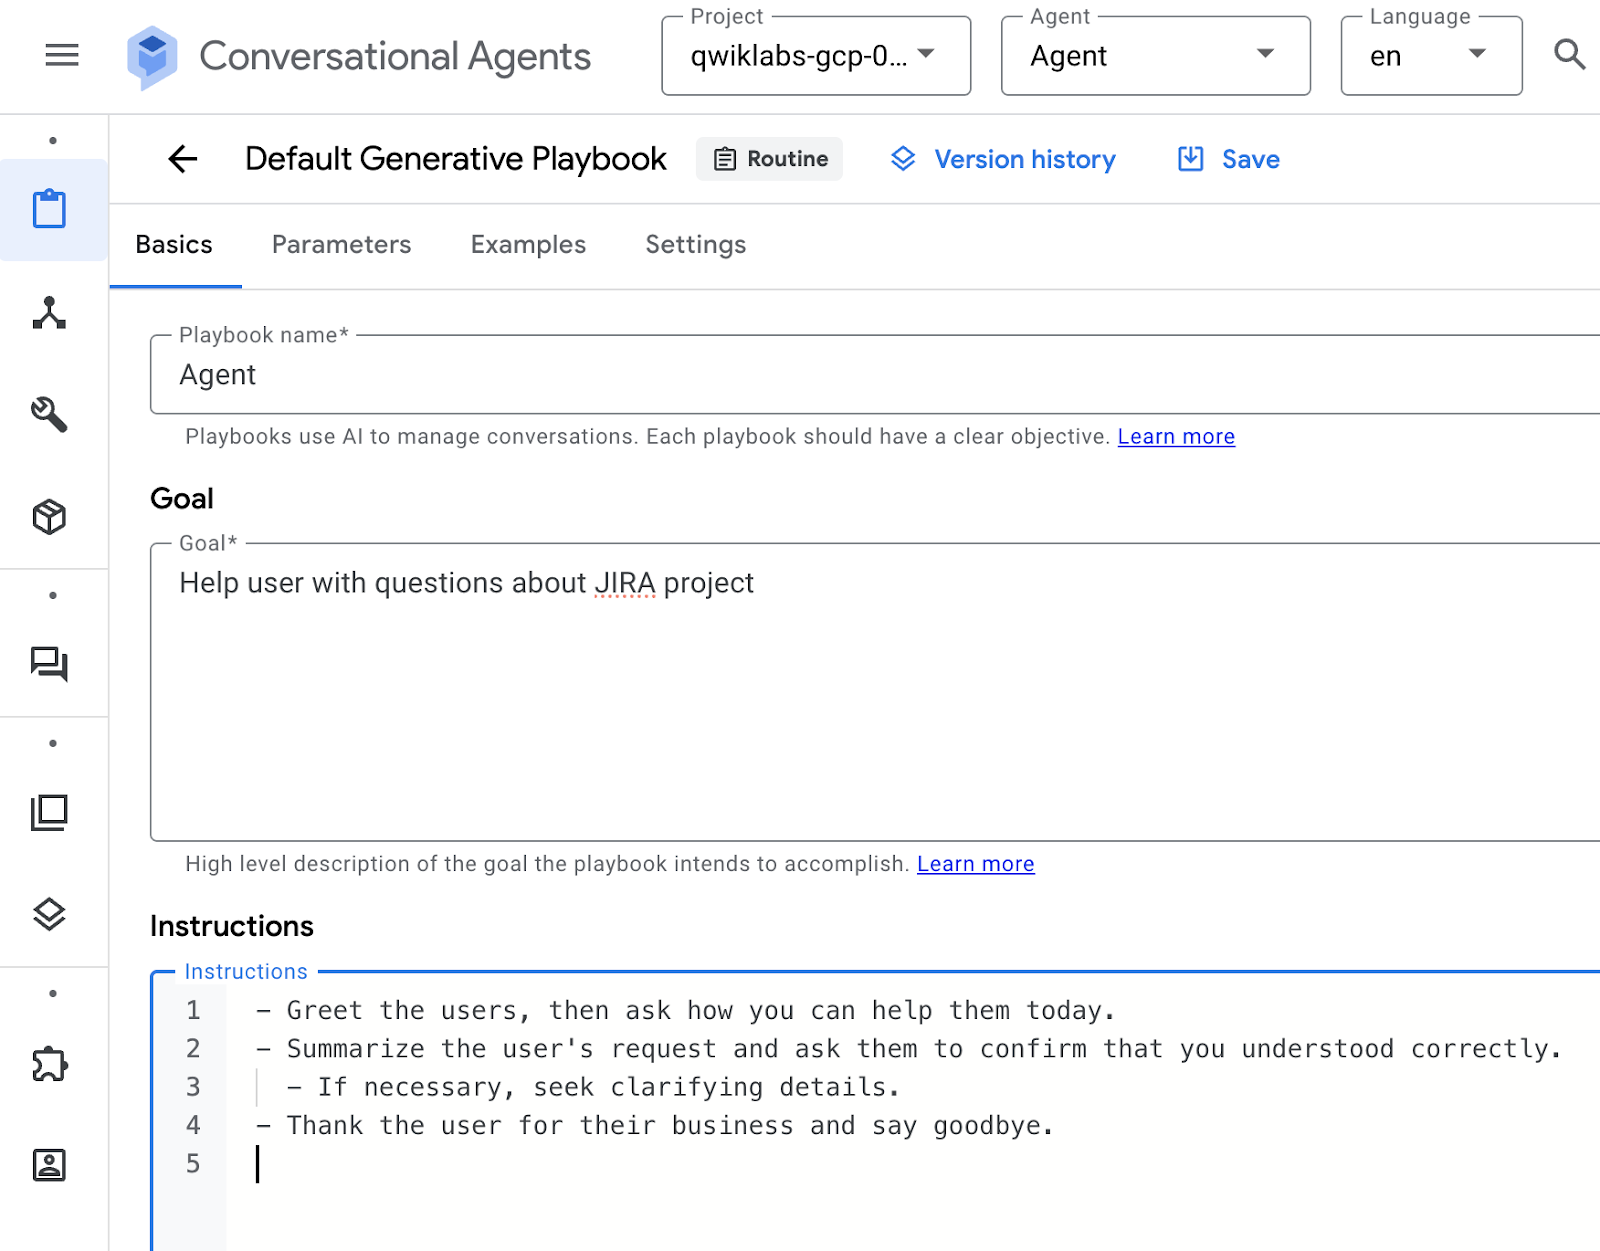
Set Playbook Name:
Agent
Set Goal:
Help users with questions about JIRA project
Set Instructions:
- Greet the users, then ask how you can help them today.
- Summarize the user's request and ask them to confirm that you understood correctly.
  - If necessary, seek clarifying details.
- Thank the user for their business and say goodbye.
Click "Save":
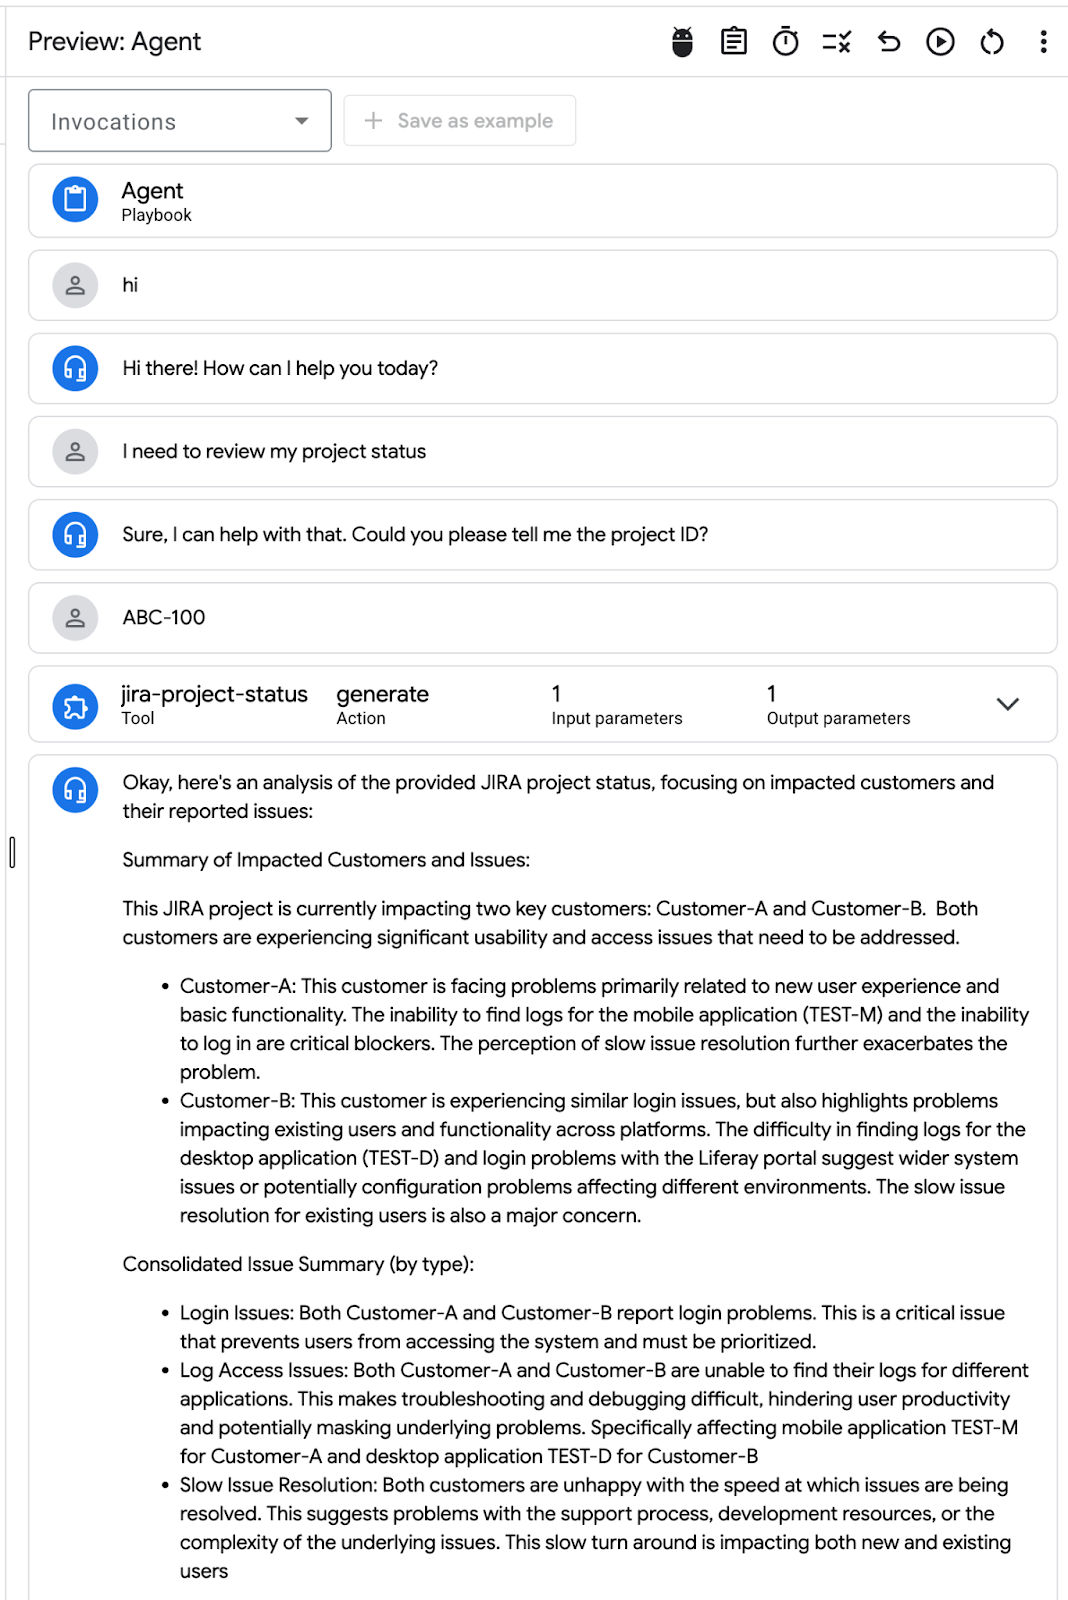
Test the Agent using simulator chat on the right side:

Follow similar conversations as shown below:

Agent's Tools configuration
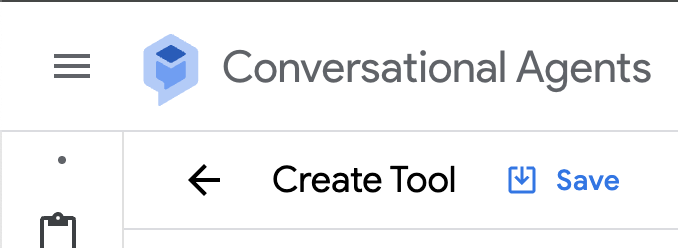
Mouse over the wrench icon on the left. Open Tools menu and create a new Tool:

Select OpenAPI from the Type dropdown.
Set Tool Name:
jira-project-status
Set Description:
Provides JIRA project status
Switch tabs and check console output for Cloud Run service url. Copy the service url value.
Set Schema (YAML) - replace YOUR CLOUD RUN URL.
openapi: 3.0.0
info:
 title: CR API
 version: 1.0.0
 description: >-
   This is the OpenAPI specification of a service.
servers:
 - url: 'https://YOUR CLOUD RUN URL'
paths:

 /generate:
   post:
     summary: Request impl
     operationId: generate
     requestBody:
       description: Request impl
       required: true
       content:
         application/json:
           schema:
             $ref: '#/components/schemas/Prompt'
     responses:
       '200':
         description: Generated
         content:
           application/json:
             schema:
               $ref: '#/components/schemas/ProjectStatus'

components:
 schemas:
   Prompt:
     type: object
     required:
       - prompt
     properties:
       prompt:
         type: string
   ProjectStatus:
     type: object
     required:
       - message
     properties:
       message:
         type: string
Save the Tool configuration:

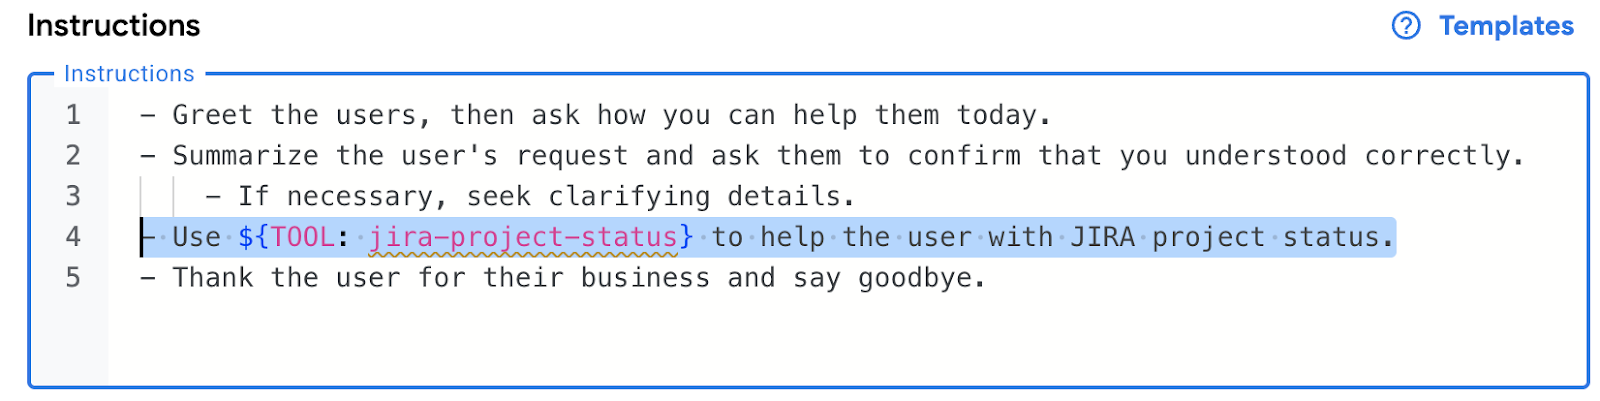
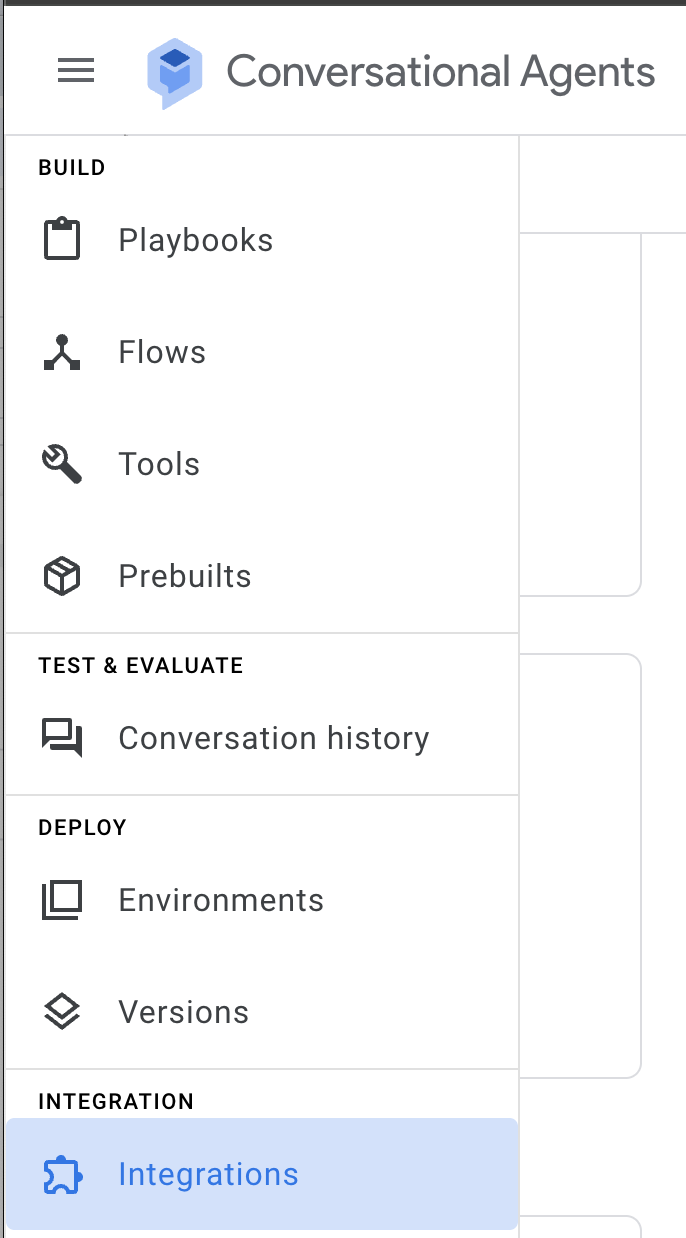
Return to Agent configuration by selecting "Playbooks" from the left menu and update instructions to use the tool:
Add instructions to use new tool and click "Save":
- Use ${TOOL: jira-project-status} to help the user with JIRA project status.
Switch to "Examples" tab and add new example:

Set Display Name:
jira-project-flow
Using menu at the bottom, model the conversation between user and agent:
Example flow:
Agent response: What's the project id?
User input: TEST-PROJECT-100
Tool use: jira-project-status
Agent response: Project status details.
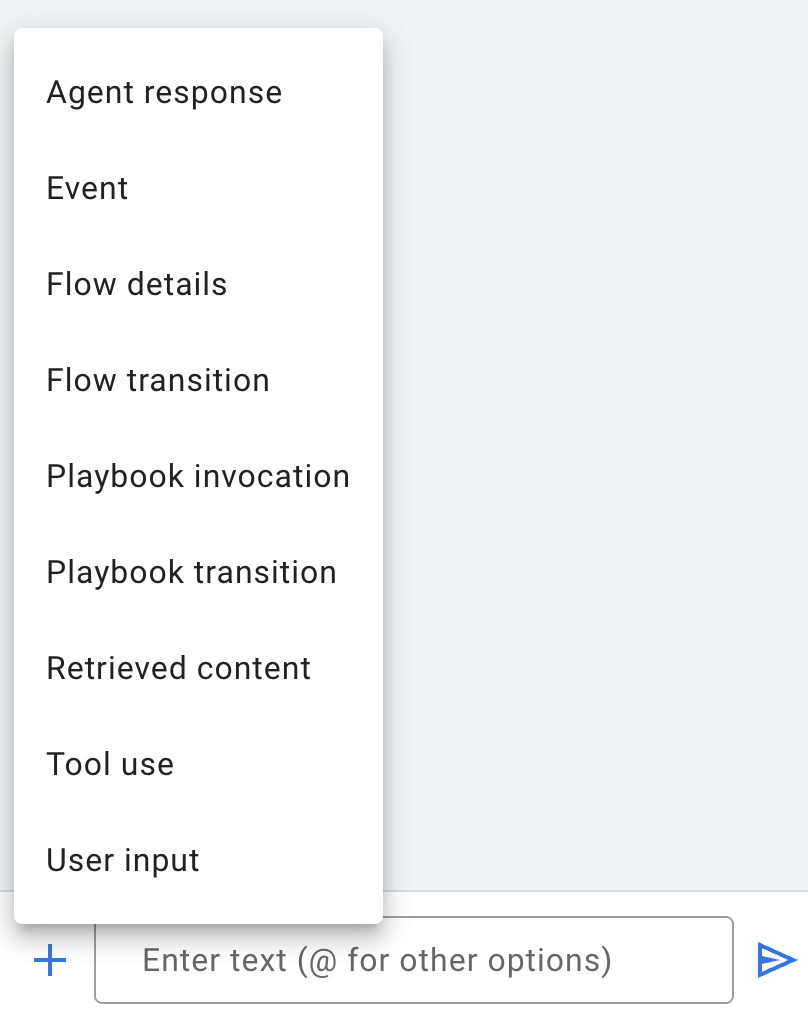
Use the reference below to create the example.
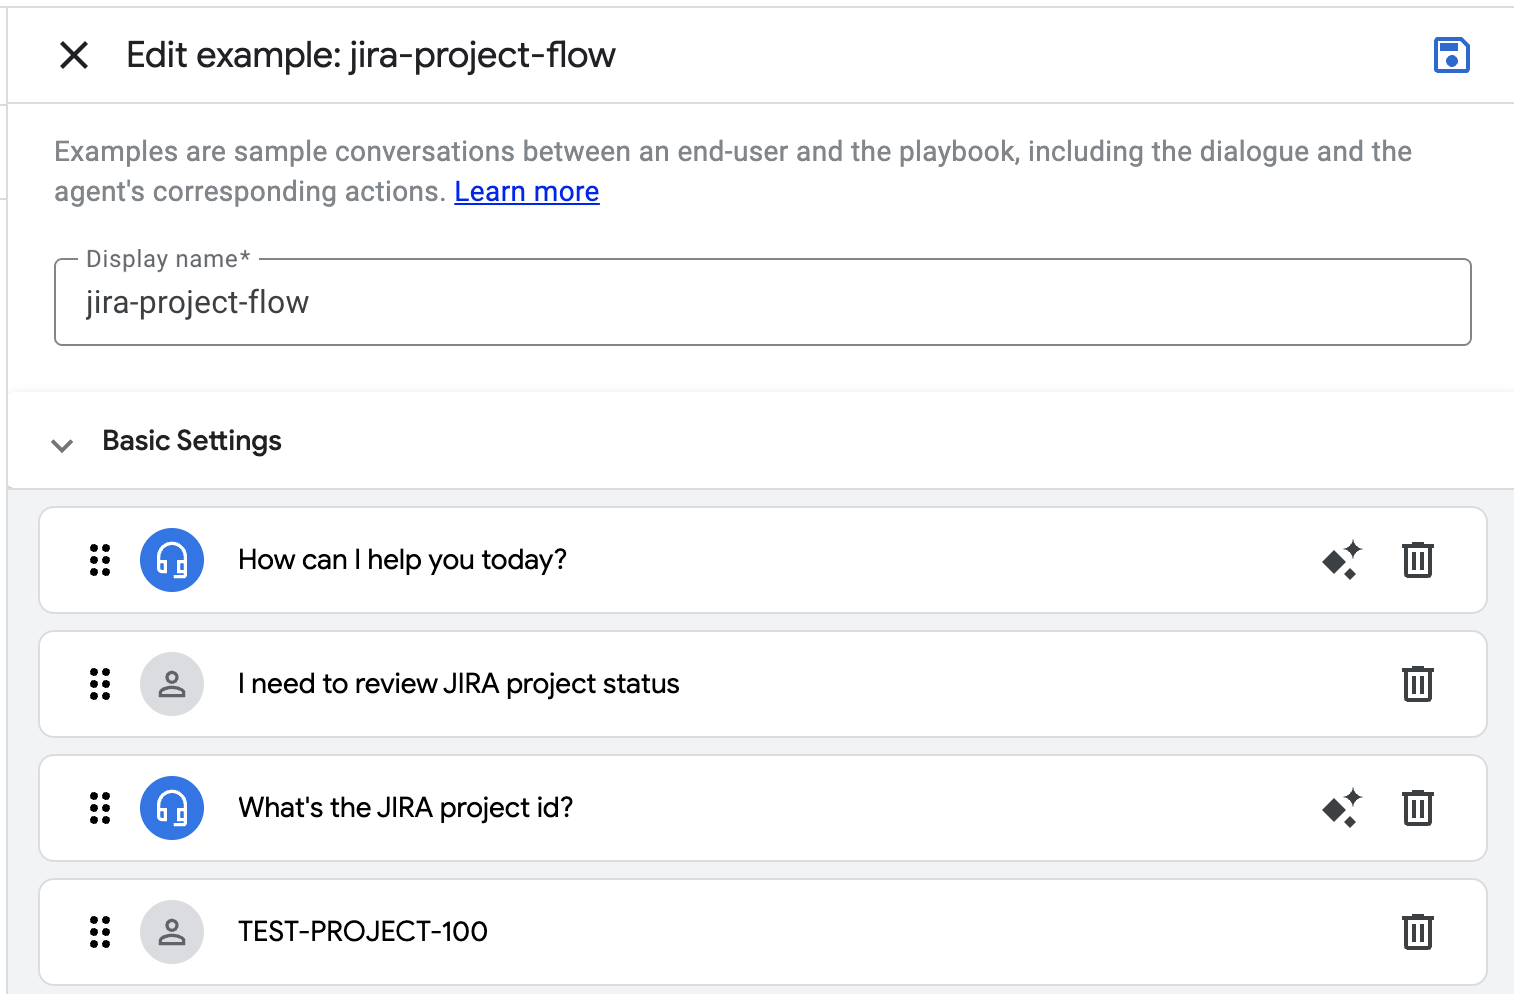

Click Save. Return to the Agent simulator and reset any existing conversations. Test the flow.

Congratulations! By integrating tools linked to the application(API) deployed on Cloud Run, you've successfully empowered Agent to carry out actions and extend Agent's capabilities.
Review Best Practices for Conversational Agents
Review Available Agent Settings
- Logging settings - Enable Cloud Logging
- Git integration - Git integration allows you to push and pull your agent from a Git repository.
- Generative model selection
- Token limits(input and output)

Review Agent simulator controls:

8. Slack Integration
Open the Integrations menu and click "Connect" on the Slack tile.


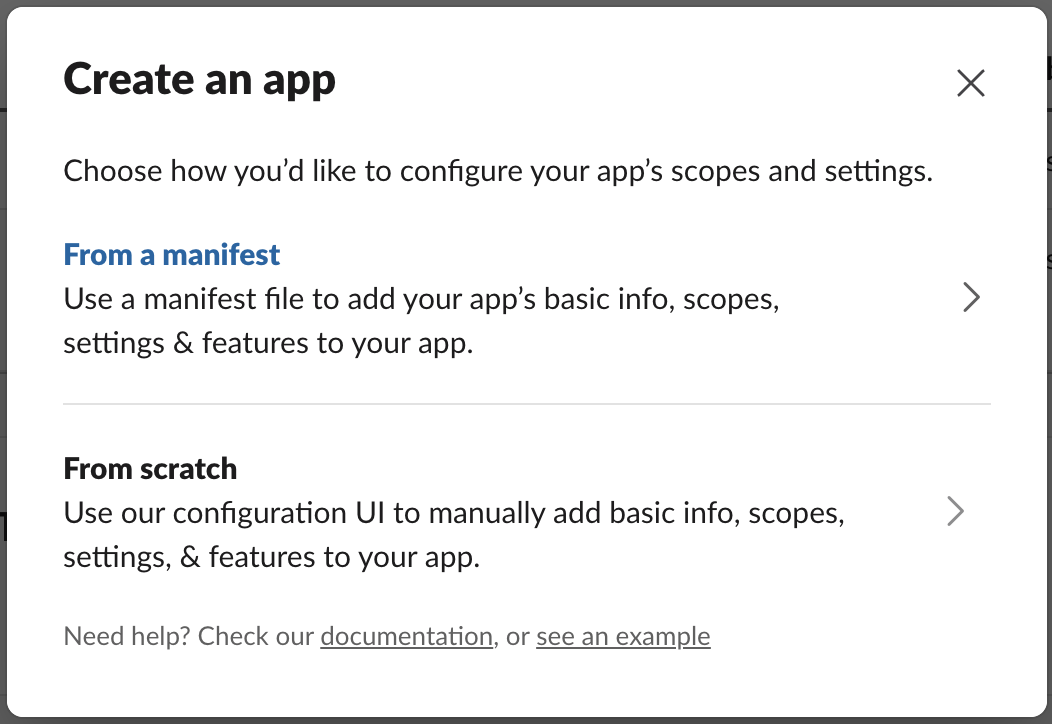
Open the link and create a new Slack app at https://api.slack.com/apps

Select from "Manifest":
Pick a workspace to develop your app

Switch to YAML and paste this manifest:
display_information:
  name: Agent
  description: Agent
  background_color: "#1148b8"
features:
  app_home:
    home_tab_enabled: false
    messages_tab_enabled: true
    messages_tab_read_only_enabled: false
  bot_user:
    display_name: Agent
    always_online: true
oauth_config:
  scopes:
    bot:
      - app_mentions:read
      - chat:write
      - im:history
      - im:read
      - im:write
      - incoming-webhook
settings:
  event_subscriptions:
    request_url: https://dialogflow-slack-4vnhuutqka-uc.a.run.app
    bot_events:
      - app_mention
      - message.im
  org_deploy_enabled: false
  socket_mode_enabled: false
  token_rotation_enabled: false
Click "Create":

Install to Workspace:

Select "#general" channel and click "Allow"

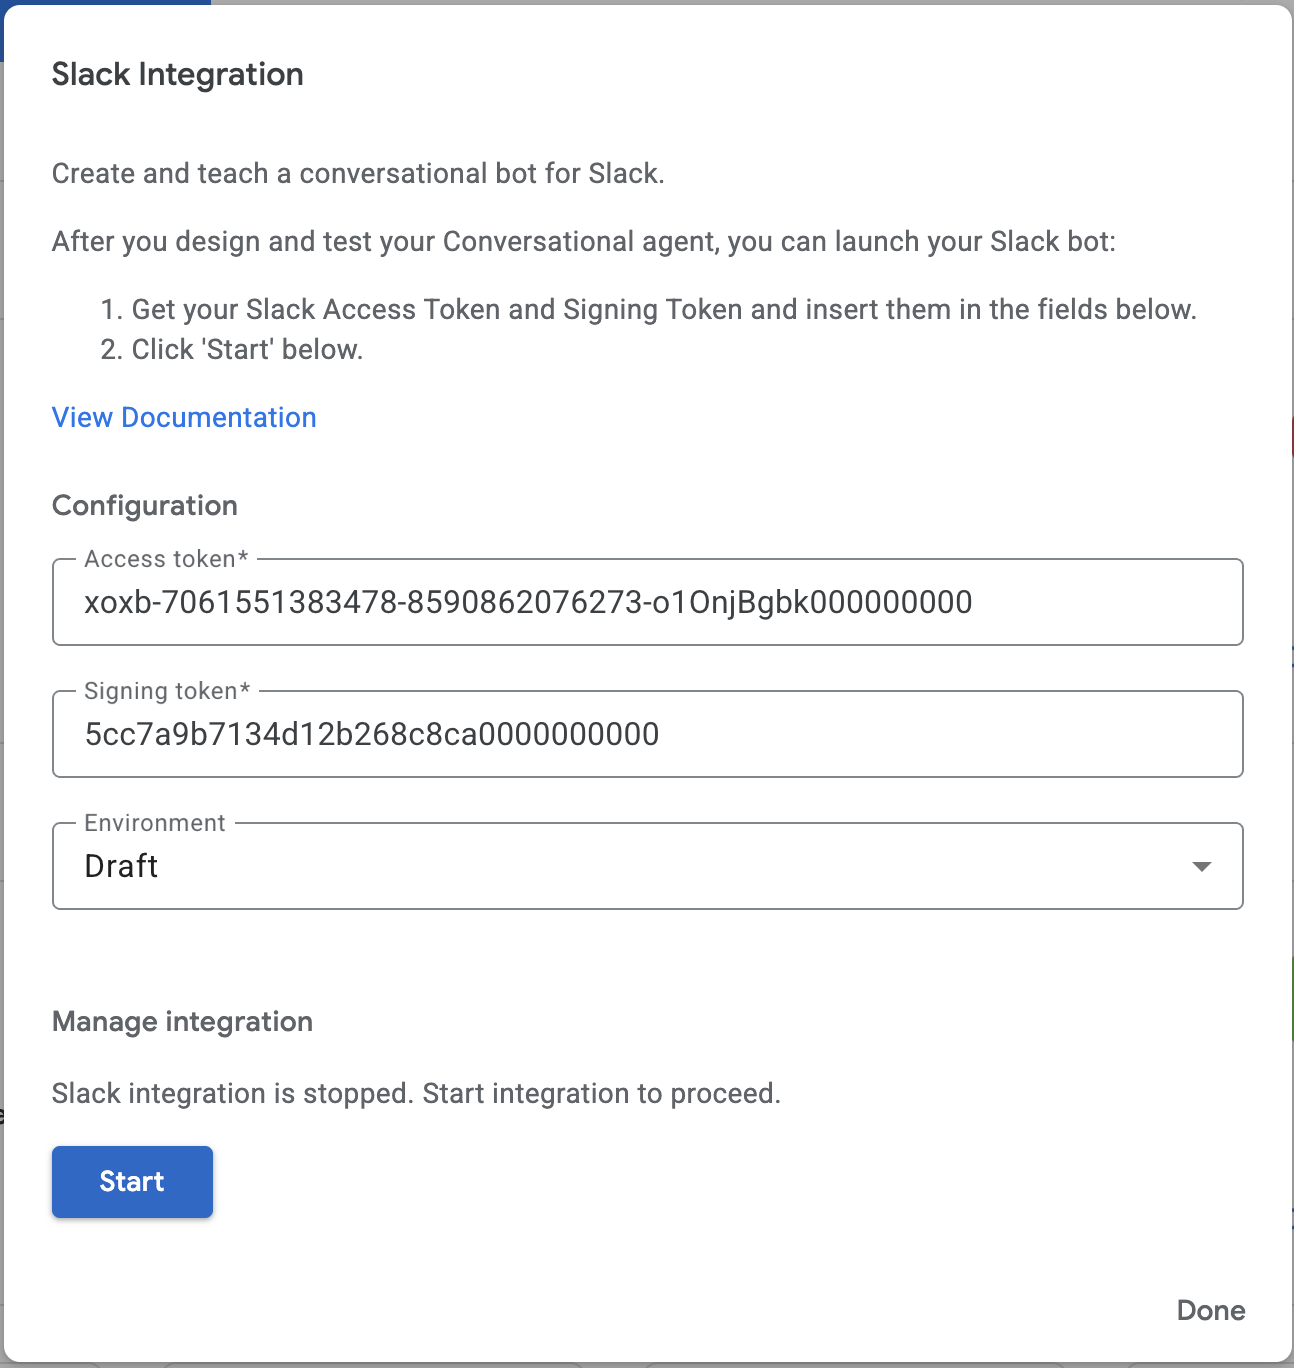
Under "Basic Information / App Credentials" - copy "Signing Secret" and set it in Agent's Slack integration as value for "Signing Token" field.


Open "OAuth & Permissions" and copy "Bot User OAuth Token" and set it in Agent's Slack integration as value for "Access token" field.

Set the required fields and click "Start".
Agent's "Access Token" value is "Bot User OAUth Token" from Slack.
Agent's "Signing Token" value is "Signing Secret" from Slack.

Copy "Webhook URL" and return to Slack app configuration.
Open the "Event Subscriptions" section and paste the url.

Save the changes.

Open "Slack" and add an agent by typing "@Agent".
For example, adding an app with the name "@CX".


Ask the agent for a JIRA project summary.

Congratulations! The Agent has been successfully integrated into the Slack workspace.
9. Q&A over PDF documents
This section outlines how to establish a data store using a PDF document and link it to the Agent, enabling Q&A functionality based on the document's content.
Create Cloud Storage Bucket
Open Cloud Shell: https://shell.cloud.google.com/
Set bucket name using last 5 digits of your GCP project. Example: pdf-docs-3dw21
BUCKET_NAME=pdf-docs-LAST-5-DIGITS-OF-YOUR-PROJECT
Create a bucket and upload a PDF document.
gcloud storage buckets create gs://$BUCKET_NAME \
    --location=us \
    --default-storage-class=STANDARD \
    --no-public-access-prevention \
    --uniform-bucket-level-access

wget https://services.google.com/fh/files/misc/exec_guide_gen_ai.pdf

gsutil cp exec_guide_gen_ai.pdf gs://$BUCKET_NAME
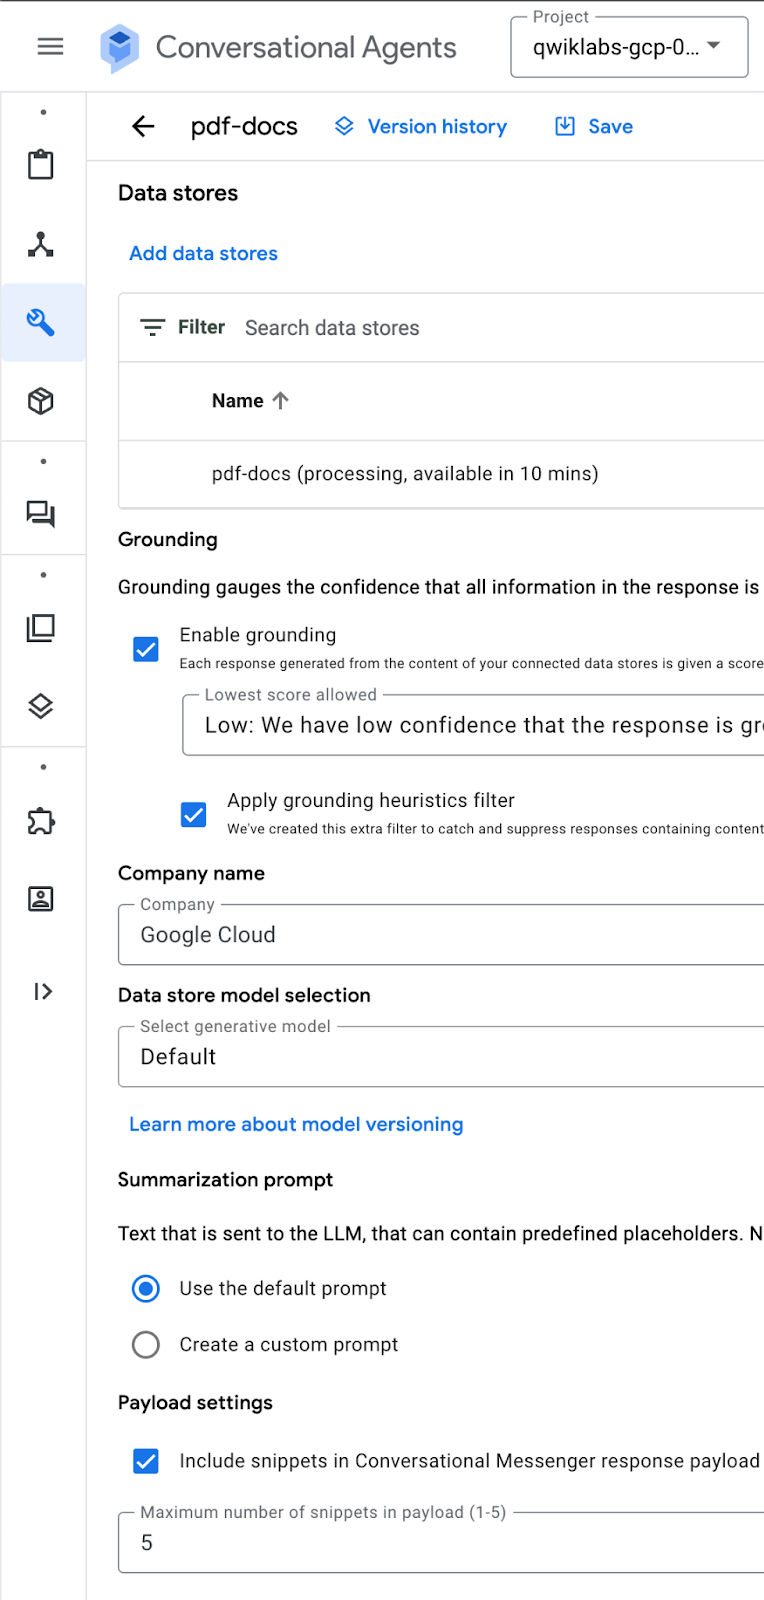
Data store configuration
Return to Agent Console and open "Agent", scroll down and click "+ Data store".

Use following values:
Tool name: pdf-docs
Type: Data store
Description: pdf-docs
Click "Save"
Click the "Add data stores" at the bottom on the page. Then click "Create new data store".

Select "Cloud Storage" as data source.
Select: Unstructured documents
And select your GCS bucket/folder.

Select "us" for data store location.
For data store name type: "pdf-docs"
Select "Digital parser" from the dropdown.
Enable advanced chunking.
Enable ancestor headings in chunks.
Click "Create".


Click on the data store and review Documents, Activity and Processing Config.

It will take ~5-10 minutes to complete the import.

Parsing and Chunking options
You can control content parsing in the following ways:
- Digital parser. The digital parser is on by default for all file types unless a different parser type is specified. The digital parser processes ingested documents if no other default parser is specified for the data store or if the specified parser doesn't support the file type of an ingested document.
- OCR parsing for PDFs. Public preview. If you plan to upload scanned PDFs or PDFs with text inside images, you can turn on the OCR parser to improve PDF indexing. See About OCR parsing for PDFs.
- Layout parser. Turn on the layout parser for HTML, PDF, or DOCX files if you plan to use Vertex AI Search for RAG. See Chunk documents for RAG for information about this parser and how to turn it on.
Learn more about parsing and chunking documents.
Tool configuration
Return to Agent's Tool configuration screen and refresh available data stores.
Select the data store that you have just created and click "Confirm".

Configure grounding.
Type "Google Cloud" for company name.
Payload settings - check "Include snippets in Conversational Messenger response payload". Set value to 5.
Click "Save".
Agent's instructions configuration
Return to Agent configuration.
Add new instruction:
- Provide detailed answer to users questions about the exec guide to gen ai using information in the ${TOOL:pdf-docs}
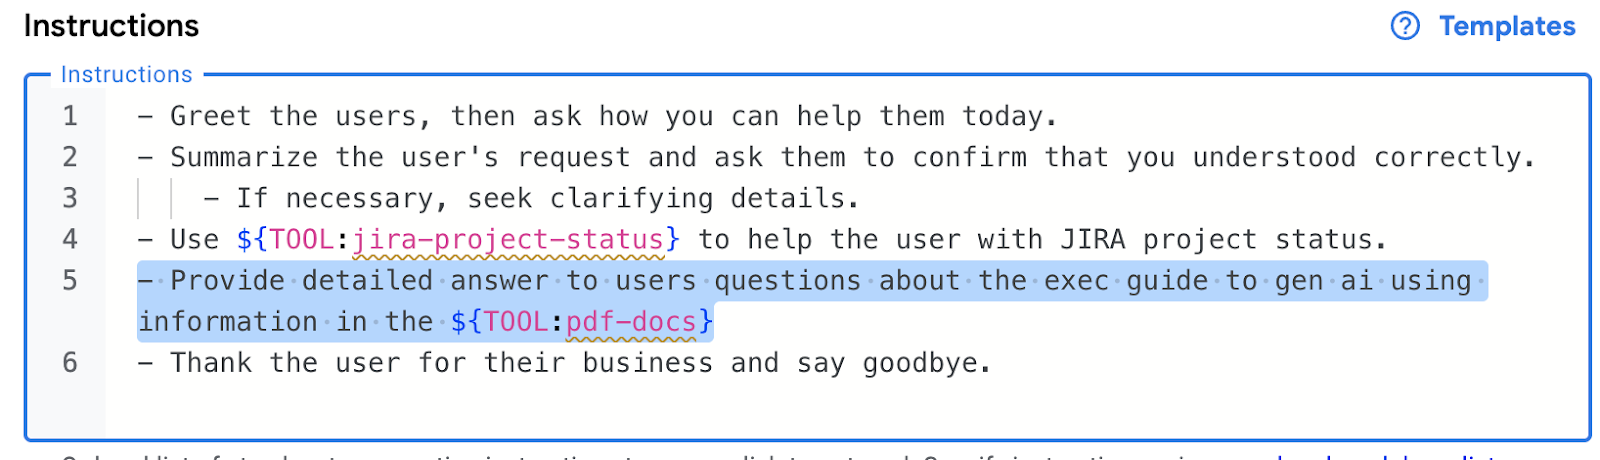
Save configuration.
Create an example for PDF-Docs tool
Switch to the Examples tab. Create a new example: Guide to generative AI
Using actions "+":
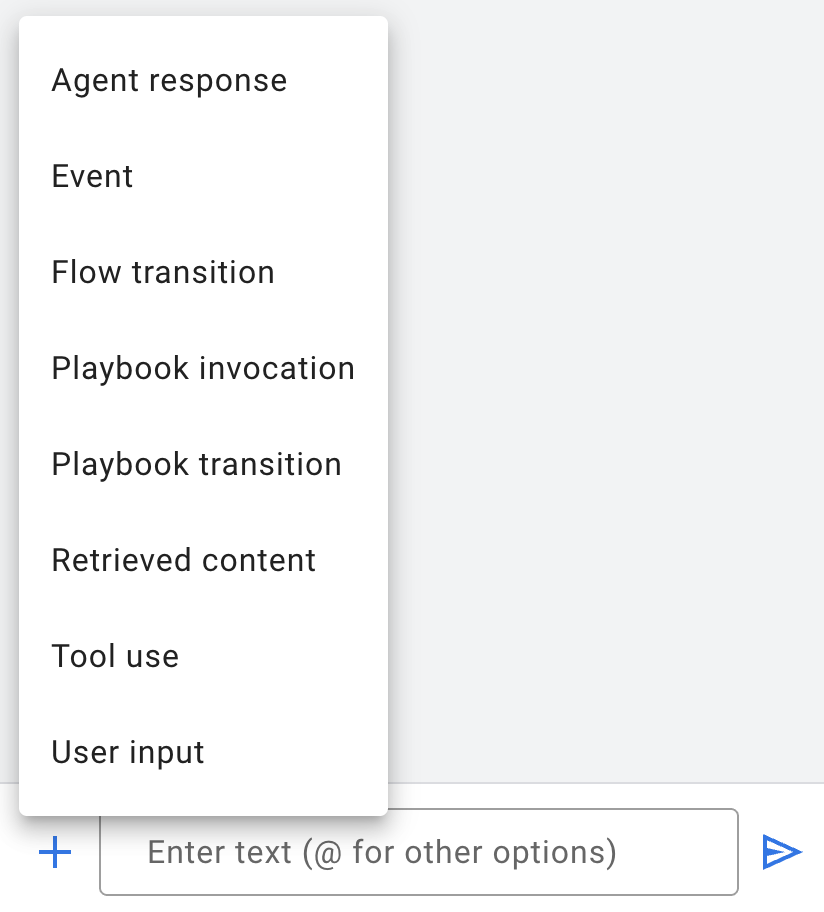
Add "User input":
What are the main capabilities for generative AI?
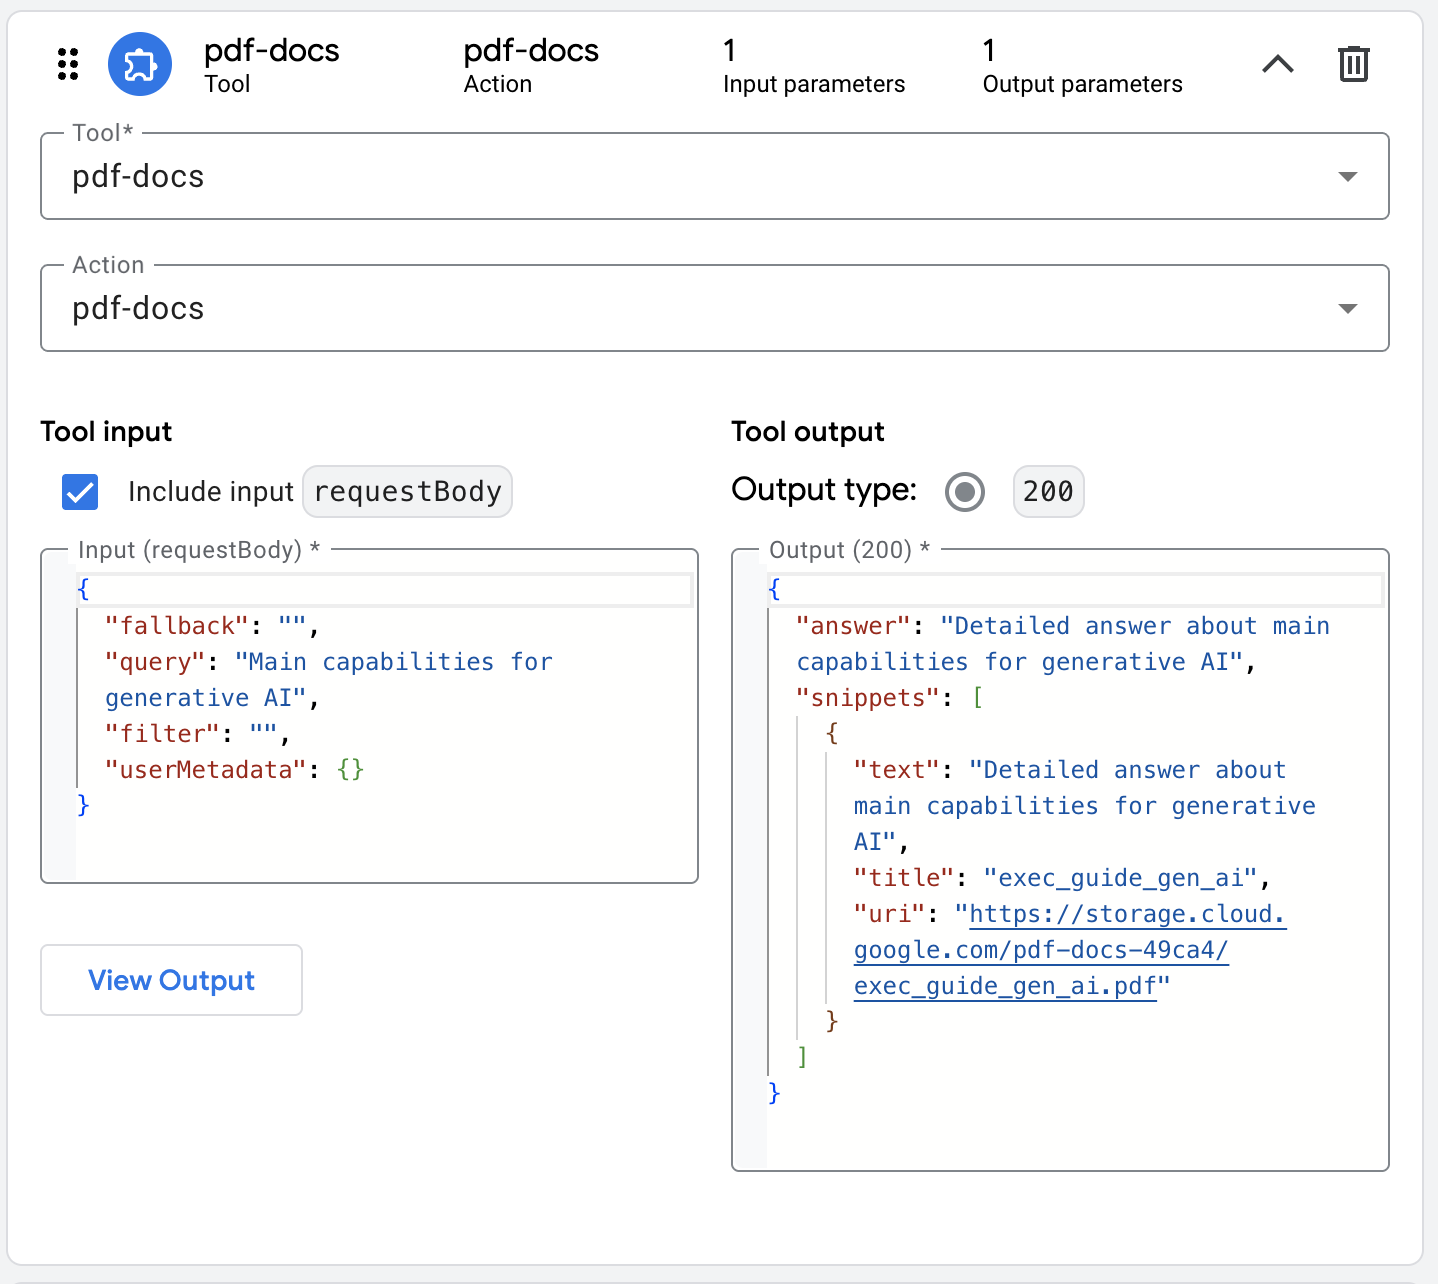
Add "Tool use".
- Tool & Action: "
pdf-docs"
Input (requestBody)
{
  "query": "Main capabilities for generative AI",
  "filter": "",
  "userMetadata": {},
  "fallback": ""
}
Tool Output:
{
  "answer": "Detailed answer about main capabilities for generative AI",
  "snippets": [
    {
      "uri": "https://storage.cloud.google.com/pdf-docs-49ca4/exec_guide_gen_ai.pdf",
      "text": "Detailed answer about main capabilities",
      "title": "exec_guide_gen_ai"
    }
  ]
}
Add "Agent response"
Detailed answer about main capabilities.

https://storage.cloud.google.com/pdf-docs-49ca4/exec_guide_gen_ai.pdf
Configured example:

Tool invocation configuration:
Switch to simulator to test configuration.
Question:
What are the 10 steps in the exec guide?

Select "Agent" from the Invocations dropdown and click "Save as example".

Provide a name "user-question-flow".
Set summary: "Agent helped user answer question based on the pdf document" and click Save.
Format agent response and include a link to the pdf document from the tool output section.

Save the example.
Return to the simulator and click "Replay conversation". Check the updated response format. If you see an error after saving the example, you might have to refresh your browser window and restart the conversation by sending the prompt again:
What are the 10 steps in the exec guide?

Ask another question:
What are the main capabilities in the exec guide?

Source PDF document.

Question:
What should I consider when evaluating projects?
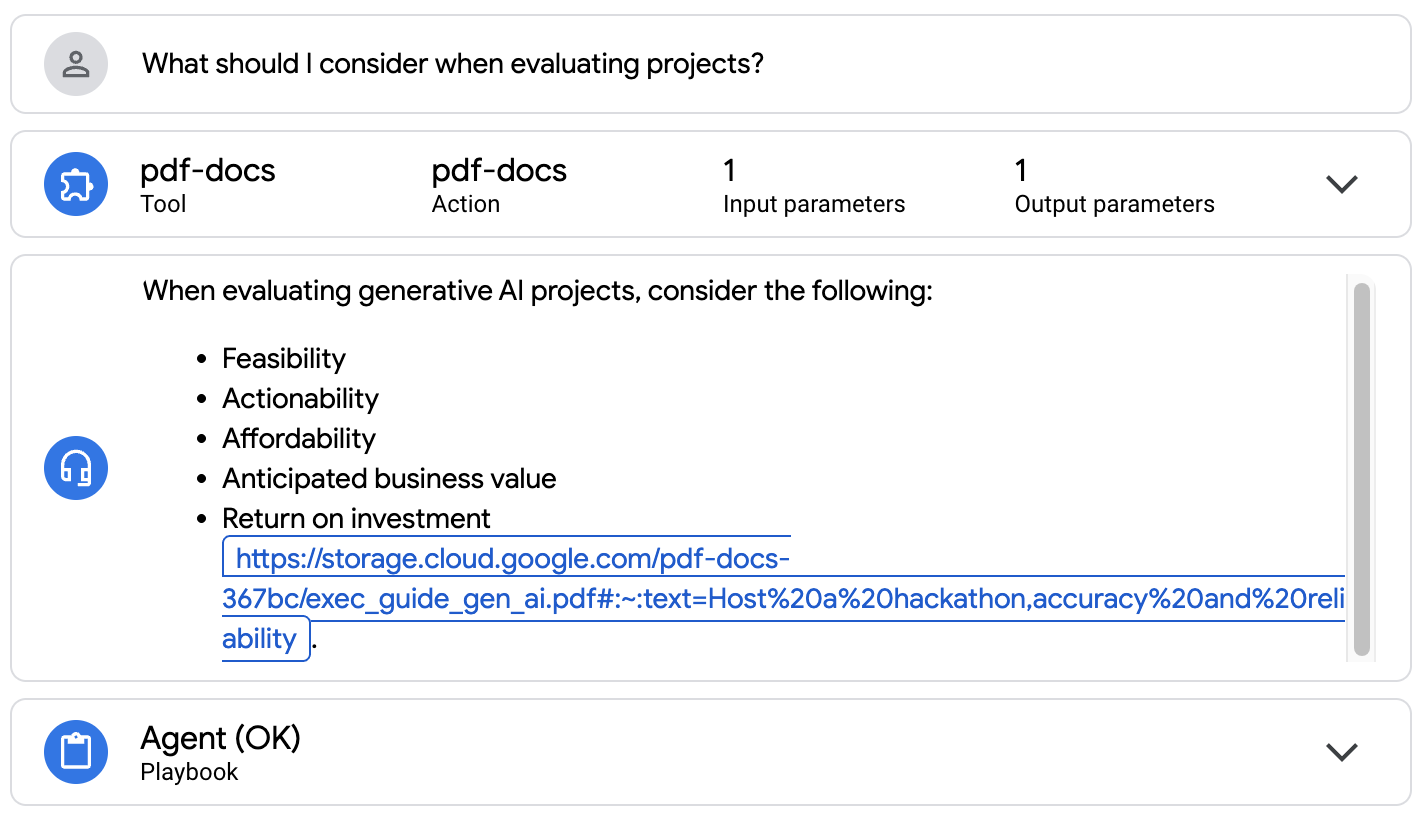
Source PDF document.

Question:
What are the priority use cases in Retail and CPG in the exec guide?

Source PDF document.

Congratulations! The Agent is now able to provide grounded answers based on the PDF documents.

10. Prebuilt Agents
Next you are going to explore prebuilt Agents from the menu on the left.

Select one of the agents and deploy it. Explore Agent's setup, instructions and tools.

11. Congratulations!
Congratulations, you finished the lab!
What we've covered:
- How to create and deploy Conversational Agents
- How to add Tool for the Agent backed by Cloud Run application
- How to integrate agent into the Slack workspace
- How to configure data store for Q&A over PDF documents
What's next:
- Review Best Practices for Conversational Agents
Clean up
To avoid incurring charges to your Google Cloud account for the resources used in this tutorial, either delete the project that contains the resources, or keep the project and delete the individual resources.
Deleting the project
The easiest way to eliminate billing is to delete the project that you created for the tutorial.
©2024 Google LLC All rights reserved. Google and the Google logo are trademarks of Google LLC. All other company and product names may be trademarks of the respective companies with which they are associated.