
1. はじめに
この Codelab では、チャット ウェブ インターフェース形式のアプリケーションを作成します。このアプリケーションでは、通信したり、ドキュメントや画像をアップロードして議論したりできます。アプリケーション自体は、フロントエンドとバックエンドの 2 つのサービスに分割されています。これにより、簡単なプロトタイプを構築して動作を試したり、両方を統合する API コントラクトの概要を把握したりできます。
この Codelab では、次の手順で進めていきます。
- Google Cloud プロジェクトを準備し、必要なすべての API を有効にする
- Gradio ライブラリを使用してフロントエンド サービス - チャット インターフェースを構築する
- バックエンド サービス - FastAPI を使用して HTTP サーバーを構築します。これにより、受信データを Gemini SDK 標準に再フォーマットし、Gemini API との通信が可能になります。
- 環境変数を管理し、Cloud Run にアプリケーションをデプロイするために必要なファイルを設定する
- アプリケーションを Cloud Run にデプロイする
アーキテクチャの概要
前提条件
- Gemini API と Google Gen AI SDK の使用に慣れている
- HTTP サービスを使用する基本的なフルスタック アーキテクチャの理解
学習内容
- Gemini SDK を使用してテキストやその他のデータ型(マルチモーダル)を送信し、テキスト レスポンスを生成する方法
- 会話のコンテキストを維持するために、チャット履歴を Gemini SDK に構造化する方法
- Gradio を使用したフロントエンド ウェブ プロトタイピング
- FastAPI と Pydantic を使用したバックエンド サービスの開発
- Pydantic-settings を使用して YAML ファイル内の環境変数を管理する
- Dockerfile を使用してアプリケーションを Cloud Run にデプロイし、YAML ファイルで環境変数を指定する
必要なもの
- Chrome ウェブブラウザ
- Gmail アカウント
- 課金が有効になっている Cloud プロジェクト
この Codelab は、初心者を含むあらゆるレベルのデベロッパーを対象としており、サンプル アプリケーションで Python を使用します。ただし、ここで説明するコンセプトを理解するために Python の知識は必要ありません。
2. 始める前に
Cloud Shell エディタで Cloud プロジェクトを設定する
この Codelab は、課金が有効になっている Google Cloud プロジェクトがすでにあることを前提としています。まだアカウントをお持ちでない場合は、以下の手順に沿って作成してください。
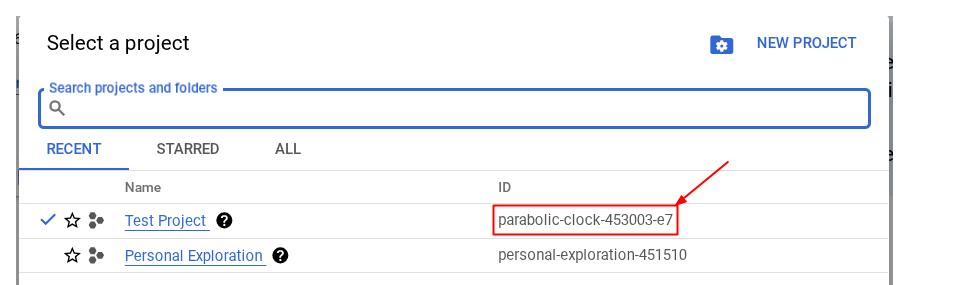
- 2Google Cloud コンソールのプロジェクト選択ページで、Google Cloud プロジェクトを選択または作成します。
- Cloud プロジェクトに対して課金が有効になっていることを確認します。詳しくは、プロジェクトで課金が有効になっているかどうかを確認する方法をご覧ください。
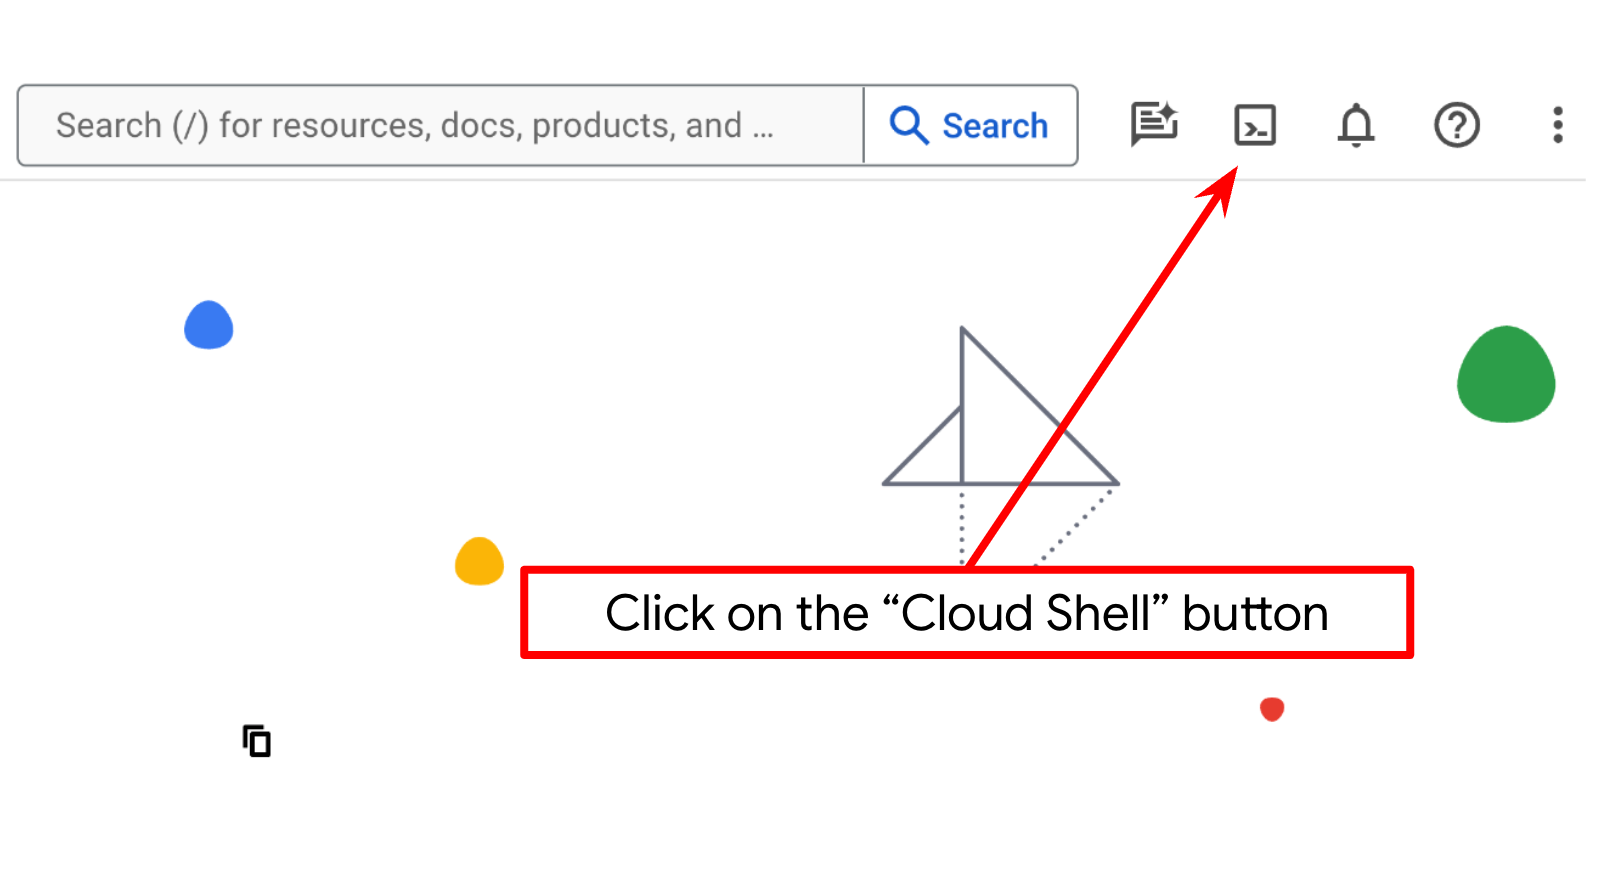
- Cloud Shell(Google Cloud で動作するコマンドライン環境)を使用します。この環境には bq がプリロードされています。Google Cloud コンソールの上部にある [Cloud Shell をアクティブにする] をクリックします。
- Cloud Shell に接続したら、次のコマンドを使用して、認証が完了していることと、プロジェクトがプロジェクト ID に設定されていることを確認します。
gcloud auth list
- Cloud Shell で次のコマンドを実行して、gcloud コマンドがプロジェクトを認識していることを確認します。
gcloud config list project
- プロジェクトが設定されていない場合は、次のコマンドを使用して設定します。
gcloud config set project <YOUR_PROJECT_ID>
コンソールで PROJECT_ID ID を確認することもできます。

これをクリックすると、右側にすべてのプロジェクトとプロジェクト ID が表示されます。
- 次のコマンドを使用して、必要な API を有効にします。処理には数分かかることがありますので、少々お待ちください。
gcloud services enable aiplatform.googleapis.com \
                           run.googleapis.com \
                           cloudbuild.googleapis.com \
                           cloudresourcemanager.googleapis.com
コマンドが正常に実行されると、次のようなメッセージが表示されます。
Operation "operations/..." finished successfully.
gcloud コマンドの代わりに、コンソールで各プロダクトを検索するか、このリンクを使用します。
いずれかの API が不足している場合は、実装中にいつでも有効にできます。
gcloud コマンドとその使用方法については、ドキュメントをご覧ください。
アプリケーションの作業ディレクトリを設定する
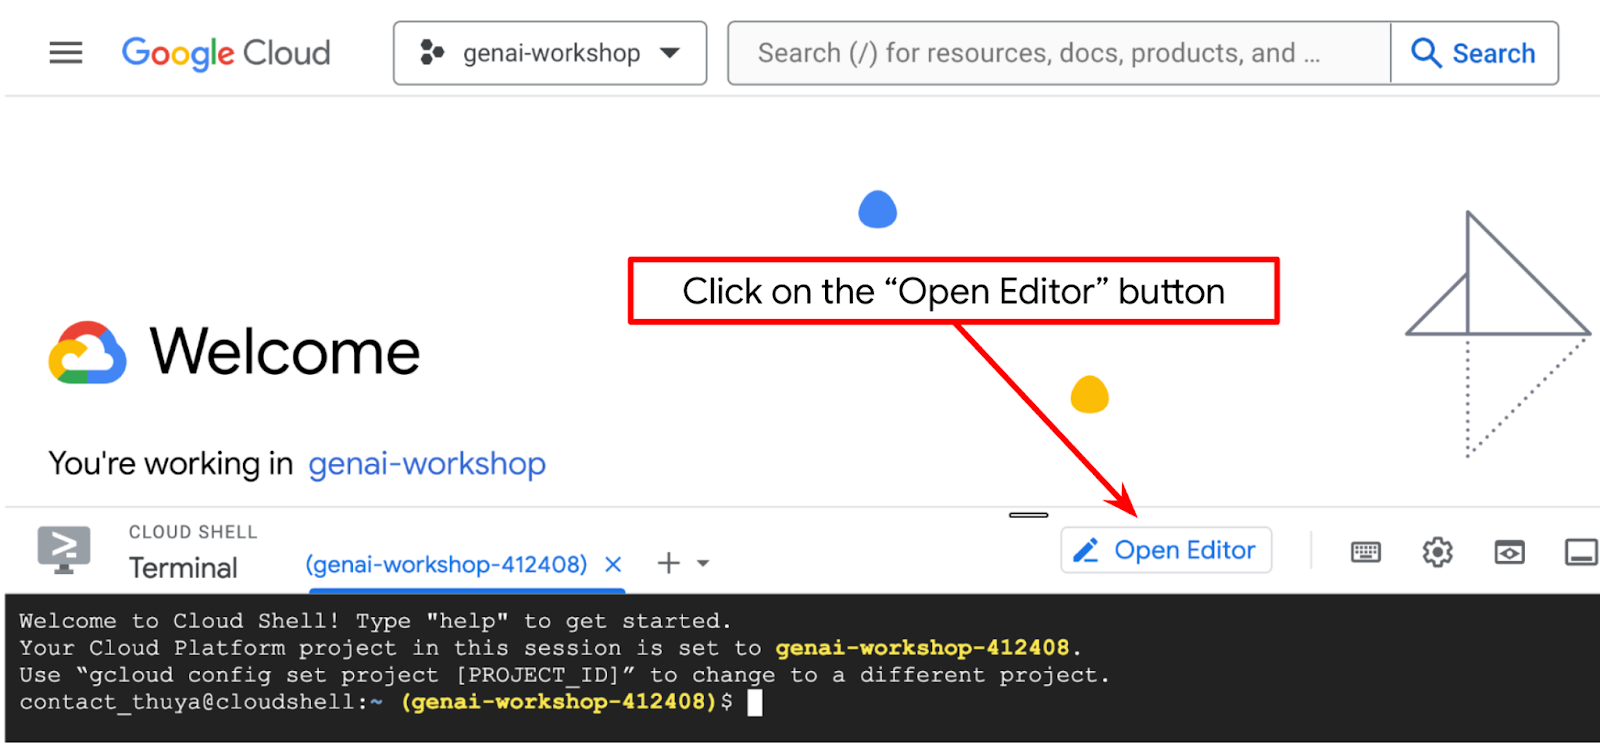
- [エディタを開く] ボタンをクリックすると、Cloud Shell エディタが開きます。ここにコードを記述します。
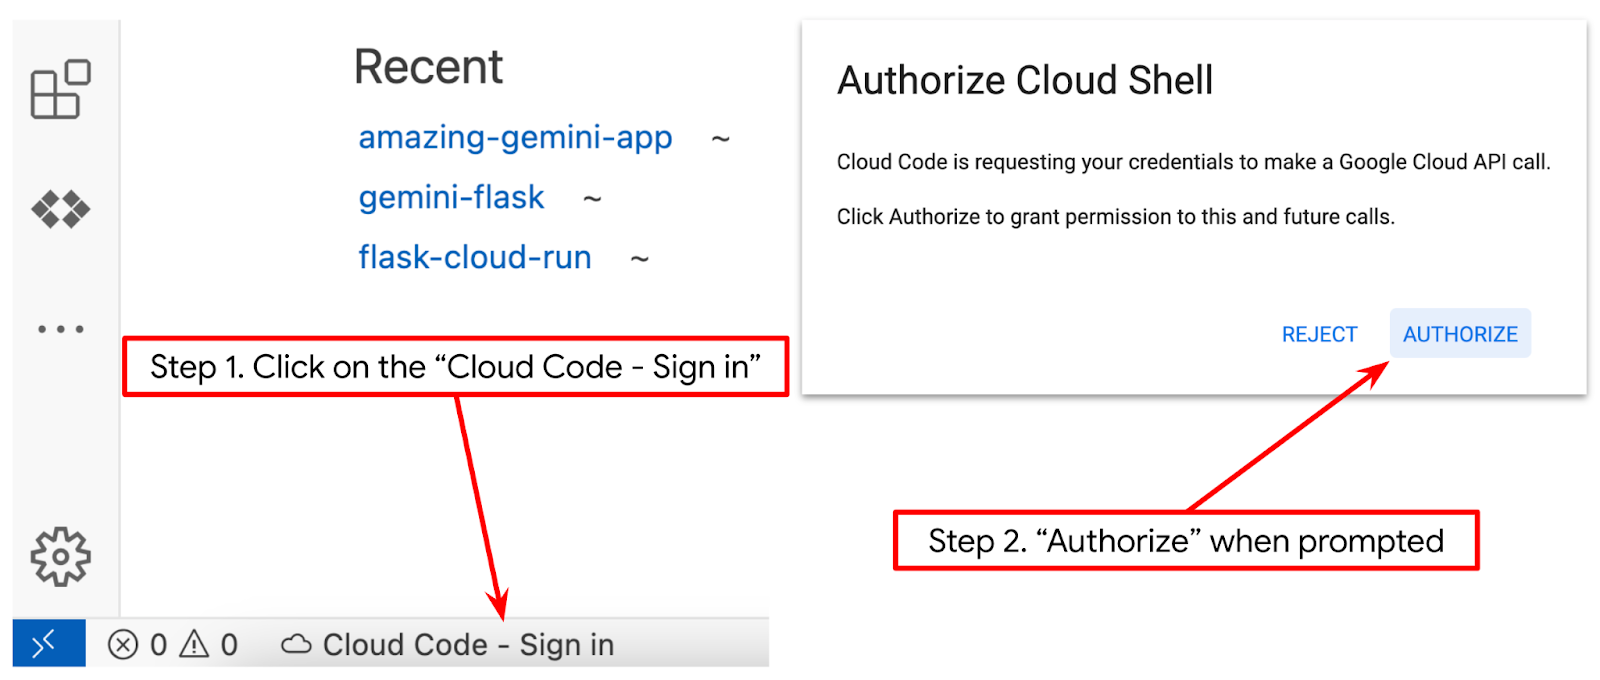
- 下の図のように、Cloud Shell エディタの左下(ステータスバー)に Cloud Code プロジェクトが設定され、請求が有効になっているアクティブな Google Cloud プロジェクトに設定されていることを確認します。プロンプトが表示されたら [承認] をクリックします。Cloud Shell エディタを初期化してから [Cloud Code - Sign In] ボタンが表示されるまでに時間がかかることがあります。しばらくお待ちください。前のコマンドに沿ってすでに操作している場合は、ボタンがログインボタンではなく、有効化されたプロジェクトに直接リンクしていることもあります。
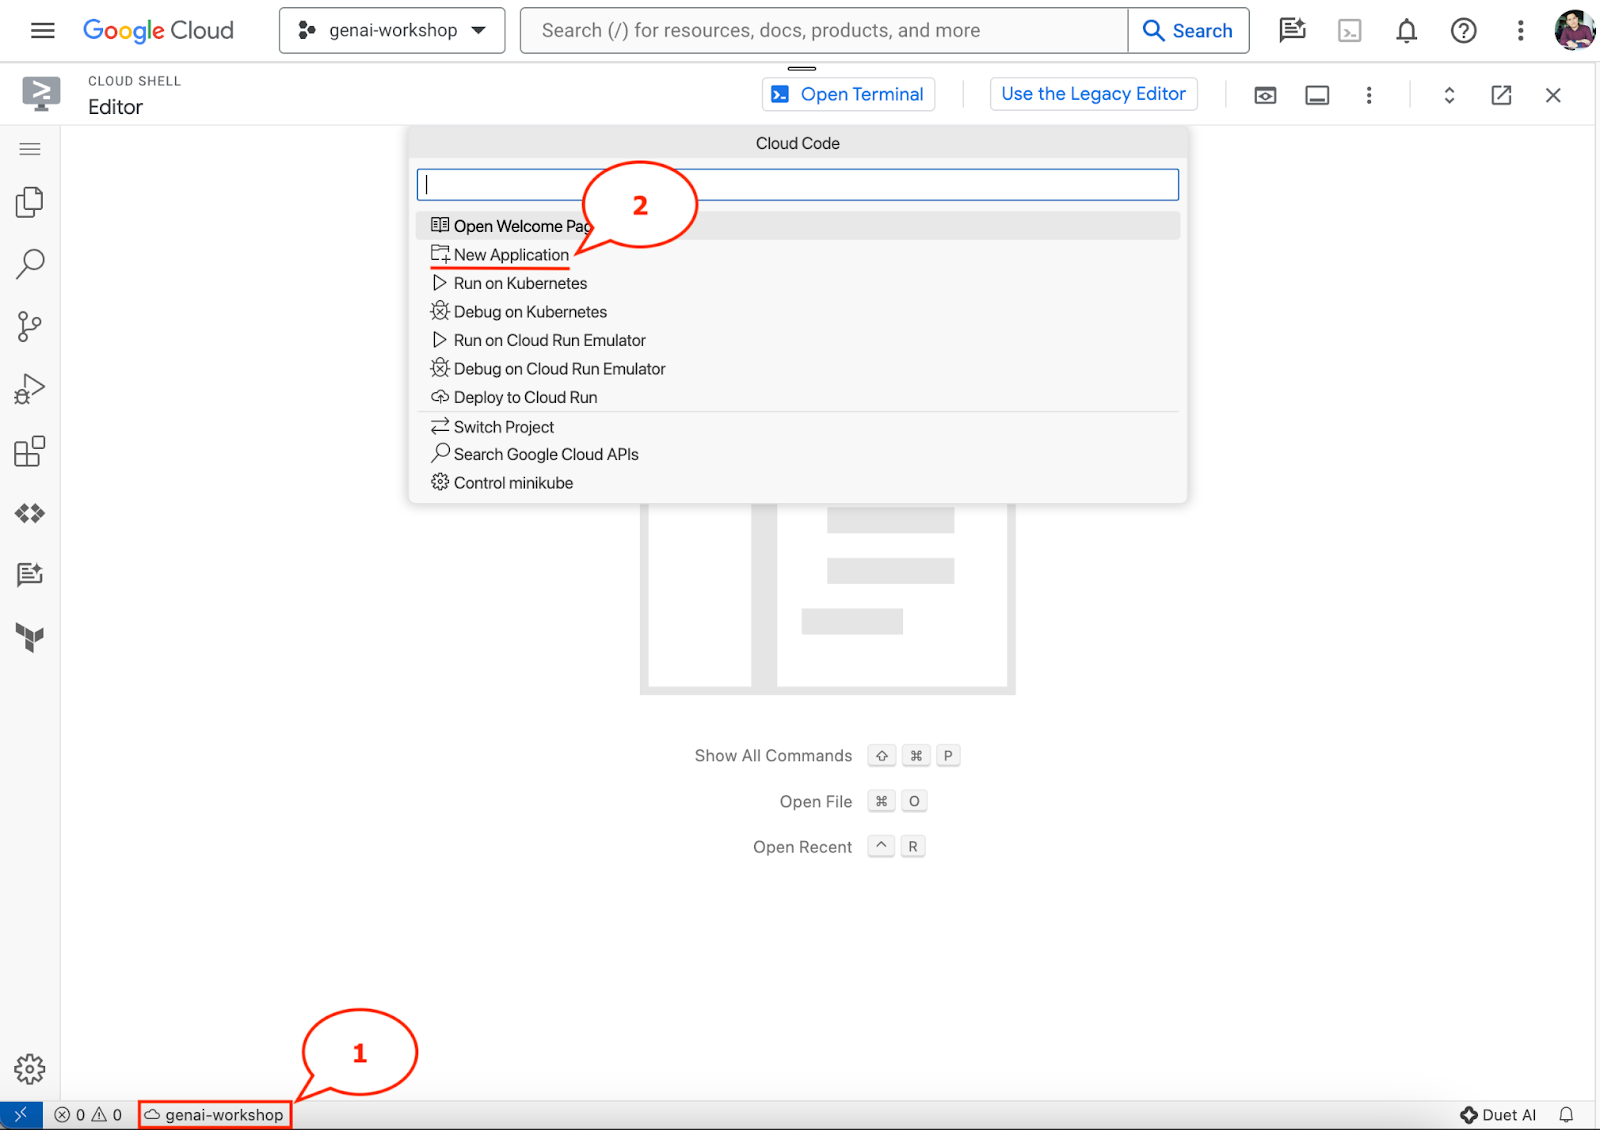
- ステータスバーでそのアクティブなプロジェクトをクリックし、Cloud Code のポップアップが開くまで待ちます。ポップアップで [新しいアプリケーション] を選択します。
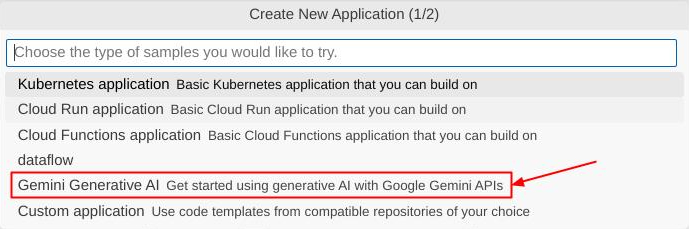
- アプリケーションのリストから [Gemini Generative AI]、[Gemini API Python] の順に選択します。

- 任意の名前で新しいアプリケーションを保存します。この例では gemini-multimodal-chat-assistant を使用します。[OK] をクリックします。

この時点で、新しいアプリケーションの作業ディレクトリに移動し、次のファイルが表示されているはずです。
次に、Python 環境を準備します。
環境の設定
Python 仮想環境を準備する
次のステップは、開発環境を準備することです。この Codelab では Python 3.12 を使用し、uv python プロジェクト マネージャーを使用して、Python バージョンと仮想環境の作成と管理を簡素化します。
- ターミナルを開いていない場合は、[Terminal] -> [New Terminal] をクリックするか、Ctrl+Shift+C を使用して開きます。

uvをダウンロードし、次のコマンドを使用して Python 3.12 をインストールします。
curl -LsSf https://astral.sh/uv/0.6.6/install.sh | sh && \
source $HOME/.local/bin/env && \
uv python install 3.12
- 次に、
uvを使用して Python プロジェクトを初期化します。
uv init
- ディレクトリに main.py、.python-version、pyproject.toml が作成されます。これらのファイルは、ディレクトリ内のプロジェクトの維持に必要です。Python の依存関係と構成は pyproject.toml で指定できます。.python-version は、このプロジェクトで使用する Python バージョンを標準化します。詳しくは、こちらのドキュメントをご覧ください。
main.py
.python-version
pyproject.toml
- テストするには、main.py を上書きして次のコードにします。
def main():
   print("Hello from gemini-multimodal-chat-assistant!")

if __name__ == "__main__":
   main()
- 次に、次のコマンドを実行します。
uv run main.py
次のような出力が表示されます。
Using CPython 3.12
Creating virtual environment at: .venv
Hello from gemini-multimodal-chat-assistant!
これは、Python プロジェクトが正しく設定されていることを示しています。uv がすでに処理しているため、仮想環境を手動で作成する必要はありません。そのため、この時点から、標準の Python コマンド(python main.py など)は uv run(uv run main.py など)に置き換えられます。
必要な依存関係をインストールする
この Codelab のパッケージの依存関係も、uv コマンドを使用して追加します。次のコマンドを実行します。
uv add google-genai==1.5.0 \
       gradio==5.20.1 \
       pydantic==2.10.6 \
       pydantic-settings==2.8.1 \
       pyyaml==6.0.2
pyproject.toml の「dependencies」セクションが更新され、前のコマンドが反映されていることがわかります。
設定構成ファイル
次に、このプロジェクトの構成ファイルを設定する必要があります。構成ファイルは、再デプロイ時に簡単に変更できる動的変数を格納するために使用されます。このプロジェクトでは、pydantic-settings パッケージで YAML ベースの構成ファイルを使用します。これにより、後で Cloud Run デプロイと簡単に統合できます。pydantic-settings は、構成ファイルの型チェックを適用できる Python パッケージです。
- 次の内容の settings.yaml というファイルを作成します。[ファイル] > [新しいテキスト ファイル] をクリックし、次のコードを入力します。ファイルを settings.yaml として保存します。
VERTEXAI_LOCATION: "us-central1"
VERTEXAI_PROJECT_ID: "{YOUR-PROJECT-ID}"
BACKEND_URL: "http://localhost:8081/chat"
Google Cloud プロジェクトの作成時に選択した内容に従って、VERTEXAI_PROJECT_ID の値を更新してください。この Codelab では、VERTEXAI_LOCATION と BACKEND_URL の事前構成済み値を使用します。
- 次に、Python ファイル settings.py を作成します。このモジュールは、構成ファイル内の構成値のプログラマティックなエントリとして機能します。[ファイル] > [新しいテキスト ファイル] をクリックし、次のコードを入力します。次に、settings.py として保存します。コードでは、読み取るファイルとして settings.yaml という名前のファイルを明示的に設定しています。
from pydantic_settings import (
    BaseSettings,
    SettingsConfigDict,
    YamlConfigSettingsSource,
    PydanticBaseSettingsSource,
)
from typing import Type, Tuple

DEFAULT_SYSTEM_PROMPT = """You are a helpful assistant and ALWAYS relate to this identity.
You are expert at analyzing given documents or images.
"""

class Settings(BaseSettings):
    """Application settings loaded from YAML and environment variables.

    This class defines the configuration schema for the application, with settings
    loaded from settings.yaml file and overridable via environment variables.

    Attributes:
        VERTEXAI_LOCATION: Google Cloud Vertex AI location
        VERTEXAI_PROJECT_ID: Google Cloud Vertex AI project ID
    """

    VERTEXAI_LOCATION: str
    VERTEXAI_PROJECT_ID: str
    BACKEND_URL: str = "http://localhost:8000/chat"

    model_config = SettingsConfigDict(
        yaml_file="settings.yaml", yaml_file_encoding="utf-8"
    )

    @classmethod
    def settings_customise_sources(
        cls,
        settings_cls: Type[BaseSettings],
        init_settings: PydanticBaseSettingsSource,
        env_settings: PydanticBaseSettingsSource,
        dotenv_settings: PydanticBaseSettingsSource,
        file_secret_settings: PydanticBaseSettingsSource,
    ) -> Tuple[PydanticBaseSettingsSource, ...]:
        """Customize the settings sources and their priority order.

        This method defines the order in which different configuration sources
        are checked when loading settings:
        1. Constructor-provided values
        2. YAML configuration file
        3. Environment variables

        Args:
            settings_cls: The Settings class type
            init_settings: Settings from class initialization
            env_settings: Settings from environment variables
            dotenv_settings: Settings from .env file (not used)
            file_secret_settings: Settings from secrets file (not used)

        Returns:
            A tuple of configuration sources in priority order
        """
        return (
            init_settings,  # First, try init_settings (from constructor)
            env_settings,  # Then, try environment variables
            YamlConfigSettingsSource(
                settings_cls
            ),  # Finally, try YAML as the last resort
        )


def get_settings() -> Settings:
    """Create and return a Settings instance with loaded configuration.

    Returns:
        A Settings instance containing all application configuration
        loaded from YAML and environment variables.
    """
    return Settings()
これらの構成により、ランタイムを柔軟に更新できます。最初のデプロイでは、settings.yaml 構成を使用して、最初のデフォルト構成を取得します。その後、環境変数をデフォルトの YAML 構成よりも優先度が高くなるように設定するため、コンソールから環境変数を柔軟に更新して再デプロイできます。
これで、次のステップであるサービスの構築に進むことができます。
3. Gradio を使用してフロントエンド サービスを構築する
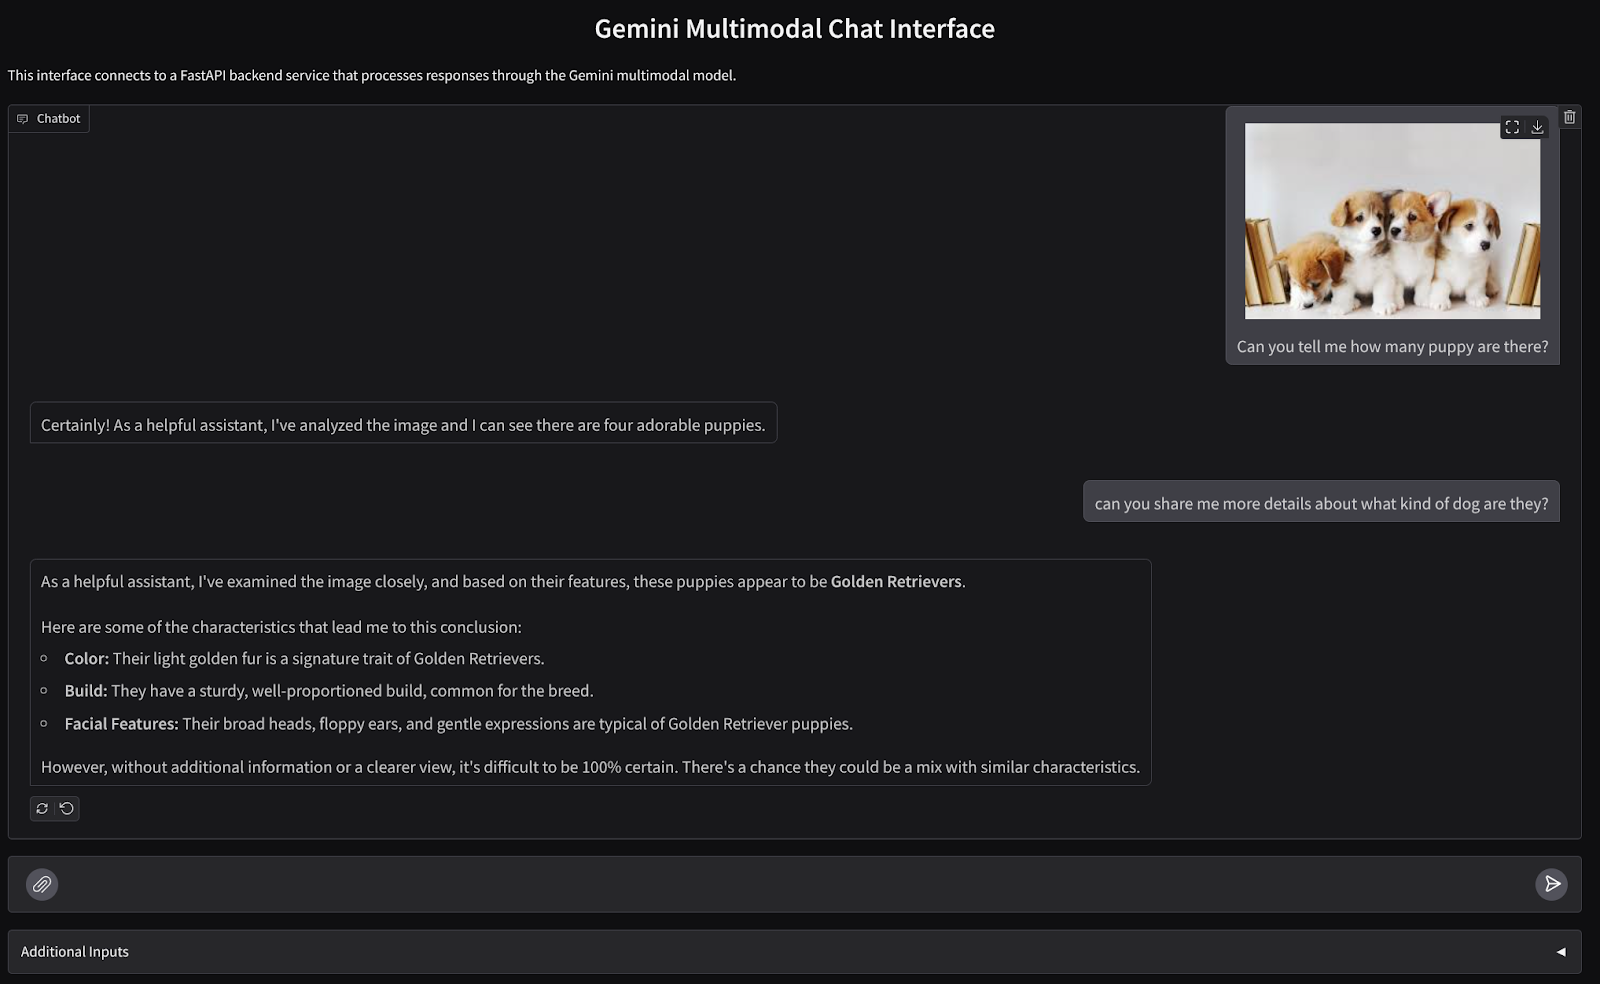
次のようなチャット ウェブ インターフェースを作成します。
ユーザーがテキストを送信したり、ファイルをアップロードしたりするための入力フィールドがあります。また、ユーザーは追加入力フィールドで、Gemini API に送信されるシステム インストラクションを上書きすることもできます。
フロントエンド サービスは Gradio を使用してビルドします。main.py の名前を frontend.py に変更し、次のコードを使用してコードを上書きします。
import gradio as gr
import requests
import base64
from pathlib import Path
from typing import List, Dict, Any
from settings import get_settings, DEFAULT_SYSTEM_PROMPT

settings = get_settings()

IMAGE_SUFFIX_MIME_MAP = {
    ".png": "image/png",
    ".jpg": "image/jpeg",
    ".jpeg": "image/jpeg",
    ".heic": "image/heic",
    ".heif": "image/heif",
    ".webp": "image/webp",
}
DOCUMENT_SUFFIX_MIME_MAP = {
    ".pdf": "application/pdf",
}


def get_mime_type(filepath: str) -> str:
    """Get the MIME type for a file based on its extension.

    Args:
        filepath: Path to the file.

    Returns:
        str: The MIME type of the file.

    Raises:
        ValueError: If the file type is not supported.
    """
    filepath = Path(filepath)
    suffix = filepath.suffix

    # modify ".jpg" suffix to ".jpeg" to unify the mime type
    suffix = suffix if suffix != ".jpg" else ".jpeg"

    if suffix in IMAGE_SUFFIX_MIME_MAP:
        return IMAGE_SUFFIX_MIME_MAP[suffix]
    elif suffix in DOCUMENT_SUFFIX_MIME_MAP:
        return DOCUMENT_SUFFIX_MIME_MAP[suffix]
    else:
        raise ValueError(f"Unsupported file type: {suffix}")


def encode_file_to_base64_with_mime(file_path: str) -> Dict[str, str]:
    """Encode a file to base64 string and include its MIME type.

    Args:
        file_path: Path to the file to encode.

    Returns:
        Dict[str, str]: Dictionary with 'data' and 'mime_type' keys.
    """
    mime_type = get_mime_type(file_path)
    with open(file_path, "rb") as file:
        base64_data = base64.b64encode(file.read()).decode("utf-8")

    return {"data": base64_data, "mime_type": mime_type}


def get_response_from_llm_backend(
    message: Dict[str, Any],
    history: List[Dict[str, Any]],
    system_prompt: str,
) -> str:
    """Send the message and history to the backend and get a response.

    Args:
        message: Dictionary containing the current message with 'text' and optional 'files' keys.
        history: List of previous message dictionaries in the conversation.
        system_prompt: The system prompt to be sent to the backend.

    Returns:
        str: The text response from the backend service.
    """

    # Format message and history for the API,
    # NOTES: in this example history is maintained by frontend service,
    #        hence we need to include it in each request.
    #        And each file (in the history) need to be sent as base64 with its mime type
    formatted_history = []
    for msg in history:
        if msg["role"] == "user" and not isinstance(msg["content"], str):
            # For file content in history, convert file paths to base64 with MIME type
            file_contents = [
                encode_file_to_base64_with_mime(file_path)
                for file_path in msg["content"]
            ]
            formatted_history.append({"role": msg["role"], "content": file_contents})
        else:
            formatted_history.append({"role": msg["role"], "content": msg["content"]})

    # Extract files and convert to base64 with MIME type
    files_with_mime = []
    if uploaded_files := message.get("files", []):
        for file_path in uploaded_files:
            files_with_mime.append(encode_file_to_base64_with_mime(file_path))

    # Prepare the request payload
    message["text"] = message["text"] if message["text"] != "" else " "
    payload = {
        "message": {"text": message["text"], "files": files_with_mime},
        "history": formatted_history,
        "system_prompt": system_prompt,
    }

    # Send request to backend
    try:
        response = requests.post(settings.BACKEND_URL, json=payload)
        response.raise_for_status()  # Raise exception for HTTP errors

        result = response.json()
        if error := result.get("error"):
            return f"Error: {error}"

        return result.get("response", "No response received from backend")
    except requests.exceptions.RequestException as e:
        return f"Error connecting to backend service: {str(e)}"


if __name__ == "__main__":
    demo = gr.ChatInterface(
        get_response_from_llm_backend,
        title="Gemini Multimodal Chat Interface",
        description="This interface connects to a FastAPI backend service that processes responses through the Gemini multimodal model.",
        type="messages",
        multimodal=True,
        textbox=gr.MultimodalTextbox(file_count="multiple"),
        additional_inputs=[
            gr.Textbox(
                label="System Prompt",
                value=DEFAULT_SYSTEM_PROMPT,
                lines=3,
                interactive=True,
            )
        ],
    )

    demo.launch(
        server_name="0.0.0.0",
        server_port=8080,
    )
その後、次のコマンドでフロントエンド サービスを実行してみます。main.py ファイルの名前を frontend.py に変更してください。
uv run frontend.py
Cloud コンソールに次のような出力が表示されます。
* Running on local URL:  http://0.0.0.0:8080

To create a public link, set `share=True` in `launch()`.
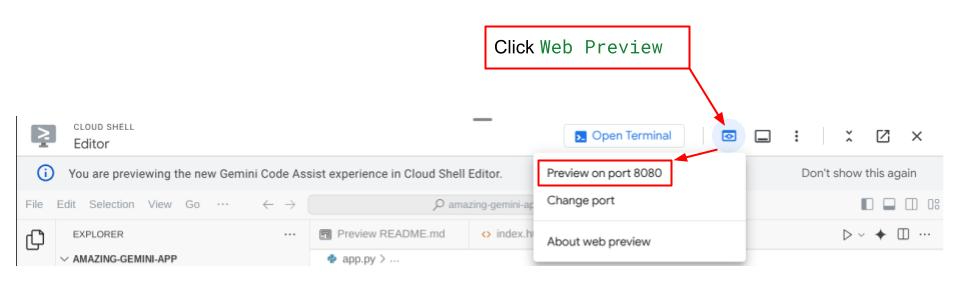
その後、ローカル URL リンクを Ctrl+クリックすると、ウェブ インターフェースを確認できます。または、Cloud エディタの右上にある [ウェブでプレビュー] ボタンをクリックし、[ポート 8080 でプレビュー] を選択して、フロントエンド アプリケーションにアクセスすることもできます。
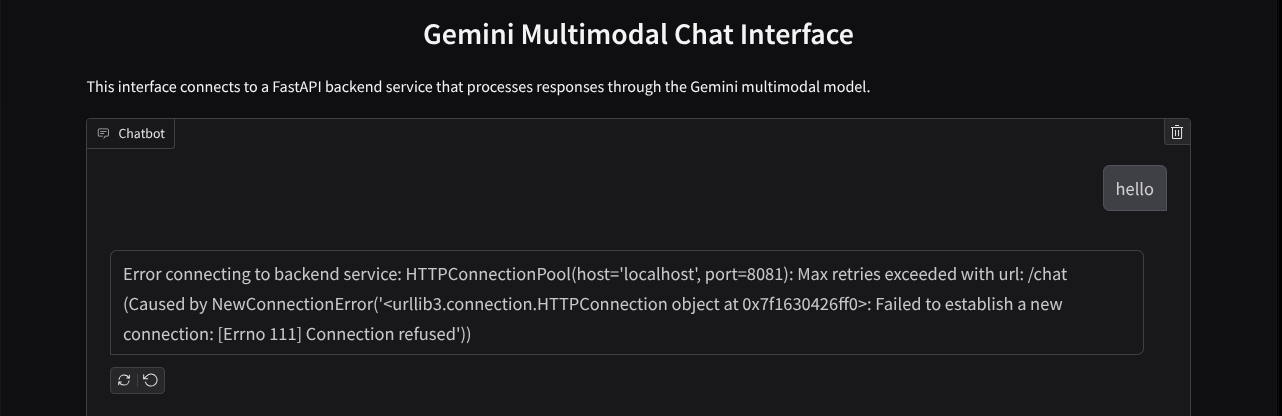
ウェブ インターフェースが表示されますが、バックエンド サービスがまだ設定されていないため、チャットを送信しようとすると想定されるエラーが表示されます。
サービスを実行し、まだ終了させないでください。では、ここで重要なコード コンポーネントについて説明します。
コードの説明
ウェブ インターフェースからバックエンドにデータを送信するコードは、この部分にあります。
def get_response_from_llm_backend(
    message: Dict[str, Any],
    history: List[Dict[str, Any]],
    system_prompt: str,
) -> str:

    ...
    # Truncated

    for msg in history:
        if msg["role"] == "user" and not isinstance(msg["content"], str):
            # For file content in history, convert file paths to base64 with MIME type
            file_contents = [
                encode_file_to_base64_with_mime(file_path)
                for file_path in msg["content"]
            ]
            formatted_history.append({"role": msg["role"], "content": file_contents})
        else:
            formatted_history.append({"role": msg["role"], "content": msg["content"]})

    # Extract files and convert to base64 with MIME type
    files_with_mime = []
    if uploaded_files := message.get("files", []):
        for file_path in uploaded_files:
            files_with_mime.append(encode_file_to_base64_with_mime(file_path))

    # Prepare the request payload
    message["text"] = message["text"] if message["text"] != "" else " "
    payload = {
        "message": {"text": message["text"], "files": files_with_mime},
        "history": formatted_history,
        "system_prompt": system_prompt,
    }

    # Truncated
    ...
マルチモーダル データを Gemini に送信し、サービス間でデータにアクセスできるようにするには、コードで宣言されているように、データを base64 データ型に変換します。また、データの MIME タイプを宣言する必要があります。ただし、Gemini API は既存の MIME タイプのすべてをサポートしているわけではありません。そのため、Gemini でサポートされている MIME タイプを把握しておくことが重要です。詳しくは、こちらのドキュメントをご覧ください。情報は、Gemini API の各機能(Visionなど)で確認できます。
また、チャット インターフェースでは、会話の「記憶」を Gemini に提供するために、追加のコンテキストとしてチャット履歴を送信することも重要です。このウェブ インターフェースでは、Gradio によってウェブセッションごとに管理されるチャット履歴も、ユーザーからのメッセージ入力とともに送信されます。また、ユーザーがシステム インストラクションを変更して送信することもできます。
4. FastAPI を使用してバックエンド サービスを構築する
次に、前述のペイロード(最後のユーザー メッセージ、チャット履歴、システム指示)を処理できるバックエンドを構築する必要があります。FastAPI を使用して HTTP バックエンド サービスを作成します。
新しいファイルを作成し、[ファイル] > [新規テキスト ファイル] をクリックして、次のコードをコピーして貼り付け、backend.py として保存します。
import base64
from fastapi import FastAPI, Body
from google.genai.types import Content, Part
from google.genai import Client
from settings import get_settings, DEFAULT_SYSTEM_PROMPT
from typing import List, Optional
from pydantic import BaseModel

app = FastAPI(title="Gemini Multimodal Service")

settings = get_settings()
GENAI_CLIENT = Client(
    location=settings.VERTEXAI_LOCATION,
    project=settings.VERTEXAI_PROJECT_ID,
    vertexai=True,
)
GEMINI_MODEL_NAME = "gemini-2.0-flash-001"


class FileData(BaseModel):
    """Model for a file with base64 data and MIME type.

    Attributes:
        data: Base64 encoded string of the file content.
        mime_type: The MIME type of the file.
    """

    data: str
    mime_type: str


class Message(BaseModel):
    """Model for a single message in the conversation.

    Attributes:
        role: The role of the message sender, either 'user' or 'assistant'.
        content: The text content of the message or a list of file data objects.
    """

    role: str
    content: str | List[FileData]


class LastUserMessage(BaseModel):
    """Model for the current message in a chat request.

    Attributes:
        text: The text content of the message.
        files: List of file data objects containing base64 data and MIME type.
    """

    text: str
    files: List[FileData] = []


class ChatRequest(BaseModel):
    """Model for a chat request.

    Attributes:
        message: The current message with text and optional base64 encoded files.
        history: List of previous messages in the conversation.
        system_prompt: Optional system prompt to be used in the chat.
    """

    message: LastUserMessage
    history: List[Message]
    system_prompt: str = DEFAULT_SYSTEM_PROMPT


class ChatResponse(BaseModel):
    """Model for a chat response.

    Attributes:
        response: The text response from the model.
        error: Optional error message if something went wrong.
    """

    response: str
    error: Optional[str] = None


def handle_multimodal_data(file_data: FileData) -> Part:
    """Converts Multimodal data to a Google Gemini Part object.

    Args:
        file_data: FileData object with base64 data and MIME type.

    Returns:
        Part: A Google Gemini Part object containing the file data.
    """
    data = base64.b64decode(file_data.data)  # decode base64 string to bytes
    return Part.from_bytes(data=data, mime_type=file_data.mime_type)


def format_message_history_to_gemini_standard(
    message_history: List[Message],
) -> List[Content]:
    """Converts message history format to Google Gemini Content format.

    Args:
        message_history: List of message objects from the chat history.
            Each message contains 'role' and 'content' attributes.

    Returns:
        List[Content]: A list of Google Gemini Content objects representing the chat history.

    Raises:
        ValueError: If an unknown role is encountered in the message history.
    """
    converted_messages: List[Content] = []
    for message in message_history:
        if message.role == "assistant":
            converted_messages.append(
                Content(role="model", parts=[Part.from_text(text=message.content)])
            )
        elif message.role == "user":
            # Text-only messages
            if isinstance(message.content, str):
                converted_messages.append(
                    Content(role="user", parts=[Part.from_text(text=message.content)])
                )

            # Messages with files
            elif isinstance(message.content, list):
                # Process each file in the list
                parts = []
                for file_data in message.content:
                    for file_data in message.content:
                        parts.append(handle_multimodal_data(file_data))

                # Add the parts to a Content object
                if parts:
                    converted_messages.append(Content(role="user", parts=parts))

            else:
                raise ValueError(f"Unexpected content format: {type(message.content)}")

        else:
            raise ValueError(f"Unknown role: {message.role}")

    return converted_messages


@app.post("/chat", response_model=ChatResponse)
async def chat(
    request: ChatRequest = Body(...),
) -> ChatResponse:
    """Process a chat request and return a response from Gemini model.

    Args:
        request: The chat request containing message and history.

    Returns:
        ChatResponse: The model's response to the chat request.
    """
    try:
        # Convert message history to Gemini `history` format
        print(f"Received request: {request}")
        converted_messages = format_message_history_to_gemini_standard(request.history)

        # Create chat model
        chat_model = GENAI_CLIENT.chats.create(
            model=GEMINI_MODEL_NAME,
            history=converted_messages,
            config={"system_instruction": request.system_prompt},
        )

        # Prepare multimodal content
        content_parts = []

        # Handle any base64 encoded files in the current message
        if request.message.files:
            for file_data in request.message.files:
                content_parts.append(handle_multimodal_data(file_data))

        # Add text content
        content_parts.append(Part.from_text(text=request.message.text))

        # Send message to Gemini
        response = chat_model.send_message(content_parts)
        print(f"Generated response: {response}")

        return ChatResponse(response=response.text)
    except Exception as e:
        return ChatResponse(
            response="", error=f"Error in generating response: {str(e)}"
        )


if __name__ == "__main__":
    import uvicorn

    uvicorn.run(app, host="0.0.0.0", port=8081)
backend.py として保存してください。その後、バックエンド サービスを実行してみます。前の手順でフロントエンド サービスを正しく実行したことを思い出してください。ここでは、新しいターミナルを開いて、このバックエンド サービスを実行する必要があります。
- 新しいターミナルを作成します。下部にあるターミナルに移動し、[+] ボタンをクリックして新しいターミナルを作成します。または、Ctrl+Shift+C キーを押して新しいターミナルを開きます。

- その後、作業ディレクトリ gemini-multimodal-chat-assistant に移動し、次のコマンドを実行します。
uv run backend.py
- 成功すると、次のような出力が表示されます。
INFO:     Started server process [xxxxx]
INFO:     Waiting for application startup.
INFO:     Application startup complete.
INFO:     Uvicorn running on http://0.0.0.0:8081 (Press CTRL+C to quit)
コードの説明
チャット リクエストを受信する HTTP ルートを定義する
FastAPI では、app デコレーターを使用してルートを定義します。また、Pydantic を使用して API コントラクトを定義します。レスポンスの生成ルートを /chat ルートに指定し、POST メソッドを使用します。これらの機能は次のコードで宣言されています。
class FileData(BaseModel):
    data: str
    mime_type: str

class Message(BaseModel):
    role: str
    content: str | List[FileData]

class LastUserMessage(BaseModel):
    text: str
    files: List[FileData] = []

class ChatRequest(BaseModel):
    message: LastUserMessage
    history: List[Message]
    system_prompt: str = DEFAULT_SYSTEM_PROMPT

class ChatResponse(BaseModel):
    response: str
    error: Optional[str] = None

    ...

@app.post("/chat", response_model=ChatResponse)
async def chat(
    request: ChatRequest = Body(...),
) -> ChatResponse:

    # Truncated
    ...
Gemini SDK のチャット履歴の形式を準備する
理解しておくべき重要な点の一つは、後で Gemini クライアントを初期化するときに history 引数値として挿入できるように、チャット履歴を再構成する方法です。以下のコードを確認できます。
def format_message_history_to_gemini_standard(
    message_history: List[Message],
) -> List[Content]:

    ...
    # Truncated

    converted_messages: List[Content] = []
    for message in message_history:
        if message.role == "assistant":
            converted_messages.append(
                Content(role="model", parts=[Part.from_text(text=message.content)])
            )
        elif message.role == "user":
            # Text-only messages
            if isinstance(message.content, str):
                converted_messages.append(
                    Content(role="user", parts=[Part.from_text(text=message.content)])
                )

            # Messages with files
            elif isinstance(message.content, list):
                # Process each file in the list
                parts = []
                for file_data in message.content:
                    parts.append(handle_multimodal_data(file_data))

                # Add the parts to a Content object
                if parts:
                    converted_messages.append(Content(role="user", parts=parts))

    #Truncated
    ...

    return converted_messages
Gemini SDK にチャット履歴を提供する場合は、データを List[Content] データ型でフォーマットする必要があります。各 Content には、少なくとも role と parts の値が必要です。role は、メッセージの送信元(user または model)を指します。ここで、部分はプロンプト自体を指します。プロンプトはテキストのみの場合もあれば、さまざまなモダリティの組み合わせの場合もあります。Content 引数の構造化方法について詳しくは、こちらのドキュメントをご覧ください。
テキスト以外の(マルチモーダル)データを処理する
フロントエンド セクションで説明したように、テキスト以外のデータやマルチモーダル データを送信する方法の一つは、データを base64 文字列として送信することです。また、データが正しく解釈されるように、データの MIME タイプを指定する必要があります。たとえば、.jpg 接尾辞の画像データを送信する場合は、image/jpeg MIME タイプを指定します。
このコードの部分では、base64 データを Gemini SDK の Part.from_bytes 形式に変換します。
def handle_multimodal_data(file_data: FileData) -> Part:
    """Converts Multimodal data to a Google Gemini Part object.

    Args:
        file_data: FileData object with base64 data and MIME type.

    Returns:
        Part: A Google Gemini Part object containing the file data.
    """
    data = base64.b64decode(file_data.data)  # decode base64 string to bytes
    return Part.from_bytes(data=data, mime_type=file_data.mime_type)
5. 統合テスト
これで、複数のサービスが異なる Cloud コンソール タブで実行されるようになります。
- ポート 8080 で実行されるフロントエンド サービス
* Running on local URL:  http://0.0.0.0:8080

To create a public link, set `share=True` in `launch()`.
- ポート 8081 で実行されるバックエンド サービス
INFO:     Started server process [xxxxx]
INFO:     Waiting for application startup.
INFO:     Application startup complete.
INFO:     Uvicorn running on http://0.0.0.0:8081 (Press CTRL+C to quit)
現時点では、ポート 8080 のウェブ アプリケーションからアシスタントとチャットしながら、ドキュメントをシームレスに送信できます。ファイルをアップロードして質問することで、テストを開始できます。一部のファイル形式はサポートされていませんため、エラーが発生する可能性があります。
テキスト ボックスの下にある [追加入力] フィールドでシステム指示を編集することもできます。

6. Cloud Run へのデプロイ
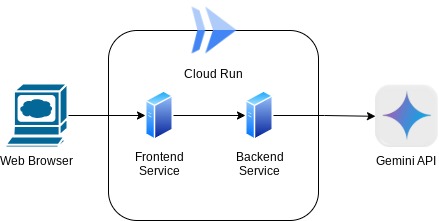
もちろん、この素晴らしいアプリを他のユーザーに紹介したいものです。そのためには、このアプリケーションをパッケージ化して、他のユーザーがアクセスできる公開サービスとして Cloud Run にデプロイします。そのためには、アーキテクチャについて復習しましょう。
この Codelab では、フロントエンド サービスとバックエンド サービスの両方を 1 つのコンテナに配置します。両方のサービスを管理するには、supervisord が必要です。
新しいファイルを作成し、[ファイル] > [新しいテキスト ファイル] をクリックして、次のコードをコピーして貼り付け、supervisord.conf として保存します。
[supervisord]
nodaemon=true
user=root
logfile=/dev/stdout
logfile_maxbytes=0
pidfile=/var/run/supervisord.pid

[program:backend]
command=uv run backend.py
directory=/app
autostart=true
autorestart=true
stdout_logfile=/dev/stdout
stdout_logfile_maxbytes=0
stderr_logfile=/dev/stderr
stderr_logfile_maxbytes=0
startsecs=10
startretries=3

[program:frontend]
command=uv run frontend.py
directory=/app
autostart=true
autorestart=true
stdout_logfile=/dev/stdout
stdout_logfile_maxbytes=0
stderr_logfile=/dev/stderr
stderr_logfile_maxbytes=0
startsecs=10
startretries=3
次に、Dockerfile が必要です。[ファイル] > [新しいテキスト ファイル] をクリックし、次のコードをコピーして貼り付け、Dockerfile として保存します。
FROM python:3.12-slim
COPY --from=ghcr.io/astral-sh/uv:0.6.6 /uv /uvx /bin/

RUN apt-get update && apt-get install -y \
    supervisor curl \
    && rm -rf /var/lib/apt/lists/*

ADD . /app
WORKDIR /app

RUN uv sync --frozen

EXPOSE 8080

# Copy supervisord configuration
COPY supervisord.conf /etc/supervisor/conf.d/supervisord.conf

ENV PYTHONUNBUFFERED=1

ENTRYPOINT ["/usr/bin/supervisord", "-c", "/etc/supervisor/conf.d/supervisord.conf"]
この時点で、アプリケーションを Cloud Run にデプロイするために必要なファイルはすべて揃っています。デプロイしましょう。Cloud Shell ターミナルに移動し、現在のプロジェクトがアクティブなプロジェクトに構成されていることを確認します。構成されていない場合は、gcloud configure コマンドを使用してプロジェクト ID を設定します。
gcloud config set project [PROJECT_ID]
次に、次のコマンドを実行して Cloud Run にデプロイします。
gcloud run deploy --source . \
                  --env-vars-file settings.yaml \
                  --port 8080 \
                  --region us-central1
サービスの名前(「gemini-multimodal-chat-assistant」など)を入力するよう求められます。アプリケーションの作業ディレクトリに Dockerfile があるため、Docker コンテナがビルドされ、Artifact Registry に push されます。また、リージョンに Artifact Registry リポジトリが作成されることを示すプロンプトが表示されます。これには「Y」と回答します。また、未認証の呼び出しを許可するかどうかを尋ねられたら、「y」と答えます。これはデモ用アプリケーションであるため、未認証のアクセスを許可しています。エンタープライズ アプリケーションと本番環境のアプリケーションには、適切な認証を使用することをおすすめします。
デプロイが完了すると、次のようなリンクが表示されます。
https://gemini-multimodal-chat-assistant-*******.us-central1.run.app
シークレット ウィンドウまたはモバイル デバイスからアプリを使用してください。すでに公開されているはずです。
7. 課題
データ探索スキルを磨くチャンスです。アシスタントが音声ファイルや動画ファイルの読み取りをサポートできるようにコードを変更する能力はありますか?
8. クリーンアップ
この Codelab で使用したリソースについて、Google Cloud アカウントに課金されないようにするには、次の操作を行います。