
1. 简介
Flame 是一款基于 Flutter 的 2D 游戏引擎。在此 Codelab 中,您将构建一款游戏,其灵感源自 20 世纪 70 年代的经典视频游戏之一,即 Steve Wozniak 的 Breakout。您将使用 Flame 的组件来绘制球棒、球和砖块。您将利用 Flame 的效果为蝙蝠的移动添加动画效果,并了解如何将 Flame 与 Flutter 的状态管理系统集成。
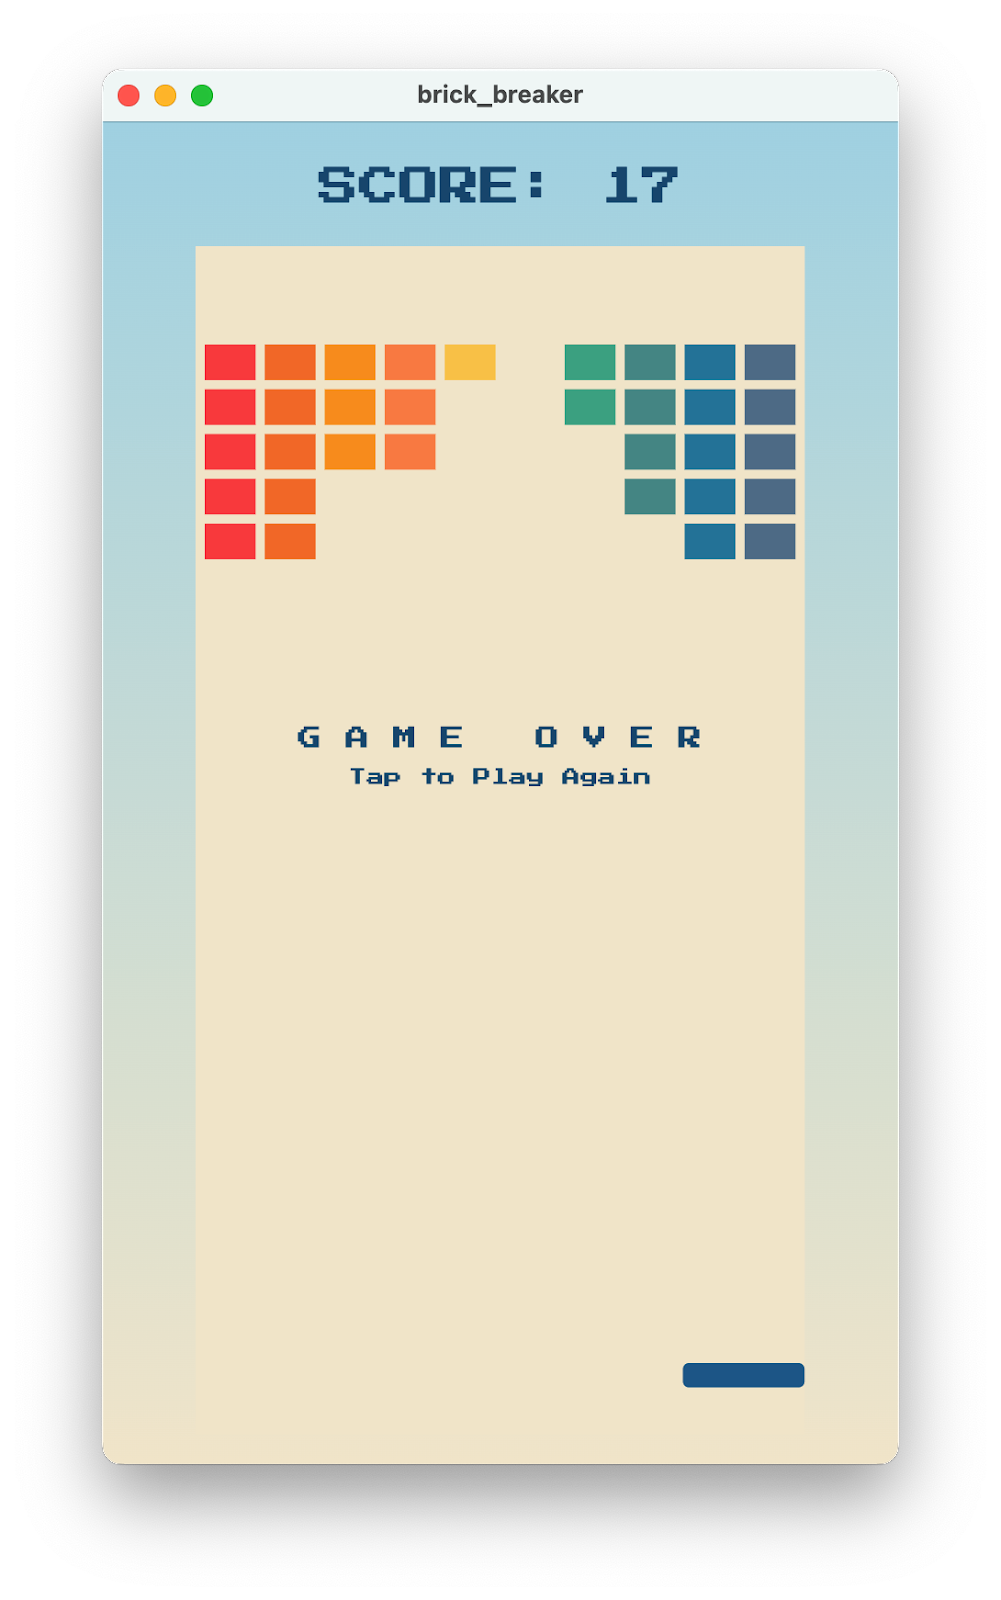
完成后,您的游戏应如下面的动画 GIF 所示,但速度会稍慢一些。

学习内容
- Flame 的基本工作原理,从
GameWidget开始。 - 如何使用游戏循环。
- Flame 的
Component如何运作。它们类似于 Flutter 的Widget。 - 如何处理碰撞。
- 如何使用
Effect为Component添加动画效果。 - 如何在 Flame 游戏之上叠加 Flutter
Widget。 - 如何将 Flame 与 Flutter 的状态管理功能集成。
构建内容
在此 Codelab 中,您将使用 Flutter 和 Flame 构建一个 2D 游戏。完成后,游戏应满足以下要求:
- 在 Flutter 支持的所有六个平台(Android、iOS、Linux、macOS、Windows 和 Web)上运行
- 使用 Flame 的游戏循环保持至少 60 fps 的帧速率。
- 使用
google_fonts软件包和flutter_animate等 Flutter 功能,重现 80 年代街机游戏的体验。
2. 设置您的 Flutter 环境
编辑者
为了简化此 Codelab,我们假设您将使用 Visual Studio Code (VS Code) 作为开发环境。VS Code 是免费的,适用于所有主要平台。我们在此 Codelab 中使用 VS Code,因为相关说明默认使用 VS Code 专有的快捷键。任务变得更加简单明了:“点击此按钮”或“按此键执行 X”,而不是“在编辑器中执行适当的操作以执行 X”。
您可以使用任何喜欢的编辑器:Android Studio、其他 IntelliJ IDE、Emacs、Vim 或 Notepad++。它们均支持 Flutter。

选择目标开发平台
Flutter 可为多个平台生成应用。您的应用可以在以下任何操作系统上运行:
- iOS
- Android
- Windows
- macOS
- Linux
- 网络
一种常见的做法是选择一个操作系统作为目标开发平台。这是您的应用在开发期间运行的操作系统。

例如,假设您开发 Flutter 应用使用的是 Windows 笔记本电脑。然后,您选择 Android 作为目标开发平台。如需预览应用,您可以使用 USB 线将 Android 设备连接到 Windows 笔记本电脑,然后您在开发的应用将在该连接的 Android 设备上或在 Android 模拟器中运行。您可以选择 Windows 作为目标开发平台,这样您在开发的应用将作为 Windows 应用与编辑器一起运行。
请先做出选择,然后再继续。您以后始终可以在其他操作系统上运行应用。选择目标开发平台之后,后续步骤才会更加顺利。
安装 Flutter
如需获取关于如何安装 Flutter SDK 的最新说明,请访问 docs.flutter.dev。
Flutter 网站上的说明介绍了 SDK 安装步骤,以及与目标开发平台相关的工具和编辑器插件。对于此 Codelab,请安装以下软件:
- Flutter SDK
- 随带 Flutter 插件的 Visual Studio Code
- 所选开发目标的编译器软件。(您需要 Visual Studio 才能以 Windows 为目标平台,或需要 Xcode 才能以 macOS 或 iOS 为目标平台)
在下一节中,您将创建您的第一个 Flutter 项目。
如果您需要排查任何问题,以下来自 StackOverflow 的一些问题解答可能有助于您排查问题。
常见问题解答
3. 创建项目
创建您的第一个 Flutter 项目
这包括打开 VS Code,并在您选择的目录中创建 Flutter 应用模板。
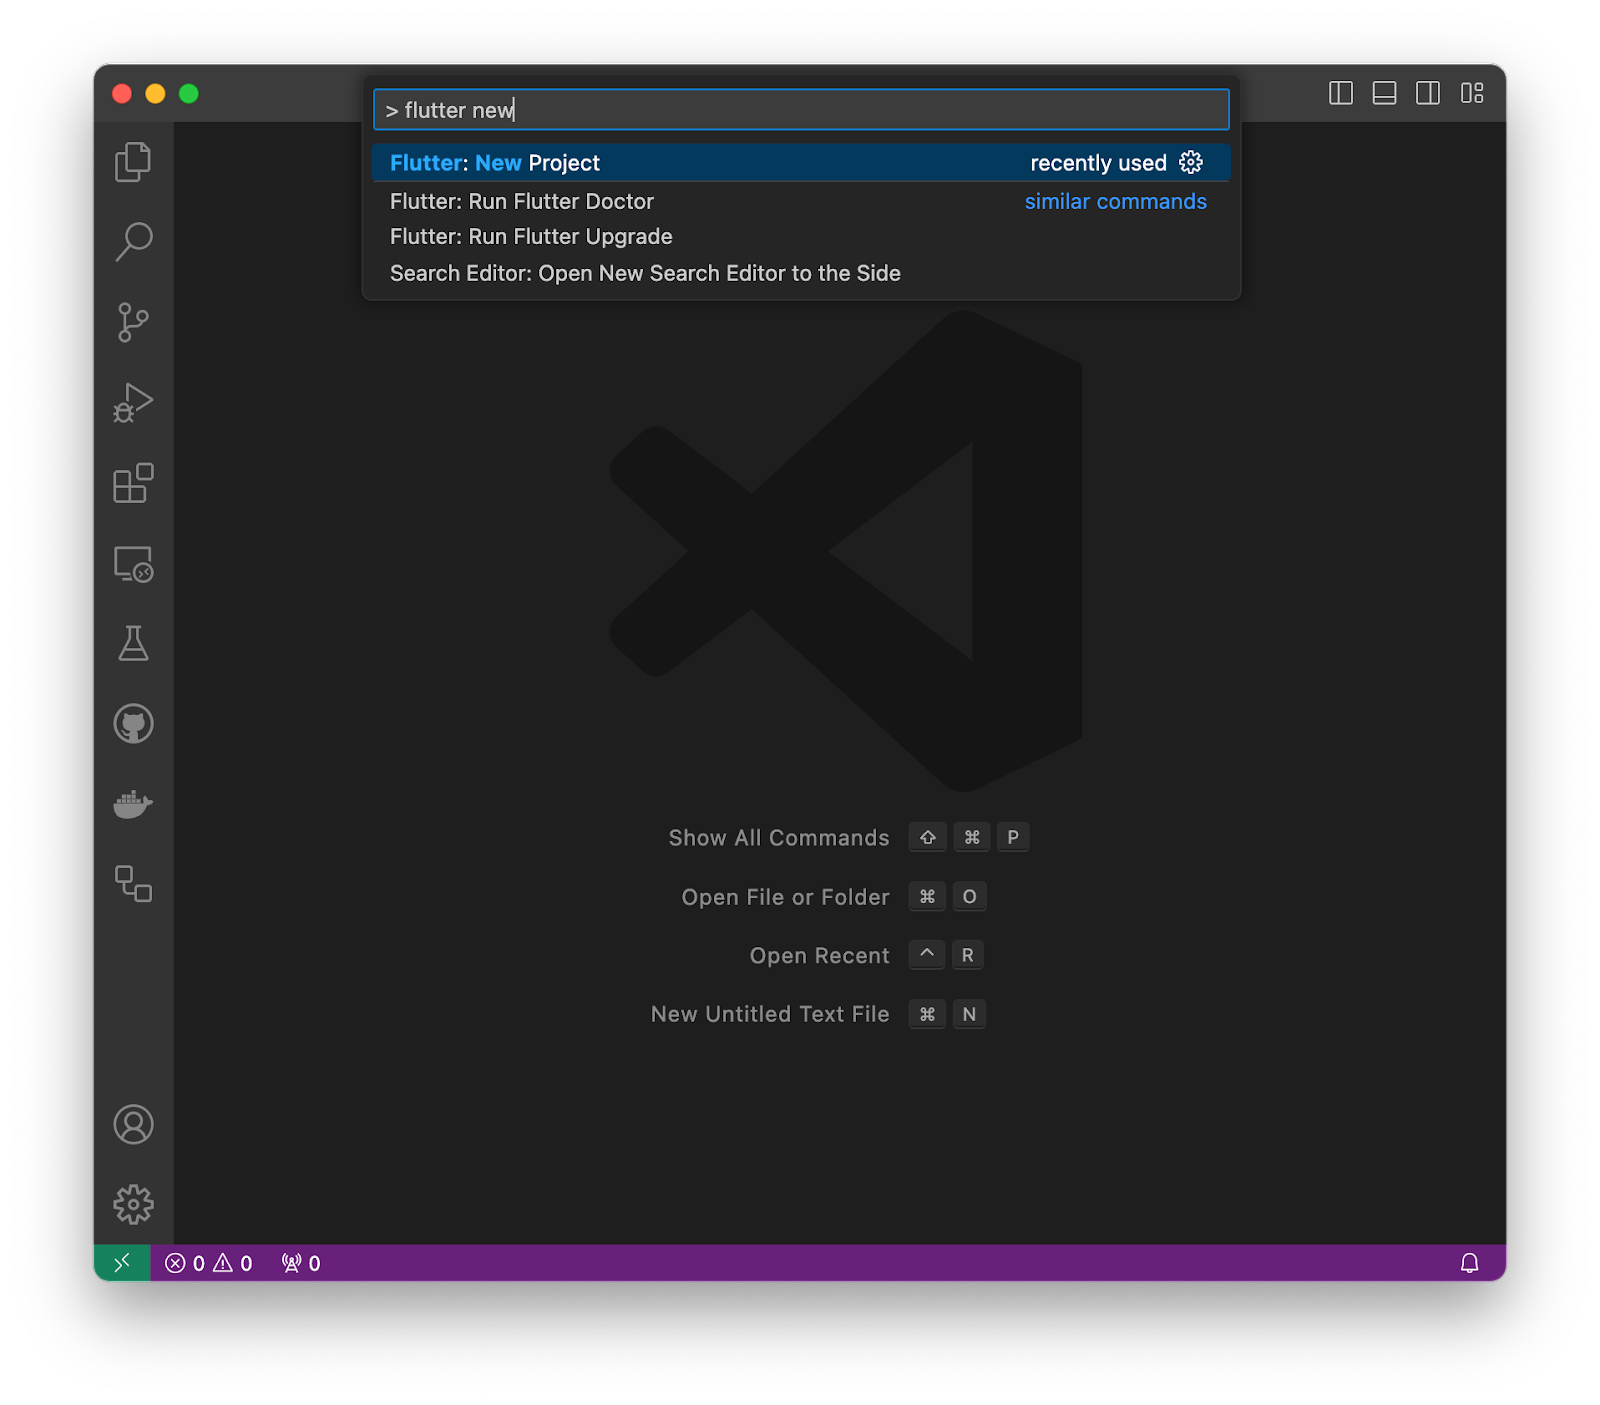
- 启动 Visual Studio Code。
- 打开命令面板(
F1或Ctrl+Shift+P或Shift+Cmd+P),然后输入“flutter new”。当该命令显示时,选择 Flutter: New Project 命令。
- 选择 Empty Application。选择要在其中创建项目的目录。此目录应为不需要提升权限或路径中不含空格的任何目录。例如,您的主目录或
C:\src\。
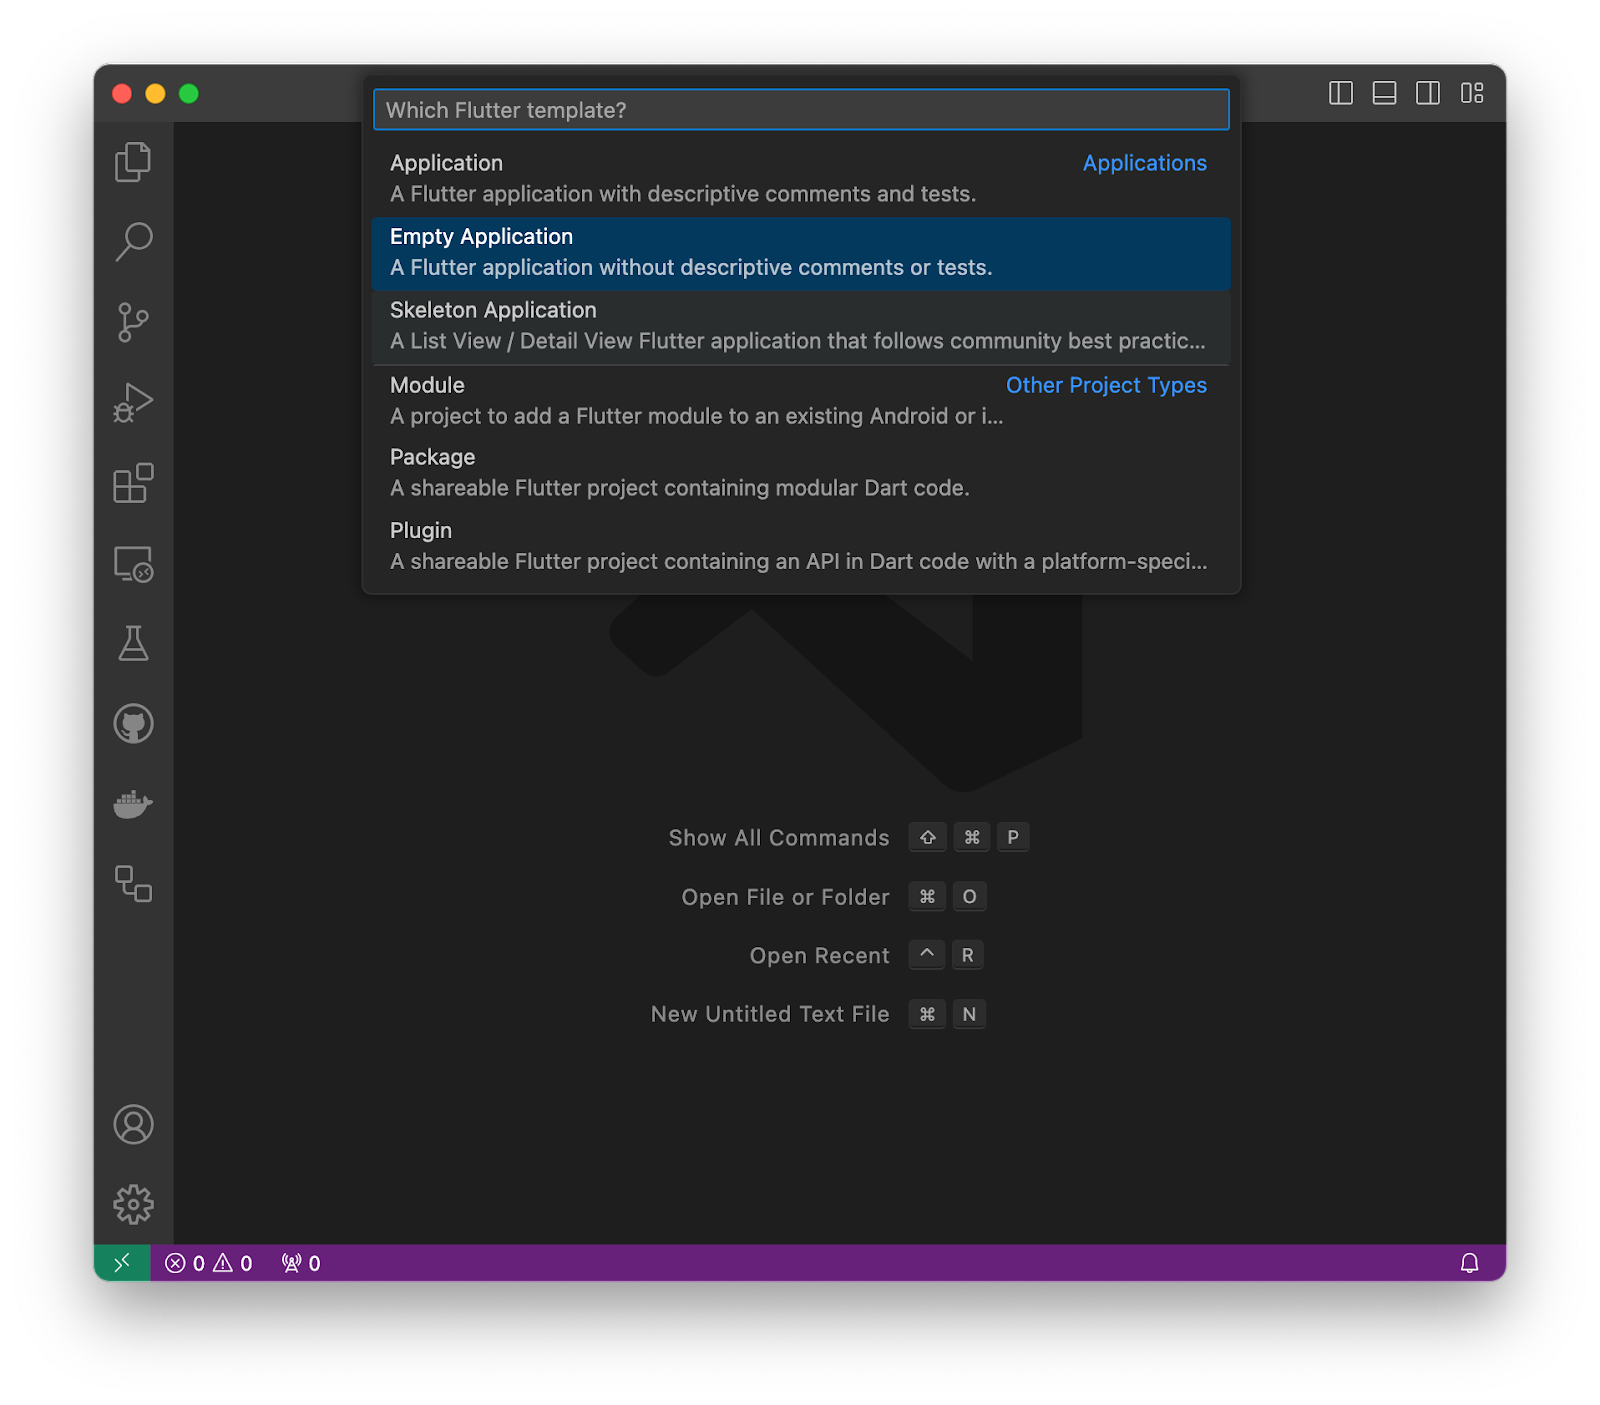
- 将项目命名为
brick_breaker。本 Codelab 的其余部分假定您将应用命名为brick_breaker。

现在,Flutter 会创建项目文件夹,然后在 VS Code 中打开该文件夹。您现在将使用应用的基本基架来覆盖两个文件的内容。
复制并粘贴初始应用
这会将此 Codelab 中提供的示例代码添加到您的应用中。
- 在 VS Code 的左侧窗格中,点击 Explorer,然后打开
pubspec.yaml文件。

- 将此文件的内容替换为以下内容。
pubspec.yaml
name: brick_breaker
description: "Re-implementing Woz's Breakout"
publish_to: "none"
version: 0.1.0

environment:
  sdk: ^3.8.0

dependencies:
  flutter:
    sdk: flutter
  flame: ^1.28.1
  flutter_animate: ^4.5.2
  google_fonts: ^6.2.1

dev_dependencies:
  flutter_test:
    sdk: flutter
  flutter_lints: ^5.0.0

flutter:
  uses-material-design: true
pubspec.yaml 文件指定与您的应用相关的基本信息,例如其当前版本、依赖项以及其随附的资源。
- 打开
lib/目录中的main.dart文件。
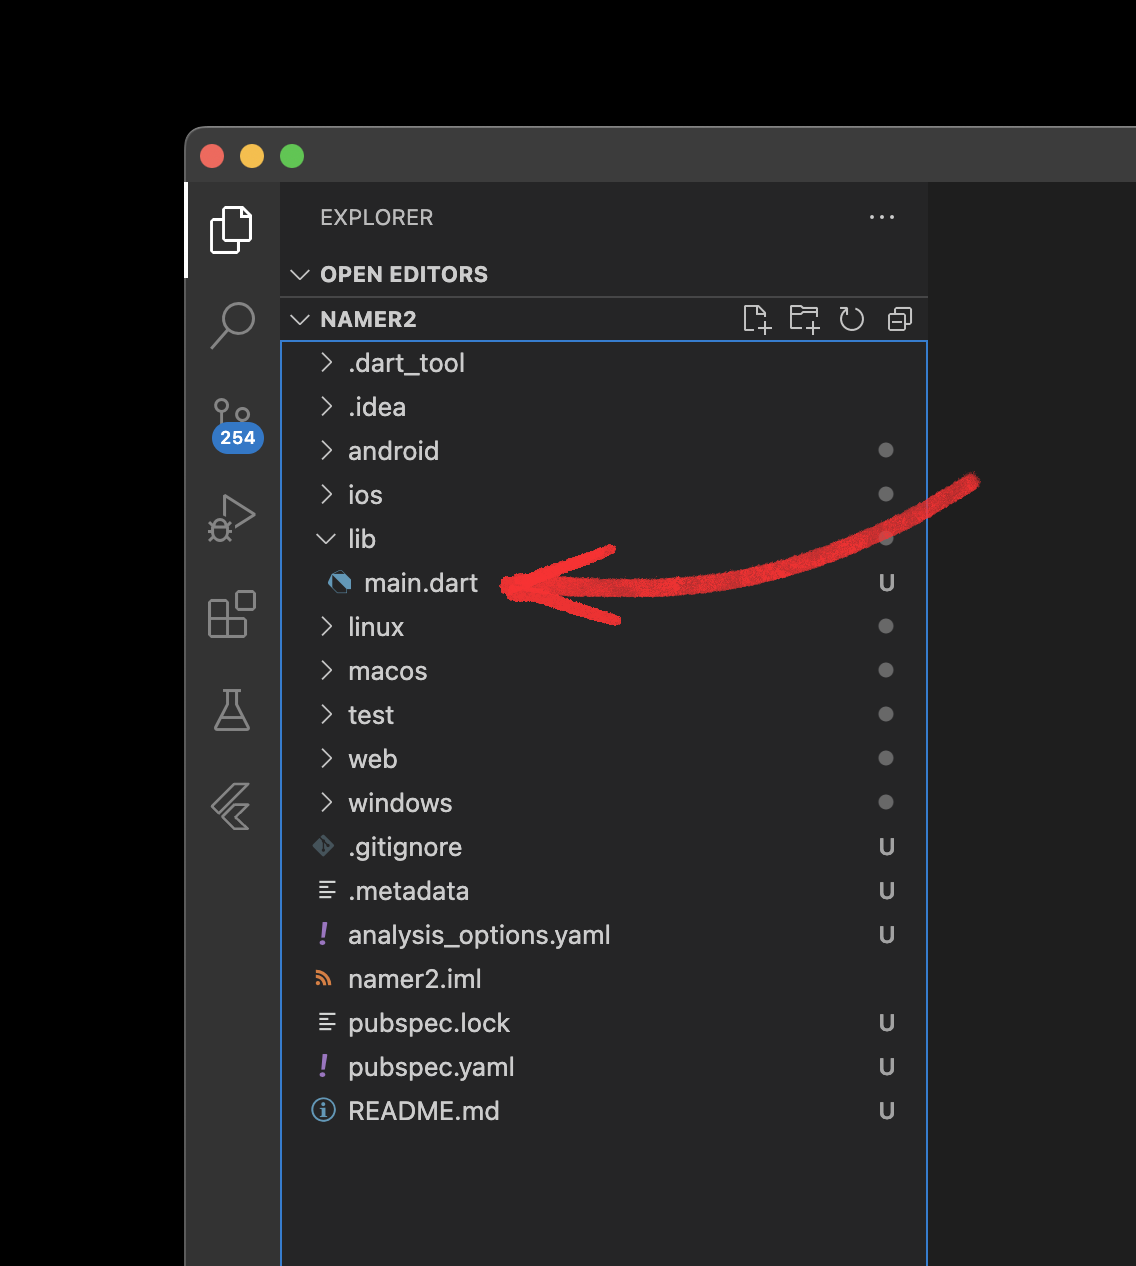
- 将此文件的内容替换为以下内容。
lib/main.dart
import 'package:flame/game.dart';
import 'package:flutter/material.dart';

void main() {
  final game = FlameGame();
  runApp(GameWidget(game: game));
}
- 运行此代码以验证一切是否正常运行。系统应显示一个新窗口,其中只有空白的黑色背景。世界上最糟糕的视频游戏现在以 60fps 的帧速率渲染!

4. 创建游戏
了解游戏规模
以二维 (2D) 方式玩的游戏需要游戏区域。您将构建一个具有特定尺寸的区域,然后使用这些尺寸来调整游戏的其他方面。
您可以通过多种方式在游戏区域中布局坐标。根据一种惯例,您可以从屏幕中心测量方向,原点 (0,0)位于屏幕中心,正值沿 x 轴将项向右移动,沿 y 轴将项向上移动。此标准适用于目前的大多数游戏,尤其是涉及三维的游戏。
在创建原始的 Breakout 游戏时,惯例是将原点设置在左上角。正 x 方向保持不变,但 y 方向被翻转。x 正方向为右,y 正方向为下。为了忠实于那个时代,此游戏将原点设置为左上角。
在名为 lib/src 的新目录中创建一个名为 config.dart 的文件。在后续步骤中,此文件将添加更多常量。
lib/src/config.dart
const gameWidth = 820.0;
const gameHeight = 1600.0;
此游戏的宽度为 820 像素,高度为 1600 像素。游戏区域会缩放以适应显示它的窗口,但添加到屏幕上的所有组件都符合此高度和宽度。
创建 PlayArea
在“打砖块”游戏中,球会从游戏区域的墙壁上弹开。为了适应碰撞,您首先需要一个 PlayArea 组件。
- 在名为
lib/src/components的新目录中创建一个名为play_area.dart的文件。 - 将以下内容添加到此文件中。
lib/src/components/play_area.dart
import 'dart:async';

import 'package:flame/components.dart';
import 'package:flutter/material.dart';

import '../brick_breaker.dart';

class PlayArea extends RectangleComponent with HasGameReference<BrickBreaker> {
  PlayArea() : super(paint: Paint()..color = const Color(0xfff2e8cf));

  @override
  FutureOr<void> onLoad() async {
    super.onLoad();
    size = Vector2(game.width, game.height);
  }
}
Flutter 有 Widget,而 Flame 有 Component。Flutter 应用由 widget 树构成,而 Flame 游戏由组件树构成。
这正是 Flutter 和 Flame 之间一个有趣的区别。Flutter 的 widget 树是一种临时描述,用于更新持久且可变的 RenderObject 层。Flame 的组件是持久且可变的,开发者应将这些组件用作模拟系统的一部分。
Flame 的组件经过优化,可用于表达游戏机制。本 Codelab 将从游戏循环开始,这将在下一步中介绍。
- 为了控制杂乱程度,请添加一个包含此项目所有组件的文件。在
lib/src/components中创建一个components.dart文件,并添加以下内容。
lib/src/components/components.dart
export 'play_area.dart';
export 指令的作用与 import 相反。它声明了此文件在导入到另一个文件时公开的功能。随着您在后续步骤中添加新组件,此文件中的条目会越来越多。
创建 Flame 游戏
为了消除上一步中的红色波浪线,请为 Flame 的 FlameGame 派生一个新的子类。
- 在
lib/src中创建一个名为brick_breaker.dart的文件,并添加以下代码。
lib/src/brick_breaker.dart
import 'dart:async';

import 'package:flame/components.dart';
import 'package:flame/game.dart';

import 'components/components.dart';
import 'config.dart';

class BrickBreaker extends FlameGame {
  BrickBreaker()
    : super(
        camera: CameraComponent.withFixedResolution(
          width: gameWidth,
          height: gameHeight,
        ),
      );

  double get width => size.x;
  double get height => size.y;

  @override
  FutureOr<void> onLoad() async {
    super.onLoad();

    camera.viewfinder.anchor = Anchor.topLeft;

    world.add(PlayArea());
  }
}
此文件用于协调游戏的操作。在构建游戏实例期间,此代码会将游戏配置为使用固定分辨率渲染。游戏会调整大小以填充包含它的屏幕,并根据需要添加信箱模式。
您公开了游戏的宽度和高度,以便子组件(例如 PlayArea)可以自行设置为合适的大小。
在 onLoad 替换方法中,您的代码会执行两项操作。
- 将左上角配置为取景器的锚点。默认情况下,
viewfinder使用区域的中间位置作为(0,0)的锚点。 - 将
PlayArea添加到world。world 表示游戏世界。它通过CameraComponent的视图转换来投影其所有子级。
在屏幕上显示游戏
如需查看您在此步骤中所做的所有更改,请使用以下更改更新 lib/main.dart 文件。
lib/main.dart
import 'package:flame/game.dart';
import 'package:flutter/material.dart';

import 'src/brick_breaker.dart';                                // Add this import

void main() {
  final game = BrickBreaker();                                  // Modify this line
  runApp(GameWidget(game: game));
}
进行这些更改后,请重启游戏。游戏应类似于下图。

在下一步中,您将向世界添加一个球,并让它动起来!
5. 显示球
创建球组件
在屏幕上放置一个移动的球需要创建另一个组件并将其添加到游戏世界中。
- 按如下方式修改
lib/src/config.dart文件的内容。
lib/src/config.dart
const gameWidth = 820.0;
const gameHeight = 1600.0;
const ballRadius = gameWidth * 0.02;                            // Add this constant
在本 Codelab 中,您将多次看到将命名常量定义为派生值的设计模式。这样一来,您就可以修改顶层 gameWidth 和 gameHeight,探索游戏外观和风格会发生怎样的变化。
- 在
lib/src/components中名为ball.dart的文件中创建Ball组件。
lib/src/components/ball.dart
import 'package:flame/components.dart';
import 'package:flutter/material.dart';

class Ball extends CircleComponent {
  Ball({
    required this.velocity,
    required super.position,
    required double radius,
  }) : super(
         radius: radius,
         anchor: Anchor.center,
         paint: Paint()
           ..color = const Color(0xff1e6091)
           ..style = PaintingStyle.fill,
       );

  final Vector2 velocity;

  @override
  void update(double dt) {
    super.update(dt);
    position += velocity * dt;
  }
}
之前,您使用 RectangleComponent 定义了 PlayArea,因此可以合理推断出存在更多形状。CircleComponent(例如 RectangleComponent)派生自 PositionedComponent,因此您可以在屏幕上放置球。更重要的是,其位置可以更新。
此组件引入了velocity(即位置随时间的变化)的概念。速度是一个 Vector2 对象,因为速度既有大小也有方向。如需更新位置,请替换游戏引擎为每一帧调用的 update 方法。dt 是指前一帧与当前帧之间的时间差。这样一来,您就可以适应不同的帧速率(60Hz 或 120Hz)或因计算量过大而导致的长帧等因素。
请密切关注 position += velocity * dt 更新。以下是实现随时间推移更新离散运动模拟的方法。
- 如需在组件列表中包含
Ball组件,请按如下方式修改lib/src/components/components.dart文件。
lib/src/components/components.dart
export 'ball.dart';                           // Add this export
export 'play_area.dart';
将球添加到世界
您有一个球。将其放置在现实世界中,并设置其在游戏区域内移动。
按如下方式修改 lib/src/brick_breaker.dart 文件。
lib/src/brick_breaker.dart
import 'dart:async';
import 'dart:math' as math;                                     // Add this import

import 'package:flame/components.dart';
import 'package:flame/game.dart';

import 'components/components.dart';
import 'config.dart';

class BrickBreaker extends FlameGame {
  BrickBreaker()
    : super(
        camera: CameraComponent.withFixedResolution(
          width: gameWidth,
          height: gameHeight,
        ),
      );

  final rand = math.Random();                                   // Add this variable
  double get width => size.x;
  double get height => size.y;

  @override
  FutureOr<void> onLoad() async {
    super.onLoad();

    camera.viewfinder.anchor = Anchor.topLeft;

    world.add(PlayArea());

    world.add(
      Ball(                                                     // Add from here...
        radius: ballRadius,
        position: size / 2,
        velocity: Vector2(
          (rand.nextDouble() - 0.5) * width,
          height * 0.2,
        ).normalized()..scale(height / 4),
      ),
    );

    debugMode = true;                                           // To here.
  }
}
此更改会将 Ball 组件添加到 world。为了将球的 position 设置为显示区域的中心,代码首先将游戏的大小减半,因为 Vector2 具有运算符重载(* 和 /),可按标量值缩放 Vector2。
设置球的 velocity 涉及更多复杂性。目的是让球以合理的速度沿随机方向向下移动。对 normalized 方法的调用会创建一个 Vector2 对象,该对象设置为与原始 Vector2 相同的方向,但缩放为距离 1。这样一来,无论球朝哪个方向移动,速度都会保持一致。然后,将球的速度按比例放大到游戏高度的 1/4。
要正确设置这些不同的值,需要进行一些迭代,也就是业内所说的游戏测试。
最后一行用于开启调试显示,这会在显示屏上添加更多信息,以帮助进行调试。
现在运行游戏,您应该会看到类似如下的显示内容。

PlayArea 组件和 Ball 组件都包含调试信息,但背景遮罩会裁剪 PlayArea 的数字。之所以所有内容都显示调试信息,是因为您为整个组件树开启了 debugMode。如果仅对所选组件启用调试更有用,您也可以这样做。
如果您多次重启游戏,可能会注意到球与墙壁的互动并不完全符合预期。为了实现这种效果,您需要添加碰撞检测功能,这将在下一步中完成。
6. 四处跳动
添加碰撞检测
碰撞检测功能可添加一种行为,让游戏能够识别两个对象何时发生接触。
如需向游戏添加碰撞检测,请将 HasCollisionDetection mixin 添加到 BrickBreaker 游戏中,如以下代码所示。
lib/src/brick_breaker.dart
import 'dart:async';
import 'dart:math' as math;

import 'package:flame/components.dart';
import 'package:flame/game.dart';

import 'components/components.dart';
import 'config.dart';

class BrickBreaker extends FlameGame with HasCollisionDetection { // Modify this line
  BrickBreaker()
    : super(
        camera: CameraComponent.withFixedResolution(
          width: gameWidth,
          height: gameHeight,
        ),
      );

  final rand = math.Random();
  double get width => size.x;
  double get height => size.y;

  @override
  FutureOr<void> onLoad() async {
    super.onLoad();

    camera.viewfinder.anchor = Anchor.topLeft;

    world.add(PlayArea());

    world.add(
      Ball(
        radius: ballRadius,
        position: size / 2,
        velocity: Vector2(
          (rand.nextDouble() - 0.5) * width,
          height * 0.2,
        ).normalized()..scale(height / 4),
      ),
    );

    debugMode = true;
  }
}
此系统会跟踪组件的碰撞框,并在每个游戏 tick 中触发碰撞回调。
如需开始填充游戏的命中框,请按如下所示修改 PlayArea 组件:
lib/src/components/play_area.dart
import 'dart:async';

import 'package:flame/collisions.dart';                         // Add this import
import 'package:flame/components.dart';
import 'package:flutter/material.dart';

import '../brick_breaker.dart';

class PlayArea extends RectangleComponent with HasGameReference<BrickBreaker> {
  PlayArea()
    : super(
        paint: Paint()..color = const Color(0xfff2e8cf),
        children: [RectangleHitbox()],                          // Add this parameter
      );

  @override
  FutureOr<void> onLoad() async {
    super.onLoad();
    size = Vector2(game.width, game.height);
  }
}
将 RectangleHitbox 组件添加为 RectangleComponent 的子级,将构建一个用于碰撞检测的命中框,其大小与父组件的大小一致。对于 RectangleHitbox,有一个名为 relative 的工厂构造函数,用于在您需要比父组件更小或更大的命中框时使用。
弹球
到目前为止,添加碰撞检测功能对游戏玩法没有任何影响。不过,在您修改 Ball 组件后,它会发生变化。当球与 PlayArea 发生碰撞时,必须改变的是球的行为。
按如下方式修改 Ball 组件。
lib/src/components/ball.dart
import 'package:flame/collisions.dart';                         // Add this import
import 'package:flame/components.dart';
import 'package:flutter/material.dart';

import '../brick_breaker.dart';                                 // And this import
import 'play_area.dart';                                        // And this one too

class Ball extends CircleComponent
    with CollisionCallbacks, HasGameReference<BrickBreaker> {   // Add these mixins
  Ball({
    required this.velocity,
    required super.position,
    required double radius,
  }) : super(
         radius: radius,
         anchor: Anchor.center,
         paint: Paint()
           ..color = const Color(0xff1e6091)
           ..style = PaintingStyle.fill,
         children: [CircleHitbox()],                            // Add this parameter
       );

  final Vector2 velocity;

  @override
  void update(double dt) {
    super.update(dt);
    position += velocity * dt;
  }

  @override                                                     // Add from here...
  void onCollisionStart(
    Set<Vector2> intersectionPoints,
    PositionComponent other,
  ) {
    super.onCollisionStart(intersectionPoints, other);
    if (other is PlayArea) {
      if (intersectionPoints.first.y <= 0) {
        velocity.y = -velocity.y;
      } else if (intersectionPoints.first.x <= 0) {
        velocity.x = -velocity.x;
      } else if (intersectionPoints.first.x >= game.width) {
        velocity.x = -velocity.x;
      } else if (intersectionPoints.first.y >= game.height) {
        removeFromParent();
      }
    } else {
      debugPrint('collision with $other');
    }
  }                                                             // To here.
}
此示例通过添加 onCollisionStart 回调进行了重大更改。之前示例中添加到 BrickBreaker 的碰撞检测系统会调用此回调。
首先,代码会测试 Ball 是否与 PlayArea 发生碰撞。目前来看,这似乎是多余的,因为游戏世界中没有其他组件。在下一步中,当您向世界添加蝙蝠时,这种情况将会发生变化。然后,它还添加了一个 else 条件,用于处理球与球棒以外的物体发生碰撞的情况。温馨提醒:请实现剩余的逻辑(如有)。
当球与底墙碰撞时,它会从游戏界面上消失,但仍清晰可见。您将在后续步骤中利用 Flame 的特效功能处理此伪影。
现在,球可以与游戏墙壁发生碰撞,如果能给玩家一个球棒来击球,那肯定会很有用…
7. 击球
创建 bat 文件
如需添加球棒以在游戏中保持球的运动状态,
- 在
lib/src/config.dart文件中插入一些常量,如下所示。
lib/src/config.dart
const gameWidth = 820.0;
const gameHeight = 1600.0;
const ballRadius = gameWidth * 0.02;
const batWidth = gameWidth * 0.2;                               // Add from here...
const batHeight = ballRadius * 2;
const batStep = gameWidth * 0.05;                               // To here.
batHeight 和 batWidth 常量一目了然。另一方面,batStep 常数需要稍作解释。在此游戏中,玩家可以使用鼠标或手指(具体取决于平台)拖动球棒,也可以使用键盘与球互动。batStep 常量用于配置每次按下向左键或向右键时球棒的步进距离。
- 按如下方式定义
Bat组件类。
lib/src/components/bat.dart
import 'package:flame/collisions.dart';
import 'package:flame/components.dart';
import 'package:flame/effects.dart';
import 'package:flame/events.dart';
import 'package:flutter/material.dart';

import '../brick_breaker.dart';

class Bat extends PositionComponent
    with DragCallbacks, HasGameReference<BrickBreaker> {
  Bat({
    required this.cornerRadius,
    required super.position,
    required super.size,
  }) : super(anchor: Anchor.center, children: [RectangleHitbox()]);

  final Radius cornerRadius;

  final _paint = Paint()
    ..color = const Color(0xff1e6091)
    ..style = PaintingStyle.fill;

  @override
  void render(Canvas canvas) {
    super.render(canvas);
    canvas.drawRRect(
      RRect.fromRectAndRadius(Offset.zero & size.toSize(), cornerRadius),
      _paint,
    );
  }

  @override
  void onDragUpdate(DragUpdateEvent event) {
    super.onDragUpdate(event);
    position.x = (position.x + event.localDelta.x).clamp(0, game.width);
  }

  void moveBy(double dx) {
    add(
      MoveToEffect(
        Vector2((position.x + dx).clamp(0, game.width), position.y),
        EffectController(duration: 0.1),
      ),
    );
  }
}
此组件引入了一些新功能。
首先,Bat 组件是 PositionComponent,而不是 RectangleComponent 或 CircleComponent。这意味着此代码需要在屏幕上渲染 Bat。为此,它会替换 render 回调。
仔细查看 canvas.drawRRect(绘制圆角矩形)调用,您可能会问自己,“矩形在哪里?”Offset.zero & size.toSize() 利用 dart:ui Offset 类上创建 Rect 的 operator & 重载。这种简写形式起初可能会让您感到困惑,但您会在较低级别的 Flutter 和 Flame 代码中经常看到它。
其次,此 Bat 组件可使用手指或鼠标(具体取决于平台)拖动。如需实现此功能,请添加 DragCallbacks 混入项并替换 onDragUpdate 事件。
最后,Bat 组件需要响应键盘控制。moveBy 函数允许其他代码指示此蝙蝠向左或向右移动一定数量的虚拟像素。此函数引入了 Flame 游戏引擎的一项新功能:Effect。通过将 MoveToEffect 对象添加为此组件的子级,播放器会看到球棒动画移动到新位置。Flame 中提供了一系列 Effect,可用于实现各种效果。
Effect 的构造函数实参包含对 game getter 的引用。这就是您在此类中包含 HasGameReference mixin 的原因。此 mixin 会向相应组件添加类型安全的 game 访问器,以访问组件树顶部的 BrickBreaker 实例。
- 如需让
BrickBreaker可以使用Bat,请按如下所示更新lib/src/components/components.dart文件。
lib/src/components/components.dart
export 'ball.dart';
export 'bat.dart';                                              // Add this export
export 'play_area.dart';
将蝙蝠添加到世界中
如需将 Bat 组件添加到游戏世界,请按如下方式更新 BrickBreaker。
lib/src/brick_breaker.dart
import 'dart:async';
import 'dart:math' as math;

import 'package:flame/components.dart';
import 'package:flame/events.dart';                             // Add this import
import 'package:flame/game.dart';
import 'package:flutter/material.dart';                         // And this import
import 'package:flutter/services.dart';                         // And this

import 'components/components.dart';
import 'config.dart';

class BrickBreaker extends FlameGame
    with HasCollisionDetection, KeyboardEvents {                // Modify this line
  BrickBreaker()
    : super(
        camera: CameraComponent.withFixedResolution(
          width: gameWidth,
          height: gameHeight,
        ),
      );

  final rand = math.Random();
  double get width => size.x;
  double get height => size.y;

  @override
  FutureOr<void> onLoad() async {
    super.onLoad();

    camera.viewfinder.anchor = Anchor.topLeft;

    world.add(PlayArea());

    world.add(
      Ball(
        radius: ballRadius,
        position: size / 2,
        velocity: Vector2(
          (rand.nextDouble() - 0.5) * width,
          height * 0.2,
        ).normalized()..scale(height / 4),
      ),
    );

    world.add(                                                  // Add from here...
      Bat(
        size: Vector2(batWidth, batHeight),
        cornerRadius: const Radius.circular(ballRadius / 2),
        position: Vector2(width / 2, height * 0.95),
      ),
    );                                                          // To here.

    debugMode = true;
  }

  @override                                                     // Add from here...
  KeyEventResult onKeyEvent(
    KeyEvent event,
    Set<LogicalKeyboardKey> keysPressed,
  ) {
    super.onKeyEvent(event, keysPressed);
    switch (event.logicalKey) {
      case LogicalKeyboardKey.arrowLeft:
        world.children.query<Bat>().first.moveBy(-batStep);
      case LogicalKeyboardKey.arrowRight:
        world.children.query<Bat>().first.moveBy(batStep);
    }
    return KeyEventResult.handled;
  }                                                             // To here.
}
添加 KeyboardEvents mixin 和替换 onKeyEvent 方法可处理键盘输入。回想一下您之前添加的用于按适当的步数移动球拍的代码。
剩余的添加代码块会将球棒以适当的位置和比例添加到游戏世界中。通过在此文件中公开所有这些设置,您可以更轻松地调整球棒和球的相对大小,从而获得合适的游戏体验。
如果您此时玩游戏,会发现您可以移动球棒来拦截球,但除了您留在 Ball 的碰撞检测代码中的调试日志记录之外,没有其他可见的响应。
现在是时候解决这个问题了。按如下方式修改 Ball 组件。
lib/src/components/ball.dart
import 'package:flame/collisions.dart';
import 'package:flame/components.dart';
import 'package:flame/effects.dart';                           // Add this import
import 'package:flutter/material.dart';

import '../brick_breaker.dart';
import 'bat.dart';                                             // And this import
import 'play_area.dart';

class Ball extends CircleComponent
    with CollisionCallbacks, HasGameReference<BrickBreaker> {
  Ball({
    required this.velocity,
    required super.position,
    required double radius,
  }) : super(
         radius: radius,
         anchor: Anchor.center,
         paint: Paint()
           ..color = const Color(0xff1e6091)
           ..style = PaintingStyle.fill,
         children: [CircleHitbox()],
       );

  final Vector2 velocity;

  @override
  void update(double dt) {
    super.update(dt);
    position += velocity * dt;
  }

  @override
  void onCollisionStart(
    Set<Vector2> intersectionPoints,
    PositionComponent other,
  ) {
    super.onCollisionStart(intersectionPoints, other);
    if (other is PlayArea) {
      if (intersectionPoints.first.y <= 0) {
        velocity.y = -velocity.y;
      } else if (intersectionPoints.first.x <= 0) {
        velocity.x = -velocity.x;
      } else if (intersectionPoints.first.x >= game.width) {
        velocity.x = -velocity.x;
      } else if (intersectionPoints.first.y >= game.height) {
        add(RemoveEffect(delay: 0.35));                         // Modify from here...
      }
    } else if (other is Bat) {
      velocity.y = -velocity.y;
      velocity.x =
          velocity.x +
          (position.x - other.position.x) / other.size.x * game.width * 0.3;
    } else {                                                    // To here.
      debugPrint('collision with $other');
    }
  }
}
这些代码变更修复了两个不同的问题。
首先,它修复了球在触及屏幕底部时突然消失的问题。如需解决此问题,请将 removeFromParent 调用替换为 RemoveEffect。RemoveEffect 会在球离开可视游戏区域后将其从游戏世界中移除。
其次,这些更改修复了球棒与球之间碰撞的处理方式。此处理代码对玩家非常有利。只要玩家用球棒击中球,球就会返回到屏幕顶部。如果您觉得这种处理方式过于宽松,想要更逼真的效果,可以更改此处理方式,以更好地契合您希望游戏呈现的感觉。
值得一提的是,velocity 更新非常复杂。它不仅会反转速度的 y 分量(就像处理与墙壁的碰撞时那样),它还会以一种取决于球棒和球在接触时的相对位置的方式更新 x 组件。这样一来,玩家就可以更好地控制球的运动,但除了通过游戏之外,玩家无法以任何方式了解具体的操作方式。
现在您有了一个可以用来击球的球棒,如果能有一些砖块让您用球来击碎,那就太棒了!
8. 打破墙壁
创建砖块
如需向游戏中添加砖块,
- 在
lib/src/config.dart文件中插入一些常量,如下所示。
lib/src/config.dart
import 'package:flutter/material.dart';                         // Add this import

const brickColors = [                                           // Add this const
  Color(0xfff94144),
  Color(0xfff3722c),
  Color(0xfff8961e),
  Color(0xfff9844a),
  Color(0xfff9c74f),
  Color(0xff90be6d),
  Color(0xff43aa8b),
  Color(0xff4d908e),
  Color(0xff277da1),
  Color(0xff577590),
];

const gameWidth = 820.0;
const gameHeight = 1600.0;
const ballRadius = gameWidth * 0.02;
const batWidth = gameWidth * 0.2;
const batHeight = ballRadius * 2;
const batStep = gameWidth * 0.05;
const brickGutter = gameWidth * 0.015;                          // Add from here...
final brickWidth =
    (gameWidth - (brickGutter * (brickColors.length + 1))) / brickColors.length;
const brickHeight = gameHeight * 0.03;
const difficultyModifier = 1.03;                                // To here.
- 按如下方式插入
Brick组件。
lib/src/components/brick.dart
import 'package:flame/collisions.dart';
import 'package:flame/components.dart';
import 'package:flutter/material.dart';

import '../brick_breaker.dart';
import '../config.dart';
import 'ball.dart';
import 'bat.dart';

class Brick extends RectangleComponent
    with CollisionCallbacks, HasGameReference<BrickBreaker> {
  Brick({required super.position, required Color color})
    : super(
        size: Vector2(brickWidth, brickHeight),
        anchor: Anchor.center,
        paint: Paint()
          ..color = color
          ..style = PaintingStyle.fill,
        children: [RectangleHitbox()],
      );

  @override
  void onCollisionStart(
    Set<Vector2> intersectionPoints,
    PositionComponent other,
  ) {
    super.onCollisionStart(intersectionPoints, other);
    removeFromParent();

    if (game.world.children.query<Brick>().length == 1) {
      game.world.removeAll(game.world.children.query<Ball>());
      game.world.removeAll(game.world.children.query<Bat>());
    }
  }
}
到目前为止,您应该已经熟悉了大部分代码。此代码使用 RectangleComponent,同时包含碰撞检测和对组件树顶部的 BrickBreaker 游戏进行类型安全引用的功能。
此代码引入的最重要的新概念是玩家如何实现获胜条件。获胜条件检查会查询世界中的砖块,并确认只剩下一块砖块。这可能有点令人困惑,因为上一行代码会从其父级中移除此砖块。
需要了解的关键点是,移除组件是一项排队的命令。它会在运行此代码后移除砖块,但在游戏世界的下一个时间步之前移除。
如需使 Brick 组件可供 BrickBreaker 访问,请按如下方式修改 lib/src/components/components.dart。
lib/src/components/components.dart
export 'ball.dart';
export 'bat.dart';
export 'brick.dart';                                            // Add this export
export 'play_area.dart';
向世界添加积木
按如下所示更新 Ball 组件。
lib/src/components/ball.dart
import 'package:flame/collisions.dart';
import 'package:flame/components.dart';
import 'package:flame/effects.dart';
import 'package:flutter/material.dart';

import '../brick_breaker.dart';
import 'bat.dart';
import 'brick.dart';                                            // Add this import
import 'play_area.dart';

class Ball extends CircleComponent
    with CollisionCallbacks, HasGameReference<BrickBreaker> {
  Ball({
    required this.velocity,
    required super.position,
    required double radius,
    required this.difficultyModifier,                           // Add this parameter
  }) : super(
         radius: radius,
         anchor: Anchor.center,
         paint: Paint()
           ..color = const Color(0xff1e6091)
           ..style = PaintingStyle.fill,
         children: [CircleHitbox()],
       );

  final Vector2 velocity;
  final double difficultyModifier;                              // Add this member

  @override
  void update(double dt) {
    super.update(dt);
    position += velocity * dt;
  }

  @override
  void onCollisionStart(
    Set<Vector2> intersectionPoints,
    PositionComponent other,
  ) {
    super.onCollisionStart(intersectionPoints, other);
    if (other is PlayArea) {
      if (intersectionPoints.first.y <= 0) {
        velocity.y = -velocity.y;
      } else if (intersectionPoints.first.x <= 0) {
        velocity.x = -velocity.x;
      } else if (intersectionPoints.first.x >= game.width) {
        velocity.x = -velocity.x;
      } else if (intersectionPoints.first.y >= game.height) {
        add(RemoveEffect(delay: 0.35));
      }
    } else if (other is Bat) {
      velocity.y = -velocity.y;
      velocity.x =
          velocity.x +
          (position.x - other.position.x) / other.size.x * game.width * 0.3;
    } else if (other is Brick) {                                // Modify from here...
      if (position.y < other.position.y - other.size.y / 2) {
        velocity.y = -velocity.y;
      } else if (position.y > other.position.y + other.size.y / 2) {
        velocity.y = -velocity.y;
      } else if (position.x < other.position.x) {
        velocity.x = -velocity.x;
      } else if (position.x > other.position.x) {
        velocity.x = -velocity.x;
      }
      velocity.setFrom(velocity * difficultyModifier);          // To here.
    }
  }
}
这引入了唯一的新方面,即一个难度修饰符,可在每次球与砖块碰撞后提高球的速度。需要通过游戏测试来确定此可调参数,以找到适合您游戏的难度曲线。
按如下方式修改 BrickBreaker 游戏。
lib/src/brick_breaker.dart
import 'dart:async';
import 'dart:math' as math;

import 'package:flame/components.dart';
import 'package:flame/events.dart';
import 'package:flame/game.dart';
import 'package:flutter/material.dart';
import 'package:flutter/services.dart';

import 'components/components.dart';
import 'config.dart';

class BrickBreaker extends FlameGame
    with HasCollisionDetection, KeyboardEvents {
  BrickBreaker()
    : super(
        camera: CameraComponent.withFixedResolution(
          width: gameWidth,
          height: gameHeight,
        ),
      );

  final rand = math.Random();
  double get width => size.x;
  double get height => size.y;

  @override
  FutureOr<void> onLoad() async {
    super.onLoad();

    camera.viewfinder.anchor = Anchor.topLeft;

    world.add(PlayArea());

    world.add(
      Ball(
        difficultyModifier: difficultyModifier,                 // Add this argument
        radius: ballRadius,
        position: size / 2,
        velocity: Vector2(
          (rand.nextDouble() - 0.5) * width,
          height * 0.2,
        ).normalized()..scale(height / 4),
      ),
    );

    world.add(
      Bat(
        size: Vector2(batWidth, batHeight),
        cornerRadius: const Radius.circular(ballRadius / 2),
        position: Vector2(width / 2, height * 0.95),
      ),
    );

    await world.addAll([                                        // Add from here...
      for (var i = 0; i < brickColors.length; i++)
        for (var j = 1; j <= 5; j++)
          Brick(
            position: Vector2(
              (i + 0.5) * brickWidth + (i + 1) * brickGutter,
              (j + 2.0) * brickHeight + j * brickGutter,
            ),
            color: brickColors[i],
          ),
    ]);                                                         // To here.

    debugMode = true;
  }

  @override
  KeyEventResult onKeyEvent(
    KeyEvent event,
    Set<LogicalKeyboardKey> keysPressed,
  ) {
    super.onKeyEvent(event, keysPressed);
    switch (event.logicalKey) {
      case LogicalKeyboardKey.arrowLeft:
        world.children.query<Bat>().first.moveBy(-batStep);
      case LogicalKeyboardKey.arrowRight:
        world.children.query<Bat>().first.moveBy(batStep);
    }
    return KeyEventResult.handled;
  }
}
如果您运行游戏,它会显示所有关键的游戏机制。您可以关闭调试并将其标记为完成,但总感觉缺少了什么。

欢迎界面、游戏结束界面,或许还有得分?Flutter 可以为游戏添加这些功能,接下来您将重点学习这方面的内容。
9. 赢得游戏
添加播放状态
在此步骤中,您将 Flame 游戏嵌入到 Flutter 封装容器中,然后为欢迎界面、游戏结束界面和游戏胜利界面添加 Flutter 叠加层。
首先,您需要修改游戏和组件文件,以实现一个播放状态,该状态可反映是否显示叠加层,以及要显示哪个叠加层。
- 按如下方式修改
BrickBreaker游戏。
lib/src/brick_breaker.dart
import 'dart:async';
import 'dart:math' as math;

import 'package:flame/components.dart';
import 'package:flame/events.dart';
import 'package:flame/game.dart';
import 'package:flutter/material.dart';
import 'package:flutter/services.dart';

import 'components/components.dart';
import 'config.dart';

enum PlayState { welcome, playing, gameOver, won }              // Add this enumeration

class BrickBreaker extends FlameGame
    with HasCollisionDetection, KeyboardEvents, TapDetector {   // Modify this line
  BrickBreaker()
    : super(
        camera: CameraComponent.withFixedResolution(
          width: gameWidth,
          height: gameHeight,
        ),
      );

  final rand = math.Random();
  double get width => size.x;
  double get height => size.y;

  late PlayState _playState;                                    // Add from here...
  PlayState get playState => _playState;
  set playState(PlayState playState) {
    _playState = playState;
    switch (playState) {
      case PlayState.welcome:
      case PlayState.gameOver:
      case PlayState.won:
        overlays.add(playState.name);
      case PlayState.playing:
        overlays.remove(PlayState.welcome.name);
        overlays.remove(PlayState.gameOver.name);
        overlays.remove(PlayState.won.name);
    }
  }                                                             // To here.

  @override
  FutureOr<void> onLoad() async {
    super.onLoad();

    camera.viewfinder.anchor = Anchor.topLeft;

    world.add(PlayArea());

    playState = PlayState.welcome;                              // Add from here...
  }

  void startGame() {
    if (playState == PlayState.playing) return;

    world.removeAll(world.children.query<Ball>());
    world.removeAll(world.children.query<Bat>());
    world.removeAll(world.children.query<Brick>());

    playState = PlayState.playing;                              // To here.

    world.add(
      Ball(
        difficultyModifier: difficultyModifier,
        radius: ballRadius,
        position: size / 2,
        velocity: Vector2(
          (rand.nextDouble() - 0.5) * width,
          height * 0.2,
        ).normalized()..scale(height / 4),
      ),
    );

    world.add(
      Bat(
        size: Vector2(batWidth, batHeight),
        cornerRadius: const Radius.circular(ballRadius / 2),
        position: Vector2(width / 2, height * 0.95),
      ),
    );

    world.addAll([                                              // Drop the await
      for (var i = 0; i < brickColors.length; i++)
        for (var j = 1; j <= 5; j++)
          Brick(
            position: Vector2(
              (i + 0.5) * brickWidth + (i + 1) * brickGutter,
              (j + 2.0) * brickHeight + j * brickGutter,
            ),
            color: brickColors[i],
          ),
    ]);
  }                                                             // Drop the debugMode

  @override                                                     // Add from here...
  void onTap() {
    super.onTap();
    startGame();
  }                                                             // To here.

  @override
  KeyEventResult onKeyEvent(
    KeyEvent event,
    Set<LogicalKeyboardKey> keysPressed,
  ) {
    super.onKeyEvent(event, keysPressed);
    switch (event.logicalKey) {
      case LogicalKeyboardKey.arrowLeft:
        world.children.query<Bat>().first.moveBy(-batStep);
      case LogicalKeyboardKey.arrowRight:
        world.children.query<Bat>().first.moveBy(batStep);
      case LogicalKeyboardKey.space:                            // Add from here...
      case LogicalKeyboardKey.enter:
        startGame();                                            // To here.
    }
    return KeyEventResult.handled;
  }

  @override
  Color backgroundColor() => const Color(0xfff2e8cf);          // Add this override
}
此代码会大幅更改 BrickBreaker 游戏。添加 playState 枚举需要做大量工作。这会记录玩家在进入、玩游戏以及输赢游戏时的状态。在文件顶部,您定义枚举,然后将其实例化为具有匹配 getter 和 setter 的隐藏状态。这些 getter 和 setter 可在游戏的不同部分触发播放状态转换时修改叠加层。
接下来,您将 onLoad 中的代码拆分为 onLoad 和新的 startGame 方法。在此变更之前,您只能通过重启游戏来开始新游戏。有了这些新功能,玩家现在无需采取如此极端的措施即可开始新游戏。
为了允许玩家开始新游戏,您为游戏配置了两个新的处理程序。您添加了点按处理程序并扩展了键盘处理程序,以便用户能够以多种模式开始新游戏。对游戏状态进行建模后,当玩家获胜或失败时,更新组件以触发游戏状态转换是有意义的。
- 按如下方式修改
Ball组件。
lib/src/components/ball.dart
import 'package:flame/collisions.dart';
import 'package:flame/components.dart';
import 'package:flame/effects.dart';
import 'package:flutter/material.dart';

import '../brick_breaker.dart';
import 'bat.dart';
import 'brick.dart';
import 'play_area.dart';

class Ball extends CircleComponent
    with CollisionCallbacks, HasGameReference<BrickBreaker> {
  Ball({
    required this.velocity,
    required super.position,
    required double radius,
    required this.difficultyModifier,
  }) : super(
         radius: radius,
         anchor: Anchor.center,
         paint: Paint()
           ..color = const Color(0xff1e6091)
           ..style = PaintingStyle.fill,
         children: [CircleHitbox()],
       );

  final Vector2 velocity;
  final double difficultyModifier;

  @override
  void update(double dt) {
    super.update(dt);
    position += velocity * dt;
  }

  @override
  void onCollisionStart(
    Set<Vector2> intersectionPoints,
    PositionComponent other,
  ) {
    super.onCollisionStart(intersectionPoints, other);
    if (other is PlayArea) {
      if (intersectionPoints.first.y <= 0) {
        velocity.y = -velocity.y;
      } else if (intersectionPoints.first.x <= 0) {
        velocity.x = -velocity.x;
      } else if (intersectionPoints.first.x >= game.width) {
        velocity.x = -velocity.x;
      } else if (intersectionPoints.first.y >= game.height) {
        add(
          RemoveEffect(
            delay: 0.35,
            onComplete: () {                                    // Modify from here
              game.playState = PlayState.gameOver;
            },
          ),
        );                                                      // To here.
      }
    } else if (other is Bat) {
      velocity.y = -velocity.y;
      velocity.x =
          velocity.x +
          (position.x - other.position.x) / other.size.x * game.width * 0.3;
    } else if (other is Brick) {
      if (position.y < other.position.y - other.size.y / 2) {
        velocity.y = -velocity.y;
      } else if (position.y > other.position.y + other.size.y / 2) {
        velocity.y = -velocity.y;
      } else if (position.x < other.position.x) {
        velocity.x = -velocity.x;
      } else if (position.x > other.position.x) {
        velocity.x = -velocity.x;
      }
      velocity.setFrom(velocity * difficultyModifier);
    }
  }
}
这项小更改会向 RemoveEffect 添加 onComplete 回调,以触发 gameOver 播放状态。如果玩家允许球从屏幕底部逃脱,那么这个值应该差不多。
- 按如下方式修改
Brick组件。
lib/src/components/brick.dart
impimport 'package:flame/collisions.dart';
import 'package:flame/components.dart';
import 'package:flutter/material.dart';

import '../brick_breaker.dart';
import '../config.dart';
import 'ball.dart';
import 'bat.dart';

class Brick extends RectangleComponent
    with CollisionCallbacks, HasGameReference<BrickBreaker> {
  Brick({required super.position, required Color color})
    : super(
        size: Vector2(brickWidth, brickHeight),
        anchor: Anchor.center,
        paint: Paint()
          ..color = color
          ..style = PaintingStyle.fill,
        children: [RectangleHitbox()],
      );

  @override
  void onCollisionStart(
    Set<Vector2> intersectionPoints,
    PositionComponent other,
  ) {
    super.onCollisionStart(intersectionPoints, other);
    removeFromParent();

    if (game.world.children.query<Brick>().length == 1) {
      game.playState = PlayState.won;                          // Add this line
      game.world.removeAll(game.world.children.query<Ball>());
      game.world.removeAll(game.world.children.query<Bat>());
    }
  }
}
另一方面,如果玩家能击碎所有砖块,则会看到“游戏获胜”界面。干得漂亮,玩家,干得漂亮!
添加 Flutter 封装容器
为了提供可嵌入游戏并添加播放状态叠加层的空间,请添加 Flutter shell。
- 在
lib/src下创建一个widgets目录。 - 添加
game_app.dart文件,并将以下内容插入该文件中。
lib/src/widgets/game_app.dart
import 'package:flame/game.dart';
import 'package:flutter/material.dart';
import 'package:google_fonts/google_fonts.dart';

import '../brick_breaker.dart';
import '../config.dart';

class GameApp extends StatelessWidget {
  const GameApp({super.key});

  @override
  Widget build(BuildContext context) {
    return MaterialApp(
      debugShowCheckedModeBanner: false,
      theme: ThemeData(
        textTheme: GoogleFonts.pressStart2pTextTheme().apply(
          bodyColor: const Color(0xff184e77),
          displayColor: const Color(0xff184e77),
        ),
      ),
      home: Scaffold(
        body: Container(
          decoration: const BoxDecoration(
            gradient: LinearGradient(
              begin: Alignment.topCenter,
              end: Alignment.bottomCenter,
              colors: [Color(0xffa9d6e5), Color(0xfff2e8cf)],
            ),
          ),
          child: SafeArea(
            child: Padding(
              padding: const EdgeInsets.all(16),
              child: Center(
                child: FittedBox(
                  child: SizedBox(
                    width: gameWidth,
                    height: gameHeight,
                    child: GameWidget.controlled(
                      gameFactory: BrickBreaker.new,
                      overlayBuilderMap: {
                        PlayState.welcome.name: (context, game) => Center(
                          child: Text(
                            'TAP TO PLAY',
                            style: Theme.of(context).textTheme.headlineLarge,
                          ),
                        ),
                        PlayState.gameOver.name: (context, game) => Center(
                          child: Text(
                            'G A M E   O V E R',
                            style: Theme.of(context).textTheme.headlineLarge,
                          ),
                        ),
                        PlayState.won.name: (context, game) => Center(
                          child: Text(
                            'Y O U   W O N ! ! !',
                            style: Theme.of(context).textTheme.headlineLarge,
                          ),
                        ),
                      },
                    ),
                  ),
                ),
              ),
            ),
          ),
        ),
      ),
    );
  }
}
此文件中的大多数内容都遵循标准的 Flutter widget 树构建。Flame 特有的部分包括使用 GameWidget.controlled 构建和管理 BrickBreaker 游戏实例,以及为 GameWidget 提供新的 overlayBuilderMap 实参。
此 overlayBuilderMap 的键必须与 BrickBreaker 中 playState 设置器添加或移除的叠加层保持一致。尝试设置此映射中不存在的叠加层会导致到处都是不开心的表情。
- 如需在屏幕上显示此新功能,请将
lib/main.dart文件替换为以下内容。
lib/main.dart
import 'package:flutter/material.dart';

import 'src/widgets/game_app.dart';

void main() {
  runApp(const GameApp());
}
如果您在 iOS、Linux、Windows 或 Web 上运行此代码,游戏会显示预期输出。如果您以 macOS 或 Android 为目标平台,则需要进行最后一次调整,才能启用 google_fonts 以进行显示。
启用字体访问权限
为 Android 添加互联网权限
对于 Android,您必须添加互联网权限。按如下方式修改 AndroidManifest.xml。
android/app/src/main/AndroidManifest.xml
<manifest xmlns:android="http://schemas.android.com/apk/res/android">
    <!-- Add the following line -->
    <uses-permission android:name="android.permission.INTERNET" />
    <application
        android:label="brick_breaker"
        android:name="${applicationName}"
        android:icon="@mipmap/ic_launcher">
        <activity
            android:name=".MainActivity"
            android:exported="true"
            android:launchMode="singleTop"
            android:taskAffinity=""
            android:theme="@style/LaunchTheme"
            android:configChanges="orientation|keyboardHidden|keyboard|screenSize|smallestScreenSize|locale|layoutDirection|fontScale|screenLayout|density|uiMode"
            android:hardwareAccelerated="true"
            android:windowSoftInputMode="adjustResize">
            <!-- Specifies an Android theme to apply to this Activity as soon as
                 the Android process has started. This theme is visible to the user
                 while the Flutter UI initializes. After that, this theme continues
                 to determine the Window background behind the Flutter UI. -->
            <meta-data
              android:name="io.flutter.embedding.android.NormalTheme"
              android:resource="@style/NormalTheme"
              />
            <intent-filter>
                <action android:name="android.intent.action.MAIN"/>
                <category android:name="android.intent.category.LAUNCHER"/>
            </intent-filter>
        </activity>
        <!-- Don't delete the meta-data below.
             This is used by the Flutter tool to generate GeneratedPluginRegistrant.java -->
        <meta-data
            android:name="flutterEmbedding"
            android:value="2" />
    </application>
    <!-- Required to query activities that can process text, see:
         https://developer.android.com/training/package-visibility and
         https://developer.android.com/reference/android/content/Intent#ACTION_PROCESS_TEXT.

         In particular, this is used by the Flutter engine in io.flutter.plugin.text.ProcessTextPlugin. -->
    <queries>
        <intent>
            <action android:name="android.intent.action.PROCESS_TEXT"/>
            <data android:mimeType="text/plain"/>
        </intent>
    </queries>
</manifest>
修改 macOS 的授权文件
对于 macOS,您需要编辑两个文件。
- 修改
DebugProfile.entitlements文件,使其与以下代码一致。
macos/Runner/DebugProfile.entitlements
<?xml version="1.0" encoding="UTF-8"?>
<!DOCTYPE plist PUBLIC "-//Apple//DTD PLIST 1.0//EN" "http://www.apple.com/DTDs/PropertyList-1.0.dtd">
<plist version="1.0">
<dict>
        <key>com.apple.security.app-sandbox</key>
        <true/>
        <key>com.apple.security.cs.allow-jit</key>
        <true/>
        <key>com.apple.security.network.server</key>
        <true/>
        <!-- Add from here... -->
        <key>com.apple.security.network.client</key>
        <true/>
        <!-- to here. -->
</dict>
</plist>
- 修改
Release.entitlements文件,使其与以下代码一致
macos/Runner/Release.entitlements
<?xml version="1.0" encoding="UTF-8"?>
<!DOCTYPE plist PUBLIC "-//Apple//DTD PLIST 1.0//EN" "http://www.apple.com/DTDs/PropertyList-1.0.dtd">
<plist version="1.0">
<dict>
        <key>com.apple.security.app-sandbox</key>
        <true/>
        <!-- Add from here... -->
        <key>com.apple.security.network.client</key>
        <true/>
        <!-- to here. -->
</dict>
</plist>
按原样运行此代码应在所有平台上显示欢迎界面和游戏结束或获胜界面。这些界面可能有点过于简单,最好能显示得分。那么,您猜猜看下一步要做什么!
10. 记录得分
为游戏添加得分
在此步骤中,您将游戏得分公开给周围的 Flutter 上下文。在此步骤中,您将 Flame 游戏中的状态公开给周围的 Flutter 状态管理。这样一来,游戏代码便可在玩家每次击碎砖块时更新得分。
- 按如下方式修改
BrickBreaker游戏。
lib/src/brick_breaker.dart
import 'dart:async';
import 'dart:math' as math;

import 'package:flame/components.dart';
import 'package:flame/events.dart';
import 'package:flame/game.dart';
import 'package:flutter/material.dart';
import 'package:flutter/services.dart';

import 'components/components.dart';
import 'config.dart';

enum PlayState { welcome, playing, gameOver, won }

class BrickBreaker extends FlameGame
    with HasCollisionDetection, KeyboardEvents, TapDetector {
  BrickBreaker()
    : super(
        camera: CameraComponent.withFixedResolution(
          width: gameWidth,
          height: gameHeight,
        ),
      );

  final ValueNotifier<int> score = ValueNotifier(0);            // Add this line
  final rand = math.Random();
  double get width => size.x;
  double get height => size.y;

  late PlayState _playState;
  PlayState get playState => _playState;
  set playState(PlayState playState) {
    _playState = playState;
    switch (playState) {
      case PlayState.welcome:
      case PlayState.gameOver:
      case PlayState.won:
        overlays.add(playState.name);
      case PlayState.playing:
        overlays.remove(PlayState.welcome.name);
        overlays.remove(PlayState.gameOver.name);
        overlays.remove(PlayState.won.name);
    }
  }

  @override
  FutureOr<void> onLoad() async {
    super.onLoad();

    camera.viewfinder.anchor = Anchor.topLeft;

    world.add(PlayArea());

    playState = PlayState.welcome;
  }

  void startGame() {
    if (playState == PlayState.playing) return;

    world.removeAll(world.children.query<Ball>());
    world.removeAll(world.children.query<Bat>());
    world.removeAll(world.children.query<Brick>());

    playState = PlayState.playing;
    score.value = 0;                                            // Add this line

    world.add(
      Ball(
        difficultyModifier: difficultyModifier,
        radius: ballRadius,
        position: size / 2,
        velocity: Vector2(
          (rand.nextDouble() - 0.5) * width,
          height * 0.2,
        ).normalized()..scale(height / 4),
      ),
    );

    world.add(
      Bat(
        size: Vector2(batWidth, batHeight),
        cornerRadius: const Radius.circular(ballRadius / 2),
        position: Vector2(width / 2, height * 0.95),
      ),
    );

    world.addAll([
      for (var i = 0; i < brickColors.length; i++)
        for (var j = 1; j <= 5; j++)
          Brick(
            position: Vector2(
              (i + 0.5) * brickWidth + (i + 1) * brickGutter,
              (j + 2.0) * brickHeight + j * brickGutter,
            ),
            color: brickColors[i],
          ),
    ]);
  }

  @override
  void onTap() {
    super.onTap();
    startGame();
  }

  @override
  KeyEventResult onKeyEvent(
    KeyEvent event,
    Set<LogicalKeyboardKey> keysPressed,
  ) {
    super.onKeyEvent(event, keysPressed);
    switch (event.logicalKey) {
      case LogicalKeyboardKey.arrowLeft:
        world.children.query<Bat>().first.moveBy(-batStep);
      case LogicalKeyboardKey.arrowRight:
        world.children.query<Bat>().first.moveBy(batStep);
      case LogicalKeyboardKey.space:
      case LogicalKeyboardKey.enter:
        startGame();
    }
    return KeyEventResult.handled;
  }

  @override
  Color backgroundColor() => const Color(0xfff2e8cf);
}
通过向游戏添加 score,您可以将游戏的状态与 Flutter 状态管理相关联。
- 修改
Brick类,以便在玩家击碎砖块时为得分增加 1 分。
lib/src/components/brick.dart
import 'package:flame/collisions.dart';
import 'package:flame/components.dart';
import 'package:flutter/material.dart';

import '../brick_breaker.dart';
import '../config.dart';
import 'ball.dart';
import 'bat.dart';

class Brick extends RectangleComponent
    with CollisionCallbacks, HasGameReference<BrickBreaker> {
  Brick({required super.position, required Color color})
    : super(
        size: Vector2(brickWidth, brickHeight),
        anchor: Anchor.center,
        paint: Paint()
          ..color = color
          ..style = PaintingStyle.fill,
        children: [RectangleHitbox()],
      );

  @override
  void onCollisionStart(
    Set<Vector2> intersectionPoints,
    PositionComponent other,
  ) {
    super.onCollisionStart(intersectionPoints, other);
    removeFromParent();
    game.score.value++;                                         // Add this line

    if (game.world.children.query<Brick>().length == 1) {
      game.playState = PlayState.won;
      game.world.removeAll(game.world.children.query<Ball>());
      game.world.removeAll(game.world.children.query<Bat>());
    }
  }
}
打造美观的游戏
现在,您可以在 Flutter 中记录得分了,接下来需要将 widget 组合起来,让界面看起来更美观。
- 在
lib/src/widgets中创建score_card.dart并添加以下内容。
lib/src/widgets/score_card.dart
import 'package:flutter/material.dart';

class ScoreCard extends StatelessWidget {
  const ScoreCard({super.key, required this.score});

  final ValueNotifier<int> score;

  @override
  Widget build(BuildContext context) {
    return ValueListenableBuilder<int>(
      valueListenable: score,
      builder: (context, score, child) {
        return Padding(
          padding: const EdgeInsets.fromLTRB(12, 6, 12, 18),
          child: Text(
            'Score: $score'.toUpperCase(),
            style: Theme.of(context).textTheme.titleLarge!,
          ),
        );
      },
    );
  }
}
- 在
lib/src/widgets中创建overlay_screen.dart并添加以下代码。
这利用 flutter_animate 软件包的功能为叠加层添加了一些动态效果和样式,从而使叠加层更加精美。
lib/src/widgets/overlay_screen.dart
import 'package:flutter/material.dart';
import 'package:flutter_animate/flutter_animate.dart';

class OverlayScreen extends StatelessWidget {
  const OverlayScreen({super.key, required this.title, required this.subtitle});

  final String title;
  final String subtitle;

  @override
  Widget build(BuildContext context) {
    return Container(
      alignment: const Alignment(0, -0.15),
      child: Column(
        mainAxisSize: MainAxisSize.min,
        children: [
          Text(
            title,
            style: Theme.of(context).textTheme.headlineLarge,
          ).animate().slideY(duration: 750.ms, begin: -3, end: 0),
          const SizedBox(height: 16),
          Text(subtitle, style: Theme.of(context).textTheme.headlineSmall)
              .animate(onPlay: (controller) => controller.repeat())
              .fadeIn(duration: 1.seconds)
              .then()
              .fadeOut(duration: 1.seconds),
        ],
      ),
    );
  }
}
如需深入了解 flutter_animate 的强大功能,请查看使用 Flutter 构建新一代界面 Codelab。
此代码在 GameApp 组件中发生了很大变化。首先,为了让 ScoreCard 能够访问 score,您需要将其从 StatelessWidget 转换为 StatefulWidget。添加得分卡需要添加 Column 以将得分堆叠在游戏上方。
其次,为了增强欢迎、游戏结束和获胜体验,您添加了新的 OverlayScreen widget。
lib/src/widgets/game_app.dart
import 'package:flame/game.dart';
import 'package:flutter/material.dart';
import 'package:google_fonts/google_fonts.dart';

import '../brick_breaker.dart';
import '../config.dart';
import 'overlay_screen.dart';                                   // Add this import
import 'score_card.dart';                                       // And this one too

class GameApp extends StatefulWidget {                          // Modify this line
  const GameApp({super.key});

  @override                                                     // Add from here...
  State<GameApp> createState() => _GameAppState();
}

class _GameAppState extends State<GameApp> {
  late final BrickBreaker game;

  @override
  void initState() {
    super.initState();
    game = BrickBreaker();
  }                                                             // To here.

  @override
  Widget build(BuildContext context) {
    return MaterialApp(
      debugShowCheckedModeBanner: false,
      theme: ThemeData(
        textTheme: GoogleFonts.pressStart2pTextTheme().apply(
          bodyColor: const Color(0xff184e77),
          displayColor: const Color(0xff184e77),
        ),
      ),
      home: Scaffold(
        body: Container(
          decoration: const BoxDecoration(
            gradient: LinearGradient(
              begin: Alignment.topCenter,
              end: Alignment.bottomCenter,
              colors: [Color(0xffa9d6e5), Color(0xfff2e8cf)],
            ),
          ),
          child: SafeArea(
            child: Padding(
              padding: const EdgeInsets.all(16),
              child: Center(
                child: Column(                                  // Modify from here...
                  children: [
                    ScoreCard(score: game.score),
                    Expanded(
                      child: FittedBox(
                        child: SizedBox(
                          width: gameWidth,
                          height: gameHeight,
                          child: GameWidget(
                            game: game,
                            overlayBuilderMap: {
                              PlayState.welcome.name: (context, game) =>
                                  const OverlayScreen(
                                    title: 'TAP TO PLAY',
                                    subtitle: 'Use arrow keys or swipe',
                                  ),
                              PlayState.gameOver.name: (context, game) =>
                                  const OverlayScreen(
                                    title: 'G A M E   O V E R',
                                    subtitle: 'Tap to Play Again',
                                  ),
                              PlayState.won.name: (context, game) =>
                                  const OverlayScreen(
                                    title: 'Y O U   W O N ! ! !',
                                    subtitle: 'Tap to Play Again',
                                  ),
                            },
                          ),
                        ),
                      ),
                    ),
                  ],
                ),                                              // To here.
              ),
            ),
          ),
        ),
      ),
    );
  }
}
完成上述所有设置后,您现在应该能够在六个 Flutter 目标平台中的任何一个上运行此游戏。游戏应如下图所示。
|
|

11. 恭喜
恭喜,您已成功使用 Flutter 和 Flame 构建了一款游戏!
您使用 Flame 2D 游戏引擎构建了一款游戏,并将其嵌入到 Flutter 封装容器中。您使用 Flame 的特效来制作动画和移除组件。您使用了 Google Fonts 和 Flutter Animate 软件包,使整个游戏看起来设计精良。
后续操作
查看下列 Codelab…