
1. 准备工作
什么是内置 Gemini 的 Google Chat 应用?
内置 Gemini 的 Google Chat 应用具有以下功能:
- 将服务和资源引入 Google Chat,让用户无需离开对话即可获取信息和执行操作。
- 与生成式 AI 模型 Gemini 集成,让用户可以在特定时间创建或搜索文本或图片等数据,从而简化工作流程。
为什么要将 Google Chat 应用与 Gemini 集成?
Gemini 等生成式 AI 模型的典型使用场景分为以下几类:
- 内容创建和增强。生成营销文案、撰写社交媒体帖子、创建逼真的图像、创作音乐或协助创作视频内容。
- 数据搜索。从非结构化知识库中提取关键的数据洞见,总结长文本,对内容进行分类或翻译语言,且准确率更高、速度更快。
- 对话。参与自然流畅、信息丰富且富有创意的对话。
对于任何想要提升其用户体验和工作效率的人来说,能够直接在熟悉的 Google Chat 界面中集成这些功能都是一个巨大的机遇。
前提条件
- 具备 Apps 脚本、Google Cloud 和 Node.js 的基础知识。
- 具备 Google Chat 概念的基础知识,包括事件处理脚本、斜杠命令、对话框、卡片、消息、应用身份验证和 API。
构建内容
在此 Codelab 中,您要构建三个内置 Gemini 的 Google Chat 应用,以涵盖上一部分中介绍的三个应用场景。
问题管理应用(内容创建和增强)
此应用会执行以下操作:
- 通过基本交互、应用首页和应用身份验证,管理从创建到完成的各种问题。
- 通过事件和配件 widget 监控消息并提供包容性帮助。
您可以使用 Gemini 执行以下操作:
- 根据消息记录和问题详情生成问题报告。
- 使用限制性提示对消息中的非包容性字词进行分类。
使用的主要技术包括 Vertex AI、Gemini、Apps 脚本和 Google Workspace API(Admin、Chat、Docs、Events)。
知识应用(数据搜索)
此应用依靠 Gemini 来理解和回答自然语言问题,并从非结构化数据返回来源引用。
使用的主要技术包括 Dialogflow CX 数据存储区代理、Dialogflow CX 网络钩子、Google Cloud Functions 和 Gemini。
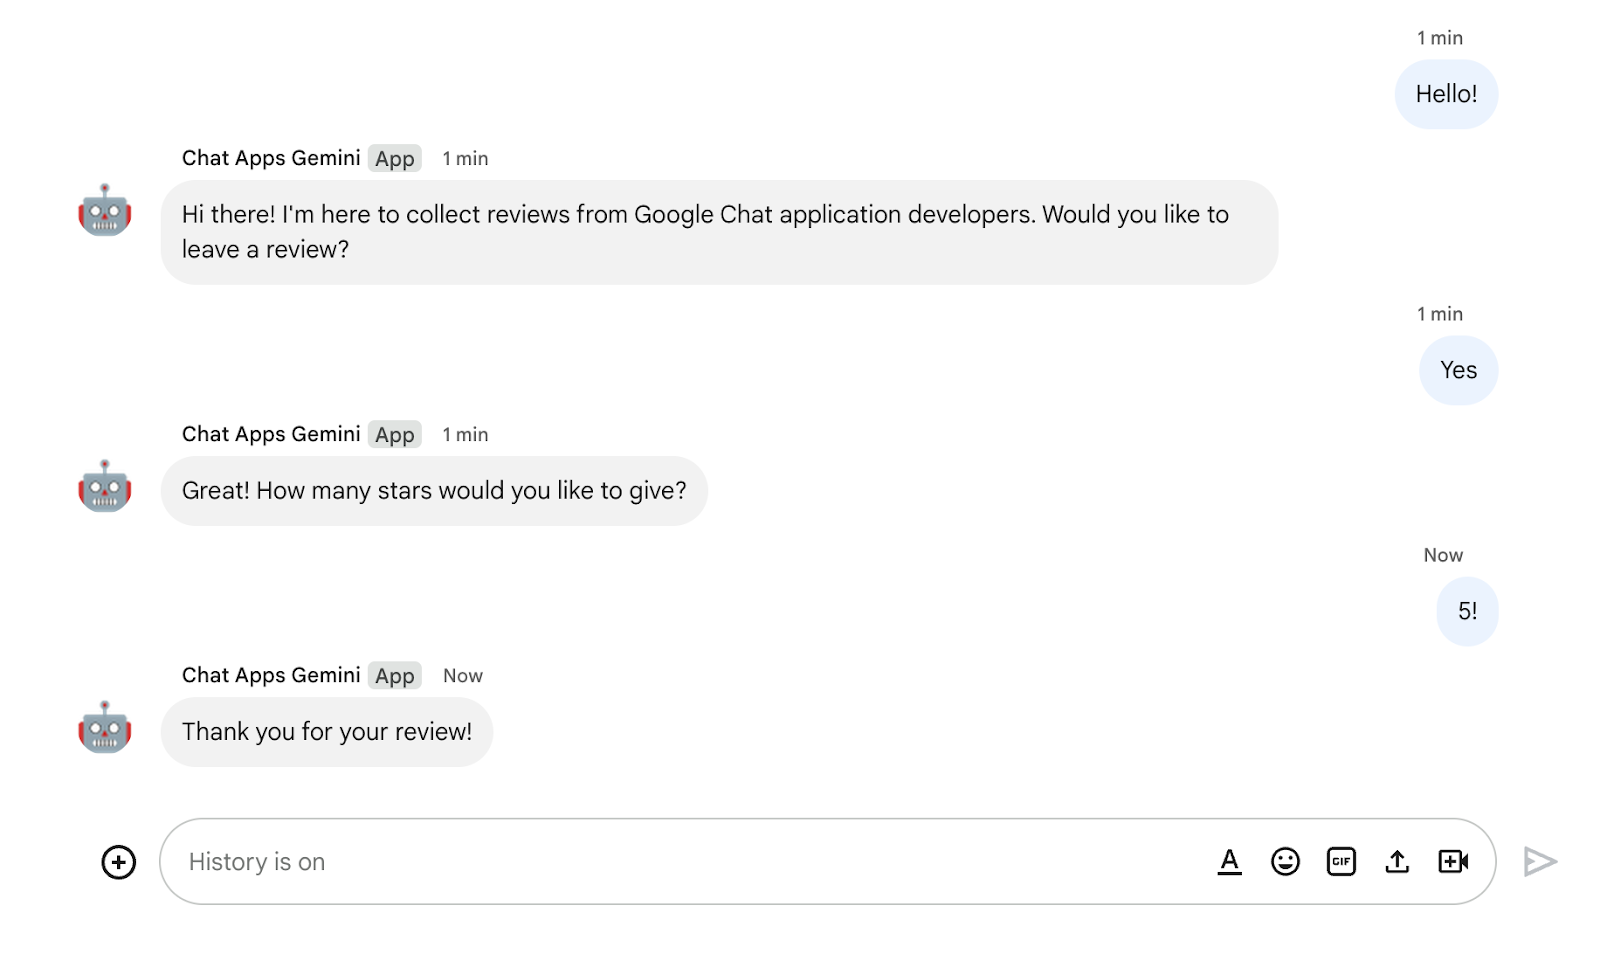
反馈应用(对话)
此应用依靠 Gemini 收集和存储自然语言对话的评价。
使用的主要技术包括 Dialogflow CX 代理、Dialogflow CX 工具、OpenAPI、Google Cloud Functions 和 Gemini。
学习内容
- 如何通过 Vertex AI 将 Google Chat 应用与 Gemini 集成。
- 如何将 Google Chat 应用与 Dialogflow CX 代理集成。
- 如何使用 Google Chat 的最新功能:应用首页、Google Chat Events 和配件 widget。
所需条件
- 已完成使用 Apps 脚本构建 Google Chat 应用快速入门 Codelab。此 Codelab 基于生成的 Apps 脚本和 Google Cloud 项目构建而成。
2. 进行设置
初始化资源
在本部分中,您可以使用自己偏好的网络浏览器访问和配置以下资源。
Apps 脚本项目
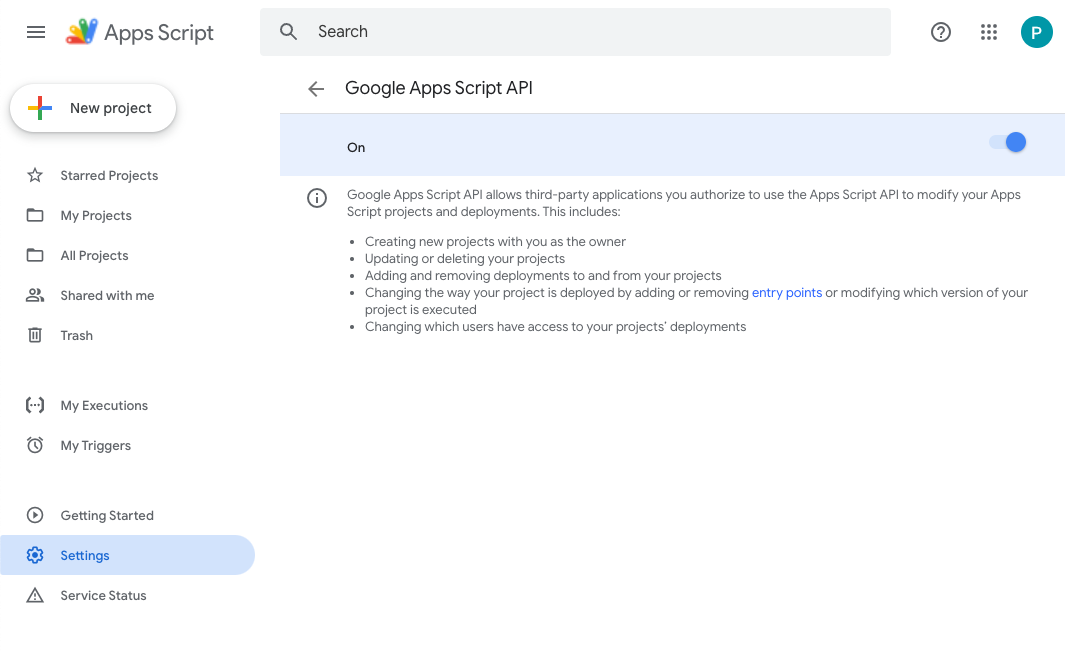
在 Apps 脚本控制台中,按以下步骤操作:
- 点击设置,然后启用 Google Apps Script API。
- 选择您的项目。
- 点击项目设置。
- 选中在编辑器中显示“
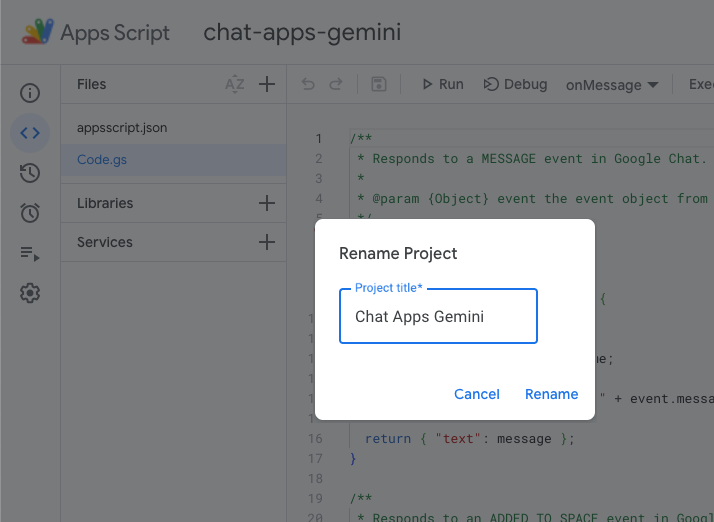
appsscript.json”清单文件复选框。 - 将项目重命名为
Chat Apps Gemini。
Google Cloud 项目
在 Google Cloud 控制台中,按以下步骤操作:
- 选择您的项目。
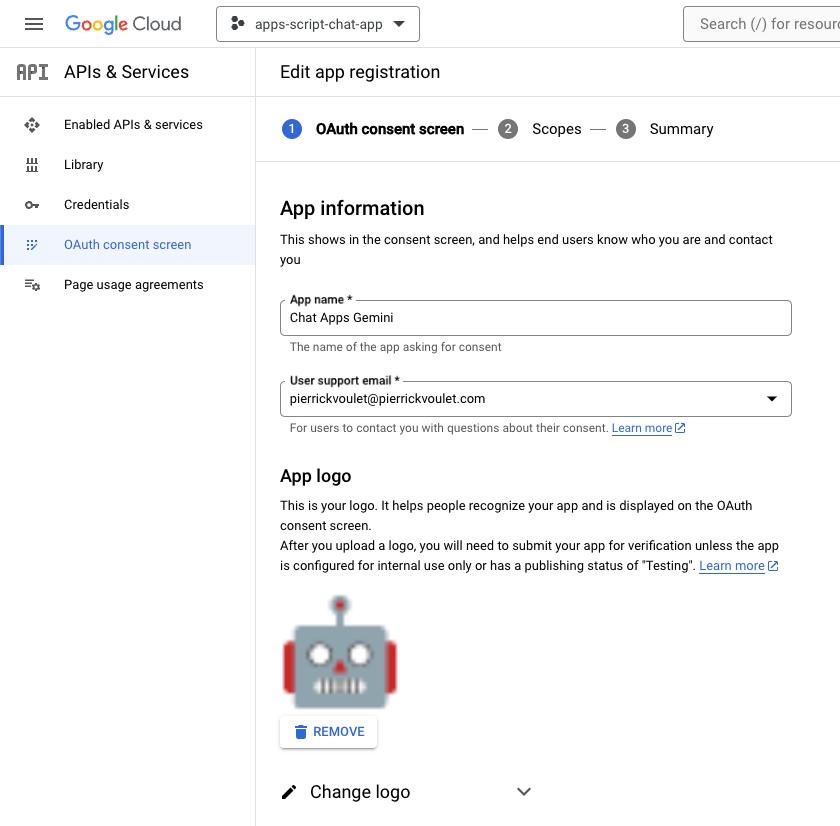
- 点击菜单 ☰ > API 和服务 > OAuth 权限请求页面 > 修改应用,然后将应用名称设为
Chat Apps Gemini。
- 找到 Google Chat API 配置,然后将应用名称和说明设为
Chat Apps Gemini。
Google Chat
在 Google Chat 中,按以下步骤操作:
- 如有必要,使用 Google Chat 应用发起聊天。
- 发送消息(例如
Hello),以确保其正常运行。

将源代码和资源下载到本地
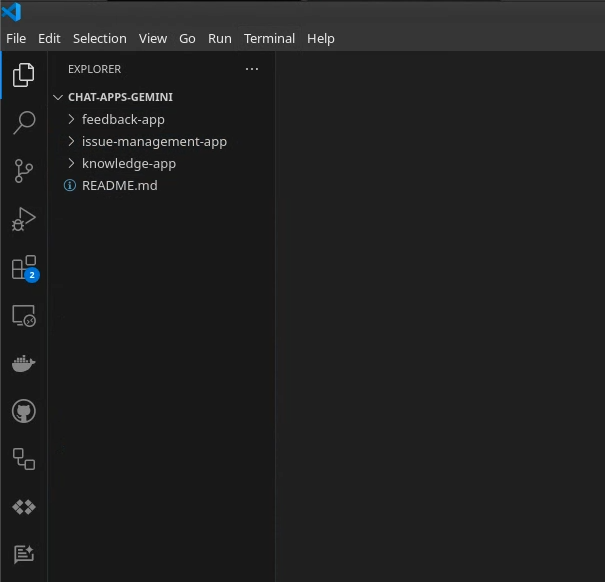
- 下载此 GitHub 代码库。
- 在您偏好的开发环境中,打开
apps-script/chat-apps-gemini目录,然后在终端里找到同一目录。
安装和配置 clasp
我们使用 clasp 轻松修改源代码并将源代码版本从本地环境推送到 Apps 脚本项目。
- 在本地环境中,安装最新版本的
node、npm和clasp。
npm install -g @google/clasp
- 使用您的账号登录:
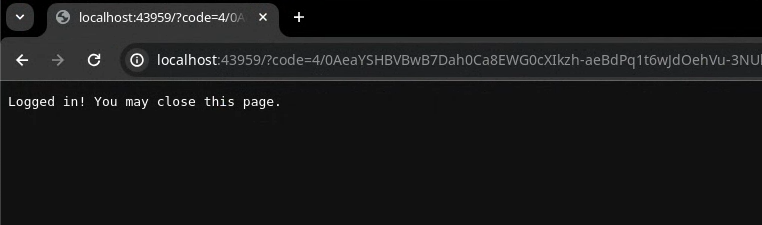
clasp login
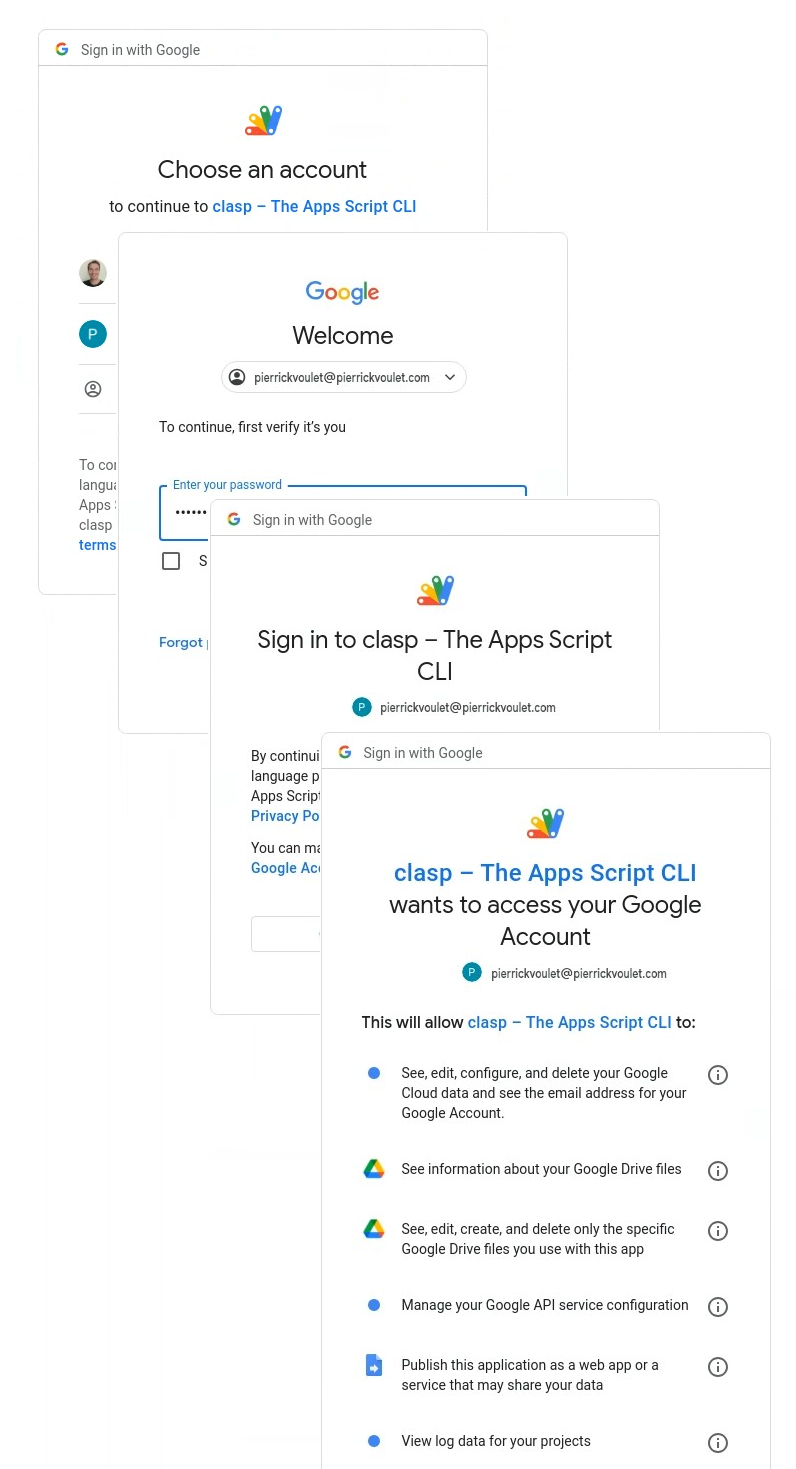
如果成功,您会在网络浏览器中看到一个基本确认屏幕,并且包含客户端凭据的 .clasprc.json 文件会更新。您可以在终端中找到其位置。
3. 应用 1:构建
查看概念
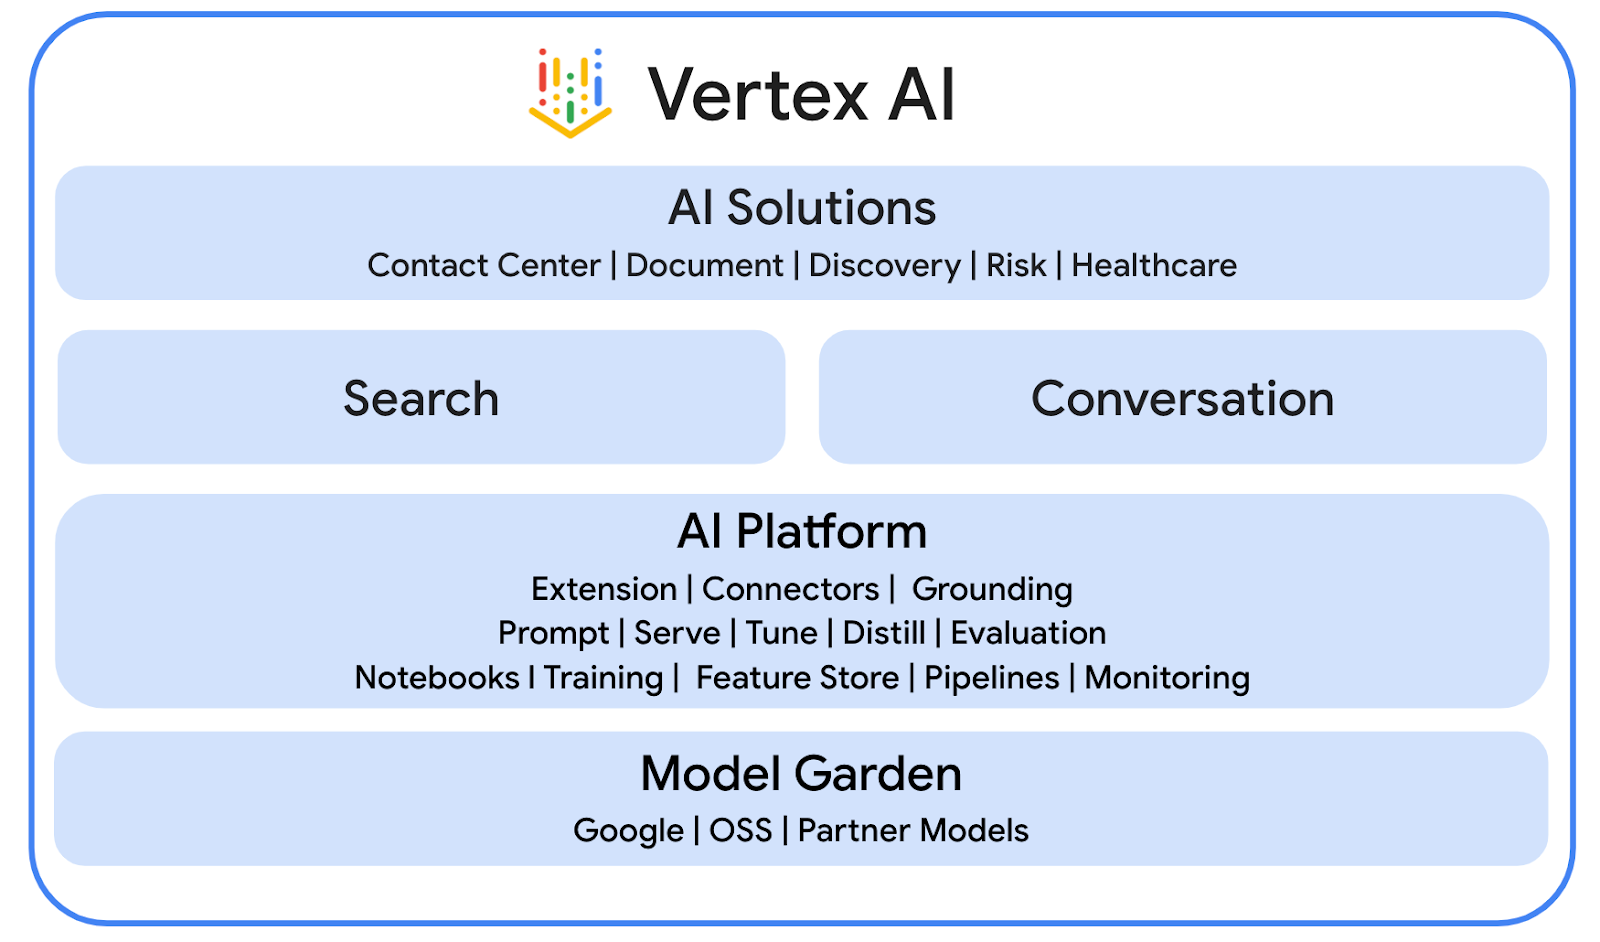
Vertex AI
Vertex AI 提供构建和使用生成式 AI 所需的一切,包括 AI 解决方案、代理构建器、130 多个基础模型以及统一的 AI 平台。
Gemini
Gemini 是 Google 推出的一款多模态 LLM,可通过 Vertex AI 访问。它能帮助人们释放潜力,从而加强想象力、增加好奇心并提高工作效率。
高级聊天服务
通过高级聊天服务,您可以在 Apps 脚本中使用 Google Chat API。这样一来,脚本就可以查找、创建和修改 Chat 聊天室、向聊天室添加或移除成员,以及阅读或发布包含文字、卡片、附件和回应的消息。
查看架构
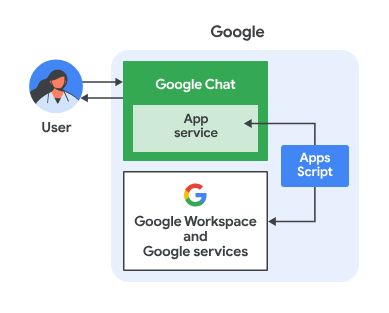
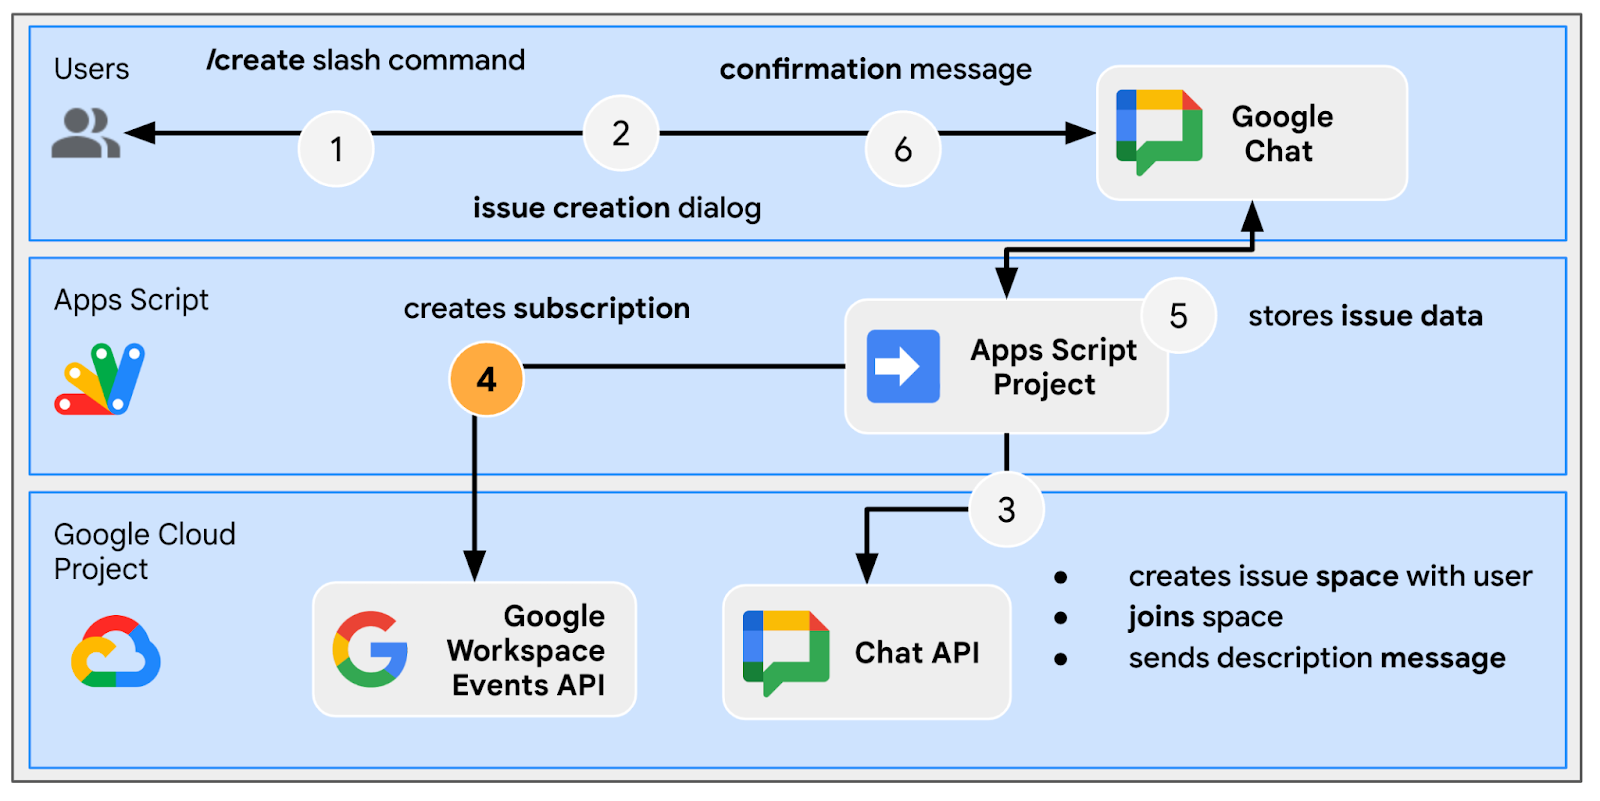
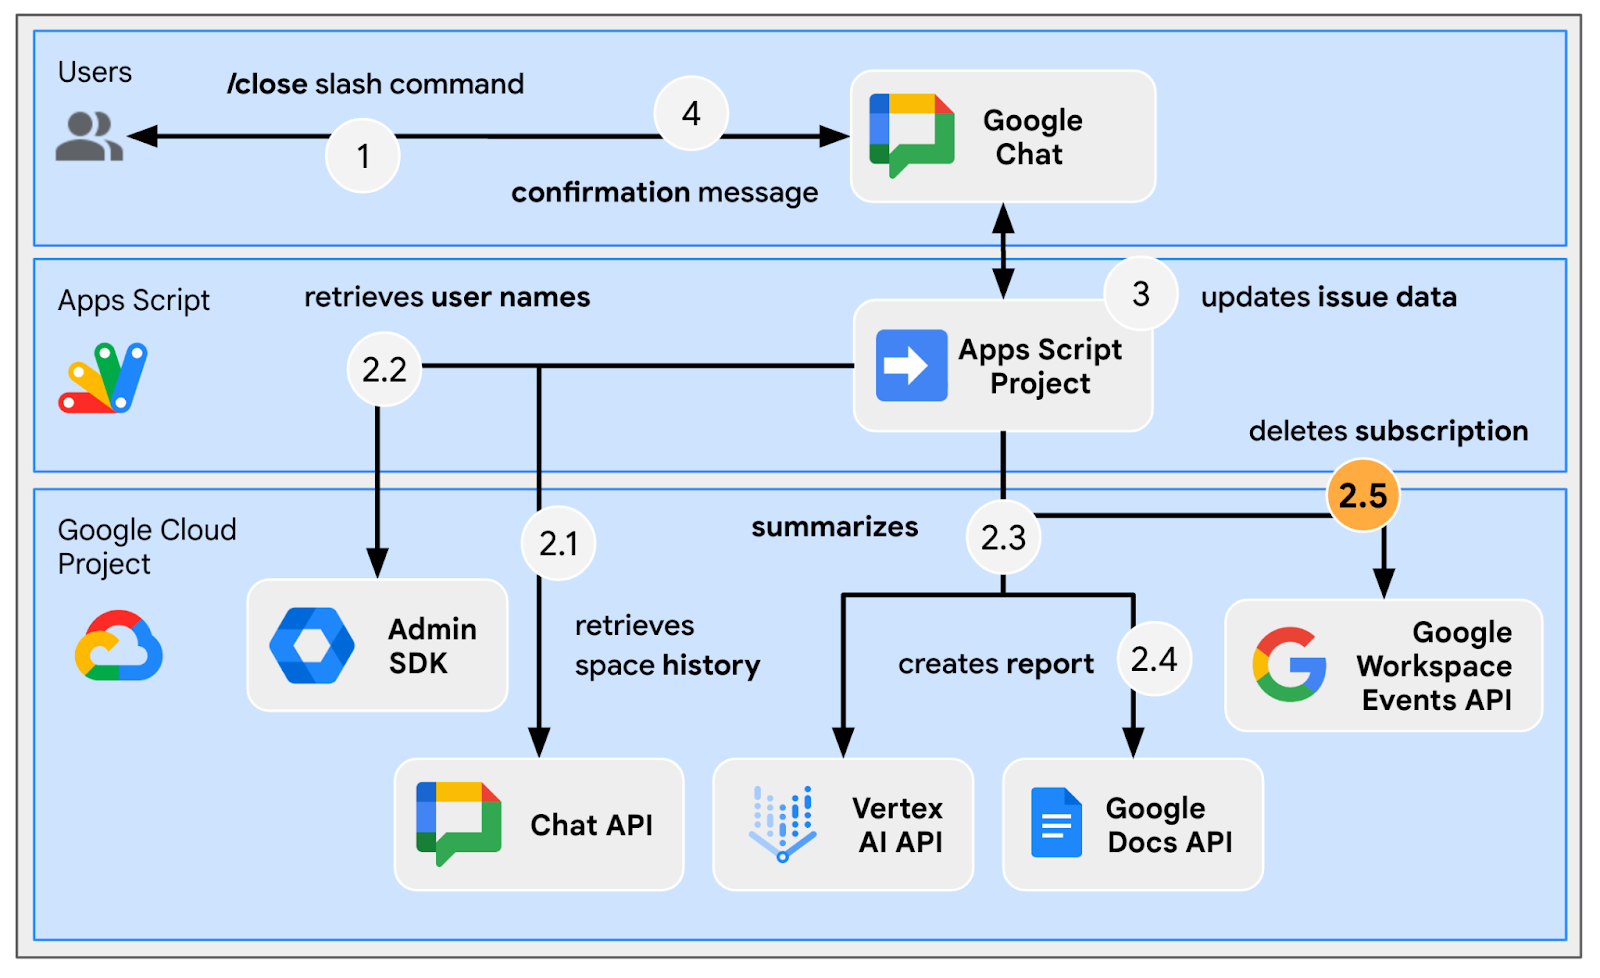
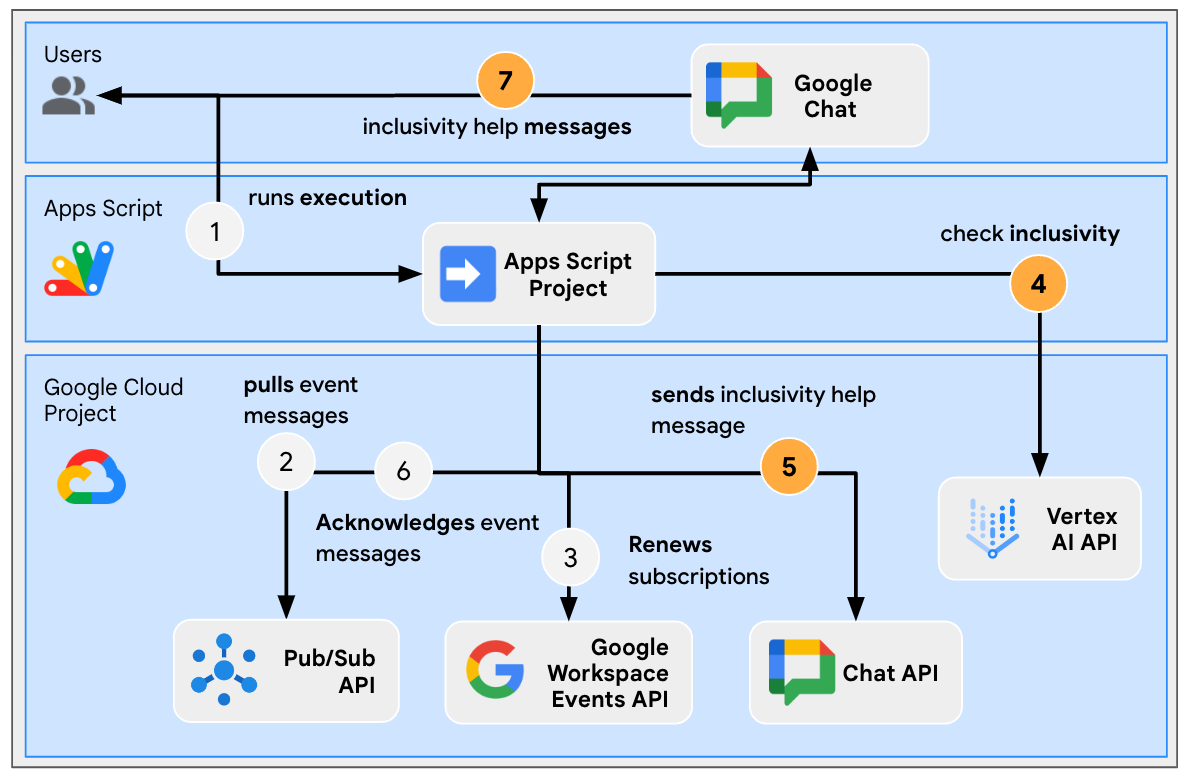
这款 Google Chat 应用基于 Apps 脚本构建而成。具体运作方式如下:
- 用户通过私信或聊天室向应用发送消息。
- 应用会处理消息,它在 Apps 脚本项目中实现,且与 Google Cloud 项目关联。
- 应用与 Google 文档和 Google Chat API 集成。
- 应用使用属性服务将数据保留在脚本属性中。
- 应用在私信或原始聊天室中发送同步响应。
查看流程
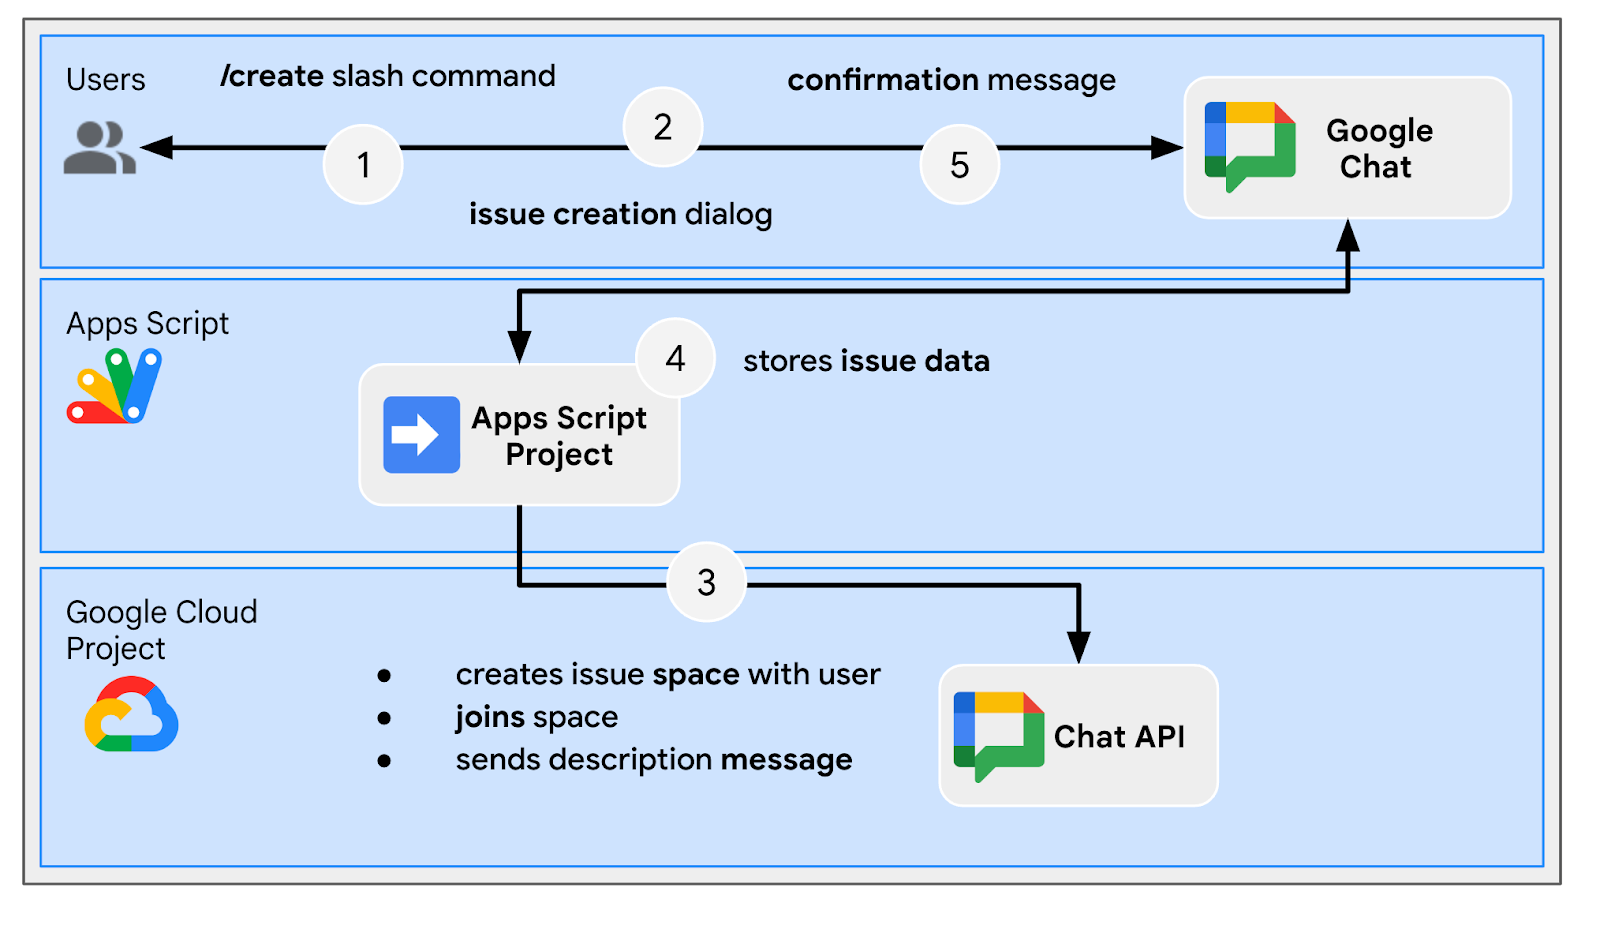
创建问题
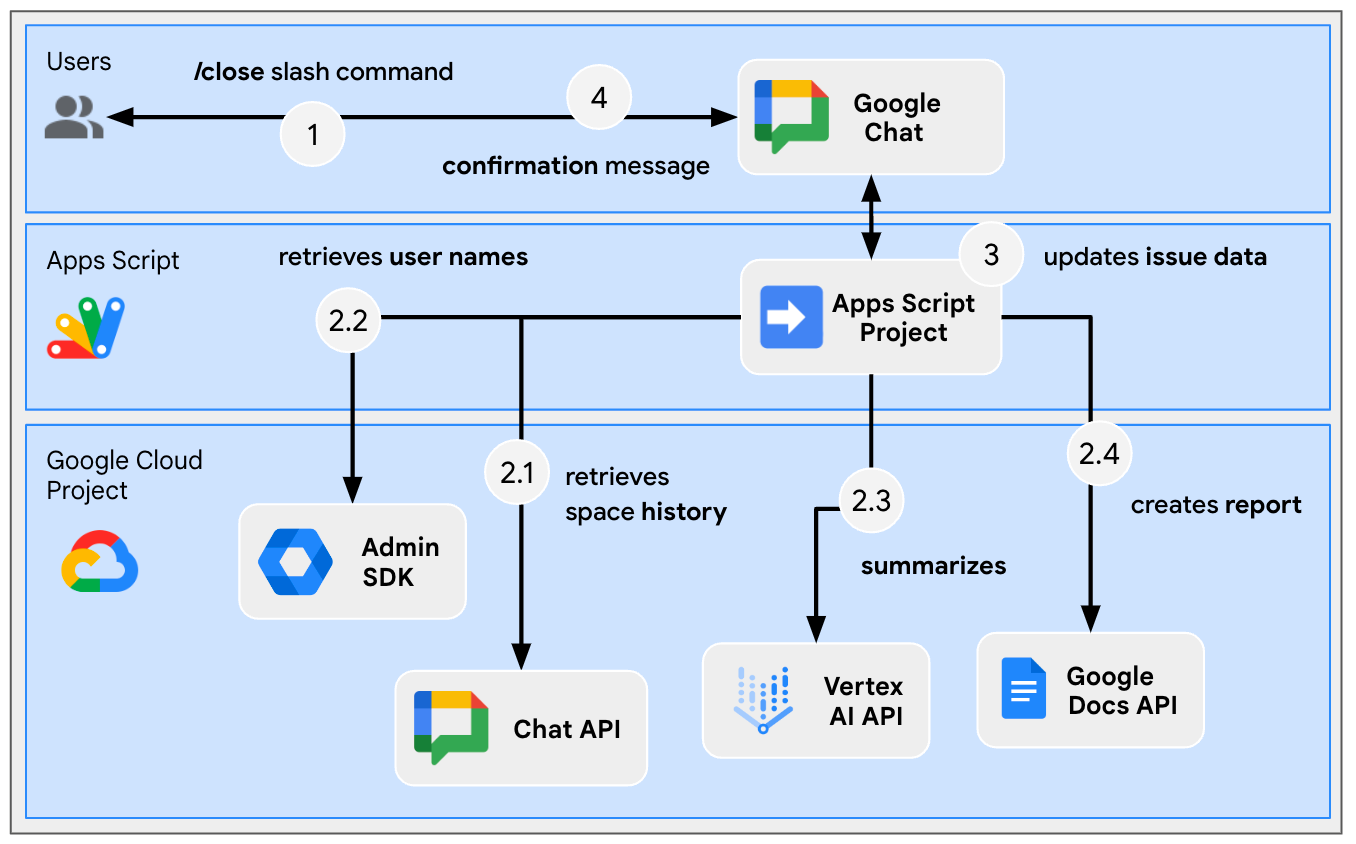
排查专用聊天室的问题
解决专用聊天室的问题
查看源代码
Apps 脚本项目包含以下脚本:
Configuration:要基于环境修改的常量。ChatApp:处理 Google Chat 互动事件,包括消息、卡片点击、斜杠命令和对话框。Storage:依赖于“属性服务”的实用函数。ChatAppAuth:依赖于 Google Chat 应用身份验证的实用函数。Docs:依赖于 Google 文档的实用函数。VertexAi:依赖于 Vertex AI 的实用函数。
以下是使用 Gemini 和聊天室历史记录生成报告文档时积极使用的部分:
appsscript.json
// Enables the Admin SDK Directory and Chat services, which you need to retrieve
// messages and usernames.

"enabledAdvancedServices": [
  ...
  {
    "userSymbol": "AdminDirectory",
    "version": "directory_v1",
    "serviceId": "admin"
  },
  {
    "userSymbol": "Chat",
    "version": "v1",
    "serviceId": "chat"
  }
  ...
]
// Includes the OAuth scopes to request the Admin SDK Directory, Google Chat,
// Google Docs, and Vertex AI APIs.

"oauthScopes": [
  ...
  "https://www.googleapis.com/auth/admin.directory.user.readonly",
  "https://www.googleapis.com/auth/chat.messages.readonly",
  "https://www.googleapis.com/auth/documents",
  "https://www.googleapis.com/auth/cloud-platform",
  ...
]
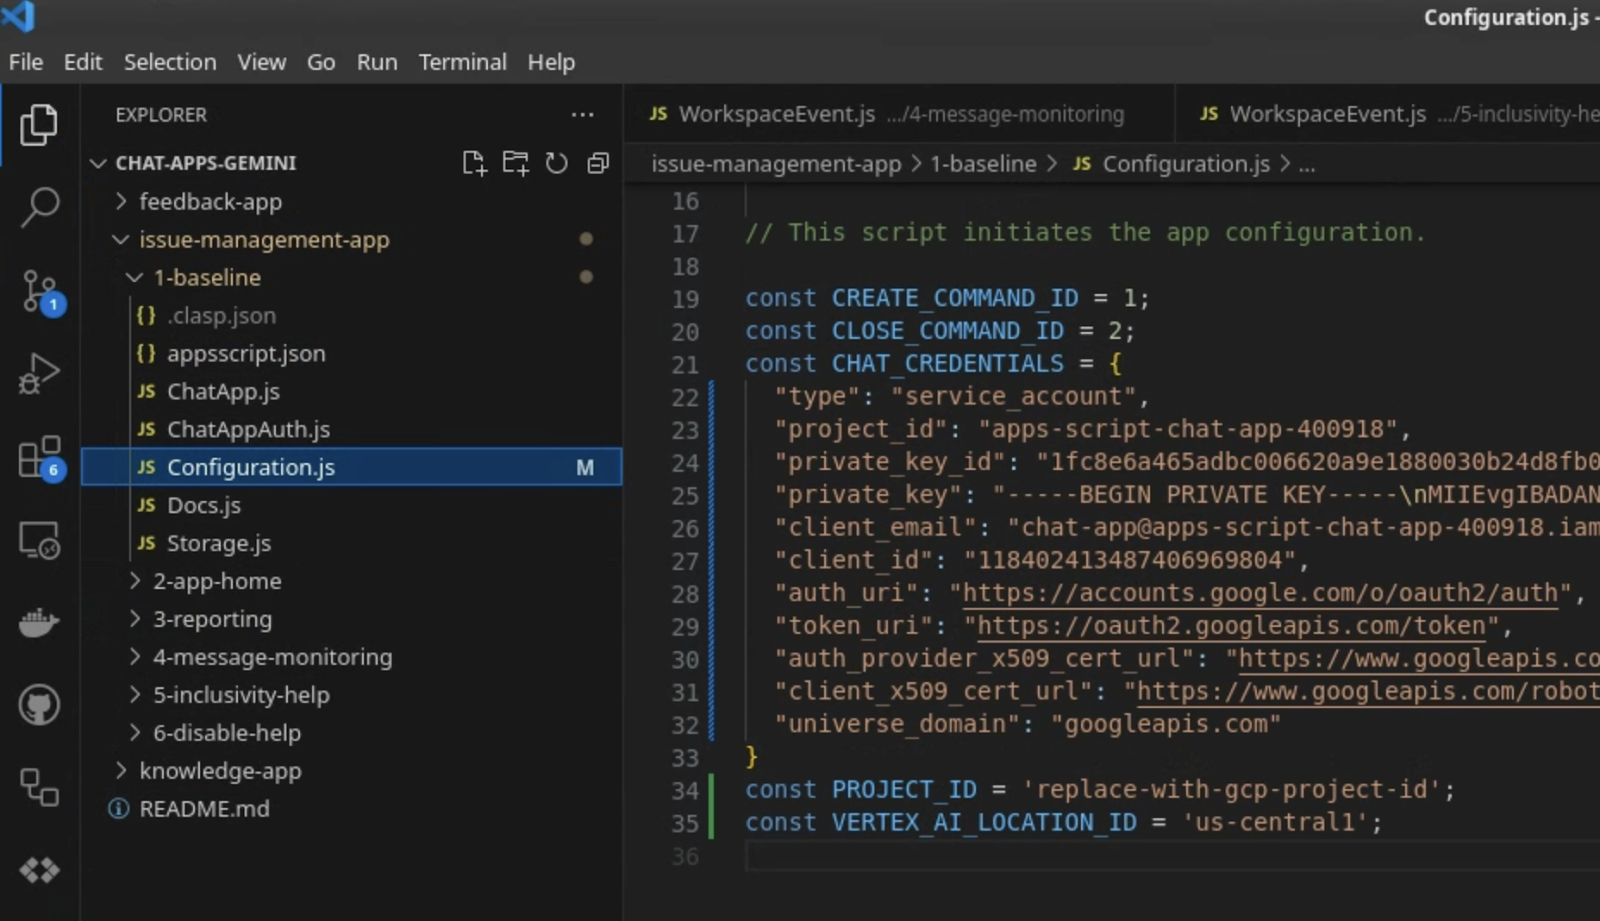
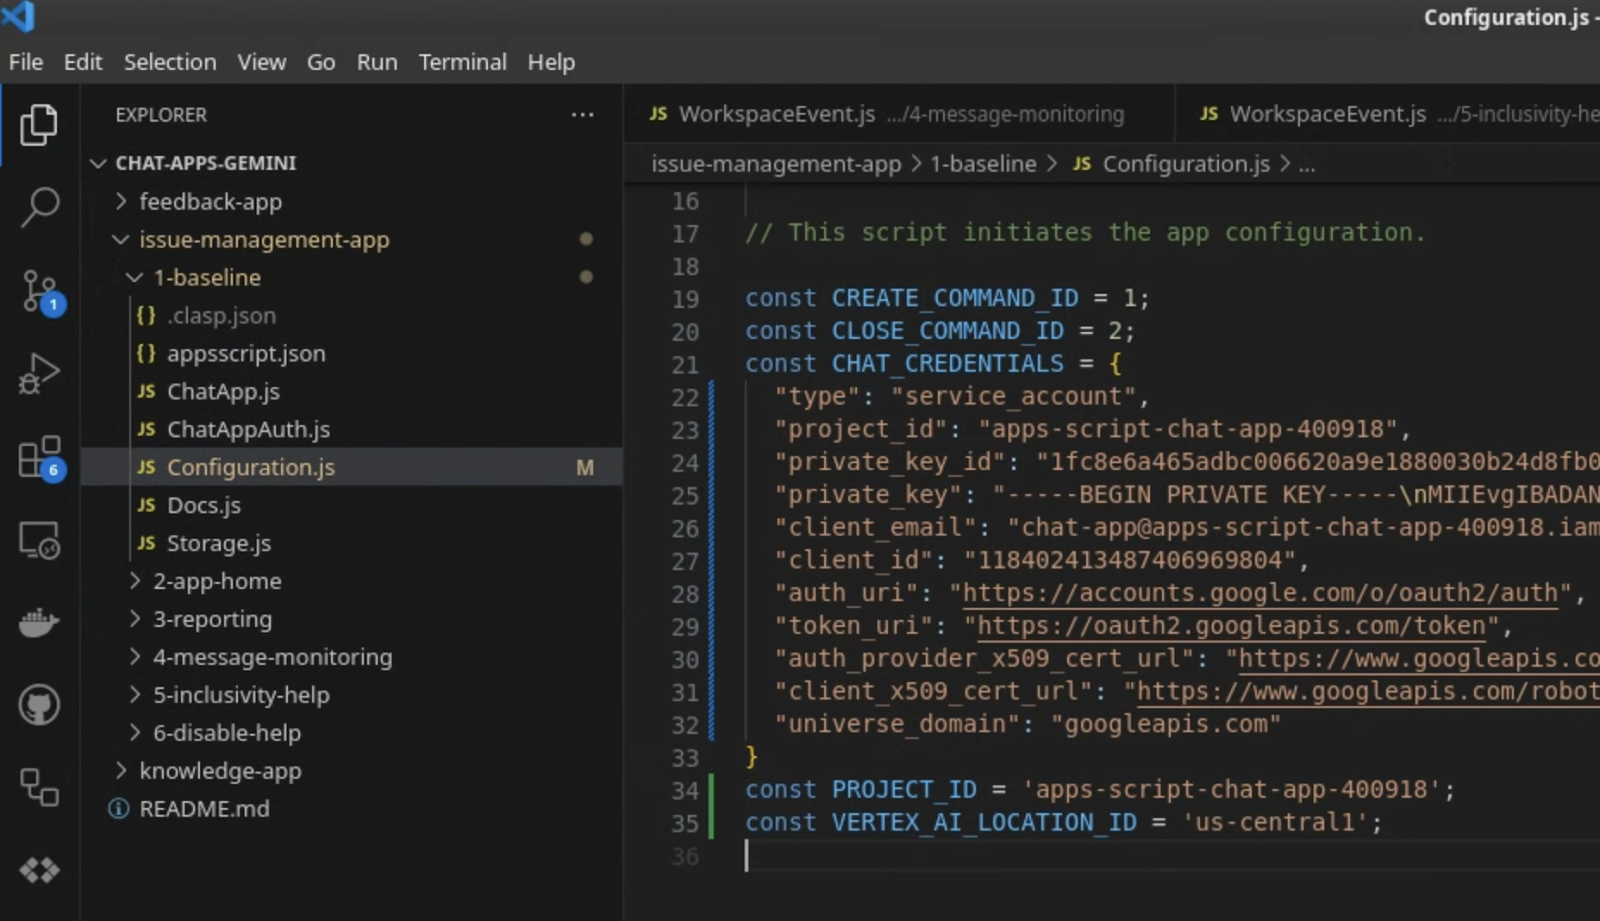
Configuration.js
// Relies on two constants: the first one is the Google Cloud project ID and the
// second one is the Vertex AI location to be used.

...
const PROJECT_ID = 'replace-with-gcp-project-id';
const VERTEX_AI_LOCATION_ID = 'us-central1';
...
ChatApp.js
// The slash command process function retrieves history, generates content, and passes
// it to the report generator.

function processSlashCommand(event) {
  ...
  if (event.message.slashCommand.commandId == CLOSE_COMMAND_ID
    && event.message.space.type !== "DM") {
    ...
    const history = exportSpaceHistory(spaceId);
    const summary = summarizeSpace(history);
    const docUrl = createReport(
      issue.title, issue.description, resolution, history, summary
    );
    ...
  }
  ...
}
/**
 * Fetches and concatenates the 100 first space messages by using the Google Chat API.
 *
 * Messages with slash commands are filtered (app command invocations).
 *
 * @return {string} concatenate space messages in the format "Sender's name: Message"
 */
function exportSpaceHistory(spaceName) {
  const messages = Chat.Spaces.Messages.list(spaceName, { 'pageSize': 100 }).messages;
  // Returns results after fetching message sender display names.
  let users = new Map();
  return messages
    .filter(message => message.slashCommand === undefined)
    .map(message =>
      `${getUserDisplayName(users, message.sender.name)}: ${message.text}`
    ).join('\n');
}
/**
 * Fetches a user's display name by using the Admin Directory API.
 *
 * A cache is used to only call the API once per user.
 *
 * @param {Map} cache the map containing users previously fetched
 * @param {string} userId the user ID to fetch
 * @return {string} the user's display name
 */
function getUserDisplayName(cache, userId) {
  if (cache.has(userId)) {
    return cache.get(userId);
  }
  let displayName = 'Unknown User';
  try {
    const user = AdminDirectory.Users.get(
      userId.replace("users/", ""),
      { projection: 'BASIC', viewType: 'domain_public' });
    displayName = user.name.displayName ? user.name.displayName : user.name.fullName;
  } catch (e) {
    // Ignores errors, uses 'Unknown User' by default.
  }
  cache.set(userId, displayName);
  return displayName;
}
VertexAi.js
/**
 * Summarizes a Google Chat space history with the Gemini Pro model using
 * Vertex AI API.
 *
 * @param {string} history the history
 * @return {string} the summary
 */
function summarizeSpace(history) {
  const url = `https://${VERTEX_AI_LOCATION_ID}-aiplatform.googleapis.com/v1`
    + `/projects/${PROJECT_ID}/locations/${VERTEX_AI_LOCATION_ID}`
    + "/publishers/google/models/gemini-1.0-pro:generateContent";
  const options = {
    method: "POST",
    headers: { Authorization: "Bearer " + ScriptApp.getOAuthToken() },
    contentType: "application/json",
    payload: JSON.stringify({
      contents: {
        role: "user",
        parts: {
          text: "Summarize the following conversation between engineers resolving"
              + " an issue in a few sentences.\n\n" + history
        }
      },
      safetySettings: {
        category: "HARM_CATEGORY_SEXUALLY_EXPLICIT",
        threshold: "BLOCK_LOW_AND_ABOVE"
      },
      generationConfig: {
        temperature: 0.2,
        topP: 0.8,
        topK: 40
      }
    })
  };

  return JSON.parse(UrlFetchApp.fetch(url, options).getContentText())
    .candidates[0].content.parts[0].text;
}
Docs.js
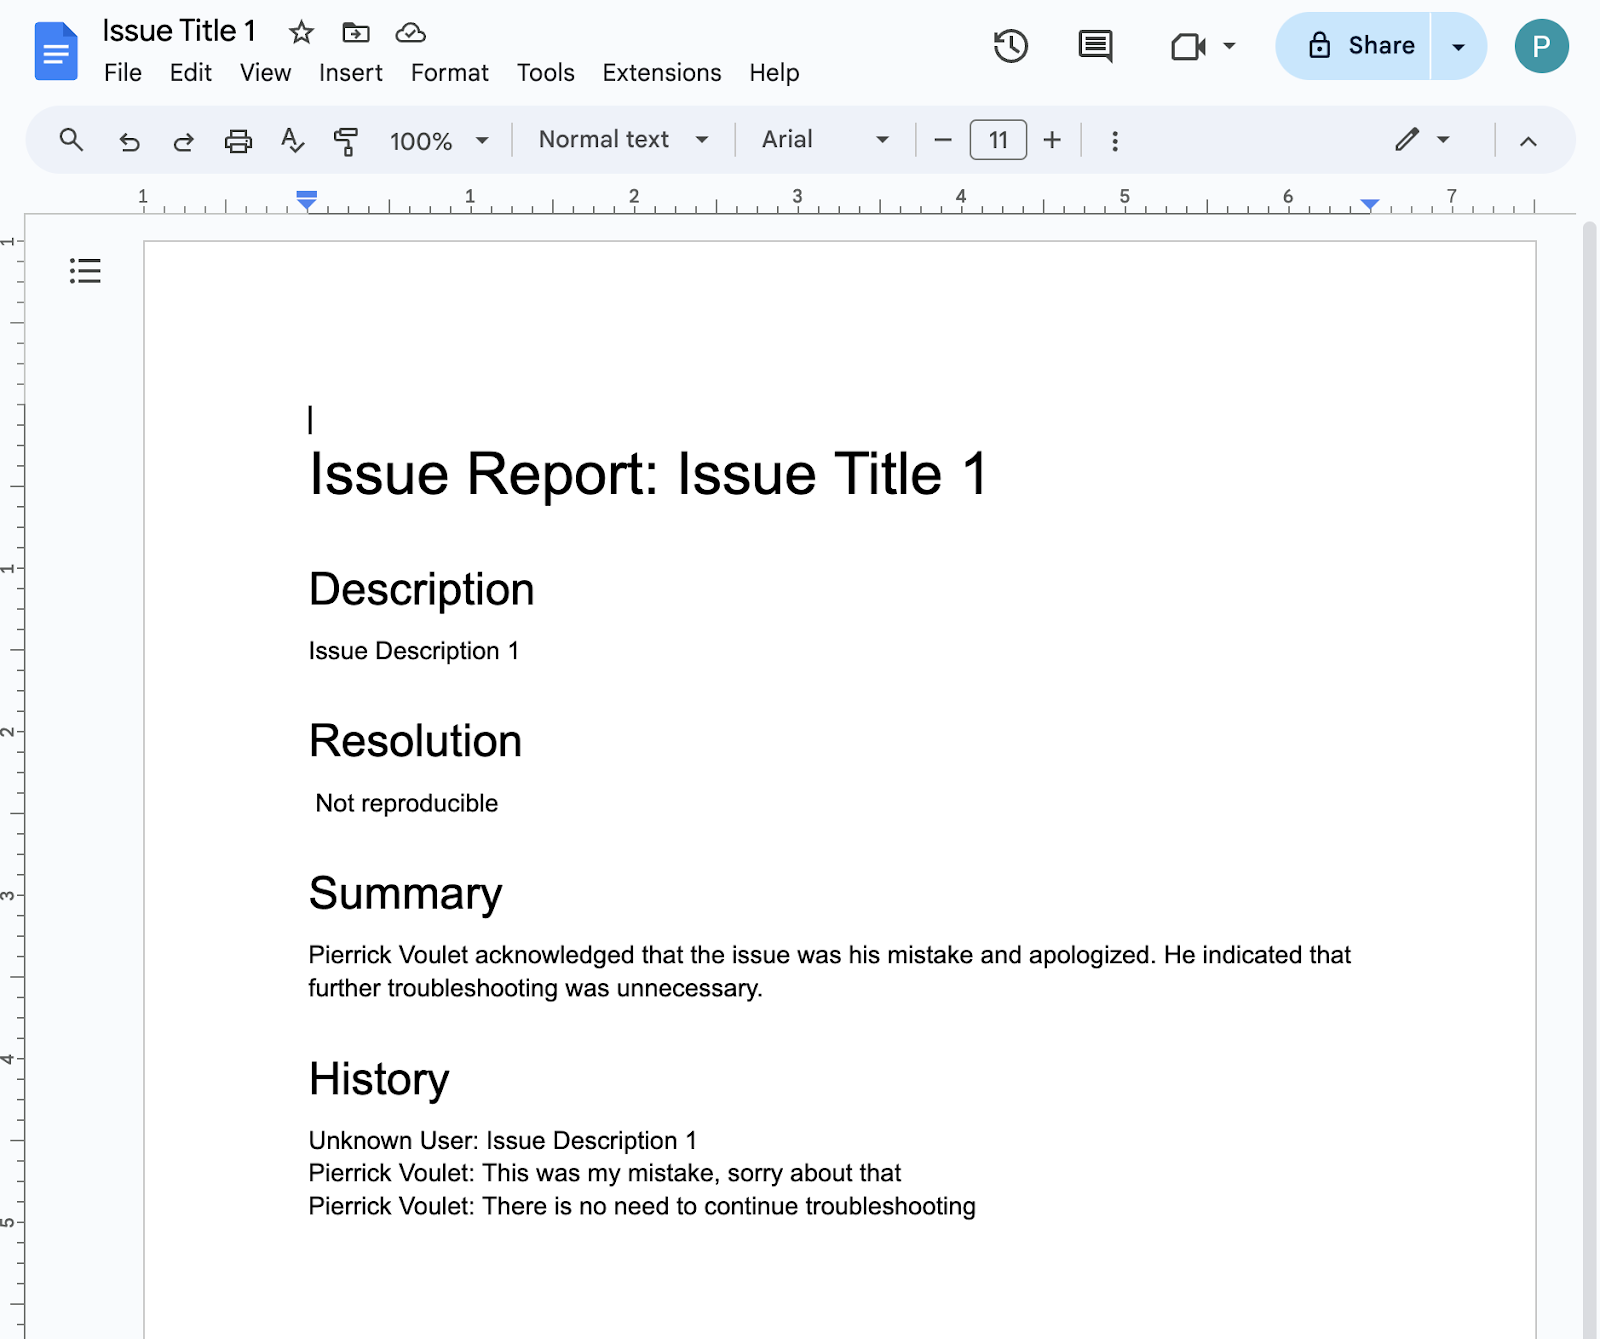
// The report generator function adds two sections: the first one is for the summary and the second one is for history.
function createReport(..., history, summary) {
  ...
  body.appendParagraph("Summary").setHeading(DocumentApp.ParagraphHeading.HEADING1);
  body.appendParagraph(summary);
  body.appendParagraph("History").setHeading(DocumentApp.ParagraphHeading.HEADING1);
  body.appendParagraph(history);
  ...
}
更新 Google Cloud 项目
启用 API
- 在 Google Cloud 控制台中,启用 Google Docs API、Google Admin SDK API 和 Vertex AI API:
- 依次点击菜单 ☰ > API 和服务 > 已启用的 API 和服务,然后确认这些 API 已启用。
启动服务账号
在 Google Cloud 控制台中,按以下步骤操作:
- 依次点击菜单 ☰ > IAM 和管理 > 服务账号 > + 创建服务账号。
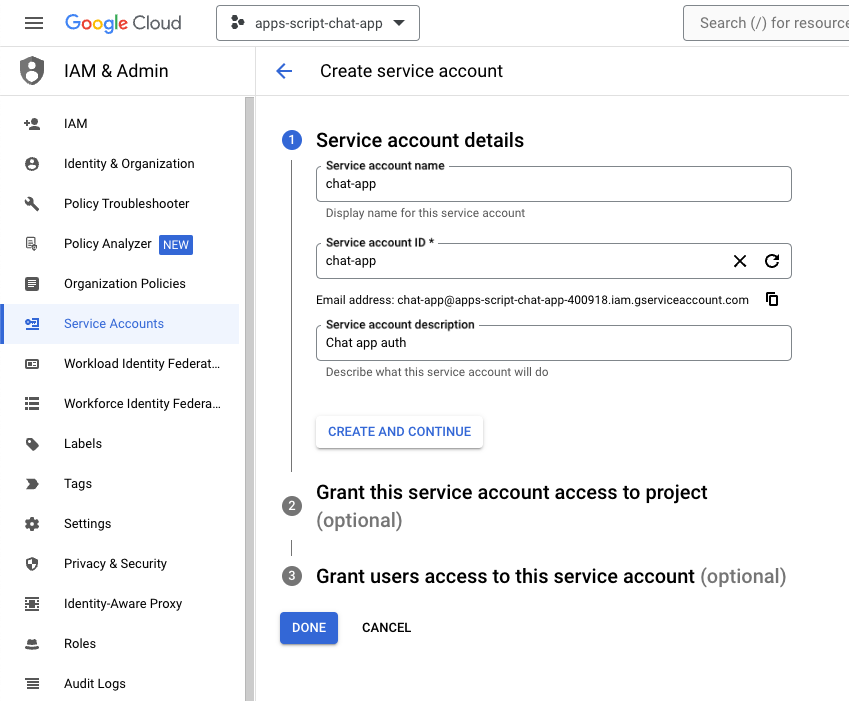
- 将服务账号名称设置为
chat-app。 - 将服务账号说明设置为
Chat app auth。 - 点击创建并继续。
- 点击完成。您将会转到服务账号页面,并看到创建的服务账号。
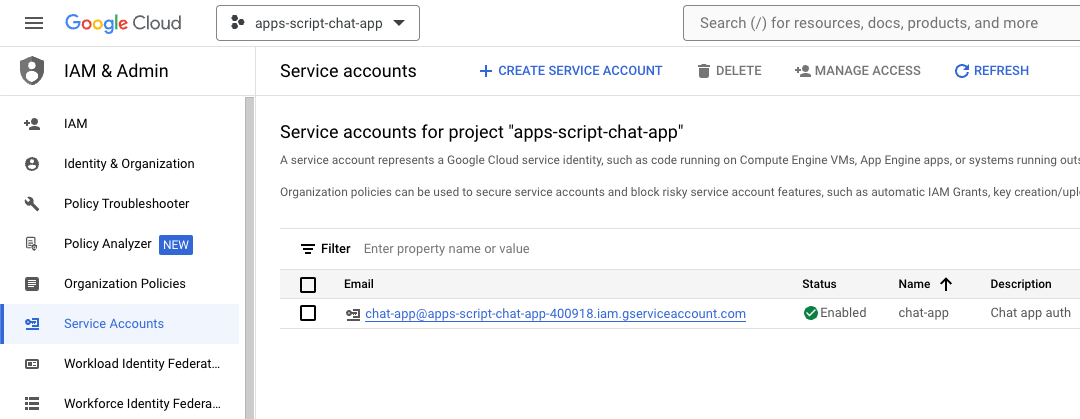
- 选择新创建的服务账号。
- 选择密钥标签页。
- 点击添加密钥。
- 点击创建新密钥。
- 选择 JSON。
- 点击创建。

对话框随即关闭,新创建的公钥/私钥对将以 JSON 文件的形式自动下载到本地环境。稍后,您在修改 Apps 脚本项目的源代码时会用到其中的内容。
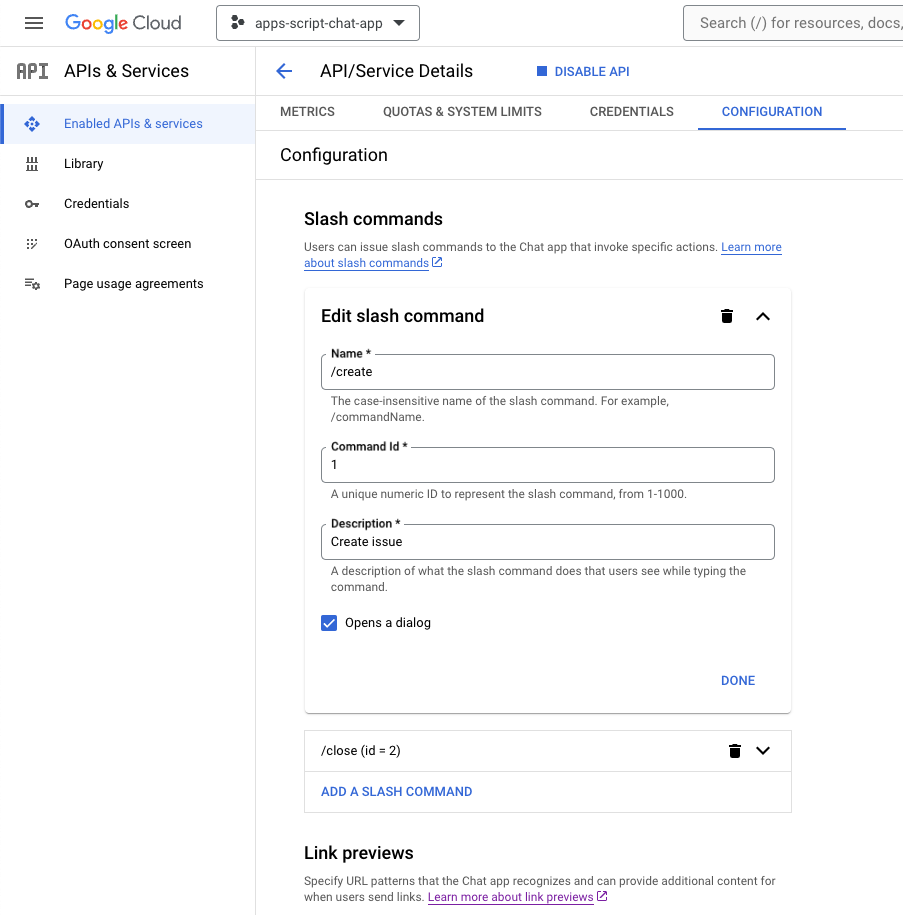
更新 Google Chat API 配置
在 Google Cloud 控制台中,按以下步骤操作:
- 添加一个斜杠命令。
- 将名称设置为
/create。 - 将命令 ID 设置为
1。 - 将说明设置为
Create a new issue。 - 选中打开对话框复选框。
- 添加另一个斜杠命令。
- 将名称设置为
/close。 - 将命令 ID 设置为
2。 - 将说明设置为
Close an issue。 - 点击保存。
更新 Apps 脚本项目
- 将本地终端中的当前目录更改为
issue-management/1-baseline。它包含源代码。在将源代码推送到 Apps 脚本项目之前,您需要配置一些内容。
配置源代码
- 将
Configuration.js文件中名为CHAT_CREDENTIALS的 JSON 常量设置为您之前下载的私钥文件内容。
- 在 Google Cloud 控制台中,依次点击菜单 ☰ > IAM 和管理 > 设置。
- 复制项目 ID。
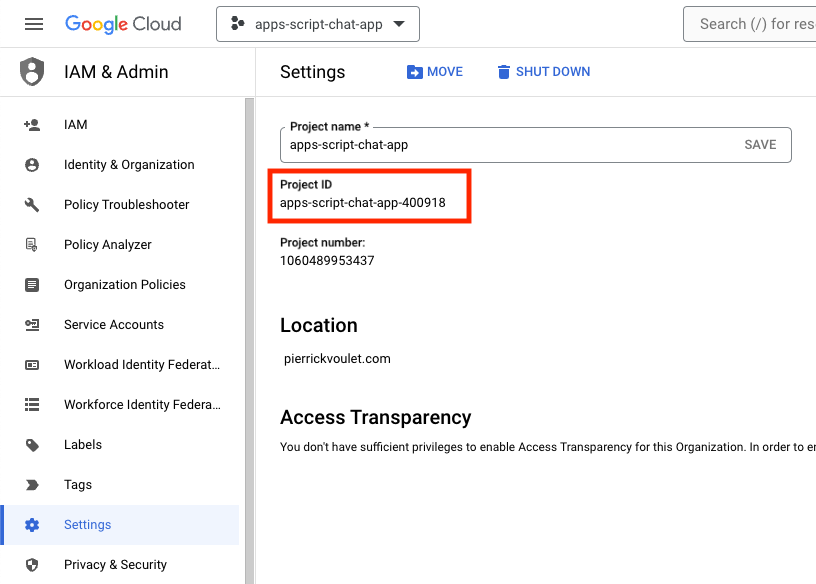
- 将
Configuration.js文件中名为PROJECT_ID的字符串常量设置为项目 ID。
配置 clasp 设置
如需初始化 clasp 设置,以将源代码推送到正确的 Apps 脚本项目,请按以下步骤操作:
- 在 Apps 脚本控制台中,选择您的项目。
- 选择项目设置。
- 在 ID 下,点击复制。
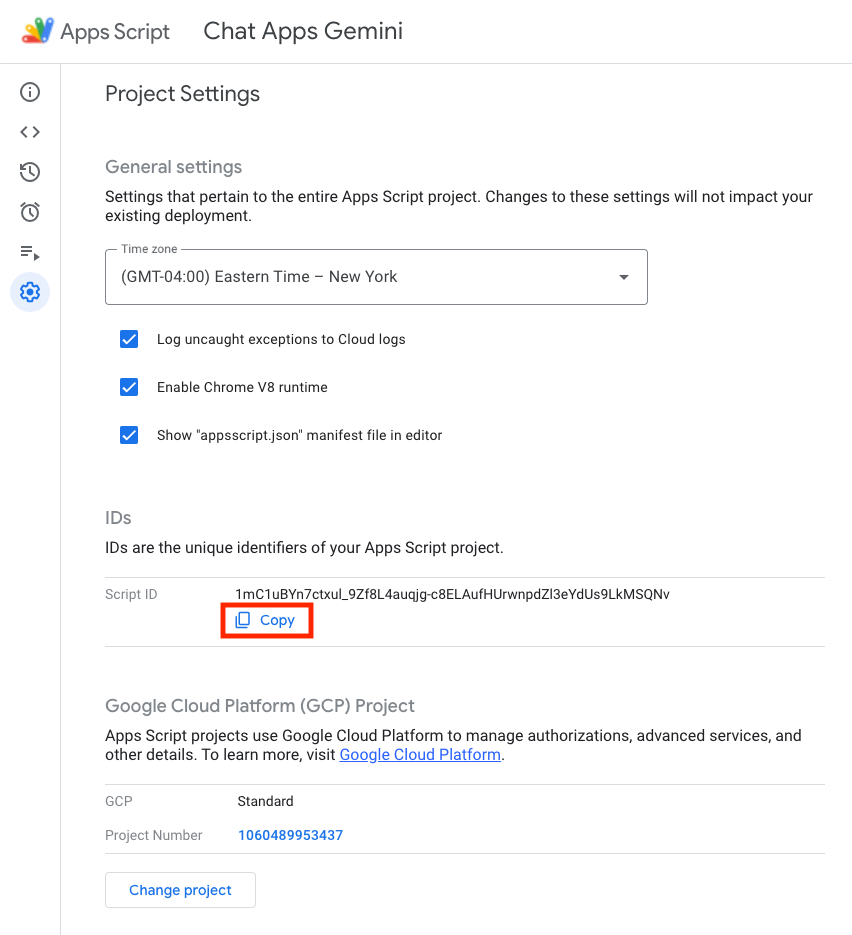
- 在当前目录中,创建一个
.clasp.json文件。 - 将
<your-script-id>替换为复制的 ID。 - 将结果复制到
.clasp.json文件。 - 保存
.clasp.json文件。
{
  "scriptId": "<your-script-id>"
}
推送源代码
- 运行以下命令:
$clasp push
? Manifest file has been updated. Do you want to push and overwrite? Yes
└─ appsscript.json
└─ ChatApp.js
└─ ChatAppAuth.js
└─ Configuration.js
└─ Docs.js
└─ Storage.js
└─ VertexAi.js
Pushed 7 files.
试试看
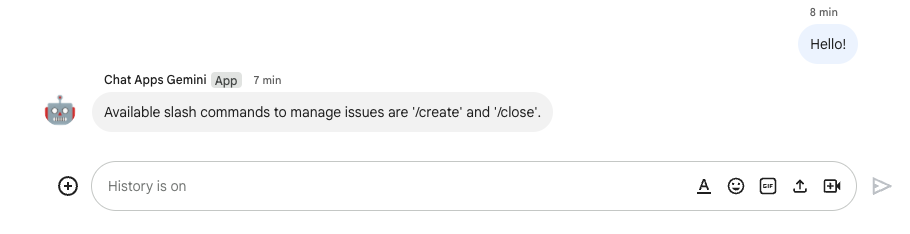
- 在 Google Chat 中,通过私信向应用发送
Hello!。应用没有回复,但系统会显示一条提示配置的消息。
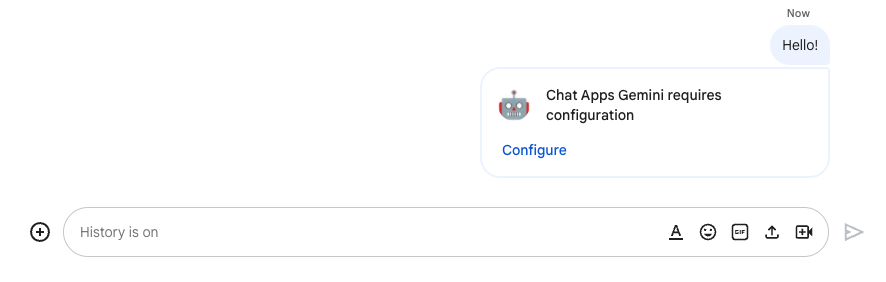
- 点击配置。
- 选择您的 Google 账号。
- 验证身份。
- 查看并允许访问该应用。
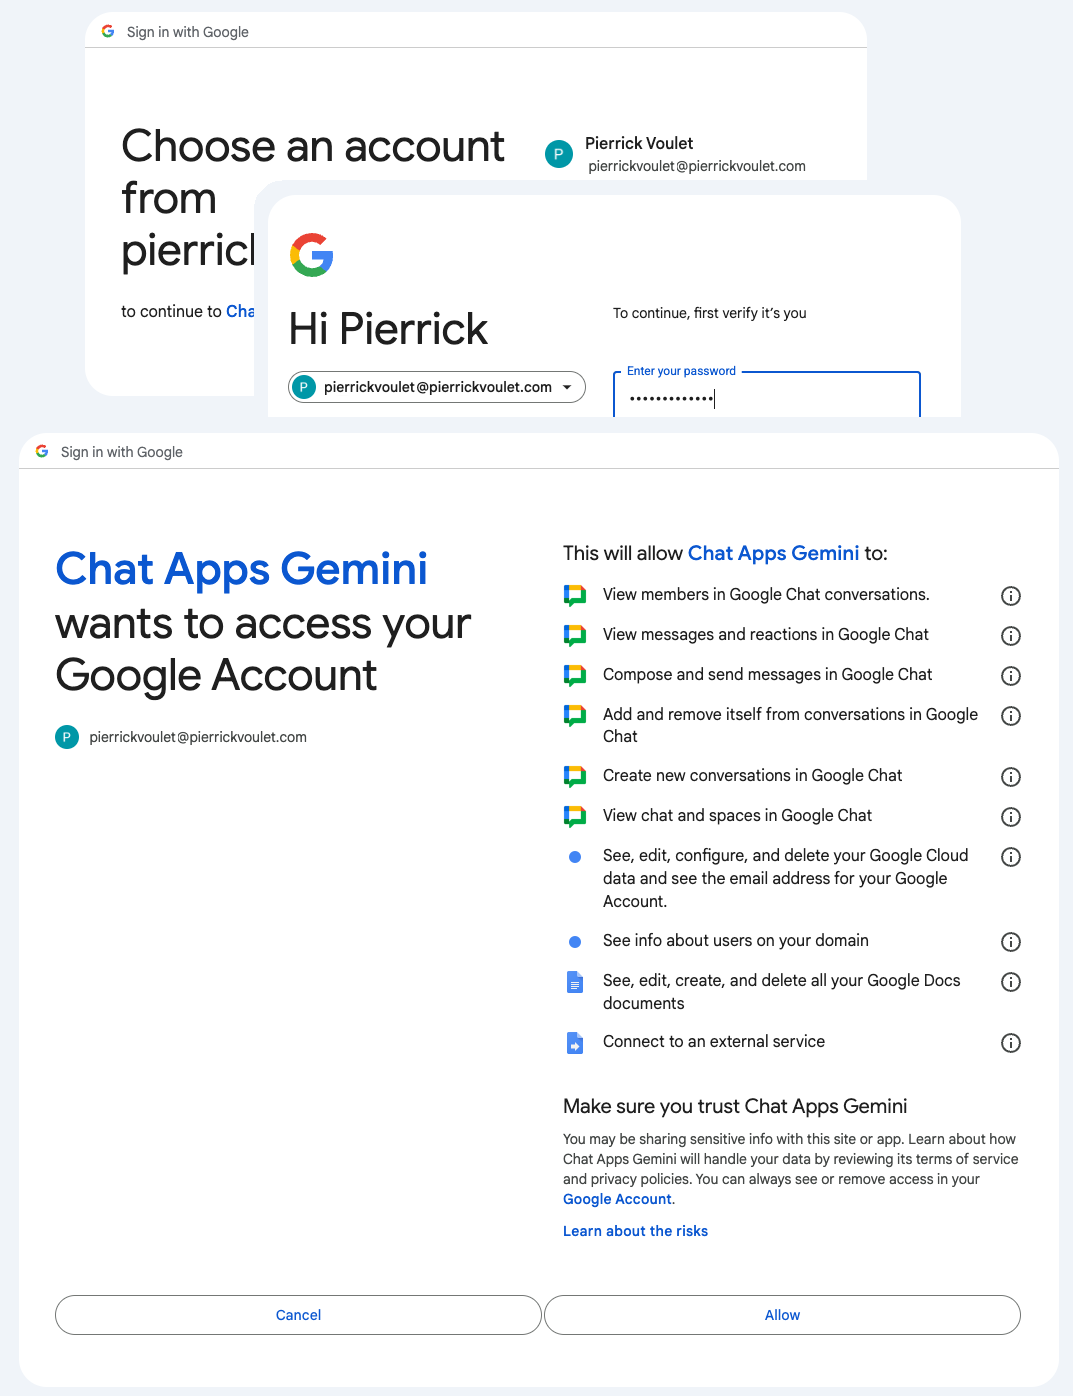
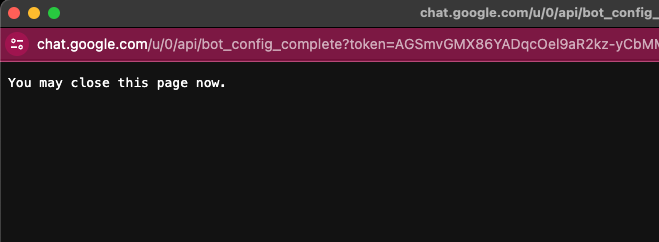
如果成功,您将在网页上看到一个基本确认屏幕,以及应用对原始消息的实际响应。
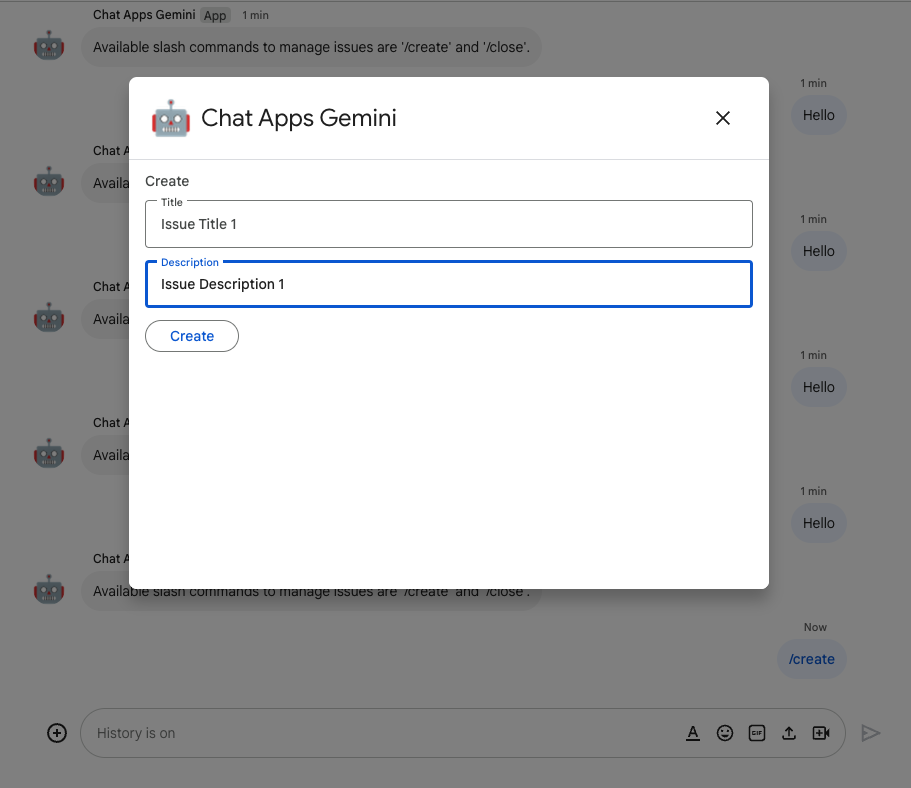
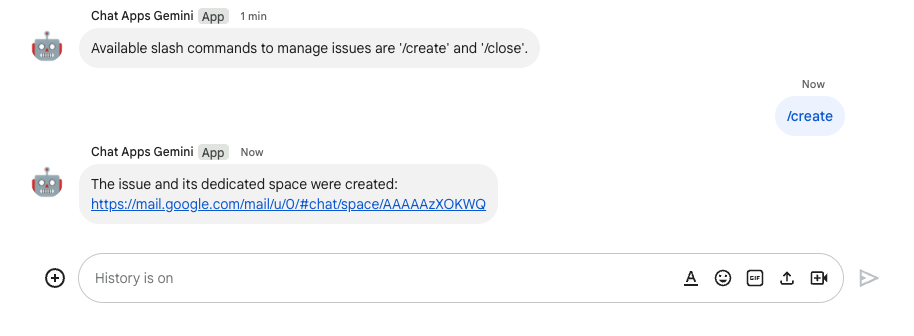
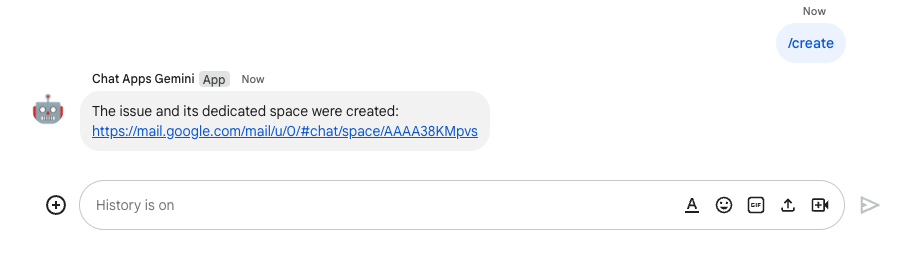
- 向应用再发送一条私信,但使用斜杠命令
/create。

- 在对话框中,将标题设置为
Issue Title 1。 - 将说明设置为“问题
Description 1”。 - 点击创建。
该应用会执行以下操作:
- 关闭对话框。
- 为新创建的问题创建一个具有相同标题的专用聊天室。
- 加入新创建的聊天室。
- 在新创建的聊天室中发送包含问题说明的消息。
- 向您发送私信,其中包含新创建的聊天室的链接。
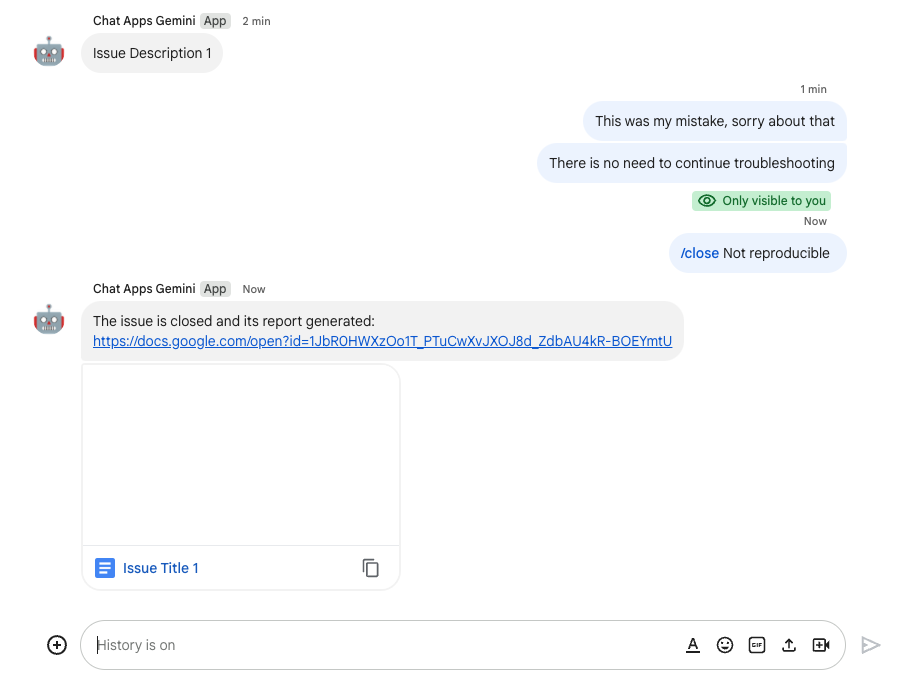
- 在新创建的聊天室中,使用斜杠命令
/close和解决方案(例如Not reproducible)发送消息。
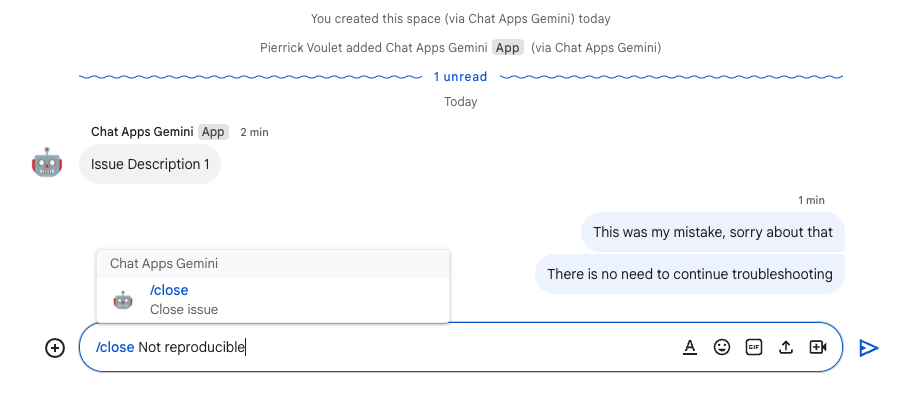
该应用会执行以下操作:
- 在 Google 文档中创建报告文档。
- 向专用于问题的聊天室发送消息,其中包含新创建的报告文档的链接。
- 打开报告文档。其中包含基本信息、历史记录和摘要。
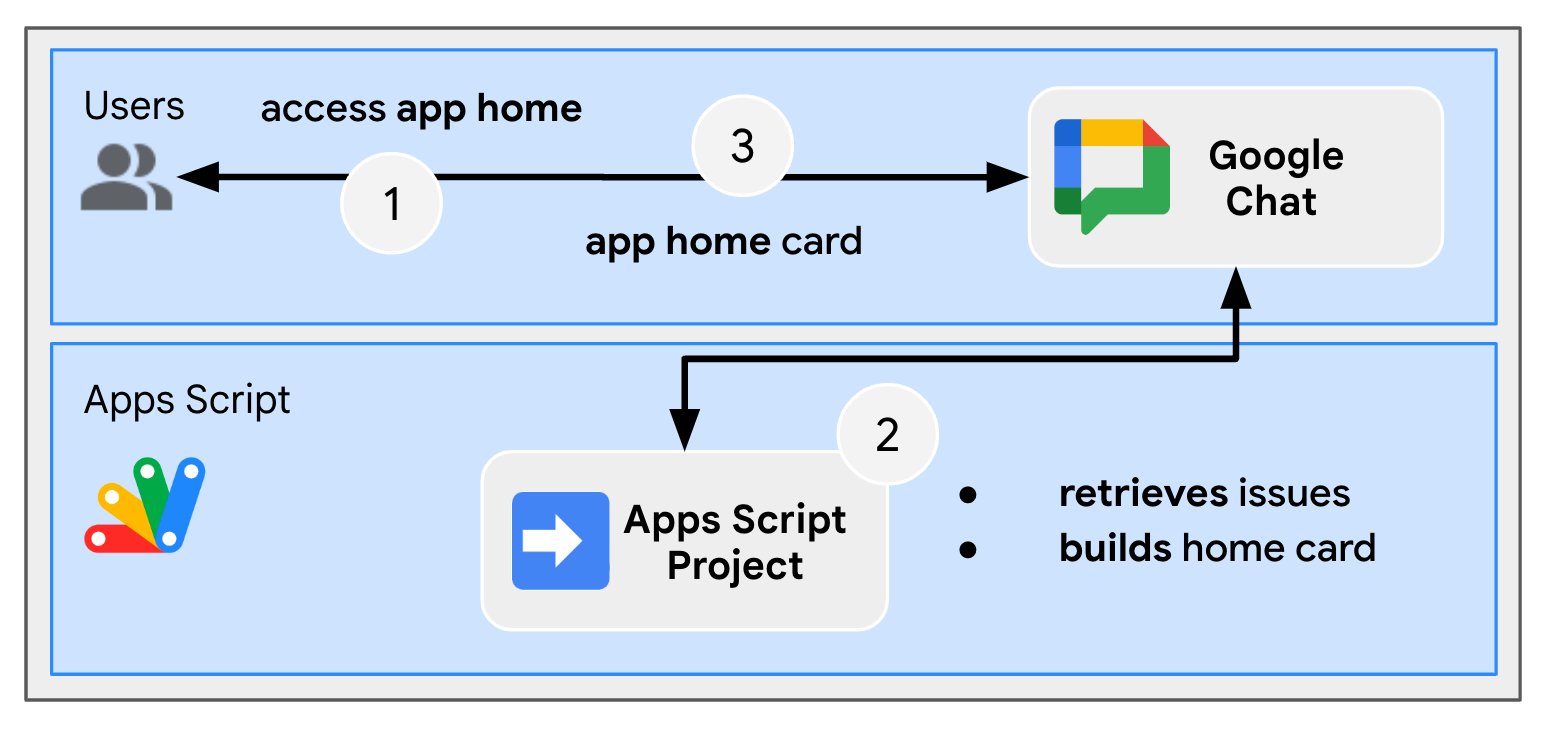
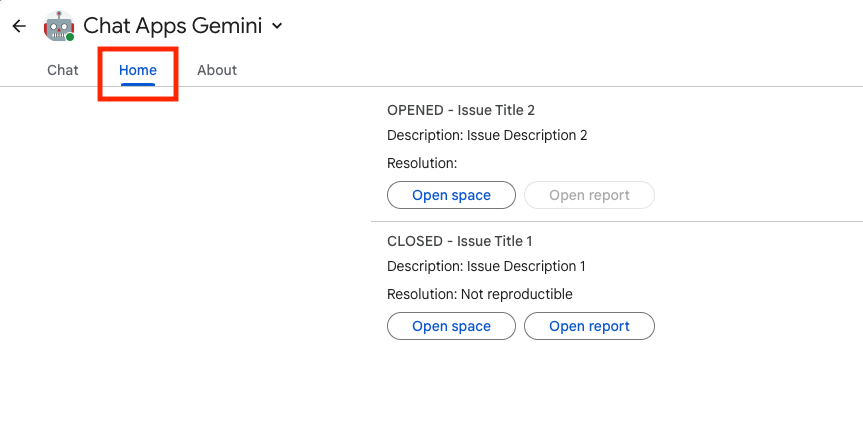
4. 可选:应用 1:添加应用首页
查看概念
应用首页是一条可自定义的卡片消息,当用户通过 Chat 应用的私信访问首页标签页时,Chat 应用就会向用户发送该卡片消息。它通常用于显示应用文档或概览。从技术上讲,会有负责处理的专用事件,该事件与卡片消息基于相同的核心原则。
查看流程
管理问题
查看源代码
Apps 脚本项目需要修改。
ChatApp.js
/**
 * Handles app home requests in Google Chat.
 *
 * Displays the latest status of all issues.
 */
function onAppHome() {
  // Generates one card section per issue.
  var sections = [];
  for (var issueKey in appProperties.getProperties()) {
    const issue = JSON.parse(appProperties.getProperty(issueKey));
    if (issue.spaceId) {
      sections.push({
        header: `${issue.status} - ${issue.title}`,
        widgets: [{ textParagraph: {
            text: `Description: ${issue.description}`
          }}, { textParagraph: {
            text: `Resolution: ${issue.resolution}`
          }}, { buttonList: { buttons: [{
              text: "Open space",
              onClick: { openLink: {
                url: `https://mail.google.com/mail/u/0/#chat/space/${issue.spaceId}`
              }}
            }, {
              text: "Open report",
              onClick: { openLink: {
                url: issue.reportUrl !== "" ? issue.reportUrl : "docs.new"
              }},
              disabled: issue.reportUrl === ""
          }]}
        }]
      });
    }
  }

  return { action: { navigations: [{ push_card: {
    sections: sections
  }}]}};
}
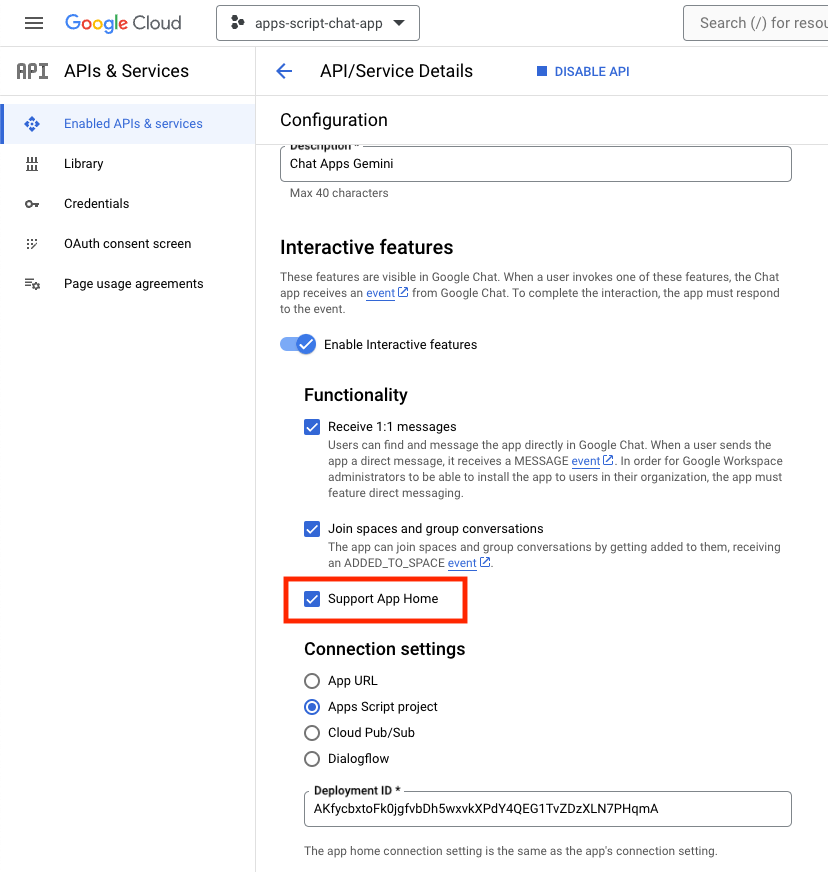
更新 Google Cloud 项目
在 Google Cloud 控制台中,按以下步骤操作:
在本地环境中,按以下步骤操作:
- 将终端中的当前目录更改为
issue-management/2-app-home,其中包含您需要使用的源代码。 - 将
issue-management/1-baseline/.clasp.json文件复制到当前目录。 - 将
issue-management/1-baseline/Configuration.js文件复制到当前目录,以替换现有文件。 - 运行以下命令:
clasp push
试试看
在 Google Chat 中,按以下步骤操作:
- 向应用发送包含斜杠命令
/create的私信。应用会打开一个对话框。 - 将标题设置为
Issue Title 2。 - 将说明设置为“问题
Description 2”。 - 点击创建。
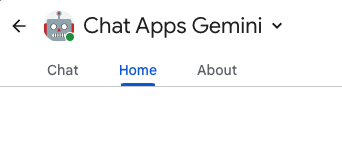
- 从包含 Google Chat 应用的聊天室中选择首页标签页。您可以查看所创建问题的详细信息。
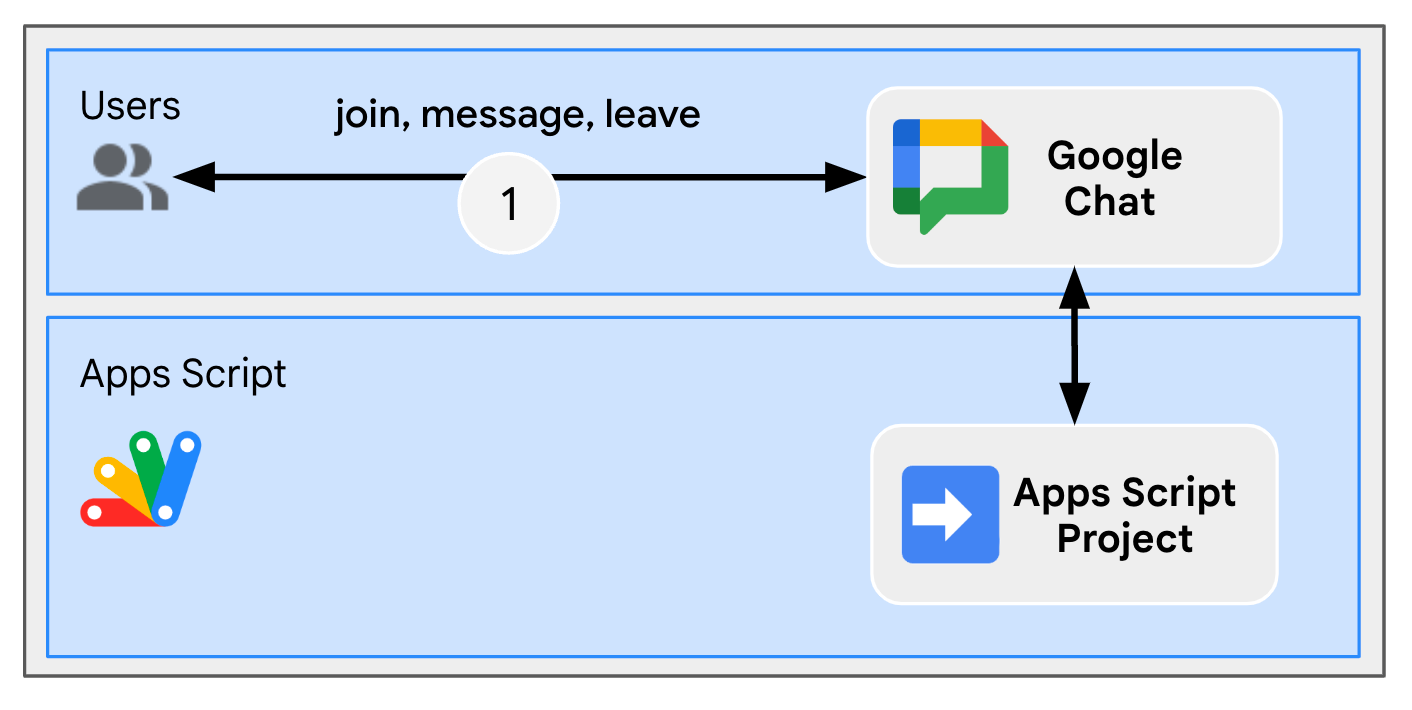
5. 可选:应用 1:添加聊天室监控
查看概念
Pub/Sub
Pub/Sub 是一种异步且可扩容的通讯服务,可将生成消息的服务与处理这些消息的服务分离开来。借助 Pub/Sub,您可以创建由事件提供方和使用方(称为发布者和订阅者)组成的系统。发布者通过广播事件而不是同步远程过程调用 (RPC) 与订阅者异步通信。
发布者将事件发送到 Pub/Sub 服务,不考虑这些事件的处理方式或处理时间。然后,Pub/Sub 会将事件传送给做出响应的所有服务。在通过 RPC 通信的系统中,发布者必须等待订阅者接收数据。但是,Pub/Sub 中的异步集成提高了整个系统的灵活性和稳健性。
主题:代表消息信息流的命名资源。您必须先创建一个主题,然后才能向其发布消息或订阅该主题。
订阅:要接受发布到主题的消息,您必须创建对该主题的订阅。订阅者客户端接收并处理发布到主题的消息。一个主题可以有多个订阅,但一个给定订阅属于单个主题。
Google Workspace 事件
Google Workspace 事件代表 Google Workspace 资源发生了更改,例如创建、更新或删除了资源。应用可以订阅 Google Workspace 资源,以异步接收和处理相关事件。

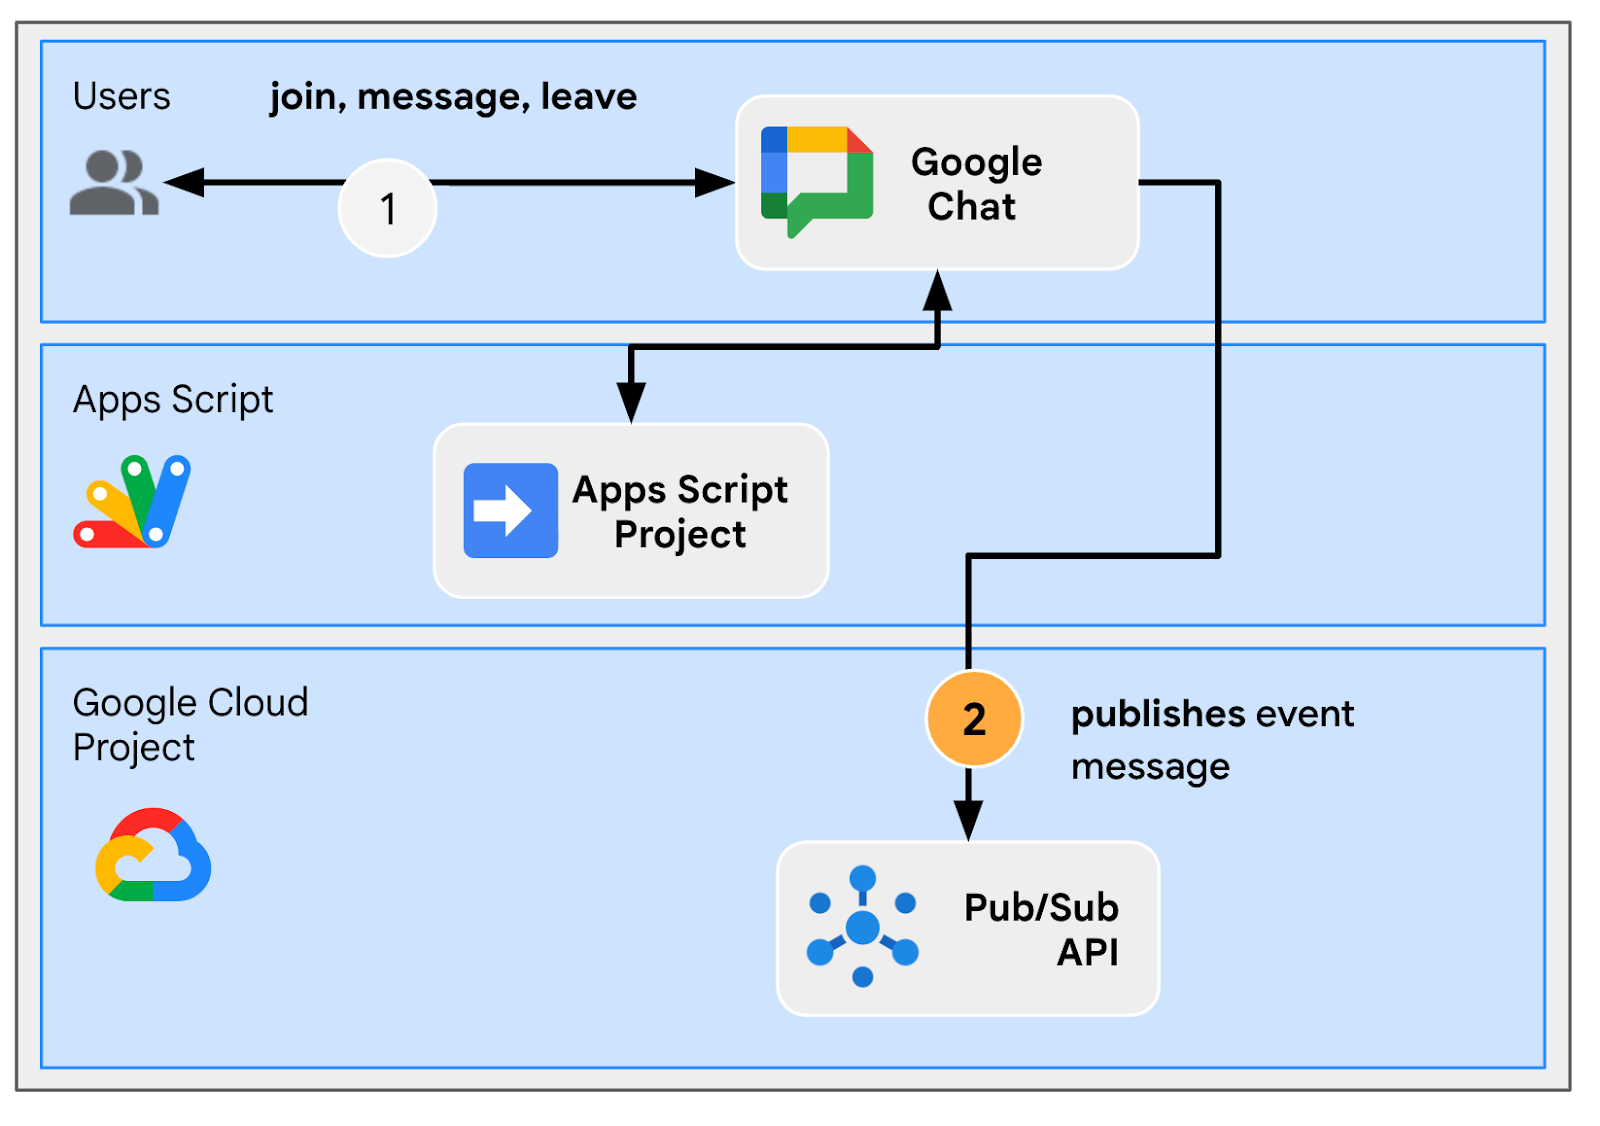
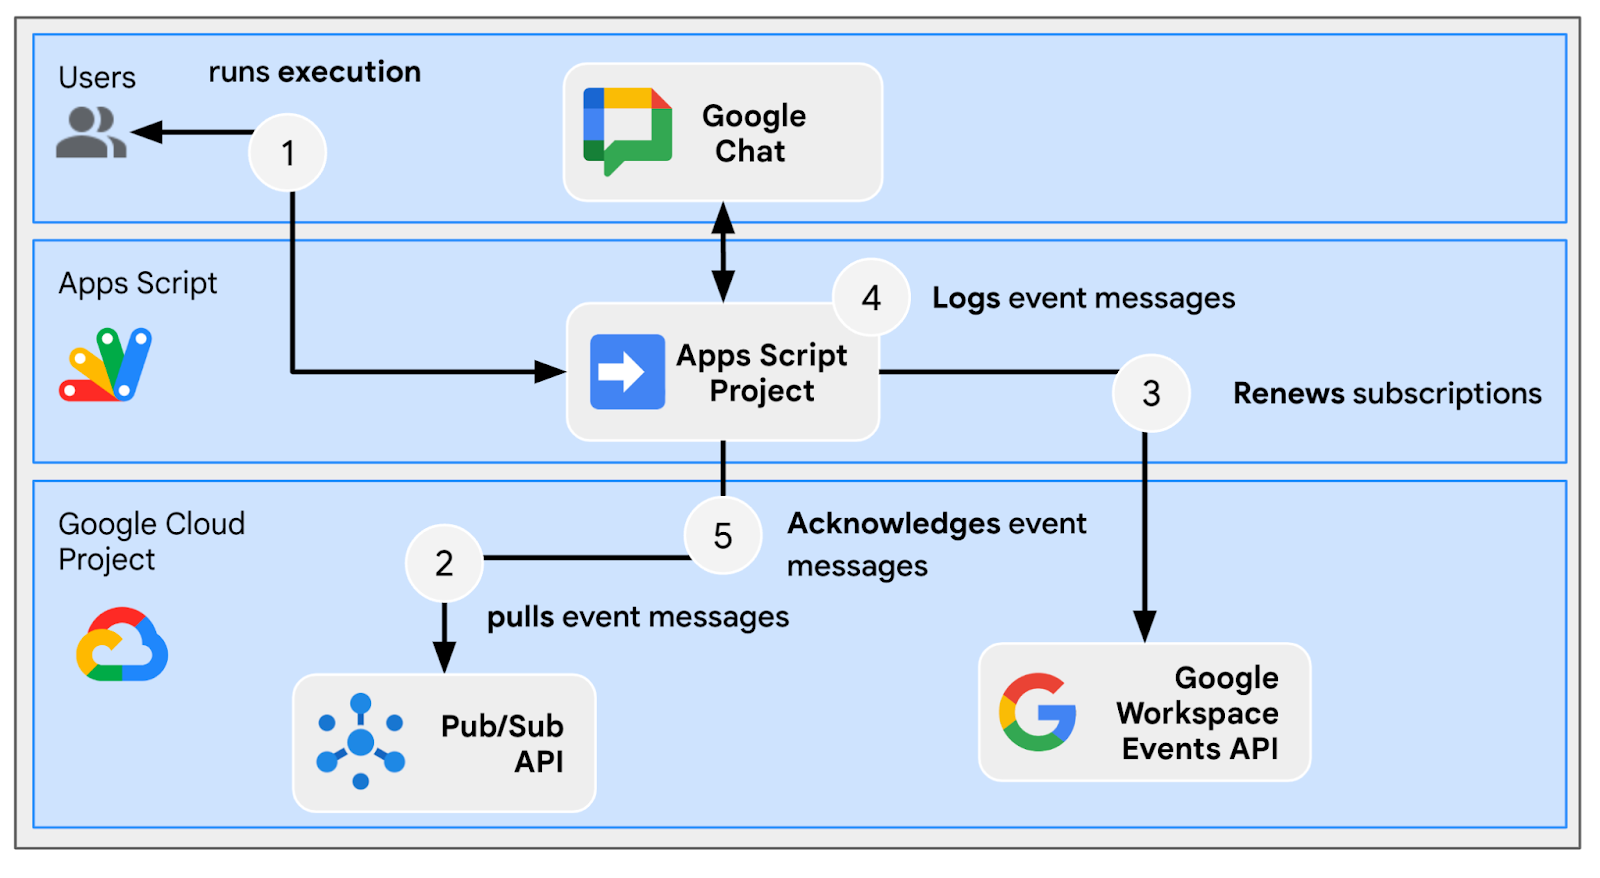
以下是 Google Workspace Events API 通过订阅向应用提交事件的方式:
- 应用订阅 Google Workspace 应用(例如聊天室)中的资源。
- 应用订阅的资源发生更改。
- Google Workspace 应用向 Pub/Sub 中的主题提交事件,它充当应用的 Google Workspace 订阅的通知端点。该事件包含资源中所发生变化的相关数据。
- 应用处理包含事件的 Pub/Sub 消息,并在必要时采取措施。
查看流程
创建问题(更新)
排查专用聊天室的问题(更新)
解决专用聊天室的问题(更新)
处理订阅
查看源代码
Apps 脚本项目需要修改。
appsscript.json
// Enables the Workspace Events service.

"enabledAdvancedServices": [
  ...
  {
    "userSymbol": "WorkspaceEvents",
    "version": "v1",
    "serviceId": "workspaceevents"
  }
  ...
]
Configuration.js
// Adds two constants: the first one is the Pub/Sub topic ID and the second one
// is the Pub/Sub subscription ID to be used to retrieve Google Workspace events.

...
const GWS_PUBSUB_TOPIC_ID = `projects/${PROJECT_ID}/topics/workspace-events`;
const GWS_PUBSUB_SUBSCRIPTION_ID =
  `projects/${PROJECT_ID}/subscriptions/workspace-events-sub`;
...
ChatApp.js
// Edits the function to delete the subscription at issue closure.

function processSlashCommand(event) {
  ...
  if (event.message.slashCommand.commandId == CLOSE_COMMAND_ID
    && event.message.space.type !== "DM") {
    ...
    deleteSubscription(issue.subscriptionId);
    ...
  }
  ...
}
// Edits the function to create the subscription.

function createIssue(event) {
  ...
  const subscriptionId = createSpaceSubscription(spaceUrl);
  const createdIssue = saveCreatedIssue(..., subscriptionId);
  ...
}
// Edits the function to delete the subscription.

function onRemoveFromSpace(event) {
  ...
  deleteSubscription(issue.subscriptionId);
  ...
}
Storage.js
// Edits the function to keep track of the subscription ID.

function saveCreatedIssue(..., spaceId, subscriptionId) {
  ...
  appProperties.setProperty(spaceId, JSON.stringify({
    ...
    subscriptionId: subscriptionId,
    ...
  }));
  ...
}
WorkspaceEvent.js
/**
 * Creates a new subscription to Google Workspace Events associated to a
 * Google Chat space.
 *
 * The subscription scope includes message creation events and resources.
 *
 * @param {string} spaceId the space ID to create a subscription for
 * @return the ID of the newly created subscription
 */
function createSpaceSubscription(spaceId) {
  const operation = WorkspaceEvents.Subscriptions.create({
    targetResource: `//chat.googleapis.com/${spaceId}`,
    eventTypes: ["google.workspace.chat.message.v1.created"],
    notificationEndpoint: { pubsubTopic: GWS_PUBSUB_TOPIC_ID },
    payloadOptions: { includeResource: true },
  });

  return operation.response.name;
}
/**
 * Processes events from subscription by using the Google Cloud PubSub API.
 *
 * It pulls and acknowledges each event.
 */
function processSubscription() {
  const response = UrlFetchApp.fetch(
    `https://pubsub.googleapis.com/v1/${GWS_PUBSUB_SUBSCRIPTION_ID}:pull`,
    {
      method: "POST",
      contentType: "application/json",
      headers: { "Authorization": "Bearer " + ScriptApp.getOAuthToken() },
      payload: JSON.stringify({ maxMessages: 10 })
    }
  );

  const messages = JSON.parse(response.getContentText()).receivedMessages;
  for (var messageIndex in messages) {
    const message = messages[messageIndex];
    const ceType = message.message.attributes["ce-type"];
    const dataStr = Utilities.newBlob(Utilities.base64Decode(message.message.data))
      .getDataAsString();
    if (ceType === "google.workspace.events.subscription.v1.expirationReminder") {
      // Renews subscription.
      renewSubscription(JSON.parse(dataStr).subscription.name);
    } else if (ceType === "google.workspace.chat.message.v1.created") {
      // Processes the message text when it's sent in a space.
      const chatMessage = JSON.parse(dataStr).message;
      if (chatMessage.sender.type !== "BOT") {
        console.log("Message was processed.");
      }
    }
    // Acknowledges successful processing to avoid getting it again next time.
    ackSubscription(message.ackId);
  }
}
/**
 * Acknowledges a subscription event by using the Google Cloud PubSub API.
 *
 * @param {string} ackId the ID of the event acknowledgment to send
 */
function ackSubscription(ackId) {
  UrlFetchApp.fetch(
    `https://pubsub.googleapis.com/v1/${GWS_PUBSUB_SUBSCRIPTION_ID}:acknowledge`,
    {
      method: "POST",
      contentType: "application/json",
      headers: { "Authorization": "Bearer " + ScriptApp.getOAuthToken() },
      payload: JSON.stringify({
        ackIds: [ackId]
      })
    }
  );
}
/**
 * Renews a subscription to Google Workspace Events.
 *
 * The default time to live option is used.
 *
 * @param {string} subscriptionId the ID of the subscription to renew
 */
function renewSubscription(subscriptionId) {
  WorkspaceEvents.Subscriptions.patch({ttl: '0s'}, subscriptionId);
}
/**
 * Deletes a subscription to Google Workspace Events.
 *
 * @param {string} subscriptionId the ID of the subscription to delete
 */
function deleteSubscription(subscriptionId) {
  WorkspaceEvents.Subscriptions.remove(subscriptionId);
}
更新 Google Cloud 项目
启用 API
- 在 Google Cloud 控制台中,启用 Google Workspace Events 和 PubSub。
- 依次点击菜单 ☰ > API 和服务 > 已启用的 API 和服务,然后确认两者均已启用。
发起订阅
您需要创建并订阅 Pub/Sub 主题,才能发布所有工作区事件。
在 Google Cloud 控制台中,按以下步骤操作:
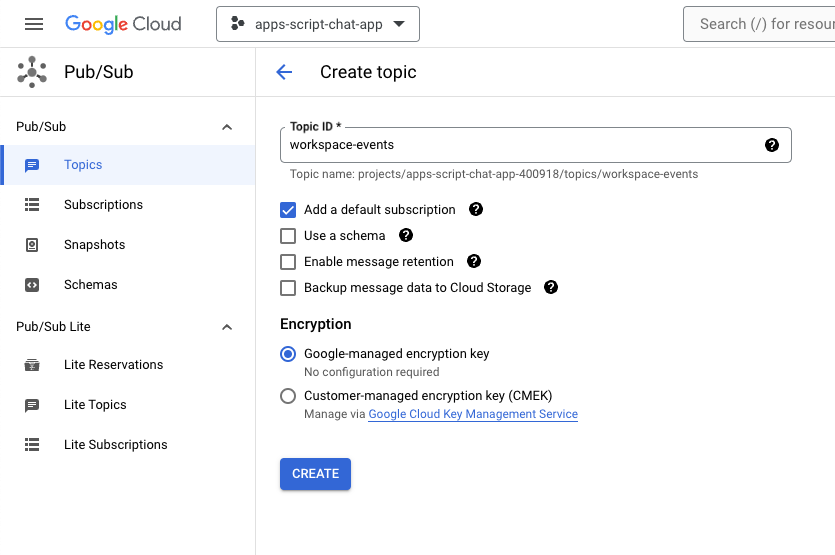
- 依次前往菜单 ☰ > Pub/Sub > 主题。
- 点击创建主题。
- 将主题 ID 设置为
workspace-events。 - 选中添加默认订阅复选框。
- 点击创建。
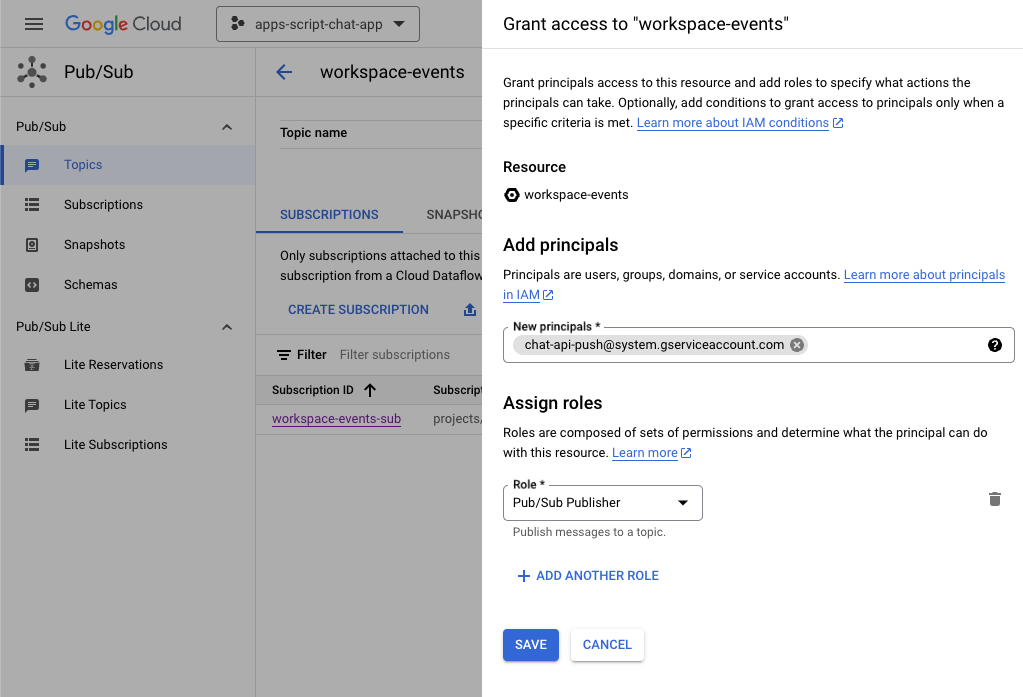
如需授予从 Google Chat 向新创建的主题发布 Pub/Sub 消息的权限,请按以下步骤操作:
- 从列表中选择主题。
- 选择权限标签页。
- 将
chat-api-push@system.gserviceaccount.com添加到新的主账号。 - 为角色选择 Pub/Sub Publisher。
- 点击保存。
更新 Apps 脚本项目
在 Google Cloud 控制台中,按以下步骤操作:
- 依次前往菜单 ☰ > IAM 和管理 > 设置。
- 复制项目 ID。
在本地环境中,按以下步骤操作:
- 将终端中的当前目录更改为
issue-management/3-message-monitoring,其中包含您需要的源代码。 - 将
Configuration.js文件中名为PROJECT_ID的字符串常量设置为复制的项目 ID。 - 将
Configuration.js文件中名为CHAT_CREDENTIALS的 JSON 常量设置为您之前下载的私钥文件内容。 - 将
issue-management/2-app-home/.clasp.json文件复制到当前目录。 - 运行以下命令:
clasp push
试试看
在 Google Chat 中,按以下步骤操作:
- 向应用发送包含斜杠命令
/create的私信。应用会打开一个对话框。 - 将标题设置为
Issue Title 3。 - 将说明设置为“问题
Description 3”。 - 点击创建。
- 在新创建的聊天室中,发送几条讨论问题的消息。
- 使用斜杠命令
/close和解决方案(例如Fixed)发送消息。
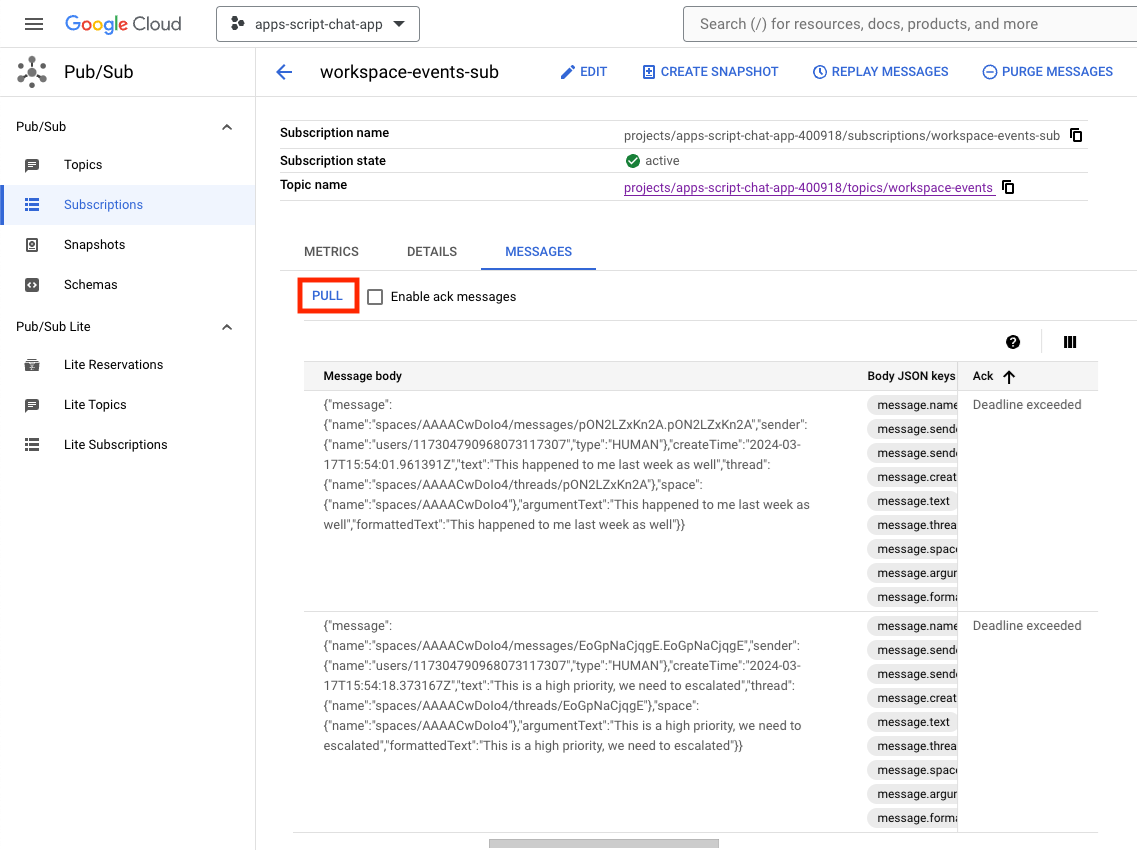
在 Google Cloud 控制台中,按以下步骤操作:
- 依次前往菜单 ☰ > Pub/Sub > 订阅。
- 选择 workspace-events-sub 订阅。
- 选择消息标签页。
- 点击拉取。表格会显示与您向新创建的聊天室所发送内容相关的消息。
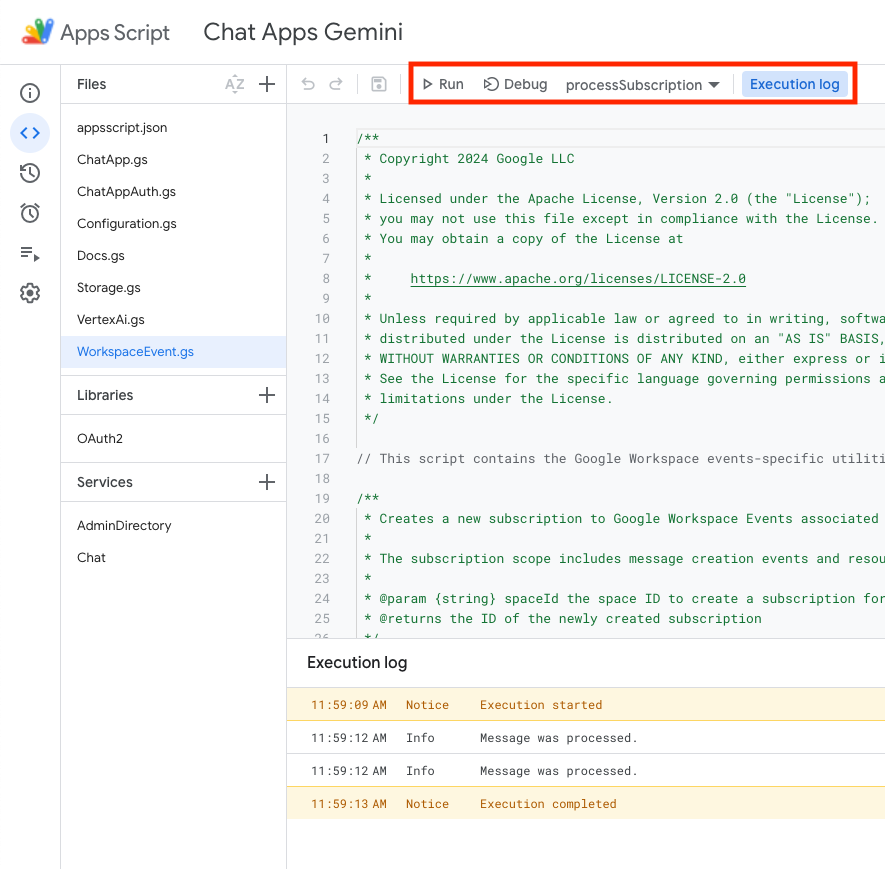
在 Apps 脚本控制台中,按以下步骤操作:
- 选择您的项目。
- 选择编辑器。
- 选择
WorkspaceEvent.gs文件。 - 在运行部分中选择
processSubscription。 - 点击
Run。您可以从执行日志中看到消息已被处理。
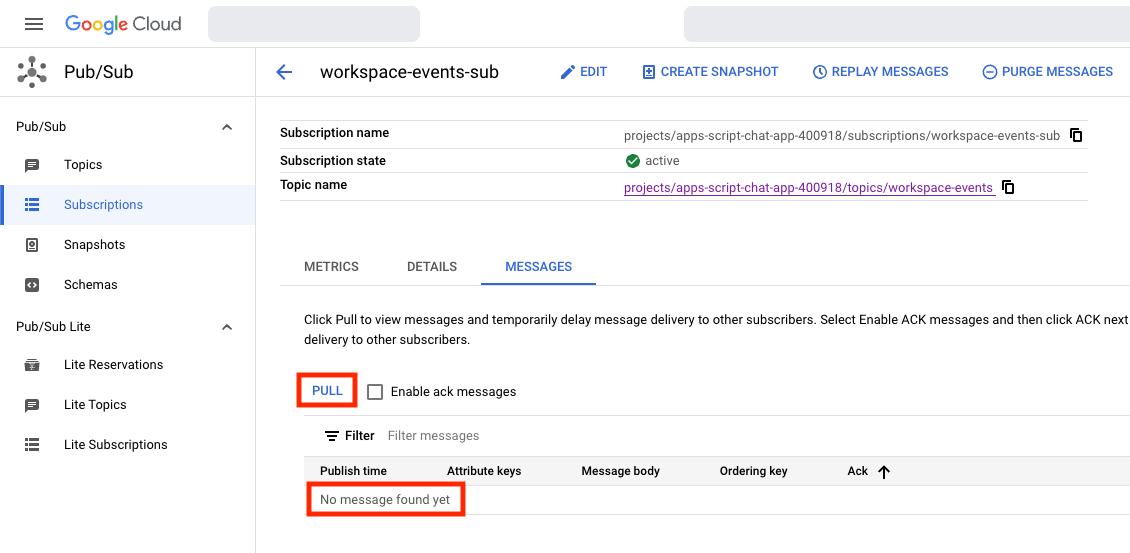
在 Google Cloud 控制台中,按以下步骤操作:
- 依次前往菜单 ☰ > Pub/Sub > 订阅。
- 选择 workspace-events-sub 订阅。
- 选择消息标签页。
- 点击拉取。表格不再显示与您向新创建的聊天室所发送内容相关的消息。
- 在您使用斜杠命令
/create创建的第三个问题的专用聊天室中,您可以在 Google Chat 中再发送几条讨论该问题的消息。
在 Google Cloud 控制台中,按以下步骤操作:
- 依次前往菜单 ☰ > Pub/Sub > 订阅。
- 选择 workspace-events-sub 订阅。
- 选择消息标签页。
- 点击拉取。此表格不会显示与您向新创建的聊天室所发送内容相关的消息。
6. 可选:应用 1:添加包容性帮助
查看概念
生成式 AI 提示是一种设计说明或问题的艺术,用于引导生成式 AI 模型生成特定类型的预期输出。常见做法是在提示中添加规则和条件,以限制答案。这有助于确保输出安全、相关、一致且符合预期。
查看流程
处理订阅(更新)
查看源代码
Apps 脚本项目需要修改。
WorkspaceEvent.js
// Edits the function to replace logging by an actual card message.
function processSubscription() {
...
for (var messageIndex in messages) {
...
} else if (ceType === "google.workspace.chat.message.v1.created") {
...
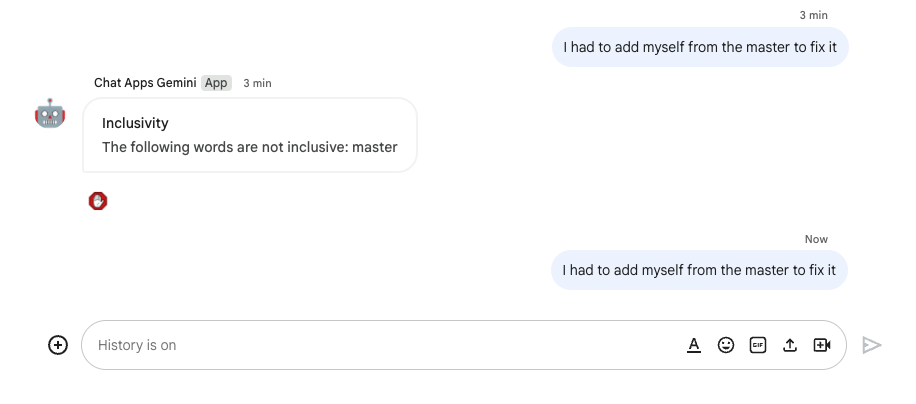
const inclusivityCheck = getInclusivityFeedback(chatMessage.text);
if (inclusivityCheck !== "It's inclusive!") {
createAppMessageUsingChatService({
cardsV2: [{ cardId: "1", card: { header: {
title: "Inclusivity",
subtitle: `The following words are not inclusive: ${inclusivityCheck}`
}}}]
},
chatMessage.space.name);
}
...
}
...
}
...
}
VertexAi.js
/**
 * Gets feedback on inclusivity for a text with the Gemini Pro model using
 * Vertex AI API.
 *
 * Returns "It's inclusive!" when it is otherwise a list of word(s) that might not
 * be optimal.
 *
 * @param {string} text the text
 * @return {string} the feedback
 */
function getInclusivityFeedback(text) {
  const url = `https://${VERTEX_AI_LOCATION_ID}-aiplatform.googleapis.com/v1`
    + `/projects/${PROJECT_ID}/locations/${VERTEX_AI_LOCATION_ID}`
    + "/publishers/google/models/gemini-1.0-pro:generateContent";
  const options =  {
    method: "POST",
    headers: { Authorization: "Bearer " + ScriptApp.getOAuthToken() },
    contentType: "application/json",
    payload: JSON.stringify({
      contents: {
        role: "user",
        parts: {
          text: "Are there any words that obviously go against inclusivity "
            + "in this text:"
            + `\n\n----------\n${text}\n----------\n\n`
            + "If there are not, answer \"It's inclusive!\" "
            + "otherwise answer by listing them separated by commas. "
            + "Do not answer with any explanation."
        }
      },
      safetySettings: {
        category: "HARM_CATEGORY_SEXUALLY_EXPLICIT",
        threshold: "BLOCK_LOW_AND_ABOVE"
      },
      generationConfig: {
        temperature: 0.2,
        topP: 0.8,
        topK: 40
      }
    })
  };

  return JSON.parse(UrlFetchApp.fetch(url, options).getContentText())
    .candidates[0].content.parts[0].text;
}
更新 Apps 脚本项目
在本地环境中,按以下步骤操作:
- 将终端中的当前目录更改为
issue-management/4-inclusivity-help,其中包含您需要的源代码。 - 将
issue-management/3-message-monitoring/.clasp.json文件复制到当前目录。 - 将
issue-management/3-message-monitoring/Configuration.js文件复制到当前目录,以替换现有文件。 - 运行以下命令:
clasp push
试试看
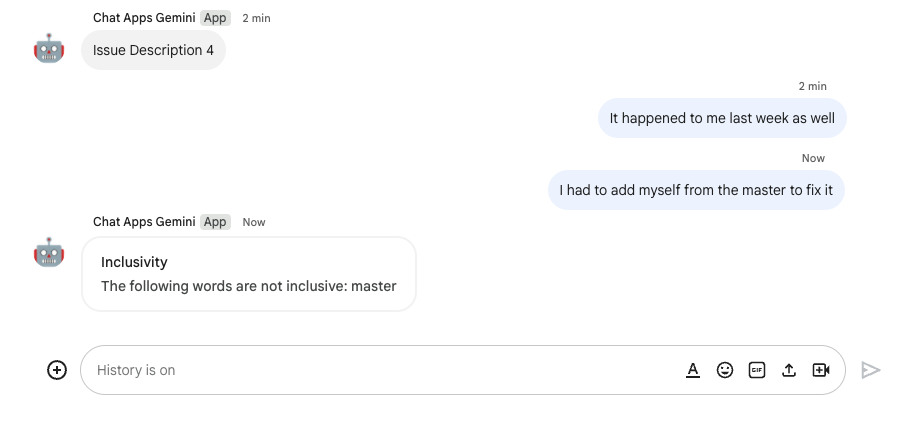
在 Google Chat 中,按以下步骤操作:
- 向应用发送包含斜杠命令
/create的私信。应用会打开一个对话框。 - 将标题设置为
Issue Title 4。 - 将说明设置为“问题
Description 4”。 - 点击创建。
- 在新创建的聊天室中,发送
It happened to me last week as well。
在 Apps 脚本控制台中,按以下步骤操作:
- 选择您的项目。
- 选择编辑器。
- 选择
WorkspaceEvent.gs文件。 - 在运行部分中选择
processSubscription。 - 点击运行。您可以从执行日志中看到消息已被处理。
在 Google Chat 中,按以下步骤操作:
- 请注意,该应用未在新创建的聊天室中发送任何包容性帮助。
- 在新创建的聊天室中,发送消息
I had to add myself from the master to fix it。
在 Apps 脚本控制台中,按以下步骤操作:
- 选择您的项目。
- 选择编辑器。
- 选择
WorkspaceEvent.gs文件。 - 在运行部分中选择
processSubscription。 - 点击运行。您可以从执行日志中看到消息已被处理。在 Google Chat 中,该应用在新创建的聊天室中发送了一条包容性帮助消息。
7. 可选:应用 1:添加偏好设置
。
查看概念
配件 widget 是附加到应用所发送消息底部的无边框 widget。这通常用于让用户在特定消息上下文中快速回应。从技术上讲,它遵循与卡片按钮相同的核心原则。
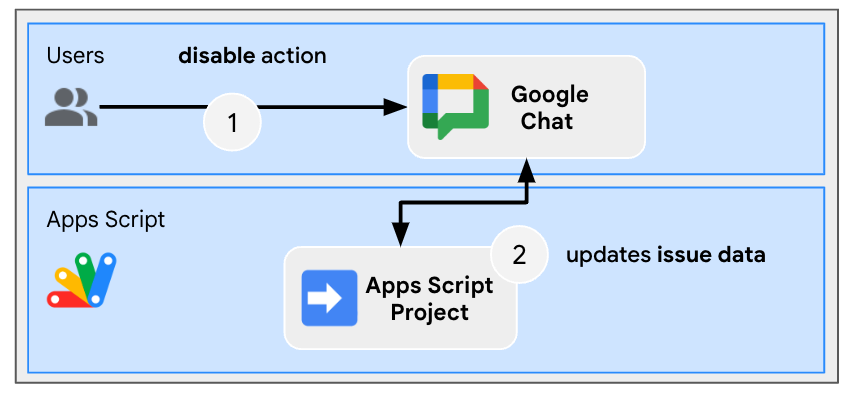
查看流程
停用包容性帮助
查看源代码
Apps 脚本项目需要修改。
ChatApp.js
// Edits the function to handle the inclusivity help disablement action for a
// given space.

function onCardClick(event) {
  ...
  if (event.action.actionMethodName === "disableInclusivityHelp") {
    disableInclusivityHelp(event.common.parameters.spaceId);
  }
}
Storage.js
// Edits the function to keep track of the inclusivity help setting.

function saveCreatedIssue(title, description, spaceId, subscriptionId) {
  appProperties.setProperty(spaceId, JSON.stringify({
    ...
    inclusivityHelp: true,
    ...
  }));
  ...
}
/**
 * Disables inclusivity help in a space.
 *
 * @param {string} spaceId the ID of dedicated space of the issue
 */
function disableInclusivityHelp(spaceId) {
  var issue = JSON.parse(appProperties.getProperty(spaceId));
  issue.inclusivityHelp = false;
  appProperties.setProperty(spaceId, JSON.stringify(issue));
}
/**
 * Checks whether the app should help with inclusivity in a given space.
 *
 * @param {string} spaceId the ID of dedicated space of the issue
 * @return whether the app should help with inclusivity
 */
function shouldHelpWithInclusivity(spaceId) {
  return JSON.parse(appProperties.getProperty(spaceId)).inclusivityHelp;
}
WorkspaceEvent.js
// Edits the function to display the accessory widget to the existing card message.

function processSubscription() {
  ...
  for (var messageIndex in messages) {
    ...
    } else if (ceType === "google.workspace.chat.message.v1.created") {
      ...
      if (... && shouldHelpWithInclusivity(chatMessage.space.name)) {
        createAppMessageUsingChatService({
          ...
          accessoryWidgets: [{ buttonList: { buttons: [{
            altText: "Disable inclusivity help",
            icon: {
              iconUrl: "https://upload.wikimedia.org/.../Stop_hand_rugen.png"
            },
            onClick: { action: {
              function: "disableInclusivityHelp",
              parameters: [{
                key: "spaceId",
                value: chatMessage.space.name
              }]
            }}
          }]}}]
        }, ...);
        ...
      }
      ...
    }
    ...
  }
  ...
}
更新 Apps 脚本项目
在本地环境中,按以下步骤操作:
- 将终端中的当前目录更改为
issue-management/5-disable-help,其中包含您需要的源代码。 - 将
issue-management/4-inclusivity-help/.clasp.json文件复制到当前目录。 - 将
issue-management/4-inclusivity-help/Configuration.js文件复制到当前目录,以替换现有文件。 - 运行以下命令:
clasp push
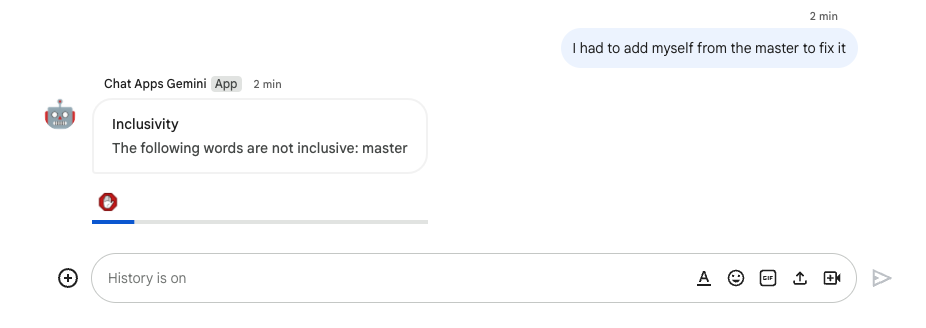
试试看
停用帮助
- 在您使用斜杠命令
/create创建的第四个问题的专用聊天室中,您可以在 Google Chat 中发送消息I had to add myself from the master to fix。
在 Apps 脚本控制台中,按以下步骤操作:
- 选择您的项目。
- 选择编辑器。
- 选择
WorkspaceEvent.gs文件。 - 在运行部分中选择
processSubscription。 - 点击运行。您可以从执行日志中看到消息已被处理。
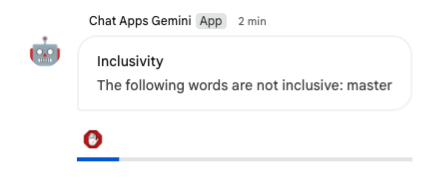
在 Google Chat 中,按以下步骤操作:
- 请注意,该应用使用配件 widget 向此问题的专用聊天室发送了包含包容性帮助的消息。
- 点击配件 widget 以停用包容性帮助。
检查停用情况
- 在您使用斜杠命令
/create创建的第四个问题的专用聊天室中,您可以在 Google Chat 中发送消息I had to add myself from the master to fix。
在 Apps 脚本控制台中,按以下步骤操作:
- 选择您的项目。
- 选择编辑器。
- 选择
WorkspaceEvent.gs文件。 - 在运行部分中选择
processSubscription。 - 点击运行。您可以从执行日志中看到消息已被处理。在 Google Chat 中,该应用未向该问题的专用聊天室发送具有包容性帮助的消息,因为该聊天室已停用。
8. 应用 2:构建
查看概念
生成式 AI 依据
是指通过将 AI 模型和可验证的知识来源联系起来,使其更加真实可靠。这项技术有助于防止 AI 编造信息,并且有助于使回答更贴合上下文,不易于产生偏见。
自然语言
与人工或计算机语言相比,人类为日常交流而使用的任一口头或书面语言。
Cloud Storage
使用 Cloud Storage,您可以在全球范围内随时存储和检索任意数量的数据。它可用于多种场景,包括传送网站内容、存储数据以用于归档和灾难恢复,或者通过直接下载向用户分发大型数据对象。
Dialogflow CX 数据存储区
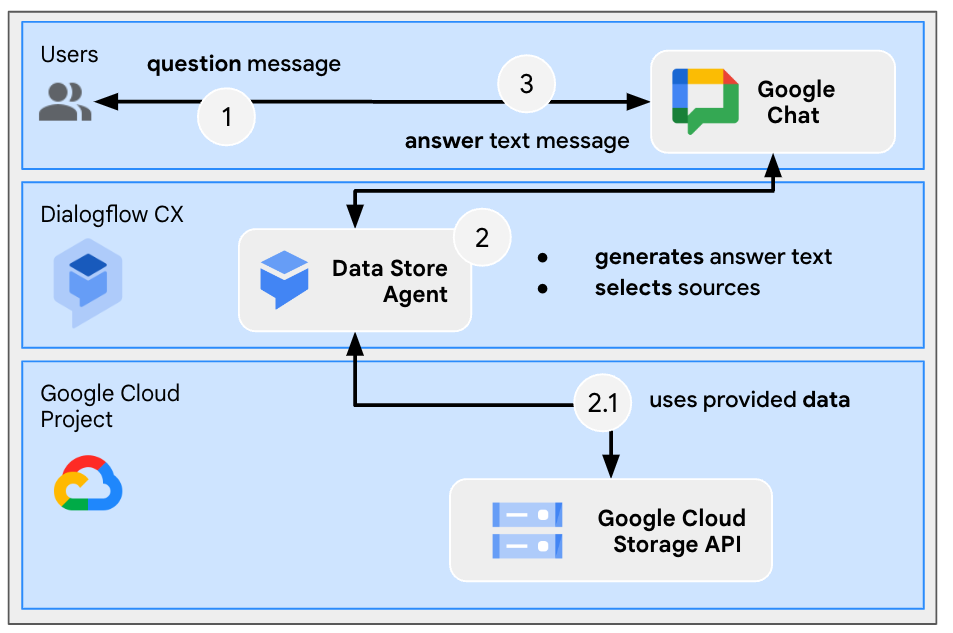
Dialogflow CX 与数据存储区相集成,数据存储区是网站和文档的集合,可供数据存储区代理从特定数据中查找最终用户问题的解答。对于给定的问题,数据存储区代理会搜索给定来源内容中的答案,并将结果汇总为连贯的回答。它还提供指向回答来源的支持链接,供最终用户了解详情。
查看架构
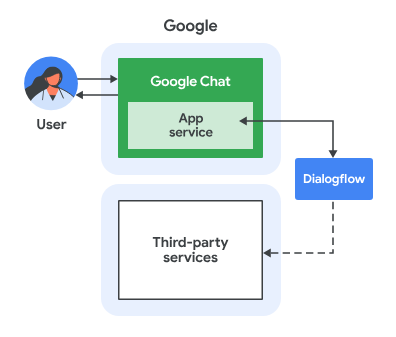
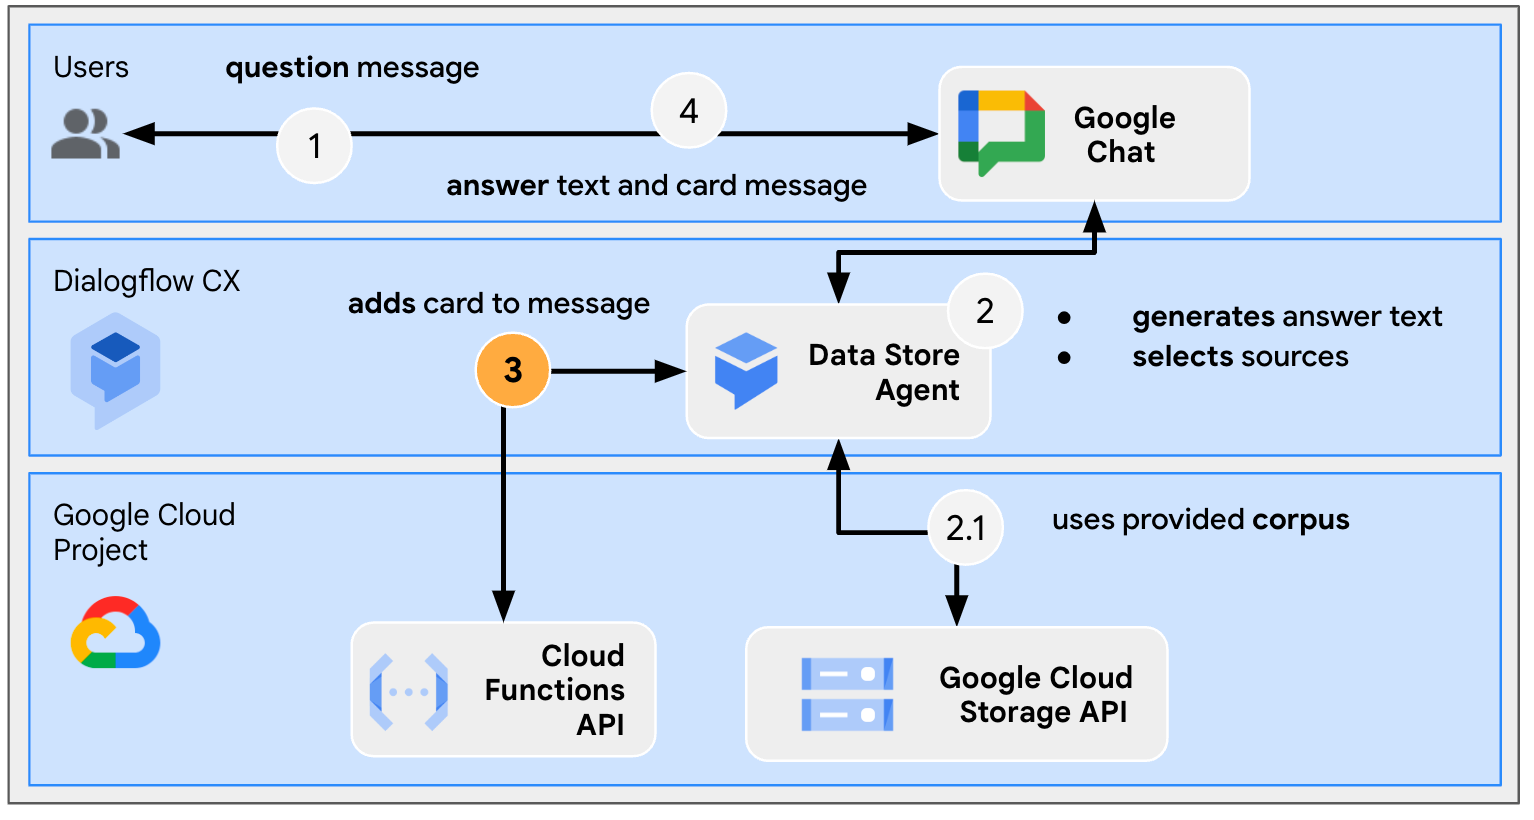
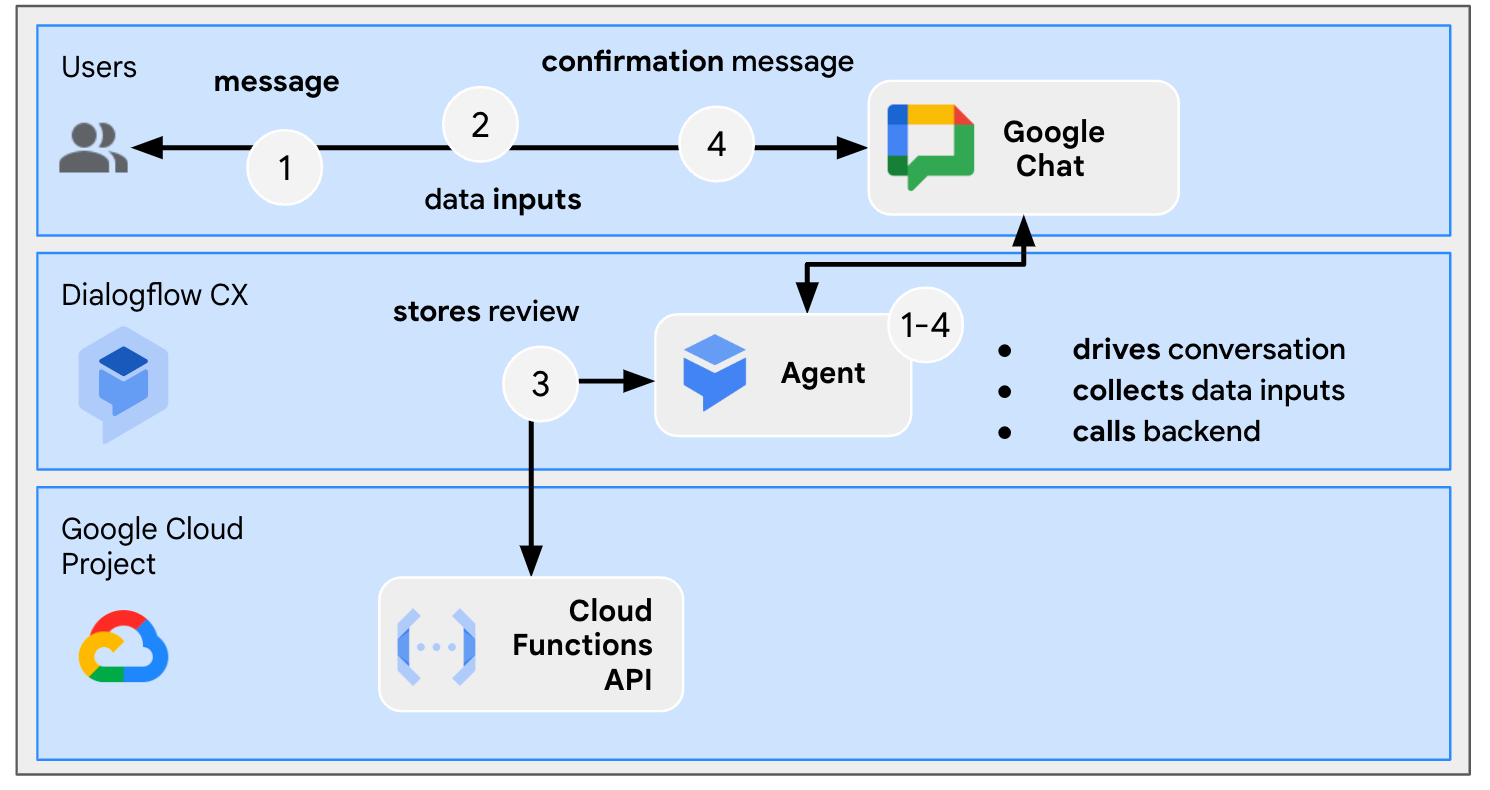
此 Google Chat 应用使用 Dialogflow CX 构建,其工作原理如下:
- 用户通过私信或聊天室向应用发送消息。
- 应用(Dialogflow CX 代理,与 Google Cloud 项目相关联)会处理消息。
- 应用与 Cloud Storage 中的数据存储区集成。
- 应用在私信或原始聊天室中发送同步响应。
查看流程
回答问题
查看源代码
您唯一需要的来源不是代码,而是用作依据的数据。
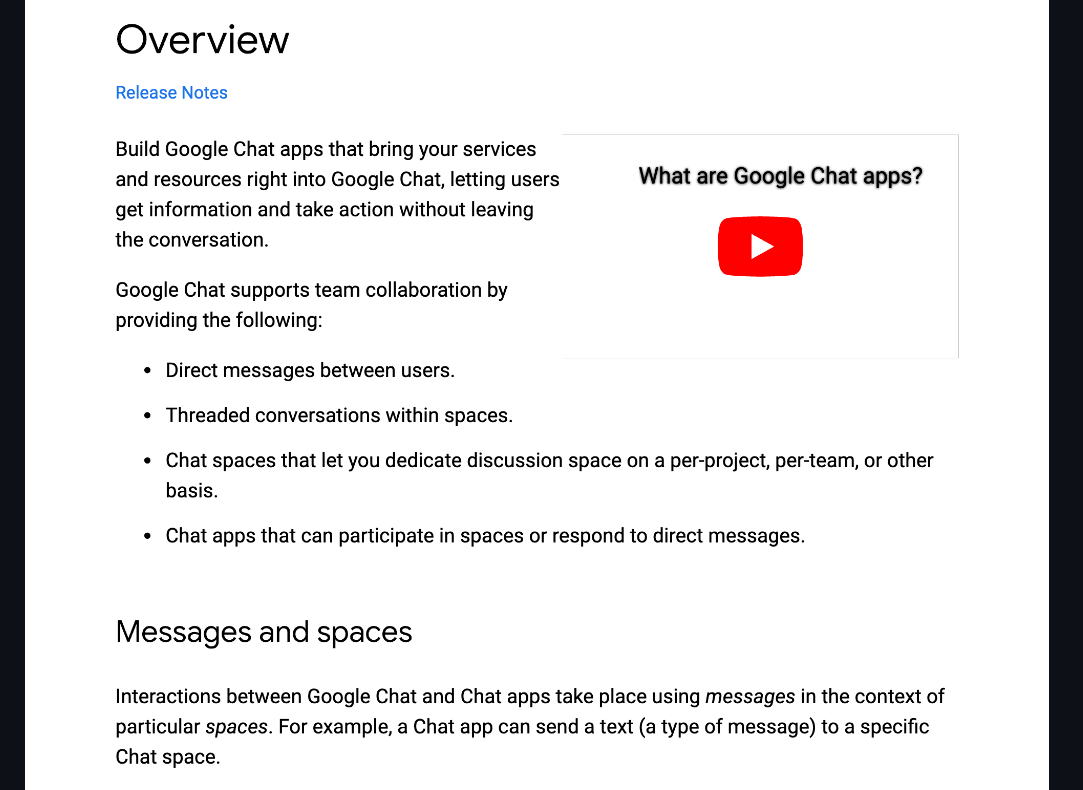
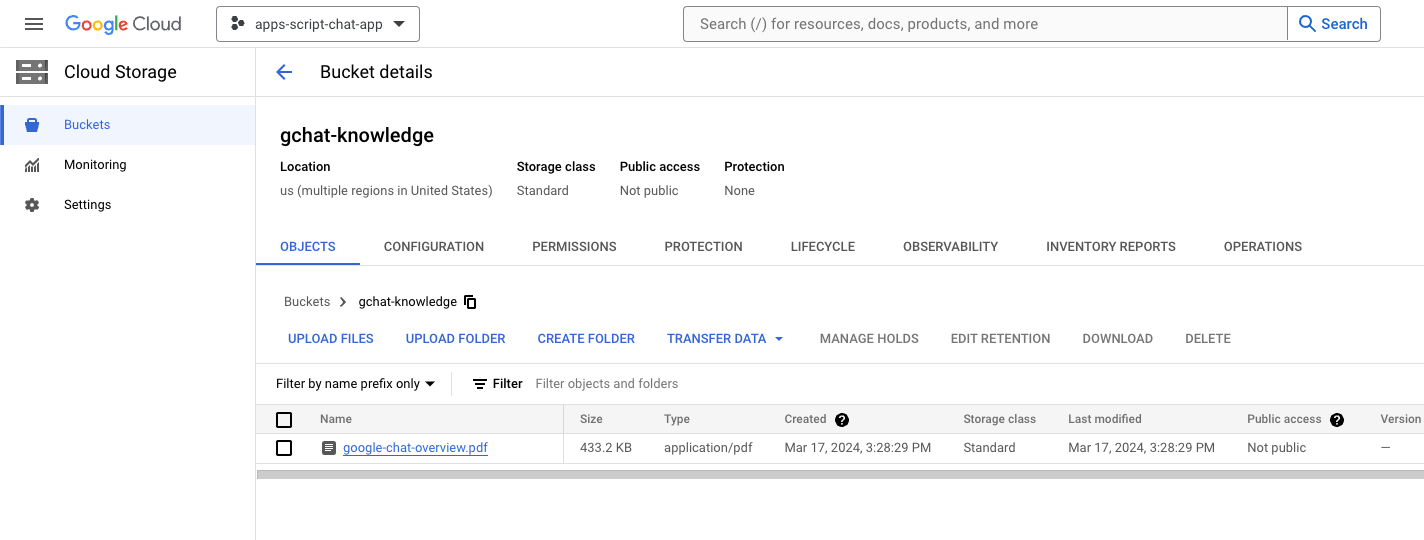
google-chat-overview.pdf
包含 Google Chat 应用的非结构化信息(Google Workspace 开发者网站网页的印刷版本)。
更新 Google Cloud 项目
在 Google Cloud 控制台中,按以下步骤操作:
- 启用 Dataflow API 和 Cloud Storage API。
- 启用 Vertex AI Agent Builder API。
- 依次点击菜单 ☰ > API 和服务 > 已启用的 API 和服务,然后确认所有 API 均已启用。
。
创建 Dialogflow CX 数据存储区代理
启动知识数据
在 Google Cloud 控制台中,按以下步骤操作:
- 依次点击菜单 ☰ > Cloud Storage > 存储桶。
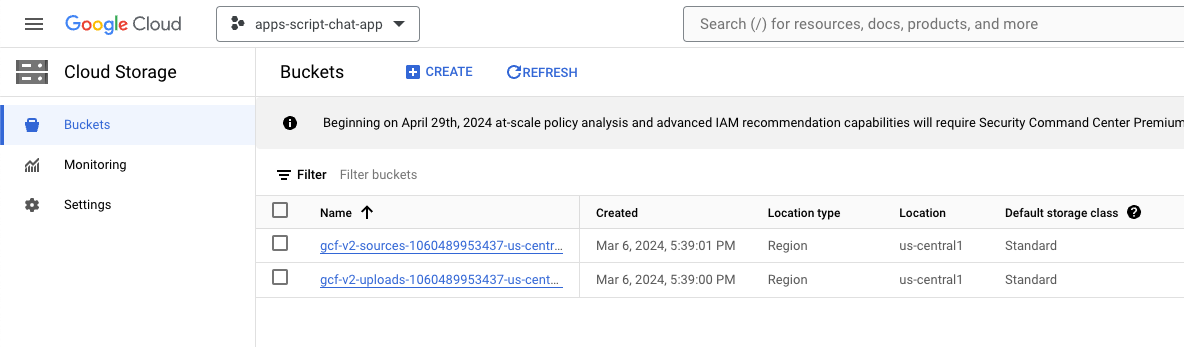
- 点击创建。
- 将名称设置为
gchat-knowledge。 - 点击创建。
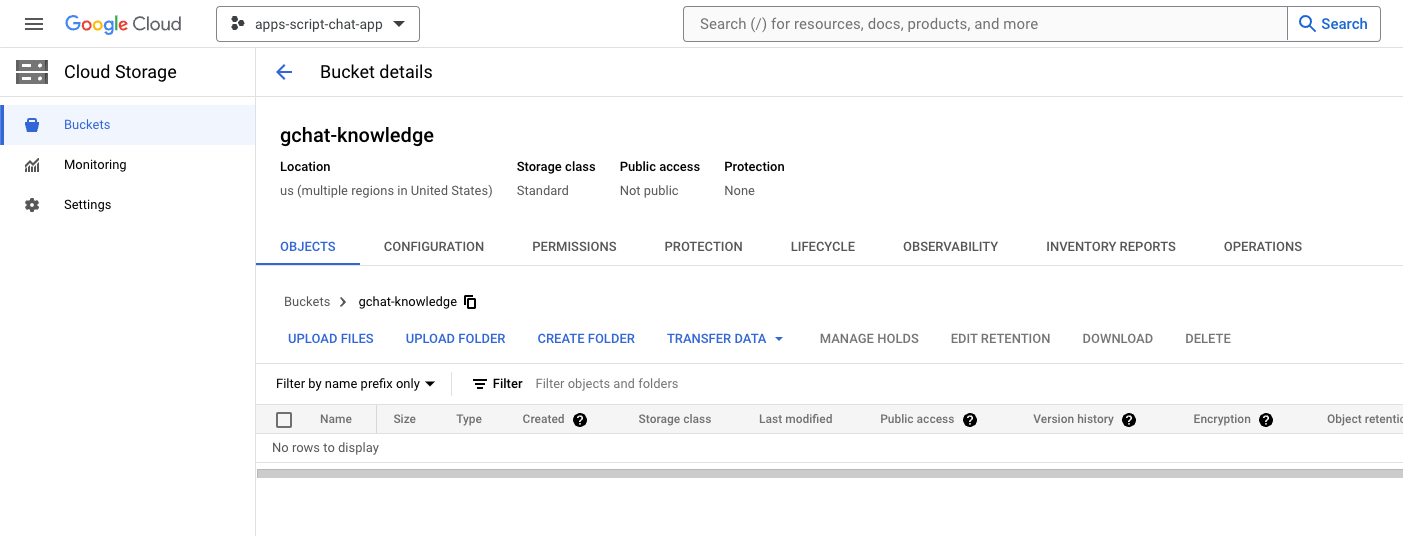
- 选择 gchat-Knowledge 存储桶。
- 点击上传文件。
- 从本地环境中选择
knowledge-app/grounding/google-chat-overview.pdf文件。
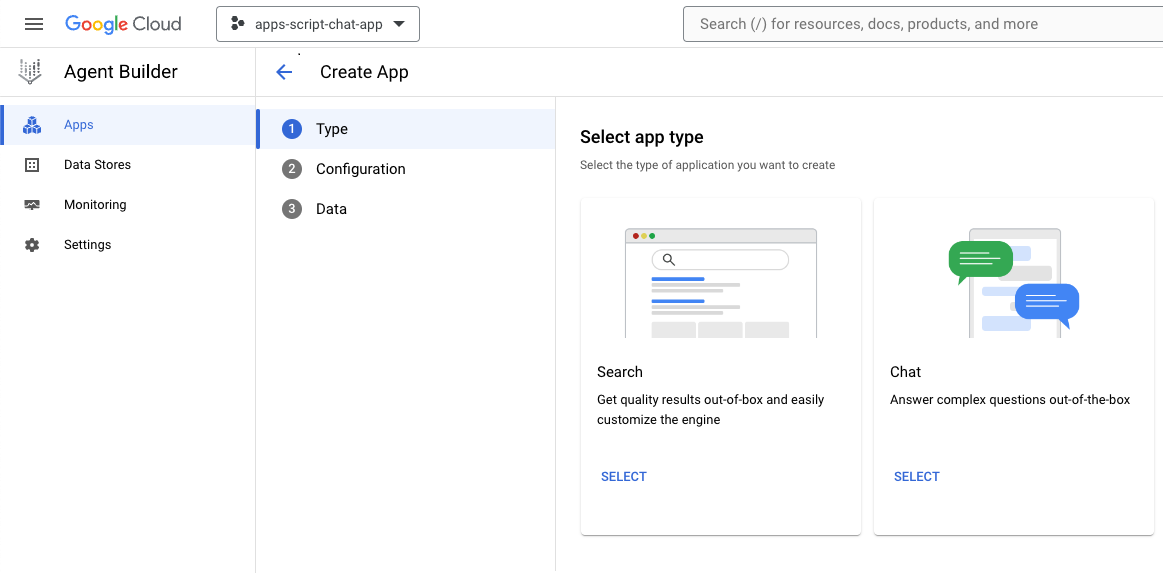
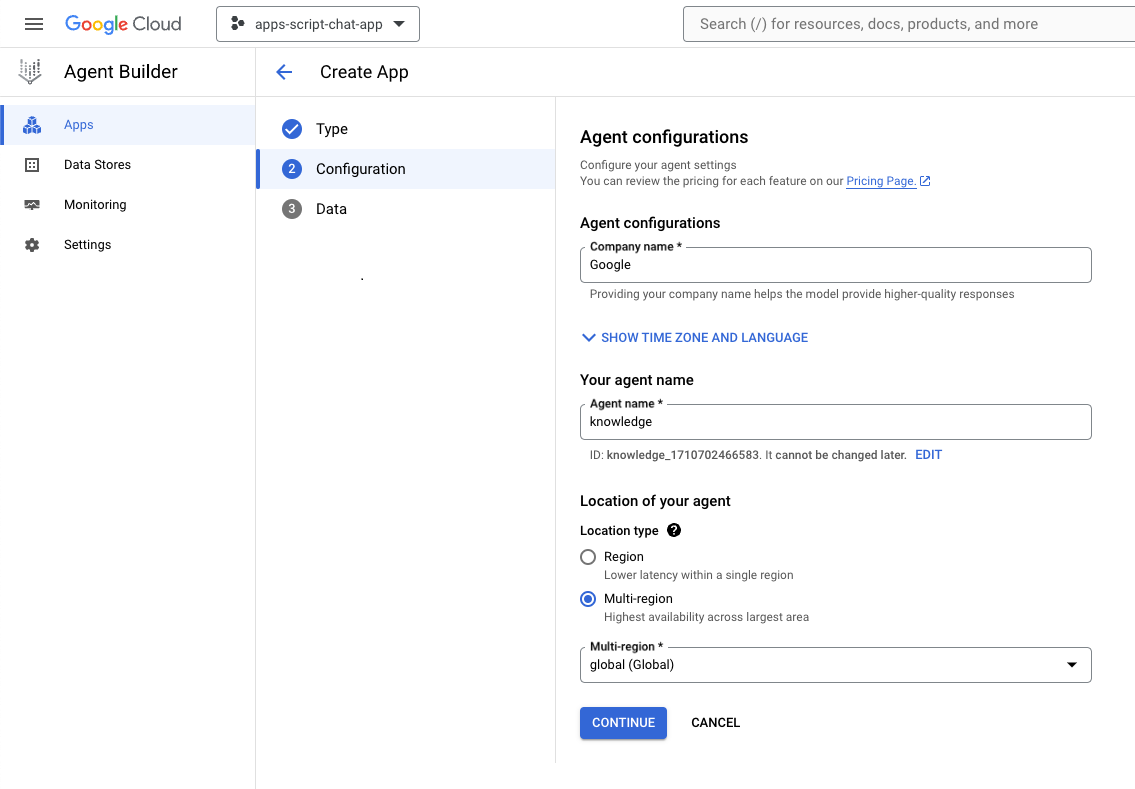
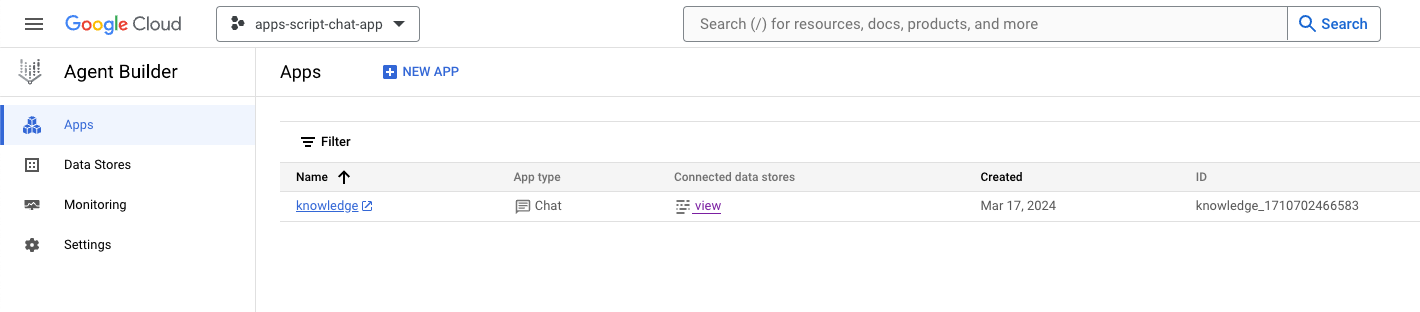
创建应用
在 Google Cloud 控制台中,按以下步骤操作:
- 点击“菜单”图标 ☰ >“代理构建器”>“应用”。
- 点击新建应用。
- 选择 Chat 类型。
- 将
Company name设为您的公司名称。 - 将
Agent name设为knowledge。 - 点击继续。
- 点击创建新的数据存储区。
- 选择 Cloud Storage 作为数据源。
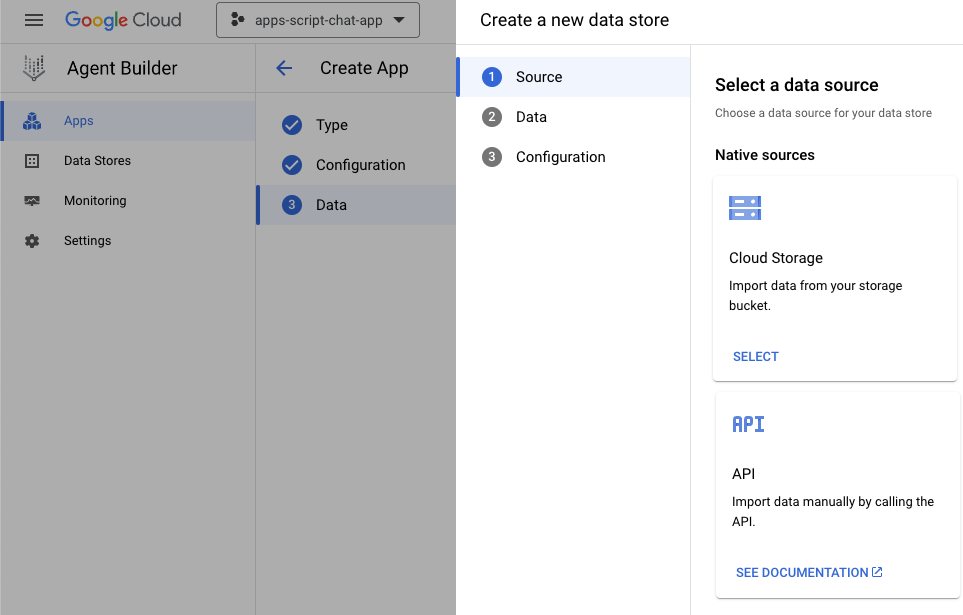
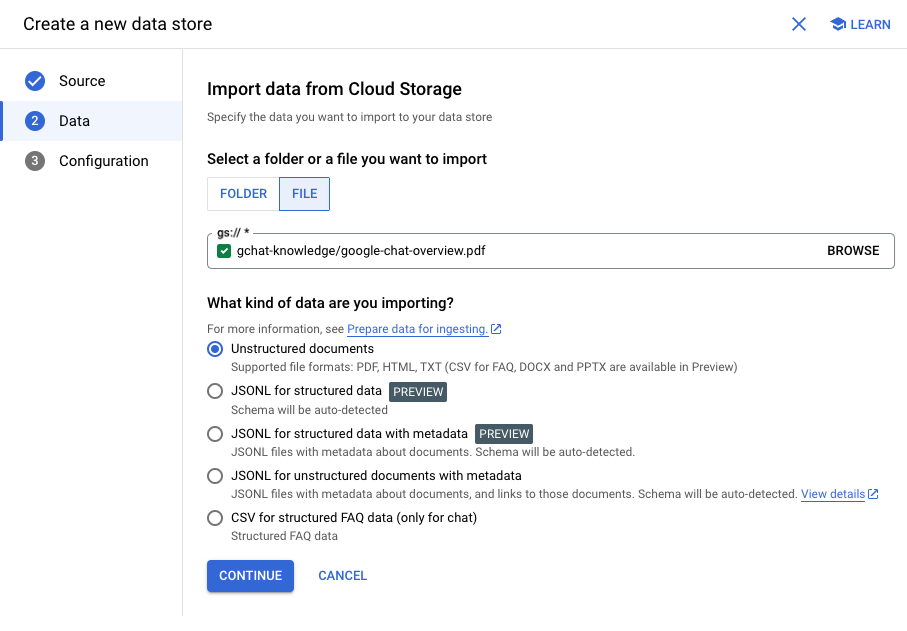
- 选择文件。
- 点击浏览。
- 选择
google-chat-overview.pdf文件。 - 点击继续。
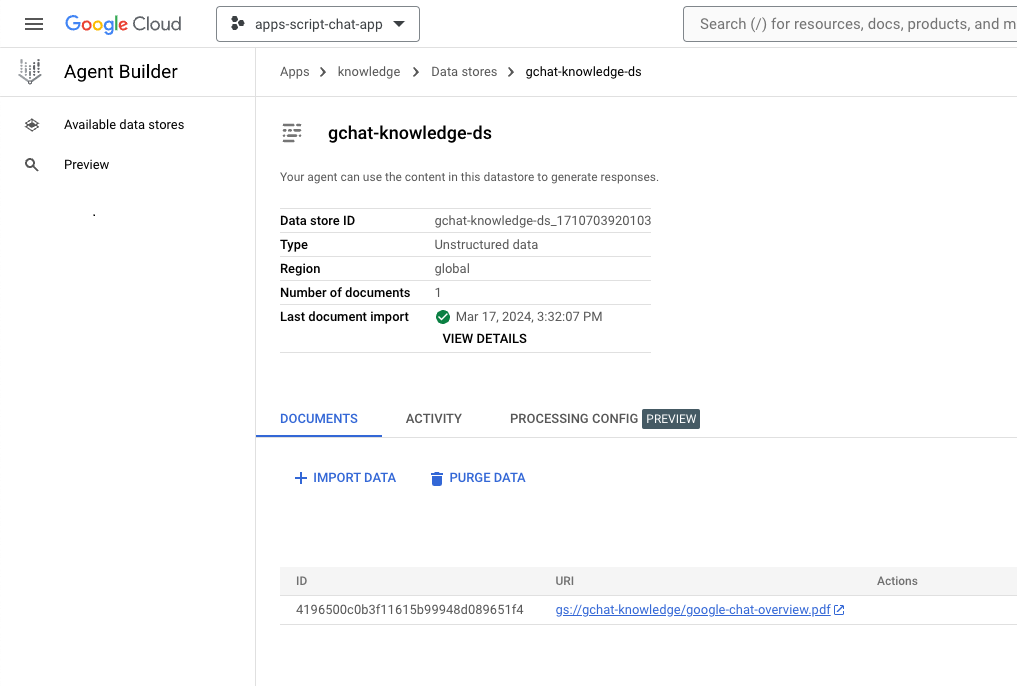
- 将数据存储区名称设置为
gchat-knowledge-ds。 - 点击创建。
- 选择表格中的 gchat-knowledge-ds 数据存储区。
- 点击创建。
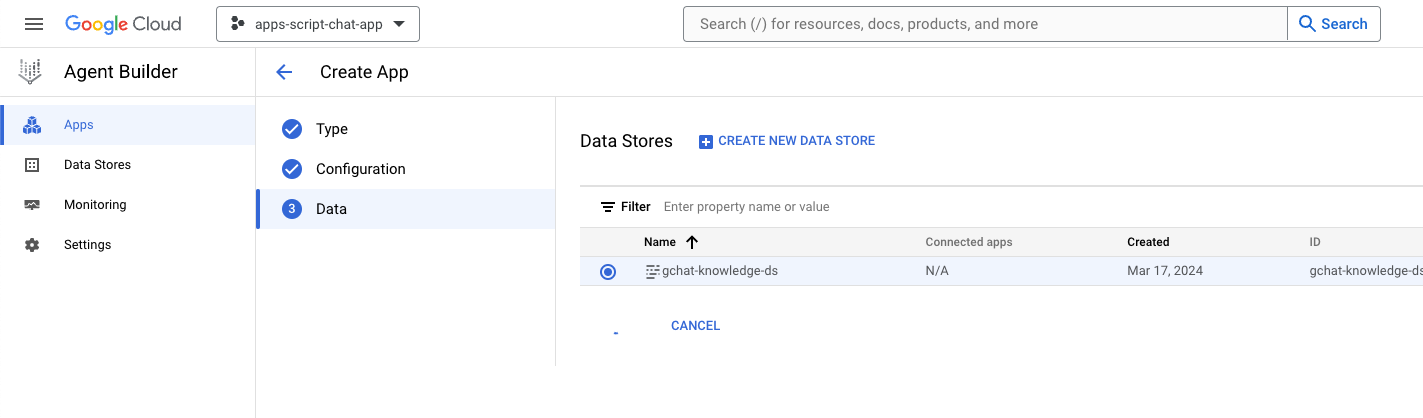
- 几分钟后,依次点击“菜单”图标 ☰ >“代理构建器”>“应用”,您会看到该应用。
- 依次点击“菜单”图标 ☰ >“代理构建器”>“数据存储区”。
- 点击 gchat-knowledge-ds 数据存储区。文档数量为
1,表示文档已准备就绪。
完成并测试应用
在 Dialogflow CX 控制台中,按以下步骤操作:
- 选择您的 Google Cloud 项目。
- 选择知识代理。
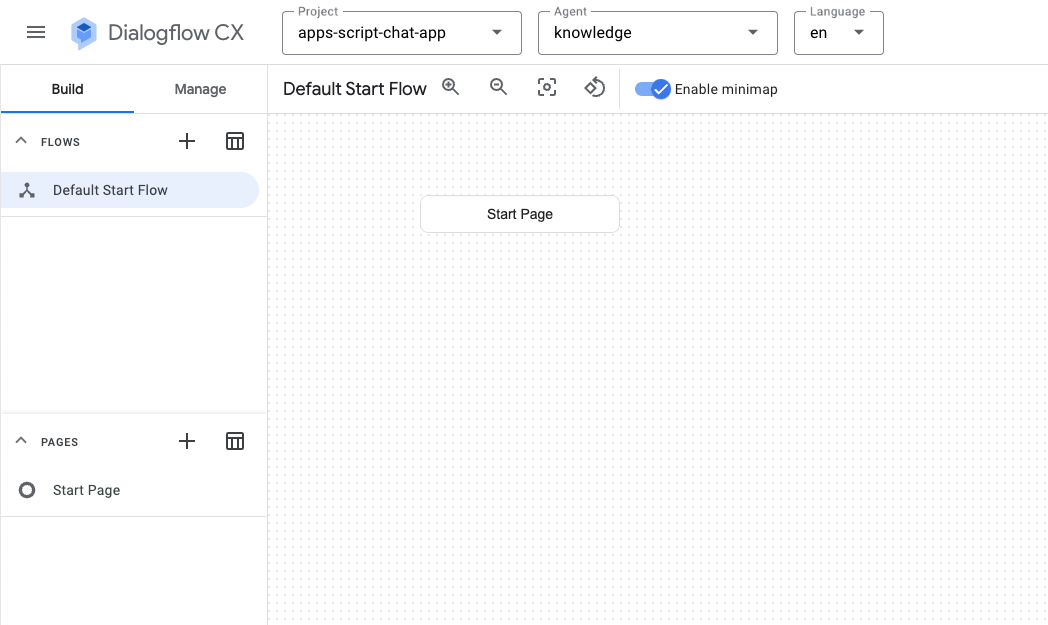
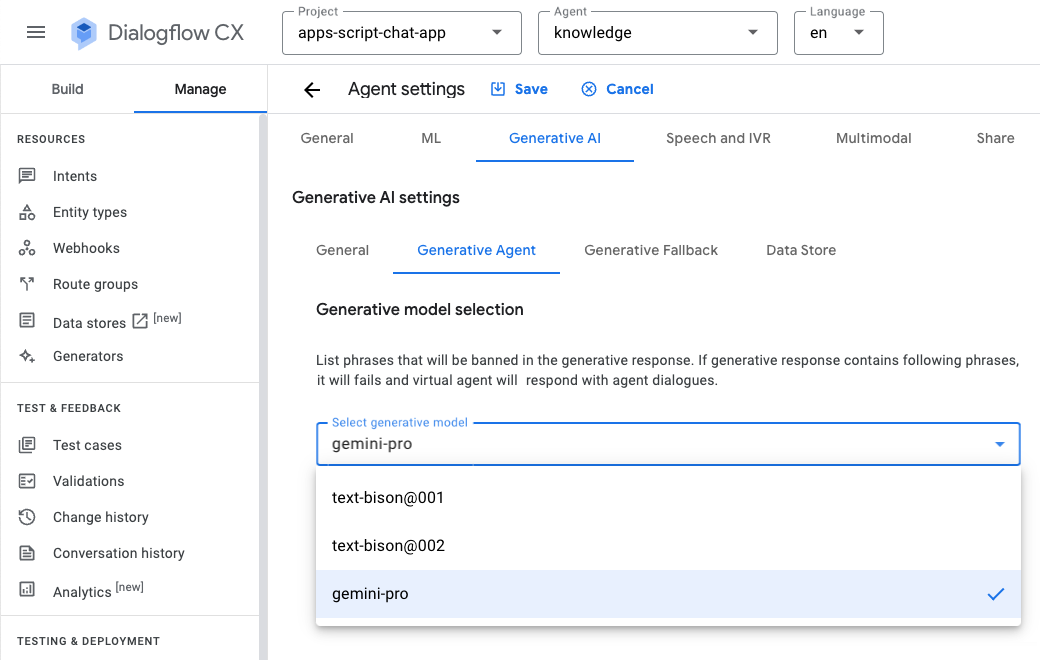
- 依次选择 Agent settings > 生成式 AI > Generative agent。
- 将模型从 Text Bison 切换为 Gemini Pro。
- 点击保存。
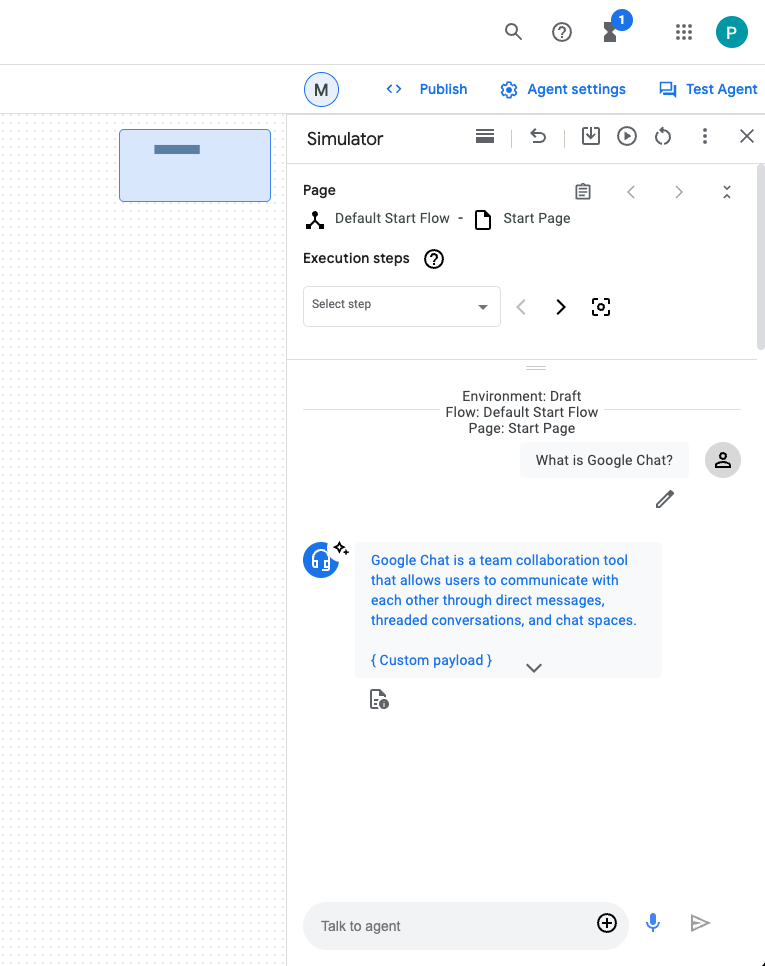
- 点击 Test agent。
- 发送
What is Google Chat?。代理做出有意义的响应。
集成 Google Chat 应用
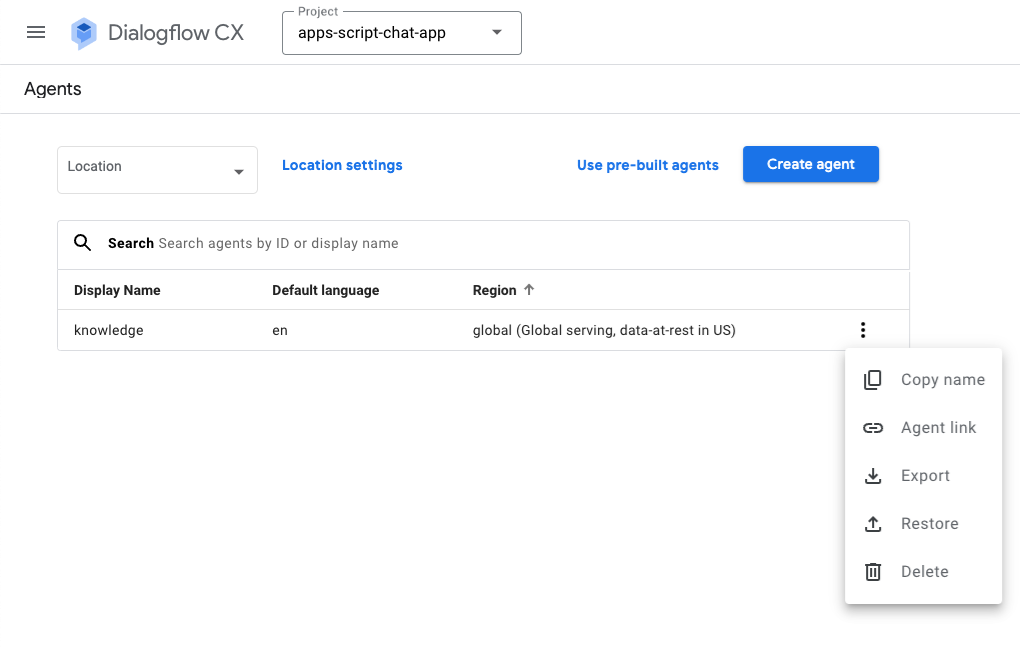
在 Dialogflow CX 控制台中,按以下步骤操作:
- 选择您的 Google Cloud 项目。
- 在知识代理所在行中,依次点击
 > Copy name。
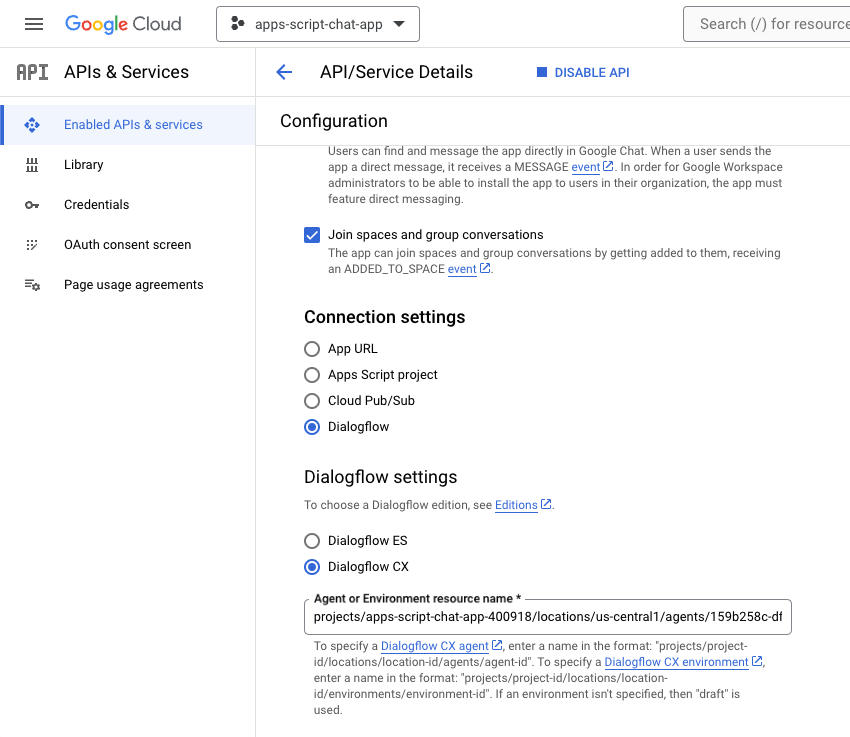
在 Google Cloud 控制台中,按以下步骤操作:
- 前往 Google Chat API 配置。
- 在连接设置下,选择 Dialogflow。
- 在 Dialogflow 设置下,选择 Dialogflow CX。
- 将代理或环境资源名称设置为您复制的代理名称。
- 移除两个斜杠命令。

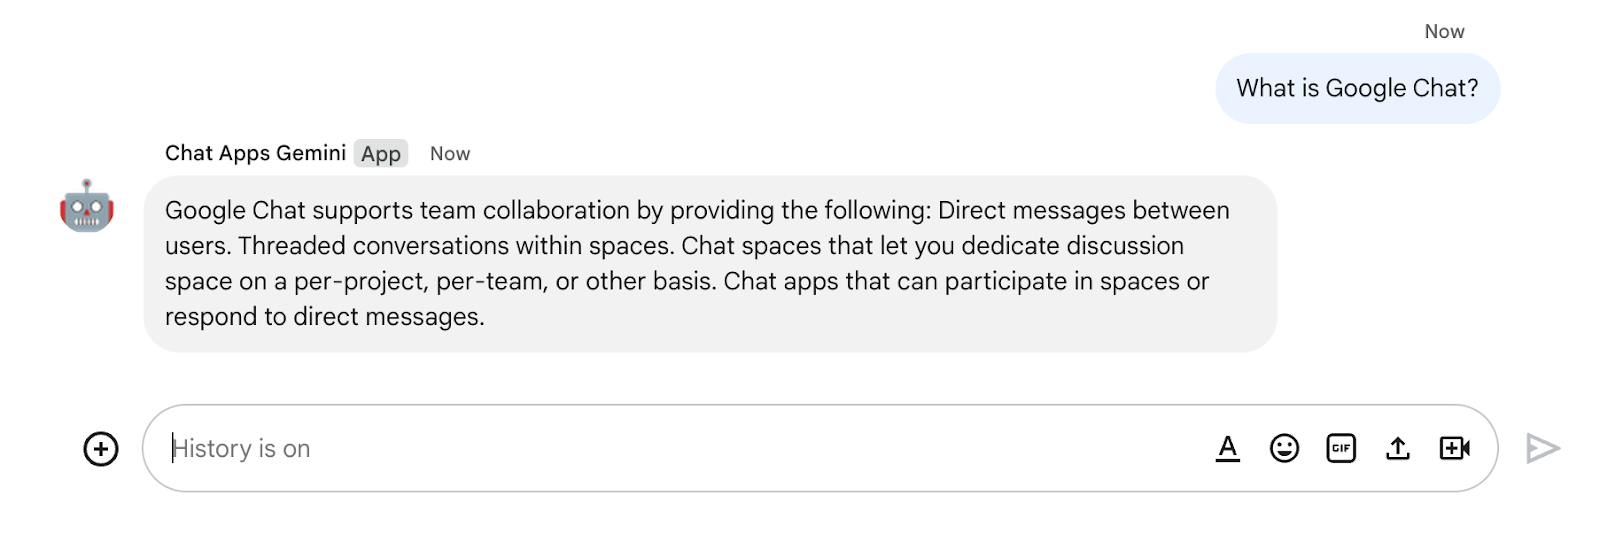
- 在 Google Chat 中,通过私信向 Google Chat 应用发送
What is Google Chat?。代理会做出有意义的响应。
9. 可选:应用 2:添加来源
查看概念
Dialogflow CX 网络钩子
托管业务逻辑或调用其他服务的服务。在 Dialogflow CX 会话期间,网络钩子可以依赖自然语言处理提取的数据来生成动态响应、验证收集的数据或在后端触发操作。
Cloud Functions
Cloud Functions 非常适合构建无服务器后端、执行实时数据处理和创建智能应用。无需配置、管理、修补或更新服务器。它们可以自动扩缩,并且具备高可用性和容错性。
查看流程
回答问题(更新)
查看源代码
您所需的唯一源代码是使代理响应适应 Google Chat 消息的函数。它用作网络钩子。
package.json
// The function relies on the Cloud Functions framework to run.

{
  "name": "agent-response-adapter",
  "version": "0.0.1",
  "dependencies": {
    "@google-cloud/functions-framework": "^3.0.0"
  },
  ...
}
index.js
/**
 * Handles all incoming requests.
 *
 * It takes a Dialogflow CX agent response as input and returns a
 * valid Google Chat card message with both the text and source links
 */
functions.http('agent-response-adapter', (request, response) => {
  // Creates Google Chat buttons based on the data store agent response
  // grounding details.
  var linkTitles = [];
  var linkButtons = [];
  const grounding = request.body.messages[1].payload.richContent[0][0];
  if (grounding.type === "match_citations") {
    // Supports citation match type.
    grounding.citations.forEach((citation) => {
      // Avoid duplications.
      if (linkTitles.indexOf(citation.title) < 0) {
        linkButtons.push({
          text: citation.title,
          onClick: { openLink: {
            url: citation.actionLink
          }}
        });
        linkTitles.push(citation.title);
      }
    });
  } else if (grounding.type === "info") {
    // Supports info type.
    if (linkTitles.indexOf(grounding.title) < 0) {
      linkButtons.push({
        text: grounding.title,
        onClick: { openLink: {
          url: grounding.actionLink
        }}
      });
      linkTitles.push(grounding.title);
    }
  }

  // Sends the Dialogflow CX fulfillment response to replace the agent response
  // with the Chat message with text and source buttons.
  response.send({ fulfillment_response: {
    merge_behavior: "REPLACE",
    messages: [{ payload: {
      // Reuses the original data store agent response text.
      text: request.body.messages[0].text.text[0],
      cardsV2: [{
        cardId: "sourcesCard",
        card: { sections: [{
          header: "Sources",
          widgets: [{ buttonList: {
            buttons: linkButtons
          }}]
        }]}
      }]
    }}]
  }});
});
更新 Google Cloud 项目
在 Google Cloud 控制台中,按以下步骤操作:
- 启用 Cloud Build API、Cloud Functions API、Cloud Logging API、Artifact Registry API 和 Cloud Run API。
- 依次点击菜单 ☰ > API 和服务 > 已启用的 API 和服务,然后确认这些 API 已启用。
更新 Dialogflow CX 数据存储区代理
您需要部署一个 Cloud Functions 函数并更新 Dialogflow CX 网络钩子,以尽可能使用多个来源触发该函数。
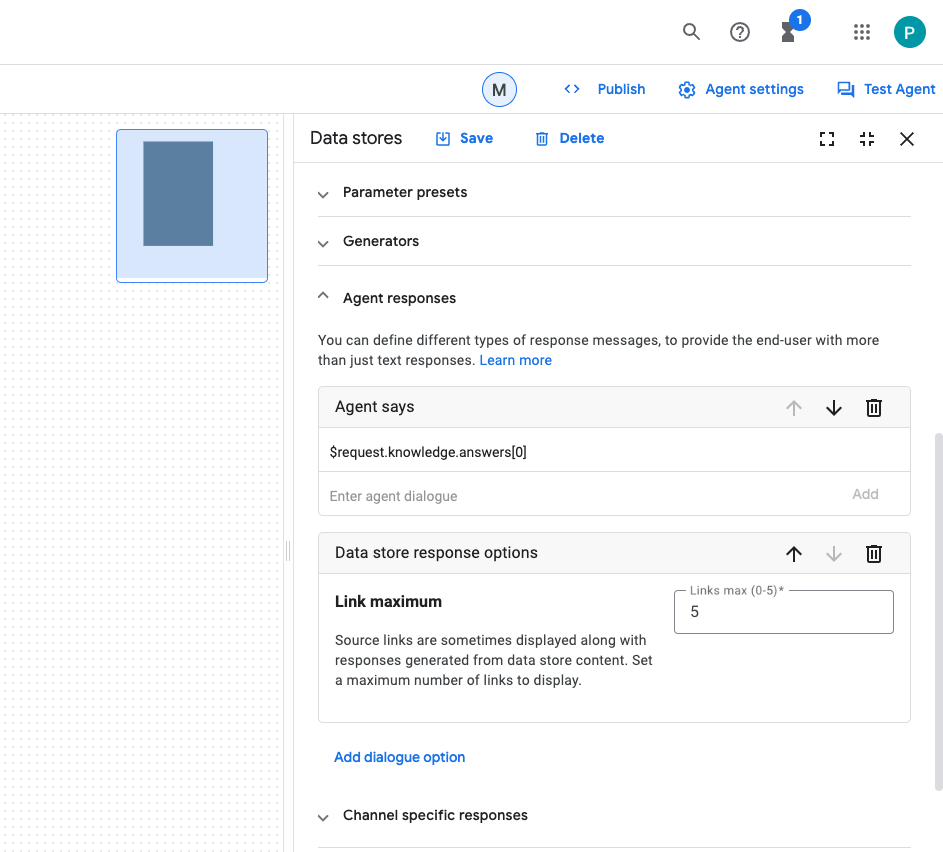
返回多个来源
默认情况下,新的数据存储区代理最多仅返回一个来源,但您可以更改为返回更多来源。
在 Dialogflow CX 控制台中,按以下步骤操作:
- 选择您的 Google Cloud 项目。
- 选择知识代理。
- 选择初始页。
- 选择 Edit data stores。
- 在 Agent responses section 下,将 Data store response options 设置为
5。 - 点击保存。
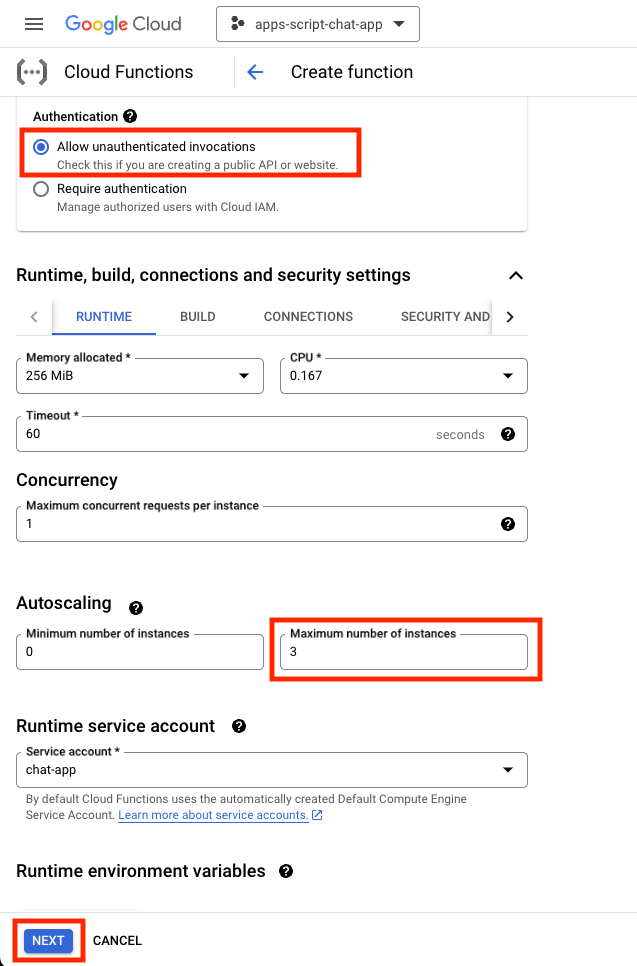
启动 Cloud Functions 函数
在 Google Cloud 控制台中,按以下步骤操作:
- 依次点击菜单 ☰ > Cloud Functions。
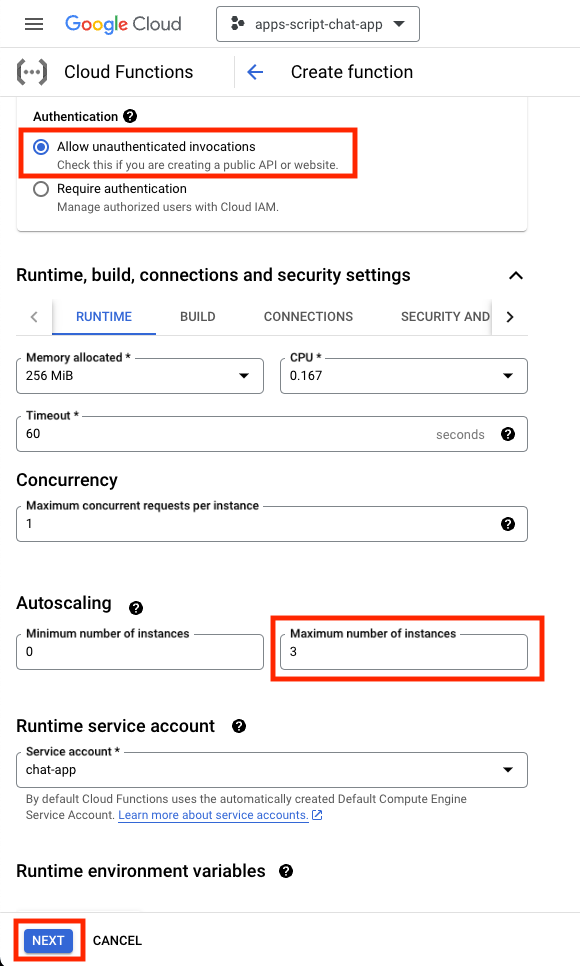
- 点击创建函数。
- 在基本信息下,将名称设置为
function-1。 - 在身份验证下,选择允许未通过身份验证的调用单选按钮。
- 在 Runtime, build, connections and security settings 下,将实例数上限设置为
3。 - 点击下一步。
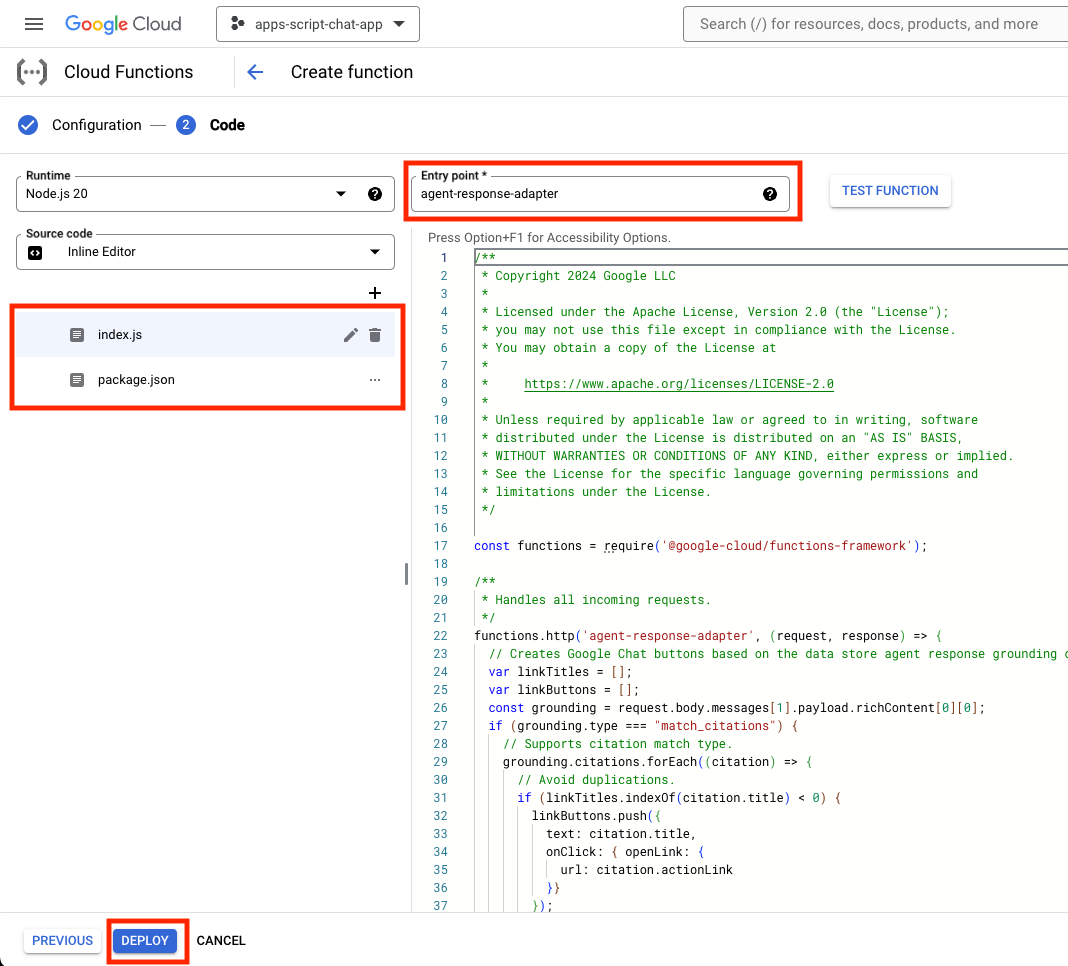
- 将入口点设置为
agent-response-adapter。 - 将默认内容替换为位于
knowledge-app/agent-response-adapter目录中的文件。 - 点击部署。
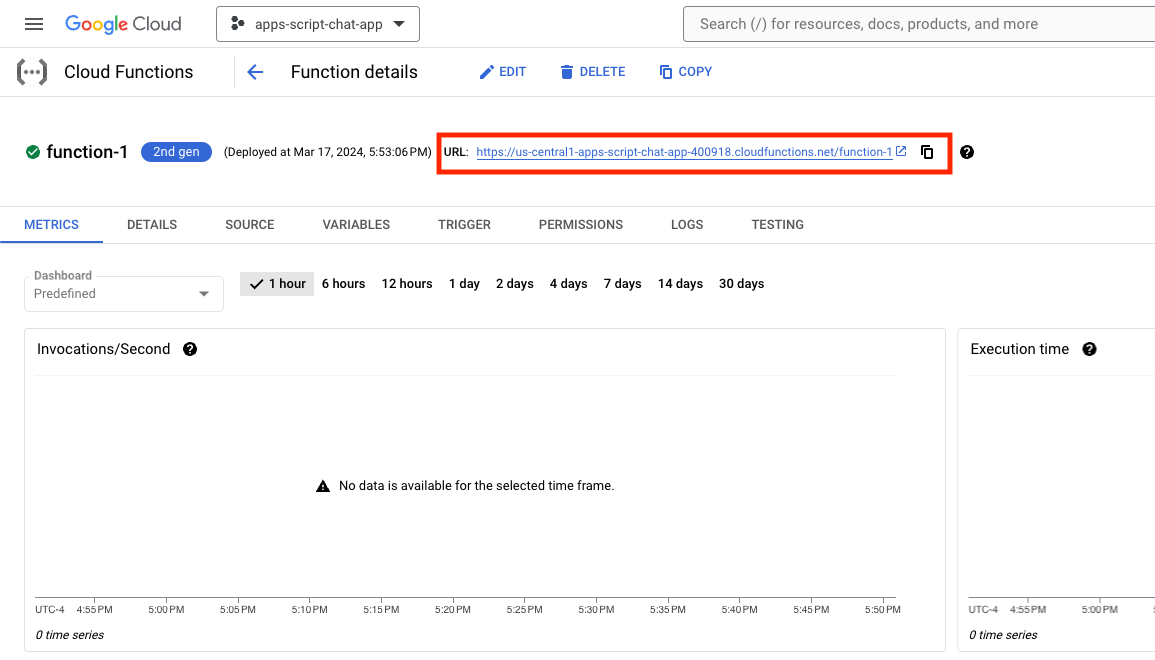
- 在等待部署函数的几分钟时间内复制该网址。
启动网络钩子
您需要配置 Dialogflow CX 代理,以使用触发新部署函数的网络钩子。
在 Dialogflow CX 控制台中,按以下步骤操作:
- 选择您的 Google Cloud 项目。
- 选择知识代理。
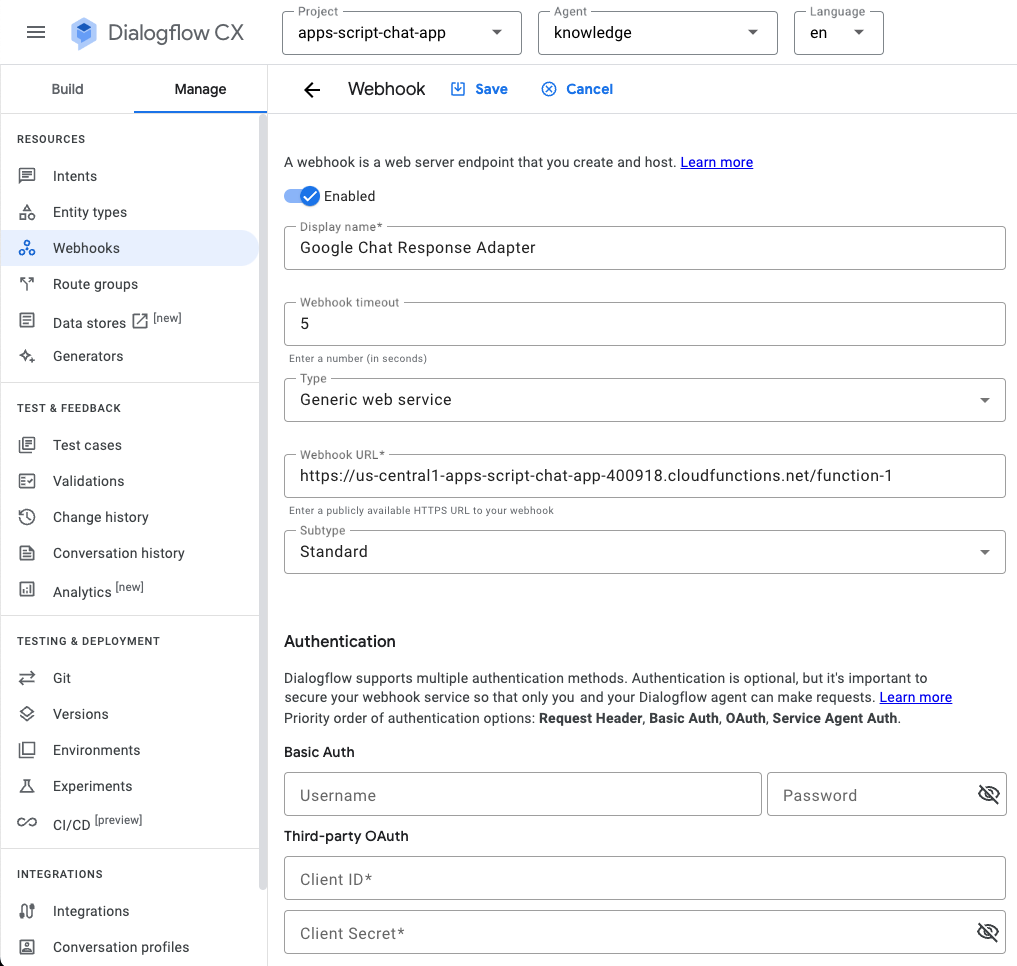
- 依次选择管理 > 网络钩子 > 创建。
- 将显示名称设置为
Google Chat Response Adapter。 - 将网络钩子网址设置为您之前复制的网址。
- 点击保存。
- 点击构建。
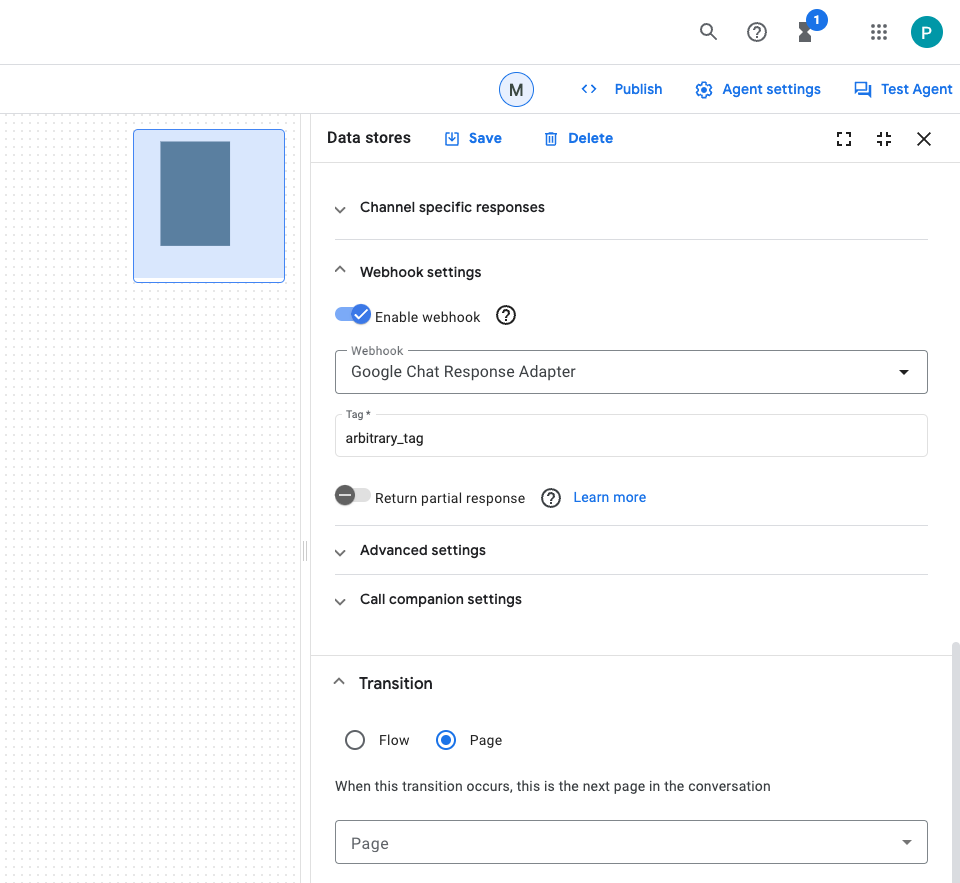
- 选择初始页。
- 选择 Edit data stores。
- 在 Webhook settings 下,点击 Enable webhook 切换开关。
- 选择 Google Chat Response Adapter for Webhook。
- 将标记设置为
arbitrary_tag。 - 点击保存。
测试应用
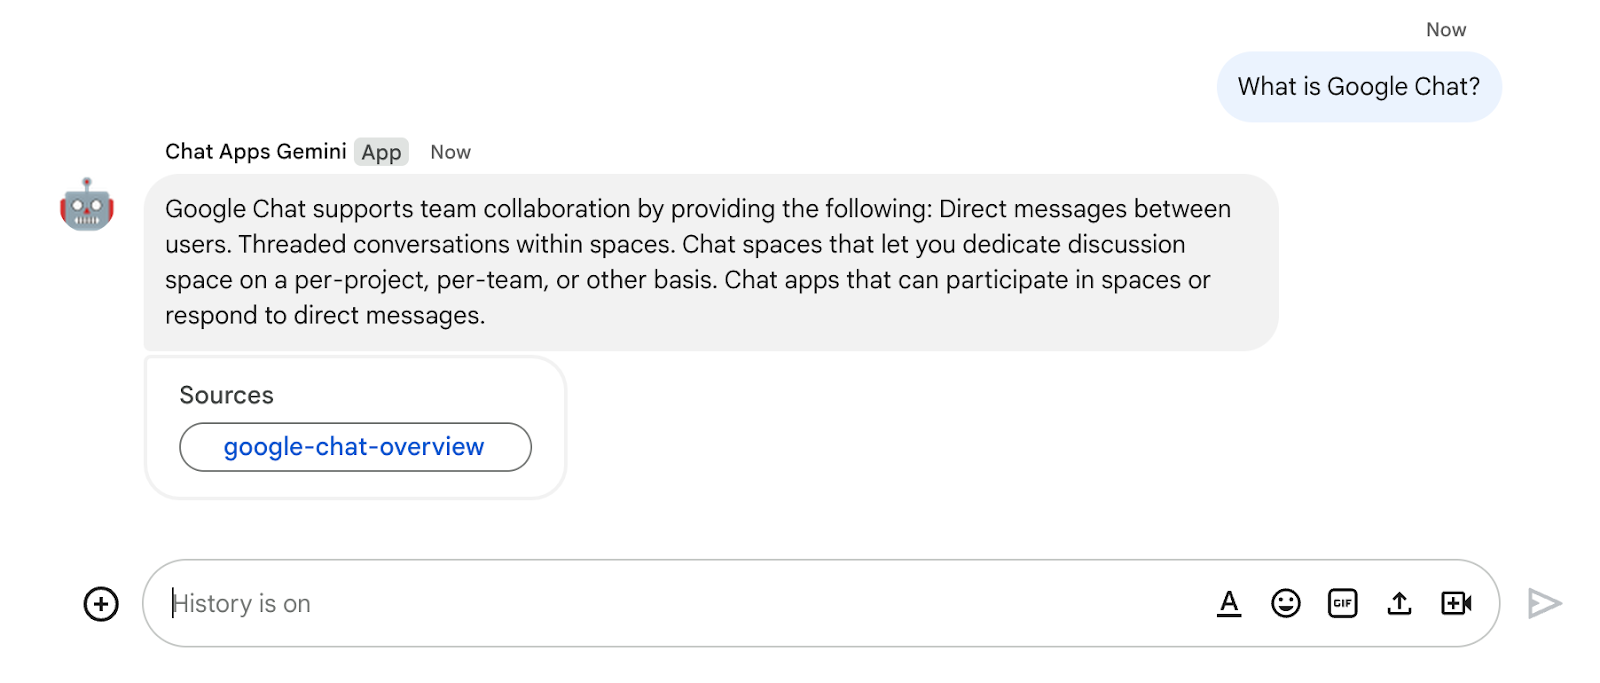
- 在 Google Chat 中,通过私信向 Google Chat 应用发送
What is Google Chat?。代理会做出有意义的响应,包含一个带有来源的卡片(如果有)。
10. 应用 3:构建
查看概念
对话式互动
即两人或多人通过自然语言来回交换信息或想法。这与通常依赖于无状态、高度结构化和不容忍交换的技术接口形成鲜明对比。
OpenAPI 规范
它提供了一种在 API 生命周期各个阶段传递信息的一致方式。它是 HTTP API 的规范语言,其定义结构和语法的方式与创建 API 时使用的编程语言无关。API 规范通常用 YAML 或 JSON 编写,便于轻松共享和使用规范。
Dialogflow CX 代理
代理应用的基本构建块。代理应用通常有多个代理,其中每个代理都定义为用来处理特定任务。代理数据被提供给 LLM,以便 LLM 获得回答问题和执行任务所需的信息。每个代理都可以提供信息、向外部服务发送查询或将对话处理推迟到 Dialogflow CX 流或其他代理来处理子任务。
Dialogflow CX 工具
工具用于将代理应用连接到外部系统。这些系统可以增强代理应用的知识,使其能够高效地执行复杂任务。
查看架构
此 Google Chat 应用使用 Dialogflow CX 构建,其工作原理如下:
- 用户通过私信或聊天室向应用发送消息。
- 应用(Dialogflow CX 代理,与 Google Cloud 项目相关联)会处理消息。
- 应用与代理集成。
- 应用在私信或原始聊天室中发送同步响应。
查看流程
收集评价
查看源代码
您需要的唯一源代码是用于模拟代理用作工具的后端服务的函数。
package.json
// The function relies on the Cloud Functions framework to run.

{
  "name": "feedback-app-backend",
  "version": "0.0.1",
  "dependencies": {
    "@google-cloud/functions-framework": "^3.0.0"
  },
  ...
}
index.js
/**
 * Handles all incoming requests.
 *
 * It always returns OK in plain text.
 */
functions.http('feedback-app-backend', (request, response) => {
    response.send('OK');
});
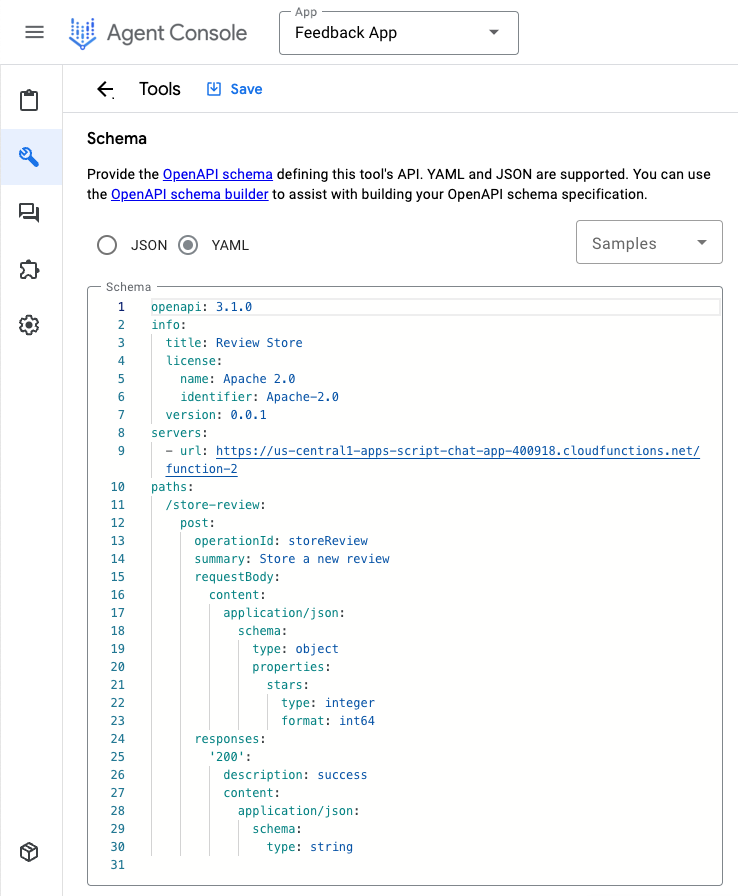
service-openapi.yaml
// Defines the backend service structure and how to request it.

openapi: 3.1.0
info:
  title: Review Store
  license:
    name: Apache 2.0
    identifier: Apache-2.0
  version: 0.0.1
servers:
  - url: https://us-central1-project-0.cloudfunctions.net
paths:
  /store-review:
    post:
      operationId: storeReview
      summary: Store a new review
      requestBody:
        content:
          application/json:
            schema:
              type: object
              properties:
                stars:
                  type: integer
                  format: int64
      responses:
        '200':
          description: success
          content:
            application/json:
              schema:
                type: string
启动后端服务模拟
您需要部署一个 Cloud Functions 函数来模拟后端服务,Dialogflow CX 代理应用需要集成和调用该后端服务作为工具。
在 Google Cloud 控制台中,按以下步骤操作:
- 依次点击菜单 ☰ > Cloud Functions。
- 点击创建函数。
- 在基本信息下,将名称设置为
function-2。 - 在身份验证下,选择允许未通过身份验证的调用单选按钮。
- 在 Runtime, build, connections and security settings 下,将实例数上限设置为
3。 - 点击下一步。
- 将入口点设置为
feedback-app-backend。 - 将默认内容替换为位于
feedback-app目录中的文件。 - 点击部署。
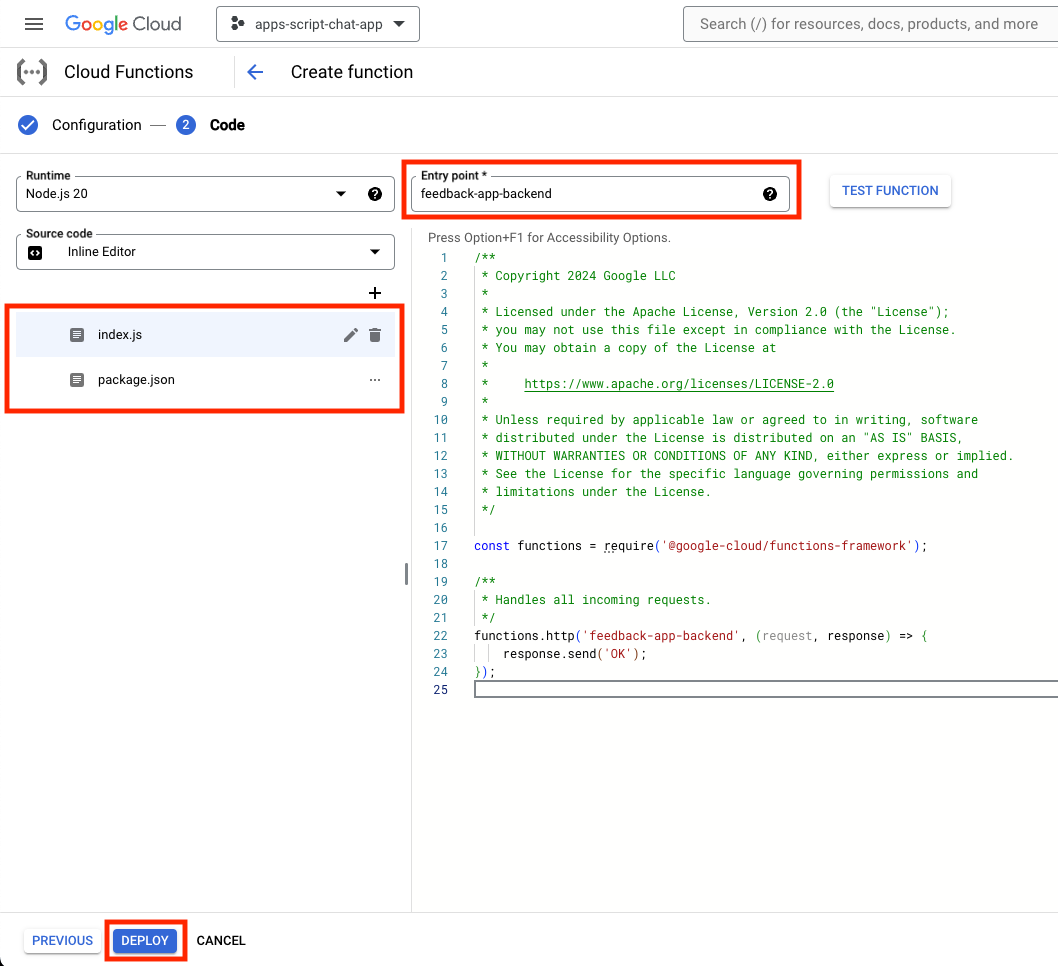
- 在等待部署函数的几分钟时间内复制该网址。
创建 Dialogflow CX 代理应用
创建应用
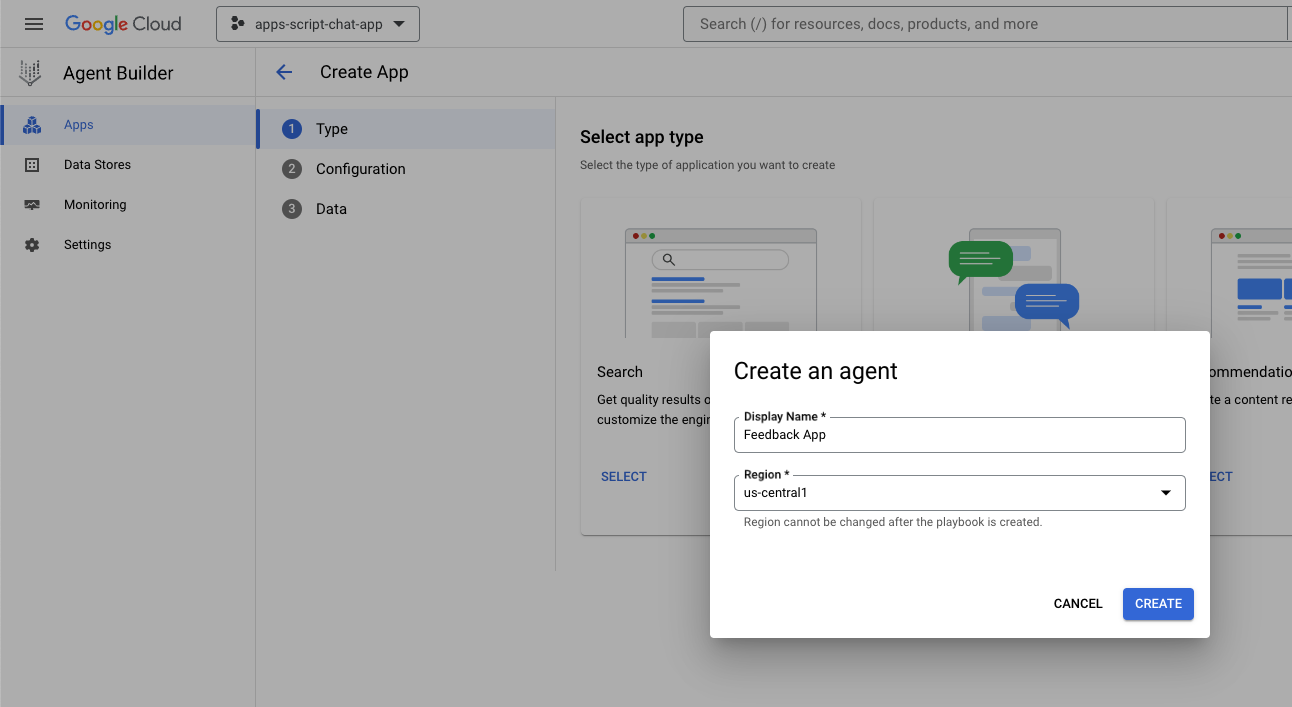
在 Google Cloud 控制台中,按以下步骤操作:
- 点击“菜单”图标 ☰ >“代理构建器”>“应用”。
- 点击新建应用。
- 选择代理。
- 将显示名称设置为
Feedback App。 - 点击创建。
启动工具
在 Google Cloud 控制台中,按以下步骤操作:
- 点击“菜单”图标 ☰ >“代理构建器”>“应用”。
- 选择 Feedback App 代理。
- 依次点击工具 > + 创建。
- 将名称设置为
review。 - 选择 OpenAPI。
- 将说明设置为以下值:
The tool takes the number of stars as a parameter of the store review method and saves it in a database for later use.
- 将
feedback-app/service-openapi.yaml文件中的$URL替换为您之前复制的网址。 - 将
YAML Schema设置为feedback-app/service-openapi.yaml文件的修改后内容。 - 点击保存。
启动代理
在 Google Cloud 控制台中,按以下步骤操作:
- 点击“菜单”图标 ☰ >“代理构建器”>“应用”。
- 选择 Feedback App 代理。
- 选择代理 > 默认生成式代理。
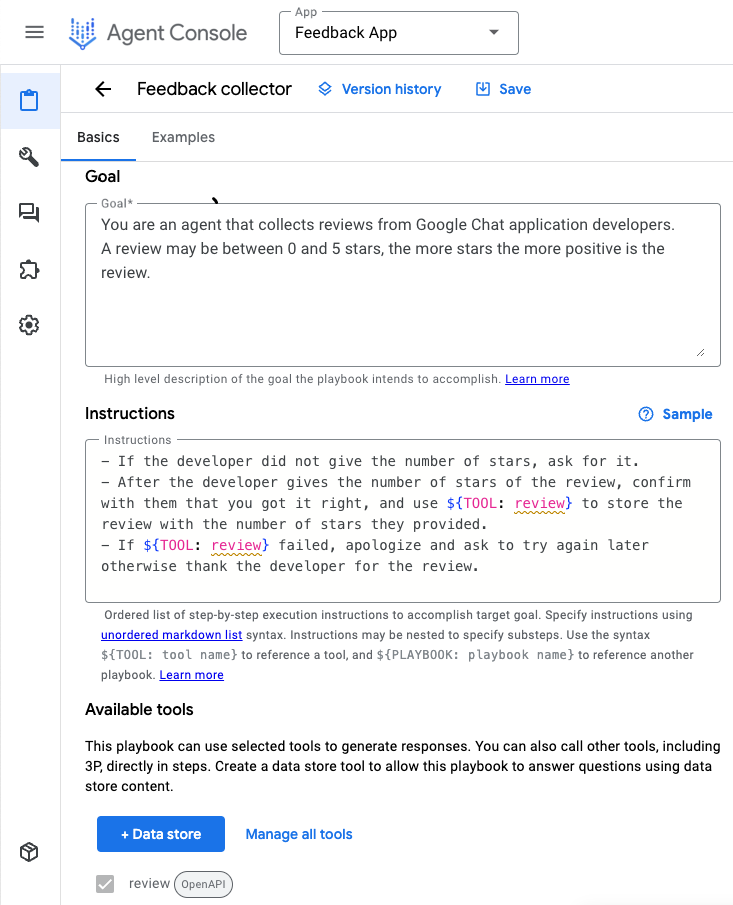
- 将代理名称设置为
Feedback collector。 - 将
goal设置为以下值:
You are an agent that collects reviews from Google Chat app developers.
A review may be between 0 and 5 stars. The more stars, the more positive the review.
- 将说明设置为以下值:
If the developer didn't provide the number of stars, ask for the number of stars.
After the developer provides the number of stars of the review, confirm the number with the developer and use ${TOOL: review} to store the review with the number of stars.
If ${TOOL: review} fails, apologize and ask to try again later. Otherwise, thank the developer for the review.
- 点击保存。
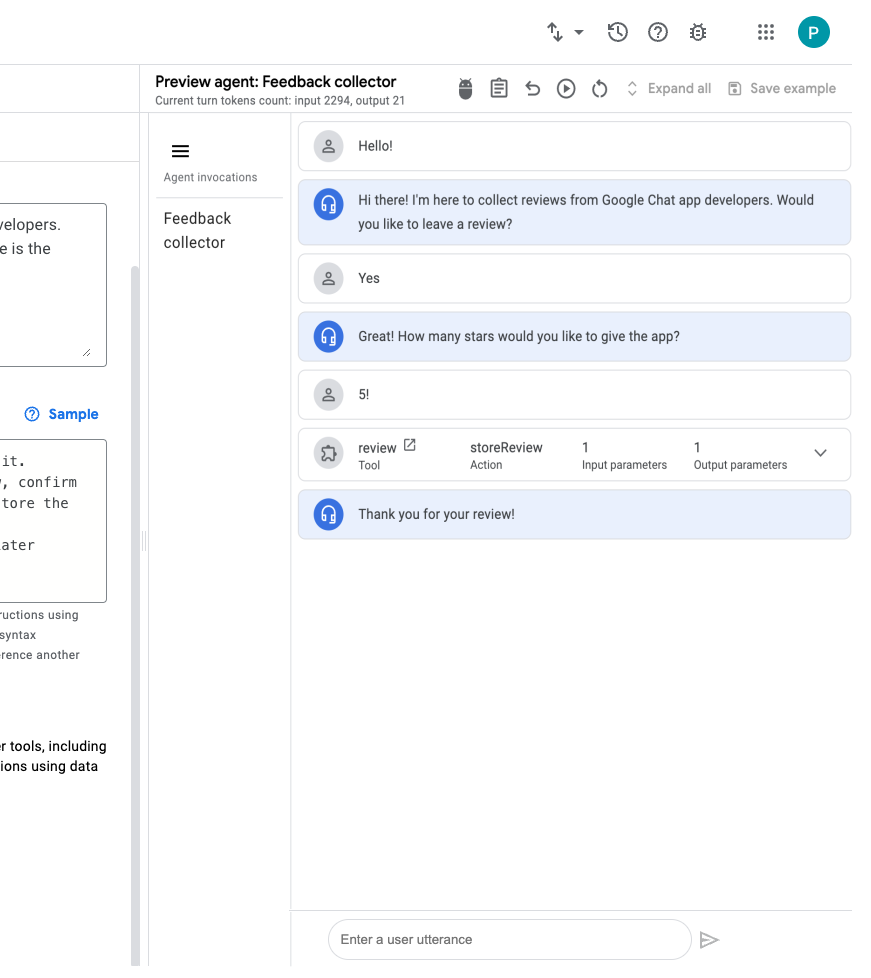
测试应用
在 Google Cloud 控制台中,按以下步骤操作:
- 点击“菜单”图标 ☰ >“代理构建器”>“应用”。
- 选择 Feedback App 代理。
- 前往预览代理。
- 在代理下,选择反馈收集器。
- 在 Select generative model 下,选择 gemini-pro。
- 发送消息
Hello!即可开始。
在 Google Cloud 控制台中,按以下步骤操作:
- 依次点击菜单 ☰ > Cloud Functions。
- 依次选择 function-2 > 日志。一些日志将 Google-Dialogflow 显示为调用方。

集成 Google Chat 应用
在 Dialogflow CX 控制台中,按以下步骤操作:
- 选择您的 Google Cloud 项目。
- 点击
Feedback App代理的操作菜单。 - 点击复制名称。
在 Google Cloud 控制台中,按以下步骤操作:
- 前往 Google Chat API 配置。
- 将代理或环境资源名称设置为您之前复制的代理名称。
- 在 Google Chat 中,通过私信向 Google Chat 应用发送
Hello!即可开始。代理的响应与您在 Dialogflow CX 控制台中进行的测试类似。
11. 清理
删除 Google Cloud 项目
为避免系统因此 Codelab 中使用的资源向您的 Google Cloud 账号收取费用,我们建议您删除该 Google Cloud 项目。
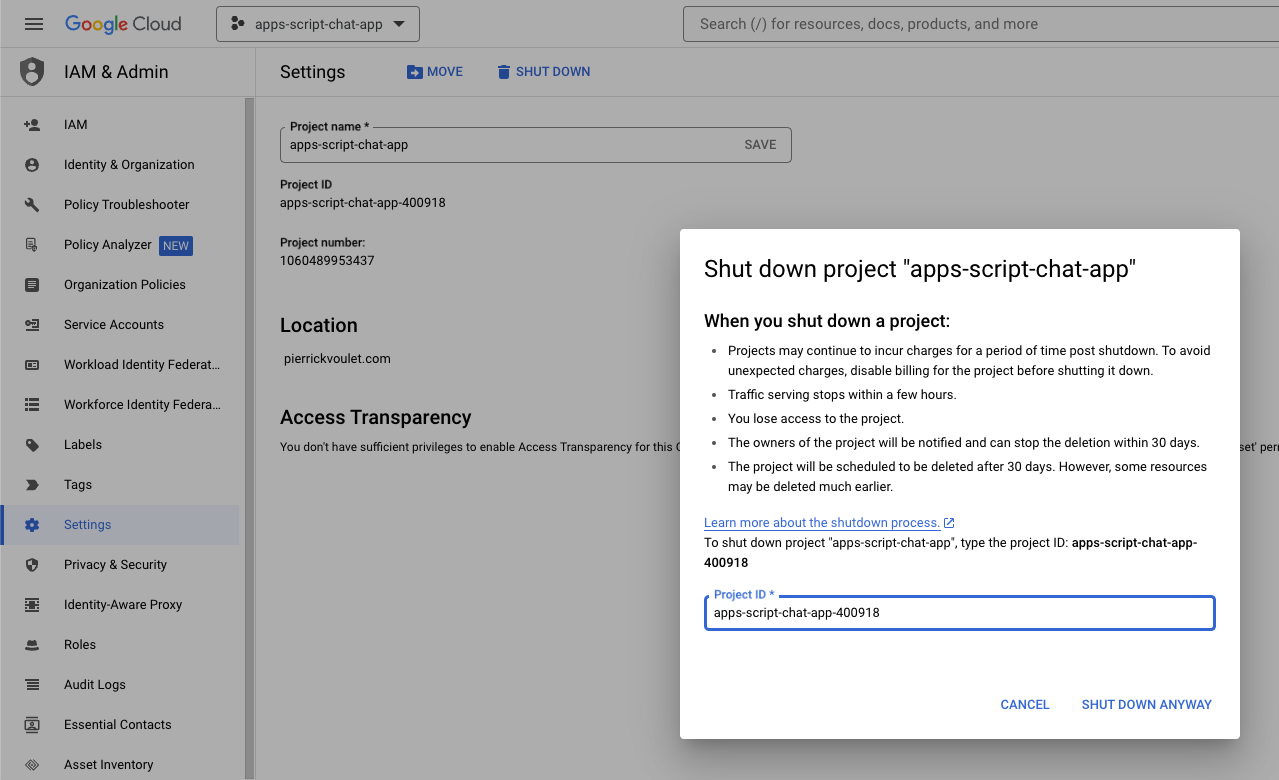
在 Google Cloud 控制台中,按以下步骤操作:
- 依次点击菜单 ☰ > IAM 和管理 > 设置。
- 点击关停。
- 输入项目 ID。
- 点击仍要关停。
删除 Apps 脚本项目
我们建议您也删除 Apps 脚本项目。
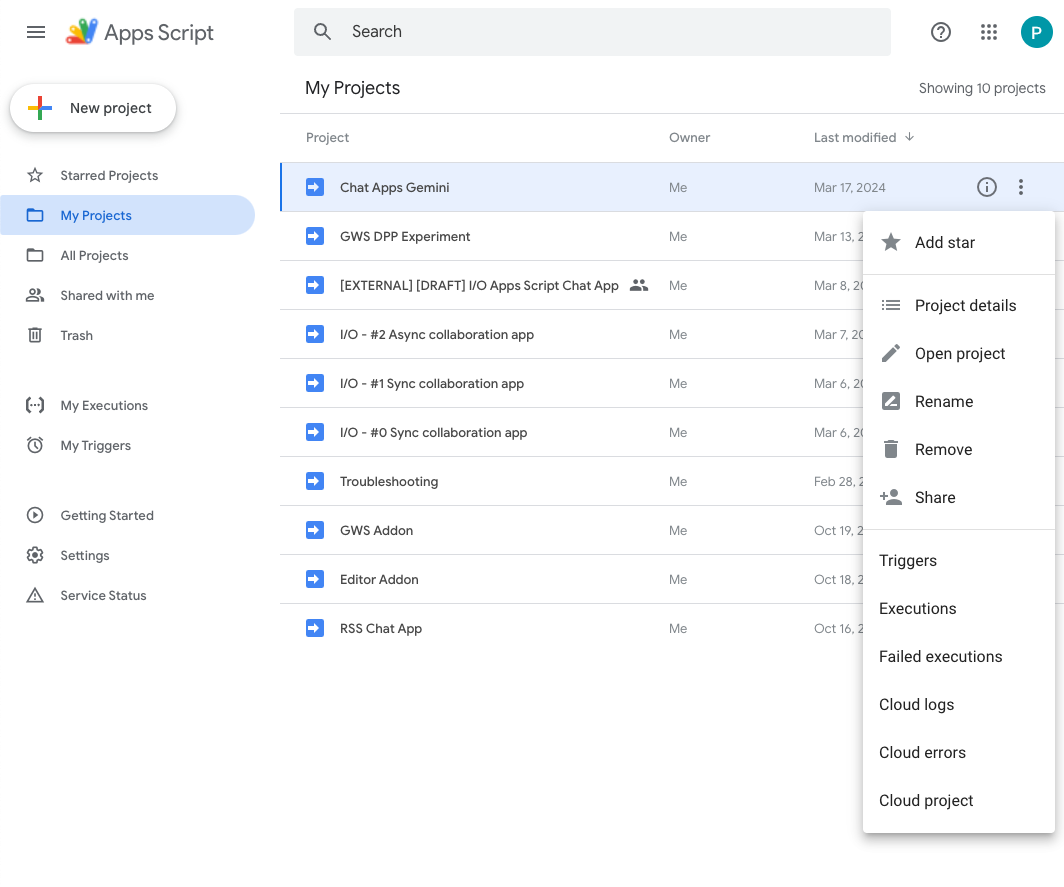
在 Apps 脚本控制台中,按以下步骤操作:
- 选择您的项目。
- 点击操作菜单。
- 点击移除。
12. 恭喜
恭喜!您已构建完成内置 Gemini 的 Google Chat 应用!
后续操作
在此 Codelab 中,我们仅展示了简单的用例,但您或许需要在您的 Google Chat 应用中考虑很多值得扩展的地方,例如:
- 与其他生成式 AI 模型集成,包括自定义模型。
- 支持其他类型的媒体,例如音频、图片和视频。
- 使用多模态。
- 依赖更长的上下文窗口和反馈环。
- 在市场上发布可正式投入使用的 Google Chat 应用。我们为开发者提供了大量资源,例如 YouTube 视频、文档网站、代码示例和教程。
- 为贵组织启用 Google Chat。借助导入模式功能,您可以更加轻松地开始使用。