
1. Introduction
In this codelab, you will be utilizing the MCP Toolbox for Databases to make available your BigQuery datasets.
Through the codelab, you will employ a step by step approach as follows:
- Identify a specific BigQuery dataset ("Google Cloud Release Notes") from the public BigQuery datasets program.
- Setup MCP Toolbox for Databases, that connects to the BigQuery dataset.
- Develop an Agent using Agent Development Kit (ADK) that will utilize the MCP Toolbox to answer queries from the user about Google Cloud Release notes
What you'll do
- Setup MCP Toolbox for Databases to expose Google Cloud Release notes, a public BigQuery dataset, as a MCP Interface to other MCP Clients (IDEs, Tools, etc).
What you'll learn
- Explore BigQuery public datasets and choose a specific dataset.
- Setup MCP Toolbox for Databases for the BigQuery public dataset that we want to make available to MCP clients.
- Design and develop an Agent using Agent Development Kit (ADK) to answer user queries.
- Test out the Agent and MCP Toolbox for Databases in the local environment.
What you'll need
- Chrome web browser.
- A local Python development environment.
2. Before you begin
Create a project
- In the Google Cloud Console, on the project selector page, select or create a Google Cloud project.
- Make sure that billing is enabled for your Cloud project. Learn how to check if billing is enabled on a projec .
- You'll use Cloud Shell, a command-line environment running in Google Cloud that comes preloaded with bq. Click Activate Cloud Shell at the top of the Google Cloud console.

- Once connected to Cloud Shell, you check that you're already authenticated and that the project is set to your project ID using the following command:
gcloud auth list
- Run the following command in Cloud Shell to confirm that the gcloud command knows about your project.
gcloud config list project
- If your project is not set, use the following command to set it:
gcloud config set project <YOUR_PROJECT_ID>
- Enable the required APIs via the command shown below. This could take a few minutes, so please be patient.
gcloud services enable cloudresourcemanager.googleapis.com \
                       servicenetworking.googleapis.com \
                       run.googleapis.com \
                       cloudbuild.googleapis.com \
                       cloudfunctions.googleapis.com \
                       aiplatform.googleapis.com \
                       sqladmin.googleapis.com \
                       compute.googleapis.com
On successful execution of the command, you should see a message similar to the one shown below:
Operation "operations/..." finished successfully.
The alternative to the gcloud command is through the console by searching for each product or using this link.
If any API is missed, you can always enable it during the course of the implementation.
Refer documentation for gcloud commands and usage.
3. Google Release Notes Dataset and MCP clients
First up, let us take a look at Google Cloud Release notes that are regularly updated at the official Google Cloud Release Notes webpage, a screenshot of which is shown below:

You might subscribe to the feed URL but what if we could simply ask in our Agent Chat about these Release notes. Maybe a simple query like "Update me on Google Cloud Release Notes".
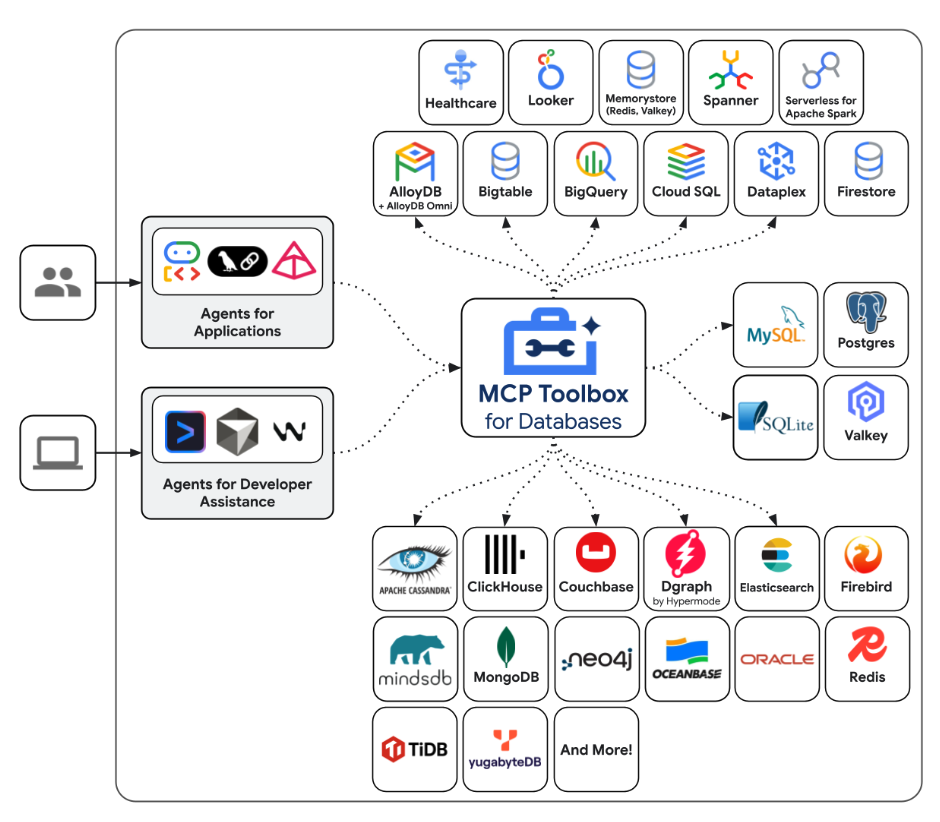
4. MCP Toolbox for Databases
MCP Toolbox for Databases is an open source MCP server for databases It was designed with enterprise-grade and production-quality in mind. It enables you to develop tools easier, faster, and more securely by handling the complexities such as connection pooling, authentication, and more.
Toolbox helps you build Gen AI tools that let your agents access data in your database. Toolbox provides:
- Simplified development: Integrate tools to your agent in less than 10 lines of code, reuse tools between multiple agents or frameworks, and deploy new versions of tools more easily.
- Better performance: Best practices such as connection pooling, authentication, and more.
- Enhanced security: Integrated auth for more secure access to your data
- End-to-end observability: Out of the box metrics and tracing with built-in support for OpenTelemetry.
- Toolbox makes it easy to connect databases to any MCP-capable AI assistants, even those that are in your IDE.
Toolbox sits between your application's orchestration framework and your database, providing a control plane that is used to modify, distribute, or invoke tools. It simplifies the management of your tools by providing you with a centralized location to store and update tools, allowing you to share tools between agents and applications and update those tools without necessarily redeploying your application.
To summarize in simple words:
- MCP Toolbox is available as a binary, container image or you can build it from source.
- It exposes a set of tools that you configure via a tools.yaml file. The tools can be thought of connecting to your data sources. You can see the various data sources that it supports : AlloyDB, BigQuery, etc.
- Since this toolbox now supports MCP, you automatically have a MCP Server endpoint that can then be consumed by the Agents (IDEs) or you can use them while developing your Agent Applications using various frameworks like Agent Development Kit (ADK).
Our focus in this blog post is going to be on the areas highlighted below:
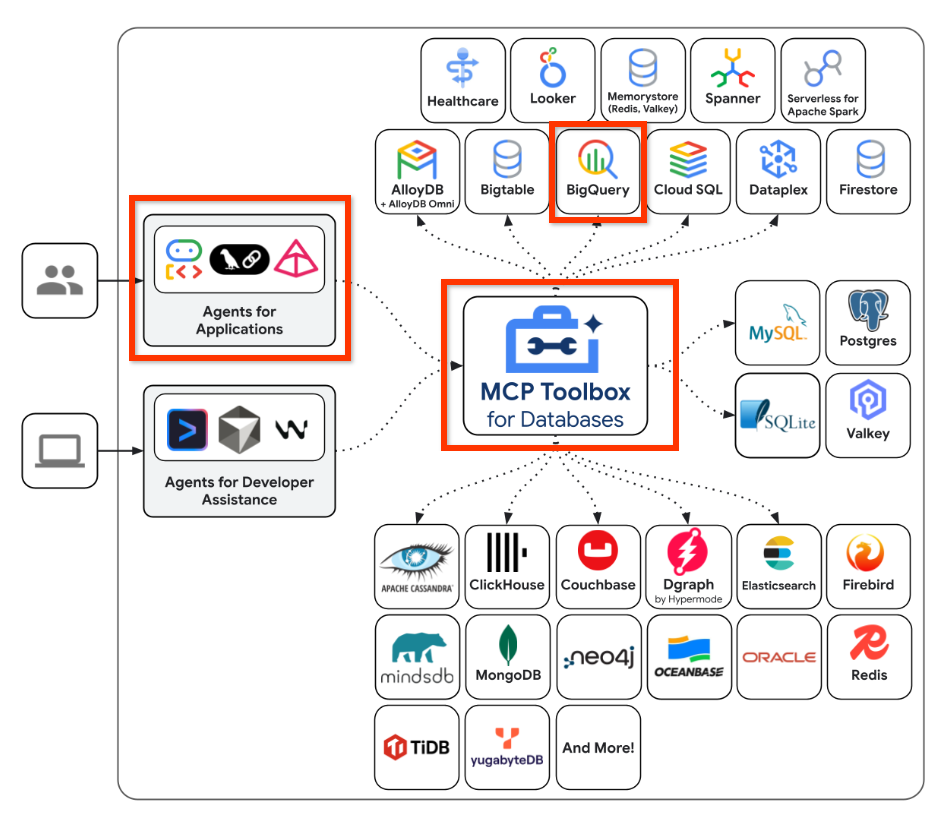
In summary, we are going to create a configuration in the MCP Toolbox for Databases that knows how to connect to our BigQuery dataset. We will then develop an Agent using Agent Development Kit (ADK) that will integrate with the MCP Toolbox endpoint and allow us to send natural queries to ask about our dataset. Think of it as an agentic application that you are developing that knows how to talk to your BigQuery dataset and it runs some queries.
5. BigQuery Dataset for Google Cloud Release Notes
The Google Cloud Public Dataset Program is a program that makes available a range of datasets for your applications. One such dataset is the Google Cloud Release Notes database. This dataset provides you the same information as the official Google Cloud Release Notes webpage and it is available as a publicly queryable dataset.
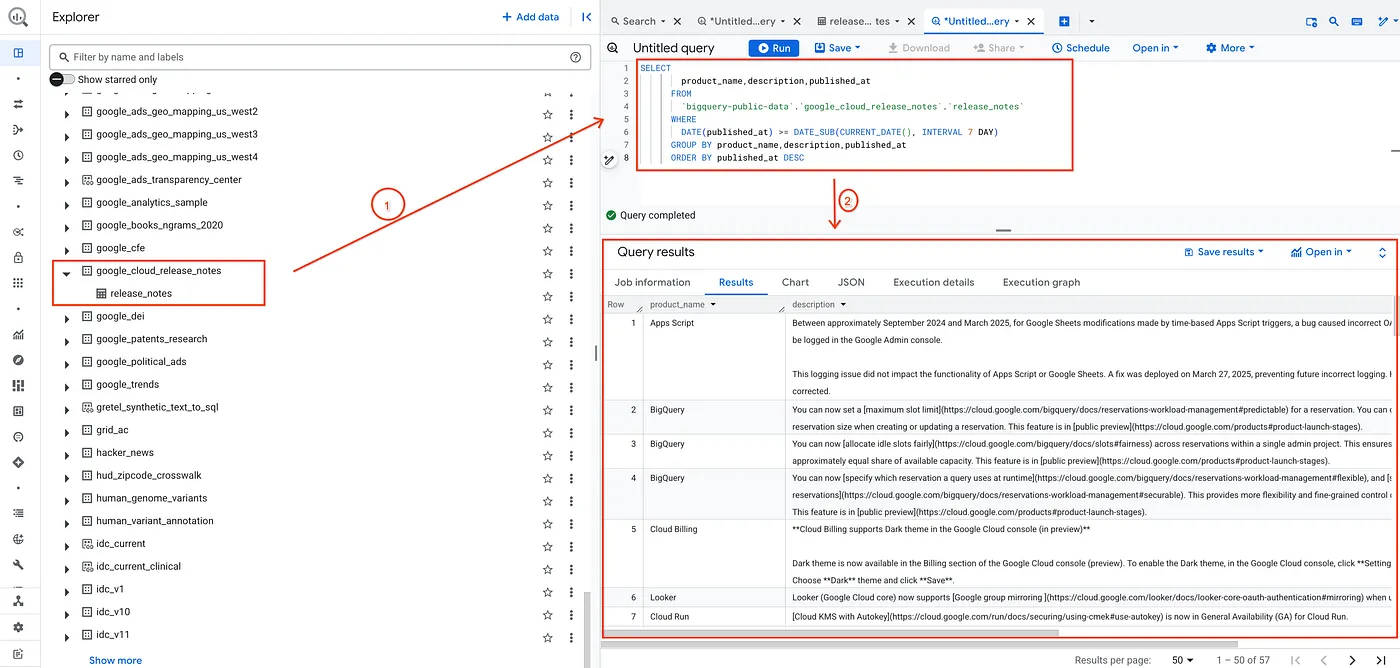
As a test, I simply validate the dataset by running a simple query shown below:
SELECT
       product_name,description,published_at
     FROM
       `bigquery-public-data`.`google_cloud_release_notes`.`release_notes`
     WHERE
       DATE(published_at) >= DATE_SUB(CURRENT_DATE(), INTERVAL 7 DAY)
     GROUP BY product_name,description,published_at
     ORDER BY published_at DESC
This gets me a list of records from the Release Notes dataset that have been published in the last 7 days.
Substitute this with any other dataset of your choice and your respective queries and parameters that you'd like. All we need to do now is set this up as a Data Source and Tool in MCP Toolbox for Databases. Let's see how to do that.
6. Installing MCP Toolbox for Databases
Open a terminal on your local machine and create a folder named mcp-toolbox.
mkdir mcp-toolbox
Go to the mcp-toolbox folder via the command shown below:
cd mcp-toolbox
Install the binary version of the MCP Toolbox for Databases via the script given below. The command given below is for Linux but if you are on Mac or Windows, ensure that you are downloading the correct binary. Check out the releases page for your Operation System and Architecture and download the correct binary.
export VERSION=0.23.0
curl -O https://storage.googleapis.com/genai-toolbox/v$VERSION/linux/amd64/toolbox
chmod +x toolbox
We now have the binary version of the toolbox ready for our use. The next step is to configure the toolbox with our data sources and other configurations.
7. Configuring the MCP Toolbox for Databases
Now, we need to define our BigQuery dataset and tools in the tools.yaml file that is needed by the MCP Toolbox for Database. The file tools.yaml is the primary way to configure Toolbox.
Create a file named tools.yaml in the same folder i.e. mcp-toolbox, the contents of which is shown below.
You can use the nano editor that is available in Cloud Shell. The nano command is as follows: "nano tools.yaml".
Remember to replace the YOUR_PROJECT_ID value with your Google Cloud Project Id.
sources:
 my-bq-source:
   kind: bigquery
   project: YOUR_PROJECT_ID

tools:
 search_release_notes_bq:
   kind: bigquery-sql
   source: my-bq-source
   statement: |
    SELECT
     product_name,description,published_at
    FROM
      `bigquery-public-data`.`google_cloud_release_notes`.`release_notes`
    WHERE
     DATE(published_at) >= DATE_SUB(CURRENT_DATE(), INTERVAL 7 DAY)
    GROUP BY product_name,description,published_at
    ORDER BY published_at DESC
   description: |
    Use this tool to get information on Google Cloud Release Notes.

toolsets:
 my_bq_toolset:
   - search_release_notes_bq
Let us understand the file in brief:
- Sources represent your different data sources that a tool can interact with. A Source represents a data source that a tool can interact with. You can define Sources as a map in the sources section of your tools.yaml file. Typically, a source configuration will contain any information needed to connect with and interact with the database. In our case, we have defined a BigQuery source
my-bq-sourceand you need to provide your Google Cloud Project Id. For more information, refer to the Sources reference. - Tools define actions an agent can take – such as reading and writing to a source. A tool represents an action your agent can take, such as running a SQL statement. You can define Tools as a map in the tools section of your tools.yaml file. Typically, a tool will require a source to act on. In our case, we define a single tool
search_release_notes_bq. This references the BigQuery sourcemy-bq-sourcethat we defined in the first step. It also has the statement and the instruction that will be used by the AI Agent clients. For more information, refer to the Tools reference. - Finally, we have the Toolset, that allows you to define groups of tools that you want to be able to load together. This can be useful for defining different groups based on agent or application. In our case, we have a toolset definition where we have currently defined only one existing tool
search_release_notes_bqthat we defined. You can have more than one toolset, which has a combination of different tools.
So currently, we have defined only one tool that gets the release notes for the last 7 days as per the query. But you can have various combinations with parameters too.
Check out some more configuration details ( Source, Tools) in the BigQuery datasource configuration in MCP Toolbox for Databases.
8. Testing the MCP Toolbox for Databases
We have downloaded and configured the Toolbox with the tools.yaml file in the mcp-toolbox folder. Let's run it locally first.
Execute the following command:
./toolbox --tools-file="tools.yaml"
On successful execution, you should see a server startup with sample output similar to the one below:
2025-12-09T08:27:02.777619+05:30 INFO "Initialized 1 sources: my-bq-source"
2025-12-09T08:27:02.777695+05:30 INFO "Initialized 0 authServices: "
2025-12-09T08:27:02.777707+05:30 INFO "Initialized 1 tools: search_release_notes_bq"
2025-12-09T08:27:02.777716+05:30 INFO "Initialized 2 toolsets: my_bq_toolset, default"
2025-12-09T08:27:02.777719+05:30 INFO "Initialized 0 prompts: "
2025-12-09T08:27:02.777723+05:30 INFO "Initialized 1 promptsets: default"
2025-12-09T08:27:02.77773+05:30 WARN "wildcard (`*`) allows all origin to access the resource and is not secure. Use it with cautious for public, non-sensitive data, or during local development. Recommended to use `--allowed-origins` flag to prevent DNS rebinding attacks"
2025-12-09T08:27:02.777839+05:30 INFO "Server ready to serve!"
The MCP Toolbox Server runs by default on port 5000. If you find that port 5000 is already in use, feel free to use another port (say 7000) as per the command shown below. Please use 7000 then instead of the 5000 port in the subsequent commands.
./toolbox --tools-file "tools.yaml" --port 7000
Let us use Cloud Shell to test this out.
Click on Web Preview in Cloud Shell as shown below:
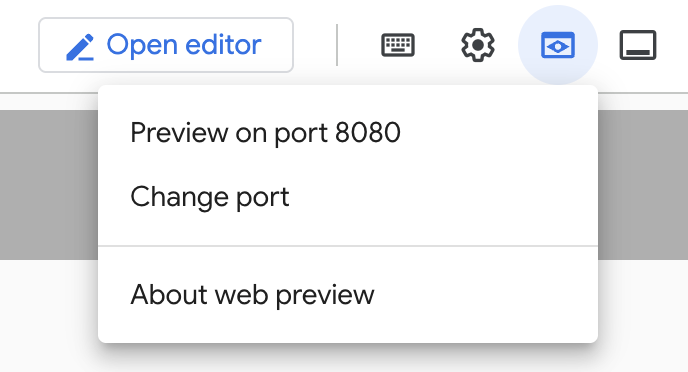
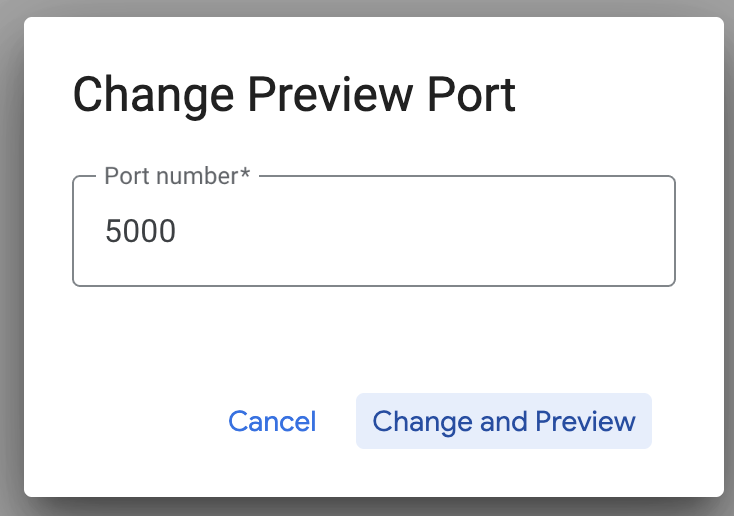
Click on Change port and set the port to 5000 as shown below and click on Change and Preview.
This should bring the following output:

In the browser URL, add the following to the end of the URL:
/api/toolset
This should bring up the tools that are currently configured. A sample output is shown below:
{
  "serverVersion": "0.22.0+binary.linux.amd64.1a6dfe8d37d0f42fb3fd3f75c50988534dbc1b85",
  "tools": {
    "search_release_notes_bq": {
      "description": "Use this tool to get information on Google Cloud Release Notes.\n",
      "parameters": [],
      "authRequired": []
    }
  }
}
Test the Tools via MCP Toolbox for Databases UI
The Toolbox provides a visual interface (Toolbox UI) to directly interact with tools by modifying parameters, managing headers, and executing calls, all within a simple web UI.
If you would like to test that out, you can run the previous command that we used to launch the Toolbox Server with a --ui option.
To do that, shutdown the previous instance of the MCP Toolbox for Databases Server that you may have running and give the following command:
./toolbox --tools-file "tools.yaml" --ui
Ideally you should see an output that the Server has been able to connect to our data sources and has loaded the toolset and tools. A sample output is given below and you will notice that it will mention that the Toolbox UI is up and running.
2025-12-09T08:28:07.479989+05:30 INFO "Initialized 1 sources: my-bq-source"
2025-12-09T08:28:07.480065+05:30 INFO "Initialized 0 authServices: "
2025-12-09T08:28:07.480079+05:30 INFO "Initialized 1 tools: search_release_notes_bq"
2025-12-09T08:28:07.480087+05:30 INFO "Initialized 2 toolsets: my_bq_toolset, default"
2025-12-09T08:28:07.48009+05:30 INFO "Initialized 0 prompts: "
2025-12-09T08:28:07.480094+05:30 INFO "Initialized 1 promptsets: default"
2025-12-09T08:28:07.4801+05:30 WARN "wildcard (`*`) allows all origin to access the resource and is not secure. Use it with cautious for public, non-sensitive data, or during local development. Recommended to use `--allowed-origins` flag to prevent DNS rebinding attacks"
2025-12-09T08:28:07.480214+05:30 INFO "Server ready to serve!"
2025-12-09T08:28:07.480218+05:30 INFO "Toolbox UI is up and running at: http://127.0.0.1:5000/ui"
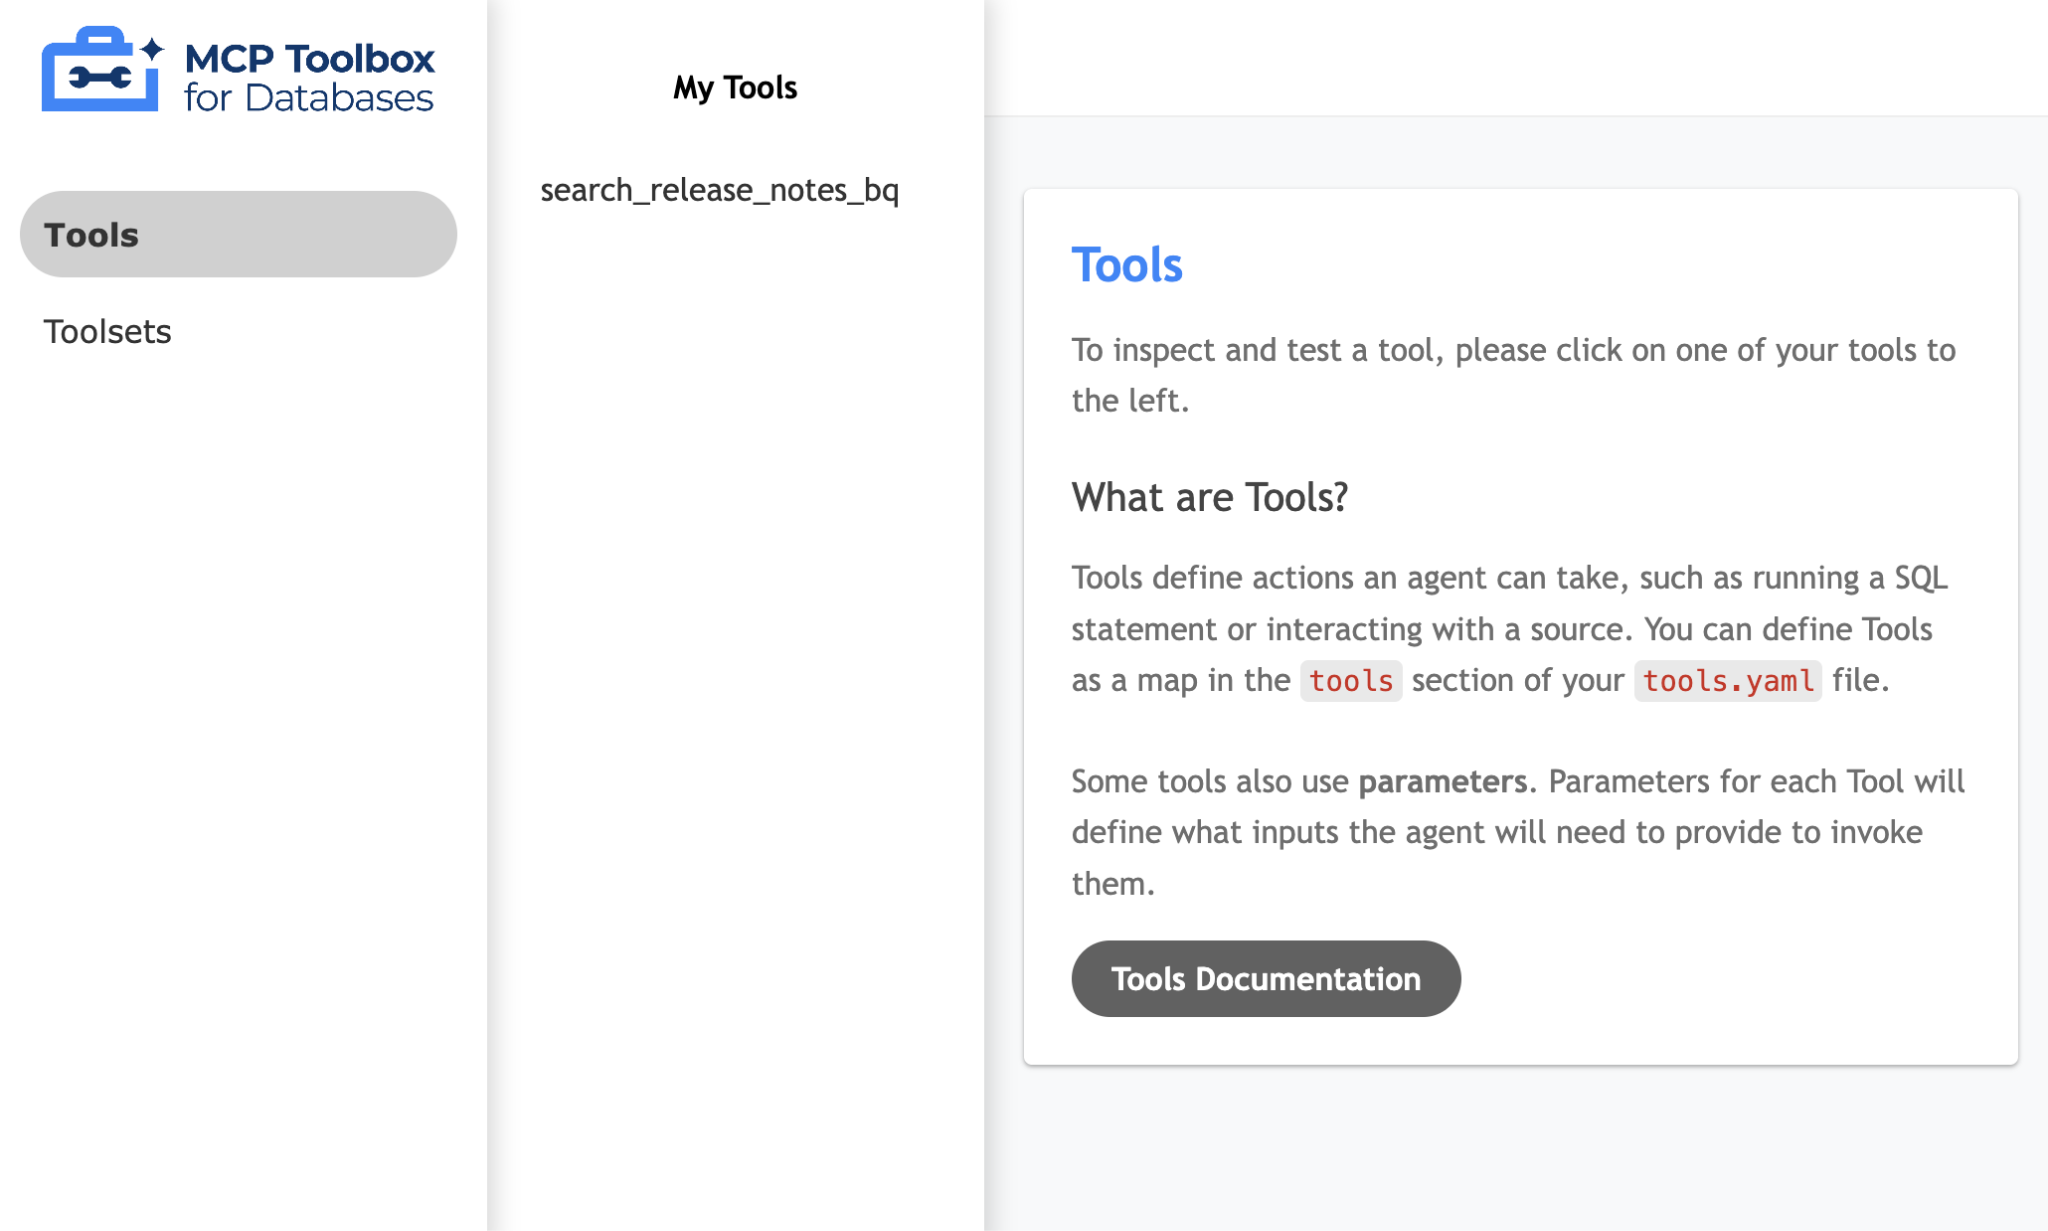
Click on the UI url and ensure that you have the /ui at the end of the URL. This will display a UI as shown below:

Click on the Tools option on the left to view the tools that have been configured and in our case, it should just one i.e. search_release_notes_bq, as shown below:
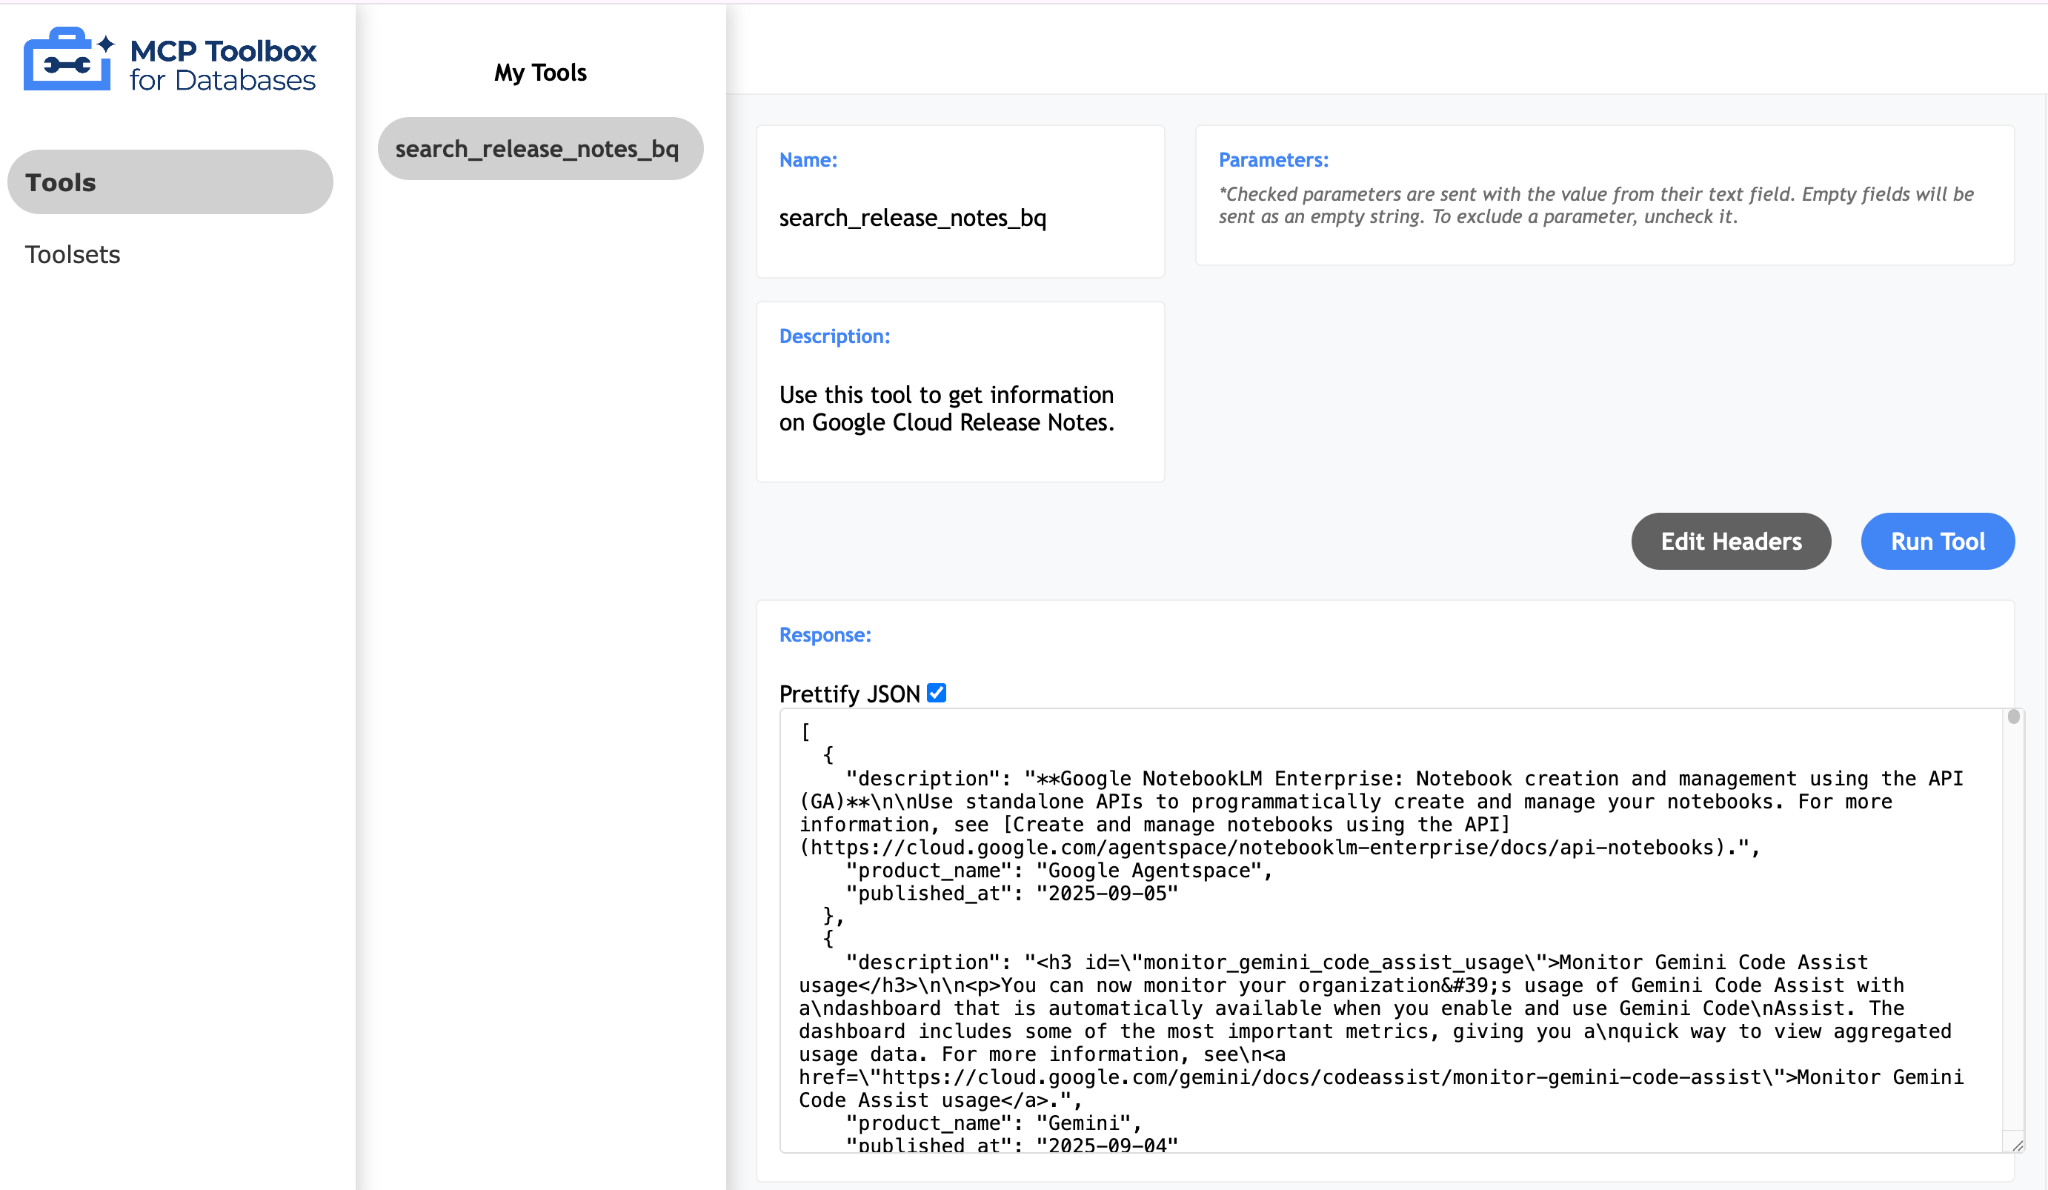
Simply click the tools (search_release_notes_bq) and it should bring up a page for you to test out the tool. Since there are no parameters to provide, you can simply click on the Run Tool to see the result. A sample run is shown below:
The MCP Toolkit for Databases also describes a Pythonic way for you to validate and test out the tools, which is documented over here. We will skip that and jump directly into the Agent Development Kit (ADK) in the next section that will utilize these tools.
9. Writing our Agent with Agent Development Kit (ADK)
Install the Agent Development Kit (ADK)
Open a new terminal tab in Cloud Shell and create a folder named my-agents as follows. Navigate to the my-agents folder too.
mkdir my-agents
cd my-agents
Now, let's create a virtual Python environment using venv as follows:
python -m venv .venv
Activate the virtual environment as follows:
source .venv/bin/activate
Install the ADK and the MCP Toolbox for Databases packages along with langchain dependency as follows:
pip install google-adk toolbox-core
You will now be able to invoke the adk utility as follows.
adk
It will show you a list of commands.
$ adk
Usage: adk [OPTIONS] COMMAND [ARGS]...

  Agent Development Kit CLI tools.

Options:
  --help  Show this message and exit.

Commands:
  api_server  Starts a FastAPI server for agents.
  create      Creates a new app in the current folder with prepopulated agent template.
  deploy      Deploys agent to hosted environments.
  eval        Evaluates an agent given the eval sets.
  run         Runs an interactive CLI for a certain agent.
  web         Starts a FastAPI server with Web UI for agents.
Creating our first Agent Application
We are now going to use adk to create a scaffolding for Google Cloud Release Notes Agent Application via the adk create command with an app name **(gcp_releasenotes_agent_app)**as given below.
adk create gcp_releasenotes_agent_app
Follow the steps and select the following:
- Gemini model for choosing a model for the root agent.
- Choose Vertex AI for the backend.
- Your default Google Project Id and region will be displayed. Select the default itself.
Choose a model for the root agent:
1. gemini-2.5-flash
2. Other models (fill later)

Choose model (1, 2): 1
1. Google AI
2. Vertex AI
Choose a backend (1, 2): 2

You need an existing Google Cloud account and project, check out this link for details:
https://google.github.io/adk-docs/get-started/quickstart/#gemini---google-cloud-vertex-ai

Enter Google Cloud project ID [YOUR_GOOGLE_PROJECT_ID]:
Enter Google Cloud region [us-central1]:

Agent created in ../my-agents/gcp_releasenotes_agent_app:
- .env
- __init__.py
- agent.py
Observe the folder in which a default template and required files for the Agent have been created.
First up is the .env file. The contents of which are shown below:
GOOGLE_GENAI_USE_VERTEXAI=1
GOOGLE_CLOUD_PROJECT=YOUR_GOOGLE_PROJECT_ID
GOOGLE_CLOUD_LOCATION=YOUR_GOOGLE_PROJECT_REGION
The values indicate that we will be using Gemini via Vertex AI along with the respective values for the Google Cloud Project Id and location.
Then we have the __init__.py file that marks the folder as a module and has a single statement that imports the agent from the agent.py file.
from . import agent
Finally, let's take a look at the agent.py file. The contents are shown below:
from google.adk.agents import Agent

root_agent = Agent(
    model='gemini-2.5-flash',
    name='root_agent',
    description='A helpful assistant for user questions.',
    instruction='Answer user questions to the best of your knowledge',
)
This is the simplest Agent that you can write with ADK. From the ADK documentation page, an Agent is a self-contained execution unit designed to act autonomously to achieve specific goals. Agents can perform tasks, interact with users, utilize external tools, and coordinate with other agents.
Specifically, an LLMAgent, commonly aliased as Agent, utilizes Large Language Models (LLMs) as their core engine to understand natural language, reason, plan, generate responses, and dynamically decide how to proceed or which tools to use, making them ideal for flexible, language-centric tasks. Learn more about LLM Agents here.
This completes our scaffolding to generate a basic Agent using the Agent Development Kit (ADK). We are now going to connect our Agent to the MCP Toolbox, so that it can use that tool to answer queries from the user (in this case, it will be the Google Cloud Release notes).
10. Connecting our Agent to Tools
We are going to connect this Agent to Tools now. In the context of ADK, a Tool represents a specific capability provided to an AI agent, enabling it to perform actions and interact with the world beyond its core text generation and reasoning abilities.
In our case, we are going to equip our Agent now with the Tools that we have configured in the MCP Toolbox for Databases.
Modify the agent.py file with the following code. Notice that we are using the default port 5000 in the code, but if you are using an alternate port number, please use that.
from google.adk.agents import Agent
from toolbox_core import ToolboxSyncClient

toolbox = ToolboxSyncClient("http://127.0.0.1:5000")

# Load all the tools
tools = toolbox.load_toolset('my_bq_toolset')

root_agent = Agent(
    name="gcp_releasenotes_agent",
    model="gemini-2.5-flash",
    description=(
        "Agent to answer questions about Google Cloud Release notes."
    ),
    instruction=(
        "You are a helpful agent who can answer user questions about the Google Cloud Release notes. Use the tools to answer the question"
    ),
    tools=tools,
)
We can now test the Agent that will fetch real data from our BigQuery dataset that has been configured with the MCP Toolbox for Databases.
To do this, follow this sequence:
In one terminal of Cloud Shell, launch the MCP Toolbox for Databases. You might already have it running locally on port 5000 as we tested earlier. If not, run the following command (from the mcp-toolbox folder) to start the server:
./toolbox --tools_file "tools.yaml"
Ideally you should see an output that the Server has been able to connect to our data sources and has loaded the toolset and tools.
Once the MCP server has started successfully, in another terminal, launch the Agent via the adk run (from the my-agents folder) command shown below. You could also use the adk web command if you like.
$ adk run gcp_releasenotes_agent_app/

Log setup complete: /tmp/agents_log/agent.20250423_170001.log
To access latest log: tail -F /tmp/agents_log/agent.latest.log
Running agent gcp_releasenotes_agent, type exit to exit.

[user]: get me the google cloud release notes


[gcp_releasenotes_agent]: Here are the Google Cloud Release Notes.

Google SecOps SOAR: Release 6.3.49 is being rolled out to the first phase of regions. This release contains internal and customer bug fixes. Published: 2025-06-14

Compute Engine: Dynamic NICs let you add or remove network interfaces to or from an instance without having to restart or recreate the instance. You can also use Dynamic NICs when you need more network interfaces. The maximum number of vNICs for most machine types in Google Cloud is 10; however, you can configure up to 16 total interfaces by using Dynamic NICs. Published: 2025-06-13

Compute Engine: General purpose C4D machine types, powered by the fifth generation AMD EPYC processors (Turin) and Google Titanium, are generally available. Published: 2025-06-13

Google Agentspace: Google Agentspace Enterprise: App-level feature management. As an Agentspace administrator, you can choose to turn the following features on or off for your end users in the web app: Agents gallery, Prompt gallery, No-code agent, NotebookLM Enterprise. Published: 2025-06-13

Cloud Load Balancing: Cloud Load Balancing supports load balancing to multi-NIC instances that use Dynamic NICs. This capability is in Preview. Published: 2025-06-13

Virtual Private Cloud: Dynamic Network Interfaces (NICs) are available in Preview. Dynamic NICs let you update an instance to add or remove network interfaces without having to restart or recreate the instance. Published: 2025-06-13

Security Command Center: The following Event Threat Detection detectors for Vertex AI have been released to Preview:
- `Persistence: New Geography for AI Service`
- `Privilege Escalation: Anomalous Multistep Service Account Delegation for AI Admin Activity`
- `Privilege Escalation: Anomalous Multistep Service Account Delegation for AI Data Access`
- `Privilege Escalation: Anomalous Service Account Impersonator for AI Admin Activity`
- `Privilege Escalation: Anomalous Service Account Impersonator for AI Data Access`
- `Privilege Escalation: Anomalous Impersonation of Service Account for AI Admin Activity`
- `Persistence: New AI API Method`
......
......
Notice that the Agent is utilizing the tool that we have configured in the MCP Toolbox for Databases (search_release_notes_bq) and retrieves the data from the BigQuery dataset and format the response accordingly.
11. Congratulations
Congratulations, you've successfully configured the MCP Toolbox for Databases and configured a BigQuery dataset for access within MCP clients.