
1. 📖 はじめに

Agent2Agent(A2A)プロトコルは、AI エージェント間の通信、特に外部システムにデプロイされた AI エージェント間の通信を標準化するように設計されています。以前は、このようなプロトコルは Model Context Protocol(MCP)と呼ばれるツール用に確立されていました。これは、LLM をデータやリソースに接続するための新しい標準です。A2A は MCP を補完しようとしています。MCP はエージェントをツールやデータに接続する複雑さを軽減することに重点を置いていますが、A2A はエージェントが自然なモダリティで連携できるようにすることに重点を置いています。エージェントがツールとしてではなく、エージェント(またはユーザー)として通信できるようにします。たとえば、注文時に双方向の通信を有効にします。
A2A は MCP を補完する位置付けにあります。公式ドキュメントでは、アプリケーションでツールに MCP を、エージェントに A2A を使用することが推奨されています。これは AgentCard で表されます(これについては後で説明します)。フレームワークは A2A を使用して、ユーザー、リモート エージェント、他のエージェントと通信できます。

このデモでは、Python SDK を使用して A2A の実装から始めます。ハンバーガーやピザの販売業者のエージェントとやり取りして注文を処理するのに役立つ、パーソナル ショッピング コンシェルジュがある場合のユースケースについて説明します。
A2A はクライアント サーバーの原則を利用します。このチュートリアルで想定される一般的な A2A フローは次のとおりです。

- A2A クライアントは、まずアクセス可能なすべての A2A サーバー エージェント カードで検出を行い、その情報を使用して接続クライアントを構築します。
- 必要に応じて、A2A クライアントは A2A サーバーにメッセージを送信します。サーバーはこのメッセージを完了すべきタスクとして評価します。プッシュ通知の受信者の URL が A2A クライアントで構成され、A2A サーバーでサポートされている場合、サーバーはタスクの進行状況をクライアントの受信エンドポイントに公開することもできます。
- タスクが完了すると、A2A サーバーはレスポンス アーティファクトを A2A クライアントに送信します。
この Codelab では、次の手順でアプローチします。
- Google Cloud プロジェクトを準備する
- コーディング環境の作業ディレクトリを設定する
- Cloud Run にバーガー エージェントをデプロイする
- ピザ エージェントを Cloud Run にデプロイする
- 購入コンシェルジュを Agent Engine にデプロイする
- ローカル インターフェースを介して購入コンシェルジュとやり取りする
アーキテクチャの概要
次のサービス アーキテクチャをデプロイします。

A2A サーバーとして機能する 2 つのサービス(Burger エージェント(CrewAI エージェント フレームワークでサポート)と Pizza エージェント(Langgraph エージェント フレームワークでサポート))をデプロイします。ユーザーは、A2A クライアントとして機能する Agent Development Kit(ADK)フレームワークを使用して実行される購入コンシェルジュと直接やり取りします。
これらの各エージェントには、独自の環境と独自のデプロイがあります。
前提条件
- Python の操作に慣れている
- HTTP サービスを使用した基本的なフルスタック アーキテクチャの理解
学習内容
- A2A サーバーのコア構造
- A2A クライアントのコア構造
- Cloud Run へのエージェント サービスのデプロイ
- エージェント サービスを Agent Engine にデプロイする
- A2A クライアントが A2A サーバーに接続する方法
- 非ストリーミング接続でのリクエストとレスポンスの構造
必要なもの
- Chrome ウェブブラウザ
- Gmail アカウント
- 請求先アカウントが有効になっている Cloud プロジェクト
この Codelab は、初心者を含むあらゆるレベルのデベロッパーを対象としており、サンプル アプリケーションで Python を使用します。ただし、ここで説明するコンセプトを理解するために Python の知識は必要ありません。
2. 🚀 ワークショップの開発環境のセットアップを準備しています
ステップ 1: Cloud コンソールでアクティブなプロジェクトを選択する
Google Cloud コンソールのプロジェクト選択ページで、Google Cloud プロジェクトを選択または作成します(コンソールの左上部分を参照)。

クリックすると、次の例のように、すべてのプロジェクトのリストが表示されます。

赤いボックスで示されている値はプロジェクト ID であり、この値はチュートリアル全体で使用されます。
Cloud プロジェクトに対して課金が有効になっていることを確認します。これを確認するには、左上のバーにあるハンバーガー アイコン ☰ をクリックしてナビゲーション メニューを表示し、[お支払い] メニューを見つけます。

「Google Cloud Platform トライアルの請求先アカウントがリンクされています」と表示されたら、このチュートリアルでプロジェクトを使用する準備が整っています。そうでない場合は、このチュートリアルの最初に戻って、請求先アカウントを利用します。

ステップ 2: Cloud Shell について理解する
チュートリアルのほとんどの部分で Cloud Shell を使用します。Google Cloud コンソールの上部にある [Cloud Shell をアクティブにする] をクリックします。承認を求めるメッセージが表示されたら、[承認] をクリックします。


Cloud Shell に接続したら、シェル(またはターミナル)がアカウントで認証されているかどうかを確認する必要があります。
gcloud auth list
次の出力例のように、個人の Gmail が表示されていれば問題ありません。
Credentialed Accounts

ACTIVE: *
ACCOUNT: alvinprayuda@gmail.com

To set the active account, run:
    $ gcloud config set account `ACCOUNT`
表示されない場合は、ブラウザを更新して、プロンプトが表示されたら [承認] をクリックしてください(接続の問題により中断されることがあります)。
次に、シェルが正しい プロジェクト ID にすでに構成されているかどうかを確認する必要があります。ターミナルの $アイコンの前に()内の値が表示されている場合(下のスクリーンショットでは値は 「a2a-agent-engine」)、この値はアクティブなシェル セッション用に構成されたプロジェクトを示しています。

表示された値がすでに正しい場合は、次のコマンドをスキップできます。正しくない場合や欠落している場合は、次のコマンドを実行します。
gcloud config set project <YOUR_PROJECT_ID>
次に、GitHub からこの Codelab のテンプレート作業ディレクトリのクローンを作成します。次のコマンドを実行します。作業ディレクトリは purchasing-concierge-a2a ディレクトリに作成されます。
git clone https://github.com/alphinside/purchasing-concierge-intro-a2a-codelab-starter.git purchasing-concierge-a2a
手順 3: Cloud Shell エディタに慣れ、アプリケーションの作業ディレクトリを設定する
これで、コーディング作業を行うようにコードエディタを設定できます。これには Cloud Shell エディタを使用します。
[エディタを開く] ボタンをクリックします。Cloud Shell エディタ  が開きます。
次に、Cloud Shell エディタの上部にある [File->Open Folder] をクリックし、ユーザー名ディレクトリを見つけて、purchasing-concierge-a2a ディレクトリを見つけて、[OK] ボタンをクリックします。これにより、選択したディレクトリがメインの作業ディレクトリになります。この例では、ユーザー名は alvinprayuda であるため、ディレクトリ パスは次のようになります。


Cloud Shell エディタは次のようになります。

次に、エディタのターミナルを開きます。メニューバーの [ターミナル] -> [新しいターミナル] をクリックするか、Ctrl+Shift+C を使用して、ブラウザの下部にターミナル ウィンドウを開きます。

現在アクティブなターミナルは、purchasing-concierge-a2a 作業ディレクトリ内にある必要があります。この Codelab では Python 3.12 を使用し、uv Python プロジェクト マネージャーを使用して、Python のバージョンと仮想環境の作成と管理の必要性を簡素化します。この uv パッケージは、Cloud Shell にすでにプリインストールされています。
次のコマンドを実行して、.venv ディレクトリの仮想環境に必要な依存関係をインストールします。
uv sync --frozen
pyproject.toml を確認して、このチュートリアルの宣言された依存関係(a2a-sdk, google-adk, and gradio)を確認します。
次に、次のコマンドを使用して、必要な API を有効にする必要があります。この処理にはしばらく時間がかかることがあります。
gcloud services enable aiplatform.googleapis.com \
                       run.googleapis.com \
                       cloudbuild.googleapis.com \
                       cloudresourcemanager.googleapis.com
コマンドが正常に実行されると、次のようなメッセージが表示されます。
Operation "operations/..." finished successfully.
3. 🚀 A2A サーバー リモート販売者エージェントを Cloud Run にデプロイする
このステップでは、赤い枠で囲まれた 2 つのリモート販売者エージェントをデプロイします。ハンバーガー エージェントは CrewAI エージェント フレームワークで動作し、ピザ エージェントは Langgraph エージェントで動作します。

4. 🚀 Burger Seller Agent - A2A サーバーをデプロイする
バーガー エージェントのソースコードは remote_seller_agents/burger_agent ディレクトリにあります。
remote_seller_agents/burger_agent ディレクトリにあるすべてのファイルは、エージェントを Cloud Run にデプロイしてサービスとしてアクセスできるようにするためにすでに十分です。次のコマンドを実行してデプロイします。
gcloud run deploy burger-agent \
    --source remote_seller_agents/burger_agent \
    --port=8080 \
    --allow-unauthenticated \
    --min 1 \
    --region us-central1 \
    --update-env-vars GOOGLE_CLOUD_LOCATION=us-central1 \
    --update-env-vars GOOGLE_CLOUD_PROJECT={your-project-id}
ソースからデプロイするためにコンテナ リポジトリが作成されるというプロンプトが表示されたら、「Y」と答えます。デプロイが成功すると、次のようなログが表示されます。
Service [burger-agent] revision [burger-agent-xxxxx-xxx] has been deployed and is serving 100 percent of traffic.
Service URL: https://burger-agent-xxxxxxxxx.us-central1.run.app
ここで xxxx の部分は、サービスをデプロイするときの一意の識別子になります。
新しいブラウザタブを開き、ブラウザでデプロイされたハンバーガー エージェント サービスの https://burger-agent-xxxxxxxxx.us-central1.run.app/.well-known/agent.json ルートに移動します。これは、デプロイされた A2A サーバー エージェント カードにアクセスするための URL です。
正常にデプロイされると、エージェント カードにアクセスしたときに、ブラウザに次のようなレスポンスが表示されます。

これは、検出目的でアクセスできる必要があるハンバーガー エージェント カードの情報です。
url の値は、ここではまだ http://0.0.0.0:8080/ に設定されています。この url 値は、A2A クライアントが外部からメッセージを送信するための主要な情報であるため、正しく構成されていません。
この値をバーガー エージェント サービスの URL に更新する必要があります。そのため、追加の環境変数 HOST_OVERRIDE を追加します。
環境変数を使用してエージェント カードの Burger Agent URL 値を更新する
HOST_OVERRIDE をバーガー エージェント サービスに追加する手順は次のとおりです。
- Cloud コンソールの上部にある検索バーで Cloud Run を検索します。

- 以前にデプロイした burger-agent Cloud Run サービスをクリックします。

- burger-service の URL をコピーし、[新しいリビジョンの編集とデプロイ] をクリックします。

- [変数とシークレット] セクションをクリックします。

- [変数を追加] をクリックし、
HOST_OVERRIDEの値をサービス URL(https://burger-agent-xxxxxxxxx.us-central1.run.appパターンを含む URL)に設定します。

- 最後に、[デプロイ] ボタンをクリックしてサービスを再デプロイします。

ブラウザ https://burger-agent-xxxxxxxxx.us-central1.run.app/.well-known/agent.json で burger-agent エージェント カードに再度アクセスすると、url 値がすでに正しく構成されています。

5. 🚀 ピザ販売エージェント - A2A サーバーのデプロイ
同様に、ピザ エージェントのソースコードは remote_seller_agents/pizza_agent ディレクトリにあります。
前の burger-agent のデプロイ手順と同様に、remote_seller_agents/pizza_agent ディレクトリにあるすべてのファイルは、エージェントを Cloud Run にデプロイしてサービスとしてアクセスできるようにするのに十分です。次のコマンドを実行してデプロイします。
gcloud run deploy pizza-agent \
    --source remote_seller_agents/pizza_agent \
    --port=8080 \
    --allow-unauthenticated \
    --min 1 \
    --region us-central1 \
    --update-env-vars GOOGLE_CLOUD_LOCATION=us-central1 \
    --update-env-vars GOOGLE_CLOUD_PROJECT={your-project-id}
デプロイが成功すると、次のようなログが表示されます。
Service [pizza-agent] revision [pizza-agent-xxxxx-xxx] has been deployed and is serving 100 percent of traffic.
Service URL: https://pizza-agent-xxxxxxxxx.us-central1.run.app
ここで xxxx の部分は、サービスをデプロイするときの一意の識別子になります。
ハンバーガー エージェントの場合も同様です。ブラウザからデプロイされたピザ エージェント サービスの https://pizza-agent-xxxxxxxxx.us-central1.run.app/.well-known/agent.json ルートにアクセスして A2A サーバー エージェント カードにアクセスしようとすると、エージェント カードのピザ エージェントの url 値がまだ正しく構成されていません。また、環境変数に HOST_OVERRIDE を追加する必要があります。
環境変数を使用してエージェント カードの Pizza Agent URL 値を更新する
ピザ エージェント サービスに HOST_OVERRIDE を追加する手順は次のとおりです。
- Cloud コンソールの上部にある検索バーで Cloud Run を検索します。
- 以前にデプロイした pizza-agent Cloud Run サービスをクリックします。

- [新しいリビジョンの編集とデプロイ] をクリックします。

- pizza-service の URL をコピーし、[変数とシークレット] セクションをクリックします。

- [変数を追加] をクリックし、
HOST_OVERRIDEの値をサービス URL(https://pizza-agent-xxxxxxxxx.us-central1.run.appパターンを含む URL)に設定します。

- 最後に、[デプロイ] ボタンをクリックしてサービスを再デプロイします。
ブラウザ https://pizza-agent-xxxxxxxxx.us-central1.run.app/.well-known/agent.json で pizza-agent エージェント カードに再度アクセスすると、url 値がすでに正しく構成されています。

この時点で、ハンバーガー サービスとピザ サービスの両方が Cloud Run に正常にデプロイされています。
6. 🚀 購入コンシェルジュ - A2A クライアントを Agent Engine にデプロイする
このステップでは、購入コンシェルジュ エージェントをデプロイします。このエージェントとやり取りします。

購入コンシェルジュ エージェントのソースコードは、purchasing_concierge ディレクトリにあります。エージェントの初期化は、purchasing_concierge/purchasing_agent.py スクリプトで確認できます。
デプロイする手順は次のとおりです。
- まず、Cloud Storage にステージング ストレージを作成する必要があります。
gcloud storage buckets create gs://purchasing-concierge-{your-project-id} --location=us-central1
- 次に、.env 変数を準備する必要があります。.env.example を .env ファイルにコピーしましょう。
cp .env.example .env
- .env ファイルを開くと、次の内容が表示されます。
GOOGLE_GENAI_USE_VERTEXAI=TRUE
GOOGLE_CLOUD_PROJECT={your-project-id}
GOOGLE_CLOUD_LOCATION=us-central1
STAGING_BUCKET=gs://purchasing-concierge-{your-project-id}
PIZZA_SELLER_AGENT_URL={your-pizza-agent-url}
BURGER_SELLER_AGENT_URL={your-burger-agent-url}
AGENT_ENGINE_RESOURCE_NAME={your-agent-engine-resource-name}
このエージェントはハンバーガー エージェントとピザ エージェントと通信するため、両方の適切な認証情報を提供する必要があります。前の手順で取得した Cloud Run URL を使用して、PIZZA_SELLER_AGENT_URL と BURGER_SELLER_AGENT_URL を更新する必要があります。
忘れた場合は、Cloud Run コンソールにアクセスしてください。コンソールの上部にある検索バーに「Cloud Run」と入力し、Cloud Run アイコンを右クリックして新しいタブで開きます。
次のように、以前にデプロイしたリモート販売者エージェント サービスが表示されます。

これらのサービスの公開 URL を確認するには、サービスのいずれかをクリックします。サービスの詳細ページにリダイレクトされます。URL は、上部の [Region] 情報のすぐ右側に表示されます。

最終的な環境変数は次のようになります。
GOOGLE_GENAI_USE_VERTEXAI=TRUE
GOOGLE_CLOUD_PROJECT={your-project-id}
GOOGLE_CLOUD_LOCATION=us-central1
STAGING_BUCKET=gs://purchasing-concierge-{your-project-id}
PIZZA_SELLER_AGENT_URL=https://pizza-agent-xxxxx.us-central1.run.app
BURGER_SELLER_AGENT_URL=https://burger-agent-xxxxx.us-central1.run.app
AGENT_ENGINE_RESOURCE_NAME={your-agent-engine-resource-name}
- これで、購入コンシェルジュ エージェントをデプロイする準備が整いました。エージェント エンジンにデプロイします。デプロイコードは
deploy_to_agent_engine.pyスクリプト内にあります。
スクリプトを実行してデプロイできます。
uv run deploy_to_agent_engine.py
デプロイが成功すると、次のようなログが表示されます。Agent Engine のリソース名が "projects/xxxx/locations/us-central1/reasoningEngines/yyyy" として表示されます。
AgentEngine created. Resource name: projects/xxxx/locations/us-central1/reasoningEngines/yyyy
To use this AgentEngine in another session:
agent_engine = vertexai.agent_engines.get('projects/xxxx/locations/us-central1/reasoningEngines/yyyy)
Deployed remote app resource: projects/xxxx/locations/us-central1/reasoningEngines/xxxx
Agent Engine ダッシュボードで検査すると(検索バーで「Agent Engine」を検索)、以前のデプロイが表示されます。

また、Agent Engine リソース名がそこに表示されていることを確認することもできます。このリソース名を使用してテストできます。
その後、この値で .env ファイルの AGENT_ENGINE_RESOURCE_NAME を更新します。エージェント エンジン リソース名を正しく指定してください。.env ファイルは次のようになります。
GOOGLE_GENAI_USE_VERTEXAI=TRUE
GOOGLE_CLOUD_PROJECT={your-project-id}
GOOGLE_CLOUD_LOCATION=us-central1
STAGING_BUCKET=gs://purchasing-concierge-{your-project-id}
PIZZA_SELLER_AGENT_URL=https://pizza-agent-xxxxx.us-central1.run.app
BURGER_SELLER_AGENT_URL=https://burger-agent-xxxxx.us-central1.run.app
AGENT_ENGINE_RESOURCE_NAME=projects/xxxx/locations/us-central1/reasoningEngines/yyyy
Agent Engine にデプロイされたエージェントをテストする
エージェント エンジンとのやり取りは、curl コマンドと SDK を介して行うことができます。たとえば、次のコマンドを実行して、デプロイされたエージェントとのやり取りを試します。
このクエリを送信して、エージェントが正常にデプロイされているかどうかを確認できます。次の test_agent_engine.sh スクリプトを実行します。
bash test_agent_engine.sh
スクリプトを調べると、エージェントに「利用可能なハンバーガー メニューを教えてください」と尋ねようとしていることがわかります。
成功すると、コンソールに次のように複数のレスポンス イベントがストリーミングされます。
{
  "content": {
    "parts": [
      {
        "text": "Here is our burger menu:\n- Classic Cheeseburger: IDR 85K\n- Double Cheeseburger: IDR 110K\n- Spicy Chicken Burger: IDR 80K\n- Spicy Cajun Burger: IDR 85K"
      }
    ],
    "role": "model"
  },
  "usage_metadata": {
    "candidates_token_count": 51,
    "candidates_tokens_details": [
      {
        "modality": "TEXT",
        "token_count": 51
      }
    ],
    "prompt_token_count": 907,
    "prompt_tokens_details": [
      {
        "modality": "TEXT",
        "token_count": 907
      }
    ],
    "total_token_count": 958,
    "traffic_type": "ON_DEMAND"
  },
  "invocation_id": "e-14679918-af68-45f1-b942-cf014368a733",
  "author": "purchasing_agent",
  "actions": {
    "state_delta": {},
    "artifact_delta": {},
    "requested_auth_configs": {}
  },
  "id": "dbe7fc43-b82a-4f3e-82aa-dd97afa8f15b",
  "timestamp": 1754287348.941454
}
次のステップでは UI を使用してみますが、まず A2A クライアントのコア コンポーネントと一般的なフローについて説明します。
7. 🚀 統合テストとペイロード検査
ウェブ UI を使用して、リモート エージェントのインタラクションで購買コンシェルジュを検査してみましょう。次のコマンドを実行して、Gradio アプリをデプロイします。このアプリを実行するには、.env ファイルが正しく入力されている必要があります。
uv run purchasing_concierge_ui.py
成功すると、次の出力が表示されます。
* Running on local URL:  http://0.0.0.0:8080
* To create a public link, set `share=True` in `launch()`.
次に、ターミナルで http://0.0.0.0:8080 の URL を Ctrl+クリックするか、ウェブ プレビュー ボタンをクリックしてウェブ UI を開きます。

次のような会話を試してください。
- ハンバーガーとピザのメニューを見せて
- バーベキュー チキン ピザ 1 個とスパイシー ケイジャン バーガー 1 個を注文したい
注文が完了するまで会話を続けます。インタラクションがどのように進行しているか、ツール呼び出しとレスポンスの内容を確認します。次の画像は、インタラクションの結果の例です。


2 つの異なるエージェントと通信すると、2 つの異なる動作が発生しますが、A2A はこれを適切に処理できます。ピザ販売業者のエージェントは購入エージェントのリクエストを直接受け付けますが、ハンバーガー販売業者のエージェントはリクエストを進める前に確認を必要とし、確認後にエージェントがハンバーガー販売業者のエージェントに確認を伝えることができます。
これで、A2A の基本概念の説明は終わりです。クライアントとサーバーのアーキテクチャとしてどのように実装されているかを見ていきましょう。
8. 💡 [コードの説明] A2A サーバーのコンセプトと実装
リモート販売者エージェントの初期化は、remote_seller_agents/*/agent.py スクリプトで確認できます。販売者エージェントのコード スニペットは次のとおりです。
Burger Agent
from crewai import Agent, Crew, LLM, Task, Process
from crewai.tools import tool

...

       model = LLM(
            model="vertex_ai/gemini-2.5-flash-lite",  # Use base model name without provider prefix
        )
        burger_agent = Agent(
            role="Burger Seller Agent",
            goal=(
                "Help user to understand what is available on burger menu and price also handle order creation."
            ),
            backstory=("You are an expert and helpful burger seller agent."),
            verbose=False,
            allow_delegation=False,
            tools=[create_burger_order],
            llm=model,
        )

        agent_task = Task(
            description=self.TaskInstruction,
            agent=burger_agent,
            expected_output="Response to the user in friendly and helpful manner",
        )

        crew = Crew(
            tasks=[agent_task],
            agents=[burger_agent],
            verbose=False,
            process=Process.sequential,
        )

        inputs = {"user_prompt": query, "session_id": sessionId}
        response = crew.kickoff(inputs)
        return response

...
Pizza Agent
from langchain_google_vertexai import ChatVertexAI
from langgraph.prebuilt import create_react_agent

...

self.model = ChatVertexAI(
    model="gemini-2.5-flash-lite",
    location=os.getenv("GOOGLE_CLOUD_LOCATION"),
    project=os.getenv("GOOGLE_CLOUD_PROJECT"),
)
self.tools = [create_pizza_order]
self.graph = create_react_agent(
    self.model,
    tools=self.tools,
    checkpointer=memory,
    prompt=self.SYSTEM_INSTRUCTION,
)

...
ご覧のとおり、これらの 2 つのエージェントは、クライアント エージェント(ADK)とはまったく異なるフレームワーク(CrewAI と Langgraph)で構築されています。A2A では、これは問題ではありません。相互に通信するために内部コードを共有する必要はありません。使用されているフレームワーク、使用されている言語、デプロイ場所は関係ありません。
A2A サーバーのコア コンポーネント
次に、A2A サーバーのコアコンセプトとコンポーネントについて説明します。
エージェント カード
A2A サーバーごとに、/.well-known/agent.json リソースでアクセス可能なエージェント カードが必要です。これは、A2A クライアントの検出フェーズをサポートするためです。このフェーズでは、エージェントにアクセスする方法と、そのすべての機能を知る方法に関する完全な情報とコンテキストが提供されます。Swagger や Postman を使用して API ドキュメントを適切に記述することに似ています。
これは、デプロイされたバーガー エージェントのエージェント カードのコンテンツです。
{
  "capabilities": {
    "streaming": true
  },
  "defaultInputModes": [
    "text",
    "text/plain"
  ],
  "defaultOutputModes": [
    "text",
    "text/plain"
  ],
  "description": "Helps with creating burger orders",
  "name": "burger_seller_agent",
  "protocolVersion": "0.2.6",
  "skills": [
    {
      "description": "Helps with creating burger orders",
      "examples": [
        "I want to order 2 classic cheeseburgers"
      ],
      "id": "create_burger_order",
      "name": "Burger Order Creation Tool",
      "tags": [
        "burger order creation"
      ]
    }
  ],
  "url": "https://burger-agent-109790610330.us-central1.run.app",
  "version": "1.0.0"
}
エージェント カードには、エージェントのスキル、ストリーミング機能、サポートされているモダリティ、プロトコル バージョンなど、多くの重要なコンポーネントがハイライト表示されます。
この情報はすべて、A2A クライアントが適切に通信できるように、適切な通信メカニズムを開発するために使用できます。サポートされているモダリティと認証メカニズムにより、通信を適切に確立できます。また、エージェント skills 情報を A2A クライアント システム プロンプトに埋め込むことで、呼び出すリモート エージェントの機能とスキルに関するコンテキストをクライアントのエージェントに提供できます。このエージェント カードのフィールドの詳細については、こちらのドキュメントをご覧ください。
コードでは、A2A Python SDK を使用してエージェント カードの実装を確立しています。実装については、以下の remote_seller_agents/burger_agent/main.py スニペットをご覧ください。
...

        capabilities = AgentCapabilities(streaming=True)
        skill = AgentSkill(
            id="create_burger_order",
            name="Burger Order Creation Tool",
            description="Helps with creating burger orders",
            tags=["burger order creation"],
            examples=["I want to order 2 classic cheeseburgers"],
        )
        agent_host_url = (
            os.getenv("HOST_OVERRIDE")
            if os.getenv("HOST_OVERRIDE")
            else f"http://{host}:{port}/"
        )
        agent_card = AgentCard(
            name="burger_seller_agent",
            description="Helps with creating burger orders",
            url=agent_host_url,
            version="1.0.0",
            defaultInputModes=BurgerSellerAgent.SUPPORTED_CONTENT_TYPES,
            defaultOutputModes=BurgerSellerAgent.SUPPORTED_CONTENT_TYPES,
            capabilities=capabilities,
            skills=[skill],
        )

...
次のようなフィールドがあります。
AgentCapabilities: エージェント サービスでサポートされる追加のオプション機能(ストリーミング機能やプッシュ通知のサポートなど)の宣言AgentSkill: エージェントでサポートされているツールまたは関数Input/OutputModes: サポートされている入力/出力タイプのモダリティUrl: エージェントとの通信に使用するアドレス
この構成では、動的エージェント ホスト URL の作成を提供しているため、ローカル テストとクラウド デプロイを簡単に切り替えることができます。そのため、前のステップで HOST_OVERRIDE 変数を追加する必要がありました。
タスクキューとエージェント エグゼキュータ
A2A サーバーは、さまざまなエージェントやユーザーからのリクエストを処理し、各タスクを完全に分離できます。これらのコンテキストをよりわかりやすくするために、下の画像をご覧ください。
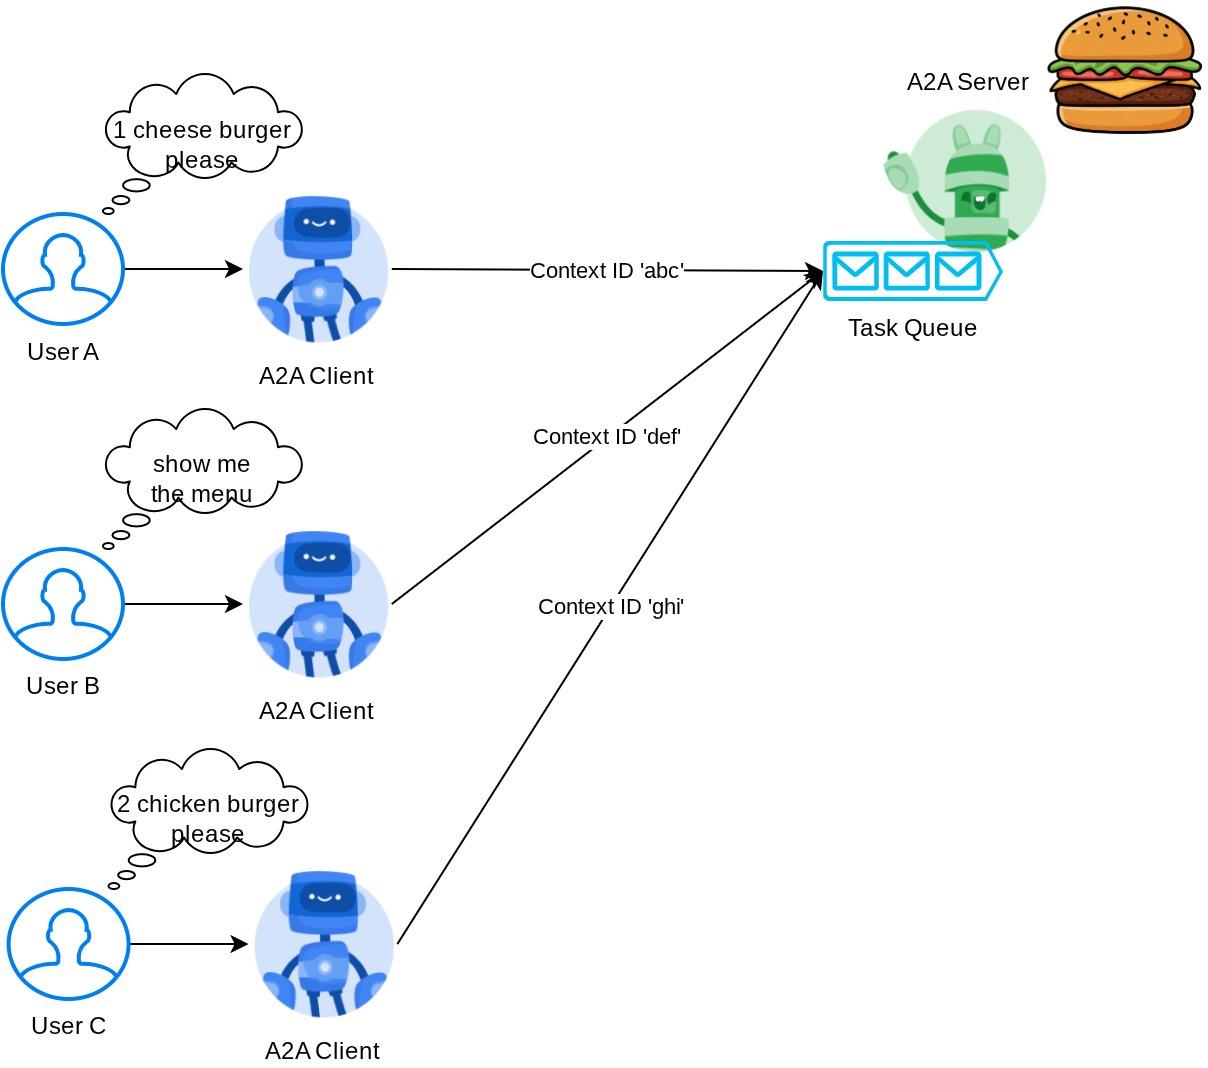
したがって、各 A2A サーバーは、受信タスクを追跡し、それに関する適切な情報を保存できる必要があります。A2A SDK には、A2A サーバーでこの課題に対処するためのモジュールが用意されています。まず、受信リクエストの処理方法に関するロジックをインスタンス化します。AgentExecutor 抽象クラスを継承することで、タスクの実行とキャンセルを管理する方法を制御できます。この実装例は remote_seller_agents/burger_agent/agent_executor.py モジュールで確認できます(ピザ販売者のケースも同様のパスです)。
...

class BurgerSellerAgentExecutor(AgentExecutor):
    """Burger Seller AgentExecutor."""

    def __init__(self):
        self.agent = BurgerSellerAgent()

    async def execute(
        self,
        context: RequestContext,
        event_queue: EventQueue,
    ) -> None:
        query = context.get_user_input()
        try:
            result = self.agent.invoke(query, context.context_id)
            print(f"Final Result ===> {result}")

            parts = [Part(root=TextPart(text=str(result)))]
            await event_queue.enqueue_event(
                completed_task(
                    context.task_id,
                    context.context_id,
                    [new_artifact(parts, f"burger_{context.task_id}")],
                    [context.message],
                )
            )
        except Exception as e:
            print("Error invoking agent: %s", e)
            raise ServerError(error=ValueError(f"Error invoking agent: {e}")) from e

    async def cancel(
        self, request: RequestContext, event_queue: EventQueue
    ) -> Task | None:
        raise ServerError(error=UnsupportedOperationError())

...
上記のコードでは、リクエストが着信したときにエージェントが直接呼び出され、呼び出しが完了した後に完了したタスクイベントを送信する基本的な処理スキームを実装しています。ただし、ここではキャンセル メソッドは実装していません。これは、短時間で実行されるオペレーションと見なされたためです。
エグゼキュータをビルドしたら、組み込みの DefaultRequestHandler、InMemoryTaskStore、A2AStarletteApplication を直接利用して HTTP サーバーをスピンアップできます。この実装は remote_seller_agents/burger_agent/__main__.py で確認できます。
...

        request_handler = DefaultRequestHandler(
            agent_executor=BurgerSellerAgentExecutor(),
            task_store=InMemoryTaskStore(),
        )
        server = A2AStarletteApplication(
            agent_card=agent_card, http_handler=request_handler
        )

        uvicorn.run(server.build(), host=host, port=port)

...
このモジュールでは、エージェント カードにアクセスするための /.well-known/agent.json ルートの実装と、A2A プロトコルをサポートするための POST エンドポイントの実装について説明します。
概要
要するに、これまでのところ、以下の 2 つの機能をサポートできる Python SDK を使用して A2A サーバーをデプロイしました。
/.well-known/agent.jsonのルートにエージェント カードを公開する- インメモリ タスクキューイングで JSON-RPC リクエストを処理する
これらの機能の開始時のエントリ ポイントは、__main__.py スクリプト(remote_seller_agents/burger_agent または remote_seller_agents/pizza_agent)で確認できます。
9. 💡 [コードの説明] Agent Engine のデプロイ
purchasing_concierge/purchasing_agent.py: の購入コンシェルジュ エージェントのコード スニペットは次のとおりです。
from google.adk import Agent

...

def create_agent(self) -> Agent:
        return Agent(
            model="gemini-2.5-flash-lite",
            name="purchasing_agent",
            instruction=self.root_instruction,
            before_model_callback=self.before_model_callback,
            before_agent_callback=self.before_agent_callback,
            description=(
                "This purchasing agent orchestrates the decomposition of the user purchase request into"
                " tasks that can be performed by the seller agents."
            ),
            tools=[
                self.send_task,
            ],
        )

...
このエージェントは ADK を使用して構築され、Agent Engine にデプロイされます。
Vertex AI Agent Engine は、開発者が本番環境で AI エージェントをデプロイ、管理、スケーリングできるようにする一連のサービスです。本番環境でエージェントをスケーリングするためのインフラストラクチャの処理は Agent Engine が行うため、開発者はアプリケーションの作成に注力できます。詳細については、こちらのドキュメント をご覧ください。以前は、エージェント サービスのデプロイに必要なファイル(main サーバー スクリプトや Dockerfile など)を準備する必要がありましたが、この場合は、ADK と Agent Engine を組み合わせて使用することで、独自のバックエンド サービスを開発することなく、Python スクリプトからエージェントを直接デプロイできます。
このチュートリアルでは、次の内容のスクリプト deploy_to_agent_engine.py を使用してデプロイします。
import vertexai
from vertexai.preview import reasoning_engines
from vertexai import agent_engines
from dotenv import load_dotenv
import os
from purchasing_concierge.agent import root_agent

load_dotenv()

PROJECT_ID = os.getenv("GOOGLE_CLOUD_PROJECT")
LOCATION = os.getenv("GOOGLE_CLOUD_LOCATION")
STAGING_BUCKET = os.getenv("STAGING_BUCKET")

vertexai.init(
    project=PROJECT_ID,
    location=LOCATION,
    staging_bucket=STAGING_BUCKET,
)

adk_app = reasoning_engines.AdkApp(
    agent=root_agent,
)

remote_app = agent_engines.create(
    agent_engine=adk_app,
    display_name="purchasing-concierge",
    requirements=[
        "google-cloud-aiplatform[adk,agent_engines]",
        "a2a-sdk==0.2.16",
    ],
    extra_packages=[
        "./purchasing_concierge",
    ],
    env_vars={
        "GOOGLE_GENAI_USE_VERTEXAI": os.environ["GOOGLE_GENAI_USE_VERTEXAI"],
        "PIZZA_SELLER_AGENT_URL": os.environ["PIZZA_SELLER_AGENT_URL"],
        "BURGER_SELLER_AGENT_URL": os.environ["BURGER_SELLER_AGENT_URL"],
    },
)

print(f"Deployed remote app resource: {remote_app.resource_name}")
これは、ADK エージェントをエージェント エンジンにデプロイするために必要な手順です。まず、ADK root_agent から AdkApp オブジェクトを作成する必要があります。次に、adk_app オブジェクトを指定して agent_engines.create メソッドを実行します。requirements フィールドで要件を指定し、extra_packages でエージェント ディレクトリのパスを指定します(必要に応じて、他のディレクトリやファイルも指定できます)。また、必要な環境変数を指定します。
10. 💡 [コードの説明] A2A クライアントのコンセプトと実装
上の図は、A2A インタラクションの一般的なフローを示しています。
- クライアントは、ルート
/.well-known/agent.jsonで指定されたリモート エージェント URL に公開済みのエージェント カードがないか検索します。 - 次に、必要に応じて、メッセージと必要なメタデータ パラメータ(セッション ID、履歴コンテキストなど)を含むメッセージをそのエージェントに送信します。サーバーはこのメッセージを完了すべきタスクとして認識します。
- A2A サーバーはリクエストを処理します。サーバーがプッシュ通知をサポートしている場合、タスク処理全体で通知を公開することもできます(この機能はこの Codelab の範囲外です)。
- 完了すると、A2A サーバーはレスポンス アーティファクトをクライアントに返送します。
上記のインタラクションのコア オブジェクトの一部は次のアイテムです(詳細については、こちらをご覧ください)。
- メッセージ: クライアントとリモート エージェント間の通信ターン
- タスク: A2A によって管理される作業の基本単位。一意の ID で識別されます。
- アーティファクト: エージェントがタスクの結果として生成する出力(ドキュメント、画像、構造化データなど)。パーツで構成されます。
- Part: メッセージまたはアーティファクト内のコンテンツの最小単位。パートは、テキスト、画像、動画、ファイルなどです。
カードの検出
A2A クライアント サービスが起動されると、通常はエージェント カード情報を取得して保存し、必要に応じて簡単にアクセスできるようにします。この Codelab では、before_agent_callback で実装します。実装は purchasing_concierge/purchasing_agent.py で確認できます。以下のコード スニペットをご覧ください。
...

async def before_agent_callback(self, callback_context: CallbackContext):
        if not self.a2a_client_init_status:
            httpx_client = httpx.AsyncClient(timeout=httpx.Timeout(timeout=30))
            for address in self.remote_agent_addresses:
                card_resolver = A2ACardResolver(
                    base_url=address, httpx_client=httpx_client
                )
                try:
                    card = await card_resolver.get_agent_card()
                    remote_connection = RemoteAgentConnections(
                        agent_card=card, agent_url=card.url
                    )
                    self.remote_agent_connections[card.name] = remote_connection
                    self.cards[card.name] = card
                except httpx.ConnectError:
                    print(f"ERROR: Failed to get agent card from : {address}")
            agent_info = []
            for ra in self.list_remote_agents():
                agent_info.append(json.dumps(ra))
            self.agents = "\n".join(agent_info)

...
ここでは、組み込みの A2A クライアント A2ACardResolver モジュールを使用して、利用可能なすべてのエージェント カードにアクセスしようとします。次に、エージェントにメッセージを送信するために必要な接続を収集します。その後、利用可能なすべてのエージェントとその仕様をプロンプトにリストする必要があります。これにより、エージェントはこれらのエージェントと通信できることを認識します。
プロンプトと送信タスクツール
これは、ここで ADK エージェントに提供するプロンプトとツールです。
...

def root_instruction(self, context: ReadonlyContext) -> str:
    current_agent = self.check_active_agent(context)
    return f"""You are an expert purchasing delegator that can delegate the user product inquiry and purchase request to the
appropriate seller remote agents.

Execution:
- For actionable tasks, you can use `send_task` to assign tasks to remote agents to perform.
- When the remote agent is repeatedly asking for user confirmation, assume that the remote agent doesn't have access to user's conversation context.
So improve the task description to include all the necessary information related to that agent
- Never ask user permission when you want to connect with remote agents. If you need to make connection with multiple remote agents, directly
connect with them without asking user permission or asking user preference
- Always show the detailed response information from the seller agent and propagate it properly to the user.
- If the remote seller is asking for confirmation, rely the confirmation question to the user if the user haven't do so.
- If the user already confirmed the related order in the past conversation history, you can confirm on behalf of the user
- Do not give irrelevant context to remote seller agent. For example, ordered pizza item is not relevant for the burger seller agent
- Never ask order confirmation to the remote seller agent

Please rely on tools to address the request, and don't make up the response. If you are not sure, please ask the user for more details.
Focus on the most recent parts of the conversation primarily.

If there is an active agent, send the request to that agent with the update task tool.

Agents:
{self.agents}

Current active seller agent: {current_agent["active_agent"]}
"""

...

async def send_task(self, agent_name: str, task: str, tool_context: ToolContext):
        """Sends a task to remote seller agent

        This will send a message to the remote agent named agent_name.

        Args:
            agent_name: The name of the agent to send the task to.
            task: The comprehensive conversation context summary
                and goal to be achieved regarding user inquiry and purchase request.
            tool_context: The tool context this method runs in.

        Yields:
            A dictionary of JSON data.
        """
        if agent_name not in self.remote_agent_connections:
            raise ValueError(f"Agent {agent_name} not found")
        state = tool_context.state
        state["active_agent"] = agent_name
        client = self.remote_agent_connections[agent_name]
        if not client:
            raise ValueError(f"Client not available for {agent_name}")
        session_id = state["session_id"]
        task: Task
        message_id = ""
        metadata = {}
        if "input_message_metadata" in state:
            metadata.update(**state["input_message_metadata"])
            if "message_id" in state["input_message_metadata"]:
                message_id = state["input_message_metadata"]["message_id"]
        if not message_id:
            message_id = str(uuid.uuid4())

        payload = {
            "message": {
                "role": "user",
                "parts": [
                    {"type": "text", "text": task}
                ],  # Use the 'task' argument here
                "messageId": message_id,
                "contextId": session_id,
            },
        }

        message_request = SendMessageRequest(
            id=message_id, params=MessageSendParams.model_validate(payload)
        )
        send_response: SendMessageResponse = await client.send_message(
            message_request=message_request
        )
        print(
            "send_response",
            send_response.model_dump_json(exclude_none=True, indent=2),
        )

        if not isinstance(send_response.root, SendMessageSuccessResponse):
            print("received non-success response. Aborting get task ")
            return None

        if not isinstance(send_response.root.result, Task):
            print("received non-task response. Aborting get task ")
            return None

        return send_response.root.result

...
プロンプトでは、購入コンシェルジュ エージェントに利用可能なすべてのリモート エージェントの名前と説明を提供します。また、ツール self.send_task では、適切なクライアントを取得してエージェントに接続し、SendMessageRequest オブジェクトを使用して必要なメタデータを送信するメカニズムを提供します。
コミュニケーションに関する取り決め
Task 定義は、A2A サーバーが所有するドメインです。ただし、A2A クライアントの視点から見ると、これはサーバーに送信される メッセージとして認識されます。クライアントからの受信メッセージをどのタスクとして定義するか、タスクの完了にクライアントからのインタラクションが必要かどうかは、サーバー次第です。タスクのライフサイクルの詳細については、こちらのドキュメントをご覧ください。この上位レベルのコンセプトを次の図に示します。


メッセージとタスクのこの交換は、message/send プロトコルの次の例に示すように、JSON-RPC 標準の上にペイロード形式を使用して実装されます。
{
  # identifier for this request
  "id": "abc123",
  # version of JSON-RPC protocol
  "jsonrpc": "2.0",
  # method name
  "method": "message/send",
  # parameters/arguments of the method
  "params": {
    "message": "hi, what can you help me with?"
  }
}
さまざまなメソッドが用意されています。たとえば、さまざまなタイプの通信(同期、ストリーミング、非同期など)をサポートしたり、タスク ステータスの通知を構成したりできます。A2A サーバーは、これらのタスク定義標準を処理するように柔軟に構成できます。これらのメソッドの詳細については、こちらのドキュメントをご覧ください。
11. 🎯 課題
必要なファイルを用意して、Gradio アプリを Cloud Run にデプロイできますか?チャレンジに参加しましょう。
12. 🧹 クリーンアップ
この Codelab で使用したリソースについて、Google Cloud アカウントに課金されないようにするには、次の手順を行います。
- Google Cloud コンソールで、[リソースの管理] ページに移動します。
- プロジェクト リストで、削除するプロジェクトを選択し、[削除] をクリックします。
- ダイアログでプロジェクト ID を入力し、[シャットダウン] をクリックしてプロジェクトを削除します。
- または、コンソールの [Cloud Run] と [Agent Engine] に移動し、デプロイしたサービスを選択して削除することもできます。