1. 📖 简介
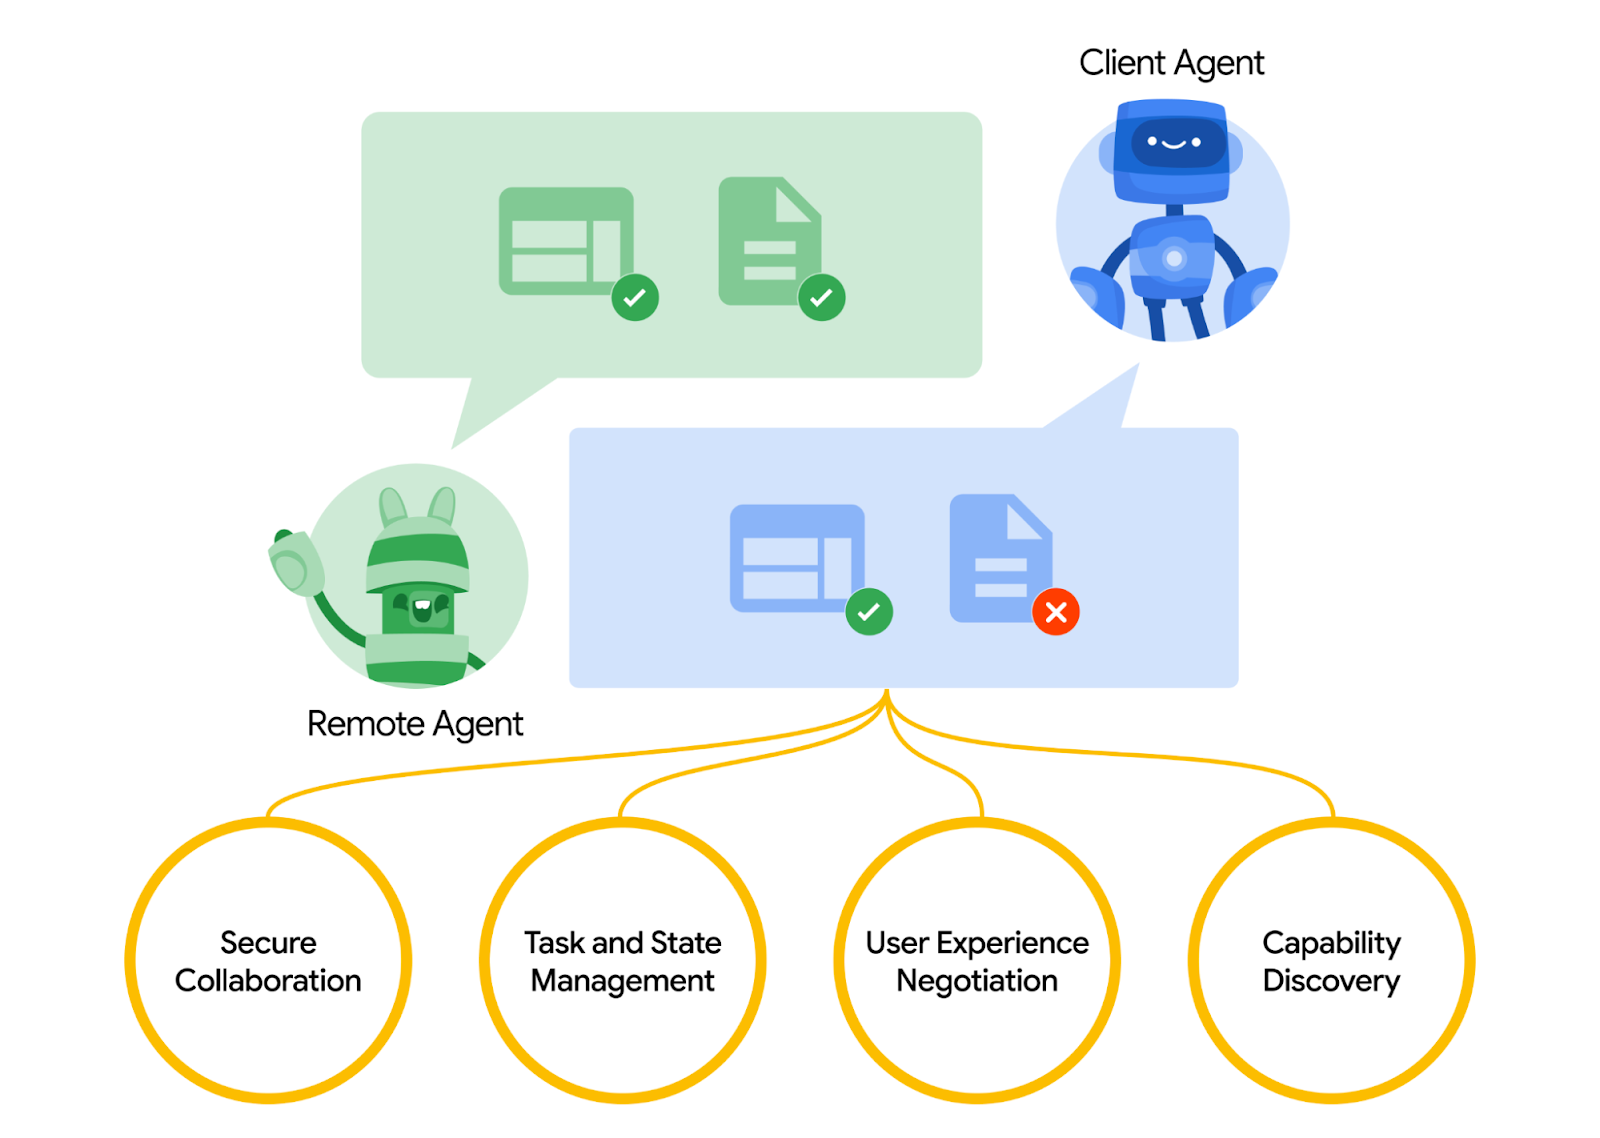
Agent2Agent (A2A) 协议旨在标准化 AI 代理之间的通信,尤其是部署在外部系统中的代理。之前,我们为工具建立了此类协议,称为 Model Context Protocol (MCP),这是一种将 LLM 与数据和资源连接起来的新兴标准。A2A 尝试补充 MCP,但 A2A 侧重于不同的问题。MCP 侧重于降低将智能体与工具和数据相连的复杂性,而 A2A 侧重于如何使智能体能够以自然的方式进行协作。它允许智能体以智能体(或用户)的身份而非工具的身份进行通信;例如,当您想订购某件商品时,可以进行来回通信。
A2A 定位为 MCP 的补充,在官方文档中,建议应用使用 MCP 作为工具,使用 A2A 作为代理 - 由 AgentCard 表示(我们将在后面讨论这一点)。然后,框架可以使用 A2A 与其用户、远程代理和其他代理进行通信。

在此演示中,我们将首先使用 Python SDK 实现 A2A。我们将探讨一个用例,其中包含一个个人购买助理,可帮助我们与汉堡和披萨卖家代理沟通,以处理我们的订单。
A2A 采用客户端-服务器原则。以下是您在本教程中将看到的典型 A2A 流程
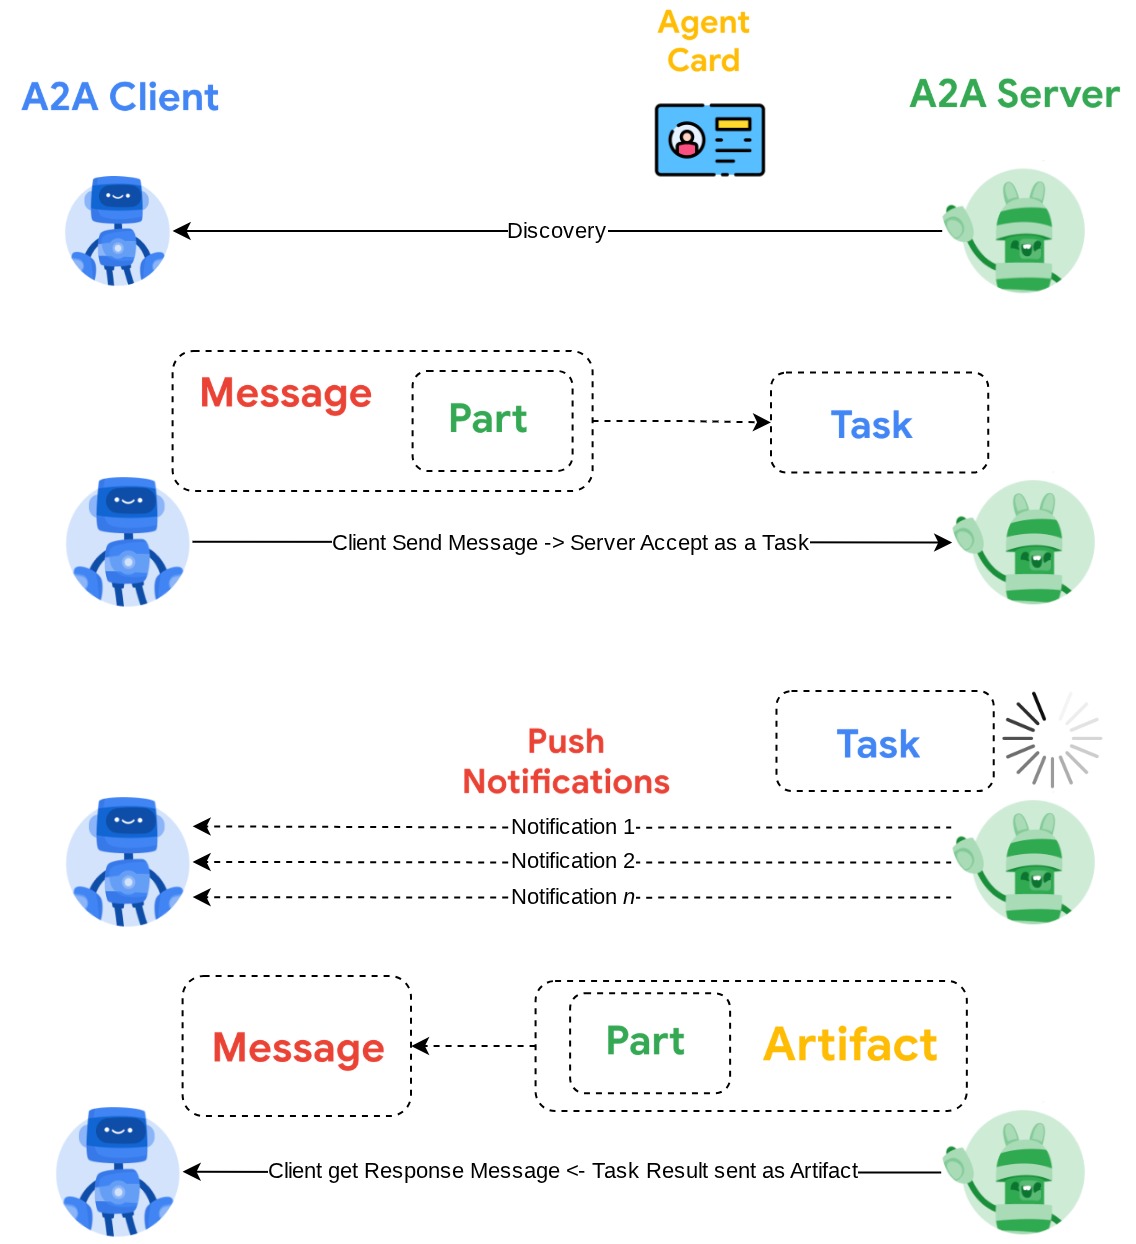
- A2A 客户端将首先对所有可访问的 A2A 服务器代理卡片进行发现,并利用其信息构建连接客户端
- 在需要时,A2A 客户端会向 A2A 服务器发送消息,服务器会将此消息评估为要完成的任务。如果 A2A 客户端上配置了推送通知接收器网址,并且 A2A 服务器支持该网址,则服务器还能够将任务进度状态发布到客户端上的接收端点
- 任务完成后,A2A 服务器会将响应制品发送到 A2A 客户端
在此 Codelab 中,您将采用以下分步方法:
- 准备 Google Cloud 项目
- 为编码环境设置工作目录
- 将汉堡智能体部署到 Cloud Run
- 将披萨代理部署到 Cloud Run
- 将购买礼宾服务部署到 Agent Engine
- 通过本地界面与购买礼宾服务互动
架构概览
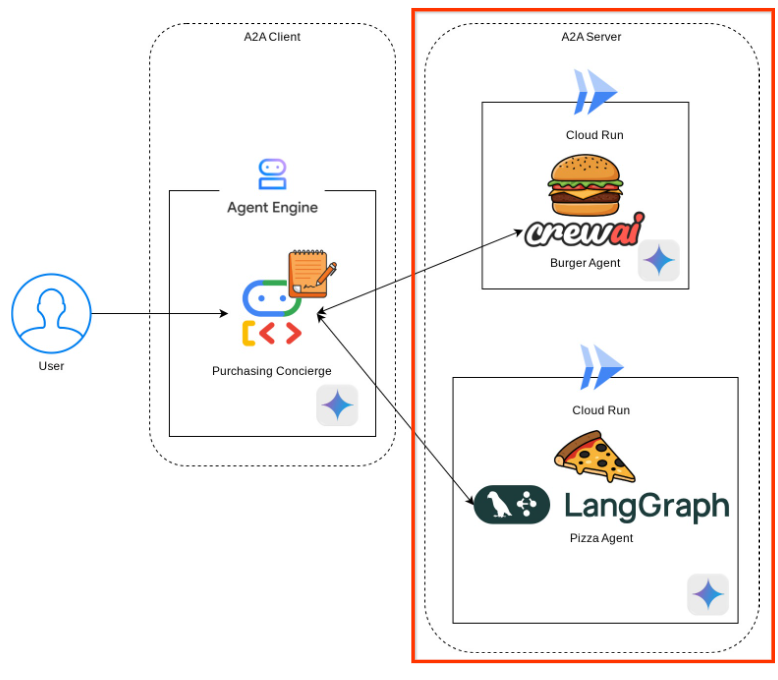
您将部署以下服务架构
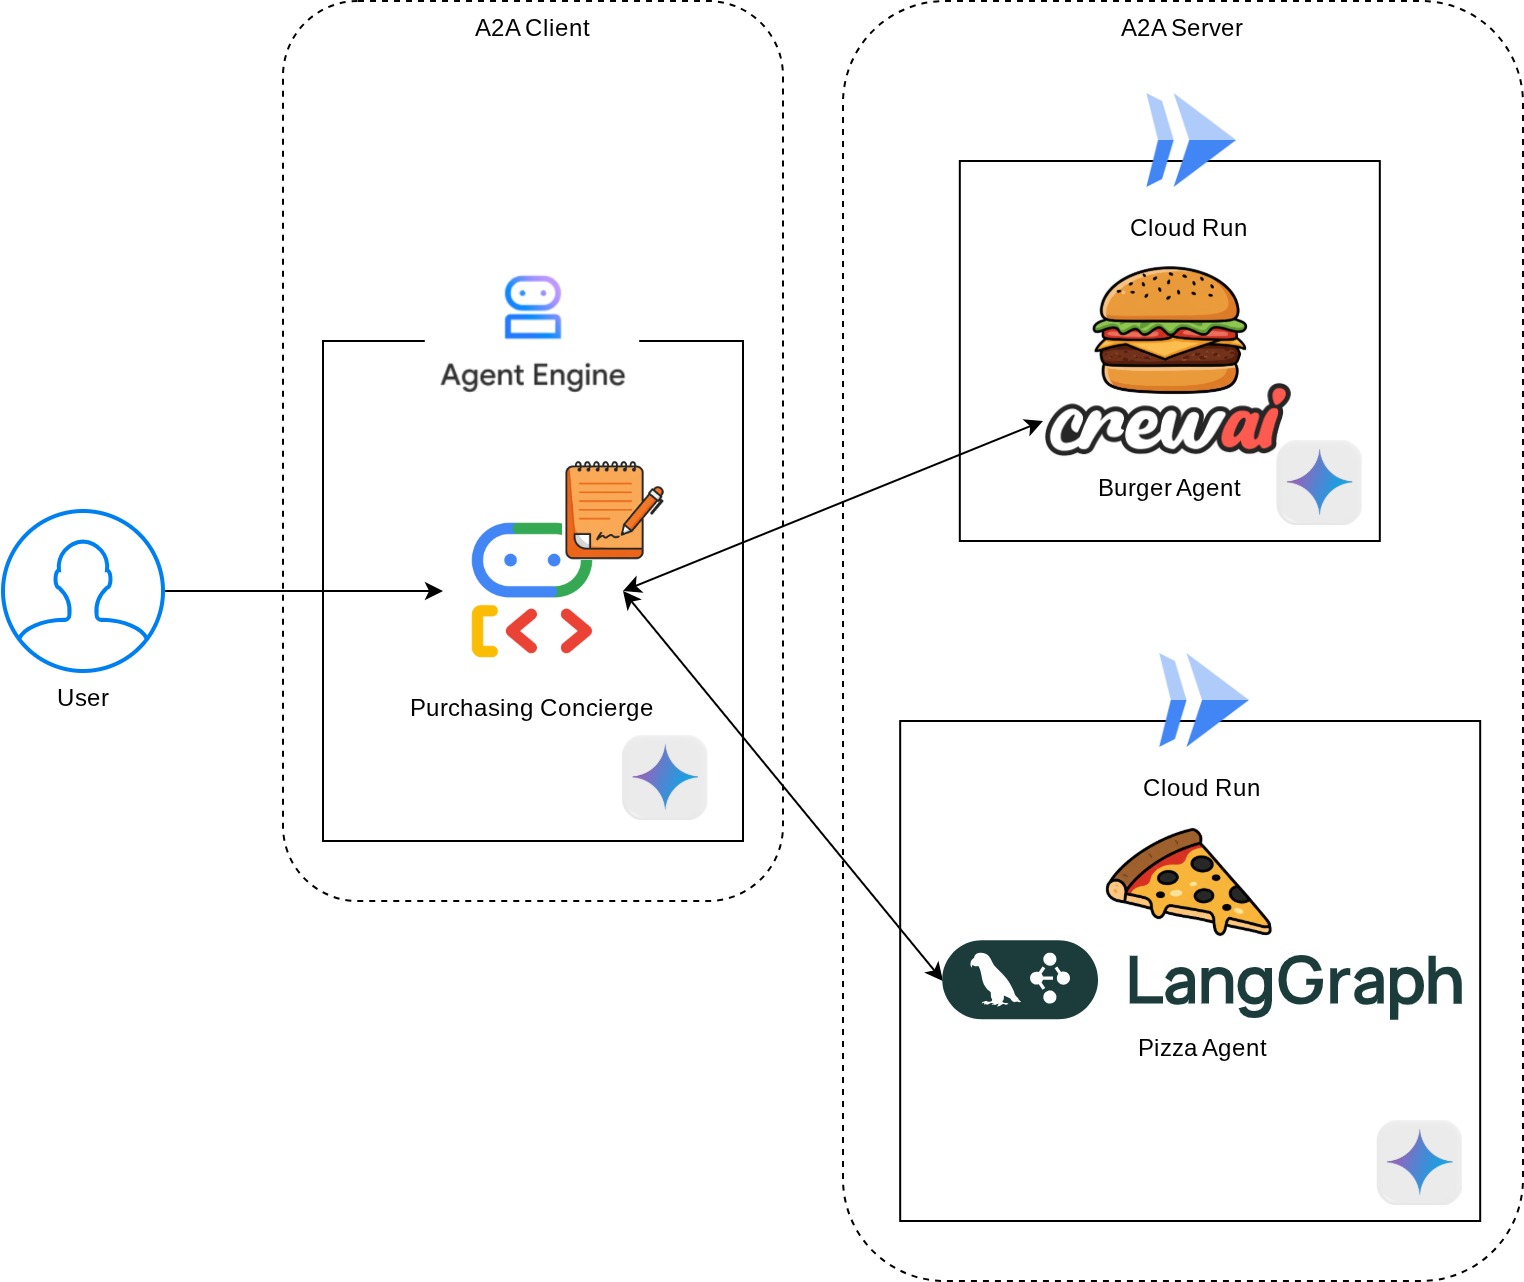
您将部署 2 个充当 A2A 服务器的服务,即 Burger 代理(由 CrewAI 代理框架提供支持)和 Pizza 代理(由 Langgraph 代理框架提供支持)。用户将仅直接与使用智能体开发套件 (ADK) 框架运行的采购礼宾服务互动,该服务将充当 A2A 客户端。
每个代理都有自己的环境和部署。
前提条件
- 能够熟练使用 Python
- 了解使用 HTTP 服务的全栈基本架构
学习内容
- A2A 服务器的核心结构
- A2A 客户端的核心结构
- 将代理服务部署到 Cloud Run
- 将代理服务部署到 Agent Engine
- A2A 客户端如何连接到 A2A 服务器
- 非流式连接中的请求和响应结构
所需条件
- Chrome 网络浏览器
- Gmail 账号
- 启用了结算账号的 Cloud 项目
此 Codelab 专为各种水平的开发者(包括新手)而设计,并在示例应用中使用 Python。不过,您无需具备 Python 知识即可理解所介绍的概念。
2. 🚀 准备工作坊开发设置
第 1 步:在 Cloud 控制台中选择有效项目
在 Google Cloud 控制台的项目选择器页面上,选择或创建一个 Google Cloud 项目(请参阅控制台的左上角部分)

点击该链接后,您会看到所有项目的列表,如以下示例所示:

红框中显示的值是项目 ID,本教程中会一直使用此值。
确保您的 Cloud 项目已启用结算功能。如需查看此信息,请点击左上角栏中的汉堡图标 ☰,该图标会显示导航菜单,然后找到“结算”菜单

如果您看到“Google Cloud Platform 试用结算账号”已关联,则表示您的项目已准备就绪,可以用于本教程。如果未显示,请返回本教程的开头并兑换结算账号

第 2 步:熟悉 Cloud Shell
在教程的大部分内容中,您将使用 Cloud Shell。点击 Google Cloud 控制台顶部的“激活 Cloud Shell”。如果系统提示您授权,请点击授权


连接到 Cloud Shell 后,我们需要检查 shell(或终端)是否已通过我们的账号进行身份验证
gcloud auth list
如果您看到个人 Gmail 地址,如以下示例输出所示,则一切正常
Credentialed Accounts

ACTIVE: *
ACCOUNT: alvinprayuda@gmail.com

To set the active account, run:
    $ gcloud config set account `ACCOUNT`
如果不是,请尝试刷新浏览器,并确保在系统提示时点击授权(连接问题可能会导致授权中断)
接下来,我们还需要检查 shell 是否已配置为正确的 PROJECT ID。如果您在终端中看到 $符号之前的括号内有值(在下面的屏幕截图中,该值为 “a2a-agent-engine”),则表示您的有效 shell 会话已配置项目。

如果显示的值已正确,您可以跳过下一个命令。不过,如果该值不正确或缺失,请运行以下命令
gcloud config set project <YOUR_PROJECT_ID>
然后,从 GitHub 克隆此 Codelab 的模板工作目录,运行以下命令。它将在 purchasing-concierge-a2a 目录中创建工作目录
git clone https://github.com/alphinside/purchasing-concierge-intro-a2a-codelab-starter.git purchasing-concierge-a2a
第 3 步:熟悉 Cloud Shell 编辑器并设置应用工作目录
现在,我们可以设置代码编辑器来执行一些编码操作。我们将使用 Cloud Shell 编辑器来完成此
点击打开编辑器按钮,系统会打开 Cloud Shell 编辑器 
之后,前往 Cloud Shell 编辑器的顶部部分,依次点击文件 -> 打开文件夹,找到您的用户名目录和 purchasing-concierge-a2a 目录,然后点击“确定”按钮。这样一来,所选目录就会成为主工作目录。在此示例中,用户名为 alvinprayuda,因此目录路径如下所示


现在,您的 Cloud Shell 编辑器应如下所示
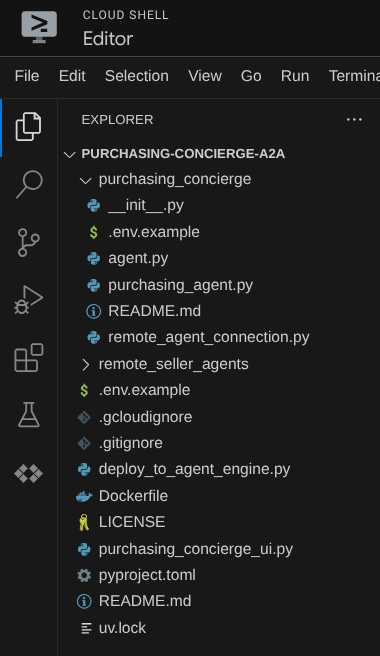
现在,打开编辑器的终端。您可以在菜单栏中点击 Terminal -> New Terminal 来打开终端,也可以使用 Ctrl + Shift + C 快捷键,这会在浏览器的底部打开一个终端窗口

当前活跃的终端应位于 purchasing-concierge-a2a 工作目录中。在此 Codelab 中,我们将使用 Python 3.12,并使用 uv Python 项目管理器来简化创建和管理 Python 版本和虚拟环境的需求。此 uv 软件包已预安装在 Cloud Shell 上。
运行此命令以将所需依赖项安装到 .venv 目录中的虚拟环境
uv sync --frozen
查看 pyproject.toml,了解本教程中声明的依赖项,即 a2a-sdk, google-adk, and gradio。
现在,我们需要通过以下命令启用必需的 API。这可能需要一段时间。
gcloud services enable aiplatform.googleapis.com \
                       run.googleapis.com \
                       cloudbuild.googleapis.com \
                       cloudresourcemanager.googleapis.com
成功执行该命令后,您应该会看到类似于以下内容的消息:
Operation "operations/..." finished successfully.
3. 🚀 将 A2A 服务器远程卖家代理部署到 Cloud Run
在此步骤中,我们将部署这两个用红框标记的远程卖家代理。汉堡代理将由 CrewAI 代理框架提供支持,披萨代理将由 Langgraph 代理提供支持
4. 🚀 部署 Burger Seller Agent - A2A 服务器
汉堡代理的源代码位于 remote_seller_agents/burger_agent 目录下。
remote_seller_agents/burger_agent 目录下的所有文件都足以将我们的代理部署到 Cloud Run,以便可以作为服务进行访问。运行以下命令以部署该应用
gcloud run deploy burger-agent \
    --source remote_seller_agents/burger_agent \
    --port=8080 \
    --allow-unauthenticated \
    --min 1 \
    --region us-central1 \
    --update-env-vars GOOGLE_CLOUD_LOCATION=us-central1 \
    --update-env-vars GOOGLE_CLOUD_PROJECT={your-project-id}
如果系统提示您将创建一个容器仓库以用于从源代码进行部署,请回答 Y。成功部署后,系统会显示如下日志。
Service [burger-agent] revision [burger-agent-xxxxx-xxx] has been deployed and is serving 100 percent of traffic.
Service URL: https://burger-agent-xxxxxxxxx.us-central1.run.app
此处的 xxxx 部分在部署服务时将是一个唯一标识符。
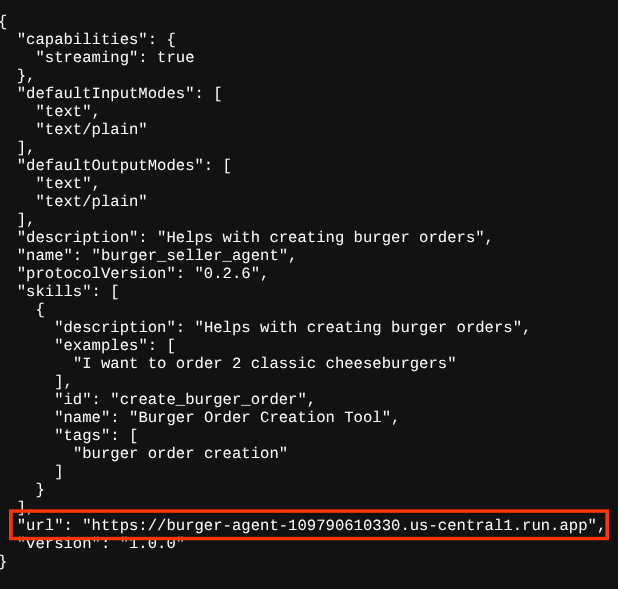
打开新的浏览器标签页,然后通过浏览器前往已部署的 Burger 代理服务的 https://burger-agent-xxxxxxxxx.us-central1.run.app/.well-known/agent.json 路由。这是用于访问已部署的 A2A 服务器代理卡片的网址。
如果成功部署,您在浏览器中访问代理卡片时会看到如下所示的响应
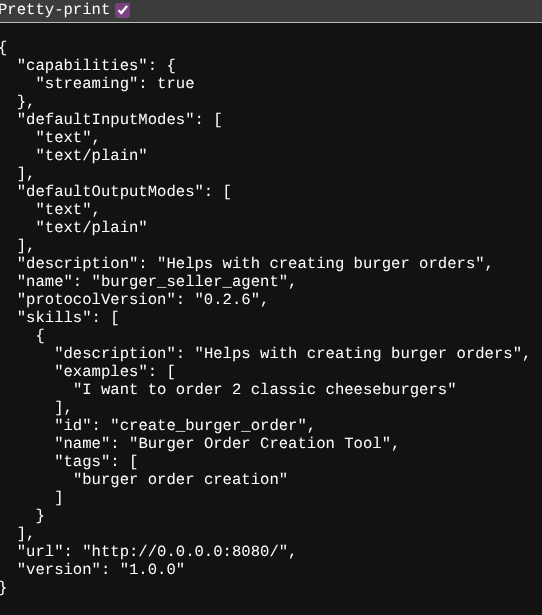
这是应可供发现的汉堡代理卡片信息。
请注意,此时 url 值仍设置为 http://0.0.0.0:8080/。此 url 值应该是 A2A 客户端从外部世界发送消息的主要信息,但未正确配置。
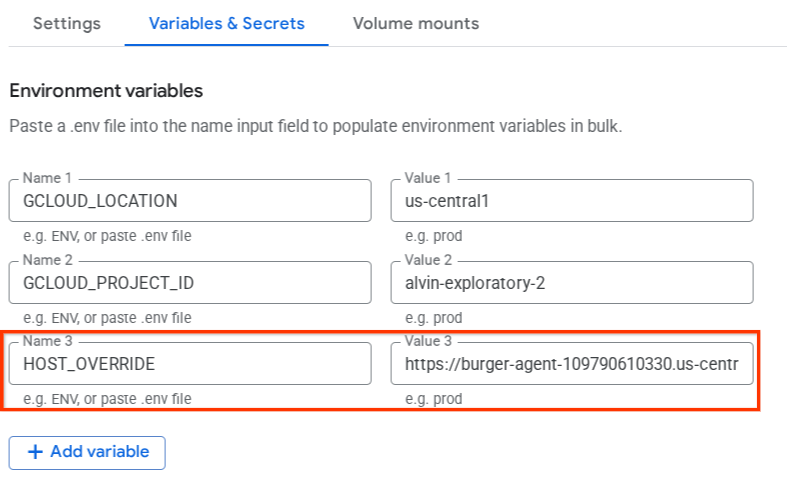
我们需要添加一个额外的环境变量 HOST_OVERRIDE,将此值更新为汉堡代理服务的网址。
通过环境变量更新代理卡上的汉堡代理网址值
如需向 burger 代理服务添加 HOST_OVERRIDE,请执行以下步骤
- 在 Cloud 控制台顶部的搜索栏中搜索 Cloud Run

- 点击之前部署的 burger-agent Cloud Run 服务

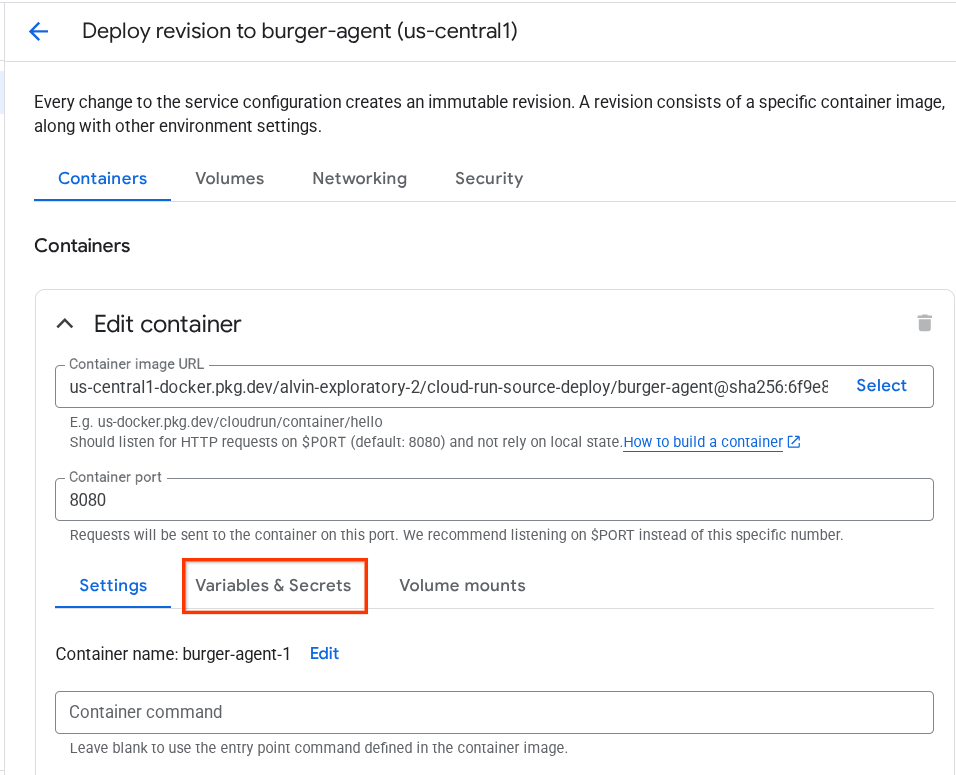
- 复制 burger-service 网址,然后点击修改和部署新的修订版本

- 然后,点击变量和密钥部分
- 之后,点击添加变量,并将
HOST_OVERRIDE的值设置为服务网址(采用https://burger-agent-xxxxxxxxx.us-central1.run.app模式的网址)
- 最后,点击部署按钮以重新部署服务

当您在浏览器 https://burger-agent-xxxxxxxxx.us-central1.run.app/.well-known/agent.json 中再次访问 burger-agent 代理卡片时,url 值将已正确配置
5. 🚀 部署披萨销售代理 - A2A 服务器
同样,披萨代理源代码位于 remote_seller_agents/pizza_agent 目录下。
与之前的 burger-agent 部署步骤类似,remote_seller_agents/pizza_agent 目录下的所有文件都足以将我们的代理部署到 Cloud Run,以便可以作为服务进行访问。运行以下命令以部署该应用
gcloud run deploy pizza-agent \
    --source remote_seller_agents/pizza_agent \
    --port=8080 \
    --allow-unauthenticated \
    --min 1 \
    --region us-central1 \
    --update-env-vars GOOGLE_CLOUD_LOCATION=us-central1 \
    --update-env-vars GOOGLE_CLOUD_PROJECT={your-project-id}
成功部署后,系统会显示如下日志。
Service [pizza-agent] revision [pizza-agent-xxxxx-xxx] has been deployed and is serving 100 percent of traffic.
Service URL: https://pizza-agent-xxxxxxxxx.us-central1.run.app
此处的 xxxx 部分在部署服务时将是一个唯一标识符。
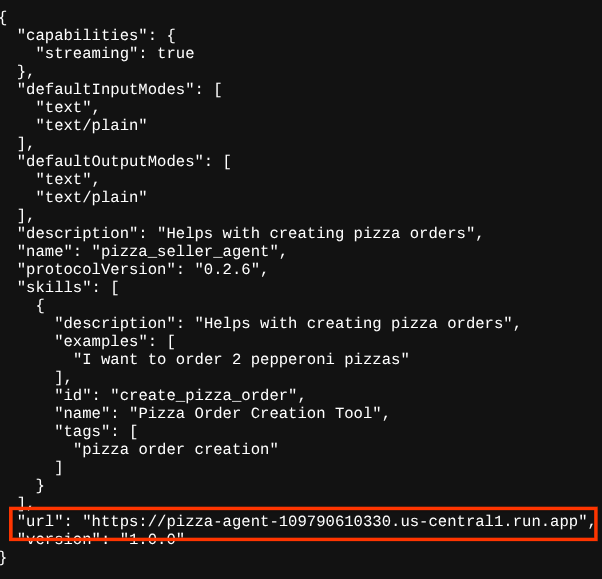
汉堡代理也是如此,当您尝试通过浏览器访问已部署的披萨代理服务的 https://pizza-agent-xxxxxxxxx.us-central1.run.app/.well-known/agent.json 路由以访问 A2A 服务器代理卡时,披萨代理卡上的披萨代理 url 值尚未正确配置。我们还需要将 HOST_OVERRIDE 添加到其环境变量中
通过环境变量更新代理卡上的 Pizza Agent 网址值
如需向披萨代理服务添加 HOST_OVERRIDE,请执行以下步骤
- 在 Cloud 控制台顶部的搜索栏中搜索 Cloud Run

- 点击之前部署的 pizza-agent Cloud Run 服务

- 点击修改和部署新修订版本

- 复制 pizza-service 网址,然后点击变量和密钥部分
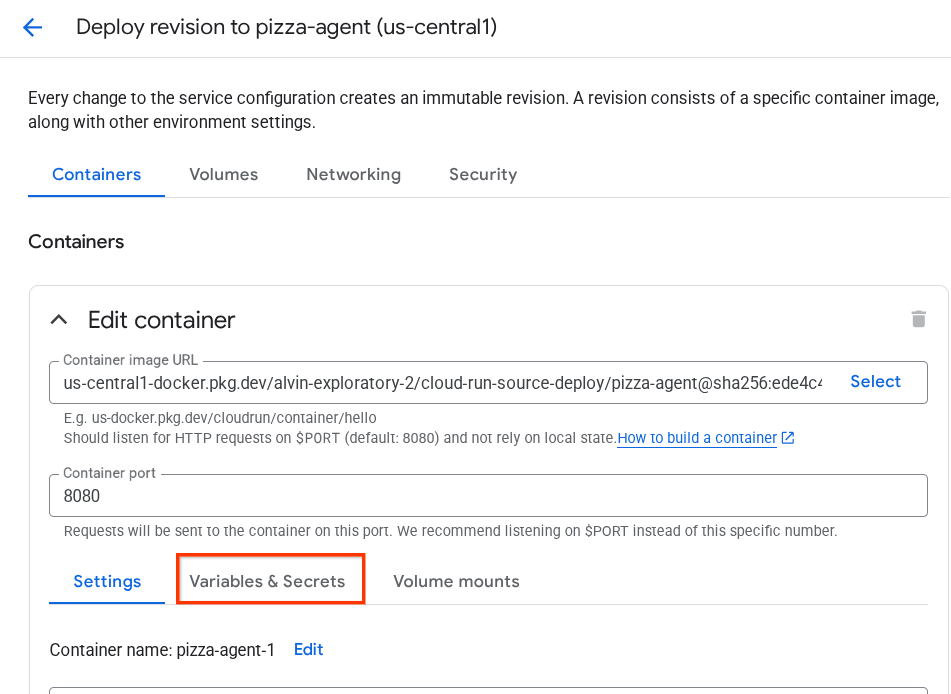
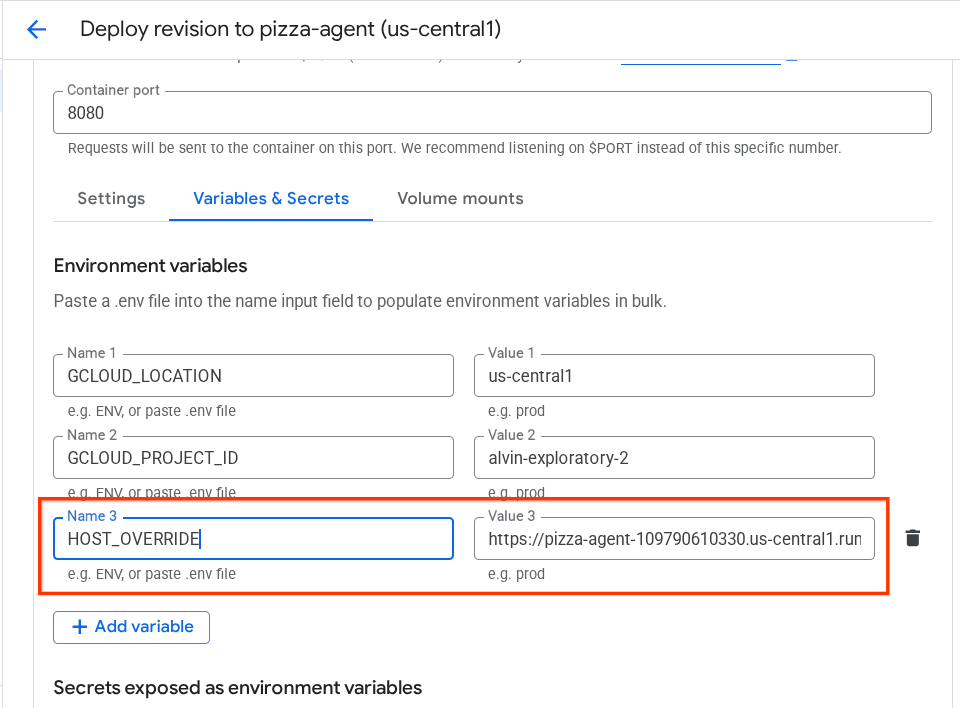
- 之后,点击添加变量,并将
HOST_OVERRIDE的值设置为服务网址(采用https://pizza-agent-xxxxxxxxx.us-central1.run.app模式的网址)
- 最后,点击部署按钮以重新部署服务

现在,当您在浏览器 https://pizza-agent-xxxxxxxxx.us-central1.run.app/.well-known/agent.json 中再次访问 pizza-agent 代理卡片时,url 值将已正确配置
此时,我们已成功将 burger 和 pizza 服务部署到 Cloud Run。
6. 🚀 将购买礼宾服务 - A2A 客户端部署到 Agent Engine
在此步骤中,我们将部署购物助理代理。我们将与此代理互动。
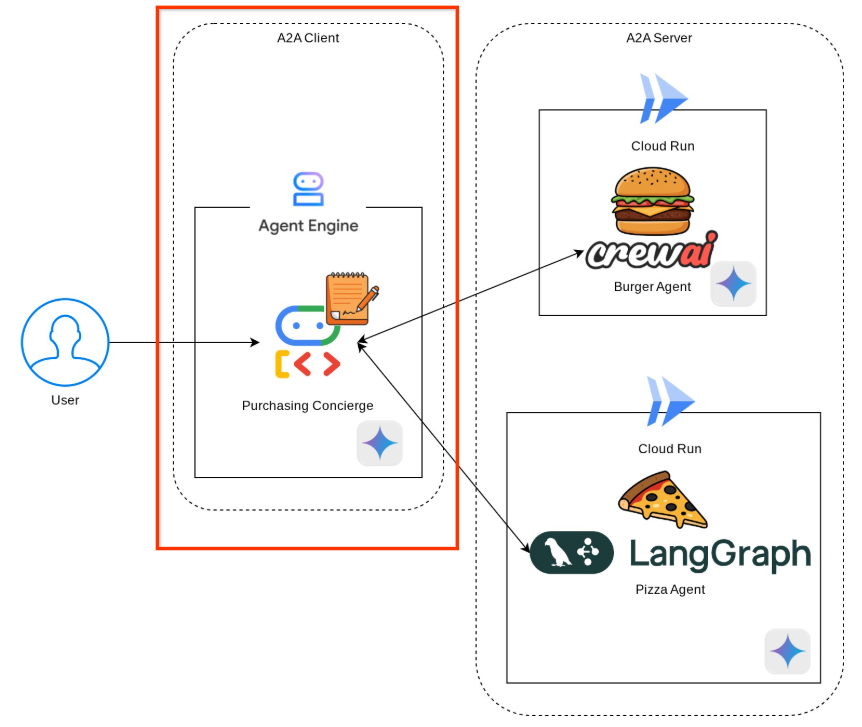
购买礼宾代理的源代码位于 purchasing_concierge 目录下。可以在 purchasing_concierge/purchasing_agent.py 脚本中检查代理初始化。
请按照以下步骤进行部署:
- 首先,我们需要在 Cloud Storage 中创建暂存存储空间
gcloud storage buckets create gs://purchasing-concierge-{your-project-id} --location=us-central1
- 现在,我们需要先准备 .env 变量,将 .env.example 复制到 .env 文件中
cp .env.example .env
- 现在,打开 .env 文件,您会看到以下内容
GOOGLE_GENAI_USE_VERTEXAI=TRUE
GOOGLE_CLOUD_PROJECT={your-project-id}
GOOGLE_CLOUD_LOCATION=us-central1
STAGING_BUCKET=gs://purchasing-concierge-{your-project-id}
PIZZA_SELLER_AGENT_URL={your-pizza-agent-url}
BURGER_SELLER_AGENT_URL={your-burger-agent-url}
AGENT_ENGINE_RESOURCE_NAME={your-agent-engine-resource-name}
此代理将与汉堡和披萨代理进行通信,因此我们需要为这两个代理提供适当的凭据。我们需要使用上一步中的 Cloud Run 网址更新 PIZZA_SELLER_AGENT_网址 和 BURGER_SELLER_AGENT_网址。
如果您忘记了这一点,请访问 Cloud Run 控制台。在控制台顶部的搜索栏中输入“Cloud Run”,然后右键点击 Cloud Run 图标,在新标签页中打开该服务

您应该会看到我们之前部署的远程卖家代理服务,如下所示

现在,如需查看这些服务的公开网址,请点击其中一项服务,系统会将您重定向到“服务详情”页面。您可以在顶部区域的“地区”信息旁边看到相应网址

最终的环境变量应与此类似
GOOGLE_GENAI_USE_VERTEXAI=TRUE
GOOGLE_CLOUD_PROJECT={your-project-id}
GOOGLE_CLOUD_LOCATION=us-central1
STAGING_BUCKET=gs://purchasing-concierge-{your-project-id}
PIZZA_SELLER_AGENT_URL=https://pizza-agent-xxxxx.us-central1.run.app
BURGER_SELLER_AGENT_URL=https://burger-agent-xxxxx.us-central1.run.app
AGENT_ENGINE_RESOURCE_NAME={your-agent-engine-resource-name}
- 现在,我们已准备好部署购买助理代理。我们将该模型部署到代理引擎,部署代码位于
deploy_to_agent_engine.py脚本中。
我们可以通过运行以下脚本来部署它:
uv run deploy_to_agent_engine.py
成功部署后,系统会显示如下日志。它会显示代理引擎资源名称,例如 "projects/xxxx/locations/us-central1/reasoningEngines/yyyy"
AgentEngine created. Resource name: projects/xxxx/locations/us-central1/reasoningEngines/yyyy
To use this AgentEngine in another session:
agent_engine = vertexai.agent_engines.get('projects/xxxx/locations/us-central1/reasoningEngines/yyyy)
Deployed remote app resource: projects/xxxx/locations/us-central1/reasoningEngines/xxxx
当我们在代理引擎信息中心内检查它时(在搜索栏中搜索“代理引擎”),系统会显示我们之前的部署

您还可以检查该界面是否显示了代理引擎资源名称。然后,我们可以利用此资源名称对其进行测试
之后,使用此值更新 .env 文件中的 AGENT_ENGINE_RESOURCE_NAME。请确保您提供的是正确的代理引擎资源名称。您的 .env 文件应如下所示:
GOOGLE_GENAI_USE_VERTEXAI=TRUE
GOOGLE_CLOUD_PROJECT={your-project-id}
GOOGLE_CLOUD_LOCATION=us-central1
STAGING_BUCKET=gs://purchasing-concierge-{your-project-id}
PIZZA_SELLER_AGENT_URL=https://pizza-agent-xxxxx.us-central1.run.app
BURGER_SELLER_AGENT_URL=https://burger-agent-xxxxx.us-central1.run.app
AGENT_ENGINE_RESOURCE_NAME=projects/xxxx/locations/us-central1/reasoningEngines/yyyy
在 Agent Engine 上测试已部署的代理
您可以通过 curl 命令和 SDK 与代理引擎互动。例如,运行以下命令,尝试与已部署的代理进行互动。
您可以尝试发送此查询,以检查代理是否已成功部署。运行以下 test_agent_engine.sh 脚本
bash test_agent_engine.sh
您可以检查脚本,并看到我们尝试向代理询问“请列出可用的汉堡菜单”
如果成功,控制台上会显示多个流式传输的响应事件,如下所示
{
  "content": {
    "parts": [
      {
        "text": "Here is our burger menu:\n- Classic Cheeseburger: IDR 85K\n- Double Cheeseburger: IDR 110K\n- Spicy Chicken Burger: IDR 80K\n- Spicy Cajun Burger: IDR 85K"
      }
    ],
    "role": "model"
  },
  "usage_metadata": {
    "candidates_token_count": 51,
    "candidates_tokens_details": [
      {
        "modality": "TEXT",
        "token_count": 51
      }
    ],
    "prompt_token_count": 907,
    "prompt_tokens_details": [
      {
        "modality": "TEXT",
        "token_count": 907
      }
    ],
    "total_token_count": 958,
    "traffic_type": "ON_DEMAND"
  },
  "invocation_id": "e-14679918-af68-45f1-b942-cf014368a733",
  "author": "purchasing_agent",
  "actions": {
    "state_delta": {},
    "artifact_delta": {},
    "requested_auth_configs": {}
  },
  "id": "dbe7fc43-b82a-4f3e-82aa-dd97afa8f15b",
  "timestamp": 1754287348.941454
}
我们将在下一步中尝试使用界面,不过我们先来讨论一下 A2A 客户端的核心组件和典型流程
7. 🚀 集成测试和载荷检查
现在,我们使用网页界面检查了我们的购买礼宾服务与远程代理的互动。运行以下命令以部署 Gradio 应用。运行此应用需要您已正确填写 .env 文件
uv run purchasing_concierge_ui.py
如果成功,系统会显示以下输出
* Running on local URL:  http://0.0.0.0:8080
* To create a public link, set `share=True` in `launch()`.
然后,按住 Ctrl 键并点击终端上的 http://0.0.0.0:8080 网址,或点击网页预览按钮以打开网页界面

尝试进行如下对话:
- 显示汉堡和披萨菜单
- 我想订购 1 个烧烤鸡肉披萨和 1 个卡真辣味汉堡
然后继续对话,直到完成订单。检查互动进展情况,以及工具调用和响应是什么?下图显示了互动结果示例。
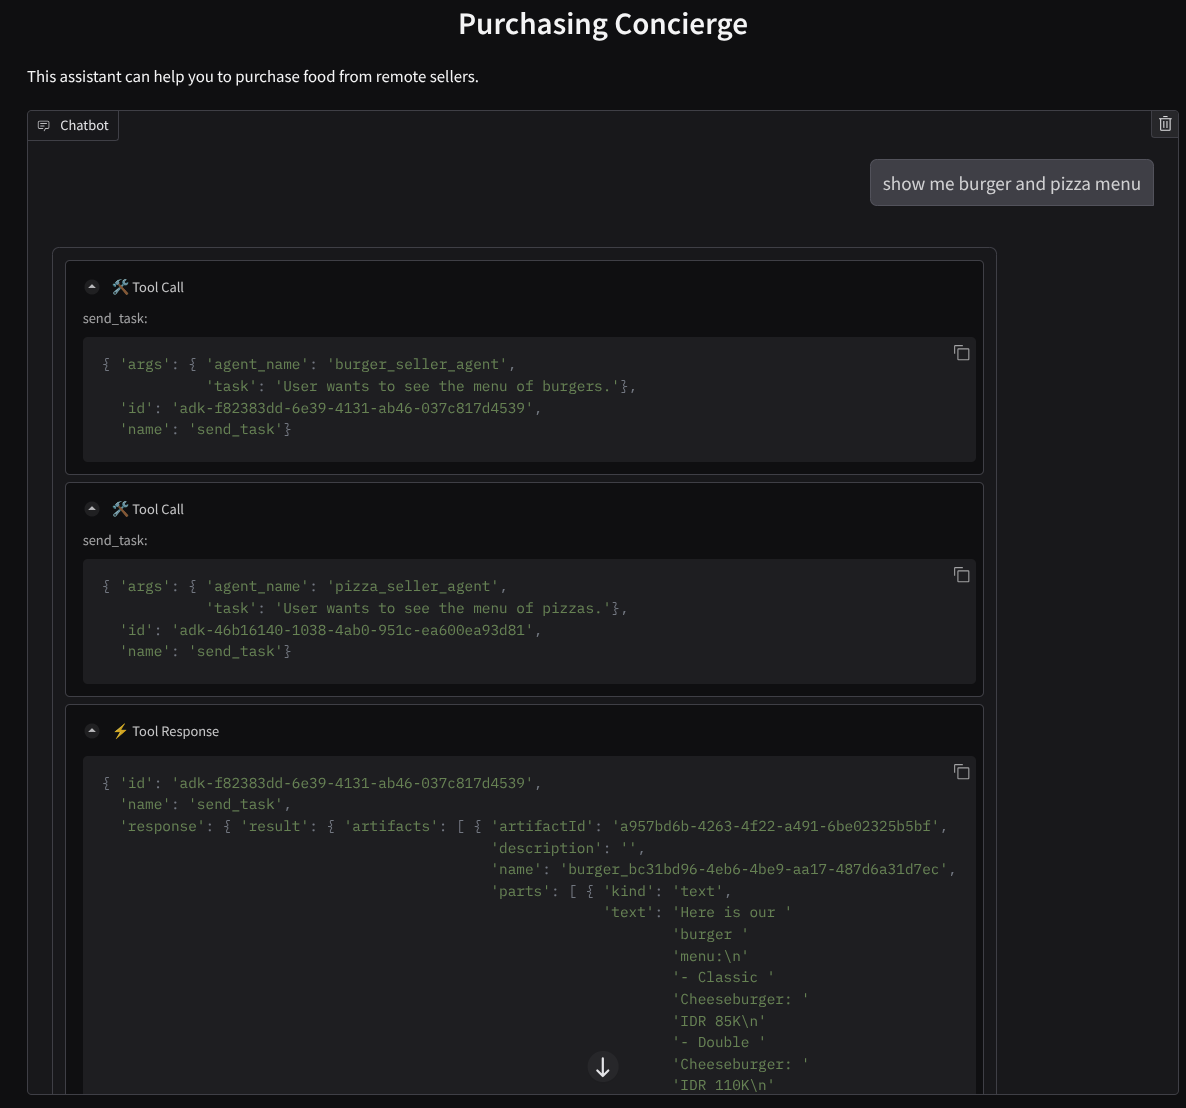
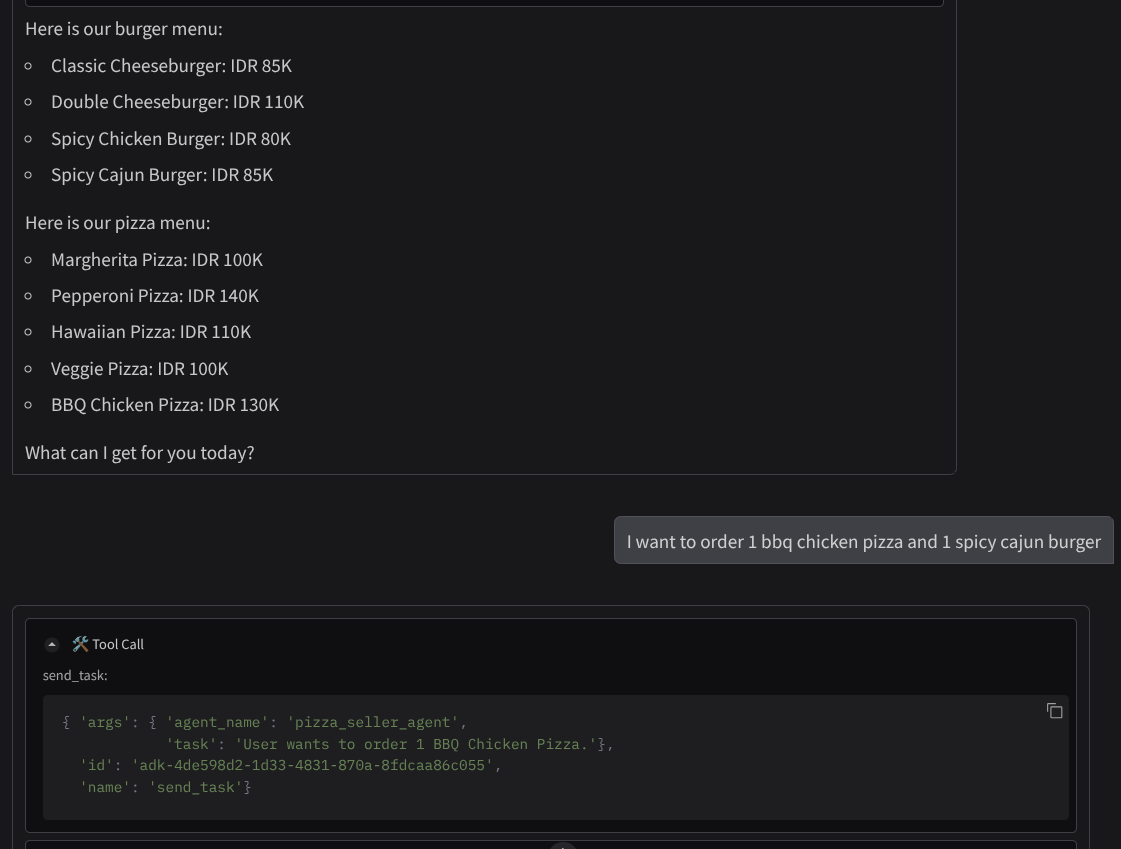
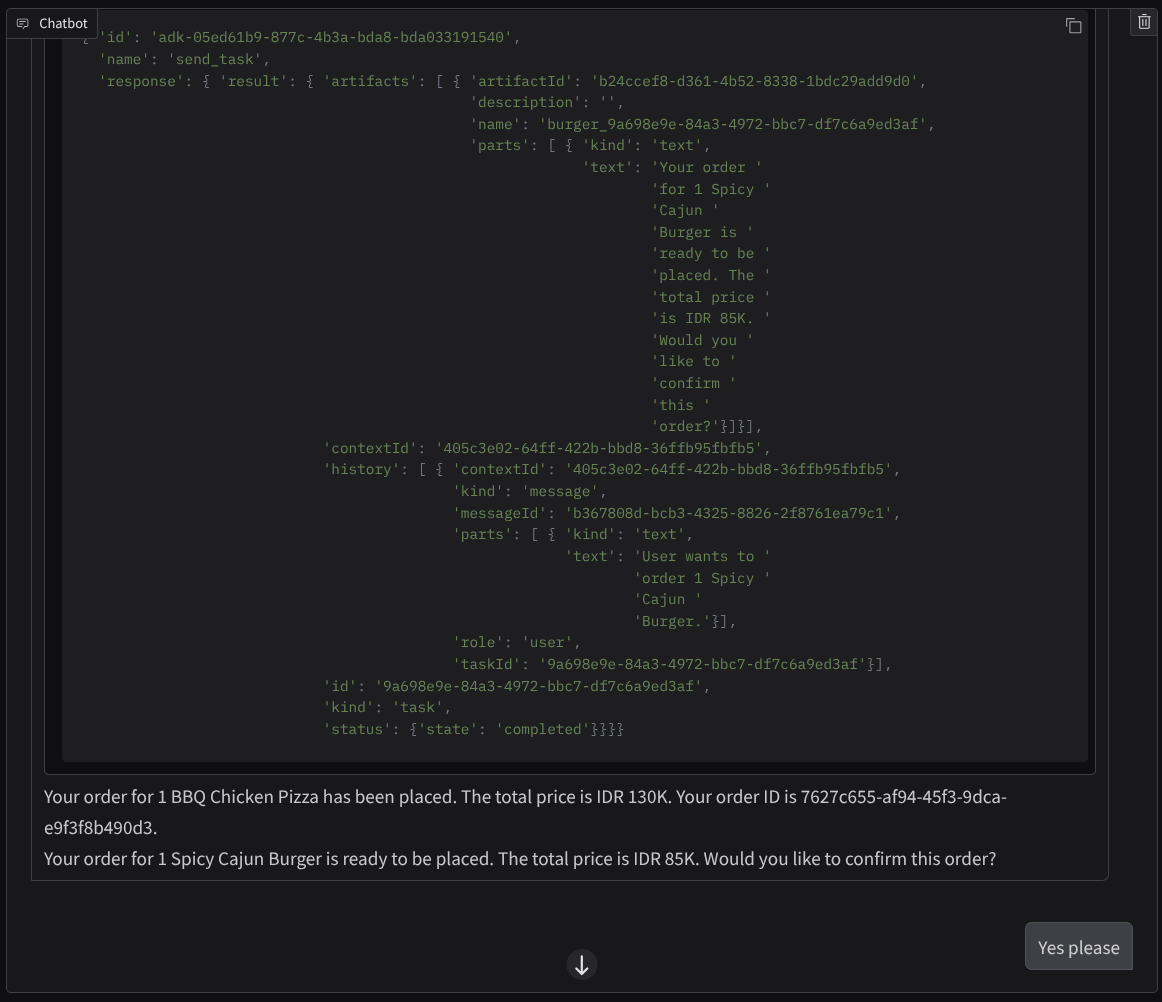
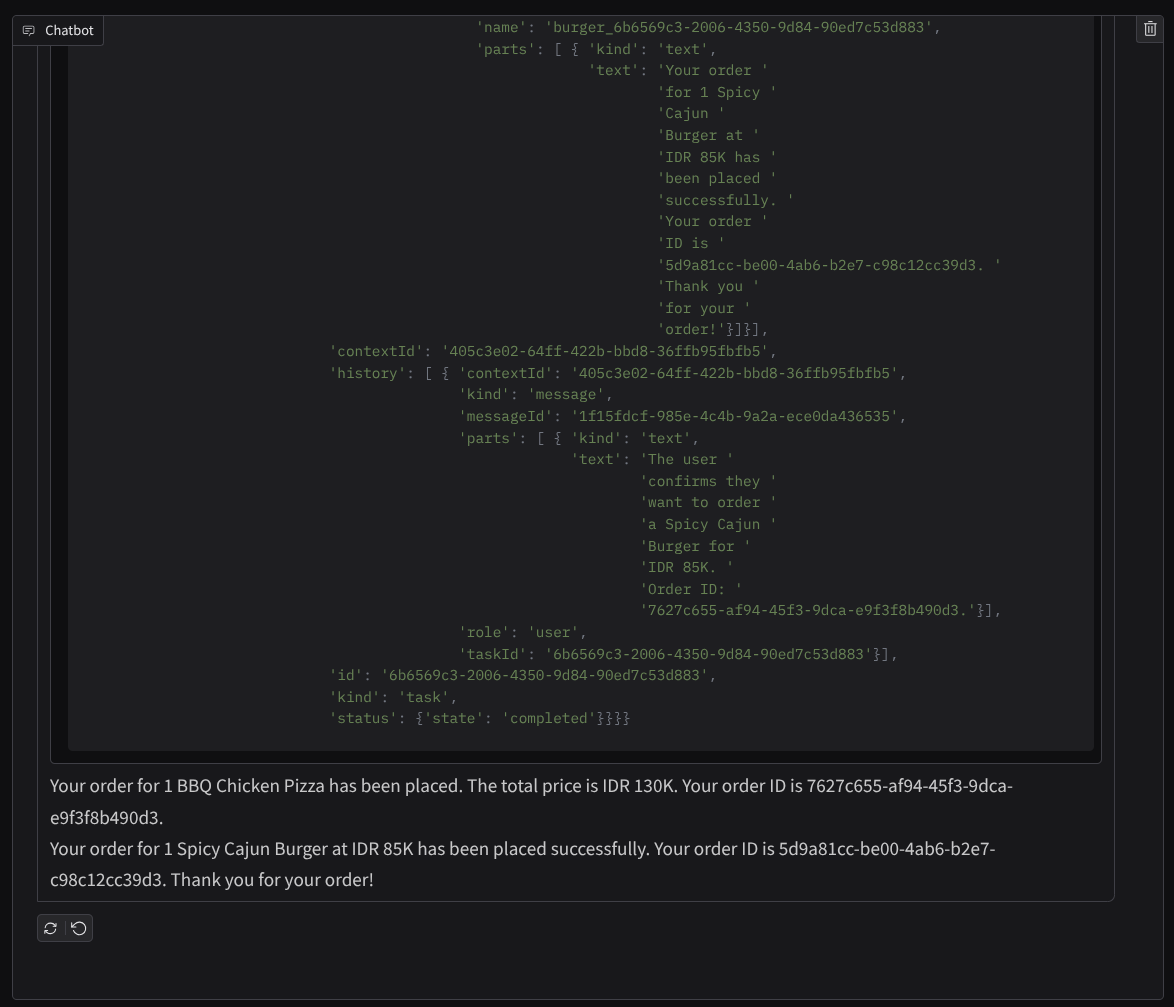
我们可以看到,与 2 个不同的代理进行通信会产生 2 种不同的行为,而 A2A 可以很好地处理这种情况。披萨销售代理会直接接受我们的购买代理请求,而汉堡代理需要我们确认后才能继续处理我们的请求,并且在我们确认后,该代理可以将确认信息传递给汉堡代理
现在,我们已经完成了 A2A 的基本概念,并了解了它如何作为客户端和服务器架构来实现
8. 💡 [代码说明] A2A 服务器概念和实现
您可以在 remote_seller_agents/*/agent.py 脚本中检查远程卖方代理的初始化。以下是卖家代理的代码段。
Burger Agent
from crewai import Agent, Crew, LLM, Task, Process
from crewai.tools import tool

...

       model = LLM(
            model="vertex_ai/gemini-2.5-flash-lite",  # Use base model name without provider prefix
        )
        burger_agent = Agent(
            role="Burger Seller Agent",
            goal=(
                "Help user to understand what is available on burger menu and price also handle order creation."
            ),
            backstory=("You are an expert and helpful burger seller agent."),
            verbose=False,
            allow_delegation=False,
            tools=[create_burger_order],
            llm=model,
        )

        agent_task = Task(
            description=self.TaskInstruction,
            agent=burger_agent,
            expected_output="Response to the user in friendly and helpful manner",
        )

        crew = Crew(
            tasks=[agent_task],
            agents=[burger_agent],
            verbose=False,
            process=Process.sequential,
        )

        inputs = {"user_prompt": query, "session_id": sessionId}
        response = crew.kickoff(inputs)
        return response

...
Pizza Agent
from langchain_google_vertexai import ChatVertexAI
from langgraph.prebuilt import create_react_agent

...

self.model = ChatVertexAI(
    model="gemini-2.5-flash-lite",
    location=os.getenv("GOOGLE_CLOUD_LOCATION"),
    project=os.getenv("GOOGLE_CLOUD_PROJECT"),
)
self.tools = [create_pizza_order]
self.graph = create_react_agent(
    self.model,
    tools=self.tools,
    checkpointer=memory,
    prompt=self.SYSTEM_INSTRUCTION,
)

...
如您所见,与客户端代理 (ADK) 相比,这两个代理是使用完全不同的框架(CrewAI 和 Langgraph)构建的。借助 A2A,这不成问题,我们不需要它们共享其内部代码即可相互通信,无论它们使用什么框架、什么语言或部署在何处,都没有关系。
A2A 服务器的核心组件
现在,我们来讨论 A2A 服务器的核心概念和组件
代理卡片
每个 A2A 服务器都必须有一个可在 /.well-known/agent.json 资源上访问的代理卡片。这是为了支持 A2A 客户端上的发现阶段,该阶段应提供有关如何访问代理以及了解其所有功能的完整信息和背景。这与使用 Swagger 或 Postman 编写的文档详尽的 API 文档类似。
这是已部署的汉堡代理代理卡的内容
{
  "capabilities": {
    "streaming": true
  },
  "defaultInputModes": [
    "text",
    "text/plain"
  ],
  "defaultOutputModes": [
    "text",
    "text/plain"
  ],
  "description": "Helps with creating burger orders",
  "name": "burger_seller_agent",
  "protocolVersion": "0.2.6",
  "skills": [
    {
      "description": "Helps with creating burger orders",
      "examples": [
        "I want to order 2 classic cheeseburgers"
      ],
      "id": "create_burger_order",
      "name": "Burger Order Creation Tool",
      "tags": [
        "burger order creation"
      ]
    }
  ],
  "url": "https://burger-agent-109790610330.us-central1.run.app",
  "version": "1.0.0"
}
这些代理卡片突出显示了许多重要组件,例如代理技能、流式传输功能、支持的模态、协议版本和其他内容。
所有这些信息都可以用于开发适当的通信机制,以便 A2A 客户端能够正常通信。支持的模态和身份验证机制可确保通信能够正常建立,并且代理 skills 信息可以嵌入到 A2A 客户端系统提示中,以便为客户端的代理提供有关要调用的远程代理功能和技能的上下文。如需了解此代理卡片的更详细字段,请参阅此文档。
在我们的代码中,代理卡片的实现是使用 A2A Python SDK 建立的,请查看下面的 remote_seller_agents/burger_agent/main.py 代码段了解具体实现
...

        capabilities = AgentCapabilities(streaming=True)
        skill = AgentSkill(
            id="create_burger_order",
            name="Burger Order Creation Tool",
            description="Helps with creating burger orders",
            tags=["burger order creation"],
            examples=["I want to order 2 classic cheeseburgers"],
        )
        agent_host_url = (
            os.getenv("HOST_OVERRIDE")
            if os.getenv("HOST_OVERRIDE")
            else f"http://{host}:{port}/"
        )
        agent_card = AgentCard(
            name="burger_seller_agent",
            description="Helps with creating burger orders",
            url=agent_host_url,
            version="1.0.0",
            defaultInputModes=BurgerSellerAgent.SUPPORTED_CONTENT_TYPES,
            defaultOutputModes=BurgerSellerAgent.SUPPORTED_CONTENT_TYPES,
            capabilities=capabilities,
            skills=[skill],
        )

...
您可以在其中看到多个字段,例如:
AgentCapabilities:代理服务支持的其他可选功能的声明,例如流式传输功能和/或推送通知支持AgentSkill: 智能体支持的工具或函数Input/OutputModes:支持的输入/输出类型模态Url:与代理通信的地址
在此配置中,我们提供动态代理主机网址创建功能,以便更轻松地在本地测试和云部署之间切换,因此我们需要在上一步中添加 HOST_OVERRIDE 变量。
任务队列和代理执行器
A2A 服务器可能正在处理来自不同代理或用户的请求,并且能够完美隔离每个任务。如需更直观地了解这些上下文,您可以查看下图
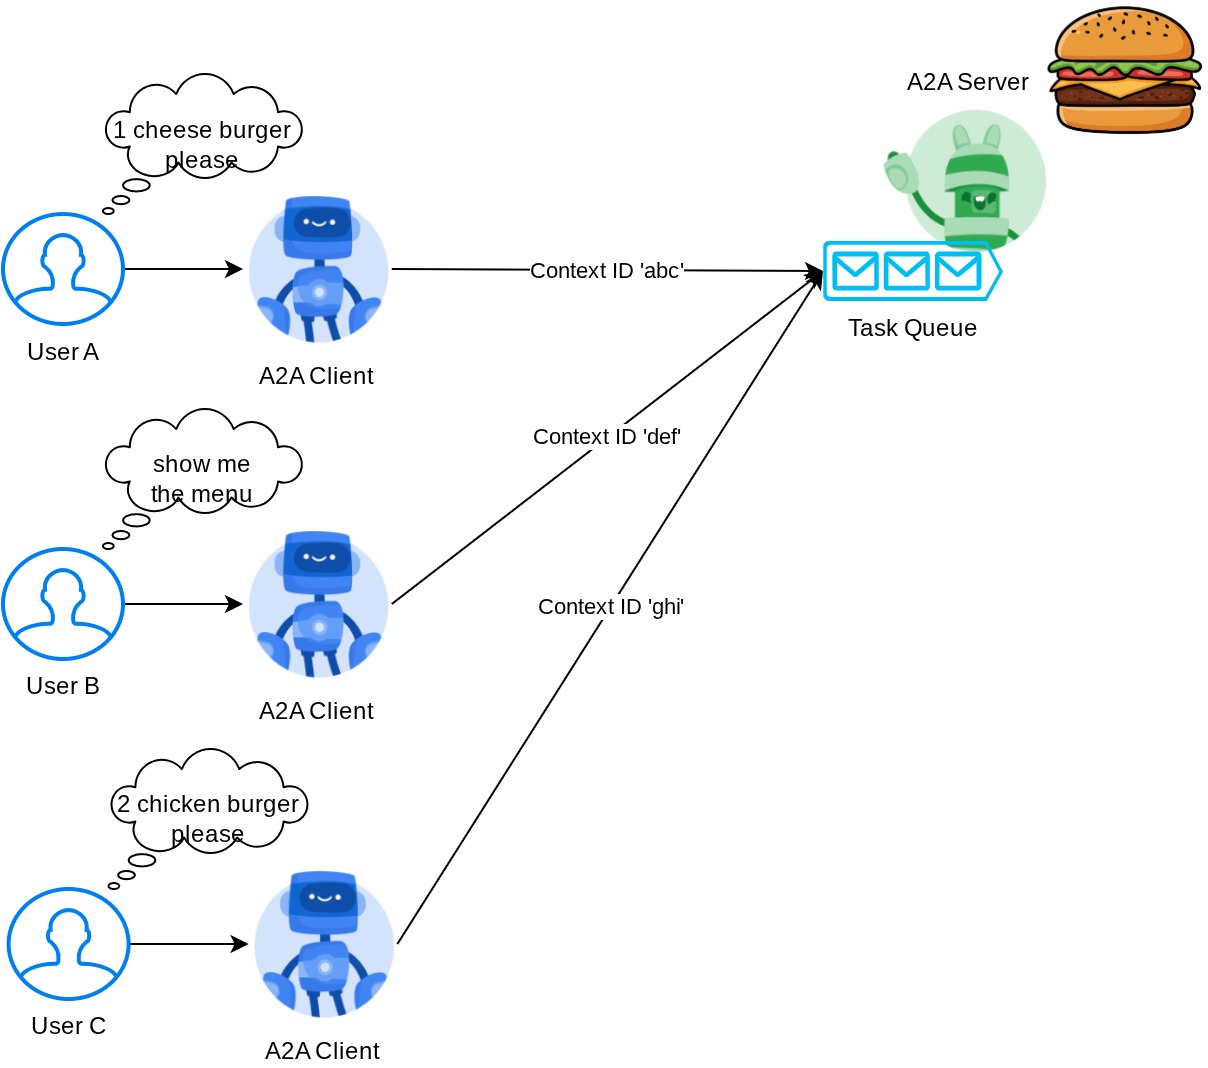
因此,每个 A2A 服务器都应能够跟踪传入的任务并存储有关任务的适当信息。A2A SDK 提供了相应模块来应对 A2A 服务器中的这一挑战。首先,我们可以实例化有关如何处理传入请求的逻辑。通过继承 AgentExecutor 抽象类,我们可以控制如何管理任务执行和取消。您可以在 remote_seller_agents/burger_agent/agent_executor.py 模块中查看此示例实现(披萨卖家案例的路径类似)
...

class BurgerSellerAgentExecutor(AgentExecutor):
    """Burger Seller AgentExecutor."""

    def __init__(self):
        self.agent = BurgerSellerAgent()

    async def execute(
        self,
        context: RequestContext,
        event_queue: EventQueue,
    ) -> None:
        query = context.get_user_input()
        try:
            result = self.agent.invoke(query, context.context_id)
            print(f"Final Result ===> {result}")

            parts = [Part(root=TextPart(text=str(result)))]
            await event_queue.enqueue_event(
                completed_task(
                    context.task_id,
                    context.context_id,
                    [new_artifact(parts, f"burger_{context.task_id}")],
                    [context.message],
                )
            )
        except Exception as e:
            print("Error invoking agent: %s", e)
            raise ServerError(error=ValueError(f"Error invoking agent: {e}")) from e

    async def cancel(
        self, request: RequestContext, event_queue: EventQueue
    ) -> Task | None:
        raise ServerError(error=UnsupportedOperationError())

...
在上面的代码中,我们实现了一个基本处理方案,其中代理将在收到请求时直接被调用,并在完成调用后发送已完成任务事件。不过,我们并未在此处实现取消方法,因为该操作被视为短时间运行的操作。
构建执行器后,我们可以直接利用内置的 DefaultRequestHandler、InMemoryTaskStore 和 A2AStarletteApplication 来启动 HTTP 服务器。您可以在 remote_seller_agents/burger_agent/__main__.py 中检查此实现
...

        request_handler = DefaultRequestHandler(
            agent_executor=BurgerSellerAgentExecutor(),
            task_store=InMemoryTaskStore(),
        )
        server = A2AStarletteApplication(
            agent_card=agent_card, http_handler=request_handler
        )

        uvicorn.run(server.build(), host=host, port=port)

...
此模块将提供 /.well-known/agent.json 路由的实现,以访问代理卡,并提供支持 A2A 协议的 POST 端点
摘要
简而言之,到目前为止,我们部署的 A2A 服务器使用 Python SDK,可以支持以下 2 项功能:
- 在
/.well-known/agent.json路线中发布代理卡片 - 使用内存中任务排队处理 JSON-RPC 请求
您可以在 __main__.py 脚本(位于 remote_seller_agents/burger_agent 或 remote_seller_agents/pizza_agent 中)中检查启动这些功能的入口点。
9. 💡 [代码说明] Agent Engine 部署
以下是 purchasing_concierge/purchasing_agent.py: 中购买礼宾代理的代码段:
from google.adk import Agent

...

def create_agent(self) -> Agent:
        return Agent(
            model="gemini-2.5-flash-lite",
            name="purchasing_agent",
            instruction=self.root_instruction,
            before_model_callback=self.before_model_callback,
            before_agent_callback=self.before_agent_callback,
            description=(
                "This purchasing agent orchestrates the decomposition of the user purchase request into"
                " tasks that can be performed by the seller agents."
            ),
            tools=[
                self.send_task,
            ],
        )

...
此代理使用 ADK 构建,并部署在 Agent Engine 上。
Vertex AI Agent Engine 是一组服务,可让开发者在生产环境中部署、管理和扩缩 AI 代理。它负责处理基础设施,使智能体在生产环境中能够自动伸缩,因此我们可以专注于创建应用。如需详细了解此问题,请参阅此文档 。以前,我们需要准备部署代理服务所需的文件(例如 main 服务器脚本和 Dockerfile),但现在,我们可以直接从 Python 脚本部署代理,而无需使用 ADK 和 Agent Engine 的组合来开发自己的后端服务。
在本教程中,我们将使用脚本 deploy_to_agent_engine.py 进行部署,该脚本的内容如下所示
import vertexai
from vertexai.preview import reasoning_engines
from vertexai import agent_engines
from dotenv import load_dotenv
import os
from purchasing_concierge.agent import root_agent

load_dotenv()

PROJECT_ID = os.getenv("GOOGLE_CLOUD_PROJECT")
LOCATION = os.getenv("GOOGLE_CLOUD_LOCATION")
STAGING_BUCKET = os.getenv("STAGING_BUCKET")

vertexai.init(
    project=PROJECT_ID,
    location=LOCATION,
    staging_bucket=STAGING_BUCKET,
)

adk_app = reasoning_engines.AdkApp(
    agent=root_agent,
)

remote_app = agent_engines.create(
    agent_engine=adk_app,
    display_name="purchasing-concierge",
    requirements=[
        "google-cloud-aiplatform[adk,agent_engines]",
        "a2a-sdk==0.2.16",
    ],
    extra_packages=[
        "./purchasing_concierge",
    ],
    env_vars={
        "GOOGLE_GENAI_USE_VERTEXAI": os.environ["GOOGLE_GENAI_USE_VERTEXAI"],
        "PIZZA_SELLER_AGENT_URL": os.environ["PIZZA_SELLER_AGENT_URL"],
        "BURGER_SELLER_AGENT_URL": os.environ["BURGER_SELLER_AGENT_URL"],
    },
)

print(f"Deployed remote app resource: {remote_app.resource_name}")
这是将 ADK 代理部署到代理引擎所需的步骤。首先,我们需要从 ADK root_agent 创建一个 AdkApp 对象。然后,我们可以通过提供 adk_app 对象来运行 agent_engines.create 方法,在 requirements 字段中指定要求,在 extra_packages 中指定代理目录路径(您也可以根据需要在此处提供其他目录和文件),并提供必要的环境变量。
10. 💡 [代码说明] A2A 客户端概念和实现

上图显示了 A2A 互动的典型流程:
- 客户端将尝试在路由
/.well-known/agent.json中提供的远程代理网址中查找任何已发布的代理卡片 - 然后,在必要时,它会向该代理发送一条消息,其中包含消息和必要的元数据参数(例如会话 ID、历史背景等)。服务器会将此消息视为要完成的任务
- A2A 服务器处理请求,如果服务器支持推送通知,它还可以在任务处理过程中发布一些通知(此功能不在本 Codelab 的范围内)
- 完成后,A2A 服务器会将响应制品发送回客户端
上述互动的一些核心对象包括以下项(如需了解详情,请点击此处):
- 消息:客户端与远程代理之间的一次通信
- 任务:由 A2A 管理的基本工作单元,由唯一 ID 标识
- 制品:智能体因执行任务而生成的输出(例如文档、图片、结构化数据),由多个部分组成
- Part:消息或制品中的最小内容单元。部分可以是文本、图片、视频、文件等。
卡片发现
当 A2A 客户端服务启动时,典型流程是尝试获取代理卡信息并存储该信息,以便在需要时轻松访问。在此 Codelab 中,我们将在 before_agent_callback 上实现它,您可以在 purchasing_concierge/purchasing_agent.py 中看到实现,请参阅下面的代码段
...

async def before_agent_callback(self, callback_context: CallbackContext):
        if not self.a2a_client_init_status:
            httpx_client = httpx.AsyncClient(timeout=httpx.Timeout(timeout=30))
            for address in self.remote_agent_addresses:
                card_resolver = A2ACardResolver(
                    base_url=address, httpx_client=httpx_client
                )
                try:
                    card = await card_resolver.get_agent_card()
                    remote_connection = RemoteAgentConnections(
                        agent_card=card, agent_url=card.url
                    )
                    self.remote_agent_connections[card.name] = remote_connection
                    self.cards[card.name] = card
                except httpx.ConnectError:
                    print(f"ERROR: Failed to get agent card from : {address}")
            agent_info = []
            for ra in self.list_remote_agents():
                agent_info.append(json.dumps(ra))
            self.agents = "\n".join(agent_info)

...
在此处,我们尝试使用内置的 A2A 客户端 A2ACardResolver 模块访问所有可用的代理卡,然后收集向代理发送消息所需的连接,之后还需要将所有可用的代理及其规范列入提示中,以便我们的代理知道它可以与这些代理通信
“提示并发送任务”工具
这是我们在此处提供给 ADK 智能体的提示和工具
...

def root_instruction(self, context: ReadonlyContext) -> str:
    current_agent = self.check_active_agent(context)
    return f"""You are an expert purchasing delegator that can delegate the user product inquiry and purchase request to the
appropriate seller remote agents.

Execution:
- For actionable tasks, you can use `send_task` to assign tasks to remote agents to perform.
- When the remote agent is repeatedly asking for user confirmation, assume that the remote agent doesn't have access to user's conversation context.
So improve the task description to include all the necessary information related to that agent
- Never ask user permission when you want to connect with remote agents. If you need to make connection with multiple remote agents, directly
connect with them without asking user permission or asking user preference
- Always show the detailed response information from the seller agent and propagate it properly to the user.
- If the remote seller is asking for confirmation, rely the confirmation question to the user if the user haven't do so.
- If the user already confirmed the related order in the past conversation history, you can confirm on behalf of the user
- Do not give irrelevant context to remote seller agent. For example, ordered pizza item is not relevant for the burger seller agent
- Never ask order confirmation to the remote seller agent

Please rely on tools to address the request, and don't make up the response. If you are not sure, please ask the user for more details.
Focus on the most recent parts of the conversation primarily.

If there is an active agent, send the request to that agent with the update task tool.

Agents:
{self.agents}

Current active seller agent: {current_agent["active_agent"]}
"""

...

async def send_task(self, agent_name: str, task: str, tool_context: ToolContext):
        """Sends a task to remote seller agent

        This will send a message to the remote agent named agent_name.

        Args:
            agent_name: The name of the agent to send the task to.
            task: The comprehensive conversation context summary
                and goal to be achieved regarding user inquiry and purchase request.
            tool_context: The tool context this method runs in.

        Yields:
            A dictionary of JSON data.
        """
        if agent_name not in self.remote_agent_connections:
            raise ValueError(f"Agent {agent_name} not found")
        state = tool_context.state
        state["active_agent"] = agent_name
        client = self.remote_agent_connections[agent_name]
        if not client:
            raise ValueError(f"Client not available for {agent_name}")
        session_id = state["session_id"]
        task: Task
        message_id = ""
        metadata = {}
        if "input_message_metadata" in state:
            metadata.update(**state["input_message_metadata"])
            if "message_id" in state["input_message_metadata"]:
                message_id = state["input_message_metadata"]["message_id"]
        if not message_id:
            message_id = str(uuid.uuid4())

        payload = {
            "message": {
                "role": "user",
                "parts": [
                    {"type": "text", "text": task}
                ],  # Use the 'task' argument here
                "messageId": message_id,
                "contextId": session_id,
            },
        }

        message_request = SendMessageRequest(
            id=message_id, params=MessageSendParams.model_validate(payload)
        )
        send_response: SendMessageResponse = await client.send_message(
            message_request=message_request
        )
        print(
            "send_response",
            send_response.model_dump_json(exclude_none=True, indent=2),
        )

        if not isinstance(send_response.root, SendMessageSuccessResponse):
            print("received non-success response. Aborting get task ")
            return None

        if not isinstance(send_response.root.result, Task):
            print("received non-task response. Aborting get task ")
            return None

        return send_response.root.result

...
在提示中,我们向购买礼宾服务代理提供了所有可用的远程代理的名称和说明,并在工具 self.send_task 中提供了一种机制,用于检索合适的客户端以连接到代理,并使用 SendMessageRequest 对象发送所需的元数据。
通信协议
任务定义是 A2A 服务器拥有的网域。不过,从 A2A 客户端的角度来看,它会将该消息视为发送给服务器的消息。服务器可以自行决定如何将来自客户端的传入消息定义为任务,以及完成任务是否需要客户端的互动。如需详细了解任务生命周期,请参阅此文档。此概念的更高级别视图如下所示:


这种消息与任务的交换是使用 JSON-RPC 标准之上的载荷格式实现的,如下面的 message/send 协议示例所示:
{
  # identifier for this request
  "id": "abc123",
  # version of JSON-RPC protocol
  "jsonrpc": "2.0",
  # method name
  "method": "message/send",
  # parameters/arguments of the method
  "params": {
    "message": "hi, what can you help me with?"
  }
}
有多种方法可供使用,例如支持不同类型的通信(例如同步、流式传输、异步)或配置任务状态的通知。A2A 服务器可以灵活配置,以处理这些任务定义标准。如需详细了解这些方法,请参阅本文档。
11. 🎯 挑战
现在,您能否自行准备必要的文件并将 Gradio 应用部署到 Cloud Run 中?是时候接受挑战了!
12. 🧹 清理
为避免系统因本 Codelab 中使用的资源向您的 Google Cloud 账号收取费用,请按照以下步骤操作:
- 在 Google Cloud 控制台中,前往管理资源页面。
- 在项目列表中,选择要删除的项目,然后点击删除。
- 在对话框中输入项目 ID,然后点击关停以删除项目。
- 或者,您也可以在控制台中前往 Cloud Run 和 Agent Engine,选择刚刚部署的服务,然后将其删除。

