เกี่ยวกับ Codelab นี้
1 ก่อนเริ่มต้น
ใน Codelab นี้ คุณจะได้เรียนรู้วิธีทำให้สีที่กำหนดเองเข้ากับสีที่สร้างโดยธีมแบบไดนามิกได้
ข้อกำหนดเบื้องต้น
นักพัฒนาแอปควรเป็น
- ทำความคุ้นเคยกับแนวคิดธีมพื้นฐานใน Android
- ทำงานอย่างสบายตากับวิดเจ็ต View ของ Android และพร็อพเพอร์ตี้
สิ่งที่คุณจะได้เรียนรู้
- วิธีใช้การปรับสีให้เข้ากันในแอปพลิเคชันโดยใช้หลายวิธี
- วิธีการทำงานของการประสานกันและเปลี่ยนสี
สิ่งที่ต้องมี
- คอมพิวเตอร์ที่ติดตั้ง Android หากต้องการดำเนินการต่อ
2 ภาพรวมของแอป
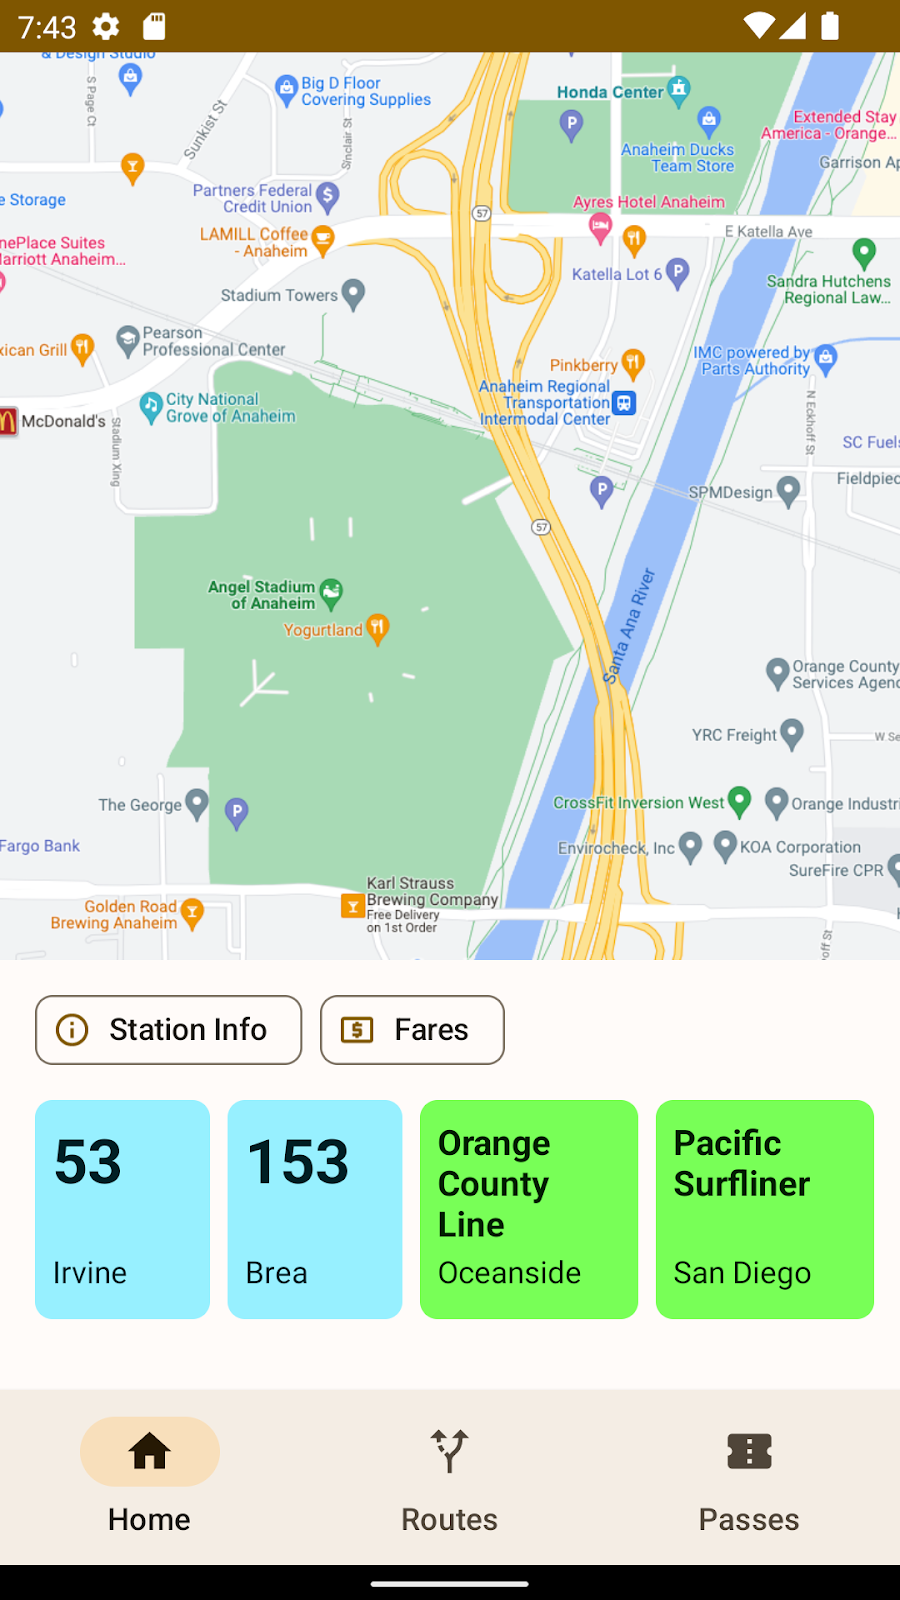
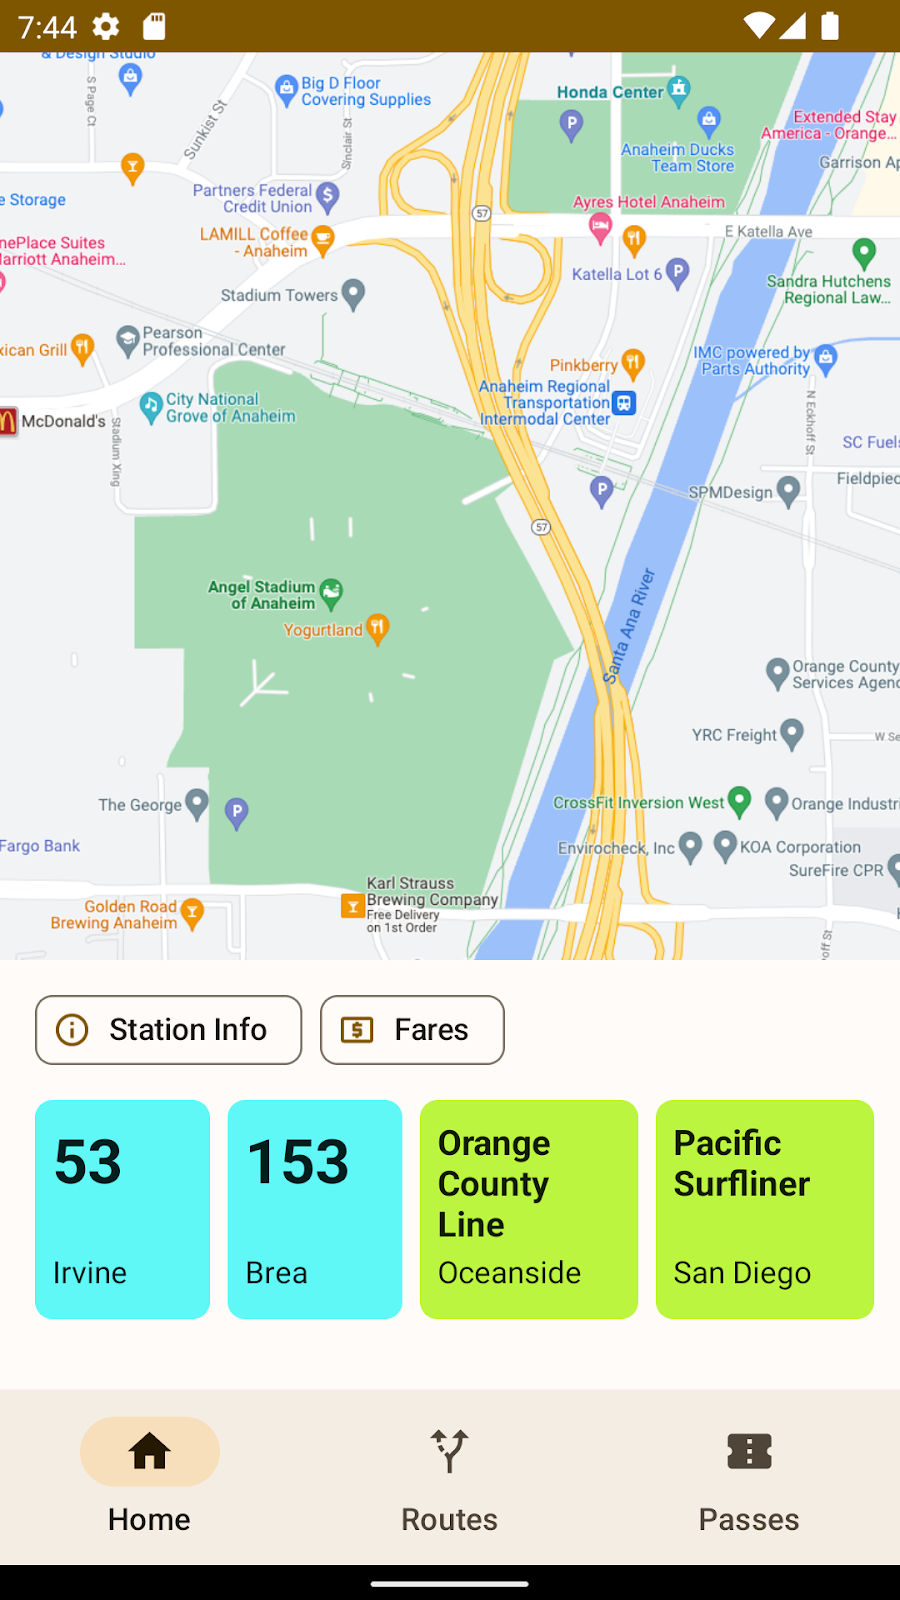
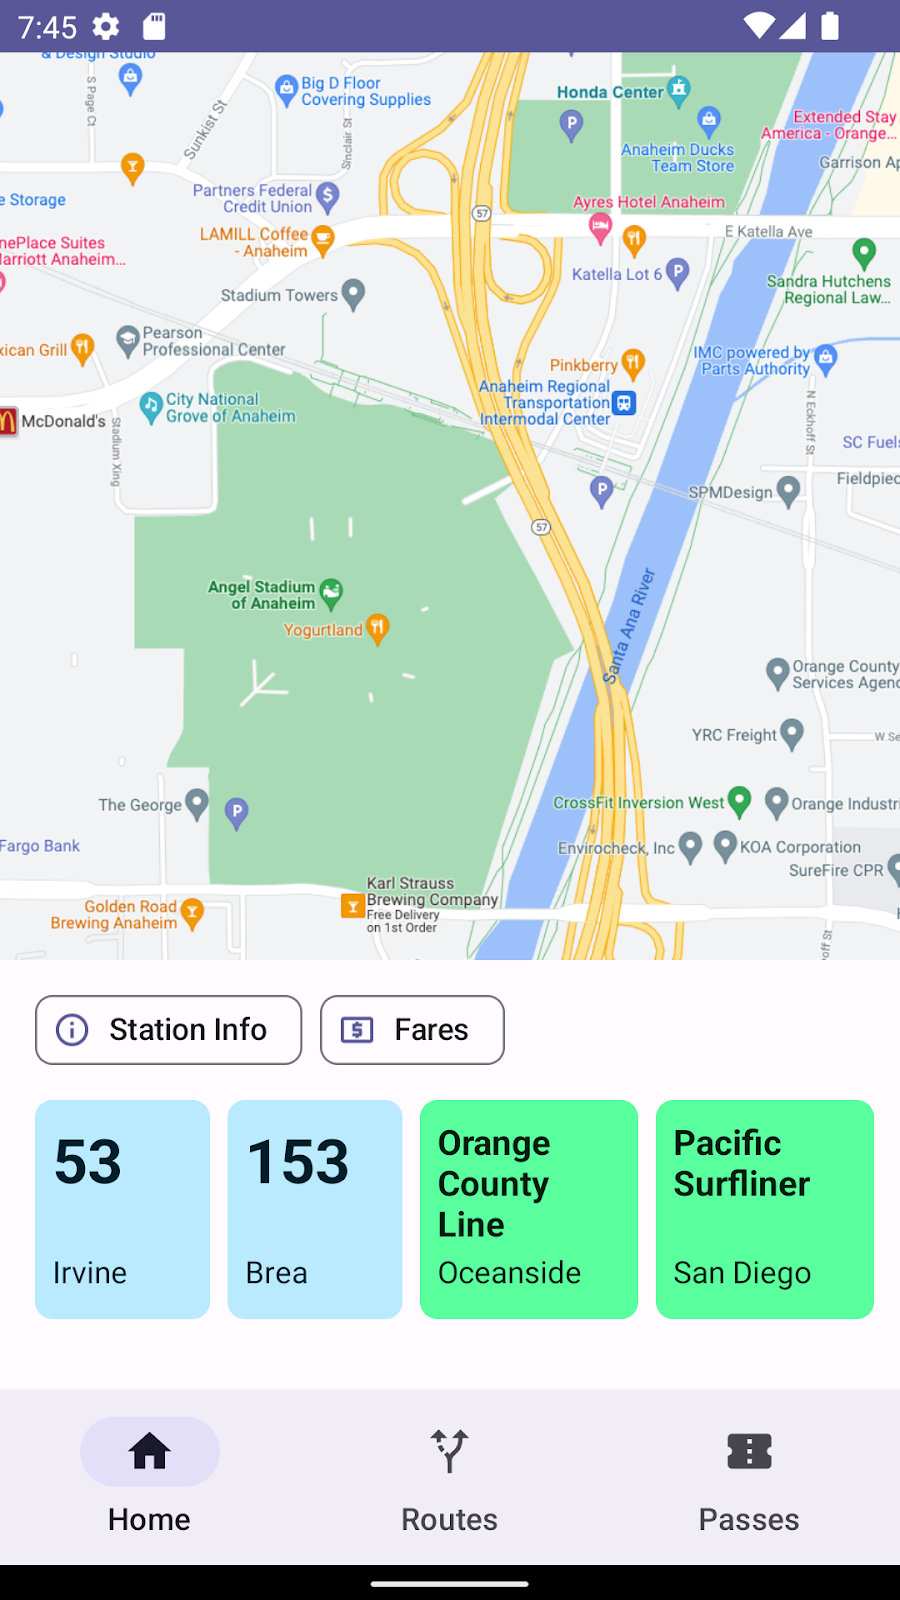
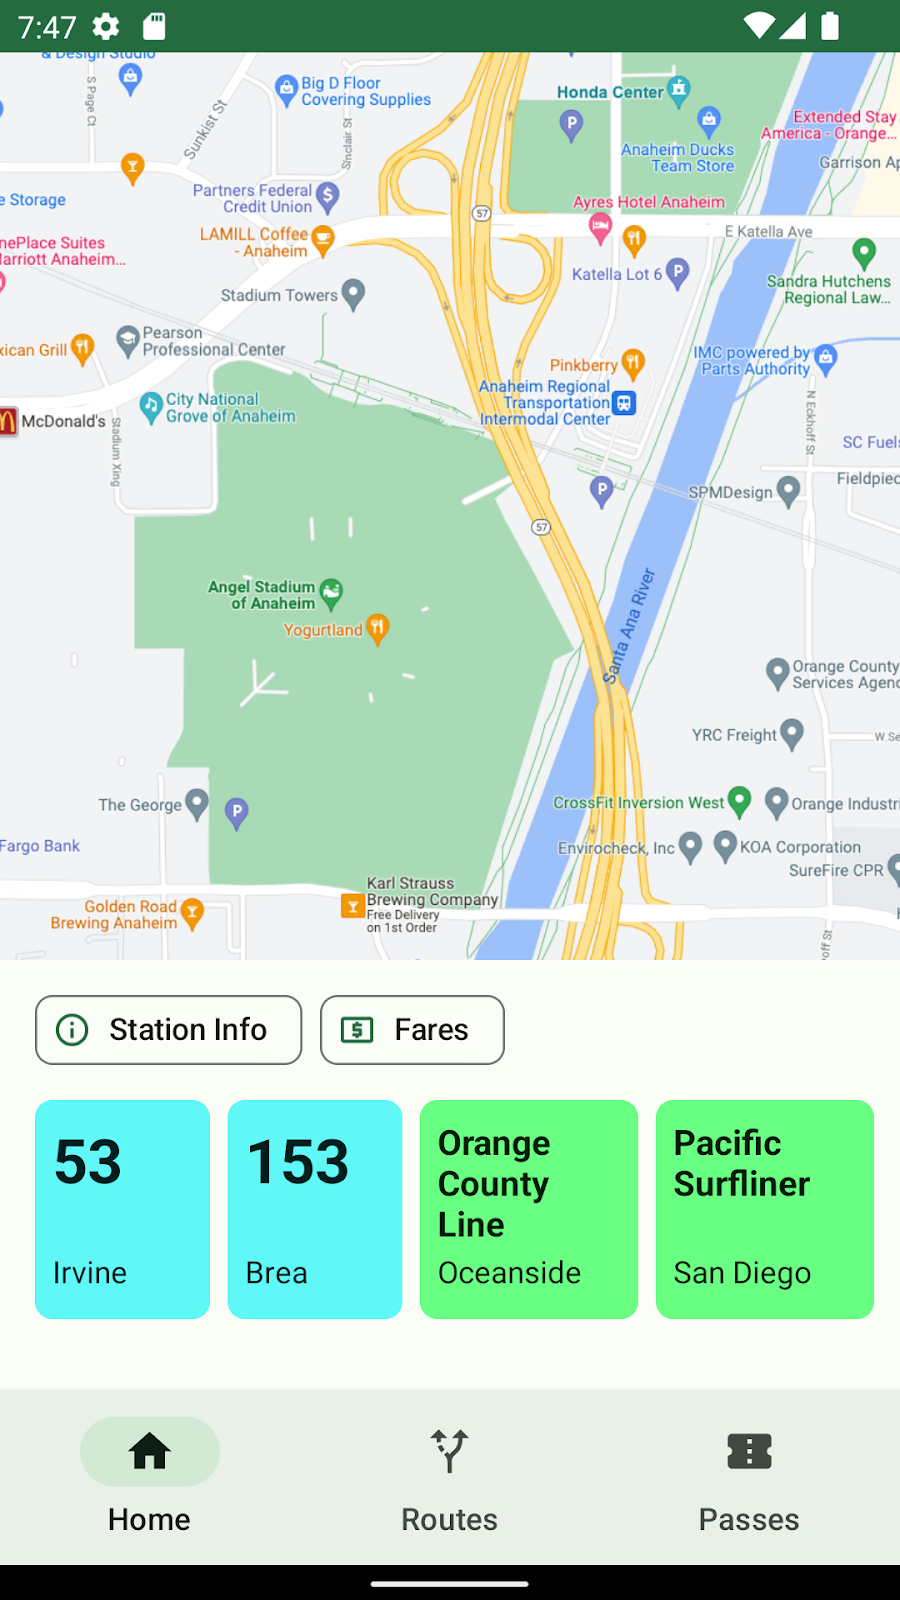
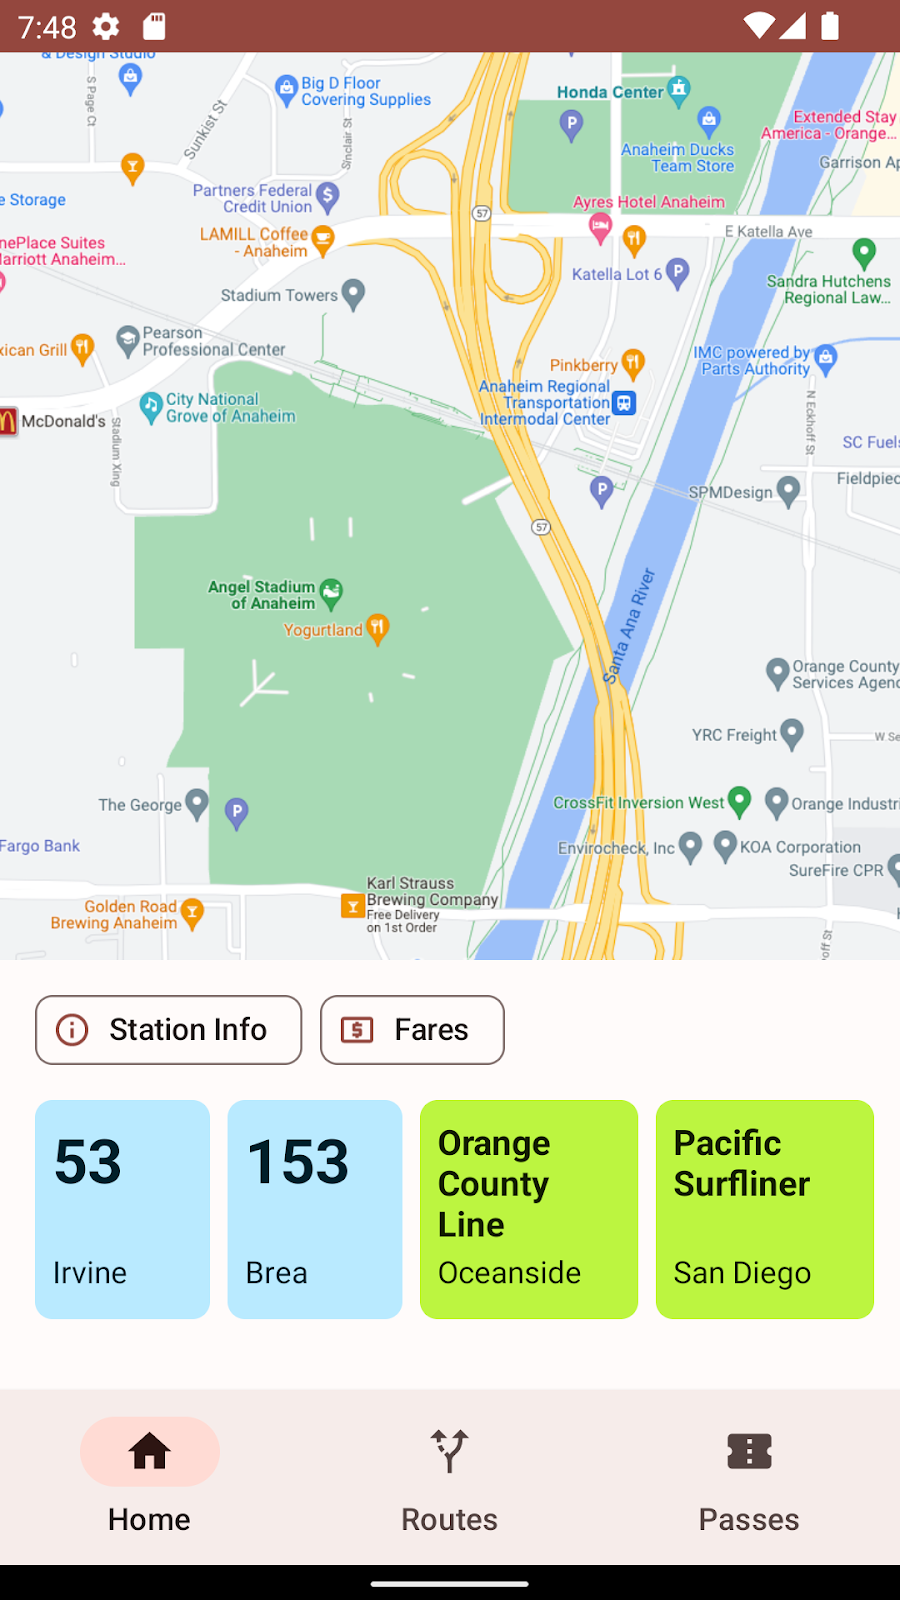
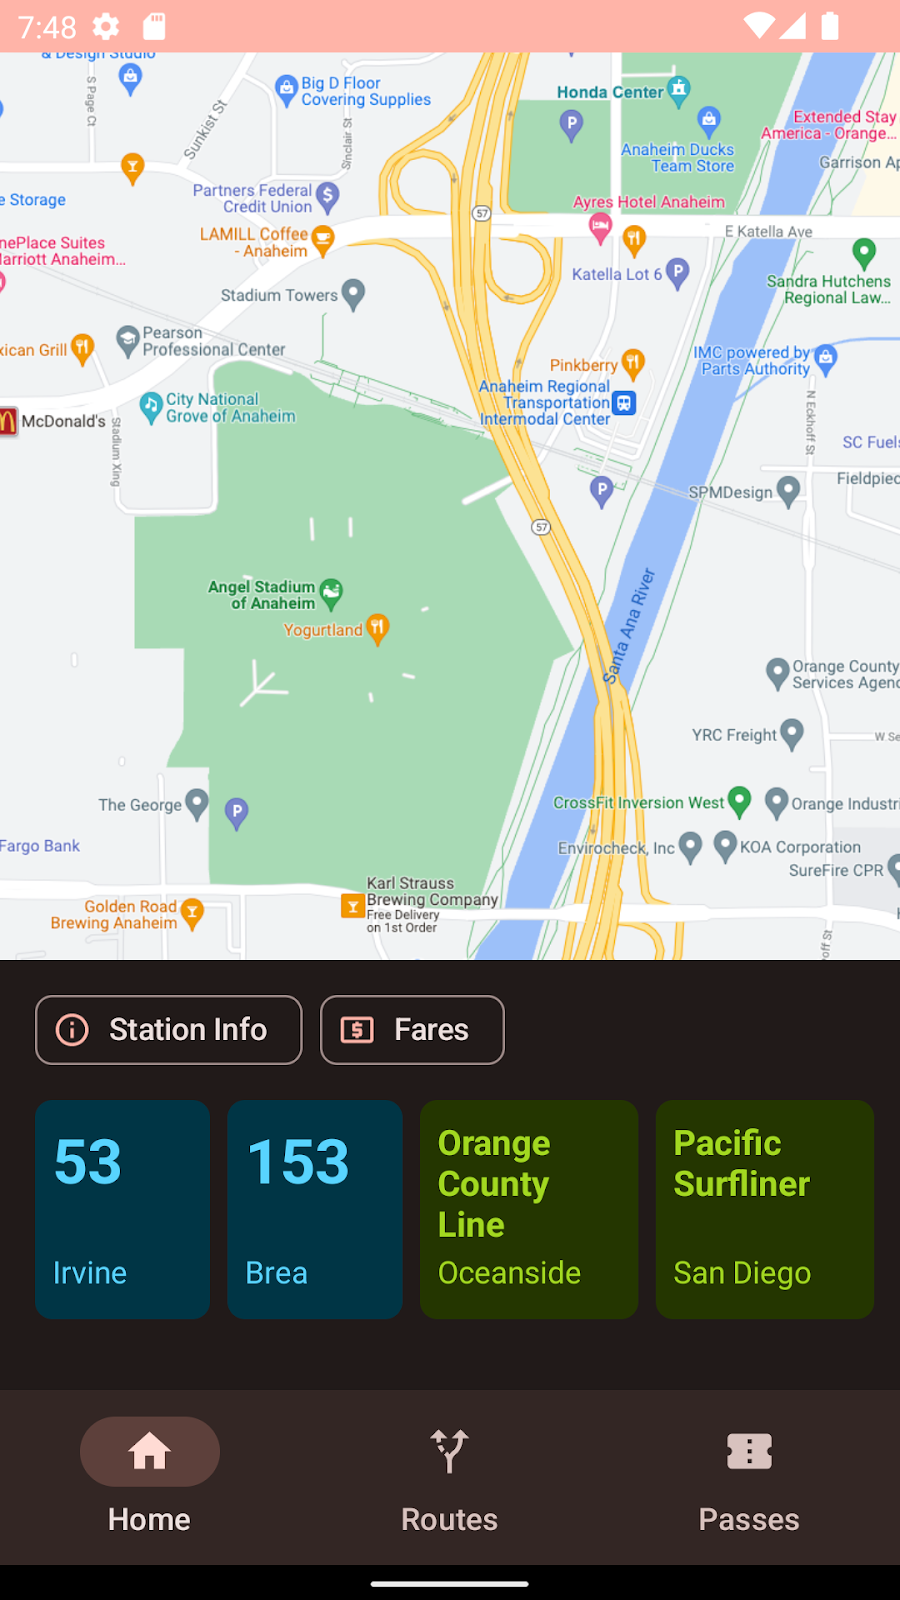
Voyaĝi เป็นแอปพลิเคชันขนส่งสาธารณะที่ใช้ธีมแบบไดนามิกอยู่แล้ว สำหรับระบบขนส่งสาธารณะจำนวนมาก สีคือตัวบ่งชี้ที่สำคัญของรถไฟ รถประจำทางหรือรถราง และสีเหล่านี้ไม่สามารถใช้แทนสีหลัก สีรอง หรือสีที่มีความหลากหลายได้ โดยจะมุ่งเน้นที่ RecyclerView ของบัตรโดยสารสี
3 การสร้างธีม
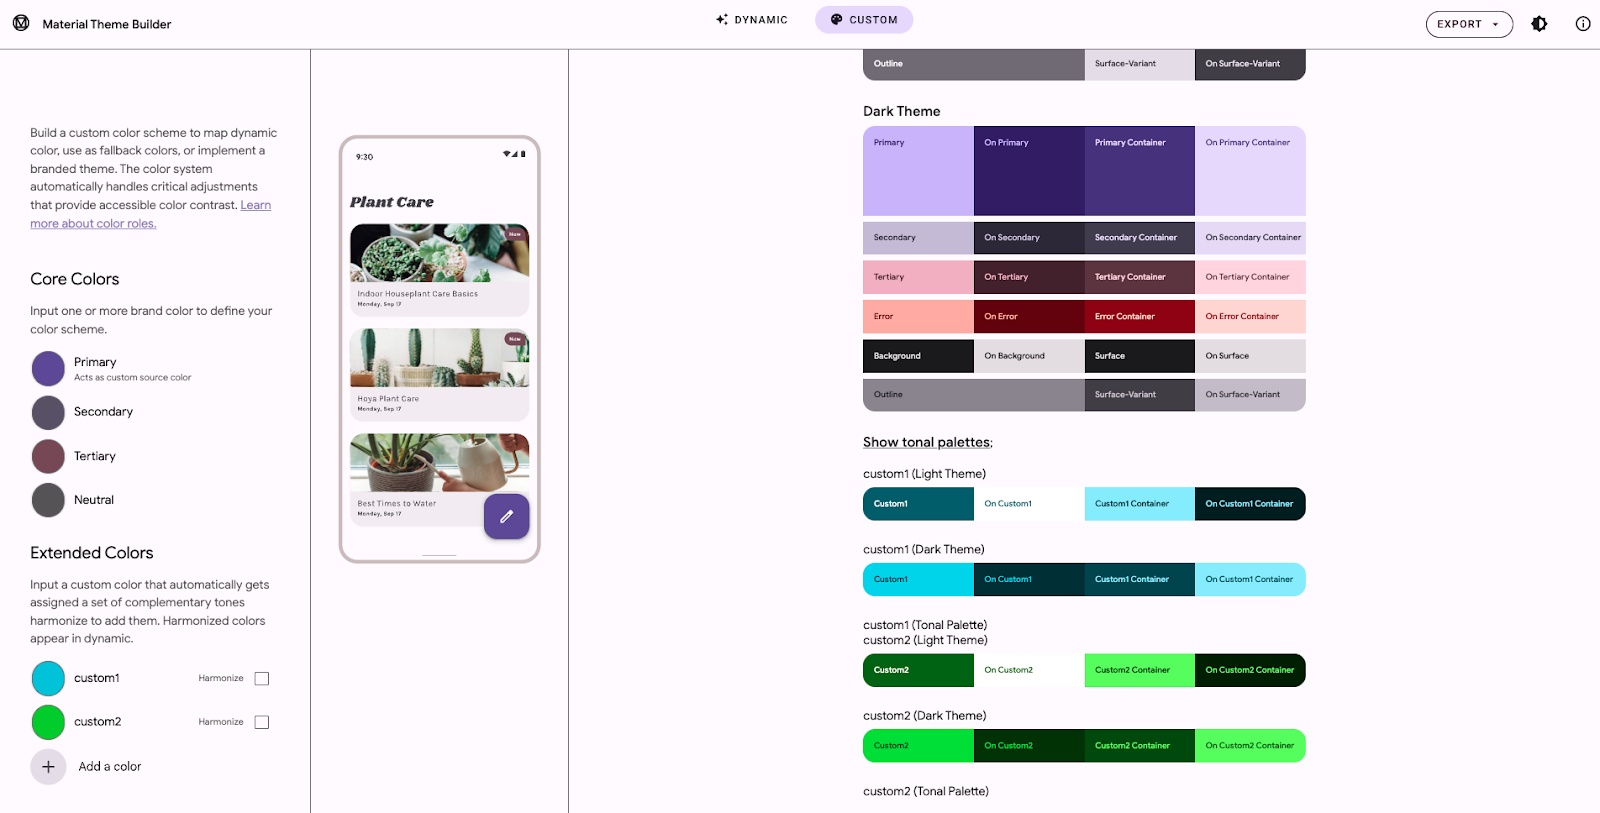
เราขอแนะนำให้ใช้เครื่องมือ Material Theme Builder เป็นจุดแรกในการสร้างธีม Material3 ในแท็บที่กำหนดเอง คุณสามารถเพิ่มสีให้กับธีมของคุณได้ คุณจะเห็นบทบาทของสีและชุดโทนสีสำหรับสีเหล่านั้นทางด้านขวา
ในส่วนสีที่ขยาย คุณจะนำสีออกหรือเปลี่ยนชื่อได้
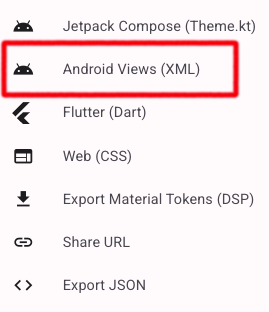
เมนูการส่งออกจะแสดงตัวเลือกการส่งออกที่เป็นไปได้หลายรายการ ในขณะที่เขียน การจัดการพิเศษของการตั้งค่าการปรับให้ตรงกันของ Material Theme Builder พร้อมใช้งานใน Android View เท่านั้น
ทำความเข้าใจค่าการส่งออกใหม่
การดาวน์โหลดที่ส่งออกจะมีไฟล์ attrs.xml ที่มีชื่อบทบาทของสีสำหรับสีที่กำหนดเองแต่ละสี เพื่อให้คุณได้ใช้สีเหล่านี้และบทบาทสีที่เกี่ยวข้องในธีมของคุณ
<resources>
   <attr name="colorCustom1" format="color" />
   <attr name="colorOnCustom1" format="color" />
   <attr name="colorCustom1Container" format="color" />
   <attr name="colorOnCustom1Container" format="color" />
   <attr name="harmonizeCustom1" format="boolean" />

   <attr name="colorCustom2" format="color" />
   <attr name="colorOnCustom2" format="color" />
   <attr name="colorCustom2Container" format="color" />
   <attr name="colorOnCustom2Container" format="color" />
   <attr name="harmonizeCustom2" format="boolean" />
</resources>
ในthes.xml เราได้สร้างบทบาทสีสี่รายการสำหรับสีที่กำหนดเองแต่ละสี (color<name>, colorOn<name>, color<name>Container, and colorOn<nameContainer>) พร็อพเพอร์ตี้ harmonize<name> แสดงให้เห็นว่านักพัฒนาซอฟต์แวร์ได้เลือกตัวเลือกใน Material Theme Builder หรือไม่ สีในธีมหลักจะไม่เปลี่ยนสี
<resources>
   <style name="AppTheme" parent="Theme.Material3.Light.NoActionBar">
       <!--- Normal theme attributes ... -->

       <item name="colorCustom1">#006876</item>
       <item name="colorOnCustom1">#ffffff</item>
       <item name="colorCustom1Container">#97f0ff</item>
       <item name="colorOnCustom1Container">#001f24</item>
       <item name="harmonizeCustom1">false</item>

       <item name="colorCustom2">#016e00</item>
       <item name="colorOnCustom2">#ffffff</item>
       <item name="colorCustom2Container">#78ff57</item>
       <item name="colorOnCustom2Container">#002200</item>
       <item name="harmonizeCustom2">false</item>
   </style>
</resources>
ในไฟล์ colors.xml สีเมล็ดที่ใช้ในการสร้างบทบาทสีที่ระบุไว้ข้างต้นจะระบุพร้อมกับค่าบูลีนหากชุดสีจะมีการขยับหรือไม่
<resources>
   <!-- other colors used in theme -->

   <color name="custom1">#1AC9E0</color>
   <color name="custom2">#32D312</color>
</resources>
4 กำลังตรวจสอบสีที่กำหนดเอง
เมื่อซูมเข้าไปที่แผงด้านข้างของ Material Theme Builder เราจะเห็นว่าการเพิ่มสีที่กำหนดเองจะแสดงแผงที่มีบทบาทสำคัญ 4 สีในจานสีอ่อนและสีเข้ม
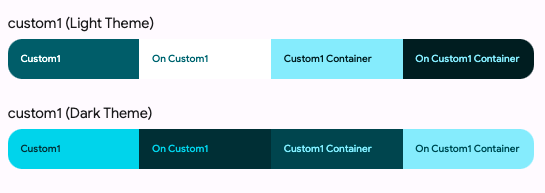
ใน Android View เราจะส่งออกสีเหล่านี้ให้คุณ แต่ภาพเบื้องหลังสามารถแสดงด้วยออบเจ็กต์ ColorRoles ได้
คลาส ColorRoles มีพร็อพเพอร์ตี้ 4 รายการ ได้แก่ accent, onAccent, accentContainer และ onAccentContainer สมบัติเหล่านี้เป็นเลขจำนวนเต็มของสีฐานสิบหก 4 สี
public final class ColorRoles {

  private final int accent;
  private final int onAccent;
  private final int accentContainer;
  private final int onAccentContainer;

  // truncated code

}
คุณดึงข้อมูลบทบาทสีหลัก 4 บทบาทจากสีที่กำหนดเองขณะรันไทม์ได้โดยใช้ getColorRoles ในคลาส MaterialColors ที่เรียกว่า getColorRoles ซึ่งช่วยให้คุณสร้างชุดบทบาทสี 4 รายการขณะรันไทม์โดยกำหนดสี Seed ที่เฉพาะเจาะจงได้
public static ColorRoles getColorRoles(
    @NonNull Context context,
    @ColorInt int color
) { /* implementation */ }
ในทำนองเดียวกัน ค่าเอาต์พุตก็คือค่าสีจริง ไม่ใช่ค่าสีที่ชี้ไป**
5 การประสานกันของสีคืออะไร
ระบบสีใหม่ของวัสดุใช้อัลกอริทึมในการออกแบบ เพื่อสร้างสีหลัก สีรอง สีที่ 3 และสีกลางจากสีเมล็ดที่ระบุ ข้อกังวลหนึ่งที่เราได้รับมากเมื่อพูดคุยกับพาร์ทเนอร์ภายในและภายนอกคือ วิธีใช้สีที่ปรับเปลี่ยนได้ในขณะที่ควบคุมสีบางสีเอาไว้ได้
สีเหล่านี้มักมีความหมายหรือบริบทเฉพาะในแอปพลิเคชันที่จะสูญหายไปหากถูกแทนที่ด้วยสีแบบสุ่ม หรือหากปล่อยไว้ตามเดิม สีเหล่านี้อาจดูน่ารำคาญหรือใช้งานไม่ได้
สีในวัสดุ "คุณ" อธิบายด้วยโทนสี โครมา และโทนสี สีของสีจะสัมพันธ์กับการรับรู้ของสีในแง่ที่เป็นสมาชิกของช่วงสีหนึ่งกับอีกช่วงสีหนึ่ง โทนจะอธิบายถึงความเข้มของสีหรือความเข้มของสี และความเข้มของสี การรับรู้เกี่ยวกับโทนสีอาจได้รับผลกระทบจากปัจจัยด้านวัฒนธรรมและภาษา ดังเช่นที่มักจะกล่าวถึงการที่ไม่มีสีน้ำเงินในวัฒนธรรมโบราณ โดยมักจะถูกมองว่าอยู่ในวงศ์เดียวกันเป็นสีเขียว
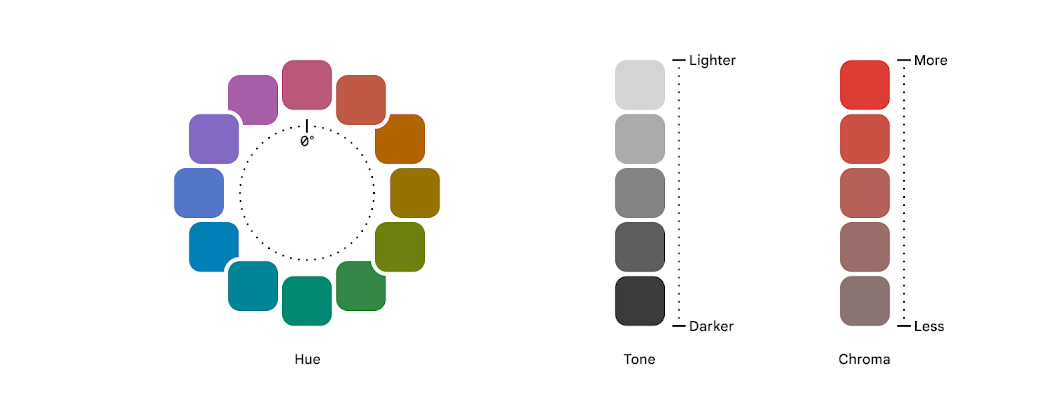 เฉดสีหนึ่งๆ จะถือว่าอบอุ่นหรือเย็นขึ้นอยู่กับตำแหน่งของสี โดยทั่วไปการเปลี่ยนเป็นสีแดง ส้ม หรือเหลืองคือทำให้อุ่นขึ้น ส่วนสีน้ำเงิน เขียว หรือม่วงนั้นบอกว่าทำให้เย็นลง แม้จะใช้สีโทนร้อนหรือเย็น คุณก็จะได้โทนสีอบอุ่นและเย็น ด้านล่างจะมีไอคอน "อุ่นขึ้น" สีเหลืองจะเติมสีส้มกว่า ในขณะที่ "เย็นกว่า" สีเหลืองได้รับอิทธิพลจากสีเขียวมากกว่า
อัลกอริทึมการประสานกันของสีจะตรวจสอบโทนสีของสีที่ไม่ปรับและสีที่เข้ากัน เพื่อหาโทนสีที่เข้ากัน แต่ไม่เปลี่ยนคุณภาพของสีต้นฉบับ ในกราฟิกแรก สีเขียว เหลือง และส้มที่เข้ากันน้อยกว่าบนสเปกตรัม ในกราฟิกถัดไป สีเขียวและสีส้มกลมกลืนกับโทนสีเหลือง สีเขียวใหม่ร้อนขึ้น และสีส้มใหม่เย็นสบายขึ้น
โทนสีเปลี่ยนไปบนสีส้มและสีเขียว แต่ยังคงสามารถมองได้ว่าเป็นสีส้มและสีเขียว

หากคุณต้องการเรียนรู้เพิ่มเติมเกี่ยวกับการตัดสินใจออกแบบ การสำรวจ และการพิจารณา เพื่อนร่วมงานของฉัน Ayan Daniels และ Andrew Lu ได้เขียนบล็อกโพสต์ที่ลงรายละเอียดมากขึ้นเล็กน้อยกว่าส่วนนี้
6 การปรับสีให้เข้ากันด้วยตนเอง
มี 2 ฟังก์ชันใน MaterialColors, harmonize และ harmonizeWithPrimary เพื่อให้เสียงเดียวสอดคล้องกัน
harmonizeWithPrimary ใช้ Context เป็นวิธีเข้าถึงธีมปัจจุบันและเป็นสีหลักจากธีมนั้น
@ColorInt
public static int harmonizeWithPrimary(@NonNull Context context, @ColorInt int colorToHarmonize) {
    return harmonize(
        colorToHarmonize,
        getColor(context, R.attr.colorPrimary, MaterialColors.class.getCanonicalName()));
  }


@ColorInt
  public static int harmonize(@ColorInt int colorToHarmonize, @ColorInt int colorToHarmonizeWith) {
    return Blend.harmonize(colorToHarmonize, colorToHarmonizeWith);
  }
หากต้องการตัดชุดเสียง 4 ชุด เราต้องดำเนินการเพิ่มเติมเล็กน้อย
เนื่องจากเรามีสีต้นฉบับอยู่แล้ว เราจึงต้องทำดังนี้
- พิจารณาว่าควรมีความสอดคล้องกันไหม
- ดูว่าเราอยู่ในโหมดมืดหรือไม่ และ
- แสดงผลออบเจ็กต์
ColorRolesที่ประสานกันหรือไม่เข้ากันหรือไม่
พิจารณาว่าจะทำให้กลมกลืนกันหรือไม่
ในธีมที่ส่งออกจาก Material Theme Builder เราได้รวมแอตทริบิวต์บูลีนโดยใช้ชื่อ harmonize<Color> ด้านล่างนี้คือฟังก์ชันอำนวยความสะดวกในการเข้าถึงค่าดังกล่าว
หากพบ ระบบจะแสดงผลค่า หรือไม่ก็แสดงว่าไม่ควรกลมกลืนกับสี
// Looks for associated harmonization attribute based on the color id
// custom1 ===> harmonizeCustom1
fun shouldHarmonize(context: Context, colorId: Int): Boolean {
   val root = context.resources.getResourceEntryName(colorId)
   val harmonizedId = "harmonize" + root.replaceFirstChar { it.uppercaseChar() }

   val identifier = context.resources.getIdentifier(
           harmonizedId, "bool", context.packageName)

   return if (identifier != 0) context.resources.getBoolean(identifier) else false
}
การสร้างออบเจ็กต์ ColorRoles แบบฮาร์โมไนซ์
retrieveHarmonizedColorRoles เป็นฟังก์ชันอำนวยความสะดวกอีกอย่างหนึ่งที่รวมขั้นตอนที่กล่าวไว้ข้างต้นทั้งหมด นั่นคือ ดึงข้อมูลค่าสีสำหรับทรัพยากรที่มีชื่อ พยายามแปลงแอตทริบิวต์บูลีนเพื่อระบุการประสานกัน และส่งออบเจ็กต์ ColorRoles ที่ได้มาจากสีเดิมหรือสีผสม (ในรูปแบบสว่างหรือมืด)
fun retrieveHarmonizedColorRoles(
   view: View,
   customId: Int,
   isLight: Boolean
): ColorRoles {
   val context = view.context
   val custom = context.getColor(customId);

   val shouldHarmonize = shouldHarmonize(context, customId)
   if (shouldHarmonize) {
       val blended = MaterialColors.harmonizeWithPrimary(context, custom)
       return MaterialColors.getColorRoles(blended, isLight)
   } else return MaterialColors.getColorRoles(custom, isLight)
}
7 กำลังเติมบัตรโดยสาร
ตามที่กล่าวไปก่อนหน้านี้ เราจะใช้ RecyclerView และอะแดปเตอร์ในการป้อนข้อมูลและลงสีคอลเล็กชันบัตรโดยสาร

การจัดเก็บข้อมูลขนส่งสาธารณะ
ในการจัดเก็บข้อมูลแบบข้อความและข้อมูลสีสำหรับบัตรโดยสาร เราจะใช้คลาสข้อมูลที่จัดเก็บชื่อ ปลายทาง และรหัสทรัพยากรสี
data class TransitInfo(val name: String, val destination: String, val colorId: Int)

/*  truncated code */

val transitItems = listOf(
   TransitInfo("53", "Irvine", R.color.custom1),
   TransitInfo("153", "Brea", R.color.custom1),
   TransitInfo("Orange County Line", "Oceanside", R.color.custom2),
   TransitInfo("Pacific Surfliner", "San Diego", R.color.custom2)
)
เราจะใช้สีนี้เพื่อสร้างโทนที่เราต้องการแบบเรียลไทม์
คุณสามารถปรับรันไทม์ให้สอดคล้องกันได้ด้วยฟังก์ชัน onBindViewHolder ต่อไปนี้
override fun onBindViewHolder(holder: ViewHolder, position: Int) {
   val transitInfo = list.get(position)
   val color = transitInfo.colorId
   if (!colorRolesMap.containsKey(color)) {

       val roles = retrieveHarmonizedColorRoles(
           holder.itemView, color,
           !isNightMode(holder.itemView.context)
       )
       colorRolesMap.put(color, roles)
   }

   val card = holder.card
   holder.transitName.text = transitInfo.name
   holder.transitDestination.text = transitInfo.destination

   val colorRoles = colorRolesMap.get(color)
   if (colorRoles != null) {
       holder.card.setCardBackgroundColor(colorRoles.accentContainer)
       holder.transitName.setTextColor(colorRoles.onAccentContainer)
       holder.transitDestination.setTextColor(colorRoles.onAccentContainer)
   }
}
8 ทำให้สีเข้ากันโดยอัตโนมัติ
อีกทางเลือกหนึ่งนอกเหนือจากการจัดการการประสานการใช้งานด้วยตนเอง คุณสามารถให้จัดการเองได้ HarmonizedColorOptions เป็นคลาสเครื่องมือสร้างที่ช่วยให้คุณระบุสิ่งที่เราได้ทำด้วยตนเอง
หลังจากเรียกคืนบริบทปัจจุบันแล้ว เพื่อให้คุณสามารถเข้าถึงรูปแบบไดนามิกปัจจุบัน คุณจะต้องระบุสีฐานที่คุณต้องการทำให้กลมกลืนกัน และสร้างบริบทใหม่โดยอิงตามออบเจ็กต์ HarmonizedColorOptions นั้นและบริบทที่เปิดใช้ DynamicColors
หากไม่ต้องการให้สีบางลง ก็อย่าใส่ HaronizedOptions ลงไป
val newContext = DynamicColors.wrapContextIfAvailable(requireContext())


val harmonizedOptions = HarmonizedColorsOptions.Builder()
 .setColorResourceIds(intArrayOf(R.color.custom1, R.color.custom2))
 .build();

harmonizedContext =
 HarmonizedColors.wrapContextIfAvailable(dynamicColorsContext, harmonizedOptions)
เมื่อใช้สีฐานที่ประสานกันแล้ว คุณจะอัปเดต onBindViewHolder ให้เรียกใช้ MaterialColors.getColorRoles ได้ง่ายๆ และระบุว่าบทบาทที่แสดงผลควรเป็นสีอ่อนหรือมืด
override fun onBindViewHolder(holder: ViewHolder, position: Int) {
   /*...*/
   val color = transitInfo.colorId
   if (!colorRolesMap.containsKey(color)) {

       val roles = MaterialColors.getColorRoles(context.getColor(color), !isNightMode(context))

       )
       colorRolesMap.put(color, roles)
   }

   val card = holder.card
   holder.transitName.text = transitInfo.name
   holder.transitDestination.text = transitInfo.destination

   val colorRoles = colorRolesMap.get(color)
   if (colorRoles != null) {
       holder.card.setCardBackgroundColor(colorRoles.accentContainer)
       holder.transitName.setTextColor(colorRoles.onAccentContainer)
       holder.transitDestination.setTextColor(colorRoles.onAccentContainer)
   }
}
9 การทำให้แอตทริบิวต์ของธีมเข้ากันโดยอัตโนมัติ
วิธีการที่ปรากฏจนถึงปัจจุบันต้องใช้การเรียกบทบาทของสีจากสีแต่ละสี ซึ่งมีประโยชน์มากในการแสดงให้เห็นว่า แอปพลิเคชันส่วนใหญ่ที่มีอยู่มีโทนสีที่เป็นธรรมชาติ แต่ไม่สมจริง คุณอาจไม่ได้สร้างสีมาโดยตรง แต่ใช้แอตทริบิวต์ธีมที่มีอยู่แทน
ก่อนหน้านี้ใน Codelab เราได้พูดถึงการส่งออกแอตทริบิวต์ธีม
<resources>
   <style name="AppTheme" parent="Theme.Material3.Light.NoActionBar">
       <!--- Normal theme attributes ... -->

       <item name="colorCustom1">#006876</item>
       <item name="colorOnCustom1">#ffffff</item>
       <item name="colorCustom1Container">#97f0ff</item>
       <item name="colorOnCustom1Container">#001f24</item>
       <item name="harmonizeCustom1">false</item>

       <item name="colorCustom2">#016e00</item>
       <item name="colorOnCustom2">#ffffff</item>
       <item name="colorCustom2Container">#78ff57</item>
       <item name="colorOnCustom2Container">#002200</item>
       <item name="harmonizeCustom2">false</item>
   </style>
</resources>
เช่นเดียวกับวิธีการอัตโนมัติวิธีแรก เราสามารถระบุค่าให้กับ HarmonizedColorOptions และใช้ HarmonizedColors เพื่อเรียกบริบทด้วยสีที่สอดคล้อง มีข้อแตกต่างสำคัญอย่างหนึ่งระหว่างทั้ง 2 วิธี นอกจากนี้เรายังต้องจัดให้มีการวางซ้อนธีมที่มีช่องต่างๆ เพื่อให้กลมกลืนกัน
val dynamicColorsContext = DynamicColors.wrapContextIfAvailable(requireContext())

// Harmonizing individual attributes
val harmonizedColorAttributes = HarmonizedColorAttributes.create(
 intArrayOf(
   R.attr.colorCustom1,
   R.attr.colorOnCustom1,
   R.attr.colorCustom1Container,
   R.attr.colorOnCustom1Container,
   R.attr.colorCustom2,
   R.attr.colorOnCustom2,
   R.attr.colorCustom2Container,
   R.attr.colorOnCustom2Container
 ), R.style.AppTheme_Overlay
)
val harmonizedOptions =
 HarmonizedColorsOptions.Builder().setColorAttributes(harmonizedColorAttributes).build()

val harmonizedContext =
 HarmonizedColors.wrapContextIfAvailable(dynamicColorsContext, harmonizedOptions)
อะแดปเตอร์ของคุณจะใช้บริบทที่สอดคล้องกัน ค่าในการวางซ้อนธีมควรอ้างอิงถึงรูปแบบสว่างหรือมืดที่ไม่เป็นอันตราย
<style name="AppTheme.Overlay" parent="AppTheme">
   <item name="colorCustom1">@color/harmonized_colorCustom1</item>
   <item name="colorOnCustom1">@color/harmonized_colorOnCustom1</item>
   <item name="colorCustom1Container">@color/harmonized_colorCustom1Container</item>
   <item name="colorOnCustom1Container">@color/harmonized_colorOnCustom1Container</item>

   <item name="colorCustom2">@color/harmonized_colorCustom2</item>
   <item name="colorOnCustom2">@color/harmonized_colorOnCustom2</item>
   <item name="colorCustom2Container">@color/harmonized_colorCustom2Container</item>
   <item name="colorOnCustom2Container">@color/harmonized_colorOnCustom2Container</item>
</style>
ภายในไฟล์เลย์เอาต์ XML เราสามารถใช้แอตทริบิวต์ที่สัมพันธ์กันเหล่านั้นได้ตามปกติ
<?xml version="1.0" encoding="utf-8"?>
<com.google.android.material.card.MaterialCardView xmlns:android="http://schemas.android.com/apk/res/android"
   xmlns:app="http://schemas.android.com/apk/res-auto"
   style="?attr/materialCardViewFilledStyle"
   android:id="@+id/card"
   android:layout_width="80dp"
   android:layout_height="100dp"
   android:layout_marginStart="8dp"
   app:cardBackgroundColor="?attr/colorCustom1Container"
   >

   <androidx.constraintlayout.widget.ConstraintLayout
       android:layout_width="match_parent"
       android:layout_height="match_parent"
       android:layout_margin="8dp">

       <TextView
           android:id="@+id/transitName"
           android:layout_width="wrap_content"
           android:layout_height="wrap_content"
           android:textSize="28sp"
           android:textStyle="bold"
           android:textColor="?attr/colorOnCustom1Container"
           app:layout_constraintTop_toTopOf="parent" />

       <TextView
           android:id="@+id/transitDestination"
           android:layout_width="wrap_content"
           android:layout_height="wrap_content"
           android:layout_marginBottom="4dp"
           android:textColor="?attr/colorOnCustom1Container"
           app:layout_constraintBottom_toBottomOf="parent" />
   </androidx.constraintlayout.widget.ConstraintLayout>
</com.google.android.material.card.MaterialCardView>
10 ซอร์สโค้ด
package com.example.voyagi.harmonization.ui.dashboard

import android.content.Context
import android.content.res.Configuration
import android.graphics.Typeface
import android.os.Bundle
import android.util.TypedValue
import android.view.LayoutInflater
import android.view.View
import android.view.ViewGroup
import android.widget.TextView
import androidx.fragment.app.Fragment
import androidx.lifecycle.Observer
import androidx.lifecycle.ViewModelProvider
import androidx.recyclerview.widget.LinearLayoutManager
import androidx.recyclerview.widget.RecyclerView
import com.example.voyagi.harmonization.R
import com.example.voyagi.harmonization.databinding.FragmentDashboardBinding
import com.example.voyagi.harmonization.ui.home.TransitCardAdapter
import com.example.voyagi.harmonization.ui.home.TransitInfo
import com.google.android.material.card.MaterialCardView
import com.google.android.material.color.ColorRoles
import com.google.android.material.color.DynamicColors
import com.google.android.material.color.HarmonizedColorAttributes
import com.google.android.material.color.HarmonizedColors
import com.google.android.material.color.HarmonizedColorsOptions
import com.google.android.material.color.MaterialColors


class DashboardFragment : Fragment() {

 enum class TransitMode { BUS, TRAIN }
 data class TransitInfo2(val name: String, val destination: String, val mode: TransitMode)

 private lateinit var dashboardViewModel: DashboardViewModel
 private var _binding: FragmentDashboardBinding? = null

 // This property is only valid between onCreateView and
 // onDestroyView.
 private val binding get() = _binding!!

 override fun onCreateView(
   inflater: LayoutInflater,
   container: ViewGroup?,
   savedInstanceState: Bundle?
 ): View? {
   dashboardViewModel =
     ViewModelProvider(this).get(DashboardViewModel::class.java)

   _binding = FragmentDashboardBinding.inflate(inflater, container, false)
   val root: View = binding.root


   val recyclerView = binding.recyclerView

   val transitItems = listOf(
     TransitInfo2("53", "Irvine", TransitMode.BUS),
     TransitInfo2("153", "Brea", TransitMode.BUS),
     TransitInfo2("Orange County Line", "Oceanside", TransitMode.TRAIN),
     TransitInfo2("Pacific Surfliner", "San Diego", TransitMode.TRAIN)
   )

   val dynamicColorsContext = DynamicColors.wrapContextIfAvailable(requireContext())

   // Harmonizing individual attributes
   val harmonizedColorAttributes = HarmonizedColorAttributes.create(
     intArrayOf(
       R.attr.colorCustom1,
       R.attr.colorOnCustom1,
       R.attr.colorCustom1Container,
       R.attr.colorOnCustom1Container,
       R.attr.colorCustom2,
       R.attr.colorOnCustom2,
       R.attr.colorCustom2Container,
       R.attr.colorOnCustom2Container
     ), R.style.AppTheme_Overlay
   )
   val harmonizedOptions =
     HarmonizedColorsOptions.Builder().setColorAttributes(harmonizedColorAttributes).build()

   val harmonizedContext =
     HarmonizedColors.wrapContextIfAvailable(dynamicColorsContext, harmonizedOptions)


   val adapter = TransitCardAdapterAttr(transitItems, harmonizedContext)
   recyclerView.adapter = adapter
   recyclerView.layoutManager =
     LinearLayoutManager(harmonizedContext, RecyclerView.HORIZONTAL, false)

   return root
 }

 override fun onDestroyView() {
   super.onDestroyView()
   _binding = null
 }
}

class TransitCardAdapterAttr(val list: List<DashboardFragment.TransitInfo2>, context: Context) :
 RecyclerView.Adapter<RecyclerView.ViewHolder>() {
 val colorRolesMap = mutableMapOf<Int, ColorRoles>()
 private var harmonizedContext: Context? = context

 override fun onCreateViewHolder(
   parent: ViewGroup,
   viewType: Int
 ): RecyclerView.ViewHolder {
   return if (viewType == DashboardFragment.TransitMode.BUS.ordinal) {
     BusViewHolder(LayoutInflater.from(harmonizedContext).inflate(R.layout.transit_item_bus, parent, false))
   } else TrainViewHolder(LayoutInflater.from(harmonizedContext).inflate(R.layout.transit_item_train, parent, false))
 }

 override fun getItemCount(): Int {
   return list.size
 }

 override fun onBindViewHolder(holder: RecyclerView.ViewHolder, position: Int) {
   val item = list[position]
   if (item.mode.ordinal == DashboardFragment.TransitMode.BUS.ordinal) {
     (holder as BusViewHolder).bind(item)
     (holder as TransitBindable).adjustNameLength()
   } else {
       (holder as TrainViewHolder).bind(item)
       (holder as TransitBindable).adjustNameLength()
   }
 }

 override fun getItemViewType(position: Int): Int {
   return list[position].mode.ordinal
 }

 interface TransitBindable {
   val card: MaterialCardView
   var transitName: TextView
   var transitDestination: TextView

   fun bind(item: DashboardFragment.TransitInfo2) {
     transitName.text = item.name
     transitDestination.text = item.destination
   }
   fun Float.toDp(context: Context) =
     TypedValue.applyDimension(
       TypedValue.COMPLEX_UNIT_DIP,
       this,
       context.resources.displayMetrics
     )
   fun adjustNameLength(){
     if (transitName.length() > 4) {
       val layoutParams = card.layoutParams
       layoutParams.width = 100f.toDp(card.context).toInt()
       card.layoutParams = layoutParams
       transitName.setTypeface(Typeface.DEFAULT_BOLD);

       transitName.setTextSize(TypedValue.COMPLEX_UNIT_SP, 16.0f)
     }
   }
 }

 inner class BusViewHolder(itemView: View) : RecyclerView.ViewHolder(itemView), TransitBindable {
   override val card: MaterialCardView = itemView.findViewById(R.id.card)
   override var transitName: TextView = itemView.findViewById(R.id.transitName)
   override var transitDestination: TextView = itemView.findViewById(R.id.transitDestination)
 }
 inner class TrainViewHolder(itemView: View) : RecyclerView.ViewHolder(itemView), TransitBindable {
   override val card: MaterialCardView = itemView.findViewById(R.id.card)
   override var transitName: TextView = itemView.findViewById(R.id.transitName)
   override var transitDestination: TextView = itemView.findViewById(R.id.transitDestination)
 }
}
12 สรุป
คุณได้เรียนรู้ใน Codelab นี้แล้ว:
- ข้อมูลเบื้องต้นเกี่ยวกับอัลกอริทึมการประสานกันของสี
- วิธีสร้างบทบาทของสีจากสีที่เห็นได้
- วิธีเลือกสีให้กลมกลืนกันในอินเทอร์เฟซผู้ใช้
- วิธีทำให้ชุดแอตทริบิวต์ในธีมสอดคล้องกัน
หากมีข้อสงสัย โปรดติดต่อเราได้ทุกเมื่อโดยใช้ @MaterialDesign บน Twitter
โปรดติดตามเนื้อหาการออกแบบและบทแนะนำเพิ่มเติมได้ที่ youtube.com/MaterialDesign

