
1. 概览
在本实验中,您将设置 GitHub Actions 工作流并将其与 Gemini 集成,以自动执行代码审核步骤。
学习内容
在本实验中,您将学习如何完成以下操作:
- 如何在 GitHub 中添加 GenAI 代码审核自动化步骤
- 如何在本地运行 devai CLI 以自动执行代码审核
前提条件
- 本实验假设您熟悉 Cloud 控制台和 Cloud Shell 环境。
2. 设置和要求
Cloud 项目设置
- 登录 Google Cloud 控制台,然后创建一个新项目或重复使用现有项目。如果您还没有 Gmail 或 Google Workspace 账号,则必须创建一个。


- 项目名称是此项目参与者的显示名称。它是 Google API 尚未使用的字符串。您可以随时对其进行更新。
- 项目 ID 在所有 Google Cloud 项目中是唯一的,并且是不可变的(一经设置便无法更改)。Cloud 控制台会自动生成一个唯一字符串;通常情况下,您无需关注该字符串。在大多数 Codelab 中,您都需要引用项目 ID(通常用
PROJECT_ID标识)。如果您不喜欢生成的 ID,可以再随机生成一个 ID。或者,您也可以尝试自己的项目 ID,看看是否可用。完成此步骤后便无法更改该 ID,并且此 ID 在项目期间会一直保留。 - 此外,还有第三个值,即部分 API 使用的项目编号,供您参考。如需详细了解所有这三个值,请参阅文档。
- 接下来,您需要在 Cloud 控制台中启用结算功能,以便使用 Cloud 资源/API。运行此 Codelab 应该不会产生太多的费用(如果有的话)。若要关闭资源以避免产生超出本教程范围的结算费用,您可以删除自己创建的资源或删除项目。Google Cloud 新用户符合参与 300 美元免费试用计划的条件。
环境设置
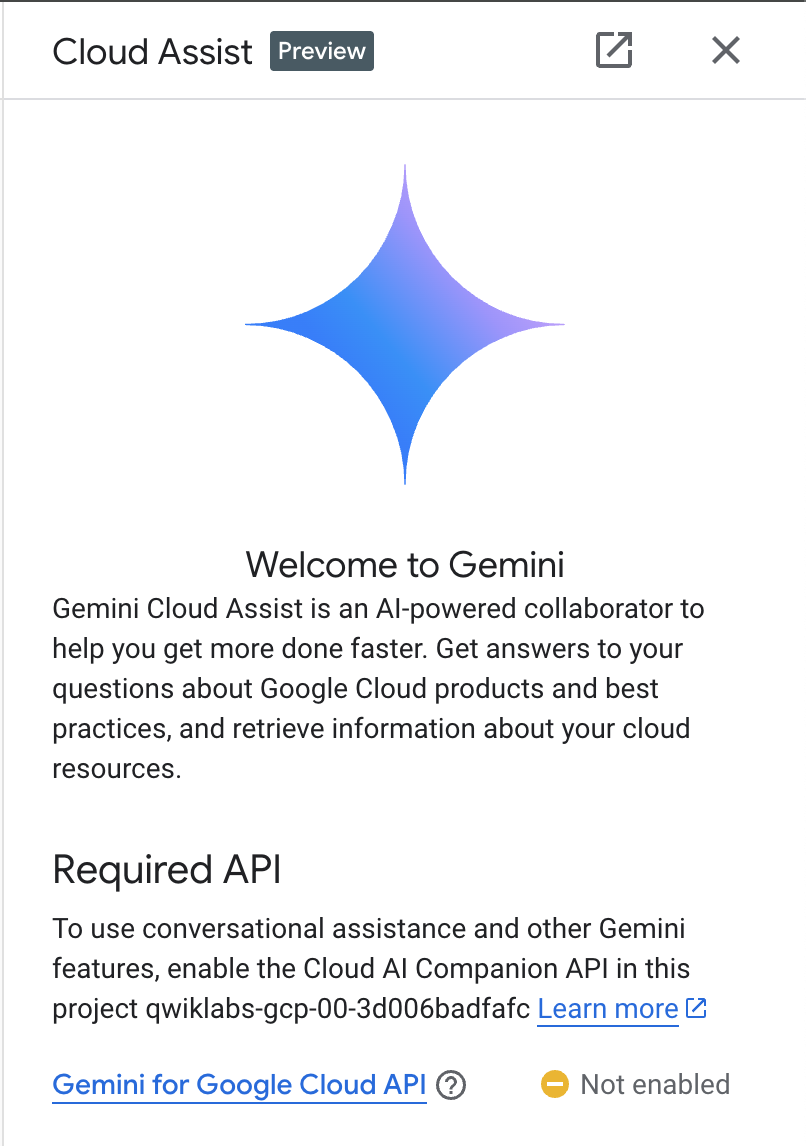
打开 Gemini 聊天。

或者,在搜索栏中输入“问一问 Gemini”。

为 Google Cloud API 启用 Gemini:
点击“Start chatting”,然后按照其中一个示例问题操作,或输入您自己的问题进行试用。
建议尝试的提示:
- 通过 5 个要点介绍 Cloud Run。
- 您是 Google Cloud Run 产品经理,需要用 5 个简短的要点向学生介绍 Cloud Run。
- 您是 Google Cloud Run 产品经理,需要向一名经过认证的 Kubernetes 开发者简要说明 5 个 Cloud Run 要点。
- 您是 Google Cloud Run 产品经理,请用 5 个关键要点向一名高级开发者说明何时使用 Cloud Run 而非 GKE。
如需详细了解如何撰写更优质的提示,请参阅提示指南。
Google Cloud 专用 Gemini 如何使用您的数据
Google 的隐私保护承诺
Google 是业界首家发布 AI/机器学习隐私权承诺的公司之一,该承诺概述了我们的信念:客户应拥有最高级别的安全性,并能够控制其在云中存储的数据。
您提交和接收的数据
您向 Gemini 提出的问题(包括您提交给 Gemini 以供分析或完成的任何输入信息或代码)称为“提示”。您从 Gemini 收到的答案或代码补全项称为“回答”。Gemini 不会将您的提示或其回答用作训练模型的数据。
提示的加密
当您向 Gemini 提交问题时,您的数据会在传输过程中进行加密,以便作为 Gemini 中底层模型的输入。
通过 Gemini 生成的节目数据
Gemini 使用第一方 Google Cloud 代码和部分第三方代码进行训练。您负责代码的安全性、测试和有效性,包括 Gemini 为您提供的任何代码补全、生成或分析。
详细了解 Google 如何处理你的提示。
3. 用于测试提示的选项
如果您想更改/扩展现有的 devai CLI 提示,可以通过多种方式实现。
Vertex AI Studio 是 Google Cloud 的 Vertex AI 平台的一部分,专为简化和加速生成式 AI 模型的开发和使用而设计。
Google AI Studio 是一款基于网络的工具,可用于对问题生成技术和 Gemini API 进行原型设计和实验。
- Gemini Web 应用 (gemini.google.com)
Google Gemini Web 应用 (gemini.google.com) 是一款基于 Web 的工具,旨在帮助您探索和利用 Google 的 Gemini AI 模型的强大功能。
- Android 版 Google Gemini 移动应用和 iOS 版 Google 应用
4. 创建服务账号
点击搜索栏右侧的图标,激活 Cloud Shell。

在打开的终端中,启用所需服务以使用 Vertex AI API 和 Gemini 聊天功能。
gcloud services enable \
    aiplatform.googleapis.com \
    cloudaicompanion.googleapis.com \
    cloudresourcemanager.googleapis.com \
    secretmanager.googleapis.com
如果系统提示您进行授权,请点击“授权”以继续。

运行以下命令以创建新的服务账号和密钥。
您将使用此服务账号从 CICD 流水线向 Vertex AI Gemini API 发出 API 调用。
PROJECT_ID=$(gcloud config get-value project)
SERVICE_ACCOUNT_NAME='vertex-client'
DISPLAY_NAME='Vertex Client'
KEY_FILE_NAME='vertex-client-key'

gcloud iam service-accounts create $SERVICE_ACCOUNT_NAME --display-name "$DISPLAY_NAME"
授予角色。
gcloud projects add-iam-policy-binding $PROJECT_ID --member="serviceAccount:$SERVICE_ACCOUNT_NAME@$PROJECT_ID.iam.gserviceaccount.com" --role="roles/aiplatform.admin" --condition None

gcloud projects add-iam-policy-binding $PROJECT_ID --member="serviceAccount:$SERVICE_ACCOUNT_NAME@$PROJECT_ID.iam.gserviceaccount.com" --role="roles/secretmanager.secretAccessor" --condition None

gcloud iam service-accounts keys create $KEY_FILE_NAME.json --iam-account=$SERVICE_ACCOUNT_NAME@$PROJECT_ID.iam.gserviceaccount.com
5. 将 GitHub 代码库分叉到您的个人 GitHub 代码库
前往 https://github.com/GoogleCloudPlatform/genai-for-developers/fork,然后选择您的 GitHub 用户 ID 作为所有者。
请点击“Create fork”。
6. 启用 GitHub Actions 工作流
在浏览器中打开已复刻的 GitHub 代码库,然后切换到“Actions”标签页以启用工作流。

7. 添加代码库 Secret
在分叉的 GitHub 代码库中,在“Settings / Secrets and variables / Actions”下创建一个代码库密钥。
添加了名称为“GOOGLE_API_CREDENTIALS”的代码库 Secret。

切换到 Google Cloud Shell 窗口/标签页,然后在 Cloud Shell 终端中运行以下命令。
cat ~/vertex-client-key.json
复制文件内容,并将其粘贴为 Secret 的值。

添加 PROJECT_ID 密钥,并将您的 Qwiklabs 项目 ID 作为值:

8. 运行 GitHub Actions 工作流
在浏览器中打开您的 GitHub 代码库,然后运行工作流。
工作流已配置为按需运行。

9. 查看工作流输出

流水线命令概览
GitHub Actions 工作流配置:devai-review.yml
测试覆盖率命令的结果:
devai review testcoverage -c ${{ github.workspace }}/sample-app/src/main/java/anthos/samples/bankofanthos/balancereader
此 devai review testcoverage 命令使用生成式 AI 模型 Gemini 分析代码及其关联的测试套件(如果有)。它会评估所提供代码的测试覆盖率,识别有和没有单元测试的文件和方法。然后,该命令会利用该模型提供覆盖率摘要,包括行数和覆盖的分支/条件等指标。它会根据分析结果提供有关提高测试覆盖率的建议,建议添加特定测试,并提供有关测试最佳实践的一般建议。最后,它会输出 Gemini 模型的回答,其中包括文件缺少覆盖率等详细信息,并通过命令行向用户提供有关改进现有测试的建议。

代码审核命令的结果:
devai review code -c ${{ github.workspace }}/sample-app/src/main/java/anthos/samples/bankofanthos/balancereader
devai review code 命令会使用生成式 AI 模型对所提供的代码段进行全面的代码审核。它将要审核的代码作为输入(上下文)和输出格式偏好设置(输出)来使用。它利用大型语言模型来分析代码的正确性、效率、可维护性、安全性和是否遵循最佳实践。该命令会构建一个详细的提示,指示 Gemini 如何进行审核,然后将其发送给模型以评估所提供的代码。最后,它会处理 Gemini 的回答,并根据用户的偏好设置将其格式设置为 Markdown、JSON 或表格,然后输出评价结果。

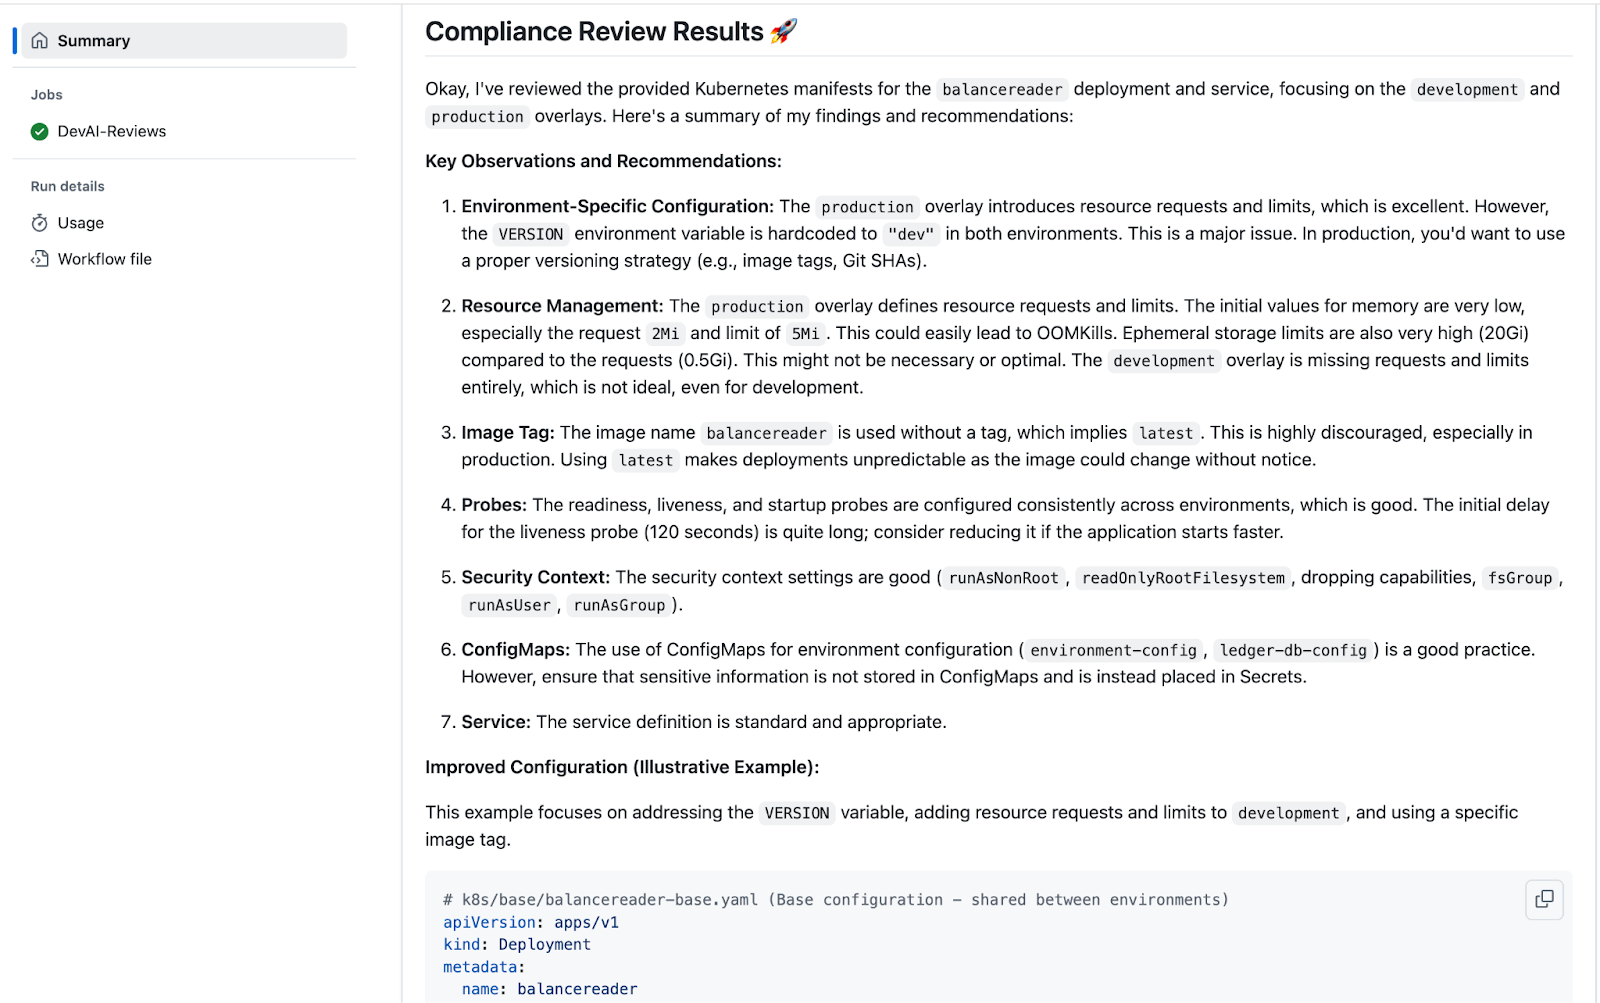
合规性审核命令的结果:
devai review compliance -c ${{ github.workspace }}/sample-app/k8s --config ${{ github.workspace }}/devai-cli/gemini/styleguide.md
devai review compliance 命令会根据一组最佳实践(通常是 Kubernetes 配置)分析代码。该命令利用 Gemini 模型来审核所提供的代码 (context),并将其与单独的配置文件 (config) 中定义的指定标准进行比较。该命令利用提示来指示 Gemini 模型充当 Kubernetes 专家并提供合规性报告。然后,它会将发现结果以简要说明的形式呈现,重点是展示如何解决发现的任何问题的代码示例。最后,该命令会将 Gemini 的合规性审核输出内容输出到控制台。这样,用户就可以轻松审核自己的代码是否符合相关要求。
10. 克隆代码库
返回 Cloud Shell 终端并克隆代码库。
在运行命令之前,请将 YOUR-GITHUB-USERID 更改为您的 GitHub 用户 ID。
git clone https://github.com/YOUR-GITHUB-USERID/genai-for-developers.git
在 Cloud Shell Editor 中更改文件夹并打开工作流文件。
cd genai-for-developers

cloudshell edit .github/workflows/devai-review.yml
等待 IDE 中显示配置文件。
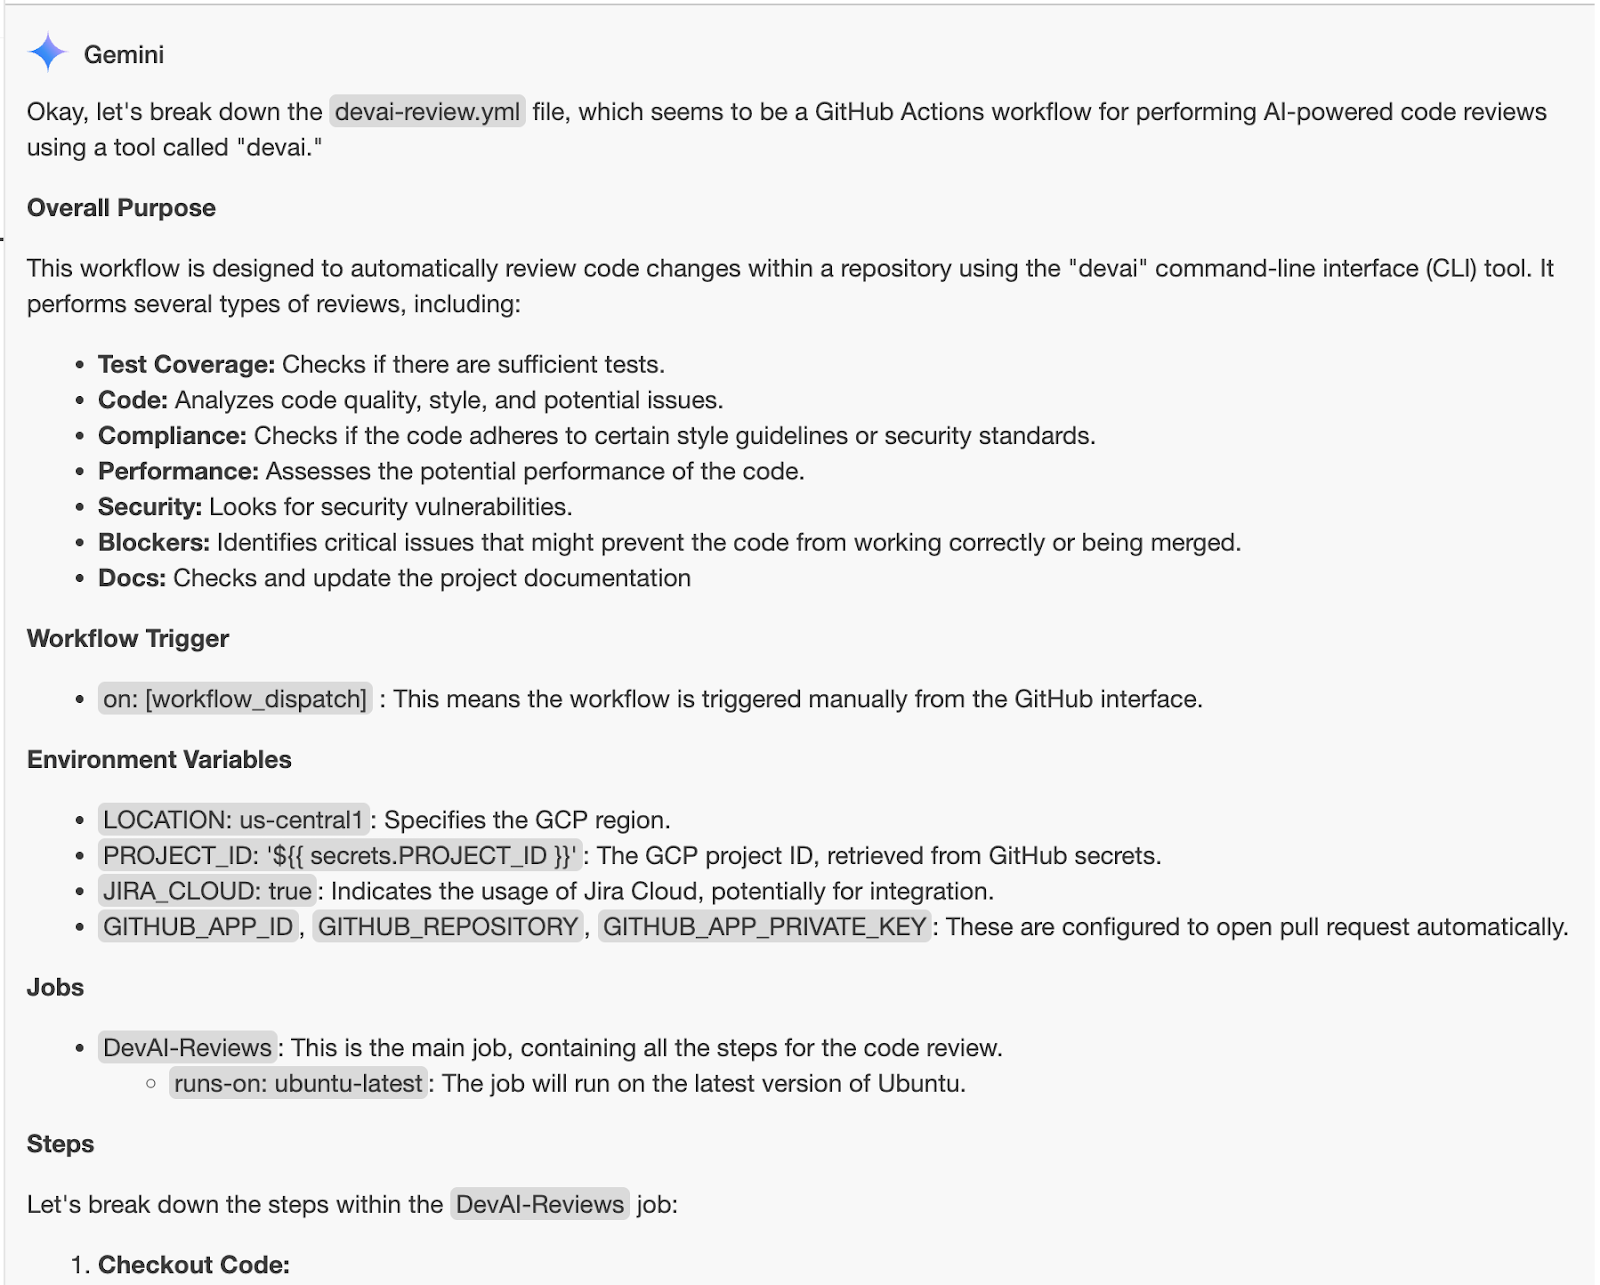
11. 使用 Gemini Code Assist 解释代码
右键点击 devai-review.yml 文件中的任意位置,然后选择 Gemini Code Assist > Explain 此选项。

审核说明:
12. DevAI CLI 开发
在本部分中,您将对 devai cli 进行更改。
首先,设置 Python virtualenv、安装所需软件包并运行示例命令。
cd ~/genai-for-developers/devai-cli
python3 -m venv venv
. venv/bin/activate
pip3 install -r src/requirements.txt
pip3 install --editable ./src
devai echo
设置所需的环境变量。
export PROJECT_ID=$(gcloud config get-value project)
export LOCATION=us-central1
运行代码审核命令,检查一切是否正常运行:
devai review code -c ~/genai-for-developers/sample-app/src/main/java/anthos/samples/bankofanthos/balancereader > code-review.md

cloudshell edit code-review.md
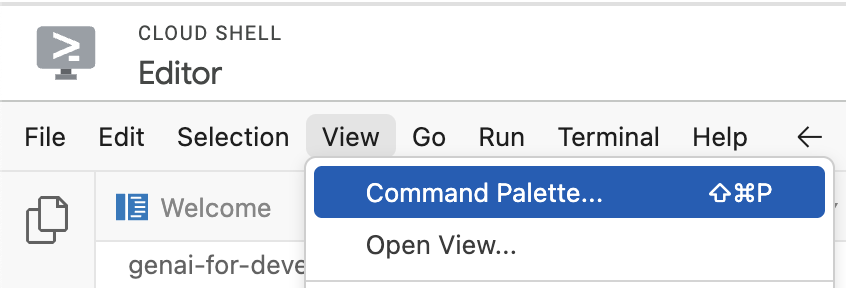
在 Cloud Shell 编辑器中使用 Markdown 预览查看结果。
使用 Command Palette 并选择“Markdown: Open Preview”。


13. 探索 devai CLI 命令
测试覆盖率审核命令
devai review testcoverage -c ~/genai-for-developers/sample-app/src > testcoverage.md

cloudshell edit testcoverage.md
合规性审核命令
devai review compliance --context ~/genai-for-developers/sample-app/k8s --config ~/genai-for-developers/devai-cli/.gemini/styleguide.md > k8s-review.md

cloudshell edit k8s-review.md
效果评估命令
devai review performance -c ~/genai-for-developers/sample-app/src/main/java > performance-review.md

cloudshell edit performance-review.md
安全审核命令
devai review security -c ~/genai-for-developers/sample-app/src/main/java > security-review.md

cloudshell edit security-review.md
屏蔽者审核命令
devai review blockers -c ~/genai-for-developers/sample-app/pom.xml
devai review blockers -c ~/genai-for-developers/sample-app/setup.md
图片/图表审核和总结
输入图 [~/genai-for-developers/images/extension-diagram.png]:

查看命令:
devai review image \
  -f ~/genai-for-developers/images/extension-diagram.png \
  -p "Review and summarize this diagram" > image-review.md

cloudshell edit image-review.md
输出:
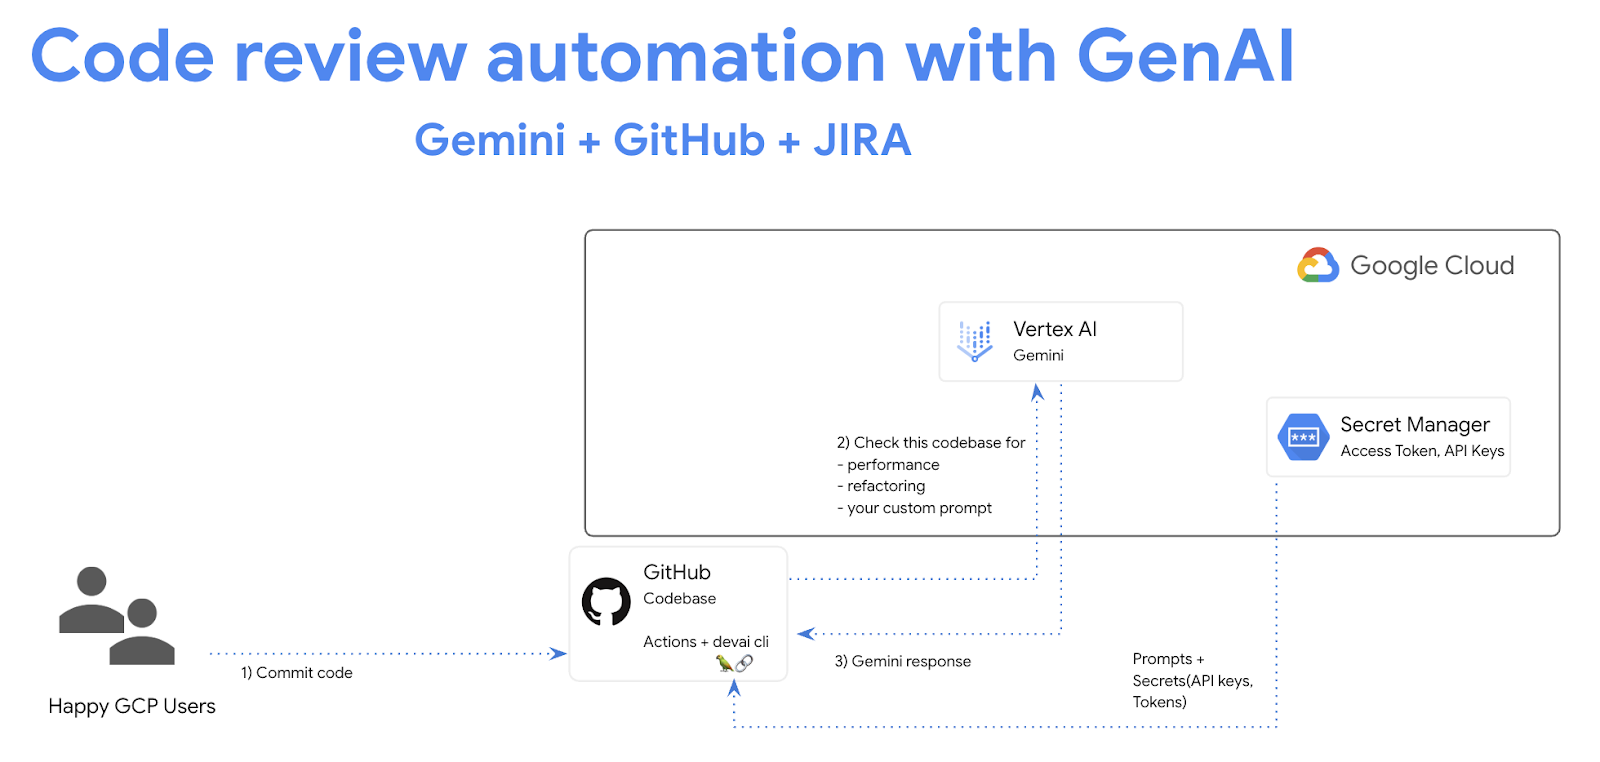
The diagram outlines a process for conducting local code reviews using a VS Code extension or CLI, leveraging Google Cloud's Vertex AI (Gemini Pro) for generating review prompts.

**Process Flow:**

1. **Code Style Check:** Developers initiate the process by checking their code for adherence to pre-defined style guidelines.
2. **Prompt Generation:** The VS Code extension/CLI sends the code to Vertex AI (Gemini Pro) on Google Cloud.
3. **Vertex AI Review:**  Vertex AI analyzes the code and generates relevant review prompts.
4. **Local Review:** The prompts are sent back to the developer's IDE for their consideration.
5. **Optional Actions:** Developers can optionally:
    - Create new JIRA issues directly from the IDE based on the review prompts.
    - Generate new issues in a GitLab repository.

**Key Components:**

* **VS Code Extension/CLI:** Tools facilitating the interaction with Vertex AI and potential integrations with JIRA and GitLab.
* **Vertex AI (Gemini Pro):**  Google Cloud's generative AI service responsible for understanding the code and generating meaningful review prompts.
* **Google Cloud Secret Manager:** Securely stores API keys and access tokens required to authenticate and interact with Google Cloud services.
* **JIRA/GitLab (Optional):** Issue tracking and project management tools that can be integrated for a streamlined workflow.

**Benefits:**

* **Automated Review Assistance:**  Leveraging AI to generate review prompts saves time and improves the consistency and quality of code reviews.
* **Local Development:** The process empowers developers to conduct reviews locally within their familiar IDE.
* **Integration Options:** The flexibility to integrate with project management tools like JIRA and GitLab streamlines workflow and issue tracking.
图片差异分析
devai review imgdiff \
  -c ~/genai-for-developers/images/devai-api.png \
  -t ~/genai-for-developers/images/devai-api-slack.png > image-diff-review.md

cloudshell edit image-diff-review.md
输出:
The following UI elements are missing in the "AFTER UPGRADE STATE" image compared to the "BEFORE UPGRADE STATE" image:

1. **Slack:** The entire Slack element, including the icon, "Team channel" label, and the arrow indicating interaction, is absent in the AFTER UPGRADE image.
2. **Storage Bucket:**  The "Storage Bucket" element with its icon and "PDFs" label is missing in the AFTER UPGRADE image.
3. **"GenAI Agents" label in Vertex AI block:** The BEFORE UPGRADE image has "Vertex AI Agents" and "GenAI Agent" labels within the Vertex AI block, while the AFTER UPGRADE image only has "Vertex AI."
4. **"Open JIRA Issue" and "Team Project" labels:** In the BEFORE UPGRADE image, these labels are connected to the JIRA block with an arrow. These are missing in the AFTER UPGRADE image.

**Decision Explanation:**

The analysis is based on a direct visual comparison of the two provided images, noting the presence and absence of specific UI elements and their associated labels. The elements listed above are present in the BEFORE UPGRADE image but absent in the AFTER UPGRADE image.
视频文件分析:
devai review video \
  -f "/tmp/video.mp4" \
  -p "Review user journey video and create unit tests using jest framework"
文档生成命令
devai document readme -c ~/genai-for-developers/sample-app/src/main/
输出:
# Bank of Anthos - Balance Reader Service

## Description

The Balance Reader service is a component of the Bank of Anthos sample application. It provides a REST endpoint for retrieving the current balance of a user account. This service demonstrates key concepts for building microservices with Spring Boot and deploying them to a Kubernetes cluster.

## Features
...
在 Cloud Shell 编辑器中查看可用的 devai CLI 命令:
cloudshell edit ~/genai-for-developers/devai-cli/README.md
或者,查看 GitHub 代码库中的 README.md。
14. 恭喜!
恭喜,您已完成此 Codelab!
所学内容:
- 在 GitHub 中添加 GenAI 代码审核自动化步骤
- 在本地运行 devai CLI
后续步骤:
- 我们将推出更多实操课程,敬请期待!
清理
为避免因本教程中使用的资源导致您的 Google Cloud 账号产生费用,请删除包含这些资源的项目,或者保留项目但删除各个资源。
删除项目
若要避免产生费用,最简单的方法是删除您为本教程创建的项目。
©2024 Google LLC 保留所有权利。Google 和 Google 徽标是 Google LLC 的商标。其他所有公司名称和产品名称可能是其各自相关公司的商标。