
1. 개요
이 실습에서는 GitHub Actions 워크플로를 설정하고 Gemini와 통합하여 코드 검토 단계를 자동화합니다.
학습할 내용
이 실습에서는 다음 작업을 진행하는 방법을 학습합니다.
- GitHub에서 GenAI 코드 검토 자동화 단계를 추가하는 방법
- devai cli를 로컬에서 실행하여 코드 검토를 자동화하는 방법
기본 요건
- 이 실습에서는 Cloud 콘솔 및 Cloud Shell 환경에 익숙하다고 가정합니다.
2. 설정 및 요구사항
Cloud 프로젝트 설정
- Google Cloud Console에 로그인하여 새 프로젝트를 만들거나 기존 프로젝트를 재사용합니다. 아직 Gmail이나 Google Workspace 계정이 없는 경우 계정을 만들어야 합니다.


- 프로젝트 이름은 이 프로젝트 참가자의 표시 이름입니다. 이는 Google API에서 사용하지 않는 문자열이며 언제든지 업데이트할 수 있습니다.
- 프로젝트 ID는 모든 Google Cloud 프로젝트에서 고유하며, 변경할 수 없습니다(설정된 후에는 변경할 수 없음). Cloud 콘솔은 고유한 문자열을 자동으로 생성합니다. 일반적으로는 신경 쓰지 않아도 됩니다. 대부분의 Codelab에서는 프로젝트 ID (일반적으로
PROJECT_ID로 식별됨)를 참조해야 합니다. 생성된 ID가 마음에 들지 않으면 다른 임의 ID를 생성할 수 있습니다. 또는 직접 시도해 보고 사용 가능한지 확인할 수도 있습니다. 이 단계 이후에는 변경할 수 없으며 프로젝트 기간 동안 유지됩니다. - 참고로 세 번째 값은 일부 API에서 사용하는 프로젝트 번호입니다. 이 세 가지 값에 대한 자세한 내용은 문서를 참고하세요.
- 다음으로 Cloud 리소스/API를 사용하려면 Cloud 콘솔에서 결제를 사용 설정해야 합니다. 이 Codelab 실행에는 많은 비용이 들지 않습니다. 이 튜토리얼이 끝난 후에 요금이 청구되지 않도록 리소스를 종료하려면 만든 리소스 또는 프로젝트를 삭제하면 됩니다. Google Cloud 신규 사용자는 300달러(USD) 상당의 무료 체험판 프로그램에 참여할 수 있습니다.
환경 설정
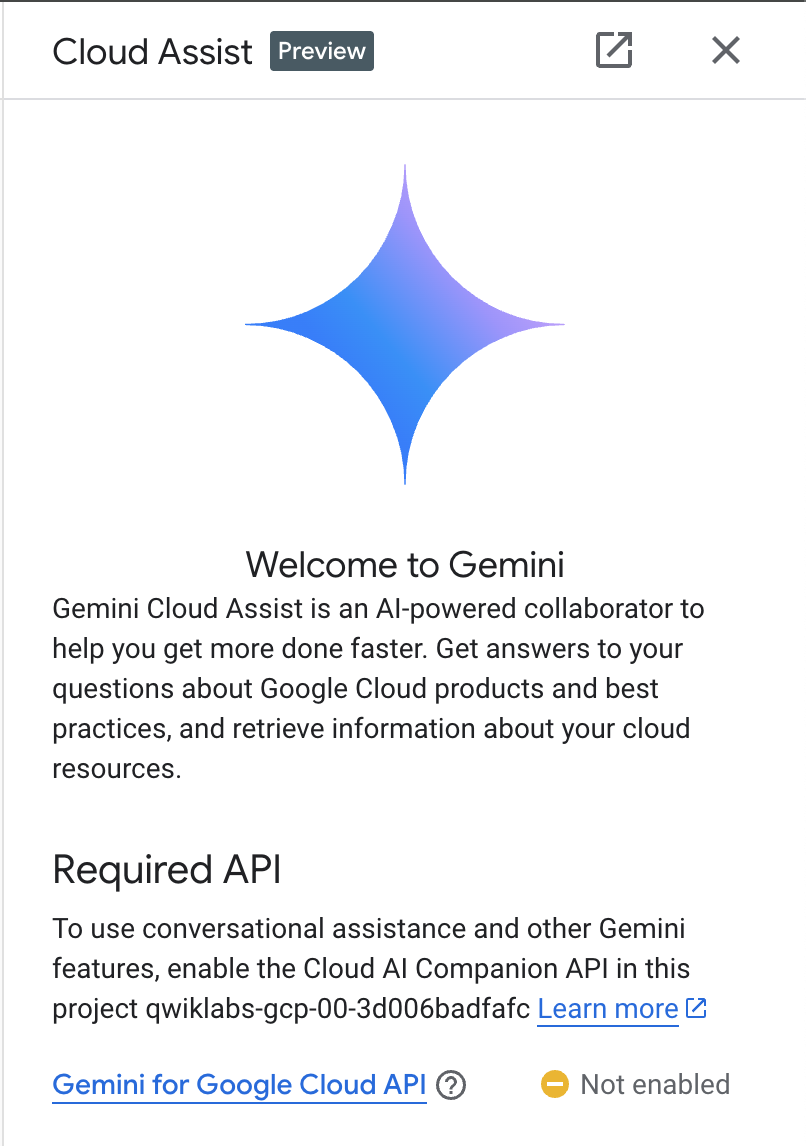
Gemini 채팅을 엽니다.

또는 검색창에 'Gemini에게 물어보기'를 입력합니다.

Google Cloud API용 Gemini를 사용 설정합니다.
'Start chatting'를 클릭하고 샘플 질문 중 하나를 따르거나 직접 프롬프트를 입력하여 사용해 봅니다.

프롬프트 예시:
- Cloud Run을 5가지 주요 사항으로 설명합니다.
- Google Cloud Run 제품 관리자로서 학생에게 Cloud Run을 5가지 핵심 사항으로 간단히 설명합니다.
- Google Cloud Run 제품 관리자로서 인증된 Kubernetes 개발자에게 Cloud Run을 5가지 핵심사항으로 간단히 설명합니다.
- Google Cloud Run 제품 관리자로서 Cloud Run과 GKE 중 어느 쪽을 사용해야 하는지 선임 개발자에게 5가지 핵심 사항으로 설명합니다.
프롬프트 가이드에서 더 나은 프롬프트 작성에 대해 자세히 알아보세요.
Google Cloud를 위한 Gemini에서 사용자 데이터를 사용하는 방법
Google 개인 정보 보호 약정
Google은 업계 최초로 AI/ML 개인 정보 보호 약정을 발표했습니다. 여기에는 클라우드에 저장된 고객 데이터에 대해 고객이 최고 수준의 보안 및 제어 권한을 가져야 한다는 Google의 신념이 표명되어 있습니다.
제출 및 수신하는 데이터
분석하거나 완료하기 위해 Gemini에 제출하는 모든 입력 정보나 코드를 포함하여 Gemini에 묻는 질문을 프롬프트라고 합니다. Gemini로부터 받는 답변이나 코드 완성을 '응답'이라고 합니다. Gemini는 프롬프트나 해당 응답을 데이터로 사용하여 모델을 학습시키지 않습니다.
프롬프트 암호화
Gemini에 프롬프트를 제출하면 Gemini의 기본 모델에 입력으로 전송 중인 데이터가 암호화됩니다.
Gemini에서 생성된 프로그램 데이터
Gemini는 퍼스트 파티 Google Cloud 코드와 선택된 서드 파티 코드로 학습됩니다. Gemini가 제공하는 코드 완성, 생성, 분석을 포함해 코드의 보안, 테스트, 효과에 대한 책임은 사용자에게 있습니다.
Google에서 메시지를 처리하는 방식을 자세히 알아보세요.
3. 프롬프트 테스트 옵션
기존 devai cli 프롬프트를 변경/확장하려면 다음과 같은 몇 가지 옵션이 있습니다.
Vertex AI Studio는 Google Cloud의 Vertex AI 플랫폼에 포함된 도구로, 생성형 AI 모델의 개발과 사용을 간소화하고 가속화하도록 설계되었습니다.
Google AI Studio는 프롬프트 엔지니어링 및 Gemini API를 프로토타입으로 제작하고 실험하기 위한 웹 기반 도구입니다.
- Gemini 웹 앱 (gemini.google.com)
Google Gemini 웹 앱 (gemini.google.com)은 Google의 Gemini AI 모델을 살펴보고 활용하는 데 도움이 되도록 설계된 웹 기반 도구입니다.
- Android용 Google Gemini 모바일 앱 및 iOS의 Google 앱
4. 서비스 계정 만들기
검색창 오른쪽에 있는 아이콘을 클릭하여 Cloud Shell을 활성화합니다.

열린 터미널에서 Vertex AI API 및 Gemini 채팅을 사용하기 위해 필요한 서비스를 사용 설정합니다.
gcloud services enable \
    aiplatform.googleapis.com \
    cloudaicompanion.googleapis.com \
    cloudresourcemanager.googleapis.com \
    secretmanager.googleapis.com
승인하라는 메시지가 표시되면 '승인'을 클릭하여 계속합니다.

다음 명령어를 실행하여 새 서비스 계정과 키를 만듭니다.
이 서비스 계정을 사용하여 CICD 파이프라인에서 Vertex AI Gemini API에 API를 호출합니다.
PROJECT_ID=$(gcloud config get-value project)
SERVICE_ACCOUNT_NAME='vertex-client'
DISPLAY_NAME='Vertex Client'
KEY_FILE_NAME='vertex-client-key'

gcloud iam service-accounts create $SERVICE_ACCOUNT_NAME --display-name "$DISPLAY_NAME"
역할을 부여합니다.
gcloud projects add-iam-policy-binding $PROJECT_ID --member="serviceAccount:$SERVICE_ACCOUNT_NAME@$PROJECT_ID.iam.gserviceaccount.com" --role="roles/aiplatform.admin" --condition None

gcloud projects add-iam-policy-binding $PROJECT_ID --member="serviceAccount:$SERVICE_ACCOUNT_NAME@$PROJECT_ID.iam.gserviceaccount.com" --role="roles/secretmanager.secretAccessor" --condition None

gcloud iam service-accounts keys create $KEY_FILE_NAME.json --iam-account=$SERVICE_ACCOUNT_NAME@$PROJECT_ID.iam.gserviceaccount.com
5. GitHub 저장소를 개인 GitHub 저장소로 포크
https://github.com/GoogleCloudPlatform/genai-for-developers/fork로 이동하여 GitHub 사용자 ID를 소유자로 선택합니다.
'Create fork'을(를) 클릭합니다.
6. GitHub Actions 워크플로 사용 설정
브라우저에서 포크된 GitHub 저장소를 열고 'Actions' 탭으로 전환하여 워크플로를 사용 설정합니다.

7. 저장소 보안 비밀 추가
포크된 GitHub 저장소의 'Settings / Secrets and variables / Actions' 아래에 저장소 비밀을 만듭니다.
이름이 'GOOGLE_API_CREDENTIALS'인 저장소 보안 비밀을 추가합니다.

Google Cloud Shell 창/탭으로 전환하고 Cloud Shell 터미널에서 아래 명령어를 실행합니다.
cat ~/vertex-client-key.json
파일 콘텐츠를 복사하여 보안 비밀의 값으로 붙여넣습니다.

Qwiklabs 프로젝트 ID를 값으로 사용하여 PROJECT_ID 시크릿을 추가합니다.

8. GitHub Actions 워크플로 실행
브라우저에서 GitHub 저장소로 이동하여 워크플로를 실행합니다.
워크플로는 주문형으로 실행되도록 구성됩니다.

9. 워크플로 출력 검토

파이프라인 명령어 개요
GitHub Actions 워크플로 구성: devai-review.yml
테스트 적용 범위 명령어의 결과:
devai review testcoverage -c ${{ github.workspace }}/sample-app/src/main/java/anthos/samples/bankofanthos/balancereader
이 devai review testcoverage 명령어는 생성형 AI 모델인 Gemini를 사용하여 코드와 관련 테스트 모음(있는 경우)을 분석합니다. 제공된 코드의 테스트 적용 범위를 평가하여 단위 테스트가 있는 파일과 없는 파일, 메서드를 식별합니다. 그런 다음 이 명령어는 모델을 활용하여 노선 및 다루어진 브랜치/조건과 같은 측정항목을 포함하여 적용 범위의 요약을 제공합니다. 분석을 바탕으로 테스트 적용 범위를 개선하기 위한 권장사항을 제공하고 추가할 특정 테스트를 제안하며 테스트 권장사항에 관한 일반적인 조언을 제공합니다. 마지막으로, 적용 범위가 없는 파일과 같은 세부정보와 명령줄을 통해 사용자에게 기존 테스트를 개선하기 위한 제안사항이 포함된 Gemini 모델의 응답을 출력합니다.

코드 검토 명령어의 결과:
devai review code -c ${{ github.workspace }}/sample-app/src/main/java/anthos/samples/bankofanthos/balancereader
devai review code 명령어는 생성형 AI 모델을 사용하여 제공된 코드 스니펫에 대한 포괄적인 코드 검토를 실행합니다. 검토할 코드를 입력 (컨텍스트)으로 사용하고 출력 형식 환경설정 (출력)을 사용합니다. 대규모 언어 모델을 활용하여 코드의 정확성, 효율성, 유지보수성, 보안, 권장사항 준수 여부를 분석합니다. 이 명령어는 검토를 수행하는 방법을 Gemini에 안내하는 자세한 프롬프트를 구성한 다음 제공된 코드를 평가하도록 모델에 전송합니다. 마지막으로 Gemini의 응답을 처리하여 사용자의 환경설정에 따라 Markdown, JSON 또는 표 형식으로 지정하고 검토 결과를 출력합니다.

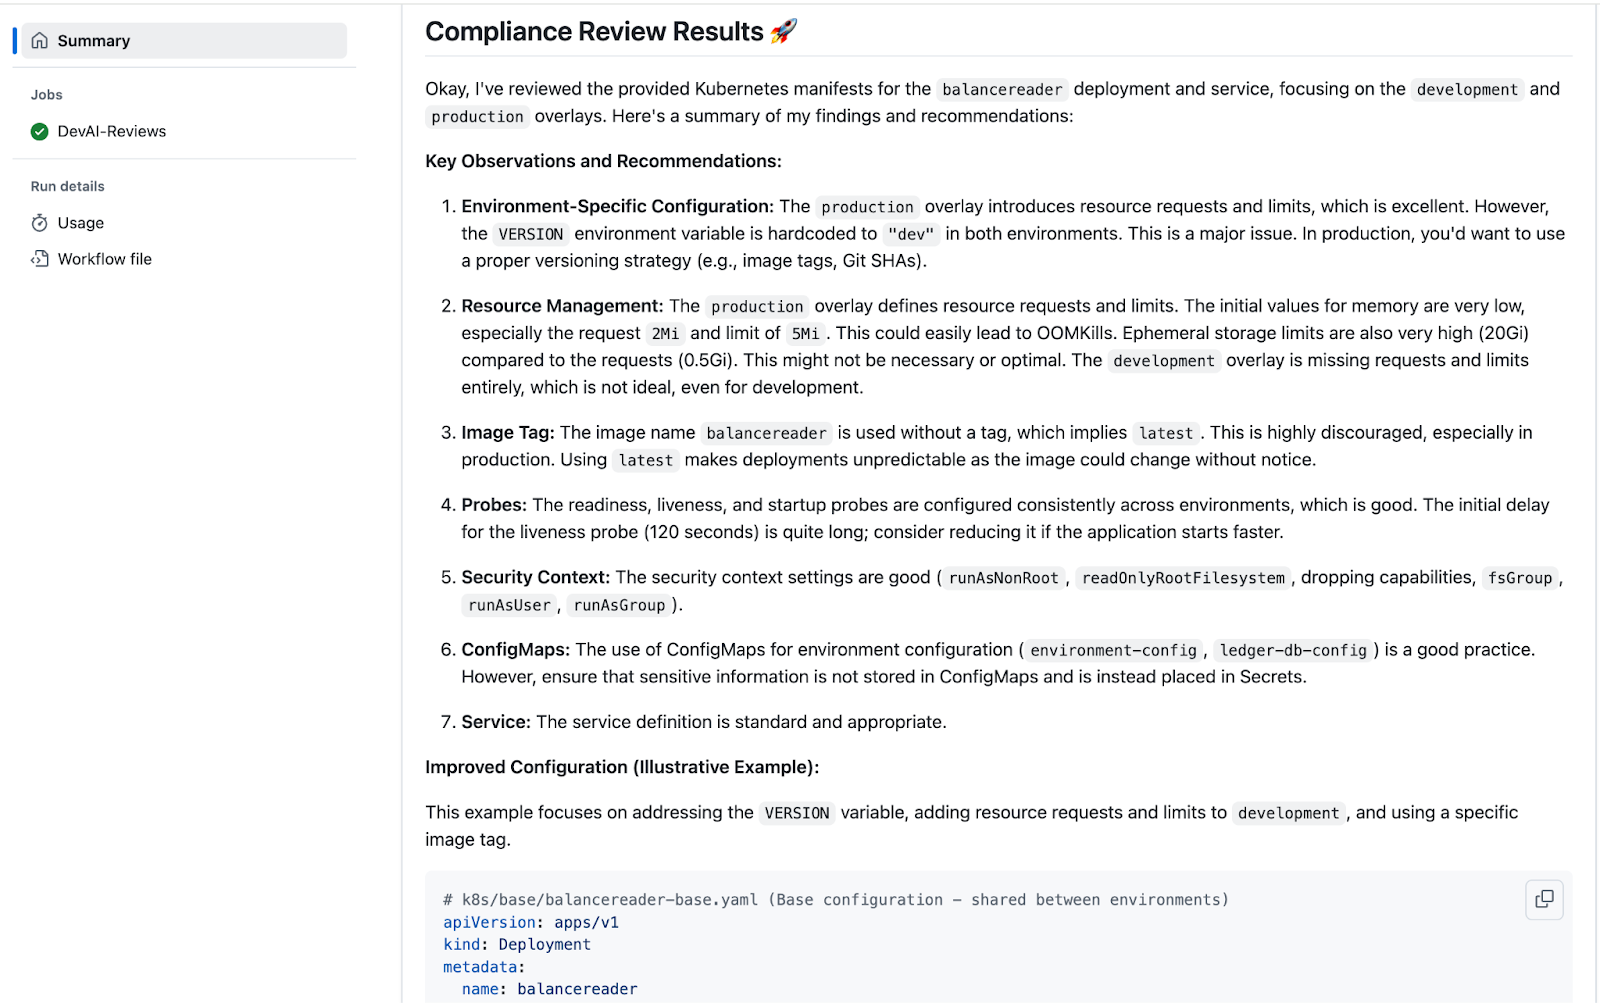
규정 준수 검토 명령어의 결과:
devai review compliance -c ${{ github.workspace }}/sample-app/k8s --config ${{ github.workspace }}/devai-cli/gemini/styleguide.md
devai review compliance 명령어는 일반적으로 Kubernetes 구성에 관한 권장사항을 기준으로 코드를 분석합니다. 이 명령어는 Gemini 모델을 사용하여 제공된 코드 (context)를 검토하고 별도의 구성 파일 (config)에 정의된 지정된 표준과 비교합니다. 이 명령어는 프롬프트를 활용하여 Gemini 모델이 Kubernetes 전문가 역할을 하고 규정 준수 보고서를 제공하도록 지시합니다. 그런 다음 확인된 문제를 해결하는 방법을 보여주는 코드 샘플에 중점을 두고 발견사항을 간단한 설명 형식으로 표시합니다. 마지막으로 이 명령어는 Gemini의 규정 준수 검토 출력을 콘솔에 출력합니다. 이를 통해 사용자는 코드의 규정 준수 여부를 쉽게 감사할 수 있습니다.
10. 저장소 복제
Cloud Shell 터미널로 돌아가서 저장소를 클론합니다.
명령어를 실행하기 전에 YOUR-GITHUB-USERID를 GitHub 사용자 ID로 변경합니다.
git clone https://github.com/YOUR-GITHUB-USERID/genai-for-developers.git
Cloud Shell 편집기에서 폴더를 변경하고 워크플로 파일을 엽니다.
cd genai-for-developers

cloudshell edit .github/workflows/devai-review.yml
구성 파일이 IDE에 표시될 때까지 기다립니다.
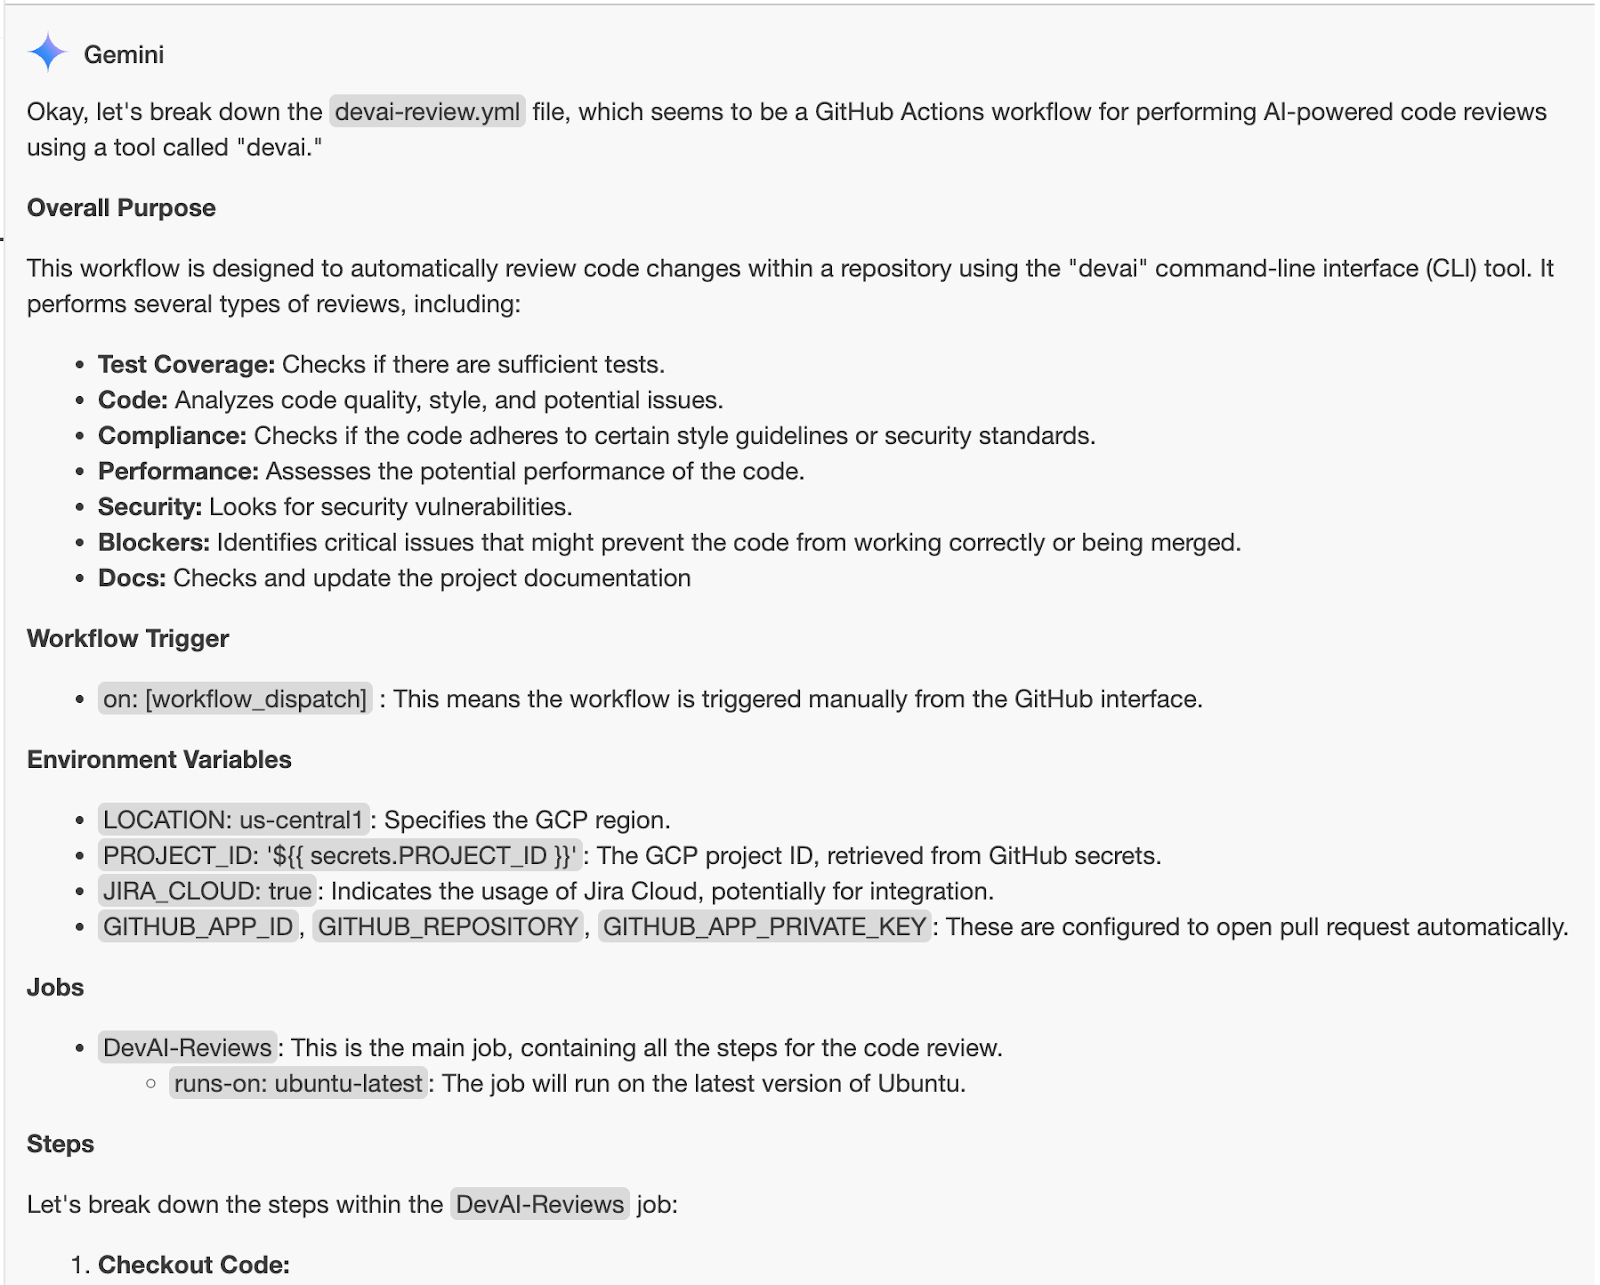
11. Gemini Code Assist로 코드 설명
devai-review.yml 파일의 아무 곳이나 마우스 오른쪽 버튼으로 클릭하고 Gemini Code Assist > Explain를 선택합니다.
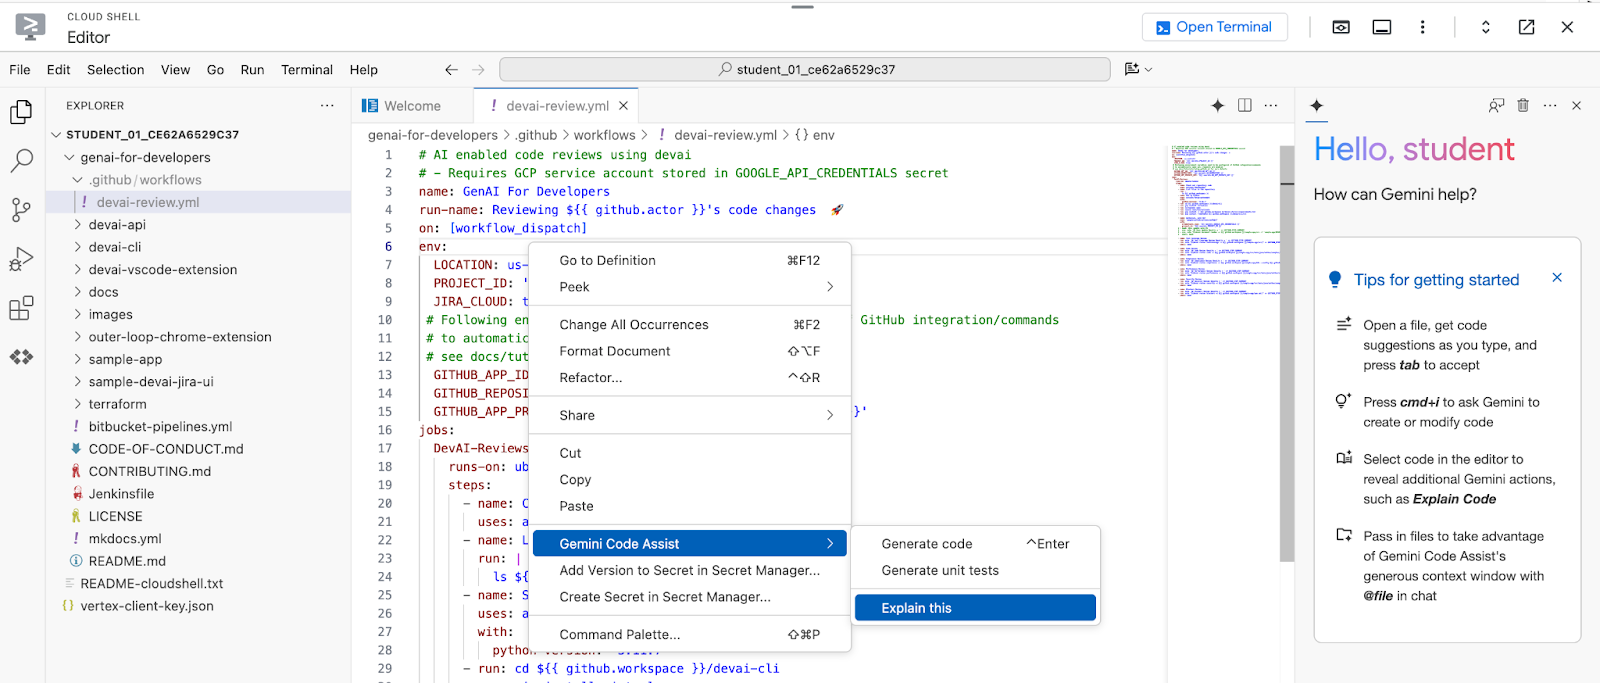
검토 설명:
12. DevAI CLI 개발
이 섹션에서는 devai cli를 변경합니다.
시작하려면 python virtualenv를 설정하고 요구사항을 설치한 후 샘플 명령어를 실행합니다.
cd ~/genai-for-developers/devai-cli
python3 -m venv venv
. venv/bin/activate
pip3 install -r src/requirements.txt
pip3 install --editable ./src
devai echo
필수 환경 변수를 설정합니다.
export PROJECT_ID=$(gcloud config get-value project)
export LOCATION=us-central1
코드 검토 명령어를 실행하여 모든 것이 제대로 작동하는지 확인합니다.
devai review code -c ~/genai-for-developers/sample-app/src/main/java/anthos/samples/bankofanthos/balancereader > code-review.md

cloudshell edit code-review.md
Cloud Shell 편집기에서 마크다운 미리보기를 사용하여 결과를 검토합니다.
명령어 팔레트를 사용하고 'Markdown: Open Preview'를 선택합니다.


13. devai cli 명령어 살펴보기
테스트 적용 범위 검토 명령어
devai review testcoverage -c ~/genai-for-developers/sample-app/src > testcoverage.md

cloudshell edit testcoverage.md
규정 준수 검토 명령어
devai review compliance --context ~/genai-for-developers/sample-app/k8s --config ~/genai-for-developers/devai-cli/.gemini/styleguide.md > k8s-review.md

cloudshell edit k8s-review.md
실적 검토 명령어
devai review performance -c ~/genai-for-developers/sample-app/src/main/java > performance-review.md

cloudshell edit performance-review.md
보안 검토 명령어
devai review security -c ~/genai-for-developers/sample-app/src/main/java > security-review.md

cloudshell edit security-review.md
차단자 검토 명령어
devai review blockers -c ~/genai-for-developers/sample-app/pom.xml
devai review blockers -c ~/genai-for-developers/sample-app/setup.md
이미지/다이어그램 검토 및 요약
입력 다이어그램[~/genai-for-developers/images/extension-diagram.png]:

명령어 검토:
devai review image \
  -f ~/genai-for-developers/images/extension-diagram.png \
  -p "Review and summarize this diagram" > image-review.md

cloudshell edit image-review.md
출력:
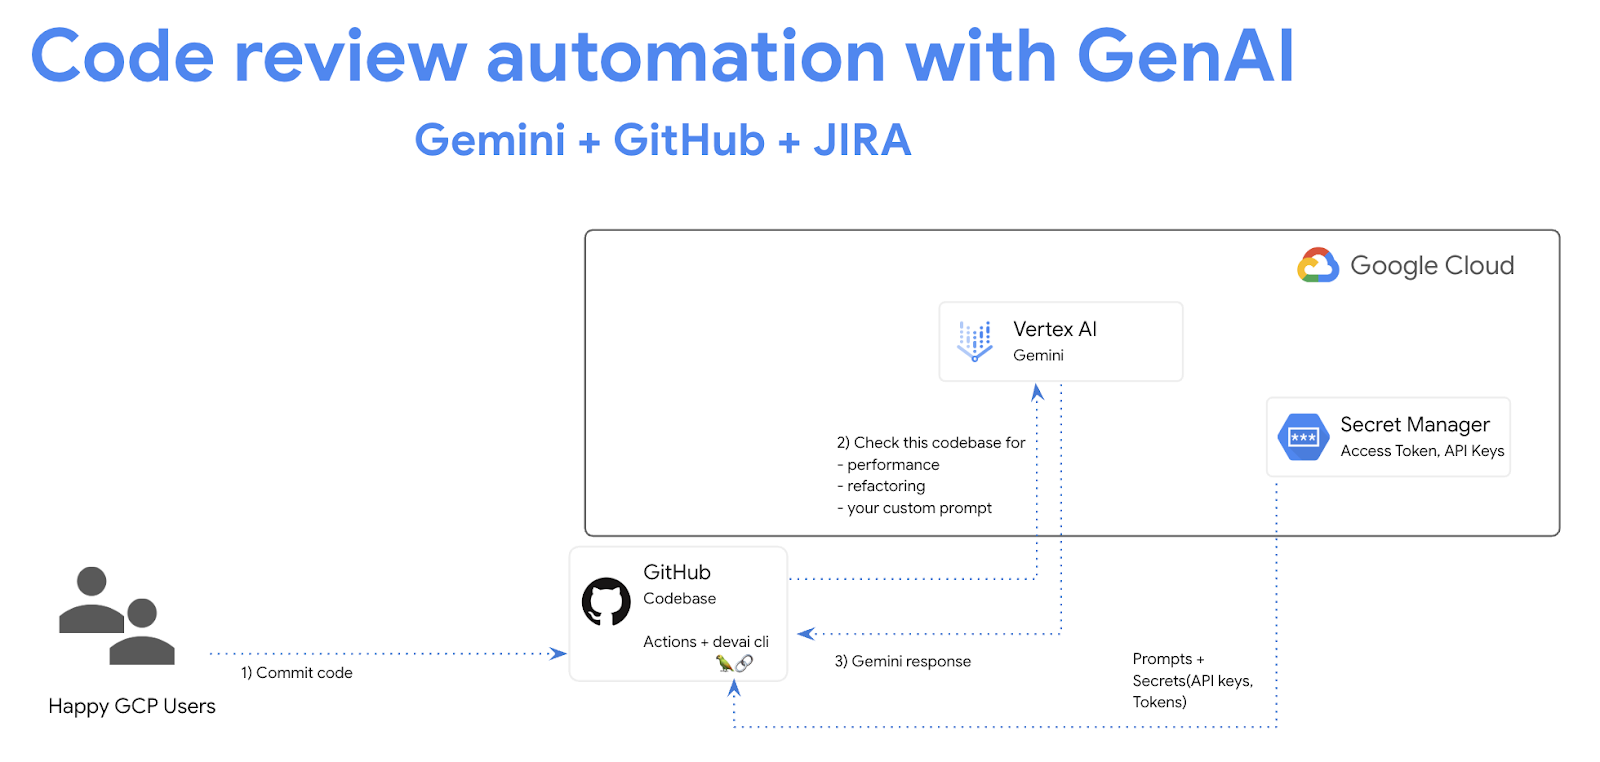
The diagram outlines a process for conducting local code reviews using a VS Code extension or CLI, leveraging Google Cloud's Vertex AI (Gemini Pro) for generating review prompts.

**Process Flow:**

1. **Code Style Check:** Developers initiate the process by checking their code for adherence to pre-defined style guidelines.
2. **Prompt Generation:** The VS Code extension/CLI sends the code to Vertex AI (Gemini Pro) on Google Cloud.
3. **Vertex AI Review:**  Vertex AI analyzes the code and generates relevant review prompts.
4. **Local Review:** The prompts are sent back to the developer's IDE for their consideration.
5. **Optional Actions:** Developers can optionally:
    - Create new JIRA issues directly from the IDE based on the review prompts.
    - Generate new issues in a GitLab repository.

**Key Components:**

* **VS Code Extension/CLI:** Tools facilitating the interaction with Vertex AI and potential integrations with JIRA and GitLab.
* **Vertex AI (Gemini Pro):**  Google Cloud's generative AI service responsible for understanding the code and generating meaningful review prompts.
* **Google Cloud Secret Manager:** Securely stores API keys and access tokens required to authenticate and interact with Google Cloud services.
* **JIRA/GitLab (Optional):** Issue tracking and project management tools that can be integrated for a streamlined workflow.

**Benefits:**

* **Automated Review Assistance:**  Leveraging AI to generate review prompts saves time and improves the consistency and quality of code reviews.
* **Local Development:** The process empowers developers to conduct reviews locally within their familiar IDE.
* **Integration Options:** The flexibility to integrate with project management tools like JIRA and GitLab streamlines workflow and issue tracking.
이미지 차이 분석
devai review imgdiff \
  -c ~/genai-for-developers/images/devai-api.png \
  -t ~/genai-for-developers/images/devai-api-slack.png > image-diff-review.md

cloudshell edit image-diff-review.md
출력:
The following UI elements are missing in the "AFTER UPGRADE STATE" image compared to the "BEFORE UPGRADE STATE" image:

1. **Slack:** The entire Slack element, including the icon, "Team channel" label, and the arrow indicating interaction, is absent in the AFTER UPGRADE image.
2. **Storage Bucket:**  The "Storage Bucket" element with its icon and "PDFs" label is missing in the AFTER UPGRADE image.
3. **"GenAI Agents" label in Vertex AI block:** The BEFORE UPGRADE image has "Vertex AI Agents" and "GenAI Agent" labels within the Vertex AI block, while the AFTER UPGRADE image only has "Vertex AI."
4. **"Open JIRA Issue" and "Team Project" labels:** In the BEFORE UPGRADE image, these labels are connected to the JIRA block with an arrow. These are missing in the AFTER UPGRADE image.

**Decision Explanation:**

The analysis is based on a direct visual comparison of the two provided images, noting the presence and absence of specific UI elements and their associated labels. The elements listed above are present in the BEFORE UPGRADE image but absent in the AFTER UPGRADE image.
동영상 파일 분석:
devai review video \
  -f "/tmp/video.mp4" \
  -p "Review user journey video and create unit tests using jest framework"
문서 생성 명령어
devai document readme -c ~/genai-for-developers/sample-app/src/main/
출력:
# Bank of Anthos - Balance Reader Service

## Description

The Balance Reader service is a component of the Bank of Anthos sample application. It provides a REST endpoint for retrieving the current balance of a user account. This service demonstrates key concepts for building microservices with Spring Boot and deploying them to a Kubernetes cluster.

## Features
...
Cloud Shell 편집기에서 사용 가능한 devai cli 명령어를 검토합니다.
cloudshell edit ~/genai-for-developers/devai-cli/README.md
또는 GitHub 저장소에서 README.md를 검토하세요.
14. 축하합니다.
축하합니다. Codelab을 완료했습니다.
학습한 내용
- GitHub에 GenAI 코드 검토 자동화 단계 추가
- devai CLI를 로컬에서 실행
다음 단계:
- 더 많은 실습 세션이 제공될 예정입니다.
삭제
이 튜토리얼에서 사용된 리소스 비용이 Google Cloud 계정에 청구되지 않도록 하려면 리소스가 포함된 프로젝트를 삭제하거나 프로젝트를 유지하고 개별 리소스를 삭제하세요.
프로젝트 삭제
비용이 청구되지 않도록 하는 가장 쉬운 방법은 튜토리얼에서 만든 프로젝트를 삭제하는 것입니다.
©2024 Google LLC All rights reserved. Google 및 Google 로고는 Google LLC의 상표입니다. 기타 모든 회사명 및 제품명은 해당 업체의 상표일 수 있습니다.