
1. 准备工作
欢迎来到“使用 ADK 构建 AI 智能体”系列的第二部分!在本实操 Codelab 中,您将为基本的 AI 智能体配备各种工具。
为了帮助您入门,本指南提供了两条路径:一条路径适用于继续学习“使用 ADK 构建 AI 智能体:基础知识”Codelab 的用户,另一条路径适用于从头开始学习的用户。这两条路径都将确保您拥有必要的智能体基础代码,以便开始学习。
完成本 Codelab 后,您将为个人助理智能体配备各种用途的工具,并为在本系列的后续部分中对其进行扩展做好准备,届时我们将把该智能体转换为复杂的多智能体系统 (MAS)。
您还可以通过此缩短的网址访问此 Codelab:goo.gle/adk-using-tools。
前提条件
- 了解 生成式 AI 概念
- 具备 Python 编程 基础知识
- 已完成“使用 ADK 构建 AI 智能体:基础知识”Codelab 或类似 Codelab
学习内容
- 通过构建自定义 Python 函数作为工具,为智能体赋予新技能。
- 使用 Google 搜索等内置工具将智能体连接到实时信息。
- 通过为复杂任务创建专门的子智能体,构建多工具智能体。
- 集成 LangChain 等热门 AI 框架中的工具,以快速扩展功能。
所需条件
- 一台可正常运行的计算机和稳定的 Wi-Fi 连接
- 一个浏览器(例如 Chrome),用于访问 Google Cloud 控制台
- 好奇心和学习热情
2. 简介
使用 ADK 构建的基本智能体具有强大的 LLM 大脑,但也有局限性:它无法访问在训练日期之后创建的信息,也无法与外部服务交互。它就像一个聪明、博学的助理,被锁在图书馆里,没有电话或互联网。为了让智能体真正有用,我们需要为其配备工具。
您可以将工具视为让 AI 助理能够访问外部世界:计算器、网络浏览器或对特定公司数据库的访问权限。在 ADK 中,工具是一个模块化代码,可让智能体执行特定操作,例如查找实时数据或调用外部 API。使用工具可将其功能扩展到简单的对话之外。
ADK 提供三种工具:
- 函数工具 :您开发的自定义工具,用于满足应用的独特要求,例如预定义函数和智能体。
- 内置工具 :框架提供的即用型工具,用于常见操作,例如 Google 搜索和代码执行。
- 第三方工具:热门外部库,例如 Serper,以及 LangChain 和 CrewAI 中的工具。
如需详细了解如何将工具与 ADK 智能体结合使用,请参阅 官方文档。在本 Codelab 中,我们将添加工具,将简单的智能体转换为功能强大的个人旅行助理。我们开始吧!
3. 入门:您的基本智能体
在为智能体配备工具之前,您需要一个基本智能体才能开始使用。请选择最适合您进度的路径。
路径 A:继续学习基础知识 Codelab
如果您刚刚完成“使用 ADK 构建 AI 智能体:基础知识”Codelab,那么一切就绪。您可以继续在现有的 ai-agents-adk 项目目录中工作。
路径 B:从头开始
如果您直接开始学习此 Codelab,请完成以下 4 个步骤来设置环境并创建必要的起始智能体。
完成这些步骤后,您就可以开始学习之旅了。
4. 构建用于货币兑换的自定义工具
在此阶段,您应该已经知道如何使用 ADK 构建简单的 AI 智能体,并在开发界面上运行该智能体。
假设您正在为下个月的日本之旅做准备,需要查看当前的货币兑换汇率。请向智能体提出以下问题:“新加坡元兑日元的汇率是多少?”

您会看到,智能体无法检索实时汇率。这是因为智能体目前无法访问互联网,也无法连接到外部系统。即使智能体回复了一个值,也很难相信该值,因为它很可能是幻觉。
为了解决这个问题,我们将实现一个 Python 函数,通过 REST API 检索汇率,并将其作为智能体的函数工具 集成。
在终端窗口中使用键盘快捷键 Ctrl + C 终止正在运行的智能体进程。
创建 custom_functions.py 文件
在 personal_assistant 文件夹中创建一个名为 custom_functions.py 的 Python 文件,方法是在终端中输入此命令.
touch personal_assistant/custom_functions.py
您的文件夹结构应如下所示:
ai-agents-adk/
└── personal_assistant/
    ├── .env
    ├── __init__.py
    ├── agent.py
    └── custom_functions.py
在代码编辑器中打开custom_functions.py。此文件将包含负责从外部 API 检索汇率数据的 Python 函数。
复制以下代码并粘贴到其中:
import requests

# define a function to get exchange rate
def get_fx_rate(base: str, target: str):
        """
        Fetches the current exchange rate between two currencies.

        Args:
                base: The base currency (e.g., "SGD").
                target: The target currency (e.g., "JPY").

        Returns:
                The exchange rate information as a json response,
                or None if the rate could not be fetched.
        """
        base_url = "https://hexarate.paikama.co/api/rates/latest"
        api_url = f"{base_url}/{base}?target={target}"

        response = requests.get(api_url)
        if response.status_code == 200:
                return response.json()
现在,修改 agent.py 文件:导入 get_fx_rate 函数并将其分配为 FunctionTool。
更新 agent.py 文件
复制此代码块并替换 agent.py 文件的现有内容:
from google.adk.agents import Agent
from google.adk.tools import FunctionTool

from .custom_functions import get_fx_rate

root_agent = Agent(
    model='gemini-2.5-flash',
    name='root_agent',
    description='A helpful assistant for user questions.',
    instruction='Answer user questions to the best of your knowledge',
    tools=[FunctionTool(get_fx_rate)]
)
更改后,通过输入以下内容再次启动智能体:
adk web
智能体启动后,再次提出相同的问题:“新加坡元兑日元的汇率是多少?”
这次,您应该会看到 get_fx_rate 工具给出的实际汇率。

您可以随意提出任何与货币兑换相关的问题。
5. 与内置 Google 搜索工具集成
现在智能体能够提供汇率,下一个任务是获取下个月的天气预报。向智能体提出以下问题:"日本东京下个月的天气预报是什么?"

正如您所料,天气预报需要实时信息,而我们的智能体没有这些信息。虽然我们可以为每个需要实时数据的应用场景编写新的 Python 函数,但添加越来越多的自定义工具会使智能体变得过于复杂且难以管理。
幸运的是,智能体开发套件 (ADK) 提供了一套内置工具,包括 Google 搜索,这些工具可供即用,简化了智能体与外部世界的互动方式。
如需为智能体配备 Google 搜索工具,您需要实现多智能体模式。首先,您需要创建一个专门的智能体,其唯一的工作是执行 Google 搜索。然后,您将此新的 Google 搜索智能体 作为工具分配给我们的主要 personal_assistant。具体步骤如下:
创建 custom_agents.py 文件
现在,在 personal_assistant 文件夹中创建一个名为 custom_agents.py 的 Python 文件 ,方法是在终端中执行以下命令:
touch personal_assistant/custom_agents.py
您的文件夹结构现在应如下所示:
ai-agents-adk/
└── personal_assistant/
    ├── .env
    ├── __init__.py
    ├── agent.py
    ├── custom_functions.py
    └── custom_agents.py
此文件将包含专门的 google_search_agent 的代码。 使用代码编辑器 将以下代码复制到 custom_agents.py 文件中。
from google.adk.agents import Agent
from google.adk.tools import google_search


# Create an agent with google search tool as a search specialist
google_search_agent = Agent(
    model='gemini-2.5-flash',
    name='google_search_agent',
    description='A search agent that uses google search to get latest information about current events, weather, or business hours.',
    instruction='Use google search to answer user questions about real-time, logistical information.',
    tools=[google_search],
)
创建文件后,更新 agent.py 文件,如下所示。
更新 agent.py 文件
复制此代码块并替换 agent.py 文件的现有内容:
from google.adk.agents import Agent
from google.adk.tools import FunctionTool
from google.adk.tools.agent_tool import AgentTool

from .custom_functions import get_fx_rate
from .custom_agents import google_search_agent


root_agent = Agent(
    model='gemini-2.5-flash',
    name='root_agent',
    description='A helpful assistant for user questions.',
    tools=[
        FunctionTool(get_fx_rate),
        AgentTool(agent=google_search_agent),
    ]
)
我们来分析一下代码中强大的新模式:
- 新的专业智能体:我们定义了一个全新的智能体
google_search_agent。请注意其具体说明,以及其唯一的工具是google_search。它是一个搜索专家。 agent_tool.AgentTool:这是 ADK 中的一个特殊封装容器。它会获取整个智能体(我们的 google_search_agent)并将其打包,使其看起来和行为都像一个标准工具。- 更智能的 **
root_agent**:我们的root_agent现在有一个新工具:AgentTool(agent=google_search_agent)。它不知道如何搜索网络,但它知道自己有一个工具可以委托搜索任务。
请注意,root_agent 中已没有指令字段。其指令现在由其可用的工具隐式定义。
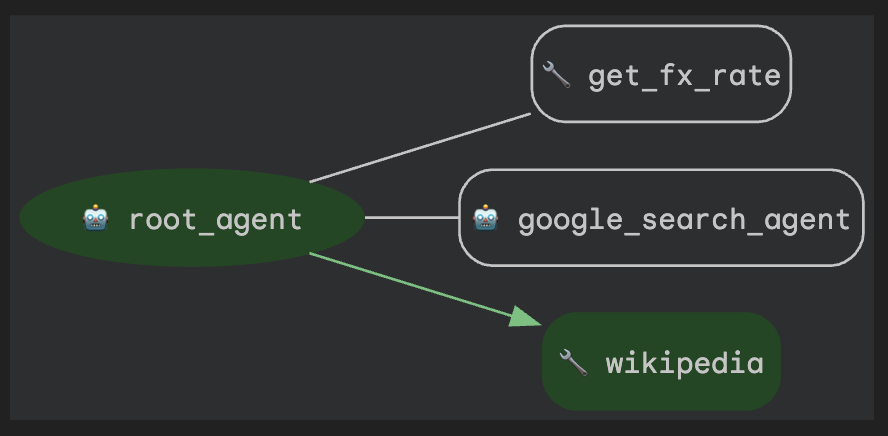
root_agent 已成为编排器或路由器,其主要工作是了解用户的请求并将其传递给正确的工具,即 get_fx_rate 函数或 google_search_agent。这种去中心化设计是构建复杂、可维护的智能体系统的关键。
现在,在终端中输入
adk web
在终端中以启动实例,然后再次向智能体提出以下问题:“日本东京下个月的天气预报是什么?”

智能体现在使用 google_search_agent 获取最新信息
您也可以尝试提出当前汇率问题。智能体现在应该能够针对相应问题使用正确的工具。

您可以随意向智能体提出其他需要实时信息的问题,并观察智能体如何使用其可用的工具处理查询。
6. 利用 LangChain 的维基百科工具
我们的智能体正在成为一个出色的旅行助理。它可以使用 get_fx_rate 工具处理货币兑换,并使用 google_search_agent 工具管理物流。但一次精彩的旅行不仅仅是物流;还要了解目的地的文化和历史。
虽然 google_search_agent 可以查找文化和历史事实,但来自维基百科等专用来源的信息通常更结构化且更可靠。
幸运的是,ADK 的设计具有高度可扩展性,可让您无缝集成 CrewAI 和 LangChain 等其他 AI 智能体框架中的工具。这种互操作性至关重要,因为它缩短了开发时间,并允许您重复使用现有工具。对于此用例,我们将利用 LangChain 中的维基百科工具。
首先,停止正在运行的智能体进程 (Ctrl + C ),然后在 终端 中输入以下命令,将其他库安装到当前的 Python 虚拟环境中。
uv pip install langchain-community wikipedia
创建 third_party_tools.py 文件
现在,在 personal_assistant 文件夹中创建一个名为 third_party_tools.py 的 Python 文件 ,方法是在终端中执行以下命令:
touch personal_assistant/third_party_tools.py
您的文件夹结构现在应如下所示:
ai-agents-adk/
└── personal_assistant/
    ├── .env
    ├── __init__.py
    ├── agent.py
    ├── custom_functions.py
    ├── custom_agents.py
    └── third_party_tools.py
此文件将包含 LangChain 维基百科工具的实现。使用 Cloud Editor 将以下代码复制到 third_party_tools.py 中:
from langchain_community.tools import WikipediaQueryRun
from langchain_community.utilities import WikipediaAPIWrapper

# Configure the Wikipedia LangChain tool to act as our cultural guide
langchain_wikipedia_tool = WikipediaQueryRun(
    api_wrapper=WikipediaAPIWrapper(top_k_results=1, doc_content_chars_max=3000)
)

# Give the tool a more specific description for our agent
langchain_wikipedia_tool.description = (
    "Provides deep historical and cultural information on landmarks, concepts, and places."
    "Use this for 'tell me about' or 'what is the history of' type questions."
)
更新 agent.py 文件
现在,使用以下内容更新 agent.py 文件:
from google.adk.agents import Agent
from google.adk.tools import FunctionTool
from google.adk.tools.agent_tool import AgentTool
from google.adk.tools.langchain_tool import LangchainTool

from .custom_functions import get_fx_rate
from .custom_agents import google_search_agent
from .third_party_tools import langchain_wikipedia_tool


root_agent = Agent(
    model='gemini-2.5-flash',
    name='root_agent',
    description='A helpful assistant for user questions.',
    tools=[
        FunctionTool(get_fx_rate),
        AgentTool(agent=google_search_agent),
        LangchainTool(langchain_wikipedia_tool),
    ]
)
现在,在终端中输入
adk web
在终端中以启动实例,然后再次向智能体提出以下问题:“请告诉我京都的历史”。

智能体正确地将其识别为历史查询,并使用其新的 Wikipedia 工具。通过集成第三方工具并为其赋予特定角色,您使智能体变得更加智能,并且对于旅行规划用途更有用。
如需确切了解智能体如何做出此选择,您可以使用 adk web 界面 中的事件检查器。依次点击“事件”标签页和最新的 functionCall 事件。

检查器会显示所有可用工具的列表,并突出显示智能体执行的工具的 tool_code。
7. 清理(可选)
由于此 Codelab 不涉及任何长时间运行的产品,因此只需在终端中按 Ctrl + C 停止活跃的智能体会话(例如终端中的 adk web 实例)即可。
删除智能体项目文件夹和文件
如果您只想从 Cloud Shell 环境中移除代码,请使用以下命令:
cd ~
rm -rf ai-agents-adk
停用 Vertex AI API
如需停用之前启用的 Vertex AI API,请运行以下命令:
gcloud services disable aiplatform.googleapis.com
关闭整个 Google Cloud 项目
如果您希望完全关闭 Google Cloud 项目,请参阅 官方指南 以获取详细说明。
8. 总结
恭喜!您已成功为个人助理智能体配备了自定义函数和实时 Google 搜索访问权限。请阅读有关 将工具与 Google ADK 结合使用 的官方文档。
更重要的是,您已经了解了构建功能强大的智能体的基本架构模式:使用专门的智能体作为工具。通过创建专用的 google_search_agent 并将其提供给 root_agent,您已经迈出了从构建单个智能体到编排简单但功能强大的多智能体系统的第一步。
现在,您已为本系列中的 下一个 Codelab 做好了充分准备,届时我们将更深入地探讨如何编排多个代理和工作流。期待您的到来!