
1. 소개
Private Service Connect 인터페이스는 생산자 Virtual Private Cloud (VPC) 네트워크가 소비자 VPC 네트워크의 다양한 대상에 대한 연결을 시작할 수 있도록 하는 리소스입니다. 프로듀서 및 소비자 네트워크는 다른 프로젝트 및 조직에 포함될 수 있습니다.
네트워크 연결이 Private Service Connect 인터페이스에서 연결을 수락하면 Google Cloud는 네트워크 연결에 지정된 소비자 서브넷의 IP 주소를 인터페이스에 할당합니다. 소비자 및 프로듀서 네트워크는 내부 IP 주소를 사용하여 연결되고 통신할 수 있습니다.
네트워크 연결과 Private Service Connect 인터페이스 간의 연결은 Private Service Connect 엔드포인트와 서비스 연결 간의 연결과 비슷하지만 다음과 같은 두 가지 주요 차이점이 있습니다.
- 네트워크 연결을 사용하면 공급자 네트워크가 소비자 네트워크에 대한 연결을 시작 (관리형 서비스 이그레스)하고 엔드포인트는 소비자 네트워크가 공급자 네트워크에 대한 연결을 시작 (관리형 서비스 인그레스)하도록 허용합니다.
- Private Service Connect 인터페이스 연결은 전환됩니다. 즉, 생산자 네트워크가 소비자 네트워크에 연결된 다른 네트워크와 통신할 수 있습니다.
빌드할 항목
이 튜토리얼에서는 Cloud 방화벽 규칙을 활용하여 그림 1과 같이 생산자에서 소비자의 컴퓨팅으로의 연결을 허용 및 거부하는 포괄적인 Private Service Connect (PSC) 인터페이스 아키텍처를 빌드합니다.
그림 1
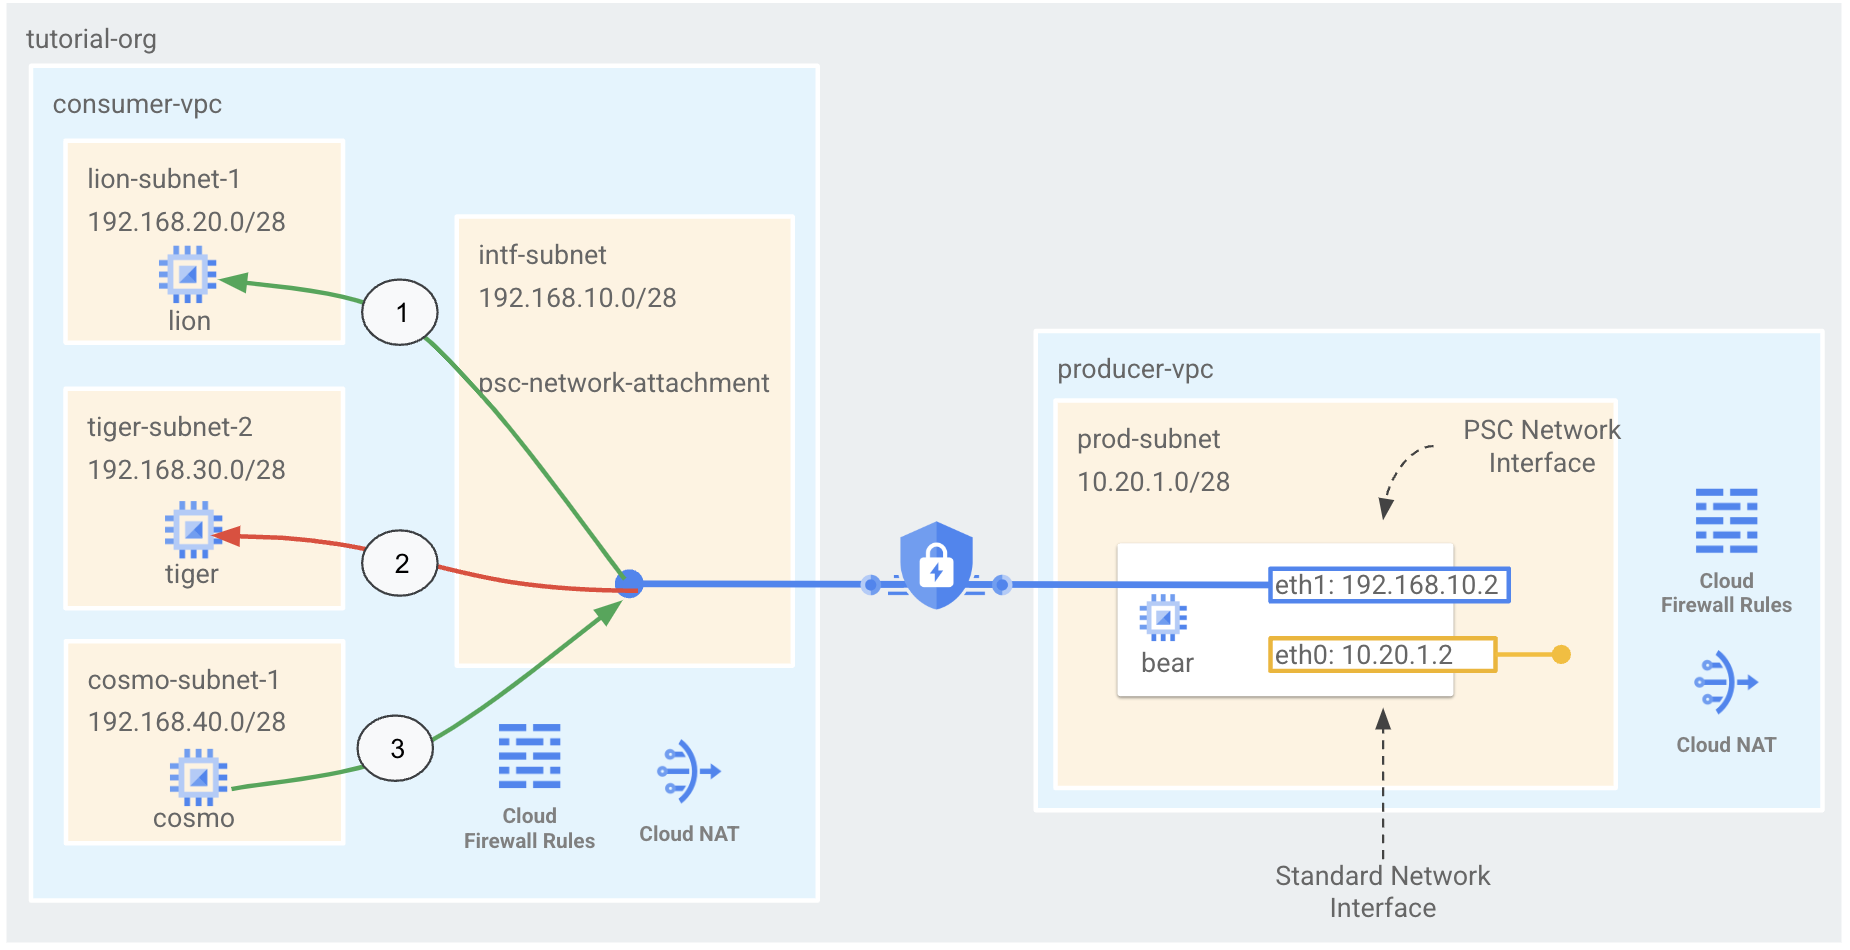
소비자 VPC에 하나의 psc-network-첨부파일을 만들어 다음과 같은 사용 사례를 수행합니다.
- Bear에서 lion으로 액세스를 허용하는 Cloud 방화벽 규칙 만들기
- Bear에서 호랑이로의 액세스를 거부하는 Cloud 방화벽 규칙 만들기
- cosmo에서 Bear로의 액세스를 허용하는 Cloud 방화벽 규칙 만들기
학습할 내용
- 네트워크 연결을 만드는 방법
- 생산자가 네트워크 연결을 사용하여 PSC 인터페이스를 만드는 방법
- 제작자와 소비자 간의 소통을 구축하는 방법
- 프로듀서 VM (곰)에서 소비자 VM (lion)으로의 액세스를 허용하는 방법
- 프로듀서 VM (곰)에서 소비자 VM (호랑이)으로의 액세스를 차단하는 방법
- 소비자 VM (cosmo)에서 제작자 VM (Bear)으로의 액세스를 허용하는 방법
필요한 항목
- Google Cloud 프로젝트
- IAM 권한
- Compute 네트워크 관리자 (roles/compute.networkAdmin)
- Compute 인스턴스 관리자 (roles/compute.instanceAdmin)
- Compute 보안 관리자 (roles/compute.securityAdmin)
2. 시작하기 전에
튜토리얼을 지원하도록 프로젝트 업데이트
이 튜토리얼에서는 $variables를 사용하여 Cloud Shell에서 gcloud 구성을 구현하는 데 도움을 줍니다.
Cloud Shell 내에서 다음을 수행합니다.
gcloud config list project
gcloud config set project [YOUR-PROJECT-NAME]
projectid=YOUR-PROJECT-NAME
echo $projectid
3. 소비자 설정
소비자 VPC 만들기
Cloud Shell 내에서 다음을 수행합니다.
gcloud compute networks create consumer-vpc --project=$projectid --subnet-mode=custom
소비자 서브넷 만들기
Cloud Shell 내에서 다음을 수행합니다.
gcloud compute networks subnets create lion-subnet-1 --project=$projectid --range=192.168.20.0/28 --network=consumer-vpc --region=us-central1
Cloud Shell 내에서 다음을 수행합니다.
gcloud compute networks subnets create tiger-subnet-1 --project=$projectid --range=192.168.30.0/28 --network=consumer-vpc --region=us-central1
Cloud Shell 내에서 다음을 수행합니다.
gcloud compute networks subnets create cosmo-subnet-1 --project=$projectid --range=192.168.40.0/28 --network=consumer-vpc --region=us-central1
Private Service Connect 네트워크 연결 서브넷 만들기
Cloud Shell 내에서 다음을 수행합니다.
gcloud compute networks subnets create intf-subnet --project=$projectid --range=192.168.10.0/28 --network=consumer-vpc --region=us-central1
Cloud Router 및 NAT 구성
VM 인스턴스에 공개 IP 주소가 없기 때문에 이 가이드에서는 소프트웨어 패키지 설치를 위해 Cloud NAT가 사용됩니다. Cloud NAT를 사용하면 비공개 IP 주소가 있는 VM이 인터넷에 액세스할 수 있습니다.
Cloud Shell 내에서 Cloud Router를 만듭니다.
gcloud compute routers create cloud-router-for-nat --network consumer-vpc --region us-central1
Cloud Shell 내에서 NAT 게이트웨이를 만듭니다.
gcloud compute routers nats create cloud-nat-us-central1 --router=cloud-router-for-nat --auto-allocate-nat-external-ips --nat-all-subnet-ip-ranges --region us-central1
4. IAP 사용 설정
IAP에서 VM 인스턴스에 연결할 수 있도록 허용하려면 다음과 같은 방화벽 규칙을 만듭니다.
- IAP를 사용하여 액세스할 수 있게 하려는 모든 VM 인스턴스에 적용됩니다.
- IP 범위 35.235.240.0/20에서 들어오는 인그레스 트래픽을 허용합니다. 이 범위에는 IAP가 TCP 전달에 사용하는 모든 IP 주소가 포함됩니다.
Cloud Shell 내에서 IAP 방화벽 규칙을 만듭니다.
gcloud compute firewall-rules create ssh-iap-consumer \
    --network consumer-vpc \
    --allow tcp:22 \
    --source-ranges=35.235.240.0/20
5. 소비자 VM 인스턴스 만들기
Cloud Shell 내에서 소비자 VM 인스턴스 lion을 만듭니다.
gcloud compute instances create lion \
    --project=$projectid \
    --machine-type=e2-micro \
    --image-family debian-11 \
    --no-address \
    --image-project debian-cloud \
    --zone us-central1-a \
    --subnet=lion-subnet-1 \
    --metadata startup-script="#! /bin/bash
      sudo apt-get update
      sudo apt-get install tcpdump
      sudo apt-get install apache2 -y
      sudo service apache2 restart
      echo 'Welcome to the lion app server !!' | tee /var/www/html/index.html
      EOF"
Cloud Shell 내에서 소비자 VM 인스턴스인 tiger를 만듭니다.
gcloud compute instances create tiger \
    --project=$projectid \
    --machine-type=e2-micro \
    --image-family debian-11 \
    --no-address \
    --image-project debian-cloud \
    --zone us-central1-a \
    --subnet=tiger-subnet-1 \
    --metadata startup-script="#! /bin/bash
      sudo apt-get update
      sudo apt-get install tcpdump
      sudo apt-get install apache2 -y
      sudo service apache2 restart
      echo 'Welcome to the tiger app server !!' | tee /var/www/html/index.html
      EOF"
Cloud Shell 내에서 소비자 VM 인스턴스 cosmo를 만듭니다.
gcloud compute instances create cosmo \
    --project=$projectid \
    --machine-type=e2-micro \
    --image-family debian-11 \
    --no-address \
    --image-project debian-cloud \
    --zone us-central1-a \
    --subnet=cosmo-subnet-1 \
    --metadata startup-script="#! /bin/bash
      sudo apt-get update
      sudo apt-get install tcpdump
      sudo apt-get install apache2 -y
      sudo service apache2 restart
      echo 'Welcome to the cosmo app server !!' | tee /var/www/html/index.html
      EOF"
인스턴스의 IP 주소를 가져와 저장합니다.
Cloud Shell 내에서 lion 및 tiger VM 인스턴스에 대해 설명을 수행합니다.
gcloud compute instances describe lion --zone=us-central1-a | grep  networkIP:

gcloud compute instances describe tiger --zone=us-central1-a | grep  networkIP:

gcloud compute instances describe cosmo --zone=us-central1-a | grep  networkIP:
6. Private Service Connect 네트워크 연결
네트워크 연결은 Private Service Connect 인터페이스의 소비자 측을 나타내는 리전별 리소스입니다. 단일 서브넷을 네트워크 연결과 연결하면 생산자가 해당 서브넷에서 Private Service Connect 인터페이스에 IP를 할당합니다. 서브넷은 네트워크 연결과 동일한 리전에 있어야 합니다. 네트워크 연결은 프로듀서 서비스와 동일한 리전에 있어야 합니다.
네트워크 연결 만들기
Cloud Shell 내에서 네트워크 연결을 만듭니다.
gcloud compute network-attachments create psc-network-attachment \
    --region=us-central1 \
    --connection-preference=ACCEPT_MANUAL \
    --producer-accept-list=$projectid \
    --subnets=intf-subnet
네트워크 연결 나열하기
Cloud Shell 내에서 네트워크 연결을 나열합니다.
gcloud compute network-attachments list
네트워크 연결 설명
Cloud Shell 내에서 네트워크 연결을 설명합니다.
gcloud compute network-attachments describe psc-network-attachment --region=us-central1
제작자가 Private Service Connect 인터페이스를 만들 때 사용할 psc-network-attachment URI를 기록해 둡니다. 예를 들어 다음과 같습니다.
user@cloudshell$ gcloud compute network-attachments describe psc-network-attachment --region=us-central1
connectionPreference: ACCEPT_MANUAL
creationTimestamp: '2023-06-06T20:57:12.623-07:00'
fingerprint: 4Yq6xAfaRO0=
id: '3235195049527328503'
kind: compute#networkAttachment
name: psc-network-attachment
network: https://www.googleapis.com/compute/v1/projects/$projectid/global/networks/consumer-vpc
producerAcceptLists:
- $projectid
region: https://www.googleapis.com/compute/v1/projects/$projectid/regions/us-central1
selfLink: https://www.googleapis.com/compute/v1/projects/$projectid/regions/us-central1/networkAttachments/psc-network-attachment
subnetworks:
- https://www.googleapis.com/compute/v1/projects/$projectid/regions/us-central1/subnetworks/intf-subnet
7. Producer 설정
생성자 VPC 네트워크 만들기
Cloud Shell 내에서 다음을 수행합니다.
gcloud compute networks create producer-vpc --project=$projectid --subnet-mode=custom
생산자 서브넷 만들기
Cloud Shell 내에서 psc 인터페이스의 vNIC0에 사용되는 서브넷을 만듭니다.
gcloud compute networks subnets create prod-subnet --project=$projectid --range=10.20.1.0/28 --network=producer-vpc --region=us-central1
8. IAP 사용 설정
IAP에서 VM 인스턴스에 연결할 수 있도록 허용하려면 다음과 같은 방화벽 규칙을 만듭니다.
- IAP를 사용하여 액세스할 수 있게 하려는 모든 VM 인스턴스에 적용됩니다.
- IP 범위 35.235.240.0/20에서 들어오는 인그레스 트래픽을 허용합니다. 이 범위에는 IAP가 TCP 전달에 사용하는 모든 IP 주소가 포함됩니다.
Cloud Shell 내에서 IAP 방화벽 규칙을 만듭니다.
gcloud compute firewall-rules create ssh-iap-producer \
    --network producer-vpc \
    --allow tcp:22 \
    --source-ranges=35.235.240.0/20
9. Private Service Connect 인터페이스 만들기
Private Service Connect 인터페이스는 생산자 Virtual Private Cloud (VPC) 네트워크가 소비자 VPC 네트워크의 다양한 대상에 대한 연결을 시작할 수 있도록 하는 리소스입니다. 프로듀서 및 소비자 네트워크는 다른 프로젝트 및 조직에 포함될 수 있습니다.
네트워크 연결이 Private Service Connect 인터페이스에서 연결을 수락하면 Google Cloud는 네트워크 연결에 지정된 소비자 서브넷의 IP 주소를 인터페이스에 할당합니다. 소비자 및 프로듀서 네트워크는 내부 IP 주소를 사용하여 연결되고 통신할 수 있습니다.
Cloud Shell 내에서 Private Service Connect 인터페이스 (베어)를 만들고 이전에 확인한 네트워크 연결 설명 출력의 psc-network-attachment URI를 삽입합니다.
gcloud compute instances create bear --zone us-central1-a --machine-type=f1-micro --can-ip-forward --network-interface subnet=prod-subnet,network=producer-vpc,no-address --network-interface network-attachment=https://www.googleapis.com/compute/v1/projects/$projectid/regions/us-central1/networkAttachments/psc-network-attachment
멀티 NIC 검증
PSC 인터페이스가 적절한 IP 주소로 구성되어 있는지 확인합니다. vNIC0은 생산자 prod-subnet (10.20.1.0/28)을 사용하고 vNIC1은 소비자 intf-subnet (192.168.10.0/28)을 사용합니다.
gcloud compute instances describe bear --zone=us-central1-a | grep networkIP:
예:
user$ gcloud compute instances describe bear --zone=us-central1-a | grep networkIP:
  networkIP: 10.20.1.2
  networkIP: 192.168.10.2
10. 소비자 방화벽 규칙 업데이트
곰에서 사자까지 액세스를 허용하는 Cloud 방화벽 규칙 만들기
Cloud Shell에서 연결-서브넷 (intf-subnet)의 IP 주소 범위에서 lion-subnet-1의 주소 범위 내 목적지로 이그레스를 허용하는 우선순위가 더 높은 규칙을 만듭니다.
gcloud compute firewall-rules create allow-limited-egress-to-lion \
    --network=consumer-vpc \
    --action=ALLOW \
    --rules=ALL \
    --direction=EGRESS \
    --priority=1000 \
    --source-ranges="192.168.10.0/28" \
    --destination-ranges="192.168.20.0/28" \
    --enable-logging
Cloud Shell에서 psc-network-attachment 서브넷의 트래픽에 대한 묵시적 인그레스 거부 규칙을 재정의하는 인그레스 허용 규칙을 만듭니다.
gcloud compute firewall-rules create allow-ingress \
--network=consumer-vpc \
--action=ALLOW \
--rules=ALL \
--direction=INGRESS \
--priority=1000 \
--source-ranges="192.168.10.0/28" \
--enable-logging
곰에서 모든 범위로의 액세스를 거부하는 Cloud 방화벽 규칙 만들기 (호랑이 포함)
Cloud Shell에서 네트워크 연결 서브넷 intf-subnet의 IP 주소 범위에서 발생하는 모든 이그레스 트래픽을 거부하는 우선순위가 낮은 규칙을 만듭니다.
gcloud compute firewall-rules create deny-all-egress \
    --network=consumer-vpc \
    --action=DENY \
    --rules=ALL \
    --direction=EGRESS \
    --priority=65534 \
    --source-ranges="192.168.10.0/28" \
    --destination-ranges="0.0.0.0/0" \
    --enable-logging
cosmo에서 Bear로 액세스를 허용하는 Cloud 방화벽 규칙 만들기
Cloud Shell에서 psc-network-attachment 서브넷의 트래픽에 대한 묵시적 인그레스 거부 규칙을 재정의하는 인그레스 허용 규칙을 만듭니다.
gcloud compute firewall-rules create vm-subnet-allow-ingress \
    --network=consumer-vpc \
    --action=ALLOW \
    --rules=ALL \
    --direction=INGRESS \
    --priority=1000 \
    --source-ranges="192.168.40.0/28" \
    --destination-ranges="192.168.10.0/28" \
    --enable-logging
11. PSC 인터페이스용 Linux 경로 만들기
PSC 인터페이스 인스턴스에서 제작자가 소비자 서브넷과 통신할 수 있도록 Linux 경로를 구성합니다.
Private Service Connect 인터페이스의 게스트 OS 이름 찾기
라우팅을 구성하려면 Private Service Connect 인터페이스의 게스트 OS 이름을 알아야 합니다. 이 이름은 Google Cloud의 인터페이스 이름과 다릅니다.
Cloud Shell 내에서 새 탭을 열고 다음을 수행합니다.
gcloud config list project
gcloud config set project [YOUR-PROJECT-NAME]
projectid=YOUR-PROJECT-NAME
echo $projectid
Cloud Shell에서 IAP를 사용하여 psc-interface VM, bear에 로그인합니다.
gcloud compute ssh bear --project=$projectid --zone=us-central1-a --tunnel-through-iap
Cloud Shell에서 psc-interface 인스턴스의 IP 주소를 가져옵니다.
ip a
예:
user@bear:~$ ip a
1: lo: <LOOPBACK,UP,LOWER_UP> mtu 65536 qdisc noqueue state UNKNOWN group default qlen 1000
    link/loopback 00:00:00:00:00:00 brd 00:00:00:00:00:00
    inet 127.0.0.1/8 scope host lo
       valid_lft forever preferred_lft forever
    inet6 ::1/128 scope host
       valid_lft forever preferred_lft forever
2: ens4: <BROADCAST,MULTICAST,UP,LOWER_UP> mtu 1460 qdisc pfifo_fast state UP group default qlen 1000
    link/ether 42:01:0a:14:01:02 brd ff:ff:ff:ff:ff:ff
    altname enp0s4
    inet 10.20.1.2/32 brd 10.20.1.2 scope global dynamic ens4
       valid_lft 85991sec preferred_lft 85991sec
    inet6 fe80::4001:aff:fe14:102/64 scope link
       valid_lft forever preferred_lft forever
3: ens5: <BROADCAST,MULTICAST,UP,LOWER_UP> mtu 1460 qdisc pfifo_fast state UP group default qlen 1000
    link/ether 42:01:c0:a8:0a:02 brd ff:ff:ff:ff:ff:ff
    altname enp0s5
    inet 192.168.10.2/32 brd 192.168.10.2 scope global dynamic ens5
       valid_lft 85991sec preferred_lft 85991sec
    inet6 fe80::4001:c0ff:fea8:a02/64 scope link
       valid_lft forever preferred_lft forever
PSC 인터페이스의 게이트웨이 IP 찾기
네트워크 인터페이스 목록에서 Private Service Connect 인터페이스의 IP 주소와 연결된 인터페이스 이름(예: ens5(vNIC1))을 찾아 저장합니다.
라우팅을 구성하려면 Private Service Connect 인터페이스 기본 게이트웨이의 IP 주소를 알아야 합니다.
PSC 인터페이스가 vNIC1과 연결되어 있으므로 Cloud Shell에서는 1을 사용합니다.
curl http://metadata.google.internal/computeMetadata/v1/instance/network-interfaces/1/gateway -H "Metadata-Flavor: Google" && echo
예시에서는 기본 gw 192.168.10.1을 생성합니다.
user@bear:~$ curl http://metadata.google.internal/computeMetadata/v1/instance/network-interfaces/1/gateway -H "Metadata-Flavor: Google" && echo
192.168.10.1
소비자 서브넷 경로 추가
Private Service Connect 인터페이스에 연결되는 소비자 서브넷마다 Private Service Connect 인터페이스의 기본 게이트웨이에 경로를 추가해야 합니다. 이렇게 하면 소비자 네트워크로 향하는 트래픽이 Private Service Connect 인터페이스에서 이그레스됩니다.
Bear 인스턴스에서 소비자 서브넷에 대한 경로를 추가합니다.
sudo ip route add 192.168.20.0/28 via 192.168.10.1 dev ens5
sudo ip route add 192.168.30.0/28 via 192.168.10.1 dev ens5
sudo ip route add 192.168.40.0/28 via 192.168.10.1 dev ens5
경로 테이블 유효성 검사
Cloud Shell에서 새로 추가된 경로의 유효성을 검사합니다.
ip route show
예:
user@bear:~$ ip route show
default via 10.20.1.1 dev ens4
10.20.1.0/28 via 10.20.1.1 dev ens4
10.20.1.1 dev ens4 scope link
192.168.10.0/28 via 192.168.10.1 dev ens5
192.168.10.1 dev ens5 scope link
192.168.20.0/28 via 192.168.10.1 dev ens5
192.168.30.0/28 via 192.168.10.1 dev ens5
192.168.40.0/28 via 192.168.10.1 dev ens5
12. 곰과 사자 간 연결의 성공 여부 확인
curl을 수행하여 생산자 VM 인스턴스인 Bear가 소비자 인스턴스인 lion과 통신할 수 있는지 확인해 보겠습니다.
Bear 인스턴스에서 튜토리얼의 앞부분에서 Bear 인스턴스에서 식별된 lion의 IP 주소에 대해 curl을 수행합니다.
curl -v <lions IP Address>
예:
user@bear:~$ curl -v 192.168.20.2
*   Trying 192.168.20.2:80...
* Connected to 192.168.20.2 (192.168.20.2) port 80 (#0)
> GET / HTTP/1.1
> Host: 192.168.20.2
> User-Agent: curl/7.74.0
> Accept: */*
>
* Mark bundle as not supporting multiuse
< HTTP/1.1 200 OK
< Date: Tue, 06 Jun 2023 03:53:08 GMT
< Server: Apache/2.4.56 (Debian)
< Last-Modified: Mon, 05 Jun 2023 19:41:26 GMT
< ETag: "1e-5fd6716a1e11b"
< Accept-Ranges: bytes
< Content-Length: 30
< Content-Type: text/html
<
Welcome to lion app server !!
* Connection #0 to host 192.168.20.2 left intact
13. 곰과 호랑이의 연결이 차단되어 있는지 확인
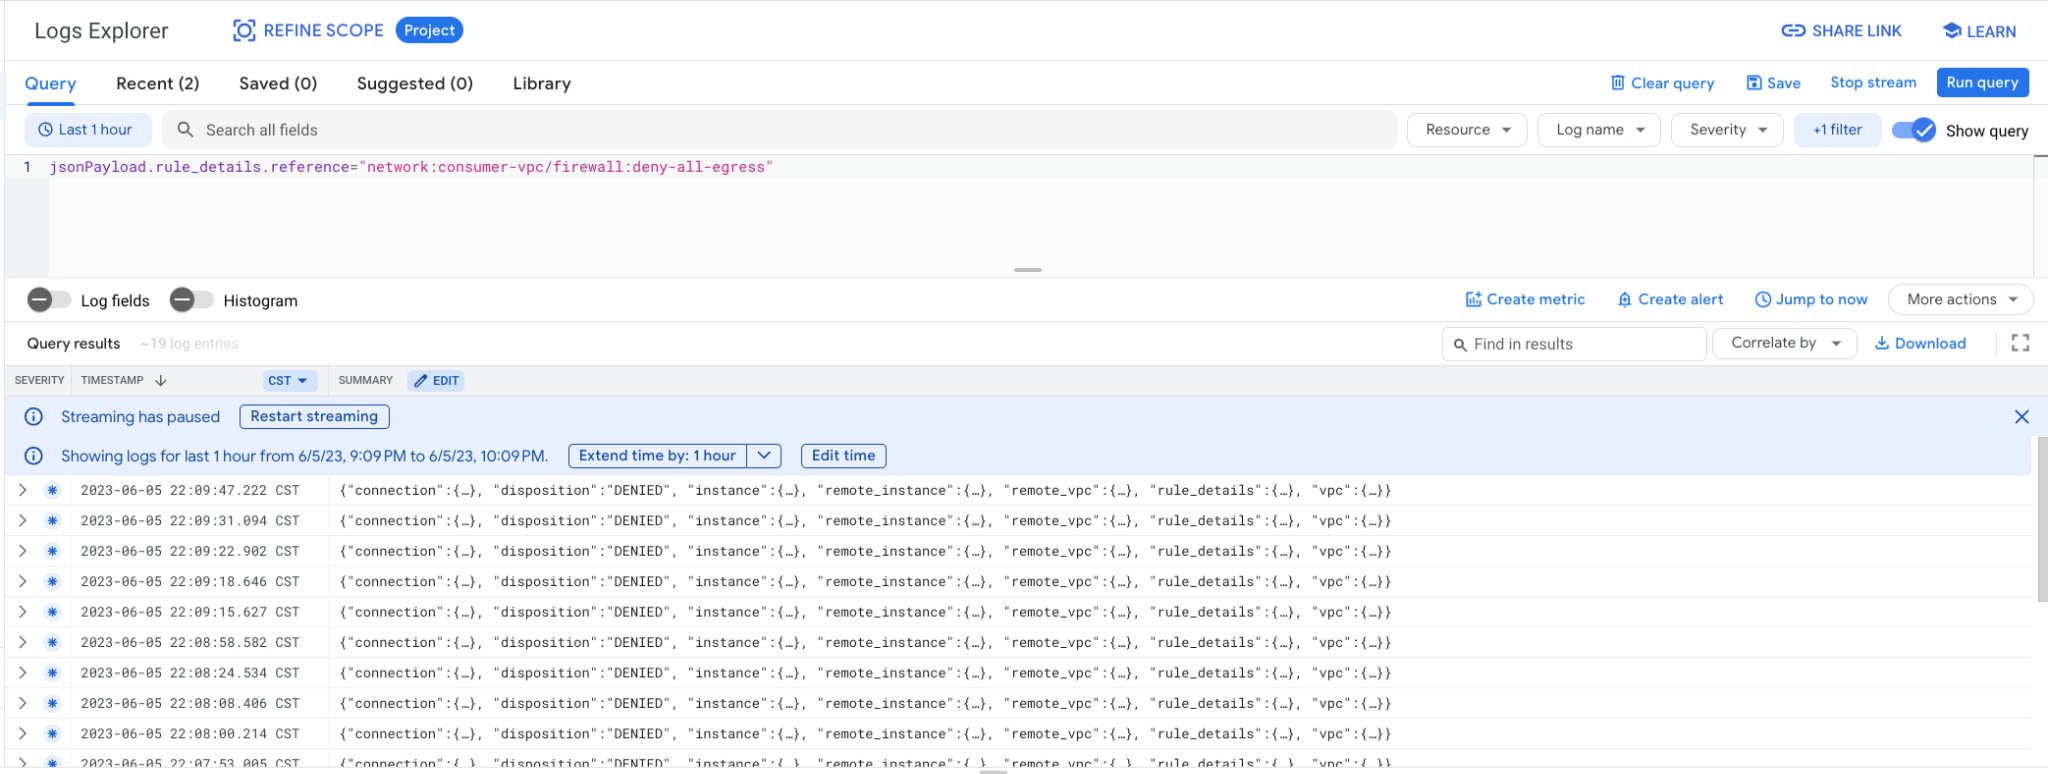
이그레스 방화벽 규칙이 방화벽 로그를 확인하여 Bear에서 호랑이로의 액세스를 차단하고 있는지 확인해 보겠습니다.
새 Cloud 콘솔 세션에서 Logging으로 이동 → 로그 탐색기 → 쿼리 표시 선택

아래 쿼리 문자열을 검색창에 붙여넣은 후 스트림을 선택합니다.
jsonPayload.rule_details.reference="network:consumer-vpc/firewall:deny-all-egress"

Bear 인스턴스에서 튜토리얼의 앞부분에서 Bear 인스턴스에서 식별된 호랑이의 IP 주소에 대해 curl을 수행합니다. curl은 결국 타임아웃됩니다.
curl -v <tiger's IP Address>
예:
user@bear:~$ curl -v 192.168.30.2
*   Trying 192.168.30.2:80...
* connect to 192.168.30.2 port 80 failed: Connection timed out
* Failed to connect to 192.168.30.2 port 80: Connection timed out
* Closing connection 0
curl: (28) Failed to connect to 192.168.30.2 port 80: Connection timed out
로그 탐색기가 거부된 방화벽 로그를 캡처했는지 확인합니다. 로그 항목을 선택하고 중첩 필드를 펼쳐 메타데이터를 확인하세요.
14. 우주에서 베어로의 연결이 성공했는지 검증
새 Cloud Shell 탭을 열고 프로젝트 설정을 업데이트합니다.
Cloud Shell 내에서 다음을 수행합니다.
gcloud config list project
gcloud config set project [YOUR-PROJECT-NAME]
projectid=YOUR-PROJECT-NAME
echo $projectid
Cloud Shell에서 IAP를 사용하여 cosmo 인스턴스에 로그인합니다.
gcloud compute ssh cosmo --project=$projectid --zone=us-central1-a --tunnel-through-iap
Cloud Shell에서 가이드 앞부분에서 식별된 베어의 IP vNIV1 IP 주소에 대해 핑을 수행합니다.
ping <bears vNIC1 IP Address>
예:
user@cosmo:~$ ping 192.168.10.2 -c 5
PING 192.168.10.2 (192.168.10.2) 56(84) bytes of data.
64 bytes from 192.168.10.2: icmp_seq=1 ttl=64 time=0.277 ms
64 bytes from 192.168.10.2: icmp_seq=2 ttl=64 time=0.288 ms
64 bytes from 192.168.10.2: icmp_seq=3 ttl=64 time=0.265 ms
64 bytes from 192.168.10.2: icmp_seq=4 ttl=64 time=0.264 ms
64 bytes from 192.168.10.2: icmp_seq=5 ttl=64 time=0.366 ms
15. 삭제
Cloud Shell에서 튜토리얼 구성요소를 삭제합니다.
gcloud compute instances delete bear --zone=us-central1-a --quiet

gcloud compute instances delete lion --zone=us-central1-a --quiet

gcloud compute instances delete tiger --zone=us-central1-a --quiet

gcloud compute instances delete cosmo --zone=us-central1-a --quiet

gcloud compute network-attachments delete psc-network-attachment --region=us-central1 --quiet

gcloud compute firewall-rules delete allow-ingress allow-limited-egress-to-lion deny-all-egress ssh-iap-consumer ssh-iap-producer vm-subnet-allow-ingress --quiet

gcloud compute networks subnets delete cosmo-subnet-1 intf-subnet lion-subnet-1 prod-subnet tiger-subnet-1 --region=us-central1 --quiet

gcloud compute routers delete cloud-router-for-nat --region=us-central1 --quiet

gcloud compute networks delete consumer-vpc --quiet

gcloud compute networks delete producer-vpc --quiet
16. 축하합니다
수고하셨습니다. 방화벽 규칙을 구현하여 Private Service Connect 인터페이스와 소비자 및 제작자 연결을 성공적으로 구성하고 검증했습니다.
소비자 인프라를 만들고 생산자가 소비자와 생산자 통신을 브리지하는 멀티 NIC VM을 만들 수 있는 네트워크 연결을 추가했습니다. 소비자 및 제작자 VPC의 인스턴스에 대한 연결을 허용하는 방화벽 규칙을 소비자 VPC 네트워크에서 만드는 방법을 알아봤습니다.
Cosmopup은 튜토리얼이 멋지다고 생각합니다.

다음 단계
다음 튜토리얼을 확인하세요.
- Private Service Connect를 소비하여 GKE로 서비스 게시 및 사용
- Private Service Connect를 소비한 서비스 게시 및 사용
- Private Service Connect 및 내부 TCP 프록시 부하 분산기를 사용하여 하이브리드 네트워킹을 통해 온프렘 서비스에 연결