
1. 簡介
ML Kit 是一款功能強大的行動 SDK,產品功能強大且易於使用,可將 Google 的機器學習專業知識導入 Android 和 iOS 應用程式。無論您是機器學習新手,還是有經驗的新手,只要使用幾行程式碼,就能輕鬆實作所需的功能。您不需要深入瞭解類神經網路或模型最佳化,就能開始使用。
運作方式
ML Kit 將 Mobile Vision 和 TensorFlow Lite 等 Google 機器學習技術整合至單一 SDK 中,方便您輕鬆將機器學習技術運用在自家應用程式中。無論是需要 Mobile Vision 裝置端模型的即時功能,還是自訂 TensorFlow Lite 圖片分類模型的靈活性,只要加入幾行程式碼,就能透過 ML Kit 完成。
本程式碼研究室將引導您自行建立 iOS 應用程式,以自動偵測圖片中的文字和臉部特徵。
建構目標
在這個程式碼研究室中,您將使用 ML Kit 建構 iOS 應用程式。您的應用程式將會:
|
|


課程內容
- 如何使用 ML Kit SDK 輕鬆在任何 iOS 應用程式中加入進階機器學習功能,例如文字辨識、臉部功能偵測
軟硬體需求
- 新版 Xcode (12.4 以上版本)
- iOS 模擬器或搭載 iOS 10.0 以上版本的實體 iOS 裝置
- ML Kit 僅支援以下兩種 64 位元架構:
x86_64和arm64 - 程式碼範例
- 對 Swift 中的 iOS 開發有基本瞭解
- 對機器學習模型有基本瞭解
本程式碼研究室著重於 ML Kit,我們不會對與本主題無關的概念和程式碼多做介紹,但會事先準備好這些程式碼區塊,屆時您只要複製及貼上即可。
2. 開始設定
下載程式碼
點選下方連結即可下載這個程式碼研究室的所有程式碼:
將下載的 ZIP 檔案解壓縮。這項操作會建立根資料夾 (mlkit-ios-codelab),其中包含所有您需要的資源。在本程式碼研究室中,您只需要 vision 子目錄中的資源。
mlkit-ios-codelab 存放區中的 vision 子目錄包含兩個目錄:
 starter:啟動您在本程式碼研究室中建構的程式碼。
- 最終:已完成的範例應用程式的程式碼。
為 CocoaPods 新增 ML Kit 依附元件
CocoaPods 的用途是將 ML Kit 依附元件新增至應用程式。如果你尚未在電腦上安裝 CocoaPods,請參閱這裡的安裝操作說明。安裝完成後,使用慣用的編輯器開啟 Podfile,並將 ML Kit 新增為依附元件:
Podfile
platform :ios, '10.0'
use_frameworks!

pod 'GoogleMLKit/FaceDetection'
pod 'GoogleMLKit/TextRecognition'

target 'MLKit-codelab' do
end
安裝 ML Kit Cocoa Pod
為確保您的應用程式能使用所有依附元件,請使用指令列安裝 ML Kit Cocoa Pod。
指令列
# Make sure you are in the root of your app
pod install
xed .
3. 執行範例應用程式
您現在可以開始首次執行應用程式了。在 Xcode 中按一下  「Run」,即可編譯應用程式,並在 iOS 模擬器上執行。
應用程式應該會在模擬器上啟動。此時,您應該會看到基本版面配置,而內含挑選器可讓您選取 2 張圖片。在下一節中,您將為應用程式新增文字辨識功能,識別圖片中的文字。
4. 新增裝置端文字辨識功能
在這個步驟中,我們將為應用程式新增辨識圖片文字的功能。
匯入 MLVision 模組
確認 ViewController 類別已有下列匯入內容。
ViewController.swift
import MLKit
建立 VisionTextRecognizer
將以下延遲屬性新增至 ViewController 類別。
ViewController.swift
private lazy var textRecognizer = TextRecognizer.textRecognizer()
設定並執行圖片的裝置端文字辨識
將以下內容新增至 ViewController 類別的 runTextRecognition 方法:
ViewController.swift
func runTextRecognition(with image: UIImage) {
  let visionImage = VisionImage(image: image)
  textRecognizer.process(visionImage) { features, error in
    self.processResult(from: features, error: error)
  }
}
上述程式碼會設定文字辨識偵測工具,並透過回應呼叫 processResult(from:, error:) 函式。
處理文字辨識回應
將下列程式碼新增至 ViewController 類別的 processResult 中,即可剖析結果並顯示在應用程式中。
ViewController.swift
 func processResult(from text: Text?, error: Error?) {
    removeDetectionAnnotations()
    guard error == nil, let text = text else {
      let errorString = error?.localizedDescription ?? Constants.detectionNoResultsMessage
      print("Text recognizer failed with error: \(errorString)")
      return
    }

    let transform = self.transformMatrix()

    // Blocks.
    for block in text.blocks {
      drawFrame(block.frame, in: .purple, transform: transform)

      // Lines.
      for line in block.lines {
        drawFrame(line.frame, in: .orange, transform: transform)

        // Elements.
        for element in line.elements {
          drawFrame(element.frame, in: .green, transform: transform)

          let transformedRect = element.frame.applying(transform)
          let label = UILabel(frame: transformedRect)
          label.text = element.text
          label.adjustsFontSizeToFitWidth = true
          self.annotationOverlayView.addSubview(label)
        }
      }
    }
  }
在模擬器上執行應用程式
接著在 Xcode 中按一下 「Run」。應用程式載入後,請確認已在挑選器中選取 Image 1,然後按一下 Find Text 按鈕。
您的應用程式現在應如下圖所示,在原始圖片上方顯示文字辨識結果和定界框。
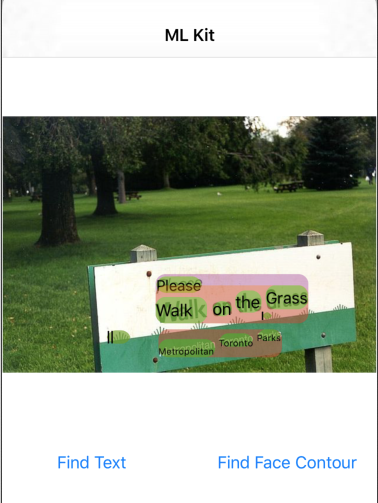
相片來源:Kai Schreiber / Wikimedia Commons / CC BY-SA 2.0
恭喜,您剛剛使用 ML Kit,將裝置端文字辨識功能新增至應用程式!裝置端文字辨識功能適用於許多用途,因為即使應用程式沒有網際網路連線,也可以快速處理靜態圖片和即時影像畫面。
5. 新增裝置端輪廓偵測功能
在這個步驟中,我們會為應用程式新增功能,用於偵測圖片中的臉孔輪廓。
建立 FaceDetector
將以下延遲屬性新增至 ViewController 類別。
ViewController.swift
private lazy var faceDetectorOption: FaceDetectorOptions = {
  let option = FaceDetectorOptions()
  option.contourMode = .all
  option.performanceMode = .fast
  return option
}()
private lazy var faceDetector = FaceDetector.faceDetector(options: faceDetectorOption)
設定並執行裝置端的臉部輪廓偵測功能
將以下內容新增至 ViewController 類別的 runFaceContourDetection 方法:
ViewController.swift
  func runFaceContourDetection(with image: UIImage) {
    let visionImage = VisionImage(image: image)
    faceDetector.process(visionImage) { features, error in
      self.processResult(from: features, error: error)
    }
  }
上述程式碼會設定文字辨識偵測工具,並透過回應呼叫 processResult(from:, error:) 函式。
處理臉部偵測工具回應
將下列程式碼新增至 ViewController 類別的 processResult 中,即可剖析結果並顯示在應用程式中。
ViewController.swift
  func processResult(from faces: [Face]?, error: Error?) {
    removeDetectionAnnotations()
    guard let faces = faces else {
      return
    }

    for feature in faces {
      let transform = self.transformMatrix()
      let transformedRect = feature.frame.applying(transform)
      UIUtilities.addRectangle(
        transformedRect,
        to: self.annotationOverlayView,
        color: UIColor.green
      )
      self.addContours(forFace: feature, transform: transform)
    }
  }
最後,在 ViewController 類別中新增輔助方法 addContours,繪製輪廓點。
ViewController.swift
 private func addContours(forFace face: Face, transform: CGAffineTransform) {
    // Face
    if let faceContour = face.contour(ofType: .face) {
      for point in faceContour.points {
        drawPoint(point, in: .blue, transform: transform)
      }
    }

    // Eyebrows
    if let topLeftEyebrowContour = face.contour(ofType: .leftEyebrowTop) {
      for point in topLeftEyebrowContour.points {
        drawPoint(point, in: .orange, transform: transform)
      }
    }
    if let bottomLeftEyebrowContour = face.contour(ofType: .leftEyebrowBottom) {
      for point in bottomLeftEyebrowContour.points {
        drawPoint(point, in: .orange, transform: transform)
      }
    }
    if let topRightEyebrowContour = face.contour(ofType: .rightEyebrowTop) {
      for point in topRightEyebrowContour.points {
        drawPoint(point, in: .orange, transform: transform)
      }
    }
    if let bottomRightEyebrowContour = face.contour(ofType: .rightEyebrowBottom) {
      for point in bottomRightEyebrowContour.points {
        drawPoint(point, in: .orange, transform: transform)
      }
    }

    // Eyes
    if let leftEyeContour = face.contour(ofType: .leftEye) {
      for point in leftEyeContour.points {
        drawPoint(point, in: .cyan, transform: transform)
      }
    }
    if let rightEyeContour = face.contour(ofType: .rightEye) {
      for point in rightEyeContour.points {
        drawPoint(point, in: .cyan, transform: transform)
      }
    }

    // Lips
    if let topUpperLipContour = face.contour(ofType: .upperLipTop) {
      for point in topUpperLipContour.points {
        drawPoint(point, in: .red, transform: transform)
      }
    }
    if let bottomUpperLipContour = face.contour(ofType: .upperLipBottom) {
      for point in bottomUpperLipContour.points {
        drawPoint(point, in: .red, transform: transform)
      }
    }
    if let topLowerLipContour = face.contour(ofType: .lowerLipTop) {
      for point in topLowerLipContour.points {
        drawPoint(point, in: .red, transform: transform)
      }
    }
    if let bottomLowerLipContour = face.contour(ofType: .lowerLipBottom) {
      for point in bottomLowerLipContour.points {
        drawPoint(point, in: .red, transform: transform)
      }
    }

    // Nose
    if let noseBridgeContour = face.contour(ofType: .noseBridge) {
      for point in noseBridgeContour.points {
        drawPoint(point, in: .yellow, transform: transform)
      }
    }
    if let noseBottomContour = face.contour(ofType: .noseBottom) {
      for point in noseBottomContour.points {
        drawPoint(point, in: .yellow, transform: transform)
      }
    }
  }
在模擬器上執行應用程式
接著在 Xcode 中按一下 「Run」。應用程式載入後,請確認已在挑選器中選取 Image 2,然後按一下 Find Face Contour 按鈕。應用程式現在應如下圖所示,顯示疊加在原始圖片上方的圖片:Grace Hopper 的臉。
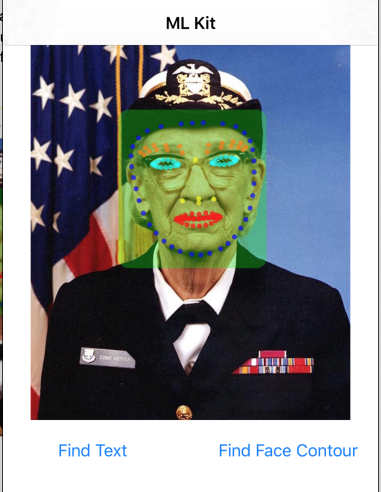
恭喜!您已經使用裝置端的 ML Kit 臉部輪廓偵測功能,在應用程式中新增裝置端輪廓偵測功能,即使應用程式無法連上網路,也能快速處理靜態圖像和即時視訊畫面,這項功能仍適用於許多用途。
6. 恭喜!
您已使用 ML Kit,輕鬆在應用程式中加入進階機器學習功能。
涵蓋內容
- 如何在 iOS 應用程式中加入 ML Kit
- 如何在 ML Kit 中使用裝置端文字辨識功能尋找圖片中的文字
- 如何在 ML Kit 中使用裝置端辨識功能來辨識圖片中的臉部特徵
後續步驟
- 在您的 iOS 應用程式中使用 ML Kit。
瞭解詳情
- https://g.co/mlkit