
1. บทนำ
ML Kit เป็น SDK สำหรับอุปกรณ์เคลื่อนที่ที่นำความเชี่ยวชาญด้านแมชชีนเลิร์นนิงของ Google มาสู่แอป Android และ iOS ในแพ็กเกจที่ทรงพลังแต่ใช้งานง่าย ไม่ว่าคุณจะเป็นมือใหม่หรือมีประสบการณ์ด้านแมชชีนเลิร์นนิง ก็ติดตั้งใช้งานฟังก์ชันที่ต้องการได้ง่ายๆ ด้วยโค้ดเพียงไม่กี่บรรทัด คุณไม่จำเป็นต้องมีความรู้ที่ลึกซึ้งเกี่ยวกับโครงข่ายประสาทหรือการเพิ่มประสิทธิภาพโมเดลเพื่อเริ่มต้นใช้งานเลย
หลักการทำงาน
ML Kit ช่วยให้การใช้เทคนิค ML ในแอปเป็นเรื่องง่ายด้วยการนำเทคโนโลยี ML ของ Google เช่น Mobile Vision และ TensorFlow Lite มาใช้ด้วยกันใน SDK เดียว ไม่ว่าคุณจะต้องการขุมพลังของความสามารถแบบเรียลไทม์ของโมเดลในอุปกรณ์ของ Mobile Vision หรือโมเดลการจัดประเภทรูปภาพ TensorFlow Lite แบบกำหนดเอง ML Kit ก็ทำงานได้ด้วยโค้ดเพียงไม่กี่บรรทัด
Codelab นี้จะแนะนำวิธีสร้างแอป iOS ของคุณเองที่สามารถตรวจจับข้อความและลักษณะใบหน้าในรูปภาพได้โดยอัตโนมัติ
สิ่งที่คุณจะสร้าง
ใน Codelab นี้ คุณจะสร้างแอป iOS ด้วย ML Kit แอปของคุณจะ
|
|


สิ่งที่คุณจะได้เรียนรู้
- วิธีใช้ ML Kit SDK เพื่อเพิ่มความสามารถขั้นสูงเกี่ยวกับแมชชีนเลิร์นนิง เช่น การจดจำข้อความ การตรวจหาฟีเจอร์ใบหน้า ลงในแอป iOS ทุกแอปได้อย่างง่ายดาย
สิ่งที่คุณต้องมี
- Xcode เวอร์ชันล่าสุด (v12.4+)
- iOS Simulator หรืออุปกรณ์ iOS จริงที่ใช้ iOS 10.0 ขึ้นไป
- ML Kit รองรับเฉพาะสถาปัตยกรรม 64 บิต 2 รายการนี้
x86_64และarm64 - โค้ดตัวอย่าง
- ความรู้พื้นฐานเกี่ยวกับการพัฒนา iOS ใน Swift
- ความเข้าใจขั้นพื้นฐานเกี่ยวกับโมเดลแมชชีนเลิร์นนิง
Codelab นี้มุ่งเน้นไปที่ ML Kit แนวคิดและโค้ดบล็อกที่ไม่เกี่ยวข้องจะปรากฎขึ้นและมีไว้เพื่อให้คุณคัดลอกและวางได้อย่างง่ายดาย
2. การตั้งค่า
ดาวน์โหลดโค้ด
คลิกลิงก์ต่อไปนี้เพื่อดาวน์โหลดโค้ดทั้งหมดสำหรับ Codelab นี้:
แตกไฟล์ ZIP ที่ดาวน์โหลด การดำเนินการนี้จะสร้างโฟลเดอร์รูท (mlkit-ios-codelab) ที่มีทรัพยากรทั้งหมดที่คุณต้องใช้ สำหรับ Codelab นี้ คุณจะต้องใช้ทรัพยากรในไดเรกทอรีย่อย vision เท่านั้น
ไดเรกทอรีย่อย vision ในที่เก็บ mlkit-ios-codelab มี 2 ไดเรกทอรี ได้แก่
 starter - โค้ดเริ่มต้นที่คุณสร้างใน Codelab นี้
- final - โค้ดที่สมบูรณ์สำหรับแอปตัวอย่างที่สร้างเสร็จแล้ว
เพิ่มทรัพยากร Dependency สำหรับ ML Kit ด้วย CocoaPods
มีการใช้ CocoaPods เพื่อเพิ่มทรัพยากร Dependency ของ ML Kit ลงในแอปของคุณ หากยังไม่ได้ติดตั้ง CocoaPods ในเครื่อง โปรดดูวิธีติดตั้งที่นี่ เมื่อติดตั้งแล้ว ให้เปิด Podfile ในเครื่องมือแก้ไขที่คุณชื่นชอบและเพิ่ม ML Kit เป็นทรัพยากร Dependency ดังนี้
Podfile
platform :ios, '10.0'
use_frameworks!

pod 'GoogleMLKit/FaceDetection'
pod 'GoogleMLKit/TextRecognition'

target 'MLKit-codelab' do
end
ติดตั้ง Cocoa Pods สำหรับ ML Kit
หากต้องการตรวจสอบว่าทรัพยากร Dependency ทั้งหมดพร้อมใช้งานสำหรับแอปของคุณ คุณควรใช้บรรทัดคำสั่งเพื่อติดตั้ง ML Kit Cocoa Pods
บรรทัดคำสั่ง
# Make sure you are in the root of your app
pod install
xed .
3. เรียกใช้แอปเริ่มต้น
ตอนนี้คุณพร้อมที่จะเรียกใช้แอปเป็นครั้งแรกแล้ว คลิก เรียกใช้ใน Xcode เพื่อรวบรวมแอปและเรียกใช้ในโปรแกรมจำลอง iOS
แอปจะเปิดขึ้นในโปรแกรมจำลอง ณ จุดนี้ คุณควรเห็นเลย์เอาต์พื้นฐานที่มีเครื่องมือเลือก ซึ่งให้คุณเลือกระหว่างรูปภาพ 2 รูปได้ ในส่วนถัดไป คุณสามารถเพิ่มการจดจำข้อความลงในแอปเพื่อระบุข้อความในภาพ
4. เพิ่มการจดจำข้อความในอุปกรณ์
ในขั้นตอนนี้ เราจะเพิ่มฟังก์ชันให้แอปของคุณจดจำข้อความในรูปภาพ
นำเข้าโมดูล MLVision
ยืนยันว่ามีการนำเข้าต่อไปนี้ไปยังชั้นเรียน ViewController อยู่
ViewController.swift
import MLKit
สร้าง VisionTextRecognizer
เพิ่มพร็อพเพอร์ตี้แบบ Lazy ต่อไปนี้ลงในชั้นเรียน ViewController
ViewController.swift
private lazy var textRecognizer = TextRecognizer.textRecognizer()
ตั้งค่าและเรียกใช้การจดจำข้อความในอุปกรณ์ในรูปภาพ
เพิ่มข้อมูลต่อไปนี้ลงในเมธอด runTextRecognition ของชั้นเรียน ViewController
ViewController.swift
func runTextRecognition(with image: UIImage) {
  let visionImage = VisionImage(image: image)
  textRecognizer.process(visionImage) { features, error in
    self.processResult(from: features, error: error)
  }
}
โค้ดด้านบนจะกำหนดค่าตัวตรวจจับการจดจำข้อความและเรียกฟังก์ชัน processResult(from:, error:) พร้อมคำตอบ
ประมวลผลคำตอบการจดจำข้อความ
เพิ่มโค้ดต่อไปนี้ลงใน processResult ในชั้นเรียน ViewController เพื่อแยกวิเคราะห์ผลลัพธ์และแสดงในแอปของคุณ
ViewController.swift
 func processResult(from text: Text?, error: Error?) {
    removeDetectionAnnotations()
    guard error == nil, let text = text else {
      let errorString = error?.localizedDescription ?? Constants.detectionNoResultsMessage
      print("Text recognizer failed with error: \(errorString)")
      return
    }

    let transform = self.transformMatrix()

    // Blocks.
    for block in text.blocks {
      drawFrame(block.frame, in: .purple, transform: transform)

      // Lines.
      for line in block.lines {
        drawFrame(line.frame, in: .orange, transform: transform)

        // Elements.
        for element in line.elements {
          drawFrame(element.frame, in: .green, transform: transform)

          let transformedRect = element.frame.applying(transform)
          let label = UILabel(frame: transformedRect)
          label.text = element.text
          label.adjustsFontSizeToFitWidth = true
          self.annotationOverlayView.addSubview(label)
        }
      }
    }
  }
เรียกใช้แอปในเครื่องจำลอง
แล้วคลิก Run ใน Xcode เมื่อแอปโหลดแล้ว โปรดเลือก Image 1 ในเครื่องมือเลือกและคลิกปุ่ม Find Text
ตอนนี้แอปของคุณควรมีลักษณะเหมือนรูปภาพด้านล่างซึ่งแสดงผลการค้นหาการจดจำข้อความและกรอบล้อมรอบที่วางซ้อนอยู่ด้านบนของรูปภาพต้นฉบับ
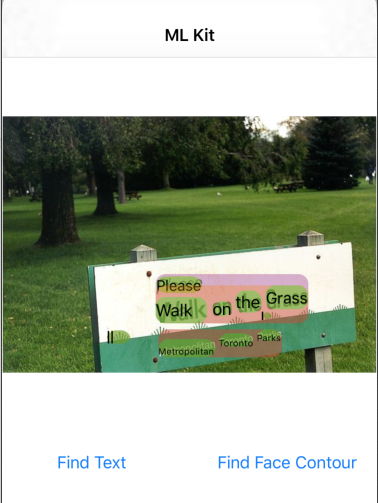
รูปภาพ: Kai Schreiber / Wikimedia Commons / CC BY-SA 2.0
ยินดีด้วย คุณเพิ่งเพิ่มการจดจำข้อความในอุปกรณ์ลงในแอปโดยใช้ ML Kit การรู้จำข้อความในอุปกรณ์เหมาะสำหรับกรณีการใช้งานมากมายเนื่องจากทำงานได้แม้แอปของคุณไม่มีการเชื่อมต่ออินเทอร์เน็ต และเร็วพอที่จะใช้กับภาพนิ่งและเฟรมวิดีโอแบบสด
5. เพิ่มการตรวจจับใบหน้าในอุปกรณ์
ในขั้นตอนนี้ เราจะเพิ่มฟังก์ชันการทำงานให้กับแอปของคุณเพื่อตรวจหารูปทรงของใบหน้าในรูปภาพ
สร้าง FaceDetector
เพิ่มพร็อพเพอร์ตี้แบบ Lazy ต่อไปนี้ลงในชั้นเรียน ViewController
ViewController.swift
private lazy var faceDetectorOption: FaceDetectorOptions = {
  let option = FaceDetectorOptions()
  option.contourMode = .all
  option.performanceMode = .fast
  return option
}()
private lazy var faceDetector = FaceDetector.faceDetector(options: faceDetectorOption)
ตั้งค่าและเรียกใช้การตรวจจับเส้นโครงร่างใบหน้าในอุปกรณ์ในรูปภาพ
เพิ่มข้อมูลต่อไปนี้ลงในเมธอด runFaceContourDetection ของชั้นเรียน ViewController
ViewController.swift
  func runFaceContourDetection(with image: UIImage) {
    let visionImage = VisionImage(image: image)
    faceDetector.process(visionImage) { features, error in
      self.processResult(from: features, error: error)
    }
  }
โค้ดด้านบนจะกำหนดค่าตัวตรวจจับการจดจำข้อความและเรียกฟังก์ชัน processResult(from:, error:) พร้อมคำตอบ
ประมวลผลการตอบสนองของเครื่องตรวจจับใบหน้า
เพิ่มโค้ดต่อไปนี้ลงใน processResult ในชั้นเรียน ViewController เพื่อแยกวิเคราะห์ผลลัพธ์และแสดงในแอปของคุณ
ViewController.swift
  func processResult(from faces: [Face]?, error: Error?) {
    removeDetectionAnnotations()
    guard let faces = faces else {
      return
    }

    for feature in faces {
      let transform = self.transformMatrix()
      let transformedRect = feature.frame.applying(transform)
      UIUtilities.addRectangle(
        transformedRect,
        to: self.annotationOverlayView,
        color: UIColor.green
      )
      self.addContours(forFace: feature, transform: transform)
    }
  }
สุดท้ายให้เพิ่มเมธอดตัวช่วย addContours ในชั้นเรียน ViewController เพื่อวาดจุดเส้นโครงร่าง
ViewController.swift
 private func addContours(forFace face: Face, transform: CGAffineTransform) {
    // Face
    if let faceContour = face.contour(ofType: .face) {
      for point in faceContour.points {
        drawPoint(point, in: .blue, transform: transform)
      }
    }

    // Eyebrows
    if let topLeftEyebrowContour = face.contour(ofType: .leftEyebrowTop) {
      for point in topLeftEyebrowContour.points {
        drawPoint(point, in: .orange, transform: transform)
      }
    }
    if let bottomLeftEyebrowContour = face.contour(ofType: .leftEyebrowBottom) {
      for point in bottomLeftEyebrowContour.points {
        drawPoint(point, in: .orange, transform: transform)
      }
    }
    if let topRightEyebrowContour = face.contour(ofType: .rightEyebrowTop) {
      for point in topRightEyebrowContour.points {
        drawPoint(point, in: .orange, transform: transform)
      }
    }
    if let bottomRightEyebrowContour = face.contour(ofType: .rightEyebrowBottom) {
      for point in bottomRightEyebrowContour.points {
        drawPoint(point, in: .orange, transform: transform)
      }
    }

    // Eyes
    if let leftEyeContour = face.contour(ofType: .leftEye) {
      for point in leftEyeContour.points {
        drawPoint(point, in: .cyan, transform: transform)
      }
    }
    if let rightEyeContour = face.contour(ofType: .rightEye) {
      for point in rightEyeContour.points {
        drawPoint(point, in: .cyan, transform: transform)
      }
    }

    // Lips
    if let topUpperLipContour = face.contour(ofType: .upperLipTop) {
      for point in topUpperLipContour.points {
        drawPoint(point, in: .red, transform: transform)
      }
    }
    if let bottomUpperLipContour = face.contour(ofType: .upperLipBottom) {
      for point in bottomUpperLipContour.points {
        drawPoint(point, in: .red, transform: transform)
      }
    }
    if let topLowerLipContour = face.contour(ofType: .lowerLipTop) {
      for point in topLowerLipContour.points {
        drawPoint(point, in: .red, transform: transform)
      }
    }
    if let bottomLowerLipContour = face.contour(ofType: .lowerLipBottom) {
      for point in bottomLowerLipContour.points {
        drawPoint(point, in: .red, transform: transform)
      }
    }

    // Nose
    if let noseBridgeContour = face.contour(ofType: .noseBridge) {
      for point in noseBridgeContour.points {
        drawPoint(point, in: .yellow, transform: transform)
      }
    }
    if let noseBottomContour = face.contour(ofType: .noseBottom) {
      for point in noseBottomContour.points {
        drawPoint(point, in: .yellow, transform: transform)
      }
    }
  }
เรียกใช้แอปในเครื่องจำลอง
แล้วคลิก Run ใน Xcode เมื่อแอปโหลดแล้ว โปรดเลือก Image 2 ในเครื่องมือเลือกและคลิกปุ่ม Find Face Contour แอปของคุณควรมีลักษณะเหมือนรูปภาพด้านล่าง โดยแสดงเส้นโครงร่างของใบหน้าของGrace Hopper เป็นจุดที่วางซ้อนอยู่บนรูปภาพต้นฉบับ
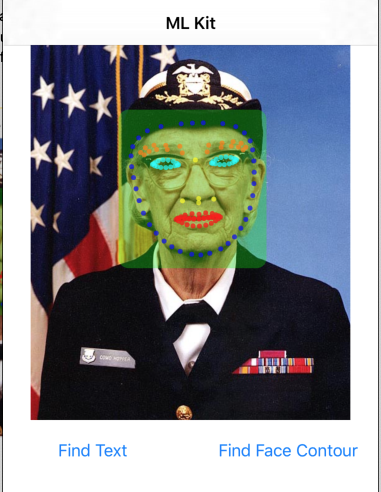
ยินดีด้วย คุณเพิ่งเพิ่มการตรวจจับเส้นโครงร่างใบหน้าในอุปกรณ์ลงในแอปโดยใช้การตรวจจับใบหน้าของ ML Kit ในอุปกรณ์ซึ่งใช้งานได้ดีกับการใช้งานหลายกรณี เพราะทำงานได้แม้ในกรณีที่แอปไม่มีการเชื่อมต่ออินเทอร์เน็ตและเร็วพอที่จะใช้กับภาพนิ่งและเฟรมวิดีโอแบบสด
6. ยินดีด้วย
คุณได้ใช้ ML Kit เพื่อเพิ่มความสามารถของแมชชีนเลิร์นนิงขั้นสูงลงในแอปอย่างง่ายดาย
หัวข้อที่ครอบคลุม
- วิธีเพิ่ม ML Kit ลงในแอป iOS
- วิธีใช้การจดจำข้อความในอุปกรณ์ใน ML Kit เพื่อค้นหาข้อความในรูปภาพ
- วิธีใช้การจดจำใบหน้าในอุปกรณ์ใน ML Kit เพื่อระบุฟีเจอร์ใบหน้าในรูปภาพ
ขั้นตอนถัดไป
- ใช้ ML Kit ในแอป iOS ของคุณเอง
ดูข้อมูลเพิ่มเติม
- https://g.co/mlkit