
1. 简介
机器学习套件是一个移动 SDK,它通过强大且易用的软件包将 Google 的机器学习专业知识融入到 Android 和 iOS 应用中。无论您是刚开始接触机器学习,还是拥有丰富的相关经验,都只需几行代码就能轻松实现所需的功能。您无需具备丰富的神经网络或模型优化知识即可开始使用。
运作方式
借助机器学习套件,您可以将 Google 的机器学习技术(例如 Mobile Vision 和 TensorFlow Lite)整合到一个 SDK 中,从而轻松地在应用中运用机器学习技术。无论您是需要 Mobile Vision 的设备端模型的实时功能,还是自定义 TensorFlow Lite 图像分类模型的灵活性,只需几行代码,机器学习套件都能帮您实现。
此 Codelab 将引导您创建自己的 iOS 应用,该应用可以自动检测图片中的文本和面部特征。
构建内容
在此 Codelab 中,您将使用机器学习套件构建一个 iOS 应用。您的应用将:
|
|


学习内容
- 如何使用机器学习套件 SDK 轻松向任何 iOS 应用添加文本识别、人脸特征检测等高级机器学习功能
所需条件
- 最新版本的 Xcode (v12.4+)
- iOS 模拟器或运行 iOS 10.0+ 的 iOS 实体设备
- 机器学习套件仅支持以下两种 64 位架构:
x86_64和arm64 - 示例代码
- 具备使用 Swift 进行 iOS 开发的基础知识
- 对机器学习模型有基本的了解
此 Codelab 重点介绍机器学习套件。对于不相关的概念,我们仅会略作介绍,但是会提供相应代码块供您复制和粘贴。
2. 准备工作
下载代码
点击下面的链接可下载本 Codelab 的所有代码:
解压下载的 ZIP 文件。这将创建一个根文件夹 (mlkit-ios-codelab),其中包含您需要的所有资源。在此 Codelab 中,您只需要 vision 子目录中的资源。
mlkit-ios-codelab 代码库中的 vision 子目录包含两个目录:
 starter - 在此 Codelab 中帮助您开始构建的起始代码。
- final - 已完成的示例应用的完整代码。
使用 CocoaPods 添加机器学习套件的依赖项
CocoaPods 用于向应用添加机器学习套件依赖项。如果您尚未在机器上安装 CocoaPods,请点击此处查看安装说明。安装后,在您喜爱的编辑器中打开 Podfile,并将机器学习套件添加为依赖项:
Podfile
platform :ios, '10.0'
use_frameworks!

pod 'GoogleMLKit/FaceDetection'
pod 'GoogleMLKit/TextRecognition'

target 'MLKit-codelab' do
end
安装机器学习套件 Cocoa Pod
为确保所有依赖项都对您的应用可用,您应使用命令行安装机器学习套件 Cocoa Pod。
命令行
# Make sure you are in the root of your app
pod install
xed .
3. 运行起始应用
现在,您可以首次运行应用了。点击 Xcode 中的  Run,以编译应用并在 iOS 模拟器上运行该应用。
应用应该会在模拟器上启动。此时,您应该会看到一个基本布局,其中包含一个选择器,允许您在 2 张图片之间进行选择。在下一部分中,您将向应用添加文本识别功能,以识别图片中的文本。
4. 添加设备端文字识别功能
在此步骤中,我们将为您的应用添加识别图片中的文本的功能。
导入 MLVision 模块
确认存在以下对 ViewController 类的导入。
ViewController.swift
import MLKit
创建 VisionTextRecognizer
将以下延迟属性添加到您的 ViewController 类中。
ViewController.swift
private lazy var textRecognizer = TextRecognizer.textRecognizer()
在设备端设置并针对图片进行文字识别
将以下代码添加到 ViewController 类的 runTextRecognition 方法中:
ViewController.swift
func runTextRecognition(with image: UIImage) {
  let visionImage = VisionImage(image: image)
  textRecognizer.process(visionImage) { features, error in
    self.processResult(from: features, error: error)
  }
}
上面的代码配置了文本识别检测器并使用响应调用函数 processResult(from:, error:)。
处理文本识别响应
将以下代码添加到 ViewController 类中的 processResult,以解析结果并将其显示在您的应用中。
ViewController.swift
 func processResult(from text: Text?, error: Error?) {
    removeDetectionAnnotations()
    guard error == nil, let text = text else {
      let errorString = error?.localizedDescription ?? Constants.detectionNoResultsMessage
      print("Text recognizer failed with error: \(errorString)")
      return
    }

    let transform = self.transformMatrix()

    // Blocks.
    for block in text.blocks {
      drawFrame(block.frame, in: .purple, transform: transform)

      // Lines.
      for line in block.lines {
        drawFrame(line.frame, in: .orange, transform: transform)

        // Elements.
        for element in line.elements {
          drawFrame(element.frame, in: .green, transform: transform)

          let transformedRect = element.frame.applying(transform)
          let label = UILabel(frame: transformedRect)
          label.text = element.text
          label.adjustsFontSizeToFitWidth = true
          self.annotationOverlayView.addSubview(label)
        }
      }
    }
  }
在模拟器上运行应用
现在,点击 Xcode 中的 Run。应用加载后,请确保在选择器中选择 Image 1,然后点击 Find Text 按钮。
现在,您的应用应如下图所示,显示文本识别结果和叠加在原始图片上的边界框。
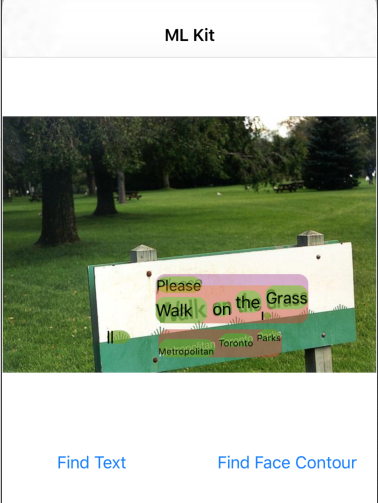
照片:Kai Schreiber / Wikimedia Commons / CC BY-SA 2.0
恭喜,您刚刚使用机器学习套件将设备端文本识别功能添加到您的应用中!设备端文本识别非常适合许多使用场景,即使您的应用没有互联网连接并且速度足够快,可以用于静态图像和实时视频帧,它也能正常运行。
5. 添加设备端人脸轮廓检测
在此步骤中,我们将向您的应用添加功能,以检测图片中人脸的轮廓。
创建 FaceDetector
将以下延迟属性添加到您的 ViewController 类中。
ViewController.swift
private lazy var faceDetectorOption: FaceDetectorOptions = {
  let option = FaceDetectorOptions()
  option.contourMode = .all
  option.performanceMode = .fast
  return option
}()
private lazy var faceDetector = FaceDetector.faceDetector(options: faceDetectorOption)
在设备端设置并针对图片运行面部轮廓检测
将以下代码添加到 ViewController 类的 runFaceContourDetection 方法中:
ViewController.swift
  func runFaceContourDetection(with image: UIImage) {
    let visionImage = VisionImage(image: image)
    faceDetector.process(visionImage) { features, error in
      self.processResult(from: features, error: error)
    }
  }
上面的代码配置了文本识别检测器并使用响应调用函数 processResult(from:, error:)。
处理人脸检测器响应
将以下代码添加到 ViewController 类中的 processResult,以解析结果并将其显示在您的应用中。
ViewController.swift
  func processResult(from faces: [Face]?, error: Error?) {
    removeDetectionAnnotations()
    guard let faces = faces else {
      return
    }

    for feature in faces {
      let transform = self.transformMatrix()
      let transformedRect = feature.frame.applying(transform)
      UIUtilities.addRectangle(
        transformedRect,
        to: self.annotationOverlayView,
        color: UIColor.green
      )
      self.addContours(forFace: feature, transform: transform)
    }
  }
最后,在 ViewController 类中添加辅助方法 addContours,以绘制轮廓点。
ViewController.swift
 private func addContours(forFace face: Face, transform: CGAffineTransform) {
    // Face
    if let faceContour = face.contour(ofType: .face) {
      for point in faceContour.points {
        drawPoint(point, in: .blue, transform: transform)
      }
    }

    // Eyebrows
    if let topLeftEyebrowContour = face.contour(ofType: .leftEyebrowTop) {
      for point in topLeftEyebrowContour.points {
        drawPoint(point, in: .orange, transform: transform)
      }
    }
    if let bottomLeftEyebrowContour = face.contour(ofType: .leftEyebrowBottom) {
      for point in bottomLeftEyebrowContour.points {
        drawPoint(point, in: .orange, transform: transform)
      }
    }
    if let topRightEyebrowContour = face.contour(ofType: .rightEyebrowTop) {
      for point in topRightEyebrowContour.points {
        drawPoint(point, in: .orange, transform: transform)
      }
    }
    if let bottomRightEyebrowContour = face.contour(ofType: .rightEyebrowBottom) {
      for point in bottomRightEyebrowContour.points {
        drawPoint(point, in: .orange, transform: transform)
      }
    }

    // Eyes
    if let leftEyeContour = face.contour(ofType: .leftEye) {
      for point in leftEyeContour.points {
        drawPoint(point, in: .cyan, transform: transform)
      }
    }
    if let rightEyeContour = face.contour(ofType: .rightEye) {
      for point in rightEyeContour.points {
        drawPoint(point, in: .cyan, transform: transform)
      }
    }

    // Lips
    if let topUpperLipContour = face.contour(ofType: .upperLipTop) {
      for point in topUpperLipContour.points {
        drawPoint(point, in: .red, transform: transform)
      }
    }
    if let bottomUpperLipContour = face.contour(ofType: .upperLipBottom) {
      for point in bottomUpperLipContour.points {
        drawPoint(point, in: .red, transform: transform)
      }
    }
    if let topLowerLipContour = face.contour(ofType: .lowerLipTop) {
      for point in topLowerLipContour.points {
        drawPoint(point, in: .red, transform: transform)
      }
    }
    if let bottomLowerLipContour = face.contour(ofType: .lowerLipBottom) {
      for point in bottomLowerLipContour.points {
        drawPoint(point, in: .red, transform: transform)
      }
    }

    // Nose
    if let noseBridgeContour = face.contour(ofType: .noseBridge) {
      for point in noseBridgeContour.points {
        drawPoint(point, in: .yellow, transform: transform)
      }
    }
    if let noseBottomContour = face.contour(ofType: .noseBottom) {
      for point in noseBottomContour.points {
        drawPoint(point, in: .yellow, transform: transform)
      }
    }
  }
在模拟器上运行应用
现在,点击 Xcode 中的 Run。应用加载后,请确保在选择器中选择 Image 2,然后点击 Find Face Contour 按钮。现在,您的应用应如下图所示,显示 Grace Hopper 面部轮廓为原始图片之上叠加的点。
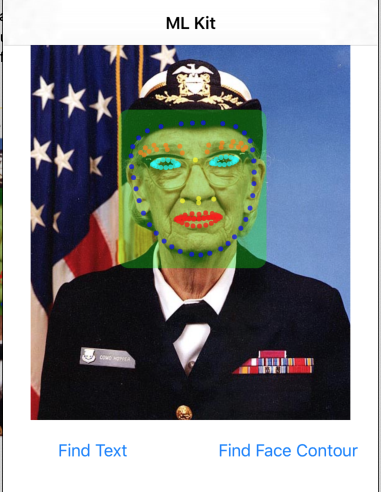
恭喜,您刚刚使用设备端机器学习套件人脸轮廓检测为应用添加了设备端人脸轮廓检测功能,该功能非常适合许多用例,即使您的应用没有互联网连接,并且速度足够快,可用于静态图像以及实时视频帧,它也能发挥作用。
6. 恭喜!
您已使用机器学习套件轻松向应用添加高级机器学习功能。
所学内容
- 如何将机器学习套件添加到 iOS 应用中
- 如何使用机器学习套件中的设备端文本识别功能查找图片中的文本
- 如何使用机器学习套件中的设备端人脸识别功能识别图片中的人脸特征
后续步骤
- 在您自己的 iOS 应用中使用机器学习套件。
了解详情
- https://g.co/mlkit