
1. 准备工作
此 Codelab 会教您如何创建一个简单的 iOS 应用,该应用使用 Google Maps Platform Navigation SDK 导航到预配置的目的地。
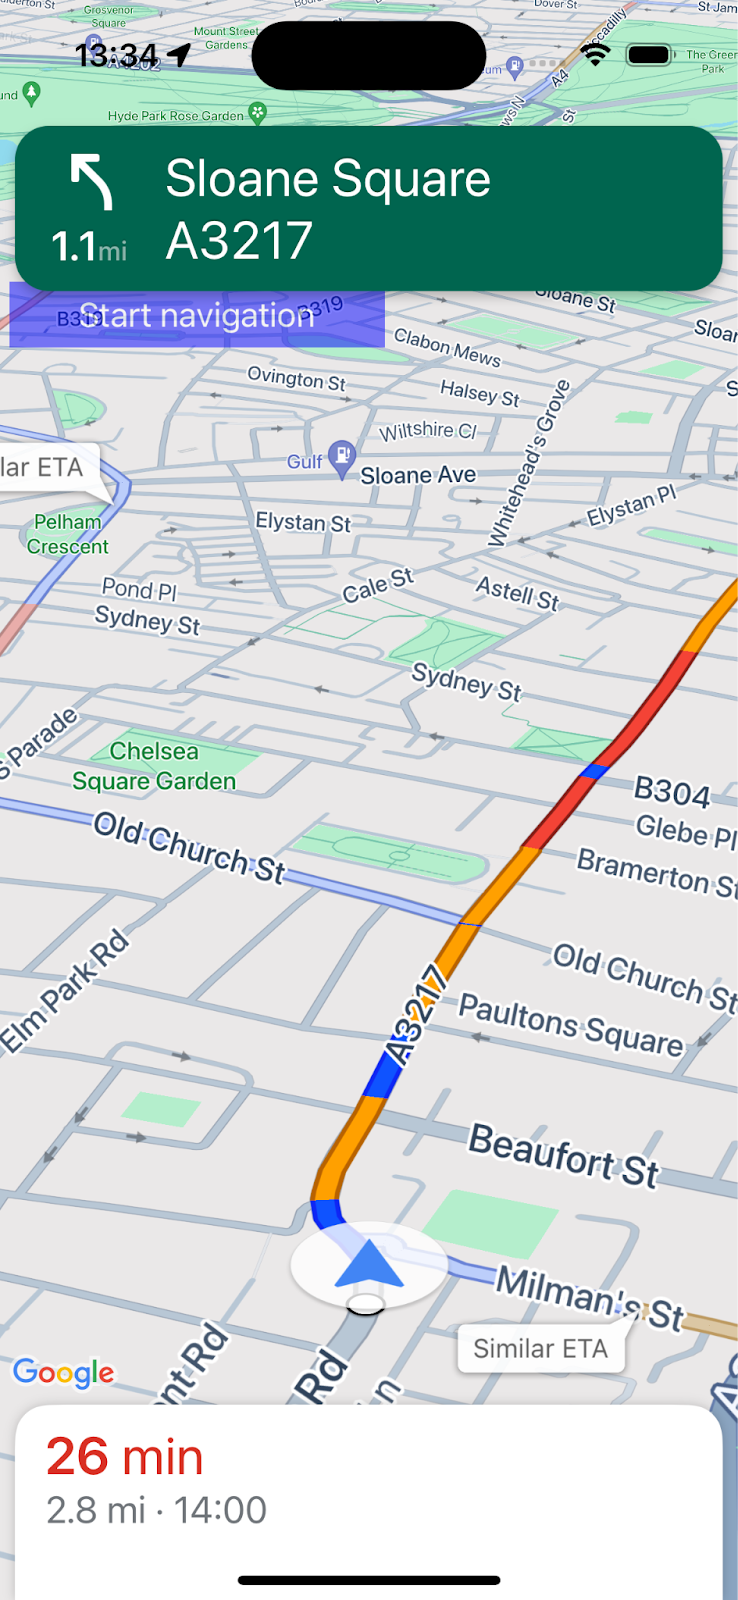
完成此 Codelab 后,您的应用将如下所示。
前提条件
- 了解 Swift 中的基本 iOS 应用开发。
- 熟悉一些基本的 Google 地图 SDK 概念,例如创建以特定位置为中心的地图。
学习内容
- 如何创建使用 Navigation SDK 导航到目的地的简单 iOS Swift 应用。
- 如何从远程 Cocoapods 代码库集成 Navigation SDK。
- 如何管理位置权限和用户协议(Navigation SDK 最终用户条款)。
- 如何初始化 SDK。
- 如何设置目的地并开始导航。
所需条件
- 最新稳定版 Xcode。
- 启用了结算功能的 Google 账号和项目。
- 一部 iOS 设备或在 Xcode 模拟器中运行的模拟设备。无论您选择哪种方式,都必须满足 Navigation SDK 的最低要求。
2. 进行设置
如果您还没有已启用结算功能的 Google Cloud Platform 账号和云项目,请按照 Google Maps Platform 使用入门说明设置 Google Cloud 项目。
在控制台中选择 Google Cloud 项目
在 Cloud 控制台中,点击项目下拉菜单,然后选择要用于此 Codelab 的项目。

在项目中启用 Navigation SDK
在 Google Cloud Marketplace 中,启用此 Codelab 所需的 Google Maps Platform API 和 SDK。
在 Google Cloud 控制台中,依次前往 API 和服务 > 库,然后搜索“Navigation SDK”。
您应该会看到一个搜索结果。
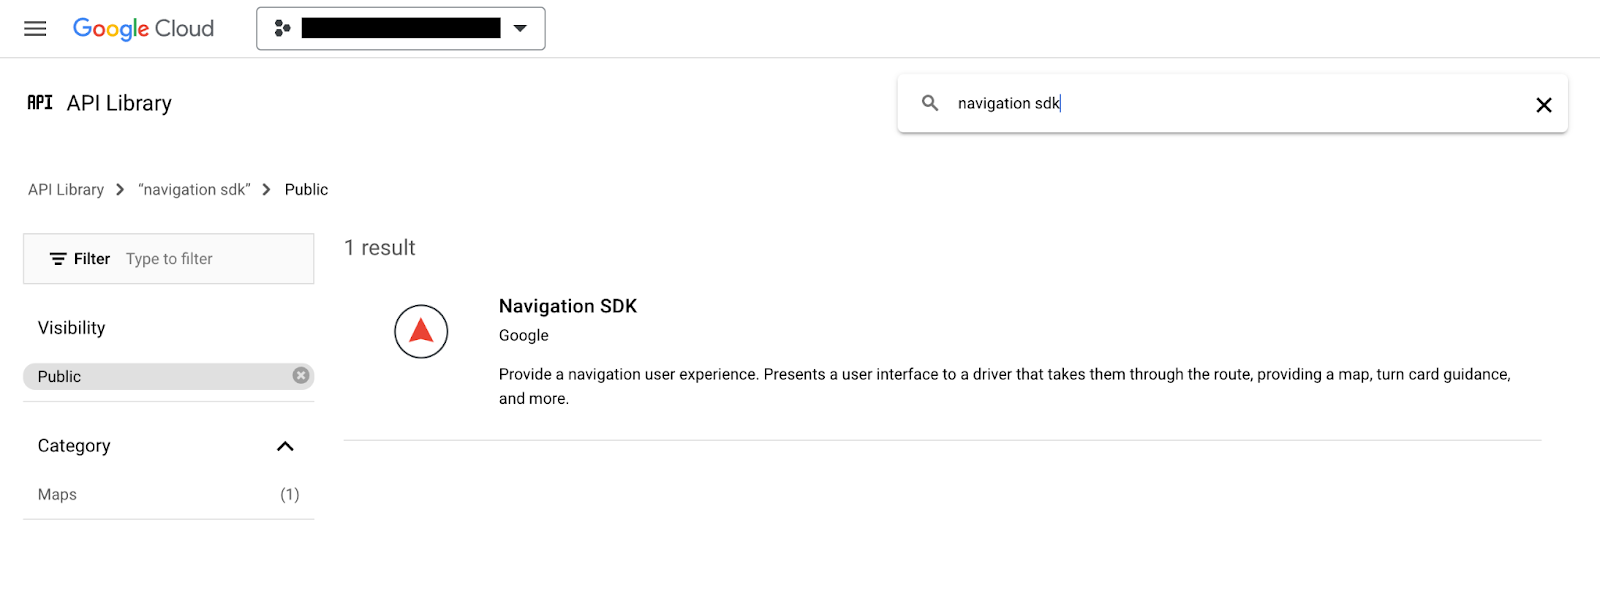
点击 Navigation SDK 以打开“产品详情”页面。点击启用以在您的项目中启用该 SDK。
针对 Google Maps SDK for iOS 重复此流程。
创建 API 密钥
在 Cloud Console 的凭据页面中,生成 API 密钥。向 Google Maps Platform 发出的所有请求都需要 API 密钥。在控制台中的“凭据”页面上。点击页面顶部的“+创建凭据”,然后从选项中选择“API 密钥”。
对于生产用途,最佳做法是为 API 密钥设置应用限制,但对于此 Codelab,这是可选操作。
3. 获取示例项目文件
本部分介绍如何通过克隆此 Codelab 的 GitHub 代码库中的文件来设置一个基本的空 Xcode 应用项目。GitHub 代码库包含 Codelab 代码的之前版本和之后版本。此 Codelab 将从空白项目模板开始,逐步构建到完成状态。如果您遇到困难,可以参考代码库中的成品项目。
克隆代码库或下载代码
前往您要存储 Codelab 的目录。
然后克隆代码库或下载代码:
git clone https://github.com/googlemaps-samples/codelab-navigation-101-ios-swift
如果您未安装 git,请点击此按钮获取代码:
为了让您能尽快上手,该代码库在 Starter 文件夹中提供了一些起始代码,以帮助您顺利完成此 Codelab。此外,我们还提供了一个已完成的 Solution 项目,以便您随时跳过或查看自己的进度。如需使用解决方案项目,您需要按照下方的“使用 Cocoapods 进行安装”说明操作,然后从 solution/Navigation SDK Codelab 文件夹运行“pod update”命令。
将代码库克隆到本地后,使用 Xcode 将 Starter 文件夹作为现有项目打开。检查项目是否已构建并运行。
连接设备或设置 Xcode 模拟器
4. 将 Navigation SDK 添加到您的应用
您可以通过以下三种方式将 Navigation SDK 集成到 Xcode 项目中:此 Codelab 使用 CocoaPods。如需详细了解如何使用 Swift Package Manager 进行集成,或通过下载 SDK 手动安装,请参阅 Navigation SDK 文档中的创建 Xcode 项目并安装 Navigation SDK。
使用 CocoaPods 进行安装
如果您尚未安装 CocoaPods 工具,请在 macOS 上从终端运行以下命令进行安装。如需了解详情,请参阅 CocoaPods 入门指南。
sudo gem install cocoapods
在项目文件夹中创建一个名为 Podfile 的新文件,该文件位于 starter/Navigation SDK Codelab 文件夹内(在 Xcode 中,依次选择“File”>“New”>“File”>“Other”>“Empty”,然后另存为“Podfile”)
将以下内容添加到 Podfile 中:
source 'https://github.com/CocoaPods/Specs.git'

platform :ios, '15.0'

target 'Navigation SDK Codelab' do
  pod 'GoogleNavigation', '9.1.1'
end
可享受 Podfile 的优惠。
打开终端,然后将目录更改为您保存 Podfile 的位置(这应该是 Codelab 代码库中的“starter/Navigation SDK Codelab”文件夹)
cd "<path-to-starter-project-folder>/Navigation SDK Codelab"
运行 pod install 命令。此操作会安装 Podfile 中指定的 API 及其可能具有的任何依赖项
pod install
关闭 Xcode,然后打开项目的 .xcworkspace 文件以启动 Xcode。从此刻开始,您必须使用 .xcworkspace 文件打开项目。
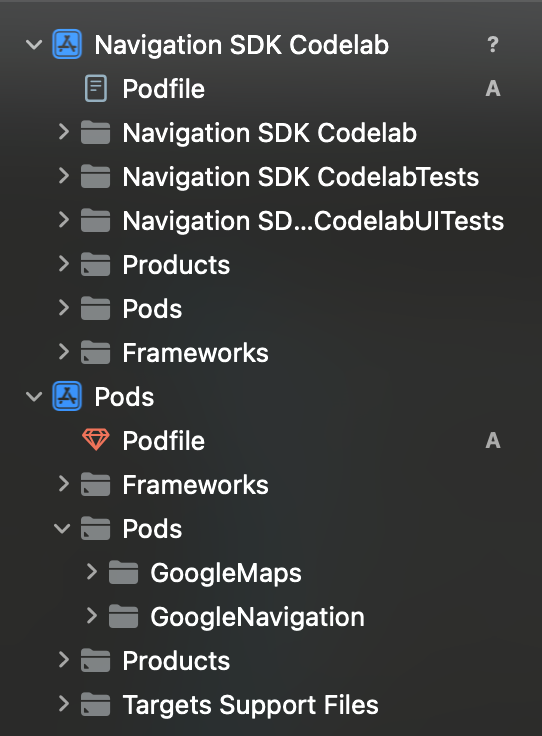
检查项目结构中是否已添加 Pods 目录,以及该目录是否包含“GoogleMaps”和“GoogleNavigation”Pod。
添加 API 密钥
按照以下方法向 AppDelegate.swift 添加 API 密钥:
- 添加以下 import 语句:
import GoogleMaps
import GoogleNavigation
- 将以下代码添加到
application(_:didFinishLaunchingWithOptions:)方法中:
GMSServices.provideAPIKey("YOUR_API_KEY")
将“YOUR_API_KEY”替换为您在上一步中创建的 API 密钥。
构建项目并修正所有错误。
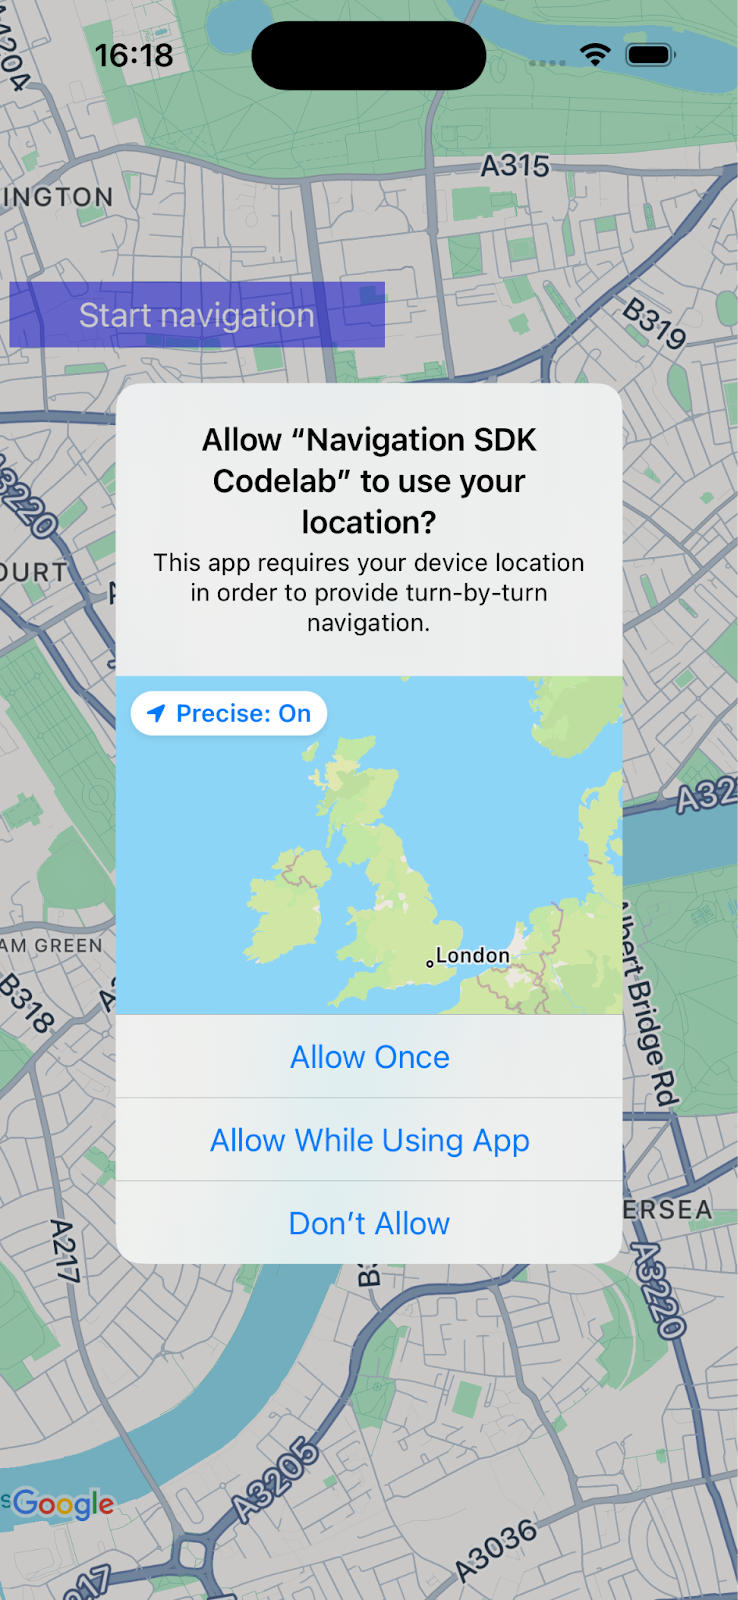
5. 配置应用权限
Navigation SDK 依赖于 GPS 信号来提供贴合道路的位置信息和精细导航,因此您的应用需要请求用户授予对精确位置数据的访问权限。
为此,您需要在 Xcode 中向应用的 Info.plist 添加一些属性,向应用添加一些代码以在运行时向用户请求权限,并处理任何错误,例如未授予权限或位置信息不可用。
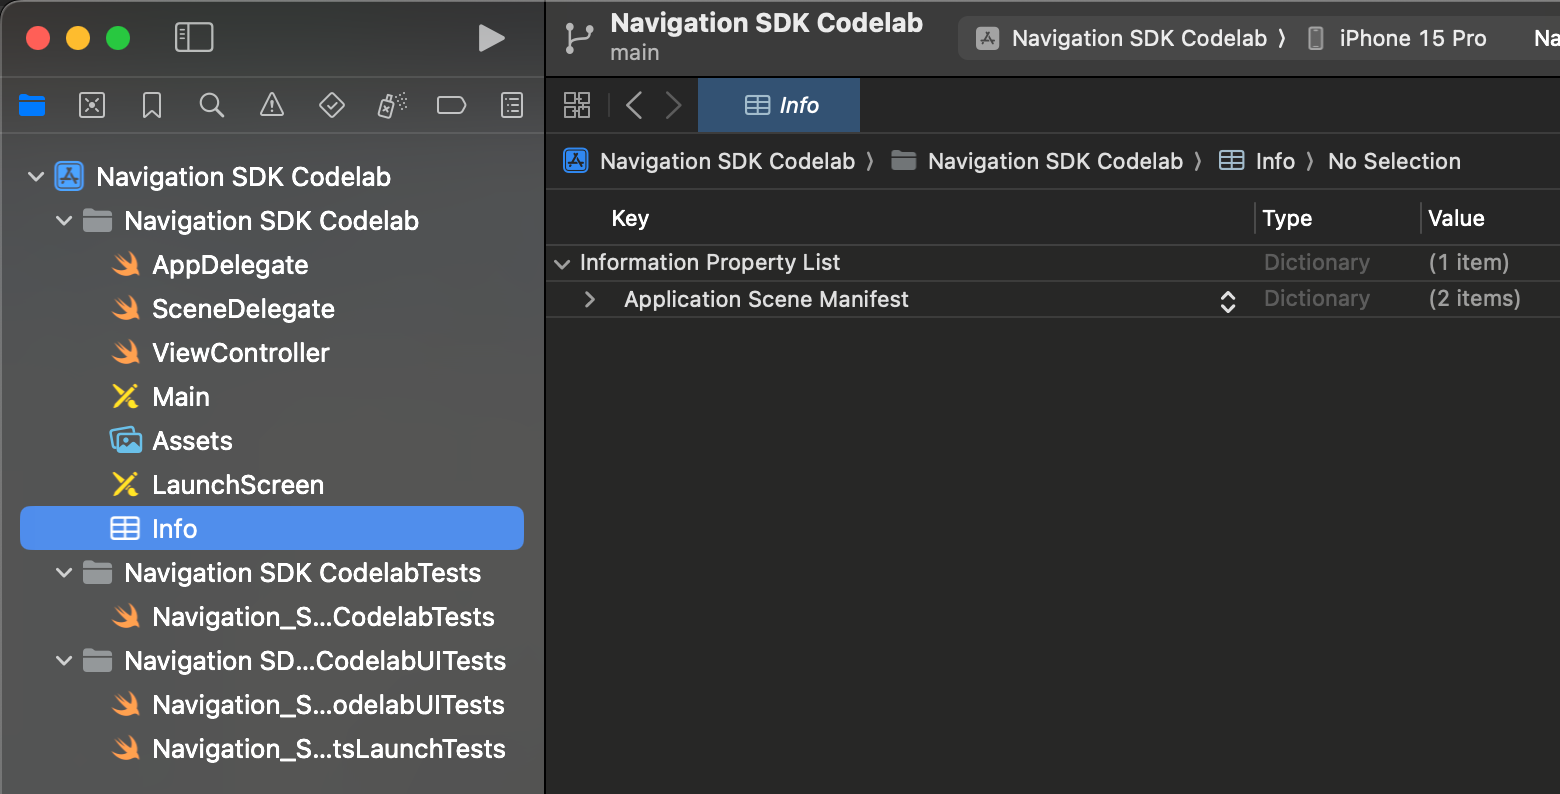
在 Xcode 中打开 Info.plist。看上去应该类似这样
请求精确位置信息权限
您可以将鼠标指针悬停在“信息属性列表”行上,直到看到“+”图标出现,然后点击该图标添加新值。点击“+”可查看包含建议的属性名称的对话框,但请注意,您也可以手动添加属性。
向 Info.plist 添加以下属性和值:
属性 | 值 |
隐私权 - 位置信息(始终和使用时)使用情况说明 | “此应用需要获取设备位置信息才能提供精细导航” |
隐私权 - 使用应用时位置信息的使用情况说明 | “此应用需要获取设备位置信息才能提供精细导航” |
allowsBackgroundLocationUpdates | 是 |
请求后台位置信息权限
向 Info.plist 添加以下属性和值:
UIBackgroundModes > 添加行 > Item 0: App registers for location updates(从建议的下拉列表中选择此值)
完成后,Info.plist 应如下所示。

在运行时请求位置信息访问权限
将以下 import 语句添加到 ViewController.swift:
import GoogleNavigation
将以下声明添加到 ViewController 类中:
var locationManager: CLLocationManager!
为 loadView() 添加方法替换并调用 locationManager.requestAlwaysAuthorization():
override func loadView() {
        locationManager = CLLocationManager()
        locationManager.requestAlwaysAuthorization()
现在,您的应用将向用户请求位置信息,并在用户授予权限后将位置信息提供给您的应用。
请求显示通知的权限
将以下代码添加到 loadView(),以请求用户授予显示通知的权限,这是显示导航操作说明所必需的。
UNUserNotificationCenter.current().requestAuthorization(options: [.alert]) {
        granted, error in
        // Handle denied authorization to display notifications.
          if !granted || error != nil {
              print("User rejected request to display notifications.")
          }
        }
构建并运行应用,并检查系统是否提示您分享位置信息和启用通知。
6. 添加导航界面
在此步骤中,您将添加地图并将其配置为显示某个位置。然后,向用户显示一个包含 Navigation SDK 使用条款的对话框。
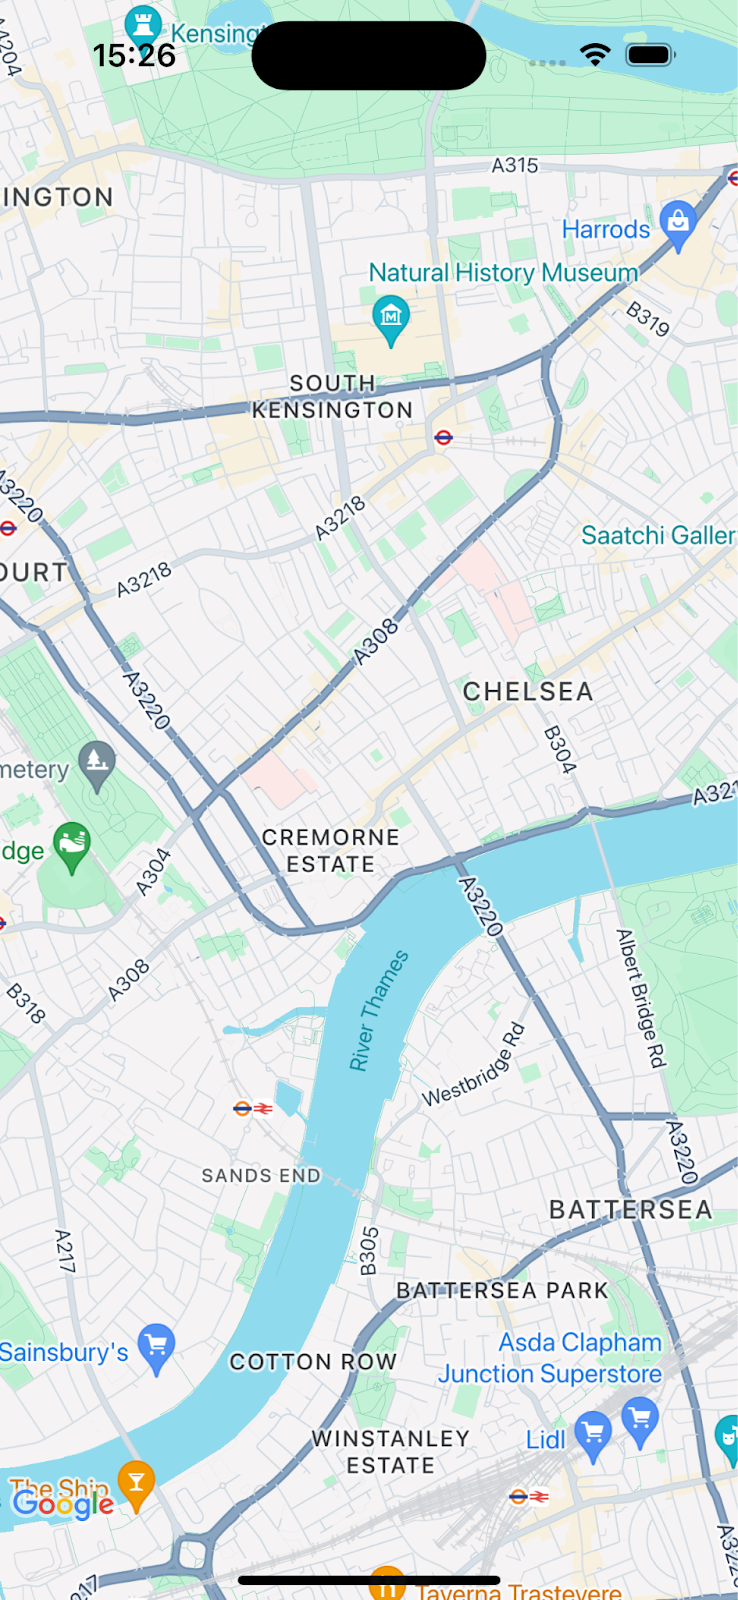
向应用添加地图视图
添加此行代码,以在 ViewController 中声明 GMSMapView 变量。
var mapView: GMSMapView!
将以下代码添加到 Viewcontroller.swift 中的 loadView() 以初始化地图。
let camera = GMSCameraPosition.camera(withLatitude: 51.483174, longitude: -0.177369, zoom: 14)
let options = GMSMapViewOptions()
options.camera = camera
options.frame = .zero

mapView = GMSMapView(options: options)
view = mapView
构建并运行应用,您应该会看到一个以伦敦西南部为中心的地图。
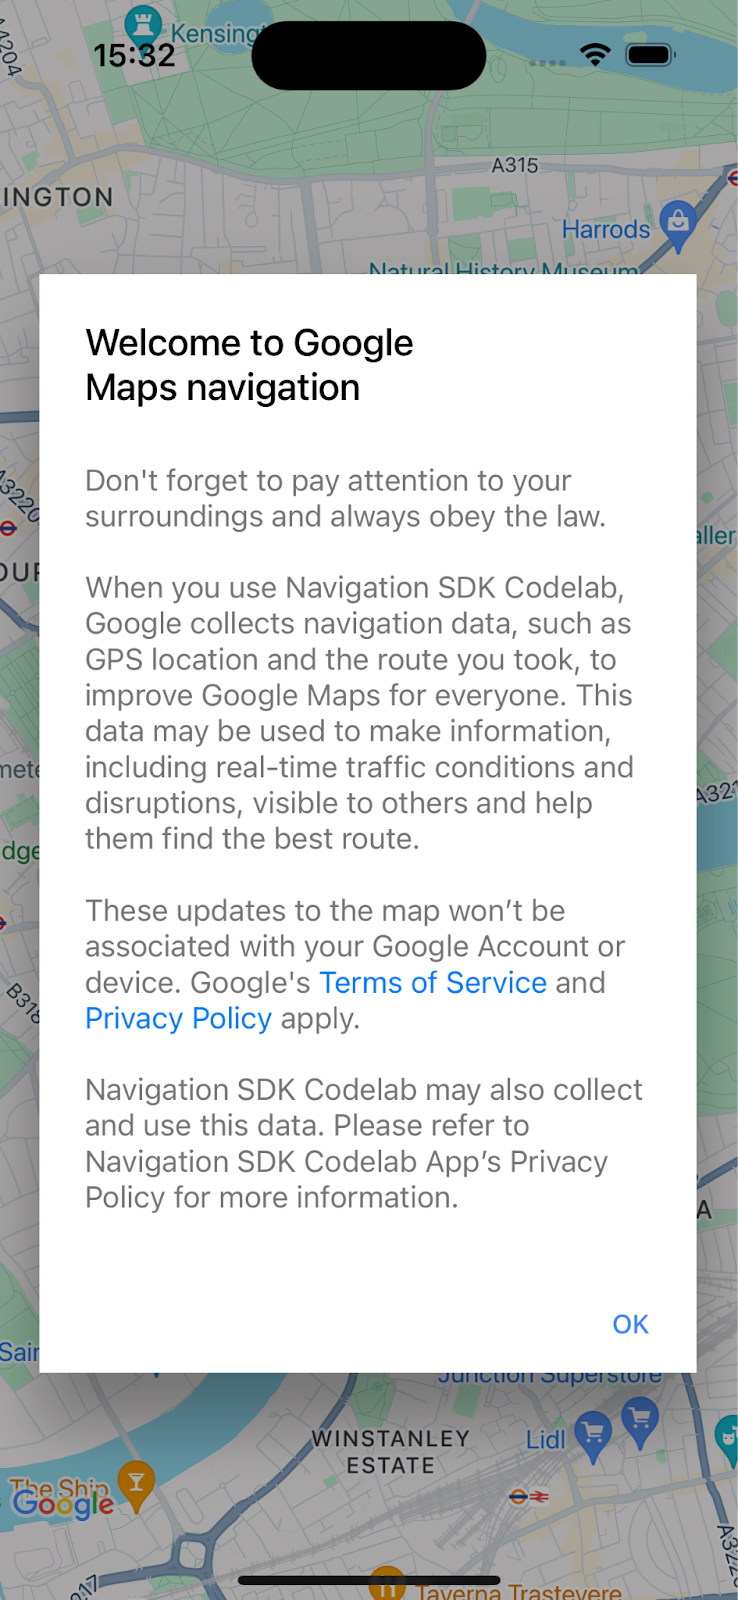
显示 Navigation SDK 产品使用条款对话框
将以下代码添加到 loadView() 方法中的 ViewController.swift(与之前的代码位于同一 loadView() 方法中)。系统会显示 Navigation SDK 最终用户使用条款。如果不接受,导航将不会启用。
// Show the terms and conditions.
let companyName = "Navigation SDK Codelab"
GMSNavigationServices.showTermsAndConditionsDialogIfNeeded(withCompanyName: companyName) { termsAccepted in
  if termsAccepted {
    // Enable navigation if the user accepts the terms.
    self.mapView.isNavigationEnabled = true
    // Request authorization for alert notifications which deliver guidance instructions
    // in the background.
  } else {
    // Handle the case when the user rejects the terms and conditions.
  }
}
构建并运行应用,以查看对话框。
7. 为按键导航事件添加监听器
此步骤将介绍如何为关键事件(例如到达目的地或司机重新规划路线)设置监听器。
如需监听这些事件,您的视图控制器必须采用 GMSNavigatorListener 协议。
将此协议添加到 ViewController.swift 中的类定义。
class ViewController: UIViewController,
                      GMSNavigatorListener {
现在,添加一行代码以在 loadView(): 中设置监听器
// Add a listener for GMSNavigator.
mapView.navigator?.add(self)
最后,向类中添加两个方法来处理引发的事件。
// Listener to handle arrival events.
func navigator(_ navigator: GMSNavigator, didArriveAt waypoint: GMSNavigationWaypoint) {
  print("You have arrived at: \(waypoint.title)")
}

// Listener for route change events.
func navigatorDidChangeRoute(_ navigator: GMSNavigator) {
  print("The route has changed.")
}
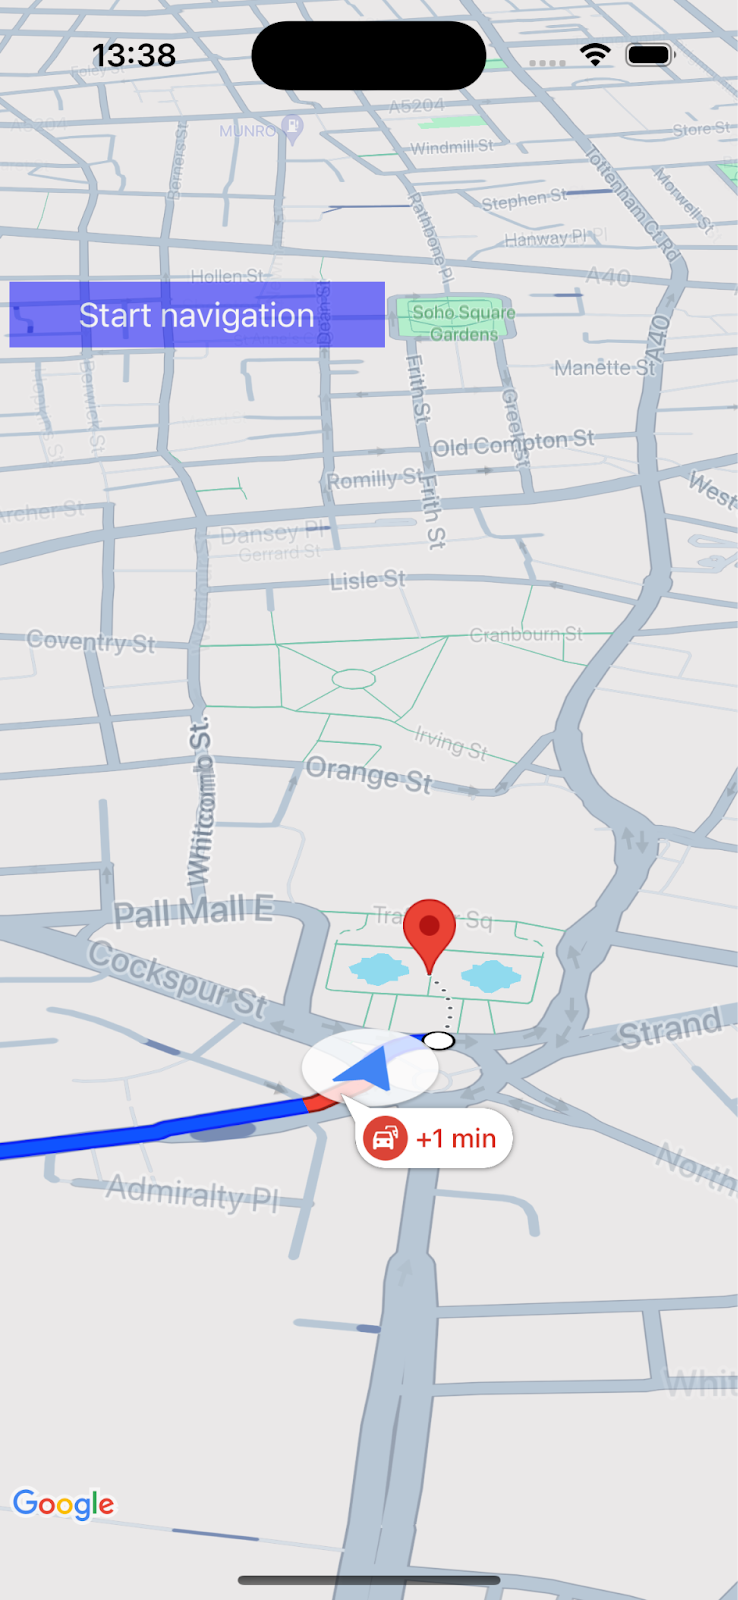
8. 设置目的地并开始引导
本部分将介绍如何设置目的地并开始导航。
为导航逻辑创建新函数。
首先,向 ViewController 添加一个名为 startNav() 的新函数。此方法将包含用于设置目的地并开始导航的逻辑。
// Create a route and start guidance.
@objc func startNav() {
}
为目的地创建 Waypoint 。
接下来,创建一个包含单个途经点的目的地数组。
// Create a route and start guidance.
@objc func startNav() {
  var destinations = [GMSNavigationWaypoint]()
  destinations.append(
    GMSNavigationWaypoint.init(
      placeID: "ChIJH-tBOc4EdkgRJ8aJ8P1CUxo",
      title: "Trafalgar Square")!)
}
调用 setDestinations()并处理响应。
接下来,调用 setDestinations 并处理返回的 GMSRouteStatus。
如果 GMSRouteStatus 为“正常”,请通过在 mapView 的 navigator 对象上设置 isGuidanceActive=true 来开始引导。否则,输出一条语句以表明发生了错误。
如果返回的 GMSRouteStatus 值为“OK”,请调用 mapView.locationSimulator.simulateLocationsAlongExistingRoute() 开始模拟沿路线行驶。
// Create a route and start guidance.
@objc func startNav() {
  var destinations = [GMSNavigationWaypoint]()
    destinations.append(
      GMSNavigationWaypoint.init(
        placeID: "ChIJH-tBOc4EdkgRJ8aJ8P1CUxo",
          title: "Trafalgar Square")!)

  mapView.navigator?.setDestinations(
    destinations
  ) { routeStatus in
    guard routeStatus == .OK else {
      print("Handle route statuses that are not OK.")
      return
    }
    //If routeStatus is OK, start guidance.
    self.mapView.navigator?.isGuidanceActive = true
    //start simulating driving along the route. self.mapView.locationSimulator?.simulateLocationsAlongExistingRoute()
    self.mapView.cameraMode = .following
  }
}
处理常见错误状态
更明确地处理 GMSRouteStatus 错误非常有用,尤其是在调试新应用的初始问题时。例如,您可能会发现,由于调试设置,您最初会更频繁地遇到位置信息权限、API 密钥或“未找到路线”错误,因此处理这些错误状态会很有用。
添加可处理这些特定情况并向控制台输出语句的代码。
mapView.navigator?.setDestinations(
  destinations
) { routeStatus in
    guard routeStatus == .OK else {
      print("Handle route statuses that are not OK.")
      switch routeStatus {
       case .locationUnavailable:
        print("Location unavailable.") //check permissions
      case .noRouteFound:
        print("No route found.") //check start location and destination
      case .waypointError:
        print("Waypoint error") //check Place ID
      default:
        print("Not sure what happened")
      }
    return
  }
添加用于开始导航引导的按钮
最后,向界面添加一个按钮,并将其与 startNav 方法相关联。创建一个名为 makeButton() 的方法,其中包含以下代码。从 loadView() 调用 makeButton() 函数。
// Add a button to the view.
func makeButton() {
  // A button to start navigation.
  let navButton = UIButton(frame: CGRect(x: 5, y: 150, width: 200, height: 35))
  navButton.backgroundColor = .blue
  navButton.alpha = 0.5
  navButton.setTitle("Start navigation", for: .normal)
  navButton.addTarget(self, action: #selector(startNav), for: .touchUpInside)
  self.mapView.addSubview(navButton)
}
构建并运行您的应用。
注意:在运行代码时
startNav()
将致电
setDestinations()
方法,在首次使用 1,000 个目的地后会产生费用。如需了解详情,请参阅用量和结算。
9. 恭喜!
做得好 - 您已抵达目的地!
您已使用 Google Maps Platform Navigation SDK 创建了一个简单的应用,该应用可提供前往目的地的精细导航。
您已配置应用权限和 Navigation SDK 最终用户条款对话框,并使用地点 ID 指定了目的地。您已在应用中处理了各种成功和错误状态。
10. 深入了解
如果您想进一步提升应用开发技能,不妨参考以下主题,从中获取灵感。