
1. 准备工作
此 Codelab 将教您创建一个简单的 Android 应用,该应用使用 Google Maps Platform Navigation SDK 导航到预先配置的目的地。
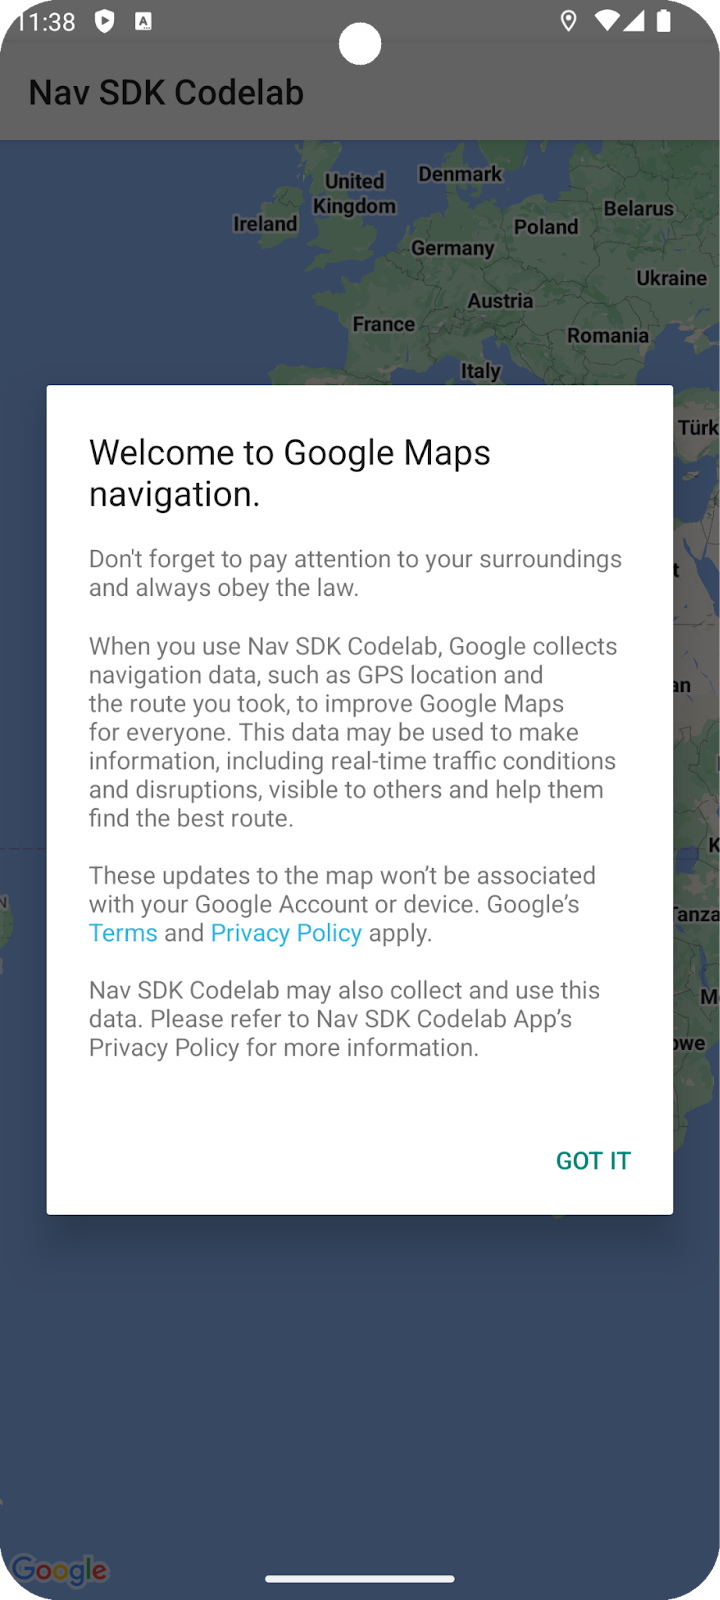
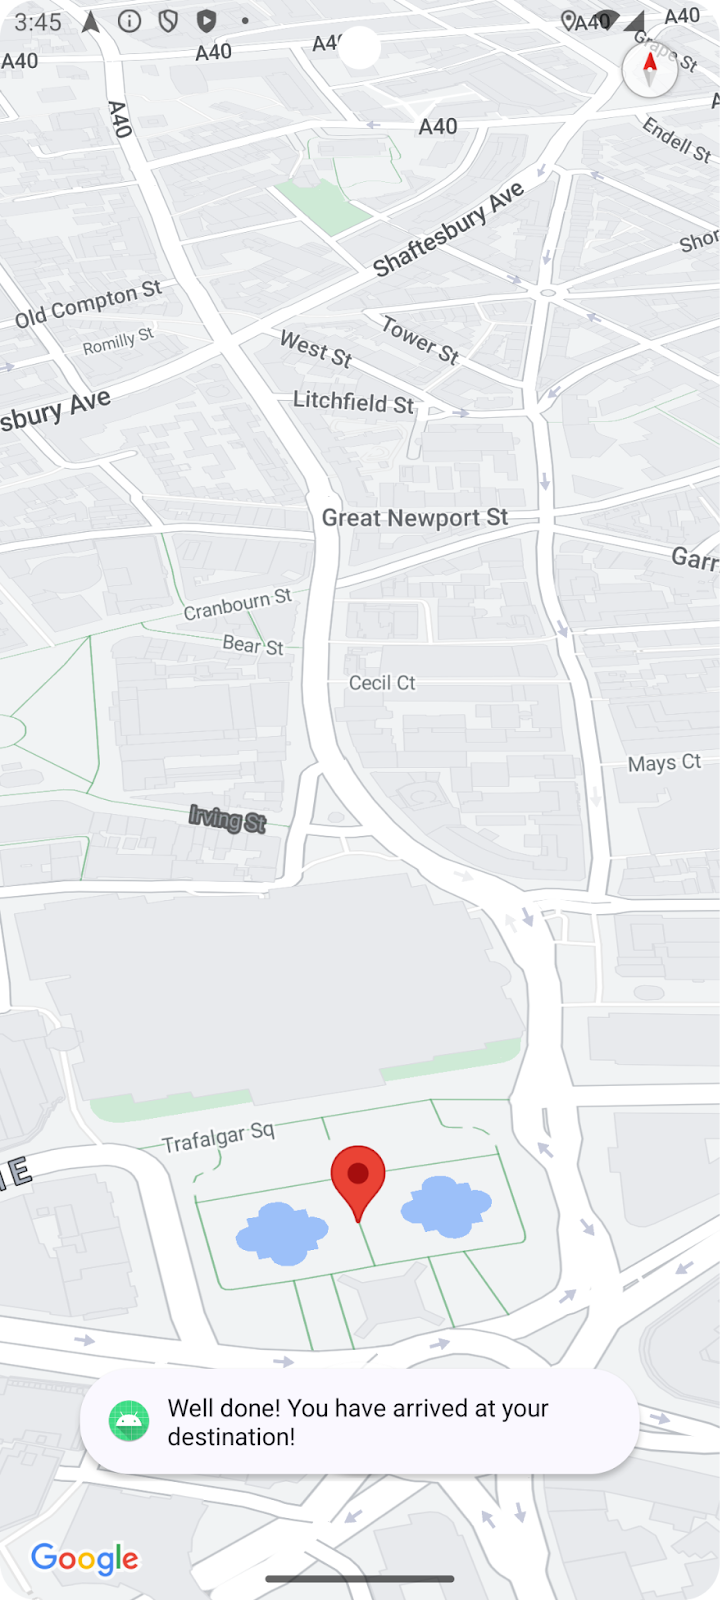
完成此 Codelab 后,您的应用将如下所示。

前提条件
- 了解使用 Kotlin 进行基本 Android 应用开发
- 对 Google Maps SDK 的基本概念(例如地图、位置、坐标)有一定的了解。
学习内容
- 如何创建使用 Navigation SDK 导航到目的地的简单 Android 应用。
- 如何从远程 Google Maven 制品库集成 Navigation SDK
- 如何管理位置信息权限和用户协议(Navigation SDK 最终用户条款)
- 如何初始化 SDK
- 如何设置目的地并开始导航。
所需条件
- 已安装最新稳定版 Android Studio。本 Codelab 是使用 Android Studio Jellyfish 创建的。如果您使用的是其他版本,界面和组件的外观和布局可能会有所不同。
- 启用了结算功能的 Google 账号和项目。
- 处于开发者模式且已启用 USB 调试的 Android 设备,或 Android 模拟器。无论您选择哪种方式,都必须满足 Navigation SDK 的最低要求
2. 进行设置
如果您还没有已启用结算功能的 Google Cloud Platform 账号和云项目,请按照“Google Maps Platform 使用入门”中的说明设置 Google Cloud 项目 https://developers.google.com/maps/gmp-get-started
在控制台中选择您的 Google Cloud 项目
在 Cloud 控制台中,点击项目下拉菜单,然后选择要用于此 Codelab 的项目。

在项目中启用 Navigation SDK
在 Google Cloud Marketplace 中,启用此 Codelab 所需的 Google Maps Platform API 和 SDK。
在 Google Cloud 控制台中,依次前往“API 和服务”>“库”,然后搜索“Navigation SDK”。
您应该会看到一个搜索结果。
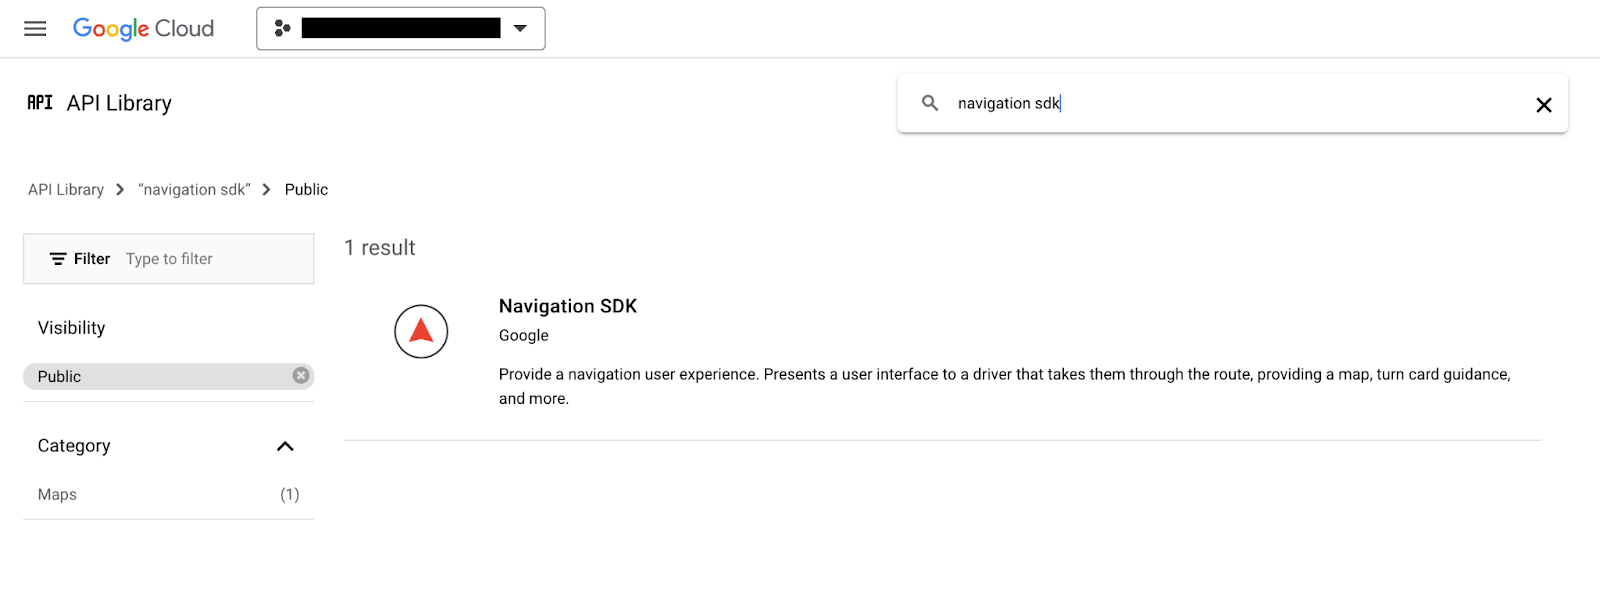
点击 Navigation SDK 结果,打开“产品详情”页面。点击“启用”按钮,以在您的项目中启用 SDK。
针对 Google Maps SDK for Android 重复此流程。
创建 API 密钥
在 Cloud Console 的凭据页面中,生成 API 密钥。您可以按照Google Maps Platform 使用入门中的“快速入门”部分的第 3 步进行操作。向 Google Maps Platform 发出的所有请求都需要 API 密钥。
3. 获取示例项目文件
本部分介绍如何通过克隆此 Codelab 的 GitHub 代码库中的文件来设置基本的空 Android Studio 项目。GitHub 代码库包含 Codelab 代码的之前版本和之后版本。此 Codelab 将从空白项目模板开始,逐步构建到完成状态。如果您遇到困难,可以参考代码库中的成品项目。
克隆此 GitHub 代码库,以获取此 Codelab 的代码。
git clone https://github.com/googlemaps-samples/codelab-navigation-101-android-kotlin.git
如果您未安装 git,请点击此按钮获取代码:
为了让您能尽快上手,该代码库在 Starter 文件夹中提供了一些起始代码,以帮助您顺利完成此 Codelab。初始项目提供基本的应用界面和 build 配置,但未添加 Navigation SDK。此外,我们还提供了一个已完成的 Solution 项目,以便您随时跳过或查看自己的进度。
在 Android Studio 中打开克隆的代码库
将代码库克隆到本地后,使用 Android Studio 将 Starter 文件夹作为现有项目打开。
- 在“Welcome to Android Studio”对话框中,点击“Open”按钮。
- 前往您保存克隆代码库的文件夹,然后选择顶级“
codelab-navigation-101-android-kotlin”文件夹内的Starter文件夹。 - 检查项目是否已构建并运行。
添加虚拟设备或连接硬件设备
如需将 Android 设备连接到计算机,请按照 Android Studio 中有关如何在硬件设备上运行应用的说明进行操作。您也可以使用 Android 虚拟设备 (AVD) 管理器配置一个虚拟设备。选择模拟器时,请务必选择一个包含 Google API 的映像。
在 Android Studio 中,点击“Run”菜单选项或 Play 按钮图标。按提示选择设备。
4. 将 Navigation SDK 添加到您的应用
将 Navigation SDK 库和您的 API 密钥添加到项目中
如需将 Navigation SDK 库添加到您的应用,您需要修改应用级 build.gradle.kts 以从 Google Maven 制品库中提取 Navigation SDK 并配置版本号。
在 build 配置中创建一个变量来存储 Navigation SDK 版本号。
在应用级 build.gradle.kts 中设置一个变量,以包含应用中使用的 Navigation SDK 的版本值,以便日后轻松更改为最新版本。
如需了解最新版本号,请参阅 Navigation SDK 版本说明。
val navSdkVersion by extra("6.0.0")
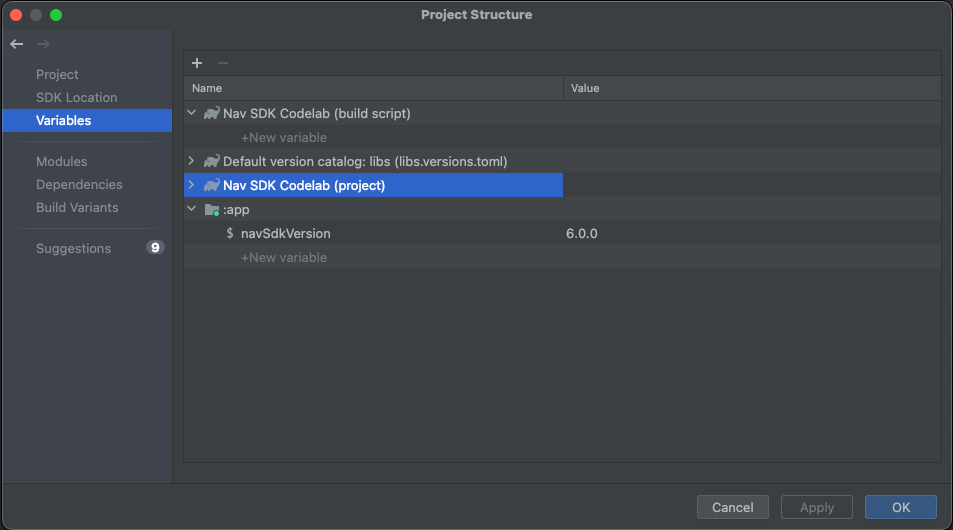
您还可以使用“文件”>“项目结构”>“变量”中的对话框修改此变量和其他变量的值:
向 build 配置添加依赖项
现在,将以下 API 依赖项添加到应用级 build.gradle.kts. 的依赖项块中。所使用的版本将是您刚刚在应用级 build.gradle.kts 中设置的 ${navSdkVersion} 的值:
dependencies {

   // Include the Google Navigation SDK.
   api("com.google.android.libraries.navigation:navigation:${navSdkVersion}")

...
添加 API 密钥
使用 Secrets Gradle 插件管理 API 密钥
建议您使用 Secrets Gradle 插件安全地管理应用中的 API 密钥。该插件已作为依赖项添加到顶级 build.gradle.kts 文件中的初始项目模板。
// Top-level build file where you can add configuration options common to all sub-projects/modules.
plugins {
    id("com.google.android.libraries.mapsplatform.secrets-gradle-plugin") version "2.0.1" apply false
    //... other plugin definitions here
}
在顶级目录中打开 secrets.properties 文件,然后将 YOUR_API_KEY 替换为您的 API 密钥。secrets.properties 不会签入版本控制系统,因此请将您的密钥存储在此文件中。
MAPS_API_KEY=YOUR_API_KEY
如需详细了解此主题,请参阅 Navigation SDK 文档中的将 API 密钥添加到应用。
验证 local.defaults.properties 的内容
空项目还在顶级目录(即 secrets.properties 文件所在的文件夹)中包含一个 local.defaults.properties 文件。打开该文件,然后查看以下代码。
MAPS_API_KEY=DEFAULT_API_KEY
此属性的存在是为了在 secrets.properties 未添加到项目中的情况下为 MAPS_API_KEY 属性提供备用值,以免构建失败。无需修改此文件。如果找不到 MAPS_API_KEY 的 secrets.properties 定义,默认值将导致应用在运行时停止运行,并显示 API 密钥错误。
检查 Android 清单是否使用了您指定的 API 密钥
打开 app/src/main/AndroidManifest.xml。您会注意到,MAPS_API_KEY 属性用于为应用设置 API 密钥:
<meta-data
    android:name="com.google.android.geo.API_KEY"
    android:value="${MAPS_API_KEY}" />
打开应用级 build.gradle.kts 文件,然后找到 secrets 属性。
插件的 propertiesFileName 设置应设置为 secrets.properties,并且 defaultPropertiesFileName 应显示 local.defaults.properties。
secrets {
    // Optionally specify a different file name containing your secrets.
    // The plugin defaults to "local.properties"
    propertiesFileName = "secrets.properties"

    // A properties file containing default secret values. This file can be
    // checked in version control.
    defaultPropertiesFileName = "local.defaults.properties"
}
保存所有文件并将项目与 Gradle 同步。
5. 配置应用权限并添加基本界面
请求精确位置信息权限
Navigation SDK 依赖于 GPS 信号才能正常运行,因此您的应用需要请求用户授予对精确位置数据的访问权限。在 AndroidManifest.xml 中,添加用于访问精确位置信息的权限作为 <manifest> 元素的子元素。
<manifest xmlns:android="http://schemas.android.com/apk/res/android"
    xmlns:tools="http://schemas.android.com/tools" >
   <uses-permission
      android:name="android.permission.ACCESS_FINE_LOCATION"
   />
</manifest>
如需详细了解 Android 位置信息权限,请参阅 Android 开发者文档的请求位置信息权限部分。
如需在 Android 14 设备上运行应用,请在与精确位置信息访问权限相同的位置添加以下 uses-permission 标记,以请求前台服务位置信息权限:
<uses-permission android:name="android.permission.FOREGROUND_SERVICE_LOCATION" />
添加具有基本界面的启动 activity
当您的应用运行时,它需要启动时执行的代码来检查用户是否已授予访问其位置信息的权限,并处理每种可能的情况,如果尚未授予权限,则请求权限。为此,请向应用添加基本界面。本 Codelab 使用在 Android Studio 中创建新的空视图 activity 时创建的界面。您将调整此代码,以便在向 activity 添加导航界面代码之前执行位置信息权限检查。
在代码编辑器中打开文件 MainActivity.kt 并检查代码,该代码显示了一个基本界面。
在运行时请求位置信息访问权限
您的应用需要在初始化 Navigation SDK 之前触发对精确位置信息的访问请求。
为确保此检查在应用启动时进行,请在 Activity 的替换 onCreate() 方法中向 MainActivity 类添加一些代码。
以下代码会检查用户是否已授予精确的位置信息权限。如果未授予,它将请求此权限。将以下代码添加到 onCreate() 方法中。
    val permissions =
      if (VERSION.SDK_INT >= VERSION_CODES.TIRAMISU) {
        arrayOf(permission.ACCESS_FINE_LOCATION, permission.POST_NOTIFICATIONS)
      } else {
        arrayOf(permission.ACCESS_FINE_LOCATION)
      }

    if (permissions.any { !checkPermissionGranted(it) }) {

      if (permissions.any { shouldShowRequestPermissionRationale(it) }) {
        // Display a dialogue explaining the required permissions.
      }

      val permissionsLauncher =
        registerForActivityResult(
          RequestMultiplePermissions(),
          { permissionResults ->
            if (permissionResults.getOrDefault(permission.ACCESS_FINE_LOCATION, false)) {
              onLocationPermissionGranted()
            } else {
              finish()
            }
          },
        )

      permissionsLauncher.launch(permissions)
    } else {
      android.os.Handler(Looper.getMainLooper()).postDelayed({ onLocationPermissionGranted() }, SPLASH_SCREEN_DELAY_MILLIS)
    }
  }

  private fun checkPermissionGranted(permissionToCheck: String): Boolean =
    ContextCompat.checkSelfPermission(this, permissionToCheck) == PackageManager.PERMISSION_GRANTED
向 MainActivity 类添加一个名为 onLocationPermissionGranted 的新函数,用于处理用户授予位置信息分享权限后的结果。在后续步骤中,我们将在此处添加代码以启动新的导航 activity。
private fun onLocationPermissionGranted() {
   //code to initialize Navigation SDK will go here
}
构建项目。如果您有任何 build 错误,请查找并修复它们。
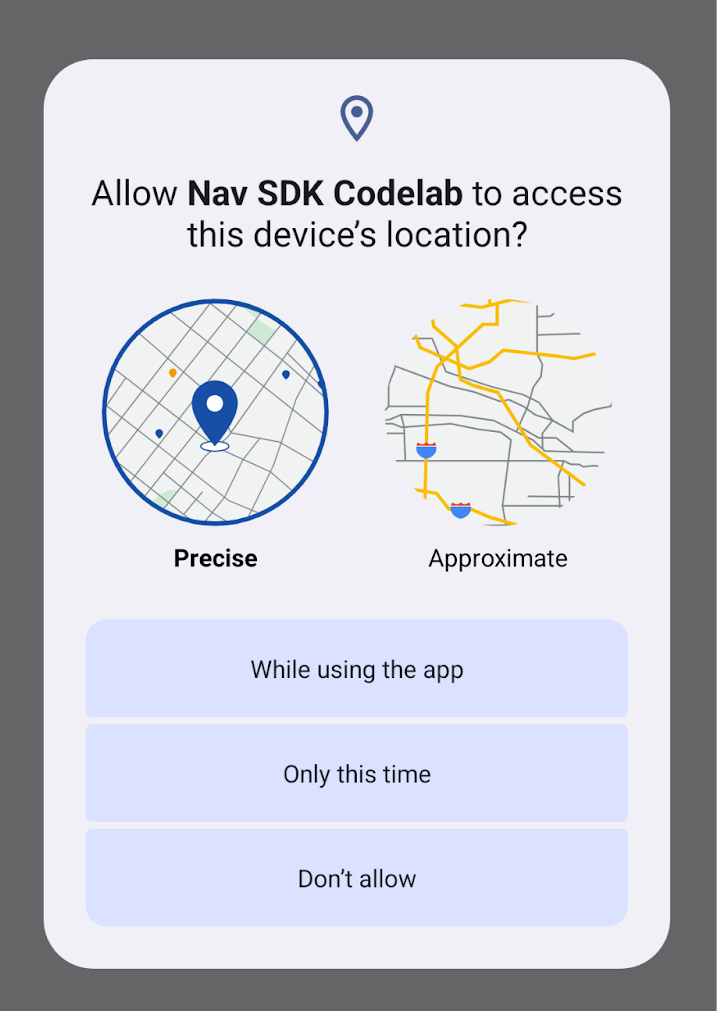
在新虚拟设备上运行项目。您应该会在应用安装并启动时看到权限请求对话框。
6. 添加导航界面
您可以通过两种方式添加导航界面:SupportNavigationFragment 或 NavigationView。
为简单起见,此 Codelab 使用了 NavigationView。
修改布局
修改 res/layout/activity_main.xml 以添加 NavigationView 的布局。
- 打开文件并切换到代码视图。
- 将该文件的全部内容替换为
RelativeLayout内NavigationView的新布局,如下例所示。由于您只需向应用添加导航视图,因此使用简单的布局即可。 - 为 NavigationView 指定 ID“
@+id/navigation_view”。
<?xml version="1.0" encoding="utf-8"?>
<RelativeLayout xmlns:android="http://schemas.android.com/apk/res/android"
   android:layout_width="match_parent"
   android:layout_height="match_parent">
 <com.google.android.libraries.navigation.NavigationView
     android:id="@+id/navigation_view"
     android:layout_width="wrap_content"
     android:layout_height="wrap_content"
      />
</RelativeLayout>
设置导航 activity
在 Android Studio 中,打开编辑器中的 MainActivity.kt 文件。
添加一些基本设置代码,以确保导航体验在应用中正常运行。在 MainActivity.kt 文件中,进行以下更改:
- 在
MainActivity类中声明一个变量以引用NavigationView:
private lateinit var navView: NavigationView
- 向
onCreate()方法添加一些代码,以获取对NavigationView的引用:
navView = findViewById(R.id.navigation_view)
navView.onCreate(savedInstanceState)
- 向
onCreate()方法添加一些代码,以确保在导航指导期间屏幕保持开启状态:
// Ensure the screen stays on during nav.
window.addFlags(WindowManager.LayoutParams.FLAG_KEEP_SCREEN_ON)
- 修改调用
ViewCompat.setOnApplyWindowInsetsListener的代码,以引用NavigationView的 ID。
ViewCompat.setOnApplyWindowInsetsListener(findViewById(R.id.navigation_view)) { v, insets ->
  val systemBars = insets.getInsets(WindowInsetsCompat.Type.systemBars())
  v.setPadding(systemBars.left, systemBars.top, systemBars.right, systemBars.bottom)
  insets
}
- 向类添加
showToast()方法,以向用户显示反馈:
private fun showToast(errorMessage: String) {
   Toast.makeText(this@MainActivity, errorMessage, Toast.LENGTH_LONG).show()
}
7. 初始化 Navigation SDK
现在,您已完成基本的 Navigation activity 设置,可以初始化 Navigation SDK 了。为此,请将以下代码添加到 MainActivity.kt 文件中:
/** Starts the Navigation API, capturing a reference when ready. */
@SuppressLint("MissingPermission")
private fun initializeNavigationApi() {
   NavigationApi.getNavigator(
       this,
       object : NavigatorListener {
           override fun onNavigatorReady(navigator: Navigator) {
               // store a reference to the Navigator object
               mNavigator = navigator
               // code to start guidance will go here
           }

           override fun onError(@NavigationApi.ErrorCode errorCode: Int) {
               when (errorCode) {
                   NavigationApi.ErrorCode.NOT_AUTHORIZED -> {
                       // Note: If this message is displayed, you may need to check that
                       // your API_KEY is specified correctly in AndroidManifest.xml
                       // and is been enabled to access the Navigation API
                       showToast(
                           "Error loading Navigation API: Your API key is " +
                                   "invalid or not authorized to use Navigation."
                       )
                   }
                   NavigationApi.ErrorCode.TERMS_NOT_ACCEPTED -> {
                       showToast(
                           "Error loading Navigation API: User did not " +
                                   "accept the Navigation Terms of Use."
                       )
                   }
                   else -> showToast("Error loading Navigation API: $errorCode")
               }
           }
       },
   )

}
此代码会创建一个名为 initializeNavigationApi() 的新方法。此方法通过调用 NavigationApi.getNavigator() 获取对 Navigator 对象的引用,并实现 NavigatorListener 以处理回调。
请注意,当 Navigation API 初始化时,系统会调用 NavigationListener.onNavigatorReady 方法,并传递一个 Navigator 对象作为参数。上述代码会将您之前声明的 mNavigator 变量更新为传递给此方法的已初始化的 Navigator 对象。
最后,从 onLocationPermissionGranted 方法中添加对 initializeNavigationApi 方法的调用。
private fun onLocationPermissionGranted() {
   initializeNavigationApi()
}
8. 为按键导航事件添加监听器
当用户遵循导航指示时,Navigation SDK 会触发事件,以通知应用有关路线上的关键状态变化,例如用户改道或到达目的地。在 MainActivity.kt 文件中,添加监听器来处理这些事件:
- 在
MainActivity类中,声明两个变量来引用事件监听器对象:
private var arrivalListener: Navigator.ArrivalListener? = null
private var routeChangedListener: Navigator.RouteChangedListener? = null
- 添加
registerNavigationListeners()方法,以便在初始化 Navigator 时设置监听器。此方法会在触发 Arrival 事件时调用Navigator.clearDestinations()以重置NavigationView:
/**
* Registers a number of example event listeners that show an on screen message when certain
* navigation events occur (e.g. the driver's route changes or the destination is reached).
*/
private fun registerNavigationListeners() {
   withNavigatorAsync {
       arrivalListener =
           Navigator.ArrivalListener { // Show an onscreen message
               showToast("User has arrived at the destination!")
               mNavigator?.clearDestinations()
           }
       mNavigator?.addArrivalListener(arrivalListener)

       routeChangedListener =
           Navigator.RouteChangedListener { // Show an onscreen message when the route changes
               showToast("onRouteChanged: the driver's route changed")
           }
       mNavigator?.addRouteChangedListener(routeChangedListener)
   }
}
- 在
initializeNavigationApi方法的onNavigatorReady回调代码中添加对registerNavigationListeners()的调用:
override fun onNavigatorReady(navigator: Navigator) {
   // store a reference to the Navigator object
   mNavigator = navigator

   //listen for events en route
   registerNavigationListeners()


}
- 配置界面。在导航运行时,您可以控制导航用户界面的各个方面。一项重要的自定义设置是摄像头位置。在
onNavigatorReady中添加对navigator对象返回的setTaskRemovedBehaviour方法的调用,如下所示。如果应用被滑动关闭,系统将终止指导和通知:
// Disables the guidance notifications and shuts down the app and background service
// when the user dismisses/swipes away the app from Android's recent tasks.
navigator.setTaskRemovedBehavior(Navigator.TaskRemovedBehavior.QUIT_SERVICE)
- 添加对
GoogleMap.followMyLocation的调用以指定CameraPerspective。可通过NavigatorView.getMapAsync()方法访问GoogleMap,如下所示:
navView.getMapAsync {
   googleMap  ->
   googleMap.followMyLocation(GoogleMap.CameraPerspective.TILTED)
}
- 为确保在整个应用生命周期内导航功能顺畅运行,请在
MainActivity类中实现以下方法:
override fun onSaveInstanceState(savedInstanceState: Bundle) {
   super.onSaveInstanceState(savedInstanceState)

   navView.onSaveInstanceState(savedInstanceState)
}

override fun onTrimMemory(level: Int) {
   super.onTrimMemory(level)
   navView.onTrimMemory(level)
}

override fun onStart() {
   super.onStart()
   navView.onStart()
}

override fun onResume() {
   super.onResume()
   navView.onResume()
}

override fun onPause() {
   navView.onPause()
   super.onPause()
}

override fun onConfigurationChanged(configuration: Configuration) {
   super.onConfigurationChanged(configuration)
   navView.onConfigurationChanged(configuration)
}

override fun onStop() {
   navView.onStop()
   super.onStop()
}

override fun onDestroy() {
   navView.onDestroy()
   withNavigatorAsync {
       // Unregister event listeners to avoid memory leaks.
       if (arrivalListener != null) {
           navigator.removeArrivalListener(arrivalListener)
       }
       if (routeChangedListener != null) {
           navigator.removeRouteChangedListener(routeChangedListener)
       }

       navigator.simulator?.unsetUserLocation()
       navigator.cleanup()
   }
   super.onDestroy()
}
9. 设置目的地
现在,您可以设置目的地并开始导航引导了。在 MainActivity.kt 文件中,进行以下更改:
- 添加了一个新的
navigateToPlace()方法,用于设置导航目的地并接受placeId参数。
/**
* Requests directions from the user's current location to a specific place (provided by the
* Place ID).
*/
private fun navigateToPlace(placeId: String) {

}
- 在
navigateToPlace()方法中,使用Waypoint.builder()方法从传递给该方法的地点 ID 创建Waypoint。处理可能会抛出的UnsupportedPlaceIdException,以应对地点 ID 无法解析为确切地址的情况:
val waypoint: Waypoint? =
// Set a destination by using a Place ID (the recommended method)
try {
   Waypoint.builder().setPlaceIdString(placeId).build()
} catch (e: Waypoint.UnsupportedPlaceIdException) {
   showToast("Place ID was unsupported.")
   return
}
- 将以下代码添加到
navigateToPlace()方法中,以使用途经点设置目的地:
val pendingRoute = mNavigator?.setDestination(waypoint)

// Set an action to perform when a route is determined to the destination
pendingRoute?.setOnResultListener { code ->
   when (code) {
       RouteStatus.OK -> {
           // Code to start guidance will go here
       }

       RouteStatus.ROUTE_CANCELED -> showToast("Route guidance canceled.")
       RouteStatus.NO_ROUTE_FOUND,
       RouteStatus.NETWORK_ERROR ->
           // TODO: Add logic to handle when a route could not be determined
           showToast("Error starting guidance: $code")

       else -> showToast("Error starting guidance: $code")
   }
}
Navigator 对象有一个 setDestinations() 方法,该方法可以接受各种参数。最基本的选项是提供 Waypoint。此值将默认为 DRIVING 出行方式,适用于四轮汽车。setDestinations() 方法会返回一个包含 RouteStatus 对象的 ListenableResultFuture 对象。RouteStatus 将指示是否找到了前往目的地的路线,如果没有,则允许您处理各种错误状态。
- 进行其他配置更改,以改善导航用户体验:
// Hide the toolbar to maximize the navigation UI
supportActionBar?.hide()

// Enable voice audio guidance (through the device speaker)
mNavigator?.setAudioGuidance(Navigator.AudioGuidance.VOICE_ALERTS_AND_GUIDANCE)


// Simulate vehicle progress along the route (for demo/debug builds)
if (BuildConfig.DEBUG) {
   mNavigator?.simulator?.simulateLocationsAlongExistingRoute(
       SimulationOptions().speedMultiplier(5f)
   )
}
这些更改包括以下改进:
- 隐藏操作栏,以最大限度地利用空间来显示导航界面。
- 启用音频引导功能,以便系统朗读提醒和导航指示。
- 通过指定速度倍增器来设置模拟器以进行调试。
- 找到将作为目的地的地点 ID。理想情况下,此位置不会离用户位置太远。使用 Google Maps Platform 地点 ID 查找工具或通过 Places API 调用获取地点 ID。
如果您要模拟导航,可以在代码中设置用户位置,也可以从已连接的设备中获取用户位置。此 Codelab 将假定您正在模拟英国伦敦的位置。
- 向
MainActivity类添加一个同伴对象,以存储起始位置和地点 ID。此 Codelab 将使用伦敦的起始位置和特拉法加广场的地点 ID:
companion object{
   const val TRAFALGAR_SQUARE ="ChIJH-tBOc4EdkgRJ8aJ8P1CUxo" //London, UK
   val startLocation = LatLng(51.345678, -0.1234456)
}
- 在
initializeNavigationApi方法内的onNavigatorReady回调中添加对navigateToPlace()方法的调用,并添加将在调试模式下执行的逻辑分支,以设置用户位置:
// Disables the guidance notifications and shuts down the app and background service
// when the user dismisses/swipes away the app from Android's recent tasks.
navigator.setTaskRemovedBehavior(Navigator.TaskRemovedBehavior.QUIT_SERVICE)

mNavigator = navigator

if (BuildConfig.DEBUG) {
   mNavigator?.simulator?.setUserLocation(MainActivity.startLocation)
}
//listen for events en route
registerNavigationListeners()

navView.getMapAsync {
   googleMap  ->
   googleMap.followMyLocation(GoogleMap.CameraPerspective.TILTED)
}

//navigate to a destination
navigateToPlace(MainActivity.TRAFALGAR_SQUARE)
10. 构建并运行代码
首次运行该应用时,您需要向该应用授予位置信息权限,并接受 Navigation SDK 使用条款。
注意:运行应用会调用 setDestinations() 方法,该方法在使用前 1,000 个目的地后会产生费用。如需了解详情,请参阅用量和结算。
设置位置信息
默认情况下,除非您已在代码中或使用模拟器属性对话框设置位置,否则模拟设备的位置可能会设置为加利福尼亚州山景城的 Google 园区。
如果是,您可能会发现应用无法找到前往您配置的地点 ID(默认情况下为澳大利亚悉尼的悉尼歌剧院)的路线。您的 showToast() 方法会显示一条“未找到路线”的消息,指明这一点。

对起始位置进行硬编码
如需在代码中设置其他位置,请在 MainActivity.kt 的 navigateToPlace() 方法中添加以下行,然后再调用 mNavigator.startGuidance():
mNavigator?.simulator?.setUserLocation(startLocation)
在您选择的默认位置启动模拟器
如需在设备模拟器中设置其他位置,请启动模拟器(如果尚未运行),然后点击带有“Extended Controls”(扩展控件)提示信息的 3 点状菜单。随即打开的对话框中包含“位置信息”菜单选项。
例如,如果您使用悉尼歌剧院的地点 ID 作为目的地,请选择澳大利亚悉尼的某个地点。例如,搜索“邦迪海滩”,选择一条建议,然后点击对话框右下角的“保存位置”。您还可以点击“保存点”,将该地点添加到保存的列表中以备将来使用。
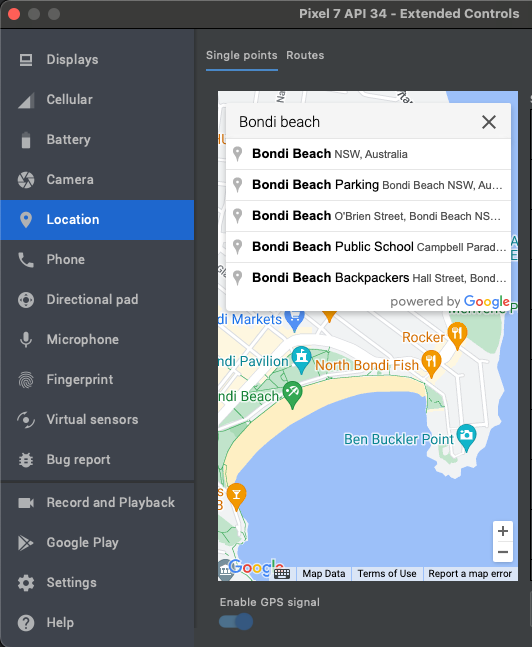
如果您将其他地点 ID 设置为目的地,请选择附近的位置,以便模拟路线是真实的,并且不会太长,方便调试。
重启应用,应用现在应该会导航到目的地。

11. 恭喜!
您已完成此 Codelab。做得好 - 您已抵达目的地!祝您编码愉快 :-)
12. 深入了解
如果您想进一步提升应用开发技能,不妨参考以下主题,从中获取灵感。
- 监听更多导航事件。添加代码,以便在司机改道或到达时显示消息。
- 自定义导航界面。
- 如果您想挑战一下自己,可以尝试添加 Places API Place Picker 控件,以便用户设置目的地。提示:GitHub 上的 Navigation SDK 演示应用具有实现示例。
- 采用 GitHub 上的 Navigation SDK 演示应用中使用的做法,防止在异步调用 Navigator 和 GoogleMap 对象时出现潜在问题。在更复杂的应用场景中,当您的代码运行时,这些对象可能尚未完成初始化。提示:您可以在 MainActivity.kt 文件末尾添加 InitializedNavScope 类,以便快速实现。