About this codelab
1. 准备工作
网站最常用的功能之一是通过 Google 地图突出显示有实体经营场所的商家、机构或其他实体的一个或多个地点。地图的实现方式可能会因各种要求(如地点数量及其更改频率)的不同而千差万别。
在此 Codelab 中,您看到的将是最简单的用例,其中只有几个地点且几乎不会更改,例如一个适用于连锁店商家的店铺定位工具。在这种情况下,您可以使用技术含量相对较低的无需任何服务器端编程的方法。但这并不是说您不能发挥创意,相反,您可利用 GeoJSON 数据格式在地图上存储和呈现每个店铺的任意信息,并自定义地图本身的标记和整体样式,以此展示创造性。
最后,您还可使用 Cloud Shell 来开发和托管您的店铺定位工具。虽然不强制要求使用 Cloud Shell,但它可让您在运行网络浏览器的任何设备上开发并向公众在线提供店铺定位工具。
前提条件
- 具备 HTML 和 JavaScript 方面的基础知识
您应执行的操作
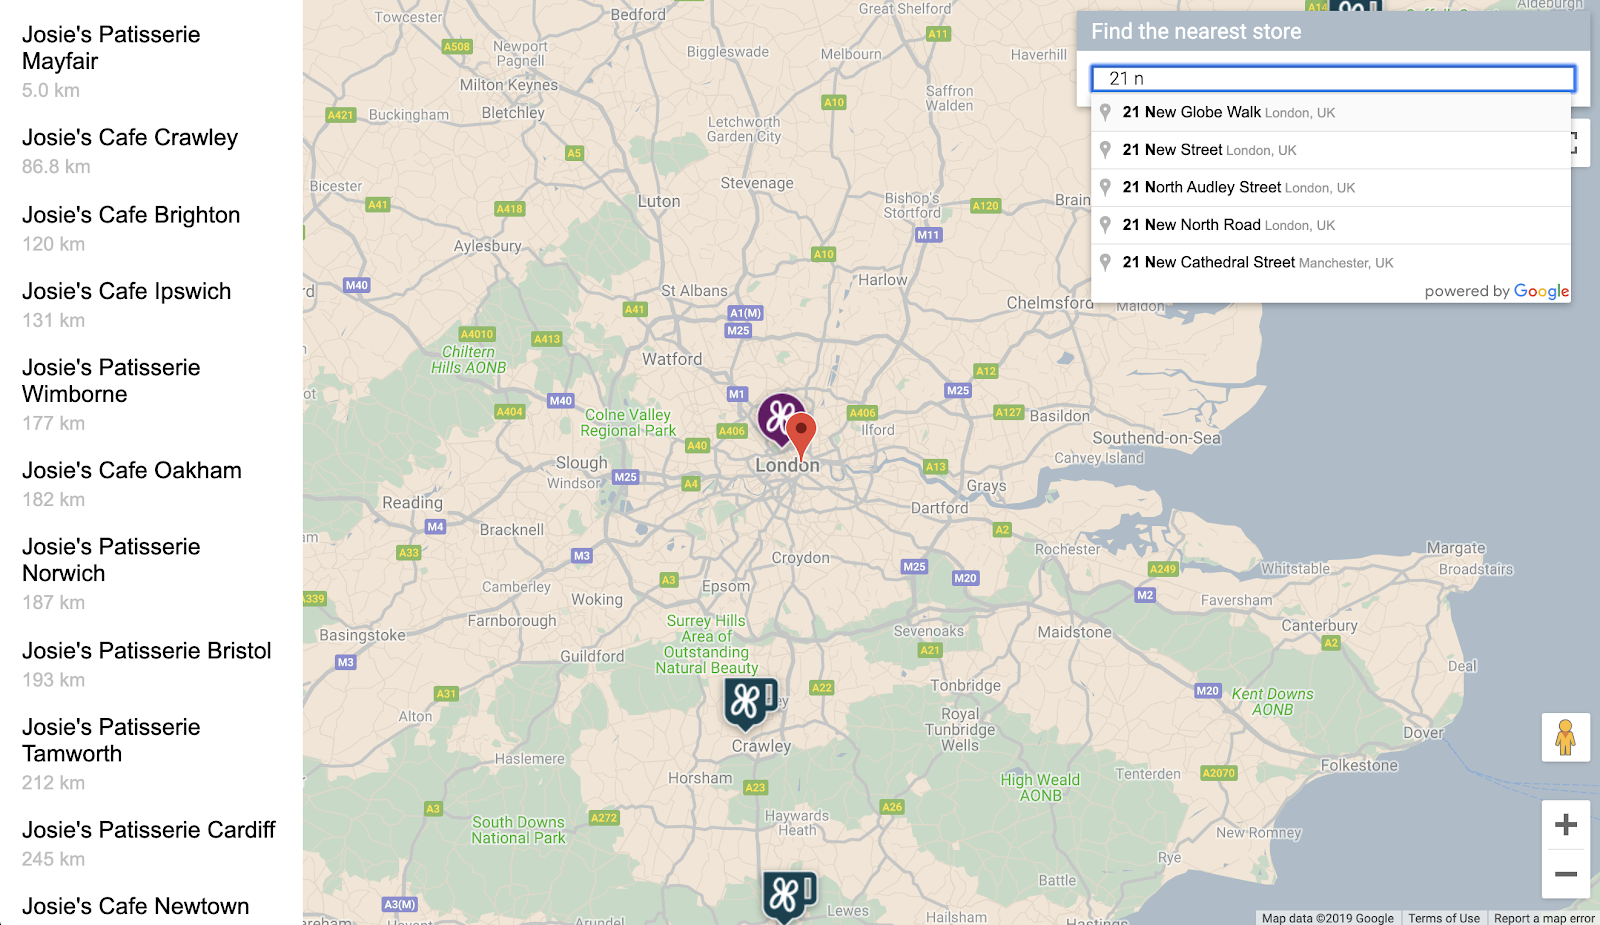
- 显示一个地图,其中包含以 GeoJSON 格式存储的一组店铺营业地点和信息。
- 自定义标记和地图本身。
- 点击店铺标记时,显示与该店铺有关的额外信息。
- 给网页添加一个地点自动补全搜索栏。
- 确定距用户提供的出发地最近的店铺营业地点。
2. 进行设置
在下文的第 3 步中,为此 Codelab 启用以下三个 API:
- Maps JavaScript API
- Places API
- Distance Matrix API
开始使用 Google Maps Platform
如果您之前从未使用过 Google Maps Platform,请参阅 Google Maps Platform 使用入门指南或观看 Google Maps Platform 使用入门播放列表中的视频,完成以下步骤:
- 创建结算帐号。
- 创建项目。
- 启用 Google Maps Platform API 和 SDK(已在上一部分中列出)。
- 生成 API 密钥。
激活 Cloud Shell
在此 Codelab 中,您需要使用 Cloud Shell,这是一种在 Google Cloud 中运行的命令行环境,可用于访问 Google Cloud 上运行的产品和资源,这样您就可以完全在网络浏览器上托管和运行项目了。
如需在 Cloud Console 中激活 Cloud Shell,请点击激活 Cloud Shell  (配置和连接到环境应该只需要片刻时间)。

此时,系统可能会先显示一个介绍性的插页,然后在浏览器的下半部分打开一个新的 shell。

连接到 Cloud Shell 后,您应该会看到自己已通过身份验证,且项目已设为您在设置过程中选择的项目 ID。
$ gcloud auth list
Credentialed Accounts:
ACTIVE  ACCOUNT
  *     <myaccount>@<mydomain>.com
$ gcloud config list project
[core]
project = <YOUR_PROJECT_ID>
如果出于某种原因未设置项目,请运行以下命令:
$ gcloud config set project <YOUR_PROJECT_ID>
3. 地图上的“Hello, World!”项目
开始进行包含地图的开发
在 Cloud Shell 中,您首先要创建一个 HTML 页面,为此 Codelab 的其余部分奠定基础。
- 在 Cloud Shell 的工具栏中,点击打开编辑器
 ,以在新的标签页中打开代码编辑器。
通过这种基于网络的代码编辑器,您可以轻松地在 Cloud Shell 中修改文件。

- 点击文件 > 新建文件夹,以此方式为您的应用在代码编辑器中创建一个新的
store-locator目录。
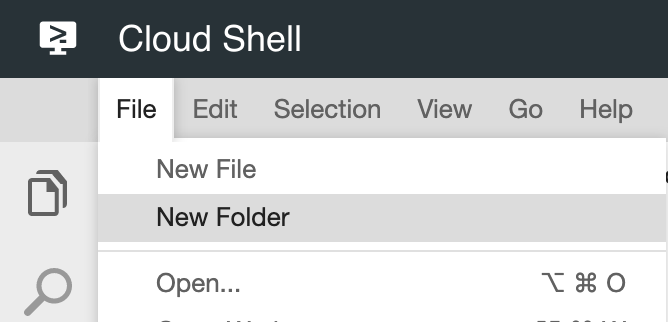
- 将新文件夹命名为
store-locator。
接下来,创建一个包含地图的网页。
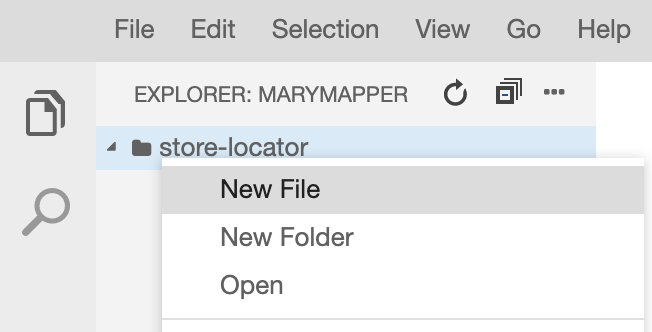
- 在
store-locator目录中创建一个文件,将其命名为index.html。
- 将以下内容放入
index.html文件:
index.html
<html>

<head>
    <title>Store Locator</title>
    <style>
        #map {
            height: 100%;
        }

        html,
        body {
            height: 100%;
            margin: 0;
            padding: 0;
        }
    </style>
</head>

<body>
    <!-- The div to hold the map -->
    <div id="map"></div>

    <script src="app.js"></script>
    <script async defer src="https://maps.googleapis.com/maps/api/js?key=YOUR_API_KEY&libraries=places&callback=initMap&solution_channel=GMP_codelabs_simplestorelocator_v1_a">
    </script>
</body>

</html>
这是用于显示地图的 HTML 页面。其中包含一些用于确保地图在视觉上占据整个页面的 CSS 元素、一个用于保存地图的 <div> 标记和一对 <script> 标记。第一个脚本标记会加载一个名为 app.js 的 JavaScript 文件,其中包含所有 JavaScript 代码。第二个脚本标记会加载 API 密钥,使用地点库来实现稍后将要添加的自动补全功能,并且会指定将在加载 Maps JavaScript API 后运行的 JavaScript 函数的名称,即 initMap。
- 将代码段中的文本
YOUR_API_KEY替换为您之前在此 Codelab 中生成的 API 密钥。 - 最后,使用以下代码创建另一个名为
app.js的文件:
app.js
function initMap() {
   // Create the map.
    const map = new google.maps.Map(document.getElementById('map'), {
        zoom: 7,
        center: { lat: 52.632469, lng: -1.689423 },
    });

}
这是创建地图所需的最基本的代码。通过此代码,您将传入对 <div> 标记的引用以保存地图,并指定中心和缩放级别。
要测试此应用,您可以在 Cloud Shell 中运行简易 Python HTTP 服务器。
- 转到 Cloud Shell,然后输入以下代码:
$ cd store-locator
$ python -m SimpleHTTPServer 8080
您会看到几行日志输出,显示您确实在 Cloud Shell 中运行简易 HTTP 服务器,而 Web 应用在 localhost 端口 8080 进行监听。
- 在 Cloud Console 工具栏中,点击网页预览
 ,然后选择在端口 8080 上预览,从而在此应用上打开网络浏览器标签页。
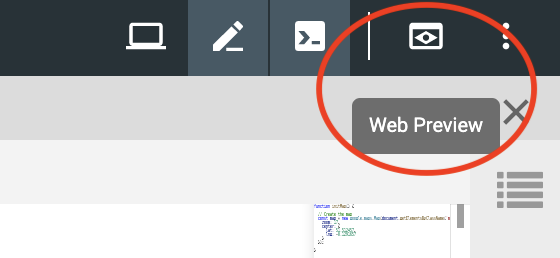
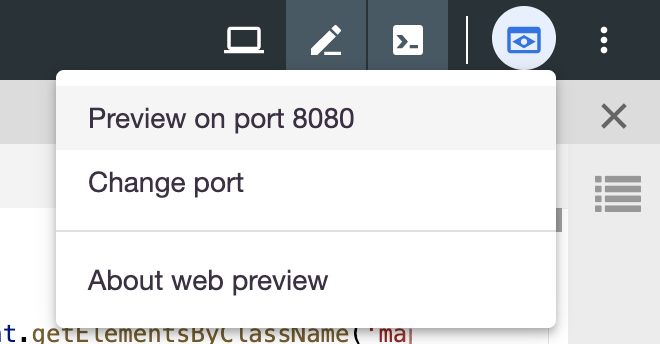
当您点击此菜单项后,系统会在您的网络浏览器中打开一个新标签页,其中包含简易 Python HTTP 服务器提供的 HTML 内容。如果一切顺利,您应该会看到一个以英国伦敦为中心的地图。
要停止简易 HTTP 服务器,请在 Cloud Shell 中按 Control+C。
4. 使用 GeoJSON 填充地图
现在,我们来看看店铺的数据。GeoJSON 是一种数据格式,用于表示简单的地貌,例如地图上的点、线或多边形。这些地图项还可以包含任意数据。这使得 GeoJSON 非常适合用来展示店铺,因为店铺在地图中基本上就是各种点,然后带有一些额外的数据,例如店铺名称、营业时间和电话号码。最重要的是,Google 地图可为 GeoJSON 提供强大的支持,这意味着您可以向 Google 地图发送 GeoJSON 文档,然后文档就会正确地呈现在地图上。
- 创建一个名为
stores.json的新文件,并粘贴以下代码:
stores.json
{
    "type": "FeatureCollection",
    "features": [{
            "geometry": {
                "type": "Point",
                "coordinates": [-0.1428115,
                    51.5125168
                ]
            },
            "type": "Feature",
            "properties": {
                "category": "patisserie",
                "hours": "10am - 6pm",
                "description": "Modern twists on classic pastries. We're part of a larger chain of patisseries and cafes.",
                "name": "Josie's Patisserie Mayfair",
                "phone": "+44 20 1234 5678",
                "storeid": "01"
            }
        },
        {
            "geometry": {
                "type": "Point",
                "coordinates": [-2.579623,
                    51.452251
                ]
            },
            "type": "Feature",
            "properties": {
                "category": "patisserie",
                "hours": "10am - 6pm",
                "description": "Come and try our award-winning cakes and pastries. We're part of a larger chain of patisseries and cafes.",
                "name": "Josie's Patisserie Bristol",
                "phone": "+44 117 121 2121",
                "storeid": "02"
            }
        },
        {
            "geometry": {
                "type": "Point",
                "coordinates": [
                    1.273459,
                    52.638072
                ]
            },
            "type": "Feature",
            "properties": {
                "category": "patisserie",
                "hours": "10am - 6pm",
                "description": "Whatever the occasion, whether it's a birthday or a wedding, Josie's Patisserie has the perfect treat for you. We're part of a larger chain of patisseries and cafes.",
                "name": "Josie's Patisserie Norwich",
                "phone": "+44 1603 123456",
                "storeid": "03"
            }
        },
        {
            "geometry": {
                "type": "Point",
                "coordinates": [-1.9912838,
                    50.8000418
                ]
            },
            "type": "Feature",
            "properties": {
                "category": "patisserie",
                "hours": "10am - 6pm",
                "description": "A gourmet patisserie that will delight your senses. We're part of a larger chain of patisseries and cafes.",
                "name": "Josie's Patisserie Wimborne",
                "phone": "+44 1202 343434",
                "storeid": "04"
            }
        },
        {
            "geometry": {
                "type": "Point",
                "coordinates": [-2.985933,
                    53.408899
                ]
            },
            "type": "Feature",
            "properties": {
                "category": "patisserie",
                "hours": "10am - 6pm",
                "description": "Spoil yourself or someone special with our classic pastries. We're part of a larger chain of patisseries and cafes.",
                "name": "Josie's Patisserie Liverpool",
                "phone": "+44 151 444 4444",
                "storeid": "05"
            }
        },
        {
            "geometry": {
                "type": "Point",
                "coordinates": [-1.689423,
                    52.632469
                ]
            },
            "type": "Feature",
            "properties": {
                "category": "patisserie",
                "hours": "10am - 6pm",
                "description": "Come and feast your eyes and tastebuds on our delicious pastries and cakes. We're part of a larger chain of patisseries and cafes.",
                "name": "Josie's Patisserie Tamworth",
                "phone": "+44 5555 55555",
                "storeid": "06"
            }
        },
        {
            "geometry": {
                "type": "Point",
                "coordinates": [-3.155305,
                    51.479756
                ]
            },
            "type": "Feature",
            "properties": {
                "category": "patisserie",
                "hours": "10am - 6pm",
                "description": "Josie's Patisserie is family-owned, and our delectable pastries, cakes, and great coffee are renowed. We're part of a larger chain of patisseries and cafes.",
                "name": "Josie's Patisserie Cardiff",
                "phone": "+44 29 6666 6666",
                "storeid": "07"
            }
        },
        {
            "geometry": {
                "type": "Point",
                "coordinates": [-0.725019,
                    52.668891
                ]
            },
            "type": "Feature",
            "properties": {
                "category": "cafe",
                "hours": "8am - 9:30pm",
                "description": "Oakham's favorite spot for fresh coffee and delicious cakes. We're part of a larger chain of patisseries and cafes.",
                "name": "Josie's Cafe Oakham",
                "phone": "+44 7777 777777",
                "storeid": "08"
            }
        },
        {
            "geometry": {
                "type": "Point",
                "coordinates": [-2.477653,
                    53.735405
                ]
            },
            "type": "Feature",
            "properties": {
                "category": "cafe",
                "hours": "8am - 9:30pm",
                "description": "Enjoy freshly brewed coffe, and home baked cakes in our homely cafe. We're part of a larger chain of patisseries and cafes.",
                "name": "Josie's Cafe Blackburn",
                "phone": "+44 8888 88888",
                "storeid": "09"
            }
        },
        {
            "geometry": {
                "type": "Point",
                "coordinates": [-0.211363,
                    51.108966
                ]
            },
            "type": "Feature",
            "properties": {
                "category": "cafe",
                "hours": "8am - 9:30pm",
                "description": "A delicious array of pastries with many flavours, and fresh coffee in an snug cafe. We're part of a larger chain of patisseries and cafes.",
                "name": "Josie's Cafe Crawley",
                "phone": "+44 1010 101010",
                "storeid": "10"
            }
        },
        {
            "geometry": {
                "type": "Point",
                "coordinates": [-0.123559,
                    50.832679
                ]
            },
            "type": "Feature",
            "properties": {
                "category": "cafe",
                "hours": "8am - 9:30pm",
                "description": "Grab a freshly brewed coffee, a decadent cake and relax in our idyllic cafe. We're part of a larger chain of patisseries and cafes.",
                "name": "Josie's Cafe Brighton",
                "phone": "+44 1313 131313",
                "storeid": "11"
            }
        },
        {
            "geometry": {
                "type": "Point",
                "coordinates": [-3.319575,
                    52.517827
                ]
            },
            "type": "Feature",
            "properties": {
                "category": "cafe",
                "hours": "8am - 9:30pm",
                "description": "Come in and unwind at this idyllic cafe with fresh coffee and home made cakes. We're part of a larger chain of patisseries and cafes.",
                "name": "Josie's Cafe Newtown",
                "phone": "+44 1414 141414",
                "storeid": "12"
            }
        },
        {
            "geometry": {
                "type": "Point",
                "coordinates": [
                    1.158167,
                    52.071634
                ]
            },
            "type": "Feature",
            "properties": {
                "category": "cafe",
                "hours": "8am - 9:30pm",
                "description": "Fresh coffee and delicious cakes in an snug cafe. We're part of a larger chain of patisseries and cafes.",
                "name": "Josie's Cafe Ipswich",
                "phone": "+44 1717 17171",
                "storeid": "13"
            }
        }
    ]
}
这里的数据非常多,但如果仔细研读,您会发现,其实数据结构都是相同的,只是针对每个店铺重复套用而已。每个店铺都是由一个带坐标数据的 GeoJSON Point 以及包含在 properties 键下的额外数据来表示的。有趣的是,GeoJSON 允许在 properties 键下添加以任意名称命名的键。在此 Codelab 中,这些键分别为 category、hours、description、name 和 phone。
- 现在修改
app.js,以便将stores.js中的 GeoJSON 加载到您的地图中。
app.js
function initMap() {
  // Create the map.
  const map = new google.maps.Map(document.getElementById('map'), {
    zoom: 7,
    center: {lat: 52.632469, lng: -1.689423},
  });

  // Load the stores GeoJSON onto the map.
  map.data.loadGeoJson('stores.json', {idPropertyName: 'storeid'});

  const apiKey = 'YOUR_API_KEY';
  const infoWindow = new google.maps.InfoWindow();

  // Show the information for a store when its marker is clicked.
  map.data.addListener('click', (event) => {
    const category = event.feature.getProperty('category');
    const name = event.feature.getProperty('name');
    const description = event.feature.getProperty('description');
    const hours = event.feature.getProperty('hours');
    const phone = event.feature.getProperty('phone');
    const position = event.feature.getGeometry().get();
    const content = `
      <h2>${name}</h2><p>${description}</p>
      <p><b>Open:</b> ${hours}<br/><b>Phone:</b> ${phone}</p>
    `;

    infoWindow.setContent(content);
    infoWindow.setPosition(position);
    infoWindow.setOptions({pixelOffset: new google.maps.Size(0, -30)});
    infoWindow.open(map);
  });
}
在代码示例中,您已通过调用 loadGeoJson 并传递 JSON 文件的名称,将 GeoJSON 加载到地图中。您还定义了一个每次用户点击标记时都会运行的函数。该函数接着会访问所点击标记的店铺的额外数据,并在显示的信息窗口中使用这些信息。要测试此应用,您可以使用与之前相同的命令运行简易 Python HTTP 服务器。
- 返回 Cloud Shell,然后输入以下代码:
$ python -m SimpleHTTPServer 8080
- 再次点击网页预览
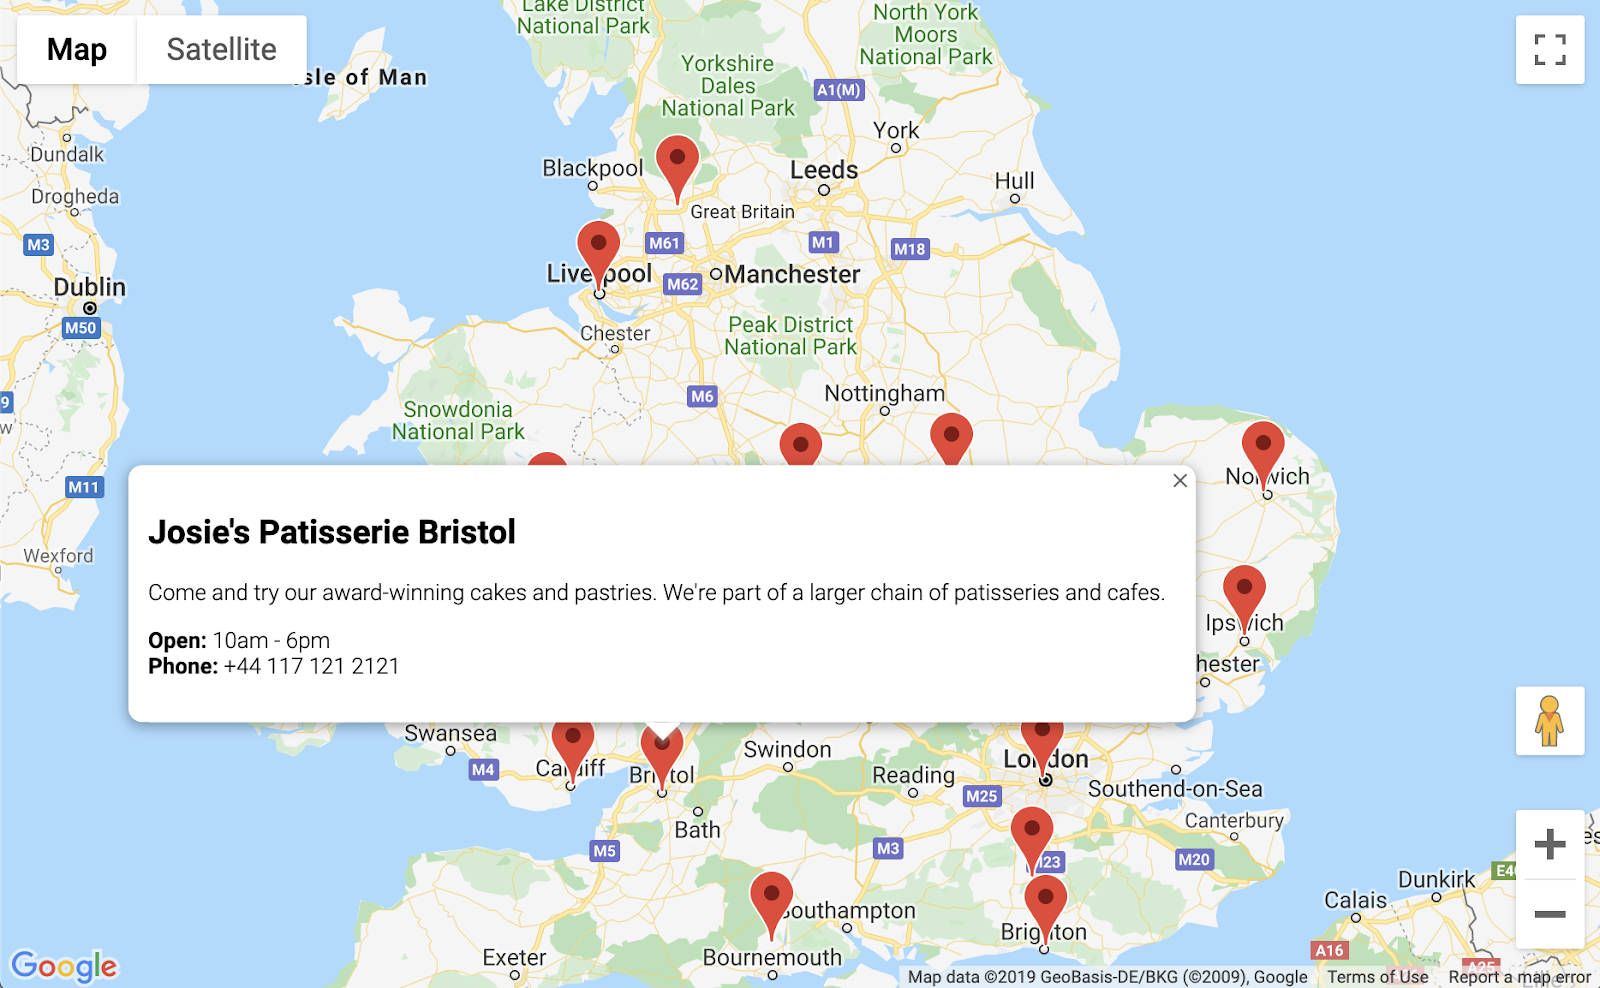
 > 在端口 8080 上预览,您应该会看到一个布满标记的地图,并可点击标记查看每个店铺的详细信息,如下例所示。进展不错!
5. 自定义地图
即将大功告成。现在,您拥有了一个地图,其中包含所有的店铺标记以及会在点击标记后显示的额外信息。但是,它看上去与其他 Google 地图太像了。太平淡无奇了!不妨试试自定义地图样式、标记、徽标和街景图像,给它装饰一番。
以下是添加了自定义样式的新版 app.js:
app.js
const mapStyle = [{
  'featureType': 'administrative',
  'elementType': 'all',
  'stylers': [{
    'visibility': 'on',
  },
  {
    'lightness': 33,
  },
  ],
},
{
  'featureType': 'landscape',
  'elementType': 'all',
  'stylers': [{
    'color': '#f2e5d4',
  }],
},
{
  'featureType': 'poi.park',
  'elementType': 'geometry',
  'stylers': [{
    'color': '#c5dac6',
  }],
},
{
  'featureType': 'poi.park',
  'elementType': 'labels',
  'stylers': [{
    'visibility': 'on',
  },
  {
    'lightness': 20,
  },
  ],
},
{
  'featureType': 'road',
  'elementType': 'all',
  'stylers': [{
    'lightness': 20,
  }],
},
{
  'featureType': 'road.highway',
  'elementType': 'geometry',
  'stylers': [{
    'color': '#c5c6c6',
  }],
},
{
  'featureType': 'road.arterial',
  'elementType': 'geometry',
  'stylers': [{
    'color': '#e4d7c6',
  }],
},
{
  'featureType': 'road.local',
  'elementType': 'geometry',
  'stylers': [{
    'color': '#fbfaf7',
  }],
},
{
  'featureType': 'water',
  'elementType': 'all',
  'stylers': [{
    'visibility': 'on',
  },
  {
    'color': '#acbcc9',
  },
  ],
},
];

function initMap() {
  // Create the map.
  const map = new google.maps.Map(document.getElementById('map'), {
    zoom: 7,
    center: {lat: 52.632469, lng: -1.689423},
    styles: mapStyle,
  });

  // Load the stores GeoJSON onto the map.
  map.data.loadGeoJson('stores.json', {idPropertyName: 'storeid'});

  // Define the custom marker icons, using the store's "category".
  map.data.setStyle((feature) => {
    return {
      icon: {
        url: `img/icon_${feature.getProperty('category')}.png`,
        scaledSize: new google.maps.Size(64, 64),
      },
    };
  });

  const apiKey = 'YOUR_API_KEY';
  const infoWindow = new google.maps.InfoWindow();

  // Show the information for a store when its marker is clicked.
  map.data.addListener('click', (event) => {
    const category = event.feature.getProperty('category');
    const name = event.feature.getProperty('name');
    const description = event.feature.getProperty('description');
    const hours = event.feature.getProperty('hours');
    const phone = event.feature.getProperty('phone');
    const position = event.feature.getGeometry().get();
    const content = `
      <img style="float:left; width:200px; margin-top:30px" src="img/logo_${category}.png">
      <div style="margin-left:220px; margin-bottom:20px;">
        <h2>${name}</h2><p>${description}</p>
        <p><b>Open:</b> ${hours}<br/><b>Phone:</b> ${phone}</p>
        <p><img src="https://maps.googleapis.com/maps/api/streetview?size=350x120&location=${position.lat()},${position.lng()}&key=${apiKey}&solution_channel=GMP_codelabs_simplestorelocator_v1_a"></p>
      </div>
      `;

    infoWindow.setContent(content);
    infoWindow.setPosition(position);
    infoWindow.setOptions({pixelOffset: new google.maps.Size(0, -30)});
    infoWindow.open(map);
  });

}
以下是您添加的内容:
mapStyle变量包含的是设置地图样式的所有信息。(此外,如有需要,您甚至还可以创建自己的样式。)- 通过使用
map.data.setStyle方法,您应用了自定义标记,即 GeoJSON 中的每个category都有不同的标记。 - 您修改了
content变量,使之包括徽标(再次通过使用 GeoJSON 中的category完成)和店铺营业地点的街景图像。
在部署此次变更前,您需要先完成如下几个步骤:
- 为
apiKey变量设置正确的值,具体做法是将app.js中的'YOUR_API_KEY'字符串替换为之前您自己的 API 密钥(即您在index.html中粘贴的同一个密钥,引号保留不变)。 - 在 Cloud Shell 中运行以下命令,以下载标记和徽标图形。确保您位于
store-locator目录中。如果简易 HTTP 服务器仍在运行,请使用Control+C将其停止。
$ mkdir -p img; cd img
$ wget https://github.com/googlecodelabs/google-maps-simple-store-locator/raw/master/src/img/icon_cafe.png
$ wget https://github.com/googlecodelabs/google-maps-simple-store-locator/raw/master/src/img/icon_patisserie.png
$ wget https://github.com/googlecodelabs/google-maps-simple-store-locator/raw/master/src/img/logo_cafe.png
$ wget https://github.com/googlecodelabs/google-maps-simple-store-locator/raw/master/src/img/logo_patisserie.png
- 运行以下命令,以预览完成的店铺定位工具:
$ python -m SimpleHTTPServer 8080
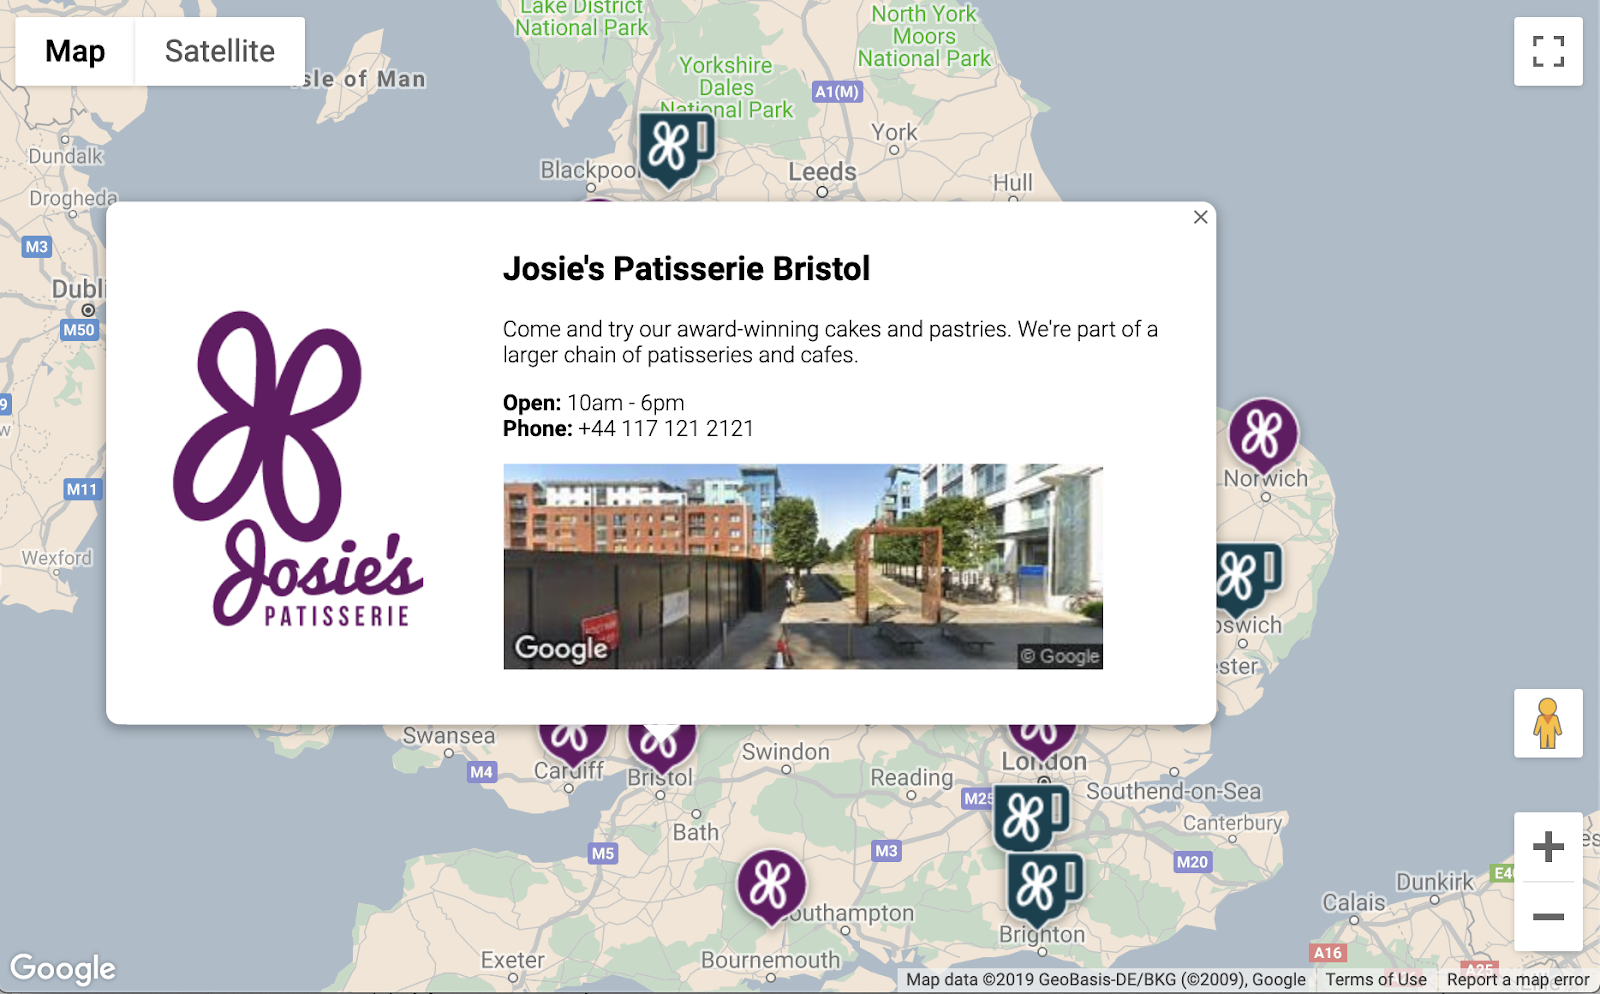
重新加载预览时,您应看到类似如下所示的地图,其中会展示自定义样式设置、自定义标记图片、改进后的信息窗口格式和每个营业地点的街景图像。
6. 获取用户输入内容
店铺定位工具的用户通常希望了解哪家店铺距其最近,或距其计划出发的地址最近。添加地点自动补全搜索栏,以便用户轻松输入出发点地址。地点自动补全会提供预先输入功能,它非常类似于自动补全在其他 Google 搜索栏中的工作方式,只不过预测的内容都是 Google Maps Platform 中的地点。
- 返回修改
index.html,以便为自动补全搜索栏和结果的侧边栏添加样式。如果您要粘贴到旧代码中,请别忘了替换您的 API 密钥。
index.html
<html>

<head>
  <title>Store Locator</title>
  <style>
    #map {
      height: 100%;
    }

    html,
    body {
      height: 100%;
      margin: 0;
      padding: 0;
    }

    /* Styling for Autocomplete search bar */
    #pac-card {
      background-color: #fff;
      border-radius: 2px 0 0 2px;
      box-shadow: 0 2px 6px rgba(0, 0, 0, 0.3);
      box-sizing: border-box;
      font-family: Roboto;
      margin: 10px 10px 0 0;
      -moz-box-sizing: border-box;
      outline: none;
    }

    #pac-container {
      padding-top: 12px;
      padding-bottom: 12px;
      margin-right: 12px;
    }

    #pac-input {
      background-color: #fff;
      font-family: Roboto;
      font-size: 15px;
      font-weight: 300;
      margin-left: 12px;
      padding: 0 11px 0 13px;
      text-overflow: ellipsis;
      width: 400px;
    }

    #pac-input:focus {
      border-color: #4d90fe;
    }

    #title {
      color: #fff;
      background-color: #acbcc9;
      font-size: 18px;
      font-weight: 400;
      padding: 6px 12px;
    }

    .hidden {
      display: none;
    }

    /* Styling for an info pane that slides out from the left.
     * Hidden by default. */
    #panel {
      height: 100%;
      width: null;
      background-color: white;
      position: fixed;
      z-index: 1;
      overflow-x: hidden;
      transition: all .2s ease-out;
    }

    .open {
      width: 250px;
    }

    .place {
      font-family: 'open sans', arial, sans-serif;
      font-size: 1.2em;
      font-weight: 500;
      margin-block-end: 0px;
      padding-left: 18px;
      padding-right: 18px;
    }

    .distanceText {
      color: silver;
      font-family: 'open sans', arial, sans-serif;
      font-size: 1em;
      font-weight: 400;
      margin-block-start: 0.25em;
      padding-left: 18px;
      padding-right: 18px;
    }
  </style>
</head>

<body>
  <!-- The div to hold the map -->
  <div id="map"></div>

  <script src="app.js"></script>
  <script async defer src="https://maps.googleapis.com/maps/api/js?key=YOUR_API_KEY&libraries=places&callback=initMap&solution_channel=GMP_codelabs_simplestorelocator_v1_a">
  </script>
</body>

</html>
自动补全搜索栏和滑出式侧边栏最初都是隐藏状态,仅在需要时才会显示出来。
- 现在,将自动补全微件添加到
app.js中的initMap函数末尾的地图上,紧挨着放置在右侧大括号前。
app.js
  // Build and add the search bar
  const card = document.createElement('div');
  const titleBar = document.createElement('div');
  const title = document.createElement('div');
  const container = document.createElement('div');
  const input = document.createElement('input');
  const options = {
    types: ['address'],
    componentRestrictions: {country: 'gb'},
  };

  card.setAttribute('id', 'pac-card');
  title.setAttribute('id', 'title');
  title.textContent = 'Find the nearest store';
  titleBar.appendChild(title);
  container.setAttribute('id', 'pac-container');
  input.setAttribute('id', 'pac-input');
  input.setAttribute('type', 'text');
  input.setAttribute('placeholder', 'Enter an address');
  container.appendChild(input);
  card.appendChild(titleBar);
  card.appendChild(container);
  map.controls[google.maps.ControlPosition.TOP_RIGHT].push(card);

  // Make the search bar into a Places Autocomplete search bar and select
  // which detail fields should be returned about the place that
  // the user selects from the suggestions.
  const autocomplete = new google.maps.places.Autocomplete(input, options);

  autocomplete.setFields(
      ['address_components', 'geometry', 'name']);
上述代码会对自动补全建议进行限制,使之仅返回地址(因为地点自动补全功能会针对机构名称和管理位置进行匹配),并将返回的地址限制为英国境内的地址。添加这些可选规范有助于减少用户需要输入的字符数,以便缩小预测范围,显示他们要查找的地址。然后,将您创建的自动补全 div 移到地图的右上角,并指定应在响应中返回各个地点的哪些字段。
- 请运行以下命令重启服务器,然后刷新预览:
$ python -m SimpleHTTPServer 8080
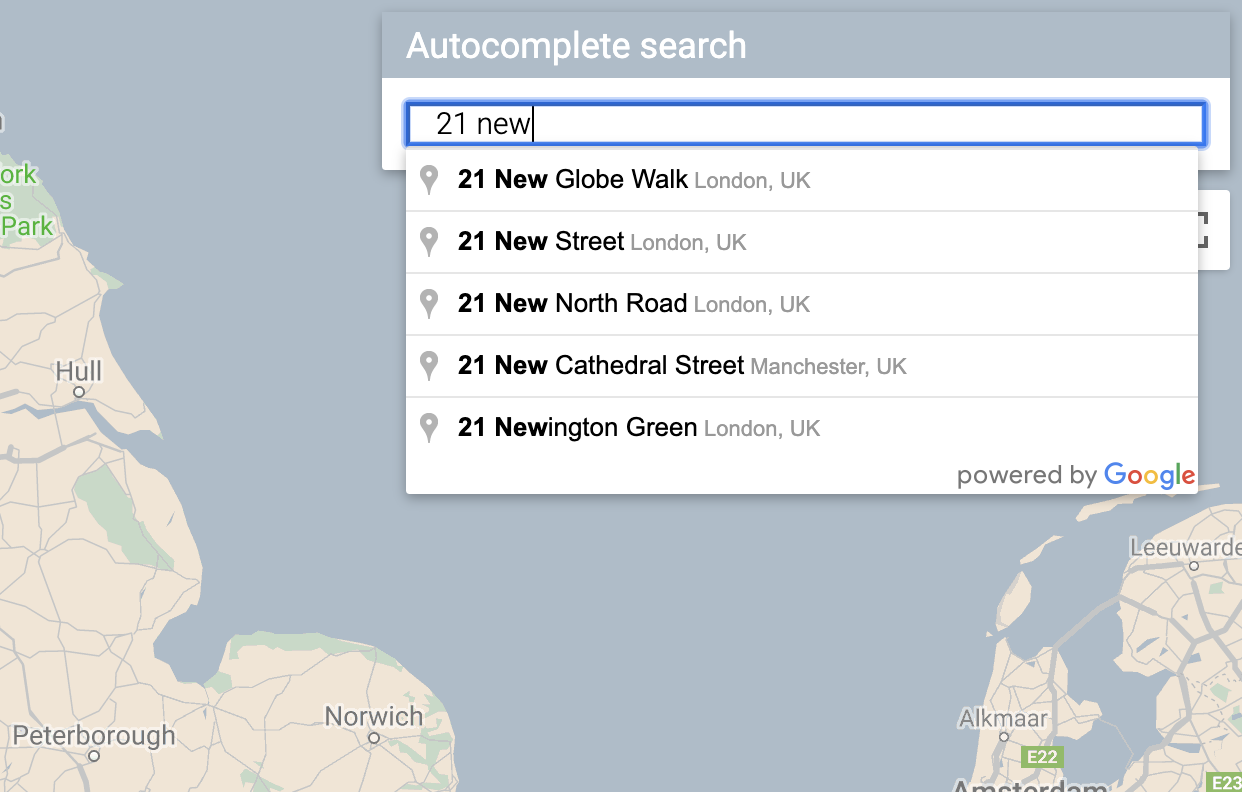
现在,您应该会在地图右上角看到自动补全微件,其中显示了与您输入的内容匹配的英国地址。
现在,您需要处理以下情况:用户从自动补全微件中选择预测地点后,以该地点为基础计算到您店铺的距离。
- 将以下代码添加到
app.js中initMap的末尾,并置于您刚刚粘贴的代码后面。
app.js
 // Set the origin point when the user selects an address
  const originMarker = new google.maps.Marker({map: map});
  originMarker.setVisible(false);
  let originLocation = map.getCenter();

  autocomplete.addListener('place_changed', async () => {
    originMarker.setVisible(false);
    originLocation = map.getCenter();
    const place = autocomplete.getPlace();

    if (!place.geometry) {
      // User entered the name of a Place that was not suggested and
      // pressed the Enter key, or the Place Details request failed.
      window.alert('No address available for input: \'' + place.name + '\'');
      return;
    }

    // Recenter the map to the selected address
    originLocation = place.geometry.location;
    map.setCenter(originLocation);
    map.setZoom(9);
    console.log(place);

    originMarker.setPosition(originLocation);
    originMarker.setVisible(true);

    // Use the selected address as the origin to calculate distances
    // to each of the store locations
    const rankedStores = await calculateDistances(map.data, originLocation);
    showStoresList(map.data, rankedStores);

    return;
  });
上述代码将添加一个监听器,以便在用户点击某个建议的地点时,地图能重新将所选地址设为中心,并以出发地为基础计算距离。您将在下一步中实现距离计算。
7. 列出距离最近的店铺
Directions API 的工作方式非常类似于在 Google 地图应用中请求路线,即输入一个出发地和一个目的地,然后获取两地之间的路线。Distance Matrix API 进一步深化了此概念,力求根据行程时间和距离,确定多个可能的出发地与多个可能的目的地之间的最优配对。在这种情况下,为帮助用户找到距离所选地址最近的店铺,您需要提供一个出发地以及一组作为目的地的店铺营业地点。
- 向
app.js添加一个名为calculateDistances的新函数。
app.js
async function calculateDistances(data, origin) {
  const stores = [];
  const destinations = [];

  // Build parallel arrays for the store IDs and destinations
  data.forEach((store) => {
    const storeNum = store.getProperty('storeid');
    const storeLoc = store.getGeometry().get();

    stores.push(storeNum);
    destinations.push(storeLoc);
  });

  // Retrieve the distances of each store from the origin
  // The returned list will be in the same order as the destinations list
  const service = new google.maps.DistanceMatrixService();
  const getDistanceMatrix =
    (service, parameters) => new Promise((resolve, reject) => {
      service.getDistanceMatrix(parameters, (response, status) => {
        if (status != google.maps.DistanceMatrixStatus.OK) {
          reject(response);
        } else {
          const distances = [];
          const results = response.rows[0].elements;
          for (let j = 0; j < results.length; j++) {
            const element = results[j];
            const distanceText = element.distance.text;
            const distanceVal = element.distance.value;
            const distanceObject = {
              storeid: stores[j],
              distanceText: distanceText,
              distanceVal: distanceVal,
            };
            distances.push(distanceObject);
          }

          resolve(distances);
        }
      });
    });

  const distancesList = await getDistanceMatrix(service, {
    origins: [origin],
    destinations: destinations,
    travelMode: 'DRIVING',
    unitSystem: google.maps.UnitSystem.METRIC,
  });

  distancesList.sort((first, second) => {
    return first.distanceVal - second.distanceVal;
  });

  return distancesList;
}
该函数会调用 Distance Matrix API,将其收到的出发地用作一个出发地,并将店铺位置用作一组目的地。然后,它会构建一个对象数组,用于存储店铺的 ID、以用户可理解的字符串表示的距离、数值形式的距离(以米为单位),然后对该数组进行排序。
用户往往希望看到一个按从近到远的顺序排列的店铺列表。此时,可使用 calculateDistances 函数返回的列表填充每个店铺的侧边栏列表,以指明店铺的显示顺序。
- 向
app.js添加一个名为showStoresList的新函数。
app.js
function showStoresList(data, stores) {
  if (stores.length == 0) {
    console.log('empty stores');
    return;
  }

  let panel = document.createElement('div');
  // If the panel already exists, use it. Else, create it and add to the page.
  if (document.getElementById('panel')) {
    panel = document.getElementById('panel');
    // If panel is already open, close it
    if (panel.classList.contains('open')) {
      panel.classList.remove('open');
    }
  } else {
    panel.setAttribute('id', 'panel');
    const body = document.body;
    body.insertBefore(panel, body.childNodes[0]);
  }

  // Clear the previous details
  while (panel.lastChild) {
    panel.removeChild(panel.lastChild);
  }

  stores.forEach((store) => {
    // Add store details with text formatting
    const name = document.createElement('p');
    name.classList.add('place');
    const currentStore = data.getFeatureById(store.storeid);
    name.textContent = currentStore.getProperty('name');
    panel.appendChild(name);
    const distanceText = document.createElement('p');
    distanceText.classList.add('distanceText');
    distanceText.textContent = store.distanceText;
    panel.appendChild(distanceText);
  });

  // Open the panel
  panel.classList.add('open');

  return;
}
- 请运行以下命令重启服务器,然后刷新预览。
$ python -m SimpleHTTPServer 8080
- 最后,在自动补全搜索栏中输入一个英国地址,然后点击其中一个建议的地点。
地图应以该地址为中心,且应显示一个侧边栏,其中会按照与选定地址的距离顺序列出店铺营业地点。下图显示了一个示例:

8. 可选:托管您的网页
到目前为止,您只能在主动运行 Python HTTP 服务器时查看地图。要在活跃的 Cloud Shell 会话之外查看您的地图,或希望能与他人分享您地图的网址,请尝试使用 Cloud Storage 来托管您的网页。Cloud Storage 是一种在线文件存储网络服务,用于在 Google 的基础架构上存储和访问数据。该服务结合了 Google Cloud 的性能和可扩展性与高级安全和共享功能。它还提供免费层级,这使得它非常适合托管您的简单店铺定位工具。
借助 Cloud Storage,文件可存储在存储分区中,这非常类似于计算机上的目录。要托管网页,您首先需要创建一个存储分区。您需要为存储分区选择一个唯一名称,或许可将您的名字用作存储分区名称的一部分。
- 确定完名称后,请在 Cloud Shell 中运行以下命令:
$ gsutil mb gs://yourname-store-locator
gsutil 是用于与 Cloud Storage 进行交互的工具。mb 命令是“make bucket”(创建存储分区)的创意缩写。如需详细了解所有可用的命令,包括您使用的命令,请参阅 gsutil 工具。
默认情况下,您在 Cloud Storage 上托管的存储分区以及文件是不公开的。但是,对于您的店铺定位工具而言,您会希望所有文件都是公开的,这样所有人就可以通过互联网访问它们。您可以在上传每个文件后将其公开,但这种做法会比较繁琐。相反,您只需为已创建的存储分区设置默认访问权限级别,然后,您上传到其中的所有文件就会沿用该访问权限级别。
- 请运行以下命令,但将
yourname-store-locator替换为您为存储分区选择的名称:
$ gsutil defacl ch -u AllUsers:R gs://yourname-store-locator
- 现在,您可以使用以下命令上传当前目录中的所有文件(当前只有
index.html和app.js文件):
$ gsutil -h "Cache-Control:no-cache" cp * gs://yourname-store-locator
现在,您应该拥有了一个包含在线地图的网页。该网页的查看网址为 http://storage.googleapis.com/yourname-store-locator/index.html,请再次将 yourname-store-locator 部分替换为您之前选择的存储分区名称。
清理
要清理此项目中创建的所有资源,最简单的方式是关停您在本教程开始时创建的 Google Cloud 项目。具体步骤如下:
- 在 Cloud Console 中,打开“设置”页面。
- 点击选择项目。
- 选择您在本教程开始时创建的项目,然后点击打开
- 输入项目 ID,然后点击关停。
9. 恭喜
恭喜!您已完成此 Codelab。
所学内容
- 通过 Maps JavaScript API 添加自定样式的地图
- 以 GeoJSON 格式将数据层加载到地图中
- 通过 Street View Static API 在网页中显示街景图像
- 使用 Places Library 将地点自动补全搜索栏添加到页面上
- 使用距离矩阵服务通过一次 API 调用计算多个距离
- 使用基于浏览器的 Cloud Shell 命令行界面,在 Google Cloud Platform 中管理和测试网络开发项目
- 通过 Cloud Storage 托管网站
了解更多内容
- 在绘制纽约市地铁地图的 Codelab 中,学习另一种使用 Google App Engine 托管网页地图的方式。
- 探索更多 Google Maps Platform Codelab,例如构建附近商家搜索服务。
- 请回答下面的问题,帮助我们为您制作最为有用的内容:
您还想查看其他哪些 Codelab?
上面没有列出您希望了解的 Codelab?没关系,请在此处通过创建新问题的方式申请 Codelab。
如果您想更深入地了解代码,请访问 https://github.com/googlecodelabs/google-maps-simple-store-locator 查看源代码库。
