
1. 簡介
Flutter 是 Google 的行動應用程式 SDK,可協助你以空前的速度為 iOS 和 Android 裝置打造優質原生體驗。
有了 Google Maps Flutter 外掛程式,您就能在應用程式中加入以 Google 地圖資料為依據的地圖。這個外掛程式會自動處理對 Google 地圖伺服器的存取、地圖顯示作業,以及對點擊和拖曳等使用者手勢的回應。您也可以在地圖中加入標記。這些物件提供有關地圖位置的額外資訊,並允許使用者與地圖互動。
建構項目
在本程式碼研究室中,您將使用 Flutter SDK 建構內含 Google 地圖的行動應用程式。您的應用程式將會:
|
|
什麼是 Flutter?
Flutter 有三項核心功能。
- 快速開發:使用 Stateful Hot Reload 技術,在數毫秒內建構您的 Android 和 iOS 應用程式。
- 豐富且靈活:快速推出功能,以原生使用者體驗為主。
- iOS 和 Android 兩者的原生效能:Flutter 的小工具結合了所有重要的平台差異 (例如捲動、導覽、圖示和字型),提供完整的原生效能。
「Google 地圖」具備:
- 全球達 99% 的服務範圍:運用可靠且詳盡的資料建立服務,範圍涵蓋 200 多個國家/地區。
- 每日 2, 500 萬次更新:準確可靠的即時位置資訊,
- 每月 10 億名每月活躍使用者:藉助 Google 地圖的支持,放心拓展事業基礎架構
本程式碼研究室將引導您在 iOS 和 Android 適用的 Flutter 應用程式中,建立 Google 地圖體驗。
課程內容
- 如何建立新的 Flutter 應用程式。
- 如何設定 Google Maps Flutter 外掛程式。
- 如何使用 Web 服務的位置資料在地圖中加入標記。
本程式碼研究室著重於將 Google 地圖新增至 Flutter 應用程式。我們不會對與本主題無關的概念和程式碼區塊做介紹,但會事先準備好這些程式碼區塊,屆時您只要複製及貼上即可。
您希望從本程式碼研究室學到什麼?
2. 設定 Flutter 環境
您需要使用兩項軟體來完成這項研究室:Flutter SDK 和編輯器。本程式碼研究室假設使用 Android Studio,但您可以使用偏好的編輯器。
您可以使用下列任一裝置執行本程式碼研究室:
- 連至電腦並設為開發人員模式的實體裝置 (Android 或 iOS)。
- iOS 模擬工具。(需要安裝 Xcode 工具)。
- Android 模擬器。(需要在 Android Studio 中設定)。
3. 開始使用
開始使用 Flutter
如要開始使用 Flutter,最簡單的方法就是運用 flutter 指令列工具建立所有必要程式碼,以便輕鬆上手。
$ flutter create google_maps_in_flutter --platforms android,ios,web
Creating project google_maps_in_flutter...
Resolving dependencies in `google_maps_in_flutter`...
Downloading packages...
Got dependencies in `google_maps_in_flutter`.
Wrote 81 files.

All done!
You can find general documentation for Flutter at: https://docs.flutter.dev/
Detailed API documentation is available at: https://api.flutter.dev/
If you prefer video documentation, consider: https://www.youtube.com/c/flutterdev

In order to run your application, type:

  $ cd google_maps_in_flutter
  $ flutter run

Your application code is in google_maps_in_flutter/lib/main.dart.
將 Google Maps Flutter 外掛程式新增為依附元件
使用 Pub 套件輕鬆為 Flutter 應用程式新增額外功能。在本程式碼研究室中,您從專案目錄執行下列指令,以介紹 Google Maps Flutter 外掛程式。
$ cd google_maps_in_flutter
$ flutter pub add google_maps_flutter
Resolving dependencies...
Downloading packages...
+ csslib 1.0.0
+ flutter_plugin_android_lifecycle 2.0.19
+ flutter_web_plugins 0.0.0 from sdk flutter
+ google_maps 7.1.0
+ google_maps_flutter 2.6.1
+ google_maps_flutter_android 2.8.0
+ google_maps_flutter_ios 2.6.0
+ google_maps_flutter_platform_interface 2.6.0
+ google_maps_flutter_web 0.5.7
+ html 0.15.4
+ js 0.6.7 (0.7.1 available)
+ js_wrapping 0.7.4
  leak_tracker 10.0.4 (10.0.5 available)
  leak_tracker_flutter_testing 3.0.3 (3.0.5 available)
  material_color_utilities 0.8.0 (0.11.1 available)
  meta 1.12.0 (1.14.0 available)
+ plugin_platform_interface 2.1.8
+ sanitize_html 2.1.0
+ stream_transform 2.1.0
  test_api 0.7.0 (0.7.1 available)
+ web 0.5.1
Changed 16 dependencies!
6 packages have newer versions incompatible with dependency constraints.
Try `flutter pub outdated` for more information.
設定 iOS platform
如要取得 iOS 版的最新版 Google Maps SDK,必須使用 iOS 14 以上的平台版本。按照下列方式修改 ios/Podfile 設定檔的頂端。
ios/Podfile
# Google Maps SDK requires platform version 14
# https://developers.google.com/maps/flutter-package/config#ios
platform :ios, '14.0'


# CocoaPods analytics sends network stats synchronously affecting flutter build latency.
ENV['COCOAPODS_DISABLE_STATS'] = 'true'
設定 Android minSDK
如要在 Android 上使用 Google Maps SDK,請將 minSdk 設為 21。按照下列方式修改 android/app/build.gradle 設定檔。
android/app/build.gradle
android {
    defaultConfig {
        // TODO: Specify your own unique Application ID (https://developer.android.com/studio/build/application-id.html).
        applicationId = "com.example.google_maps_in_flutter"
        // Minimum Android version for Google Maps SDK
        // https://developers.google.com/maps/flutter-package/config#android
        minSdk = 21
        targetSdk = flutter.targetSdkVersion
        versionCode = flutterVersionCode.toInteger()
        versionName = flutterVersionName
    }

}
4. 在應用程式中加入 Google 地圖
API 金鑰是關鍵
如要在 Flutter 應用程式中使用 Google 地圖,請務必以 Google 地圖平台設定 API 專案,並遵循 Maps SDK for Android 的 API 金鑰、Maps SDK for iOS使用 API 金鑰和 Maps JavaScript API 的 API 金鑰。備妥 API 金鑰後,請執行下列步驟以設定 Android 和 iOS 應用程式。
為 Android 應用程式新增 API 金鑰
如要在 Android 應用程式中新增 API 金鑰,請在 android/app/src/main 中編輯 AndroidManifest.xml 檔案。新增單一 meta-data 項目,其中包含在 application 節點內上一步建立的 API 金鑰。
android/app/src/main/AndroidManifest.xml
<manifest xmlns:android="http://schemas.android.com/apk/res/android">
    <application
        android:label="google_maps_in_flutter"
        android:name="${applicationName}"
        android:icon="@mipmap/ic_launcher">

        <!-- TODO: Add your Google Maps API key here -->
        <meta-data android:name="com.google.android.geo.API_KEY"
               android:value="YOUR-KEY-HERE"/>

        <activity
            android:name=".MainActivity"
            android:exported="true"
            android:launchMode="singleTop"
            android:taskAffinity=""
            android:theme="@style/LaunchTheme"
            android:configChanges="orientation|keyboardHidden|keyboard|screenSize|smallestScreenSize|locale|layoutDirection|fontScale|screenLayout|density|uiMode"
            android:hardwareAccelerated="true"
            android:windowSoftInputMode="adjustResize">
            <!-- Specifies an Android theme to apply to this Activity as soon as
                 the Android process has started. This theme is visible to the user
                 while the Flutter UI initializes. After that, this theme continues
                 to determine the Window background behind the Flutter UI. -->
            <meta-data
              android:name="io.flutter.embedding.android.NormalTheme"
              android:resource="@style/NormalTheme"
              />
            <intent-filter>
                <action android:name="android.intent.action.MAIN"/>
                <category android:name="android.intent.category.LAUNCHER"/>
            </intent-filter>
        </activity>
        <!-- Don't delete the meta-data below.
             This is used by the Flutter tool to generate GeneratedPluginRegistrant.java -->
        <meta-data
            android:name="flutterEmbedding"
            android:value="2" />
    </application>
    <!-- Required to query activities that can process text, see:
         https://developer.android.com/training/package-visibility and
         https://developer.android.com/reference/android/content/Intent#ACTION_PROCESS_TEXT.

         In particular, this is used by the Flutter engine in io.flutter.plugin.text.ProcessTextPlugin. -->
    <queries>
        <intent>
            <action android:name="android.intent.action.PROCESS_TEXT"/>
            <data android:mimeType="text/plain"/>
        </intent>
    </queries>
</manifest>
為 iOS 應用程式新增 API 金鑰
如要將 API 金鑰新增至 iOS 應用程式,請在 ios/Runner 中編輯 AppDelegate.swift 檔案。與 Android 不同,在 iOS 上新增 API 金鑰時,必須變更 Runner 應用程式的原始碼。AppDelegate 是應用程式初始化程序中的核心單例模式。
對這個檔案進行兩項變更。首先,新增 #import 陳述式來提取 Google 地圖標頭,然後呼叫 GMSServices 單例模式的 provideAPIKey() 方法。這個 API 金鑰可讓 Google 地圖正確提供地圖圖塊。
ios/Runner/AppDelegate.swift
import Flutter
import UIKit
import GoogleMaps                                          // Add this import

@UIApplicationMain
@objc class AppDelegate: FlutterAppDelegate {
  override func application(
    _ application: UIApplication,
    didFinishLaunchingWithOptions launchOptions: [UIApplication.LaunchOptionsKey: Any]?
  ) -> Bool {
    GeneratedPluginRegistrant.register(with: self)

    // TODO: Add your Google Maps API key
    GMSServices.provideAPIKey("YOUR-API-KEY")               // Add this line

    return super.application(application, didFinishLaunchingWithOptions: launchOptions)
  }
}
為網頁應用程式新增 API 金鑰
如要將 API 金鑰新增至網頁應用程式,請在 web 中編輯 index.html 檔案。在 head 區段中使用 API 金鑰新增 Maps JavaScript 指令碼的參照。
web/index.html
<!DOCTYPE html>
<html>
<head>
  <!--
    If you are serving your web app in a path other than the root, change the
    href value below to reflect the base path you are serving from.

    The path provided below has to start and end with a slash "/" in order for
    it to work correctly.

    For more details:
    * https://developer.mozilla.org/en-US/docs/Web/HTML/Element/base

    This is a placeholder for base href that will be replaced by the value of
    the `--base-href` argument provided to `flutter build`.
  -->
  <base href="$FLUTTER_BASE_HREF">

  <meta charset="UTF-8">
  <meta content="IE=Edge" http-equiv="X-UA-Compatible">
  <meta name="description" content="A new Flutter project.">

  <!-- iOS meta tags & icons -->
  <meta name="apple-mobile-web-app-capable" content="yes">
  <meta name="apple-mobile-web-app-status-bar-style" content="black">
  <meta name="apple-mobile-web-app-title" content="google_maps_in_flutter">
  <link rel="apple-touch-icon" href="icons/Icon-192.png">

  <!-- Favicon -->
  <link rel="icon" type="image/png" href="favicon.png"/>

  <!-- Add your Google Maps API key here -->
  <script src="https://maps.googleapis.com/maps/api/js?key=YOUR-KEY-HERE"></script>

  <title>google_maps_in_flutter</title>
  <link rel="manifest" href="manifest.json">
</head>
<body>
  <script src="flutter_bootstrap.js" async></script>
</body>
</html>
將地圖顯示在畫面上
現在該在螢幕上取得地圖了。將 lib/main.dart 的內容替換成以下內容。
lib/main.dart
import 'package:flutter/material.dart';
import 'package:google_maps_flutter/google_maps_flutter.dart';

void main() {
  runApp(const MyApp());
}

class MyApp extends StatefulWidget {
  const MyApp({super.key});

  @override
  State<MyApp> createState() => _MyAppState();
}

class _MyAppState extends State<MyApp> {
  late GoogleMapController mapController;

  final LatLng _center = const LatLng(45.521563, -122.677433);

  void _onMapCreated(GoogleMapController controller) {
    mapController = controller;
  }

  @override
  Widget build(BuildContext context) {
    return MaterialApp(
      theme: ThemeData(
        useMaterial3: true,
        colorSchemeSeed: Colors.green[700],
      ),
      home: Scaffold(
        appBar: AppBar(
          title: const Text('Maps Sample App'),
          elevation: 2,
        ),
        body: GoogleMap(
          onMapCreated: _onMapCreated,
          initialCameraPosition: CameraPosition(
            target: _center,
            zoom: 11.0,
          ),
        ),
      ),
    );
  }
}
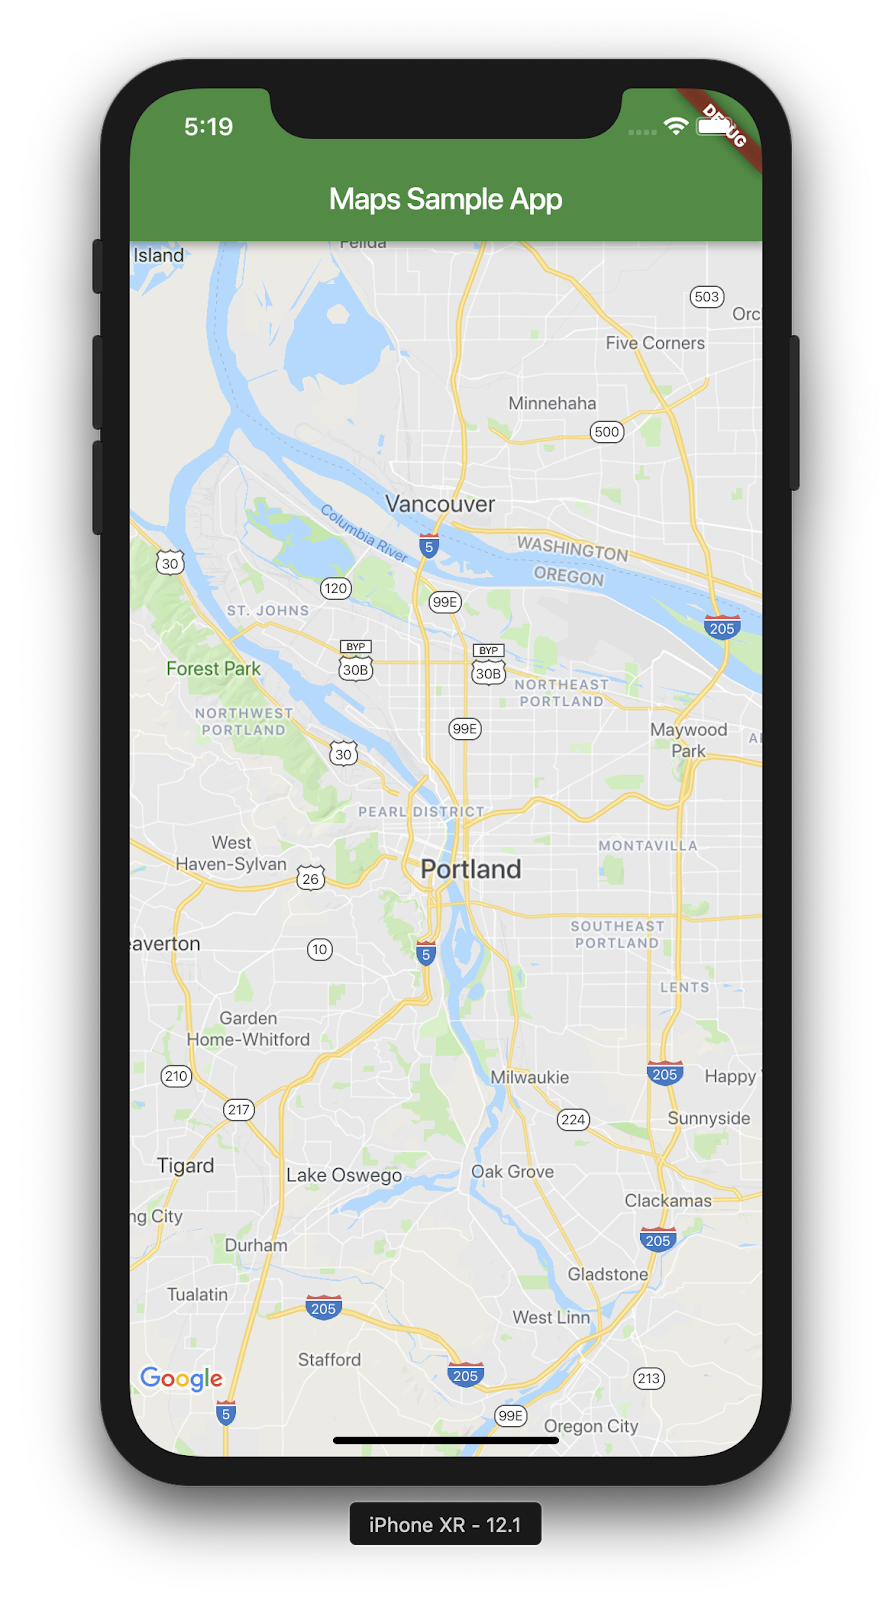
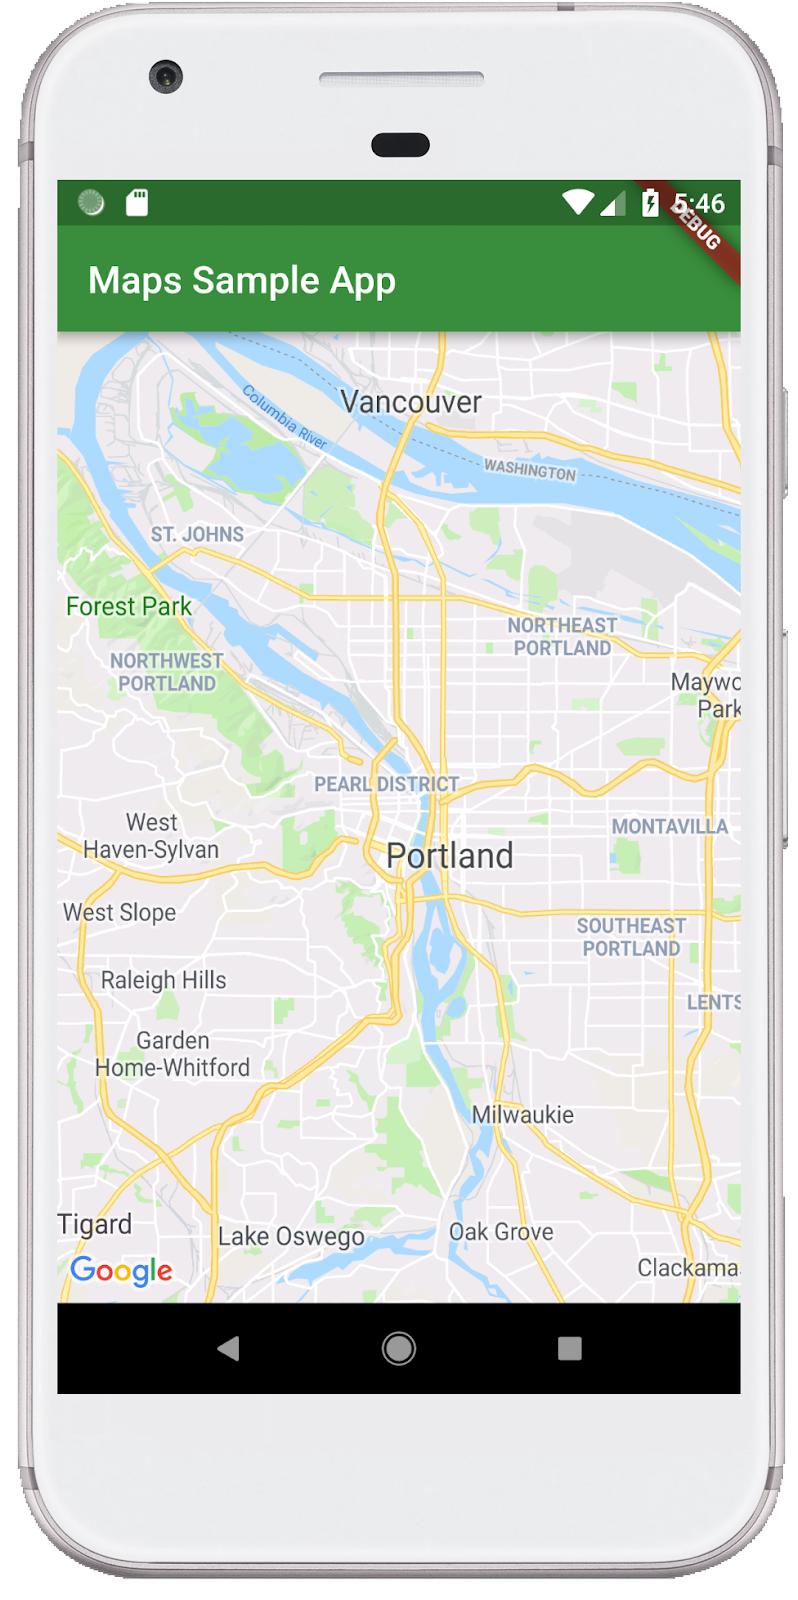
執行應用程式
在 iOS 或 Android 中執行 Flutter 應用程式,查看以波特蘭為中心的單張地圖檢視。或者,您也可以執行 Android 模擬器或 iOS 模擬器。您可以隨意修改地圖中心,以表明您的居住地或對您重要的地點。
$ flutter run
|
|
5. 在地圖上顯示 Google
Google 在世界各地設有許多辦事處,從北美洲、拉丁美洲、歐洲、亞太地區到非洲和中東。若您進行調查,這些地圖最大的優點就是能夠輕鬆使用的 API 端點,以 JSON 格式提供辦公室位置資訊。在這個步驟中,您需要將這些辦公室位置加進地圖。在這個步驟中,您將使用程式碼產生功能來剖析 JSON。
將三個新的 Flutter 依附元件新增至專案,如下所示。新增用來發出 HTTP 要求的 http 套件,藉此宣告用於表示 JSON 文件的物件結構的 json_serializable 和 json_annotation,並且新增 build_runner 來支援程式碼產生功能。
$ flutter pub add http json_annotation json_serializable dev:build_runner
Resolving dependencies...
Downloading packages...
+ _fe_analyzer_shared 67.0.0 (68.0.0 available)
+ analyzer 6.4.1 (6.5.0 available)
+ args 2.5.0
+ build 2.4.1
+ build_config 1.1.1
+ build_daemon 4.0.1
+ build_resolvers 2.4.2
+ build_runner 2.4.9
+ build_runner_core 7.3.0
+ built_collection 5.1.1
+ built_value 8.9.2
+ checked_yaml 2.0.3
+ code_builder 4.10.0
+ convert 3.1.1
+ crypto 3.0.3
+ dart_style 2.3.6
+ file 7.0.0
+ fixnum 1.1.0
+ frontend_server_client 4.0.0
+ glob 2.1.2
+ graphs 2.3.1
+ http 1.2.1
+ http_multi_server 3.2.1
+ http_parser 4.0.2
+ io 1.0.4
  js 0.6.7 (0.7.1 available)
+ json_annotation 4.9.0
+ json_serializable 6.8.0
  leak_tracker 10.0.4 (10.0.5 available)
  leak_tracker_flutter_testing 3.0.3 (3.0.5 available)
+ logging 1.2.0
  material_color_utilities 0.8.0 (0.11.1 available)
  meta 1.12.0 (1.14.0 available)
+ mime 1.0.5
+ package_config 2.1.0
+ pool 1.5.1
+ pub_semver 2.1.4
+ pubspec_parse 1.2.3
+ shelf 1.4.1
+ shelf_web_socket 1.0.4
+ source_gen 1.5.0
+ source_helper 1.3.4
  test_api 0.7.0 (0.7.1 available)
+ timing 1.0.1
+ typed_data 1.3.2
+ watcher 1.1.0
+ web_socket_channel 2.4.5
+ yaml 3.1.2
Changed 42 dependencies!
8 packages have newer versions incompatible with dependency constraints.
Try `flutter pub outdated` for more information.
透過產生程式碼剖析 JSON
您可能已經注意到,從 API 端點傳回的 JSON 資料具有一般結構。若想產生程式碼,將資料竊取至可用於程式碼的物件,會很有幫助。
在 lib/src 目錄中建立 locations.dart 檔案,並說明傳回的 JSON 資料結構,如下所示:
lib/src/locations.dart
import 'dart:convert';

import 'package:flutter/foundation.dart';
import 'package:flutter/services.dart' show rootBundle;
import 'package:http/http.dart' as http;
import 'package:json_annotation/json_annotation.dart';

part 'locations.g.dart';

@JsonSerializable()
class LatLng {
  LatLng({
    required this.lat,
    required this.lng,
  });

  factory LatLng.fromJson(Map<String, dynamic> json) => _$LatLngFromJson(json);
  Map<String, dynamic> toJson() => _$LatLngToJson(this);

  final double lat;
  final double lng;
}

@JsonSerializable()
class Region {
  Region({
    required this.coords,
    required this.id,
    required this.name,
    required this.zoom,
  });

  factory Region.fromJson(Map<String, dynamic> json) => _$RegionFromJson(json);
  Map<String, dynamic> toJson() => _$RegionToJson(this);

  final LatLng coords;
  final String id;
  final String name;
  final double zoom;
}

@JsonSerializable()
class Office {
  Office({
    required this.address,
    required this.id,
    required this.image,
    required this.lat,
    required this.lng,
    required this.name,
    required this.phone,
    required this.region,
  });

  factory Office.fromJson(Map<String, dynamic> json) => _$OfficeFromJson(json);
  Map<String, dynamic> toJson() => _$OfficeToJson(this);

  final String address;
  final String id;
  final String image;
  final double lat;
  final double lng;
  final String name;
  final String phone;
  final String region;
}

@JsonSerializable()
class Locations {
  Locations({
    required this.offices,
    required this.regions,
  });

  factory Locations.fromJson(Map<String, dynamic> json) =>
      _$LocationsFromJson(json);
  Map<String, dynamic> toJson() => _$LocationsToJson(this);

  final List<Office> offices;
  final List<Region> regions;
}

Future<Locations> getGoogleOffices() async {
  const googleLocationsURL = 'https://about.google/static/data/locations.json';

  // Retrieve the locations of Google offices
  try {
    final response = await http.get(Uri.parse(googleLocationsURL));
    if (response.statusCode == 200) {
      return Locations.fromJson(
          json.decode(response.body) as Map<String, dynamic>);
    }
  } catch (e) {
    if (kDebugMode) {
      print(e);
    }
  }

  // Fallback for when the above HTTP request fails.
  return Locations.fromJson(
    json.decode(
      await rootBundle.loadString('assets/locations.json'),
    ) as Map<String, dynamic>,
  );
}
新增這段程式碼後,IDE (如果您使用) 應會顯示一些紅色線條,因為其參照了不存在的同層檔案。locations.g.dart. 產生的檔案會在無類型的 JSON 結構和已命名的物件之間轉換。按照以下方式執行 build_runner,即可建立這個檔案:
$ dart run build_runner build --delete-conflicting-outputs
[INFO] Generating build script...
[INFO] Generating build script completed, took 357ms

[INFO] Creating build script snapshot......
[INFO] Creating build script snapshot... completed, took 10.5s

[INFO] There was output on stdout while compiling the build script snapshot, run with `--verbose` to see it (you will need to run a `clean` first to re-snapshot).

[INFO] Initializing inputs
[INFO] Building new asset graph...
[INFO] Building new asset graph completed, took 646ms

[INFO] Checking for unexpected pre-existing outputs....
[INFO] Deleting 1 declared outputs which already existed on disk.
[INFO] Checking for unexpected pre-existing outputs. completed, took 3ms

[INFO] Running build...
[INFO] Generating SDK summary...
[INFO] 3.4s elapsed, 0/3 actions completed.
[INFO] Generating SDK summary completed, took 3.4s

[INFO] 4.7s elapsed, 2/3 actions completed.
[INFO] Running build completed, took 4.7s

[INFO] Caching finalized dependency graph...
[INFO] Caching finalized dependency graph completed, took 36ms

[INFO] Succeeded after 4.8s with 2 outputs (7 actions)
您的程式碼現在應該會再次乾淨地分析。接下來,我們應加入 getGoogleOffices 函式中使用的備用 locations.json 檔案。加入這類備用內容的其中一個原因是,這個函式中載入的靜態資料無需 CORS 標頭,因此無法在網路瀏覽器中載入。Android 和 iOS Flutter 應用程式不需要 CORS 標頭,但行動數據存取權在最佳時機可能會很安全。
在瀏覽器中前往 https://about.google/static/data/locations.json,然後將內容儲存至資產目錄。或者,您也可以使用指令列,如下所示。
$ mkdir assets
$ cd assets
$ curl -o locations.json https://about.google/static/data/locations.json
  % Total    % Received % Xferd  Average Speed   Time    Time     Time  Current
                                 Dload  Upload   Total   Spent    Left  Speed
100 30348  100 30348    0     0  75492      0 --:--:-- --:--:-- --:--:-- 75492
下載素材資源檔案後,請將該檔案新增至 pubspec.yaml 檔案的「Flutter」部分。
pubspec.yaml
flutter:
  uses-material-design: true

  assets:
    - assets/locations.json
請修改 main.dart 檔案以要求地圖資料,然後使用傳回的資訊將辦公室加入地圖:
lib/main.dart
import 'package:flutter/material.dart';
import 'package:google_maps_flutter/google_maps_flutter.dart';
import 'src/locations.dart' as locations;

void main() {
  runApp(const MyApp());
}

class MyApp extends StatefulWidget {
  const MyApp({super.key});

  @override
  State<MyApp> createState() => _MyAppState();
}

class _MyAppState extends State<MyApp> {
  final Map<String, Marker> _markers = {};
  Future<void> _onMapCreated(GoogleMapController controller) async {
    final googleOffices = await locations.getGoogleOffices();
    setState(() {
      _markers.clear();
      for (final office in googleOffices.offices) {
        final marker = Marker(
          markerId: MarkerId(office.name),
          position: LatLng(office.lat, office.lng),
          infoWindow: InfoWindow(
            title: office.name,
            snippet: office.address,
          ),
        );
        _markers[office.name] = marker;
      }
    });
  }

  @override
  Widget build(BuildContext context) {
    return MaterialApp(
      theme: ThemeData(
        useMaterial3: true,
        colorSchemeSeed: Colors.green[700],
      ),
      home: Scaffold(
        appBar: AppBar(
          title: const Text('Google Office Locations'),
          elevation: 2,
        ),
        body: GoogleMap(
          onMapCreated: _onMapCreated,
          initialCameraPosition: const CameraPosition(
            target: LatLng(0, 0),
            zoom: 2,
          ),
          markers: _markers.values.toSet(),
        ),
      ),
    );
  }
}
此程式碼會執行以下多項作業:
- 在
_onMapCreated中,它會使用上一個步驟的 JSON 剖析程式碼await,直到載入完畢為止。然後,使用傳回的資料在setState()回呼內建立Marker。應用程式收到新標記後,setState 會標記 Flutter 來重新繪製畫面,以顯示辦公室位置。 - 標記會儲存在與
GoogleMap小工具相關聯的Map中。這會將標記連結至正確的地圖。當然,您也可以擁有多份地圖,並在每個地圖中顯示不同的標記。
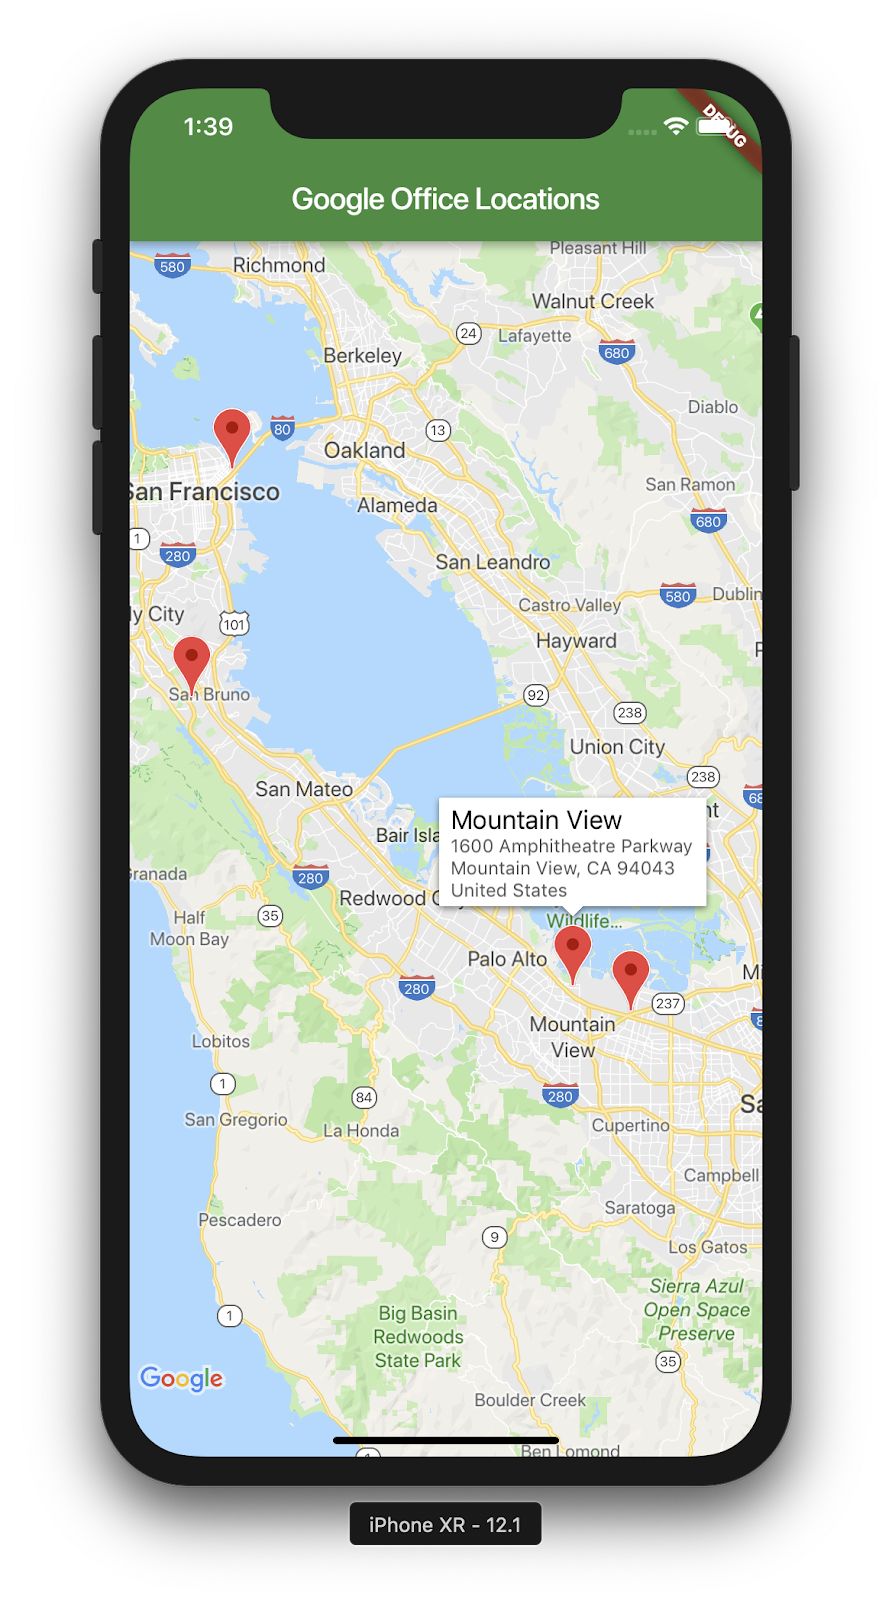
以下是您已完成的截圖。目前,這項功能可以添加很多有趣的內容。舉例來說,您可以新增辦公室清單檢視,瞭解哪些辦公室會在使用者點選辦公室時移動和縮放地圖,但正如他們所說,這項練習就交由讀者自由來了!
6. 後續步驟
恭喜!
您已完成程式碼研究室,使用 Google 地圖打造了 Flutter 應用程式!您也曾與 JSON Web Service 互動。
其他後續步驟
本程式碼研究室打造了一個體驗,能夠以視覺化方式在地圖上呈現多個點。許多行動應用程式都以這項功能為基礎,來滿足許多不同的使用者需求。以下資源也能協助您進一步提升成效:
- 使用 Flutter 和 Google 地圖建構行動應用程式 (2019 年 Cloud Next 大會談論)
- Hadrien Lejard 的
google_maps_webservice套件,可以協助 Google Maps Web Services,例如 Directions API、Distance Matrix API 和 Places API 相當容易使用。 - 如果您要查看透過 JSON REST 使用 API 的不同選項,請參閱 Andrew Brogdon 的 Medium 文章,瞭解一系列可與 JSON REST API 搭配使用的選項。