
1. บทนำ
Flutter คือ SDK แอปบนอุปกรณ์เคลื่อนที่ของ Google สำหรับสร้างประสบการณ์เนทีฟที่มีคุณภาพสูงบน iOS และ Android ในเวลาที่รวดเร็ว
ปลั๊กอิน Google Maps Flutter จะช่วยให้คุณเพิ่มแผนที่โดยอิงตามข้อมูล Google Maps ลงในแอปพลิเคชันได้ ปลั๊กอินจะจัดการการเข้าถึงเซิร์ฟเวอร์ Google Maps, การแสดงแผนที่ และการตอบกลับท่าทางสัมผัสของผู้ใช้ เช่น การคลิกและลากโดยอัตโนมัติ คุณสามารถเพิ่มเครื่องหมายลงในแผนที่ของคุณได้ วัตถุเหล่านี้ให้ข้อมูลเพิ่มเติมสำหรับตำแหน่งบนแผนที่ และช่วยให้ผู้ใช้โต้ตอบกับแผนที่ได้
สิ่งที่คุณจะสร้าง
ใน Codelab นี้ คุณจะได้สร้างแอปสำหรับอุปกรณ์เคลื่อนที่ที่แสดง Google Maps โดยใช้ Flutter SDK แอปของคุณจะ
|
|
Flutter คืออะไร
Flutter มีความสามารถหลัก 3 อย่าง
- พัฒนาได้เร็ว: สร้างแอปพลิเคชัน Android และ iOS ได้ในมิลลิวินาทีด้วย Stateful Hot Reload
- ชัดเจนและยืดหยุ่น: จัดส่งฟีเจอร์ต่างๆ ได้อย่างรวดเร็วโดยมุ่งเน้นประสบการณ์การใช้งานแบบเนทีฟของผู้ใช้ปลายทาง
- ประสิทธิภาพโฆษณาเนทีฟทั้งบน iOS และ Android: วิดเจ็ตของ Flutter มีความแตกต่างที่สำคัญทั้งหมดของแพลตฟอร์มรวมอยู่ด้วย เช่น การเลื่อน การนำทาง ไอคอน และแบบอักษร เพื่อให้โฆษณาเนทีฟได้เต็มประสิทธิภาพ
Google Maps มี:
- ครอบคลุมพื้นที่ 99% ทั่วโลก: สร้างด้วยข้อมูลที่ครอบคลุมและน่าเชื่อถือจากกว่า 200 ประเทศและเขตแดน
- การอัปเดต 25 ล้านรายการทุกวัน: พึ่งพาข้อมูลตำแหน่งที่แม่นยำแบบเรียลไทม์
- ผู้ใช้ที่ใช้งานอยู่ 1 พันล้านคนต่อเดือน: ปรับขนาดได้อย่างมั่นใจด้วยการสนับสนุนจาก Google Maps โครงสร้างพื้นฐาน
Codelab นี้จะแนะนำวิธีสร้างประสบการณ์ Google Maps ในแอป Flutter สำหรับทั้ง iOS และ Android
สิ่งที่คุณจะได้เรียนรู้
- วิธีสร้างแอปพลิเคชัน Flutter ใหม่
- วิธีกำหนดค่าปลั๊กอิน Google Maps Flutter
- วิธีเพิ่มเครื่องหมายลงในแผนที่โดยใช้ข้อมูลตำแหน่งจากบริการเว็บ
Codelab นี้มุ่งเน้นที่การเพิ่มแผนที่ Google ลงในแอป Flutter แนวคิดและโค้ดบล็อกที่ไม่เกี่ยวข้องจะปรากฎขึ้นและมีไว้เพื่อให้คุณคัดลอกและวางได้อย่างง่ายดาย
คุณต้องการเรียนรู้อะไรจาก Codelab นี้
2. ตั้งค่าสภาพแวดล้อม Flutter
ห้องทดลองนี้ต้องมีซอฟต์แวร์ 2 ชนิด ได้แก่ Flutter SDK และเครื่องมือแก้ไข Codelab นี้จะถือว่าใช้ Android Studio แต่คุณใช้ตัวแก้ไขที่ต้องการได้
คุณเรียกใช้ Codelab ได้โดยใช้อุปกรณ์ต่อไปนี้
- อุปกรณ์จริง (Android หรือ iOS) ที่เชื่อมต่อกับคอมพิวเตอร์และตั้งค่าเป็นโหมดนักพัฒนาซอฟต์แวร์
- เครื่องมือจำลอง iOS (ต้องติดตั้งเครื่องมือ Xcode)
- โปรแกรมจำลองของ Android (ต้องตั้งค่าใน Android Studio)
3. เริ่มต้นใช้งาน
การเริ่มต้นใช้งาน Flutter
วิธีที่ง่ายที่สุดในการเริ่มต้นใช้งาน Flutter คือการใช้เครื่องมือบรรทัดคำสั่ง Flutter เพื่อสร้างโค้ดที่จำเป็นทั้งหมดเพื่อประสบการณ์การเริ่มต้นใช้งานที่ไม่ซับซ้อน
$ flutter create google_maps_in_flutter --platforms android,ios,web
Creating project google_maps_in_flutter...
Resolving dependencies in `google_maps_in_flutter`...
Downloading packages...
Got dependencies in `google_maps_in_flutter`.
Wrote 81 files.

All done!
You can find general documentation for Flutter at: https://docs.flutter.dev/
Detailed API documentation is available at: https://api.flutter.dev/
If you prefer video documentation, consider: https://www.youtube.com/c/flutterdev

In order to run your application, type:

  $ cd google_maps_in_flutter
  $ flutter run

Your application code is in google_maps_in_flutter/lib/main.dart.
การเพิ่มปลั๊กอิน Google Maps Flutter เป็นทรัพยากร Dependency
การเพิ่มความสามารถเพิ่มเติมให้กับแอป Flutter นั้นทำได้ง่ายโดยใช้แพ็กเกจ Pub ใน Codelab นี้ คุณได้แนะนำปลั๊กอิน Google Maps Flutter โดยเรียกใช้คำสั่งต่อไปนี้จากไดเรกทอรีโครงการ
$ cd google_maps_in_flutter
$ flutter pub add google_maps_flutter
Resolving dependencies...
Downloading packages...
+ csslib 1.0.0
+ flutter_plugin_android_lifecycle 2.0.19
+ flutter_web_plugins 0.0.0 from sdk flutter
+ google_maps 7.1.0
+ google_maps_flutter 2.6.1
+ google_maps_flutter_android 2.8.0
+ google_maps_flutter_ios 2.6.0
+ google_maps_flutter_platform_interface 2.6.0
+ google_maps_flutter_web 0.5.7
+ html 0.15.4
+ js 0.6.7 (0.7.1 available)
+ js_wrapping 0.7.4
  leak_tracker 10.0.4 (10.0.5 available)
  leak_tracker_flutter_testing 3.0.3 (3.0.5 available)
  material_color_utilities 0.8.0 (0.11.1 available)
  meta 1.12.0 (1.14.0 available)
+ plugin_platform_interface 2.1.8
+ sanitize_html 2.1.0
+ stream_transform 2.1.0
  test_api 0.7.0 (0.7.1 available)
+ web 0.5.1
Changed 16 dependencies!
6 packages have newer versions incompatible with dependency constraints.
Try `flutter pub outdated` for more information.
การกำหนดค่า iOS platform
ต้องใช้ iOS 14 ในเวอร์ชันขั้นต่ำของแพลตฟอร์ม จึงจะใช้ Google Maps SDK ใน iOS ได้ แก้ไขด้านบนของไฟล์การกำหนดค่า ios/Podfile ดังนี้
ios/Podfile
# Google Maps SDK requires platform version 14
# https://developers.google.com/maps/flutter-package/config#ios
platform :ios, '14.0'


# CocoaPods analytics sends network stats synchronously affecting flutter build latency.
ENV['COCOAPODS_DISABLE_STATS'] = 'true'
กำลังกำหนดค่า Android minSDK
หากต้องการใช้ Google Maps SDK บน Android ต้องตั้งค่า minSdk เป็น 21 แก้ไขไฟล์การกำหนดค่า android/app/build.gradle ดังนี้
android/app/build.gradle
android {
    defaultConfig {
        // TODO: Specify your own unique Application ID (https://developer.android.com/studio/build/application-id.html).
        applicationId = "com.example.google_maps_in_flutter"
        // Minimum Android version for Google Maps SDK
        // https://developers.google.com/maps/flutter-package/config#android
        minSdk = 21
        targetSdk = flutter.targetSdkVersion
        versionCode = flutterVersionCode.toInteger()
        versionName = flutterVersionName
    }

}
4. การเพิ่ม Google Maps ลงในแอป
หัวใจสำคัญคือคีย์ API
หากต้องการใช้ Google Maps ในแอป Flutter คุณต้องกำหนดค่าโปรเจ็กต์ API ด้วยแพลตฟอร์ม Google Maps โดยทำตามคีย์การใช้ API ของ Maps SDK สำหรับ Android และ Maps SDK สำหรับ iOS ใช้คีย์ API และการใช้คีย์ API ของ Maps JavaScript API เมื่อมีคีย์ API อยู่ในมือแล้ว ให้ทำตามขั้นตอนต่อไปนี้เพื่อกำหนดค่าแอปพลิเคชันทั้ง Android และ iOS
การเพิ่มคีย์ API สำหรับแอป Android
หากต้องการเพิ่มคีย์ API ในแอป Android ให้แก้ไขไฟล์ AndroidManifest.xml ใน android/app/src/main เพิ่มรายการ meta-data รายการเดียวที่มีคีย์ API ที่สร้างขึ้นในขั้นตอนก่อนหน้าภายในโหนด application
android/app/src/main/AndroidManifest.xml
<manifest xmlns:android="http://schemas.android.com/apk/res/android">
    <application
        android:label="google_maps_in_flutter"
        android:name="${applicationName}"
        android:icon="@mipmap/ic_launcher">

        <!-- TODO: Add your Google Maps API key here -->
        <meta-data android:name="com.google.android.geo.API_KEY"
               android:value="YOUR-KEY-HERE"/>

        <activity
            android:name=".MainActivity"
            android:exported="true"
            android:launchMode="singleTop"
            android:taskAffinity=""
            android:theme="@style/LaunchTheme"
            android:configChanges="orientation|keyboardHidden|keyboard|screenSize|smallestScreenSize|locale|layoutDirection|fontScale|screenLayout|density|uiMode"
            android:hardwareAccelerated="true"
            android:windowSoftInputMode="adjustResize">
            <!-- Specifies an Android theme to apply to this Activity as soon as
                 the Android process has started. This theme is visible to the user
                 while the Flutter UI initializes. After that, this theme continues
                 to determine the Window background behind the Flutter UI. -->
            <meta-data
              android:name="io.flutter.embedding.android.NormalTheme"
              android:resource="@style/NormalTheme"
              />
            <intent-filter>
                <action android:name="android.intent.action.MAIN"/>
                <category android:name="android.intent.category.LAUNCHER"/>
            </intent-filter>
        </activity>
        <!-- Don't delete the meta-data below.
             This is used by the Flutter tool to generate GeneratedPluginRegistrant.java -->
        <meta-data
            android:name="flutterEmbedding"
            android:value="2" />
    </application>
    <!-- Required to query activities that can process text, see:
         https://developer.android.com/training/package-visibility and
         https://developer.android.com/reference/android/content/Intent#ACTION_PROCESS_TEXT.

         In particular, this is used by the Flutter engine in io.flutter.plugin.text.ProcessTextPlugin. -->
    <queries>
        <intent>
            <action android:name="android.intent.action.PROCESS_TEXT"/>
            <data android:mimeType="text/plain"/>
        </intent>
    </queries>
</manifest>
การเพิ่มคีย์ API สำหรับแอป iOS
หากต้องการเพิ่มคีย์ API ลงในแอป iOS ให้แก้ไขไฟล์ AppDelegate.swift ใน ios/Runner การเพิ่มคีย์ API บน iOS ทำให้ต้องเปลี่ยนแปลงซอร์สโค้ดของแอป Runner ซึ่งต่างจาก Android AppDelegate เป็น Singleton หลักที่เป็นส่วนหนึ่งของกระบวนการเริ่มต้นแอป
ทำการเปลี่ยนแปลง 2 รายการในไฟล์นี้ ก่อนอื่น ให้เพิ่มคำสั่ง #import เพื่อดึงส่วนหัวของ Google Maps แล้วเรียกเมธอด provideAPIKey() ของ Singleton ประเภท GMSServices คีย์ API นี้ช่วยให้ Google Maps แสดงชิ้นส่วนแผนที่ได้อย่างถูกต้อง
ios/Runner/AppDelegate.swift
import Flutter
import UIKit
import GoogleMaps                                          // Add this import

@UIApplicationMain
@objc class AppDelegate: FlutterAppDelegate {
  override func application(
    _ application: UIApplication,
    didFinishLaunchingWithOptions launchOptions: [UIApplication.LaunchOptionsKey: Any]?
  ) -> Bool {
    GeneratedPluginRegistrant.register(with: self)

    // TODO: Add your Google Maps API key
    GMSServices.provideAPIKey("YOUR-API-KEY")               // Add this line

    return super.application(application, didFinishLaunchingWithOptions: launchOptions)
  }
}
การเพิ่มคีย์ API สำหรับเว็บแอป
หากต้องการเพิ่มคีย์ API ไปยังเว็บแอป ให้แก้ไขไฟล์ index.html ใน web เพิ่มการอ้างอิงลงในสคริปต์ JavaScript ของ Maps ในส่วนส่วนหัวด้วยคีย์ API
web/index.html
<!DOCTYPE html>
<html>
<head>
  <!--
    If you are serving your web app in a path other than the root, change the
    href value below to reflect the base path you are serving from.

    The path provided below has to start and end with a slash "/" in order for
    it to work correctly.

    For more details:
    * https://developer.mozilla.org/en-US/docs/Web/HTML/Element/base

    This is a placeholder for base href that will be replaced by the value of
    the `--base-href` argument provided to `flutter build`.
  -->
  <base href="$FLUTTER_BASE_HREF">

  <meta charset="UTF-8">
  <meta content="IE=Edge" http-equiv="X-UA-Compatible">
  <meta name="description" content="A new Flutter project.">

  <!-- iOS meta tags & icons -->
  <meta name="apple-mobile-web-app-capable" content="yes">
  <meta name="apple-mobile-web-app-status-bar-style" content="black">
  <meta name="apple-mobile-web-app-title" content="google_maps_in_flutter">
  <link rel="apple-touch-icon" href="icons/Icon-192.png">

  <!-- Favicon -->
  <link rel="icon" type="image/png" href="favicon.png"/>

  <!-- Add your Google Maps API key here -->
  <script src="https://maps.googleapis.com/maps/api/js?key=YOUR-KEY-HERE"></script>

  <title>google_maps_in_flutter</title>
  <link rel="manifest" href="manifest.json">
</head>
<body>
  <script src="flutter_bootstrap.js" async></script>
</body>
</html>
การวางแผนที่บนหน้าจอ
ตอนนี้ได้เวลาแสดงแผนที่บนหน้าจอแล้ว แทนที่เนื้อหาของ lib/main.dart ด้วยข้อมูลต่อไปนี้
lib/main.dart
import 'package:flutter/material.dart';
import 'package:google_maps_flutter/google_maps_flutter.dart';

void main() {
  runApp(const MyApp());
}

class MyApp extends StatefulWidget {
  const MyApp({super.key});

  @override
  State<MyApp> createState() => _MyAppState();
}

class _MyAppState extends State<MyApp> {
  late GoogleMapController mapController;

  final LatLng _center = const LatLng(45.521563, -122.677433);

  void _onMapCreated(GoogleMapController controller) {
    mapController = controller;
  }

  @override
  Widget build(BuildContext context) {
    return MaterialApp(
      theme: ThemeData(
        useMaterial3: true,
        colorSchemeSeed: Colors.green[700],
      ),
      home: Scaffold(
        appBar: AppBar(
          title: const Text('Maps Sample App'),
          elevation: 2,
        ),
        body: GoogleMap(
          onMapCreated: _onMapCreated,
          initialCameraPosition: CameraPosition(
            target: _center,
            zoom: 11.0,
          ),
        ),
      ),
    );
  }
}
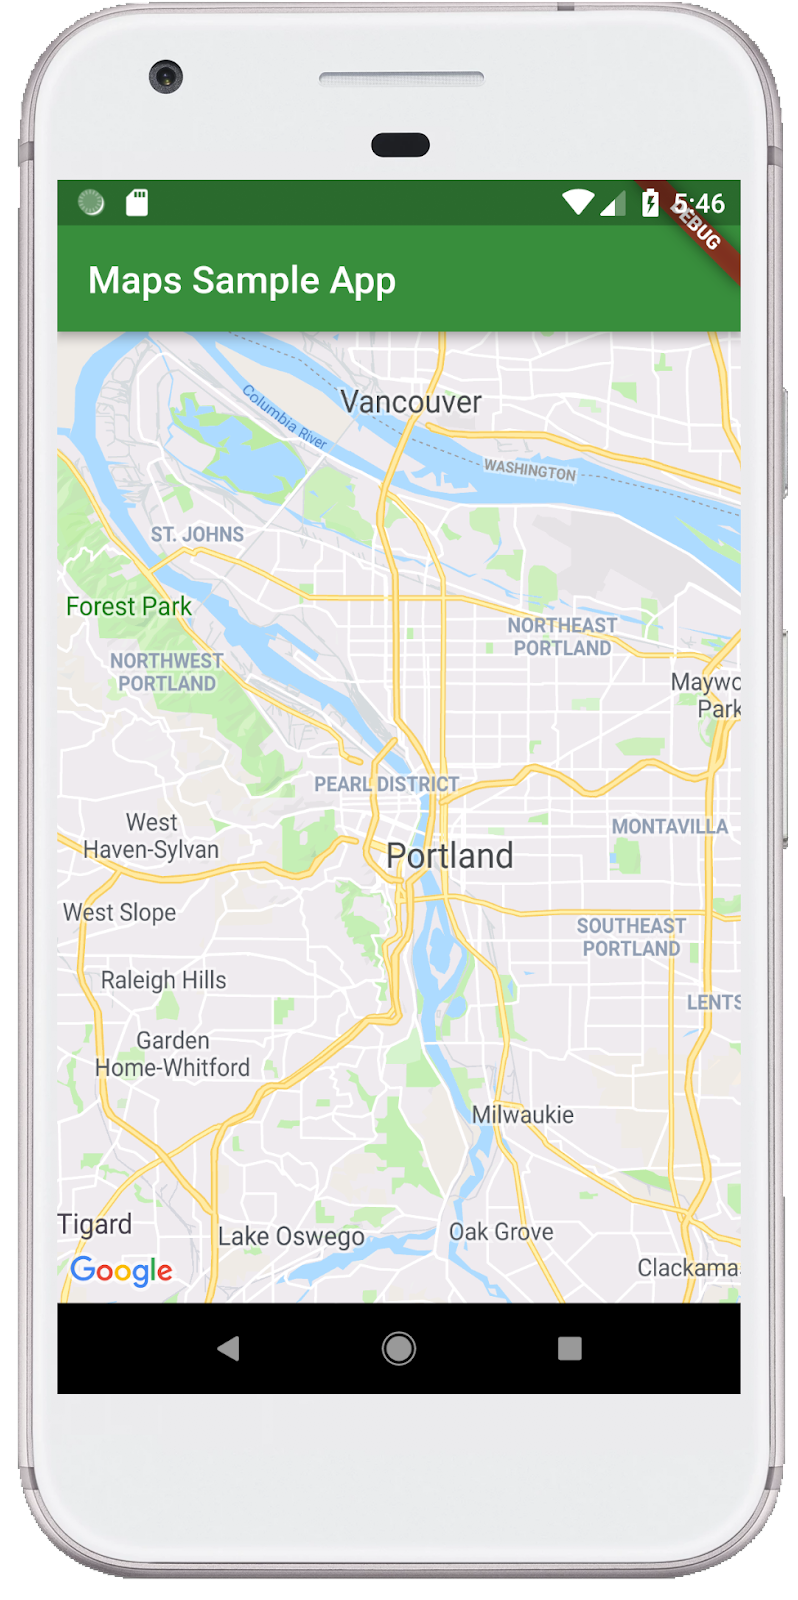
การเรียกใช้แอป
เรียกใช้แอป Flutter ใน iOS หรือ Android เพื่อดูมุมมองแผนที่ภาพเดียวที่ตั้งศูนย์กลางของพอร์ตแลนด์ อีกทางเลือกหนึ่งคือเรียกใช้โปรแกรมจำลองของ Android หรือเครื่องจำลองของ iOS อย่าลังเลที่จะแก้ไขศูนย์แผนที่เพื่อแสดงถึงบ้านเกิดของคุณ หรือสถานที่ที่สำคัญสำหรับคุณ
$ flutter run
|
|

5. วาง Google ไว้บนแผนที่
Google มีสำนักงานหลายแห่งทั่วโลก ตั้งแต่อเมริกาเหนือ ละตินอเมริกา ยุโรป เอเชียแปซิฟิก ไปจนถึงแอฟริกาและ ตะวันออกกลาง ข้อดีเกี่ยวกับแผนที่เหล่านี้คือ แผนที่มีปลายทาง API ที่ใช้งานง่ายเพื่อให้ส่งข้อมูลสถานที่ตั้งสำนักงานในรูปแบบ JSON ในขั้นตอนนี้ คุณจะต้องใส่สถานที่ตั้งสำนักงานเหล่านี้ไว้บนแผนที่ ในขั้นตอนนี้ คุณจะใช้การสร้างโค้ดเพื่อแยกวิเคราะห์ JSON
เพิ่มทรัพยากร Dependency ของ Flutter ใหม่ 3 รายการไปยังโปรเจ็กต์ดังนี้ เพิ่มแพ็กเกจ http สำหรับการส่งคำขอ HTTP อย่างง่ายดาย json_serializable และ json_annotation สำหรับการประกาศโครงสร้างออบเจ็กต์สำหรับการแสดงเอกสาร JSON เพิ่ม build_runner สำหรับการสนับสนุนการสร้างโค้ด
$ flutter pub add http json_annotation json_serializable dev:build_runner
Resolving dependencies...
Downloading packages...
+ _fe_analyzer_shared 67.0.0 (68.0.0 available)
+ analyzer 6.4.1 (6.5.0 available)
+ args 2.5.0
+ build 2.4.1
+ build_config 1.1.1
+ build_daemon 4.0.1
+ build_resolvers 2.4.2
+ build_runner 2.4.9
+ build_runner_core 7.3.0
+ built_collection 5.1.1
+ built_value 8.9.2
+ checked_yaml 2.0.3
+ code_builder 4.10.0
+ convert 3.1.1
+ crypto 3.0.3
+ dart_style 2.3.6
+ file 7.0.0
+ fixnum 1.1.0
+ frontend_server_client 4.0.0
+ glob 2.1.2
+ graphs 2.3.1
+ http 1.2.1
+ http_multi_server 3.2.1
+ http_parser 4.0.2
+ io 1.0.4
  js 0.6.7 (0.7.1 available)
+ json_annotation 4.9.0
+ json_serializable 6.8.0
  leak_tracker 10.0.4 (10.0.5 available)
  leak_tracker_flutter_testing 3.0.3 (3.0.5 available)
+ logging 1.2.0
  material_color_utilities 0.8.0 (0.11.1 available)
  meta 1.12.0 (1.14.0 available)
+ mime 1.0.5
+ package_config 2.1.0
+ pool 1.5.1
+ pub_semver 2.1.4
+ pubspec_parse 1.2.3
+ shelf 1.4.1
+ shelf_web_socket 1.0.4
+ source_gen 1.5.0
+ source_helper 1.3.4
  test_api 0.7.0 (0.7.1 available)
+ timing 1.0.1
+ typed_data 1.3.2
+ watcher 1.1.0
+ web_socket_channel 2.4.5
+ yaml 3.1.2
Changed 42 dependencies!
8 packages have newer versions incompatible with dependency constraints.
Try `flutter pub outdated` for more information.
การแยกวิเคราะห์ JSON ด้วยการสร้างโค้ด
คุณอาจสังเกตเห็นว่าข้อมูล JSON ที่แสดงผลจากปลายทาง API มีโครงสร้างปกติ คงจะเป็นประโยชน์ในการสร้างโค้ดเพื่อนำข้อมูลดังกล่าวไปไว้ในออบเจ็กต์ที่คุณใช้ในโค้ดได้
ในไดเรกทอรี lib/src ให้สร้างไฟล์ locations.dart และอธิบายโครงสร้างของข้อมูล JSON ที่แสดงผลดังนี้
lib/src/locations.dart
import 'dart:convert';

import 'package:flutter/foundation.dart';
import 'package:flutter/services.dart' show rootBundle;
import 'package:http/http.dart' as http;
import 'package:json_annotation/json_annotation.dart';

part 'locations.g.dart';

@JsonSerializable()
class LatLng {
  LatLng({
    required this.lat,
    required this.lng,
  });

  factory LatLng.fromJson(Map<String, dynamic> json) => _$LatLngFromJson(json);
  Map<String, dynamic> toJson() => _$LatLngToJson(this);

  final double lat;
  final double lng;
}

@JsonSerializable()
class Region {
  Region({
    required this.coords,
    required this.id,
    required this.name,
    required this.zoom,
  });

  factory Region.fromJson(Map<String, dynamic> json) => _$RegionFromJson(json);
  Map<String, dynamic> toJson() => _$RegionToJson(this);

  final LatLng coords;
  final String id;
  final String name;
  final double zoom;
}

@JsonSerializable()
class Office {
  Office({
    required this.address,
    required this.id,
    required this.image,
    required this.lat,
    required this.lng,
    required this.name,
    required this.phone,
    required this.region,
  });

  factory Office.fromJson(Map<String, dynamic> json) => _$OfficeFromJson(json);
  Map<String, dynamic> toJson() => _$OfficeToJson(this);

  final String address;
  final String id;
  final String image;
  final double lat;
  final double lng;
  final String name;
  final String phone;
  final String region;
}

@JsonSerializable()
class Locations {
  Locations({
    required this.offices,
    required this.regions,
  });

  factory Locations.fromJson(Map<String, dynamic> json) =>
      _$LocationsFromJson(json);
  Map<String, dynamic> toJson() => _$LocationsToJson(this);

  final List<Office> offices;
  final List<Region> regions;
}

Future<Locations> getGoogleOffices() async {
  const googleLocationsURL = 'https://about.google/static/data/locations.json';

  // Retrieve the locations of Google offices
  try {
    final response = await http.get(Uri.parse(googleLocationsURL));
    if (response.statusCode == 200) {
      return Locations.fromJson(
          json.decode(response.body) as Map<String, dynamic>);
    }
  } catch (e) {
    if (kDebugMode) {
      print(e);
    }
  }

  // Fallback for when the above HTTP request fails.
  return Locations.fromJson(
    json.decode(
      await rootBundle.loadString('assets/locations.json'),
    ) as Map<String, dynamic>,
  );
}
เมื่อเพิ่มโค้ดนี้แล้ว IDE (หากคุณใช้โค้ดนี้อยู่) ควรแสดงตัวยึกยือสีแดง เนื่องจากโค้ดนี้อ้างอิงไฟล์ข้างเคียงที่ไม่มีอยู่ locations.g.dart. ไฟล์ที่สร้างขึ้นนี้จะแปลงระหว่างโครงสร้าง JSON ที่ไม่ได้พิมพ์และออบเจ็กต์ที่มีชื่อ สร้างโค้ดโดยเรียกใช้ build_runner ดังนี้
$ dart run build_runner build --delete-conflicting-outputs
[INFO] Generating build script...
[INFO] Generating build script completed, took 357ms

[INFO] Creating build script snapshot......
[INFO] Creating build script snapshot... completed, took 10.5s

[INFO] There was output on stdout while compiling the build script snapshot, run with `--verbose` to see it (you will need to run a `clean` first to re-snapshot).

[INFO] Initializing inputs
[INFO] Building new asset graph...
[INFO] Building new asset graph completed, took 646ms

[INFO] Checking for unexpected pre-existing outputs....
[INFO] Deleting 1 declared outputs which already existed on disk.
[INFO] Checking for unexpected pre-existing outputs. completed, took 3ms

[INFO] Running build...
[INFO] Generating SDK summary...
[INFO] 3.4s elapsed, 0/3 actions completed.
[INFO] Generating SDK summary completed, took 3.4s

[INFO] 4.7s elapsed, 2/3 actions completed.
[INFO] Running build completed, took 4.7s

[INFO] Caching finalized dependency graph...
[INFO] Caching finalized dependency graph completed, took 36ms

[INFO] Succeeded after 4.8s with 2 outputs (7 actions)
ตอนนี้โค้ดของคุณควรจะวิเคราะห์อย่างละเอียดอีกครั้งแล้ว ต่อไป เราควรเพิ่มไฟล์ locations.json สำรองที่ใช้ในฟังก์ชัน getGoogleOffices เหตุผลหนึ่งที่การรวมข้อมูลสำรองนี้ไว้คือข้อมูลคงที่ที่โหลดในฟังก์ชันนี้จะแสดงโดยไม่มีส่วนหัว CORS จึงทำให้โหลดในเว็บเบราว์เซอร์ไม่สำเร็จ แอป Flutter สำหรับ Android และ iOS ไม่ต้องใช้ส่วนหัว CORS แต่การเข้าถึงข้อมูลอุปกรณ์เคลื่อนที่อาจยุ่งยากในบางครั้ง
ไปที่ https://about.google/static/data/locations.json ในเบราว์เซอร์แล้วบันทึกเนื้อหาลงในไดเรกทอรีเนื้อหา หรือจะใช้บรรทัดคำสั่งดังต่อไปนี้ก็ได้
$ mkdir assets
$ cd assets
$ curl -o locations.json https://about.google/static/data/locations.json
  % Total    % Received % Xferd  Average Speed   Time    Time     Time  Current
                                 Dload  Upload   Total   Spent    Left  Speed
100 30348  100 30348    0     0  75492      0 --:--:-- --:--:-- --:--:-- 75492
เมื่อคุณดาวน์โหลดไฟล์เนื้อหาแล้ว ให้เพิ่มลงในส่วน Flutter ของไฟล์ pubspec.yaml
pubspec.yaml
flutter:
  uses-material-design: true

  assets:
    - assets/locations.json
แก้ไขไฟล์ main.dart เพื่อขอข้อมูลแผนที่ แล้วใช้ข้อมูลที่ส่งคืนเพื่อเพิ่มสำนักงานลงในแผนที่ ดังนี้
lib/main.dart
import 'package:flutter/material.dart';
import 'package:google_maps_flutter/google_maps_flutter.dart';
import 'src/locations.dart' as locations;

void main() {
  runApp(const MyApp());
}

class MyApp extends StatefulWidget {
  const MyApp({super.key});

  @override
  State<MyApp> createState() => _MyAppState();
}

class _MyAppState extends State<MyApp> {
  final Map<String, Marker> _markers = {};
  Future<void> _onMapCreated(GoogleMapController controller) async {
    final googleOffices = await locations.getGoogleOffices();
    setState(() {
      _markers.clear();
      for (final office in googleOffices.offices) {
        final marker = Marker(
          markerId: MarkerId(office.name),
          position: LatLng(office.lat, office.lng),
          infoWindow: InfoWindow(
            title: office.name,
            snippet: office.address,
          ),
        );
        _markers[office.name] = marker;
      }
    });
  }

  @override
  Widget build(BuildContext context) {
    return MaterialApp(
      theme: ThemeData(
        useMaterial3: true,
        colorSchemeSeed: Colors.green[700],
      ),
      home: Scaffold(
        appBar: AppBar(
          title: const Text('Google Office Locations'),
          elevation: 2,
        ),
        body: GoogleMap(
          onMapCreated: _onMapCreated,
          initialCameraPosition: const CameraPosition(
            target: LatLng(0, 0),
            zoom: 2,
          ),
          markers: _markers.values.toSet(),
        ),
      ),
    );
  }
}
โค้ดนี้จะดำเนินการหลายอย่าง ดังนี้
- ใน
_onMapCreatedจะใช้โค้ดการแยกวิเคราะห์ JSON จากขั้นตอนก่อนหน้าawaitจนกว่าจะโหลดเสร็จ จากนั้นจะใช้ข้อมูลที่ได้เพื่อสร้างMarkerภายใน CallbacksetState()เมื่อแอปได้รับตัวทำเครื่องหมายใหม่ setState จะติดธง Flutter เพื่อทาสีหน้าจอใหม่ ซึ่งทําให้ระบบแสดงสถานที่ตั้งสำนักงาน - เครื่องหมายจะจัดเก็บไว้ใน
Mapที่เชื่อมโยงกับวิดเจ็ตGoogleMapซึ่งจะเชื่อมโยงเครื่องหมายไปยังแผนที่ที่ถูกต้อง แน่นอนว่าคุณมีแผนที่หลายฉบับและแสดงเครื่องหมายที่ต่างกันในแต่ละแห่งได้
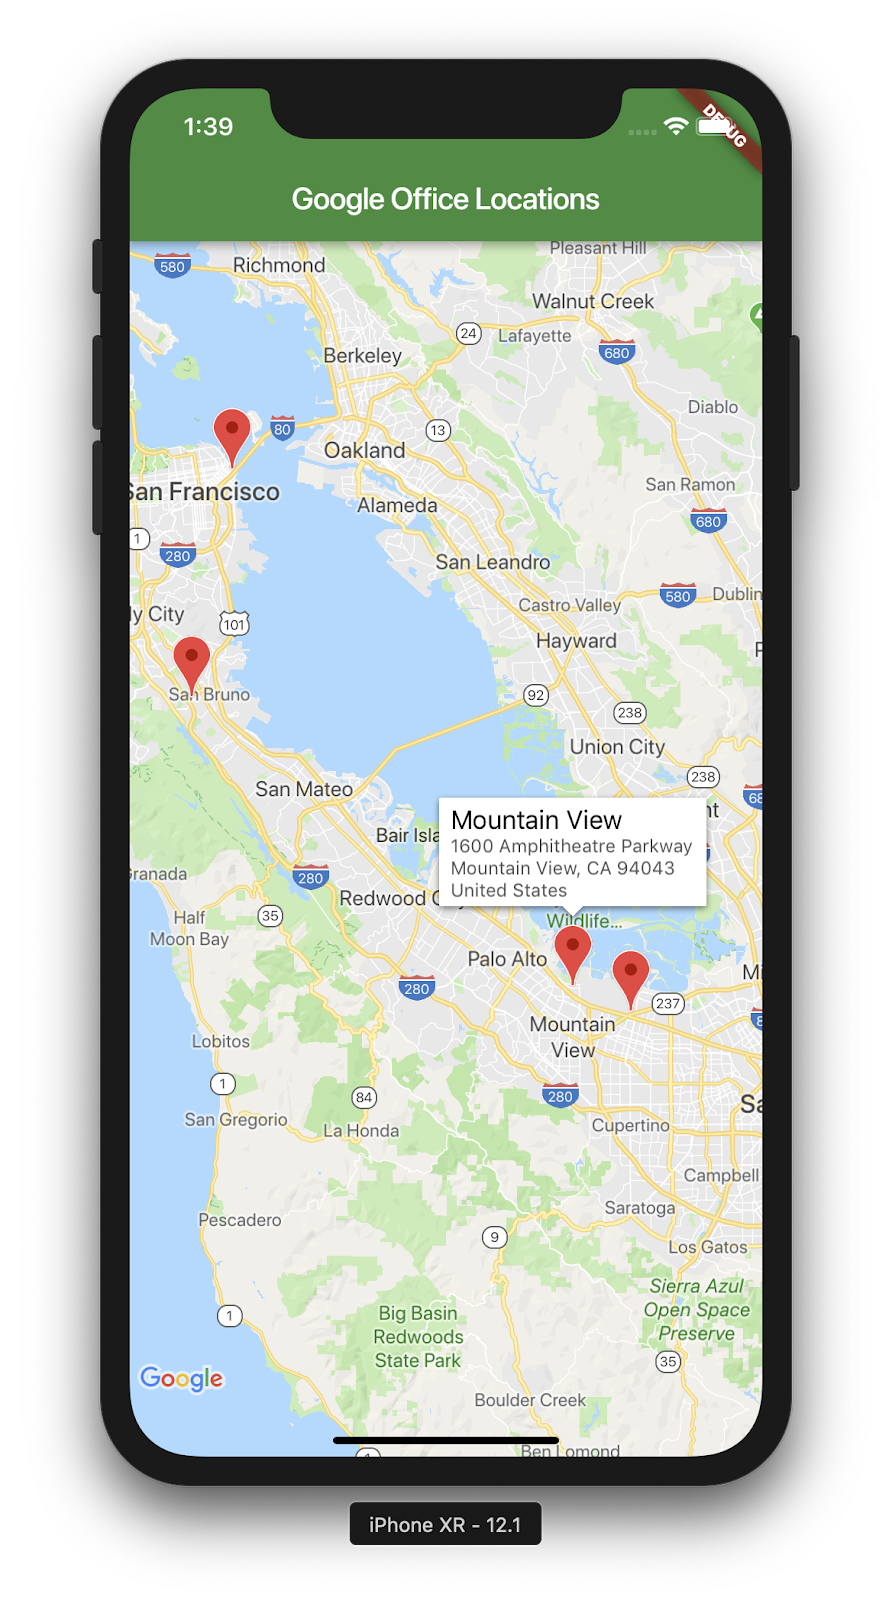
นี่คือภาพหน้าจอของสิ่งที่คุณทำสำเร็จ ยังมีสิ่งที่น่าสนใจเพิ่มเติมอีกมากมายที่สามารถทำได้ในขั้นนี้ ตัวอย่างเช่น คุณสามารถเพิ่มมุมมองรายการของสำนักงานที่ย้ายและซูมแผนที่เมื่อผู้ใช้คลิกสำนักงาน แต่ผู้อ่านจะเป็นผู้เดียว
6. ขั้นตอนถัดไป
ยินดีด้วย
คุณศึกษา Codelab เสร็จแล้วและได้สร้างแอป Flutter ด้วย Google Maps แล้ว คุณยังโต้ตอบกับบริการเว็บ JSON ด้วย
ขั้นตอนถัดไปอื่นๆ
Codelab นี้สร้างประสบการณ์ในการแสดงจุดต่างๆ บนแผนที่ มีแอปบนอุปกรณ์เคลื่อนที่จำนวนมากที่พัฒนาต่อยอดความสามารถนี้เพื่อรองรับความต้องการที่แตกต่างกันของผู้ใช้ ยังมีแหล่งข้อมูลอื่นๆ ที่จะช่วยให้คุณดำเนินการต่อไปได้
- สร้างแอปบนอุปกรณ์เคลื่อนที่ด้วย Flutter และ Google Maps (จากงาน Cloud Next ปี 2019)
- แพ็กเกจ
google_maps_webserviceของ Hadrien Lejard ซึ่งทำให้บริการบนเว็บของ Google Maps เช่น Directions API, Distance Matrix API และ Places API ใช้งานได้ง่าย - หากคุณต้องการดูตัวเลือกอื่นในการใช้ API ผ่าน JSON REST โปรดดูโพสต์ใน Medium ของ Andrew Brogdon สำหรับตัวเลือกต่างๆ สำหรับการทำงานกับ API ของ JSON REST