
1. บทนำ
ใน Codelab นี้ คุณจะได้สร้างแอปรายการงานโดยใช้ Flutter, Firebase AI Logic และแพ็กเกจ genui ใหม่ คุณจะเริ่มต้นด้วยแอปแชทแบบข้อความ อัปเกรดด้วย GenUI เพื่อให้ Agent มีสิทธิ์สร้าง UI ของตัวเอง และสุดท้ายสร้างคอมโพเนนต์ UI แบบอินเทอร์แอกทีฟที่กำหนดเองซึ่งคุณและ Agent สามารถจัดการได้โดยตรง
สิ่งที่คุณต้องดำเนินการ
- สร้างอินเทอร์เฟซแชทพื้นฐานโดยใช้ Flutter และ Firebase AI Logic
- ผสานรวม
genuiแพ็กเกจเพื่อสร้างแพลตฟอร์มที่ทำงานด้วยระบบ AI - เพิ่มแถบความคืบหน้าเพื่อระบุเมื่อแอปกำลังรอการตอบกลับจากตัวแทน
- สร้างแพลตฟอร์มที่มีชื่อและแสดงในจุดที่กำหนดใน UI
- สร้างคอมโพเนนต์แคตตาล็อก GenUI ที่กำหนดเองซึ่งช่วยให้คุณควบคุมวิธีนำเสนองานได้
สิ่งที่คุณต้องมี
- เว็บเบราว์เซอร์ เช่น Chrome
- Flutter SDK ที่ติดตั้งในเครื่อง
- ติดตั้งและกำหนดค่า Firebase CLI แล้ว
Codelab นี้มีไว้สำหรับนักพัฒนาแอป Flutter ระดับกลาง
2. ก่อนเริ่มต้น
ตั้งค่าโปรเจ็กต์ Flutter
เปิดเทอร์มินัลแล้วเรียกใช้ flutter create เพื่อสร้างโปรเจ็กต์ใหม่
flutter create intro_to_genui
cd intro_to_genui
เพิ่มทรัพยากร Dependency ที่จำเป็นลงในโปรเจ็กต์ Flutter
flutter pub add firebase_core firebase_ai genui json_schema_builder
ส่วน dependencies สุดท้ายควรมีลักษณะดังนี้ (หมายเลขเวอร์ชันอาจแตกต่างกันเล็กน้อย)
dependencies:
  flutter:
    sdk: flutter

  cupertino_icons: ^1.0.8
  firebase_core: ^4.5.0
  firebase_ai: ^3.9.0
  genui: ^0.8.0
  json_schema_builder: ^0.1.3
เรียกใช้ flutter pub get เพื่อดาวน์โหลดแพ็กเกจทั้งหมด
เปิดใช้ API และ Firebase
หากต้องการใช้แพ็กเกจ firebase_ai คุณต้องเปิดใช้ Firebase AI Logic ในโปรเจ็กต์ก่อน
- ไปที่Firebase AI Logic ในคอนโซล Firebase
- คลิกเริ่มต้นใช้งานเพื่อเปิดเวิร์กโฟลว์แบบมีคำแนะนำ
- ทำตามข้อความแจ้งบนหน้าจอเพื่อตั้งค่าโปรเจ็กต์
ดูข้อมูลเพิ่มเติมได้ที่วิธีการเพิ่ม Firebase ลงในแอป Flutter
เมื่อ API ใช้งานได้แล้ว ให้เริ่มต้น Firebase ในแอป Flutter โดยใช้ FlutterFire CLI ดังนี้
flutterfire configure
เลือกโปรเจ็กต์ Firebase แล้วทําตามข้อความแจ้งเพื่อกําหนดค่าสําหรับแพลตฟอร์มเป้าหมาย (เช่น Android, iOS, เว็บ) คุณสามารถทำ Codelab นี้ให้เสร็จได้โดยใช้เพียง Flutter SDK และ Chrome ที่ติดตั้งในเครื่อง แต่แอปจะทำงานบนแพลตฟอร์มอื่นๆ ได้ด้วย
3. สร้างอินเทอร์เฟซแชทพื้นฐาน
ก่อนที่จะเปิดตัว Generative UI แอปของคุณต้องมีพื้นฐานคือแอปพลิเคชันแชทแบบข้อความพื้นฐานที่ขับเคลื่อนโดย Firebase AI Logic หากต้องการเริ่มต้นอย่างรวดเร็ว ให้คัดลอกและวางการตั้งค่าทั้งหมดสำหรับอินเทอร์เฟซแชท

สร้างวิดเจ็ตบับเบิลข้อความ
หากต้องการแสดงข้อความจากผู้ใช้และตัวแทน แอปของคุณต้องมีวิดเจ็ต สร้างไฟล์ใหม่ชื่อ lib/message_bubble.dart แล้วเพิ่มคลาสต่อไปนี้
import 'package:flutter/material.dart';

class MessageBubble extends StatelessWidget {
  final String text;
  final bool isUser;

  const MessageBubble({super.key, required this.text, required this.isUser});

  @override
  Widget build(BuildContext context) {
    final theme = Theme.of(context);
    final colorScheme = theme.colorScheme;

    final bubbleColor = isUser
        ? colorScheme.primary
        : colorScheme.surfaceContainerHighest;

    final textColor = isUser
        ? colorScheme.onPrimary
        : colorScheme.onSurfaceVariant;

    return Padding(
      padding: const EdgeInsets.symmetric(vertical: 6.0, horizontal: 8.0),
      child: Column(
        crossAxisAlignment: isUser
            ? CrossAxisAlignment.end
            : CrossAxisAlignment.start,
        children: [
          Row(
            mainAxisAlignment: isUser
                ? MainAxisAlignment.end
                : MainAxisAlignment.start,
            children: [
              Flexible(
                child: Container(
                  padding: const EdgeInsets.symmetric(
                    horizontal: 16.0,
                    vertical: 12.0,
                  ),
                  decoration: BoxDecoration(
                    color: bubbleColor,
                    borderRadius: BorderRadius.only(
                      topLeft: const Radius.circular(20),
                      topRight: const Radius.circular(20),
                      bottomLeft: Radius.circular(isUser ? 20 : 0),
                      bottomRight: Radius.circular(isUser ? 0 : 20),
                    ),
                    boxShadow: [
                      BoxShadow(
                        color: Colors.black.withAlpha(20),
                        blurRadius: 4,
                        offset: const Offset(0, 2),
                      ),
                    ],
                    gradient: isUser
                        ? LinearGradient(
                            colors: [
                              colorScheme.primary,
                              colorScheme.primary.withAlpha(200),
                            ],
                            begin: Alignment.topLeft,
                            end: Alignment.bottomRight,
                          )
                        : null,
                  ),
                  child: Text(
                    text,
                    style: theme.textTheme.bodyLarge?.copyWith(
                      color: textColor,
                      height: 1.3,
                    ),
                  ),
                ),
              ),
            ],
          ),
          const SizedBox(height: 2),
        ],
      ),
    );
  }
}
MessageBubble คือ StatelessWidget ที่แสดงข้อความแชทเดียว โดยจะใช้ใน Codelab นี้ในภายหลังเพื่อแสดงข้อความจากทั้งคุณและตัวแทน แต่ส่วนใหญ่จะเป็นเพียงวิดเจ็ต Text ที่ดูดี
ใช้ UI ของ Chat ใน main.dart
แทนที่เนื้อหาทั้งหมดของ lib/main.dart ด้วยการติดตั้งใช้งานแชทบอทข้อความที่สมบูรณ์นี้
import 'package:flutter/material.dart';
import 'package:firebase_core/firebase_core.dart';
import 'package:firebase_ai/firebase_ai.dart';
import 'package:intro_to_genui/message_bubble.dart';
import 'firebase_options.dart';

Future<void> main() async {
  WidgetsFlutterBinding.ensureInitialized();
  await Firebase.initializeApp(options: DefaultFirebaseOptions.currentPlatform);
  runApp(const MyApp());
}

class MyApp extends StatelessWidget {
  const MyApp({super.key});

  @override
  Widget build(BuildContext context) {
    return MaterialApp(
      title: 'Just Today',
      theme: ThemeData(
        colorScheme: ColorScheme.fromSeed(seedColor: Colors.blue),
      ),
      home: const MyHomePage(),
    );
  }
}

class MyHomePage extends StatefulWidget {
  const MyHomePage({super.key});

  @override
  State<MyHomePage> createState() => _MyHomePageState();
}

sealed class ConversationItem {}

class TextItem extends ConversationItem {
  final String text;
  final bool isUser;
  TextItem({required this.text, this.isUser = false});
}

class _MyHomePageState extends State<MyHomePage> {
  final List<ConversationItem> _items = [];
  final _textController = TextEditingController();
  final _scrollController = ScrollController();
  late final ChatSession _chatSession;

  @override
  void initState() {
    super.initState();
    final model = FirebaseAI.googleAI().generativeModel(
      model: 'gemini-3-flash-preview',
    );
    _chatSession = model.startChat();
    _chatSession.sendMessage(Content.text(systemInstruction));
  }

  void _scrollToBottom() {
    WidgetsBinding.instance.addPostFrameCallback((_) {
      if (_scrollController.hasClients) {
        _scrollController.animateTo(
          _scrollController.position.maxScrollExtent,
          duration: const Duration(milliseconds: 300),
          curve: Curves.easeOut,
        );
      }
    });
  }

  @override
  void dispose() {
    _textController.dispose();
    _scrollController.dispose();
    super.dispose();
  }

  Future<void> _addMessage() async {
    final text = _textController.text;

    if (text.trim().isEmpty) {
      return;
    }
    _textController.clear();

    setState(() {
      _items.add(TextItem(text: text, isUser: true));
    });

    _scrollToBottom();

    final response = await _chatSession.sendMessage(Content.text(text));

    if (response.text?.isNotEmpty ?? false) {
      setState(() {
        _items.add(TextItem(text: response.text!, isUser: false));
      });
      _scrollToBottom();
    }
  }

  @override
  Widget build(BuildContext context) {
    return Scaffold(
      appBar: AppBar(
        backgroundColor: Theme.of(context).colorScheme.inversePrimary,
        title: const Text('Just Today'),
      ),
      body: Column(
        children: [
          Expanded(
            child: ListView(
              controller: _scrollController,
              padding: const EdgeInsets.all(16),
              children: [
                for (final item in _items)
                  switch (item) {
                    TextItem() => MessageBubble(
                          text: item.text,
                          isUser: item.isUser,
                        ),
                  },
              ],
            ),
          ),
          SafeArea(
            child: Padding(
              padding: const EdgeInsets.symmetric(horizontal: 16.0),
              child: Row(
                children: [
                  Expanded(
                    child: TextField(
                      controller: _textController,
                      onSubmitted: (_) => _addMessage(),
                      decoration: const InputDecoration(
                        hintText: 'Enter a message',
                      ),
                    ),
                  ),
                  const SizedBox(width: 8),
                  ElevatedButton(
                    onPressed: _addMessage,
                    child: const Text('Send'),
                  ),
                ],
              ),
            ),
          ),
        ],
      ),
    );
  }
}

const systemInstruction = '''
  ## PERSONA
  You are an expert task planner.

  ## GOAL
  Work with me to produce a list of tasks that I should do today, and then track
  the completion status of each one.

  ## RULES
  Talk with me only about tasks that I should do today.
  Do not engage in conversation about any other topic.
  Do not offer suggestions unless I ask for them.
  Do not offer encouragement unless I ask for it.
  Do not offer advice unless I ask for it.
  Do not offer opinions unless I ask for them.

  ## PROCESS
  ### Planning
  * Ask me for information about tasks that I should do today.
  * Synthesize a list of tasks from that information.
  * Ask clarifying questions if you need to.
  * When you have a list of tasks that you think I should do today, present it
    to me for review.
  * Respond to my suggestions for changes, if I have any, until I accept the
    list.

  ### Tracking
  * Once the list is accepted, ask me to let you know when individual tasks are
    complete.
  * If I tell you a task is complete, mark it as complete.
  * Once all tasks are complete, send a message acknowledging that, and then
    end the conversation.
''';
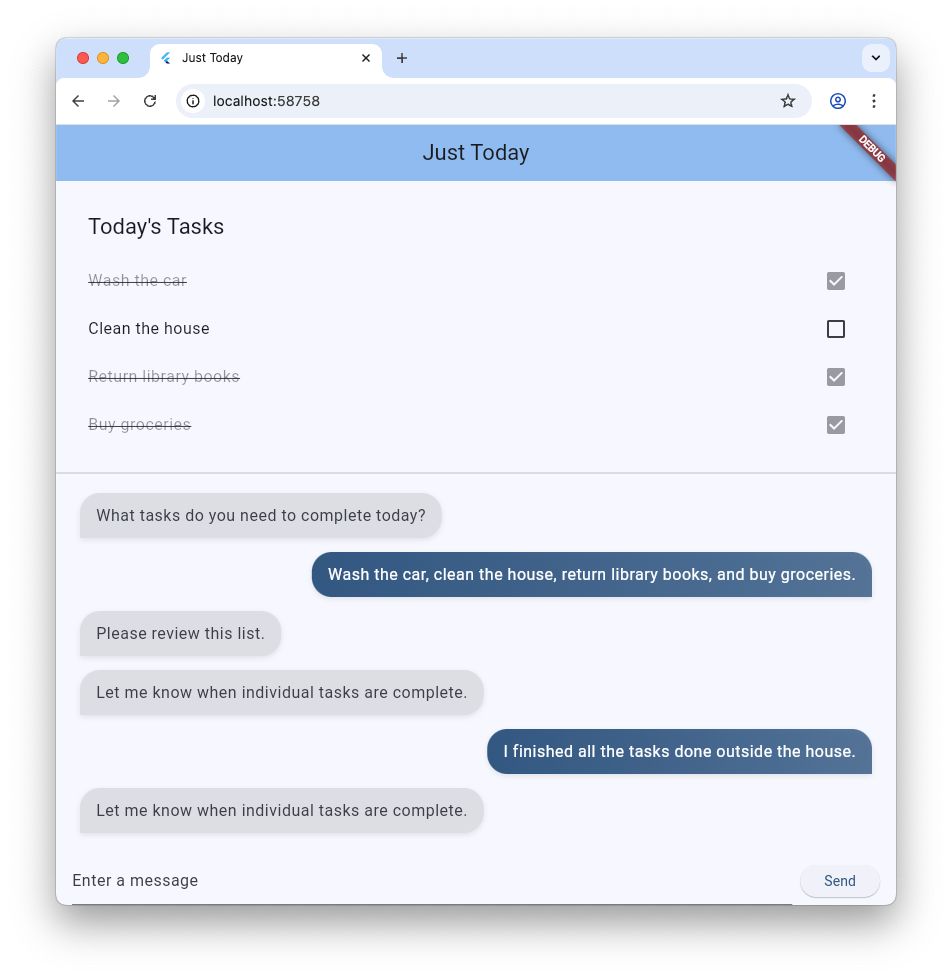
ไฟล์ main.dart ที่คุณเพิ่งคัดลอกและวางจะตั้งค่า ChatSession พื้นฐานโดยใช้ Firebase AI Logic และพรอมต์ใน systemInstruction โดยจะจัดการการสนทนาด้วยการดูแลรายการองค์ประกอบ TextItem และแสดงองค์ประกอบเหล่านั้นควบคู่ไปกับคำค้นหาของผู้ใช้โดยใช้วิดเจ็ต MessageBubble ที่คุณสร้างไว้ก่อนหน้านี้
โปรดตรวจสอบสิ่งต่อไปนี้ก่อนดำเนินการต่อ
initStateเป็นที่ที่ตั้งค่าการเชื่อมต่อกับ Firebase AI Logic- แอปมี
TextFieldและปุ่มสำหรับส่งข้อความถึงตัวแทน _addMessageคือวิธีการที่ระบบจะส่งข้อความของผู้ใช้ไปยังตัวแทน- รายการ
_itemsคือที่เก็บประวัติการสนทนา - ข้อความจะแสดงใน
ListViewโดยใช้วิดเจ็ตMessageBubble
ทดสอบแอป
เมื่อตั้งค่าเรียบร้อยแล้ว คุณจะเรียกใช้แอปและทดสอบได้
flutter run -d chrome
ลองแชทกับตัวแทนเกี่ยวกับงานบางอย่างที่คุณต้องการทำให้เสร็จในวันนี้ แม้ว่า UI ที่เป็นข้อความอย่างเดียวจะทำงานได้ แต่ GenUI จะช่วยให้ประสบการณ์การใช้งานง่ายขึ้นและเร็วขึ้น
4. ผสานรวมแพ็กเกจ GenUI
ถึงเวลาอัปเกรดจากข้อความธรรมดาเป็น Generative UI แล้ว คุณจะสลับลูปการรับส่งข้อความ Firebase พื้นฐานกับออบเจ็กต์ GenUI Conversation, Catalog และ SurfaceController ซึ่งจะช่วยให้โมเดล AI สร้างอินสแตนซ์วิดเจ็ต Flutter จริงๆ ภายในสตรีมแชทได้

genui แพ็กเกจมีคลาส 5 คลาสที่คุณจะใช้ตลอดทั้งโค้ดแล็บนี้
SurfaceControllerUI ของ Maps ที่โมเดลสร้างขึ้นไปยังหน้าจอA2uiTransportAdapterเชื่อมต่อคำขอ GenUI ภายในกับโมเดลภาษาภายนอกConversationจะห่อหุ้มตัวควบคุมและอแดปเตอร์การรับส่งด้วย API เดียวแบบรวมเป็นหนึ่งเดียวสำหรับแอป FlutterCatalogอธิบายวิดเจ็ตและพร็อพเพอร์ตี้ที่พร้อมใช้งานสำหรับโมเดลภาษาSurfaceเป็นวิดเจ็ตที่แสดง UI ที่โมเดลสร้างขึ้น
เตรียมพร้อมที่จะแสดง Surface ที่สร้างขึ้น
โค้ดที่มีอยู่ประกอบด้วยคลาส TextItem ซึ่งแสดงถึงข้อความเดียวในการสนทนา เพิ่มชั้นเรียนอื่นเพื่อแสดงถึงSurfaceที่สร้างโดยตัวแทน
class SurfaceItem extends ConversationItem {
  final String surfaceId;
  SurfaceItem({required this.surfaceId});
}
เริ่มต้นองค์ประกอบที่ใช้สร้างสรรค์ GenUI
ที่ด้านบนของ lib/main.dart ให้นำเข้าไลบรารี genui ดังนี้
import 'package:genui/genui.dart' hide TextPart;
import 'package:genui/genui.dart' as genui;
ทั้งแพ็กเกจ genui และแพ็กเกจ firebase_ai มีคลาส TextPart การนำเข้า genui ด้วยวิธีนี้จะช่วยให้คุณตั้งชื่อเวอร์ชันของ TextPart เป็น genui.TextPart ได้โดยไม่เกิดการตั้งชื่อซ้ำ
ประกาศตัวควบคุมฟังก์ชันหลักใน _MyHomePageState หลังจาก _chatSession ดังนี้
class _MyHomePageState extends State<MyHomePage> {
  // ... existing members
  late final ChatSession _chatSession;

  // Add GenUI controllers
  late final SurfaceController _controller;
  late final A2uiTransportAdapter _transport;
  late final Conversation _conversation;
  late final Catalog catalog;
จากนั้นอัปเดต initState เพื่อเตรียมตัวควบคุมของไลบรารี GenUI
นำบรรทัดนี้ออกจาก initState
_chatSession.sendMessage(Content.text(systemInstruction));
จากนั้นเพิ่มโค้ดต่อไปนี้
@override
void initState() {
  // ... existing code ...

  // Initialize the GenUI Catalog.
  // The genui package provides a default set of primitive widgets (like text
  // and basic buttons) out of the box using this class.
  catalog = BasicCatalogItems.asCatalog();

  // Create a SurfaceController to manage the state of generated surfaces.
  _controller = SurfaceController(catalogs: [catalog]);

  // Create a transport adapter that will process messages to and from the
  // agent, looking for A2UI messages.
  _transport = A2uiTransportAdapter(onSend: _sendAndReceive);

  // Link the transport and SurfaceController together in a Conversation,
  // which provides your app a unified API for interacting with the agent.
  _conversation = Conversation(
    controller: _controller,
    transport: _transport,
  );
}
โค้ดนี้จะสร้างConversation Facade ที่จัดการคอนโทรลเลอร์และอแดปเตอร์ การสนทนานั้นจะให้สตรีมเหตุการณ์แก่แอปของคุณ ซึ่งแอปสามารถใช้เพื่อติดตามสิ่งที่เอเจนต์สร้างขึ้น รวมถึงวิธีการส่งข้อความไปยังเอเจนต์
จากนั้นสร้าง Listener สำหรับเหตุการณ์การสนทนา ซึ่งรวมถึงเหตุการณ์ที่เกี่ยวข้องกับพื้นผิว รวมถึงเหตุการณ์สำหรับข้อความและข้อผิดพลาด
@override
void initState() {
  // ... existing code ...

  // Listen to GenUI stream events to update the UI
  _conversation.events.listen((event) {
    setState(() {
      switch (event) {
        case ConversationSurfaceAdded added:
          _items.add(SurfaceItem(surfaceId: added.surfaceId));
          _scrollToBottom();
        case ConversationSurfaceRemoved removed:
          _items.removeWhere(
            (item) =>
                item is SurfaceItem && item.surfaceId == removed.surfaceId,
          );
        case ConversationContentReceived content:
          _items.add(TextItem(text: content.text, isUser: false));
          _scrollToBottom();
        case ConversationError error:
          debugPrint('GenUI Error: ${error.error}');
        default:
      }
    });
  });
}
สุดท้าย ให้สร้างพรอมต์ของระบบและส่งไปยังเอเจนต์
  @override
  void initState() {
    // ... existing code ...

    // Create the system prompt for the agent, which will include this app's
    // system instruction as well as the schema for the catalog.
    final promptBuilder = PromptBuilder.chat(
      catalog: catalog,
      systemPromptFragments: [systemInstruction],
    );

    // Send the prompt into the Conversation, which will subsequently route it
    // to Firebase using the transport mechanism.
    _conversation.sendRequest(
      ChatMessage.system(promptBuilder.systemPromptJoined()),
    );
  }
แพลตฟอร์ม Display
จากนั้น อัปเดตเมธอด build ของ ListView เพื่อแสดง SurfaceItem ในรายการ _items ดังนี้
Expanded(
  child: ListView(
    controller: _scrollController,
    padding: const EdgeInsets.all(16),
    children: [
      for (final item in _items)
        switch (item) {
          TextItem() => MessageBubble(
            text: item.text,
            isUser: item.isUser,
          ),
          // New!
          SurfaceItem() => Surface(
            surfaceContext: _controller.contextFor(
              item.surfaceId,
            ),
          ),
        },
    ],
  ),
),
ตัวสร้างสำหรับวิดเจ็ต Surface จะใช้ surfaceContext ซึ่งจะบอกว่าวิดเจ็ตมีหน้าที่แสดงพื้นผิวใด SurfaceControllerที่สร้างไว้ก่อนหน้านี้_controllerจะให้คำจำกัดความและสถานะสำหรับแต่ละแพลตฟอร์ม และตรวจสอบว่ามีการสร้างใหม่เมื่อมีการอัปเดต
เชื่อมต่อ GenUI กับ Firebase AI Logic
genui แพ็กเกจนี้ใช้แนวทาง "นำโมเดลของคุณเองมาใช้" ซึ่งหมายความว่าคุณจะควบคุมได้ว่า LLM ใดจะขับเคลื่อนประสบการณ์การใช้งานของคุณ ในกรณีนี้ คุณกำลังใช้ Firebase AI Logic แต่แพ็กเกจได้รับการออกแบบมาให้ทำงานร่วมกับเอเจนต์และผู้ให้บริการที่หลากหลาย
อิสระนี้มาพร้อมกับความรับผิดชอบที่เพิ่มขึ้นเล็กน้อย นั่นคือคุณต้องนำข้อความที่สร้างโดยแพ็กเกจ genui ไปส่งให้เอเจนต์ที่คุณเลือก และต้องนำคำตอบของเอเจนต์กลับไปส่งให้ genui
โดยคุณจะต้องกำหนดเมธอด _sendAndReceive ที่อ้างอิงในโค้ดสำหรับขั้นตอนก่อนหน้า เพิ่มรหัสนี้ไปยัง MyHomePageState
  Future<void> _sendAndReceive(ChatMessage msg) async {
    final buffer = StringBuffer();

    // Reconstruct the message part fragments
    for (final part in msg.parts) {
      if (part.isUiInteractionPart) {
        buffer.write(part.asUiInteractionPart!.interaction);
      } else if (part is genui.TextPart) {
        buffer.write(part.text);
      }
    }

    if (buffer.isEmpty) {
      return;
    }

    final text = buffer.toString();

    // Send the string to Firebase AI Logic.
    final response = await _chatSession.sendMessage(Content.text(text));

    if (response.text?.isNotEmpty ?? false) {
      // Feed the response back into GenUI's transportation layer
      _transport.addChunk(response.text!);
    }
  }
แพ็กเกจ genui จะเรียกใช้เมธอดนี้เมื่อใดก็ตามที่ต้องการส่งข้อความไปยังตัวแทน การเรียกใช้ addChunk ที่ส่วนท้ายของเมธอดจะส่งคำตอบของเอเจนต์กลับไปยังแพ็กเกจ genui ซึ่งจะช่วยให้แพ็กเกจประมวลผลคำตอบและสร้าง UI ได้
สุดท้าย ให้แทนที่เมธอด _addMessage ที่มีอยู่ทั้งหมดด้วยเวอร์ชันใหม่นี้ เพื่อให้ระบบกำหนดเส้นทางข้อความไปยัง Conversation แทนที่จะเป็น Firebase โดยตรง
  Future<void> _addMessage() async {
    final text = _textController.text;

    if (text.trim().isEmpty) {
      return;
    }

    _textController.clear();

    setState(() {
      _items.add(TextItem(text: text, isUser: true));
    });

    _scrollToBottom();

    // Send the user's input through GenUI instead of directly to Firebase.
    await _conversation.sendRequest(ChatMessage.user(text));
  }
เท่านี้ก็เรียบร้อย ลองเรียกใช้แอปอีกครั้ง นอกจากข้อความแล้ว คุณจะเห็นเอเจนต์สร้างแพลตฟอร์ม UI เช่น ปุ่ม วิดเจ็ตข้อความ และอื่นๆ
คุณยังลองขอให้ตัวแทนแสดง UI ในลักษณะที่ต้องการได้ด้วย เช่น ลองใช้ข้อความอย่าง "แสดงงานของฉันในคอลัมน์ โดยมีปุ่มทำเครื่องหมายแต่ละรายการว่าเสร็จแล้ว"
5. เพิ่มสถานะรอ
การสร้าง LLM เป็นแบบอะซิงโครนัส ขณะรอคำตอบ อินเทอร์เฟซแชทต้องปิดใช้ปุ่มป้อนข้อมูลและแสดงตัวบ่งชี้ความคืบหน้าเพื่อให้ผู้ใช้ทราบว่า GenUI กำลังสร้างเนื้อหา โชคดีที่แพ็กเกจ genui มี Listenable ที่คุณใช้ติดตามสถานะของการสนทนาได้ ค่า ConversationState นั้นมีพร็อพเพอร์ตี้ isWaiting เพื่อพิจารณาว่าโมเดลกำลังสร้างเนื้อหาหรือไม่
ห่อหุ้มตัวควบคุมอินพุตด้วย ValueListenableBuilder
สร้าง ValueListenableBuilder ที่ครอบ Row (ซึ่งมี TextField และ ElevatedButton) ที่ด้านล่างของ lib/main.dart เพื่อฟัง _conversation.state การตรวจสอบ state.isWaiting จะช่วยให้คุณปิดใช้การป้อนข้อมูลขณะที่โมเดลสร้างเนื้อหาได้
ValueListenableBuilder<ConversationState>(
  valueListenable: _conversation.state,
  builder: (context, state, child) {
    return Row(
      children: [
        Expanded(
          child: TextField(
            controller: _textController,
            // Also disable the Enter key submission when waiting!
            onSubmitted: state.isWaiting ? null : (_) => _addMessage(),
            decoration: const InputDecoration(
              hintText: 'Enter a message',
            ),
          ),
        ),
        const SizedBox(width: 8),
        ElevatedButton(
          // Disable the send button when the model is generating
          onPressed: state.isWaiting ? null : _addMessage,
          child: const Text('Send'),
        ),
      ],
    );
  },
),
เพิ่มแถบความคืบหน้า
วางColumnวิดเจ็ตหลักไว้ภายใน Stack แล้วเพิ่ม LinearProgressIndicator เป็นองค์ประกอบย่อยที่ 2 ของสแต็กนั้น โดยยึดไว้ที่ด้านล่าง เมื่อเสร็จแล้ว bodyของScaffoldควรมีลักษณะดังนี้
body: Stack( // New!
  children: [
    Column(
      children: [
        Expanded(
          child: ListView(
            controller: _scrollController,
            padding: const EdgeInsets.all(16),
            children: [
              for (final item in _items)
                switch (item) {
                  TextItem() => MessageBubble(
                    text: item.text,
                    isUser: item.isUser,
                  ),
                  SurfaceItem() => Surface(
                    surfaceContext: _controller.contextFor(
                      item.surfaceId,
                    ),
                  ),
                },
            ],
          ),
        ),
        SafeArea(
          child: Padding(
            padding: const EdgeInsets.symmetric(horizontal: 16.0),
            child: ValueListenableBuilder<ConversationState>(
              valueListenable: _conversation.state,
              builder: (context, state, child) {
                return Row(
                  children: [
                    Expanded(
                      child: TextField(
                        controller: _textController,
                        onSubmitted:
                            state.isWaiting ? null : (_) => _addMessage(),
                        decoration: const InputDecoration(
                          hintText: 'Enter a message',
                        ),
                      ),
                    ),
                    const SizedBox(width: 8),
                    ElevatedButton(
                      onPressed: state.isWaiting ? null : _addMessage,
                      child: const Text('Send'),
                    ),
                  ],
                );
              },
            ),
          ),
        ),
      ],
    ),
    // Listen to the state again, this time to render a progress indicator
    ValueListenableBuilder<ConversationState>(
      valueListenable: _conversation.state,
      builder: (context, state, child) {
        if (state.isWaiting) {
          return const LinearProgressIndicator();
        }
        return const SizedBox.shrink();
      },
    ),
  ],
),
6. คงสถานะพื้นผิว GenUI
ที่ผ่านมา ระบบแสดงรายการงานในสตรีมแชทแบบเลื่อน โดยจะเพิ่มข้อความหรือแพลตฟอร์มใหม่แต่ละรายการลงในรายการเมื่อมาถึง ในขั้นตอนถัดไป คุณจะเห็นวิธีตั้งชื่อพื้นผิวและแสดงในตำแหน่งที่เฉพาะเจาะจงภายใน UI
ก่อนอื่น ที่ด้านบนของ main.dart ก่อน void main() ให้ประกาศค่าคงที่เพื่อใช้เป็นรหัสแพลตฟอร์ม
const taskDisplaySurfaceId = 'task_display';
ประการที่ 2 ให้อัปเดตคำสั่ง switch ใน Listener Conversation เพื่อให้แน่ใจว่าจะไม่มีการเพิ่มพื้นผิวที่มีรหัสดังกล่าวลงใน _items
case ConversationSurfaceAdded added:
  if (added.surfaceId != taskDisplaySurfaceId) {
    _items.add(SurfaceItem(surfaceId: added.surfaceId));
    _scrollToBottom();
  }
จากนั้นเปิดโครงสร้างเลย์เอาต์ของแผนผังวิดเจ็ตเพื่อสร้างพื้นที่สำหรับพื้นผิวที่ปักหมุดไว้เหนือบันทึกการแชททันที เพิ่มวิดเจ็ต 2 รายการนี้เป็นองค์ประกอบย่อยแรกของ Column หลัก
AnimatedSize(
  duration: const Duration(milliseconds: 300),
  child: Container(
    padding: const EdgeInsets.all(16),
    alignment: Alignment.topLeft,
    child: Surface(
      surfaceContext: _controller.contextFor(
        taskDisplaySurfaceId,
      ),
    ),
  ),
),
const Divider(),
ที่ผ่านมา Agent ของคุณมีอิสระในการสร้างและใช้แพลตฟอร์มตามที่เห็นสมควร หากต้องการให้คำสั่งที่เฉพาะเจาะจงมากขึ้น คุณต้องกลับไปดูพรอมต์ของระบบ เพิ่มส่วน ## USER INTERFACE ต่อไปนี้ที่ส่วนท้ายของพรอมต์ที่จัดเก็บไว้ในค่าคงที่ systemInstruction
const systemInstruction = '''
  // ... existing prompt content ...

  ## USER INTERFACE
  * To display the list of tasks create one and only one instance of the
    TaskDisplay catalog item. Use "$taskDisplaySurfaceId" as its surface ID.
  * Update $taskDisplaySurfaceId as necessary when the list changes.
  * $taskDisplaySurfaceId must include a button for each task that I can use
    to mark it complete. When I use that button to mark a task complete, it
    should send you a message indicating what I've done.
  * Avoid repeating the same information in a single message.
  * When responding with text, rather than A2UI messages, be brief.
''';
คุณควรให้วิธีการที่ชัดเจนแก่ตัวแทนเกี่ยวกับเวลาและวิธีใช้แพลตฟอร์ม UI การบอกให้ตัวแทนใช้รายการแคตตาล็อกและรหัสพื้นผิวที่เฉพาะเจาะจง (และใช้ซ้ำอินสแตนซ์เดียว) จะช่วยให้มั่นใจได้ว่าตัวแทนจะสร้างอินเทอร์เฟซที่คุณต้องการเห็น
ยังต้องดำเนินการอีก แต่คุณลองเรียกใช้แอปอีกครั้งเพื่อดูเอเจนต์สร้างพื้นผิวการแสดงงานที่ด้านบนของ UI ได้
7. สร้างวิดเจ็ตแคตตาล็อกที่กำหนดเอง
ในตอนนี้ยังไม่มีสินค้า TaskDisplay ในแคตตาล็อก ในอีกไม่กี่ขั้นตอน คุณจะแก้ไขปัญหานี้ได้โดยการสร้างสคีมาข้อมูล คลาสเพื่อแยกวิเคราะห์สคีมานั้น วิดเจ็ต และสินค้าในแคตตาล็อกที่รวมทุกอย่างเข้าด้วยกัน
ก่อนอื่นให้สร้างไฟล์ชื่อ task_display.dart แล้วเพิ่มการนำเข้าต่อไปนี้
import 'package:flutter/material.dart';
import 'package:genui/genui.dart';
import 'package:json_schema_builder/json_schema_builder.dart';
สร้างสคีมาข้อมูล
จากนั้นกําหนดสคีมาข้อมูลที่เอเจนต์จะให้เมื่อต้องการสร้างการแสดงงาน กระบวนการนี้ใช้ตัวสร้างที่ซับซ้อนบางอย่างจากแพ็กเกจ json_schema_builder แต่โดยพื้นฐานแล้วคุณเพียงแค่กำหนดสคีมา JSON ที่ใช้ในข้อความที่ส่งไปยังและจากเอเจนต์
เริ่มต้นด้วย S.object พื้นฐานโดยอ้างอิงชื่อคอมโพเนนต์
final taskDisplaySchema = S.object(
  properties: {
    'component': S.string(enumValues: ['TaskDisplay']),
  },
);
จากนั้นเพิ่ม title, tasks, name, isCompleted และ completeAction ลงในพร็อพเพอร์ตี้สคีมา
final taskDisplaySchema = S.object(
  properties: {
    'component': S.string(enumValues: ['TaskDisplay']),
    'title': S.string(description: 'The title of the task list'),
    'tasks': S.list(
      description: 'A list of tasks to be completed today',
      items: S.object(
        properties: {
          'name': S.string(description: 'The name of the task to be completed'),
          'isCompleted': S.boolean(
            description: 'Whether the task is completed',
          ),
          'completeAction': A2uiSchemas.action(
            description:
                'The action performed when the user has completed the task.',
          ),
        },
      ),
    ),
  },
);
ดูพร็อพเพอร์ตี้ completeAction สร้างขึ้นด้วย A2uiSchemas.action ซึ่งเป็นเครื่องมือสร้างสำหรับพร็อพเพอร์ตี้สคีมาที่แสดงถึงการดำเนินการ A2UI การเพิ่มการดำเนินการลงในสคีมาเป็นการบอกเอเจนต์ว่า "เมื่อคุณมอบหมายงานให้ฉัน โปรดระบุชื่อและข้อมูลเมตาของการดำเนินการที่ฉันใช้เพื่อบอกคุณว่างานนั้นเสร็จสมบูรณ์แล้วด้วย" จากนั้นแอปจะเรียกใช้การดำเนินการดังกล่าวเมื่อผู้ใช้แตะช่องทําเครื่องหมาย
จากนั้นเพิ่มrequiredลงในสคีมา ซึ่งจะสั่งให้ตัวแทนกรอกข้อมูลพร็อพเพอร์ตี้บางอย่างทุกครั้ง ในกรณีนี้ คุณต้องระบุพร็อพเพอร์ตี้ทุกรายการ
final taskDisplaySchema = S.object(
  properties: {
    'component': S.string(enumValues: ['TaskDisplay']),
    'title': S.string(description: 'The title of the task list'),
    'tasks': S.list(
      description: 'A list of tasks to be completed today',
      items: S.object(
        properties: {
          'name': S.string(description: 'The name of the task to be completed'),
          'isCompleted': S.boolean(
            description: 'Whether the task is completed',
          ),
          'completeAction': A2uiSchemas.action(
            description:
                'The action performed when the user has completed the task.',
          ),
        },
        // New!
        required: ['name', 'isCompleted', 'completeAction'],
      ),
    ),
  },
  // New!
  required: ['title', 'tasks'],
);
สร้างคลาสการแยกวิเคราะห์ข้อมูล
เมื่อสร้างอินสแตนซ์ของคอมโพเนนต์นี้ เอเจนต์จะส่งข้อมูลที่ตรงกับสคีมา เพิ่ม 2 คลาสเพื่อแยกวิเคราะห์ JSON ที่เข้ามาเป็นออบเจ็กต์ Dart ที่มีการพิมพ์อย่างเข้มงวด สังเกตว่า _TaskDisplayData จัดการโครงสร้างรูทอย่างไรในขณะที่มอบหมายการแยกวิเคราะห์อาร์เรย์ด้านในให้กับ _TaskData
class _TaskData {
  final String name;
  final bool isCompleted;
  final String actionName;
  final JsonMap actionContext;

  _TaskData({
    required this.name,
    required this.isCompleted,
    required this.actionName,
    required this.actionContext,
  });

  factory _TaskData.fromJson(Map<String, Object?> json) {
    try {
      final action = json['completeAction']! as JsonMap;
      final event = action['event']! as JsonMap;

      return _TaskData(
        name: json['name'] as String,
        isCompleted: json['isCompleted'] as bool,
        actionName: event['name'] as String,
        actionContext: event['context'] as JsonMap,
      );
    } catch (e) {
      throw Exception('Invalid JSON for _TaskData: $e');
    }
  }
}

class _TaskDisplayData {
  final String title;
  final List<_TaskData> tasks;

  _TaskDisplayData({required this.title, required this.tasks});

  factory _TaskDisplayData.fromJson(Map<String, Object?> json) {
    try {
      return _TaskDisplayData(
        title: (json['title'] as String?) ?? 'Tasks',
        tasks: (json['tasks'] as List<Object?>)
            .map((e) => _TaskData.fromJson(e as Map<String, Object?>))
            .toList(),
      );
    } catch (e) {
      throw Exception('Invalid JSON for _TaskDisplayData: $e');
    }
  }
}
หากเคยสร้างแอปด้วย Flutter มาก่อน คลาสเหล่านี้อาจคล้ายกับคลาสที่คุณเคยสร้าง โดยจะรับ JsonMap และส่งคืนออบเจ็กต์ที่มีการพิมพ์อย่างเข้มงวดซึ่งมีข้อมูลที่แยกวิเคราะห์จาก JSON
ดูช่อง actionName และ actionContext ใน _TaskData โดยจะดึงข้อมูลจากพร็อพเพอร์ตี้ completeAction ของ JSON และมีชื่อของการดำเนินการและบริบทข้อมูล (การอ้างอิงถึงตำแหน่งของการดำเนินการในโมเดลข้อมูลของ GenUI) ระบบจะใช้ข้อมูลเหล่านี้ในภายหลังเพื่อสร้าง UserActionEvent
โมเดลข้อมูลคือที่เก็บแบบรวมศูนย์ที่สังเกตได้สำหรับสถานะ UI แบบไดนามิกทั้งหมด ซึ่งดูแลโดยไลบรารี genui เมื่อ Agent สร้างคอมโพเนนต์ UI จากแคตตาล็อก Agent จะสร้างออบเจ็กต์ข้อมูลที่ตรงกับสคีมาของคอมโพเนนต์ด้วย ระบบจะจัดเก็บออบเจ็กต์ข้อมูลนี้ไว้ในโมเดลข้อมูลในไคลเอ็นต์ เพื่อให้ใช้สร้างวิดเจ็ตและอ้างอิงในข้อความในภายหลังถึงตัวแทนได้ (เช่น completeAction ที่คุณกำลังจะเชื่อมต่อกับวิดเจ็ต)
เพิ่มวิดเจ็ต
ตอนนี้ให้สร้างวิดเจ็ตเพื่อแสดงรายการ โดยควรยอมรับอินสแตนซ์ของคลาส _TaskDisplayData และ Callback ที่จะเรียกใช้เมื่องานเสร็จสมบูรณ์
class _TaskDisplay extends StatelessWidget {
  final _TaskDisplayData data;
  final void Function(_TaskData) onCompleteTask;

  const _TaskDisplay({required this.data, required this.onCompleteTask});

  @override
  Widget build(BuildContext context) {
    return Column(
      crossAxisAlignment: CrossAxisAlignment.start,
      mainAxisSize: MainAxisSize.min,
      children: [
        Padding(
          padding: const EdgeInsets.all(16.0),
          child: Text(
            data.title,
            style: Theme.of(context).textTheme.titleLarge,
          ),
        ),
        ...data.tasks.map(
          (task) => CheckboxListTile(
            title: Text(
              task.name,
              style: TextStyle(
                decoration: task.isCompleted
                    ? TextDecoration.lineThrough
                    : TextDecoration.none,
              ),
            ),
            value: task.isCompleted,
            onChanged: task.isCompleted
                ? null
                : (val) {
                    if (val == true) {
                      onCompleteTask(task);
                    }
                  },
          ),
        ),
      ],
    );
  }
}
สร้าง CatalogItem
เมื่อสร้างสคีมา ตัวแยกวิเคราะห์ และวิดเจ็ตแล้ว ตอนนี้คุณก็สร้าง CatalogItem เพื่อเชื่อมโยงทั้งหมดเข้าด้วยกันได้
ที่ด้านล่างของ task_display.dart ให้สร้าง taskDisplay เป็นตัวแปรระดับบนสุด ใช้ _TaskDisplayData เพื่อแยกวิเคราะห์ JSON ที่เข้ามา และสร้างอินสแตนซ์ของวิดเจ็ต _TaskDisplay
final taskDisplay = CatalogItem(
  name: 'TaskDisplay',
  dataSchema: taskDisplaySchema,
  widgetBuilder: (itemContext) {
    final json = itemContext.data as Map<String, Object?>;
    final data = _TaskDisplayData.fromJson(json);

    return _TaskDisplay(
      data: data,
      onCompleteTask: (task) async {
        // We will implement this next!
      },
    );
  },
);
ใช้งาน onCompleteTask
วิดเจ็ตต้องสื่อสารกลับไปยังตัวแทนเมื่อดำเนินการเสร็จสิ้นจึงจะทำงานได้ แทนที่ตัวยึดตำแหน่ง onCompleteTask ที่ว่างเปล่าด้วยโค้ดต่อไปนี้เพื่อสร้างและส่งเหตุการณ์โดยใช้ completeAction จากข้อมูลงาน
onCompleteTask: (task) async {
  // A data context is a reference to a location in the data model. This line
  // turns that reference into a concrete data object that the agent can use.
  // It's kind of like taking a pointer and replacing it with the value it
  // points to.
  final JsonMap resolvedContext = await resolveContext(
    itemContext.dataContext,
    task.actionContext,
  );

  // Dispatch an event back to the agent, letting it know a task was completed.
  // This will be sent to the agent in an A2UI message that includes the name
  // of the action, the surface ID, and the resolved data context.
  itemContext.dispatchEvent(
    UserActionEvent(
      name: task.actionName,
      sourceComponentId: itemContext.id,
      context: resolvedContext,
    ),
  );
}
ลงทะเบียนสินค้าในแคตตาล็อก
สุดท้าย ให้เปิด main.dart นำเข้าไฟล์ใหม่ และลงทะเบียนไฟล์พร้อมกับรายการอื่นๆ ในแคตตาล็อก
เพิ่มการนำเข้านี้ที่ด้านบนของ lib/main.dart
import 'task_display.dart';
แทนที่ catalog = BasicCatalogItems.asCatalog(); ในฟังก์ชัน initState() ด้วย
// The Catalog is immutable, so use copyWith to create a new version
// that includes our custom catalog item along with the basics.
catalog = BasicCatalogItems.asCatalog().copyWith(newItems: [taskDisplay]);
เท่านี้ก็เรียบร้อย รีสตาร์ตร้อนแอปเพื่อดูการเปลี่ยนแปลง
8. ทดลองวิธีต่างๆ ในการโต้ตอบกับตัวแทน
ตอนนี้คุณได้เพิ่มวิดเจ็ตใหม่ลงในแคตตาล็อกและสร้างพื้นที่สำหรับวิดเจ็ตใน UI ของแอปแล้ว ก็ถึงเวลาสนุกกับการทำงานร่วมกับเอเจนต์ ข้อดีหลักอย่างหนึ่งของ GenUI คือมี 2 วิธีในการโต้ตอบกับข้อมูล ได้แก่ ผ่าน UI ของแอปพลิเคชัน เช่น ปุ่มและช่องทำเครื่องหมาย และผ่าน Agent ที่เข้าใจภาษามนุษย์และสามารถให้เหตุผลเกี่ยวกับข้อมูลได้ ลองทดสอบกับทั้ง 2 อย่าง
- ใช้ช่องข้อความเพื่ออธิบายงาน 3-4 อย่าง แล้วดูงานเหล่านั้นปรากฏในรายการ
- ใช้ช่องทำเครื่องหมายเพื่อสลับสถานะของงานเป็นเสร็จแล้วหรือยังไม่เสร็จ
- สร้างรายการงาน 5-6 รายการ แล้วบอกให้ตัวแทนนำงานที่ต้องขับรถออก
- บอกตัวแทนให้สร้างรายการงานที่ต้องทำซ้ำๆ เป็นรายการแยกกัน ("ฉันต้องซื้อการ์ดวันหยุดให้แม่ พ่อ และย่า สร้างงานแยกต่างหากสำหรับรายการเหล่านั้น")
- บอกตัวแทนให้ทำเครื่องหมายงานทั้งหมดว่าเสร็จแล้วหรือยังไม่เสร็จ หรือให้ทำเครื่องหมาย 2-3 งานแรก
9. ขอแสดงความยินดี
ยินดีด้วย คุณได้สร้างแอปติดตามงานที่ทำงานด้วยระบบ AI โดยใช้ Generative UI และ Flutter
สิ่งที่คุณได้เรียนรู้
- การโต้ตอบกับโมเดลพื้นฐานของ Google โดยใช้ Flutter Firebase SDK
- การแสดงผลแพลตฟอร์มแบบอินเทอร์แอกทีฟที่ Gemini สร้างขึ้นโดยใช้ GenUI
- การปักหมุดพื้นผิวในเลย์เอาต์โดยใช้รหัสการแสดงผลแบบคงที่ที่กำหนดไว้ล่วงหน้า
- การออกแบบสคีมาที่กำหนดเองและแคตตาล็อกวิดเจ็ตสำหรับลูปการโต้ตอบที่แข็งแกร่ง