
1. 事前準備
Flutter 結合了熱重載和宣告式 UI,可讓開發人員快速疊代建立新的使用者介面。不過,有時您需要為介面新增額外的互動功能。這些觸控效果可以像點選按鈕時的動畫一樣快速,也可以像使用 GPU 扭曲使用者介面的著色器一樣戲劇化。
在本程式碼研究室中,您將建構 Flutter 應用程式,運用動畫、著色器和粒子場的強大功能,打造出令人聯想到科幻電影和電視節目的使用者介面。
建構項目
您將為末日後科幻主題遊戲建構初始選單頁面。其中包含一個標題,可透過片段著色器對文字取樣,以視覺化方式製作動畫;一個難度選單,可透過大量動畫變更頁面的顏色主題;以及一個以第二個片段著色器繪製的動畫圓球。如果這樣還不夠,您會在程式碼研究室的最後,加入細微的粒子效果,為網頁帶來動感和趣味。
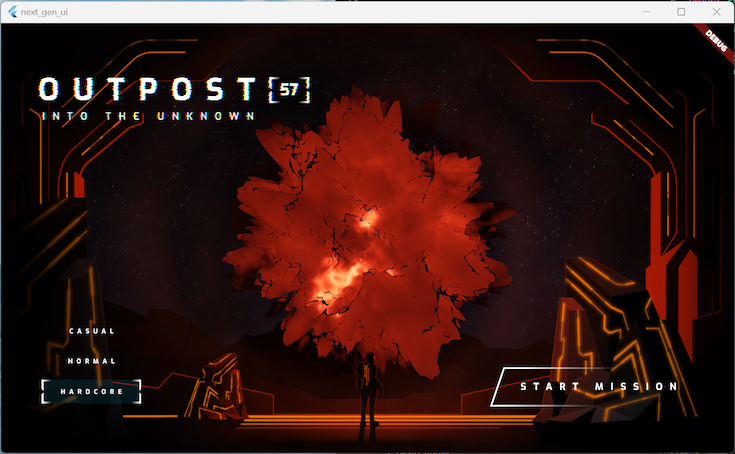
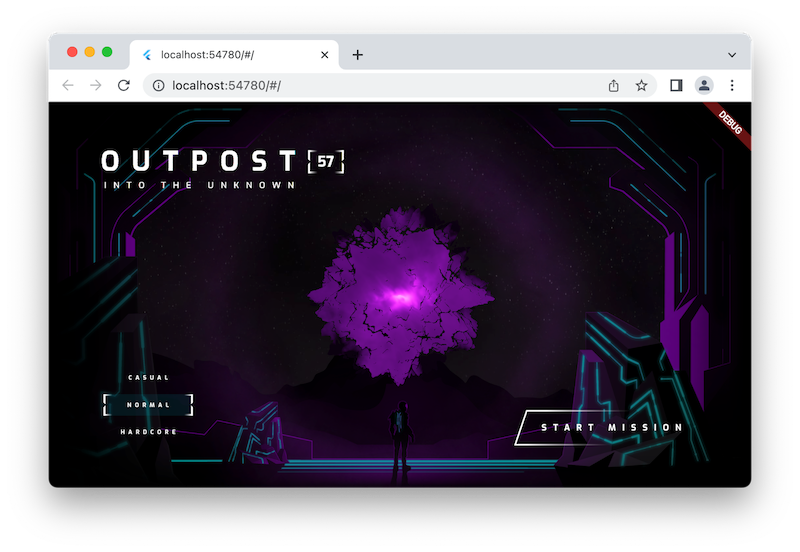
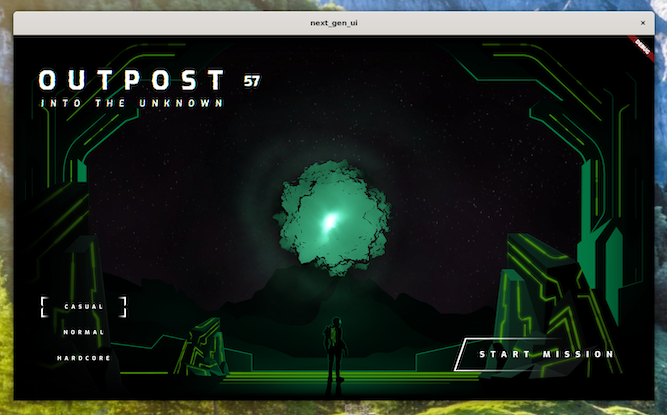
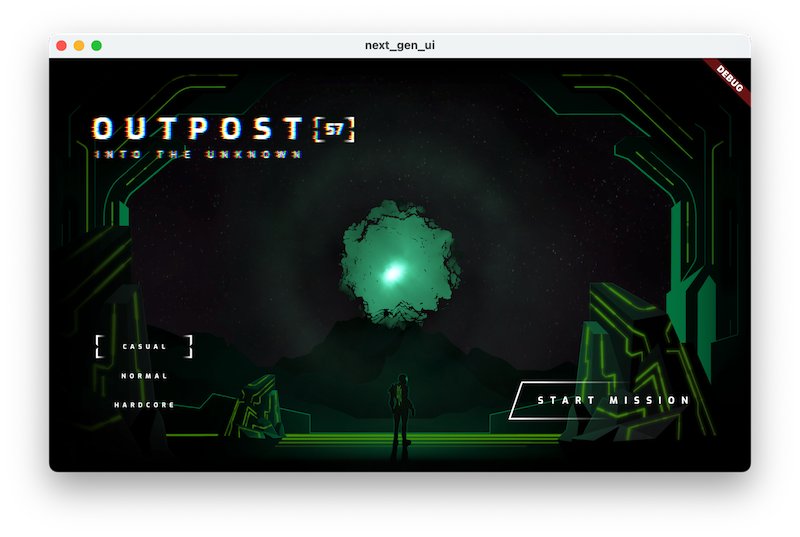
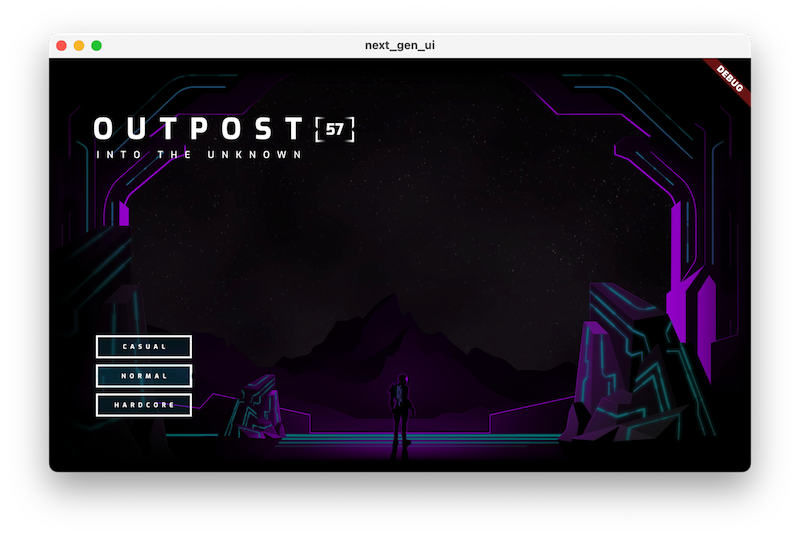
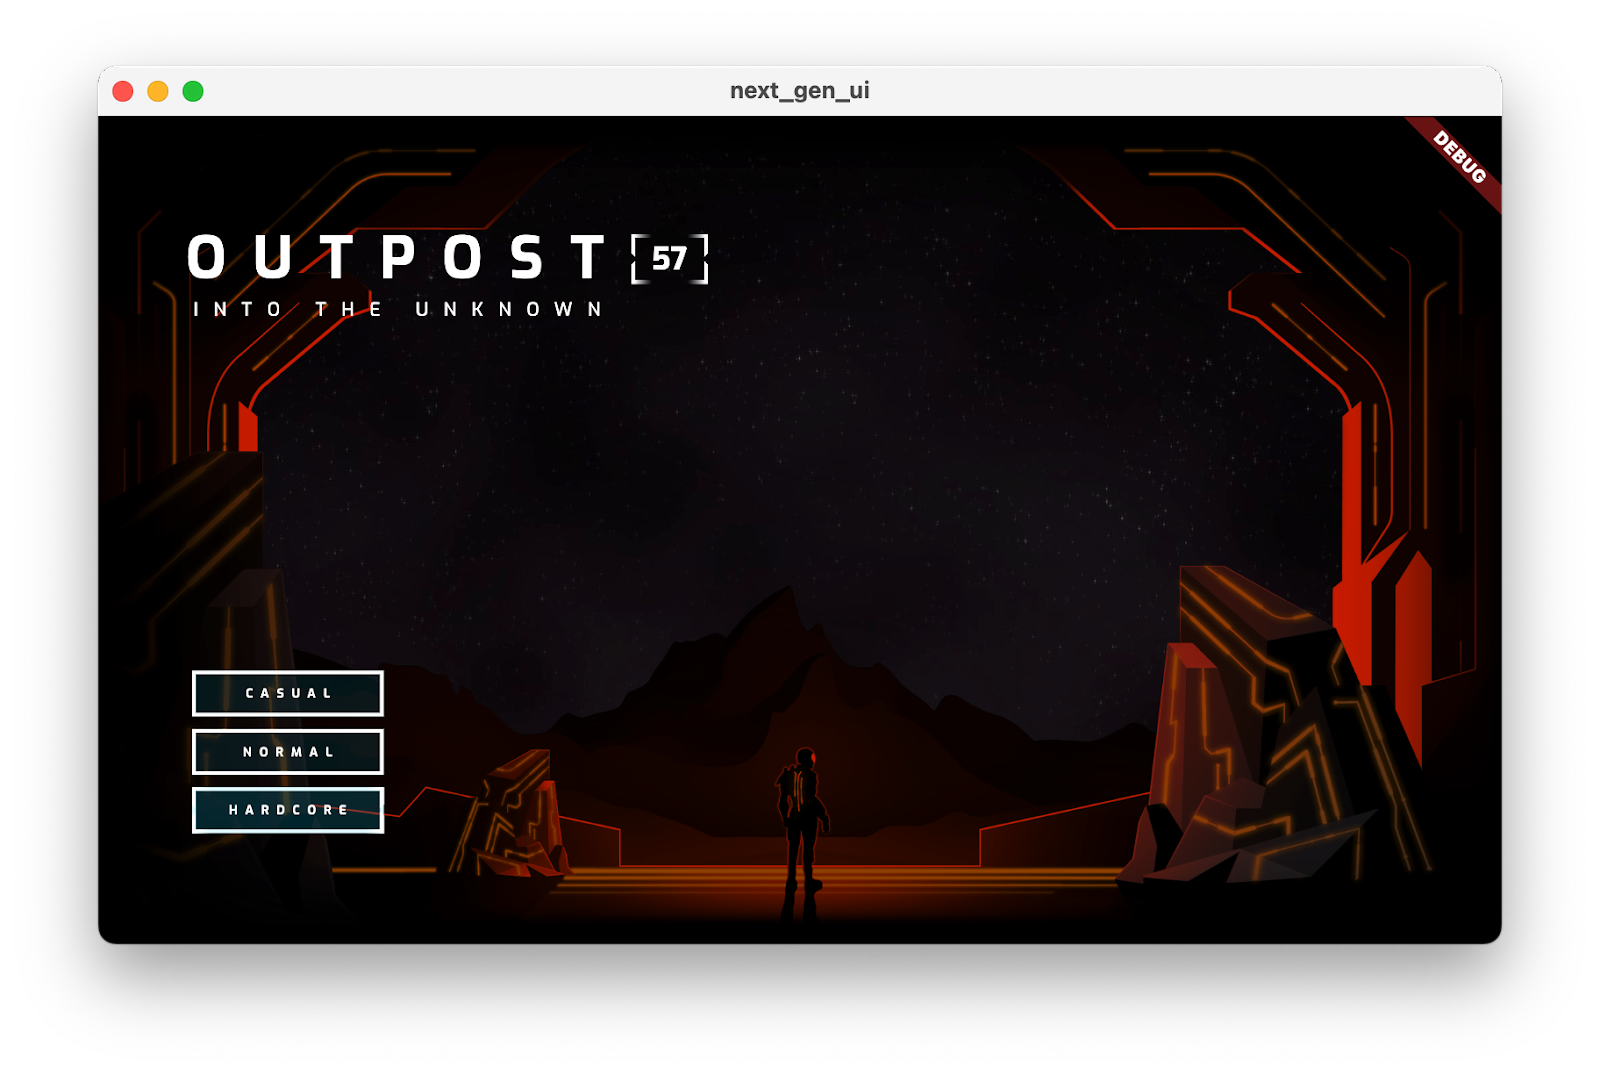
以下螢幕截圖顯示您在三種支援的電腦作業系統 (Windows、Linux 和 macOS) 上建構的應用程式。為求完整,我們也提供網頁瀏覽器版本 (同樣支援)。到處都是動畫和片段著色器!
|
|
|
|
必要條件
- 具備使用 Dart 進行 Flutter 開發的基本知識,如「您的第一個 Flutter 應用程式」程式碼研究室所述
課程內容
- 如何使用
flutter_animate製作生動活潑的動畫 - 如何在電腦和網頁上使用 Flutter 對片段著色器的支援
- 如何使用
particle_field在應用程式中加入粒子動畫
軟硬體需求
- Flutter SDK
- 設定 VS Code 以使用 Flutter 和 Dart
- 設定 桌面支援,以便在 Windows、Linux 或 macOS 上使用 Flutter
- 為 Flutter 設定網頁支援
2. 開始操作
下載範例程式碼
- 前往這個 GitHub 存放區。
- 依序點選「Code」>「Download zip」,下載這個程式碼研究室的所有程式碼。
- 將下載的 ZIP 檔案解壓縮,解壓縮後會產生
codelabs-main根資料夾。您只需要next-gen-ui/子目錄,其中包含step_01至step_06資料夾,這些資料夾內含的原始碼可供您在本程式碼研究室的每個步驟中建構。
下載專案依附元件
- 在 VS Code 中,依序點選「File」>「Open folder」>「codelabs-main」>「next-gen-uis」>「step_01」,開啟入門專案。
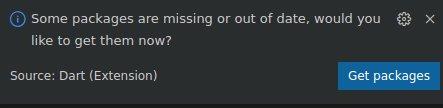
- 如果看到 VS Code 對話方塊,提示您下載入門應用程式的必要套件,請按一下「Get packages」(取得套件)。
- 如果沒有看到 VS Code 對話方塊,提示您下載入門應用程式的必要套件,請開啟終端機,然後前往
step_01資料夾並執行flutter pub get指令。
執行範例應用程式
- 在 VS Code 中,選取您執行的電腦作業系統,或選取 Chrome (如要在網頁瀏覽器中測試應用程式)。
舉例來說,如果您使用 macOS 做為部署目標,會看到以下內容:

將 Chrome 設為部署目標時,您會看到以下內容:

- 開啟
lib/main.dart檔案,然後按一下「開始偵錯」 。應用程式會在電腦作業系統或 Chrome 瀏覽器中啟動。
探索範例應用程式
在範例應用程式中,請注意下列事項:
- 使用者介面已準備就緒,可供您建構。
assets目錄包含您會用到的藝術素材資源和兩個片段著色器。pubspec.yaml檔案已列出您要使用的資產和一組發布套件。lib目錄包含必要main.dart檔案、列出藝術資產和片段著色器路徑的assets.dart檔案,以及列出您將使用的 TextStyles 和 Colors 的styles.dart檔案。lib目錄也包含common目錄,其中含有您在本程式碼研究室中會用到的一些實用公用程式,以及orb_shader目錄,其中包含用於顯示帶有頂點著色器的圓球的Widget。
啟動應用程式後,畫面如下所示。
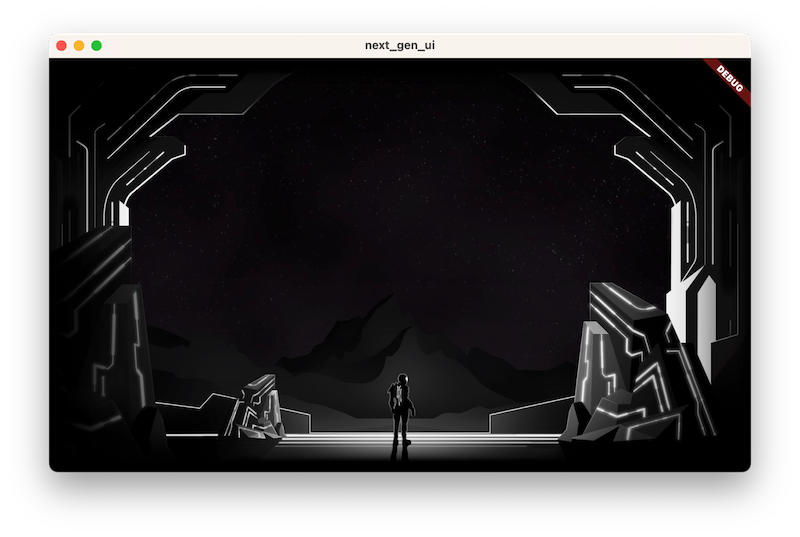
3. 描繪場景
在這個步驟中,您要將所有背景圖片資產以圖層形式放置在畫面上。一開始畫面會呈現奇怪的單色,但您會在步驟結尾為場景新增顏色。
在場景中新增素材資源
- 在
lib目錄中建立title_screen目錄,然後新增title_screen.dart檔案。在檔案中加入以下內容:
lib/title_screen/title_screen.dart
import 'package:flutter/material.dart';

import '../assets.dart';

class TitleScreen extends StatelessWidget {
  const TitleScreen({super.key});

  @override
  Widget build(BuildContext context) {
    return Scaffold(
      backgroundColor: Colors.black,
      body: Center(
        child: Stack(
          children: [
            /// Bg-Base
            Image.asset(AssetPaths.titleBgBase),

            /// Bg-Receive
            Image.asset(AssetPaths.titleBgReceive),

            /// Mg-Base
            Image.asset(AssetPaths.titleMgBase),

            /// Mg-Receive
            Image.asset(AssetPaths.titleMgReceive),

            /// Mg-Emit
            Image.asset(AssetPaths.titleMgEmit),

            /// Fg-Rocks
            Image.asset(AssetPaths.titleFgBase),

            /// Fg-Receive
            Image.asset(AssetPaths.titleFgReceive),

            /// Fg-Emit
            Image.asset(AssetPaths.titleFgEmit),
          ],
        ),
      ),
    );
  }
}
這個小工具包含以圖層堆疊資產的場景。背景、中景和前景層分別由兩到三張圖片組成。這些圖片會以不同顏色打光,以擷取光線在場景中的移動方式。
- 在
main.dart檔案中新增下列內容:
lib/main.dart
import 'dart:io' show Platform;

import 'package:flutter/foundation.dart' show kIsWeb;
import 'package:flutter/material.dart';
import 'package:window_size/window_size.dart';
                                                          // Remove 'styles.dart' import
import 'title_screen/title_screen.dart';                  // Add this import


void main() {
  if (!kIsWeb && (Platform.isWindows || Platform.isLinux || Platform.isMacOS)) {
    WidgetsFlutterBinding.ensureInitialized();
    setWindowMinSize(const Size(800, 500));
  }
  runApp(const NextGenApp());
}

class NextGenApp extends StatelessWidget {
  const NextGenApp({super.key});

  @override
  Widget build(BuildContext context) {
    return MaterialApp(
      themeMode: ThemeMode.dark,
      darkTheme: ThemeData(brightness: Brightness.dark),
      home: const TitleScreen(),                          // Replace with this widget
    );
  }
}
這會將應用程式的 UI 換成藝術素材資源建立的單色場景。接著為每個圖層上色。
新增圖片著色公用程式
將下列內容新增至 title_screen.dart 檔案,加入圖片著色公用程式:
lib/title_screen/title_screen.dart
import 'package:flutter/material.dart';

import '../assets.dart';

class TitleScreen extends StatelessWidget {
  const TitleScreen({super.key});

  @override
  Widget build(BuildContext context) {
    return Scaffold(
      backgroundColor: Colors.black,
      body: Center(
        child: Stack(
          children: [
            /// Bg-Base
            Image.asset(AssetPaths.titleBgBase),

            /// Bg-Receive
            Image.asset(AssetPaths.titleBgReceive),

            /// Mg-Base
            Image.asset(AssetPaths.titleMgBase),

            /// Mg-Receive
            Image.asset(AssetPaths.titleMgReceive),

            /// Mg-Emit
            Image.asset(AssetPaths.titleMgEmit),

            /// Fg-Rocks
            Image.asset(AssetPaths.titleFgBase),

            /// Fg-Receive
            Image.asset(AssetPaths.titleFgReceive),

            /// Fg-Emit
            Image.asset(AssetPaths.titleFgEmit),
          ],
        ),
      ),
    );
  }
}

class _LitImage extends StatelessWidget {                 // Add from here...
  const _LitImage({
    required this.color,
    required this.imgSrc,
    required this.lightAmt,
  });
  final Color color;
  final String imgSrc;
  final double lightAmt;

  @override
  Widget build(BuildContext context) {
    final hsl = HSLColor.fromColor(color);
    return Image.asset(
      imgSrc,
      color: hsl.withLightness(hsl.lightness * lightAmt).toColor(),
      colorBlendMode: BlendMode.modulate,
    );
  }
}                                                         // to here.
這個 _LitImage 公用程式小工具會根據藝術資產發射或接收光線,重新著色每個藝術資產。由於您尚未使用這個新小工具,因此可能會觸發 Lint 警告。
彩繪
修改 title_screen.dart 檔案,以顏色繪製,如下所示:
lib/title_screen/title_screen.dart
import 'package:flutter/material.dart';

import '../assets.dart';
import '../styles.dart';                                  // Add this import

class TitleScreen extends StatelessWidget {
  const TitleScreen({super.key});

  final _finalReceiveLightAmt = 0.7;                      // Add this attribute
  final _finalEmitLightAmt = 0.5;                         // And this attribute

  @override
  Widget build(BuildContext context) {
    final orbColor = AppColors.orbColors[0];              // Add this final variable
    final emitColor = AppColors.emitColors[0];            // And this one

    return Scaffold(
      backgroundColor: Colors.black,
      body: Center(
        child: Stack(
          children: [
            /// Bg-Base
            Image.asset(AssetPaths.titleBgBase),

            /// Bg-Receive
            _LitImage(                                    // Modify from here...
              color: orbColor,
              imgSrc: AssetPaths.titleBgReceive,
              lightAmt: _finalReceiveLightAmt,
            ),                                            // to here.

            /// Mg-Base
            _LitImage(                                    // Modify from here...
              imgSrc: AssetPaths.titleMgBase,
              color: orbColor,
              lightAmt: _finalReceiveLightAmt,
            ),                                            // to here.

            /// Mg-Receive
            _LitImage(                                    // Modify from here...
              imgSrc: AssetPaths.titleMgReceive,
              color: orbColor,
              lightAmt: _finalReceiveLightAmt,
            ),                                            // to here.

            /// Mg-Emit
            _LitImage(                                    // Modify from here...
              imgSrc: AssetPaths.titleMgEmit,
              color: emitColor,
              lightAmt: _finalEmitLightAmt,
            ),                                            // to here.

            /// Fg-Rocks
            Image.asset(AssetPaths.titleFgBase),

            /// Fg-Receive
            _LitImage(                                    // Modify from here...
              imgSrc: AssetPaths.titleFgReceive,
              color: orbColor,
              lightAmt: _finalReceiveLightAmt,
            ),                                            // to here.

            /// Fg-Emit
            _LitImage(                                    // Modify from here...
              imgSrc: AssetPaths.titleFgEmit,
              color: emitColor,
              lightAmt: _finalEmitLightAmt,
            ),                                            // to here.
          ],
        ),
      ),
    );
  }
}

class _LitImage extends StatelessWidget {
  const _LitImage({
    required this.color,
    required this.imgSrc,
    required this.lightAmt,
  });
  final Color color;
  final String imgSrc;
  final double lightAmt;

  @override
  Widget build(BuildContext context) {
    final hsl = HSLColor.fromColor(color);
    return Image.asset(
      imgSrc,
      color: hsl.withLightness(hsl.lightness * lightAmt).toColor(),
      colorBlendMode: BlendMode.modulate,
    );
  }
}
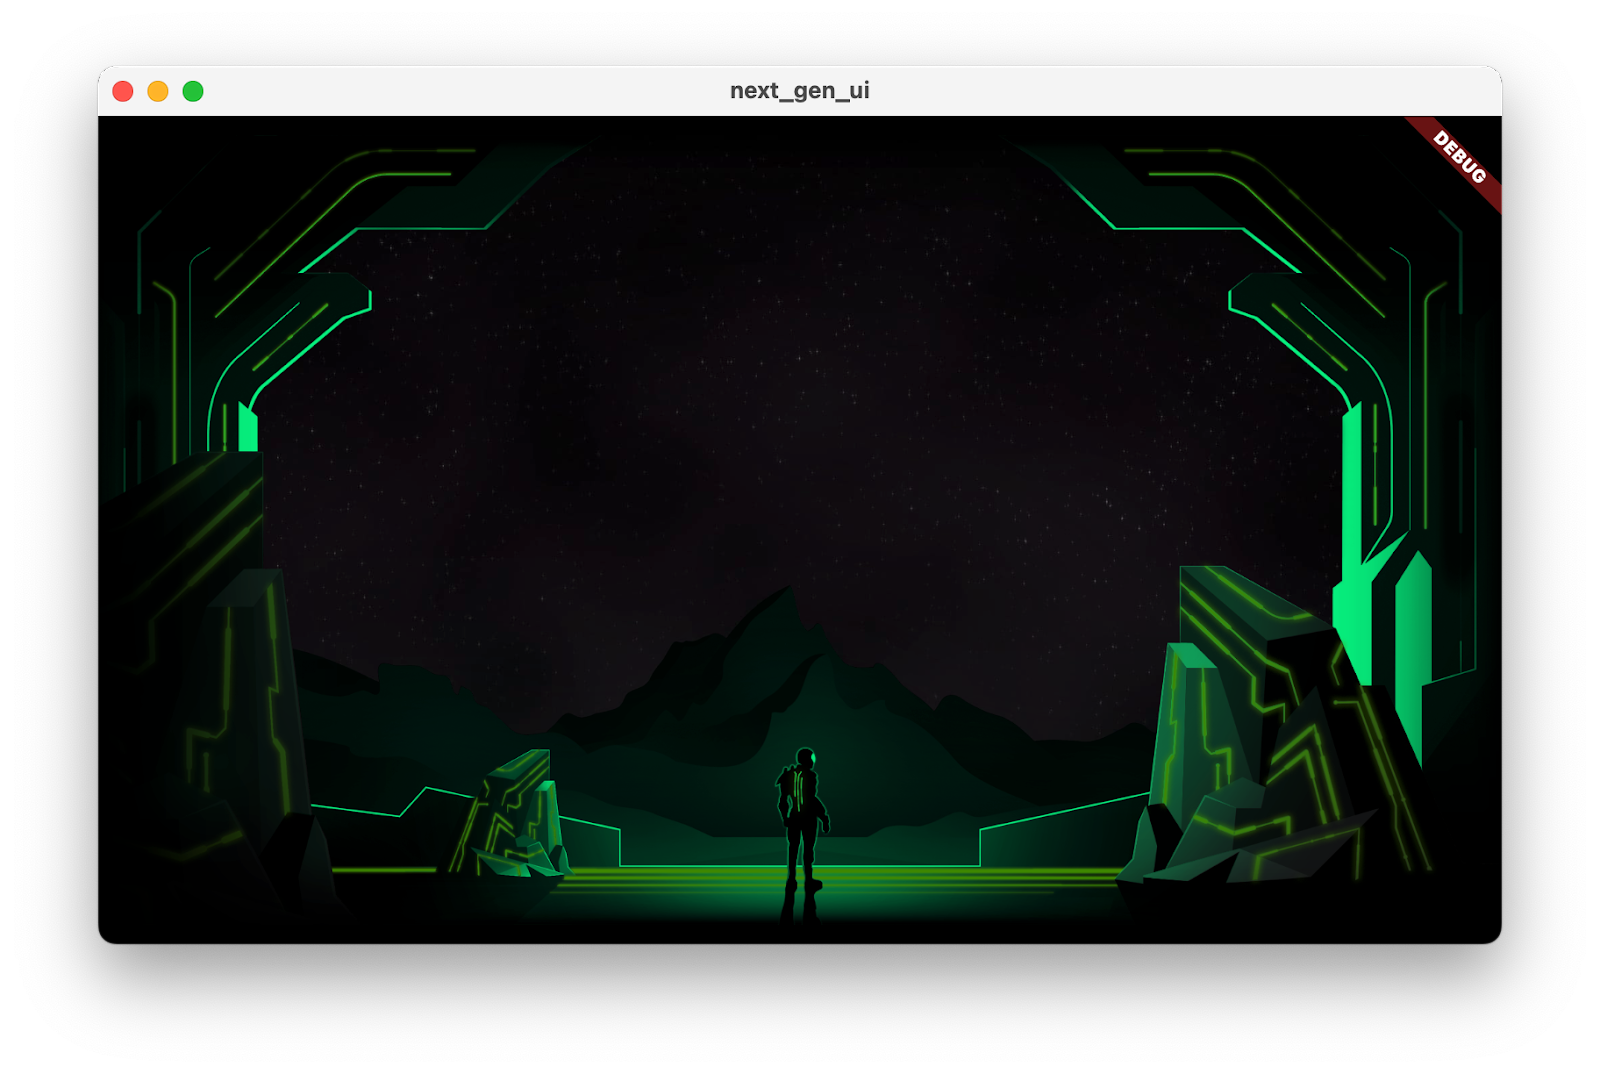
這是應用程式的另一個版本,這次的藝術資產已染成綠色。
4. 新增 UI
在這個步驟中,您會在上一步建立的場景上放置使用者介面。包括標題、難度選取按鈕,以及最重要的「開始」按鈕。
請加入標題
- 在
lib/title_screen目錄中建立title_screen_ui.dart檔案,並在檔案中新增下列內容:
lib/title_screen/title_screen_ui.dart
import 'package:extra_alignments/extra_alignments.dart';
import 'package:flutter/material.dart';
import 'package:gap/gap.dart';

import '../assets.dart';
import '../common/ui_scaler.dart';
import '../styles.dart';

class TitleScreenUi extends StatelessWidget {
  const TitleScreenUi({
    super.key,
  });
  @override
  Widget build(BuildContext context) {
    return const Padding(
      padding: EdgeInsets.symmetric(vertical: 40, horizontal: 50),
      child: Stack(
        children: [
          /// Title Text
          TopLeft(
            child: UiScaler(
              alignment: Alignment.topLeft,
              child: _TitleText(),
            ),
          ),
        ],
      ),
    );
  }
}

class _TitleText extends StatelessWidget {
  const _TitleText();

  @override
  Widget build(BuildContext context) {
    return Column(
      mainAxisSize: MainAxisSize.min,
      crossAxisAlignment: CrossAxisAlignment.start,
      children: [
        const Gap(20),
        Row(
          mainAxisSize: MainAxisSize.min,
          children: [
            Transform.translate(
              offset: Offset(-(TextStyles.h1.letterSpacing! * .5), 0),
              child: Text('OUTPOST', style: TextStyles.h1),
            ),
            Image.asset(AssetPaths.titleSelectedLeft, height: 65),
            Text('57', style: TextStyles.h2),
            Image.asset(AssetPaths.titleSelectedRight, height: 65),
          ],
        ),
        Text('INTO THE UNKNOWN', style: TextStyles.h3),
      ],
    );
  }
}
這個小工具包含標題,以及構成這個應用程式使用者介面的所有按鈕。
- 更新
lib/title_screen/title_screen.dart檔案,如下所示:
lib/title_screen/title_screen.dart
import 'package:flutter/material.dart';

import '../assets.dart';
import '../styles.dart';
import 'title_screen_ui.dart';                            // Add this import

class TitleScreen extends StatelessWidget {
  const TitleScreen({super.key});

  final _finalReceiveLightAmt = 0.7;
  final _finalEmitLightAmt = 0.5;

  @override
  Widget build(BuildContext context) {
    final orbColor = AppColors.orbColors[0];
    final emitColor = AppColors.emitColors[0];

    return Scaffold(
      backgroundColor: Colors.black,
      body: Center(
        child: Stack(
          children: [
            /// Bg-Base
            Image.asset(AssetPaths.titleBgBase),

            /// Bg-Receive
            _LitImage(
              color: orbColor,
              imgSrc: AssetPaths.titleBgReceive,
              lightAmt: _finalReceiveLightAmt,
            ),

            /// Mg-Base
            _LitImage(
              imgSrc: AssetPaths.titleMgBase,
              color: orbColor,
              lightAmt: _finalReceiveLightAmt,
            ),

            /// Mg-Receive
            _LitImage(
              imgSrc: AssetPaths.titleMgReceive,
              color: orbColor,
              lightAmt: _finalReceiveLightAmt,
            ),

            /// Mg-Emit
            _LitImage(
              imgSrc: AssetPaths.titleMgEmit,
              color: emitColor,
              lightAmt: _finalEmitLightAmt,
            ),

            /// Fg-Rocks
            Image.asset(AssetPaths.titleFgBase),

            /// Fg-Receive
            _LitImage(
              imgSrc: AssetPaths.titleFgReceive,
              color: orbColor,
              lightAmt: _finalReceiveLightAmt,
            ),

            /// Fg-Emit
            _LitImage(
              imgSrc: AssetPaths.titleFgEmit,
              color: emitColor,
              lightAmt: _finalEmitLightAmt,
            ),

            /// UI
            const Positioned.fill(                        // Add from here...
              child: TitleScreenUi(),
            ),                                            // to here.
          ],
        ),
      ),
    );
  }
}

class _LitImage extends StatelessWidget {
  const _LitImage({
    required this.color,
    required this.imgSrc,
    required this.lightAmt,
  });
  final Color color;
  final String imgSrc;
  final double lightAmt;

  @override
  Widget build(BuildContext context) {
    final hsl = HSLColor.fromColor(color);
    return Image.asset(
      imgSrc,
      color: hsl.withLightness(hsl.lightness * lightAmt).toColor(),
      colorBlendMode: BlendMode.modulate,
    );
  }
}
執行這段程式碼會顯示標題,也就是使用者介面的開頭。
![程式碼研究室應用程式正在執行,標題顯示「Outpost [57] Into the unknown」](https://codelabs.developers.google.cn/static/codelabs/flutter-next-gen-uis/img/ed313b0bbcc38b66.png?authuser=0&hl=zh-tw)
新增難度按鈕
- 更新
title_screen_ui.dart,為focusable_control_builder套件新增匯入項目:
lib/title_screen/title_screen_ui.dart
import 'package:extra_alignments/extra_alignments.dart';
import 'package:flutter/material.dart';
import 'package:focusable_control_builder/focusable_control_builder.dart'; // Add import
import 'package:gap/gap.dart';

import '../assets.dart';
import '../common/ui_scaler.dart';
import '../styles.dart';
- 在
TitleScreenUi小工具中新增下列項目:
lib/title_screen/title_screen_ui.dart
class TitleScreenUi extends StatelessWidget {
  const TitleScreenUi({
    super.key,
    required this.difficulty,                            // Edit from here...
    required this.onDifficultyPressed,
    required this.onDifficultyFocused,
  });

  final int difficulty;
  final void Function(int difficulty) onDifficultyPressed;
  final void Function(int? difficulty) onDifficultyFocused; // to here.

  @override
  Widget build(BuildContext context) {
    return Padding(                                      // Move this const...
      padding: const EdgeInsets.symmetric(vertical: 40, horizontal: 50), // to here.
      child: Stack(
        children: [
          /// Title Text
          const TopLeft(                                 // Add a const here, as well
            child: UiScaler(
              alignment: Alignment.topLeft,
              child: _TitleText(),
            ),
          ),

          /// Difficulty Btns
          BottomLeft(                                    // Add from here...
            child: UiScaler(
              alignment: Alignment.bottomLeft,
              child: _DifficultyBtns(
                difficulty: difficulty,
                onDifficultyPressed: onDifficultyPressed,
                onDifficultyFocused: onDifficultyFocused,
              ),
            ),
          ),                                             // to here.
        ],
      ),
    );
  }
}
- 新增下列兩個小工具,實作難度按鈕:
lib/title_screen/title_screen_ui.dart
class _DifficultyBtns extends StatelessWidget {
  const _DifficultyBtns({
    required this.difficulty,
    required this.onDifficultyPressed,
    required this.onDifficultyFocused,
  });

  final int difficulty;
  final void Function(int difficulty) onDifficultyPressed;
  final void Function(int? difficulty) onDifficultyFocused;

  @override
  Widget build(BuildContext context) {
    return Column(
      mainAxisSize: MainAxisSize.min,
      children: [
        _DifficultyBtn(
          label: 'Casual',
          selected: difficulty == 0,
          onPressed: () => onDifficultyPressed(0),
          onHover: (over) => onDifficultyFocused(over ? 0 : null),
        ),
        _DifficultyBtn(
          label: 'Normal',
          selected: difficulty == 1,
          onPressed: () => onDifficultyPressed(1),
          onHover: (over) => onDifficultyFocused(over ? 1 : null),
        ),
        _DifficultyBtn(
          label: 'Hardcore',
          selected: difficulty == 2,
          onPressed: () => onDifficultyPressed(2),
          onHover: (over) => onDifficultyFocused(over ? 2 : null),
        ),
        const Gap(20),
      ],
    );
  }
}

class _DifficultyBtn extends StatelessWidget {
  const _DifficultyBtn({
    required this.selected,
    required this.onPressed,
    required this.onHover,
    required this.label,
  });
  final String label;
  final bool selected;
  final VoidCallback onPressed;
  final void Function(bool hasFocus) onHover;

  @override
  Widget build(BuildContext context) {
    return FocusableControlBuilder(
      onPressed: onPressed,
      onHoverChanged: (_, state) => onHover.call(state.isHovered),
      builder: (_, state) {
        return Padding(
          padding: const EdgeInsets.all(8.0),
          child: SizedBox(
            width: 250,
            height: 60,
            child: Stack(
              children: [
                /// Bg with fill and outline
                Container(
                  decoration: BoxDecoration(
                    color: const Color(0xFF00D1FF).withOpacity(.1),
                    border: Border.all(color: Colors.white, width: 5),
                  ),
                ),

                if (state.isHovered || state.isFocused) ...[
                  Container(
                    decoration: BoxDecoration(
                      color: const Color(0xFF00D1FF).withOpacity(.1),
                    ),
                  ),
                ],

                /// cross-hairs (selected state)
                if (selected) ...[
                  CenterLeft(
                    child: Image.asset(AssetPaths.titleSelectedLeft),
                  ),
                  CenterRight(
                    child: Image.asset(AssetPaths.titleSelectedRight),
                  ),
                ],

                /// Label
                Center(
                  child: Text(label.toUpperCase(), style: TextStyles.btn),
                ),
              ],
            ),
          ),
        );
      },
    );
  }
}
- 將
TitleScreen小工具從無狀態轉換為有狀態,並新增狀態,以便根據難度變更色彩配置:
lib/title_screen/title_screen.dart
import 'package:flutter/material.dart';

import '../assets.dart';
import '../styles.dart';
import 'title_screen_ui.dart';

class TitleScreen extends StatefulWidget {
  const TitleScreen({super.key});

  @override
  State<TitleScreen> createState() => _TitleScreenState();
}

class _TitleScreenState extends State<TitleScreen> {
  Color get _emitColor =>
      AppColors.emitColors[_difficultyOverride ?? _difficulty];
  Color get _orbColor =>
      AppColors.orbColors[_difficultyOverride ?? _difficulty];

  /// Currently selected difficulty
  int _difficulty = 0;

  /// Currently focused difficulty (if any)
  int? _difficultyOverride;

  void _handleDifficultyPressed(int value) {
    setState(() => _difficulty = value);
  }

  void _handleDifficultyFocused(int? value) {
    setState(() => _difficultyOverride = value);
  }

  final _finalReceiveLightAmt = 0.7;
  final _finalEmitLightAmt = 0.5;

  @override
  Widget build(BuildContext context) {
    return Scaffold(
      backgroundColor: Colors.black,
      body: Center(
        child: Stack(
          children: [
            /// Bg-Base
            Image.asset(AssetPaths.titleBgBase),

            /// Bg-Receive
            _LitImage(
              color: _orbColor,
              imgSrc: AssetPaths.titleBgReceive,
              lightAmt: _finalReceiveLightAmt,
            ),

            /// Mg-Base
            _LitImage(
              imgSrc: AssetPaths.titleMgBase,
              color: _orbColor,
              lightAmt: _finalReceiveLightAmt,
            ),

            /// Mg-Receive
            _LitImage(
              imgSrc: AssetPaths.titleMgReceive,
              color: _orbColor,
              lightAmt: _finalReceiveLightAmt,
            ),

            /// Mg-Emit
            _LitImage(
              imgSrc: AssetPaths.titleMgEmit,
              color: _emitColor,
              lightAmt: _finalEmitLightAmt,
            ),

            /// Fg-Rocks
            Image.asset(AssetPaths.titleFgBase),

            /// Fg-Receive
            _LitImage(
              imgSrc: AssetPaths.titleFgReceive,
              color: _orbColor,
              lightAmt: _finalReceiveLightAmt,
            ),

            /// Fg-Emit
            _LitImage(
              imgSrc: AssetPaths.titleFgEmit,
              color: _emitColor,
              lightAmt: _finalEmitLightAmt,
            ),

            /// UI
            Positioned.fill(
              child: TitleScreenUi(
                difficulty: _difficulty,
                onDifficultyFocused: _handleDifficultyFocused,
                onDifficultyPressed: _handleDifficultyPressed,
              ),
            ),
          ],
        ),
      ),
    );
  }
}

class _LitImage extends StatelessWidget {
  const _LitImage({
    required this.color,
    required this.imgSrc,
    required this.lightAmt,
  });
  final Color color;
  final String imgSrc;
  final double lightAmt;

  @override
  Widget build(BuildContext context) {
    final hsl = HSLColor.fromColor(color);
    return Image.asset(
      imgSrc,
      color: hsl.withLightness(hsl.lightness * lightAmt).toColor(),
      colorBlendMode: BlendMode.modulate,
    );
  }
}
以下是兩種不同難度設定的使用者介面。請注意,套用為灰階圖片遮罩的難度顏色會產生逼真的反射效果!
|
|
新增開始按鈕
- 更新
title_screen_ui.dart檔案。在TitleScreenUi小工具中新增下列項目:
lib/title_screen/title_screen_ui.dart
class TitleScreenUi extends StatelessWidget {
  const TitleScreenUi({
    super.key,
    required this.difficulty,
    required this.onDifficultyPressed,
    required this.onDifficultyFocused,
  });

  final int difficulty;
  final void Function(int difficulty) onDifficultyPressed;
  final void Function(int? difficulty) onDifficultyFocused;

  @override
  Widget build(BuildContext context) {
    return Padding(
      padding: const EdgeInsets.symmetric(vertical: 40, horizontal: 50),
      child: Stack(
        children: [
          /// Title Text
          const TopLeft(
            child: UiScaler(
              alignment: Alignment.topLeft,
              child: _TitleText(),
            ),
          ),

          /// Difficulty Btns
          BottomLeft(
            child: UiScaler(
              alignment: Alignment.bottomLeft,
              child: _DifficultyBtns(
                difficulty: difficulty,
                onDifficultyPressed: onDifficultyPressed,
                onDifficultyFocused: onDifficultyFocused,
              ),
            ),
          ),

          /// StartBtn
          BottomRight(                                    // Add from here...
            child: UiScaler(
              alignment: Alignment.bottomRight,
              child: Padding(
                padding: const EdgeInsets.only(bottom: 20, right: 40),
                child: _StartBtn(onPressed: () {}),
              ),
            ),
          ),                                              // to here.
        ],
      ),
    );
  }
}
- 新增下列小工具,實作開始按鈕:
lib/title_screen/title_screen_ui.dart
class _StartBtn extends StatefulWidget {
  const _StartBtn({required this.onPressed});
  final VoidCallback onPressed;

  @override
  State<_StartBtn> createState() => _StartBtnState();
}

class _StartBtnState extends State<_StartBtn> {
  AnimationController? _btnAnim;
  bool _wasHovered = false;

  @override
  Widget build(BuildContext context) {
    return FocusableControlBuilder(
      cursor: SystemMouseCursors.click,
      onPressed: widget.onPressed,
      builder: (_, state) {
        if ((state.isHovered || state.isFocused) &&
            !_wasHovered &&
            _btnAnim?.status != AnimationStatus.forward) {
          _btnAnim?.forward(from: 0);
        }
        _wasHovered = (state.isHovered || state.isFocused);
        return SizedBox(
          width: 520,
          height: 100,
          child: Stack(
            children: [
              Positioned.fill(child: Image.asset(AssetPaths.titleStartBtn)),
              if (state.isHovered || state.isFocused) ...[
                Positioned.fill(
                    child: Image.asset(AssetPaths.titleStartBtnHover)),
              ],
              Center(
                child: Row(
                  mainAxisAlignment: MainAxisAlignment.end,
                  children: [
                    Text('START MISSION',
                        style: TextStyles.btn
                            .copyWith(fontSize: 24, letterSpacing: 18)),
                  ],
                ),
              ),
            ],
          ),
        );
      },
    );
  }
}
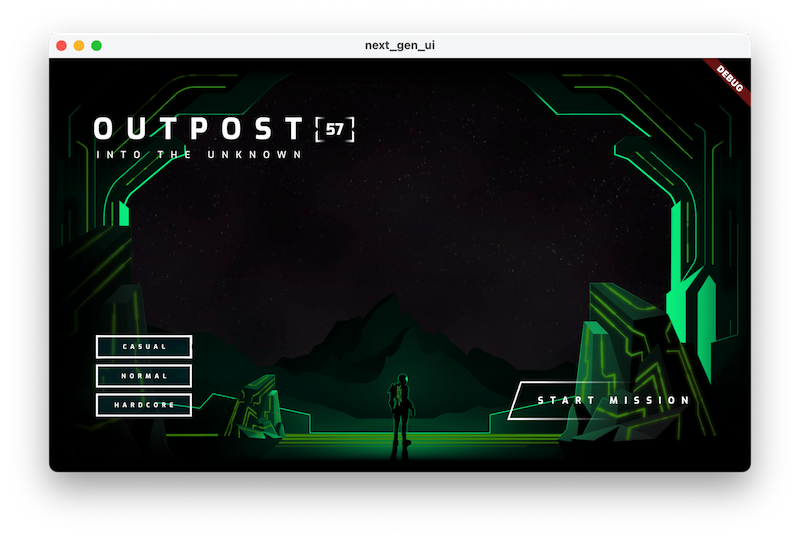
以下是執行應用程式的畫面,其中包含完整的一組按鈕。
5. 新增動畫
在這個步驟中,您將為使用者介面和藝術資產的顏色轉換製作動畫。
淡入標題
在這個步驟中,您會使用多種方法為 Flutter 應用程式製作動畫。其中一種方法是使用 flutter_animate。只要您在應用程式中進行熱重載,這個套件支援的動畫就會自動重播,以加快開發疊代速度。
- 修改
lib/main.dart中的程式碼,如下所示:
lib/main.dart
import 'dart:io' show Platform;

import 'package:flutter/foundation.dart' show kIsWeb;
import 'package:flutter/material.dart';
import 'package:flutter_animate/flutter_animate.dart';   // Add this import
import 'package:window_size/window_size.dart';

import 'title_screen/title_screen.dart';

void main() {
  if (!kIsWeb && (Platform.isWindows || Platform.isLinux || Platform.isMacOS)) {
    WidgetsFlutterBinding.ensureInitialized();
    setWindowMinSize(const Size(800, 500));
  }
  Animate.restartOnHotReload = true;                     // Add this line
  runApp(const NextGenApp());
}

class NextGenApp extends StatelessWidget {
  const NextGenApp({super.key});

  @override
  Widget build(BuildContext context) {
    return MaterialApp(
      themeMode: ThemeMode.dark,
      darkTheme: ThemeData(brightness: Brightness.dark),
      home: const TitleScreen(),
    );
  }
}
- 如要使用
flutter_animate套件,請務必匯入該套件。在lib/title_screen/title_screen_ui.dart中新增匯入項目,如下所示:
lib/title_screen/title_screen_ui.dart
import 'package:extra_alignments/extra_alignments.dart';
import 'package:flutter/material.dart';
import 'package:flutter_animate/flutter_animate.dart';   // Add this import
import 'package:focusable_control_builder/focusable_control_builder.dart';
import 'package:gap/gap.dart';

import '../assets.dart';
import '../common/ui_scaler.dart';
import '../styles.dart';

class TitleScreenUi extends StatelessWidget {
- 編輯
_TitleText小工具,為標題新增動畫,如下所示:
lib/title_screen/title_screen_ui.dart
class _TitleText extends StatelessWidget {
  const _TitleText();

  @override
  Widget build(BuildContext context) {
    return Column(
      mainAxisSize: MainAxisSize.min,
      crossAxisAlignment: CrossAxisAlignment.start,
      children: [
        const Gap(20),
        Row(
          mainAxisSize: MainAxisSize.min,
          children: [
            Transform.translate(
              offset: Offset(-(TextStyles.h1.letterSpacing! * .5), 0),
              child: Text('OUTPOST', style: TextStyles.h1),
            ),
            Image.asset(AssetPaths.titleSelectedLeft, height: 65),
            Text('57', style: TextStyles.h2),
            Image.asset(AssetPaths.titleSelectedRight, height: 65),
          ],                                             // Edit from here...
        ).animate().fadeIn(delay: .8.seconds, duration: .7.seconds),
        Text('INTO THE UNKNOWN', style: TextStyles.h3)
            .animate()
            .fadeIn(delay: 1.seconds, duration: .7.seconds),
      ],                                                 // to here.
    );
  }
}
- 按下「重新載入」,即可看到標題淡入。
淡入難度按鈕
- 編輯
_DifficultyBtns小工具,為難度按鈕的初始外觀新增動畫,如下所示:
lib/title_screen/title_screen_ui.dart
class _DifficultyBtns extends StatelessWidget {
  const _DifficultyBtns({
    required this.difficulty,
    required this.onDifficultyPressed,
    required this.onDifficultyFocused,
  });

  final int difficulty;
  final void Function(int difficulty) onDifficultyPressed;
  final void Function(int? difficulty) onDifficultyFocused;

  @override
  Widget build(BuildContext context) {
    return Column(
      mainAxisSize: MainAxisSize.min,
      children: [
        _DifficultyBtn(
          label: 'Casual',
          selected: difficulty == 0,
          onPressed: () => onDifficultyPressed(0),
          onHover: (over) => onDifficultyFocused(over ? 0 : null),
        )                                                // Add from here...
            .animate()
            .fadeIn(delay: 1.3.seconds, duration: .35.seconds)
            .slide(begin: const Offset(0, .2)),          // to here
        _DifficultyBtn(
          label: 'Normal',
          selected: difficulty == 1,
          onPressed: () => onDifficultyPressed(1),
          onHover: (over) => onDifficultyFocused(over ? 1 : null),
        )                                                // Add from here...
            .animate()
            .fadeIn(delay: 1.5.seconds, duration: .35.seconds)
            .slide(begin: const Offset(0, .2)),          // to here
        _DifficultyBtn(
          label: 'Hardcore',
          selected: difficulty == 2,
          onPressed: () => onDifficultyPressed(2),
          onHover: (over) => onDifficultyFocused(over ? 2 : null),
        )                                                // Add from here...
            .animate()
            .fadeIn(delay: 1.7.seconds, duration: .35.seconds)
            .slide(begin: const Offset(0, .2)),          // to here
        const Gap(20),
      ],
    );
  }
}
- 按下「重新載入」,即可看到難度按鈕依序出現,並向上滑動。
淡入「開始」按鈕
- 編輯
_StartBtnState狀態類別,為開始按鈕新增動畫,如下所示:
lib/title_screen/title_screen_ui.dart
class _StartBtnState extends State<_StartBtn> {
  AnimationController? _btnAnim;
  bool _wasHovered = false;

  @override
  Widget build(BuildContext context) {
    return FocusableControlBuilder(
      cursor: SystemMouseCursors.click,
      onPressed: widget.onPressed,
      builder: (_, state) {
        if ((state.isHovered || state.isFocused) &&
            !_wasHovered &&
            _btnAnim?.status != AnimationStatus.forward) {
          _btnAnim?.forward(from: 0);
        }
        _wasHovered = (state.isHovered || state.isFocused);
        return SizedBox(
          width: 520,
          height: 100,
          child: Stack(
            children: [
              Positioned.fill(child: Image.asset(AssetPaths.titleStartBtn)),
              if (state.isHovered || state.isFocused) ...[
                Positioned.fill(
                    child: Image.asset(AssetPaths.titleStartBtnHover)),
              ],
              Center(
                child: Row(
                  mainAxisAlignment: MainAxisAlignment.end,
                  children: [
                    Text('START MISSION',
                        style: TextStyles.btn
                            .copyWith(fontSize: 24, letterSpacing: 18)),
                  ],
                ),
              ),
            ],
          )                                              // Edit from here...
              .animate(autoPlay: false, onInit: (c) => _btnAnim = c)
              .shimmer(duration: .7.seconds, color: Colors.black),
        )
            .animate()
            .fadeIn(delay: 2.3.seconds)
            .slide(begin: const Offset(0, .2));
      },                                                 // to here.
    );
  }
}
- 按下「重新載入」,即可看到難度按鈕依序出現,並向上滑動。
為難度懸停效果製作動畫
如要為難度按鈕的懸停狀態新增動畫,請按照下列方式編輯 _DifficultyBtn 狀態類別:
lib/title_screen/title_screen_ui.dart
class _DifficultyBtn extends StatelessWidget {
  const _DifficultyBtn({
    required this.selected,
    required this.onPressed,
    required this.onHover,
    required this.label,
  });
  final String label;
  final bool selected;
  final VoidCallback onPressed;
  final void Function(bool hasFocus) onHover;

  @override
  Widget build(BuildContext context) {
    return FocusableControlBuilder(
      onPressed: onPressed,
      onHoverChanged: (_, state) => onHover.call(state.isHovered),
      builder: (_, state) {
        return Padding(
          padding: const EdgeInsets.all(8.0),
          child: SizedBox(
            width: 250,
            height: 60,
            child: Stack(
              children: [
                /// Bg with fill and outline
                AnimatedOpacity(                         // Edit from here
                  opacity: (!selected && (state.isHovered || state.isFocused))
                      ? 1
                      : 0,
                  duration: .3.seconds,
                  child: Container(
                    decoration: BoxDecoration(
                      color: const Color(0xFF00D1FF).withOpacity(.1),
                      border: Border.all(color: Colors.white, width: 5),
                    ),
                  ),
                ),                                       // to here.

                if (state.isHovered || state.isFocused) ...[
                  Container(
                    decoration: BoxDecoration(
                      color: const Color(0xFF00D1FF).withOpacity(.1),
                    ),
                  ),
                ],

                /// cross-hairs (selected state)
                if (selected) ...[
                  CenterLeft(
                    child: Image.asset(AssetPaths.titleSelectedLeft),
                  ),
                  CenterRight(
                    child: Image.asset(AssetPaths.titleSelectedRight),
                  ),
                ],

                /// Label
                Center(
                  child: Text(label.toUpperCase(), style: TextStyles.btn),
                ),
              ],
            ),
          ),
        );
      },
    );
  }
}
現在滑鼠懸停在未選取的難度按鈕上時,按鈕會顯示 BoxDecoration。
為顏色變化加入動畫效果
- 背景顏色會立即變更,而且變化劇烈。建議在色彩配置之間,為亮起的圖片加上動畫效果。將
flutter_animate新增至lib/title_screen/title_screen.dart:
lib/title_screen/title_screen.dart
import 'package:flutter/material.dart';
import 'package:flutter_animate/flutter_animate.dart';    // Add this import

import '../assets.dart';
import '../styles.dart';
import 'title_screen_ui.dart';

class TitleScreen extends StatefulWidget {
- 在
lib/title_screen/title_screen.dart中新增_AnimatedColors小工具:
lib/title_screen/title_screen.dart
class _AnimatedColors extends StatelessWidget {
  const _AnimatedColors({
    required this.emitColor,
    required this.orbColor,
    required this.builder,
  });

  final Color emitColor;
  final Color orbColor;

  final Widget Function(BuildContext context, Color orbColor, Color emitColor)
      builder;

  @override
  Widget build(BuildContext context) {
    final duration = .5.seconds;
    return TweenAnimationBuilder(
      tween: ColorTween(begin: emitColor, end: emitColor),
      duration: duration,
      builder: (_, emitColor, __) {
        return TweenAnimationBuilder(
          tween: ColorTween(begin: orbColor, end: orbColor),
          duration: duration,
          builder: (context, orbColor, __) {
            return builder(context, orbColor!, emitColor!);
          },
        );
      },
    );
  }
}
- 使用剛建立的小工具,更新
_TitleScreenState中的build方法,以動畫方式呈現亮起圖片的顏色,如下所示:
lib/title_screen/title_screen.dart
class _TitleScreenState extends State<TitleScreen> {
  Color get _emitColor =>
      AppColors.emitColors[_difficultyOverride ?? _difficulty];
  Color get _orbColor =>
      AppColors.orbColors[_difficultyOverride ?? _difficulty];

  /// Selected difficulty
  int _difficulty = 0;

  /// Focused difficulty (if any)
  int? _difficultyOverride;

  void _handleDifficultyPressed(int value) {
    setState(() => _difficulty = value);
  }

  void _handleDifficultyFocused(int? value) {
    setState(() => _difficultyOverride = value);
  }

  final _finalReceiveLightAmt = 0.7;
  final _finalEmitLightAmt = 0.5;

  @override
  Widget build(BuildContext context) {
    return Scaffold(
      backgroundColor: Colors.black,
      body: Center(
        child: _AnimatedColors(                           // Edit from here...
          orbColor: _orbColor,
          emitColor: _emitColor,
          builder: (_, orbColor, emitColor) {
            return Stack(
              children: [
                /// Bg-Base
                Image.asset(AssetPaths.titleBgBase),

                /// Bg-Receive
                _LitImage(
                  color: orbColor,
                  imgSrc: AssetPaths.titleBgReceive,
                  lightAmt: _finalReceiveLightAmt,
                ),

                /// Mg-Base
                _LitImage(
                  imgSrc: AssetPaths.titleMgBase,
                  color: orbColor,
                  lightAmt: _finalReceiveLightAmt,
                ),

                /// Mg-Receive
                _LitImage(
                  imgSrc: AssetPaths.titleMgReceive,
                  color: orbColor,
                  lightAmt: _finalReceiveLightAmt,
                ),

                /// Mg-Emit
                _LitImage(
                  imgSrc: AssetPaths.titleMgEmit,
                  color: emitColor,
                  lightAmt: _finalEmitLightAmt,
                ),

                /// Fg-Rocks
                Image.asset(AssetPaths.titleFgBase),

                /// Fg-Receive
                _LitImage(
                  imgSrc: AssetPaths.titleFgReceive,
                  color: orbColor,
                  lightAmt: _finalReceiveLightAmt,
                ),

                /// Fg-Emit
                _LitImage(
                  imgSrc: AssetPaths.titleFgEmit,
                  color: emitColor,
                  lightAmt: _finalEmitLightAmt,
                ),

                /// UI
                Positioned.fill(
                  child: TitleScreenUi(
                    difficulty: _difficulty,
                    onDifficultyFocused: _handleDifficultyFocused,
                    onDifficultyPressed: _handleDifficultyPressed,
                  ),
                ),
              ],
            ).animate().fadeIn(duration: 1.seconds, delay: .3.seconds);
          },
        ),                                                // to here.
      ),
    );
  }
}
完成最後的編輯後,您已為畫面上的每個元素新增動畫,效果好多了!
6. 新增片段著色器
在這個步驟中,您要將片段著色器新增至應用程式。首先,您要使用著色器修改標題,營造更反烏托邦的感覺。接著,您會新增第二個著色器,建立一個圓球,做為頁面的中央焦點。
使用片段著色器扭曲標題
這項變更會導入 provider 套件,以便將編譯後的著色器傳遞至小工具樹狀結構。如要瞭解著色器載入方式,請參閱 lib/assets.dart 中的實作方式。
- 修改
lib/main.dart中的程式碼,如下所示:
lib/main.dart
import 'dart:io' show Platform;

import 'package:flutter/foundation.dart' show kIsWeb;
import 'package:flutter/material.dart';
import 'package:flutter_animate/flutter_animate.dart';
import 'package:provider/provider.dart';                 // Add this import
import 'package:window_size/window_size.dart';

import 'assets.dart';                                    // Add this import
import 'title_screen/title_screen.dart';

void main() {
  if (!kIsWeb && (Platform.isWindows || Platform.isLinux || Platform.isMacOS)) {
    WidgetsFlutterBinding.ensureInitialized();
    setWindowMinSize(const Size(800, 500));
  }
  Animate.restartOnHotReload = true;
  runApp(                                                // Edit from here...
    FutureProvider<FragmentPrograms?>(
      create: (context) => loadFragmentPrograms(),
      initialData: null,
      child: const NextGenApp(),
    ),
  );                                                     // to here.
}

class NextGenApp extends StatelessWidget {
  const NextGenApp({super.key});

  @override
  Widget build(BuildContext context) {
    return MaterialApp(
      themeMode: ThemeMode.dark,
      darkTheme: ThemeData(brightness: Brightness.dark),
      home: const TitleScreen(),
    );
  }
}
- 如要使用
provider套件和step_01中包含的著色器公用程式,請匯入這些項目。在lib/title_screen/title_screen_ui.dart中新增匯入項目,如下所示:
lib/title_screen/title_screen_ui.dart
import 'package:extra_alignments/extra_alignments.dart';
import 'package:flutter/material.dart';
import 'package:flutter_animate/flutter_animate.dart';
import 'package:focusable_control_builder/focusable_control_builder.dart';
import 'package:gap/gap.dart';
import 'package:provider/provider.dart';                 // Add this import

import '../assets.dart';
import '../common/shader_effect.dart';                   // And this import
import '../common/ticking_builder.dart';                 // And this import
import '../common/ui_scaler.dart';
import '../styles.dart';

class TitleScreenUi extends StatelessWidget {
- 編輯
_TitleText小工具,使用著色器扭曲標題,如下所示:
lib/title_screen/title_screen_ui.dart
class _TitleText extends StatelessWidget {
  const _TitleText();

  @override
  Widget build(BuildContext context) {
    Widget content = Column(                             // Modify this line
      mainAxisSize: MainAxisSize.min,
      crossAxisAlignment: CrossAxisAlignment.start,
      children: [
        const Gap(20),
        Row(
          mainAxisSize: MainAxisSize.min,
          children: [
            Transform.translate(
              offset: Offset(-(TextStyles.h1.letterSpacing! * .5), 0),
              child: Text('OUTPOST', style: TextStyles.h1),
            ),
            Image.asset(AssetPaths.titleSelectedLeft, height: 65),
            Text('57', style: TextStyles.h2),
            Image.asset(AssetPaths.titleSelectedRight, height: 65),
          ],
        ).animate().fadeIn(delay: .8.seconds, duration: .7.seconds),
        Text('INTO THE UNKNOWN', style: TextStyles.h3)
            .animate()
            .fadeIn(delay: 1.seconds, duration: .7.seconds),
      ],
    );
    return Consumer<FragmentPrograms?>(                  // Add from here...
      builder: (context, fragmentPrograms, _) {
        if (fragmentPrograms == null) return content;
        return TickingBuilder(
          builder: (context, time) {
            return AnimatedSampler(
              (image, size, canvas) {
                const double overdrawPx = 30;
                final shader = fragmentPrograms.ui.fragmentShader();
                shader
                  ..setFloat(0, size.width)
                  ..setFloat(1, size.height)
                  ..setFloat(2, time)
                  ..setImageSampler(0, image);
                Rect rect = Rect.fromLTWH(-overdrawPx, -overdrawPx,
                    size.width + overdrawPx, size.height + overdrawPx);
                canvas.drawRect(rect, Paint()..shader = shader);
              },
              child: content,
            );
          },
        );
      },
    );                                                   // to here.
  }
}
您應該會看到標題扭曲變形,就像反烏托邦未來會發生的情況。
新增球體
現在在視窗中央加入圓球。您需要在開始按鈕中新增 onPressed 回呼。
- 在
lib/title_screen/title_screen_ui.dart中,按照下列步驟修改TitleScreenUi:
lib/title_screen/title_screen_ui.dart
class TitleScreenUi extends StatelessWidget {
  const TitleScreenUi({
    super.key,
    required this.difficulty,
    required this.onDifficultyPressed,
    required this.onDifficultyFocused,
    required this.onStartPressed,                         // Add this argument
  });

  final int difficulty;
  final void Function(int difficulty) onDifficultyPressed;
  final void Function(int? difficulty) onDifficultyFocused;
  final VoidCallback onStartPressed;                      // Add this attribute

  @override
  Widget build(BuildContext context) {
    return Padding(
      padding: const EdgeInsets.symmetric(vertical: 40, horizontal: 50),
      child: Stack(
        children: [
          /// Title Text
          const TopLeft(
            child: UiScaler(
              alignment: Alignment.topLeft,
              child: _TitleText(),
            ),
          ),

          /// Difficulty Btns
          BottomLeft(
            child: UiScaler(
              alignment: Alignment.bottomLeft,
              child: _DifficultyBtns(
                difficulty: difficulty,
                onDifficultyPressed: onDifficultyPressed,
                onDifficultyFocused: onDifficultyFocused,
              ),
            ),
          ),

          /// StartBtn
          BottomRight(
            child: UiScaler(
              alignment: Alignment.bottomRight,
              child: Padding(
                padding: const EdgeInsets.only(bottom: 20, right: 40),
                child: _StartBtn(onPressed: onStartPressed),  // Edit this line
              ),
            ),
          ),
        ],
      ),
    );
  }
}
您已使用回呼修改開始按鈕,現在需要對 lib/title_screen/title_screen.dart 檔案進行大量修改。
- 修改匯入項目,如下所示:
lib/title_screen/title_screen.dart
import 'dart:math';                                       // Add this import
import 'dart:ui';                                         // And this import

import 'package:flutter/material.dart';
import 'package:flutter/services.dart';                   // Add this import
import 'package:flutter_animate/flutter_animate.dart';

import '../assets.dart';
import '../orb_shader/orb_shader_config.dart';            // And this import
import '../orb_shader/orb_shader_widget.dart';            // And this import too
import '../styles.dart';
import 'title_screen_ui.dart';

class TitleScreen extends StatefulWidget {
- 修改
_TitleScreenState,使其符合下列內容。幾乎所有類別部分都會以某種方式修改。
lib/title_screen/title_screen.dart
class _TitleScreenState extends State<TitleScreen>
    with SingleTickerProviderStateMixin {
  final _orbKey = GlobalKey<OrbShaderWidgetState>();

  /// Editable Settings
  /// 0-1, receive lighting strength
  final _minReceiveLightAmt = .35;
  final _maxReceiveLightAmt = .7;

  /// 0-1, emit lighting strength
  final _minEmitLightAmt = .5;
  final _maxEmitLightAmt = 1;

  /// Internal
  var _mousePos = Offset.zero;

  Color get _emitColor =>
      AppColors.emitColors[_difficultyOverride ?? _difficulty];
  Color get _orbColor =>
      AppColors.orbColors[_difficultyOverride ?? _difficulty];

  /// Selected difficulty
  int _difficulty = 0;

  /// Focused difficulty (if any)
  int? _difficultyOverride;
  double _orbEnergy = 0;
  double _minOrbEnergy = 0;

  double get _finalReceiveLightAmt {
    final light =
        lerpDouble(_minReceiveLightAmt, _maxReceiveLightAmt, _orbEnergy) ?? 0;
    return light + _pulseEffect.value * .05 * _orbEnergy;
  }

  double get _finalEmitLightAmt {
    return lerpDouble(_minEmitLightAmt, _maxEmitLightAmt, _orbEnergy) ?? 0;
  }

  late final _pulseEffect = AnimationController(
    vsync: this,
    duration: _getRndPulseDuration(),
    lowerBound: -1,
    upperBound: 1,
  );

  Duration _getRndPulseDuration() => 100.ms + 200.ms * Random().nextDouble();

  double _getMinEnergyForDifficulty(int difficulty) => switch (difficulty) {
        1 => 0.3,
        2 => 0.6,
        _ => 0,
      };


  @override
  void initState() {
    super.initState();
    _pulseEffect.forward();
    _pulseEffect.addListener(_handlePulseEffectUpdate);
  }

  void _handlePulseEffectUpdate() {
    if (_pulseEffect.status == AnimationStatus.completed) {
      _pulseEffect.reverse();
      _pulseEffect.duration = _getRndPulseDuration();
    } else if (_pulseEffect.status == AnimationStatus.dismissed) {
      _pulseEffect.duration = _getRndPulseDuration();
      _pulseEffect.forward();
    }
  }

  void _handleDifficultyPressed(int value) {
    setState(() => _difficulty = value);
    _bumpMinEnergy();
  }

  Future<void> _bumpMinEnergy([double amount = 0.1]) async {
    setState(() {
      _minOrbEnergy = _getMinEnergyForDifficulty(_difficulty) + amount;
    });
    await Future<void>.delayed(.2.seconds);
    setState(() {
      _minOrbEnergy = _getMinEnergyForDifficulty(_difficulty);
    });
  }

  void _handleStartPressed() => _bumpMinEnergy(0.3);

  void _handleDifficultyFocused(int? value) {
    setState(() {
      _difficultyOverride = value;
      if (value == null) {
        _minOrbEnergy = _getMinEnergyForDifficulty(_difficulty);
      } else {
        _minOrbEnergy = _getMinEnergyForDifficulty(value);
      }
    });
  }

  /// Update mouse position so the orbWidget can use it, doing it here prevents
  /// btns from blocking the mouse-move events in the widget itself.
  void _handleMouseMove(PointerHoverEvent e) {
    setState(() {
      _mousePos = e.localPosition;
    });
  }

  @override
  Widget build(BuildContext context) {
    return Scaffold(
      backgroundColor: Colors.black,
      body: Center(
        child: MouseRegion(
          onHover: _handleMouseMove,
          child: _AnimatedColors(
            orbColor: _orbColor,
            emitColor: _emitColor,
            builder: (_, orbColor, emitColor) {
              return Stack(
                children: [
                  /// Bg-Base
                  Image.asset(AssetPaths.titleBgBase),

                  /// Bg-Receive
                  _LitImage(
                    color: orbColor,
                    imgSrc: AssetPaths.titleBgReceive,
                    pulseEffect: _pulseEffect,
                    lightAmt: _finalReceiveLightAmt,
                  ),

                  /// Orb
                  Positioned.fill(
                    child: Stack(
                      children: [
                        // Orb
                        OrbShaderWidget(
                          key: _orbKey,
                          mousePos: _mousePos,
                          minEnergy: _minOrbEnergy,
                          config: OrbShaderConfig(
                            ambientLightColor: orbColor,
                            materialColor: orbColor,
                            lightColor: orbColor,
                          ),
                          onUpdate: (energy) => setState(() {
                            _orbEnergy = energy;
                          }),
                        ),
                      ],
                    ),
                  ),

                  /// Mg-Base
                  _LitImage(
                    imgSrc: AssetPaths.titleMgBase,
                    color: orbColor,
                    pulseEffect: _pulseEffect,
                    lightAmt: _finalReceiveLightAmt,
                  ),

                  /// Mg-Receive
                  _LitImage(
                    imgSrc: AssetPaths.titleMgReceive,
                    color: orbColor,
                    pulseEffect: _pulseEffect,
                    lightAmt: _finalReceiveLightAmt,
                  ),

                  /// Mg-Emit
                  _LitImage(
                    imgSrc: AssetPaths.titleMgEmit,
                    color: emitColor,
                    pulseEffect: _pulseEffect,
                    lightAmt: _finalEmitLightAmt,
                  ),

                  /// Fg-Rocks
                  Image.asset(AssetPaths.titleFgBase),

                  /// Fg-Receive
                  _LitImage(
                    imgSrc: AssetPaths.titleFgReceive,
                    color: orbColor,
                    pulseEffect: _pulseEffect,
                    lightAmt: _finalReceiveLightAmt,
                  ),

                  /// Fg-Emit
                  _LitImage(
                    imgSrc: AssetPaths.titleFgEmit,
                    color: emitColor,
                    pulseEffect: _pulseEffect,
                    lightAmt: _finalEmitLightAmt,
                  ),

                  /// UI
                  Positioned.fill(
                    child: TitleScreenUi(
                      difficulty: _difficulty,
                      onDifficultyFocused: _handleDifficultyFocused,
                      onDifficultyPressed: _handleDifficultyPressed,
                      onStartPressed: _handleStartPressed,
                    ),
                  ),
                ],
              ).animate().fadeIn(duration: 1.seconds, delay: .3.seconds);
            },
          ),
        ),
      ),
    );
  }
}
- 按照下列方式修改
_LitImage:
lib/title_screen/title_screen.dart
class _LitImage extends StatelessWidget {
  const _LitImage({
    required this.color,
    required this.imgSrc,
    required this.pulseEffect,                            // Add this parameter
    required this.lightAmt,
  });
  final Color color;
  final String imgSrc;
  final AnimationController pulseEffect;                  // Add this attribute
  final double lightAmt;

  @override
  Widget build(BuildContext context) {
    final hsl = HSLColor.fromColor(color);
    return ListenableBuilder(                             // Edit from here...
      listenable: pulseEffect,
      builder: (context, child) {
        return Image.asset(
          imgSrc,
          color: hsl.withLightness(hsl.lightness * lightAmt).toColor(),
          colorBlendMode: BlendMode.modulate,
        );
      },
    );                                                    // to here.
  }
}
這是新增的結果。
7. 新增粒子動畫
在這個步驟中,您會新增粒子動畫,為應用程式建立細微的脈衝動作。
在各處新增粒子
- 建立新的
lib/title_screen/particle_overlay.dart檔案,然後加入下列程式碼:
lib/title_screen/particle_overlay.dart
import 'dart:math';

import 'package:flutter/material.dart';
import 'package:particle_field/particle_field.dart';
import 'package:rnd/rnd.dart';

class ParticleOverlay extends StatelessWidget {
  const ParticleOverlay({super.key, required this.color, required this.energy});

  final Color color;
  final double energy;

  @override
  Widget build(BuildContext context) {
    return ParticleField(
      spriteSheet: SpriteSheet(
        image: const AssetImage('assets/images/particle-wave.png'),
      ),
      // blend the image's alpha with the specified color:
      blendMode: BlendMode.dstIn,

      // this runs every tick:
      onTick: (controller, _, size) {
        List<Particle> particles = controller.particles;

        // add a new particle with random angle, distance & velocity:
        double a = rnd(pi * 2);
        double dist = rnd(1, 4) * 35 + 150 * energy;
        double vel = rnd(1, 2) * (1 + energy * 1.8);
        particles.add(Particle(
          // how many ticks this particle will live:
          lifespan: rnd(1, 2) * 20 + energy * 15,
          // starting distance from center:
          x: cos(a) * dist,
          y: sin(a) * dist,
          // starting velocity:
          vx: cos(a) * vel,
          vy: sin(a) * vel,
          // other starting values:
          rotation: a,
          scale: rnd(1, 2) * 0.6 + energy * 0.5,
        ));

        // update all of the particles:
        for (int i = particles.length - 1; i >= 0; i--) {
          Particle p = particles[i];
          if (p.lifespan <= 0) {
            // particle is expired, remove it:
            particles.removeAt(i);
            continue;
          }
          p.update(
            scale: p.scale * 1.025,
            vx: p.vx * 1.025,
            vy: p.vy * 1.025,
            color: color.withOpacity(p.lifespan * 0.001 + 0.01),
            lifespan: p.lifespan - 1,
          );
        }
      },
    );
  }
}
- 按照下列方式修改
lib/title_screen/title_screen.dart的匯入項目:
lib/title_screen/title_screen.dart
import 'dart:math';
import 'dart:ui';

import 'package:flutter/material.dart';
import 'package:flutter/services.dart';
import 'package:flutter_animate/flutter_animate.dart';

import '../assets.dart';
import '../orb_shader/orb_shader_config.dart';
import '../orb_shader/orb_shader_widget.dart';
import '../styles.dart';
import 'particle_overlay.dart';                          // Add this import
import 'title_screen_ui.dart';

class TitleScreen extends StatefulWidget {
- 修改
_TitleScreenState的build方法,將ParticleOverlay新增至 UI,如下所示:
lib/title_screen/title_screen.dart
@override
Widget build(BuildContext context) {
  return Scaffold(
    backgroundColor: Colors.black,
    body: Center(
      child: MouseRegion(
        onHover: _handleMouseMove,
        child: _AnimatedColors(
          orbColor: _orbColor,
          emitColor: _emitColor,
          builder: (_, orbColor, emitColor) {
            return Stack(
              children: [
                /// Bg-Base
                Image.asset(AssetPaths.titleBgBase),

                /// Bg-Receive
                _LitImage(
                  color: orbColor,
                  imgSrc: AssetPaths.titleBgReceive,
                  pulseEffect: _pulseEffect,
                  lightAmt: _finalReceiveLightAmt,
                ),

                /// Orb
                Positioned.fill(
                  child: Stack(
                    children: [
                      // Orb
                      OrbShaderWidget(
                        key: _orbKey,
                        mousePos: _mousePos,
                        minEnergy: _minOrbEnergy,
                        config: OrbShaderConfig(
                          ambientLightColor: orbColor,
                          materialColor: orbColor,
                          lightColor: orbColor,
                        ),
                        onUpdate: (energy) => setState(() {
                          _orbEnergy = energy;
                        }),
                      ),
                    ],
                  ),
                ),

                /// Mg-Base
                _LitImage(
                  imgSrc: AssetPaths.titleMgBase,
                  color: orbColor,
                  pulseEffect: _pulseEffect,
                  lightAmt: _finalReceiveLightAmt,
                ),

                /// Mg-Receive
                _LitImage(
                  imgSrc: AssetPaths.titleMgReceive,
                  color: orbColor,
                  pulseEffect: _pulseEffect,
                  lightAmt: _finalReceiveLightAmt,
                ),

                /// Mg-Emit
                _LitImage(
                  imgSrc: AssetPaths.titleMgEmit,
                  color: emitColor,
                  pulseEffect: _pulseEffect,
                  lightAmt: _finalEmitLightAmt,
                ),

                /// Particle Field
                Positioned.fill(                          // Add from here...
                  child: IgnorePointer(
                    child: ParticleOverlay(
                      color: orbColor,
                      energy: _orbEnergy,
                    ),
                  ),
                ),                                        // to here.

                /// Fg-Rocks
                Image.asset(AssetPaths.titleFgBase),

                /// Fg-Receive
                _LitImage(
                  imgSrc: AssetPaths.titleFgReceive,
                  color: orbColor,
                  pulseEffect: _pulseEffect,
                  lightAmt: _finalReceiveLightAmt,
                ),

                /// Fg-Emit
                _LitImage(
                  imgSrc: AssetPaths.titleFgEmit,
                  color: emitColor,
                  pulseEffect: _pulseEffect,
                  lightAmt: _finalEmitLightAmt,
                ),

                /// UI
                Positioned.fill(
                  child: TitleScreenUi(
                    difficulty: _difficulty,
                    onDifficultyFocused: _handleDifficultyFocused,
                    onDifficultyPressed: _handleDifficultyPressed,
                    onStartPressed: _handleStartPressed,
                  ),
                ),
              ],
            ).animate().fadeIn(duration: 1.seconds, delay: .3.seconds);
          },
        ),
      ),
    ),
  );
}
最終結果包含動畫、片段著色器和粒子效果,而且適用於多個平台!
在任何地方新增粒子,包括網頁
目前這段程式碼有一個小問題。Flutter 在網路上執行時,可以使用兩種替代的算繪引擎:CanvasKit 引擎 (預設用於電腦類別的瀏覽器) 和 HTML DOM 算繪器 (預設用於行動裝置)。問題在於 HTML DOM 算繪器不支援片段著色器。
修正方法是只使用 CanvasKit 算繪器建構網頁。如要這麼做,請在建構指令中加入標記,如下所示:
$ flutter build web --web-renderer canvaskit
Font asset "MaterialIcons-Regular.otf" was tree-shaken, reducing it from 1645184 to 7692 bytes (99.5% reduction). Tree-shaking can be disabled by providing the --no-tree-shake-icons flag
when building your app.
Font asset "CupertinoIcons.ttf" was tree-shaken, reducing it from 257628 to 1172 bytes (99.5% reduction). Tree-shaking can be disabled by providing the --no-tree-shake-icons flag when
building your app.
Compiling lib/main.dart for the Web...                             15.6s
✓ Built build/web
這次在 Chrome 瀏覽器中顯示您努力的成果。
8. 恭喜
您已建構出功能齊全的遊戲簡介畫面,其中包含動畫、片段著色器和粒子動畫!現在,您可以在 Flutter 支援的所有平台上使用這些技術。
瞭解詳情
- 查看
flutter_animate套件 - 參閱 Flutter 對片段著色器的支援說明文件
- Patricio Gonzalez Vivo 和 Jen Lowe 撰寫的著色器之書
- 著色器玩具:協作式著色器遊樂場
- simple_shader:Flutter 片段著色器範例專案