
1. Başlamadan önce
Flutter, geliştiricilerin anında yeniden yükleme ve bildirim temelli kullanıcı arayüzü kombinasyonunu kullanarak yeni kullanıcı arayüzlerini hızlı bir şekilde yinelemeli olarak oluşturmasına olanak tanır. Ancak, bir arayüze ek etkileşim eklemeniz gereken zamanlar olabilir. Bu dokunuşlar, tıklama sırasında bir düğmeyi animasyonla hareketlendirmek kadar hızlı veya GPU'nun gücünü kullanarak kullanıcı arayüzünü çarpıtan bir gölgelendirici kadar etkileyici olabilir.
Bu codelab'de, animasyonların, gölgelendiricilerin ve parçacık alanlarının gücünden yararlanarak, kod yazmadığımız zamanlarda hepimizin severek izlediği bilim kurgu filmlerini ve TV programlarını anımsatan bir kullanıcı arayüzü oluşturmak için Flutter uygulaması geliştireceksiniz.
Ne oluşturacaksınız?
Kıyamet sonrası bilim kurgu temalı bir oyun için ilk menü sayfasını oluşturacaksınız. Metni görsel olarak canlandırmak için örnekleme yapan bir parça gölgelendiriciye sahip bir başlık, sayfanın renk temasını bol animasyonla değiştiren bir zorluk menüsü ve ikinci bir parça gölgelendiriciyle boyanmış animasyonlu bir küre var. Bu yeterli olmazsa codelab'in sonunda sayfaya hareket ve ilgi katmak için ince bir parçacık efekti ekleyeceksiniz.
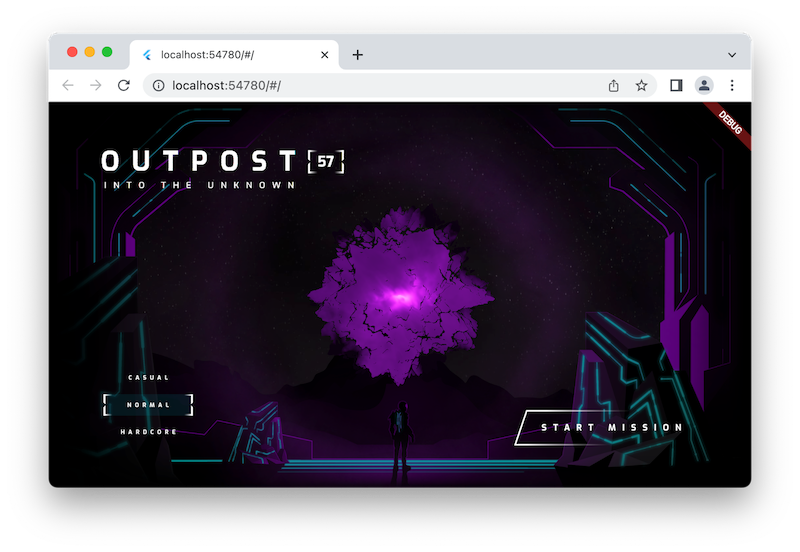
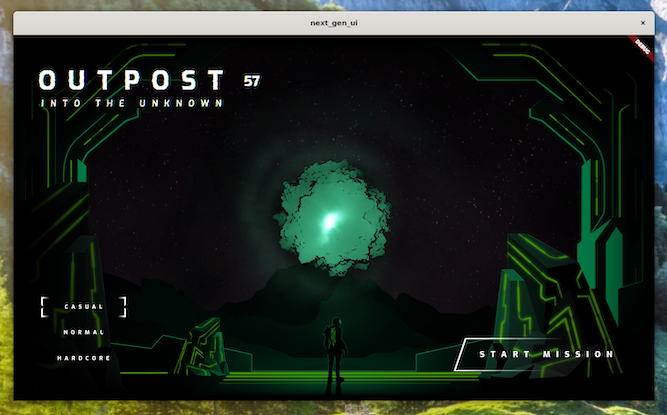
Aşağıdaki ekran görüntülerinde, desteklenen üç masaüstü işletim sisteminde (Windows, Linux ve macOS) oluşturacağınız uygulama gösterilmektedir. Eksiksiz olması için web tarayıcısı sürümü de (desteklenir) sağlanır. Her yerde animasyonlar ve parça gölgelendiriciler
|
|
|
|

Ön koşullar
- İlk Flutter uygulamanız codelab'inde ele alındığı gibi, Dart ile Flutter geliştirme hakkında temel bilgiler
Öğrenecekleriniz
- İfade animasyonları oluşturmak için
flutter_animatenasıl kullanılır? - Masaüstü ve web'de Flutter'ın parça gölgelendiriciler için desteğini kullanma
particle_fieldile uygulamanıza parçacık animasyonları ekleme
İhtiyacınız olanlar
- Flutter SDK'sı
- Flutter ve Dart için VS Code kurulumu
- Windows, Linux veya macOS için Flutter'da masaüstü desteği kurulumu
- Flutter için web desteği kurulumu
2. Başlayın
Başlangıç kodunu indirin
- Bu GitHub deposuna gidin.
- Bu codelab'in tüm kodunu indirmek için Code > Download zip'i (Kod > Zip dosyasını indir) tıklayın.
- İndirilen ZIP dosyasını ayıklayarak
codelabs-mainkök klasörünü açın. Bu kod laboratuvarındaki her adımda temel alacağınız kaynak kodunu içerenstep_01ilestep_06klasörlerini içerennext-gen-ui/alt dizini yeterlidir.
Proje bağımlılıklarını indirme
- Başlangıç projesini açmak için VS Code'da File > Open folder > codelabs-main > next-gen-uis > step_01'i (Dosya > Klasörü aç > codelabs-main > next-gen-uis > step_01) tıklayın.
- Başlangıç uygulaması için gerekli paketleri indirmenizi isteyen bir VS Code iletişim kutusu görürseniz Paketleri al'ı tıklayın.
- Başlangıç uygulaması için gerekli paketleri indirmenizi isteyen bir VS Code iletişim kutusu görmüyorsanız terminalinizi açın,
step_01klasörüne gidin veflutter pub getkomutunu çalıştırın.
Başlangıç uygulamasını çalıştırma
- VS Code'da, uygulamanızı bir web tarayıcısında test etmek istiyorsanız kullandığınız masaüstü işletim sistemini veya Chrome'u seçin.
Örneğin, dağıtım hedefiniz olarak macOS'i kullandığınızda gördüğünüz ekran aşağıda verilmiştir:

Chrome'u dağıtım hedefiniz olarak kullandığınızda görecekleriniz:

lib/main.dartdosyasını açın ve Hata ayıklamayı başlat'ı tıklayın. Uygulama, masaüstü işletim sisteminizde veya Chrome tarayıcıda başlatılır.
Başlangıç uygulamasını keşfetme
Başlangıç uygulamasında aşağıdakilere dikkat edin:
- Kullanıcı arayüzü oluşturmaya hazırdır.
assetsdizininde, kullanacağınız sanat öğeleri ve iki parça gölgelendirici bulunur.pubspec.yamldosyası, kullanacağınız öğeleri ve pub paketleri koleksiyonunu zaten listeliyor.libdizini, zorunlumain.dartdosyasını, görsel öğelerin ve parça gölgelendiricilerin yolunu listeleyen birassets.dartdosyasını ve kullanacağınız TextStyles ve Colors'ı listeleyen birstyles.dartdosyasını içerir.libdizini, bu codelab'de kullanacağınız bir dizi faydalı yardımcı programı içerencommondizinini ve küreyi bir köşe gölgelendiriciyle görüntülemek için kullanılacak birWidgetiçerenorb_shaderdizinini de içerir.
Uygulamayı başlattıktan sonra görecekleriniz:
3. Sahneyi boyama
Bu adımda, arka plan sanat öğelerinin tümünü ekrana katmanlar halinde yerleştirirsiniz. İlk başta sahnenin tek renkli görünmesini bekleyin. Bu adımın sonunda sahneye renk ekleyeceksiniz.
Sahneye öğe ekleme
libdizininizde birtitle_screendizini oluşturun ve ardından birtitle_screen.dartdosyası ekleyin. Dosyaya aşağıdaki içeriği ekleyin:
lib/title_screen/title_screen.dart
import 'package:flutter/material.dart';

import '../assets.dart';

class TitleScreen extends StatelessWidget {
  const TitleScreen({super.key});

  @override
  Widget build(BuildContext context) {
    return Scaffold(
      backgroundColor: Colors.black,
      body: Center(
        child: Stack(
          children: [
            /// Bg-Base
            Image.asset(AssetPaths.titleBgBase),

            /// Bg-Receive
            Image.asset(AssetPaths.titleBgReceive),

            /// Mg-Base
            Image.asset(AssetPaths.titleMgBase),

            /// Mg-Receive
            Image.asset(AssetPaths.titleMgReceive),

            /// Mg-Emit
            Image.asset(AssetPaths.titleMgEmit),

            /// Fg-Rocks
            Image.asset(AssetPaths.titleFgBase),

            /// Fg-Receive
            Image.asset(AssetPaths.titleFgReceive),

            /// Fg-Emit
            Image.asset(AssetPaths.titleFgEmit),
          ],
        ),
      ),
    );
  }
}
Bu widget, katmanlar halinde yerleştirilmiş öğelerin bulunduğu sahneyi içerir. Arka plan, orta plan ve ön plan katmanlarının her biri iki veya üç resimden oluşan bir grupla temsil edilir. Bu görüntüler, ışığın sahne içinde nasıl hareket ettiğini yakalamak için farklı renklerle aydınlatılır.
main.dartdosyasına aşağıdaki içeriği ekleyin:
lib/main.dart
import 'dart:io' show Platform;

import 'package:flutter/foundation.dart' show kIsWeb;
import 'package:flutter/material.dart';
import 'package:window_size/window_size.dart';
                                                          // Remove 'styles.dart' import
import 'title_screen/title_screen.dart';                  // Add this import


void main() {
  if (!kIsWeb && (Platform.isWindows || Platform.isLinux || Platform.isMacOS)) {
    WidgetsFlutterBinding.ensureInitialized();
    setWindowMinSize(const Size(800, 500));
  }
  runApp(const NextGenApp());
}

class NextGenApp extends StatelessWidget {
  const NextGenApp({super.key});

  @override
  Widget build(BuildContext context) {
    return MaterialApp(
      themeMode: ThemeMode.dark,
      darkTheme: ThemeData(brightness: Brightness.dark),
      home: const TitleScreen(),                          // Replace with this widget
    );
  }
}
Bu, uygulamanın kullanıcı arayüzünü, sanat öğelerinin oluşturduğu tek renkli sahneyle değiştirir. Ardından her katmanı renklendirirsiniz.
Resim renklendirme yardımcı programı ekleme
title_screen.dart dosyasına aşağıdaki içeriği ekleyerek bir resim renklendirme yardımcı programı ekleyin:
lib/title_screen/title_screen.dart
import 'package:flutter/material.dart';

import '../assets.dart';

class TitleScreen extends StatelessWidget {
  const TitleScreen({super.key});

  @override
  Widget build(BuildContext context) {
    return Scaffold(
      backgroundColor: Colors.black,
      body: Center(
        child: Stack(
          children: [
            /// Bg-Base
            Image.asset(AssetPaths.titleBgBase),

            /// Bg-Receive
            Image.asset(AssetPaths.titleBgReceive),

            /// Mg-Base
            Image.asset(AssetPaths.titleMgBase),

            /// Mg-Receive
            Image.asset(AssetPaths.titleMgReceive),

            /// Mg-Emit
            Image.asset(AssetPaths.titleMgEmit),

            /// Fg-Rocks
            Image.asset(AssetPaths.titleFgBase),

            /// Fg-Receive
            Image.asset(AssetPaths.titleFgReceive),

            /// Fg-Emit
            Image.asset(AssetPaths.titleFgEmit),
          ],
        ),
      ),
    );
  }
}

class _LitImage extends StatelessWidget {                 // Add from here...
  const _LitImage({
    required this.color,
    required this.imgSrc,
    required this.lightAmt,
  });
  final Color color;
  final String imgSrc;
  final double lightAmt;

  @override
  Widget build(BuildContext context) {
    final hsl = HSLColor.fromColor(color);
    return Image.asset(
      imgSrc,
      color: hsl.withLightness(hsl.lightness * lightAmt).toColor(),
      colorBlendMode: BlendMode.modulate,
    );
  }
}                                                         // to here.
Bu _LitImage yardımcı program widget'ı, ışık yayıp yaymadıklarına bağlı olarak her bir sanat öğesini yeniden renklendirir. Bu yeni widget'ı henüz kullanmadığınız için bir linter uyarısı tetiklenebilir.
Renkli boyama
title_screen.dart dosyasını aşağıdaki gibi değiştirerek renkli boyama yapın:
lib/title_screen/title_screen.dart
import 'package:flutter/material.dart';

import '../assets.dart';
import '../styles.dart';                                  // Add this import

class TitleScreen extends StatelessWidget {
  const TitleScreen({super.key});

  final _finalReceiveLightAmt = 0.7;                      // Add this attribute
  final _finalEmitLightAmt = 0.5;                         // And this attribute

  @override
  Widget build(BuildContext context) {
    final orbColor = AppColors.orbColors[0];              // Add this final variable
    final emitColor = AppColors.emitColors[0];            // And this one

    return Scaffold(
      backgroundColor: Colors.black,
      body: Center(
        child: Stack(
          children: [
            /// Bg-Base
            Image.asset(AssetPaths.titleBgBase),

            /// Bg-Receive
            _LitImage(                                    // Modify from here...
              color: orbColor,
              imgSrc: AssetPaths.titleBgReceive,
              lightAmt: _finalReceiveLightAmt,
            ),                                            // to here.

            /// Mg-Base
            _LitImage(                                    // Modify from here...
              imgSrc: AssetPaths.titleMgBase,
              color: orbColor,
              lightAmt: _finalReceiveLightAmt,
            ),                                            // to here.

            /// Mg-Receive
            _LitImage(                                    // Modify from here...
              imgSrc: AssetPaths.titleMgReceive,
              color: orbColor,
              lightAmt: _finalReceiveLightAmt,
            ),                                            // to here.

            /// Mg-Emit
            _LitImage(                                    // Modify from here...
              imgSrc: AssetPaths.titleMgEmit,
              color: emitColor,
              lightAmt: _finalEmitLightAmt,
            ),                                            // to here.

            /// Fg-Rocks
            Image.asset(AssetPaths.titleFgBase),

            /// Fg-Receive
            _LitImage(                                    // Modify from here...
              imgSrc: AssetPaths.titleFgReceive,
              color: orbColor,
              lightAmt: _finalReceiveLightAmt,
            ),                                            // to here.

            /// Fg-Emit
            _LitImage(                                    // Modify from here...
              imgSrc: AssetPaths.titleFgEmit,
              color: emitColor,
              lightAmt: _finalEmitLightAmt,
            ),                                            // to here.
          ],
        ),
      ),
    );
  }
}

class _LitImage extends StatelessWidget {
  const _LitImage({
    required this.color,
    required this.imgSrc,
    required this.lightAmt,
  });
  final Color color;
  final String imgSrc;
  final double lightAmt;

  @override
  Widget build(BuildContext context) {
    final hsl = HSLColor.fromColor(color);
    return Image.asset(
      imgSrc,
      color: hsl.withLightness(hsl.lightness * lightAmt).toColor(),
      colorBlendMode: BlendMode.modulate,
    );
  }
}
İşte uygulama tekrar burada. Bu kez sanat öğeleri yeşil renkte.

4. Kullanıcı arayüzü ekleme
Bu adımda, önceki adımda oluşturulan sahnenin üzerine bir kullanıcı arayüzü yerleştirirsiniz. Başlık, zorluk seçici düğmeleri ve en önemli düğme olan Başlat bu kapsamdadır.
Başlık ekleyin
lib/title_screendizininde birtitle_screen_ui.dartdosyası oluşturun ve dosyaya aşağıdaki içeriği ekleyin:
lib/title_screen/title_screen_ui.dart
import 'package:extra_alignments/extra_alignments.dart';
import 'package:flutter/material.dart';
import 'package:gap/gap.dart';

import '../assets.dart';
import '../common/ui_scaler.dart';
import '../styles.dart';

class TitleScreenUi extends StatelessWidget {
  const TitleScreenUi({
    super.key,
  });
  @override
  Widget build(BuildContext context) {
    return const Padding(
      padding: EdgeInsets.symmetric(vertical: 40, horizontal: 50),
      child: Stack(
        children: [
          /// Title Text
          TopLeft(
            child: UiScaler(
              alignment: Alignment.topLeft,
              child: _TitleText(),
            ),
          ),
        ],
      ),
    );
  }
}

class _TitleText extends StatelessWidget {
  const _TitleText();

  @override
  Widget build(BuildContext context) {
    return Column(
      mainAxisSize: MainAxisSize.min,
      crossAxisAlignment: CrossAxisAlignment.start,
      children: [
        const Gap(20),
        Row(
          mainAxisSize: MainAxisSize.min,
          children: [
            Transform.translate(
              offset: Offset(-(TextStyles.h1.letterSpacing! * .5), 0),
              child: Text('OUTPOST', style: TextStyles.h1),
            ),
            Image.asset(AssetPaths.titleSelectedLeft, height: 65),
            Text('57', style: TextStyles.h2),
            Image.asset(AssetPaths.titleSelectedRight, height: 65),
          ],
        ),
        Text('INTO THE UNKNOWN', style: TextStyles.h3),
      ],
    );
  }
}
Bu widget, başlığı ve bu uygulamanın kullanıcı arayüzünü oluşturan tüm düğmeleri içerir.
lib/title_screen/title_screen.dartdosyasını aşağıdaki gibi güncelleyin:
lib/title_screen/title_screen.dart
import 'package:flutter/material.dart';

import '../assets.dart';
import '../styles.dart';
import 'title_screen_ui.dart';                            // Add this import

class TitleScreen extends StatelessWidget {
  const TitleScreen({super.key});

  final _finalReceiveLightAmt = 0.7;
  final _finalEmitLightAmt = 0.5;

  @override
  Widget build(BuildContext context) {
    final orbColor = AppColors.orbColors[0];
    final emitColor = AppColors.emitColors[0];

    return Scaffold(
      backgroundColor: Colors.black,
      body: Center(
        child: Stack(
          children: [
            /// Bg-Base
            Image.asset(AssetPaths.titleBgBase),

            /// Bg-Receive
            _LitImage(
              color: orbColor,
              imgSrc: AssetPaths.titleBgReceive,
              lightAmt: _finalReceiveLightAmt,
            ),

            /// Mg-Base
            _LitImage(
              imgSrc: AssetPaths.titleMgBase,
              color: orbColor,
              lightAmt: _finalReceiveLightAmt,
            ),

            /// Mg-Receive
            _LitImage(
              imgSrc: AssetPaths.titleMgReceive,
              color: orbColor,
              lightAmt: _finalReceiveLightAmt,
            ),

            /// Mg-Emit
            _LitImage(
              imgSrc: AssetPaths.titleMgEmit,
              color: emitColor,
              lightAmt: _finalEmitLightAmt,
            ),

            /// Fg-Rocks
            Image.asset(AssetPaths.titleFgBase),

            /// Fg-Receive
            _LitImage(
              imgSrc: AssetPaths.titleFgReceive,
              color: orbColor,
              lightAmt: _finalReceiveLightAmt,
            ),

            /// Fg-Emit
            _LitImage(
              imgSrc: AssetPaths.titleFgEmit,
              color: emitColor,
              lightAmt: _finalEmitLightAmt,
            ),

            /// UI
            const Positioned.fill(                        // Add from here...
              child: TitleScreenUi(),
            ),                                            // to here.
          ],
        ),
      ),
    );
  }
}

class _LitImage extends StatelessWidget {
  const _LitImage({
    required this.color,
    required this.imgSrc,
    required this.lightAmt,
  });
  final Color color;
  final String imgSrc;
  final double lightAmt;

  @override
  Widget build(BuildContext context) {
    final hsl = HSLColor.fromColor(color);
    return Image.asset(
      imgSrc,
      color: hsl.withLightness(hsl.lightness * lightAmt).toColor(),
      colorBlendMode: BlendMode.modulate,
    );
  }
}
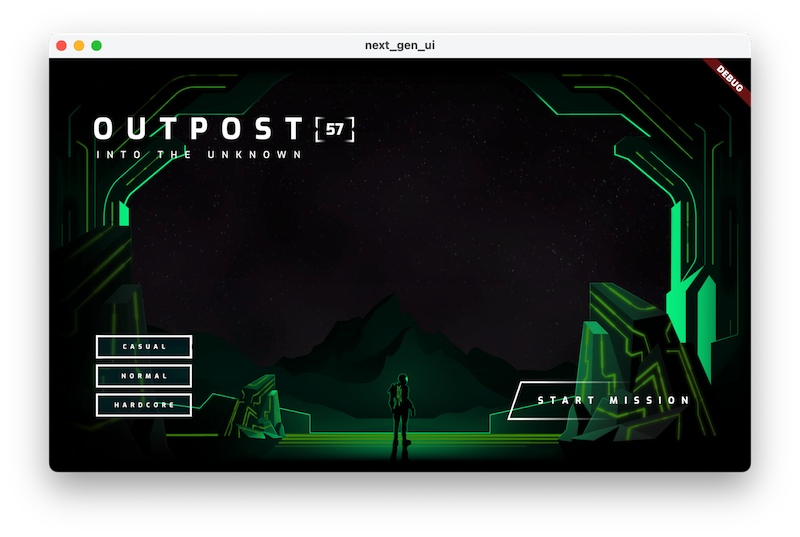
Bu kodu çalıştırmak, kullanıcı arayüzünün başlangıcı olan başlığı gösterir.
!["Outpost [57] Into the unknown" (Bilinmeyene Yolculuk) başlığıyla çalışan codelab uygulaması](https://codelabs.developers.google.cn/static/codelabs/flutter-next-gen-uis/img/ed313b0bbcc38b66.png?authuser=0&hl=tr)
Zorluk derecesi düğmelerini ekleme
focusable_control_builderpaketi için yeni bir içe aktarma işlemi ekleyerektitle_screen_ui.dartdosyasını güncelleyin:
lib/title_screen/title_screen_ui.dart
import 'package:extra_alignments/extra_alignments.dart';
import 'package:flutter/material.dart';
import 'package:focusable_control_builder/focusable_control_builder.dart'; // Add import
import 'package:gap/gap.dart';

import '../assets.dart';
import '../common/ui_scaler.dart';
import '../styles.dart';
TitleScreenUiwidget'ına aşağıdakileri ekleyin:
lib/title_screen/title_screen_ui.dart
class TitleScreenUi extends StatelessWidget {
  const TitleScreenUi({
    super.key,
    required this.difficulty,                            // Edit from here...
    required this.onDifficultyPressed,
    required this.onDifficultyFocused,
  });

  final int difficulty;
  final void Function(int difficulty) onDifficultyPressed;
  final void Function(int? difficulty) onDifficultyFocused; // to here.

  @override
  Widget build(BuildContext context) {
    return Padding(                                      // Move this const...
      padding: const EdgeInsets.symmetric(vertical: 40, horizontal: 50), // to here.
      child: Stack(
        children: [
          /// Title Text
          const TopLeft(                                 // Add a const here, as well
            child: UiScaler(
              alignment: Alignment.topLeft,
              child: _TitleText(),
            ),
          ),

          /// Difficulty Btns
          BottomLeft(                                    // Add from here...
            child: UiScaler(
              alignment: Alignment.bottomLeft,
              child: _DifficultyBtns(
                difficulty: difficulty,
                onDifficultyPressed: onDifficultyPressed,
                onDifficultyFocused: onDifficultyFocused,
              ),
            ),
          ),                                             // to here.
        ],
      ),
    );
  }
}
- Zorluk düğmelerini uygulamak için aşağıdaki iki widget'ı ekleyin:
lib/title_screen/title_screen_ui.dart
class _DifficultyBtns extends StatelessWidget {
  const _DifficultyBtns({
    required this.difficulty,
    required this.onDifficultyPressed,
    required this.onDifficultyFocused,
  });

  final int difficulty;
  final void Function(int difficulty) onDifficultyPressed;
  final void Function(int? difficulty) onDifficultyFocused;

  @override
  Widget build(BuildContext context) {
    return Column(
      mainAxisSize: MainAxisSize.min,
      children: [
        _DifficultyBtn(
          label: 'Casual',
          selected: difficulty == 0,
          onPressed: () => onDifficultyPressed(0),
          onHover: (over) => onDifficultyFocused(over ? 0 : null),
        ),
        _DifficultyBtn(
          label: 'Normal',
          selected: difficulty == 1,
          onPressed: () => onDifficultyPressed(1),
          onHover: (over) => onDifficultyFocused(over ? 1 : null),
        ),
        _DifficultyBtn(
          label: 'Hardcore',
          selected: difficulty == 2,
          onPressed: () => onDifficultyPressed(2),
          onHover: (over) => onDifficultyFocused(over ? 2 : null),
        ),
        const Gap(20),
      ],
    );
  }
}

class _DifficultyBtn extends StatelessWidget {
  const _DifficultyBtn({
    required this.selected,
    required this.onPressed,
    required this.onHover,
    required this.label,
  });
  final String label;
  final bool selected;
  final VoidCallback onPressed;
  final void Function(bool hasFocus) onHover;

  @override
  Widget build(BuildContext context) {
    return FocusableControlBuilder(
      onPressed: onPressed,
      onHoverChanged: (_, state) => onHover.call(state.isHovered),
      builder: (_, state) {
        return Padding(
          padding: const EdgeInsets.all(8.0),
          child: SizedBox(
            width: 250,
            height: 60,
            child: Stack(
              children: [
                /// Bg with fill and outline
                Container(
                  decoration: BoxDecoration(
                    color: const Color(0xFF00D1FF).withOpacity(.1),
                    border: Border.all(color: Colors.white, width: 5),
                  ),
                ),

                if (state.isHovered || state.isFocused) ...[
                  Container(
                    decoration: BoxDecoration(
                      color: const Color(0xFF00D1FF).withOpacity(.1),
                    ),
                  ),
                ],

                /// cross-hairs (selected state)
                if (selected) ...[
                  CenterLeft(
                    child: Image.asset(AssetPaths.titleSelectedLeft),
                  ),
                  CenterRight(
                    child: Image.asset(AssetPaths.titleSelectedRight),
                  ),
                ],

                /// Label
                Center(
                  child: Text(label.toUpperCase(), style: TextStyles.btn),
                ),
              ],
            ),
          ),
        );
      },
    );
  }
}
TitleScreenwidget'ını durumsuzdan durumluya dönüştürün ve zorluğa göre renk şemasının değiştirilmesini sağlamak için durum ekleyin:
lib/title_screen/title_screen.dart
import 'package:flutter/material.dart';

import '../assets.dart';
import '../styles.dart';
import 'title_screen_ui.dart';

class TitleScreen extends StatefulWidget {
  const TitleScreen({super.key});

  @override
  State<TitleScreen> createState() => _TitleScreenState();
}

class _TitleScreenState extends State<TitleScreen> {
  Color get _emitColor =>
      AppColors.emitColors[_difficultyOverride ?? _difficulty];
  Color get _orbColor =>
      AppColors.orbColors[_difficultyOverride ?? _difficulty];

  /// Currently selected difficulty
  int _difficulty = 0;

  /// Currently focused difficulty (if any)
  int? _difficultyOverride;

  void _handleDifficultyPressed(int value) {
    setState(() => _difficulty = value);
  }

  void _handleDifficultyFocused(int? value) {
    setState(() => _difficultyOverride = value);
  }

  final _finalReceiveLightAmt = 0.7;
  final _finalEmitLightAmt = 0.5;

  @override
  Widget build(BuildContext context) {
    return Scaffold(
      backgroundColor: Colors.black,
      body: Center(
        child: Stack(
          children: [
            /// Bg-Base
            Image.asset(AssetPaths.titleBgBase),

            /// Bg-Receive
            _LitImage(
              color: _orbColor,
              imgSrc: AssetPaths.titleBgReceive,
              lightAmt: _finalReceiveLightAmt,
            ),

            /// Mg-Base
            _LitImage(
              imgSrc: AssetPaths.titleMgBase,
              color: _orbColor,
              lightAmt: _finalReceiveLightAmt,
            ),

            /// Mg-Receive
            _LitImage(
              imgSrc: AssetPaths.titleMgReceive,
              color: _orbColor,
              lightAmt: _finalReceiveLightAmt,
            ),

            /// Mg-Emit
            _LitImage(
              imgSrc: AssetPaths.titleMgEmit,
              color: _emitColor,
              lightAmt: _finalEmitLightAmt,
            ),

            /// Fg-Rocks
            Image.asset(AssetPaths.titleFgBase),

            /// Fg-Receive
            _LitImage(
              imgSrc: AssetPaths.titleFgReceive,
              color: _orbColor,
              lightAmt: _finalReceiveLightAmt,
            ),

            /// Fg-Emit
            _LitImage(
              imgSrc: AssetPaths.titleFgEmit,
              color: _emitColor,
              lightAmt: _finalEmitLightAmt,
            ),

            /// UI
            Positioned.fill(
              child: TitleScreenUi(
                difficulty: _difficulty,
                onDifficultyFocused: _handleDifficultyFocused,
                onDifficultyPressed: _handleDifficultyPressed,
              ),
            ),
          ],
        ),
      ),
    );
  }
}

class _LitImage extends StatelessWidget {
  const _LitImage({
    required this.color,
    required this.imgSrc,
    required this.lightAmt,
  });
  final Color color;
  final String imgSrc;
  final double lightAmt;

  @override
  Widget build(BuildContext context) {
    final hsl = HSLColor.fromColor(color);
    return Image.asset(
      imgSrc,
      color: hsl.withLightness(hsl.lightness * lightAmt).toColor(),
      colorBlendMode: BlendMode.modulate,
    );
  }
}
Kullanıcı arayüzü, iki farklı zorluk ayarında gösterilmektedir. Maske olarak uygulanan zorluk renklerinin, gri tonlamalı görüntülerde gerçekçi ve yansıtıcı bir efekt oluşturduğunu fark edin.
|
|
Başlat düğmesini ekleme
title_screen_ui.dartdosyasını güncelleyin.TitleScreenUiwidget'ına aşağıdakileri ekleyin:
lib/title_screen/title_screen_ui.dart
class TitleScreenUi extends StatelessWidget {
  const TitleScreenUi({
    super.key,
    required this.difficulty,
    required this.onDifficultyPressed,
    required this.onDifficultyFocused,
  });

  final int difficulty;
  final void Function(int difficulty) onDifficultyPressed;
  final void Function(int? difficulty) onDifficultyFocused;

  @override
  Widget build(BuildContext context) {
    return Padding(
      padding: const EdgeInsets.symmetric(vertical: 40, horizontal: 50),
      child: Stack(
        children: [
          /// Title Text
          const TopLeft(
            child: UiScaler(
              alignment: Alignment.topLeft,
              child: _TitleText(),
            ),
          ),

          /// Difficulty Btns
          BottomLeft(
            child: UiScaler(
              alignment: Alignment.bottomLeft,
              child: _DifficultyBtns(
                difficulty: difficulty,
                onDifficultyPressed: onDifficultyPressed,
                onDifficultyFocused: onDifficultyFocused,
              ),
            ),
          ),

          /// StartBtn
          BottomRight(                                    // Add from here...
            child: UiScaler(
              alignment: Alignment.bottomRight,
              child: Padding(
                padding: const EdgeInsets.only(bottom: 20, right: 40),
                child: _StartBtn(onPressed: () {}),
              ),
            ),
          ),                                              // to here.
        ],
      ),
    );
  }
}
- Başlat düğmesini uygulamak için aşağıdaki widget'ı ekleyin:
lib/title_screen/title_screen_ui.dart
class _StartBtn extends StatefulWidget {
  const _StartBtn({required this.onPressed});
  final VoidCallback onPressed;

  @override
  State<_StartBtn> createState() => _StartBtnState();
}

class _StartBtnState extends State<_StartBtn> {
  AnimationController? _btnAnim;
  bool _wasHovered = false;

  @override
  Widget build(BuildContext context) {
    return FocusableControlBuilder(
      cursor: SystemMouseCursors.click,
      onPressed: widget.onPressed,
      builder: (_, state) {
        if ((state.isHovered || state.isFocused) &&
            !_wasHovered &&
            _btnAnim?.status != AnimationStatus.forward) {
          _btnAnim?.forward(from: 0);
        }
        _wasHovered = (state.isHovered || state.isFocused);
        return SizedBox(
          width: 520,
          height: 100,
          child: Stack(
            children: [
              Positioned.fill(child: Image.asset(AssetPaths.titleStartBtn)),
              if (state.isHovered || state.isFocused) ...[
                Positioned.fill(
                    child: Image.asset(AssetPaths.titleStartBtnHover)),
              ],
              Center(
                child: Row(
                  mainAxisAlignment: MainAxisAlignment.end,
                  children: [
                    Text('START MISSION',
                        style: TextStyles.btn
                            .copyWith(fontSize: 24, letterSpacing: 18)),
                  ],
                ),
              ),
            ],
          ),
        );
      },
    );
  }
}
Aşağıda, düğmelerin tamamını içeren bir uygulamayı görebilirsiniz.
5. Animasyon ekleme
Bu adımda, kullanıcı arayüzünü ve sanat öğelerinin renk geçişlerini canlandıracaksınız.
Başlığı yükselerek gösterme
Bu adımda, Flutter uygulamasını canlandırmak için birden fazla yaklaşım kullanacaksınız. Yaklaşımlardan biri flutter_animate kullanmaktır. Bu paketle desteklenen animasyonlar, geliştirme yinelemelerini hızlandırmak için uygulamanızı her hızlı yeniden yüklediğinizde otomatik olarak yeniden oynatılabilir.
lib/main.dartiçindeki kodu aşağıdaki şekilde değiştirin:
lib/main.dart
import 'dart:io' show Platform;

import 'package:flutter/foundation.dart' show kIsWeb;
import 'package:flutter/material.dart';
import 'package:flutter_animate/flutter_animate.dart';   // Add this import
import 'package:window_size/window_size.dart';

import 'title_screen/title_screen.dart';

void main() {
  if (!kIsWeb && (Platform.isWindows || Platform.isLinux || Platform.isMacOS)) {
    WidgetsFlutterBinding.ensureInitialized();
    setWindowMinSize(const Size(800, 500));
  }
  Animate.restartOnHotReload = true;                     // Add this line
  runApp(const NextGenApp());
}

class NextGenApp extends StatelessWidget {
  const NextGenApp({super.key});

  @override
  Widget build(BuildContext context) {
    return MaterialApp(
      themeMode: ThemeMode.dark,
      darkTheme: ThemeData(brightness: Brightness.dark),
      home: const TitleScreen(),
    );
  }
}
flutter_animatepaketinden yararlanmak için paketi içe aktarmanız gerekir. İçe aktarma işleminilib/title_screen/title_screen_ui.dart'ya aşağıdaki şekilde ekleyin:
lib/title_screen/title_screen_ui.dart
import 'package:extra_alignments/extra_alignments.dart';
import 'package:flutter/material.dart';
import 'package:flutter_animate/flutter_animate.dart';   // Add this import
import 'package:focusable_control_builder/focusable_control_builder.dart';
import 'package:gap/gap.dart';

import '../assets.dart';
import '../common/ui_scaler.dart';
import '../styles.dart';

class TitleScreenUi extends StatelessWidget {
_TitleTextwidget'ını aşağıdaki şekilde düzenleyerek başlığa animasyon ekleyin:
lib/title_screen/title_screen_ui.dart
class _TitleText extends StatelessWidget {
  const _TitleText();

  @override
  Widget build(BuildContext context) {
    return Column(
      mainAxisSize: MainAxisSize.min,
      crossAxisAlignment: CrossAxisAlignment.start,
      children: [
        const Gap(20),
        Row(
          mainAxisSize: MainAxisSize.min,
          children: [
            Transform.translate(
              offset: Offset(-(TextStyles.h1.letterSpacing! * .5), 0),
              child: Text('OUTPOST', style: TextStyles.h1),
            ),
            Image.asset(AssetPaths.titleSelectedLeft, height: 65),
            Text('57', style: TextStyles.h2),
            Image.asset(AssetPaths.titleSelectedRight, height: 65),
          ],                                             // Edit from here...
        ).animate().fadeIn(delay: .8.seconds, duration: .7.seconds),
        Text('INTO THE UNKNOWN', style: TextStyles.h3)
            .animate()
            .fadeIn(delay: 1.seconds, duration: .7.seconds),
      ],                                                 // to here.
    );
  }
}
- Başlığın görünmesini sağlamak için Yeniden yükle'ye basın.
Zorluk düğmelerini görünür hale getirme
_DifficultyBtnswidget'ını aşağıdaki şekilde düzenleyerek zorluk düğmelerinin ilk görünümüne animasyon ekleyin:
lib/title_screen/title_screen_ui.dart
class _DifficultyBtns extends StatelessWidget {
  const _DifficultyBtns({
    required this.difficulty,
    required this.onDifficultyPressed,
    required this.onDifficultyFocused,
  });

  final int difficulty;
  final void Function(int difficulty) onDifficultyPressed;
  final void Function(int? difficulty) onDifficultyFocused;

  @override
  Widget build(BuildContext context) {
    return Column(
      mainAxisSize: MainAxisSize.min,
      children: [
        _DifficultyBtn(
          label: 'Casual',
          selected: difficulty == 0,
          onPressed: () => onDifficultyPressed(0),
          onHover: (over) => onDifficultyFocused(over ? 0 : null),
        )                                                // Add from here...
            .animate()
            .fadeIn(delay: 1.3.seconds, duration: .35.seconds)
            .slide(begin: const Offset(0, .2)),          // to here
        _DifficultyBtn(
          label: 'Normal',
          selected: difficulty == 1,
          onPressed: () => onDifficultyPressed(1),
          onHover: (over) => onDifficultyFocused(over ? 1 : null),
        )                                                // Add from here...
            .animate()
            .fadeIn(delay: 1.5.seconds, duration: .35.seconds)
            .slide(begin: const Offset(0, .2)),          // to here
        _DifficultyBtn(
          label: 'Hardcore',
          selected: difficulty == 2,
          onPressed: () => onDifficultyPressed(2),
          onHover: (over) => onDifficultyFocused(over ? 2 : null),
        )                                                // Add from here...
            .animate()
            .fadeIn(delay: 1.7.seconds, duration: .35.seconds)
            .slide(begin: const Offset(0, .2)),          // to here
        const Gap(20),
      ],
    );
  }
}
- Zorluk düğmelerinin sırayla ve küçük bir kaydırma animasyonuyla görünmesini sağlamak için Yeniden yükle'ye basın.
Başlat düğmesini yavaşça görünür hale getirme
_StartBtnStatedurum sınıfını aşağıdaki şekilde düzenleyerek başlangıç düğmesine animasyon ekleyin:
lib/title_screen/title_screen_ui.dart
class _StartBtnState extends State<_StartBtn> {
  AnimationController? _btnAnim;
  bool _wasHovered = false;

  @override
  Widget build(BuildContext context) {
    return FocusableControlBuilder(
      cursor: SystemMouseCursors.click,
      onPressed: widget.onPressed,
      builder: (_, state) {
        if ((state.isHovered || state.isFocused) &&
            !_wasHovered &&
            _btnAnim?.status != AnimationStatus.forward) {
          _btnAnim?.forward(from: 0);
        }
        _wasHovered = (state.isHovered || state.isFocused);
        return SizedBox(
          width: 520,
          height: 100,
          child: Stack(
            children: [
              Positioned.fill(child: Image.asset(AssetPaths.titleStartBtn)),
              if (state.isHovered || state.isFocused) ...[
                Positioned.fill(
                    child: Image.asset(AssetPaths.titleStartBtnHover)),
              ],
              Center(
                child: Row(
                  mainAxisAlignment: MainAxisAlignment.end,
                  children: [
                    Text('START MISSION',
                        style: TextStyles.btn
                            .copyWith(fontSize: 24, letterSpacing: 18)),
                  ],
                ),
              ),
            ],
          )                                              // Edit from here...
              .animate(autoPlay: false, onInit: (c) => _btnAnim = c)
              .shimmer(duration: .7.seconds, color: Colors.black),
        )
            .animate()
            .fadeIn(delay: 2.3.seconds)
            .slide(begin: const Offset(0, .2));
      },                                                 // to here.
    );
  }
}
- Zorluk düğmelerinin sırayla ve küçük bir kaydırma animasyonuyla görünmesini sağlamak için Yeniden yükle'ye basın.
Zorluk fareyle üzerine gelme efektini animasyonla gösterme
_DifficultyBtn durum sınıfını aşağıdaki şekilde düzenleyerek zorluk düğmelerinin üzerine gelindiğinde animasyon ekleyin:
lib/title_screen/title_screen_ui.dart
class _DifficultyBtn extends StatelessWidget {
  const _DifficultyBtn({
    required this.selected,
    required this.onPressed,
    required this.onHover,
    required this.label,
  });
  final String label;
  final bool selected;
  final VoidCallback onPressed;
  final void Function(bool hasFocus) onHover;

  @override
  Widget build(BuildContext context) {
    return FocusableControlBuilder(
      onPressed: onPressed,
      onHoverChanged: (_, state) => onHover.call(state.isHovered),
      builder: (_, state) {
        return Padding(
          padding: const EdgeInsets.all(8.0),
          child: SizedBox(
            width: 250,
            height: 60,
            child: Stack(
              children: [
                /// Bg with fill and outline
                AnimatedOpacity(                         // Edit from here
                  opacity: (!selected && (state.isHovered || state.isFocused))
                      ? 1
                      : 0,
                  duration: .3.seconds,
                  child: Container(
                    decoration: BoxDecoration(
                      color: const Color(0xFF00D1FF).withOpacity(.1),
                      border: Border.all(color: Colors.white, width: 5),
                    ),
                  ),
                ),                                       // to here.

                if (state.isHovered || state.isFocused) ...[
                  Container(
                    decoration: BoxDecoration(
                      color: const Color(0xFF00D1FF).withOpacity(.1),
                    ),
                  ),
                ],

                /// cross-hairs (selected state)
                if (selected) ...[
                  CenterLeft(
                    child: Image.asset(AssetPaths.titleSelectedLeft),
                  ),
                  CenterRight(
                    child: Image.asset(AssetPaths.titleSelectedRight),
                  ),
                ],

                /// Label
                Center(
                  child: Text(label.toUpperCase(), style: TextStyles.btn),
                ),
              ],
            ),
          ),
        );
      },
    );
  }
}
Zorluk düğmeleri, fare seçilmeyen bir düğmenin üzerine geldiğinde artık BoxDecoration simgesini gösteriyor.
Renk değişikliğini animasyonla gösterme
- Arka plan rengi anında ve sert bir şekilde değişiyor. Işıklı resimleri renk şemaları arasında canlandırmak daha iyi sonuç verir.
flutter_animateuygulamasınılib/title_screen/title_screen.dartuygulamasına ekleme:
lib/title_screen/title_screen.dart
import 'package:flutter/material.dart';
import 'package:flutter_animate/flutter_animate.dart';    // Add this import

import '../assets.dart';
import '../styles.dart';
import 'title_screen_ui.dart';

class TitleScreen extends StatefulWidget {
lib/title_screen/title_screen.dart'da_AnimatedColorswidget'ı ekleme:
lib/title_screen/title_screen.dart
class _AnimatedColors extends StatelessWidget {
  const _AnimatedColors({
    required this.emitColor,
    required this.orbColor,
    required this.builder,
  });

  final Color emitColor;
  final Color orbColor;

  final Widget Function(BuildContext context, Color orbColor, Color emitColor)
      builder;

  @override
  Widget build(BuildContext context) {
    final duration = .5.seconds;
    return TweenAnimationBuilder(
      tween: ColorTween(begin: emitColor, end: emitColor),
      duration: duration,
      builder: (_, emitColor, __) {
        return TweenAnimationBuilder(
          tween: ColorTween(begin: orbColor, end: orbColor),
          duration: duration,
          builder: (context, orbColor, __) {
            return builder(context, orbColor!, emitColor!);
          },
        );
      },
    );
  }
}
- Yeni oluşturduğunuz widget'ı kullanarak
buildyöntemini_TitleScreenStateiçinde aşağıdaki şekilde güncelleyerek aydınlatılmış resimlerin renklerini canlandırın:
lib/title_screen/title_screen.dart
class _TitleScreenState extends State<TitleScreen> {
  Color get _emitColor =>
      AppColors.emitColors[_difficultyOverride ?? _difficulty];
  Color get _orbColor =>
      AppColors.orbColors[_difficultyOverride ?? _difficulty];

  /// Selected difficulty
  int _difficulty = 0;

  /// Focused difficulty (if any)
  int? _difficultyOverride;

  void _handleDifficultyPressed(int value) {
    setState(() => _difficulty = value);
  }

  void _handleDifficultyFocused(int? value) {
    setState(() => _difficultyOverride = value);
  }

  final _finalReceiveLightAmt = 0.7;
  final _finalEmitLightAmt = 0.5;

  @override
  Widget build(BuildContext context) {
    return Scaffold(
      backgroundColor: Colors.black,
      body: Center(
        child: _AnimatedColors(                           // Edit from here...
          orbColor: _orbColor,
          emitColor: _emitColor,
          builder: (_, orbColor, emitColor) {
            return Stack(
              children: [
                /// Bg-Base
                Image.asset(AssetPaths.titleBgBase),

                /// Bg-Receive
                _LitImage(
                  color: orbColor,
                  imgSrc: AssetPaths.titleBgReceive,
                  lightAmt: _finalReceiveLightAmt,
                ),

                /// Mg-Base
                _LitImage(
                  imgSrc: AssetPaths.titleMgBase,
                  color: orbColor,
                  lightAmt: _finalReceiveLightAmt,
                ),

                /// Mg-Receive
                _LitImage(
                  imgSrc: AssetPaths.titleMgReceive,
                  color: orbColor,
                  lightAmt: _finalReceiveLightAmt,
                ),

                /// Mg-Emit
                _LitImage(
                  imgSrc: AssetPaths.titleMgEmit,
                  color: emitColor,
                  lightAmt: _finalEmitLightAmt,
                ),

                /// Fg-Rocks
                Image.asset(AssetPaths.titleFgBase),

                /// Fg-Receive
                _LitImage(
                  imgSrc: AssetPaths.titleFgReceive,
                  color: orbColor,
                  lightAmt: _finalReceiveLightAmt,
                ),

                /// Fg-Emit
                _LitImage(
                  imgSrc: AssetPaths.titleFgEmit,
                  color: emitColor,
                  lightAmt: _finalEmitLightAmt,
                ),

                /// UI
                Positioned.fill(
                  child: TitleScreenUi(
                    difficulty: _difficulty,
                    onDifficultyFocused: _handleDifficultyFocused,
                    onDifficultyPressed: _handleDifficultyPressed,
                  ),
                ),
              ],
            ).animate().fadeIn(duration: 1.seconds, delay: .3.seconds);
          },
        ),                                                // to here.
      ),
    );
  }
}
Bu son düzenlemeyle ekrandaki her öğeye animasyon eklediniz ve sonuç çok daha iyi görünüyor.
6. Parça gölgelendiriciler ekleme
Bu adımda, uygulamaya parça gölgelendiriciler ekleyeceksiniz. İlk olarak, başlığı daha distopik bir görünüm verecek şekilde değiştirmek için bir gölgelendirici kullanacaksınız. Ardından, sayfanın merkezi odak noktası olarak hizmet veren bir küre oluşturmak için ikinci bir gölgelendirici eklersiniz.
Başlığı parça gölgelendiriciyle bozma
Bu değişiklikle, derlenmiş gölgelendiricilerin widget ağacına aktarılmasını sağlayan provider paketini kullanıma sunarsınız. Gölgelendiricilerin nasıl yüklendiğini merak ediyorsanız lib/assets.dart bölümündeki uygulamaya bakın.
lib/main.dartiçindeki kodu aşağıdaki şekilde değiştirin:
lib/main.dart
import 'dart:io' show Platform;

import 'package:flutter/foundation.dart' show kIsWeb;
import 'package:flutter/material.dart';
import 'package:flutter_animate/flutter_animate.dart';
import 'package:provider/provider.dart';                 // Add this import
import 'package:window_size/window_size.dart';

import 'assets.dart';                                    // Add this import
import 'title_screen/title_screen.dart';

void main() {
  if (!kIsWeb && (Platform.isWindows || Platform.isLinux || Platform.isMacOS)) {
    WidgetsFlutterBinding.ensureInitialized();
    setWindowMinSize(const Size(800, 500));
  }
  Animate.restartOnHotReload = true;
  runApp(                                                // Edit from here...
    FutureProvider<FragmentPrograms?>(
      create: (context) => loadFragmentPrograms(),
      initialData: null,
      child: const NextGenApp(),
    ),
  );                                                     // to here.
}

class NextGenApp extends StatelessWidget {
  const NextGenApp({super.key});

  @override
  Widget build(BuildContext context) {
    return MaterialApp(
      themeMode: ThemeMode.dark,
      darkTheme: ThemeData(brightness: Brightness.dark),
      home: const TitleScreen(),
    );
  }
}
providerpaketinden vestep_01'de bulunan gölgelendirici yardımcı programlarından yararlanmak için bunları içe aktarmanız gerekir.lib/title_screen/title_screen_ui.dartbölümüne aşağıdaki şekilde yeni içe aktarma işlemleri ekleyin:
lib/title_screen/title_screen_ui.dart
import 'package:extra_alignments/extra_alignments.dart';
import 'package:flutter/material.dart';
import 'package:flutter_animate/flutter_animate.dart';
import 'package:focusable_control_builder/focusable_control_builder.dart';
import 'package:gap/gap.dart';
import 'package:provider/provider.dart';                 // Add this import

import '../assets.dart';
import '../common/shader_effect.dart';                   // And this import
import '../common/ticking_builder.dart';                 // And this import
import '../common/ui_scaler.dart';
import '../styles.dart';

class TitleScreenUi extends StatelessWidget {
_TitleTextwidget'ını aşağıdaki şekilde düzenleyerek başlığı gölgelendiriciyle bozun:
lib/title_screen/title_screen_ui.dart
class _TitleText extends StatelessWidget {
  const _TitleText();

  @override
  Widget build(BuildContext context) {
    Widget content = Column(                             // Modify this line
      mainAxisSize: MainAxisSize.min,
      crossAxisAlignment: CrossAxisAlignment.start,
      children: [
        const Gap(20),
        Row(
          mainAxisSize: MainAxisSize.min,
          children: [
            Transform.translate(
              offset: Offset(-(TextStyles.h1.letterSpacing! * .5), 0),
              child: Text('OUTPOST', style: TextStyles.h1),
            ),
            Image.asset(AssetPaths.titleSelectedLeft, height: 65),
            Text('57', style: TextStyles.h2),
            Image.asset(AssetPaths.titleSelectedRight, height: 65),
          ],
        ).animate().fadeIn(delay: .8.seconds, duration: .7.seconds),
        Text('INTO THE UNKNOWN', style: TextStyles.h3)
            .animate()
            .fadeIn(delay: 1.seconds, duration: .7.seconds),
      ],
    );
    return Consumer<FragmentPrograms?>(                  // Add from here...
      builder: (context, fragmentPrograms, _) {
        if (fragmentPrograms == null) return content;
        return TickingBuilder(
          builder: (context, time) {
            return AnimatedSampler(
              (image, size, canvas) {
                const double overdrawPx = 30;
                final shader = fragmentPrograms.ui.fragmentShader();
                shader
                  ..setFloat(0, size.width)
                  ..setFloat(1, size.height)
                  ..setFloat(2, time)
                  ..setImageSampler(0, image);
                Rect rect = Rect.fromLTWH(-overdrawPx, -overdrawPx,
                    size.width + overdrawPx, size.height + overdrawPx);
                canvas.drawRect(rect, Paint()..shader = shader);
              },
              child: content,
            );
          },
        );
      },
    );                                                   // to here.
  }
}
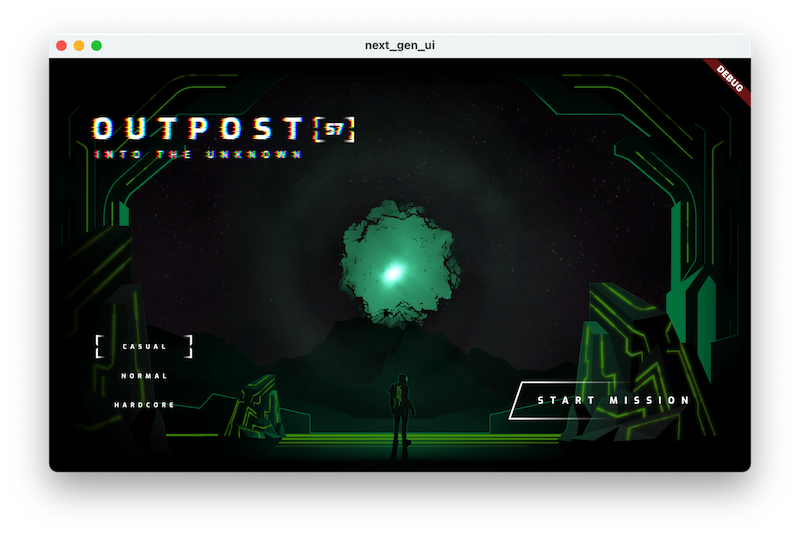
Başlığın, distopik bir gelecekte olacağı gibi bozulduğunu görürsünüz.
Küreyi ekleme
Şimdi pencerenin ortasına küreyi ekleyin. Başlat düğmesine onPressed geri araması eklemeniz gerekir.
lib/title_screen/title_screen_ui.dartbölümündeTitleScreenUiöğesini aşağıdaki şekilde değiştirin:
lib/title_screen/title_screen_ui.dart
class TitleScreenUi extends StatelessWidget {
  const TitleScreenUi({
    super.key,
    required this.difficulty,
    required this.onDifficultyPressed,
    required this.onDifficultyFocused,
    required this.onStartPressed,                         // Add this argument
  });

  final int difficulty;
  final void Function(int difficulty) onDifficultyPressed;
  final void Function(int? difficulty) onDifficultyFocused;
  final VoidCallback onStartPressed;                      // Add this attribute

  @override
  Widget build(BuildContext context) {
    return Padding(
      padding: const EdgeInsets.symmetric(vertical: 40, horizontal: 50),
      child: Stack(
        children: [
          /// Title Text
          const TopLeft(
            child: UiScaler(
              alignment: Alignment.topLeft,
              child: _TitleText(),
            ),
          ),

          /// Difficulty Btns
          BottomLeft(
            child: UiScaler(
              alignment: Alignment.bottomLeft,
              child: _DifficultyBtns(
                difficulty: difficulty,
                onDifficultyPressed: onDifficultyPressed,
                onDifficultyFocused: onDifficultyFocused,
              ),
            ),
          ),

          /// StartBtn
          BottomRight(
            child: UiScaler(
              alignment: Alignment.bottomRight,
              child: Padding(
                padding: const EdgeInsets.only(bottom: 20, right: 40),
                child: _StartBtn(onPressed: onStartPressed),  // Edit this line
              ),
            ),
          ),
        ],
      ),
    );
  }
}
Geri çağırma işleviyle başlatma düğmesini değiştirdiğinize göre artık lib/title_screen/title_screen.dart dosyasında büyük değişiklikler yapmanız gerekiyor.
- İçe aktarma işlemlerini aşağıdaki gibi değiştirin:
lib/title_screen/title_screen.dart
import 'dart:math';                                       // Add this import
import 'dart:ui';                                         // And this import

import 'package:flutter/material.dart';
import 'package:flutter/services.dart';                   // Add this import
import 'package:flutter_animate/flutter_animate.dart';

import '../assets.dart';
import '../orb_shader/orb_shader_config.dart';            // And this import
import '../orb_shader/orb_shader_widget.dart';            // And this import too
import '../styles.dart';
import 'title_screen_ui.dart';

class TitleScreen extends StatefulWidget {
_TitleScreenStatedeğerini aşağıdakiyle eşleşecek şekilde değiştirin. Sınıfın neredeyse her bölümü bir şekilde değiştirilir.
lib/title_screen/title_screen.dart
class _TitleScreenState extends State<TitleScreen>
    with SingleTickerProviderStateMixin {
  final _orbKey = GlobalKey<OrbShaderWidgetState>();

  /// Editable Settings
  /// 0-1, receive lighting strength
  final _minReceiveLightAmt = .35;
  final _maxReceiveLightAmt = .7;

  /// 0-1, emit lighting strength
  final _minEmitLightAmt = .5;
  final _maxEmitLightAmt = 1;

  /// Internal
  var _mousePos = Offset.zero;

  Color get _emitColor =>
      AppColors.emitColors[_difficultyOverride ?? _difficulty];
  Color get _orbColor =>
      AppColors.orbColors[_difficultyOverride ?? _difficulty];

  /// Selected difficulty
  int _difficulty = 0;

  /// Focused difficulty (if any)
  int? _difficultyOverride;
  double _orbEnergy = 0;
  double _minOrbEnergy = 0;

  double get _finalReceiveLightAmt {
    final light =
        lerpDouble(_minReceiveLightAmt, _maxReceiveLightAmt, _orbEnergy) ?? 0;
    return light + _pulseEffect.value * .05 * _orbEnergy;
  }

  double get _finalEmitLightAmt {
    return lerpDouble(_minEmitLightAmt, _maxEmitLightAmt, _orbEnergy) ?? 0;
  }

  late final _pulseEffect = AnimationController(
    vsync: this,
    duration: _getRndPulseDuration(),
    lowerBound: -1,
    upperBound: 1,
  );

  Duration _getRndPulseDuration() => 100.ms + 200.ms * Random().nextDouble();

  double _getMinEnergyForDifficulty(int difficulty) => switch (difficulty) {
        1 => 0.3,
        2 => 0.6,
        _ => 0,
      };


  @override
  void initState() {
    super.initState();
    _pulseEffect.forward();
    _pulseEffect.addListener(_handlePulseEffectUpdate);
  }

  void _handlePulseEffectUpdate() {
    if (_pulseEffect.status == AnimationStatus.completed) {
      _pulseEffect.reverse();
      _pulseEffect.duration = _getRndPulseDuration();
    } else if (_pulseEffect.status == AnimationStatus.dismissed) {
      _pulseEffect.duration = _getRndPulseDuration();
      _pulseEffect.forward();
    }
  }

  void _handleDifficultyPressed(int value) {
    setState(() => _difficulty = value);
    _bumpMinEnergy();
  }

  Future<void> _bumpMinEnergy([double amount = 0.1]) async {
    setState(() {
      _minOrbEnergy = _getMinEnergyForDifficulty(_difficulty) + amount;
    });
    await Future<void>.delayed(.2.seconds);
    setState(() {
      _minOrbEnergy = _getMinEnergyForDifficulty(_difficulty);
    });
  }

  void _handleStartPressed() => _bumpMinEnergy(0.3);

  void _handleDifficultyFocused(int? value) {
    setState(() {
      _difficultyOverride = value;
      if (value == null) {
        _minOrbEnergy = _getMinEnergyForDifficulty(_difficulty);
      } else {
        _minOrbEnergy = _getMinEnergyForDifficulty(value);
      }
    });
  }

  /// Update mouse position so the orbWidget can use it, doing it here prevents
  /// btns from blocking the mouse-move events in the widget itself.
  void _handleMouseMove(PointerHoverEvent e) {
    setState(() {
      _mousePos = e.localPosition;
    });
  }

  @override
  Widget build(BuildContext context) {
    return Scaffold(
      backgroundColor: Colors.black,
      body: Center(
        child: MouseRegion(
          onHover: _handleMouseMove,
          child: _AnimatedColors(
            orbColor: _orbColor,
            emitColor: _emitColor,
            builder: (_, orbColor, emitColor) {
              return Stack(
                children: [
                  /// Bg-Base
                  Image.asset(AssetPaths.titleBgBase),

                  /// Bg-Receive
                  _LitImage(
                    color: orbColor,
                    imgSrc: AssetPaths.titleBgReceive,
                    pulseEffect: _pulseEffect,
                    lightAmt: _finalReceiveLightAmt,
                  ),

                  /// Orb
                  Positioned.fill(
                    child: Stack(
                      children: [
                        // Orb
                        OrbShaderWidget(
                          key: _orbKey,
                          mousePos: _mousePos,
                          minEnergy: _minOrbEnergy,
                          config: OrbShaderConfig(
                            ambientLightColor: orbColor,
                            materialColor: orbColor,
                            lightColor: orbColor,
                          ),
                          onUpdate: (energy) => setState(() {
                            _orbEnergy = energy;
                          }),
                        ),
                      ],
                    ),
                  ),

                  /// Mg-Base
                  _LitImage(
                    imgSrc: AssetPaths.titleMgBase,
                    color: orbColor,
                    pulseEffect: _pulseEffect,
                    lightAmt: _finalReceiveLightAmt,
                  ),

                  /// Mg-Receive
                  _LitImage(
                    imgSrc: AssetPaths.titleMgReceive,
                    color: orbColor,
                    pulseEffect: _pulseEffect,
                    lightAmt: _finalReceiveLightAmt,
                  ),

                  /// Mg-Emit
                  _LitImage(
                    imgSrc: AssetPaths.titleMgEmit,
                    color: emitColor,
                    pulseEffect: _pulseEffect,
                    lightAmt: _finalEmitLightAmt,
                  ),

                  /// Fg-Rocks
                  Image.asset(AssetPaths.titleFgBase),

                  /// Fg-Receive
                  _LitImage(
                    imgSrc: AssetPaths.titleFgReceive,
                    color: orbColor,
                    pulseEffect: _pulseEffect,
                    lightAmt: _finalReceiveLightAmt,
                  ),

                  /// Fg-Emit
                  _LitImage(
                    imgSrc: AssetPaths.titleFgEmit,
                    color: emitColor,
                    pulseEffect: _pulseEffect,
                    lightAmt: _finalEmitLightAmt,
                  ),

                  /// UI
                  Positioned.fill(
                    child: TitleScreenUi(
                      difficulty: _difficulty,
                      onDifficultyFocused: _handleDifficultyFocused,
                      onDifficultyPressed: _handleDifficultyPressed,
                      onStartPressed: _handleStartPressed,
                    ),
                  ),
                ],
              ).animate().fadeIn(duration: 1.seconds, delay: .3.seconds);
            },
          ),
        ),
      ),
    );
  }
}
_LitImageöğesini aşağıdaki şekilde değiştirin:
lib/title_screen/title_screen.dart
class _LitImage extends StatelessWidget {
  const _LitImage({
    required this.color,
    required this.imgSrc,
    required this.pulseEffect,                            // Add this parameter
    required this.lightAmt,
  });
  final Color color;
  final String imgSrc;
  final AnimationController pulseEffect;                  // Add this attribute
  final double lightAmt;

  @override
  Widget build(BuildContext context) {
    final hsl = HSLColor.fromColor(color);
    return ListenableBuilder(                             // Edit from here...
      listenable: pulseEffect,
      builder: (context, child) {
        return Image.asset(
          imgSrc,
          color: hsl.withLightness(hsl.lightness * lightAmt).toColor(),
          colorBlendMode: BlendMode.modulate,
        );
      },
    );                                                    // to here.
  }
}
Bu eklemenin sonucu gösterilmektedir.
7. Parçacık animasyonları ekleme
Bu adımda, uygulamaya hafif bir titreşim hareketi eklemek için parçacık animasyonları ekleyeceksiniz.
Her yere parçacık ekleme
- Yeni bir
lib/title_screen/particle_overlay.dartdosyası oluşturun ve aşağıdaki kodu ekleyin:
lib/title_screen/particle_overlay.dart
import 'dart:math';

import 'package:flutter/material.dart';
import 'package:particle_field/particle_field.dart';
import 'package:rnd/rnd.dart';

class ParticleOverlay extends StatelessWidget {
  const ParticleOverlay({super.key, required this.color, required this.energy});

  final Color color;
  final double energy;

  @override
  Widget build(BuildContext context) {
    return ParticleField(
      spriteSheet: SpriteSheet(
        image: const AssetImage('assets/images/particle-wave.png'),
      ),
      // blend the image's alpha with the specified color:
      blendMode: BlendMode.dstIn,

      // this runs every tick:
      onTick: (controller, _, size) {
        List<Particle> particles = controller.particles;

        // add a new particle with random angle, distance & velocity:
        double a = rnd(pi * 2);
        double dist = rnd(1, 4) * 35 + 150 * energy;
        double vel = rnd(1, 2) * (1 + energy * 1.8);
        particles.add(Particle(
          // how many ticks this particle will live:
          lifespan: rnd(1, 2) * 20 + energy * 15,
          // starting distance from center:
          x: cos(a) * dist,
          y: sin(a) * dist,
          // starting velocity:
          vx: cos(a) * vel,
          vy: sin(a) * vel,
          // other starting values:
          rotation: a,
          scale: rnd(1, 2) * 0.6 + energy * 0.5,
        ));

        // update all of the particles:
        for (int i = particles.length - 1; i >= 0; i--) {
          Particle p = particles[i];
          if (p.lifespan <= 0) {
            // particle is expired, remove it:
            particles.removeAt(i);
            continue;
          }
          p.update(
            scale: p.scale * 1.025,
            vx: p.vx * 1.025,
            vy: p.vy * 1.025,
            color: color.withOpacity(p.lifespan * 0.001 + 0.01),
            lifespan: p.lifespan - 1,
          );
        }
      },
    );
  }
}
lib/title_screen/title_screen.dartiçin içe aktarma işlemlerini aşağıdaki gibi değiştirin:
lib/title_screen/title_screen.dart
import 'dart:math';
import 'dart:ui';

import 'package:flutter/material.dart';
import 'package:flutter/services.dart';
import 'package:flutter_animate/flutter_animate.dart';

import '../assets.dart';
import '../orb_shader/orb_shader_config.dart';
import '../orb_shader/orb_shader_widget.dart';
import '../styles.dart';
import 'particle_overlay.dart';                          // Add this import
import 'title_screen_ui.dart';

class TitleScreen extends StatefulWidget {
_TitleScreenStateöğesininbuildyöntemini aşağıdaki gibi değiştirerek kullanıcı arayüzüneParticleOverlayöğesini ekleyin:
lib/title_screen/title_screen.dart
@override
Widget build(BuildContext context) {
  return Scaffold(
    backgroundColor: Colors.black,
    body: Center(
      child: MouseRegion(
        onHover: _handleMouseMove,
        child: _AnimatedColors(
          orbColor: _orbColor,
          emitColor: _emitColor,
          builder: (_, orbColor, emitColor) {
            return Stack(
              children: [
                /// Bg-Base
                Image.asset(AssetPaths.titleBgBase),

                /// Bg-Receive
                _LitImage(
                  color: orbColor,
                  imgSrc: AssetPaths.titleBgReceive,
                  pulseEffect: _pulseEffect,
                  lightAmt: _finalReceiveLightAmt,
                ),

                /// Orb
                Positioned.fill(
                  child: Stack(
                    children: [
                      // Orb
                      OrbShaderWidget(
                        key: _orbKey,
                        mousePos: _mousePos,
                        minEnergy: _minOrbEnergy,
                        config: OrbShaderConfig(
                          ambientLightColor: orbColor,
                          materialColor: orbColor,
                          lightColor: orbColor,
                        ),
                        onUpdate: (energy) => setState(() {
                          _orbEnergy = energy;
                        }),
                      ),
                    ],
                  ),
                ),

                /// Mg-Base
                _LitImage(
                  imgSrc: AssetPaths.titleMgBase,
                  color: orbColor,
                  pulseEffect: _pulseEffect,
                  lightAmt: _finalReceiveLightAmt,
                ),

                /// Mg-Receive
                _LitImage(
                  imgSrc: AssetPaths.titleMgReceive,
                  color: orbColor,
                  pulseEffect: _pulseEffect,
                  lightAmt: _finalReceiveLightAmt,
                ),

                /// Mg-Emit
                _LitImage(
                  imgSrc: AssetPaths.titleMgEmit,
                  color: emitColor,
                  pulseEffect: _pulseEffect,
                  lightAmt: _finalEmitLightAmt,
                ),

                /// Particle Field
                Positioned.fill(                          // Add from here...
                  child: IgnorePointer(
                    child: ParticleOverlay(
                      color: orbColor,
                      energy: _orbEnergy,
                    ),
                  ),
                ),                                        // to here.

                /// Fg-Rocks
                Image.asset(AssetPaths.titleFgBase),

                /// Fg-Receive
                _LitImage(
                  imgSrc: AssetPaths.titleFgReceive,
                  color: orbColor,
                  pulseEffect: _pulseEffect,
                  lightAmt: _finalReceiveLightAmt,
                ),

                /// Fg-Emit
                _LitImage(
                  imgSrc: AssetPaths.titleFgEmit,
                  color: emitColor,
                  pulseEffect: _pulseEffect,
                  lightAmt: _finalEmitLightAmt,
                ),

                /// UI
                Positioned.fill(
                  child: TitleScreenUi(
                    difficulty: _difficulty,
                    onDifficultyFocused: _handleDifficultyFocused,
                    onDifficultyPressed: _handleDifficultyPressed,
                    onStartPressed: _handleStartPressed,
                  ),
                ),
              ],
            ).animate().fadeIn(duration: 1.seconds, delay: .3.seconds);
          },
        ),
      ),
    ),
  );
}
Sonuç olarak, birden fazla platformda animasyonlar, parça gölgelendiriciler ve parçacık efektleri elde edebilirsiniz.
Her yere parçacık ekleyin (web dahil)
Kodun mevcut haliyle ilgili küçük bir sorun var. Flutter web'de çalışırken kullanılabilecek iki alternatif oluşturma motoru vardır: masaüstü sınıfı tarayıcılarda varsayılan olarak kullanılan CanvasKit motoru ve mobil cihazlarda varsayılan olarak kullanılan bir HTML DOM oluşturucu. Sorun, HTML DOM oluşturucunun parça gölgelendiricileri desteklememesidir.
Düzeltme, yalnızca CanvasKit oluşturucuyu kullanarak web için derleme yapmaktır. Bunu yapmak için derleme komutuna aşağıdaki gibi bir işaret ekleyin:
$ flutter build web --web-renderer canvaskit
Font asset "MaterialIcons-Regular.otf" was tree-shaken, reducing it from 1645184 to 7692 bytes (99.5% reduction). Tree-shaking can be disabled by providing the --no-tree-shake-icons flag
when building your app.
Font asset "CupertinoIcons.ttf" was tree-shaken, reducing it from 257628 to 1172 bytes (99.5% reduction). Tree-shaking can be disabled by providing the --no-tree-shake-icons flag when
building your app.
Compiling lib/main.dart for the Web...                             15.6s
✓ Built build/web
Tüm emekleriniz bu kez Chrome tarayıcıda gösteriliyor.
8. Tebrikler
Animasyonlar, parça gölgelendiriciler ve parçacık animasyonları içeren, tam özellikli bir oyun giriş ekranı oluşturdunuz. Artık bu teknikleri Flutter'ın desteklediği tüm platformlarda kullanabilirsiniz.
Daha fazla bilgi
flutter_animatepaketine göz atın- Flutter'da Parça Gölgelendiriciler için Destek dokümanını inceleyin.
- Patricio Gonzalez Vivo ve Jen Lowe'un The Book of Shaders adlı kitabı
- Ortak çalışmaya olanak tanıyan bir gölgelendirici oyun alanı olan Shader toy
- simple_shader: Flutter fragment shader örnek projesi