

1. はじめに
Flutter アプリにアプリ内購入を追加するには、Apple App Store と Google Play ストアを設定し、信頼できるバックエンドで購入トークンを確認して、消費可能な通貨、1 回限りのアップグレード、定期購入の特典などの利用資格を付与する必要があります。
この Codelab では、Google Antigravity と協力して、Dash マスコットを通貨として使用するモバイル クリッカー ゲーム Dash Clicker を作成します。また、Dart shelf バックエンド サービスと Cloud Firestore を組み合わせて、次の 3 種類のアプリ内購入を検証、追跡します。
- 消費型(
dash_consumable_2k): 繰り返し購入できるアイテム。プレーヤーは購入するとすぐに 2,000 ダッシュを獲得できます。複数回購入できます。 - 非消費型(
dash_upgrade_3d): 従来の Dash マスコットを最新の 3D Dash に永久に変換する、1 回限りの永続的なアップグレード。 - サブスクリプション(
dash_subscription_doubler): 自動更新のサブスクリプション。サブスクリプションが有効な間、受動的に生成されるクリック数を増やします。
|
|
|


作成するアプリの概要
material_uiとcupertino_uiでスタイル設定された Flutter モバイルアプリ(app/)。ストアの商品をクエリし、購入を開始して、リアルタイムの購入ストリームに対応します。- Google Play と App Store で購入レシートを検証し、ストアの課金イベントをポーリングして、購入状態を Cloud Firestore に記録する Dart
shelfバックエンド サーバー(dart-backend/)。
学習の流れ
この Codelab では、フルスタックのアプリ内購入フローを構築して接続する手順を、ステップごとに説明します。
- 開発環境をセットアップする - Flutter と Google Antigravity をインストールし、Antigravity に Dash Clicker スターター プロジェクト(
app/)をスキャフォールディングするよう指示して、iOS バンドル ID と AndroidapplicationIdを構成します。 - プラグインをインストールする - Antigravity に
in_app_purchaseとin_app_purchase_platform_interfaceをapp/に追加するよう指示します。 - アプリストアを設定する - App ID を登録し、サンドボックス テスト アカウントを作成して、App Store Connect で 3 つのプロダクトを設定します。
- Google Play ストアを設定する - Google Play Console でアプリを作成し、Gradle でリリース用キーストアの署名を設定するよう Antigravity に指示します。初期 App Bundle をアップロードし、ライセンス テスターを追加して、プロダクトを設定します。
- Firebase を設定する - Firebase コンソールで Google ログインと Cloud Firestore を有効にし、
flutterfire configureを実行して、Android SHA-1 フィンガープリントと iOS URL スキームを構成します。 - 購入の更新情報をリッスンする - Antigravity に、テスト可能な
IAPConnectionラッパーを追加し、purchaseStreamに登録して、TestIAPConnectionでアプリをテストするよう指示します。 - 購入する - Antigravity に
ProductDetailsをPurchasableProductでラップするよう指示し、ストアの商品をクエリして、buyConsumableとbuyNonConsumableをトリガーし、保留中の購入を完了します。 - バックエンドを設定する - Antigravity に
IapRepositoryを使用してdart-backend/サーバーをスキャフォールディングし、サービス アカウントの認証情報を構成するよう指示します。 - 購入を確認する - Antigravity に、
PurchasePageで Firebase ログインを要求し、購入トークンを/verifypurchaseに送信して、GooglePlayPurchaseHandlerとAppStorePurchaseHandlerを実装するよう指示します。 - 購入を追跡する - Antigravity に、バックエンドで Google Cloud Pub/Sub とアプリストア Server API をポーリングし、
IAPRepoを使用して利用資格を Flutter クライアントに同期するよう指示します。
学習内容
- Google Antigravity と連携して、フルスタックの Flutter アプリ内購入アプリと Dart バックエンドを反復的に構築してカスタマイズする方法。
- App Store Connect と Google Play Console で、消費型アイテム、非消費型アイテム、定期購入アイテムを設定する方法。
in_app_purchaseプラグインを使用して、商品のクエリ、購入の開始、購入ストリームの処理を行う方法。- Dart バックエンドで Google Play とアプリストアの購入トークンを検証し、Cloud Firestore に保存する方法。
- ストアの課金イベントを処理し、デバイス間で定期購入とアップグレードの利用資格を同期する方法。
前提条件
- Flutter ウィジェット、Dart 構文、
Provider状態管理に関する基本的な知識。 - Apple デベロッパー アカウント(iOS でのアプリストアでの購入をテストする場合)、Google Play デベロッパー アカウント(Android での Google Play ストアでの購入をテストする場合)、またはその両方。
- Firebase アカウントと Firebase CLI。
2. 開発環境を設定する
編集者
この Codelab では、AI ファーストの開発環境として Google Antigravity を使用します。各ステップで、Antigravity に Flutter クライアント(app/)と Dart バックエンド(dart-backend/)の生成または進化を指示し、生成されたコードを検査して、必要に応じてバリエーションを探索します。
Flutter をインストールする
Flutter SDK の最新のインストール手順は、常に docs.flutter.dev にあります。
この Codelab では、次のソフトウェアをインストールします。
- Flutter SDK
- 公式の Dart プラグインと Flutter プラグインが有効になっている Google Antigravity(プラグイン マーケットプレイスの [Build with Google] セクションで入手可能)。
- 選んだモバイル ターゲット用のコンパイラ ソフトウェア(Android がターゲットなら Android Studio、iOS がターゲットなら Xcode)。
Antigravity にスターター プロジェクトを作成するよう指示する
- Google Antigravity を起動し、Flutter アプリ(
app/)と Dart サーバー(dart-backend/)の両方をビルドする空のワークスペース ディレクトリを開きます。権限昇格を必要としないパス、またはスペースを含まないパス(ホーム ディレクトリ内のフォルダやC:\src\など)を選択します。 - Antigravity エージェントのチャットパネルで、次のプロンプトを送信して、
app/に Dash Clicker スターター アプリをスキャフォールディングします。
Create a new empty Flutter project in `app/` named `dashclicker` targeting Android and iOS (`flutter create app --project-name dashclicker --empty --platforms android,ios`). Add the `cloud_firestore`, `cupertino_icons`, `firebase_auth`, `firebase_core`, `google_sign_in`, `http`, `intl`, `provider`, `logging`, `material_ui`, and `cupertino_ui` packages. Download `dash_old.png` and `dash.png` from `https://raw.githubusercontent.com/flutter/codelabs/main/in_app_purchases/step_00/app/assets/dash_old.png` and `https://raw.githubusercontent.com/flutter/codelabs/main/in_app_purchases/step_00/app/assets/dash.png` into `app/assets/` and register `assets/` under `flutter: assets:` in `app/pubspec.yaml`. Set `minSdk = 23` in `app/android/app/build.gradle.kts`, and add `GIDClientID` and `CFBundleURLTypes` placeholders in `app/ios/Runner/Info.plist`. Scaffold the Dash Clicker starter files using `package:material_ui/material_ui.dart` and `package:cupertino_ui/cupertino_ui.dart`:
- `lib/constants.dart` defining `cloudRegion = 'europe-west1'`, `storeKeyConsumable = 'dash_consumable_2k'`, `storeKeyUpgrade = 'dash_upgrade_3d'`, `storeKeySubscription = 'dash_subscription_doubler'`, and `serverIp = '192.168.178.46'`
- `lib/firebase_options.dart` with a placeholder `DefaultFirebaseOptions` for Android and iOS
- `lib/model/firebase_state.dart` (`enum FirebaseState { loading, available, notAvailable }`), `lib/model/store_state.dart` (`enum StoreState { loading, available, notAvailable }`), `lib/model/purchasable_product.dart` (`enum ProductStatus { purchasable, purchased, pending }` and `PurchasableProduct(this.title, this.description, this.price)`), and `lib/model/past_purchase.dart` (`PurchaseType`, `Store`, `Status`, and `PastPurchase.fromJson`)
- `lib/logic/dash_counter.dart` (`DashCounter extends ChangeNotifier` with `count`, `countString`, `increment()`, `addAutoIncrement()`, `applyPaidMultiplier()`, `removePaidMultiplier()`, `addBoughtDashes(int amount)`, and a 10Hz `Timer.periodic`)
- `lib/logic/dash_purchases.dart` (`DashPurchases extends ChangeNotifier` with `counter`, `storeState = StoreState.available`, mock `products`, `bool get beautifiedDash => false`, and a simulated `buy(PurchasableProduct product)` method)
- `lib/logic/dash_upgrades.dart` (`DashUpgrades extends ChangeNotifier` and `Upgrade` for `'Tim Sneath'`)
- `lib/logic/firebase_notifier.dart` (`FirebaseNotifier extends ChangeNotifier` initializing `Firebase.initializeApp`, `GoogleSignIn.instance`, `FirebaseAuth`, and `FirebaseFirestore`)
- `lib/repo/iap_repo.dart` (`IAPRepo extends ChangeNotifier` listening to Firebase auth changes and the `purchases` collection in Firestore)
- `lib/pages/home_page.dart` (`HomePage`, `DashClickerWidget`, `CounterStateWidget`, and `UpgradeList`), `lib/pages/login_page.dart` (`LoginPage`), and `lib/pages/purchase_page.dart` (`PurchasePage`, `_PurchasesLoading`, `_PurchasesNotAvailable`, `_PurchaseList`, `_PurchaseWidget`, and `PastPurchasesWidget`)
- `lib/main.dart` (`MyApp` and `MyHomePage` providing `FirebaseNotifier`, `DashCounter`, `DashUpgrades`, `IAPRepo`, and `DashPurchases` using `MultiProvider` with a `BottomNavigationBar` switching between `HomePage` and `PurchasePage`)
- `test/widget_test.dart` pumping `const MyApp()` and verifying `find.text('Tim Sneath')`.
生成されたスターター コードを理解する
Antigravity は app/ Flutter プロジェクトを作成し、Provider と ChangeNotifier を使用して Dash Clicker ゲーム アーキテクチャをスキャフォールディングします。
app/lib/main.dartは、MyHomePage内に 5 つのChangeNotifierProvider(FirebaseNotifier、DashCounter、DashUpgrades、IAPRepo、DashPurchases)を登録し、HomePageとPurchasePageを切り替えます。app/lib/constants.dartは、App Store Connect と Google Play Console で設定する ID と一致する必要がある 3 つのストア プロダクト ID を定義します。
const cloudRegion = 'europe-west1';
const storeKeyConsumable = 'dash_consumable_2k';
const storeKeyUpgrade = 'dash_upgrade_3d';
const storeKeySubscription = 'dash_subscription_doubler';

// TODO: Replace by your own server IP
const serverIp = '192.168.178.46';
アプリのバンドル ID とアプリケーション ID を構成する
アプリストアや Google Play ストアと通信するには、アプリに一意のリバース ドメイン識別子(例: dev.flutter.dashclicker)が必要です。iOS ではバンドル ID、Android ではアプリケーション ID と呼ばれます。両方のプラットフォームで同じ識別子を使用すると、構成が簡単になります。
まず、Xcode で app/ios/Runner.xcworkspace を開いて、iOS のバンドル ID を設定します。
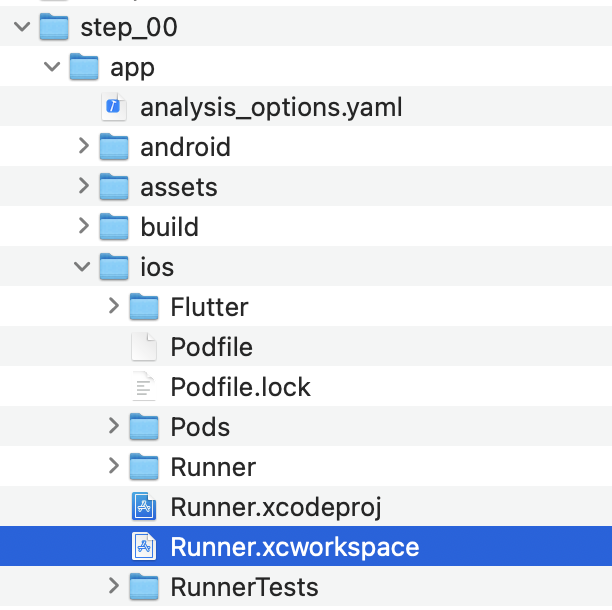
Xcode のプロジェクト ナビゲータで、上部の [Runner] を選択し、[Signing & Capabilities] タブを開いて、[Team] を選択し、一意の [バンドル ID] を入力します。

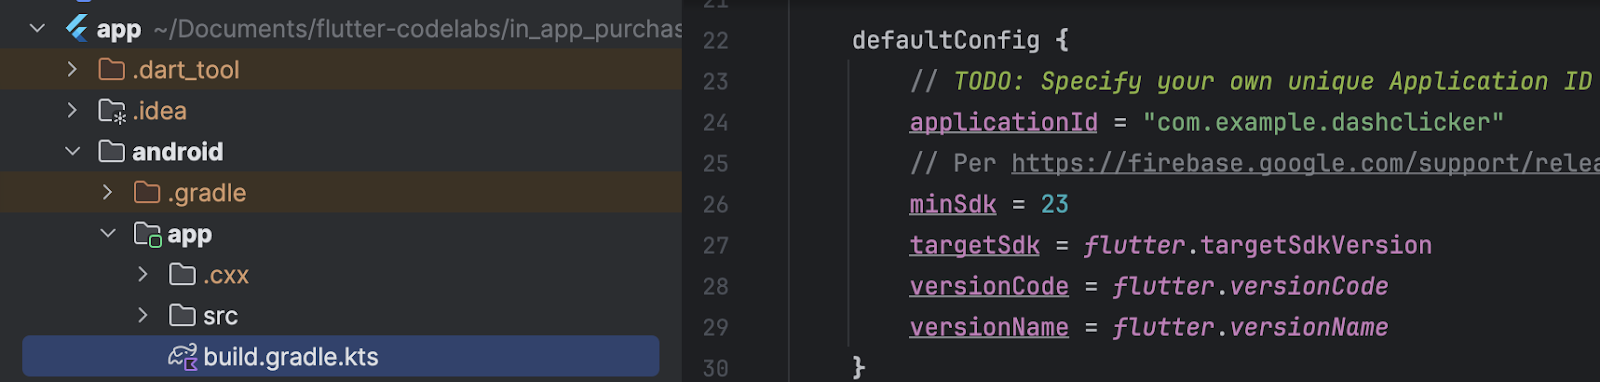
次に、app/android/app/build.gradle.kts の Android applicationId を、選択した識別子と一致するように更新します(直接編集するか、app/android/app/build.gradle.kts の applicationId を選択した ID に更新するよう Antigravity に依頼します)。
3. プラグインをインストールする
このステップでは、in_app_purchase プラグインとそのプラットフォーム インターフェース パッケージ(ウィジェット テストでストア接続をモックするために使用)を app/ に追加するよう Antigravity に指示します。
Antigravity に in_app_purchase をインストールするよう指示する
Antigravity エージェントのチャットパネルで、次のプロンプトを送信します。
In `app/`, add `in_app_purchase` to `dependencies` and `in_app_purchase_platform_interface` to `dev_dependencies` in `pubspec.yaml`.
生成されたコードを理解する
Antigravity は app/ 内で flutter pub add in_app_purchase dev:in_app_purchase_platform_interface を実行し、app/pubspec.yaml を更新します。
dependencies:
  flutter:
    sdk: flutter
  cloud_firestore: ^7.1.0
  cupertino_icons: ^2.0.0
  cupertino_ui: ^1.1.6
  firebase_auth: ^7.0.1
  firebase_core: ^5.1.0
  google_sign_in: ^7.2.0
  http: ^1.6.0
  in_app_purchase: ^3.3.1
  intl: ^0.20.3
  logging: ^1.3.0
  material_ui: ^1.11.0
  provider: ^6.1.5+1

dev_dependencies:
  flutter_test:
    sdk: flutter
  flutter_lints: ^6.0.0
  in_app_purchase_platform_interface: ^1.4.1
in_app_purchaseは、iOS の StoreKit と Android の Google Play 請求サービスを基盤とするクロス プラットフォームのInAppPurchaseAPI を提供します。in_app_purchase_platform_interfaceはInAppPurchasePlatformAdditionを公開します。これにより、app/test/widget_test.dartでモックInAppPurchaseクライアントを実装できます。
4. アプリストアを設定する
iOS でアプリ内購入をテストするには、App Store Connect にアプリを登録し、購入可能なプロダクトを設定する必要があります。アプリを公開したり、審査のために送信したりする必要はありませんが、Apple デベロッパー アカウントが必要です。お持ちでない場合は、Apple Developer Program に登録してください。
有料アプリ契約
アプリ内購入を使用するには、App Store Connect で有効な有料アプリ契約が必要です。App Store Connect に移動し、[Agreements, Tax, and Banking](または [Business])を選択します。

無料アプリと有料アプリの契約を確認します。有料アプリの利用規約を確認して同意し、必要な税務情報と銀行情報を入力します。

すべての設定が完了すると、[有料アプリ] のステータスが [有効] に変わります。有効な有料アプリ契約がない場合、StoreKit はテスト中にアプリ内アイテムを返しません。

アプリ ID を登録する
Apple デベロッパー ポータルで新しいアプリ ID を作成します。
- Apple Developer Identifiers にアクセスし、[Identifiers] ヘッダーの横にある + アイコンをクリックします。

- [App IDs] を選択し、[Continue] をクリックします。

- タイプとして [App] を選択し、[Continue] をクリックします。

- 説明を入力し、[Bundle ID](Explicit)を Xcode で設定したバンドル ID と完全に一致するように設定します。[In-App Purchase] 機能が有効になっていることを確認し、識別子を登録します。

詳しくは、Apple Developer Account Help をご覧ください。
新しいアプリとサンドボックス ユーザーを作成する
登録済みのバンドル ID を使用して、App Store Connect で新しいアプリを作成します。
|
|


アプリの作成と契約の管理について詳しくは、App Store Connect ヘルプをご覧ください。
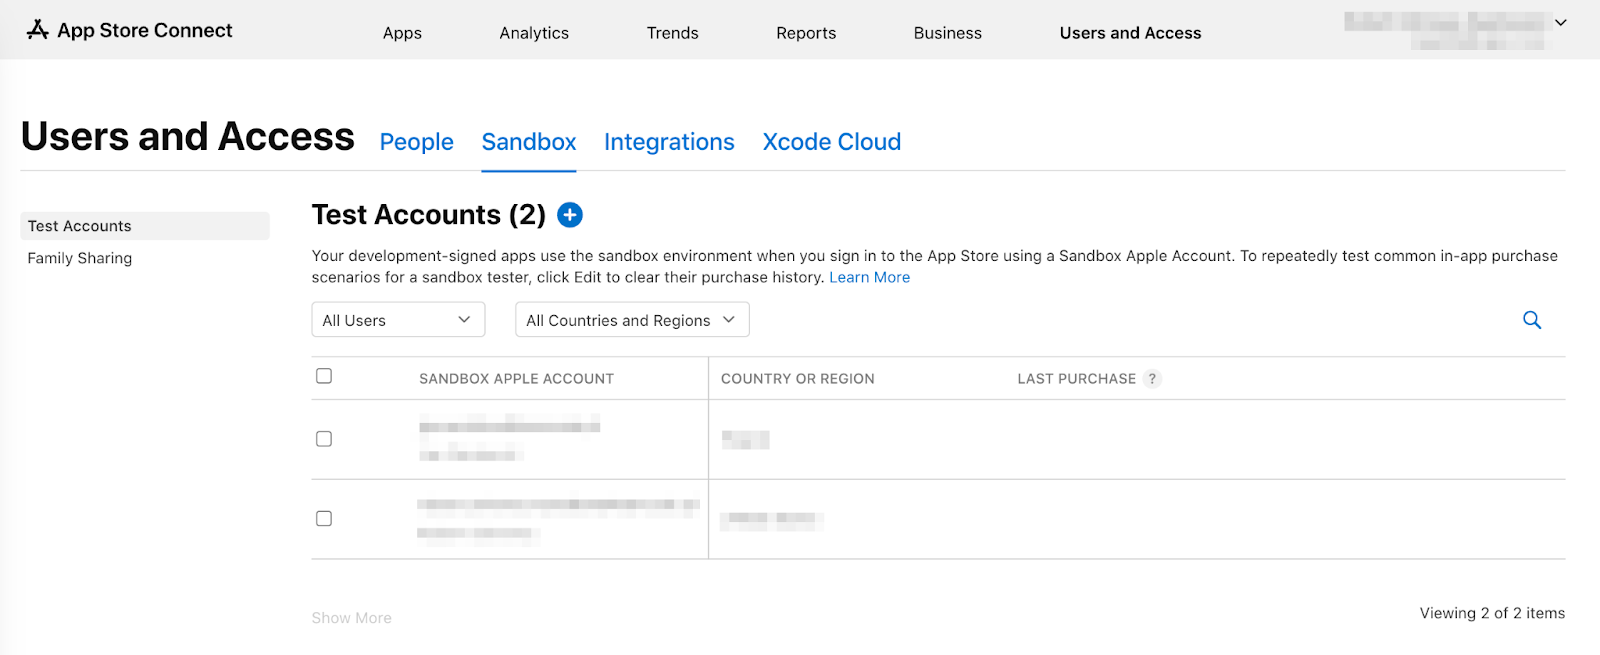
実際の請求なしでアプリ内購入をテストするには、App Store Connect の [ユーザーとアクセス] > [サンドボックス] でサンドボックス Apple アカウントを作成します。Apple アカウントにまだ関連付けられていないメールアドレスを使用する必要があります。
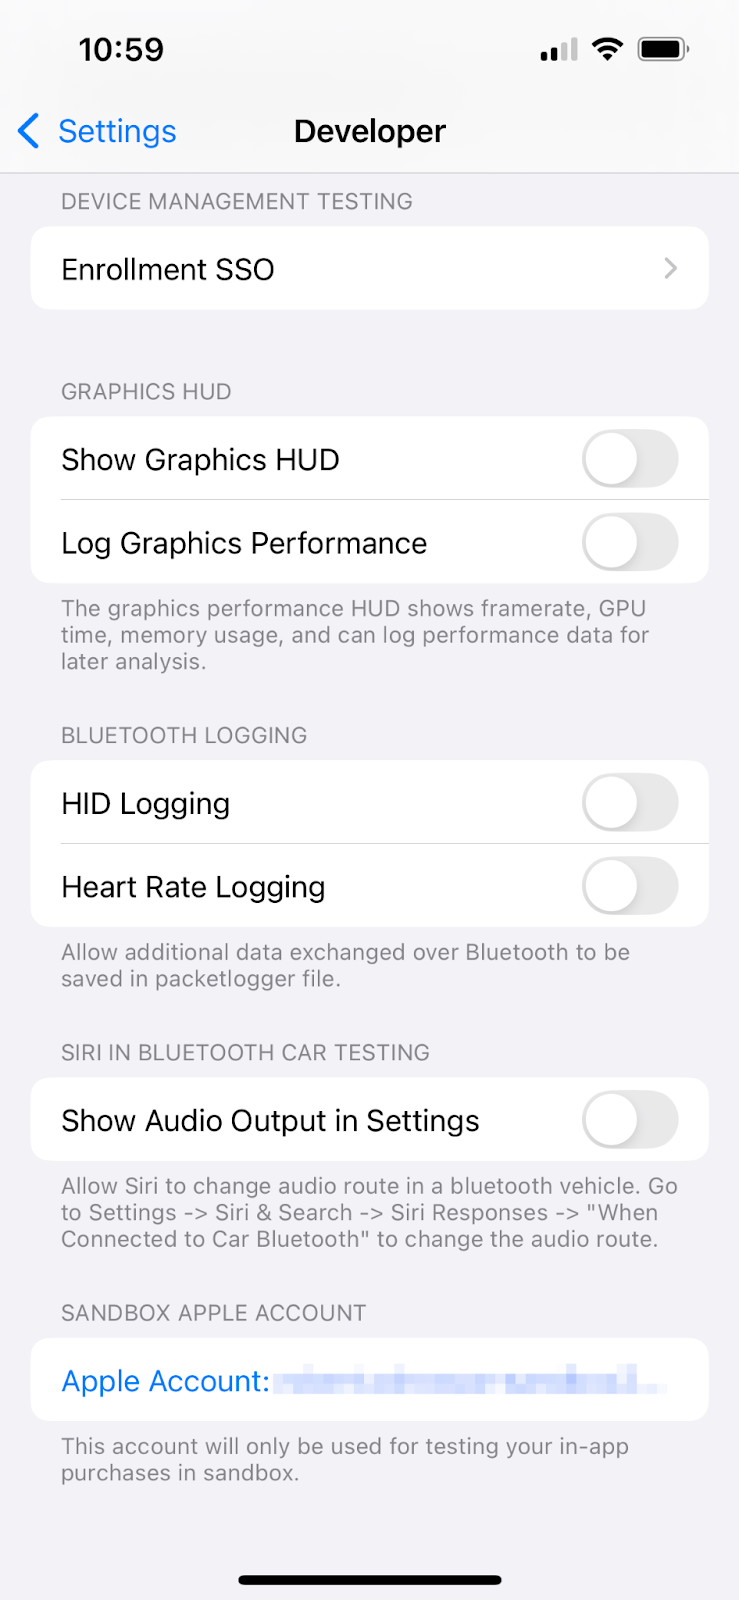
テスト用の iPhone または iPad で、[設定] > [デベロッパー] > [サンドボックス Apple アカウント] に移動し、サンドボックス アカウントでログインします。
|
|

アプリ内購入を設定する
次に、App Store Connect で 3 つの購入可能アイテムを構成します。
dash_consumable_2k: 繰り返し購入できる、1 回の購入につき 2,000 ダッシュが付与される、1 回限りのアイテムの購入。dash_upgrade_3d: 1 回のみ購入可能な非消費型のアップグレード購入。3D Dash マスコットのロックが解除されます。dash_subscription_doubler: 有効期間中にパッシブ クリックを増やす自動更新の定期購入。

アプリの アプリ内購入(および 定期購入)セクションで、次の商品 ID を持つ 3 つの商品を作成します。
- 消費型アイテム(
dash_consumable_2k):- 参照名
dash consumable 2k、プロダクト IDdash_consumable_2kで消費型アイテムを作成します。
- サンドボックス ユーザーの国または地域で商品を利用できるように、提供状況を設定します。

- 価格を
\$1.99(または現地通貨の相当額)に設定します。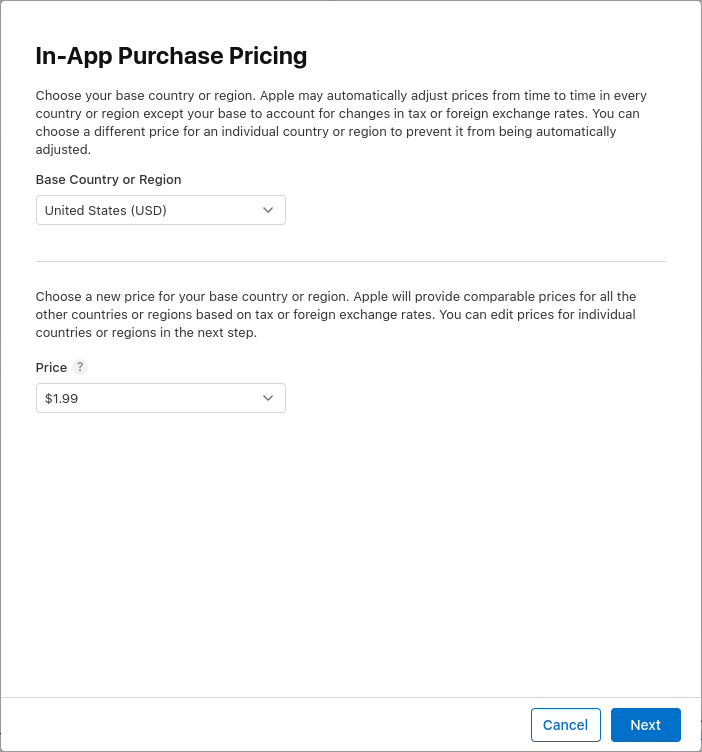
- 表示名
Spring is in the airと説明2000 dashes fly outを含むローカライズを追加します。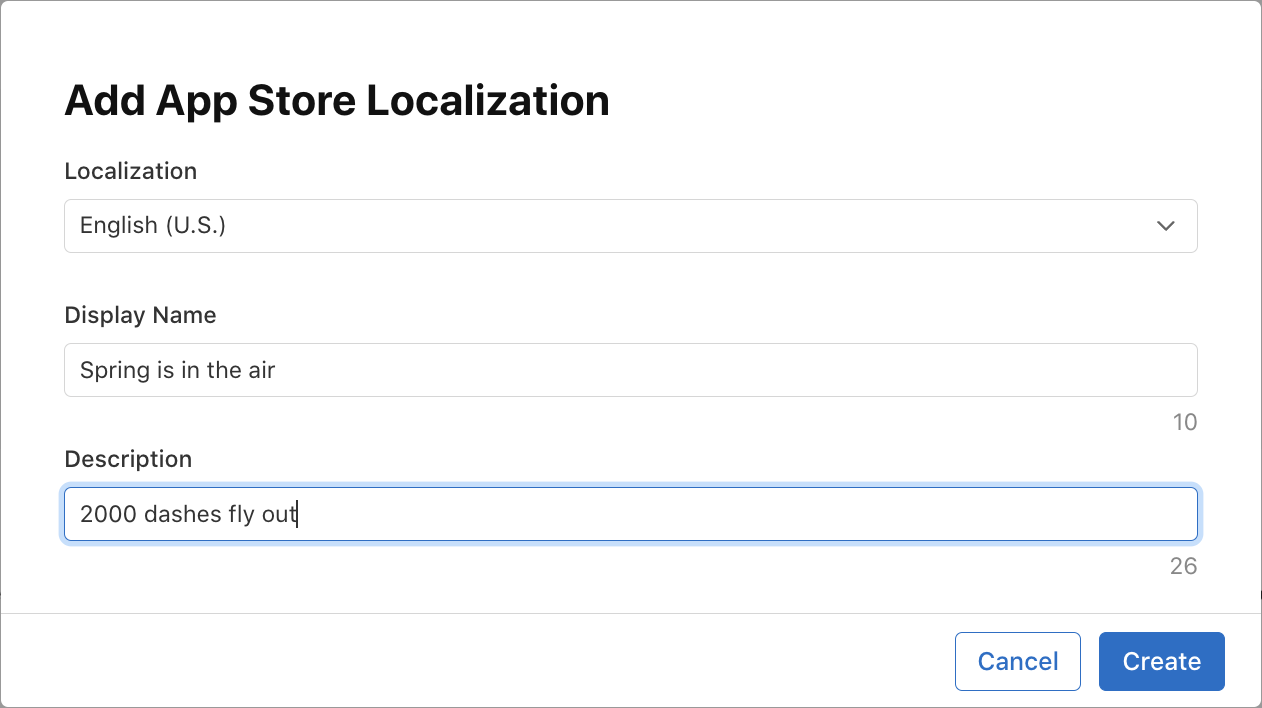
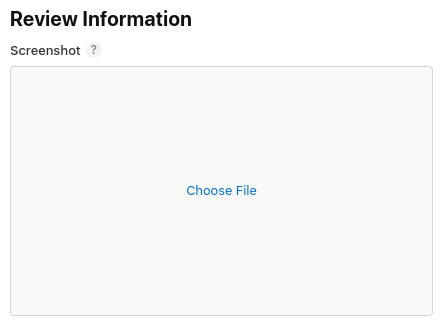
- クチコミのスクリーンショットをアップロードします。画像の内容はサンドボックス テストには関係ありませんが、スクリーンショットをアップロードすると、商品が [Ready to Submit] 状態に移行します。これは、アプリが StoreKit から商品を取得するために必要です。
- 参照名
- 非消費型(
dash_upgrade_3d):- 参照名
dash upgrade 3d、商品 IDdash_upgrade_3dの非消費型商品を作成します。 - 表示名を
3D Dash、説明をBrings your dash back to the future、価格を\$0.99に設定します。 dash_consumable_2kの場合と同様に、公開設定を構成し、審査用のスクリーンショットをアップロードします。
- 参照名
- 自動更新の定期購入(
dash_subscription_doubler):- [定期購入] で、
subscriptionsという名前の定期購入グループを作成します(ユーザーは同じグループ内で一度に 1 つのアイテムのみを定期購入でき、グループ内でアップグレードまたはダウングレードできます)。
- サブスクリプション グループのアプリストア ローカライズを追加します。

- グループ内に、参照名
dash subscription doubler、プロダクト IDdash_subscription_doublerの定期購入を作成します。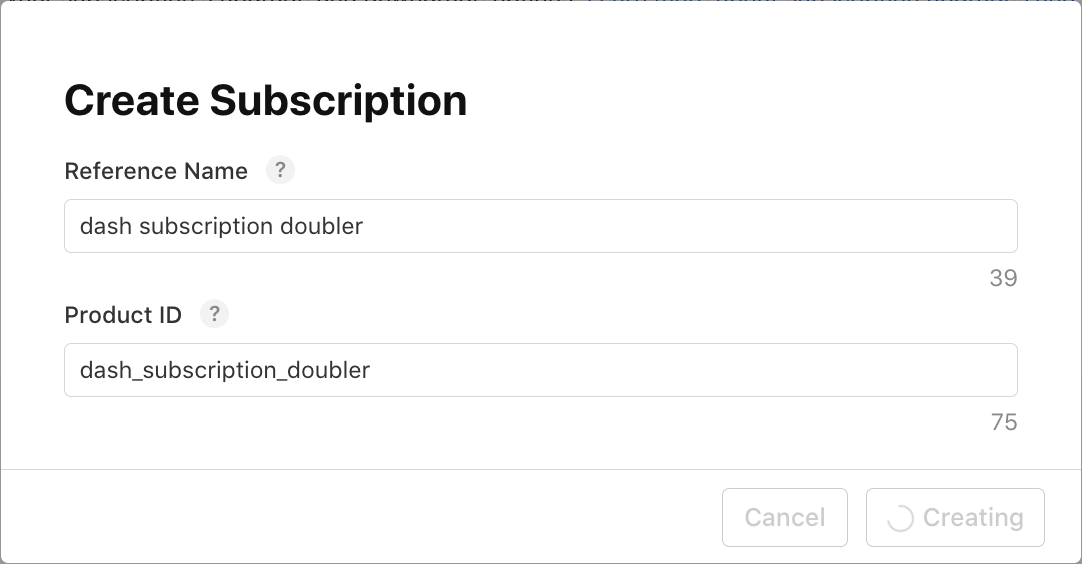
- [定期購入期間] を [1 週間]、[表示名] を
Jet Engine、[説明] をDoubles your clicks、[価格] を\$0.49に設定します。提供状況を設定し、審査用のスクリーンショットをアップロードして、ステータスを [送信準備完了] にします。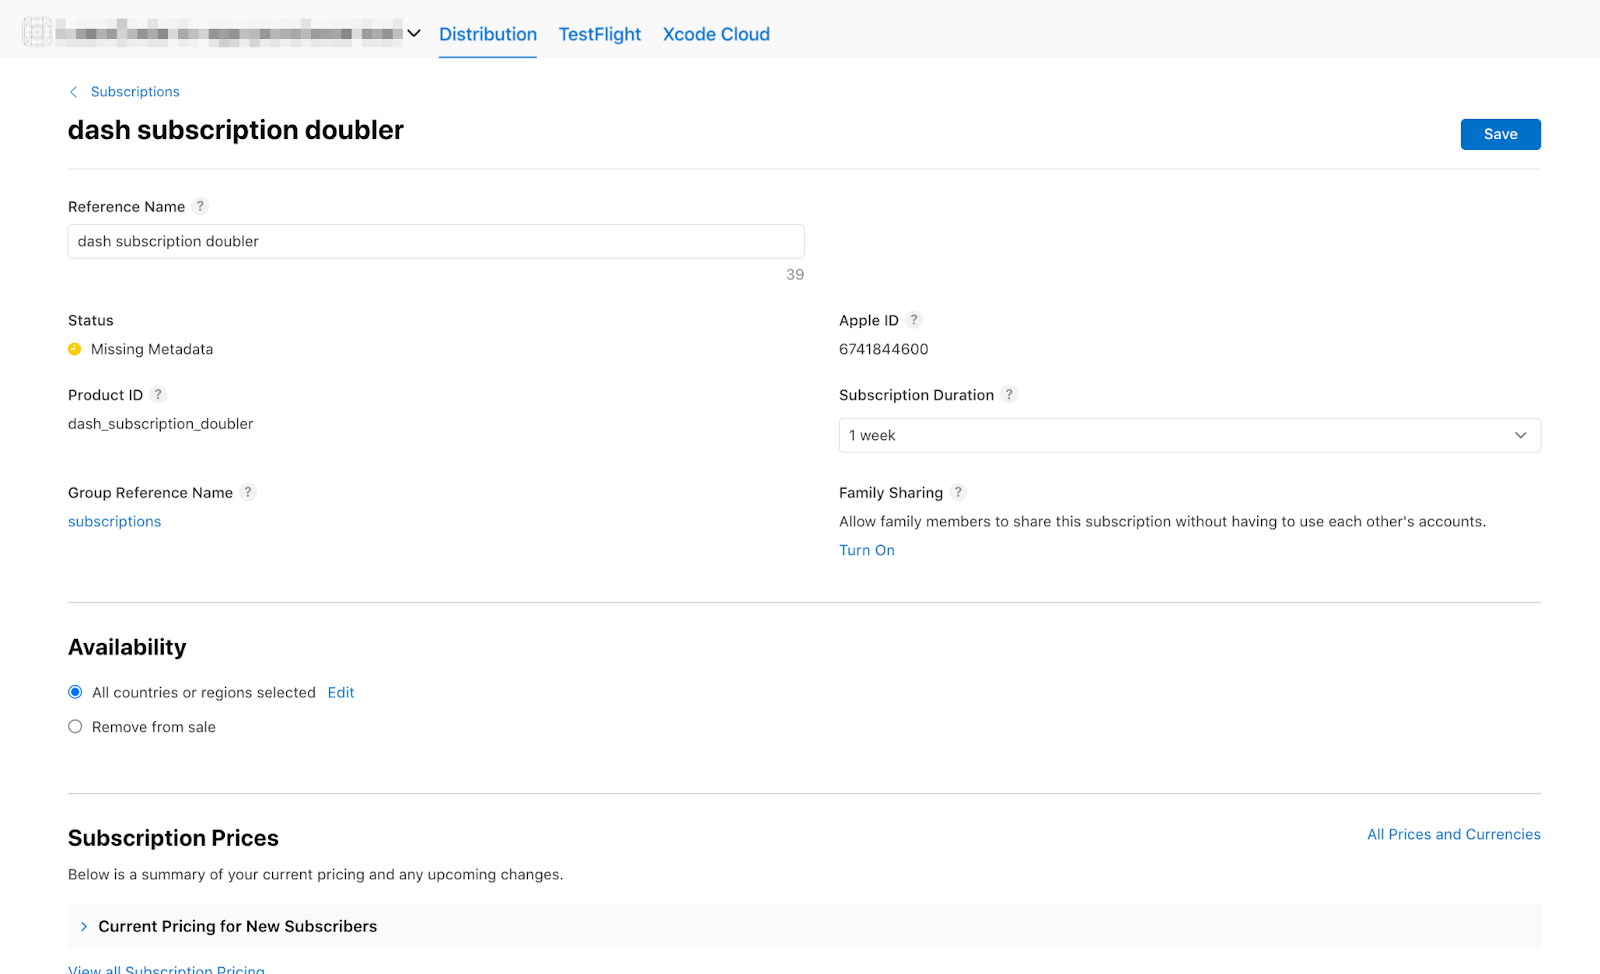
- [定期購入] で、
これで、App Store Connect に商品が表示され、[Ready to Submit] ステータスが表示されます。


5. Google Play ストアを設定する
Android でアプリ内購入をテストするには、Google Play デベロッパー アカウントが必要です。Google Play デベロッパー アカウントをまだ作成していない場合は、こちらの手順に沿って登録してください。
新しいアプリを作成する
Google Play Console で新しいアプリを作成します。
- Google Play Console を開きます。
- [すべてのアプリ] > [アプリを作成] を選択します。
- デフォルトの言語を選択し、アプリ名を入力します(後で変更できます)。
- アプリの種類として [ゲーム] を選択し、料金モデルとして [無料] を選択します。
- デベロッパー プログラム ポリシーと米国輸出法に関する宣言に同意し、[アプリを作成] を選択します。
アプリを作成したら、ダッシュボードで最初のアプリの設定タスクを完了します。

アプリケーションに署名する
Google Play 請求サービスをテストするには、署名済みのリリース appbundle を少なくとも 1 つ、Google Play Console のテストトラックにアップロードする必要があります。
キーストアを作成する
アップロード キーストアがまだない場合は、ターミナルから生成します。
macOS または Linux の場合:
keytool -genkey -v -keystore ~/key.jks -keyalg RSA -keysize 2048 -validity 10000 -alias key
Windows の場合:
keytool -genkey -v -keystore c:\Users\USER_NAME\key.jks -storetype JKS -keyalg RSA -keysize 2048 -validity 10000 -alias key
app/android/key.properties を作成します
キーストアへの参照を含む app/android/key.properties を作成します。
storePassword=<password from previous step>
keyPassword=<password from previous step>
keyAlias=key
storeFile=<location of the key store file, such as /Users/<user name>/key.jks>
Gradle でリリース署名を構成するよう Antigravity にプロンプトを入力する
Antigravity で次のプロンプトを送信して、app/android/app/build.gradle.kts でリリース署名を接続します。
Update `app/android/app/build.gradle.kts` to load `key.properties` into a `Properties` object if the file exists, configure a `release` signing config inside `signingConfigs` using `keyAlias`, `keyPassword`, `storeFile`, and `storePassword`, and assign `signingConfigs.getByName("release")` to the `release` build type when `key.properties` is present.
Antigravity は app/android/app/build.gradle.kts を更新して key.properties を読み込み、リリースビルドに署名します。
val keystoreProperties = Properties()
val keystorePropertiesFile = rootProject.file("key.properties")
if (keystorePropertiesFile.exists()) {
    keystoreProperties.load(FileInputStream(keystorePropertiesFile))
}

android {
    // ...
    signingConfigs {
        create("release") {
            keyAlias = keystoreProperties["keyAlias"] as String?
            keyPassword = keystoreProperties["keyPassword"] as String?
            storeFile = keystoreProperties["storeFile"]?.let { file(it) }
            storePassword = keystoreProperties["storePassword"] as String?
        }
    }

    buildTypes {
        release {
            signingConfig = signingConfigs.getByName("release")
        }
    }
}
最初のビルドをアップロードする
app/ から署名付きのリリース App Bundle をビルドします。
cd app
flutter build appbundle
リリース バンドルは app/build/app/outputs/bundle/release/app-release.aab に書き込まれます。
Google Play Console で、[テストとリリース] > [テスト] > [クローズド テスト] に移動し、クローズド テスト リリースを作成して app-release.aab をアップロードし、[保存] > [リリースのレビュー] > [クローズド テストへの公開を開始] をクリックします。
テストユーザーを設定する
Android でアプリ内購入をテストするには、Google Play Console の 2 つの場所でテスターの Google アカウントを追加します。
- テストトラックのテスター: [テストとリリース] > [テスト] > [内部テスト](または [クローズド テスト])に移動し、[テスター] タブを開いて、[メーリング リストの作成] をクリックします。テスターのメールアドレスを追加し、リストを選択して、[変更を保存] をクリックします。

- ライセンス テスター: [すべてのアプリ] ビューに戻り、[設定] > [ライセンス テスト] を選択して、同じテスターのメールアドレスを追加し、[ライセンス レスポンス] を
RESPOND_NORMALLYに設定して、[変更を保存] をクリックします。
アプリ内購入を設定する
Google Play Console で同じ 3 つの商品 ID を設定します。
dash_consumable_2k: 2,000 ダッシュを付与する、消費可能なアイテムの購入。dash_upgrade_3d: 1 回限りの 3D ダッシュ アップグレード(非消費型)。dash_subscription_doubler: 自動更新のクリック乗数定期購入。
まず、1 回限りのアイテム(dash_consumable_2k と dash_upgrade_3d)を作成します。
- Google Play Console でアプリを選択し、[Google Play で収益化] > [商品] > [アプリ内アイテム] に移動します。
- [アイテムを作成] をクリックします。

- 正確な商品 ID(
dash_consumable_2k)、名前、説明、価格を入力し、[保存]、[有効化] の順にクリックします。 dash_upgrade_3dについても同じ手順を繰り返します。
次に、サブスクリプション(dash_subscription_doubler)を作成します。
- [Google Play で収益化する] > [商品] > [定期購入] に移動し、[定期購入を作成] をクリックします。

- 商品 ID(
dash_subscription_doubler)を入力し、請求対象期間が 1 週間の基本プランと価格を追加して、[保存]、[有効化] をクリックします。
6. Firebase を設定する
Cloud Firestore でバックエンド サービスを使用して購入を確認、追跡すると、アプリに次のようなセキュリティ上のメリットがあります。
- Google Play サーバーと Apple サーバーで直接取引を検証する。
- サーバーサイドの請求イベント(更新や解約など)に対応できます。
- 認証された各ユーザーに関連付けられた信頼できる唯一の情報源を Cloud Firestore に保存します。
- ユーザーがデバイスの時計を改ざんしてプレミアム特典のロックを解除することはできません。
Firebase プロジェクトを作成する
- Firebase コンソールを開き、新しい Firebase プロジェクト(Dash Clicker など)を作成します。
- [Build] > [Authentication] に移動し、[始める] をクリックして、[ログイン方法] タブを開き、[Google] ログイン プロバイダを有効にします。

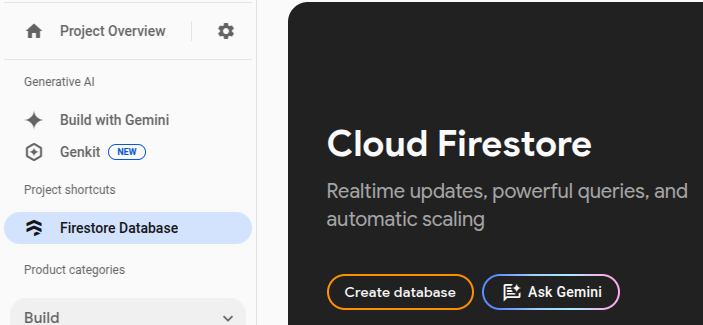
- [ビルド] > [Firestore Database] に移動して、データベースを作成します。
- Cloud Firestore で [ルール] タブを開き、認証されたユーザーが自分の購入ドキュメントのみを読み取れるように、次のセキュリティ ルールを公開します。
rules_version = '2';
service cloud.firestore {
  match /databases/{database}/documents {
    match /purchases/{purchaseId} {
      allow read: if request.auth != null && request.auth.uid == resource.data.userId
    }
  }
}
Flutter 向け Firebase を設定する
FlutterFire の設定ガイドに沿って FlutterFire CLI をインストールし、app/ 内で flutterfire configure を実行します。
cd app
flutterfire configure
- 作成した Firebase プロジェクトを選択します。
- android と ios を有効にします。
lib/firebase_options.dartのオーバーライドを求められたら、yes と入力します。
Android 用 Firebase を設定する: デバッグ SHA-1 証明書
Android で Google ログインを使用するには、Firebase コンソールでデバッグ キーストアの SHA-1 フィンガープリントを登録する必要があります。
- Firebase コンソールで、[プロジェクトの概要] > [プロジェクトの設定] > [全般] を開き、[マイアプリ] まで下にスクロールして、Android アプリを選択します。

app/android/から署名レポートを生成します。cd app/android ./gradlew :app:signingReportVariant: debugとConfig: debugでSHA1フィンガープリントを見つけて、Firebase コンソールで Android アプリに追加し、app/でflutterfire configureを再実行して、google-services.jsonとlib/firebase_options.dartに更新された OAuth クライアント構成が含まれるようにします。
iOS 向けに Firebase を設定する: URL スキームを構成する
iOS で Google ログインをサポートするには、app/ios/Runner/Info.plist の CFBundleURLTypes 内に app/ios/Runner/GoogleService-Info.plist の REVERSED_CLIENT_ID を含める必要があります(google_sign_in iOS 統合ドキュメントをご覧ください)。
Antigravity に、app/ios/Runner/GoogleService-Info.plist から REVERSED_CLIENT_ID と CLIENT_ID を app/ios/Runner/Info.plist にコピーするよう指示できます。
Read `CLIENT_ID` and `REVERSED_CLIENT_ID` from `app/ios/Runner/GoogleService-Info.plist` and update `GIDClientID` and `CFBundleURLTypes` (`CFBundleURLSchemes`) in `app/ios/Runner/Info.plist` with those values.
app/ios/Runner/Info.plist では、CFBundleURLTypes エントリは次のようになります。
<key>CFBundleURLTypes</key>
<array>
	<dict>
		<key>CFBundleTypeRole</key>
		<string>Editor</string>
		<key>CFBundleURLSchemes</key>
		<array>
			<string>com.googleusercontent.apps.YOUR_REVERSED_CLIENT_ID</string>
		</array>
	</dict>
</array>
7. 購入の最新情報をリッスンする
このステップでは、アプリの起動直後にストアの購入の更新をリッスンするように Flutter アプリを準備し、オーバーライド可能な IAPConnection ラッパーを導入してウィジェット ツリーをテスト可能な状態に保ちます。
Antigravity に購入の更新をリッスンするよう指示する
Antigravity で次のプロンプトを送信します。
Update `app/lib/main.dart` to define an `IAPConnection` class with a static `InAppPurchase? _instance` and a static getter and setter for `instance` (defaulting to `InAppPurchase.instance`), and set `lazy: false` on `ChangeNotifierProvider<DashPurchases>`. Update `DashPurchases` in `app/lib/logic/dash_purchases.dart` to set `storeState = StoreState.notAvailable`, hold `final iapConnection = IAPConnection.instance` and `late StreamSubscription<List<PurchaseDetails>> _subscription`, subscribe to `iapConnection.purchaseStream.listen(_onPurchaseUpdate, onDone: _updateStreamOnDone, onError: _updateStreamOnError)` in the constructor, cancel `_subscription` in `dispose()`, and add `_onPurchaseUpdate`, `_updateStreamOnDone`, and `_updateStreamOnError` methods. Finally, update `app/test/widget_test.dart` to define `TestIAPConnection implements InAppPurchase` and set `IAPConnection.instance = TestIAPConnection()` before pumping `MyApp`.
生成されたコードを理解する
app/lib/main.dart でのプロバイダの積極的な初期化と IAPConnection
デフォルトでは、Provider はウィジェットが最初に値を読み取るときに、遅延して値を作成します。保留中の店舗での取引件数は起動時にすぐに purchaseStream に届く可能性があるため、ChangeNotifierProvider は lazy: false を設定します。さらに、IAPConnection は静的シームを提供するため、ウィジェット テストで InAppPurchase の疑似実装を挿入できます。
class IAPConnection {
  static InAppPurchase? _instance;
  static set instance(InAppPurchase value) {
    _instance = value;
  }

  static InAppPurchase get instance {
    _instance ??= InAppPurchase.instance;
    return _instance!;
  }
}
ChangeNotifierProvider<DashPurchases>(
  create: (context) => DashPurchases(context.read<DashCounter>()),
  lazy: false,
),
app/lib/logic/dash_purchases.dart で purchaseStream を定期購入する
DashPurchases では、コンストラクタが iapConnection.purchaseStream に登録し、dispose() が _subscription をキャンセルします。
  final iapConnection = IAPConnection.instance;

  DashPurchases(this.counter) {
    final purchaseUpdated = iapConnection.purchaseStream;
    _subscription = purchaseUpdated.listen(
      _onPurchaseUpdate,
      onDone: _updateStreamOnDone,
      onError: _updateStreamOnError,
    );
  }

  @override
  void dispose() {
    _subscription.cancel();
    super.dispose();
  }
アプリを実行してテストする
app/ でウィジェット テストスイートを実行して、TestIAPConnection がストア接続を適切にモックすることを確認します。
cd app
flutter test
8. 購入する
このステップでは、ハードコードされたモック商品を、queryProductDetails を使用して取得した実際のストアの商品に置き換え、ユーザーが商品をタップしたときに購入を開始し、purchaseStream で更新が届いたときに取引を完了します。
Antigravity を読み込んで購入するようプロンプトを表示する
Antigravity で次のプロンプトを送信します。
Update `PurchasableProduct` in `app/lib/model/purchasable_product.dart` to wrap a `ProductDetails productDetails` from `package:in_app_purchase/in_app_purchase.dart`, exposing `id`, `title`, `description`, and `price` getters from `productDetails` and initializing `status = ProductStatus.purchasable`. Then update `DashPurchases` in `app/lib/logic/dash_purchases.dart` to initialize `storeState = StoreState.loading`, `products = []`, and `bool _beautifiedDashUpgrade = false` (backing `beautifiedDash`), call `loadPurchases()` in the constructor to check `iapConnection.isAvailable()` and query `{storeKeyConsumable, storeKeySubscription, storeKeyUpgrade}` with `iapConnection.queryProductDetails(ids)`, implement `buy(PurchasableProduct product)` using `PurchaseParam` to call `iapConnection.buyConsumable` for `storeKeyConsumable` and `iapConnection.buyNonConsumable` for `storeKeySubscription` and `storeKeyUpgrade`, and implement `_onPurchaseUpdate` and `_handlePurchase(PurchaseDetails purchaseDetails)` to apply `PurchaseStatus.purchased` rewards (`counter.applyPaidMultiplier()`, `counter.addBoughtDashes(2000)`, `_beautifiedDashUpgrade = true`) and call `iapConnection.completePurchase(purchaseDetails)` when `purchaseDetails.pendingCompletePurchase` is true.
生成されたコードを理解する
app/lib/model/purchasable_product.dart で ProductDetails をラップする
PurchasableProduct は、ローカル UI ProductStatus(purchasable、purchased、pending)を追跡しながら、ストアから返された ProductDetails をラップします。
class PurchasableProduct {
  String get id => productDetails.id;
  String get title => productDetails.title;
  String get description => productDetails.description;
  String get price => productDetails.price;
  ProductStatus status;
  ProductDetails productDetails;

  PurchasableProduct(this.productDetails) : status = ProductStatus.purchasable;
}
app/lib/logic/dash_purchases.dart の商品をクエリしています
loadPurchases() は、まず iapConnection.isAvailable() を使用して、基盤となるストアにアクセスできることを確認し、次に app/lib/constants.dart で定義されている 3 つの商品 ID をクエリします。
  Future<void> loadPurchases() async {
    final available = await iapConnection.isAvailable();
    if (!available) {
      storeState = StoreState.notAvailable;
      notifyListeners();
      return;
    }
    const ids = <String>{
      storeKeyConsumable,
      storeKeySubscription,
      storeKeyUpgrade,
    };
    final response = await iapConnection.queryProductDetails(ids);
    products = response.productDetails
        .map((e) => PurchasableProduct(e))
        .toList();
    storeState = StoreState.available;
    notifyListeners();
  }
購入の開始と完了
ユーザーが PurchasePage で商品をタップすると、buy() は PurchaseParam を作成し、消費アイテムを buyConsumable に、1 回限りのアップグレードまたは定期購入を buyNonConsumable にディスパッチします。
  Future<void> buy(PurchasableProduct product) async {
    final purchaseParam = PurchaseParam(productDetails: product.productDetails);
    switch (product.id) {
      case storeKeyConsumable:
        await iapConnection.buyConsumable(purchaseParam: purchaseParam);
      case storeKeySubscription:
      case storeKeyUpgrade:
        await iapConnection.buyNonConsumable(purchaseParam: purchaseParam);
      default:
        throw ArgumentError.value(
          product.productDetails,
          '${product.id} is not a known product',
        );
    }
  }
ストアが purchaseStream で更新された PurchaseDetails オブジェクトを出力すると、_handlePurchase は対応する特典を付与し、completePurchase を呼び出して完了を通知します。
  Future<void> _handlePurchase(PurchaseDetails purchaseDetails) async {
    if (purchaseDetails.status == PurchaseStatus.purchased) {
      switch (purchaseDetails.productID) {
        case storeKeySubscription:
          counter.applyPaidMultiplier();
        case storeKeyConsumable:
          counter.addBoughtDashes(2000);
        case storeKeyUpgrade:
          _beautifiedDashUpgrade = true;
      }
    }

    if (purchaseDetails.pendingCompletePurchase) {
      await iapConnection.completePurchase(purchaseDetails);
    }
  }
アプリを実行してテストする
app/ で flutter test を実行し、構成したテストデバイスでアプリを起動します。ストアの商品が有効になると、[購入] タブに購入可能な商品が表示されます。

9. バックエンドを設定する
サーバーで購入を確認して追跡する前に、app/ と並行して dart-backend/ で Dart バックエンド サービスをスキャフォールディングし、Firebase、Google Play、アプリストア の認証情報を構成します。
Antigravity に Dart バックエンドのスキャフォールディングを指示する
Antigravity エージェントのチャットパネルで、次のプロンプトを送信して dart-backend/ プロジェクトを作成します。
Create a Dart shelf server project in `dart-backend/` with package name `firebase_backend_dart` (`dart create -t server-shelf`). Add `googleapis: ^16.0.0`, `googleapis_auth`, `http`, and `app_store_server_sdk` to `dependencies`, and `test` to `dev_dependencies` (configuring `deprecated_member_use: ignore` in `dart-backend/analysis_options.yaml`). Create:
- `dart-backend/lib/constants.dart` defining `androidPackageId`, `appStoreIssuerId`, `appStoreKeyId`, `appStoreSharedSecret`, `bundleId`, `googleCloudProjectId`, and `googlePlayPubsubBillingTopic = 'play_billing'`
- `dart-backend/lib/helpers.dart` with `serveHandler(Handler handler)`, `listenPort()`, and `terminateRequestFuture()` listening to `SIGINT` and `SIGTERM`
- `dart-backend/lib/products.dart` defining `ProductData(this.productId, this.type)`, `enum ProductType { subscription, nonSubscription }`, and `productDataMap` for `'dash_consumable_2k'`, `'dash_upgrade_3d'`, and `'dash_subscription_doubler'`
- `dart-backend/lib/iap_repository.dart` defining `enum IAPSource { googleplay, appstore }`, `abstract class Purchase`, `NonSubscriptionPurchase`, `SubscriptionPurchase`, and `IapRepository(this.api, this.projectId)` using `package:googleapis/firestore/v1.dart` (`createOrUpdatePurchase`, `updatePurchase`, and `getPurchases`)
- `dart-backend/bin/server.dart` starting an empty `Router()` with `await serveHandler(router.call)`.
生成されたコードを理解する
dart-backend/bin/server.dartはshelf_routerRouterを初期化し、dart-backend/lib/helpers.dartのserveHandlerを使用してポート8080で HTTP リクエストを処理します。dart-backend/lib/products.dartは、各商品 ID(dash_consumable_2k、dash_upgrade_3d、dash_subscription_doubler)をそのProductType(nonSubscriptionまたはsubscription)にマッピングします。dart-backend/lib/iap_repository.dartは、FirestoreApiを使用して Cloud Firestore のpurchasesコレクション内のNonSubscriptionPurchaseドキュメントとSubscriptionPurchaseドキュメントの読み取りと書き込みをカプセル化します。
次のコマンドを実行して、サーバーがローカルで起動することをテストできます。
cd dart-backend
dart run ./bin/server.dart
Firebase へのアクセスを設定する
dart-backend/ が確認済みの購入を Cloud Firestore に書き込めるようにするには、サービス アカウント キーを生成します。
- Firebase コンソールで、[プロジェクトの設定] > [サービス アカウント] を開き、[新しい秘密鍵を生成] をクリックします。

- ダウンロードした JSON ファイルを
dart-backend/assets/service-account-firebase.jsonとして保存します。
Google Play へのアクセスを設定する
dart-backend/ が Google Play Android Developer API を使用して Android での購入を確認できるようにするには:
- Google Cloud コンソールで Google Play Android Developer API のページを開き、API を有効にします。

- Google Cloud の [サービス アカウント] ページに移動し、[+ サービス アカウントを作成] をクリックします。

- サービス アカウント名を入力し、[作成して続行] をクリックします。
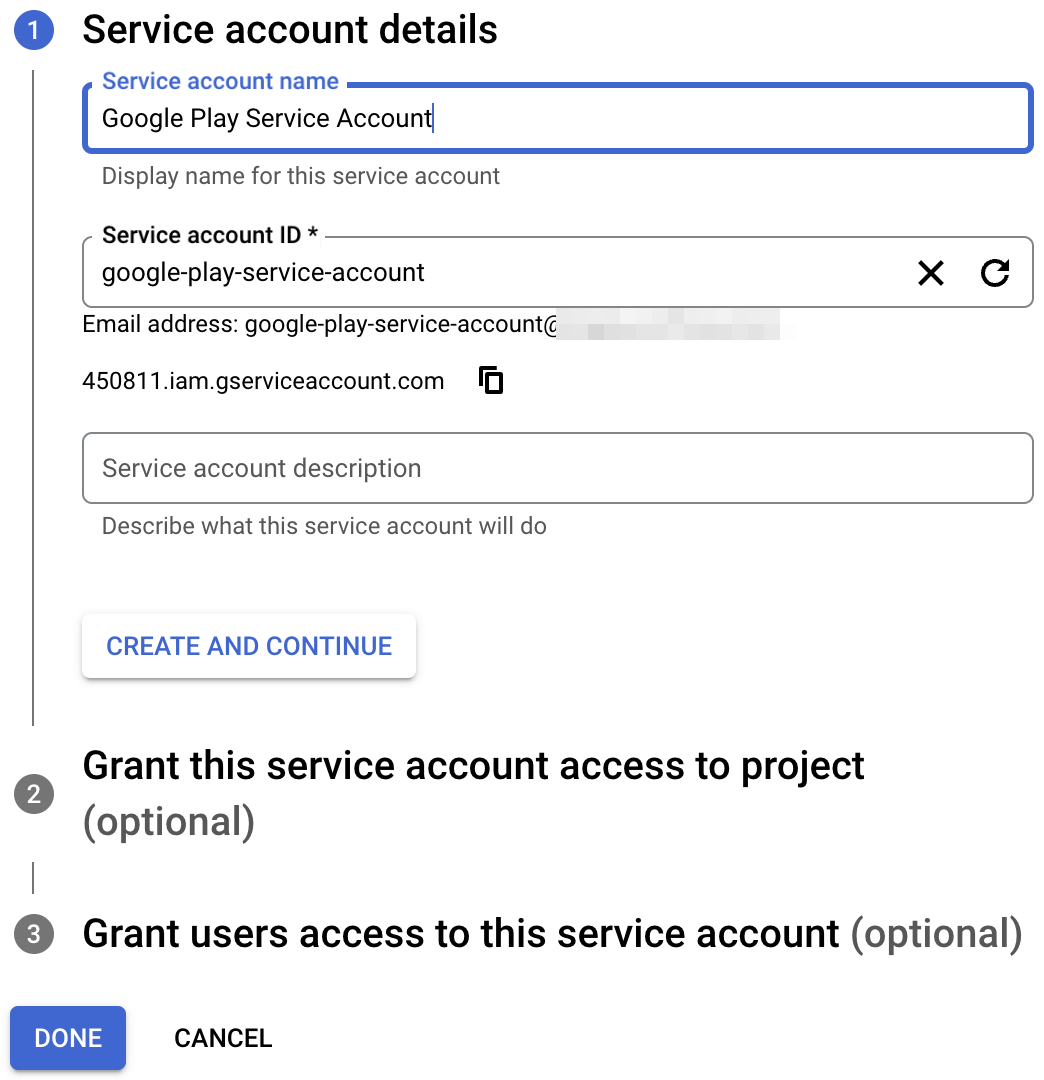
- Pub/Sub サブスクライバーのロールを付与し、[完了] をクリックします。

- 新しく作成したサービス アカウントの操作メニューを開き、[鍵を管理] を選択します。
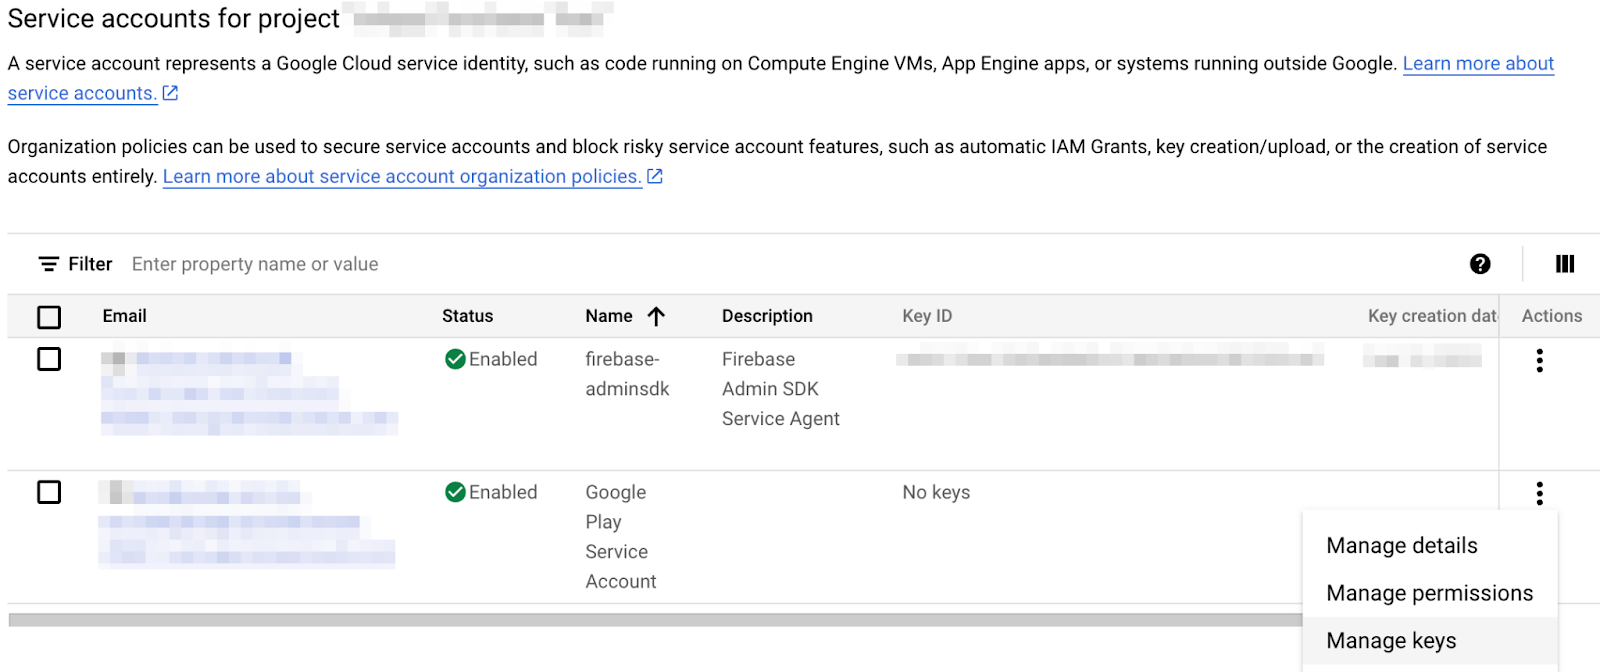
- [鍵を追加] > [新しい鍵を作成] を選択し、[JSON] を選択して鍵をダウンロードします。


- ダウンロードしたファイルを
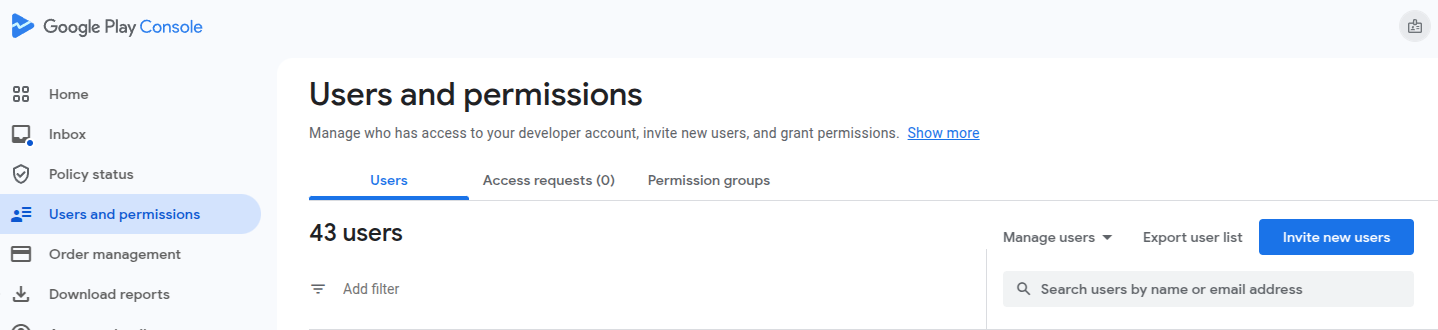
dart-backend/assets/service-account-google-play.jsonとして保存します。 - Google Play Console で [ユーザーと権限] を開き、[新しいユーザーを招待] をクリックして、サービス アカウントのメールアドレスを入力します。

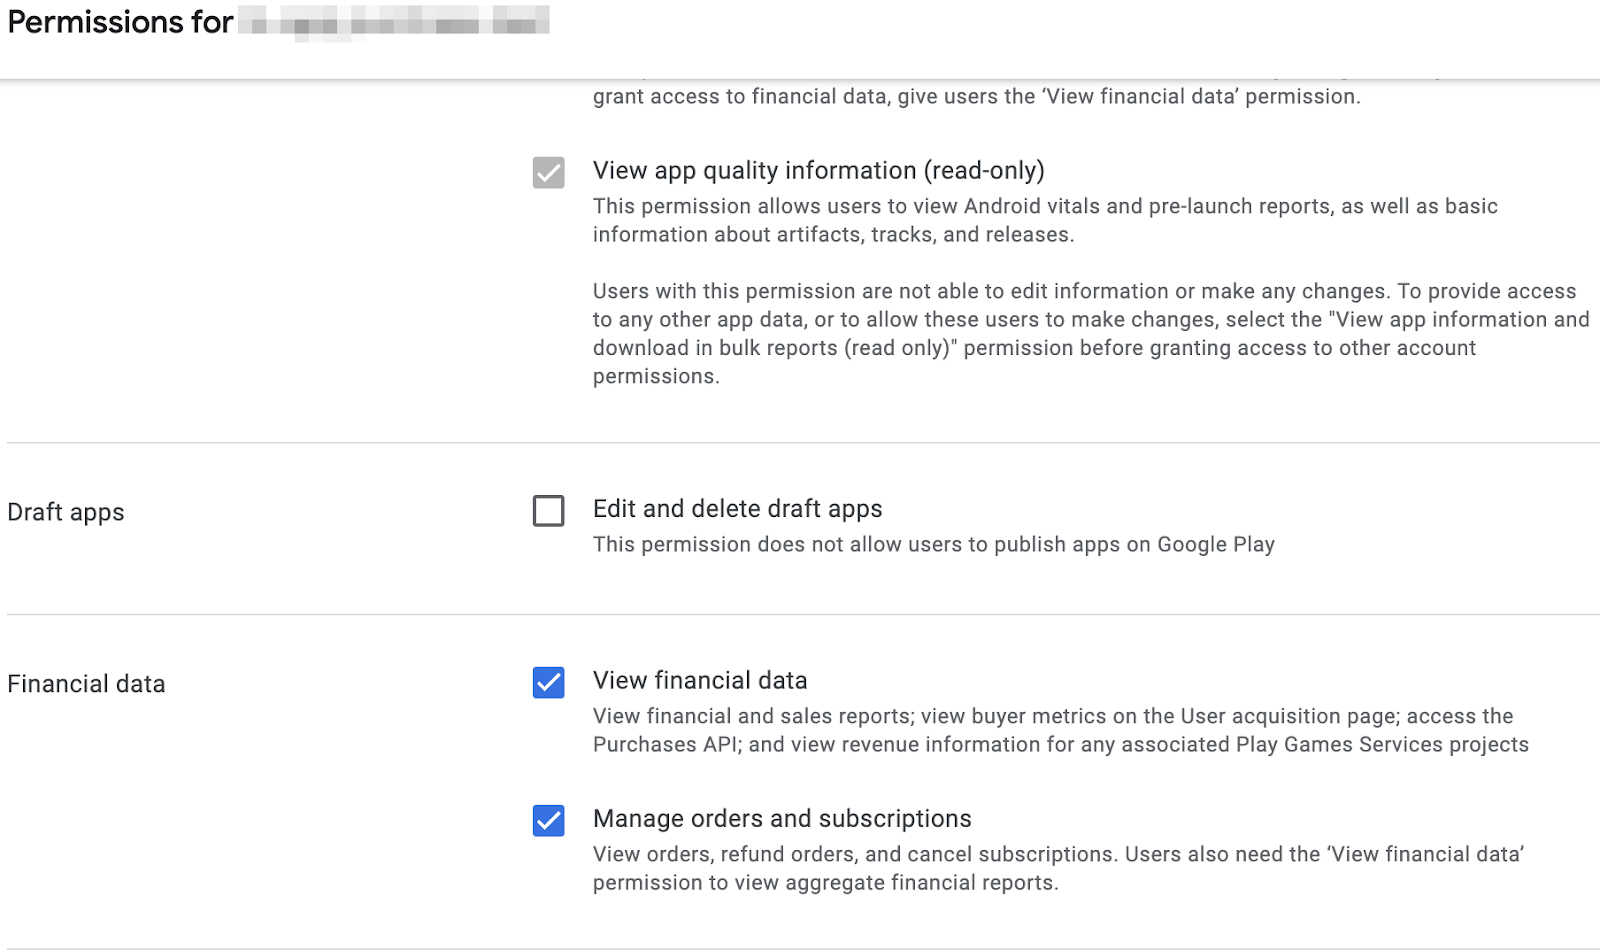
- アプリの売上データの表示権限と注文と定期購入の管理権限を付与し、[ユーザーを招待] をクリックします。
Apple アプリストアへのアクセスを設定する
バックエンドで App Store のレシートを検証するには、アプリ固有の共有シークレットを生成します。
- App Store Connect を開き、[Apps] を選択して、アプリを選択します。
- サイドバーで、[General] > [App Information] に移動します。
- [App-Specific Shared Secret] で [Manage] をクリックし、新しい共有シークレットを生成してコピーします。


dart-backend/lib/constants.dart を更新します
dart-backend/lib/constants.dart に次の定数が設定されていることを確認します。
androidPackageId: Android のapplicationId(com.example.dashclickerなど)。appStoreSharedSecret: App Store Connect の共有シークレット。bundleId: iOS バンドル ID(com.example.dashclickerなど)。
10. 購入を確認する
ユーザーが iOS または Android で購入を完了すると、ストアは確認トークン(PurchaseDetails.verificationData.serverVerificationData)を発行します。Flutter アプリは、クライアント デバイスを直接信頼するのではなく、このトークンを dart-backend/ に送信します。は、Google Play または App Store でトークンを確認し、購入を Cloud Firestore に記録します。

Antigravity にクライアントとバックエンドで購入を確認するよう求める
Antigravity で次のプロンプトを送信して、Flutter アプリと Dart バックエンドの検証フローを接続します。
1. In `app/`:
- Update `PurchasePage` in `app/lib/pages/purchase_page.dart` to watch `FirebaseNotifier` and return `_PurchasesLoading()` when `state == FirebaseState.loading`, `_PurchasesNotAvailable()` when `state == FirebaseState.notAvailable`, and `const LoginPage()` when `!firebaseNotifier.loggedIn`.
- Add `User? get user => FirebaseAuth.instance.currentUser;` to `FirebaseNotifier` in `app/lib/logic/firebase_notifier.dart`.
- Update `DashPurchases` in `app/lib/logic/dash_purchases.dart` (and its provider in `app/lib/main.dart`) to accept `this.firebaseNotifier`, implement `_verifyPurchase(PurchaseDetails purchaseDetails)` that sends an HTTP `POST` request to `Uri.http('$serverIp:8080', '/verifypurchase')` with JSON body `{'source': purchaseDetails.verificationData.source, 'productId': purchaseDetails.productID, 'verificationData': purchaseDetails.verificationData.serverVerificationData, 'userId': firebaseNotifier.user?.uid}`, and update `_handlePurchase` so purchase rewards are only applied when `await _verifyPurchase(purchaseDetails)` returns `true`.

2. In `dart-backend/`:
- Create `dart-backend/lib/purchase_handler.dart` with `abstract class PurchaseHandler` defining `handleNonSubscription`, `handleSubscription`, and `verifyPurchase` switching on `productData.type`.
- Create `dart-backend/lib/google_play_purchase_handler.dart` with `GooglePlayPurchaseHandler extends PurchaseHandler` that verifies one-time purchases using `androidPublisher.purchases.products.get` and subscriptions using `androidPublisher.purchases.subscriptions.get`, parses order IDs with `extractOrderId(String orderId)` (stripping `..` renewal suffixes), maps statuses with `_nonSubscriptionStatusFrom` and `_subscriptionStatusFrom`, and saves purchases to `iapRepository`.
- Create `dart-backend/lib/app_store_purchase_handler.dart` with `AppStorePurchaseHandler extends PurchaseHandler` that validates receipts with `ITunesApi(ITunesHttpClient(ITunesEnvironment.sandbox(), loggingEnabled: true)).verifyReceipt` and saves `NonSubscriptionPurchase` and `SubscriptionPurchase` records to `iapRepository`.
- Update `dart-backend/bin/server.dart` to initialize `AndroidPublisherApi` and `FirestoreApi` from the service account JSON files in `_createPurchaseHandlers()`, register a `POST /verifypurchase` route, and extract request fields in `getPurchaseData(dynamic payload)` using Dart 3 map pattern matching.
生成されたコードを理解する
認証後に購入を制限し、/verifypurchase を呼び出す
app/lib/pages/purchase_page.dart では、PurchasePage が FirebaseNotifier をチェックし、ユーザーがログインするまで LoginPage を表示します。
    var firebaseNotifier = context.watch<FirebaseNotifier>();
    if (firebaseNotifier.state == FirebaseState.loading) {
      return _PurchasesLoading();
    } else if (firebaseNotifier.state == FirebaseState.notAvailable) {
      return _PurchasesNotAvailable();
    }

    if (!firebaseNotifier.loggedIn) {
      return const LoginPage();
    }
app/lib/logic/dash_purchases.dart では、_handlePurchase がアプリ内報酬を付与する前に、_verifyPurchase がストアソース(google_play または app_store)、productID、serverVerificationData、ログイン済みの userId を Dart バックエンドに送信します。
  Future<bool> _verifyPurchase(PurchaseDetails purchaseDetails) async {
    final url = Uri.http('$serverIp:8080', '/verifypurchase');
    const headers = {
      'Content-type': 'application/json',
      'Accept': 'application/json',
    };
    final response = await http.post(
      url,
      body: jsonEncode({
        'source': purchaseDetails.verificationData.source,
        'productId': purchaseDetails.productID,
        'verificationData':
            purchaseDetails.verificationData.serverVerificationData,
        'userId': firebaseNotifier.user?.uid,
      }),
      headers: headers,
    );
    if (response.statusCode == 200) {
      return true;
    } else {
      return false;
    }
  }
dart-backend/bin/server.dart でのルーティングと Dart 3 のパターン マッチング
サーバーでは、POST /verifypurchase が Dart 3 マップパターンとレコード戻り値の型を使用して getPurchaseData で JSON リクエスト本文をデコードし、一致するストア ハンドラに検証を委任します。
  router.post('/verifypurchase', (Request request) async {
    final dynamic payload = json.decode(await request.readAsString());
    final (:userId, :source, :productData, :token) = getPurchaseData(payload);

    final result = await purchaseHandlers[source]!.verifyPurchase(
      userId: userId,
      productData: productData,
      token: token,
    );

    if (result) {
      return Response.ok('all good!');
    } else {
      return Response.internalServerError();
    }
  });
({String userId, String source, ProductData productData, String token})
getPurchaseData(dynamic payload) {
  if (payload case {
    'userId': String userId,
    'source': String source,
    'productId': String productId,
    'verificationData': String token,
  }) {
    return (
      userId: userId,
      source: source,
      productData: productDataMap[productId]!,
      token: token,
    );
  } else {
    throw const FormatException('Unexpected JSON');
  }
}
Google Play とアプリストアの領収書の確認
dart-backend/lib/google_play_purchase_handler.dartでは、GooglePlayPurchaseHandlerが 1 回限りのアイテムのandroidPublisher.purchases.products.getと定期購入のandroidPublisher.purchases.subscriptions.getをクエリし、extractOrderIdを使用して定期購入のオーダー ID から..#更新サフィックスを削除し、iapRepositoryを使用して結果のNonSubscriptionPurchaseまたはSubscriptionPurchaseを Cloud Firestore に書き込みます。dart-backend/lib/app_store_purchase_handler.dartでは、AppStorePurchaseHandlerがapp_store_server_sdkパッケージを使用して_iTunesAPI.verifyReceiptを呼び出し、response.latestReceiptInfoで検証された各領収書を Cloud Firestore に永続化します。
バックエンドを実行してテストする
dart-backend/ からバックエンド サーバーを起動します。
cd dart-backend
dart run bin/server.dart
11. 購入履歴を管理する
定期購入は、アプリ外で更新、期限切れ、解約されることがあります。このステップでは、Google Cloud Pub/Sub と App Store Server API からストアの請求更新をポーリングするようにバックエンドを構成し、IAPRepo を使用して Cloud Firestore からユーザーのアクティブな利用資格をリアクティブに同期するように Flutter クライアントを更新します。
Cloud Pub/Sub とアプリストアサーバー API キーを構成する
Google Play Cloud Pub/Sub の設定
dart-backend/lib/constants.dartのgoogleCloudProjectIdを Google Cloud と Firebase プロジェクトのプロジェクト ID に設定します。- Google Cloud コンソールで Cloud Pub/Sub のトピックページを開き、プロジェクトが選択されていることを確認して、[+ トピックを作成] をクリックします。

- [トピック ID] を
play_billingに設定し(dart-backend/lib/constants.dartのgooglePlayPubsubBillingTopicと一致。デフォルトのサブスクリプションplay_billing-subが自動的に作成されます)、[作成] をクリックします。
play_billingトピックのその他メニューを開き、[閲覧権限を表示] を選択します。
- [プリンシパルを追加] をクリックし、
google-play-developer-notifications@system.gserviceaccount.comを入力して、[Pub/Sub パブリッシャー] ロールを割り当て、[保存] をクリックします。
- トピックの完全な名前をコピーし、Google Play Console でアプリを開いて、[Google Play で収益化する] > [収益化のセットアップ] に移動し、トピック名を貼り付けて、[変更を保存] をクリックします。

App Store Server API キーの設定
- App Store Connect にログインし、[Users and Access] を選択します。
- [Integrations] > [Keys] > [アプリ内購入] に移動し、[+] ボタンをクリックして新しい鍵(例:
Codelab key)を生成します。 .p8鍵ファイルをダウンロードして、dart-backend/assets/SubscriptionKey.p8として保存します。- キー ID と発行者 ID を
dart-backend/lib/constants.dartのappStoreKeyIdとappStoreIssuerIdにコピーします。

Antigravity にストア イベントをポーリングしてクライアントの状態を同期するよう指示する
Antigravity で次のプロンプトを送信します。
1. In `dart-backend/`:
- Update `GooglePlayPurchaseHandler` in `dart-backend/lib/google_play_purchase_handler.dart` to accept `pubsub.PubsubApi pubsubApi` from `package:googleapis/pubsub/v1.dart`, start a 10-second `Timer.periodic` calling `_pullMessageFromPubSub()`, decode base64 Pub/Sub messages in `_processMessage(String data64, String? ackId)` (handling `testNotification`, `subscriptionNotification`, and `oneTimeProductNotification`), and acknowledge processed messages in `_ackMessage(String id)`.
- Update `AppStorePurchaseHandler` in `dart-backend/lib/app_store_purchase_handler.dart` to accept `AppStoreServerAPI appStoreServerAPI`, start a 10-second `Timer.periodic` calling `_pullStatus()`, query `appStoreServerAPI.getAllSubscriptionStatuses(purchase.orderId)` for active App Store subscriptions in `iapRepository`, and update their expiration date and `SubscriptionStatus` in Firestore.
- Update `dart-backend/bin/server.dart` to add `pubsub.PubsubApi.cloudPlatformScope` to the Google Play client scopes, construct `PubsubApi` and `AppStoreServerAPI` (reading `assets/SubscriptionKey.p8` and caching JWT tokens in `assets/appstore.token`), and pass them to `GooglePlayPurchaseHandler` and `AppStorePurchaseHandler`.
- Create unit tests in `dart-backend/test/firebase_backend_dart_test.dart` verifying `extractOrderId` (with and without a `..0` suffix) and `getPurchaseData` (valid and invalid payloads).

2. In `app/`:
- Update `DashPurchases` in `app/lib/logic/dash_purchases.dart` (and its provider in `app/lib/main.dart`) to accept `this.iapRepo` (`IAPRepo`), register `iapRepo.addListener(purchasesUpdate)` in the constructor and `iapRepo.removeListener(purchasesUpdate)` in `dispose()`, and implement `purchasesUpdate()` and `_updateStatus(PurchasableProduct product, ProductStatus status)` (setting `product.status = status` when `product.status != status`) so `iapRepo.hasActiveSubscription` applies or removes the paid counter multiplier and `iapRepo.hasUpgrade` updates `_beautifiedDashUpgrade` and product statuses.
生成されたコードを理解する
バックエンドで Google Play Pub/Sub と App Store Server API をポーリングする
dart-backend/lib/google_play_purchase_handler.dart では、_pullMessageFromPubSub が 10 秒ごとに projects/$googleCloudProjectId/subscriptions/$googlePlayPubsubBillingTopic-sub サブスクリプションをポーリングし、各 Base64 通知ペイロードをデコードして、handleSubscription または handleNonSubscription を再実行して Firestore を更新し、_ackMessage を使用してメッセージを確認します。
  Future<void> _pullMessageFromPubSub() async {
    print('Polling Google Play messages');
    final request = pubsub.PullRequest(maxMessages: 1000);
    final topicName =
        'projects/$googleCloudProjectId/subscriptions/$googlePlayPubsubBillingTopic-sub';
    final pullResponse = await pubsubApi.projects.subscriptions.pull(
      request,
      topicName,
    );
    final messages = pullResponse.receivedMessages ?? [];
    for (final message in messages) {
      final data64 = message.message?.data;
      if (data64 != null) {
        await _processMessage(data64, message.ackId);
      }
    }
  }
同様に、dart-backend/lib/app_store_purchase_handler.dart では、_pullStatus が 10 秒ごとに appStoreServerAPI.getAllSubscriptionStatuses(purchase.orderId) をクエリし、Cloud Firestore で各サブスクリプションの expiryDate と SubscriptionStatus(active または expired)を更新します。
デバイスでの Firestore の購入の同期
app/lib/repo/iap_repo.dart では、IAPRepo が Cloud Firestore で認証済みユーザーの purchases ドキュメントをリアルタイムでリッスンし、hasActiveSubscription と hasUpgrade を計算します。
    var purchaseStream = _firestore
        .collection('purchases')
        .where('userId', isEqualTo: user.uid)
        .snapshots();
    _purchaseSubscription = purchaseStream.listen((snapshot) {
      purchases = snapshot.docs.map((document) {
        var data = document.data();
        return PastPurchase.fromJson(data);
      }).toList();

      hasActiveSubscription = purchases.any(
        (element) =>
            element.productId == storeKeySubscription &&
            element.status != Status.expired,
      );

      hasUpgrade = purchases.any(
        (element) => element.productId == storeKeyUpgrade,
      );

      notifyListeners();
    });
IAPRepo がリスナーに通知するたびに、app/lib/logic/dash_purchases.dart の DashPurchases.purchasesUpdate() が 10 倍のクリック乗数を有効または無効にし、_beautifiedDashUpgrade を切り替え、PurchasePage に表示される商品のステータスを更新します。
  void purchasesUpdate() {
    var subscriptions = <PurchasableProduct>[];
    var upgrades = <PurchasableProduct>[];
    if (products.isNotEmpty) {
      subscriptions = products
          .where((element) => element.productDetails.id == storeKeySubscription)
          .toList();
      upgrades = products
          .where((element) => element.productDetails.id == storeKeyUpgrade)
          .toList();
    }

    if (iapRepo.hasActiveSubscription) {
      counter.applyPaidMultiplier();
      for (var element in subscriptions) {
        _updateStatus(element, ProductStatus.purchased);
      }
    } else {
      counter.removePaidMultiplier();
      for (var element in subscriptions) {
        _updateStatus(element, ProductStatus.purchasable);
      }
    }

    if (iapRepo.hasUpgrade != _beautifiedDashUpgrade) {
      _beautifiedDashUpgrade = iapRepo.hasUpgrade;
      for (var element in upgrades) {
        _updateStatus(
          element,
          _beautifiedDashUpgrade
              ? ProductStatus.purchased
              : ProductStatus.purchasable,
        );
      }
      notifyListeners();
    }
  }

  void _updateStatus(PurchasableProduct product, ProductStatus status) {
    if (product.status != status) {
      product.status = status;
      notifyListeners();
    }
  }
アプリとバックエンドを実行してテストする
両方のプロジェクトで単体テストとウィジェット テストを実行し、すべてが正常に分析され、合格することを確認します。
cd dart-backend
dart test
cd ../app
flutter test
12. 完了
おめでとうございます!Google Antigravity と協力して、Dart 検証バックエンドを備えた Flutter でのフルスタックのアプリ内購入統合を構築しました。
作成したもの
- App Store Connect と Google Play Console で、消費型(
dash_consumable_2k)、非消費型(dash_upgrade_3d)、自動更新の定期購入(dash_subscription_doubler)の各アイテムを設定しました。 - Dash Clicker Flutter アプリ(
app/)をin_app_purchaseプラグインに接続し、商品の詳細をクエリしてpurchaseStreamをリッスンしました。 - Dart
shelfバックエンド(dart-backend/)を構築。このバックエンドは、Google Play Android Developer API とアプリストアで購読トークンを検証し、Cloud Pub/Sub と App Store Server API を使用して課金情報の更新をポーリングし、Cloud Firestore で購読ステータスを保持します。 IAPRepoを使用して、確認済みの購入利用資格をリアルタイムで Flutter クライアントに同期します。
次のステップ
- Firebase Auth ID トークン検証ミドルウェアを
dart-backend/bin/server.dartのPOST /verifypurchaseに追加します。 dart-backend/を Cloud Run にデプロイし、Google Cloud Pub/Sub と App Store Server Notifications の push Webhook を構成します。