1. 简介
Flutter 是 Google 的界面工具包,用于通过单一代码库针对移动设备、网页和桌面设备构建经过原生编译的精美应用。Flutter 是一款免费的开放源码工具包,可与现有代码一起使用,广受全球开发者和组织的青睐。
在此 Codelab 中,您将改进 Flutter 音乐应用,使其从枯燥乏味变得生动美观。为此,此 Codelab 使用了在 Material 3 中引入的工具和 API。
学习内容
- 如何编写可在各种平台上使用且界面美观的 Flutter 应用。
- 如何在应用中设计文本,确保文本能够提升用户体验。
- 如何选择合适的颜色、自定义 widget、构建自己的主题,以及快速轻松地实现深色模式。
- 如何构建跨平台自适应应用。
- 如何构建在任何屏幕上都能呈现良好显示效果的应用。
- 如何向 Flutter 应用加入动态效果,让其生动起来。
前提条件:
此 Codelab 假定您具备一定程度的 Flutter 经验。如果没有,您可能需要先了解基础知识。以下链接非常有用:
您将构建的内容
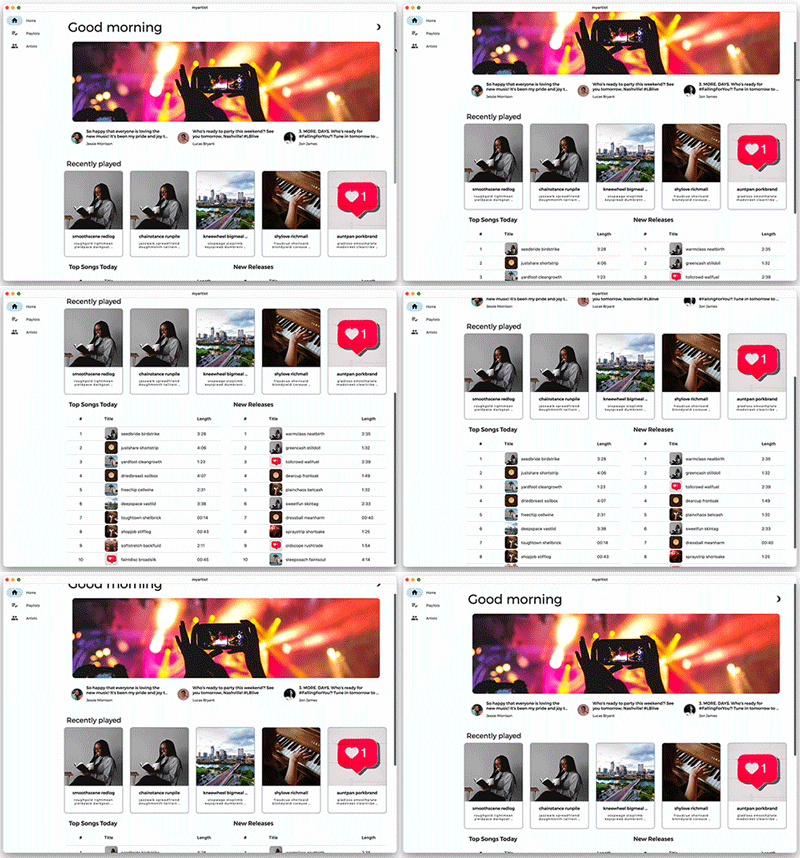
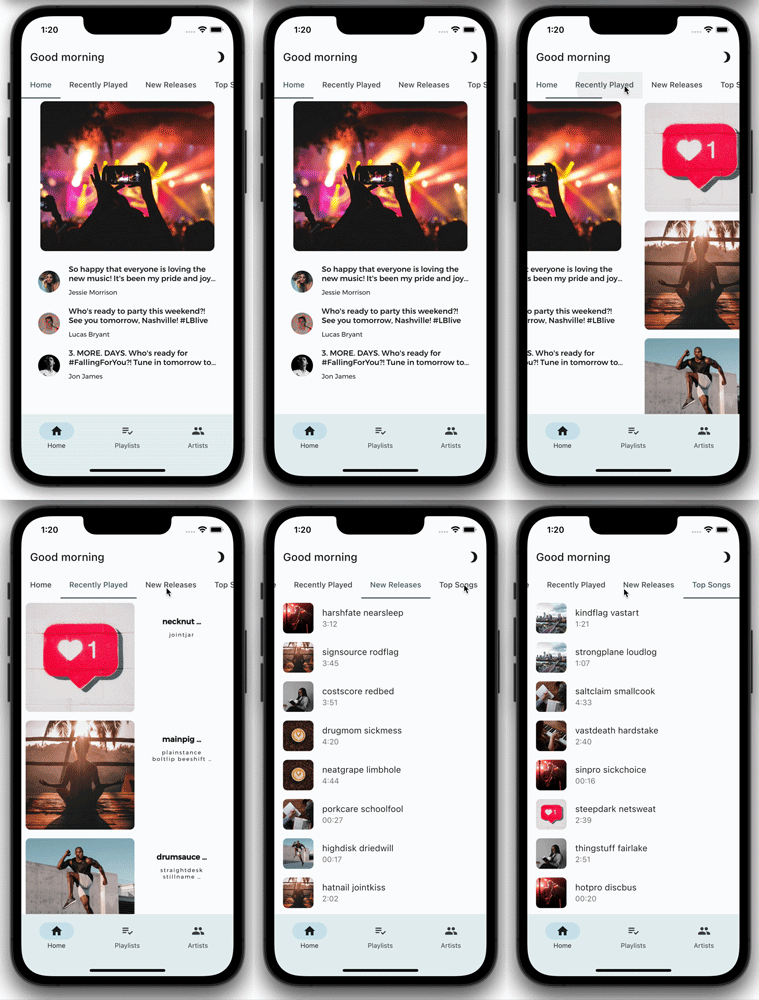
此 Codelab 将指导您为一款名为 MyArtist 的应用构建主屏幕。MyArtist 是一款音乐播放器应用,粉丝可以通过该应用了解自己喜爱的音乐人的最新动态。此 Codelab 介绍了如何修改您的应用设计,使其在各种平台上都看起来美观。
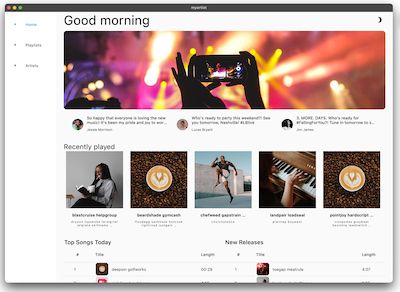
下方的动画 GIF 展示了在此 Codelab 完成后该应用的运作方式:
您想通过此 Codelab 学习哪些内容?
2. 设置您的 Flutter 开发环境
您需要使用两款软件才能完成此 Codelab:Flutter SDK 和一款编辑器。
您可使用以下任一设备学习此 Codelab:
- 一台连接到计算机并设置为开发者模式的实体 Android 或 iOS 设备。
- iOS 模拟器(需要安装 Xcode 工具)。
- Android 模拟器(需要在 Android Studio 中设置)。
- 浏览器(需要使用 Chrome,以便进行调试)。
- 对于 Windows、Linux 或 macOS 桌面应用,您必须在打算部署到的平台上进行开发。因此,如果您要开发 Windows 桌面应用,则必须在 Windows 上进行开发,才能使用相应的构建链。如需详细了解针对各种操作系统的具体要求,请访问 docs.flutter.dev/desktop。
3. 获取 Codelab 起始应用
从 GitHub 克隆
如需从 GitHub 克隆此 Codelab,请运行以下命令:
git clone https://github.com/flutter/codelabs.git
cd codelabs/boring_to_beautiful/step_01/
为确保一切正常,请将 Flutter 应用作为桌面应用运行,如下所示。或者,在您的 IDE 中打开此项目,并使用它所集成的工具运行该应用。
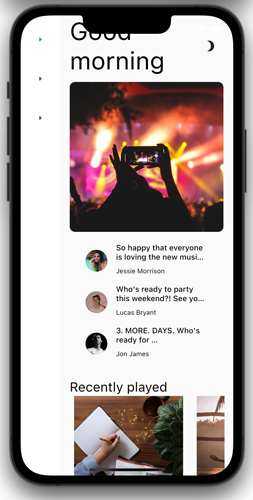
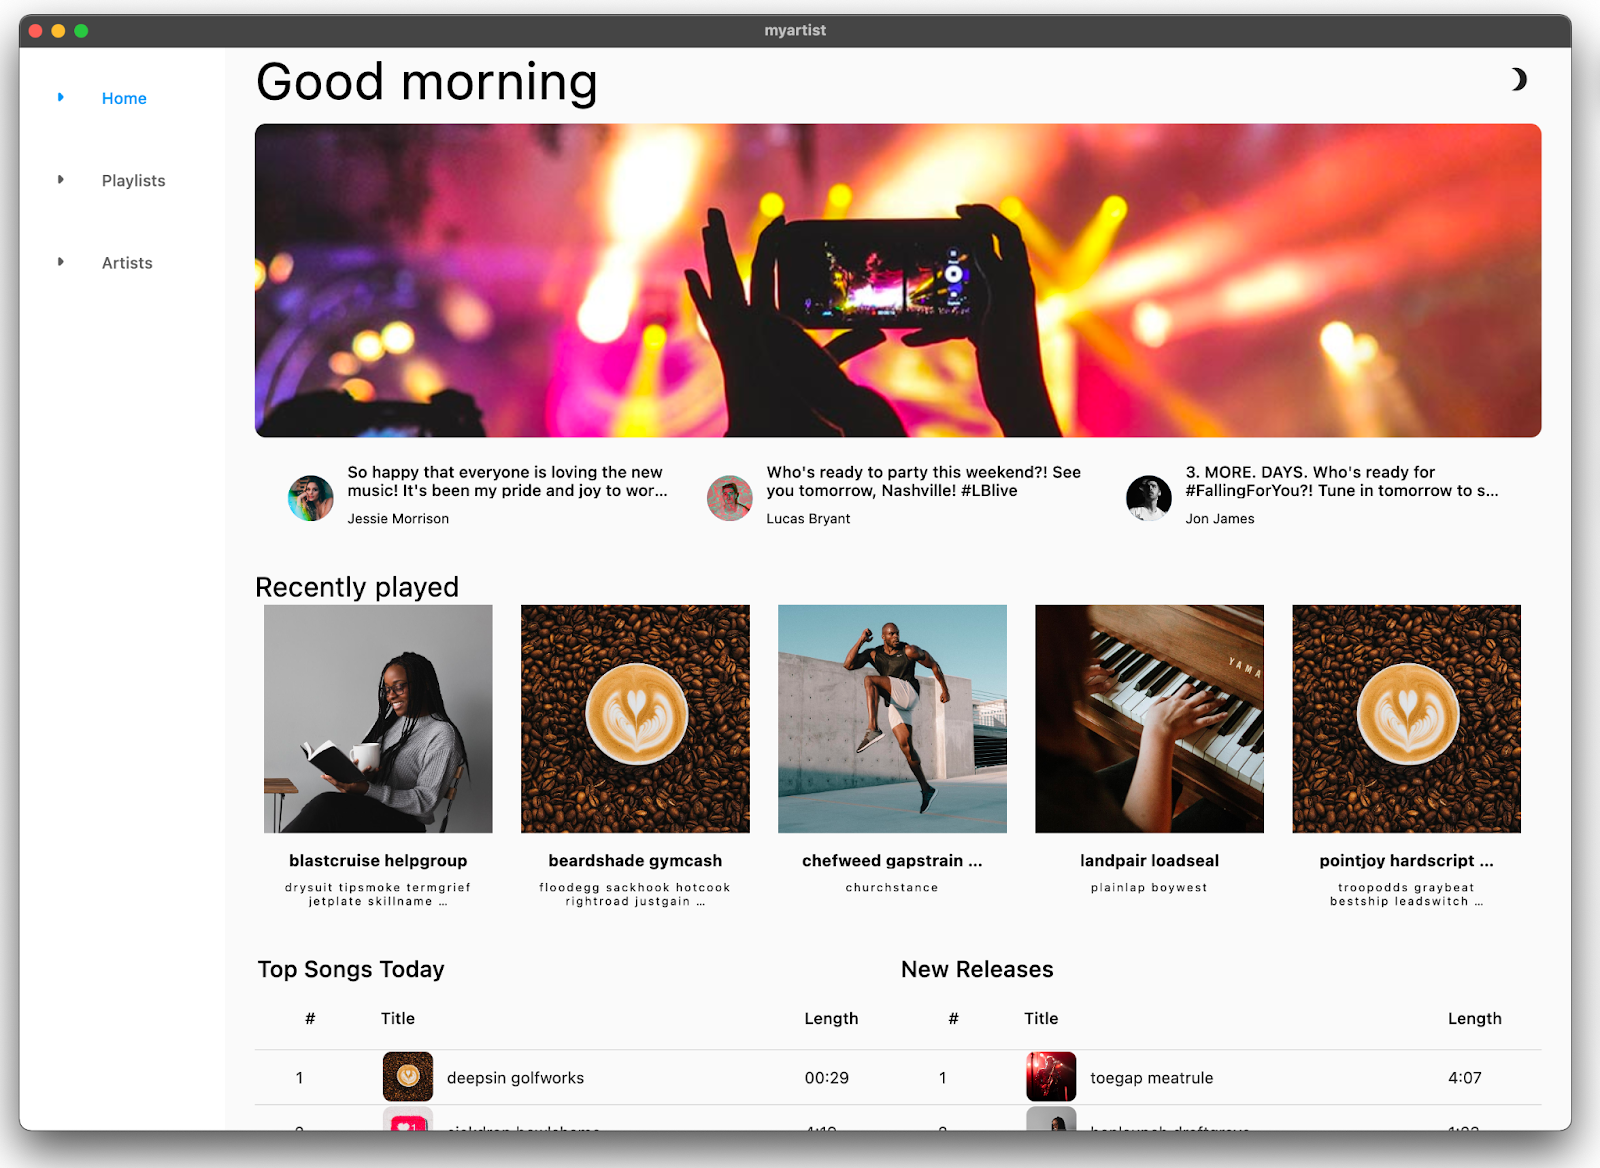
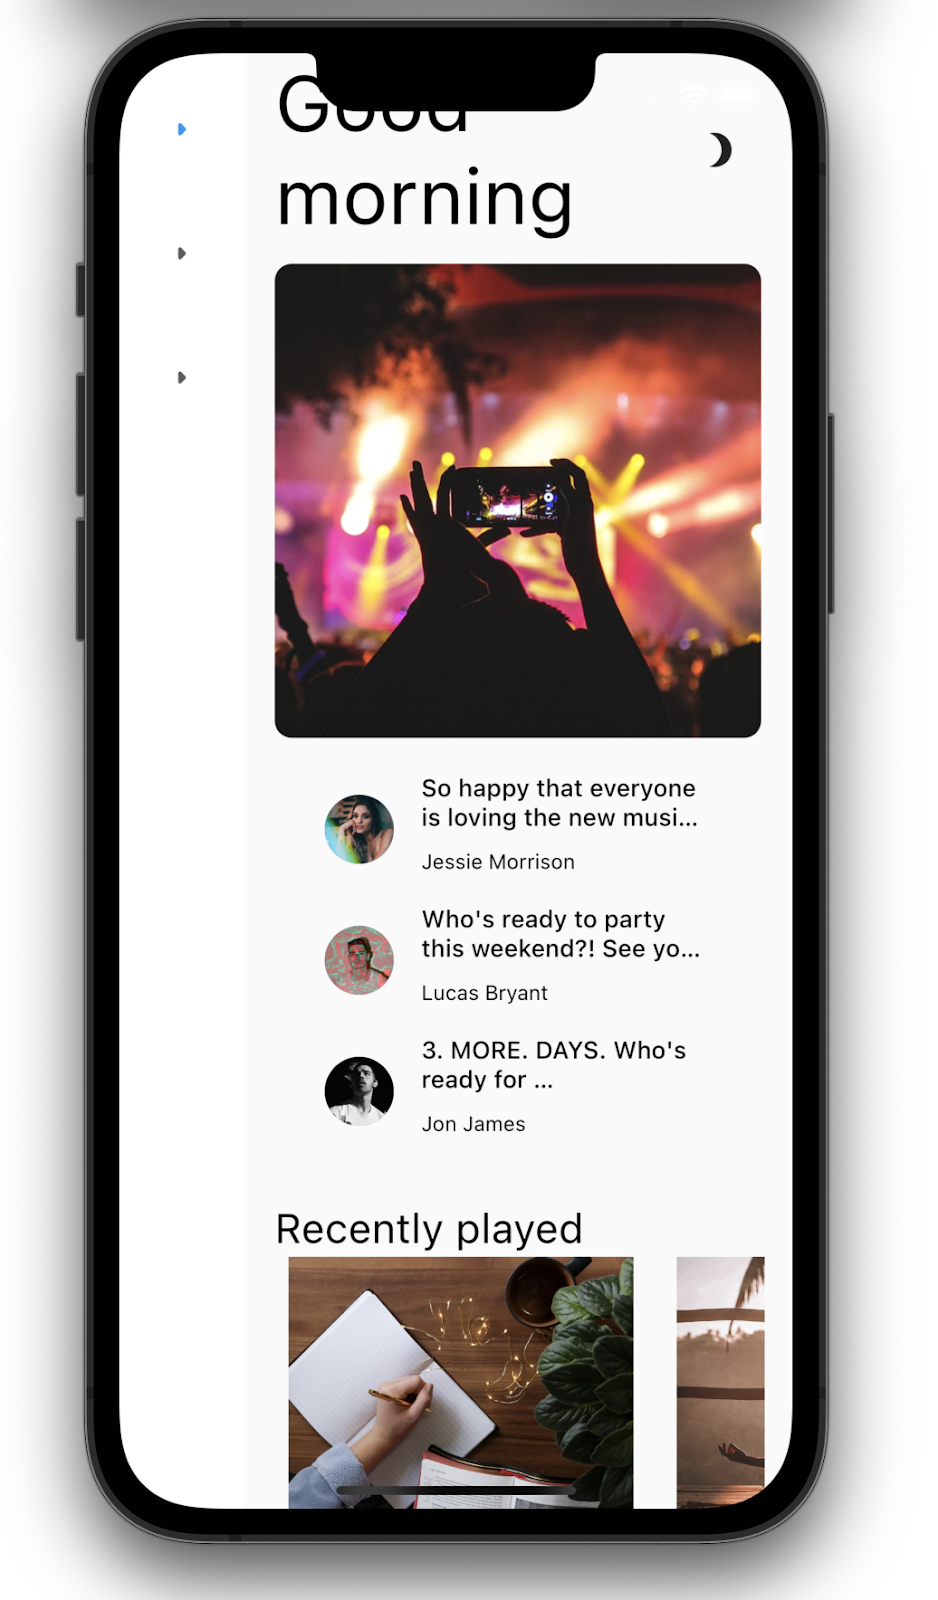
大功告成!系统应该会运行用于显示 MyArtist 主屏幕的起始代码。您应该会看到 MyArtist 主屏幕。其在桌面设备上看起来没问题,但在移动设备上…不太好。其中的一个原因,它没有充分考虑凹口造型(刘海)。不用担心,您会解决此问题!
浏览代码
接下来,浏览下代码。
打开 lib/src/features/home/view/home_screen.dart,其中包含以下内容:
lib/src/features/home/view/home_screen.dart
import 'package:adaptive_components/adaptive_components.dart';
import 'package:flutter/material.dart';

import '../../../shared/classes/classes.dart';
import '../../../shared/extensions.dart';
import '../../../shared/providers/providers.dart';
import '../../../shared/views/views.dart';
import '../../playlists/view/playlist_songs.dart';
import 'view.dart';

class HomeScreen extends StatefulWidget {
  const HomeScreen({Key? key}) : super(key: key);

  @override
  State<HomeScreen> createState() => _HomeScreenState();
}

class _HomeScreenState extends State<HomeScreen> {
  @override
  Widget build(BuildContext context) {
    final PlaylistsProvider playlistProvider = PlaylistsProvider();
    final List<Playlist> playlists = playlistProvider.playlists;
    final Playlist topSongs = playlistProvider.topSongs;
    final Playlist newReleases = playlistProvider.newReleases;
    final ArtistsProvider artistsProvider = ArtistsProvider();
    final List<Artist> artists = artistsProvider.artists;
    return LayoutBuilder(
      builder: (context, constraints) {
        // Add conditional mobile layout

        return Scaffold(
          body: SingleChildScrollView(
            child: AdaptiveColumn(
              children: [
                AdaptiveContainer(
                  columnSpan: 12,
                  child: Padding(
                    padding: const EdgeInsets.all(2), // Modify this line
                    child: Row(
                      mainAxisAlignment: MainAxisAlignment.spaceBetween,
                      children: [
                        Expanded(
                          child: Text(
                            'Good morning',
                            style: context.displaySmall,
                          ),
                        ),
                        const SizedBox(width: 20),
                        const BrightnessToggle(),
                      ],
                    ),
                  ),
                ),
                AdaptiveContainer(
                  columnSpan: 12,
                  child: Column(
                    children: [
                      const HomeHighlight(),
                      LayoutBuilder(
                        builder: (context, constraints) => HomeArtists(
                          artists: artists,
                          constraints: constraints,
                        ),
                      ),
                    ],
                  ),
                ),
                AdaptiveContainer(
                  columnSpan: 12,
                  child: Column(
                    crossAxisAlignment: CrossAxisAlignment.start,
                    children: [
                      Padding(
                        padding: const EdgeInsets.all(2), // Modify this line
                        child: Text(
                          'Recently played',
                          style: context.headlineSmall,
                        ),
                      ),
                      HomeRecent(
                        playlists: playlists,
                      ),
                    ],
                  ),
                ),
                AdaptiveContainer(
                  columnSpan: 12,
                  child: Padding(
                    padding: const EdgeInsets.all(2), // Modify this line
                    child: Row(
                      crossAxisAlignment: CrossAxisAlignment.start,
                      children: [
                        Flexible(
                          flex: 10,
                          child: Column(
                            mainAxisAlignment: MainAxisAlignment.start,
                            crossAxisAlignment: CrossAxisAlignment.start,
                            children: [
                              Padding(
                                padding:
                                    const EdgeInsets.all(2), // Modify this line
                                child: Text(
                                  'Top Songs Today',
                                  style: context.titleLarge,
                                ),
                              ),
                              LayoutBuilder(
                                builder: (context, constraints) =>
                                    PlaylistSongs(
                                  playlist: topSongs,
                                  constraints: constraints,
                                ),
                              ),
                            ],
                          ),
                        ),
                        // Add spacer between tables
                        Flexible(
                          flex: 10,
                          child: Column(
                            mainAxisAlignment: MainAxisAlignment.start,
                            crossAxisAlignment: CrossAxisAlignment.start,
                            children: [
                              Padding(
                                padding:
                                    const EdgeInsets.all(2), // Modify this line
                                child: Text(
                                  'New Releases',
                                  style: context.titleLarge,
                                ),
                              ),
                              LayoutBuilder(
                                builder: (context, constraints) =>
                                    PlaylistSongs(
                                  playlist: newReleases,
                                  constraints: constraints,
                                ),
                              ),
                            ],
                          ),
                        ),
                      ],
                    ),
                  ),
                ),
              ],
            ),
          ),
        );
      },
    );
  }
}
此文件会导入 material.dart 并使用两个类实现有状态 widget:
import语句使 Material Components 可用。HomeScreen类表示显示的整个页面。_HomeScreenState类的build()方法会创建 widget 树的根,这会影响界面中所有 widget 的创建方式。
4. 利用排版
文字无处不在。文字是一种与用户沟通的实用方法。要将您的应用打造得友好且充满乐趣,又或是值得信赖且专业?您喜爱的银行应用不使用 Comic Sans 是有原因的。文字的呈现方式决定了用户对应用的第一印象。以下这些方式有助于您更周全地使用文字。
要多彩呈现,不要平铺直叙
尽可能“多彩呈现”而不是“平铺直叙”。例如,起始应用中 NavigationRail 的每个主路由都有对应的标签页,但前置图标是相同的:
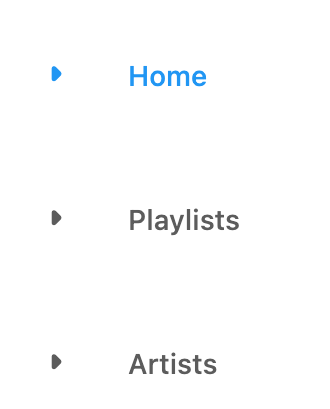
这样不会起到帮助作用,因为用户仍然需要阅读每个标签页中的文字。为此,请先添加视觉提示,以便用户快速浏览前置图标以找到所需标签页。这也有助于满足本地化和无障碍功能要求。
 在
在 lib/src/shared/router.dart 中,为每个导航目的地(主屏幕、播放列表和用户)添加不同的前置图标:
lib/src/shared/router.dart
const List<NavigationDestination> destinations = [
  NavigationDestination(
    label: 'Home',
    icon: Icon(Icons.home), // Modify this line
    route: '/',
  ),
  NavigationDestination(
    label: 'Playlists',
    icon: Icon(Icons.playlist_add_check), // Modify this line
    route: '/playlists',
  ),
  NavigationDestination(
    label: 'Artists',
    icon: Icon(Icons.people), // Modify this line
    route: '/artists',
  ),
];
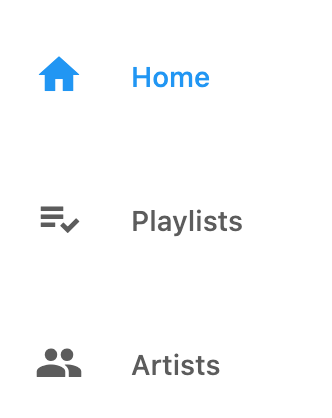
有问题?
如果您的应用运行不正常,请检查是否存在拼写错误。如果需要,请使用以下链接中提供的代码恢复到正常状态。
谨慎选择字体
字体决定了您的应用的特色,因此选择合适的字体至关重要。选择字体时,请考虑以下几点:
- Sans Serif 或 Serif:Serif 字体在字母末尾有装饰性笔画或“字尾”,因此被认为更加正式。Sans Serif 字体没有装饰性笔画,因此通常被认为不太正式。
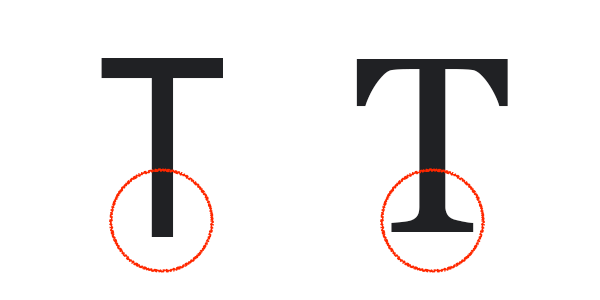 设为 Sans Serif 字体的字母 T 和设为 Serif 字体的字母 T
 - 全大写字体:当希望他人关注少量文字(例如大标题)时,使用全大写是合适的,但如果过度使用,其可能会被视为向用户大声呼喊,导致用户对全大写完全忽略。
- 词首字母大写或句首字母大写:添加标题或标签时,请考虑如何使用大写字母:“词首字母大写”,在这种情况下,每个单词的首字母会大写(“This Is a Title Case Title”),这样会更正式。“句首字母大写”,在这种情况下,只会将专有名词首字母大写和第一个单词的首字母大写(“This is a sentence case title”),这样会让文字显得更像对话以及更亲切。
- 字距(各字母间的间距)、行长(整个屏幕上完整文本的宽度)和行高(每行文本的高度):这几项中的任何一项过大或多小,都会降低应用给用户带来的观感。例如,在阅读一大段完整的文字时,很容易无法回到之前所在位置。
考虑到这一点,请前往 Google Fonts,并选择 Montserrat 等 Sans Serif 字体,因为这款音乐应用旨在显得好玩、有趣。
 从命令行拉取
 google_fonts 软件包。此操作还会更新 pubspec 文件,以将字体添加为应用依赖项。
$ flutter pub add google_fonts
macos/Runner/DebugProfile.entitlements
<?xml version="1.0" encoding="UTF-8"?>
<!DOCTYPE plist PUBLIC "-//Apple//DTD PLIST 1.0//EN" "http://www.apple.com/DTDs/PropertyList-1.0.dtd">
<plist version="1.0">
<dict>
        <key>com.apple.security.app-sandbox</key>
        <true/>
        <key>com.apple.security.cs.allow-jit</key>
        <true/>
// Make sure these lines are present from here...
        <key>com.apple.security.network.client</key> //For macOS only
        <true/>
// .. To here
        <key>com.apple.security.network.server</key>
        <true/>
</dict>
</plist>
 在
在 lib/src/shared/extensions.dart 中,导入新软件包:
lib/src/shared/extensions.dart
import 'package:google_fonts/google_fonts.dart'; // Add this line.
 设置 Montserrat
 TextTheme:
TextTheme get textTheme => GoogleFonts.montserratTextTheme(theme.textTheme); // Modify this line
 热重载
热重载  以启用更改。(如需进行热重载,您可以使用 IDE 中的按钮,或在命令行中输入
 r):
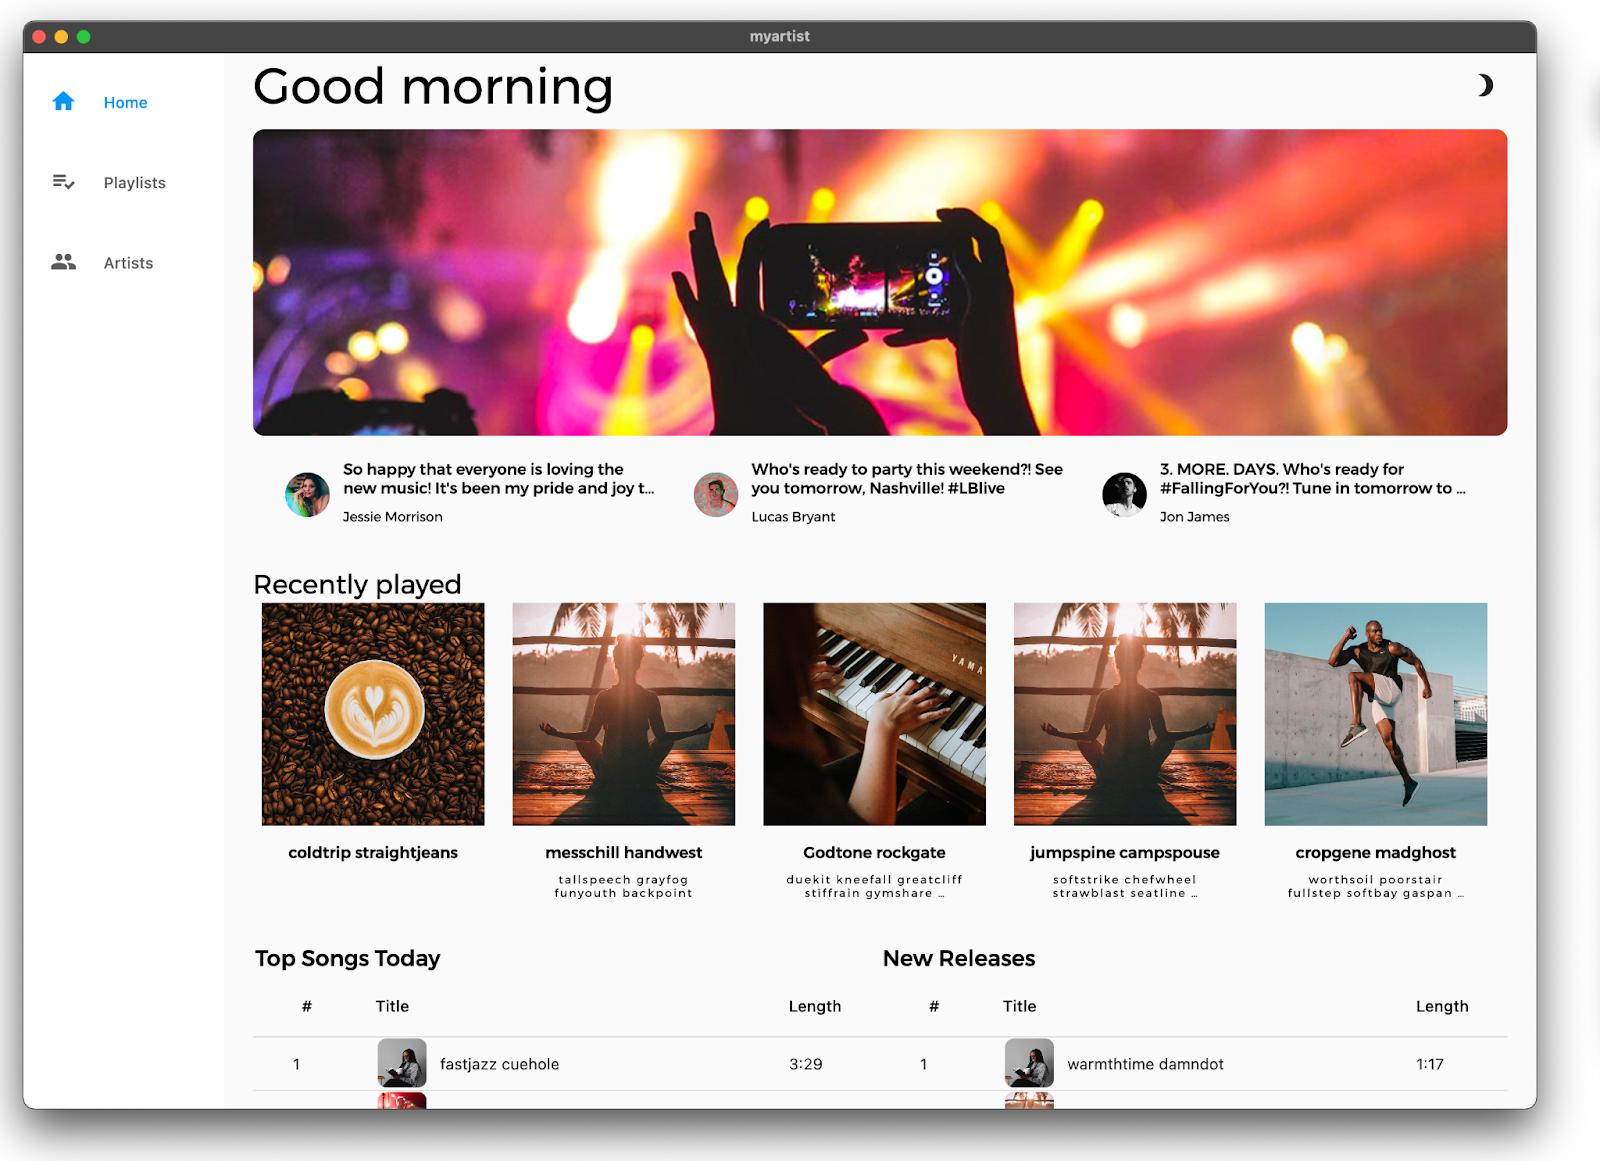
您应该会看到新的 NavigationRail 图标,并且文字用 Montserrat 字体显示。
有问题?
如果您的应用运行不正常,请检查是否存在拼写错误。如果需要,请使用以下链接中提供的代码恢复到正常状态。
5. 设置主题
主题通过指定一套颜色和文本样式体系,使应用实现结构化设计并具备一致的风格。借助主题,您可以快速实现界面,而无需为一些小细节费心,例如为每个 widget 指定确切的颜色。
Flutter 开发者通常会通过以下两种方式之一创建自定义主题组件:
- 创建单独的自定义 widget,每个 widget 都有自己的主题。
- 为默认 widget 创建限定了范围的主题。
此示例使用位于 lib/src/shared/providers/theme.dart 中的主题提供程序在整个应用中创建主题一致的 widget 和颜色:
lib/src/shared/providers/theme.dart
import 'dart:math';

import 'package:flutter/material.dart';
import 'package:material_color_utilities/material_color_utilities.dart';

class NoAnimationPageTransitionsBuilder extends PageTransitionsBuilder {
 const NoAnimationPageTransitionsBuilder();

 @override
 Widget buildTransitions<T>(
   PageRoute<T> route,
   BuildContext context,
   Animation<double> animation,
   Animation<double> secondaryAnimation,
   Widget child,
 ) {
   return child;
 }
}

class ThemeSettingChange extends Notification {
 ThemeSettingChange({required this.settings});
 final ThemeSettings settings;
}

class ThemeProvider extends InheritedWidget {
 const ThemeProvider(
     {Key? key,
     required this.settings,
     required this.lightDynamic,
     required this.darkDynamic,
     required Widget child})
     : super(key: key, child: child);

 final ValueNotifier<ThemeSettings> settings;
 final ColorScheme? lightDynamic;
 final ColorScheme? darkDynamic;

 final pageTransitionsTheme = const PageTransitionsTheme(
   builders: <TargetPlatform, PageTransitionsBuilder>{
     TargetPlatform.android: FadeUpwardsPageTransitionsBuilder(),
     TargetPlatform.iOS: CupertinoPageTransitionsBuilder(),
     TargetPlatform.linux: NoAnimationPageTransitionsBuilder(),
     TargetPlatform.macOS: NoAnimationPageTransitionsBuilder(),
     TargetPlatform.windows: NoAnimationPageTransitionsBuilder(),
   },
 );

 Color custom(CustomColor custom) {
   if (custom.blend) {
     return blend(custom.color);
   } else {
     return custom.color;
   }
 }

 Color blend(Color targetColor) {
   return Color(
       Blend.harmonize(targetColor.value, settings.value.sourceColor.value));
 }

 Color source(Color? target) {
   Color source = settings.value.sourceColor;
   if (target != null) {
     source = blend(target);
   }
   return source;
 }

 ColorScheme colors(Brightness brightness, Color? targetColor) {
   final dynamicPrimary = brightness == Brightness.light
       ? lightDynamic?.primary
       : darkDynamic?.primary;
   return ColorScheme.fromSeed(
     seedColor: dynamicPrimary ?? source(targetColor),
     brightness: brightness,
   );
 }

 ShapeBorder get shapeMedium => RoundedRectangleBorder(
       borderRadius: BorderRadius.circular(8),
     );

 CardTheme cardTheme() {
   return CardTheme(
     elevation: 0,
     shape: shapeMedium,
     clipBehavior: Clip.antiAlias,
   );
 }

 ListTileThemeData listTileTheme(ColorScheme colors) {
   return ListTileThemeData(
     shape: shapeMedium,
     selectedColor: colors.secondary,
   );
 }

 AppBarTheme appBarTheme(ColorScheme colors) {
   return AppBarTheme(
     elevation: 0,
     backgroundColor: colors.surface,
     foregroundColor: colors.onSurface,
   );
 }

 TabBarTheme tabBarTheme(ColorScheme colors) {
   return TabBarTheme(
     labelColor: colors.secondary,
     unselectedLabelColor: colors.onSurfaceVariant,
     indicator: BoxDecoration(
       border: Border(
         bottom: BorderSide(
           color: colors.secondary,
           width: 2,
         ),
       ),
     ),
   );
 }

 BottomAppBarTheme bottomAppBarTheme(ColorScheme colors) {
   return BottomAppBarTheme(
     color: colors.surface,
     elevation: 0,
   );
 }

 BottomNavigationBarThemeData bottomNavigationBarTheme(ColorScheme colors) {
   return BottomNavigationBarThemeData(
     type: BottomNavigationBarType.fixed,
     backgroundColor: colors.surfaceVariant,
     selectedItemColor: colors.onSurface,
     unselectedItemColor: colors.onSurfaceVariant,
     elevation: 0,
     landscapeLayout: BottomNavigationBarLandscapeLayout.centered,
   );
 }

 NavigationRailThemeData navigationRailTheme(ColorScheme colors) {
   return const NavigationRailThemeData();
 }

 DrawerThemeData drawerTheme(ColorScheme colors) {
   return DrawerThemeData(
     backgroundColor: colors.surface,
   );
 }

 ThemeData light([Color? targetColor]) {
   final _colors = colors(Brightness.light, targetColor);
   return ThemeData.light().copyWith(
     pageTransitionsTheme: pageTransitionsTheme,
     colorScheme: _colors,
     appBarTheme: appBarTheme(_colors),
     cardTheme: cardTheme(),
     listTileTheme: listTileTheme(_colors),
     bottomAppBarTheme: bottomAppBarTheme(_colors),
     bottomNavigationBarTheme: bottomNavigationBarTheme(_colors),
     navigationRailTheme: navigationRailTheme(_colors),
     tabBarTheme: tabBarTheme(_colors),
     drawerTheme: drawerTheme(_colors),
     scaffoldBackgroundColor: _colors.background,
     useMaterial3: true,
   );
 }

 ThemeData dark([Color? targetColor]) {
   final _colors = colors(Brightness.dark, targetColor);
   return ThemeData.dark().copyWith(
     pageTransitionsTheme: pageTransitionsTheme,
     colorScheme: _colors,
     appBarTheme: appBarTheme(_colors),
     cardTheme: cardTheme(),
     listTileTheme: listTileTheme(_colors),
     bottomAppBarTheme: bottomAppBarTheme(_colors),
     bottomNavigationBarTheme: bottomNavigationBarTheme(_colors),
     navigationRailTheme: navigationRailTheme(_colors),
     tabBarTheme: tabBarTheme(_colors),
     drawerTheme: drawerTheme(_colors),
     scaffoldBackgroundColor: _colors.background,
     useMaterial3: true,
   );
 }

 ThemeMode themeMode() {
   return settings.value.themeMode;
 }

 ThemeData theme(BuildContext context, [Color? targetColor]) {
   final brightness = MediaQuery.of(context).platformBrightness;
   return brightness == Brightness.light
       ? light(targetColor)
       : dark(targetColor);
 }

 static ThemeProvider of(BuildContext context) {
   return context.dependOnInheritedWidgetOfExactType<ThemeProvider>()!;
 }

 @override
 bool updateShouldNotify(covariant ThemeProvider oldWidget) {
   return oldWidget.settings != settings;
 }
}

class ThemeSettings {
 ThemeSettings({
   required this.sourceColor,
   required this.themeMode,
 });

 final Color sourceColor;
 final ThemeMode themeMode;
}

Color randomColor() {
 return Color(Random().nextInt(0xFFFFFFFF));
}

// Custom Colors
const linkColor = CustomColor(
 name: 'Link Color',
 color: Color(0xFF00B0FF),
);

class CustomColor {
 const CustomColor({
   required this.name,
   required this.color,
   this.blend = true,
 });

 final String name;
 final Color color;
 final bool blend;

 Color value(ThemeProvider provider) {
   return provider.custom(this);
 }
}
 如需使用该提供程序,请创建一个实例,并将其传递给位于
 lib/src/shared/app.dart 的 MaterialApp 中限定了范围的主题对象。该实例将会被任何嵌套的 Theme 对象继承:
lib/src/shared/app.dart
import 'package:dynamic_color/dynamic_color.dart';
import 'package:flutter/material.dart';
import 'package:flutter_bloc/flutter_bloc.dart';

import 'playback/bloc/bloc.dart';
import 'providers/theme.dart';
import 'router.dart';

class MyApp extends StatefulWidget {
 const MyApp({Key? key}) : super(key: key);

 @override
 State<MyApp> createState() => _MyAppState();
}

class _MyAppState extends State<MyApp> {
 final settings = ValueNotifier(ThemeSettings(
   sourceColor:  Colors.pink,
   themeMode: ThemeMode.system,
 ));
 @override
 Widget build(BuildContext context) {
   return BlocProvider<PlaybackBloc>(
     create: (context) => PlaybackBloc(),
     child: DynamicColorBuilder(
       builder: (lightDynamic, darkDynamic) => ThemeProvider(
           lightDynamic: lightDynamic,
           darkDynamic: darkDynamic,
           settings: settings,
           child: NotificationListener<ThemeSettingChange>(
             onNotification: (notification) {
               settings.value = notification.settings;
               return true;
             },
             child: ValueListenableBuilder<ThemeSettings>(
               valueListenable: settings,
               builder: (context, value, _) {
                 final theme = ThemeProvider.of(context); // Add this line
                 return MaterialApp.router(
                   debugShowCheckedModeBanner: false,
                   title: 'Flutter Demo',
                   theme: theme.light(settings.value.sourceColor), // Add this line
                   routeInformationParser: appRouter.routeInformationParser,
                   routerDelegate: appRouter.routerDelegate,
                 );
               },
             ),
           )),
     ),
   );
 }
}
设置好主题后,请为应用选择颜色。
选择一套合适的颜色有时并非易事。您可能对主要颜色大体了解,但可能希望您的应用有不止一种颜色。文字应该使用哪种颜色?标题?内容?链接?背景颜色如何?Material Theme Builder 是一款基于网络的工具(在 Material 3 中引入),可帮助您为应用选择一组互补色。
 如需为应用选择源颜色,请打开 Material Theme Builder 并探索界面的不同颜色。请务必选择与品牌美学和/或您的个人偏好相符的颜色。
创建主题后,右键点击 Primary(主要)颜色气泡 - 此操作会打开一个对话框,其中包含主要颜色的十六进制值。复制此值(您也可以使用此对话框设置颜色)。
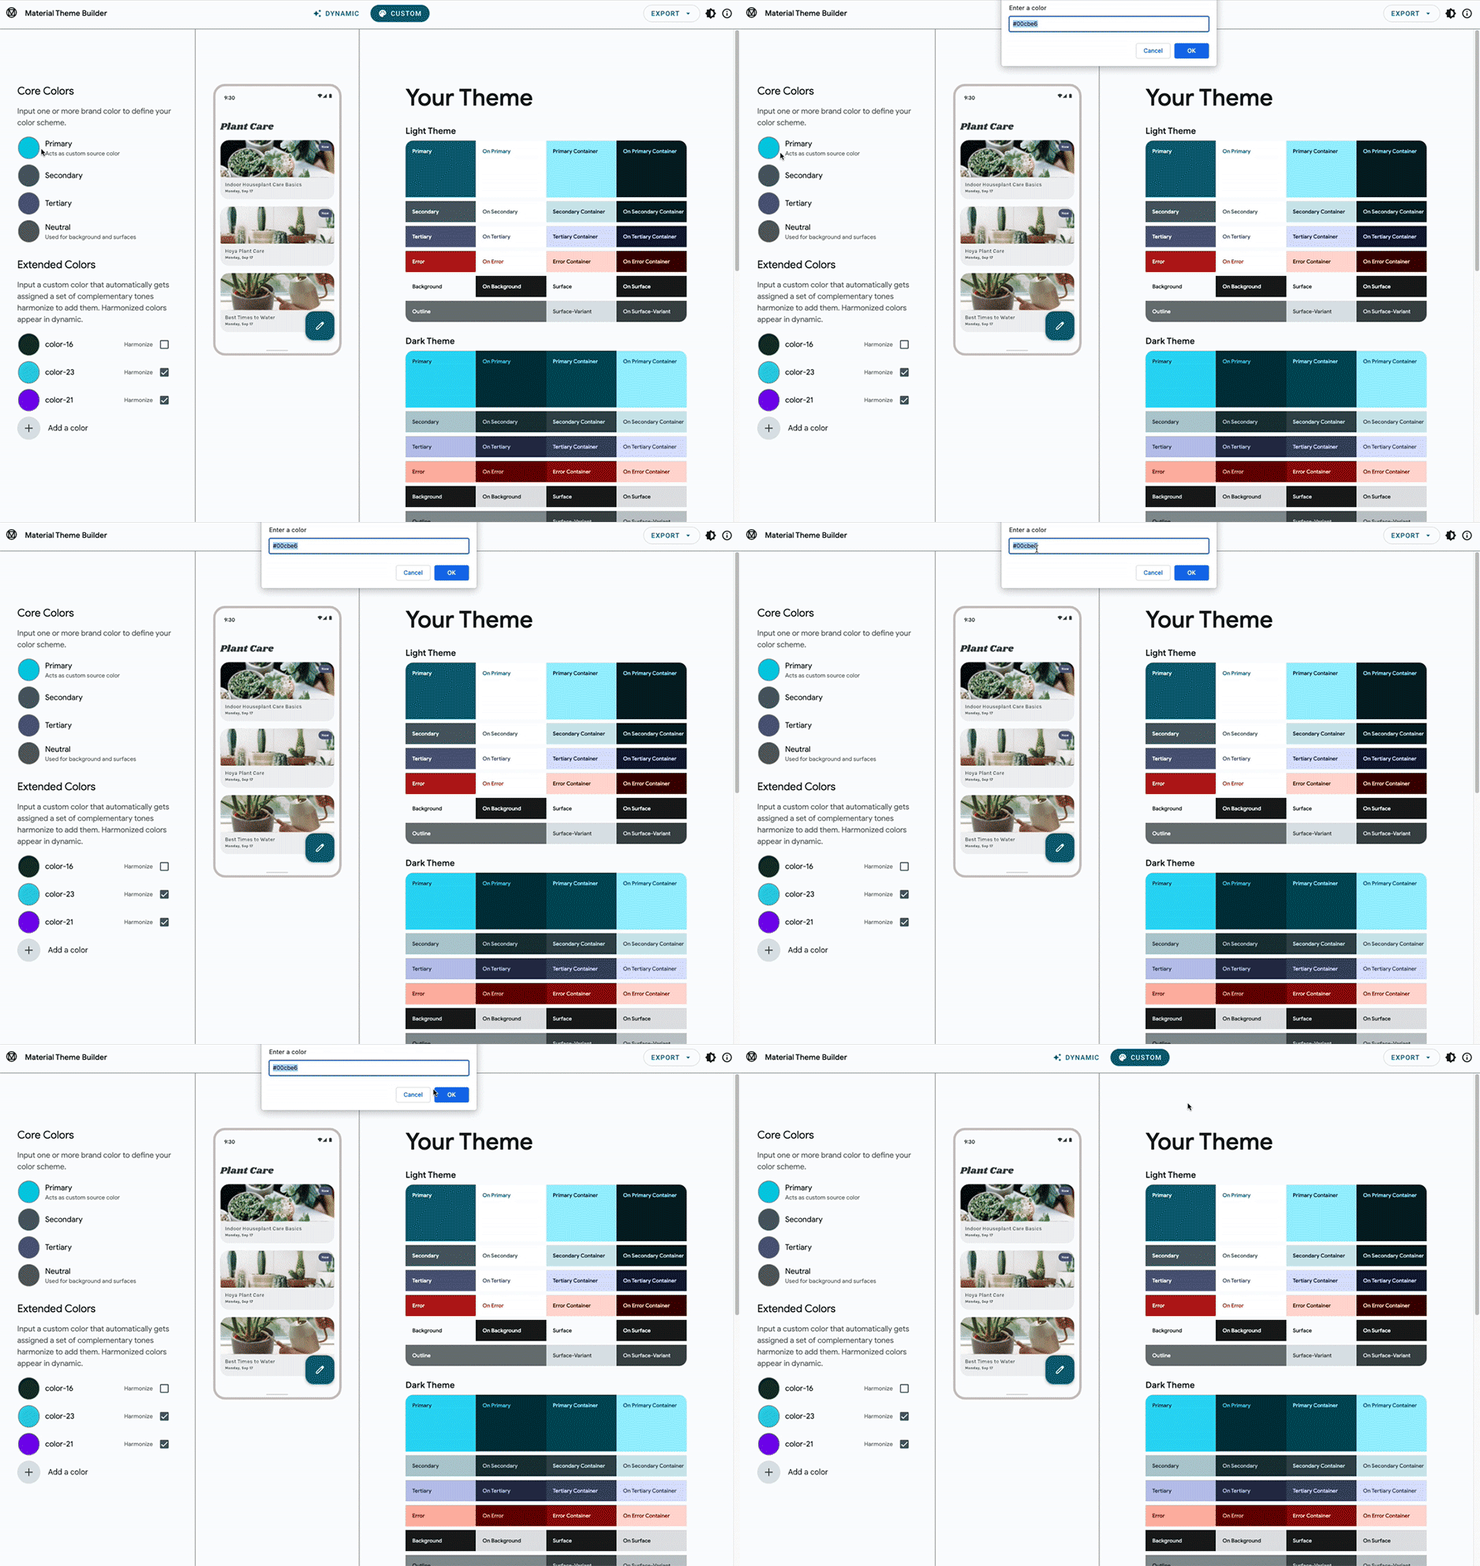
 将主要颜色的十六进制值传递给主题提供程序。例如,十六进制颜色码
 #00cbe6 被指定为 Color(0xff00cbe6)。ThemeProvider 会生成 ThemeData,其中包含您在 Material Theme Builder 中预览的一组互补色:
final settings = ValueNotifier(ThemeSettings(
   sourceColor:  Color(0xff00cbe6), // Replace this color
   themeMode: ThemeMode.system,
 ));
热重启应用。应用主要颜色后,应用会显得更具表现力。通过在上下文中引用主题并获取 ColorScheme,访问所有新颜色:
final colors = Theme.of(context).colorScheme;
 如需使用特定颜色,请访问
 colorScheme 中的颜色角色。前往 lib/src/shared/views/outlined_card.dart,为 OutlinedCard 添加边框:
lib/src/shared/views/outlined_card.dart
class _OutlinedCardState extends State<OutlinedCard> {
  @override
  Widget build(BuildContext context) {
    return MouseRegion(
      cursor: widget.clickable
          ? SystemMouseCursors.click
          : SystemMouseCursors.basic,
      child: Container(
        child: widget.child,
        // Add from here...
        decoration: BoxDecoration(
          border: Border.all(
            color: Theme.of(context).colorScheme.outline,
            width: 1,
          ),
        ),
        // ... To here.
      ),
    );
  }
}
Material 3 引入了精细的颜色角色,这些角色可以相互补充,并在整个界面中用于添加新表达式层。这些新的颜色角色包括:
Primary、OnPrimary、PrimaryContainer、OnPrimaryContainerSecondary、OnSecondary、SecondaryContainer、OnSecondaryContainerTertiary、OnTertiary、TertiaryContainer、OnTertiaryContainerError、OnError、ErrorContainer、OnErrorContainerBackground、OnBackgroundSurface、OnSurface、SurfaceVariant、OnSurfaceVariantShadow、Outline、InversePrimary
此外,新的设计令牌既支持浅色主题,也支持深色主题:
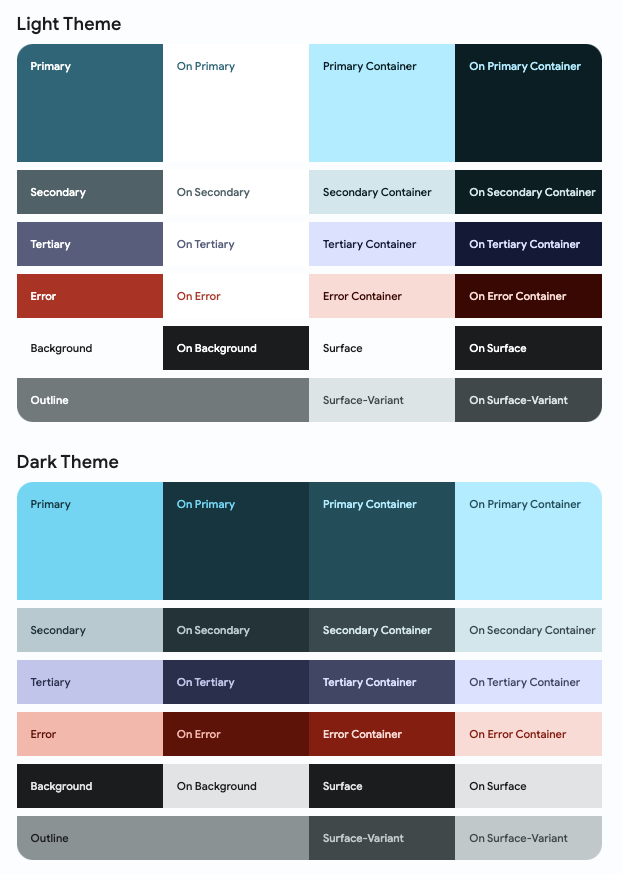
这些颜色角色可用于为界面的不同部分指定含义和强调效果。即使组件并不显眼,也可以利用动态配色。
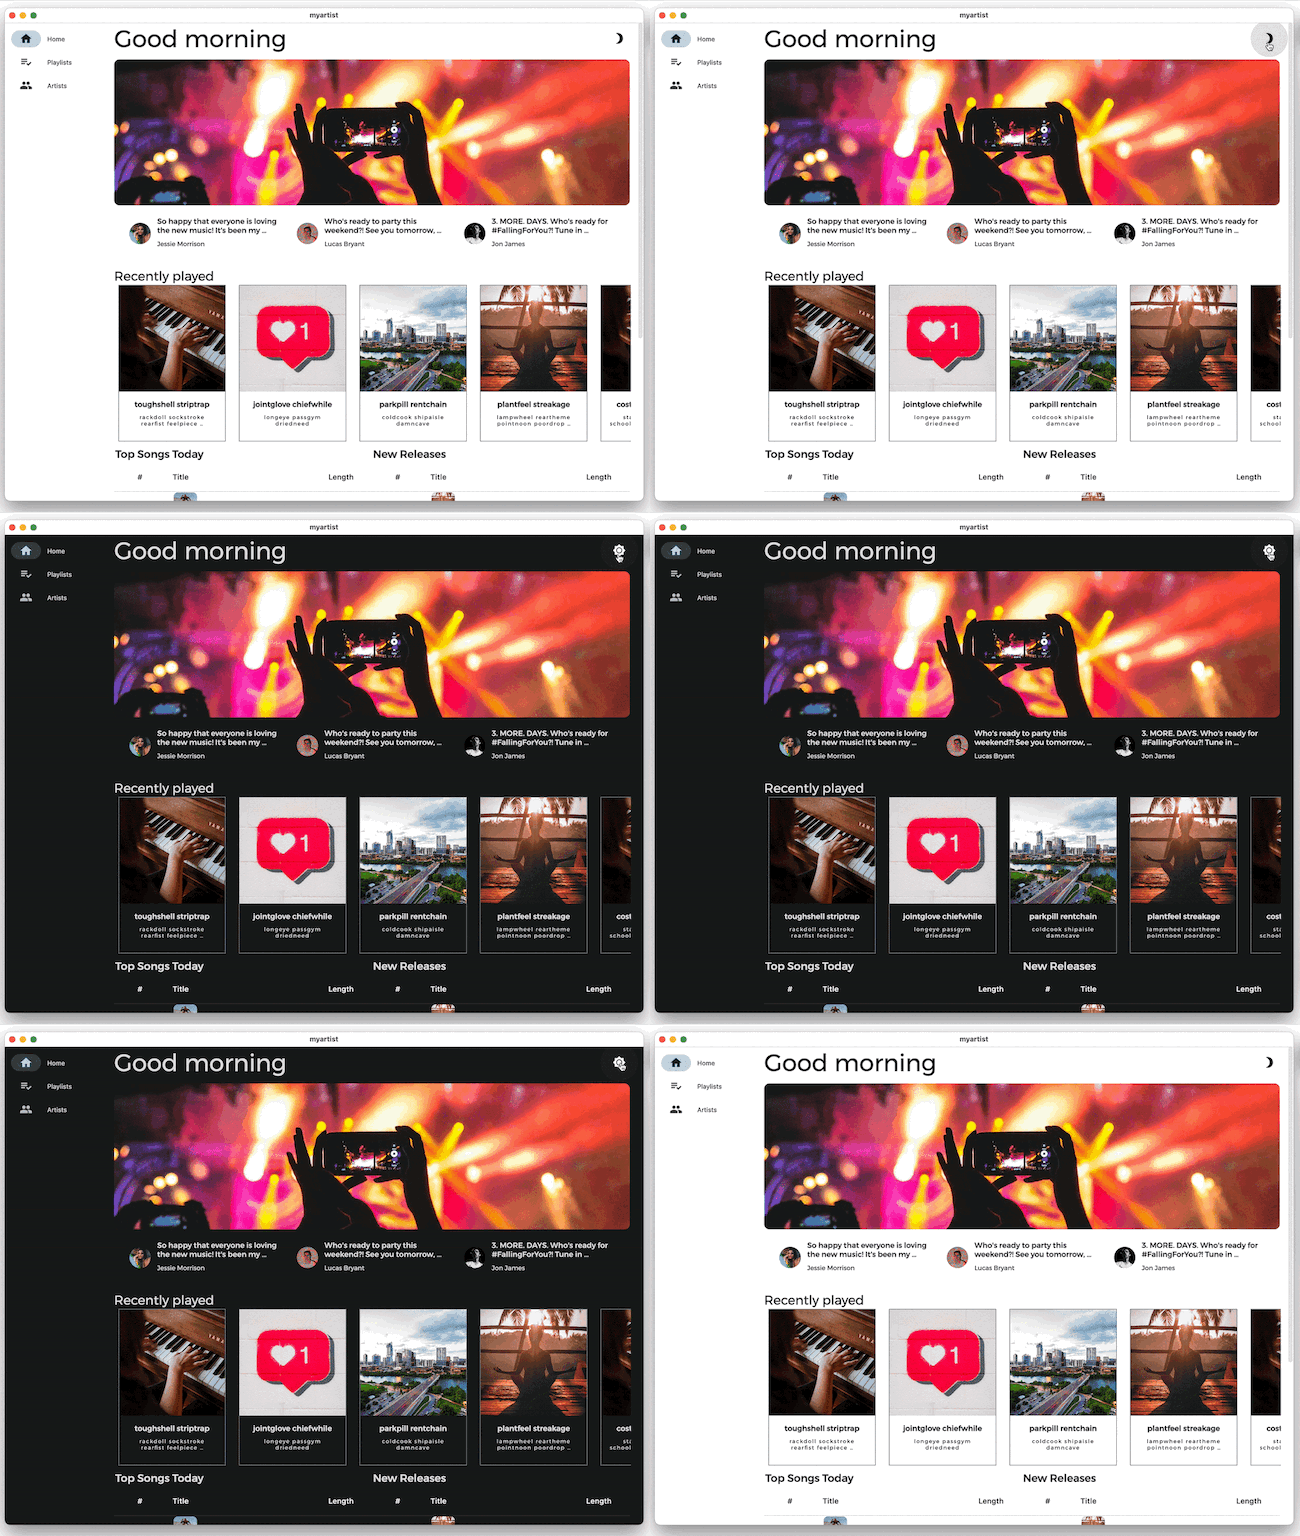
 用户可以在设备的系统设置中设置应用亮度。在
 lib/src/shared/app.dart 中,当设备设置为深色模式时,系统会将深色主题和主题模式返回到 MaterialApp。
lib/src/shared/app.dart
return MaterialApp.router(
  debugShowCheckedModeBanner: false,
  title: 'Flutter Demo',
  theme: theme.light(settings.value.sourceColor),
  darkTheme: theme.dark(settings.value.sourceColor), // Add this line
  themeMode: theme.themeMode(), // Add this line
  routeInformationParser: appRouter.routeInformationParser,
  routerDelegate: appRouter.routerDelegate,
);
点击右上角的月亮图标即可启用深色模式。
有问题?
如果您的应用未正常运行,则可以使用以下链接中提供的代码将将应用恢复到正常状态。
6. 添加自适应设计
借助 Flutter,您可以构建几乎可以在任何位置运行的应用,但这并不意味着每个应用在所有位置会具有相同的行为。用户希望应用在不同平台有不同的行为和功能。
Material 提供了软件包,以便您更轻松地使用自适应布局 - 您可以在 GitHub 上找到这些 Flutter 软件包。
在构建跨平台自适应应用时,请注意以下平台差异:
- 输入法:鼠标、触摸或游戏手柄
- 字体大小、设备屏幕方向和查看距离
- 屏幕尺寸和外形规格:手机、平板电脑、可折叠设备、桌面设备、网页浏览器

lib/src/shared/views/adaptive_navigation.dart 文件包含一个导航类,您可以通过该类提供目的地和内容列表来呈现正文。由于您在多个屏幕上使用此布局,您需要将共用的基本布局传递到每个子布局中。侧边导航栏适用于桌面设备和大屏幕设备,不过可通过在移动设备上显示底部导航栏则让布局适合在移动设备上显示。
lib/src/shared/views/adaptive_navigation.dart
import 'package:flutter/material.dart';

class AdaptiveNavigation extends StatelessWidget {
  const AdaptiveNavigation({
    Key? key,
    required this.destinations,
    required this.selectedIndex,
    required this.onDestinationSelected,
    required this.child,
  }) : super(key: key);

  final List<NavigationDestination> destinations;
  final int selectedIndex;
  final void Function(int index) onDestinationSelected;
  final Widget child;

  @override
  Widget build(BuildContext context) {
    return LayoutBuilder(
      builder: (context, dimens) {
        // Tablet Layout
        if (dimens.maxWidth >= 600) { // Add this line
          return Scaffold(
            body: Row(
              children: [
                NavigationRail(
                  extended: dimens.maxWidth >= 800,
                  minExtendedWidth: 180,
                  destinations: destinations
                      .map((e) => NavigationRailDestination(
                            icon: e.icon,
                            label: Text(e.label),
                          ))
                      .toList(),
                  selectedIndex: selectedIndex,
                  onDestinationSelected: onDestinationSelected,
                ),
                Expanded(child: child),
              ],
            ),
          );
        } // Add this line

        // Mobile Layout
        // Add from here...
        return Scaffold(
          body: child,
          bottomNavigationBar: NavigationBar(
            destinations: destinations,
            selectedIndex: selectedIndex,
            onDestinationSelected: onDestinationSelected,
          ),
        );
        // ... To here.
      },
    );
  }
}
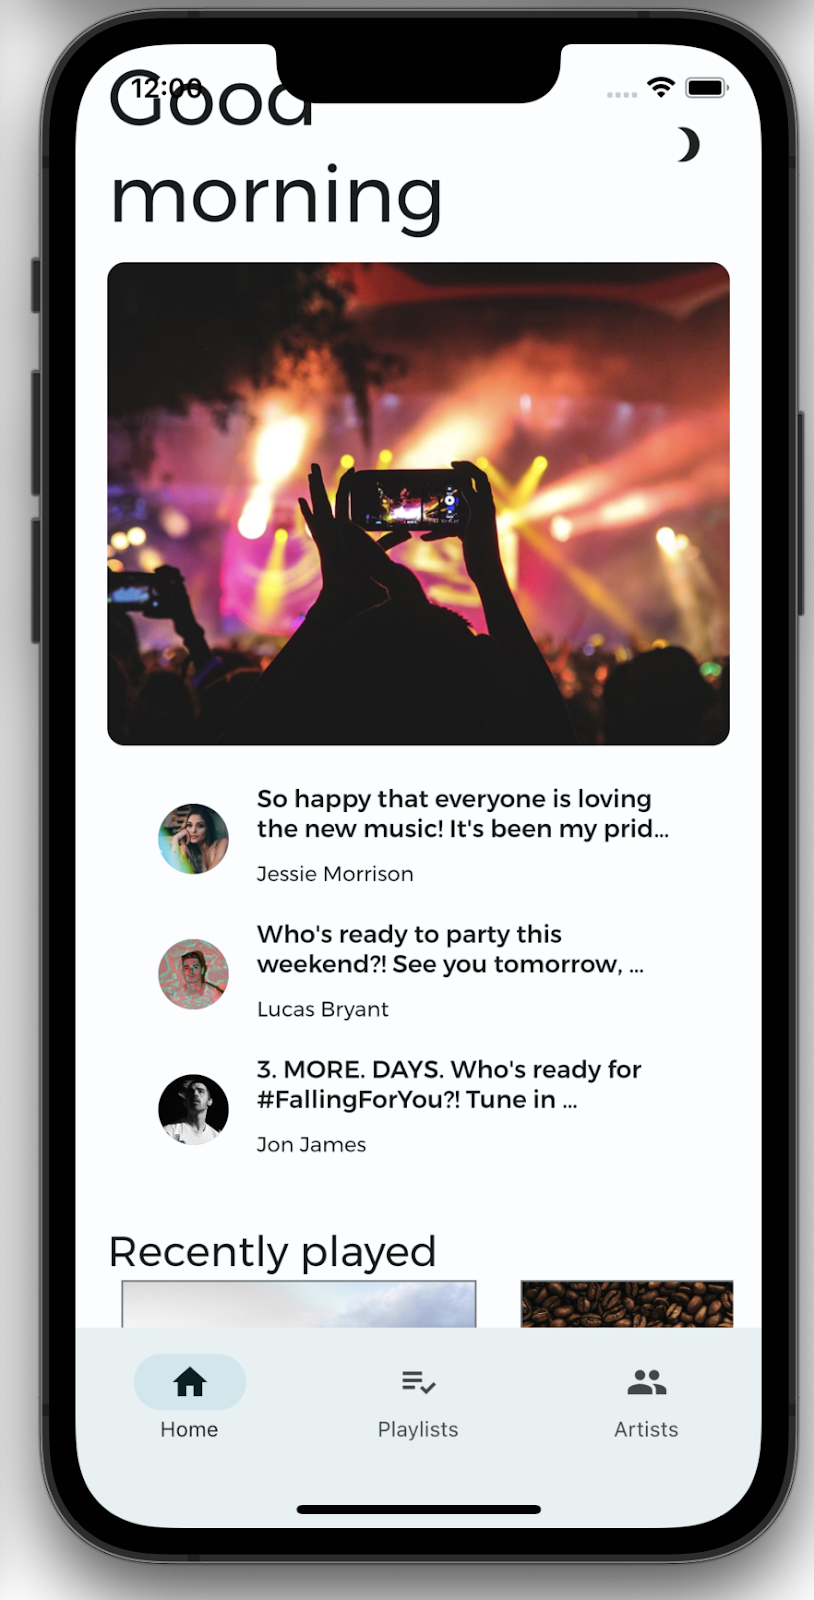
并非所有屏幕都具有相同的尺寸。如果您尝试在手机上显示桌面版应用,则必须执行一些组合操作(眯着眼看并缩放)才能看到所有内容。您希望应用根据显示的屏幕来更改显示方式。通过自适应设计,您可以确保应用在各种尺寸的屏幕上都能完美呈现。
如需让您的应用具备自适应性,请添加一些自适应断点(不要与调试断点混淆)。这些断点指定了应用应更改其布局的屏幕尺寸。
在不缩小内容的情况下,较小屏幕无法像大屏幕一样显示非常多的内容。为了不让该应用看起来像缩小版的桌面应用,请为使用标签页来拆分内容的移动应用创建单独的布局。这会使应用在移动设备上呈现时更具原生感。
在为不同目标设计优化布局时,最好先查看以下扩展方法(定义请参阅 lib/src/shared/extensions.dart 的 MyArtist 项目)。
lib/src/shared/extensions.dart
extension BreakpointUtils on BoxConstraints {
  bool get isTablet => maxWidth > 730;
  bool get isDesktop => maxWidth > 1200;
  bool get isMobile => !isTablet && !isDesktop;
}
大于 730 像素(较长的一侧)但小于 1200 像素的屏幕被视为平板电脑。任何大于 1200 像素的屏幕都会被视为桌面设备。如果设备既不是平板电脑,也不是桌面设备,就会被视为移动设备。您可以在 material.io 上详细了解自适应断点。您可以考虑使用 adaptive_points 软件包。
主屏幕的响应式布局使用 AdaptiveContainer 和 AdaptiveColumn(基于使用 adaptive_components 和 adaptive_breakpoints 软件包的 12 列网格)在 Material Design 中实现响应式网格布局。
return LayoutBuilder(
      builder: (context, constraints) {
        return Scaffold(
          body: SingleChildScrollView(
            child: AdaptiveColumn(
              children: [
                AdaptiveContainer(
                  columnSpan: 12,
                  child: Padding(
                    padding: const EdgeInsets.symmetric(
                      horizontal: 20,
                      vertical: 40,
                    ),
                    child: Row(
                      mainAxisAlignment: MainAxisAlignment.spaceBetween,
                      children: [
                        Expanded(
                          child: Text(
                            'Good morning',
                            style: context.displaySmall,
                          ),
                        ),
                        const SizedBox(width: 20),
                        const BrightnessToggle(),
                      ],
                    ),
                  ),
                ),
                AdaptiveContainer(
                  columnSpan: 12,
                  child: Column(
                    children: [
                      const HomeHighlight(),
                      LayoutBuilder(
                        builder: (context, constraints) => HomeArtists(
                          artists: artists,
                          constraints: constraints,
                        ),
                      ),
                    ],
                  ),
                ),
                AdaptiveContainer(
                  columnSpan: 12,
                  child: Column(
                    crossAxisAlignment: CrossAxisAlignment.start,
                    children: [
                      Padding(
                        padding: const EdgeInsets.symmetric(
                          horizontal: 15,
                          vertical: 20,
                        ),
                        child: Text(
                          'Recently played',
                          style: context.headlineSmall,
                        ),
                      ),
                      HomeRecent(
                        playlists: playlists,
                      ),
                    ],
                  ),
                ),
                AdaptiveContainer(
                  columnSpan: 12,
                  child: Padding(
                    padding: const EdgeInsets.all(15),
                    child: Row(
                      crossAxisAlignment: CrossAxisAlignment.start,
                      children: [
                        Flexible(
                          flex: 10,
                          child: Column(
                            mainAxisAlignment: MainAxisAlignment.start,
                            crossAxisAlignment: CrossAxisAlignment.start,
                            children: [
                              Padding(
                                padding:
                                    const EdgeInsets.only(left: 8, bottom: 8),
                                child: Text(
                                  'Top Songs Today',
                                  style: context.titleLarge,
                                ),
                              ),
                              LayoutBuilder(
                                builder: (context, constraints) =>
                                    PlaylistSongs(
                                  playlist: topSongs,
                                  constraints: constraints,
                                ),
                              ),
                            ],
                          ),
                        ),
                        const SizedBox(width: 25),
                        Flexible(
                          flex: 10,
                          child: Column(
                            mainAxisAlignment: MainAxisAlignment.start,
                            crossAxisAlignment: CrossAxisAlignment.start,
                            children: [
                              Padding(
                                padding:
                                    const EdgeInsets.only(left: 8, bottom: 8),
                                child: Text(
                                  'New Releases',
                                  style: context.titleLarge,
                                ),
                              ),
                              LayoutBuilder(
                                builder: (context, constraints) =>
                                    PlaylistSongs(
                                  playlist: newReleases,
                                  constraints: constraints,
                                ),
                              ),
                            ],
                          ),
                        ),
                      ],
                    ),
                  ),
                ),
              ],
            ),
          ),
        );
      },
    );
 自适应布局需要两种布局:一种用于移动设备的布局,另一种用于针对大屏幕设备的响应式布局。
LayoutBuilder 目前仅返回桌面设备布局。在 lib/src/features/home/view/home_screen.dart 中,将移动设备布局构建为包含 4 个标签页的 TabBar 和 TabBarView。
lib/src/features/home/view/home_screen.dart
import 'package:adaptive_components/adaptive_components.dart';
import 'package:flutter/material.dart';

import '../../../shared/classes/classes.dart';
import '../../../shared/extensions.dart';
import '../../../shared/providers/providers.dart';
import '../../../shared/views/views.dart';
import '../../playlists/view/playlist_songs.dart';
import 'view.dart';

class HomeScreen extends StatefulWidget {
 const HomeScreen({Key? key}) : super(key: key);

 @override
 State<HomeScreen> createState() => _HomeScreenState();
}

class _HomeScreenState extends State<HomeScreen> {
 @override
 Widget build(BuildContext context) {
   final PlaylistsProvider playlistProvider = PlaylistsProvider();
   final List<Playlist> playlists = playlistProvider.playlists;
   final Playlist topSongs = playlistProvider.topSongs;
   final Playlist newReleases = playlistProvider.newReleases;
   final ArtistsProvider artistsProvider = ArtistsProvider();
   final List<Artist> artists = artistsProvider.artists;
   return LayoutBuilder(
     builder: (context, constraints) {
       // Add from here...
       if (constraints.isMobile) {
          return DefaultTabController(
            length: 4,
            child: Scaffold(
              appBar: AppBar(
                centerTitle: false,
                title: const Text('Good morning'),
                actions: const [BrightnessToggle()],
                bottom: const TabBar(
                  isScrollable: true,
                  tabs: [
                    Tab(text: 'Home'),
                    Tab(text: 'Recently Played'),
                    Tab(text: 'New Releases'),
                    Tab(text: 'Top Songs'),
                  ],
                ),
              ),
              body: LayoutBuilder(
                builder: (context, constraints) => TabBarView(
                  children: [
                    SingleChildScrollView(
                      child: Column(
                        children: [
                          const HomeHighlight(),
                          HomeArtists(
                            artists: artists,
                            constraints: constraints,
                          ),
                        ],
                      ),
                    ),
                    HomeRecent(
                      playlists: playlists,
                      axis: Axis.vertical,
                    ),
                    PlaylistSongs(
                      playlist: topSongs,
                      constraints: constraints,
                    ),
                    PlaylistSongs(
                      playlist: newReleases,
                      constraints: constraints,
                    ),
                  ],
                ),
              ),
            ),
          );
        }
       // ... To here.

       return Scaffold(
          body: SingleChildScrollView(
            child: AdaptiveColumn(
              children: [
                AdaptiveContainer(
                  columnSpan: 12,
                  child: Padding(
                    padding: const EdgeInsets.symmetric(
                      horizontal: 20,
                      vertical: 40,
                    ),
                    child: Row(
                      mainAxisAlignment: MainAxisAlignment.spaceBetween,
                      children: [
                        Expanded(
                          child: Text(
                            'Good morning',
                            style: context.displaySmall,
                          ),
                        ),
                        const SizedBox(width: 20),
                        const BrightnessToggle(),
                      ],
                    ),
                  ),
                ),
                AdaptiveContainer(
                  columnSpan: 12,
                  child: Column(
                    children: [
                      const HomeHighlight(),
                      LayoutBuilder(
                        builder: (context, constraints) => HomeArtists(
                          artists: artists,
                          constraints: constraints,
                        ),
                      ),
                    ],
                  ),
                ),
                AdaptiveContainer(
                  columnSpan: 12,
                  child: Column(
                    crossAxisAlignment: CrossAxisAlignment.start,
                    children: [
                      Padding(
                        padding: const EdgeInsets.symmetric(
                          horizontal: 15,
                          vertical: 20,
                        ),
                        child: Text(
                          'Recently played',
                          style: context.headlineSmall,
                        ),
                      ),
                      HomeRecent(
                        playlists: playlists,
                      ),
                    ],
                  ),
                ),
                AdaptiveContainer(
                  columnSpan: 12,
                  child: Padding(
                    padding: const EdgeInsets.all(15),
                    child: Row(
                      crossAxisAlignment: CrossAxisAlignment.start,
                      children: [
                        Flexible(
                          flex: 10,
                          child: Column(
                            mainAxisAlignment: MainAxisAlignment.start,
                            crossAxisAlignment: CrossAxisAlignment.start,
                            children: [
                              Padding(
                                padding:
                                    const EdgeInsets.only(left: 8, bottom: 8),
                                child: Text(
                                  'Top Songs Today',
                                  style: context.titleLarge,
                                ),
                              ),
                              LayoutBuilder(
                                builder: (context, constraints) =>
                                    PlaylistSongs(
                                  playlist: topSongs,
                                  constraints: constraints,
                                ),
                              ),
                            ],
                          ),
                        ),
                        const SizedBox(width: 25),
                        Flexible(
                          flex: 10,
                          child: Column(
                            mainAxisAlignment: MainAxisAlignment.start,
                            crossAxisAlignment: CrossAxisAlignment.start,
                            children: [
                              Padding(
                                padding:
                                    const EdgeInsets.only(left: 8, bottom: 8),
                                child: Text(
                                  'New Releases',
                                  style: context.titleLarge,
                                ),
                              ),
                              LayoutBuilder(
                                builder: (context, constraints) =>
                                    PlaylistSongs(
                                  playlist: newReleases,
                                  constraints: constraints,
                                ),
                              ),
                            ],
                          ),
                        ),
                      ],
                    ),
                  ),
                ),
              ],
            ),
          ),
        );
     },
   );
 }
}
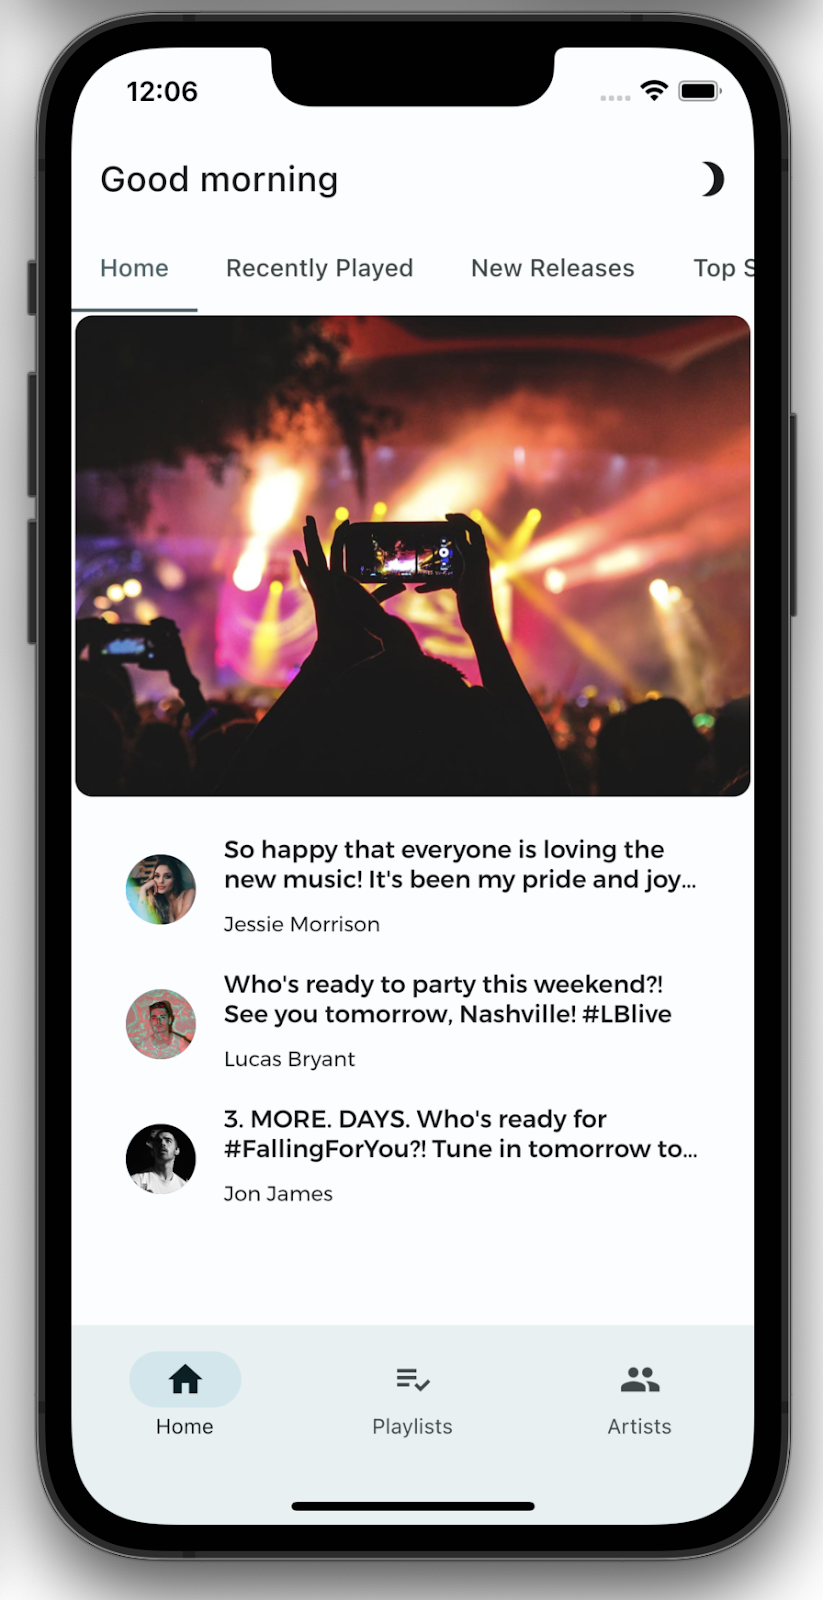
有问题?
如果您的应用未正常运行,则可以使用以下链接中提供的代码将将应用恢复到正常状态。
使用空白
空白是应用的重要视觉工具,可创建各个部分间的组织间隔。
有太多空白比空白不足要好。如果要将更多内容放入空间,相比减小字体或视觉元素的大小,添加更多空白更可取。
对于有视觉障碍的用户来说,缺少空白可能会是一大难题。过多空白可能会导致缺少连贯,让界面看起来没有条理。例如,请查看以下屏幕截图:
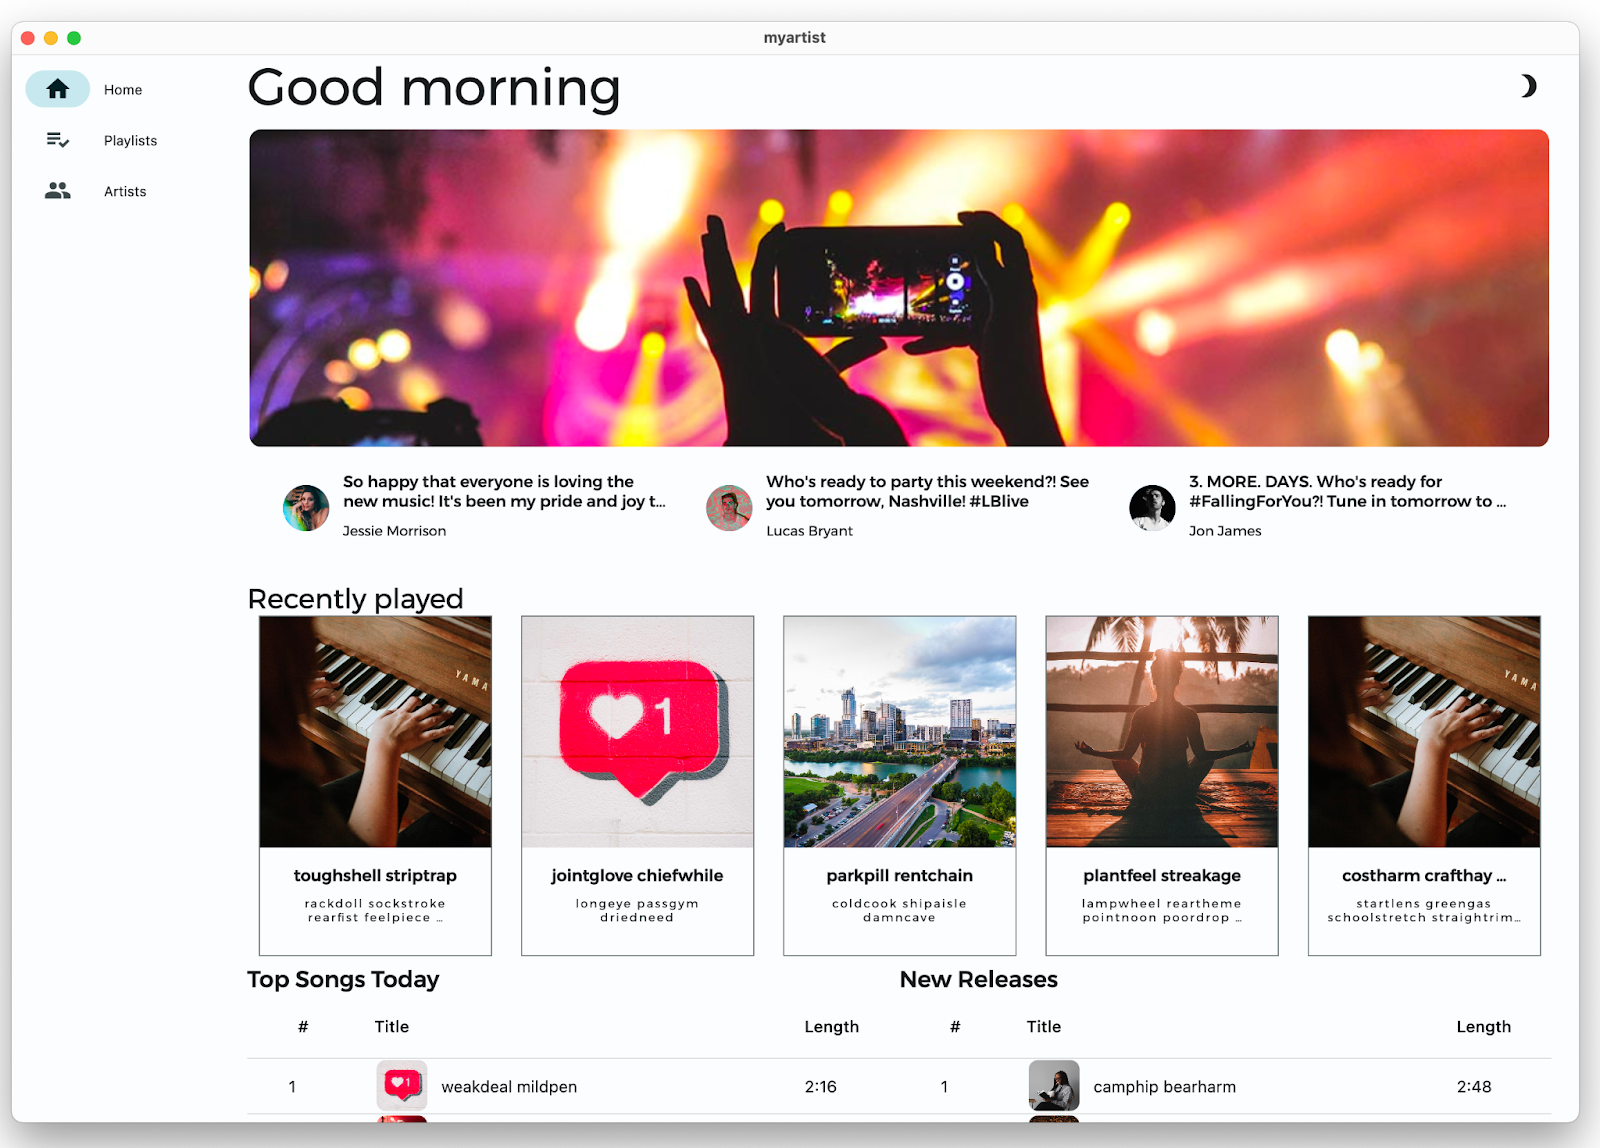
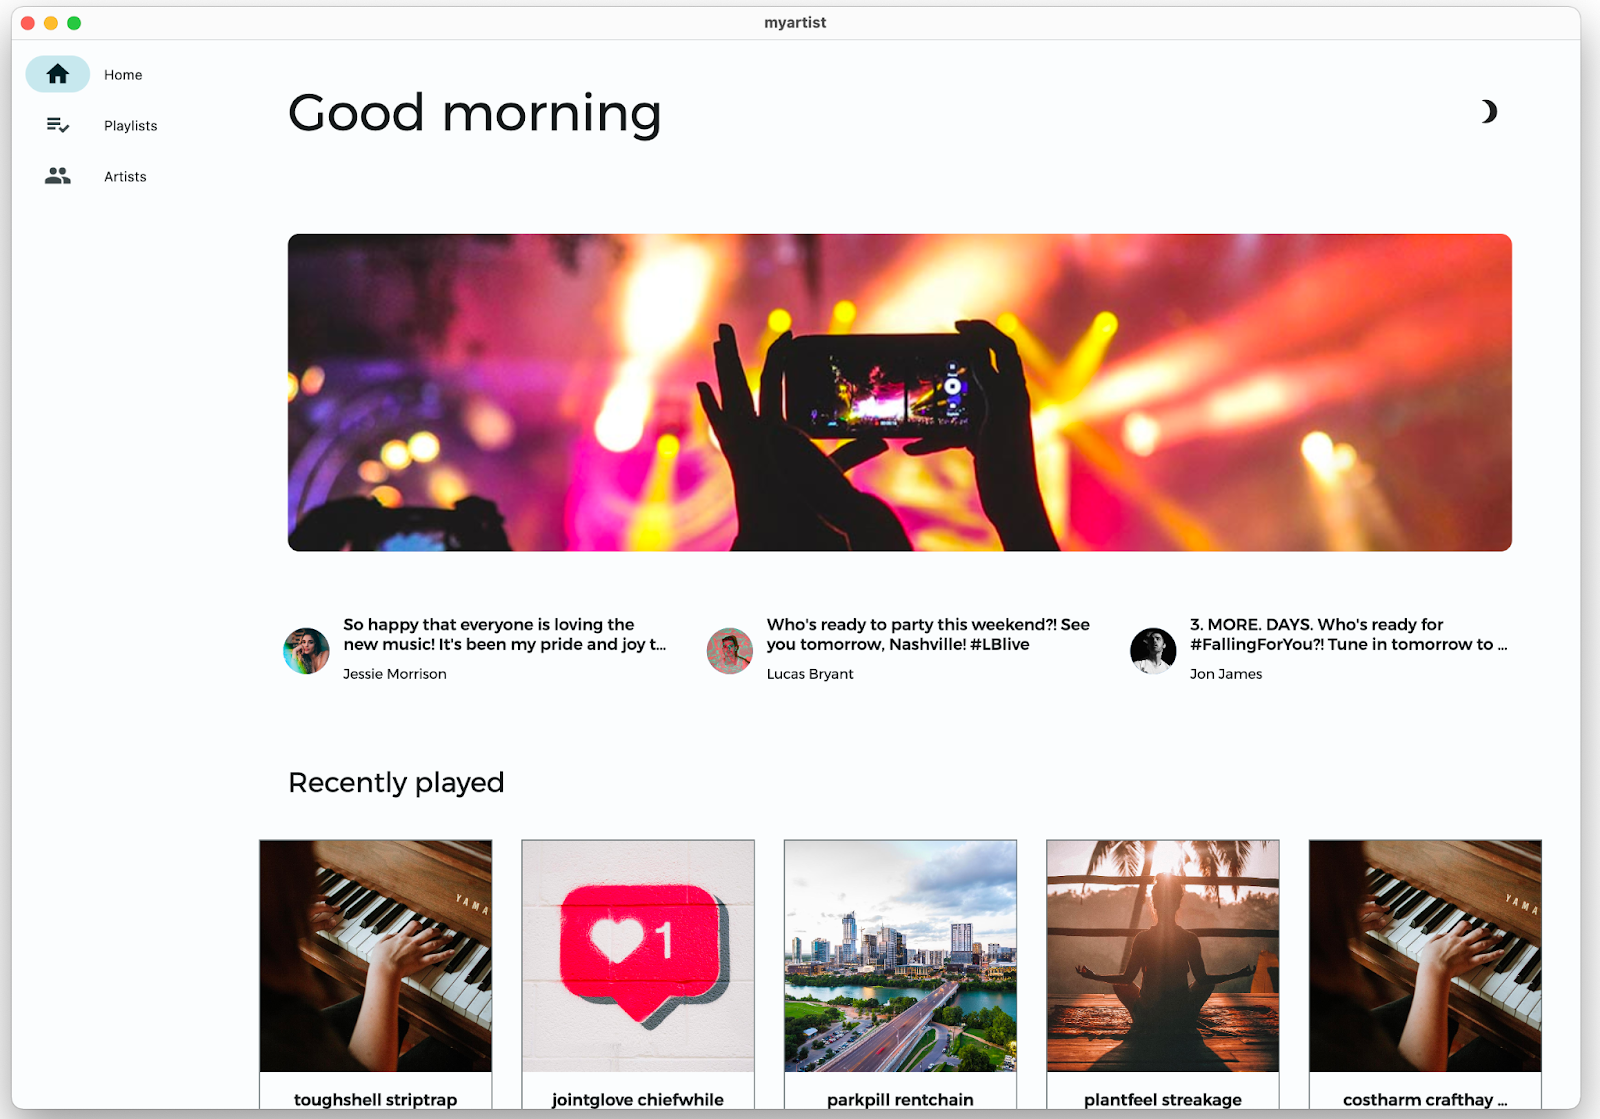
接下来,您可以向主屏幕添加空白,以腾出更多空间。然后,您将进一步调整布局,以微调间距。
 使用
使用 Padding 对象封装 widget,以在该 widget 周围添加空白。将 lib/src/features/home/view/home_screen.dart 中当前的所有内边距值增加至 35:
lib/src/features/home/view/home_screen.dart
Scaffold(
      body: SingleChildScrollView(
        child: AdaptiveColumn(
          children: [
            AdaptiveContainer(
              columnSpan: 12,
              child: Padding(
                padding: const EdgeInsets.all(35), // Modify this line
                child: Row(
                  mainAxisAlignment: MainAxisAlignment.spaceBetween,
                  children: [
                    Expanded(
                      child: Text(
                        'Good morning',
                        style: context.displaySmall,
                      ),
                    ),
                    const SizedBox(width: 20),
                    const BrightnessToggle(),
                  ],
                ),
              ),
            ),
            AdaptiveContainer(
              columnSpan: 12,
              child: Column(
                children: [
                  const HomeHighlight(),
                  LayoutBuilder(
                    builder: (context, constraints) => HomeArtists(
                      artists: artists,
                      constraints: constraints,
                    ),
                  ),
                ],
              ),
            ),
            AdaptiveContainer(
              columnSpan: 12,
              child: Column(
                crossAxisAlignment: CrossAxisAlignment.start,
                children: [
                  Padding(
                    padding: const EdgeInsets.all(35), // Modify this line
                    child: Text(
                      'Recently played',
                      style: context.headlineSmall,
                    ),
                  ),
                  HomeRecent(
                    playlists: playlists,
                  ),
                ],
              ),
            ),
            AdaptiveContainer(
              columnSpan: 12,
              child: Padding(
                padding: const EdgeInsets.all(35), // Modify this line
                child: Row(
                  crossAxisAlignment: CrossAxisAlignment.start,
                  children: [
                    Flexible(
                      flex: 10,
                      child: Column(
                        mainAxisAlignment: MainAxisAlignment.start,
                        crossAxisAlignment: CrossAxisAlignment.start,
                        children: [
                          Padding(
                            padding:
                                const EdgeInsets.all(35), // Modify this line
                            child: Text(
                              'Top Songs Today',
                              style: context.titleLarge,
                            ),
                          ),
                          LayoutBuilder(
                            builder: (context, constraints) => PlaylistSongs(
                              playlist: topSongs,
                              constraints: constraints,
                            ),
                          ),
                        ],
                      ),
                    ),
                    // Add spacer between tables
                    Flexible(
                      flex: 10,
                      child: Column(
                        mainAxisAlignment: MainAxisAlignment.start,
                        crossAxisAlignment: CrossAxisAlignment.start,
                        children: [
                          Padding(
                            padding:
                                const EdgeInsets.all(35), // Modify this line
                            child: Text(
                              'New Releases',
                              style: context.titleLarge,
                            ),
                          ),
                          LayoutBuilder(
                            builder: (context, constraints) => PlaylistSongs(
                              playlist: newReleases,
                              constraints: constraints,
                            ),
                          ),
                        ],
                      ),
                    ),
                  ],
                ),
              ),
            ),
          ],
        ),
      ),
    );
 热重载应用。它看起来和以前一样,但在widget之间留有更多空白。增加的内边距看上去更加美观,但是顶部的突出显示横幅仍过于靠近边缘。
 在
在 lib/src/features/home/view/home_highlight.dart中,将横幅上的内边距更改为 35:
lib/src/features/home/view/home_highlight.dart
class HomeHighlight extends StatelessWidget {
  const HomeHighlight({Key? key}) : super(key: key);

  @override
  Widget build(BuildContext context) {
    return Row(
      children: [
        Expanded(
          child: Padding(
            padding: const EdgeInsets.all(35), // Modify this line
            child: Clickable(
              child: SizedBox(
                height: 275,
                child: ClipRRect(
                  borderRadius: BorderRadius.circular(10),
                  child: Image.asset(
                    'assets/images/news/concert.jpeg',
                    fit: BoxFit.cover,
                  ),
                ),
              ),
              onTap: () => launch('https://docs.flutter.dev'),
            ),
          ),
        ),
      ],
    );
  }
}
 热重载应用。底部的两个播放列表之间没有空白,因此它们看起来似乎属于同一表。事实并非如此,您接下来将修复该问题。
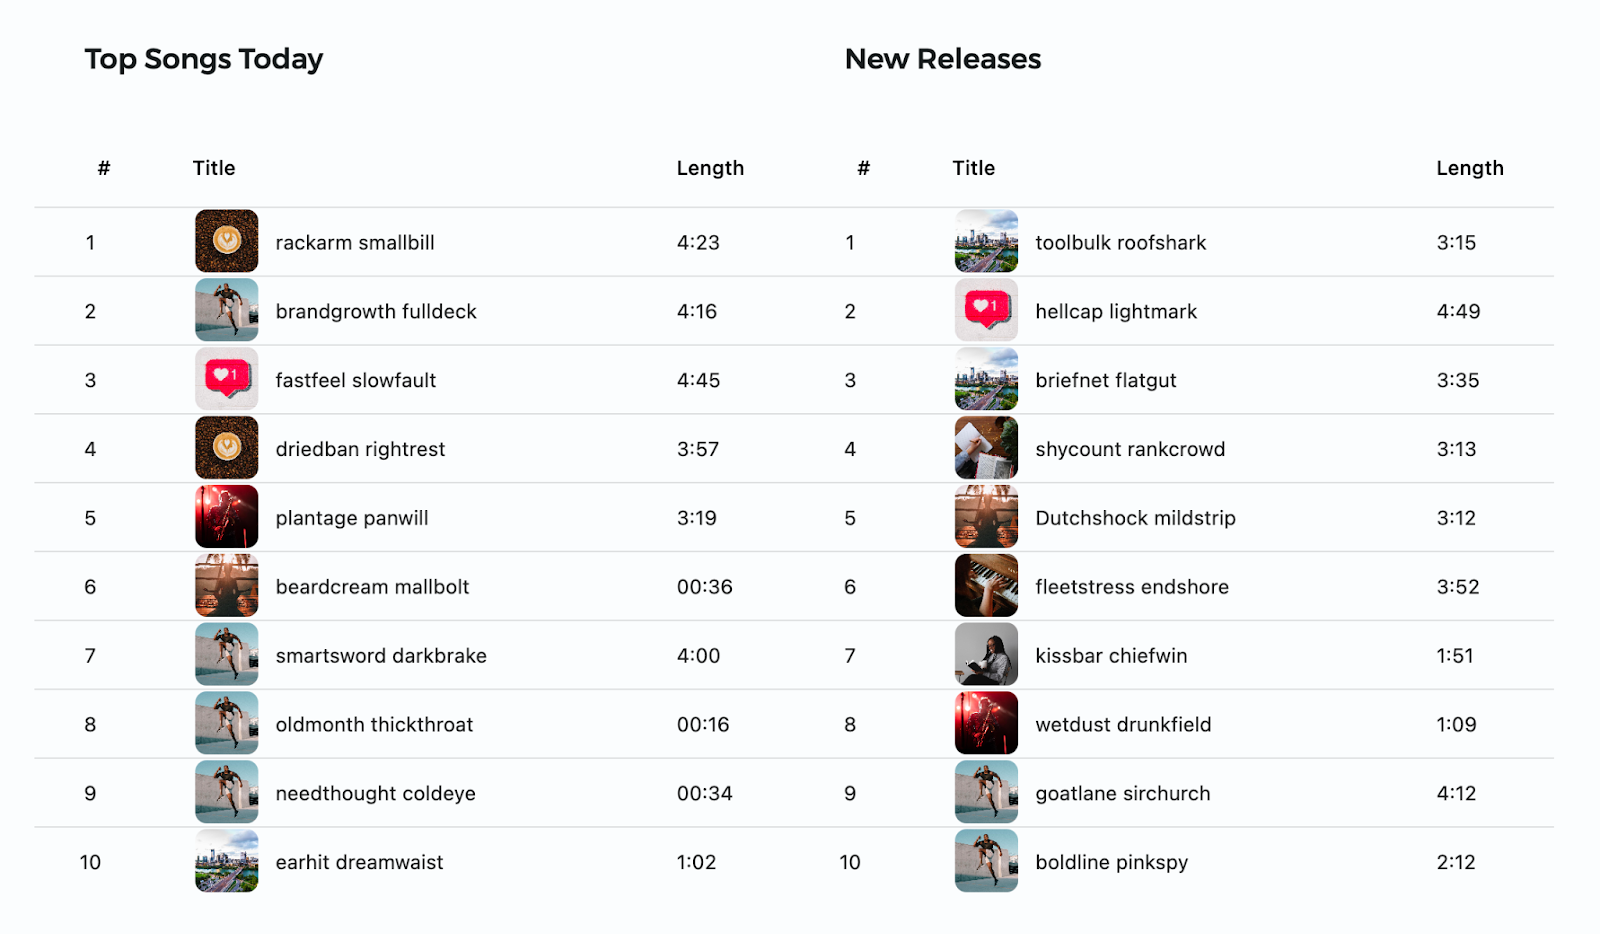
 在包含播放列表的
 Row 中插入大小widget,从而在播放列表之间添加空白。在 lib/src/features/home/view/home_screen.dart 中,添加宽度为 35 的 SizedBox:
lib/src/features/home/view/home_screen.dart
Padding(
  padding: const EdgeInsets.all(35),
  child: Row(
    crossAxisAlignment: CrossAxisAlignment.start,
    children: [
      Flexible(
        flex: 10,
        child: Column(
          mainAxisAlignment: MainAxisAlignment.start,
          crossAxisAlignment: CrossAxisAlignment.start,
          children: [
            Padding(
              padding: const EdgeInsets.all(35),
              child: Text(
                'Top Songs Today',
                style: context.titleLarge,
              ),
            ),
            PlaylistSongs(
              playlist: topSongs,
              constraints: constraints,
            ),
          ],
        ),
      ),
      const SizedBox(width: 35), // Add this line
      Flexible(
        flex: 10,
        child: Column(
          mainAxisAlignment: MainAxisAlignment.start,
          crossAxisAlignment: CrossAxisAlignment.start,
          children: [
            Padding(
              padding: const EdgeInsets.all(35),
              child: Text(
                'New Releases',
                style: context.titleLarge,
              ),
            ),
            PlaylistSongs(
              playlist: newReleases,
              constraints: constraints,
            ),
          ],
        ),
      ),
    ],
  ),
),
 热重载应用。应用应如下所示:
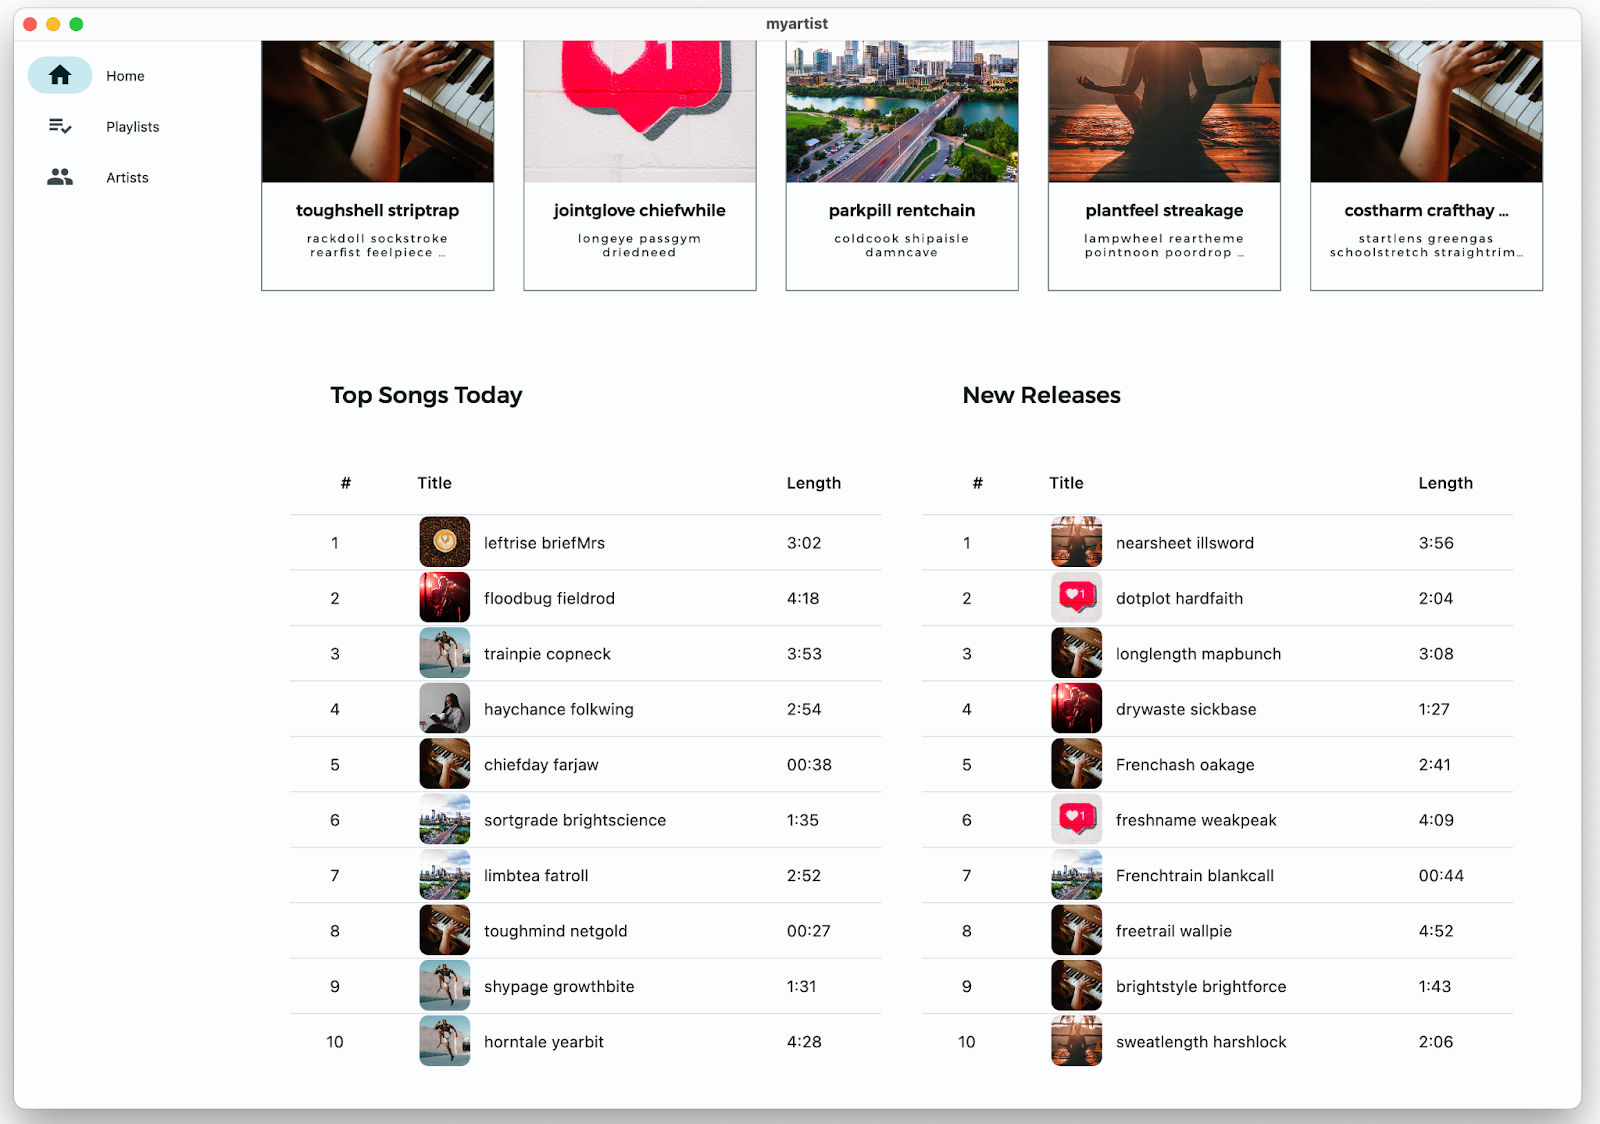
现在,主屏幕内容有很多空间,但每项内容看起来太分散,并且各部分之间没有内聚性。
 到目前为止,您已使用
 EdgeInsets.all(35) 将主屏幕上widget的所有内边距(水平和垂直)都设为 35,不过您也可以分别设置每个边缘的内边距。自定义内边距以更好地适应空间。
EdgeInsets.LTRB()可设置左侧、顶部、右侧和底部内边距EdgeInsets.symmetric()将垂直(顶部和底部)的内边距设置为等值,将水平(左侧和右侧)的内边距设置为等值EdgeInsets.only()仅设置指定的边缘。
Scaffold(
  body: SingleChildScrollView(
    child: AdaptiveColumn(
      children: [
        AdaptiveContainer(
           columnSpan: 12,
             child: Padding(
               padding: const EdgeInsets.fromLTRB(20, 25, 20, 10), // Modify this line
               child: Row(
                 mainAxisAlignment: MainAxisAlignment.spaceBetween,
                   children: [
                     Expanded(
                       child: Text(
                         'Good morning',
                          style: context.displaySmall,
                       ),
                     ),
                     const SizedBox(width: 20),
                     const BrightnessToggle(),
                   ],
                 ),
               ),
             ),
             AdaptiveContainer(
               columnSpan: 12,
               child: Column(
                 children: [
                   const HomeHighlight(),
                   LayoutBuilder(
                     builder: (context, constraints) => HomeArtists(
                       artists: artists,
                       constraints: constraints,
                     ),
                   ),
                 ],
               ),
             ),
             AdaptiveContainer(
               columnSpan: 12,
               child: Column(
                 crossAxisAlignment: CrossAxisAlignment.start,
                 children: [
                   Padding(
                     padding: const EdgeInsets.symmetric(
                       horizontal: 15,
                       vertical: 10,
                     ), // Modify this line
                     child: Text(
                       'Recently played',
                       style: context.headlineSmall,
                     ),
                   ),
                   HomeRecent(
                     playlists: playlists,
                   ),
                 ],
               ),
             ),
             AdaptiveContainer(
               columnSpan: 12,
               child: Padding(
                 padding: const EdgeInsets.all(15), // Modify this line
                 child: Row(
                   crossAxisAlignment: CrossAxisAlignment.start,
                   children: [
                     Flexible(
                       flex: 10,
                         child: Column(
                           mainAxisAlignment: MainAxisAlignment.start,
                           crossAxisAlignment: CrossAxisAlignment.start,
                           children: [
                             Padding(
                               padding: const EdgeInsets.only(left: 8, bottom: 8), // Modify this line
                               child: Text(
                                 'Top Songs Today',
                                 style: context.titleLarge,
                               ),
                             ),
                             LayoutBuilder(
                               builder: (context, constraints) =>
                                    PlaylistSongs(
                                  playlist: topSongs,
                                  constraints: constraints,
                                ),
                              ),
                            ],
                          ),
                        ),
                    const SizedBox(width: 25),
                    Flexible(
                      flex: 10,
                      child: Column(
                        mainAxisAlignment: MainAxisAlignment.start,
                        crossAxisAlignment: CrossAxisAlignment.start,
                        children: [
                          Padding(
                            padding: const EdgeInsets.only(left: 8, bottom: 8), // Modify this line
                            child: Text(
                              'New Releases',
                               style: context.titleLarge,
                            ),
                          ),
                          LayoutBuilder(
                            builder: (context, constraints) =>
                                    PlaylistSongs(
                                  playlist: newReleases,
                                  constraints: constraints,
                                ),
                              ),
                            ],
                          ),
                        ),
                      ],
                    ),
                  ),
                ),
              ],
            ),
          ),
        );
 在
在 lib/src/features/home/view/home_highlight.dart 中,将横幅的左右内边距设为 35,将上下内边距设为 5:
lib/src/features/home/view/home_highlight.dart
class HomeHighlight extends StatelessWidget {
  const HomeHighlight({Key? key}) : super(key: key);

  @override
  Widget build(BuildContext context) {
    return Row(
      children: [
        Expanded(
          child: Padding(
            // Modify this line
            padding: const EdgeInsets.symmetric(horizontal: 35, vertical: 5),
            child: Clickable(
              child: SizedBox(
                height: 275,
                child: ClipRRect(
                  borderRadius: BorderRadius.circular(10),
                  child: Image.asset(
                    'assets/images/news/concert.jpeg',
                    fit: BoxFit.cover,
                  ),
                ),
              ),
              onTap: () => launch('https://docs.flutter.dev'),
            ),
          ),
        ),
      ],
    );
  }
}
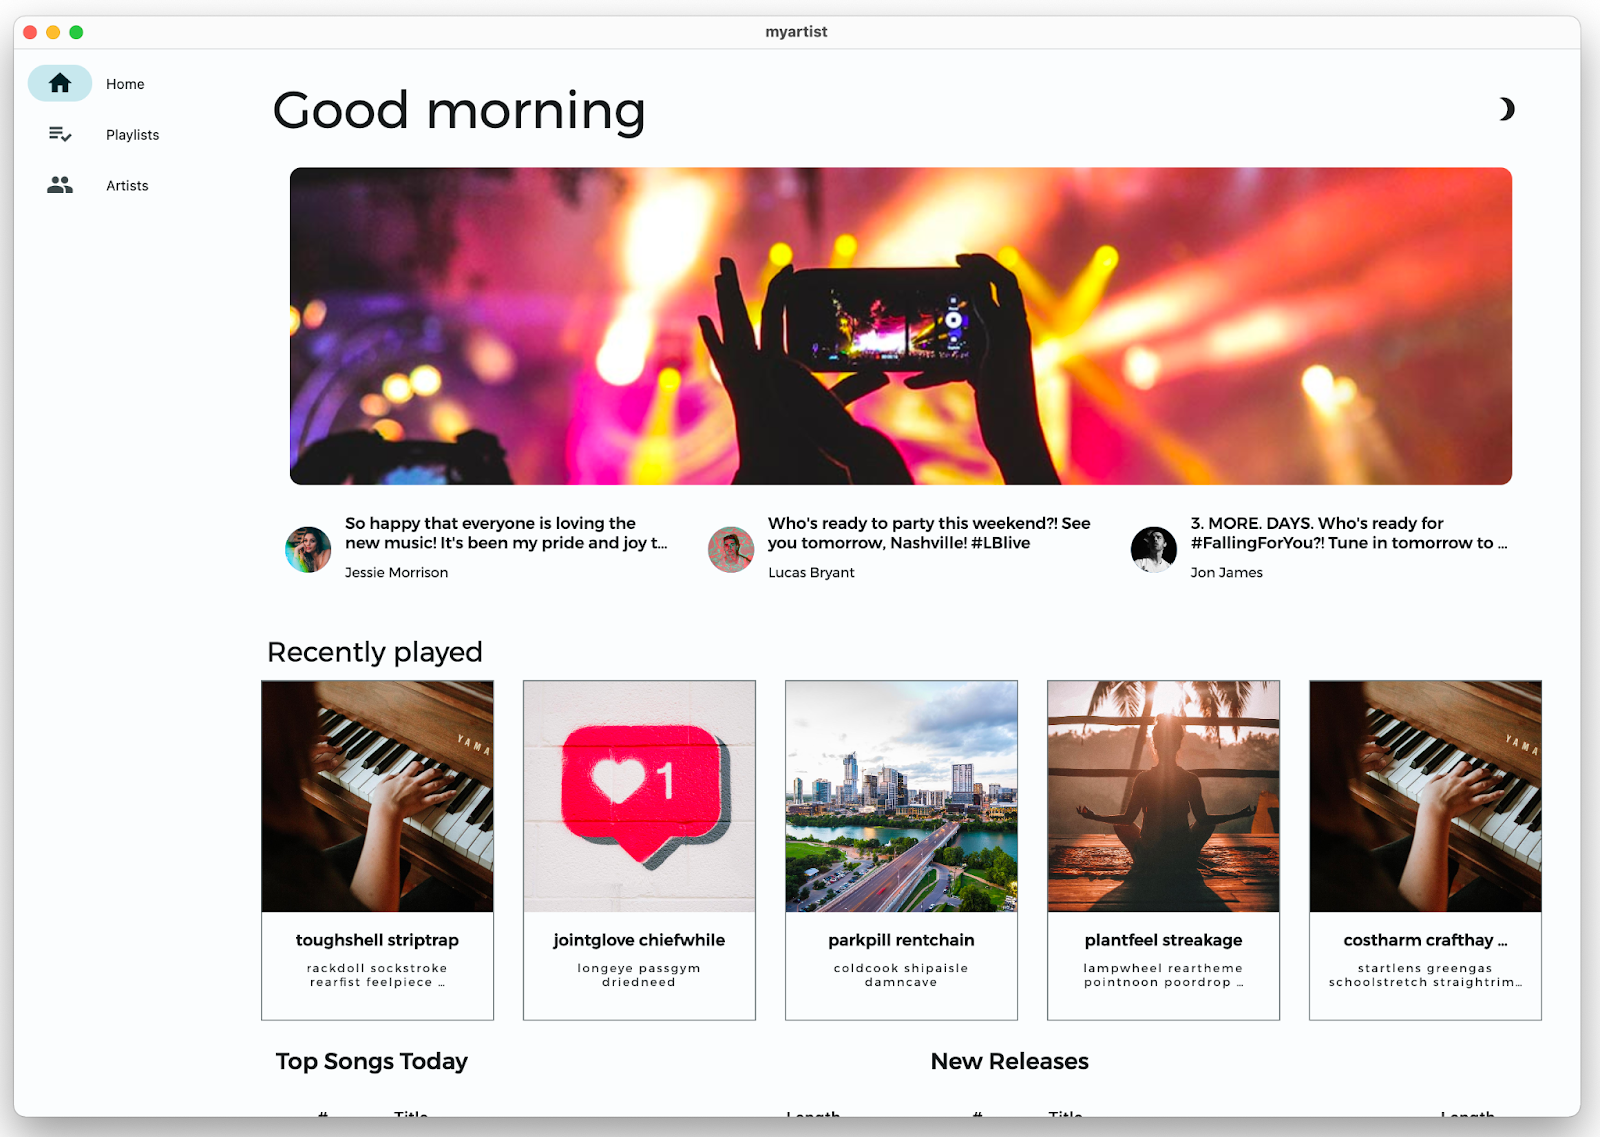
 热重载应用。布局和间距看起来好多了!最后,再添加一些动态效果和动画。
有问题?
如果您的应用未正常运行,则可以使用以下链接中提供的代码将将应用恢复到正常状态。
7. 添加动态效果和动画
动态效果和动画是引入动态场景和活力以及在用户与应用互动时提供反馈的绝佳方式。
在屏幕之间添加动画效果
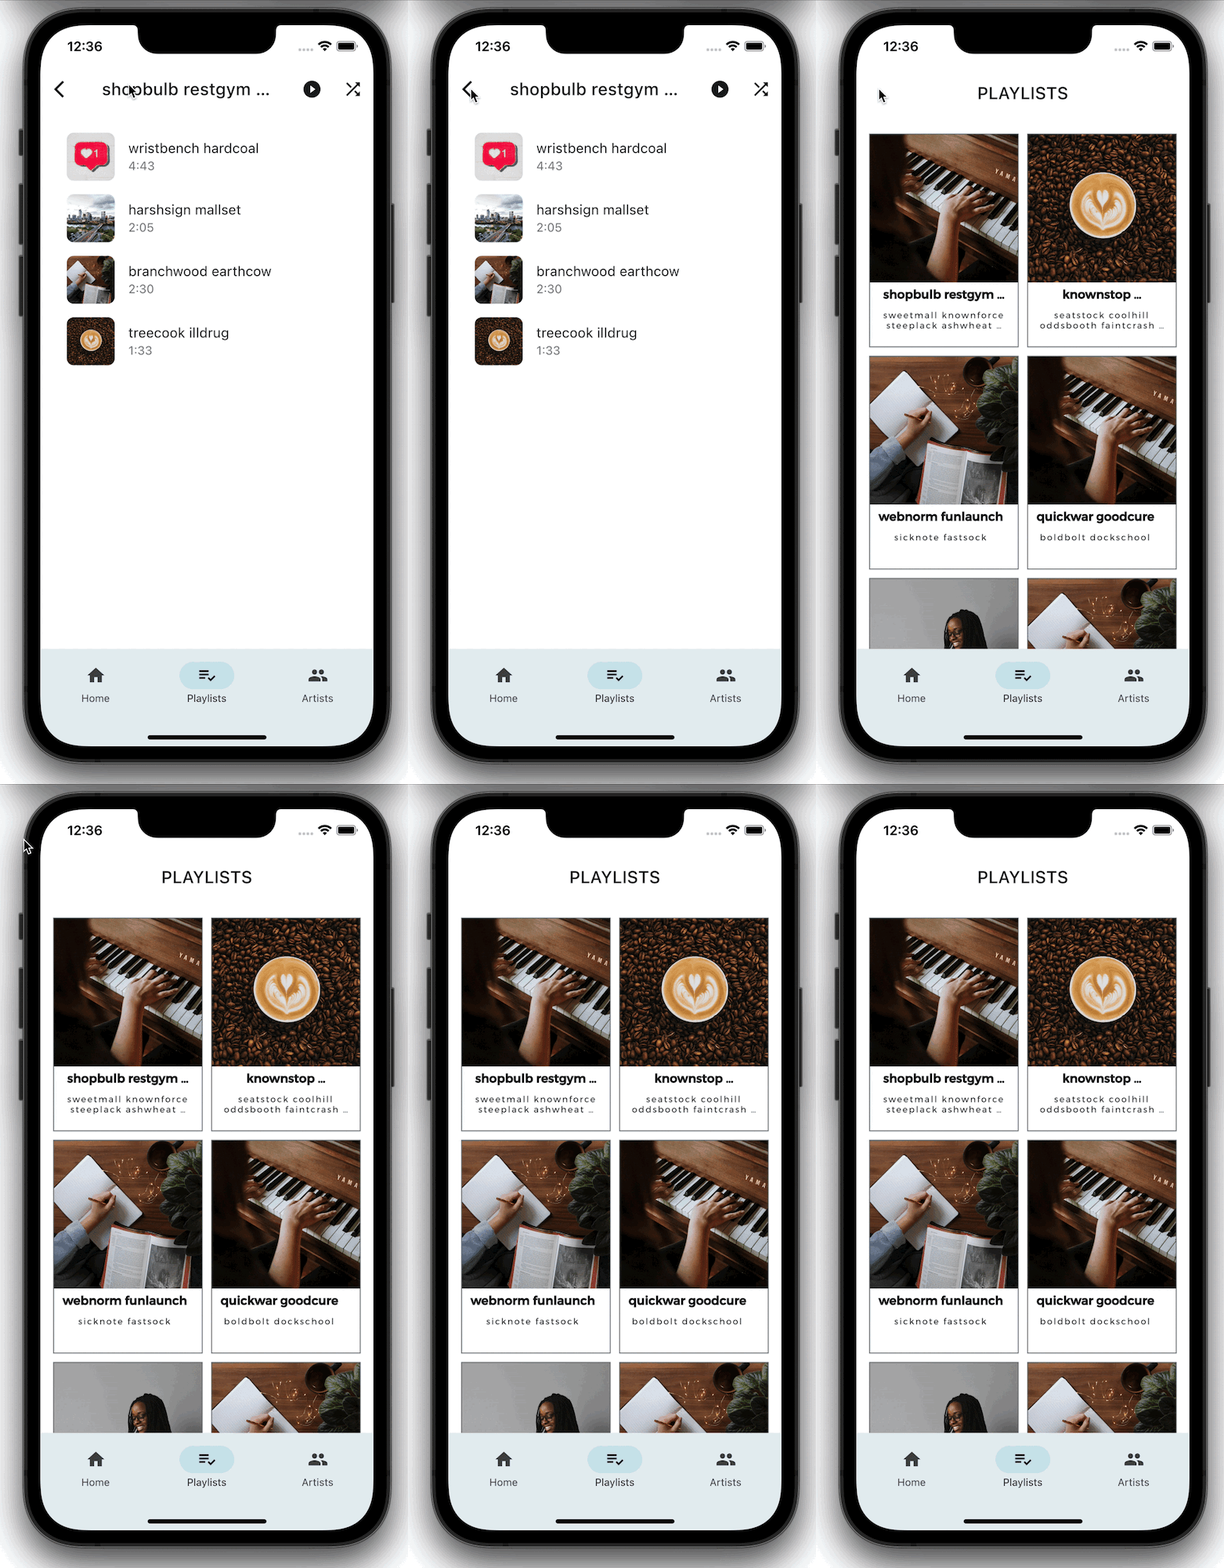
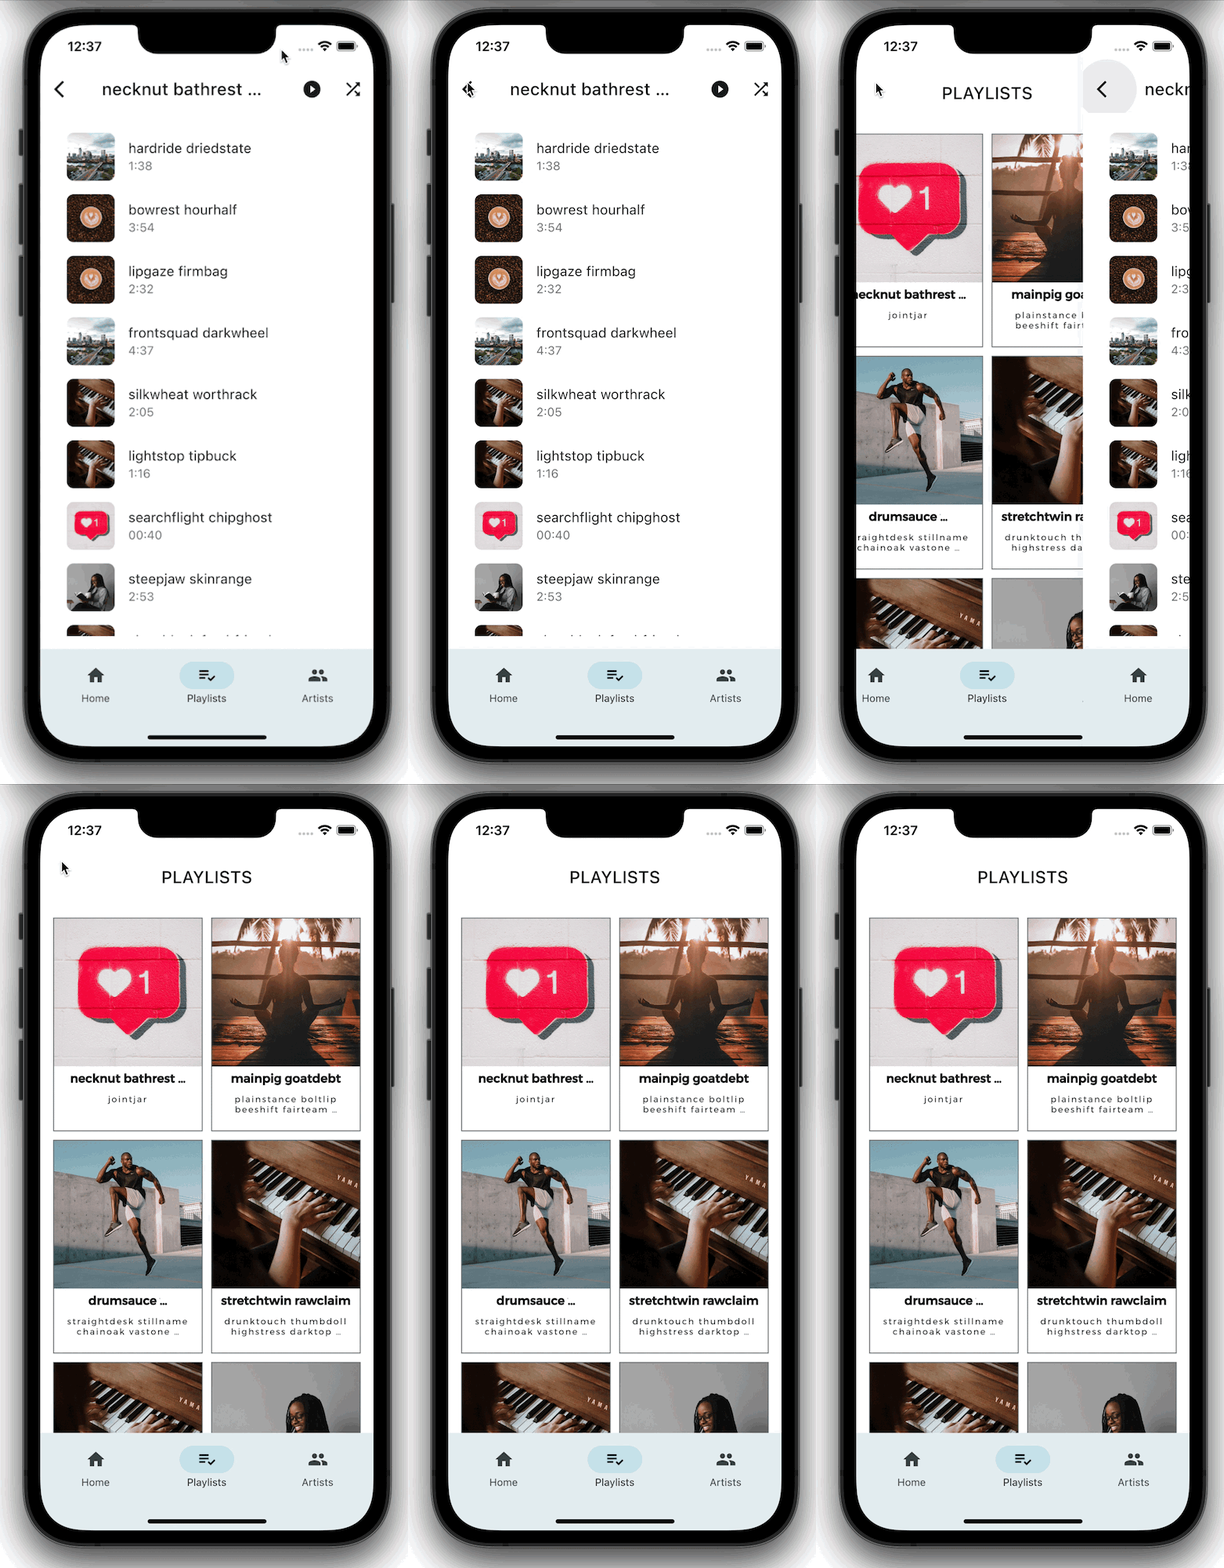
ThemeProvider 定义了一个 PageTransitionsTheme,其中包含适用于移动平台(iOS、Android)的屏幕过渡动画。桌面设备用户已经通过鼠标或触控板点击获取反馈,因此不需要页面过渡动画。
Flutter 会根据在 lib/src/shared/providers/theme.dart 中显示的目标平台提供您为应用配置的屏幕过渡动画:
lib/src/shared/providers/theme.dart
final pageTransitionsTheme = const PageTransitionsTheme(
  builders: <TargetPlatform, PageTransitionsBuilder>{
    TargetPlatform.android: FadeUpwardsPageTransitionsBuilder(),
    TargetPlatform.iOS: CupertinoPageTransitionsBuilder(),
    TargetPlatform.linux: NoAnimationPageTransitionsBuilder(),
    TargetPlatform.macOS: NoAnimationPageTransitionsBuilder(),
    TargetPlatform.windows: NoAnimationPageTransitionsBuilder(),
  },
);
 将
将 PageTransitionsTheme 传递给 lib/src/shared/providers/theme.dart 中的浅色和深色主题
lib/src/shared/providers/theme.dart
ThemeData light([Color? targetColor]) {
  final _colors = colors(Brightness.light, targetColor);
  return ThemeData.light().copyWith(
    pageTransitionsTheme: pageTransitionsTheme, // Add this line
    colorScheme: ColorScheme.fromSeed(
      seedColor: source(targetColor),
      brightness: Brightness.light,
    ),
    appBarTheme: appBarTheme(_colors),
    cardTheme: cardTheme(),
    listTileTheme: listTileTheme(),
    tabBarTheme: tabBarTheme(_colors),
    scaffoldBackgroundColor: _colors.background,
  );
}

ThemeData dark([Color? targetColor]) {
  final _colors = colors(Brightness.dark, targetColor);
  return ThemeData.dark().copyWith(
    pageTransitionsTheme: pageTransitionsTheme, // Add this line
    colorScheme: ColorScheme.fromSeed(
      seedColor: source(targetColor),
      brightness: Brightness.dark,
    ),
    appBarTheme: appBarTheme(_colors),
    cardTheme: cardTheme(),
    listTileTheme: listTileTheme(),
    tabBarTheme: tabBarTheme(_colors),
    scaffoldBackgroundColor: _colors.background,
  );
}
在 iOS 上不使用动画 | 在 iOS 上使用动画 |
|
|
有问题?
如果您的应用未正常运行,则可以使用以下链接中提供的代码将将应用恢复到正常状态。
添加悬停状态
为桌面应用添加动态效果的一种方式是使用悬停状态。在此状态下,当用户将光标悬停在 widget 上时,widget 会更改其状态(如颜色、形状或内容)。
默认情况下,_OutlinedCardState 类(用于“最近播放”播放列表图块)会返回 MouseRegion(它会在光标悬停时将光标箭头变为指针),但您可以添加更多视觉反馈。
 打开 lib/src/shared/views/outlined_card.dart 并将其内容替换为以下实现,从而引入
 _hovered 状态。
lib/src/shared/views/outlined_card.dart
import 'package:flutter/material.dart';

class OutlinedCard extends StatefulWidget {
  const OutlinedCard({
    Key? key,
    required this.child,
    this.clickable = true,
  }) : super(key: key);
  final Widget child;
  final bool clickable;
  @override
  State<OutlinedCard> createState() => _OutlinedCardState();
}

class _OutlinedCardState extends State<OutlinedCard> {
  bool _hovered = false;

  @override
  Widget build(BuildContext context) {
    final borderRadius = BorderRadius.circular(_hovered ? 20 : 8);
    const animationCurve = Curves.easeInOut;
    return MouseRegion(
      onEnter: (_) {
        if (!widget.clickable) return;
        setState(() {
          _hovered = true;
        });
      },
      onExit: (_) {
        if (!widget.clickable) return;
        setState(() {
          _hovered = false;
        });
      },
      cursor: widget.clickable ? SystemMouseCursors.click : SystemMouseCursors.basic,
      child: AnimatedContainer(
        duration: kThemeAnimationDuration,
        curve: animationCurve,
        decoration: BoxDecoration(
          border: Border.all(
            color: Theme.of(context).colorScheme.outline,
            width: 1,
          ),
          borderRadius: borderRadius,
        ),
        foregroundDecoration: BoxDecoration(
          color: Theme.of(context).colorScheme.onSurface.withOpacity(
                _hovered ? 0.12 : 0,
              ),
          borderRadius: borderRadius,
        ),
        child: TweenAnimationBuilder<BorderRadius>(
          duration: kThemeAnimationDuration,
          curve: animationCurve,
          tween: Tween(begin: BorderRadius.zero, end: borderRadius),
          builder: (context, borderRadius, child) => ClipRRect(
            clipBehavior: Clip.antiAlias,
            borderRadius: borderRadius,
            child: child,
          ),
          child: widget.child,
        ),
      ),
    );
  }
}
 热重载应用,然后将光标悬停在最近播放的某个播放列表图块上。
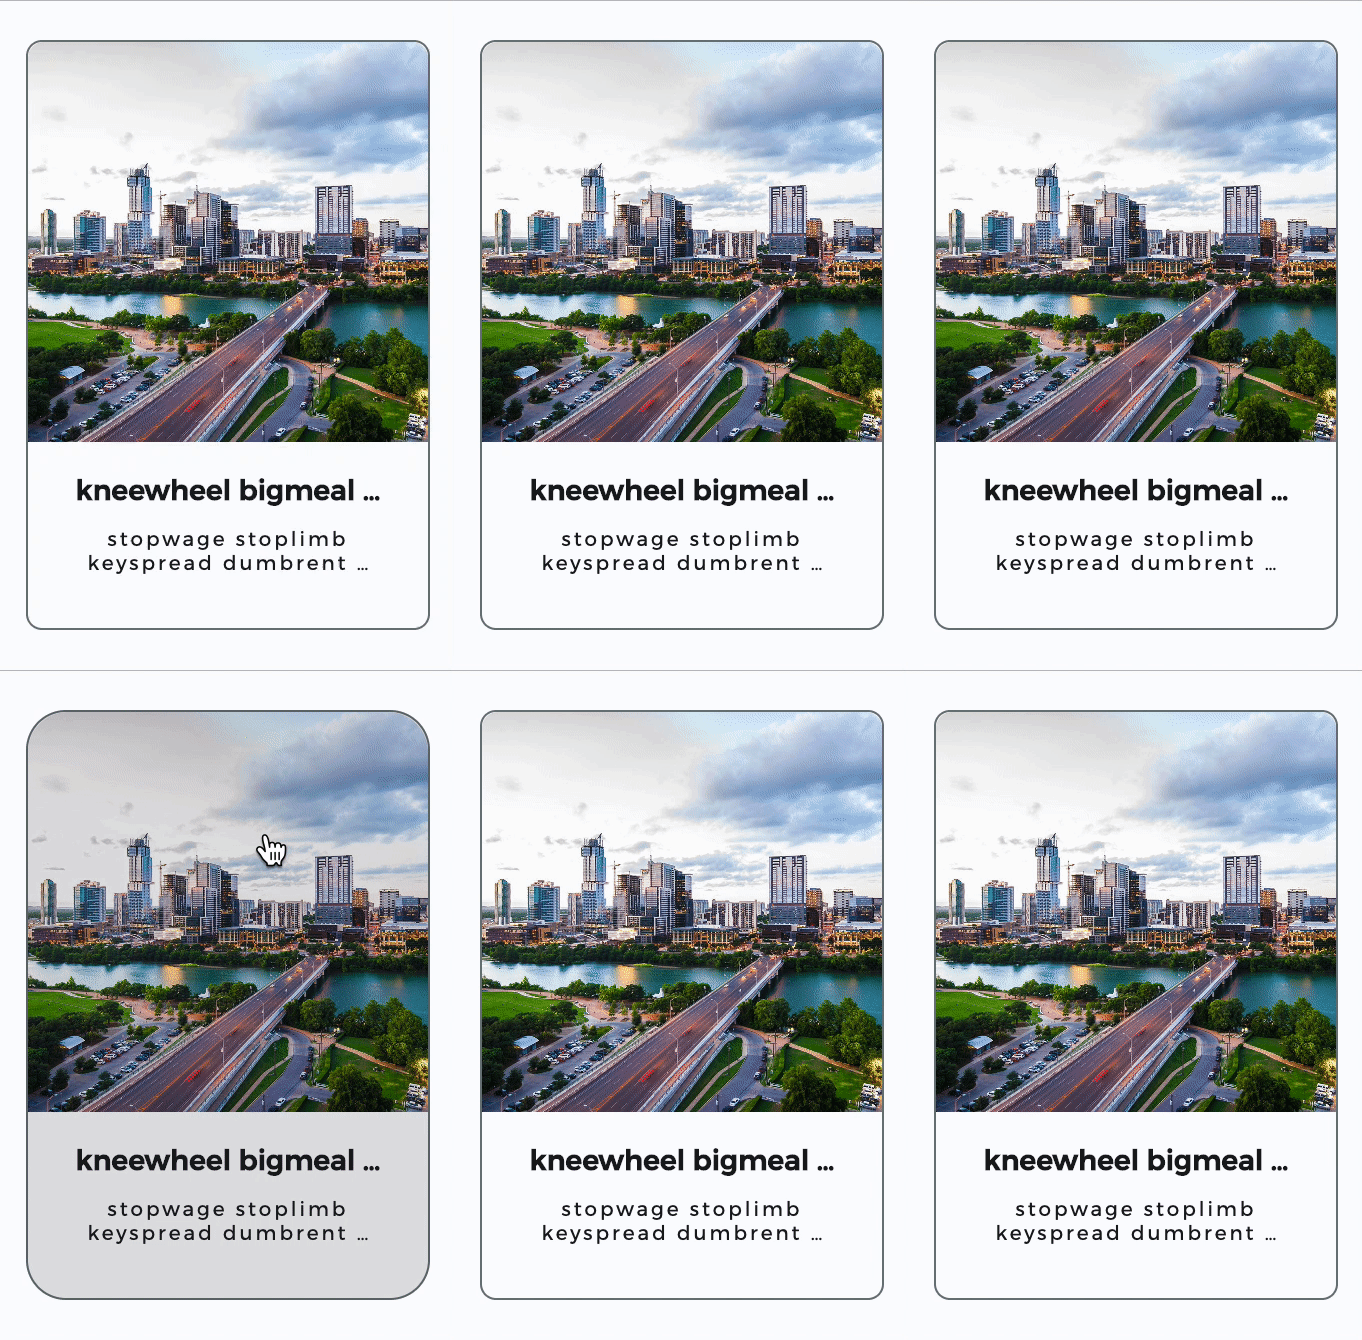
OutlinedCard 会更改不透明度并四舍五入。
 最后,使用
最后,使用 lib/src/shared/views/hoverable_song_play_button.dart 中定义的 HoverableSongPlayButton widget,将播放列表中的歌曲编号以动画形式移动到播放按钮。在 lib/src/features/playlists/view/playlist_songs.dart 中,使用 HoverableSongPlayButton 封装 Center widget(包含歌曲编号):
lib/src/features/playlists/view/playlist_songs.dart
HoverableSongPlayButton(        // Add this line
  hoverMode: HoverMode.overlay, // Add this line
  song: playlist.songs[index],  // Add this line
  child: Center(                // Modify this line
    child: Text(
      (index + 1).toString(),
       textAlign: TextAlign.center,
       ),
    ),
  ),                            // Add this line
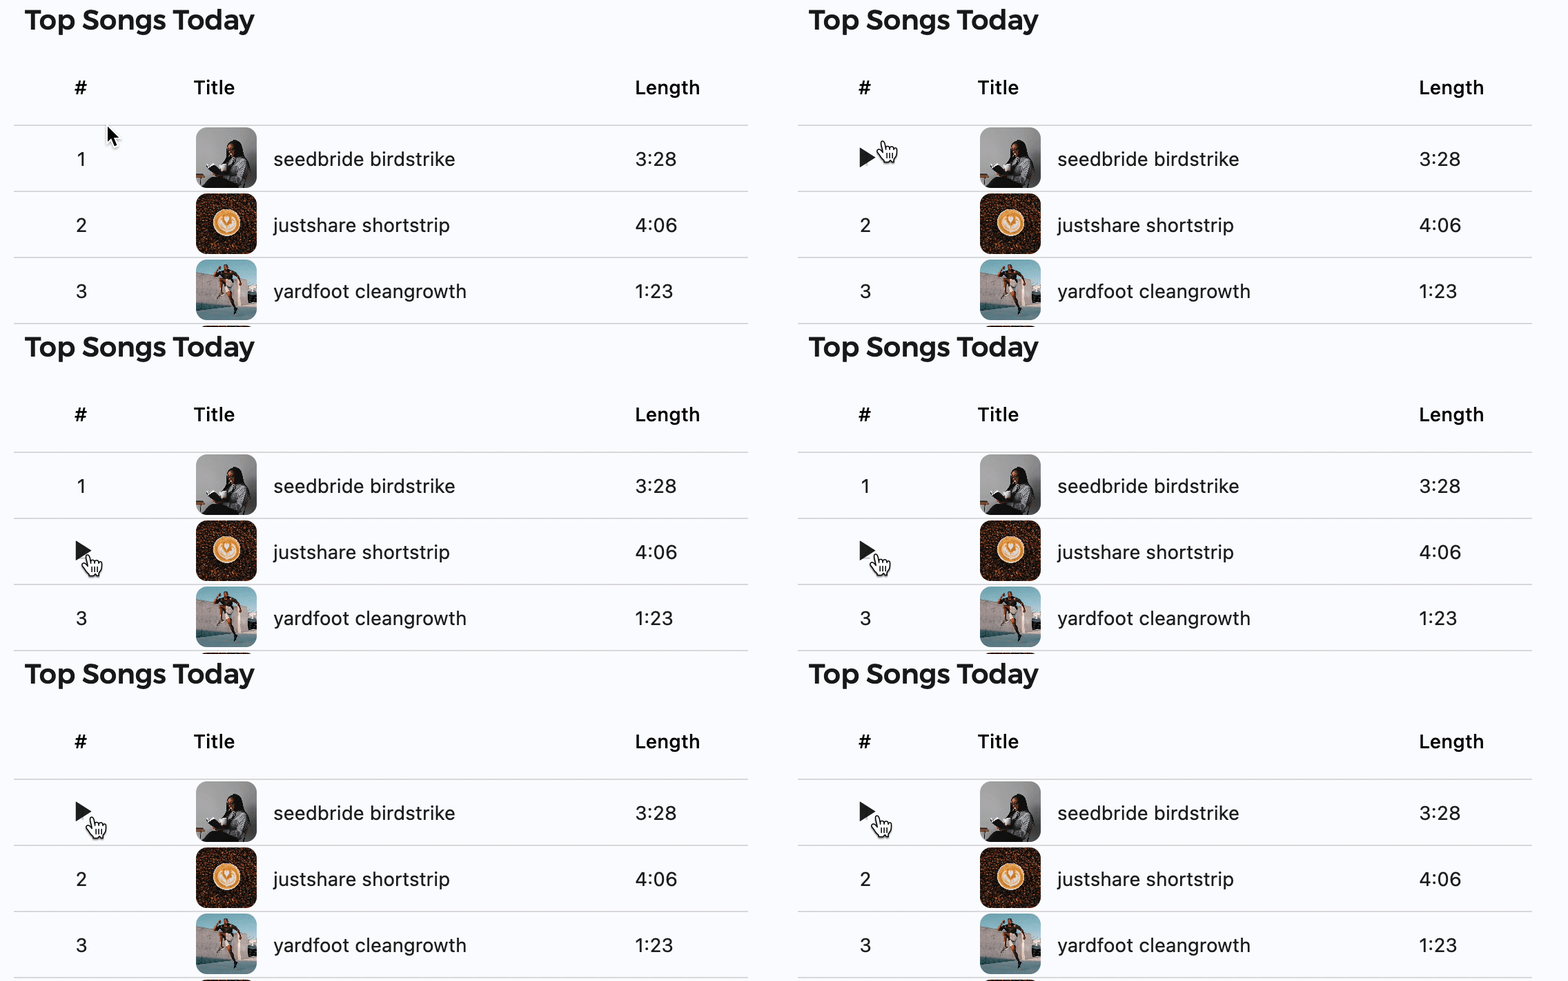
 热重载应用,然后将光标悬停在 Songs Today(今日热门歌曲)或 New Releases(新发行)播放列表中的歌曲编号上。
该编号会以动画形式移动到 play(播放)按钮,当您点击该按钮时,系统会播放相应歌曲。
在 GitHub 上查看最终的项目代码。
8. 恭喜!
您已完成此 Codelab!您已经了解,您可以将许多小更改集成到应用中,使其更美观、更易于访问、更本地化且更适合多个平台。这些技巧包括但不限于:
- 排版:文字不仅仅是一种通讯工具。使用文本显示方式可对用户体验和其对应用的看法产生积极影响。
- 主题:建立一个您可以放心使用的设计系统,不必为每个 widget 都做出设计决策。
- 适应性:考虑用户运行您的应用的设备和平台及其功能。考虑屏幕尺寸和应用的显示方式。
- 动态效果和动画:向应用中添加动态场景可以提升用户体验,更实用地为用户提供反馈。
只需对应用进行一些细微调整,即可让其从枯燥乏味变得生动美观:
之前 | 之后 |
|
|
|
|
后续步骤
我们希望您已详细了解如何在 Flutter 中构建精美应用!
如果您应用了本文提及的任何建议或技巧(或有自己的建议要分享),我们非常期待收到您的反馈!请在 Twitter 上通过 @rodydavis 和 @khanhnwin 与我们联系!
以下资源也可能会有帮助。
主题
自适应和响应式资源:
- 针对自适应和响应式应用对 Flutter 进行解码(视频)
- 自适应布局(视频来自“The Boring Flutter Development Show”)
- 创建响应式和自适应应用 (flutter.dev)
- 适用于 Flutter 的自适应 Material 组件(GitHub 上的库)
- 5 件事助您为开发适用于大屏设备的应用做好准备(视频来自 2021 年 Google I/O 大会)
常规设计资源:
- 小事:成为神秘的设计者-开发者(视频来自 Flutter Engage)
- 适用于可折叠设备的 Material Design 3 (material.io)
此外,您还可联系 Flutter 社区!
继续努力,让应用世界变得美好!

