
1. บทนำ
Flutter เป็นชุดเครื่องมือ UI ของ Google สำหรับสร้างแอปพลิเคชันที่สวยงามและคอมไพล์แบบเนทีฟสำหรับอุปกรณ์เคลื่อนที่ เว็บ และเดสก์ท็อปจากฐานของโค้ดรายการเดียว Flutter ทำงานร่วมกับโค้ดที่มีอยู่ นักพัฒนาซอฟต์แวร์และองค์กรทั่วโลกใช้ Flutter และ Flutter เป็นโอเพนซอร์สที่ใช้งานได้ฟรี
ใน Codelab นี้ คุณจะปรับปรุงแอปพลิเคชันเพลง Flutter ให้น่าใช้งานมากขึ้น ด้วยเหตุนี้ Codelab นี้จึงใช้เครื่องมือและ API ที่เปิดตัวใน Material 3
สิ่งที่คุณจะได้เรียนรู้
- วิธีเขียนแอป Flutter ที่ใช้งานได้และสวยงามในทุกแพลตฟอร์ม
- วิธีออกแบบข้อความในแอปเพื่อให้แน่ใจว่าข้อความจะช่วยเพิ่มประสบการณ์ของผู้ใช้
- วิธีเลือกสีที่เหมาะสม ปรับแต่งวิดเจ็ต สร้างธีมของคุณเอง และเปิดใช้โหมดมืดได้อย่างรวดเร็ว
- วิธีสร้างแอปที่ปรับให้เหมาะกับอุปกรณ์ทุกแพลตฟอร์ม
- วิธีสร้างแอปที่ดูดีบนหน้าจอทุกขนาด
- วิธีเพิ่มการเคลื่อนไหวในแอป Flutter เพื่อให้โดดเด่น
ข้อกำหนดเบื้องต้น
โค้ดแล็บนี้ถือว่าคุณมีประสบการณ์การใช้งาน Flutter อยู่บ้าง หากไม่ คุณอาจต้องเรียนรู้พื้นฐานก่อน ลิงก์ต่อไปนี้มีประโยชน์
- ดูการสร้างอินเทอร์เฟซผู้ใช้ด้วย Flutter
- ลองใช้ Codelab แอป Flutter แรกของคุณ
สิ่งที่คุณจะสร้าง
Codelab นี้จะแนะนำการสร้างหน้าจอหลักสําหรับแอปพลิเคชันชื่อ MyArtist ซึ่งเป็นแอปเพลเยอร์เพลงที่แฟนๆ สามารถติดตามข่าวสารเกี่ยวกับศิลปินคนโปรดได้ ซึ่งจะอธิบายวิธีแก้ไขการออกแบบแอปให้ดูสวยงามในแพลตฟอร์มต่างๆ
วิดีโอต่อไปนี้แสดงวิธีการทำงานของแอปเมื่อทำ Codelab นี้เสร็จสมบูรณ์
คุณต้องการเรียนรู้อะไรจาก Codelab นี้
2. ตั้งค่าสภาพแวดล้อมการพัฒนา Flutter
คุณต้องใช้ซอฟต์แวร์ 2 อย่างในการฝึกนี้ ได้แก่ Flutter SDK และเครื่องมือแก้ไข
คุณเรียกใช้โค้ดแล็บได้โดยใช้อุปกรณ์ต่อไปนี้
- อุปกรณ์ Android หรือ iOS จริงที่เชื่อมต่อกับคอมพิวเตอร์และตั้งค่าเป็นโหมดนักพัฒนาซอฟต์แวร์
- โปรแกรมจำลอง iOS (ต้องติดตั้งเครื่องมือ Xcode)
- โปรแกรมจำลอง Android (ต้องมีการตั้งค่าใน Android Studio)
- เบราว์เซอร์ (ต้องใช้ Chrome สำหรับการแก้ไขข้อบกพร่อง)
- เป็นแอปพลิเคชันเดสก์ท็อป Windows, Linux หรือ macOS คุณต้องพัฒนาในแพลตฟอร์มที่วางแผนจะติดตั้งใช้งาน ดังนั้น หากต้องการพัฒนาแอปเดสก์ท็อป Windows คุณต้องพัฒนาใน Windows เพื่อเข้าถึงเชนการบิลด์ที่เหมาะสม มีข้อกำหนดเฉพาะสำหรับระบบปฏิบัติการที่อธิบายไว้อย่างละเอียดใน docs.flutter.dev/desktop
3. ดาวน์โหลดแอปเริ่มต้นใช้งาน Codelab
โคลนจาก GitHub
หากต้องการโคลนโค้ดแล็บนี้จาก GitHub ให้เรียกใช้คำสั่งต่อไปนี้
git clone https://github.com/flutter/codelabs.git
cd codelabs/boring_to_beautiful/step_01/
ตรวจสอบว่าทุกอย่างทำงานได้ตามปกติโดยเรียกใช้แอปพลิเคชัน Flutter เป็นแอปพลิเคชันเดสก์ท็อปดังที่แสดงด้านล่าง หรือจะเปิดโปรเจ็กต์นี้ใน IDE และใช้เครื่องมือของ IDE เพื่อเรียกใช้แอปพลิเคชันก็ได้
flutter run
สำเร็จ! รหัสเริ่มต้นสำหรับหน้าจอหลักของ MyArtist ควรทำงานอยู่ คุณควรเห็นหน้าจอหลักของ MyArtist โฆษณาดูดีบนเดสก์ท็อป แต่อุปกรณ์เคลื่อนที่... ไม่ค่อยดี เหตุผลหนึ่งคือไม่รองรับรอยบาก ไม่ต้องกังวล คุณจะแก้ไขปัญหานี้ได้


ทัวร์ชมโค้ด
ถัดไป ให้ดูตัวอย่างโค้ด
เปิด lib/src/features/home/view/home_screen.dart ซึ่งมีสิ่งต่อไปนี้
lib/src/features/home/view/home_screen.dart
import 'package:flutter/material.dart';

import '../../../shared/classes/classes.dart';
import '../../../shared/extensions.dart';
import '../../../shared/providers/providers.dart';
import '../../../shared/views/views.dart';
import '../../../utils/adaptive_components.dart';
import '../../playlists/view/playlist_songs.dart';
import 'view.dart';

class HomeScreen extends StatefulWidget {
  const HomeScreen({super.key});

  @override
  State<HomeScreen> createState() => _HomeScreenState();
}

class _HomeScreenState extends State<HomeScreen> {
  @override
  Widget build(BuildContext context) {
    final PlaylistsProvider playlistProvider = PlaylistsProvider();
    final List<Playlist> playlists = playlistProvider.playlists;
    final Playlist topSongs = playlistProvider.topSongs;
    final Playlist newReleases = playlistProvider.newReleases;
    final ArtistsProvider artistsProvider = ArtistsProvider();
    final List<Artist> artists = artistsProvider.artists;
    return LayoutBuilder(
      builder: (context, constraints) {
        return Scaffold(
          body: SingleChildScrollView(
            child: AdaptiveColumn(
              children: [
                AdaptiveContainer(
                  columnSpan: 12,
                  child: Padding(
                    padding: const EdgeInsets.all(2),
                    child: Row(
                      mainAxisAlignment: MainAxisAlignment.spaceBetween,
                      children: [
                        Expanded(
                          child: Text(
                            'Good morning',
                            style: context.displaySmall,
                          ),
                        ),
                        const SizedBox(width: 20),
                        const BrightnessToggle(),
                      ],
                    ),
                  ),
                ),
                AdaptiveContainer(
                  columnSpan: 12,
                  child: Column(
                    children: [
                      const HomeHighlight(),
                      LayoutBuilder(
                        builder: (context, constraints) => HomeArtists(
                          artists: artists,
                          constraints: constraints,
                        ),
                      ),
                    ],
                  ),
                ),
                AdaptiveContainer(
                  columnSpan: 12,
                  child: Column(
                    crossAxisAlignment: CrossAxisAlignment.start,
                    children: [
                      Padding(
                        padding: const EdgeInsets.all(2),
                        child: Text(
                          'Recently played',
                          style: context.headlineSmall,
                        ),
                      ),
                      HomeRecent(playlists: playlists),
                    ],
                  ),
                ),
                AdaptiveContainer(
                  columnSpan: 12,
                  child: Padding(
                    padding: const EdgeInsets.all(2),
                    child: Row(
                      crossAxisAlignment: CrossAxisAlignment.start,
                      children: [
                        Flexible(
                          flex: 10,
                          child: Column(
                            mainAxisAlignment: MainAxisAlignment.start,
                            crossAxisAlignment: CrossAxisAlignment.start,
                            children: [
                              Padding(
                                padding: const EdgeInsets.all(2),
                                child: Text(
                                  'Top Songs Today',
                                  style: context.titleLarge,
                                ),
                              ),
                              LayoutBuilder(
                                builder: (context, constraints) =>
                                    PlaylistSongs(
                                      playlist: topSongs,
                                      constraints: constraints,
                                    ),
                              ),
                            ],
                          ),
                        ),
                        Flexible(
                          flex: 10,
                          child: Column(
                            mainAxisAlignment: MainAxisAlignment.start,
                            crossAxisAlignment: CrossAxisAlignment.start,
                            children: [
                              Padding(
                                padding: const EdgeInsets.all(2),
                                child: Text(
                                  'New Releases',
                                  style: context.titleLarge,
                                ),
                              ),
                              LayoutBuilder(
                                builder: (context, constraints) =>
                                    PlaylistSongs(
                                      playlist: newReleases,
                                      constraints: constraints,
                                    ),
                              ),
                            ],
                          ),
                        ),
                      ],
                    ),
                  ),
                ),
              ],
            ),
          ),
        );
      },
    );
  }
}
ไฟล์นี้จะนําเข้า material.dart และใช้วิดเจ็ตที่มีสถานะโดยใช้ 2 คลาส ได้แก่
- คำสั่ง
importจะทำให้ Material Components พร้อมใช้งาน - Class
HomeScreenแสดงถึงทั้งหน้าที่แสดง - เมธอด
build()ของคลาส_HomeScreenStateจะสร้างรูทของต้นไม้วิดเจ็ต ซึ่งส่งผลต่อวิธีสร้างวิดเจ็ตทั้งหมดใน UI
4. ใช้ประโยชน์จากการจัดรูปแบบตัวอักษร
ข้อความมีอยู่ทุกที่ ข้อความเป็นวิธีสื่อสารที่มีประโยชน์กับผู้ใช้ แอปของคุณตั้งใจให้เป็นแอปที่เข้าถึงง่ายและสนุกสนาน หรือน่าเชื่อถือและเป็นมืออาชีพ แอปธนาคารที่คุณชื่นชอบไม่ได้ใช้แบบอักษร Comic Sans ด้วยเหตุใด ลักษณะการนำเสนอข้อความจะกำหนดความประทับใจแรกที่มีต่อแอปของคุณ ต่อไปนี้คือวิธีใช้ข้อความอย่างรอบคอบมากขึ้น
แสดงให้เห็นแทนการบอก
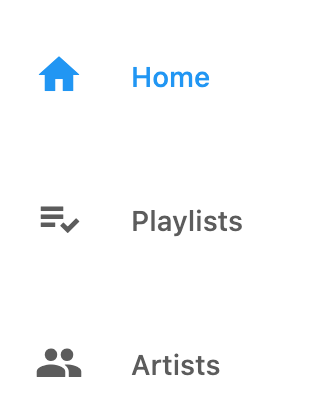
ใช้ "แสดง" แทน "บอก" ทุกครั้งที่เป็นไปได้ เช่น NavigationRail ในแอปเริ่มต้นจะมีแท็บสำหรับเส้นทางหลักแต่ละเส้นทาง แต่ไอคอนนำหน้าจะเหมือนกัน

ซึ่งไม่เป็นประโยชน์เนื่องจากผู้ใช้ยังคงต้องอ่านข้อความของแต่ละแท็บ เริ่มต้นด้วยการเพิ่มสิ่งบอกใบ้ที่มองเห็นได้เพื่อให้ผู้ใช้มองไปที่ไอคอนนำหน้าได้อย่างรวดเร็วเพื่อค้นหาแท็บที่ต้องการ ทั้งยังช่วยในการแปลและความสามารถในการเข้าถึงด้วย
ใน lib/src/shared/router.dart ให้เพิ่มไอคอนนำหน้าที่แตกต่างกันสำหรับปลายทางการนำทางแต่ละแห่ง (หน้าแรก เพลย์ลิสต์ และผู้คน) ดังนี้
lib/src/shared/router.dart
const List<NavigationDestination> destinations = [
  NavigationDestination(
    label: 'Home',
    icon: Icon(Icons.home),                                      // Modify this line
    route: '/',
  ),
  NavigationDestination(
    label: 'Playlists',
    icon: Icon(Icons.playlist_add_check),                        // Modify this line
    route: '/playlists',
  ),
  NavigationDestination(
    label: 'Artists',
    icon: Icon(Icons.people),                                    // Modify this line
    route: '/artists',
  ),
];
หากพบปัญหา
หากแอปทำงานไม่ถูกต้อง ให้ตรวจหาการพิมพ์ผิด หากจำเป็น ให้ใช้รหัสในลิงก์ต่อไปนี้เพื่อดำเนินการต่อ
เลือกแบบอักษรอย่างรอบคอบ
แบบอักษรจะกำหนดบุคลิกของแอปพลิเคชัน ดังนั้นการเลือกแบบอักษรที่เหมาะสมจึงสำคัญอย่างยิ่ง สิ่งที่ควรพิจารณาเมื่อเลือกแบบอักษรมีดังนี้
- แบบไม่มีขีดหรือแบบมีขีด: แบบมีขีดจะมีเส้นตกแต่งหรือ "หาง" ที่ส่วนท้ายของตัวอักษร และดูเป็นทางการมากกว่า แบบอักษรที่ไม่มี Serif จะไม่มีเส้นตกแต่งและมักจะให้ความรู้สึกไม่เป็นทางการมากกว่า

- แบบอักษรตัวพิมพ์ใหญ่ทั้งหมด: การใช้ตัวพิมพ์ใหญ่ทั้งหมดเหมาะสําหรับการดึงดูดความสนใจไปยังข้อความจํานวนไม่มาก (เช่น บรรทัดแรก) แต่หากใช้มากเกินไปอาจทําให้ผู้ใช้รู้สึกว่าเป็นการตะโกน ซึ่งทําให้ผู้ใช้ไม่สนใจข้อความนั้นเลย
- ขึ้นต้นคำด้วยตัวพิมพ์ใหญ่หรือขึ้นต้นประโยคด้วยตัวพิมพ์ใหญ่: เมื่อเพิ่มชื่อหรือป้ายกํากับ ให้พิจารณาวิธีใช้อักษรตัวพิมพ์ใหญ่ โดยขึ้นต้นคำด้วยตัวพิมพ์ใหญ่ซึ่งตัวอักษรตัวแรกของทุกคำเป็นตัวพิมพ์ใหญ่ ("This Is a Title Case Title") จะดูเป็นทางการมากกว่า ขึ้นต้นประโยคด้วยตัวพิมพ์ใหญ่ ซึ่งจะใช้ตัวพิมพ์ใหญ่เฉพาะกับคำนามเฉพาะและคำแรกในข้อความ ("This is a sentence case title") จะให้ความรู้สึกเป็นกันเองและไม่เป็นทางการมากกว่า
- การเว้นวรรค (ระยะห่างระหว่างแต่ละตัวอักษร), ความยาวบรรทัด (ความกว้างของข้อความทั้งหมดบนหน้าจอ) และความสูงบรรทัด (ความสูงของข้อความแต่ละบรรทัด): ระยะห่างเหล่านี้มากหรือน้อยเกินไปจะทำให้แอปอ่านยาก เช่น การอ่านข้อความขนาดใหญ่ที่ต่อเนื่องกันอาจทำให้คุณจดจําตําแหน่งอ่านได้ยาก
ด้วยเหตุนี้ โปรดไปที่ Google Fonts แล้วเลือกแบบอักษรแบบ Sans Serif เช่น Montserrat เนื่องจากแอปเพลงมีไว้เพื่อความสนุกสนาน
ดึงข้อมูลแพ็กเกจ google_fonts จากบรรทัดคำสั่ง ซึ่งจะอัปเดตไฟล์ pubspec.yaml เพื่อเพิ่มแบบอักษรเป็นทรัพยากร Dependency ของแอปด้วย
flutter pub add google_fonts
macos/Runner/DebugProfile.entitlements
<?xml version="1.0" encoding="UTF-8"?>
<!DOCTYPE plist PUBLIC "-//Apple//DTD PLIST 1.0//EN" "https://www.apple.com/DTDs/PropertyList-1.0.dtd">
<plist version="1.0">
<dict>
        <key>com.apple.security.app-sandbox</key>
        <true/>
        <key>com.apple.security.cs.allow-jit</key>
        <true/>
        <key>com.apple.security.network.server</key>
        <true/>
        <!-- Make sure the following two lines are present -->
        <key>com.apple.security.network.client</key>
        <true/>
</dict>
</plist>
ใน lib/src/shared/extensions.dart ให้นําเข้าแพ็กเกจใหม่โดยทำดังนี้
lib/src/shared/extensions.dart
import 'package:google_fonts/google_fonts.dart'; // Add this line.
ตั้งค่า Montserrat TextTheme:
TextTheme get textTheme => GoogleFonts.montserratTextTheme(theme.textTheme); // Modify this line
โหลด  ซ้ำขณะทำงานเพื่อเปิดใช้งานการเปลี่ยนแปลง (ใช้ปุ่มใน IDE หรือจากบรรทัดคำสั่ง ให้ป้อน
 r เพื่อโหลดซ้ำแบบ Hot Reload)
คุณควรเห็นไอคอน NavigationRail ใหม่พร้อมกับข้อความที่แสดงในแบบอักษร Montserrat
หากพบปัญหา
หากแอปทำงานไม่ถูกต้อง ให้ตรวจหาการพิมพ์ผิด หากจำเป็น ให้ใช้รหัสในลิงก์ต่อไปนี้เพื่อดำเนินการต่อ
5. ตั้งค่าธีม
ธีมช่วยให้แอปมีการออกแบบที่เป็นระเบียบและมีความสม่ำเสมอด้วยการระบุชุดสีและสไตล์ข้อความ ธีมช่วยให้คุณใช้ UI ได้อย่างรวดเร็วโดยไม่ต้องกังวลกับรายละเอียดเล็กๆ น้อยๆ เช่น การระบุสีที่ตรงกันทุกประการสำหรับวิดเจ็ตแต่ละรายการ
โดยปกติแล้ว นักพัฒนาซอฟต์แวร์ Flutter จะสร้างคอมโพเนนต์ธีมที่กำหนดเองด้วยวิธีใดวิธีหนึ่งต่อไปนี้
- สร้างวิดเจ็ตที่กําหนดเองแต่ละรายการโดยแต่ละรายการจะมีธีมของตัวเอง
- สร้างธีมที่มีขอบเขตสำหรับวิดเจ็ตเริ่มต้น
ตัวอย่างนี้ใช้ผู้ให้บริการธีมที่อยู่ใน lib/src/shared/providers/theme.dart เพื่อสร้างวิดเจ็ตและสีที่มีธีมสอดคล้องกันทั่วทั้งแอป
lib/src/shared/providers/theme.dart
import 'dart:math';

import 'package:flutter/material.dart';
import 'package:material_color_utilities/material_color_utilities.dart';

class NoAnimationPageTransitionsBuilder extends PageTransitionsBuilder {
  const NoAnimationPageTransitionsBuilder();

  @override
  Widget buildTransitions<T>(
    PageRoute<T> route,
    BuildContext context,
    Animation<double> animation,
    Animation<double> secondaryAnimation,
    Widget child,
  ) {
    return child;
  }
}

class ThemeSettingChange extends Notification {
  ThemeSettingChange({required this.settings});
  final ThemeSettings settings;
}

class ThemeProvider extends InheritedWidget {
  const ThemeProvider({
    super.key,
    required this.settings,
    required this.lightDynamic,
    required this.darkDynamic,
    required super.child,
  });

  final ValueNotifier<ThemeSettings> settings;
  final ColorScheme? lightDynamic;
  final ColorScheme? darkDynamic;

  final pageTransitionsTheme = const PageTransitionsTheme(
    builders: <TargetPlatform, PageTransitionsBuilder>{
      TargetPlatform.android: FadeUpwardsPageTransitionsBuilder(),
      TargetPlatform.iOS: CupertinoPageTransitionsBuilder(),
      TargetPlatform.linux: NoAnimationPageTransitionsBuilder(),
      TargetPlatform.macOS: NoAnimationPageTransitionsBuilder(),
      TargetPlatform.windows: NoAnimationPageTransitionsBuilder(),
    },
  );

  Color custom(CustomColor custom) {
    if (custom.blend) {
      return blend(custom.color);
    } else {
      return custom.color;
    }
  }

  Color blend(Color targetColor) {
    return Color(
      Blend.harmonize(
        targetColor.toARGB32(),
        settings.value.sourceColor.toARGB32(),
      ),
    );
  }

  Color source(Color? target) {
    Color source = settings.value.sourceColor;
    if (target != null) {
      source = blend(target);
    }
    return source;
  }

  ColorScheme colors(Brightness brightness, Color? targetColor) {
    final dynamicPrimary = brightness == Brightness.light
        ? lightDynamic?.primary
        : darkDynamic?.primary;
    return ColorScheme.fromSeed(
      seedColor: dynamicPrimary ?? source(targetColor),
      brightness: brightness,
    );
  }

  ShapeBorder get shapeMedium =>
      RoundedRectangleBorder(borderRadius: BorderRadius.circular(8));

  CardThemeData cardTheme() {
    return CardThemeData(
      elevation: 0,
      shape: shapeMedium,
      clipBehavior: Clip.antiAlias,
    );
  }

  ListTileThemeData listTileTheme(ColorScheme colors) {
    return ListTileThemeData(
      shape: shapeMedium,
      selectedColor: colors.secondary,
    );
  }

  AppBarTheme appBarTheme(ColorScheme colors) {
    return AppBarTheme(
      elevation: 0,
      backgroundColor: colors.surface,
      foregroundColor: colors.onSurface,
    );
  }

  TabBarThemeData tabBarTheme(ColorScheme colors) {
    return TabBarThemeData(
      labelColor: colors.secondary,
      unselectedLabelColor: colors.onSurfaceVariant,
      indicator: BoxDecoration(
        border: Border(bottom: BorderSide(color: colors.secondary, width: 2)),
      ),
    );
  }

  BottomAppBarTheme bottomAppBarTheme(ColorScheme colors) {
    return BottomAppBarTheme(color: colors.surface, elevation: 0);
  }

  BottomNavigationBarThemeData bottomNavigationBarTheme(ColorScheme colors) {
    return BottomNavigationBarThemeData(
      type: BottomNavigationBarType.fixed,
      backgroundColor: colors.surfaceContainerHighest,
      selectedItemColor: colors.onSurface,
      unselectedItemColor: colors.onSurfaceVariant,
      elevation: 0,
      landscapeLayout: BottomNavigationBarLandscapeLayout.centered,
    );
  }

  NavigationRailThemeData navigationRailTheme(ColorScheme colors) {
    return const NavigationRailThemeData();
  }

  DrawerThemeData drawerTheme(ColorScheme colors) {
    return DrawerThemeData(backgroundColor: colors.surface);
  }

  ThemeData light([Color? targetColor]) {
    final colorScheme = colors(Brightness.light, targetColor);
    return ThemeData.light().copyWith(
      colorScheme: colorScheme,
      appBarTheme: appBarTheme(colorScheme),
      cardTheme: cardTheme(),
      listTileTheme: listTileTheme(colorScheme),
      bottomAppBarTheme: bottomAppBarTheme(colorScheme),
      bottomNavigationBarTheme: bottomNavigationBarTheme(colorScheme),
      navigationRailTheme: navigationRailTheme(colorScheme),
      tabBarTheme: tabBarTheme(colorScheme),
      drawerTheme: drawerTheme(colorScheme),
      scaffoldBackgroundColor: colorScheme.surface,
    );
  }

  ThemeData dark([Color? targetColor]) {
    final colorScheme = colors(Brightness.dark, targetColor);
    return ThemeData.dark().copyWith(
      colorScheme: colorScheme,
      appBarTheme: appBarTheme(colorScheme),
      cardTheme: cardTheme(),
      listTileTheme: listTileTheme(colorScheme),
      bottomAppBarTheme: bottomAppBarTheme(colorScheme),
      bottomNavigationBarTheme: bottomNavigationBarTheme(colorScheme),
      navigationRailTheme: navigationRailTheme(colorScheme),
      tabBarTheme: tabBarTheme(colorScheme),
      drawerTheme: drawerTheme(colorScheme),
      scaffoldBackgroundColor: colorScheme.surface,
    );
  }

  ThemeMode themeMode() {
    return settings.value.themeMode;
  }

  ThemeData theme(BuildContext context, [Color? targetColor]) {
    final brightness = MediaQuery.of(context).platformBrightness;
    return brightness == Brightness.light
        ? light(targetColor)
        : dark(targetColor);
  }

  static ThemeProvider of(BuildContext context) {
    return context.dependOnInheritedWidgetOfExactType<ThemeProvider>()!;
  }

  @override
  bool updateShouldNotify(covariant ThemeProvider oldWidget) {
    return oldWidget.settings != settings;
  }
}

class ThemeSettings {
  ThemeSettings({required this.sourceColor, required this.themeMode});

  final Color sourceColor;
  final ThemeMode themeMode;
}

Color randomColor() {
  return Color(Random().nextInt(0xFFFFFFFF));
}

const linkColor = CustomColor(name: 'Link Color', color: Color(0xFF00B0FF));

class CustomColor {
  const CustomColor({
    required this.name,
    required this.color,
    this.blend = true,
  });

  final String name;
  final Color color;
  final bool blend;

  Color value(ThemeProvider provider) {
    return provider.custom(this);
  }
}
หากต้องการใช้ผู้ให้บริการ ให้สร้างอินสแตนซ์และส่งไปยังออบเจ็กต์ธีมที่มีขอบเขตใน MaterialApp ซึ่งอยู่ใน lib/src/shared/app.dart โดยออบเจ็กต์ Theme ที่ฝังอยู่จะรับค่าต่อไปนี้
lib/src/shared/app.dart
import 'package:dynamic_color/dynamic_color.dart';
import 'package:flutter/material.dart';
import 'package:flutter_bloc/flutter_bloc.dart';

import 'playback/bloc/bloc.dart';
import 'providers/theme.dart';
import 'router.dart';

class MyApp extends StatefulWidget {
 const MyApp({super.key});

 @override
 State<MyApp> createState() => _MyAppState();
}

class _MyAppState extends State<MyApp> {
 final settings = ValueNotifier(ThemeSettings(
   sourceColor:  Colors.pink,
   themeMode: ThemeMode.system,
 ));
 @override
 Widget build(BuildContext context) {
   return BlocProvider<PlaybackBloc>(
     create: (context) => PlaybackBloc(),
     child: DynamicColorBuilder(
       builder: (lightDynamic, darkDynamic) => ThemeProvider(
           lightDynamic: lightDynamic,
           darkDynamic: darkDynamic,
           settings: settings,
           child: NotificationListener<ThemeSettingChange>(
             onNotification: (notification) {
               settings.value = notification.settings;
               return true;
             },
             child: ValueListenableBuilder<ThemeSettings>(
               valueListenable: settings,
               builder: (context, value, _) {
                 final theme = ThemeProvider.of(context); // Add this line
                 return MaterialApp.router(
                   debugShowCheckedModeBanner: false,
                   title: 'Flutter Demo',
                   theme: theme.light(settings.value.sourceColor), // Add this line
                   routeInformationParser: appRouter.routeInformationParser,
                   routerDelegate: appRouter.routerDelegate,
                 );
               },
             ),
           )),
     ),
   );
 }
}
เมื่อตั้งค่าธีมแล้ว ให้เลือกสีสำหรับแอปพลิเคชัน
การเลือกชุดสีที่เหมาะสมอาจเป็นเรื่องยาก คุณอาจทราบสีหลักแล้ว แต่อาจต้องการใช้สีมากกว่า 1 สีในแอป ข้อความควรเป็นสีอะไร ชื่อ เนื้อหา ลิงก์ แล้วสีพื้นหลังล่ะ ตัวสร้างธีม Material เป็นเครื่องมือบนเว็บ (เปิดตัวใน Material 3) ที่ช่วยคุณเลือกชุดสีที่ส่งเสริมกันสำหรับแอป
หากต้องการเลือกสีต้นทางสำหรับแอปพลิเคชัน ให้เปิดเครื่องมือสร้างธีม Material แล้วสำรวจสีต่างๆ สำหรับ UI การเลือกสีที่เข้ากับภาพลักษณ์ของแบรนด์หรือความชอบส่วนตัวเป็นสิ่งสำคัญ
หลังจากสร้างธีมแล้ว ให้คลิกขวาลูกโป่งสีหลัก ซึ่งจะเปิดกล่องโต้ตอบที่มีค่าสีฐานสิบหกของสีหลัก คัดลอกค่านี้ (คุณตั้งค่าสีโดยใช้กล่องโต้ตอบนี้ได้ด้วย)
ส่งค่าเลขฐานสิบหกของสีหลักไปยังผู้ให้บริการธีม เช่น ระบุสีฐาน 16 #00cbe6 เป็น Color(0xff00cbe6) ThemeProvider จะสร้าง ThemeData ที่มีชุดสีเสริมซึ่งคุณดูตัวอย่างได้ในเครื่องมือสร้างธีม Material
final settings = ValueNotifier(ThemeSettings(
   sourceColor:  Color(0xff00cbe6), // Replace this color
   themeMode: ThemeMode.system,
 ));
รีสตาร์ทแอปทันที เมื่อใช้สีหลักแล้ว แอปจะเริ่มดูน่าสนใจมากขึ้น เข้าถึงสีใหม่ทั้งหมดโดยอ้างอิงธีมในบริบทและรับ ColorScheme ดังนี้
final colors = Theme.of(context).colorScheme;
หากต้องการใช้สีใดสีหนึ่ง ให้เข้าถึงบทบาทสีใน colorScheme ไปที่ lib/src/shared/views/outlined_card.dart แล้วใส่เส้นขอบใน OutlinedCard โดยทำดังนี้
lib/src/shared/views/outlined_card.dart
class _OutlinedCardState extends State<OutlinedCard> {
  @override
  Widget build(BuildContext context) {
    return MouseRegion(
      cursor: widget.clickable
          ? SystemMouseCursors.click
          : SystemMouseCursors.basic,
      child: Container(
        // Add from here...
        decoration: BoxDecoration(
          border: Border.all(
            color: Theme.of(context).colorScheme.outline,
            width: 1,
          ),
        ),
        // ... To here.
        child: widget.child,
      ),
    );
  }
}
Material 3 เปิดตัวบทบาทของสีที่ละเอียดอ่อนซึ่งช่วยส่งเสริมกันและกัน และนำไปใช้ได้ทั่วทั้ง UI เพื่อเพิ่มระดับการแสดงออกใหม่ๆ บทบาทสีใหม่เหล่านี้มีดังนี้
Primary,OnPrimary,PrimaryContainer,OnPrimaryContainerSecondary,OnSecondary,SecondaryContainer,OnSecondaryContainerTertiary,OnTertiary,TertiaryContainer,OnTertiaryContainerError,OnError,ErrorContainer,OnErrorContainerBackground,OnBackgroundSurface,OnSurface,SurfaceVariant,OnSurfaceVariantShadow,Outline,InversePrimary
นอกจากนี้ โทเค็นการออกแบบใหม่ยังรองรับทั้งธีมสว่างและธีมมืด

บทบาทของสีเหล่านี้สามารถใช้เพื่อกำหนดความหมายและเน้นส่วนต่างๆ ของ UI ได้ แม้ว่าองค์ประกอบจะไม่โดดเด่น แต่ก็ยังใช้ประโยชน์จากสีแบบไดนามิกได้
ผู้ใช้สามารถตั้งค่าความสว่างของแอปได้ในการตั้งค่าระบบของอุปกรณ์ ใน lib/src/shared/app.dart เมื่อตั้งค่าอุปกรณ์เป็นโหมดมืด ให้เปลี่ยนธีมมืดและโหมดธีมกลับเป็น MaterialApp
lib/src/shared/app.dart
return MaterialApp.router(
  debugShowCheckedModeBanner: false,
  title: 'Flutter Demo',
  theme: theme.light(settings.value.sourceColor),
  darkTheme: theme.dark(settings.value.sourceColor), // Add this line
  themeMode: theme.themeMode(), // Add this line
  routeInformationParser: appRouter.routeInformationParser,
  routerDelegate: appRouter.routerDelegate,
);
คลิกไอคอนดวงจันทร์ที่มุมขวาบนเพื่อเปิดใช้โหมดมืด
หากพบปัญหา
หากแอปทำงานไม่ถูกต้อง ให้ใช้รหัสในลิงก์ต่อไปนี้เพื่อแก้ไขปัญหา
6. เพิ่มการออกแบบที่ปรับขนาดได้
Flutter ช่วยให้คุณสร้างแอปที่ทำงานได้เกือบทุกที่ แต่ไม่ได้หมายความว่าแอปทุกแอปต้องทํางานเหมือนกันในทุกที่ ผู้ใช้คาดหวังถึงลักษณะการทำงานและฟีเจอร์ที่แตกต่างกันจากแพลตฟอร์มต่างๆ
Material มีแพ็กเกจที่ช่วยให้ใช้งานเลย์เอาต์แบบปรับเปลี่ยนได้ง่ายขึ้น โดยคุณจะดูแพ็กเกจ Flutter เหล่านี้ได้ใน GitHub
โปรดคำนึงถึงความแตกต่างของแพลตฟอร์มต่อไปนี้เมื่อสร้างแอปพลิเคชันที่ปรับเปลี่ยนได้ข้ามแพลตฟอร์ม
- วิธีการป้อนข้อมูล: เมาส์ การสัมผัส หรือเกมแพด
- ขนาดแบบอักษร การวางแนวของอุปกรณ์ และระยะการดู
- ขนาดหน้าจอและรูปแบบของอุปกรณ์: โทรศัพท์ แท็บเล็ต แบบพับได้ เดสก์ท็อป เว็บ
ไฟล์ lib/src/shared/views/adaptive_navigation.dart มีคลาสการนำทางที่คุณสามารถระบุรายการปลายทางและเนื้อหาเพื่อแสดงผลเนื้อหาได้ เนื่องจากคุณใช้เลย์เอาต์นี้ในหลายหน้าจอ จึงมีเลย์เอาต์พื้นฐานที่แชร์เพื่อส่งไปยังแต่ละรายการย่อย แถบนำทางเหมาะสำหรับเดสก์ท็อปและหน้าจอขนาดใหญ่ แต่ให้ทำเลย์เอาต์ที่เหมาะกับอุปกรณ์เคลื่อนที่โดยแสดงแถบนำทางด้านล่างบนอุปกรณ์เคลื่อนที่แทน
lib/src/shared/views/adaptive_navigation.dart
import 'package:flutter/material.dart';

class AdaptiveNavigation extends StatelessWidget {
  const AdaptiveNavigation({
    super.key,
    required this.destinations,
    required this.selectedIndex,
    required this.onDestinationSelected,
    required this.child,
  });

  final List<NavigationDestination> destinations;
  final int selectedIndex;
  final void Function(int index) onDestinationSelected;
  final Widget child;

  @override
  Widget build(BuildContext context) {
    return LayoutBuilder(
      builder: (context, dimens) {
        if (dimens.maxWidth >= 600) {                               // Add this line
          return Scaffold(
            body: Row(
              children: [
                NavigationRail(
                  extended: dimens.maxWidth >= 800,
                  minExtendedWidth: 180,
                  destinations: destinations
                      .map(
                        (e) => NavigationRailDestination(
                          icon: e.icon,
                          label: Text(e.label),
                        ),
                      )
                      .toList(),
                  selectedIndex: selectedIndex,
                  onDestinationSelected: onDestinationSelected,
                ),
                Expanded(child: child),
              ],
            ),
          );
        }                                                           // Add this line
        // Mobile Layout
        // Add from here...
        return Scaffold(
          body: child,
          bottomNavigationBar: NavigationBar(
            destinations: destinations,
            selectedIndex: selectedIndex,
            onDestinationSelected: onDestinationSelected,
          ),
        );
        // ... To here.
      },
    );
  }
}

หน้าจอแต่ละขนาดมีขนาดไม่เท่ากัน หากพยายามแสดงแอปเวอร์ชันเดสก์ท็อปในโทรศัพท์ คุณอาจต้องเพ่งมองและซูมเพื่อดูทุกอย่าง คุณต้องการให้แอปเปลี่ยนลักษณะที่ปรากฏตามหน้าจอที่แสดง การออกแบบที่ปรับเปลี่ยนตามอุปกรณ์ช่วยให้มั่นใจได้ว่าแอปของคุณจะดูดีบนหน้าจอทุกขนาด
หากต้องการให้แอปตอบสนอง ให้ใส่จุดหยุดพักที่ปรับเปลี่ยนได้ (อย่าสับสนกับจุดหยุดพักสำหรับการแก้ไขข้อบกพร่อง) เบรกพอยต์เหล่านี้ระบุขนาดหน้าจอที่แอปควรเปลี่ยนเลย์เอาต์
หน้าจอขนาดเล็กจะแสดงเนื้อหาได้น้อยกว่าหน้าจอขนาดใหญ่โดยไม่ต้องย่อเนื้อหา เพื่อป้องกันไม่ให้แอปดูเหมือนแอปบนเดสก์ท็อปที่ย่อขนาดลง ให้สร้างเลย์เอาต์แยกต่างหากสำหรับอุปกรณ์เคลื่อนที่ที่ใช้แท็บเพื่อแบ่งเนื้อหา วิธีนี้ช่วยให้แอปดูกลมกลืนกับอุปกรณ์เคลื่อนที่มากขึ้น
วิธีการขยายต่อไปนี้ (ที่กําหนดไว้ในโปรเจ็กต์ MyArtist ใน lib/src/shared/extensions.dart) เป็นจุดเริ่มต้นที่ดีเมื่อออกแบบเลย์เอาต์ที่เพิ่มประสิทธิภาพสําหรับเป้าหมายต่างๆ
lib/src/shared/extensions.dart
extension BreakpointUtils on BoxConstraints {
  bool get isTablet => maxWidth > 730;
  bool get isDesktop => maxWidth > 1200;
  bool get isMobile => !isTablet && !isDesktop;
}
หน้าจอที่ใหญ่กว่า 730 พิกเซล (ในแนวยาวที่สุด) แต่เล็กกว่า 1,200 พิกเซลจะถือว่าใช้กับแท็บเล็ต รูปภาพที่มีขนาดใหญ่กว่า 1,200 พิกเซลจะถือว่ามีขนาดสำหรับเดสก์ท็อป หากอุปกรณ์ไม่ใช่แท็บเล็ตหรือเดสก์ท็อป ระบบจะถือว่าอุปกรณ์นั้นเป็นอุปกรณ์เคลื่อนที่ ดูข้อมูลเพิ่มเติมเกี่ยวกับจุดพักแบบปรับได้ใน material.io
เลย์เอาต์ที่ปรับเปลี่ยนตามอุปกรณ์ของหน้าจอหลักใช้ AdaptiveContainer และ AdaptiveColumn โดยอิงตามตารางกริด 12 คอลัมน์
เลย์เอาต์ที่ปรับเปลี่ยนตามอุปกรณ์ต้องมี 2 เลย์เอาต์ ได้แก่ เลย์เอาต์สำหรับอุปกรณ์เคลื่อนที่และเลย์เอาต์ที่ปรับเปลี่ยนตามอุปกรณ์สำหรับหน้าจอขนาดใหญ่ เมื่อถึงจุดนี้ LayoutBuilder จะแสดงเลย์เอาต์เดสก์ท็อป ใน lib/src/features/home/view/home_screen.dart ให้สร้างเลย์เอาต์สำหรับอุปกรณ์เคลื่อนที่เป็น TabBar และ TabBarView ที่มี 4 แท็บ
lib/src/features/home/view/home_screen.dart
import 'package:flutter/material.dart';

import '../../../shared/classes/classes.dart';
import '../../../shared/extensions.dart';
import '../../../shared/providers/providers.dart';
import '../../../shared/views/views.dart';
import '../../../utils/adaptive_components.dart';
import '../../playlists/view/playlist_songs.dart';
import 'view.dart';

class HomeScreen extends StatefulWidget {
  const HomeScreen({super.key});

  @override
  State<HomeScreen> createState() => _HomeScreenState();
}

class _HomeScreenState extends State<HomeScreen> {
  @override
  Widget build(BuildContext context) {
    final PlaylistsProvider playlistProvider = PlaylistsProvider();
    final List<Playlist> playlists = playlistProvider.playlists;
    final Playlist topSongs = playlistProvider.topSongs;
    final Playlist newReleases = playlistProvider.newReleases;
    final ArtistsProvider artistsProvider = ArtistsProvider();
    final List<Artist> artists = artistsProvider.artists;
    return LayoutBuilder(
      builder: (context, constraints) {
       // Add from here...
        if (constraints.isMobile) {
          return DefaultTabController(
            length: 4,
            child: Scaffold(
              appBar: AppBar(
                centerTitle: false,
                title: const Text('Good morning'),
                actions: const [BrightnessToggle()],
                bottom: const TabBar(
                  isScrollable: true,
                  tabs: [
                    Tab(text: 'Home'),
                    Tab(text: 'Recently Played'),
                    Tab(text: 'New Releases'),
                    Tab(text: 'Top Songs'),
                  ],
                ),
              ),
              body: LayoutBuilder(
                builder: (context, constraints) => TabBarView(
                  children: [
                    SingleChildScrollView(
                      child: Column(
                        children: [
                          const HomeHighlight(),
                          HomeArtists(
                            artists: artists,
                            constraints: constraints,
                          ),
                        ],
                      ),
                    ),
                    HomeRecent(playlists: playlists, axis: Axis.vertical),
                    PlaylistSongs(playlist: topSongs, constraints: constraints),
                    PlaylistSongs(
                      playlist: newReleases,
                      constraints: constraints,
                    ),
                  ],
                ),
              ),
            ),
          );
        }
       // ... To here.

        return Scaffold(
          body: SingleChildScrollView(
            child: AdaptiveColumn(
              children: [
                AdaptiveContainer(
                  columnSpan: 12,
                  child: Padding(
                    padding: const EdgeInsets.all(2),
                    child: Row(
                      mainAxisAlignment: MainAxisAlignment.spaceBetween,
                      children: [
                        Expanded(
                          child: Text(
                            'Good morning',
                            style: context.displaySmall,
                          ),
                        ),
                        const SizedBox(width: 20),
                        const BrightnessToggle(),
                      ],
                    ),
                  ),
                ),
                AdaptiveContainer(
                  columnSpan: 12,
                  child: Column(
                    children: [
                      const HomeHighlight(),
                      LayoutBuilder(
                        builder: (context, constraints) => HomeArtists(
                          artists: artists,
                          constraints: constraints,
                        ),
                      ),
                    ],
                  ),
                ),
                AdaptiveContainer(
                  columnSpan: 12,
                  child: Column(
                    crossAxisAlignment: CrossAxisAlignment.start,
                    children: [
                      Padding(
                        padding: const EdgeInsets.all(2),
                        child: Text(
                          'Recently played',
                          style: context.headlineSmall,
                        ),
                      ),
                      HomeRecent(playlists: playlists),
                    ],
                  ),
                ),
                AdaptiveContainer(
                  columnSpan: 12,
                  child: Padding(
                    padding: const EdgeInsets.all(2),
                    child: Row(
                      crossAxisAlignment: CrossAxisAlignment.start,
                      children: [
                        Flexible(
                          flex: 10,
                          child: Column(
                            mainAxisAlignment: MainAxisAlignment.start,
                            crossAxisAlignment: CrossAxisAlignment.start,
                            children: [
                              Padding(
                                padding: const EdgeInsets.all(2),
                                child: Text(
                                  'Top Songs Today',
                                  style: context.titleLarge,
                                ),
                              ),
                              LayoutBuilder(
                                builder: (context, constraints) =>
                                    PlaylistSongs(
                                      playlist: topSongs,
                                      constraints: constraints,
                                    ),
                              ),
                            ],
                          ),
                        ),
                        Flexible(
                          flex: 10,
                          child: Column(
                            mainAxisAlignment: MainAxisAlignment.start,
                            crossAxisAlignment: CrossAxisAlignment.start,
                            children: [
                              Padding(
                                padding: const EdgeInsets.all(2),
                                child: Text(
                                  'New Releases',
                                  style: context.titleLarge,
                                ),
                              ),
                              LayoutBuilder(
                                builder: (context, constraints) =>
                                    PlaylistSongs(
                                      playlist: newReleases,
                                      constraints: constraints,
                                    ),
                              ),
                            ],
                          ),
                        ),
                      ],
                    ),
                  ),
                ),
              ],
            ),
          ),
        );
      },
    );
  }
}

หากพบปัญหา
หากแอปทำงานไม่ถูกต้อง ให้ใช้รหัสในลิงก์ต่อไปนี้เพื่อแก้ไขปัญหา
7. ใช้การเว้นวรรค
พื้นที่ว่างเป็นเครื่องมือภาพที่สำคัญสำหรับแอปของคุณ ซึ่งช่วยจัดระเบียบส่วนต่างๆ ไว้ด้วยกัน
การมีช่องว่างมากเกินไปดีกว่ามีไม่เพียงพอ การเพิ่มพื้นที่ว่างมากกว่าการลดขนาดแบบอักษรหรือองค์ประกอบภาพเพื่อให้พอดีกับพื้นที่มากขึ้น
การไม่มีพื้นที่ว่างอาจทำให้ผู้ที่มีภาวะสายตามีปัญหา ช่องว่างมากเกินไปอาจทำให้ขาดความสอดคล้องกันและทำให้ UI ดูไม่เป็นระเบียบ ตัวอย่างเช่น ดูภาพหน้าจอต่อไปนี้


ต่อไป คุณจะต้องเพิ่มพื้นที่ว่างในหน้าจอหลักเพื่อให้มีพื้นที่มากขึ้น จากนั้นคุณปรับเลย์เอาต์เพิ่มเติมเพื่อปรับระยะห่างให้ละเอียดยิ่งขึ้น
ตัดขึ้นบรรทัดใหม่ของวิดเจ็ตด้วยออบเจ็กต์ Padding เพื่อเพิ่มเว้นวรรครอบๆ วิดเจ็ตนั้น เพิ่มค่าการถ่วงทุกค่าใน lib/src/features/home/view/home_screen.dart เป็น 35
lib/src/features/home/view/home_screen.dart
return Scaffold(
  body: SingleChildScrollView(
    child: AdaptiveColumn(
      children: [
        AdaptiveContainer(
          columnSpan: 12,
          child: Padding(
            padding: const EdgeInsets.all(35),                   // Modify this line
            child: Row(
              mainAxisAlignment: MainAxisAlignment.spaceBetween,
              children: [
                Expanded(
                  child: Text(
                    'Good morning',
                    style: context.displaySmall,
                  ),
                ),
                const SizedBox(width: 20),
                const BrightnessToggle(),
              ],
            ),
          ),
        ),
        AdaptiveContainer(
          columnSpan: 12,
          child: Column(
            children: [
              const HomeHighlight(),
              LayoutBuilder(
                builder: (context, constraints) => HomeArtists(
                  artists: artists,
                  constraints: constraints,
                ),
              ),
            ],
          ),
        ),
        AdaptiveContainer(
          columnSpan: 12,
          child: Column(
            crossAxisAlignment: CrossAxisAlignment.start,
            children: [
              Padding(
                padding: const EdgeInsets.all(35),               // Modify this line
                child: Text(
                  'Recently played',
                  style: context.headlineSmall,
                ),
              ),
              HomeRecent(playlists: playlists),
            ],
          ),
        ),
        AdaptiveContainer(
          columnSpan: 12,
          child: Padding(
            padding: const EdgeInsets.all(35),                   // Modify this line
            child: Row(
              crossAxisAlignment: CrossAxisAlignment.start,
              children: [
                Flexible(
                  flex: 10,
                  child: Column(
                    mainAxisAlignment: MainAxisAlignment.start,
                    crossAxisAlignment: CrossAxisAlignment.start,
                    children: [
                      Padding(
                        padding: const EdgeInsets.all(35),       // Modify this line
                        child: Text(
                          'Top Songs Today',
                          style: context.titleLarge,
                        ),
                      ),
                      LayoutBuilder(
                        builder: (context, constraints) =>
                            PlaylistSongs(
                              playlist: topSongs,
                              constraints: constraints,
                            ),
                      ),
                    ],
                  ),
                ),
                Flexible(
                  flex: 10,
                  child: Column(
                    mainAxisAlignment: MainAxisAlignment.start,
                    crossAxisAlignment: CrossAxisAlignment.start,
                    children: [
                      Padding(
                        padding: const EdgeInsets.all(35),       // Modify this line
                        child: Text(
                          'New Releases',
                          style: context.titleLarge,
                        ),
                      ),
                      LayoutBuilder(
                        builder: (context, constraints) =>
                            PlaylistSongs(
                              playlist: newReleases,
                              constraints: constraints,
                            ),
                      ),
                    ],
                  ),
                ),
              ],
            ),
          ),
        ),
      ],
    ),
  ),
);
โหลดแอปซ้ำขณะทำงาน แอปควรมีลักษณะเหมือนเดิม แต่มีเว้นวรรคระหว่างวิดเจ็ตมากขึ้น การเว้นวรรคเพิ่มเติมดูดีขึ้น แต่แบนเนอร์ไฮไลต์ที่ด้านบนยังอยู่ใกล้กับขอบมากเกินไป
ใน lib/src/features/home/view/home_highlight.dart ให้เปลี่ยนระยะห่างจากขอบในแบนเนอร์เป็น 15
lib/src/features/home/view/home_highlight.dart
class HomeHighlight extends StatelessWidget {
  const HomeHighlight({super.key});

  @override
  Widget build(BuildContext context) {
    return Row(
      children: [
        Expanded(
          child: Padding(
            padding: const EdgeInsets.all(15),                   // Modify this line
            child: Clickable(
              child: SizedBox(
                height: 275,
                child: ClipRRect(
                  borderRadius: BorderRadius.circular(10),
                  child: Image.asset(
                    'assets/images/news/concert.jpeg',
                    fit: BoxFit.cover,
                  ),
                ),
              ),
              onTap: () => launchUrl(Uri.parse('https://docs.flutter.dev')),
            ),
          ),
        ),
      ],
    );
  }
}
โหลดแอปซ้ำแบบ Hot Reload เพลย์ลิสต์ 2 รายการที่ด้านล่างไม่มีเว้นวรรคระหว่างกัน จึงดูเหมือนว่าอยู่ในตารางเดียวกัน ไม่ได้เป็นเช่นนั้น และคุณจะแก้ไขในลำดับถัดไป

เพิ่มเว้นวรรคระหว่างเพลย์ลิสต์โดยแทรกวิดเจ็ตขนาดลงใน Row ที่มีเพลย์ลิสต์ ใน lib/src/features/home/view/home_screen.dart ให้เพิ่ม SizedBox ที่มีความกว้าง 35 ดังนี้
lib/src/features/home/view/home_screen.dart
AdaptiveContainer(
  columnSpan: 12,
  child: Padding(
    padding: const EdgeInsets.all(35),
    child: Row(
      crossAxisAlignment: CrossAxisAlignment.start,
      children: [
        Flexible(
          flex: 10,
          child: Column(
            mainAxisAlignment: MainAxisAlignment.start,
            crossAxisAlignment: CrossAxisAlignment.start,
            children: [
              Padding(
                padding: const EdgeInsets.all(35),
                child: Text(
                  'Top Songs Today',
                  style: context.titleLarge,
                ),
              ),
              LayoutBuilder(
                builder: (context, constraints) =>
                    PlaylistSongs(
                      playlist: topSongs,
                      constraints: constraints,
                    ),
              ),
            ],
          ),
        ),
        const SizedBox(width: 35),                                  // Add this line
        Flexible(
          flex: 10,
          child: Column(
            mainAxisAlignment: MainAxisAlignment.start,
            crossAxisAlignment: CrossAxisAlignment.start,
            children: [
              Padding(
                padding: const EdgeInsets.all(35),
                child: Text(
                  'New Releases',
                  style: context.titleLarge,
                ),
              ),
              LayoutBuilder(
                builder: (context, constraints) =>
                    PlaylistSongs(
                      playlist: newReleases,
                      constraints: constraints,
                    ),
              ),
            ],
          ),
        ),
      ],
    ),
  ),
),
โหลดแอปซ้ำขณะทำงาน แอปควรมีลักษณะดังต่อไปนี้

ตอนนี้มีพื้นที่เหลือเฟือสำหรับเนื้อหาในหน้าจอหลัก แต่ทุกอย่างดูแยกกันเกินไปและไม่มีความสอดคล้องกันระหว่างส่วนต่างๆ
จนถึงตอนนี้ คุณได้ตั้งค่าระยะห่างจากขอบทั้งหมด (ทั้งแนวนอนและแนวตั้ง) สำหรับวิดเจ็ตในหน้าจอหลักเป็น 35 ด้วย EdgeInsets.all(35) แต่คุณตั้งค่าระยะห่างจากขอบแต่ละด้านแยกกันได้เช่นกัน ปรับแต่งระยะห่างจากขอบเพื่อให้พอดีกับพื้นที่มากขึ้น
EdgeInsets.LTRB()ตั้งค่าซ้าย บน ขวา และล่างแยกกันEdgeInsets.symmetric()กําหนดระยะห่างจากขอบในแนวตั้ง (ด้านบนและด้านล่าง) ให้เท่ากัน และระยะห่างจากขอบในแนวนอน (ซ้ายและขวา) ให้เท่ากันEdgeInsets.only()จะตั้งค่าเฉพาะขอบที่ระบุเท่านั้น
lib/src/features/home/view/home_screen.dart
return Scaffold(
  body: SingleChildScrollView(
    child: AdaptiveColumn(
      children: [
        AdaptiveContainer(
          columnSpan: 12,
          child: Padding(
            padding: const EdgeInsets.fromLTRB(20, 25, 20, 10),  // Modify this line
            child: Row(
              mainAxisAlignment: MainAxisAlignment.spaceBetween,
              children: [
                Expanded(
                  child: Text(
                    'Good morning',
                    style: context.displaySmall,
                  ),
                ),
                const SizedBox(width: 20),
                const BrightnessToggle(),
              ],
            ),
          ),
        ),
        AdaptiveContainer(
          columnSpan: 12,
          child: Column(
            children: [
              const HomeHighlight(),
              LayoutBuilder(
                builder: (context, constraints) => HomeArtists(
                  artists: artists,
                  constraints: constraints,
                ),
              ),
            ],
          ),
        ),
        AdaptiveContainer(
          columnSpan: 12,
          child: Column(
            crossAxisAlignment: CrossAxisAlignment.start,
            children: [
              Padding(
                padding: const EdgeInsets.symmetric(             // Modify from here...
                  horizontal: 15,
                  vertical: 10,
                ),                                               // To here.
                child: Text(
                  'Recently played',
                  style: context.headlineSmall,
                ),
              ),
              HomeRecent(playlists: playlists),
            ],
          ),
        ),
        AdaptiveContainer(
          columnSpan: 12,
          child: Padding(
            padding: const EdgeInsets.all(15),                   // Modify this line
            child: Row(
              crossAxisAlignment: CrossAxisAlignment.start,
              children: [
                Flexible(
                  flex: 10,
                  child: Column(
                    mainAxisAlignment: MainAxisAlignment.start,
                    crossAxisAlignment: CrossAxisAlignment.start,
                    children: [
                      Padding(
                        padding: const EdgeInsets.only(          // Modify from here...
                          left: 8,
                          bottom: 8,
                        ),                                       // To here.
                        child: Text(
                          'Top Songs Today',
                          style: context.titleLarge,
                        ),
                      ),
                      LayoutBuilder(
                        builder: (context, constraints) =>
                            PlaylistSongs(
                              playlist: topSongs,
                              constraints: constraints,
                            ),
                      ),
                    ],
                  ),
                ),
                const SizedBox(width: 25),                       // Modify this line
                Flexible(
                  flex: 10,
                  child: Column(
                    mainAxisAlignment: MainAxisAlignment.start,
                    crossAxisAlignment: CrossAxisAlignment.start,
                    children: [
                      Padding(
                        padding: const EdgeInsets.only(          // Modify from here...
                          left: 8,
                          bottom: 8,
                        ),                                       // To here.
                        child: Text(
                          'New Releases',
                          style: context.titleLarge,
                        ),
                      ),
                      LayoutBuilder(
                        builder: (context, constraints) =>
                            PlaylistSongs(
                              playlist: newReleases,
                              constraints: constraints,
                            ),
                      ),
                    ],
                  ),
                ),
              ],
            ),
          ),
        ),
      ],
    ),
  ),
);
ใน lib/src/features/home/view/home_highlight.dart ให้ตั้งค่าระยะห่างจากขอบซ้ายและขวาในแบนเนอร์เป็น 35 และระยะห่างจากขอบบนและล่างเป็น 5
lib/src/features/home/view/home_highlight.dart
class HomeHighlight extends StatelessWidget {
  const HomeHighlight({super.key});

  @override
  Widget build(BuildContext context) {
    return Row(
      children: [
        Expanded(
          child: Padding(
            // Modify the following line
            padding: const EdgeInsets.symmetric(horizontal: 35, vertical: 5),
            child: Clickable(
              child: SizedBox(
                height: 275,
                child: ClipRRect(
                  borderRadius: BorderRadius.circular(10),
                  child: Image.asset(
                    'assets/images/news/concert.jpeg',
                    fit: BoxFit.cover,
                  ),
                ),
              ),
              onTap: () => launchUrl(Uri.parse('https://docs.flutter.dev')),
            ),
          ),
        ),
      ],
    );
  }
}
โหลดแอปซ้ำขณะทำงาน เลย์เอาต์และระยะห่างดูดีขึ้นมาก เพิ่มการเคลื่อนไหวและภาพเคลื่อนไหวเพื่อปิดท้าย
หากพบปัญหา
หากแอปทำงานไม่ถูกต้อง ให้ใช้รหัสในลิงก์ต่อไปนี้เพื่อแก้ไขปัญหา
8. เพิ่มการเคลื่อนไหวและภาพเคลื่อนไหว
ภาพเคลื่อนไหวเป็นวิธีที่ยอดเยี่ยมในการนำเสนอการเคลื่อนไหวและพลังงาน รวมถึงแสดงผลลัพธ์เมื่อผู้ใช้โต้ตอบกับแอป
สร้างภาพเคลื่อนไหวระหว่างหน้าจอ
ThemeProvider จะกำหนด PageTransitionsTheme ด้วยภาพเคลื่อนไหวการเปลี่ยนหน้าจอสำหรับแพลตฟอร์มอุปกรณ์เคลื่อนที่ (iOS, Android) ผู้ใช้เดสก์ท็อปจะได้รับฟีดแบ็กจากการคลิกเมาส์หรือแทร็กแพดอยู่แล้ว จึงไม่จำเป็นต้องใช้ภาพเคลื่อนไหวการเปลี่ยนหน้า
Flutter มีภาพเคลื่อนไหวการเปลี่ยนหน้าจอที่คุณกำหนดค่าให้กับแอปตามแพลตฟอร์มเป้าหมายได้ดังที่เห็นใน lib/src/shared/providers/theme.dart
lib/src/shared/providers/theme.dart
final pageTransitionsTheme = const PageTransitionsTheme(
  builders: <TargetPlatform, PageTransitionsBuilder>{
    TargetPlatform.android: FadeUpwardsPageTransitionsBuilder(),
    TargetPlatform.iOS: CupertinoPageTransitionsBuilder(),
    TargetPlatform.linux: NoAnimationPageTransitionsBuilder(),
    TargetPlatform.macOS: NoAnimationPageTransitionsBuilder(),
    TargetPlatform.windows: NoAnimationPageTransitionsBuilder(),
  },
);
ส่ง PageTransitionsTheme ไปยังทั้งธีมสว่างและธีมมืดใน lib/src/shared/providers/theme.dart
lib/src/shared/providers/theme.dart
ThemeData light([Color? targetColor]) {
  final colorScheme = colors(Brightness.light, targetColor);
  return ThemeData.light().copyWith(
    pageTransitionsTheme: pageTransitionsTheme,                     // Add this line
    colorScheme: colorScheme,
    appBarTheme: appBarTheme(colorScheme),
    cardTheme: cardTheme(),
    listTileTheme: listTileTheme(colorScheme),
    bottomAppBarTheme: bottomAppBarTheme(colorScheme),
    bottomNavigationBarTheme: bottomNavigationBarTheme(colorScheme),
    navigationRailTheme: navigationRailTheme(colorScheme),
    tabBarTheme: tabBarTheme(colorScheme),
    drawerTheme: drawerTheme(colorScheme),
    scaffoldBackgroundColor: colorScheme.surface,
  );
}

ThemeData dark([Color? targetColor]) {
  final colorScheme = colors(Brightness.dark, targetColor);
  return ThemeData.dark().copyWith(
    pageTransitionsTheme: pageTransitionsTheme,                     // Add this line
    colorScheme: colorScheme,
    appBarTheme: appBarTheme(colorScheme),
    cardTheme: cardTheme(),
    listTileTheme: listTileTheme(colorScheme),
    bottomAppBarTheme: bottomAppBarTheme(colorScheme),
    bottomNavigationBarTheme: bottomNavigationBarTheme(colorScheme),
    navigationRailTheme: navigationRailTheme(colorScheme),
    tabBarTheme: tabBarTheme(colorScheme),
    drawerTheme: drawerTheme(colorScheme),
    scaffoldBackgroundColor: colorScheme.surface,
  );
}
ไม่มีภาพเคลื่อนไหวบน iOS
มีภาพเคลื่อนไหวใน iOS
หากพบปัญหา
หากแอปทำงานไม่ถูกต้อง ให้ใช้รหัสในลิงก์ต่อไปนี้เพื่อแก้ไขปัญหา
9. เพิ่มสถานะการวางเมาส์เหนือ
วิธีหนึ่งในการเพิ่มการเคลื่อนไหวในแอปบนเดสก์ท็อปคือการใช้สถานะโฮเวอร์ ซึ่งวิดเจ็ตจะเปลี่ยนสถานะ (เช่น สี รูปร่าง หรือเนื้อหา) เมื่อผู้ใช้วางเคอร์เซอร์เหนือวิดเจ็ต
โดยค่าเริ่มต้น คลาส _OutlinedCardState (ใช้สำหรับการ์ดเพลย์ลิสต์ "เล่นล่าสุด") จะแสดงผลเป็น MouseRegion ซึ่งจะเปลี่ยนลูกศรเคอร์เซอร์ให้กลายเป็นเคอร์เซอร์เมื่อวางเมาส์เหนือ แต่คุณสามารถเพิ่มการแสดงผลภาพเพิ่มเติมได้
เปิด lib/src/shared/views/outlined_card.dart แล้วแทนที่เนื้อหาด้วยการใช้งานต่อไปนี้เพื่อแนะนำสถานะ _hovered
lib/src/shared/views/outlined_card.dart
import 'package:flutter/material.dart';

class OutlinedCard extends StatefulWidget {
  const OutlinedCard({super.key, required this.child, this.clickable = true});

  final Widget child;
  final bool clickable;

  @override
  State<OutlinedCard> createState() => _OutlinedCardState();
}

class _OutlinedCardState extends State<OutlinedCard> {
  bool _hovered = false;

  @override
  Widget build(BuildContext context) {
    final borderRadius = BorderRadius.circular(_hovered ? 20 : 8);
    const animationCurve = Curves.easeInOut;
    return MouseRegion(
      onEnter: (_) {
        if (!widget.clickable) return;
        setState(() {
          _hovered = true;
        });
      },
      onExit: (_) {
        if (!widget.clickable) return;
        setState(() {
          _hovered = false;
        });
      },
      cursor: widget.clickable
          ? SystemMouseCursors.click
          : SystemMouseCursors.basic,
      child: AnimatedContainer(
        duration: kThemeAnimationDuration,
        curve: animationCurve,
        decoration: BoxDecoration(
          border: Border.all(
            color: Theme.of(context).colorScheme.outline,
            width: 1,
          ),
          borderRadius: borderRadius,
        ),
        foregroundDecoration: BoxDecoration(
          color: Theme.of(
            context,
          ).colorScheme.onSurface.withAlpha(_hovered ? 30 : 0),
          borderRadius: borderRadius,
        ),
        child: TweenAnimationBuilder<BorderRadius>(
          duration: kThemeAnimationDuration,
          curve: animationCurve,
          tween: Tween(begin: BorderRadius.zero, end: borderRadius),
          builder: (context, borderRadius, child) => ClipRRect(
            clipBehavior: Clip.antiAlias,
            borderRadius: borderRadius,
            child: child,
          ),
          child: widget.child,
        ),
      ),
    );
  }
}
โหลดแอปซ้ำแบบ Hot Reload แล้ววางเมาส์เหนือการ์ดเพลย์ลิสต์ที่เล่นล่าสุด
OutlinedCard จะเปลี่ยนความทึบแสงและปัดมุม
สุดท้าย ให้สร้างภาพเคลื่อนไหวของหมายเลขเพลงในเพลย์ลิสต์ให้กลายเป็นปุ่มเล่นโดยใช้วิดเจ็ต HoverableSongPlayButton ที่กําหนดไว้ใน lib/src/shared/views/hoverable_song_play_button.dart ใน lib/src/features/playlists/view/playlist_songs.dart ให้ใส่วิดเจ็ต Center (ซึ่งมีหมายเลขเพลง) ไว้ใน HoverableSongPlayButton ดังนี้
lib/src/features/playlists/view/playlist_songs.dart
rowBuilder: (context, index) => DataRow.byIndex(
  index: index,
  cells: [
    DataCell(
      HoverableSongPlayButton(                                      // Modify from here...
        hoverMode: HoverMode.overlay,
        song: playlist.songs[index],
        child: Center(
          child: Text(
            (index + 1).toString(),
            textAlign: TextAlign.center,
          ),
        ),
      ),                                                            // To here.
    ),
    DataCell(
      Row(
        children: [
          Padding(
            padding: const EdgeInsets.all(2),
            child: ClippedImage(playlist.songs[index].image.image),
          ),
          const SizedBox(width: 10),
          Expanded(child: Text(playlist.songs[index].title)),
        ],
      ),
    ),
    DataCell(Text(playlist.songs[index].length.toHumanizedString())),
  ],
),
โหลดแอปซ้ำแบบ Hot Reload แล้ววางเคอร์เซอร์เหนือหมายเลขเพลงในเพลย์ลิสต์เพลงยอดนิยมวันนี้หรือเพลงใหม่
ตัวเลขจะเคลื่อนไหวเป็นปุ่มเล่นที่จะเล่นเพลงเมื่อคุณคลิก
10. ยินดีด้วย
คุณทำ Codelab นี้เสร็จแล้ว คุณได้เรียนรู้แล้วว่าการเปลี่ยนแปลงเล็กๆ น้อยๆ มากมายสามารถผสานรวมเข้ากับแอปเพื่อให้แอปดูสวยงามขึ้น รวมถึงเข้าถึงได้ง่ายขึ้น แปลได้ง่ายขึ้น และเหมาะกับแพลตฟอร์มต่างๆ มากขึ้น เทคนิคเหล่านี้รวมถึงแต่ไม่จำกัดเพียงรายการต่อไปนี้
- การจัดรูปแบบตัวอักษร: ข้อความเป็นมากกว่าเครื่องมือสื่อสาร ใช้วิธีแสดงข้อความเพื่อให้เกิดผลลัพธ์เชิงบวกต่อประสบการณ์และมุมมองของผู้ใช้เกี่ยวกับแอป
- ธีม: สร้างระบบการออกแบบที่คุณใช้ได้อย่างน่าเชื่อถือโดยไม่ต้องตัดสินใจเกี่ยวกับการออกแบบวิดเจ็ตแต่ละรายการ
- ความสามารถในการปรับตัว: พิจารณาอุปกรณ์และแพลตฟอร์มที่ผู้ใช้เรียกใช้แอปของคุณ รวมถึงความสามารถของอุปกรณ์และแพลตฟอร์ม พิจารณาขนาดหน้าจอและลักษณะที่แอปแสดง
- การเคลื่อนไหวและภาพเคลื่อนไหว: การเพิ่มการเคลื่อนไหวในแอปจะช่วยเพิ่มประสบการณ์ของผู้ใช้ และที่สำคัญคือแสดงความคิดเห็นให้ผู้ใช้ทราบ
การปรับแต่งเล็กๆ น้อยๆ เพียงไม่กี่อย่างก็สามารถเปลี่ยนแอปที่น่าเบื่อให้ดูสวยงามได้
ก่อน
หลัง
ขั้นตอนถัดไป
เราหวังว่าคุณจะได้เรียนรู้เพิ่มเติมเกี่ยวกับการสร้างแอปที่สวยงามใน Flutter
หากใช้เคล็ดลับที่กล่าวถึงที่นี่ (หรือมีเคล็ดลับของคุณเองที่จะแชร์) เรายินดีรับฟังจากคุณ ติดต่อเราได้ที่ @rodydavis และ @khanhnwin บน Twitter
แหล่งข้อมูลต่อไปนี้อาจเป็นประโยชน์สำหรับคุณ
ธีม
- เครื่องมือสร้างธีม Material (เครื่องมือ)
แหล่งข้อมูลที่ปรับเปลี่ยนและตอบสนอง
- การถอดรหัส Flutter เกี่ยวกับแบบปรับเปลี่ยนได้กับแบบตอบสนอง (วิดีโอ)
- เลย์เอาต์แบบปรับอัตโนมัติ (วิดีโอจาก The Boring Flutter Development Show)
- การสร้างแอปที่ปรับเปลี่ยนตามอุปกรณ์และปรับขนาดได้ (flutter.dev)
- คอมโพเนนต์ Material แบบปรับเปลี่ยนได้สำหรับ Flutter (ไลบรารีใน GitHub)
- 5 สิ่งที่คุณทำได้เพื่อเตรียมแอปให้พร้อมใช้งานบนหน้าจอขนาดใหญ่ (วิดีโอจาก Google I/O 2021)
แหล่งข้อมูลการออกแบบทั่วไป
- สิ่งเล็กๆ น้อยๆ: การเป็นดีไซเนอร์ที่เป็นนักพัฒนาซอฟต์แวร์ในตำนาน (วิดีโอจาก Flutter Engage)
- Material Design 3 สำหรับอุปกรณ์แบบพับได้ (material.io)
นอกจากนี้ โปรดเชื่อมต่อกับชุมชน Flutter
ออกไปสร้างโลกแอปให้สวยงาม