
Thông tin về lớp học lập trình này
1. Giới thiệu
Material 3 là phiên bản mới nhất của hệ thống thiết kế nguồn mở của Google. Flutter đã mở rộng tính năng hỗ trợ để xây dựng các ứng dụng đẹp mắt bằng Material 3. Trong lớp học lập trình này, bạn sẽ bắt đầu với một ứng dụng Flutter trống và xây dựng một ứng dụng có đầy đủ kiểu và ảnh động bằng Material 3 với Flutter.
Sản phẩm bạn sẽ tạo ra
Trong lớp học lập trình này, bạn sẽ xây dựng một ứng dụng nhắn tin mô phỏng. Ứng dụng này sẽ:
- Sử dụng thiết kế thích ứng để hoạt động trên máy tính hoặc thiết bị di động.
- Sử dụng ảnh động để chuyển đổi linh hoạt giữa các bố cục.
- Sử dụng Material 3 để tạo kiểu biểu cảm.
- Chạy trên Android, iOS, web, Windows, Linux và macOS.

Lớp học lập trình này tập trung vào Material 3 với Flutter. Các khái niệm và khối mã không liên quan được tinh chỉnh và cung cấp cho bạn, chỉ cần sao chép và dán.
2. Thiết lập môi trường Flutter
Bạn cần có
- SDK Flutter
- Một trình soạn thảo, ví dụ: VS Code hoặc Android Studio.
Lớp học lập trình này đã được kiểm thử để triển khai trên Android, iOS, web, Windows, Linux và macOS. Một số mục tiêu triển khai này yêu cầu bạn phải cài đặt thêm phần mềm để có thể triển khai. Bạn nên chạy flutter doctor để hiểu rõ liệu nền tảng của mình đã được thiết lập đúng cách hay chưa.
$ flutter doctor
Doctor summary (to see all details, run flutter doctor -v):
[✓] Flutter (Channel stable, 3.32.1, on macOS 15.5 24F74 darwin-arm64, locale en-AU)
[✓] Android toolchain - develop for Android devices (Android SDK version 36.0.0)
[✓] Xcode - develop for iOS and macOS (Xcode 16.3)
[✓] Chrome - develop for the web
[✓] Android Studio (version 2024.2)
[✓] IntelliJ IDEA Community Edition (version 2024.3.1.1)
[✓] VS Code (version 1.100.3)
[✓] Connected device (3 available)
[✓] Network resources

• No issues found!
Nếu có vấn đề được liệt kê trong kết quả ảnh hưởng đến mục tiêu triển khai mà bạn đã chọn, hãy chạy flutter doctor -v để biết thêm thông tin chi tiết. Nếu bạn không thể giải quyết vấn đề sau khi thử các bước do flutter doctor -v liệt kê, hãy cân nhắc liên hệ với cộng đồng Flutter.
3. Bắt đầu
Tạo ứng dụng Flutter trống
Hầu hết các nhà phát triển Flutter đều tạo một ứng dụng "đếm số lượt nhấn nút" cơ bản bằng flutter create, sau đó dành vài phút để xoá những phần không cần thiết. Bạn có thể tạo một dự án Flutter trống (sử dụng tham số --empty), chỉ cần những thông tin thiết yếu để khởi động và chạy ứng dụng.
$ flutter create animated_responsive_layout --empty
Creating project animated_responsive_layout...
Resolving dependencies in `animated_responsive_layout`...
Downloading packages...
Got dependencies in `animated_responsive_layout`.
Wrote 129 files.

All done!
You can find general documentation for Flutter at: https://docs.flutter.dev/
Detailed API documentation is available at: https://api.flutter.dev/
If you prefer video documentation, consider: https://www.youtube.com/c/flutterdev

In order to run your empty application, type:

  $ cd animated_responsive_layout
  $ flutter run

Your empty application code is in animated_responsive_layout/lib/main.dart.
Bạn có thể chạy mã này thông qua trình soạn thảo mã hoặc trực tiếp từ dòng lệnh. Tuỳ thuộc vào chuỗi công cụ bạn đã cài đặt và liệu bạn có đang chạy trình mô phỏng hay trình mô phỏng hay không, bạn có thể được yêu cầu quyết định chạy ứng dụng trên mục tiêu triển khai nào. Ví dụ: sau đây là cách bạn có thể chọn chạy ứng dụng trống trong trình duyệt web bằng cách chọn tuỳ chọn "Chome".
$ cd animated_responsive_layout
$ flutter run
Connected devices:
macOS (desktop) • macos  • darwin-arm64   • macOS 15.5 24F74 darwin-arm64
Chrome (web)    • chrome • web-javascript • Google Chrome 137.0.7151.56

[1]: macOS (macos)
[2]: Chrome (chrome)
Please choose one (or "q" to quit): 2
Launching lib/main.dart on Chrome in debug mode...
Waiting for connection from debug service on Chrome...              6.4s
This app is linked to the debug service: ws://127.0.0.1:60848/AM68Aq_ZiB8=/ws
Debug service listening on ws://127.0.0.1:60848/AM68Aq_ZiB8=/ws

Flutter run key commands.
R Hot restart.
h List all available interactive commands.
d Detach (terminate "flutter run" but leave application running).
c Clear the screen
q Quit (terminate the application on the device).

A Dart VM Service on Chrome is available at: http://127.0.0.1:60848/AM68Aq_ZiB8=
The Flutter DevTools debugger and profiler on Chrome is available at: http://127.0.0.1:9100?uri=http://127.0.0.1:60848/AM68Aq_ZiB8=
Application finished.
Trong trường hợp này, bạn sẽ thấy ứng dụng trống đang chạy trong trình duyệt web Chrome. Bạn cũng có thể chọn chạy ứng dụng này trong Android, iOS hoặc hệ điều hành máy tính.

4. Tạo ứng dụng nhắn tin
Tạo hình đại diện
Mọi ứng dụng nhắn tin đều cần hình ảnh của người dùng. Những hình ảnh này đại diện cho người dùng và được gọi là hình đại diện. Tiếp theo, hãy tạo một thư mục tài sản ở đầu cây dự án và điền vào thư mục đó một loạt hình ảnh từ kho lưu trữ git cho lớp học lập trình này. Một cách để thực hiện việc này là sử dụng công cụ dòng lệnh wget như sau.
$ mkdir assets
$ cd assets
$ for name in avatar_1 avatar_2 avatar_3 avatar_4 \
              avatar_5 avatar_6 avatar_7 thumbnail_1; \
  do wget https://raw.githubusercontent.com/flutter/codelabs/main/animated-responsive-layout/step_04/assets/$name.png ; \
  done
Thao tác này sẽ tải các hình ảnh sau xuống thư mục assets của ứng dụng:
|
|
|
|
|
|
|
|
|
|
|
|
|
|
|
|


Giờ đây, khi đã có các thành phần hình ảnh đại diện, bạn cần thêm các thành phần đó vào tệp pubspec.yaml như sau:
pubspec.yaml
name: animated_responsive_layout
description: "A new Flutter project."
publish_to: 'none'
version: 0.1.0

environment:
  sdk: ^3.8.0

dependencies:
  flutter:
    sdk: flutter

dev_dependencies:
  flutter_test:
    sdk: flutter
  flutter_lints: ^5.0.0

flutter:
  uses-material-design: true

                                        # Add from here...
  assets:
    - assets/avatar_1.png
    - assets/avatar_2.png
    - assets/avatar_3.png
    - assets/avatar_4.png
    - assets/avatar_5.png
    - assets/avatar_6.png
    - assets/avatar_7.png
    - assets/thumbnail_1.png
                                        # ... to here.
Ứng dụng cần có nguồn dữ liệu cho các thông báo mà ứng dụng hiển thị. Trong thư mục lib của dự án, hãy tạo một thư mục con models. Bạn có thể thực hiện việc này trên dòng lệnh bằng mkdir hoặc trong trình soạn thảo văn bản mà bạn chọn. Tạo tệp models.dart trong thư mục lib/models có nội dung sau:
lib/models/models.dart
class Attachment {
  const Attachment({required this.url});

  final String url;
}

class Email {
  const Email({
    required this.sender,
    required this.recipients,
    required this.subject,
    required this.content,
    this.replies = 0,
    this.attachments = const [],
  });

  final User sender;
  final List<User> recipients;
  final String subject;
  final String content;
  final List<Attachment> attachments;
  final double replies;
}

class Name {
  const Name({required this.first, required this.last});

  final String first;
  final String last;
  String get fullName => '$first $last';
}

class User {
  const User({
    required this.name,
    required this.avatarUrl,
    required this.lastActive,
  });

  final Name name;
  final String avatarUrl;
  final DateTime lastActive;
}
Giờ đây, bạn đã có định nghĩa về hình dạng của dữ liệu, hãy tạo một tệp data.dart trong thư mục lib/models với nội dung sau:
lib/models/data.dart
import 'models.dart';

final User user_0 = User(
  name: const Name(first: 'Me', last: ''),
  avatarUrl: 'assets/avatar_1.png',
  lastActive: DateTime.now(),
);
final User user_1 = User(
  name: const Name(first: '老', last: '强'),
  avatarUrl: 'assets/avatar_2.png',
  lastActive: DateTime.now().subtract(const Duration(minutes: 10)),
);
final User user_2 = User(
  name: const Name(first: 'So', last: 'Duri'),
  avatarUrl: 'assets/avatar_3.png',
  lastActive: DateTime.now().subtract(const Duration(minutes: 20)),
);
final User user_3 = User(
  name: const Name(first: 'Lily', last: 'MacDonald'),
  avatarUrl: 'assets/avatar_4.png',
  lastActive: DateTime.now().subtract(const Duration(hours: 2)),
);
final User user_4 = User(
  name: const Name(first: 'Ziad', last: 'Aouad'),
  avatarUrl: 'assets/avatar_5.png',
  lastActive: DateTime.now().subtract(const Duration(hours: 6)),
);

final List<Email> emails = [
  Email(
    sender: user_1,
    recipients: [],
    subject: '豆花鱼',
    content: '最近忙吗?昨晚我去了你最爱的那家饭馆,点了他们的特色豆花鱼,吃着吃着就想你了。',
  ),
  Email(
    sender: user_2,
    recipients: [],
    subject: 'Dinner Club',
    content:
        'I think it's time for us to finally try that new noodle shop downtown that doesn't use menus. Anyone else have other suggestions for dinner club this week? I'm so intrigued by this idea of a noodle restaurant where no one gets to order for themselves - could be fun, or terrible, or both :)\n\nSo',
  ),
  Email(
    sender: user_3,
    recipients: [],
    subject: 'This food show is made for you',
    content:
        'Ping– you'd love this new food show I started watching. It's produced by a Thai drummer who started getting recognized for the amazing vegan food she always brought to shows.',
    attachments: [const Attachment(url: 'assets/thumbnail_1.png')],
  ),
  Email(
    sender: user_4,
    recipients: [],
    subject: 'Volunteer EMT with me?',
    content:
        'What do you think about training to be volunteer EMTs? We could do it together for moral support. Think about it??',
  ),
];

final List<Email> replies = [
  Email(
    sender: user_2,
    recipients: [user_3, user_2],
    subject: 'Dinner Club',
    content:
        'I think it's time for us to finally try that new noodle shop downtown that doesn't use menus. Anyone else have other suggestions for dinner club this week? I'm so intrigued by this idea of a noodle restaurant where no one gets to order for themselves - could be fun, or terrible, or both :)\n\nSo',
  ),
  Email(
    sender: user_0,
    recipients: [user_3, user_2],
    subject: 'Dinner Club',
    content:
        'Yes! I forgot about that place! I'm definitely up for taking a risk this week and handing control over to this mysterious noodle chef. I wonder what happens if you have allergies though? Lucky none of us have any otherwise I'd be a bit concerned.\n\nThis is going to be great. See you all at the usual time?',
  ),
];
Khi đã có dữ liệu đó, đã đến lúc xác định một vài tiện ích để hiển thị dữ liệu đó. Tạo một thư mục con trong lib có tên là widgets. Bạn sẽ tạo 4 tệp trong widgets và có thể nhận được một số cảnh báo từ trình chỉnh sửa cho đến khi tạo xong cả 4 tệp. Hãy nhớ rằng mục đích của lớp học lập trình này là tạo kiểu cho ứng dụng bằng Material 3. Vì vậy, hãy thêm nội dung được liệt kê vào mỗi tệp trong số 4 tệp sau:
lib/widgets/email_list_view.dart
import 'package:flutter/material.dart';

import '../models/data.dart' as data;
import '../models/models.dart';
import 'email_widget.dart';
import 'search_bar.dart' as search_bar;

class EmailListView extends StatelessWidget {
  const EmailListView({
    super.key,
    this.selectedIndex,
    this.onSelected,
    required this.currentUser,
  });

  final int? selectedIndex;
  final ValueChanged<int>? onSelected;
  final User currentUser;

  @override
  Widget build(BuildContext context) {
    return Padding(
      padding: const EdgeInsets.symmetric(horizontal: 8.0),
      child: ListView(
        children: [
          const SizedBox(height: 8),
          search_bar.SearchBar(currentUser: currentUser),
          const SizedBox(height: 8),
          ...List.generate(data.emails.length, (index) {
            return Padding(
              padding: const EdgeInsets.only(bottom: 8.0),
              child: EmailWidget(
                email: data.emails[index],
                onSelected: onSelected != null
                    ? () {
                        onSelected!(index);
                      }
                    : null,
                isSelected: selectedIndex == index,
              ),
            );
          }),
        ],
      ),
    );
  }
}
Có thể hiển thị danh sách email có vẻ như là một chức năng mà ứng dụng nhắn tin phải có. Bạn sẽ nhận được một vài khiếu nại từ trình chỉnh sửa, nhưng bạn có thể khắc phục một số khiếu nại đó bằng cách thêm tệp tiếp theo email_widget.dart.
lib/widgets/email_widget.dart
import 'package:flutter/material.dart';
import '../models/models.dart';
import 'star_button.dart';

enum EmailType { preview, threaded, primaryThreaded }

class EmailWidget extends StatefulWidget {
  const EmailWidget({
    super.key,
    required this.email,
    this.isSelected = false,
    this.isPreview = true,
    this.isThreaded = false,
    this.showHeadline = false,
    this.onSelected,
  });

  final bool isSelected;
  final bool isPreview;
  final bool showHeadline;
  final bool isThreaded;
  final void Function()? onSelected;
  final Email email;

  @override
  State<EmailWidget> createState() => _EmailWidgetState();
}

class _EmailWidgetState extends State<EmailWidget> {
  late final ColorScheme _colorScheme = Theme.of(context).colorScheme;
  late Color unselectedColor = Color.alphaBlend(
    _colorScheme.primary.withAlpha(20),
    _colorScheme.surface,
  );

  Color get _surfaceColor => switch (widget) {
    EmailWidget(isPreview: false) => _colorScheme.surface,
    EmailWidget(isSelected: true) => _colorScheme.primaryContainer,
    _ => unselectedColor,
  };

  @override
  Widget build(BuildContext context) {
    return GestureDetector(
      onTap: widget.onSelected,
      child: Card(
        elevation: 0,
        color: _surfaceColor,
        clipBehavior: Clip.hardEdge,
        child: Column(
          crossAxisAlignment: CrossAxisAlignment.start,
          mainAxisSize: MainAxisSize.min,
          children: [
            if (widget.showHeadline) ...[
              EmailHeadline(email: widget.email, isSelected: widget.isSelected),
            ],
            EmailContent(
              email: widget.email,
              isPreview: widget.isPreview,
              isThreaded: widget.isThreaded,
              isSelected: widget.isSelected,
            ),
          ],
        ),
      ),
    );
  }
}

class EmailContent extends StatefulWidget {
  const EmailContent({
    super.key,
    required this.email,
    required this.isPreview,
    required this.isThreaded,
    required this.isSelected,
  });

  final Email email;
  final bool isPreview;
  final bool isThreaded;
  final bool isSelected;

  @override
  State<EmailContent> createState() => _EmailContentState();
}

class _EmailContentState extends State<EmailContent> {
  late final ColorScheme _colorScheme = Theme.of(context).colorScheme;
  late final TextTheme _textTheme = Theme.of(context).textTheme;

  Widget get contentSpacer => SizedBox(height: widget.isThreaded ? 20 : 2);

  String get lastActiveLabel {
    final DateTime now = DateTime.now();
    if (widget.email.sender.lastActive.isAfter(now)) throw ArgumentError();
    final Duration elapsedTime = widget.email.sender.lastActive
        .difference(now)
        .abs();
    return switch (elapsedTime) {
      Duration(inSeconds: < 60) => '${elapsedTime.inSeconds}s',
      Duration(inMinutes: < 60) => '${elapsedTime.inMinutes}m',
      Duration(inHours: < 24) => '${elapsedTime.inHours}h',
      Duration(inDays: < 365) => '${elapsedTime.inDays}d',
      _ => throw UnimplementedError(),
    };
  }

  TextStyle? get contentTextStyle => switch (widget) {
    EmailContent(isThreaded: true) => _textTheme.bodyLarge,
    EmailContent(isSelected: true) => _textTheme.bodyMedium?.copyWith(
      color: _colorScheme.onPrimaryContainer,
    ),
    _ => _textTheme.bodyMedium?.copyWith(color: _colorScheme.onSurfaceVariant),
  };

  @override
  Widget build(BuildContext context) {
    return Padding(
      padding: const EdgeInsets.all(20),
      child: Column(
        crossAxisAlignment: CrossAxisAlignment.start,
        children: [
          LayoutBuilder(
            builder: (context, constraints) {
              return Row(
                crossAxisAlignment: CrossAxisAlignment.center,
                children: [
                  if (constraints.maxWidth - 200 > 0) ...[
                    CircleAvatar(
                      backgroundImage: AssetImage(
                        widget.email.sender.avatarUrl,
                      ),
                    ),
                    const Padding(
                      padding: EdgeInsets.symmetric(horizontal: 6.0),
                    ),
                  ],
                  Expanded(
                    child: Column(
                      crossAxisAlignment: CrossAxisAlignment.start,
                      children: [
                        Text(
                          widget.email.sender.name.fullName,
                          overflow: TextOverflow.fade,
                          maxLines: 1,
                          style: widget.isSelected
                              ? _textTheme.labelMedium?.copyWith(
                                  color: _colorScheme.onSecondaryContainer,
                                )
                              : _textTheme.labelMedium?.copyWith(
                                  color: _colorScheme.onSurface,
                                ),
                        ),
                        Text(
                          lastActiveLabel,
                          overflow: TextOverflow.fade,
                          maxLines: 1,
                          style: widget.isSelected
                              ? _textTheme.labelMedium?.copyWith(
                                  color: _colorScheme.onSecondaryContainer,
                                )
                              : _textTheme.labelMedium?.copyWith(
                                  color: _colorScheme.onSurfaceVariant,
                                ),
                        ),
                      ],
                    ),
                  ),
                  if (constraints.maxWidth - 200 > 0) ...[const StarButton()],
                ],
              );
            },
          ),
          const SizedBox(width: 8),
          Column(
            crossAxisAlignment: CrossAxisAlignment.start,
            children: [
              if (widget.isPreview) ...[
                Text(
                  widget.email.subject,
                  style: const TextStyle(
                    fontSize: 18,
                  ).copyWith(color: _colorScheme.onSurface),
                ),
              ],
              if (widget.isThreaded) ...[
                contentSpacer,
                Text(
                  "To ${widget.email.recipients.map((recipient) => recipient.name.first).join(", ")}",
                  style: _textTheme.bodyMedium,
                ),
              ],
              contentSpacer,
              Text(
                widget.email.content,
                maxLines: widget.isPreview ? 2 : 100,
                overflow: TextOverflow.ellipsis,
                style: contentTextStyle,
              ),
            ],
          ),
          const SizedBox(width: 12),
          widget.email.attachments.isNotEmpty
              ? Container(
                  height: 96,
                  decoration: BoxDecoration(
                    borderRadius: BorderRadius.circular(8.0),
                    image: DecorationImage(
                      fit: BoxFit.cover,
                      image: AssetImage(widget.email.attachments.first.url),
                    ),
                  ),
                )
              : const SizedBox.shrink(),
          if (!widget.isPreview) ...[const EmailReplyOptions()],
        ],
      ),
    );
  }
}

class EmailHeadline extends StatefulWidget {
  const EmailHeadline({
    super.key,
    required this.email,
    required this.isSelected,
  });

  final Email email;
  final bool isSelected;

  @override
  State<EmailHeadline> createState() => _EmailHeadlineState();
}

class _EmailHeadlineState extends State<EmailHeadline> {
  late final TextTheme _textTheme = Theme.of(context).textTheme;
  late final ColorScheme _colorScheme = Theme.of(context).colorScheme;

  @override
  Widget build(BuildContext context) {
    return LayoutBuilder(
      builder: (context, constraints) {
        return Container(
          height: 84,
          color: Color.alphaBlend(
            _colorScheme.primary.withAlpha(12),
            _colorScheme.surface,
          ),
          child: Padding(
            padding: const EdgeInsets.fromLTRB(24, 12, 12, 12),
            child: Row(
              mainAxisSize: MainAxisSize.max,
              crossAxisAlignment: CrossAxisAlignment.center,
              children: [
                Expanded(
                  child: Column(
                    mainAxisSize: MainAxisSize.min,
                    crossAxisAlignment: CrossAxisAlignment.start,
                    children: [
                      Text(
                        widget.email.subject,
                        maxLines: 1,
                        overflow: TextOverflow.fade,
                        style: const TextStyle(
                          fontSize: 18,
                          fontWeight: FontWeight.w400,
                        ),
                      ),
                      Text(
                        '${widget.email.replies.toString()} Messages',
                        maxLines: 1,
                        overflow: TextOverflow.fade,
                        style: _textTheme.labelMedium?.copyWith(
                          fontWeight: FontWeight.w500,
                        ),
                      ),
                    ],
                  ),
                ),
                // Display a "condensed" version if the widget in the row are
                // expected to overflow.
                if (constraints.maxWidth - 200 > 0) ...[
                  SizedBox(
                    height: 40,
                    width: 40,
                    child: FloatingActionButton(
                      onPressed: () {},
                      elevation: 0,
                      backgroundColor: _colorScheme.surface,
                      child: const Icon(Icons.delete_outline),
                    ),
                  ),
                  const Padding(padding: EdgeInsets.only(right: 8.0)),
                  SizedBox(
                    height: 40,
                    width: 40,
                    child: FloatingActionButton(
                      onPressed: () {},
                      elevation: 0,
                      backgroundColor: _colorScheme.surface,
                      child: const Icon(Icons.more_vert),
                    ),
                  ),
                ],
              ],
            ),
          ),
        );
      },
    );
  }
}

class EmailReplyOptions extends StatefulWidget {
  const EmailReplyOptions({super.key});

  @override
  State<EmailReplyOptions> createState() => _EmailReplyOptionsState();
}

class _EmailReplyOptionsState extends State<EmailReplyOptions> {
  late final ColorScheme _colorScheme = Theme.of(context).colorScheme;

  @override
  Widget build(BuildContext context) {
    return LayoutBuilder(
      builder: (context, constraints) {
        if (constraints.maxWidth < 100) {
          return const SizedBox.shrink();
        }
        return Row(
          children: [
            Expanded(
              child: TextButton(
                style: ButtonStyle(
                  backgroundColor: WidgetStateProperty.all(
                    _colorScheme.onInverseSurface,
                  ),
                ),
                onPressed: () {},
                child: Text(
                  'Reply',
                  style: TextStyle(color: _colorScheme.onSurfaceVariant),
                ),
              ),
            ),
            const SizedBox(width: 8),
            Expanded(
              child: TextButton(
                style: ButtonStyle(
                  backgroundColor: WidgetStateProperty.all(
                    _colorScheme.onInverseSurface,
                  ),
                ),
                onPressed: () {},
                child: Text(
                  'Reply All',
                  style: TextStyle(color: _colorScheme.onSurfaceVariant),
                ),
              ),
            ),
          ],
        );
      },
    );
  }
}
Vâng, có rất nhiều hoạt động diễn ra trong tiện ích đó. Bạn nên tìm hiểu một số chi tiết, đặc biệt là để xem cách áp dụng màu sắc trong toàn bộ tiện ích. Đây sẽ trở thành một chủ đề định kỳ. Tiếp theo là search_bar.dart.
lib/widgets/search_bar.dart
import 'package:flutter/material.dart';

import '../models/models.dart';

class SearchBar extends StatelessWidget {
  const SearchBar({super.key, required this.currentUser});

  final User currentUser;

  @override
  Widget build(BuildContext context) {
    return SizedBox(
      height: 56,
      child: Container(
        decoration: BoxDecoration(
          borderRadius: BorderRadius.circular(100),
          color: Colors.white,
        ),
        padding: const EdgeInsets.fromLTRB(31, 12, 12, 12),
        child: Row(
          crossAxisAlignment: CrossAxisAlignment.center,
          children: [
            const Icon(Icons.search),
            const SizedBox(width: 23.5),
            Expanded(
              child: TextField(
                maxLines: 1,
                decoration: InputDecoration(
                  isDense: true,
                  border: InputBorder.none,
                  hintText: 'Search replies',
                  hintStyle: Theme.of(context).textTheme.bodyMedium,
                ),
              ),
            ),
            CircleAvatar(backgroundImage: AssetImage(currentUser.avatarUrl)),
          ],
        ),
      ),
    );
  }
}
Một tiện ích đơn giản và không có trạng thái hơn nhiều. Tiếp theo, hãy thêm một tiện ích khác, star_button.dart:
lib/widgets/star_button.dart
impoimport 'package:flutter/material.dart';

class StarButton extends StatefulWidget {
  const StarButton({super.key});

  @override
  State<StarButton> createState() => _StarButtonState();
}

class _StarButtonState extends State<StarButton> {
  bool state = false;
  late final ColorScheme _colorScheme = Theme.of(context).colorScheme;

  Icon get icon {
    final IconData iconData = state ? Icons.star : Icons.star_outline;

    return Icon(iconData, color: Colors.grey, size: 20);
  }

  void _toggle() {
    setState(() {
      state = !state;
    });
  }

  double get turns => state ? 1 : 0;

  @override
  Widget build(BuildContext context) {
    return AnimatedRotation(
      turns: turns,
      curve: Curves.decelerate,
      duration: const Duration(milliseconds: 300),
      child: FloatingActionButton(
        elevation: 0,
        shape: const CircleBorder(),
        backgroundColor: _colorScheme.surface,
        onPressed: () => _toggle(),
        child: Padding(padding: const EdgeInsets.all(10.0), child: icon),
      ),
    );
  }
}
Tiếp theo, hãy cập nhật nhân vật chính của chương trình, lib/main.dart. Thay thế nội dung hiện tại của tệp đó bằng nội dung sau.
lib/main.dart
import 'package:flutter/material.dart';

import 'models/data.dart' as data;
import 'models/models.dart';
import 'widgets/email_list_view.dart';

void main() {
  runApp(const MainApp());
}

class MainApp extends StatelessWidget {
  const MainApp({super.key});

  @override
  Widget build(BuildContext context) {
    return MaterialApp(
      theme: ThemeData.light(),
      home: Feed(currentUser: data.user_0),
    );
  }
}

class Feed extends StatefulWidget {
  const Feed({super.key, required this.currentUser});

  final User currentUser;

  @override
  State<Feed> createState() => _FeedState();
}

class _FeedState extends State<Feed> {
  late final _colorScheme = Theme.of(context).colorScheme;
  late final _backgroundColor = Color.alphaBlend(
    _colorScheme.primary.withAlpha(36),
    _colorScheme.surface,
  );

  @override
  Widget build(BuildContext context) {
    return Scaffold(
      body: Container(
        color: _backgroundColor,
        child: EmailListView(currentUser: widget.currentUser),
      ),
      floatingActionButton: FloatingActionButton(
        backgroundColor: _colorScheme.tertiaryContainer,
        foregroundColor: _colorScheme.onTertiaryContainer,
        onPressed: () {},
        child: const Icon(Icons.add),
      ),
    );
  }
}
Chạy ứng dụng để xem bạn đang bắt đầu từ đâu.
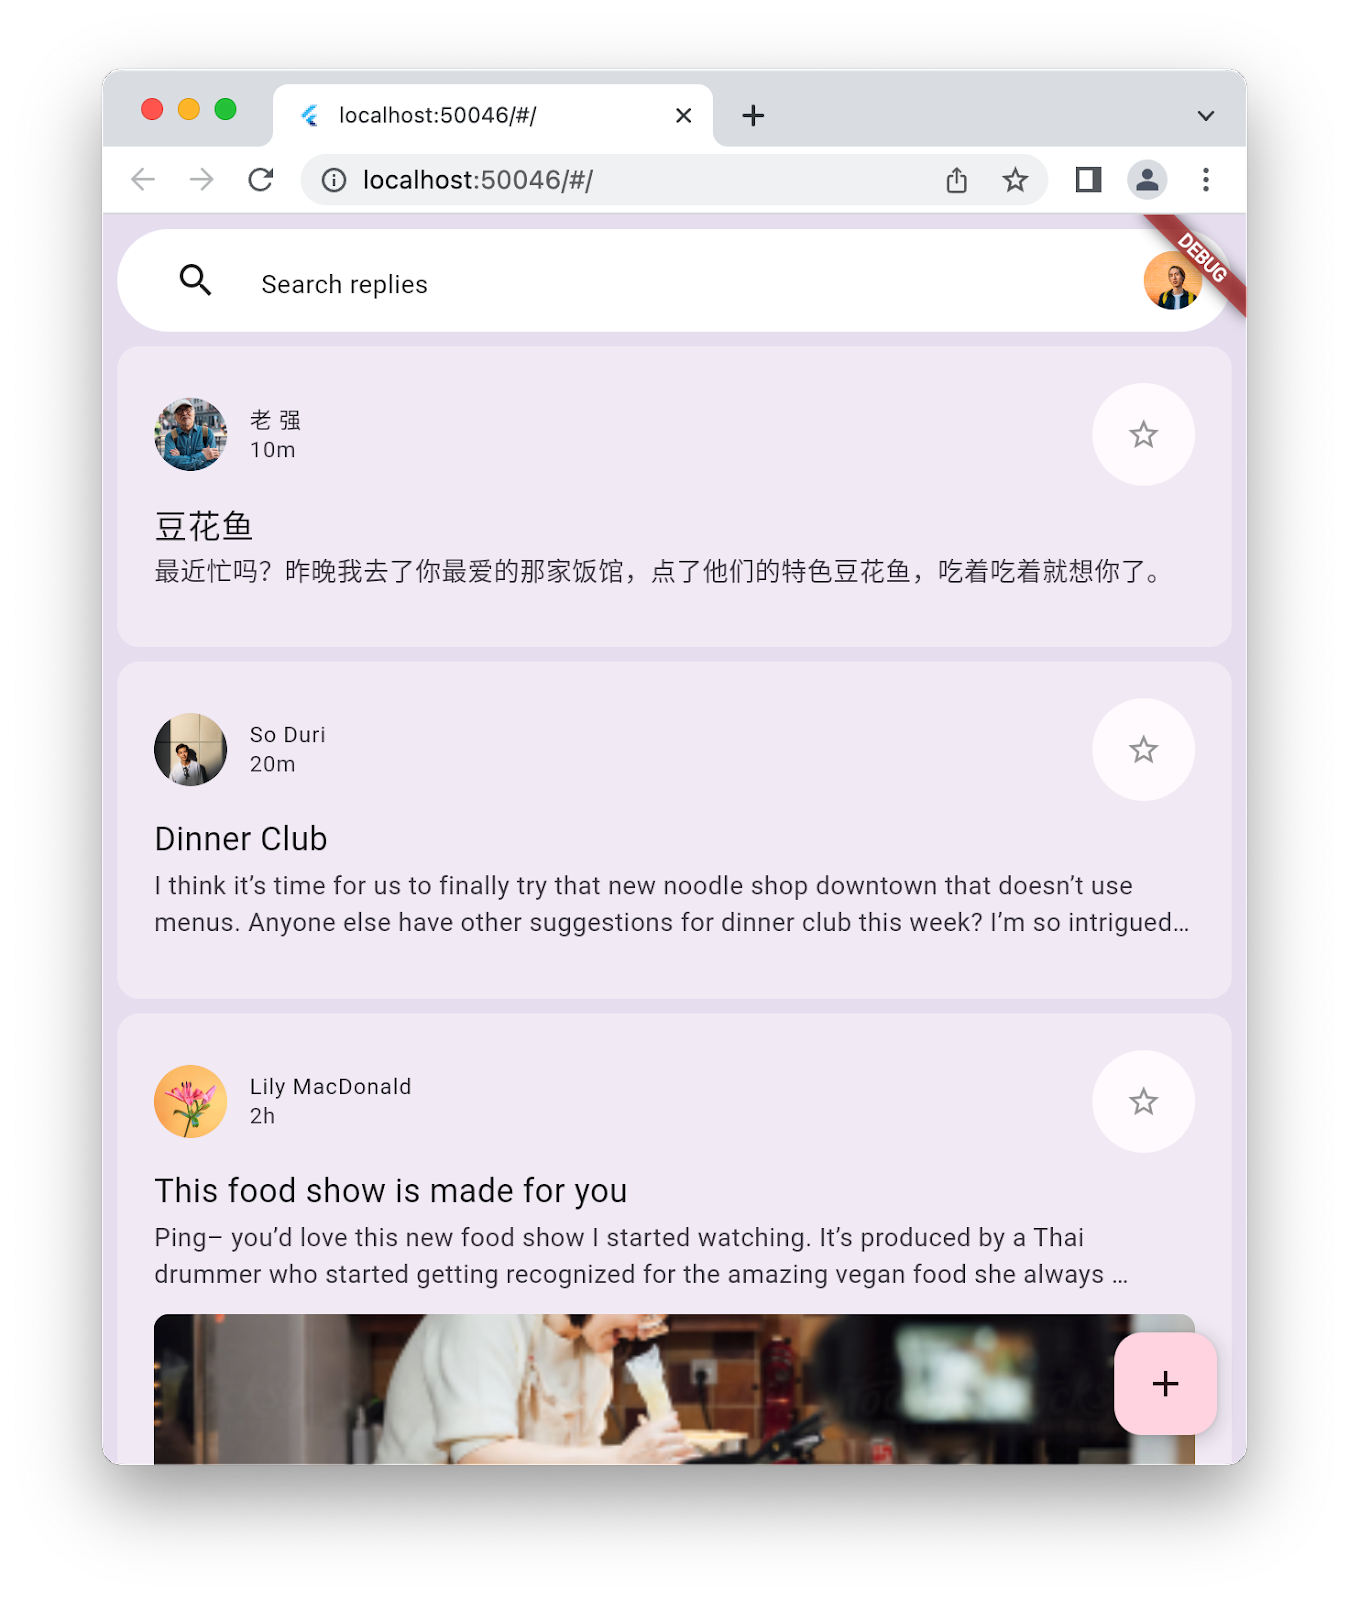
5. Thêm NavigationBar
Ở cuối bước trước, ứng dụng khởi động có một danh sách thông báo nhưng không có nhiều hoạt động khác. Trong bước này, bạn thêm NavigationBar để tăng thêm sự hấp dẫn về hình ảnh. Khi ứng dụng chuyển đổi từ bản phác thảo giao diện người dùng thành một ứng dụng thực tế, thanh điều hướng sẽ cung cấp nhiều khu vực của ứng dụng để người dùng sử dụng.
Việc có NavigationBar ngụ ý rằng có các đích đến để điều hướng đến. Tạo một tệp mới trong thư mục lib có tên destinations.dart và điền mã sau vào tệp đó.
lib/destinations.dart
import 'package:flutter/material.dart';

class Destination {
  const Destination(this.icon, this.label);
  final IconData icon;
  final String label;
}

const List<Destination> destinations = <Destination>[
  Destination(Icons.inbox_rounded, 'Inbox'),
  Destination(Icons.article_outlined, 'Articles'),
  Destination(Icons.messenger_outline_rounded, 'Messages'),
  Destination(Icons.group_outlined, 'Groups'),
];
Điều này cung cấp cho ứng dụng 4 đích đến để NavigationBar hiển thị. Tiếp theo, hãy kết nối danh sách đích đến này vào tệp lib/main.dart như sau:
lib/main.dart
import 'package:flutter/material.dart';

import 'destinations.dart';                    // Add this import
import 'models/data.dart' as data;
import 'models/models.dart';
import 'widgets/email_list_view.dart';

void main() {
  runApp(const MainApp());
}

class MainApp extends StatelessWidget {
  const MainApp({super.key});

  @override
  Widget build(BuildContext context) {
    return MaterialApp(
      theme: ThemeData.light(),
      home: Feed(currentUser: data.user_0),
    );
  }
}

class Feed extends StatefulWidget {
  const Feed({super.key, required this.currentUser});

  final User currentUser;

  @override
  State<Feed> createState() => _FeedState();
}

class _FeedState extends State<Feed> {
  late final _colorScheme = Theme.of(context).colorScheme;
  late final _backgroundColor = Color.alphaBlend(
    _colorScheme.primary.withAlpha(36),
    _colorScheme.surface,
  );

  int selectedIndex = 0;                       // Add this variable

  @override
  Widget build(BuildContext context) {
    return Scaffold(
      body: Container(
        color: _backgroundColor,
        child: EmailListView(
                                              // Add from here...
          selectedIndex: selectedIndex,
          onSelected: (index) {
            setState(() {
              selectedIndex = index;
            });
          },
                                              // ... to here.
          currentUser: widget.currentUser,
        ),
      ),
      floatingActionButton: FloatingActionButton(
        backgroundColor: _colorScheme.tertiaryContainer,
        foregroundColor: _colorScheme.onTertiaryContainer,
        onPressed: () {},
        child: const Icon(Icons.add),
      ),
                                                  // Add from here...
      bottomNavigationBar: NavigationBar(
        elevation: 0,
        backgroundColor: Colors.white,
        destinations: destinations.map<NavigationDestination>((d) {
          return NavigationDestination(icon: Icon(d.icon), label: d.label);
        }).toList(),
        selectedIndex: selectedIndex,
        onDestinationSelected: (index) {
          setState(() {
            selectedIndex = index;
          });
        },
      ),
                                                // ...to here.
    );
  }
}
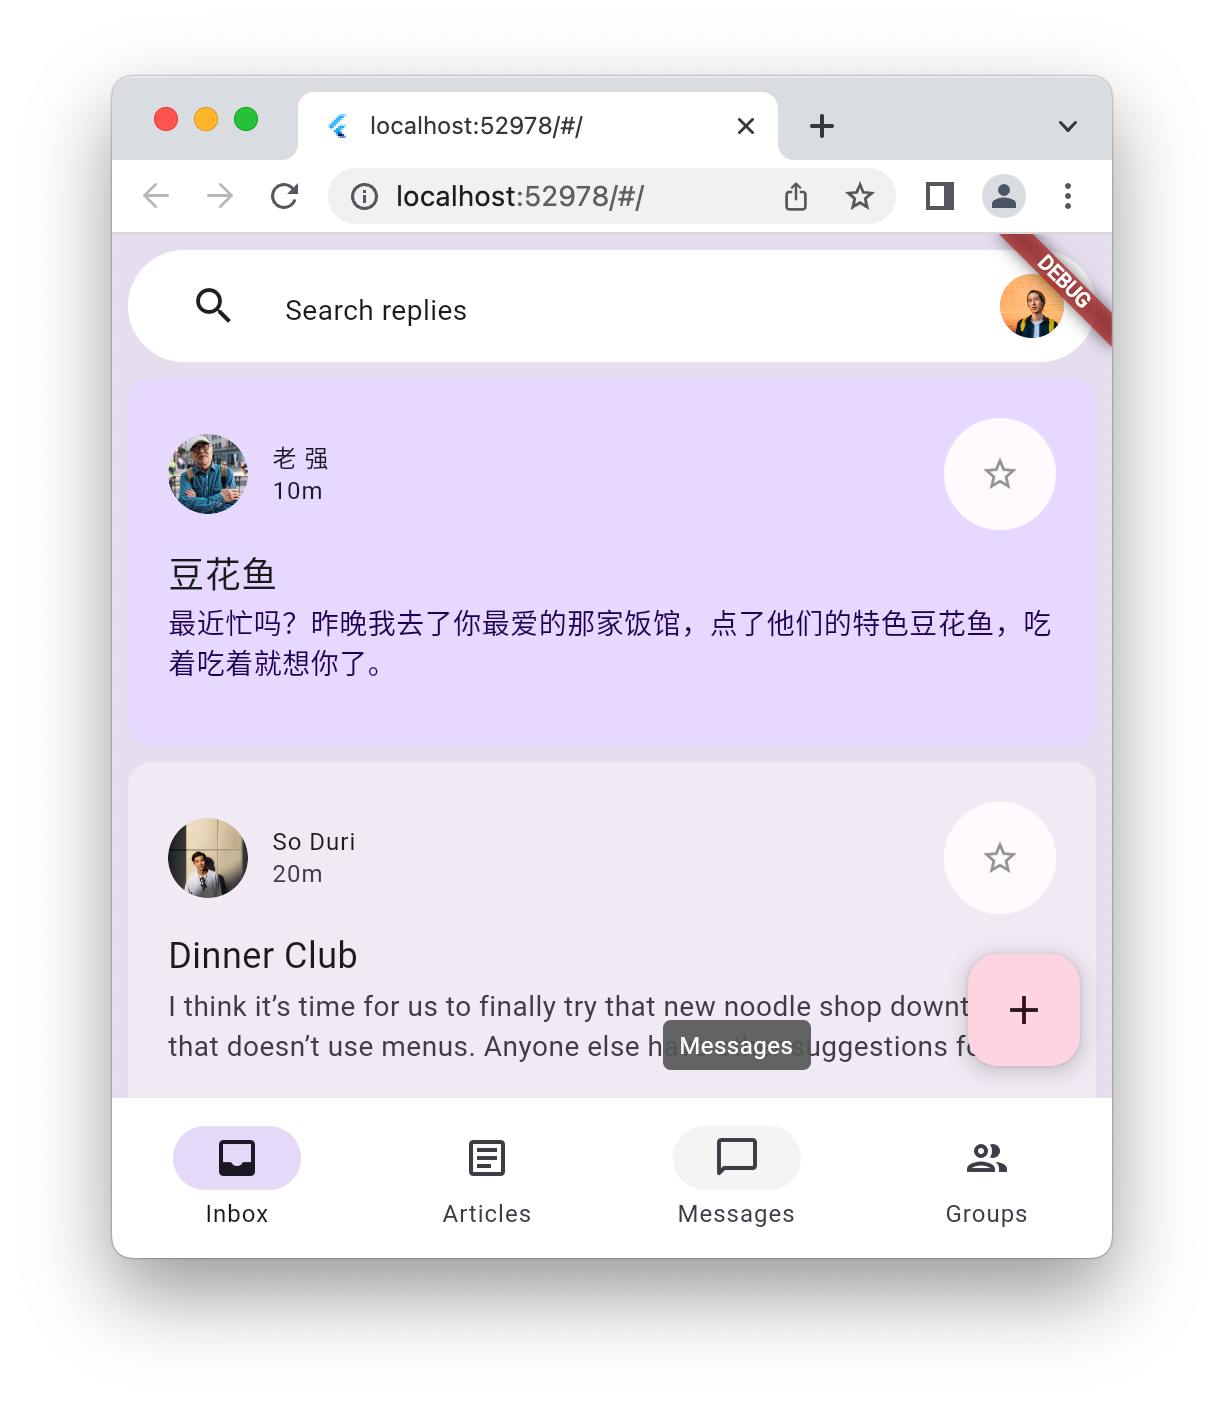
Thay vì xác định nội dung khác nhau cho từng đích đến, hãy thay đổi trạng thái của từng thông báo để phản ánh đích đến đã chọn trong NavigationBar. Để đảm bảo tính nhất quán, thao tác này cũng hoạt động theo chiều ngược lại: chọn một thông báo sẽ hiển thị đích đến tương ứng trong NavigationBar. Chạy ứng dụng để xác minh những thay đổi này:

Điều này có vẻ hợp lý trong cấu hình hẹp, tuy nhiên nếu bạn làm cho cửa sổ rộng hơn hoặc xoay trình mô phỏng điện thoại sang ngang, thì nó sẽ trông hơi kỳ lạ. Để khắc phục vấn đề này, hãy giới thiệu NavigationRail ở bên trái màn hình khi ứng dụng đủ rộng. Việc này sẽ được xử lý trong bước tiếp theo.
6. Thêm NavigationRail
Bước này sẽ thêm NavigationRail vào ứng dụng. Ý tưởng là chỉ hiển thị một trong hai Tiện ích điều hướng tuỳ thuộc vào kích thước màn hình, tức là bạn cần ẩn hoặc hiện NavigationBar khi cần. Trong thư mục lib/widgets, hãy tạo tệp disappearing_bottom_navigation_bar.dart rồi thêm mã sau:
lib/widgets/disappearing_bottom_navigation_bar.dart
import 'package:flutter/material.dart';

import '../destinations.dart';

class DisappearingBottomNavigationBar extends StatelessWidget {
  const DisappearingBottomNavigationBar({
    super.key,
    required this.selectedIndex,
    this.onDestinationSelected,
  });

  final int selectedIndex;
  final ValueChanged<int>? onDestinationSelected;

  @override
  Widget build(BuildContext context) {
    return NavigationBar(
      elevation: 0,
      backgroundColor: Colors.white,
      destinations: destinations.map<NavigationDestination>((d) {
        return NavigationDestination(icon: Icon(d.icon), label: d.label);
      }).toList(),
      selectedIndex: selectedIndex,
      onDestinationSelected: onDestinationSelected,
    );
  }
}
Trong cùng thư mục, hãy thêm một tệp khác có tên là disappearing_navigation_rail.dart bằng mã sau:
lib/widgets/disappearing_navigation_rail.dart
import 'package:flutter/material.dart';

import '../destinations.dart';

class DisappearingNavigationRail extends StatelessWidget {
  const DisappearingNavigationRail({
    super.key,
    required this.backgroundColor,
    required this.selectedIndex,
    this.onDestinationSelected,
  });

  final Color backgroundColor;
  final int selectedIndex;
  final ValueChanged<int>? onDestinationSelected;

  @override
  Widget build(BuildContext context) {
    final colorScheme = Theme.of(context).colorScheme;
    return NavigationRail(
      selectedIndex: selectedIndex,
      backgroundColor: backgroundColor,
      onDestinationSelected: onDestinationSelected,
      leading: Column(
        children: [
          IconButton(onPressed: () {}, icon: const Icon(Icons.menu)),
          const SizedBox(height: 8),
          FloatingActionButton(
            shape: const RoundedRectangleBorder(
              borderRadius: BorderRadius.all(Radius.circular(15)),
            ),
            backgroundColor: colorScheme.tertiaryContainer,
            foregroundColor: colorScheme.onTertiaryContainer,
            onPressed: () {},
            child: const Icon(Icons.add),
          ),
        ],
      ),
      groupAlignment: -0.85,
      destinations: destinations.map((d) {
        return NavigationRailDestination(
          icon: Icon(d.icon),
          label: Text(d.label),
        );
      }).toList(),
    );
  }
}
Khi các thành ngữ điều hướng được tái cấu trúc thành các tiện ích riêng, tệp lib/main.dart cần một số sửa đổi:
lib/main.dart
import 'package:flutter/material.dart';

// Remove the destination.dart import, it's not required
import 'models/data.dart' as data;
import 'models/models.dart';
import 'widgets/disappearing_bottom_navigation_bar.dart';  // Add import
import 'widgets/disappearing_navigation_rail.dart';        // Add import
import 'widgets/email_list_view.dart';

void main() {
  runApp(const MainApp());
}

class MainApp extends StatelessWidget {
  const MainApp({super.key});

  @override
  Widget build(BuildContext context) {
    return MaterialApp(
      theme: ThemeData.light(),
      home: Feed(currentUser: data.user_0),
    );
  }
}

class Feed extends StatefulWidget {
  const Feed({super.key, required this.currentUser});

  final User currentUser;

  @override
  State<Feed> createState() => _FeedState();
}

class _FeedState extends State<Feed> {
  late final _colorScheme = Theme.of(context).colorScheme;
  late final _backgroundColor = Color.alphaBlend(
    _colorScheme.primary.withAlpha(36),
    _colorScheme.surface,
  );

  int selectedIndex = 0;
                                                  // Add from here...
  bool wideScreen = false;

  @override
  void didChangeDependencies() {
    super.didChangeDependencies();

    final double width = MediaQuery.of(context).size.width;
    wideScreen = width > 600;
  }
                                                 // ... to here.

  @override
  Widget build(BuildContext context) {
                                                 // Modify from here...
    return Scaffold(
      body: Row(
        children: [
          if (wideScreen)
            DisappearingNavigationRail(
              selectedIndex: selectedIndex,
              backgroundColor: _backgroundColor,
              onDestinationSelected: (index) {
                setState(() {
                  selectedIndex = index;
                });
              },
            ),
          Expanded(
            child: Container(
              color: _backgroundColor,
              child: EmailListView(
                selectedIndex: selectedIndex,
                onSelected: (index) {
                  setState(() {
                    selectedIndex = index;
                  });
                },
                currentUser: widget.currentUser,
              ),
            ),
          ),
        ],
      ),
      floatingActionButton: wideScreen
          ? null
          : FloatingActionButton(
              backgroundColor: _colorScheme.tertiaryContainer,
              foregroundColor: _colorScheme.onTertiaryContainer,
              onPressed: () {},
              child: const Icon(Icons.add),
            ),
      bottomNavigationBar: wideScreen
          ? null
          : DisappearingBottomNavigationBar(
              selectedIndex: selectedIndex,
              onDestinationSelected: (index) {
                setState(() {
                  selectedIndex = index;
                });
              },
            ),
    );
                                                    // ... to here.
  }
}
Thay đổi quan trọng đầu tiên đối với tệp main.dart là việc bổ sung trạng thái wideScreen cập nhật bất cứ khi nào người dùng đổi kích thước màn hình, cho dù đó là bằng cách đổi kích thước cửa sổ trình duyệt hay xoay điện thoại. Thay đổi tiếp theo sẽ sửa đổi NavigationBar và FloatingActionButton tuỳ thuộc vào việc ứng dụng có ở chế độ wideScreen hay không. Cuối cùng, NavigationRail được giới thiệu có điều kiện ở bên trái nếu màn hình đủ rộng. Chạy ứng dụng trên web hoặc máy tính và đổi kích thước màn hình để hiển thị hai bố cục khác nhau.
|
|

Việc có hai bố cục khác nhau là tốt, tuy nhiên quá trình chuyển đổi giữa hai bố cục này không tốt. Việc thay thế thanh bằng dải điều hướng (và ngược lại) theo cách linh hoạt hơn sẽ cải thiện đáng kể ứng dụng này. Bạn sẽ thêm ảnh động này trong bước tiếp theo.
7. Tạo ảnh động cho hiệu ứng chuyển đổi
Để tạo trải nghiệm ảnh động, bạn cần tạo một loạt ảnh động, trong đó mỗi thành phần được biên đạo phù hợp. Đối với ảnh động này, bạn sẽ bắt đầu bằng cách tạo một tệp mới trong thư mục lib có tên là animations.dart với các đường cong ảnh động mà bạn cần.
lib/animations.dart
import 'package:flutter/animation.dart';

class BarAnimation extends ReverseAnimation {
  BarAnimation({required AnimationController parent})
    : super(
        CurvedAnimation(
          parent: parent,
          curve: const Interval(0, 1 / 5),
          reverseCurve: const Interval(1 / 5, 4 / 5),
        ),
      );
}

class OffsetAnimation extends CurvedAnimation {
  OffsetAnimation({required super.parent})
    : super(
        curve: const Interval(
          2 / 5,
          3 / 5,
          curve: Curves.easeInOutCubicEmphasized,
        ),
        reverseCurve: Interval(
          4 / 5,
          1,
          curve: Curves.easeInOutCubicEmphasized.flipped,
        ),
      );
}

class RailAnimation extends CurvedAnimation {
  RailAnimation({required super.parent})
    : super(
        curve: const Interval(0 / 5, 4 / 5),
        reverseCurve: const Interval(3 / 5, 1),
      );
}

class RailFabAnimation extends CurvedAnimation {
  RailFabAnimation({required super.parent})
    : super(curve: const Interval(3 / 5, 1));
}

class ScaleAnimation extends CurvedAnimation {
  ScaleAnimation({required super.parent})
    : super(
        curve: const Interval(
          3 / 5,
          4 / 5,
          curve: Curves.easeInOutCubicEmphasized,
        ),
        reverseCurve: Interval(
          3 / 5,
          1,
          curve: Curves.easeInOutCubicEmphasized.flipped,
        ),
      );
}

class ShapeAnimation extends CurvedAnimation {
  ShapeAnimation({required super.parent})
    : super(
        curve: const Interval(
          2 / 5,
          3 / 5,
          curve: Curves.easeInOutCubicEmphasized,
        ),
      );
}

class SizeAnimation extends CurvedAnimation {
  SizeAnimation({required super.parent})
    : super(
        curve: const Interval(
          0 / 5,
          3 / 5,
          curve: Curves.easeInOutCubicEmphasized,
        ),
        reverseCurve: Interval(
          2 / 5,
          1,
          curve: Curves.easeInOutCubicEmphasized.flipped,
        ),
      );
}
Việc phát triển các đường cong này đòi hỏi phải lặp lại, điều này sẽ dễ dàng hơn nhiều nhờ tính năng tải lại nhanh của Flutter. Để sử dụng các ảnh động này, bạn cần có một số hiệu ứng chuyển đổi. Tạo một thư mục con trong thư mục lib có tên là transitions và thêm một tệp có tên là bottom_bar_transition.dart bằng mã sau:
lib/transitions/bottom_bar_transition.dart
import 'package:flutter/material.dart';
import '../animations.dart';

class BottomBarTransition extends StatefulWidget {
  const BottomBarTransition({
    super.key,
    required this.animation,
    required this.backgroundColor,
    required this.child,
  });

  final Animation<double> animation;
  final Color backgroundColor;
  final Widget child;

  @override
  State<BottomBarTransition> createState() => _BottomBarTransition();
}

class _BottomBarTransition extends State<BottomBarTransition> {
  late final Animation<Offset> offsetAnimation = Tween<Offset>(
    begin: const Offset(0, 1),
    end: Offset.zero,
  ).animate(OffsetAnimation(parent: widget.animation));

  late final Animation<double> heightAnimation = Tween<double>(
    begin: 0,
    end: 1,
  ).animate(SizeAnimation(parent: widget.animation));

  @override
  Widget build(BuildContext context) {
    return ClipRect(
      child: DecoratedBox(
        decoration: BoxDecoration(color: widget.backgroundColor),
        child: Align(
          alignment: Alignment.topLeft,
          heightFactor: heightAnimation.value,
          child: FractionalTranslation(
            translation: offsetAnimation.value,
            child: widget.child,
          ),
        ),
      ),
    );
  }
}
Thêm một tệp khác vào thư mục lib/transitions có tên là nav_rail_transition.dart rồi thêm mã sau:
lib/transitions/nav_rail_transition.dart
import 'package:flutter/material.dart';
import '../animations.dart';

class NavRailTransition extends StatefulWidget {
  const NavRailTransition({
    super.key,
    required this.animation,
    required this.backgroundColor,
    required this.child,
  });

  final Animation<double> animation;
  final Widget child;
  final Color backgroundColor;

  @override
  State<NavRailTransition> createState() => _NavRailTransitionState();
}

class _NavRailTransitionState extends State<NavRailTransition> {
  // The animations are only rebuilt by this method when the text
  // direction changes because this widget only depends on Directionality.
  late final bool ltr = Directionality.of(context) == TextDirection.ltr;
  late final Animation<Offset> offsetAnimation = Tween<Offset>(
    begin: ltr ? const Offset(-1, 0) : const Offset(1, 0),
    end: Offset.zero,
  ).animate(OffsetAnimation(parent: widget.animation));
  late final Animation<double> widthAnimation = Tween<double>(
    begin: 0,
    end: 1,
  ).animate(SizeAnimation(parent: widget.animation));

  @override
  Widget build(BuildContext context) {
    return ClipRect(
      child: DecoratedBox(
        decoration: BoxDecoration(color: widget.backgroundColor),
        child: AnimatedBuilder(
          animation: widthAnimation,
          builder: (context, child) {
            return Align(
              alignment: Alignment.topLeft,
              widthFactor: widthAnimation.value,
              child: FractionalTranslation(
                translation: offsetAnimation.value,
                child: widget.child,
              ),
            );
          },
        ),
      ),
    );
  }
}
Hai tiện ích chuyển đổi này bao gồm tiện ích thanh và dải điều hướng để tạo hiệu ứng ảnh động cho sự xuất hiện và biến mất của các tiện ích này. Để sử dụng hai tiện ích chuyển đổi này, hãy cập nhật hai tiện ích, bắt đầu bằng disappearing_bottom_navigation_bar.dart:
lib/widgets/disappearing_bottom_navigation_bar.dart
import 'package:flutter/material.dart';

import '../animations.dart';                          // Add this import
import '../destinations.dart';
import '../transitions/bottom_bar_transition.dart';   // Add this import

class DisappearingBottomNavigationBar extends StatelessWidget {
  const DisappearingBottomNavigationBar({
    super.key,
    required this.barAnimation,                       // Add this parameter
    required this.selectedIndex,
    this.onDestinationSelected,
  });

  final BarAnimation barAnimation;                   // Add this variable
  final int selectedIndex;
  final ValueChanged<int>? onDestinationSelected;

  @override
  Widget build(BuildContext context) {
                                                     // Modify from here...
    return BottomBarTransition(
      animation: barAnimation,
      backgroundColor: Colors.white,
      child: NavigationBar(
        elevation: 0,
        backgroundColor: Colors.white,
        destinations: destinations.map<NavigationDestination>((d) {
          return NavigationDestination(icon: Icon(d.icon), label: d.label);
        }).toList(),
        selectedIndex: selectedIndex,
        onDestinationSelected: onDestinationSelected,
      ),
    );
                                                     // ... to here.
  }
}
Nội dung sửa đổi trước đó thêm một trong các ảnh động và tích hợp hiệu ứng chuyển đổi. Điều này cho phép bạn kiểm soát cách thanh điều hướng xuất hiện và biến mất.
Tiếp theo, hãy sửa đổi disappearing_navigation_rail.dart như sau:
lib/widgets/disappearing_navigation_rail.dart
import 'package:flutter/material.dart';

import '../animations.dart';                          // Add this import
import '../destinations.dart';
import '../transitions/nav_rail_transition.dart';     // Add this import
import 'animated_floating_action_button.dart';        // Add this import

class DisappearingNavigationRail extends StatelessWidget {
  const DisappearingNavigationRail({
    super.key,
    required this.railAnimation,                      // Add this parameter
    required this.railFabAnimation,                   // Add this parameter
    required this.backgroundColor,
    required this.selectedIndex,
    this.onDestinationSelected,
  });

  final RailAnimation railAnimation;                  // Add this variable
  final RailFabAnimation railFabAnimation;            // Add this variable
  final Color backgroundColor;
  final int selectedIndex;
  final ValueChanged<int>? onDestinationSelected;

  @override
  Widget build(BuildContext context) {
    // Delete colorScheme
                                                      // Modify from here ...
    return NavRailTransition(
      animation: railAnimation,
      backgroundColor: backgroundColor,
      child: NavigationRail(
        selectedIndex: selectedIndex,
        backgroundColor: backgroundColor,
        onDestinationSelected: onDestinationSelected,
        leading: Column(
          children: [
            IconButton(onPressed: () {}, icon: const Icon(Icons.menu)),
            const SizedBox(height: 8),
            AnimatedFloatingActionButton(
              animation: railFabAnimation,
              elevation: 0,
              onPressed: () {},
              child: const Icon(Icons.add),
            ),
          ],
        ),
        groupAlignment: -0.85,
        destinations: destinations.map((d) {
          return NavigationRailDestination(
            icon: Icon(d.icon),
            label: Text(d.label),
          );
        }).toList(),
      ),
    );
                                                      // ... to here.
  }
}
Trong khi nhập mã trước, có thể bạn đã nhận được một loạt cảnh báo lỗi về một tiện ích chưa xác định – FloatingActionButton. Để khắc phục vấn đề này, hãy thêm tệp có tên animated_floating_action_button.dart vào lib/widgets bằng mã sau:
lib/widgets/animated_floating_action_button.dart
import 'dart:ui';

import 'package:flutter/material.dart';
import '../animations.dart';

class AnimatedFloatingActionButton extends StatefulWidget {
  const AnimatedFloatingActionButton({
    super.key,
    required this.animation,
    this.elevation,
    this.onPressed,
    this.child,
  });

  final Animation<double> animation;
  final VoidCallback? onPressed;
  final Widget? child;
  final double? elevation;

  @override
  State<AnimatedFloatingActionButton> createState() =>
      _AnimatedFloatingActionButton();
}

class _AnimatedFloatingActionButton
    extends State<AnimatedFloatingActionButton> {
  late final ColorScheme _colorScheme = Theme.of(context).colorScheme;
  late final Animation<double> _scaleAnimation = ScaleAnimation(
    parent: widget.animation,
  );
  late final Animation<double> _shapeAnimation = ShapeAnimation(
    parent: widget.animation,
  );

  @override
  Widget build(BuildContext context) {
    return ScaleTransition(
      scale: _scaleAnimation,
      child: FloatingActionButton(
        elevation: widget.elevation,
        shape: RoundedRectangleBorder(
          borderRadius: BorderRadius.all(
            Radius.circular(lerpDouble(30, 15, _shapeAnimation.value)!),
          ),
        ),
        backgroundColor: _colorScheme.tertiaryContainer,
        foregroundColor: _colorScheme.onTertiaryContainer,
        onPressed: widget.onPressed,
        child: widget.child,
      ),
    );
  }
}
Để đưa các thay đổi này vào ứng dụng, hãy cập nhật tệp main.dart như sau:
lib/main.dart
import 'package:flutter/material.dart';

import 'animations.dart';                               // Add this import
import 'models/data.dart' as data;
import 'models/models.dart';
import 'widgets/animated_floating_action_button.dart';  // Add this import
import 'widgets/disappearing_bottom_navigation_bar.dart';
import 'widgets/disappearing_navigation_rail.dart';
import 'widgets/email_list_view.dart';

void main() {
  runApp(const MainApp());
}

class MainApp extends StatelessWidget {
  const MainApp({super.key});

  @override
  Widget build(BuildContext context) {
    return MaterialApp(
      theme: ThemeData.light(),
      home: Feed(currentUser: data.user_0),
    );
  }
}

class Feed extends StatefulWidget {
  const Feed({super.key, required this.currentUser});

  final User currentUser;

  @override
  State<Feed> createState() => _FeedState();
}

class _FeedState extends State<Feed> with SingleTickerProviderStateMixin {
  late final _colorScheme = Theme.of(context).colorScheme;
  late final _backgroundColor = Color.alphaBlend(
    _colorScheme.primary.withAlpha(36),
    _colorScheme.surface,
  );
                                                        // Add from here...
  late final _controller = AnimationController(
    duration: const Duration(milliseconds: 1000),
    reverseDuration: const Duration(milliseconds: 1250),
    value: 0,
    vsync: this,
  );
  late final _railAnimation = RailAnimation(parent: _controller);
  late final _railFabAnimation = RailFabAnimation(parent: _controller);
  late final _barAnimation = BarAnimation(parent: _controller);
                                                        // ... to here.

  int selectedIndex = 0;
  // Remove wideScreen
  bool controllerInitialized = false;                   // Add this variable

  @override
  void didChangeDependencies() {
    super.didChangeDependencies();

    final double width = MediaQuery.of(context).size.width;
    // Remove wideScreen reference
                                                        // Add from here ...
    final AnimationStatus status = _controller.status;
    if (width > 600) {
      if (status != AnimationStatus.forward &&
          status != AnimationStatus.completed) {
        _controller.forward();
      }
    } else {
      if (status != AnimationStatus.reverse &&
          status != AnimationStatus.dismissed) {
        _controller.reverse();
      }
    }
    if (!controllerInitialized) {
      controllerInitialized = true;
      _controller.value = width > 600 ? 1 : 0;
    }
                                                        // ... to here.
  }

                                                        // Add from here ...
  @override
  void dispose() {
    _controller.dispose();
    super.dispose();
  }
                                                        // ... to here.

  @override
  Widget build(BuildContext context) {
                                                        // Modify from here ...
    return AnimatedBuilder(
      animation: _controller,
      builder: (context, _) {
        return Scaffold(
          body: Row(
            children: [
              DisappearingNavigationRail(
                railAnimation: _railAnimation,
                railFabAnimation: _railFabAnimation,
                selectedIndex: selectedIndex,
                backgroundColor: _backgroundColor,
                onDestinationSelected: (index) {
                  setState(() {
                    selectedIndex = index;
                  });
                },
              ),
              Expanded(
                child: Container(
                  color: _backgroundColor,
                  child: EmailListView(
                    selectedIndex: selectedIndex,
                    onSelected: (index) {
                      setState(() {
                        selectedIndex = index;
                      });
                    },
                    currentUser: widget.currentUser,
                  ),
                ),
              ),
            ],
          ),
          floatingActionButton: AnimatedFloatingActionButton(
            animation: _barAnimation,
            onPressed: () {},
            child: const Icon(Icons.add),
          ),
          bottomNavigationBar: DisappearingBottomNavigationBar(
            barAnimation: _barAnimation,
            selectedIndex: selectedIndex,
            onDestinationSelected: (index) {
              setState(() {
                selectedIndex = index;
              });
            },
          ),
        );
      },
    );
                                                        // ... to here.
  }
}
Chạy ứng dụng. Ban đầu, ứng dụng sẽ có giao diện giống như trước. Thay đổi kích thước màn hình để xem nút bật/tắt giao diện người dùng giữa dải điều hướng và thanh điều hướng, tuỳ thuộc vào kích thước và kích thước. Giờ đây, chuyển động của các hiệu ứng chuyển đổi này sẽ mượt mà và vui nhộn. Sử dụng tính năng tải lại nhanh để thay đổi các đường cong ảnh động được dùng để xem cách ảnh động thay đổi cảm nhận về ứng dụng.
8. Thêm danh sách có chế độ xem chi tiết
Ngoài ra, ứng dụng nhắn tin là nơi tuyệt vời để hiển thị danh sách có bố cục chi tiết, nhưng chỉ khi màn hình đủ rộng. Bắt đầu bằng cách thêm một tệp có tên reply_list_view.dart trong lib/widgets và điền mã sau vào tệp đó:
lib/widgets/reply_list_view.dart
import 'package:flutter/material.dart';

import '../models/data.dart' as data;
import 'email_widget.dart';

class ReplyListView extends StatelessWidget {
  const ReplyListView({super.key});

  @override
  Widget build(BuildContext context) {
    return Padding(
      padding: const EdgeInsets.only(right: 8.0),
      child: ListView(
        children: [
          const SizedBox(height: 8),
          ...List.generate(data.replies.length, (index) {
            return Padding(
              padding: const EdgeInsets.only(bottom: 8.0),
              child: EmailWidget(
                email: data.replies[index],
                isPreview: false,
                isThreaded: true,
                showHeadline: index == 0,
              ),
            );
          }),
        ],
      ),
    );
  }
}
Tiếp theo, trong lib/transitions, hãy thêm một list_detail_transition.dart và điền mã sau vào:
lib/transitions/list_detail_transition.dart
import 'dart:ui';

import 'package:flutter/material.dart';
import '../animations.dart';

class ListDetailTransition extends StatefulWidget {
  const ListDetailTransition({
    super.key,
    required this.animation,
    required this.one,
    required this.two,
  });

  final Animation<double> animation;
  final Widget one;
  final Widget two;

  @override
  State<ListDetailTransition> createState() => _ListDetailTransitionState();
}

class _ListDetailTransitionState extends State<ListDetailTransition> {
  Animation<double> widthAnimation = const AlwaysStoppedAnimation(0);
  late final Animation<double> sizeAnimation = SizeAnimation(
    parent: widget.animation,
  );
  late final Animation<Offset> offsetAnimation = Tween<Offset>(
    begin: const Offset(1, 0),
    end: Offset.zero,
  ).animate(OffsetAnimation(parent: sizeAnimation));
  double currentFlexFactor = 0;

  @override
  void didChangeDependencies() {
    super.didChangeDependencies();

    final double width = MediaQuery.of(context).size.width;
    double nextFlexFactor = switch (width) {
      >= 800 && < 1200 => lerpDouble(1000, 2000, (width - 800) / 400)!,
      >= 1200 && < 1600 => lerpDouble(2000, 3000, (width - 1200) / 400)!,
      >= 1600 => 3000,
      _ => 1000,
    };

    if (nextFlexFactor == currentFlexFactor) {
      return;
    }

    if (currentFlexFactor == 0) {
      widthAnimation = Tween<double>(
        begin: 0,
        end: nextFlexFactor,
      ).animate(sizeAnimation);
    } else {
      final TweenSequence<double> sequence = TweenSequence([
        if (sizeAnimation.value > 0) ...[
          TweenSequenceItem(
            tween: Tween(begin: 0, end: widthAnimation.value),
            weight: sizeAnimation.value,
          ),
        ],
        if (sizeAnimation.value < 1) ...[
          TweenSequenceItem(
            tween: Tween(begin: widthAnimation.value, end: nextFlexFactor),
            weight: 1 - sizeAnimation.value,
          ),
        ],
      ]);

      widthAnimation = sequence.animate(sizeAnimation);
    }

    currentFlexFactor = nextFlexFactor;
  }

  @override
  Widget build(BuildContext context) {
    return widthAnimation.value.toInt() == 0
        ? widget.one
        : Row(
            children: [
              Flexible(flex: 1000, child: widget.one),
              Flexible(
                flex: widthAnimation.value.toInt(),
                child: FractionalTranslation(
                  translation: offsetAnimation.value,
                  child: widget.two,
                ),
              ),
            ],
          );
  }
}
Tích hợp nội dung này vào ứng dụng bằng cách cập nhật lib/main.dart như sau:
lib/main.dart
import 'package:flutter/material.dart';

import 'animations.dart';
import 'models/data.dart' as data;
import 'models/models.dart';
import 'transitions/list_detail_transition.dart';          // Add import
import 'widgets/animated_floating_action_button.dart';
import 'widgets/disappearing_bottom_navigation_bar.dart';
import 'widgets/disappearing_navigation_rail.dart';
import 'widgets/email_list_view.dart';
import 'widgets/reply_list_view.dart';                     // Add import

void main() {
  runApp(const MainApp());
}

class MainApp extends StatelessWidget {
  const MainApp({super.key});

  @override
  Widget build(BuildContext context) {
    return MaterialApp(
      theme: ThemeData.light(),
      home: Feed(currentUser: data.user_0),
    );
  }
}

class Feed extends StatefulWidget {
  const Feed({super.key, required this.currentUser});

  final User currentUser;

  @override
  State<Feed> createState() => _FeedState();
}

class _FeedState extends State<Feed> with SingleTickerProviderStateMixin {
  late final _colorScheme = Theme.of(context).colorScheme;
  late final _backgroundColor = Color.alphaBlend(
    _colorScheme.primary.withAlpha(36),
    _colorScheme.surface,
  );
  late final _controller = AnimationController(
    duration: const Duration(milliseconds: 1000),
    reverseDuration: const Duration(milliseconds: 1250),
    value: 0,
    vsync: this,
  );
  late final _railAnimation = RailAnimation(parent: _controller);
  late final _railFabAnimation = RailFabAnimation(parent: _controller);
  late final _barAnimation = BarAnimation(parent: _controller);

  int selectedIndex = 0;
  bool controllerInitialized = false;

  @override
  void didChangeDependencies() {
    super.didChangeDependencies();

    final double width = MediaQuery.of(context).size.width;
    final AnimationStatus status = _controller.status;
    if (width > 600) {
      if (status != AnimationStatus.forward &&
          status != AnimationStatus.completed) {
        _controller.forward();
      }
    } else {
      if (status != AnimationStatus.reverse &&
          status != AnimationStatus.dismissed) {
        _controller.reverse();
      }
    }
    if (!controllerInitialized) {
      controllerInitialized = true;
      _controller.value = width > 600 ? 1 : 0;
    }
  }

  @override
  void dispose() {
    _controller.dispose();
    super.dispose();
  }

  @override
  Widget build(BuildContext context) {
    return AnimatedBuilder(
      animation: _controller,
      builder: (context, _) {
        return Scaffold(
          body: Row(
            children: [
              DisappearingNavigationRail(
                railAnimation: _railAnimation,
                railFabAnimation: _railFabAnimation,
                selectedIndex: selectedIndex,
                backgroundColor: _backgroundColor,
                onDestinationSelected: (index) {
                  setState(() {
                    selectedIndex = index;
                  });
                },
              ),
              Expanded(
                child: Container(
                  color: _backgroundColor,
                                                // Update from here ...
                  child: ListDetailTransition(
                    animation: _railAnimation,
                    one: EmailListView(
                      selectedIndex: selectedIndex,
                      onSelected: (index) {
                        setState(() {
                          selectedIndex = index;
                        });
                      },
                      currentUser: widget.currentUser,
                    ),
                    two: const ReplyListView(),
                  ),
                                                // ... to here.
                ),
              ),
            ],
          ),
          floatingActionButton: AnimatedFloatingActionButton(
            animation: _barAnimation,
            onPressed: () {},
            child: const Icon(Icons.add),
          ),
          bottomNavigationBar: DisappearingBottomNavigationBar(
            barAnimation: _barAnimation,
            selectedIndex: selectedIndex,
            onDestinationSelected: (index) {
              setState(() {
                selectedIndex = index;
              });
            },
          ),
        );
      },
    );
  }
}
Chạy ứng dụng để xem tất cả các thành phần được kết hợp với nhau. Bạn có kiểu Material 3 và ảnh động giữa các bố cục khác nhau, trong một ứng dụng đại diện cho một ứng dụng thực tế. Mã sẽ có dạng như sau:

9. Xin chúc mừng
Xin chúc mừng! Bạn đã tạo thành công ứng dụng Material 3 Flutter đầu tiên!
Để xem lại tất cả các bước của lớp học lập trình này trong mã, hãy xem trong kho lưu trữ GitHub của các lớp học lập trình Flutter.
Tiếp theo là gì?
Hãy xem một số lớp học lập trình này...
- Tạo trò chơi bằng Flutter và Flame
- Thay đổi ứng dụng Flutter từ nhàm chán thành đẹp mắt
- Sử dụng FFI trong trình bổ trợ Flutter
Tài liệu đọc thêm
- Đọc thêm về thông tin cập nhật về Material 3 trong Flutter
- Xem tài liệu về Flutter Material 3
- Xem tất cả tài nguyên Material 3