
1. Wprowadzenie
Material 3 to najnowsza wersja systemu projektowania Google w wersji open source. Flutter rozszerza obsługę tworzenia atrakcyjnych aplikacji przy użyciu Material 3. W tym samouczku zaczniesz od pustej aplikacji Flutter, a potem stworzysz w Flutterze w pełni stylizowaną i animowaną aplikację.
Co utworzysz
W tym ćwiczeniu spróbujesz utworzyć aplikację do przesyłania wiadomości. Twoja aplikacja będzie:
- Użyj elastycznego projektu, aby strona działała na komputerach i urządzeniach mobilnych.
- Używaj animacji, aby płynnie przełączać się między różnymi układami.
- Do wyrazistego stylizowania używaj Material 3.
- działa na Androidzie, iOS, w internecie, systemach Windows, Linux i macOS;

Ten moduł dotyczy Material 3 w Flutterze. Nieistotne koncepcje i bloki kodu zostały zamaskowane. Można je po prostu skopiować i wkleić.
2. Konfigurowanie środowiska Flutter
Czego potrzebujesz
- Pakiet SDK Flutter
- edytor, np. VS Code lub Android Studio;
To laboratorium kodu zostało przetestowane pod kątem wdrażania na Androidzie, iOS, w internecie, w systemach Windows, Linux i macOS. Niektóre z tych miejsc docelowych wymagają zainstalowania dodatkowego oprogramowania. Aby sprawdzić, czy platforma jest prawidłowo skonfigurowana, uruchom flutter doctor.
$ flutter doctor
Doctor summary (to see all details, run flutter doctor -v):
[✓] Flutter (Channel stable, 3.32.1, on macOS 15.5 24F74 darwin-arm64, locale en-AU)
[✓] Android toolchain - develop for Android devices (Android SDK version 36.0.0)
[✓] Xcode - develop for iOS and macOS (Xcode 16.3)
[✓] Chrome - develop for the web
[✓] Android Studio (version 2024.2)
[✓] IntelliJ IDEA Community Edition (version 2024.3.1.1)
[✓] VS Code (version 1.100.3)
[✓] Connected device (3 available)
[✓] Network resources

• No issues found!
Jeśli w wyniku znajdziesz problemy, które wpływają na wybrany cel wdrożenia, uruchom polecenie flutter doctor -v, aby uzyskać bardziej szczegółowe informacje. Jeśli po wykonaniu czynności wymienionych przez flutter doctor -v nie możesz rozwiązać problemu, skontaktuj się z społecznością Flutter.
3. Pierwsze kroki
Tworzenie pustej aplikacji Flutter
Większość deweloperów Fluttera tworzy podstawową aplikację „zliczającą kliknięcia przycisku” za pomocą flutter create, a potem poświęca kilka minut na usunięcie tego, czego nie potrzebują. Możesz utworzyć pusty projekt Fluttera (za pomocą parametru --empty) z najbardziej podstawowymi elementami, aby uruchomić aplikację.
$ flutter create animated_responsive_layout --empty
Creating project animated_responsive_layout...
Resolving dependencies in `animated_responsive_layout`...
Downloading packages...
Got dependencies in `animated_responsive_layout`.
Wrote 129 files.

All done!
You can find general documentation for Flutter at: https://docs.flutter.dev/
Detailed API documentation is available at: https://api.flutter.dev/
If you prefer video documentation, consider: https://www.youtube.com/c/flutterdev

In order to run your empty application, type:

  $ cd animated_responsive_layout
  $ flutter run

Your empty application code is in animated_responsive_layout/lib/main.dart.
Możesz uruchomić ten kod za pomocą edytora kodu lub bezpośrednio z poziomu wiersza poleceń. W zależności od tego, jakie toolchainy masz zainstalowane i czy masz uruchomione symulator lub emulator, możesz zostać poproszony(-a) o wybranie celu wdrożenia, na którym ma działać aplikacja. Oto przykład uruchomienia pustej aplikacji w przeglądarce internetowej po wybraniu opcji „Chome”.
$ cd animated_responsive_layout
$ flutter run
Connected devices:
macOS (desktop) • macos  • darwin-arm64   • macOS 15.5 24F74 darwin-arm64
Chrome (web)    • chrome • web-javascript • Google Chrome 137.0.7151.56

[1]: macOS (macos)
[2]: Chrome (chrome)
Please choose one (or "q" to quit): 2
Launching lib/main.dart on Chrome in debug mode...
Waiting for connection from debug service on Chrome...              6.4s
This app is linked to the debug service: ws://127.0.0.1:60848/AM68Aq_ZiB8=/ws
Debug service listening on ws://127.0.0.1:60848/AM68Aq_ZiB8=/ws

Flutter run key commands.
R Hot restart.
h List all available interactive commands.
d Detach (terminate "flutter run" but leave application running).
c Clear the screen
q Quit (terminate the application on the device).

A Dart VM Service on Chrome is available at: http://127.0.0.1:60848/AM68Aq_ZiB8=
The Flutter DevTools debugger and profiler on Chrome is available at: http://127.0.0.1:9100?uri=http://127.0.0.1:60848/AM68Aq_ZiB8=
Application finished.
W tym scenariuszu zobaczysz pustą aplikację działającą w przeglądarce Chrome. Możesz też uruchomić aplikację na Androidzie, iOS lub komputerze.

4. Tworzenie aplikacji Messenger
Tworzenie awatara
Każda aplikacja do przesyłania wiadomości potrzebuje zdjęć użytkowników. Te obrazy reprezentują użytkowników i są nazywane awatarami. Następnie utwórz katalog zasobów u góry drzewa projektu i uzupełnij go serią obrazów z repozytorium Git tego Codelab. Jednym ze sposobów jest użycie narzędzia wiersza poleceń wget w ten sposób:
$ mkdir assets
$ cd assets
$ for name in avatar_1 avatar_2 avatar_3 avatar_4 \
              avatar_5 avatar_6 avatar_7 thumbnail_1; \
  do wget https://raw.githubusercontent.com/flutter/codelabs/main/animated-responsive-layout/step_04/assets/$name.png ; \
  done
Spowoduje to pobranie do katalogu assets aplikacji tych obrazów:
|
|
|
|
|
|
|
|
|
|
|
|
|
|
|
|


Teraz, gdy masz już komponenty z obrazem awatara, musisz je dodać do pliku pubspec.yaml w ten sposób:
pubspec.yaml
name: animated_responsive_layout
description: "A new Flutter project."
publish_to: 'none'
version: 0.1.0

environment:
  sdk: ^3.8.0

dependencies:
  flutter:
    sdk: flutter

dev_dependencies:
  flutter_test:
    sdk: flutter
  flutter_lints: ^5.0.0

flutter:
  uses-material-design: true

                                        # Add from here...
  assets:
    - assets/avatar_1.png
    - assets/avatar_2.png
    - assets/avatar_3.png
    - assets/avatar_4.png
    - assets/avatar_5.png
    - assets/avatar_6.png
    - assets/avatar_7.png
    - assets/thumbnail_1.png
                                        # ... to here.
Aplikacja wymaga źródła danych dla wyświetlanych wiadomości. W katalogu lib projektu utwórz podkatalog models. Możesz to zrobić w wierszu poleceń za pomocą polecenia mkdir lub w dowolnym edytorze tekstowym. Utwórz w katalogu lib/models plik models.dart z tą zawartością:
lib/models/models.dart
class Attachment {
  const Attachment({required this.url});

  final String url;
}

class Email {
  const Email({
    required this.sender,
    required this.recipients,
    required this.subject,
    required this.content,
    this.replies = 0,
    this.attachments = const [],
  });

  final User sender;
  final List<User> recipients;
  final String subject;
  final String content;
  final List<Attachment> attachments;
  final double replies;
}

class Name {
  const Name({required this.first, required this.last});

  final String first;
  final String last;
  String get fullName => '$first $last';
}

class User {
  const User({
    required this.name,
    required this.avatarUrl,
    required this.lastActive,
  });

  final Name name;
  final String avatarUrl;
  final DateTime lastActive;
}
Teraz, gdy masz już zdefiniowany kształt danych, utwórz w katalogu lib/models plik data.dart z treścią:
lib/models/data.dart
import 'models.dart';
final User user_0 = User(
name: const Name(first: 'Me', last: ''),
avatarUrl: 'assets/avatar_1.png',
lastActive: DateTime.now(),
);
final User user_1 = User(
name: const Name(first: '老', last: '强'),
avatarUrl: 'assets/avatar_2.png',
lastActive: DateTime.now().subtract(const Duration(minutes: 10)),
);
final User user_2 = User(
name: const Name(first: 'So', last: 'Duri'),
avatarUrl: 'assets/avatar_3.png',
lastActive: DateTime.now().subtract(const Duration(minutes: 20)),
);
final User user_3 = User(
name: const Name(first: 'Lily', last: 'MacDonald'),
avatarUrl: 'assets/avatar_4.png',
lastActive: DateTime.now().subtract(const Duration(hours: 2)),
);
final User user_4 = User(
name: const Name(first: 'Ziad', last: 'Aouad'),
avatarUrl: 'assets/avatar_5.png',
lastActive: DateTime.now().subtract(const Duration(hours: 6)),
);
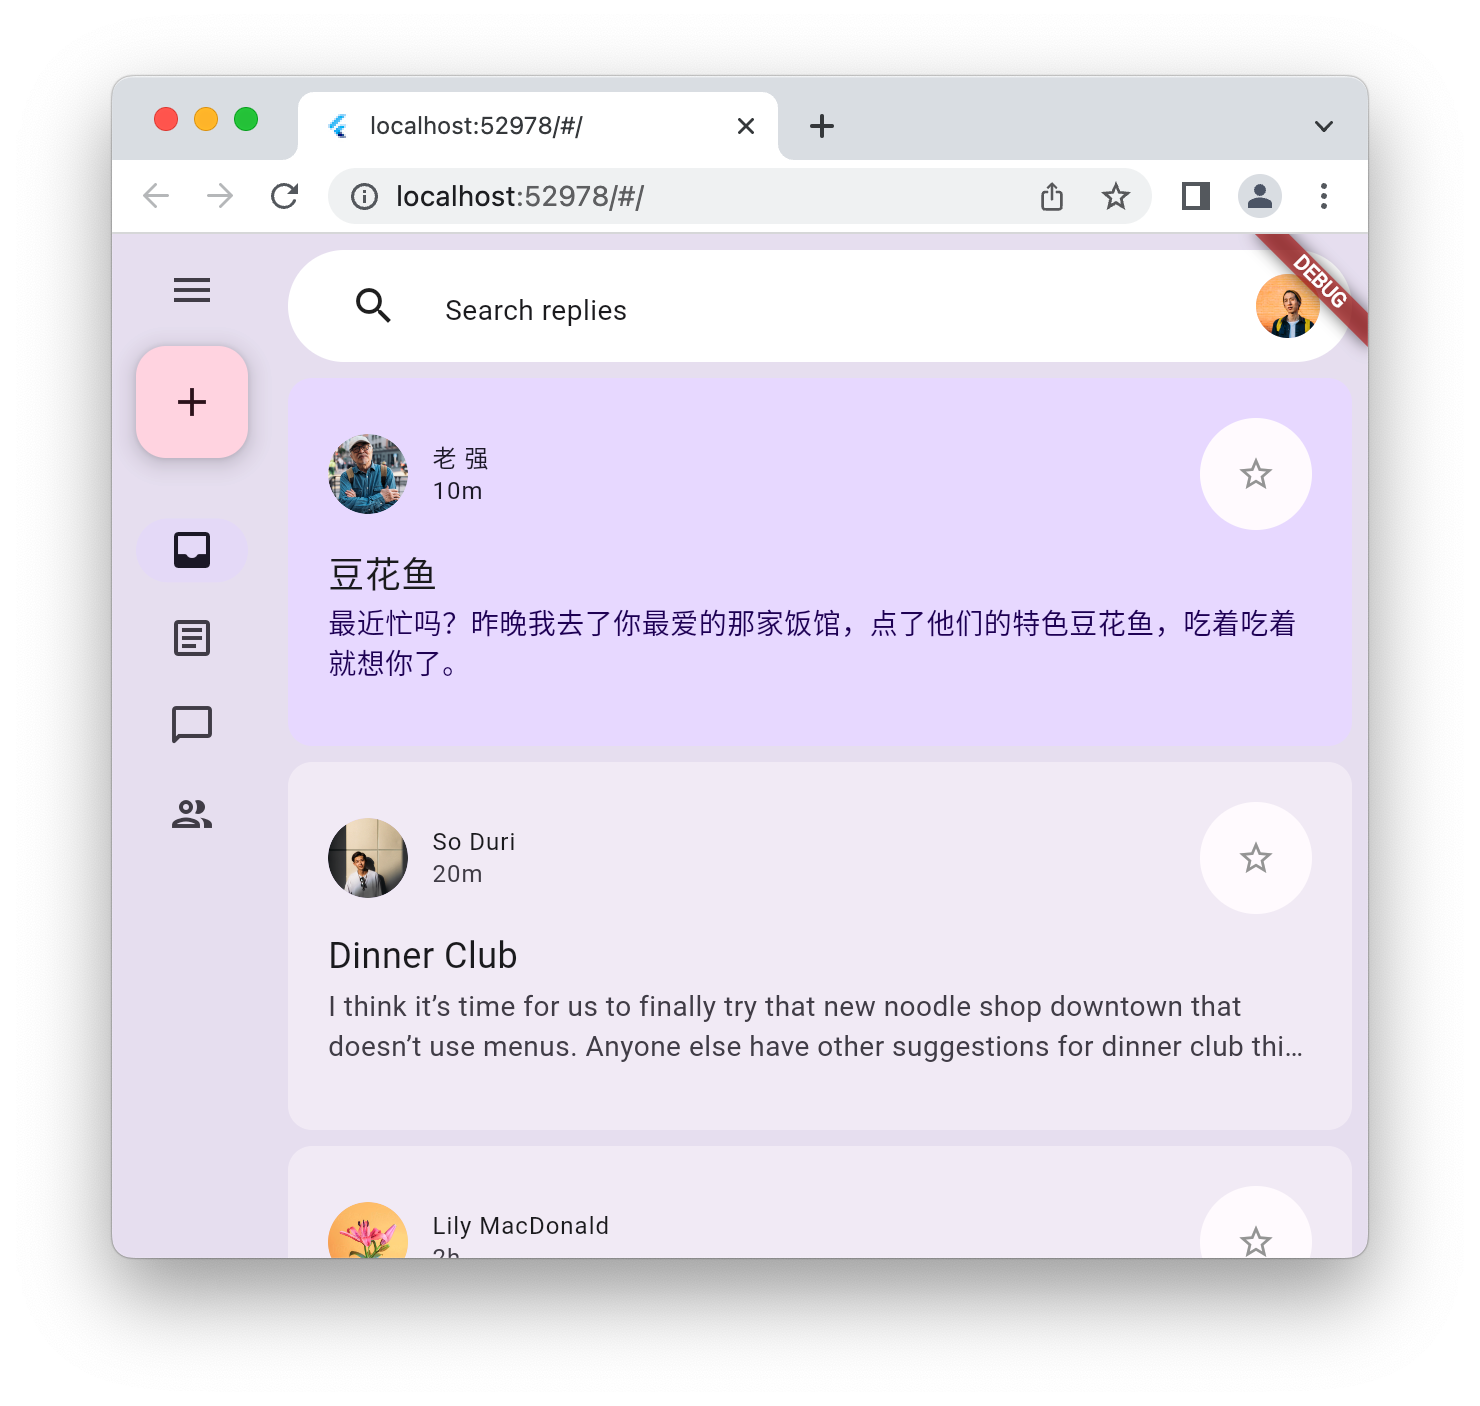
final List<Email> emails = [
Email(
sender: user_1,
recipients: [],
subject: '豆花鱼',
content: '最近忙吗?昨晚我去了你最爱的那家饭馆,点了他们的特色豆花鱼,吃着吃着就想你了。',
),
Email(
sender: user_2,
recipients: [],
subject: 'Dinner Club',
content:
'I think it's time for us to finally try that new noodle shop downtown that doesn't use menus. Anyone else have other suggestions for dinner club this week? I'm so intrigued by this idea of a noodle restaurant where no one gets to order for themselves - could be fun, or terrible, or both :)\n\nSo',
),
Email(
sender: user_3,
recipients: [],
subject: 'This food show is made for you',
content:
'Ping– you'd love this new food show I started watching. It's produced by a Thai drummer who started getting recognized for the amazing vegan food she always brought to shows.',
attachments: [const Attachment(url: 'assets/thumbnail_1.png')],
),
Email(
sender: user_4,
recipients: [],
subject: 'Volunteer EMT with me?',
content:
'What do you think about training to be volunteer EMTs? We could do it together for moral support. Think about it??',
),
];
final List<Email> replies = [
Email(
sender: user_2,
recipients: [user_3, user_2],
subject: 'Dinner Club',
content:
'I think it's time for us to finally try that new noodle shop downtown that doesn't use menus. Anyone else have other suggestions for dinner club this week? I'm so intrigued by this idea of a noodle restaurant where no one gets to order for themselves - could be fun, or terrible, or both :)\n\nSo',
),
Email(
sender: user_0,
recipients: [user_3, user_2],
subject: 'Dinner Club',
content:
'Yes! I forgot about that place! I'm definitely up for taking a risk this week and handing control over to this mysterious noodle chef. I wonder what happens if you have allergies though? Lucky none of us have any otherwise I'd be a bit concerned.\n\nThis is going to be great. See you all at the usual time?',
),
];
Gdy już masz te dane, możesz zdefiniować kilka widżetów, które je wyświetlą. Utwórz podkatalog o nazwie lib.widgets Utworzysz 4 pliki w folderze widgets. Dopóki nie utworzysz wszystkich 4 plików, edytor będzie wyświetlać ostrzeżenia. Pamiętaj, że celem tego Codelab jest nadanie aplikacji stylu za pomocą biblioteki Material 3. Dodaj te 4 pliki z podanymi niżej treściami:
lib/widgets/email_list_view.dart
import 'package:flutter/material.dart';

import '../models/data.dart' as data;
import '../models/models.dart';
import 'email_widget.dart';
import 'search_bar.dart' as search_bar;

class EmailListView extends StatelessWidget {
  const EmailListView({
    super.key,
    this.selectedIndex,
    this.onSelected,
    required this.currentUser,
  });

  final int? selectedIndex;
  final ValueChanged<int>? onSelected;
  final User currentUser;

  @override
  Widget build(BuildContext context) {
    return Padding(
      padding: const EdgeInsets.symmetric(horizontal: 8.0),
      child: ListView(
        children: [
          const SizedBox(height: 8),
          search_bar.SearchBar(currentUser: currentUser),
          const SizedBox(height: 8),
          ...List.generate(data.emails.length, (index) {
            return Padding(
              padding: const EdgeInsets.only(bottom: 8.0),
              child: EmailWidget(
                email: data.emails[index],
                onSelected: onSelected != null
                    ? () {
                        onSelected!(index);
                      }
                    : null,
                isSelected: selectedIndex == index,
              ),
            );
          }),
        ],
      ),
    );
  }
}
Wyświetlanie listy e-maili wydaje się być funkcją aplikacji do przesyłania wiadomości. Redaktor zgłosił kilka problemów, ale niektóre z nich możesz rozwiązać, dodając kolejny plik email_widget.dart.
lib/widgets/email_widget.dart
import 'package:flutter/material.dart';
import '../models/models.dart';
import 'star_button.dart';

enum EmailType { preview, threaded, primaryThreaded }

class EmailWidget extends StatefulWidget {
  const EmailWidget({
    super.key,
    required this.email,
    this.isSelected = false,
    this.isPreview = true,
    this.isThreaded = false,
    this.showHeadline = false,
    this.onSelected,
  });

  final bool isSelected;
  final bool isPreview;
  final bool showHeadline;
  final bool isThreaded;
  final void Function()? onSelected;
  final Email email;

  @override
  State<EmailWidget> createState() => _EmailWidgetState();
}

class _EmailWidgetState extends State<EmailWidget> {
  late final ColorScheme _colorScheme = Theme.of(context).colorScheme;
  late Color unselectedColor = Color.alphaBlend(
    _colorScheme.primary.withAlpha(20),
    _colorScheme.surface,
  );

  Color get _surfaceColor => switch (widget) {
    EmailWidget(isPreview: false) => _colorScheme.surface,
    EmailWidget(isSelected: true) => _colorScheme.primaryContainer,
    _ => unselectedColor,
  };

  @override
  Widget build(BuildContext context) {
    return GestureDetector(
      onTap: widget.onSelected,
      child: Card(
        elevation: 0,
        color: _surfaceColor,
        clipBehavior: Clip.hardEdge,
        child: Column(
          crossAxisAlignment: CrossAxisAlignment.start,
          mainAxisSize: MainAxisSize.min,
          children: [
            if (widget.showHeadline) ...[
              EmailHeadline(email: widget.email, isSelected: widget.isSelected),
            ],
            EmailContent(
              email: widget.email,
              isPreview: widget.isPreview,
              isThreaded: widget.isThreaded,
              isSelected: widget.isSelected,
            ),
          ],
        ),
      ),
    );
  }
}

class EmailContent extends StatefulWidget {
  const EmailContent({
    super.key,
    required this.email,
    required this.isPreview,
    required this.isThreaded,
    required this.isSelected,
  });

  final Email email;
  final bool isPreview;
  final bool isThreaded;
  final bool isSelected;

  @override
  State<EmailContent> createState() => _EmailContentState();
}

class _EmailContentState extends State<EmailContent> {
  late final ColorScheme _colorScheme = Theme.of(context).colorScheme;
  late final TextTheme _textTheme = Theme.of(context).textTheme;

  Widget get contentSpacer => SizedBox(height: widget.isThreaded ? 20 : 2);

  String get lastActiveLabel {
    final DateTime now = DateTime.now();
    if (widget.email.sender.lastActive.isAfter(now)) throw ArgumentError();
    final Duration elapsedTime = widget.email.sender.lastActive
        .difference(now)
        .abs();
    return switch (elapsedTime) {
      Duration(inSeconds: < 60) => '${elapsedTime.inSeconds}s',
      Duration(inMinutes: < 60) => '${elapsedTime.inMinutes}m',
      Duration(inHours: < 24) => '${elapsedTime.inHours}h',
      Duration(inDays: < 365) => '${elapsedTime.inDays}d',
      _ => throw UnimplementedError(),
    };
  }

  TextStyle? get contentTextStyle => switch (widget) {
    EmailContent(isThreaded: true) => _textTheme.bodyLarge,
    EmailContent(isSelected: true) => _textTheme.bodyMedium?.copyWith(
      color: _colorScheme.onPrimaryContainer,
    ),
    _ => _textTheme.bodyMedium?.copyWith(color: _colorScheme.onSurfaceVariant),
  };

  @override
  Widget build(BuildContext context) {
    return Padding(
      padding: const EdgeInsets.all(20),
      child: Column(
        crossAxisAlignment: CrossAxisAlignment.start,
        children: [
          LayoutBuilder(
            builder: (context, constraints) {
              return Row(
                crossAxisAlignment: CrossAxisAlignment.center,
                children: [
                  if (constraints.maxWidth - 200 > 0) ...[
                    CircleAvatar(
                      backgroundImage: AssetImage(
                        widget.email.sender.avatarUrl,
                      ),
                    ),
                    const Padding(
                      padding: EdgeInsets.symmetric(horizontal: 6.0),
                    ),
                  ],
                  Expanded(
                    child: Column(
                      crossAxisAlignment: CrossAxisAlignment.start,
                      children: [
                        Text(
                          widget.email.sender.name.fullName,
                          overflow: TextOverflow.fade,
                          maxLines: 1,
                          style: widget.isSelected
                              ? _textTheme.labelMedium?.copyWith(
                                  color: _colorScheme.onSecondaryContainer,
                                )
                              : _textTheme.labelMedium?.copyWith(
                                  color: _colorScheme.onSurface,
                                ),
                        ),
                        Text(
                          lastActiveLabel,
                          overflow: TextOverflow.fade,
                          maxLines: 1,
                          style: widget.isSelected
                              ? _textTheme.labelMedium?.copyWith(
                                  color: _colorScheme.onSecondaryContainer,
                                )
                              : _textTheme.labelMedium?.copyWith(
                                  color: _colorScheme.onSurfaceVariant,
                                ),
                        ),
                      ],
                    ),
                  ),
                  if (constraints.maxWidth - 200 > 0) ...[const StarButton()],
                ],
              );
            },
          ),
          const SizedBox(width: 8),
          Column(
            crossAxisAlignment: CrossAxisAlignment.start,
            children: [
              if (widget.isPreview) ...[
                Text(
                  widget.email.subject,
                  style: const TextStyle(
                    fontSize: 18,
                  ).copyWith(color: _colorScheme.onSurface),
                ),
              ],
              if (widget.isThreaded) ...[
                contentSpacer,
                Text(
                  "To ${widget.email.recipients.map((recipient) => recipient.name.first).join(", ")}",
                  style: _textTheme.bodyMedium,
                ),
              ],
              contentSpacer,
              Text(
                widget.email.content,
                maxLines: widget.isPreview ? 2 : 100,
                overflow: TextOverflow.ellipsis,
                style: contentTextStyle,
              ),
            ],
          ),
          const SizedBox(width: 12),
          widget.email.attachments.isNotEmpty
              ? Container(
                  height: 96,
                  decoration: BoxDecoration(
                    borderRadius: BorderRadius.circular(8.0),
                    image: DecorationImage(
                      fit: BoxFit.cover,
                      image: AssetImage(widget.email.attachments.first.url),
                    ),
                  ),
                )
              : const SizedBox.shrink(),
          if (!widget.isPreview) ...[const EmailReplyOptions()],
        ],
      ),
    );
  }
}

class EmailHeadline extends StatefulWidget {
  const EmailHeadline({
    super.key,
    required this.email,
    required this.isSelected,
  });

  final Email email;
  final bool isSelected;

  @override
  State<EmailHeadline> createState() => _EmailHeadlineState();
}

class _EmailHeadlineState extends State<EmailHeadline> {
  late final TextTheme _textTheme = Theme.of(context).textTheme;
  late final ColorScheme _colorScheme = Theme.of(context).colorScheme;

  @override
  Widget build(BuildContext context) {
    return LayoutBuilder(
      builder: (context, constraints) {
        return Container(
          height: 84,
          color: Color.alphaBlend(
            _colorScheme.primary.withAlpha(12),
            _colorScheme.surface,
          ),
          child: Padding(
            padding: const EdgeInsets.fromLTRB(24, 12, 12, 12),
            child: Row(
              mainAxisSize: MainAxisSize.max,
              crossAxisAlignment: CrossAxisAlignment.center,
              children: [
                Expanded(
                  child: Column(
                    mainAxisSize: MainAxisSize.min,
                    crossAxisAlignment: CrossAxisAlignment.start,
                    children: [
                      Text(
                        widget.email.subject,
                        maxLines: 1,
                        overflow: TextOverflow.fade,
                        style: const TextStyle(
                          fontSize: 18,
                          fontWeight: FontWeight.w400,
                        ),
                      ),
                      Text(
                        '${widget.email.replies.toString()} Messages',
                        maxLines: 1,
                        overflow: TextOverflow.fade,
                        style: _textTheme.labelMedium?.copyWith(
                          fontWeight: FontWeight.w500,
                        ),
                      ),
                    ],
                  ),
                ),
                // Display a "condensed" version if the widget in the row are
                // expected to overflow.
                if (constraints.maxWidth - 200 > 0) ...[
                  SizedBox(
                    height: 40,
                    width: 40,
                    child: FloatingActionButton(
                      onPressed: () {},
                      elevation: 0,
                      backgroundColor: _colorScheme.surface,
                      child: const Icon(Icons.delete_outline),
                    ),
                  ),
                  const Padding(padding: EdgeInsets.only(right: 8.0)),
                  SizedBox(
                    height: 40,
                    width: 40,
                    child: FloatingActionButton(
                      onPressed: () {},
                      elevation: 0,
                      backgroundColor: _colorScheme.surface,
                      child: const Icon(Icons.more_vert),
                    ),
                  ),
                ],
              ],
            ),
          ),
        );
      },
    );
  }
}

class EmailReplyOptions extends StatefulWidget {
  const EmailReplyOptions({super.key});

  @override
  State<EmailReplyOptions> createState() => _EmailReplyOptionsState();
}

class _EmailReplyOptionsState extends State<EmailReplyOptions> {
  late final ColorScheme _colorScheme = Theme.of(context).colorScheme;

  @override
  Widget build(BuildContext context) {
    return LayoutBuilder(
      builder: (context, constraints) {
        if (constraints.maxWidth < 100) {
          return const SizedBox.shrink();
        }
        return Row(
          children: [
            Expanded(
              child: TextButton(
                style: ButtonStyle(
                  backgroundColor: WidgetStateProperty.all(
                    _colorScheme.onInverseSurface,
                  ),
                ),
                onPressed: () {},
                child: Text(
                  'Reply',
                  style: TextStyle(color: _colorScheme.onSurfaceVariant),
                ),
              ),
            ),
            const SizedBox(width: 8),
            Expanded(
              child: TextButton(
                style: ButtonStyle(
                  backgroundColor: WidgetStateProperty.all(
                    _colorScheme.onInverseSurface,
                  ),
                ),
                onPressed: () {},
                child: Text(
                  'Reply All',
                  style: TextStyle(color: _colorScheme.onSurfaceVariant),
                ),
              ),
            ),
          ],
        );
      },
    );
  }
}
Tak, w tym widżecie dzieje się dużo. Warto dokładnie przyjrzeć się temu widgetowi, zwłaszcza aby zobaczyć, jak kolor jest stosowany w całości. Będzie to stały element. Następny: search_bar.dart.
lib/widgets/search_bar.dart
import 'package:flutter/material.dart';

import '../models/models.dart';

class SearchBar extends StatelessWidget {
  const SearchBar({super.key, required this.currentUser});

  final User currentUser;

  @override
  Widget build(BuildContext context) {
    return SizedBox(
      height: 56,
      child: Container(
        decoration: BoxDecoration(
          borderRadius: BorderRadius.circular(100),
          color: Colors.white,
        ),
        padding: const EdgeInsets.fromLTRB(31, 12, 12, 12),
        child: Row(
          crossAxisAlignment: CrossAxisAlignment.center,
          children: [
            const Icon(Icons.search),
            const SizedBox(width: 23.5),
            Expanded(
              child: TextField(
                maxLines: 1,
                decoration: InputDecoration(
                  isDense: true,
                  border: InputBorder.none,
                  hintText: 'Search replies',
                  hintStyle: Theme.of(context).textTheme.bodyMedium,
                ),
              ),
            ),
            CircleAvatar(backgroundImage: AssetImage(currentUser.avatarUrl)),
          ],
        ),
      ),
    );
  }
}
znacznie prostszy i bezstanowy widget. Następnie dodaj kolejny widżet, star_button.dart:
lib/widgets/star_button.dart
impoimport 'package:flutter/material.dart';

class StarButton extends StatefulWidget {
  const StarButton({super.key});

  @override
  State<StarButton> createState() => _StarButtonState();
}

class _StarButtonState extends State<StarButton> {
  bool state = false;
  late final ColorScheme _colorScheme = Theme.of(context).colorScheme;

  Icon get icon {
    final IconData iconData = state ? Icons.star : Icons.star_outline;

    return Icon(iconData, color: Colors.grey, size: 20);
  }

  void _toggle() {
    setState(() {
      state = !state;
    });
  }

  double get turns => state ? 1 : 0;

  @override
  Widget build(BuildContext context) {
    return AnimatedRotation(
      turns: turns,
      curve: Curves.decelerate,
      duration: const Duration(milliseconds: 300),
      child: FloatingActionButton(
        elevation: 0,
        shape: const CircleBorder(),
        backgroundColor: _colorScheme.surface,
        onPressed: () => _toggle(),
        child: Padding(padding: const EdgeInsets.all(10.0), child: icon),
      ),
    );
  }
}
Następnie zaktualizuj główną gwiazdę programu, lib/main.dart. Zastąp bieżącą zawartość tego pliku podanym niżej kodem.
lib/main.dart
import 'package:flutter/material.dart';

import 'models/data.dart' as data;
import 'models/models.dart';
import 'widgets/email_list_view.dart';

void main() {
  runApp(const MainApp());
}

class MainApp extends StatelessWidget {
  const MainApp({super.key});

  @override
  Widget build(BuildContext context) {
    return MaterialApp(
      theme: ThemeData.light(),
      home: Feed(currentUser: data.user_0),
    );
  }
}

class Feed extends StatefulWidget {
  const Feed({super.key, required this.currentUser});

  final User currentUser;

  @override
  State<Feed> createState() => _FeedState();
}

class _FeedState extends State<Feed> {
  late final _colorScheme = Theme.of(context).colorScheme;
  late final _backgroundColor = Color.alphaBlend(
    _colorScheme.primary.withAlpha(36),
    _colorScheme.surface,
  );

  @override
  Widget build(BuildContext context) {
    return Scaffold(
      body: Container(
        color: _backgroundColor,
        child: EmailListView(currentUser: widget.currentUser),
      ),
      floatingActionButton: FloatingActionButton(
        backgroundColor: _colorScheme.tertiaryContainer,
        foregroundColor: _colorScheme.onTertiaryContainer,
        onPressed: () {},
        child: const Icon(Icons.add),
      ),
    );
  }
}
Uruchom aplikację, aby zobaczyć, od czego zacząć.

5. Dodaj NavigationBar
Na końcu poprzedniego kroku aplikacja startowa zawierała listę wiadomości, ale nie było w niej zbyt wiele treści. W tym kroku dodasz NavigationBar, aby wzbogacić wizualnie swoją prezentację. Gdy aplikacja przekształca się z szkicu UI w prawdziwą aplikację, użytkownik może korzystać z różnych obszarów aplikacji za pomocą paska nawigacji.
Wskazanie NavigationBar oznacza, że istnieją miejsca docelowe, do których można się udać. Utwórz w katalogu lib plik o nazwie destinations.dart i uzupełnij go tym kodem.
lib/destinations.dart
import 'package:flutter/material.dart';

class Destination {
  const Destination(this.icon, this.label);
  final IconData icon;
  final String label;
}

const List<Destination> destinations = <Destination>[
  Destination(Icons.inbox_rounded, 'Inbox'),
  Destination(Icons.article_outlined, 'Articles'),
  Destination(Icons.messenger_outline_rounded, 'Messages'),
  Destination(Icons.group_outlined, 'Groups'),
];
Aplikacja ma w ten sposób 4 miejsca docelowe, w których może wyświetlić element NavigationBar. Następnie dodaj tę listę miejsc docelowych do pliku lib/main.dart w ten sposób:
lib/main.dart
import 'package:flutter/material.dart';

import 'destinations.dart';                    // Add this import
import 'models/data.dart' as data;
import 'models/models.dart';
import 'widgets/email_list_view.dart';

void main() {
  runApp(const MainApp());
}

class MainApp extends StatelessWidget {
  const MainApp({super.key});

  @override
  Widget build(BuildContext context) {
    return MaterialApp(
      theme: ThemeData.light(),
      home: Feed(currentUser: data.user_0),
    );
  }
}

class Feed extends StatefulWidget {
  const Feed({super.key, required this.currentUser});

  final User currentUser;

  @override
  State<Feed> createState() => _FeedState();
}

class _FeedState extends State<Feed> {
  late final _colorScheme = Theme.of(context).colorScheme;
  late final _backgroundColor = Color.alphaBlend(
    _colorScheme.primary.withAlpha(36),
    _colorScheme.surface,
  );

  int selectedIndex = 0;                       // Add this variable

  @override
  Widget build(BuildContext context) {
    return Scaffold(
      body: Container(
        color: _backgroundColor,
        child: EmailListView(
                                              // Add from here...
          selectedIndex: selectedIndex,
          onSelected: (index) {
            setState(() {
              selectedIndex = index;
            });
          },
                                              // ... to here.
          currentUser: widget.currentUser,
        ),
      ),
      floatingActionButton: FloatingActionButton(
        backgroundColor: _colorScheme.tertiaryContainer,
        foregroundColor: _colorScheme.onTertiaryContainer,
        onPressed: () {},
        child: const Icon(Icons.add),
      ),
                                                  // Add from here...
      bottomNavigationBar: NavigationBar(
        elevation: 0,
        backgroundColor: Colors.white,
        destinations: destinations.map<NavigationDestination>((d) {
          return NavigationDestination(icon: Icon(d.icon), label: d.label);
        }).toList(),
        selectedIndex: selectedIndex,
        onDestinationSelected: (index) {
          setState(() {
            selectedIndex = index;
          });
        },
      ),
                                                // ...to here.
    );
  }
}
Zamiast definiowania różnych treści dla poszczególnych miejsc docelowych, zmień stan poszczególnych wiadomości, aby odzwierciedlał wybrane miejsce docelowe w NavigationBar. Ze względu na spójność działa to też w drugą stronę: po wybraniu wiadomości w polu NavigationBar wyświetla się odpowiedni adres docelowy. Uruchom aplikację, aby sprawdzić te zmiany:

W wąskiej konfiguracji wygląda to całkiem nieźle, ale jeśli rozszerzysz okno lub obrócisz symulator telefonu w poziomie, będzie wyglądać nieco dziwnie. Aby to naprawić, wprowadź NavigationRail po lewej stronie ekranu, gdy aplikacja jest wystarczająco szeroka. W następnym kroku zajmiemy się tym problemem.
6. Dodawanie Kolumny nawigacyjnej
Ten krok spowoduje dodanie do aplikacji NavigationRail. Założenie jest takie, aby w zależności od rozmiaru ekranu wyświetlać tylko jeden z 2 widżetów nawigacji. Oznacza to, że w razie potrzeby musisz ukryć lub wyświetlić NavigationBar. W katalogu lib/widgets utwórz plik disappearing_bottom_navigation_bar.dart i dodaj do niego ten kod:
lib/widgets/disappearing_bottom_navigation_bar.dart
import 'package:flutter/material.dart';

import '../destinations.dart';

class DisappearingBottomNavigationBar extends StatelessWidget {
  const DisappearingBottomNavigationBar({
    super.key,
    required this.selectedIndex,
    this.onDestinationSelected,
  });

  final int selectedIndex;
  final ValueChanged<int>? onDestinationSelected;

  @override
  Widget build(BuildContext context) {
    return NavigationBar(
      elevation: 0,
      backgroundColor: Colors.white,
      destinations: destinations.map<NavigationDestination>((d) {
        return NavigationDestination(icon: Icon(d.icon), label: d.label);
      }).toList(),
      selectedIndex: selectedIndex,
      onDestinationSelected: onDestinationSelected,
    );
  }
}
W tym samym katalogu dodaj kolejny plik o nazwie disappearing_navigation_rail.dart z tym kodem:
lib/widgets/disappearing_navigation_rail.dart
import 'package:flutter/material.dart';

import '../destinations.dart';

class DisappearingNavigationRail extends StatelessWidget {
  const DisappearingNavigationRail({
    super.key,
    required this.backgroundColor,
    required this.selectedIndex,
    this.onDestinationSelected,
  });

  final Color backgroundColor;
  final int selectedIndex;
  final ValueChanged<int>? onDestinationSelected;

  @override
  Widget build(BuildContext context) {
    final colorScheme = Theme.of(context).colorScheme;
    return NavigationRail(
      selectedIndex: selectedIndex,
      backgroundColor: backgroundColor,
      onDestinationSelected: onDestinationSelected,
      leading: Column(
        children: [
          IconButton(onPressed: () {}, icon: const Icon(Icons.menu)),
          const SizedBox(height: 8),
          FloatingActionButton(
            shape: const RoundedRectangleBorder(
              borderRadius: BorderRadius.all(Radius.circular(15)),
            ),
            backgroundColor: colorScheme.tertiaryContainer,
            foregroundColor: colorScheme.onTertiaryContainer,
            onPressed: () {},
            child: const Icon(Icons.add),
          ),
        ],
      ),
      groupAlignment: -0.85,
      destinations: destinations.map((d) {
        return NavigationRailDestination(
          icon: Icon(d.icon),
          label: Text(d.label),
        );
      }).toList(),
    );
  }
}
Po przekształceniu idiomów nawigacji w osobne widżety plik lib/main.dart wymaga pewnych modyfikacji:
lib/main.dart
import 'package:flutter/material.dart';

// Remove the destination.dart import, it's not required
import 'models/data.dart' as data;
import 'models/models.dart';
import 'widgets/disappearing_bottom_navigation_bar.dart';  // Add import
import 'widgets/disappearing_navigation_rail.dart';        // Add import
import 'widgets/email_list_view.dart';

void main() {
  runApp(const MainApp());
}

class MainApp extends StatelessWidget {
  const MainApp({super.key});

  @override
  Widget build(BuildContext context) {
    return MaterialApp(
      theme: ThemeData.light(),
      home: Feed(currentUser: data.user_0),
    );
  }
}

class Feed extends StatefulWidget {
  const Feed({super.key, required this.currentUser});

  final User currentUser;

  @override
  State<Feed> createState() => _FeedState();
}

class _FeedState extends State<Feed> {
  late final _colorScheme = Theme.of(context).colorScheme;
  late final _backgroundColor = Color.alphaBlend(
    _colorScheme.primary.withAlpha(36),
    _colorScheme.surface,
  );

  int selectedIndex = 0;
                                                  // Add from here...
  bool wideScreen = false;

  @override
  void didChangeDependencies() {
    super.didChangeDependencies();

    final double width = MediaQuery.of(context).size.width;
    wideScreen = width > 600;
  }
                                                 // ... to here.

  @override
  Widget build(BuildContext context) {
                                                 // Modify from here...
    return Scaffold(
      body: Row(
        children: [
          if (wideScreen)
            DisappearingNavigationRail(
              selectedIndex: selectedIndex,
              backgroundColor: _backgroundColor,
              onDestinationSelected: (index) {
                setState(() {
                  selectedIndex = index;
                });
              },
            ),
          Expanded(
            child: Container(
              color: _backgroundColor,
              child: EmailListView(
                selectedIndex: selectedIndex,
                onSelected: (index) {
                  setState(() {
                    selectedIndex = index;
                  });
                },
                currentUser: widget.currentUser,
              ),
            ),
          ),
        ],
      ),
      floatingActionButton: wideScreen
          ? null
          : FloatingActionButton(
              backgroundColor: _colorScheme.tertiaryContainer,
              foregroundColor: _colorScheme.onTertiaryContainer,
              onPressed: () {},
              child: const Icon(Icons.add),
            ),
      bottomNavigationBar: wideScreen
          ? null
          : DisappearingBottomNavigationBar(
              selectedIndex: selectedIndex,
              onDestinationSelected: (index) {
                setState(() {
                  selectedIndex = index;
                });
              },
            ),
    );
                                                    // ... to here.
  }
}
Pierwszą ważną zmianą w pliku main.dart jest dodanie stanu wideScreen, który aktualizuje się, gdy użytkownik zmienia rozmiar wyświetlacza, np. przez zmianę rozmiaru okna przeglądarki lub obrócenie telefonu. Kolejna zmiana polega na tym, że funkcje NavigationBar i FloatingActionButton będą zależeć od tego, czy aplikacja jest w trybie wideScreen. Na koniec NavigationRail jest wyświetlany w warunkach określonych po lewej stronie, jeśli ekran jest wystarczająco szeroki. Uruchom aplikację w przeglądarce lub na komputerze i zmień rozmiar ekranu, aby wyświetlić 2 różne układy.
|
|

Dwa różne układy są dobre, ale przejście między nimi nie jest zbyt dobre. Zastąpienie paska szynami (i odwrotnie) w bardziej dynamiczny sposób znacznie poprawiłoby działanie aplikacji. W następnym kroku dodasz tę animację.
7. Animowanie przejść
Tworzenie animowanego interfejsu wymaga stworzenia serii animacji, w których każdy element jest odpowiednio skoordynowany. W przypadku tej animacji zacznij od utworzenia w katalogu lib nowego pliku o nazwie animations.dart z potrzebnymi Ci krzywiznami animacji.
lib/animations.dart
import 'package:flutter/animation.dart';

class BarAnimation extends ReverseAnimation {
  BarAnimation({required AnimationController parent})
    : super(
        CurvedAnimation(
          parent: parent,
          curve: const Interval(0, 1 / 5),
          reverseCurve: const Interval(1 / 5, 4 / 5),
        ),
      );
}

class OffsetAnimation extends CurvedAnimation {
  OffsetAnimation({required super.parent})
    : super(
        curve: const Interval(
          2 / 5,
          3 / 5,
          curve: Curves.easeInOutCubicEmphasized,
        ),
        reverseCurve: Interval(
          4 / 5,
          1,
          curve: Curves.easeInOutCubicEmphasized.flipped,
        ),
      );
}

class RailAnimation extends CurvedAnimation {
  RailAnimation({required super.parent})
    : super(
        curve: const Interval(0 / 5, 4 / 5),
        reverseCurve: const Interval(3 / 5, 1),
      );
}

class RailFabAnimation extends CurvedAnimation {
  RailFabAnimation({required super.parent})
    : super(curve: const Interval(3 / 5, 1));
}

class ScaleAnimation extends CurvedAnimation {
  ScaleAnimation({required super.parent})
    : super(
        curve: const Interval(
          3 / 5,
          4 / 5,
          curve: Curves.easeInOutCubicEmphasized,
        ),
        reverseCurve: Interval(
          3 / 5,
          1,
          curve: Curves.easeInOutCubicEmphasized.flipped,
        ),
      );
}

class ShapeAnimation extends CurvedAnimation {
  ShapeAnimation({required super.parent})
    : super(
        curve: const Interval(
          2 / 5,
          3 / 5,
          curve: Curves.easeInOutCubicEmphasized,
        ),
      );
}

class SizeAnimation extends CurvedAnimation {
  SizeAnimation({required super.parent})
    : super(
        curve: const Interval(
          0 / 5,
          3 / 5,
          curve: Curves.easeInOutCubicEmphasized,
        ),
        reverseCurve: Interval(
          2 / 5,
          1,
          curve: Curves.easeInOutCubicEmphasized.flipped,
        ),
      );
}
Tworzenie tych krzywych wymaga iteracji, co jest znacznie łatwiejsze dzięki funkcji odświeżania na gorąco w Flutterze. Aby używać tych animacji, musisz mieć przejścia. Utwórz w katalogu lib podkatalog o nazwie transitions i dodaj plik o nazwie bottom_bar_transition.dart z tym kodem:
lib/transitions/bottom_bar_transition.dart
import 'package:flutter/material.dart';
import '../animations.dart';

class BottomBarTransition extends StatefulWidget {
  const BottomBarTransition({
    super.key,
    required this.animation,
    required this.backgroundColor,
    required this.child,
  });

  final Animation<double> animation;
  final Color backgroundColor;
  final Widget child;

  @override
  State<BottomBarTransition> createState() => _BottomBarTransition();
}

class _BottomBarTransition extends State<BottomBarTransition> {
  late final Animation<Offset> offsetAnimation = Tween<Offset>(
    begin: const Offset(0, 1),
    end: Offset.zero,
  ).animate(OffsetAnimation(parent: widget.animation));

  late final Animation<double> heightAnimation = Tween<double>(
    begin: 0,
    end: 1,
  ).animate(SizeAnimation(parent: widget.animation));

  @override
  Widget build(BuildContext context) {
    return ClipRect(
      child: DecoratedBox(
        decoration: BoxDecoration(color: widget.backgroundColor),
        child: Align(
          alignment: Alignment.topLeft,
          heightFactor: heightAnimation.value,
          child: FractionalTranslation(
            translation: offsetAnimation.value,
            child: widget.child,
          ),
        ),
      ),
    );
  }
}
Dodaj do katalogu lib/transitions plik o nazwie nav_rail_transition.dart i dodaj do niego ten kod:
lib/transitions/nav_rail_transition.dart
import 'package:flutter/material.dart';
import '../animations.dart';

class NavRailTransition extends StatefulWidget {
  const NavRailTransition({
    super.key,
    required this.animation,
    required this.backgroundColor,
    required this.child,
  });

  final Animation<double> animation;
  final Widget child;
  final Color backgroundColor;

  @override
  State<NavRailTransition> createState() => _NavRailTransitionState();
}

class _NavRailTransitionState extends State<NavRailTransition> {
  // The animations are only rebuilt by this method when the text
  // direction changes because this widget only depends on Directionality.
  late final bool ltr = Directionality.of(context) == TextDirection.ltr;
  late final Animation<Offset> offsetAnimation = Tween<Offset>(
    begin: ltr ? const Offset(-1, 0) : const Offset(1, 0),
    end: Offset.zero,
  ).animate(OffsetAnimation(parent: widget.animation));
  late final Animation<double> widthAnimation = Tween<double>(
    begin: 0,
    end: 1,
  ).animate(SizeAnimation(parent: widget.animation));

  @override
  Widget build(BuildContext context) {
    return ClipRect(
      child: DecoratedBox(
        decoration: BoxDecoration(color: widget.backgroundColor),
        child: AnimatedBuilder(
          animation: widthAnimation,
          builder: (context, child) {
            return Align(
              alignment: Alignment.topLeft,
              widthFactor: widthAnimation.value,
              child: FractionalTranslation(
                translation: offsetAnimation.value,
                child: widget.child,
              ),
            );
          },
        ),
      ),
    );
  }
}
Te 2 widżety przejścia otaczają widżety paska i paska nawigacyjnego, aby animować ich pojawianie się i znikanie. Aby używać tych 2 widżetów przejściowych, zaktualizuj 2 widżety, zaczynając od disappearing_bottom_navigation_bar.dart:
lib/widgets/disappearing_bottom_navigation_bar.dart
import 'package:flutter/material.dart';

import '../animations.dart';                          // Add this import
import '../destinations.dart';
import '../transitions/bottom_bar_transition.dart';   // Add this import

class DisappearingBottomNavigationBar extends StatelessWidget {
  const DisappearingBottomNavigationBar({
    super.key,
    required this.barAnimation,                       // Add this parameter
    required this.selectedIndex,
    this.onDestinationSelected,
  });

  final BarAnimation barAnimation;                   // Add this variable
  final int selectedIndex;
  final ValueChanged<int>? onDestinationSelected;

  @override
  Widget build(BuildContext context) {
                                                     // Modify from here...
    return BottomBarTransition(
      animation: barAnimation,
      backgroundColor: Colors.white,
      child: NavigationBar(
        elevation: 0,
        backgroundColor: Colors.white,
        destinations: destinations.map<NavigationDestination>((d) {
          return NavigationDestination(icon: Icon(d.icon), label: d.label);
        }).toList(),
        selectedIndex: selectedIndex,
        onDestinationSelected: onDestinationSelected,
      ),
    );
                                                     // ... to here.
  }
}
Poprzednia modyfikacja dodaje jedną z animacji i integruje przejście. Dzięki temu możesz kontrolować sposób wyświetlania i znikania paska nawigacyjnego.
Następnie zmień disappearing_navigation_rail.dart w ten sposób:
lib/widgets/disappearing_navigation_rail.dart
import 'package:flutter/material.dart';

import '../animations.dart';                          // Add this import
import '../destinations.dart';
import '../transitions/nav_rail_transition.dart';     // Add this import
import 'animated_floating_action_button.dart';        // Add this import

class DisappearingNavigationRail extends StatelessWidget {
  const DisappearingNavigationRail({
    super.key,
    required this.railAnimation,                      // Add this parameter
    required this.railFabAnimation,                   // Add this parameter
    required this.backgroundColor,
    required this.selectedIndex,
    this.onDestinationSelected,
  });

  final RailAnimation railAnimation;                  // Add this variable
  final RailFabAnimation railFabAnimation;            // Add this variable
  final Color backgroundColor;
  final int selectedIndex;
  final ValueChanged<int>? onDestinationSelected;

  @override
  Widget build(BuildContext context) {
    // Delete colorScheme
                                                      // Modify from here ...
    return NavRailTransition(
      animation: railAnimation,
      backgroundColor: backgroundColor,
      child: NavigationRail(
        selectedIndex: selectedIndex,
        backgroundColor: backgroundColor,
        onDestinationSelected: onDestinationSelected,
        leading: Column(
          children: [
            IconButton(onPressed: () {}, icon: const Icon(Icons.menu)),
            const SizedBox(height: 8),
            AnimatedFloatingActionButton(
              animation: railFabAnimation,
              elevation: 0,
              onPressed: () {},
              child: const Icon(Icons.add),
            ),
          ],
        ),
        groupAlignment: -0.85,
        destinations: destinations.map((d) {
          return NavigationRailDestination(
            icon: Icon(d.icon),
            label: Text(d.label),
          );
        }).toList(),
      ),
    );
                                                      // ... to here.
  }
}
Podczas wpisywania poprzedniego kodu prawdopodobnie pojawiły się ostrzeżenia o niezdefiniowanym widżecie FloatingActionButton. Aby rozwiązać ten problem, dodaj do folderu lib/widgets plik o nazwie animated_floating_action_button.dart z tym kodem:
lib/widgets/animated_floating_action_button.dart
import 'dart:ui';

import 'package:flutter/material.dart';
import '../animations.dart';

class AnimatedFloatingActionButton extends StatefulWidget {
  const AnimatedFloatingActionButton({
    super.key,
    required this.animation,
    this.elevation,
    this.onPressed,
    this.child,
  });

  final Animation<double> animation;
  final VoidCallback? onPressed;
  final Widget? child;
  final double? elevation;

  @override
  State<AnimatedFloatingActionButton> createState() =>
      _AnimatedFloatingActionButton();
}

class _AnimatedFloatingActionButton
    extends State<AnimatedFloatingActionButton> {
  late final ColorScheme _colorScheme = Theme.of(context).colorScheme;
  late final Animation<double> _scaleAnimation = ScaleAnimation(
    parent: widget.animation,
  );
  late final Animation<double> _shapeAnimation = ShapeAnimation(
    parent: widget.animation,
  );

  @override
  Widget build(BuildContext context) {
    return ScaleTransition(
      scale: _scaleAnimation,
      child: FloatingActionButton(
        elevation: widget.elevation,
        shape: RoundedRectangleBorder(
          borderRadius: BorderRadius.all(
            Radius.circular(lerpDouble(30, 15, _shapeAnimation.value)!),
          ),
        ),
        backgroundColor: _colorScheme.tertiaryContainer,
        foregroundColor: _colorScheme.onTertiaryContainer,
        onPressed: widget.onPressed,
        child: widget.child,
      ),
    );
  }
}
Aby wprowadzić te zmiany w aplikacji, zaktualizuj plik main.dart w ten sposób:
lib/main.dart
import 'package:flutter/material.dart';

import 'animations.dart';                               // Add this import
import 'models/data.dart' as data;
import 'models/models.dart';
import 'widgets/animated_floating_action_button.dart';  // Add this import
import 'widgets/disappearing_bottom_navigation_bar.dart';
import 'widgets/disappearing_navigation_rail.dart';
import 'widgets/email_list_view.dart';

void main() {
  runApp(const MainApp());
}

class MainApp extends StatelessWidget {
  const MainApp({super.key});

  @override
  Widget build(BuildContext context) {
    return MaterialApp(
      theme: ThemeData.light(),
      home: Feed(currentUser: data.user_0),
    );
  }
}

class Feed extends StatefulWidget {
  const Feed({super.key, required this.currentUser});

  final User currentUser;

  @override
  State<Feed> createState() => _FeedState();
}

class _FeedState extends State<Feed> with SingleTickerProviderStateMixin {
  late final _colorScheme = Theme.of(context).colorScheme;
  late final _backgroundColor = Color.alphaBlend(
    _colorScheme.primary.withAlpha(36),
    _colorScheme.surface,
  );
                                                        // Add from here...
  late final _controller = AnimationController(
    duration: const Duration(milliseconds: 1000),
    reverseDuration: const Duration(milliseconds: 1250),
    value: 0,
    vsync: this,
  );
  late final _railAnimation = RailAnimation(parent: _controller);
  late final _railFabAnimation = RailFabAnimation(parent: _controller);
  late final _barAnimation = BarAnimation(parent: _controller);
                                                        // ... to here.

  int selectedIndex = 0;
  // Remove wideScreen
  bool controllerInitialized = false;                   // Add this variable

  @override
  void didChangeDependencies() {
    super.didChangeDependencies();

    final double width = MediaQuery.of(context).size.width;
    // Remove wideScreen reference
                                                        // Add from here ...
    final AnimationStatus status = _controller.status;
    if (width > 600) {
      if (status != AnimationStatus.forward &&
          status != AnimationStatus.completed) {
        _controller.forward();
      }
    } else {
      if (status != AnimationStatus.reverse &&
          status != AnimationStatus.dismissed) {
        _controller.reverse();
      }
    }
    if (!controllerInitialized) {
      controllerInitialized = true;
      _controller.value = width > 600 ? 1 : 0;
    }
                                                        // ... to here.
  }

                                                        // Add from here ...
  @override
  void dispose() {
    _controller.dispose();
    super.dispose();
  }
                                                        // ... to here.

  @override
  Widget build(BuildContext context) {
                                                        // Modify from here ...
    return AnimatedBuilder(
      animation: _controller,
      builder: (context, _) {
        return Scaffold(
          body: Row(
            children: [
              DisappearingNavigationRail(
                railAnimation: _railAnimation,
                railFabAnimation: _railFabAnimation,
                selectedIndex: selectedIndex,
                backgroundColor: _backgroundColor,
                onDestinationSelected: (index) {
                  setState(() {
                    selectedIndex = index;
                  });
                },
              ),
              Expanded(
                child: Container(
                  color: _backgroundColor,
                  child: EmailListView(
                    selectedIndex: selectedIndex,
                    onSelected: (index) {
                      setState(() {
                        selectedIndex = index;
                      });
                    },
                    currentUser: widget.currentUser,
                  ),
                ),
              ),
            ],
          ),
          floatingActionButton: AnimatedFloatingActionButton(
            animation: _barAnimation,
            onPressed: () {},
            child: const Icon(Icons.add),
          ),
          bottomNavigationBar: DisappearingBottomNavigationBar(
            barAnimation: _barAnimation,
            selectedIndex: selectedIndex,
            onDestinationSelected: (index) {
              setState(() {
                selectedIndex = index;
              });
            },
          ),
        );
      },
    );
                                                        // ... to here.
  }
}
Uruchom aplikację. Na początku powinna wyglądać tak samo jak wcześniej. Zmieniaj rozmiar ekranu, aby zobaczyć, jak interfejs przełącza się między paskiem nawigacji a paskiem nawigacji, w zależności od rozmiaru i wymiarów. Ruchy podczas tych przejść powinny być płynne i zabawne. Użyj funkcji szybkiego ponownego wczytywania, aby zmienić stosowane krzywe animacji i sprawdzić, jak to wpływa na działanie aplikacji.
8. Dodawanie listy z widokiem szczegółowym
Dodatkowo aplikacja do przesyłania wiadomości to świetne miejsce na wyświetlanie listy z układem szczegółowym, ale tylko wtedy, gdy ekran jest wystarczająco szeroki. Zacznij od dodania pliku o nazwie lib/widgets w katalogu reply_list_view.dart i wypełnij go tym kodem:
lib/widgets/reply_list_view.dart
import 'package:flutter/material.dart';

import '../models/data.dart' as data;
import 'email_widget.dart';

class ReplyListView extends StatelessWidget {
  const ReplyListView({super.key});

  @override
  Widget build(BuildContext context) {
    return Padding(
      padding: const EdgeInsets.only(right: 8.0),
      child: ListView(
        children: [
          const SizedBox(height: 8),
          ...List.generate(data.replies.length, (index) {
            return Padding(
              padding: const EdgeInsets.only(bottom: 8.0),
              child: EmailWidget(
                email: data.replies[index],
                isPreview: false,
                isThreaded: true,
                showHeadline: index == 0,
              ),
            );
          }),
        ],
      ),
    );
  }
}
Następnie w lib/transitions dodaj list_detail_transition.dart i wypełnij go tym kodem:
lib/transitions/list_detail_transition.dart
import 'dart:ui';

import 'package:flutter/material.dart';
import '../animations.dart';

class ListDetailTransition extends StatefulWidget {
  const ListDetailTransition({
    super.key,
    required this.animation,
    required this.one,
    required this.two,
  });

  final Animation<double> animation;
  final Widget one;
  final Widget two;

  @override
  State<ListDetailTransition> createState() => _ListDetailTransitionState();
}

class _ListDetailTransitionState extends State<ListDetailTransition> {
  Animation<double> widthAnimation = const AlwaysStoppedAnimation(0);
  late final Animation<double> sizeAnimation = SizeAnimation(
    parent: widget.animation,
  );
  late final Animation<Offset> offsetAnimation = Tween<Offset>(
    begin: const Offset(1, 0),
    end: Offset.zero,
  ).animate(OffsetAnimation(parent: sizeAnimation));
  double currentFlexFactor = 0;

  @override
  void didChangeDependencies() {
    super.didChangeDependencies();

    final double width = MediaQuery.of(context).size.width;
    double nextFlexFactor = switch (width) {
      >= 800 && < 1200 => lerpDouble(1000, 2000, (width - 800) / 400)!,
      >= 1200 && < 1600 => lerpDouble(2000, 3000, (width - 1200) / 400)!,
      >= 1600 => 3000,
      _ => 1000,
    };

    if (nextFlexFactor == currentFlexFactor) {
      return;
    }

    if (currentFlexFactor == 0) {
      widthAnimation = Tween<double>(
        begin: 0,
        end: nextFlexFactor,
      ).animate(sizeAnimation);
    } else {
      final TweenSequence<double> sequence = TweenSequence([
        if (sizeAnimation.value > 0) ...[
          TweenSequenceItem(
            tween: Tween(begin: 0, end: widthAnimation.value),
            weight: sizeAnimation.value,
          ),
        ],
        if (sizeAnimation.value < 1) ...[
          TweenSequenceItem(
            tween: Tween(begin: widthAnimation.value, end: nextFlexFactor),
            weight: 1 - sizeAnimation.value,
          ),
        ],
      ]);

      widthAnimation = sequence.animate(sizeAnimation);
    }

    currentFlexFactor = nextFlexFactor;
  }

  @override
  Widget build(BuildContext context) {
    return widthAnimation.value.toInt() == 0
        ? widget.one
        : Row(
            children: [
              Flexible(flex: 1000, child: widget.one),
              Flexible(
                flex: widthAnimation.value.toInt(),
                child: FractionalTranslation(
                  translation: offsetAnimation.value,
                  child: widget.two,
                ),
              ),
            ],
          );
  }
}
Zintegruj te treści z aplikacją, aktualizując lib/main.dart w ten sposób:
lib/main.dart
import 'package:flutter/material.dart';

import 'animations.dart';
import 'models/data.dart' as data;
import 'models/models.dart';
import 'transitions/list_detail_transition.dart';          // Add import
import 'widgets/animated_floating_action_button.dart';
import 'widgets/disappearing_bottom_navigation_bar.dart';
import 'widgets/disappearing_navigation_rail.dart';
import 'widgets/email_list_view.dart';
import 'widgets/reply_list_view.dart';                     // Add import

void main() {
  runApp(const MainApp());
}

class MainApp extends StatelessWidget {
  const MainApp({super.key});

  @override
  Widget build(BuildContext context) {
    return MaterialApp(
      theme: ThemeData.light(),
      home: Feed(currentUser: data.user_0),
    );
  }
}

class Feed extends StatefulWidget {
  const Feed({super.key, required this.currentUser});

  final User currentUser;

  @override
  State<Feed> createState() => _FeedState();
}

class _FeedState extends State<Feed> with SingleTickerProviderStateMixin {
  late final _colorScheme = Theme.of(context).colorScheme;
  late final _backgroundColor = Color.alphaBlend(
    _colorScheme.primary.withAlpha(36),
    _colorScheme.surface,
  );
  late final _controller = AnimationController(
    duration: const Duration(milliseconds: 1000),
    reverseDuration: const Duration(milliseconds: 1250),
    value: 0,
    vsync: this,
  );
  late final _railAnimation = RailAnimation(parent: _controller);
  late final _railFabAnimation = RailFabAnimation(parent: _controller);
  late final _barAnimation = BarAnimation(parent: _controller);

  int selectedIndex = 0;
  bool controllerInitialized = false;

  @override
  void didChangeDependencies() {
    super.didChangeDependencies();

    final double width = MediaQuery.of(context).size.width;
    final AnimationStatus status = _controller.status;
    if (width > 600) {
      if (status != AnimationStatus.forward &&
          status != AnimationStatus.completed) {
        _controller.forward();
      }
    } else {
      if (status != AnimationStatus.reverse &&
          status != AnimationStatus.dismissed) {
        _controller.reverse();
      }
    }
    if (!controllerInitialized) {
      controllerInitialized = true;
      _controller.value = width > 600 ? 1 : 0;
    }
  }

  @override
  void dispose() {
    _controller.dispose();
    super.dispose();
  }

  @override
  Widget build(BuildContext context) {
    return AnimatedBuilder(
      animation: _controller,
      builder: (context, _) {
        return Scaffold(
          body: Row(
            children: [
              DisappearingNavigationRail(
                railAnimation: _railAnimation,
                railFabAnimation: _railFabAnimation,
                selectedIndex: selectedIndex,
                backgroundColor: _backgroundColor,
                onDestinationSelected: (index) {
                  setState(() {
                    selectedIndex = index;
                  });
                },
              ),
              Expanded(
                child: Container(
                  color: _backgroundColor,
                                                // Update from here ...
                  child: ListDetailTransition(
                    animation: _railAnimation,
                    one: EmailListView(
                      selectedIndex: selectedIndex,
                      onSelected: (index) {
                        setState(() {
                          selectedIndex = index;
                        });
                      },
                      currentUser: widget.currentUser,
                    ),
                    two: const ReplyListView(),
                  ),
                                                // ... to here.
                ),
              ),
            ],
          ),
          floatingActionButton: AnimatedFloatingActionButton(
            animation: _barAnimation,
            onPressed: () {},
            child: const Icon(Icons.add),
          ),
          bottomNavigationBar: DisappearingBottomNavigationBar(
            barAnimation: _barAnimation,
            selectedIndex: selectedIndex,
            onDestinationSelected: (index) {
              setState(() {
                selectedIndex = index;
              });
            },
          ),
        );
      },
    );
  }
}
Uruchom aplikację, aby zobaczyć wszystkie elementy razem. Aplikacja, która przedstawia prawdziwą aplikację, ma styl Material 3 i animację między różnymi układami. Powinien on wyglądać tak:
9. Gratulacje
Gratulacje, udało Ci się utworzyć pierwszą aplikację Flutter w wersji Material 3.
Aby przejrzeć wszystkie kroki tego Codelab w kodzie, otwórz repozytorium GitHuba z Codelab Fluttera.
Co dalej?
Zapoznaj się z tymi ćwiczeniami z programowania…
- Tworzenie gry za pomocą Flutter i Flame
- Jak sprawić, aby aplikacja Flutter była ładna, a nie nudna
- Używanie FFI w pluginie Fluttera
Więcej informacji
- Dowiedz się więcej o aktualizacjach Material 3 w Flutterze.
- Zapoznaj się z dokumentacją Flutter Material 3.
- Zapoznaj się ze wszystkimi zasobami Material 3.