
إنشاء تخطيط تطبيق سريع الاستجابة مزود بالرسوم المتحركة باستخدام Material 3
لمحة عن هذا الدرس التطبيقي حول الترميز
1. مقدمة
Material 3 هو أحدث إصدار من نظام التصميم مفتوح المصدر من Google. تعمل Flutter على توسيع نطاق التوافق مع إنشاء تطبيقات رائعة باستخدام Material 3. في هذا الدرس التطبيقي حول الترميز، ستبدأ بتطبيق Flutter فارغ وستنشئ تطبيقًا مُصمّمًا بالكامل ومزوّدًا بتأثيرات متحركة باستخدام Material 3 مع Flutter.
ما ستُنشئه
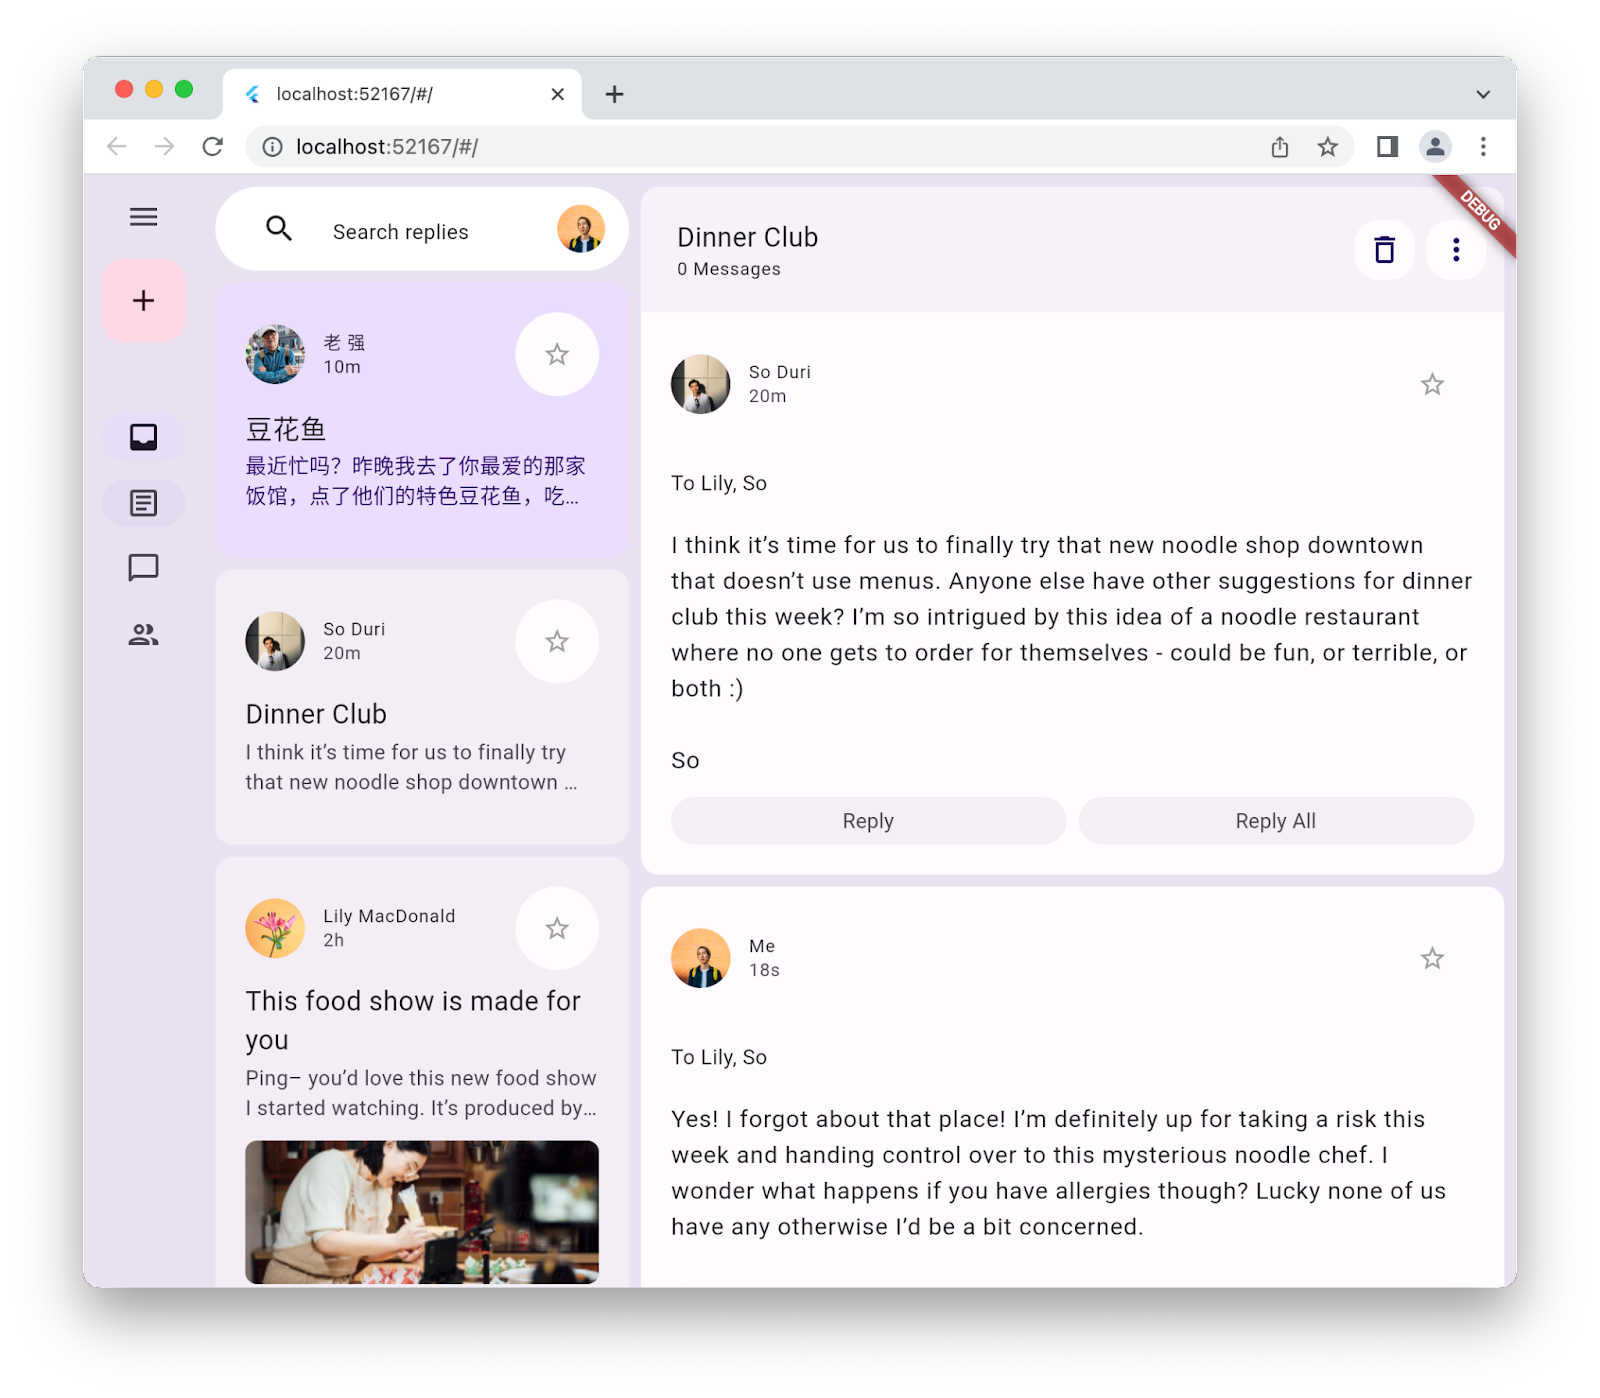
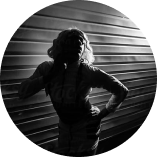
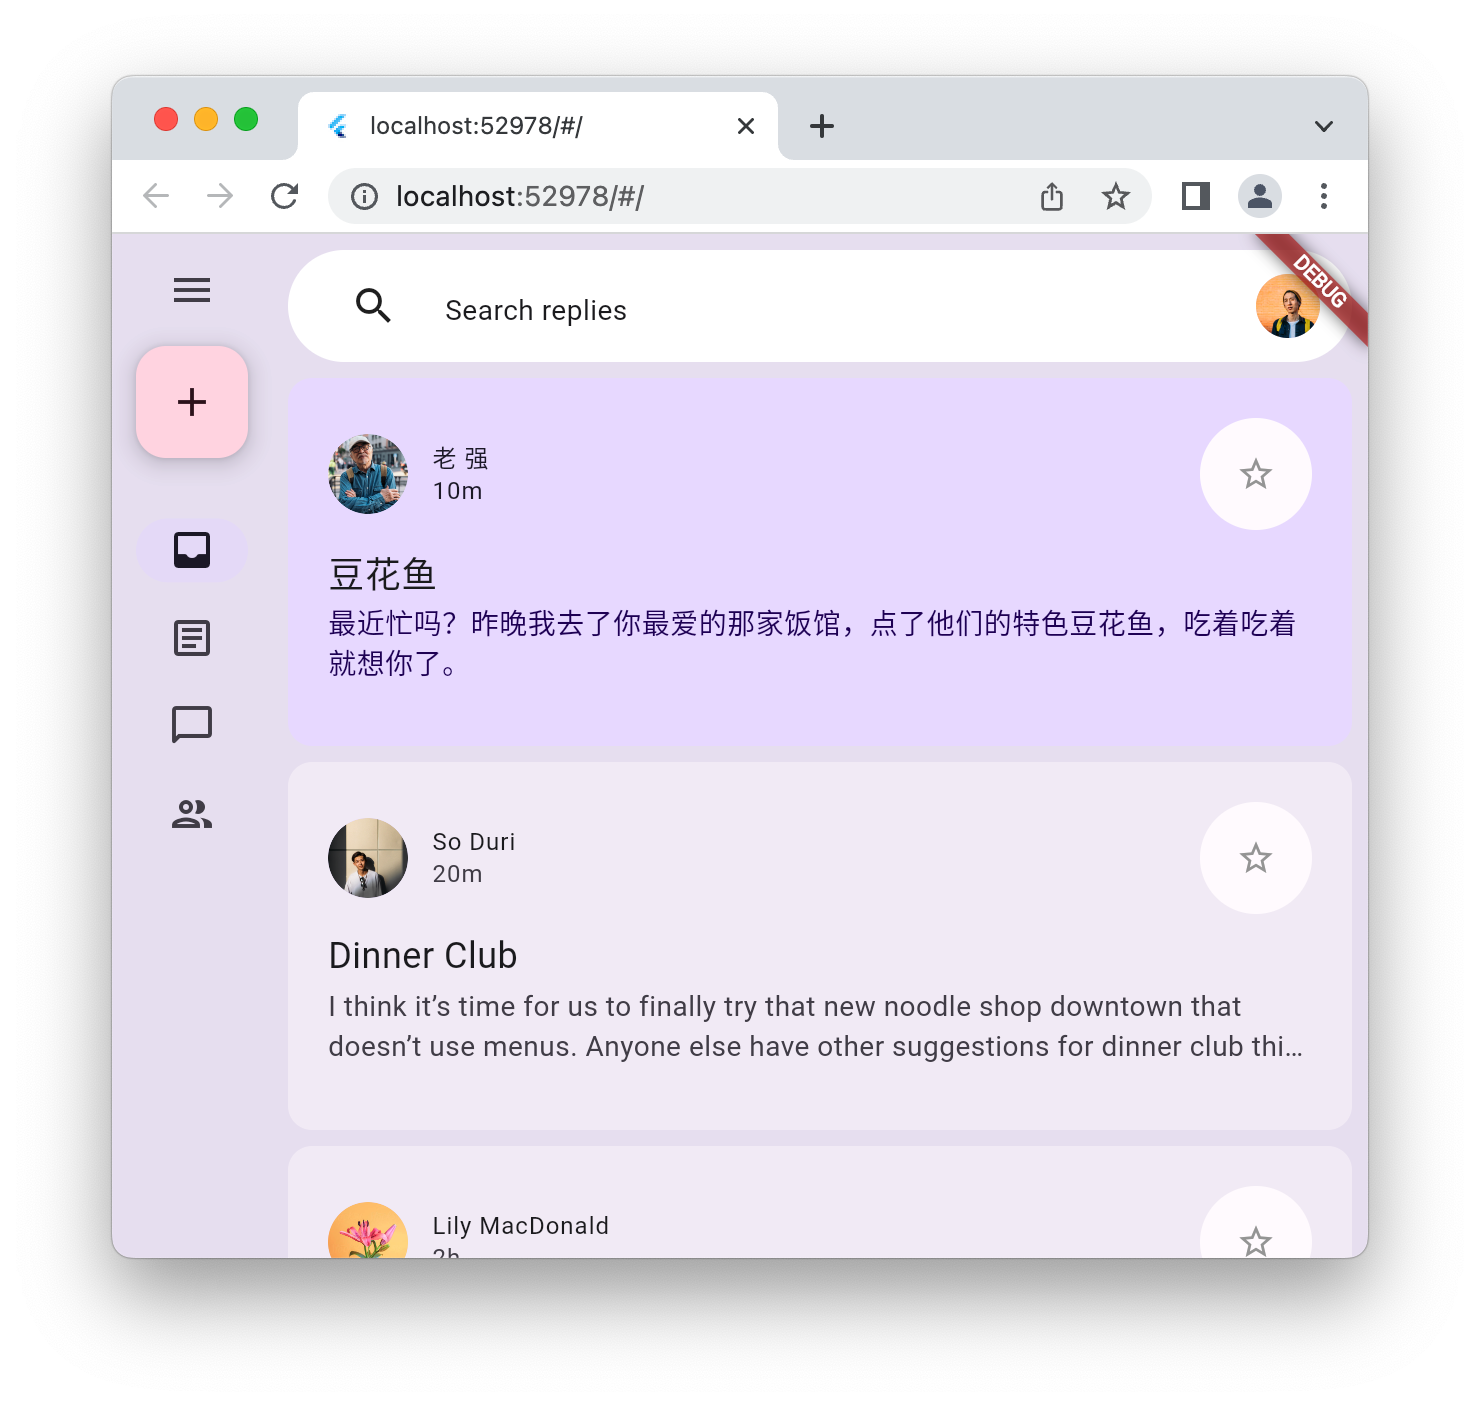
في هذا الدليل التعليمي حول رموز البرامج، ستنشئ تطبيق مراسلة وهميًا. سينفّذ تطبيقك ما يلي:
- استخدِم تصميمًا متكيّفًا ليناسب أجهزة الكمبيوتر المكتبي أو الأجهزة الجوّالة.
- استخدِم المؤثرات الحركية للتبديل بسلاسة بين التنسيقات المختلفة.
- استخدِم Material 3 لتصميم تعبيري.
- يمكن تشغيلها على أجهزة Android وiOS والويب وWindows وLinux وmacOS.
يركز هذا الدرس التطبيقي حول الترميز على Material 3 باستخدام Flutter. يتم تجاهل المفاهيم غير ذات الصلة ووحدات الرموز البرمجية، ويتم توفيرها لك لكي تتمكّن من نسخها ولصقها.
2. إعداد بيئة Flutter
المتطلبات
- حزمة تطوير البرامج (SDK) من Flutter
- محرِّر، مثل VS Code أو استوديو Android
تم اختبار هذا الدرس التطبيقي للنشر على Android وiOS والويب وWindows وLinux وmacOS. تتطلّب بعض استهدافات النشر هذه تثبيت برامج إضافية لتتمكّن من نشرها. من الطرق الجيدة لمعرفة ما إذا كان النظام الأساسي قد تم إعداده بشكلٍ صحيح هي تنفيذ flutter doctor.
$ flutter doctor
Doctor summary (to see all details, run flutter doctor -v):
[✓] Flutter (Channel stable, 3.32.1, on macOS 15.5 24F74 darwin-arm64, locale en-AU)
[✓] Android toolchain - develop for Android devices (Android SDK version 36.0.0)
[✓] Xcode - develop for iOS and macOS (Xcode 16.3)
[✓] Chrome - develop for the web
[✓] Android Studio (version 2024.2)
[✓] IntelliJ IDEA Community Edition (version 2024.3.1.1)
[✓] VS Code (version 1.100.3)
[✓] Connected device (3 available)
[✓] Network resources

• No issues found!
إذا كانت هناك مشاكل مُدرَجة في الإخراج تؤثّر في هدف النشر الذي اخترته، يمكنك تشغيل flutter doctor -v للحصول على معلومات أكثر تفصيلاً. إذا لم تتمكّن من حلّ المشكلة بعد تجربة الخطوات التي ذكرها "flutter doctor -v"، ننصحك بالتواصل مع منتدى Flutter.
3. الخطوات الأولى
إنشاء تطبيق Flutter فارغ
ينشئ معظم مطوّري Flutter تطبيقًا أساسيًا "لاحتساب عدد النقرات على الزر" باستخدام flutter create، ثم يقضون بضع دقائق في إزالة ما لا يحتاجون إليه. يمكنك إنشاء مشروع Flutter فارغ (باستخدام المَعلمة --empty) يتضمّن الأساسيات فقط لتشغيل التطبيق.
$ flutter create animated_responsive_layout --empty
Creating project animated_responsive_layout...
Resolving dependencies in `animated_responsive_layout`...
Downloading packages...
Got dependencies in `animated_responsive_layout`.
Wrote 129 files.

All done!
You can find general documentation for Flutter at: https://docs.flutter.dev/
Detailed API documentation is available at: https://api.flutter.dev/
If you prefer video documentation, consider: https://www.youtube.com/c/flutterdev

In order to run your empty application, type:

  $ cd animated_responsive_layout
  $ flutter run

Your empty application code is in animated_responsive_layout/lib/main.dart.
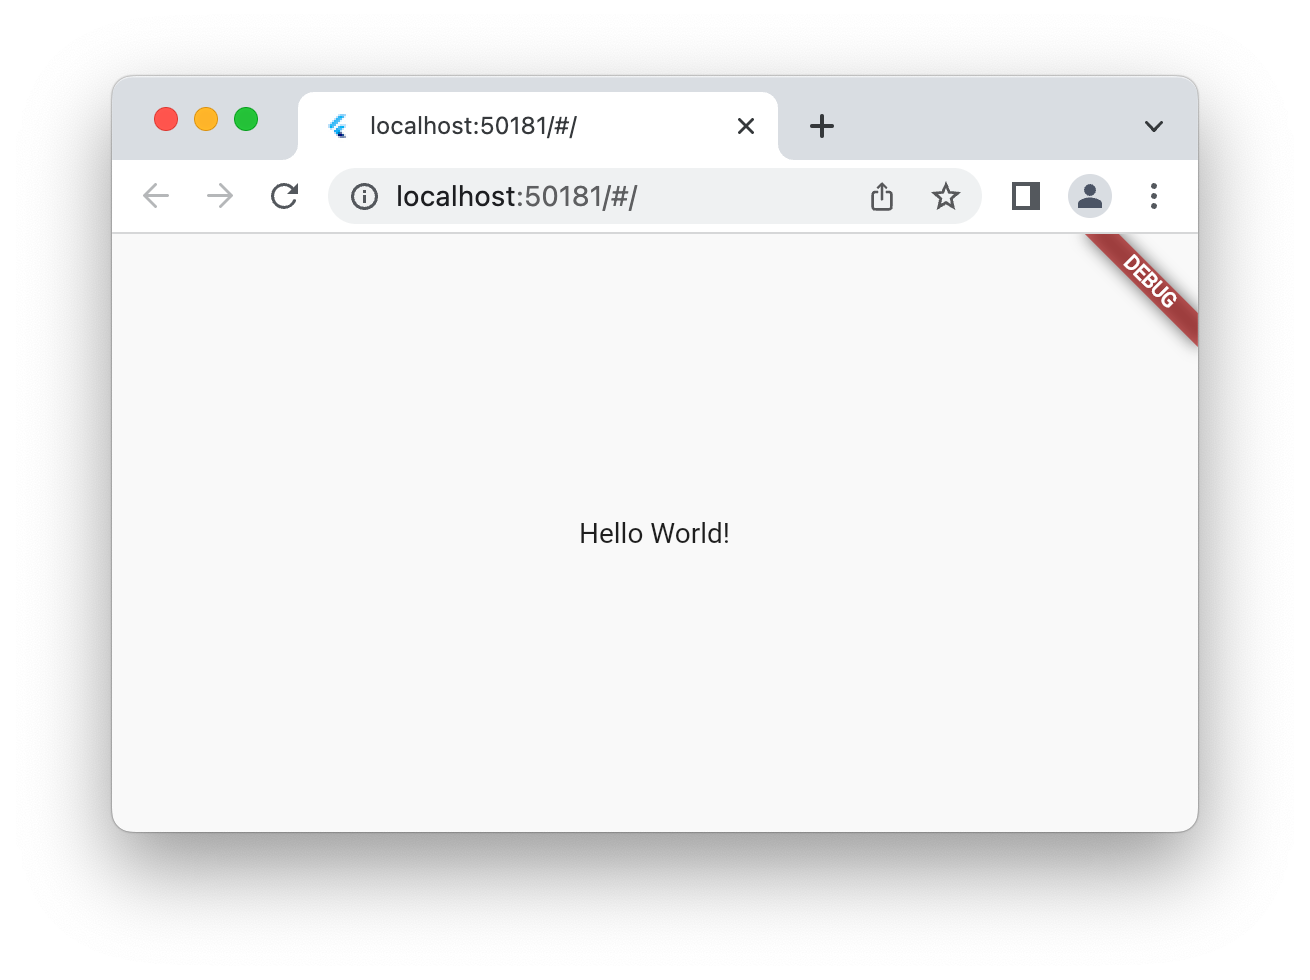
يمكنك تشغيل هذا الرمز، إما من خلال محرِّر الرموز البرمجية أو مباشرةً من سطر الأوامر. استنادًا إلى مجموعات أدوات التطوير التي ثبّتها وما إذا كنت تستخدم محاكيات أو أجهزة محاكاة، قد يُطلب منك تحديد هدف النشر الذي تريد تشغيل التطبيق عليه. في ما يلي، على سبيل المثال، كيفية اختيار تشغيل التطبيق الفارغ في متصفّح ويب من خلال اختيار خيار "Chome".
$ cd animated_responsive_layout
$ flutter run
Connected devices:
macOS (desktop) • macos  • darwin-arm64   • macOS 15.5 24F74 darwin-arm64
Chrome (web)    • chrome • web-javascript • Google Chrome 137.0.7151.56

[1]: macOS (macos)
[2]: Chrome (chrome)
Please choose one (or "q" to quit): 2
Launching lib/main.dart on Chrome in debug mode...
Waiting for connection from debug service on Chrome...              6.4s
This app is linked to the debug service: ws://127.0.0.1:60848/AM68Aq_ZiB8=/ws
Debug service listening on ws://127.0.0.1:60848/AM68Aq_ZiB8=/ws

Flutter run key commands.
R Hot restart.
h List all available interactive commands.
d Detach (terminate "flutter run" but leave application running).
c Clear the screen
q Quit (terminate the application on the device).

A Dart VM Service on Chrome is available at: http://127.0.0.1:60848/AM68Aq_ZiB8=
The Flutter DevTools debugger and profiler on Chrome is available at: http://127.0.0.1:9100?uri=http://127.0.0.1:60848/AM68Aq_ZiB8=
Application finished.
في هذا السيناريو، سيظهر لك التطبيق الفارغ قيد التشغيل في متصفّح الويب Chrome. يمكنك أيضًا اختيار تشغيله على نظام التشغيل Android أو iOS أو نظام التشغيل على الكمبيوتر المكتبي.
4. إنشاء تطبيق مراسلة
إنشاء صور أفاتار
يحتاج كل تطبيق مراسلة إلى صور المستخدمين. تمثّل هذه الصور المستخدمين، ويُشار إليها باسم "صور رمزية". بعد ذلك، أنشئ دليلاً لملفات أصول التطبيق في أعلى شجرة المشروع، واملأه بسلسلة من الصور من مستودع git الخاص بهذا الدليل التعليمي حول رموز البرامج. وإحدى طرق إجراء ذلك هي استخدام أداة سطر الأوامر wget على النحو التالي.
$ mkdir assets
$ cd assets
$ for name in avatar_1 avatar_2 avatar_3 avatar_4 \
              avatar_5 avatar_6 avatar_7 thumbnail_1; \
  do wget https://raw.githubusercontent.com/flutter/codelabs/main/animated-responsive-layout/step_04/assets/$name.png ; \
  done
يؤدي ذلك إلى تنزيل الصور التالية في دليل assets في تطبيقك:
|
|
|
|
|
|
|
|
|
|
|
|
|
|
|
|

بعد أن حصلت على مواد عرض الصور الرمزية، عليك إضافتها إلى ملف pubspec.yaml على النحو التالي:
pubspec.yaml
name: animated_responsive_layout
description: "A new Flutter project."
publish_to: 'none'
version: 0.1.0

environment:
  sdk: ^3.8.0

dependencies:
  flutter:
    sdk: flutter

dev_dependencies:
  flutter_test:
    sdk: flutter
  flutter_lints: ^5.0.0

flutter:
  uses-material-design: true

                                        # Add from here...
  assets:
    - assets/avatar_1.png
    - assets/avatar_2.png
    - assets/avatar_3.png
    - assets/avatar_4.png
    - assets/avatar_5.png
    - assets/avatar_6.png
    - assets/avatar_7.png
    - assets/thumbnail_1.png
                                        # ... to here.
يتطلّب التطبيق مصدر بيانات للرسائل التي يعرضها. في دليل lib الخاص بمشروعك، أنشئ دليلاً فرعيًا models. يمكنك إجراء ذلك على سطر الأوامر باستخدام mkdir، أو في محرِّر النصوص الذي تختاره. أنشئ ملف models.dart في الدليل lib/models يتضمّن المحتوى التالي:
lib/models/models.dart
class Attachment {
  const Attachment({required this.url});

  final String url;
}

class Email {
  const Email({
    required this.sender,
    required this.recipients,
    required this.subject,
    required this.content,
    this.replies = 0,
    this.attachments = const [],
  });

  final User sender;
  final List<User> recipients;
  final String subject;
  final String content;
  final List<Attachment> attachments;
  final double replies;
}

class Name {
  const Name({required this.first, required this.last});

  final String first;
  final String last;
  String get fullName => '$first $last';
}

class User {
  const User({
    required this.name,
    required this.avatarUrl,
    required this.lastActive,
  });

  final Name name;
  final String avatarUrl;
  final DateTime lastActive;
}
الآن بعد أن أصبح لديك تعريف لشكل البيانات، أنشئ ملف data.dart في دليل lib/models يتضمّن المحتوى التالي:
lib/models/data.dart
import 'models.dart';

final User user_0 = User(
  name: const Name(first: 'Me', last: ''),
  avatarUrl: 'assets/avatar_1.png',
  lastActive: DateTime.now(),
);
final User user_1 = User(
  name: const Name(first: '老', last: '强'),
  avatarUrl: 'assets/avatar_2.png',
  lastActive: DateTime.now().subtract(const Duration(minutes: 10)),
);
final User user_2 = User(
  name: const Name(first: 'So', last: 'Duri'),
  avatarUrl: 'assets/avatar_3.png',
  lastActive: DateTime.now().subtract(const Duration(minutes: 20)),
);
final User user_3 = User(
  name: const Name(first: 'Lily', last: 'MacDonald'),
  avatarUrl: 'assets/avatar_4.png',
  lastActive: DateTime.now().subtract(const Duration(hours: 2)),
);
final User user_4 = User(
  name: const Name(first: 'Ziad', last: 'Aouad'),
  avatarUrl: 'assets/avatar_5.png',
  lastActive: DateTime.now().subtract(const Duration(hours: 6)),
);

final List<Email> emails = [
  Email(
    sender: user_1,
    recipients: [],
    subject: '豆花鱼',
    content: '最近忙吗?昨晚我去了你最爱的那家饭馆,点了他们的特色豆花鱼,吃着吃着就想你了。',
  ),
  Email(
    sender: user_2,
    recipients: [],
    subject: 'Dinner Club',
    content:
        'I think it's time for us to finally try that new noodle shop downtown that doesn't use menus. Anyone else have other suggestions for dinner club this week? I'm so intrigued by this idea of a noodle restaurant where no one gets to order for themselves - could be fun, or terrible, or both :)\n\nSo',
  ),
  Email(
    sender: user_3,
    recipients: [],
    subject: 'This food show is made for you',
    content:
        'Ping– you'd love this new food show I started watching. It's produced by a Thai drummer who started getting recognized for the amazing vegan food she always brought to shows.',
    attachments: [const Attachment(url: 'assets/thumbnail_1.png')],
  ),
  Email(
    sender: user_4,
    recipients: [],
    subject: 'Volunteer EMT with me?',
    content:
        'What do you think about training to be volunteer EMTs? We could do it together for moral support. Think about it??',
  ),
];

final List<Email> replies = [
  Email(
    sender: user_2,
    recipients: [user_3, user_2],
    subject: 'Dinner Club',
    content:
        'I think it's time for us to finally try that new noodle shop downtown that doesn't use menus. Anyone else have other suggestions for dinner club this week? I'm so intrigued by this idea of a noodle restaurant where no one gets to order for themselves - could be fun, or terrible, or both :)\n\nSo',
  ),
  Email(
    sender: user_0,
    recipients: [user_3, user_2],
    subject: 'Dinner Club',
    content:
        'Yes! I forgot about that place! I'm definitely up for taking a risk this week and handing control over to this mysterious noodle chef. I wonder what happens if you have allergies though? Lucky none of us have any otherwise I'd be a bit concerned.\n\nThis is going to be great. See you all at the usual time?',
  ),
];
بعد الحصول على هذه البيانات، حان وقت تحديد عنصرَي واجهة مستخدم لعرض هذه البيانات. أنشئ دليلاً فرعيًا ضمن lib باسم widgets. ستنشئ أربعة ملفات في widgets، ومن المحتمل أن تتلقّى بعض التحذيرات من المحرِّر إلى أن يتم إنشاء الملفات الأربعة. تذكَّر أنّ الهدف من هذا الدرس التطبيقي حول الترميز هو تصميم التطبيق باستخدام Material 3. لذلك، أضِف كل ملف من الملفات الأربعة التالية مع المحتوى المدرَج:
lib/widgets/email_list_view.dart
import 'package:flutter/material.dart';

import '../models/data.dart' as data;
import '../models/models.dart';
import 'email_widget.dart';
import 'search_bar.dart' as search_bar;

class EmailListView extends StatelessWidget {
  const EmailListView({
    super.key,
    this.selectedIndex,
    this.onSelected,
    required this.currentUser,
  });

  final int? selectedIndex;
  final ValueChanged<int>? onSelected;
  final User currentUser;

  @override
  Widget build(BuildContext context) {
    return Padding(
      padding: const EdgeInsets.symmetric(horizontal: 8.0),
      child: ListView(
        children: [
          const SizedBox(height: 8),
          search_bar.SearchBar(currentUser: currentUser),
          const SizedBox(height: 8),
          ...List.generate(data.emails.length, (index) {
            return Padding(
              padding: const EdgeInsets.only(bottom: 8.0),
              child: EmailWidget(
                email: data.emails[index],
                onSelected: onSelected != null
                    ? () {
                        onSelected!(index);
                      }
                    : null,
                isSelected: selectedIndex == index,
              ),
            );
          }),
        ],
      ),
    );
  }
}
يبدو أنّ إمكانية عرض قائمة بالرسائل الإلكترونية هي إحدى الميزات التي يجب أن يقدّمها تطبيق المراسلة. ستتلقّى بعض الشكاوى من المحرِّر، ولكن يمكنك حلّ بعض منها عن طريق إضافة الملف التالي email_widget.dart.
lib/widgets/email_widget.dart
import 'package:flutter/material.dart';
import '../models/models.dart';
import 'star_button.dart';

enum EmailType { preview, threaded, primaryThreaded }

class EmailWidget extends StatefulWidget {
  const EmailWidget({
    super.key,
    required this.email,
    this.isSelected = false,
    this.isPreview = true,
    this.isThreaded = false,
    this.showHeadline = false,
    this.onSelected,
  });

  final bool isSelected;
  final bool isPreview;
  final bool showHeadline;
  final bool isThreaded;
  final void Function()? onSelected;
  final Email email;

  @override
  State<EmailWidget> createState() => _EmailWidgetState();
}

class _EmailWidgetState extends State<EmailWidget> {
  late final ColorScheme _colorScheme = Theme.of(context).colorScheme;
  late Color unselectedColor = Color.alphaBlend(
    _colorScheme.primary.withAlpha(20),
    _colorScheme.surface,
  );

  Color get _surfaceColor => switch (widget) {
    EmailWidget(isPreview: false) => _colorScheme.surface,
    EmailWidget(isSelected: true) => _colorScheme.primaryContainer,
    _ => unselectedColor,
  };

  @override
  Widget build(BuildContext context) {
    return GestureDetector(
      onTap: widget.onSelected,
      child: Card(
        elevation: 0,
        color: _surfaceColor,
        clipBehavior: Clip.hardEdge,
        child: Column(
          crossAxisAlignment: CrossAxisAlignment.start,
          mainAxisSize: MainAxisSize.min,
          children: [
            if (widget.showHeadline) ...[
              EmailHeadline(email: widget.email, isSelected: widget.isSelected),
            ],
            EmailContent(
              email: widget.email,
              isPreview: widget.isPreview,
              isThreaded: widget.isThreaded,
              isSelected: widget.isSelected,
            ),
          ],
        ),
      ),
    );
  }
}

class EmailContent extends StatefulWidget {
  const EmailContent({
    super.key,
    required this.email,
    required this.isPreview,
    required this.isThreaded,
    required this.isSelected,
  });

  final Email email;
  final bool isPreview;
  final bool isThreaded;
  final bool isSelected;

  @override
  State<EmailContent> createState() => _EmailContentState();
}

class _EmailContentState extends State<EmailContent> {
  late final ColorScheme _colorScheme = Theme.of(context).colorScheme;
  late final TextTheme _textTheme = Theme.of(context).textTheme;

  Widget get contentSpacer => SizedBox(height: widget.isThreaded ? 20 : 2);

  String get lastActiveLabel {
    final DateTime now = DateTime.now();
    if (widget.email.sender.lastActive.isAfter(now)) throw ArgumentError();
    final Duration elapsedTime = widget.email.sender.lastActive
        .difference(now)
        .abs();
    return switch (elapsedTime) {
      Duration(inSeconds: < 60) => '${elapsedTime.inSeconds}s',
      Duration(inMinutes: < 60) => '${elapsedTime.inMinutes}m',
      Duration(inHours: < 24) => '${elapsedTime.inHours}h',
      Duration(inDays: < 365) => '${elapsedTime.inDays}d',
      _ => throw UnimplementedError(),
    };
  }

  TextStyle? get contentTextStyle => switch (widget) {
    EmailContent(isThreaded: true) => _textTheme.bodyLarge,
    EmailContent(isSelected: true) => _textTheme.bodyMedium?.copyWith(
      color: _colorScheme.onPrimaryContainer,
    ),
    _ => _textTheme.bodyMedium?.copyWith(color: _colorScheme.onSurfaceVariant),
  };

  @override
  Widget build(BuildContext context) {
    return Padding(
      padding: const EdgeInsets.all(20),
      child: Column(
        crossAxisAlignment: CrossAxisAlignment.start,
        children: [
          LayoutBuilder(
            builder: (context, constraints) {
              return Row(
                crossAxisAlignment: CrossAxisAlignment.center,
                children: [
                  if (constraints.maxWidth - 200 > 0) ...[
                    CircleAvatar(
                      backgroundImage: AssetImage(
                        widget.email.sender.avatarUrl,
                      ),
                    ),
                    const Padding(
                      padding: EdgeInsets.symmetric(horizontal: 6.0),
                    ),
                  ],
                  Expanded(
                    child: Column(
                      crossAxisAlignment: CrossAxisAlignment.start,
                      children: [
                        Text(
                          widget.email.sender.name.fullName,
                          overflow: TextOverflow.fade,
                          maxLines: 1,
                          style: widget.isSelected
                              ? _textTheme.labelMedium?.copyWith(
                                  color: _colorScheme.onSecondaryContainer,
                                )
                              : _textTheme.labelMedium?.copyWith(
                                  color: _colorScheme.onSurface,
                                ),
                        ),
                        Text(
                          lastActiveLabel,
                          overflow: TextOverflow.fade,
                          maxLines: 1,
                          style: widget.isSelected
                              ? _textTheme.labelMedium?.copyWith(
                                  color: _colorScheme.onSecondaryContainer,
                                )
                              : _textTheme.labelMedium?.copyWith(
                                  color: _colorScheme.onSurfaceVariant,
                                ),
                        ),
                      ],
                    ),
                  ),
                  if (constraints.maxWidth - 200 > 0) ...[const StarButton()],
                ],
              );
            },
          ),
          const SizedBox(width: 8),
          Column(
            crossAxisAlignment: CrossAxisAlignment.start,
            children: [
              if (widget.isPreview) ...[
                Text(
                  widget.email.subject,
                  style: const TextStyle(
                    fontSize: 18,
                  ).copyWith(color: _colorScheme.onSurface),
                ),
              ],
              if (widget.isThreaded) ...[
                contentSpacer,
                Text(
                  "To ${widget.email.recipients.map((recipient) => recipient.name.first).join(", ")}",
                  style: _textTheme.bodyMedium,
                ),
              ],
              contentSpacer,
              Text(
                widget.email.content,
                maxLines: widget.isPreview ? 2 : 100,
                overflow: TextOverflow.ellipsis,
                style: contentTextStyle,
              ),
            ],
          ),
          const SizedBox(width: 12),
          widget.email.attachments.isNotEmpty
              ? Container(
                  height: 96,
                  decoration: BoxDecoration(
                    borderRadius: BorderRadius.circular(8.0),
                    image: DecorationImage(
                      fit: BoxFit.cover,
                      image: AssetImage(widget.email.attachments.first.url),
                    ),
                  ),
                )
              : const SizedBox.shrink(),
          if (!widget.isPreview) ...[const EmailReplyOptions()],
        ],
      ),
    );
  }
}

class EmailHeadline extends StatefulWidget {
  const EmailHeadline({
    super.key,
    required this.email,
    required this.isSelected,
  });

  final Email email;
  final bool isSelected;

  @override
  State<EmailHeadline> createState() => _EmailHeadlineState();
}

class _EmailHeadlineState extends State<EmailHeadline> {
  late final TextTheme _textTheme = Theme.of(context).textTheme;
  late final ColorScheme _colorScheme = Theme.of(context).colorScheme;

  @override
  Widget build(BuildContext context) {
    return LayoutBuilder(
      builder: (context, constraints) {
        return Container(
          height: 84,
          color: Color.alphaBlend(
            _colorScheme.primary.withAlpha(12),
            _colorScheme.surface,
          ),
          child: Padding(
            padding: const EdgeInsets.fromLTRB(24, 12, 12, 12),
            child: Row(
              mainAxisSize: MainAxisSize.max,
              crossAxisAlignment: CrossAxisAlignment.center,
              children: [
                Expanded(
                  child: Column(
                    mainAxisSize: MainAxisSize.min,
                    crossAxisAlignment: CrossAxisAlignment.start,
                    children: [
                      Text(
                        widget.email.subject,
                        maxLines: 1,
                        overflow: TextOverflow.fade,
                        style: const TextStyle(
                          fontSize: 18,
                          fontWeight: FontWeight.w400,
                        ),
                      ),
                      Text(
                        '${widget.email.replies.toString()} Messages',
                        maxLines: 1,
                        overflow: TextOverflow.fade,
                        style: _textTheme.labelMedium?.copyWith(
                          fontWeight: FontWeight.w500,
                        ),
                      ),
                    ],
                  ),
                ),
                // Display a "condensed" version if the widget in the row are
                // expected to overflow.
                if (constraints.maxWidth - 200 > 0) ...[
                  SizedBox(
                    height: 40,
                    width: 40,
                    child: FloatingActionButton(
                      onPressed: () {},
                      elevation: 0,
                      backgroundColor: _colorScheme.surface,
                      child: const Icon(Icons.delete_outline),
                    ),
                  ),
                  const Padding(padding: EdgeInsets.only(right: 8.0)),
                  SizedBox(
                    height: 40,
                    width: 40,
                    child: FloatingActionButton(
                      onPressed: () {},
                      elevation: 0,
                      backgroundColor: _colorScheme.surface,
                      child: const Icon(Icons.more_vert),
                    ),
                  ),
                ],
              ],
            ),
          ),
        );
      },
    );
  }
}

class EmailReplyOptions extends StatefulWidget {
  const EmailReplyOptions({super.key});

  @override
  State<EmailReplyOptions> createState() => _EmailReplyOptionsState();
}

class _EmailReplyOptionsState extends State<EmailReplyOptions> {
  late final ColorScheme _colorScheme = Theme.of(context).colorScheme;

  @override
  Widget build(BuildContext context) {
    return LayoutBuilder(
      builder: (context, constraints) {
        if (constraints.maxWidth < 100) {
          return const SizedBox.shrink();
        }
        return Row(
          children: [
            Expanded(
              child: TextButton(
                style: ButtonStyle(
                  backgroundColor: WidgetStateProperty.all(
                    _colorScheme.onInverseSurface,
                  ),
                ),
                onPressed: () {},
                child: Text(
                  'Reply',
                  style: TextStyle(color: _colorScheme.onSurfaceVariant),
                ),
              ),
            ),
            const SizedBox(width: 8),
            Expanded(
              child: TextButton(
                style: ButtonStyle(
                  backgroundColor: WidgetStateProperty.all(
                    _colorScheme.onInverseSurface,
                  ),
                ),
                onPressed: () {},
                child: Text(
                  'Reply All',
                  style: TextStyle(color: _colorScheme.onSurfaceVariant),
                ),
              ),
            ),
          ],
        );
      },
    );
  }
}
نعم، هناك الكثير من الإجراءات التي يتم تنفيذها في التطبيق المصغّر هذا. من الجدير دراسة هذه العناصر ببعض التفصيل، لا سيما للاطّلاع على كيفية تطبيق اللون في التطبيق المصغّر. سيصبح هذا الموضوع متكرّرًا. التالي، search_bar.dart.
lib/widgets/search_bar.dart
import 'package:flutter/material.dart';

import '../models/models.dart';

class SearchBar extends StatelessWidget {
  const SearchBar({super.key, required this.currentUser});

  final User currentUser;

  @override
  Widget build(BuildContext context) {
    return SizedBox(
      height: 56,
      child: Container(
        decoration: BoxDecoration(
          borderRadius: BorderRadius.circular(100),
          color: Colors.white,
        ),
        padding: const EdgeInsets.fromLTRB(31, 12, 12, 12),
        child: Row(
          crossAxisAlignment: CrossAxisAlignment.center,
          children: [
            const Icon(Icons.search),
            const SizedBox(width: 23.5),
            Expanded(
              child: TextField(
                maxLines: 1,
                decoration: InputDecoration(
                  isDense: true,
                  border: InputBorder.none,
                  hintText: 'Search replies',
                  hintStyle: Theme.of(context).textTheme.bodyMedium,
                ),
              ),
            ),
            CircleAvatar(backgroundImage: AssetImage(currentUser.avatarUrl)),
          ],
        ),
      ),
    );
  }
}
أداة أبسط بكثير وبدون حالة بعد ذلك، أضِف تطبيقًا مصغّرًا آخر، star_button.dart:
lib/widgets/star_button.dart
impoimport 'package:flutter/material.dart';

class StarButton extends StatefulWidget {
  const StarButton({super.key});

  @override
  State<StarButton> createState() => _StarButtonState();
}

class _StarButtonState extends State<StarButton> {
  bool state = false;
  late final ColorScheme _colorScheme = Theme.of(context).colorScheme;

  Icon get icon {
    final IconData iconData = state ? Icons.star : Icons.star_outline;

    return Icon(iconData, color: Colors.grey, size: 20);
  }

  void _toggle() {
    setState(() {
      state = !state;
    });
  }

  double get turns => state ? 1 : 0;

  @override
  Widget build(BuildContext context) {
    return AnimatedRotation(
      turns: turns,
      curve: Curves.decelerate,
      duration: const Duration(milliseconds: 300),
      child: FloatingActionButton(
        elevation: 0,
        shape: const CircleBorder(),
        backgroundColor: _colorScheme.surface,
        onPressed: () => _toggle(),
        child: Padding(padding: const EdgeInsets.all(10.0), child: icon),
      ),
    );
  }
}
بعد ذلك، عدِّل معلومات النجم الرئيسي في العرض، "lib/main.dart". استبدِل المحتوى الحالي لهذا الملف بما يلي.
lib/main.dart
import 'package:flutter/material.dart';

import 'models/data.dart' as data;
import 'models/models.dart';
import 'widgets/email_list_view.dart';

void main() {
  runApp(const MainApp());
}

class MainApp extends StatelessWidget {
  const MainApp({super.key});

  @override
  Widget build(BuildContext context) {
    return MaterialApp(
      theme: ThemeData.light(),
      home: Feed(currentUser: data.user_0),
    );
  }
}

class Feed extends StatefulWidget {
  const Feed({super.key, required this.currentUser});

  final User currentUser;

  @override
  State<Feed> createState() => _FeedState();
}

class _FeedState extends State<Feed> {
  late final _colorScheme = Theme.of(context).colorScheme;
  late final _backgroundColor = Color.alphaBlend(
    _colorScheme.primary.withAlpha(36),
    _colorScheme.surface,
  );

  @override
  Widget build(BuildContext context) {
    return Scaffold(
      body: Container(
        color: _backgroundColor,
        child: EmailListView(currentUser: widget.currentUser),
      ),
      floatingActionButton: FloatingActionButton(
        backgroundColor: _colorScheme.tertiaryContainer,
        foregroundColor: _colorScheme.onTertiaryContainer,
        onPressed: () {},
        child: const Icon(Icons.add),
      ),
    );
  }
}
شغِّل التطبيق لمعرفة ما يمكنك البدء به.
5. إضافة NavigationBar
في نهاية الخطوة السابقة، كان تطبيق التشغيل المُسبَق يتضمّن قائمة بالرسائل، ولكن لم يكن هناك الكثير من الإجراءات الأخرى. في هذه الخطوة، يمكنك إضافة NavigationBar لإضافة المزيد من اللمسات المميّزة. عندما يتحول التطبيق من رسم تخطيطي لواجهة المستخدم إلى تطبيق حقيقي، يقدّم شريط التنقّل مناطق مختلفة من التطبيق ليستخدمها المستخدم.
يشير توفّر NavigationBar إلى توفّر وجهات للتنقّل إليها. أنشئ ملفًا جديدًا في الدليل lib باسم destinations.dart واملأه بالرمز البرمجي التالي.
lib/destinations.dart
import 'package:flutter/material.dart';

class Destination {
  const Destination(this.icon, this.label);
  final IconData icon;
  final String label;
}

const List<Destination> destinations = <Destination>[
  Destination(Icons.inbox_rounded, 'Inbox'),
  Destination(Icons.article_outlined, 'Articles'),
  Destination(Icons.messenger_outline_rounded, 'Messages'),
  Destination(Icons.group_outlined, 'Groups'),
];
يمنح ذلك التطبيق أربع وجهات لعرض NavigationBar. بعد ذلك، عليك ربط قائمة الوجهات هذه بملف lib/main.dart على النحو التالي:
lib/main.dart
import 'package:flutter/material.dart';

import 'destinations.dart';                    // Add this import
import 'models/data.dart' as data;
import 'models/models.dart';
import 'widgets/email_list_view.dart';

void main() {
  runApp(const MainApp());
}

class MainApp extends StatelessWidget {
  const MainApp({super.key});

  @override
  Widget build(BuildContext context) {
    return MaterialApp(
      theme: ThemeData.light(),
      home: Feed(currentUser: data.user_0),
    );
  }
}

class Feed extends StatefulWidget {
  const Feed({super.key, required this.currentUser});

  final User currentUser;

  @override
  State<Feed> createState() => _FeedState();
}

class _FeedState extends State<Feed> {
  late final _colorScheme = Theme.of(context).colorScheme;
  late final _backgroundColor = Color.alphaBlend(
    _colorScheme.primary.withAlpha(36),
    _colorScheme.surface,
  );

  int selectedIndex = 0;                       // Add this variable

  @override
  Widget build(BuildContext context) {
    return Scaffold(
      body: Container(
        color: _backgroundColor,
        child: EmailListView(
                                              // Add from here...
          selectedIndex: selectedIndex,
          onSelected: (index) {
            setState(() {
              selectedIndex = index;
            });
          },
                                              // ... to here.
          currentUser: widget.currentUser,
        ),
      ),
      floatingActionButton: FloatingActionButton(
        backgroundColor: _colorScheme.tertiaryContainer,
        foregroundColor: _colorScheme.onTertiaryContainer,
        onPressed: () {},
        child: const Icon(Icons.add),
      ),
                                                  // Add from here...
      bottomNavigationBar: NavigationBar(
        elevation: 0,
        backgroundColor: Colors.white,
        destinations: destinations.map<NavigationDestination>((d) {
          return NavigationDestination(icon: Icon(d.icon), label: d.label);
        }).toList(),
        selectedIndex: selectedIndex,
        onDestinationSelected: (index) {
          setState(() {
            selectedIndex = index;
          });
        },
      ),
                                                // ...to here.
    );
  }
}
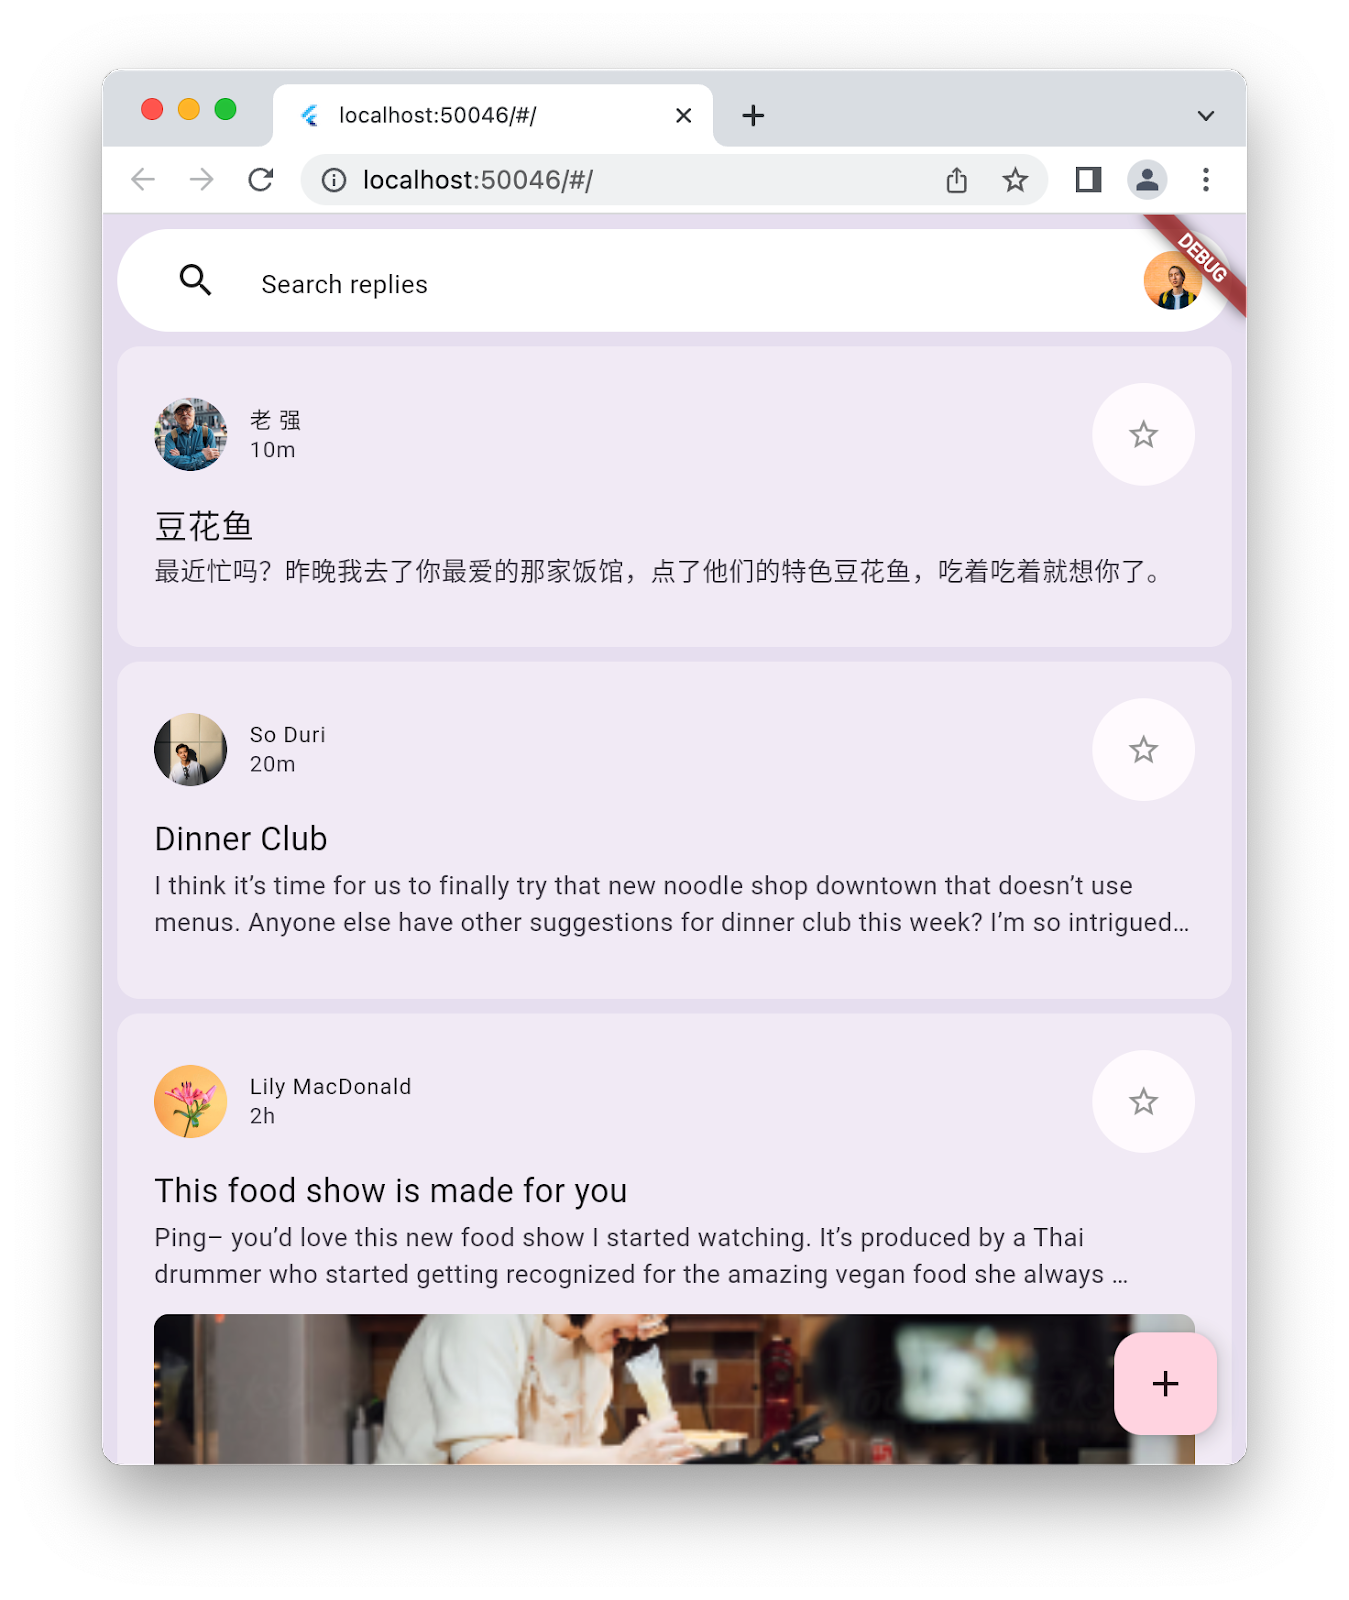
بدلاً من تحديد محتوى مختلف لكل وجهة، يمكنك تغيير حالة الرسائل الفردية لتعكس الوجهة المحدّدة في NavigationBar. وللحفاظ على الاتساق، يعمل هذا الإجراء بالعكس أيضًا: يؤدي اختيار رسالة إلى عرض الوجهة المقابلة في NavigationBar. شغِّل التطبيق للتحقّق من هذه التغييرات:
يبدو هذا معقولاً في الإعدادات الضيقة، ولكن إذا وسّعت النافذة أو حوّلت محاكي الهاتف إلى الوضع الأفقي، سيبدو الأمر غريبًا بعض الشيء. لحلّ هذه المشكلة، أضِف NavigationRail على يمين الشاشة عندما يكون التطبيق عريضًا بما يكفي. سيتم حلّ هذه المشكلة في الخطوة التالية.
6. إضافة NavigationRail
تؤدي هذه الخطوة إلى إضافة NavigationRail إلى طلبك. والفكرة هي عرض عنصر واحد فقط من عنصرَي التنقّل المصغّرَين استنادًا إلى حجم الشاشة، ما يعني أنّك تحتاج إلى إخفاء NavigationBar أو عرضه عند الحاجة. في الدليل lib/widgets، أنشئ ملف disappearing_bottom_navigation_bar.dart وأضِف الرمز التالي:
lib/widgets/disappearing_bottom_navigation_bar.dart
import 'package:flutter/material.dart';

import '../destinations.dart';

class DisappearingBottomNavigationBar extends StatelessWidget {
  const DisappearingBottomNavigationBar({
    super.key,
    required this.selectedIndex,
    this.onDestinationSelected,
  });

  final int selectedIndex;
  final ValueChanged<int>? onDestinationSelected;

  @override
  Widget build(BuildContext context) {
    return NavigationBar(
      elevation: 0,
      backgroundColor: Colors.white,
      destinations: destinations.map<NavigationDestination>((d) {
        return NavigationDestination(icon: Icon(d.icon), label: d.label);
      }).toList(),
      selectedIndex: selectedIndex,
      onDestinationSelected: onDestinationSelected,
    );
  }
}
في الدليل نفسه، أضِف ملفًا آخر باسم disappearing_navigation_rail.dart يتضمّن الرمز التالي:
lib/widgets/disappearing_navigation_rail.dart
import 'package:flutter/material.dart';

import '../destinations.dart';

class DisappearingNavigationRail extends StatelessWidget {
  const DisappearingNavigationRail({
    super.key,
    required this.backgroundColor,
    required this.selectedIndex,
    this.onDestinationSelected,
  });

  final Color backgroundColor;
  final int selectedIndex;
  final ValueChanged<int>? onDestinationSelected;

  @override
  Widget build(BuildContext context) {
    final colorScheme = Theme.of(context).colorScheme;
    return NavigationRail(
      selectedIndex: selectedIndex,
      backgroundColor: backgroundColor,
      onDestinationSelected: onDestinationSelected,
      leading: Column(
        children: [
          IconButton(onPressed: () {}, icon: const Icon(Icons.menu)),
          const SizedBox(height: 8),
          FloatingActionButton(
            shape: const RoundedRectangleBorder(
              borderRadius: BorderRadius.all(Radius.circular(15)),
            ),
            backgroundColor: colorScheme.tertiaryContainer,
            foregroundColor: colorScheme.onTertiaryContainer,
            onPressed: () {},
            child: const Icon(Icons.add),
          ),
        ],
      ),
      groupAlignment: -0.85,
      destinations: destinations.map((d) {
        return NavigationRailDestination(
          icon: Icon(d.icon),
          label: Text(d.label),
        );
      }).toList(),
    );
  }
}
بعد إعادة تنظيم مصطلحات التنقّل في التطبيقات لإنشاء التطبيقات المصغّرة الخاصة بها، يتطلّب ملف lib/main.dart إجراء بعض التعديلات:
lib/main.dart
import 'package:flutter/material.dart';

// Remove the destination.dart import, it's not required
import 'models/data.dart' as data;
import 'models/models.dart';
import 'widgets/disappearing_bottom_navigation_bar.dart';  // Add import
import 'widgets/disappearing_navigation_rail.dart';        // Add import
import 'widgets/email_list_view.dart';

void main() {
  runApp(const MainApp());
}

class MainApp extends StatelessWidget {
  const MainApp({super.key});

  @override
  Widget build(BuildContext context) {
    return MaterialApp(
      theme: ThemeData.light(),
      home: Feed(currentUser: data.user_0),
    );
  }
}

class Feed extends StatefulWidget {
  const Feed({super.key, required this.currentUser});

  final User currentUser;

  @override
  State<Feed> createState() => _FeedState();
}

class _FeedState extends State<Feed> {
  late final _colorScheme = Theme.of(context).colorScheme;
  late final _backgroundColor = Color.alphaBlend(
    _colorScheme.primary.withAlpha(36),
    _colorScheme.surface,
  );

  int selectedIndex = 0;
                                                  // Add from here...
  bool wideScreen = false;

  @override
  void didChangeDependencies() {
    super.didChangeDependencies();

    final double width = MediaQuery.of(context).size.width;
    wideScreen = width > 600;
  }
                                                 // ... to here.

  @override
  Widget build(BuildContext context) {
                                                 // Modify from here...
    return Scaffold(
      body: Row(
        children: [
          if (wideScreen)
            DisappearingNavigationRail(
              selectedIndex: selectedIndex,
              backgroundColor: _backgroundColor,
              onDestinationSelected: (index) {
                setState(() {
                  selectedIndex = index;
                });
              },
            ),
          Expanded(
            child: Container(
              color: _backgroundColor,
              child: EmailListView(
                selectedIndex: selectedIndex,
                onSelected: (index) {
                  setState(() {
                    selectedIndex = index;
                  });
                },
                currentUser: widget.currentUser,
              ),
            ),
          ),
        ],
      ),
      floatingActionButton: wideScreen
          ? null
          : FloatingActionButton(
              backgroundColor: _colorScheme.tertiaryContainer,
              foregroundColor: _colorScheme.onTertiaryContainer,
              onPressed: () {},
              child: const Icon(Icons.add),
            ),
      bottomNavigationBar: wideScreen
          ? null
          : DisappearingBottomNavigationBar(
              selectedIndex: selectedIndex,
              onDestinationSelected: (index) {
                setState(() {
                  selectedIndex = index;
                });
              },
            ),
    );
                                                    // ... to here.
  }
}
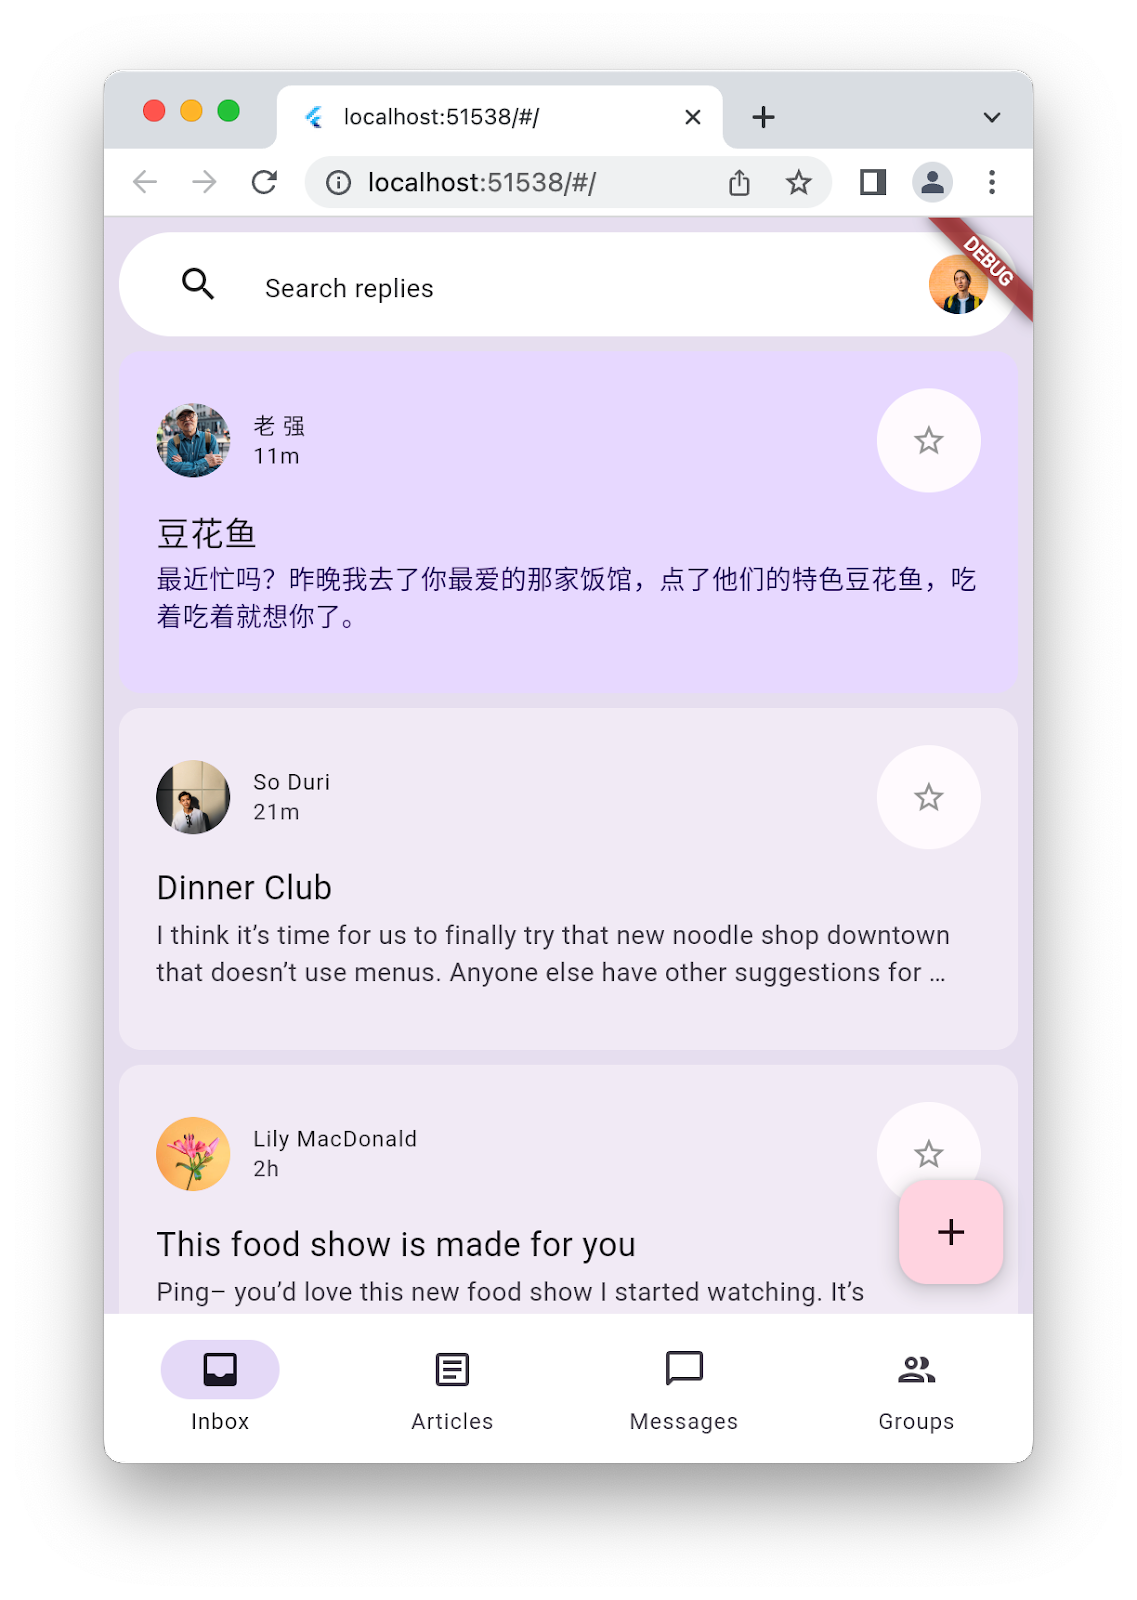
أول تغيير مهم في ملف main.dart هو إضافة حالة wideScreen يتم تعديلها كلما غيّر المستخدم حجم الشاشة، سواء من خلال تغيير حجم نافذة المتصفّح أو تدوير الهاتف. يُعدّل التغيير التالي NavigationBar وFloatingActionButton ليصبحا يعتمدان على ما إذا كان التطبيق في وضع wideScreen. أخيرًا، يتم عرض الرمز NavigationRail بشكل مشروط على يمين الشاشة إذا كانت الشاشة عريضة بما يكفي. شغِّل التطبيق على الويب أو الكمبيوتر المكتبي وغيِّر حجم الشاشة لعرض التنسيقَين المختلفَين.
|
|
من الجيد أن يكون هناك تنسيقان مختلفان، ولكن الانتقال بينهما ليس رائعًا. سيؤدي استبدال الشريط بقضيب (أو العكس) بطريقة أكثر ديناميكية إلى تحسين هذا التطبيق بشكل كبير. ستضيف هذا المقطع المتحركة في الخطوة التالية.
7. إضافة تأثيرات متحركة إلى الانتقالات
يتضمن إنشاء تجربة متحركة إنشاء سلسلة من الرسوم المتحركة، مع تصميم كل مكوّن بشكل ملائم. بالنسبة إلى هذا المقطع المتحرك، ستبدأ بإنشاء ملف جديد في الدليل lib باسم animations.dart يتضمّن منحنيات الحركة التي تحتاج إليها.
lib/animations.dart
import 'package:flutter/animation.dart';

class BarAnimation extends ReverseAnimation {
  BarAnimation({required AnimationController parent})
    : super(
        CurvedAnimation(
          parent: parent,
          curve: const Interval(0, 1 / 5),
          reverseCurve: const Interval(1 / 5, 4 / 5),
        ),
      );
}

class OffsetAnimation extends CurvedAnimation {
  OffsetAnimation({required super.parent})
    : super(
        curve: const Interval(
          2 / 5,
          3 / 5,
          curve: Curves.easeInOutCubicEmphasized,
        ),
        reverseCurve: Interval(
          4 / 5,
          1,
          curve: Curves.easeInOutCubicEmphasized.flipped,
        ),
      );
}

class RailAnimation extends CurvedAnimation {
  RailAnimation({required super.parent})
    : super(
        curve: const Interval(0 / 5, 4 / 5),
        reverseCurve: const Interval(3 / 5, 1),
      );
}

class RailFabAnimation extends CurvedAnimation {
  RailFabAnimation({required super.parent})
    : super(curve: const Interval(3 / 5, 1));
}

class ScaleAnimation extends CurvedAnimation {
  ScaleAnimation({required super.parent})
    : super(
        curve: const Interval(
          3 / 5,
          4 / 5,
          curve: Curves.easeInOutCubicEmphasized,
        ),
        reverseCurve: Interval(
          3 / 5,
          1,
          curve: Curves.easeInOutCubicEmphasized.flipped,
        ),
      );
}

class ShapeAnimation extends CurvedAnimation {
  ShapeAnimation({required super.parent})
    : super(
        curve: const Interval(
          2 / 5,
          3 / 5,
          curve: Curves.easeInOutCubicEmphasized,
        ),
      );
}

class SizeAnimation extends CurvedAnimation {
  SizeAnimation({required super.parent})
    : super(
        curve: const Interval(
          0 / 5,
          3 / 5,
          curve: Curves.easeInOutCubicEmphasized,
        ),
        reverseCurve: Interval(
          2 / 5,
          1,
          curve: Curves.easeInOutCubicEmphasized.flipped,
        ),
      );
}
يتطلّب تطوير هذه المنحنيات تكرارًا، ما يسهّله ميزة "إعادة التحميل السريع" في Flutter. لاستخدام هذه الصور المتحركة، تحتاج إلى بعض الانتقالات. أنشئ دليلاً فرعيًا في دليل lib باسم transitions، وأضِف ملفًا باسم bottom_bar_transition.dart يتضمّن الرمز التالي:
lib/transitions/bottom_bar_transition.dart
import 'package:flutter/material.dart';
import '../animations.dart';

class BottomBarTransition extends StatefulWidget {
  const BottomBarTransition({
    super.key,
    required this.animation,
    required this.backgroundColor,
    required this.child,
  });

  final Animation<double> animation;
  final Color backgroundColor;
  final Widget child;

  @override
  State<BottomBarTransition> createState() => _BottomBarTransition();
}

class _BottomBarTransition extends State<BottomBarTransition> {
  late final Animation<Offset> offsetAnimation = Tween<Offset>(
    begin: const Offset(0, 1),
    end: Offset.zero,
  ).animate(OffsetAnimation(parent: widget.animation));

  late final Animation<double> heightAnimation = Tween<double>(
    begin: 0,
    end: 1,
  ).animate(SizeAnimation(parent: widget.animation));

  @override
  Widget build(BuildContext context) {
    return ClipRect(
      child: DecoratedBox(
        decoration: BoxDecoration(color: widget.backgroundColor),
        child: Align(
          alignment: Alignment.topLeft,
          heightFactor: heightAnimation.value,
          child: FractionalTranslation(
            translation: offsetAnimation.value,
            child: widget.child,
          ),
        ),
      ),
    );
  }
}
أضِف ملفًا آخر إلى الدليل lib/transitions باسم nav_rail_transition.dart وأضِف الرمز البرمجي التالي:
lib/transitions/nav_rail_transition.dart
import 'package:flutter/material.dart';
import '../animations.dart';

class NavRailTransition extends StatefulWidget {
  const NavRailTransition({
    super.key,
    required this.animation,
    required this.backgroundColor,
    required this.child,
  });

  final Animation<double> animation;
  final Widget child;
  final Color backgroundColor;

  @override
  State<NavRailTransition> createState() => _NavRailTransitionState();
}

class _NavRailTransitionState extends State<NavRailTransition> {
  // The animations are only rebuilt by this method when the text
  // direction changes because this widget only depends on Directionality.
  late final bool ltr = Directionality.of(context) == TextDirection.ltr;
  late final Animation<Offset> offsetAnimation = Tween<Offset>(
    begin: ltr ? const Offset(-1, 0) : const Offset(1, 0),
    end: Offset.zero,
  ).animate(OffsetAnimation(parent: widget.animation));
  late final Animation<double> widthAnimation = Tween<double>(
    begin: 0,
    end: 1,
  ).animate(SizeAnimation(parent: widget.animation));

  @override
  Widget build(BuildContext context) {
    return ClipRect(
      child: DecoratedBox(
        decoration: BoxDecoration(color: widget.backgroundColor),
        child: AnimatedBuilder(
          animation: widthAnimation,
          builder: (context, child) {
            return Align(
              alignment: Alignment.topLeft,
              widthFactor: widthAnimation.value,
              child: FractionalTranslation(
                translation: offsetAnimation.value,
                child: widget.child,
              ),
            );
          },
        ),
      ),
    );
  }
}
يلفّ هذان التطبيقان المصغّران للانتقال شريط التنقّل وتطبيقَي شريط التنقّل المصغّرَين، لإضافة تأثيرات متحركة إلى ظهورهما واختفاءهما. لاستخدام هذين التطبيقَين المصغّرَين للانتقال، عليك تعديل تطبيقَين مصغّرَين، بدءًا من disappearing_bottom_navigation_bar.dart:
lib/widgets/disappearing_bottom_navigation_bar.dart
import 'package:flutter/material.dart';

import '../animations.dart';                          // Add this import
import '../destinations.dart';
import '../transitions/bottom_bar_transition.dart';   // Add this import

class DisappearingBottomNavigationBar extends StatelessWidget {
  const DisappearingBottomNavigationBar({
    super.key,
    required this.barAnimation,                       // Add this parameter
    required this.selectedIndex,
    this.onDestinationSelected,
  });

  final BarAnimation barAnimation;                   // Add this variable
  final int selectedIndex;
  final ValueChanged<int>? onDestinationSelected;

  @override
  Widget build(BuildContext context) {
                                                     // Modify from here...
    return BottomBarTransition(
      animation: barAnimation,
      backgroundColor: Colors.white,
      child: NavigationBar(
        elevation: 0,
        backgroundColor: Colors.white,
        destinations: destinations.map<NavigationDestination>((d) {
          return NavigationDestination(icon: Icon(d.icon), label: d.label);
        }).toList(),
        selectedIndex: selectedIndex,
        onDestinationSelected: onDestinationSelected,
      ),
    );
                                                     // ... to here.
  }
}
يضيف التعديل السابق أحد الرسوم المتحركة ويدمج انتقالًا. يمنحك ذلك إمكانية التحكّم في كيفية ظهور شريط التنقّل واختفائه.
بعد ذلك، عدِّل disappearing_navigation_rail.dart على النحو التالي:
lib/widgets/disappearing_navigation_rail.dart
import 'package:flutter/material.dart';

import '../animations.dart';                          // Add this import
import '../destinations.dart';
import '../transitions/nav_rail_transition.dart';     // Add this import
import 'animated_floating_action_button.dart';        // Add this import

class DisappearingNavigationRail extends StatelessWidget {
  const DisappearingNavigationRail({
    super.key,
    required this.railAnimation,                      // Add this parameter
    required this.railFabAnimation,                   // Add this parameter
    required this.backgroundColor,
    required this.selectedIndex,
    this.onDestinationSelected,
  });

  final RailAnimation railAnimation;                  // Add this variable
  final RailFabAnimation railFabAnimation;            // Add this variable
  final Color backgroundColor;
  final int selectedIndex;
  final ValueChanged<int>? onDestinationSelected;

  @override
  Widget build(BuildContext context) {
    // Delete colorScheme
                                                      // Modify from here ...
    return NavRailTransition(
      animation: railAnimation,
      backgroundColor: backgroundColor,
      child: NavigationRail(
        selectedIndex: selectedIndex,
        backgroundColor: backgroundColor,
        onDestinationSelected: onDestinationSelected,
        leading: Column(
          children: [
            IconButton(onPressed: () {}, icon: const Icon(Icons.menu)),
            const SizedBox(height: 8),
            AnimatedFloatingActionButton(
              animation: railFabAnimation,
              elevation: 0,
              onPressed: () {},
              child: const Icon(Icons.add),
            ),
          ],
        ),
        groupAlignment: -0.85,
        destinations: destinations.map((d) {
          return NavigationRailDestination(
            icon: Icon(d.icon),
            label: Text(d.label),
          );
        }).toList(),
      ),
    );
                                                      // ... to here.
  }
}
أثناء إدخال الرمز السابق، من المحتمل أنّك تلقّيت مجموعة من تحذيرات الأخطاء بشأن تطبيق مصغّر غير محدّد، وهو FloatingActionButton. لحلّ هذه المشكلة، أضِف ملفًا باسم animated_floating_action_button.dart إلى lib/widgets باستخدام الرمز التالي:
lib/widgets/animated_floating_action_button.dart
import 'dart:ui';

import 'package:flutter/material.dart';
import '../animations.dart';

class AnimatedFloatingActionButton extends StatefulWidget {
  const AnimatedFloatingActionButton({
    super.key,
    required this.animation,
    this.elevation,
    this.onPressed,
    this.child,
  });

  final Animation<double> animation;
  final VoidCallback? onPressed;
  final Widget? child;
  final double? elevation;

  @override
  State<AnimatedFloatingActionButton> createState() =>
      _AnimatedFloatingActionButton();
}

class _AnimatedFloatingActionButton
    extends State<AnimatedFloatingActionButton> {
  late final ColorScheme _colorScheme = Theme.of(context).colorScheme;
  late final Animation<double> _scaleAnimation = ScaleAnimation(
    parent: widget.animation,
  );
  late final Animation<double> _shapeAnimation = ShapeAnimation(
    parent: widget.animation,
  );

  @override
  Widget build(BuildContext context) {
    return ScaleTransition(
      scale: _scaleAnimation,
      child: FloatingActionButton(
        elevation: widget.elevation,
        shape: RoundedRectangleBorder(
          borderRadius: BorderRadius.all(
            Radius.circular(lerpDouble(30, 15, _shapeAnimation.value)!),
          ),
        ),
        backgroundColor: _colorScheme.tertiaryContainer,
        foregroundColor: _colorScheme.onTertiaryContainer,
        onPressed: widget.onPressed,
        child: widget.child,
      ),
    );
  }
}
لنقل هذه التغييرات إلى التطبيق، عليك تعديل ملف main.dart على النحو التالي:
lib/main.dart
import 'package:flutter/material.dart';

import 'animations.dart';                               // Add this import
import 'models/data.dart' as data;
import 'models/models.dart';
import 'widgets/animated_floating_action_button.dart';  // Add this import
import 'widgets/disappearing_bottom_navigation_bar.dart';
import 'widgets/disappearing_navigation_rail.dart';
import 'widgets/email_list_view.dart';

void main() {
  runApp(const MainApp());
}

class MainApp extends StatelessWidget {
  const MainApp({super.key});

  @override
  Widget build(BuildContext context) {
    return MaterialApp(
      theme: ThemeData.light(),
      home: Feed(currentUser: data.user_0),
    );
  }
}

class Feed extends StatefulWidget {
  const Feed({super.key, required this.currentUser});

  final User currentUser;

  @override
  State<Feed> createState() => _FeedState();
}

class _FeedState extends State<Feed> with SingleTickerProviderStateMixin {
  late final _colorScheme = Theme.of(context).colorScheme;
  late final _backgroundColor = Color.alphaBlend(
    _colorScheme.primary.withAlpha(36),
    _colorScheme.surface,
  );
                                                        // Add from here...
  late final _controller = AnimationController(
    duration: const Duration(milliseconds: 1000),
    reverseDuration: const Duration(milliseconds: 1250),
    value: 0,
    vsync: this,
  );
  late final _railAnimation = RailAnimation(parent: _controller);
  late final _railFabAnimation = RailFabAnimation(parent: _controller);
  late final _barAnimation = BarAnimation(parent: _controller);
                                                        // ... to here.

  int selectedIndex = 0;
  // Remove wideScreen
  bool controllerInitialized = false;                   // Add this variable

  @override
  void didChangeDependencies() {
    super.didChangeDependencies();

    final double width = MediaQuery.of(context).size.width;
    // Remove wideScreen reference
                                                        // Add from here ...
    final AnimationStatus status = _controller.status;
    if (width > 600) {
      if (status != AnimationStatus.forward &&
          status != AnimationStatus.completed) {
        _controller.forward();
      }
    } else {
      if (status != AnimationStatus.reverse &&
          status != AnimationStatus.dismissed) {
        _controller.reverse();
      }
    }
    if (!controllerInitialized) {
      controllerInitialized = true;
      _controller.value = width > 600 ? 1 : 0;
    }
                                                        // ... to here.
  }

                                                        // Add from here ...
  @override
  void dispose() {
    _controller.dispose();
    super.dispose();
  }
                                                        // ... to here.

  @override
  Widget build(BuildContext context) {
                                                        // Modify from here ...
    return AnimatedBuilder(
      animation: _controller,
      builder: (context, _) {
        return Scaffold(
          body: Row(
            children: [
              DisappearingNavigationRail(
                railAnimation: _railAnimation,
                railFabAnimation: _railFabAnimation,
                selectedIndex: selectedIndex,
                backgroundColor: _backgroundColor,
                onDestinationSelected: (index) {
                  setState(() {
                    selectedIndex = index;
                  });
                },
              ),
              Expanded(
                child: Container(
                  color: _backgroundColor,
                  child: EmailListView(
                    selectedIndex: selectedIndex,
                    onSelected: (index) {
                      setState(() {
                        selectedIndex = index;
                      });
                    },
                    currentUser: widget.currentUser,
                  ),
                ),
              ),
            ],
          ),
          floatingActionButton: AnimatedFloatingActionButton(
            animation: _barAnimation,
            onPressed: () {},
            child: const Icon(Icons.add),
          ),
          bottomNavigationBar: DisappearingBottomNavigationBar(
            barAnimation: _barAnimation,
            selectedIndex: selectedIndex,
            onDestinationSelected: (index) {
              setState(() {
                selectedIndex = index;
              });
            },
          ),
        );
      },
    );
                                                        // ... to here.
  }
}
شغِّل التطبيق. من المفترض أن يبدو كما كان في السابق. يمكنك تغيير حجم الشاشة للاطّلاع على واجهة المستخدم التي تتبدّل بين شريط التنقّل وشريط التنقّل، وذلك استنادًا إلى الحجم والأبعاد. من المفترض أن تظهر الآن حركة هذه الانتقالات سلسة ومرحة. استخدِم ميزة "إعادة التحميل السريع" لتغيير منحنيات الرسوم المتحركة المستخدَمة لمعرفة كيفية تغييرها لتجربة التطبيق.
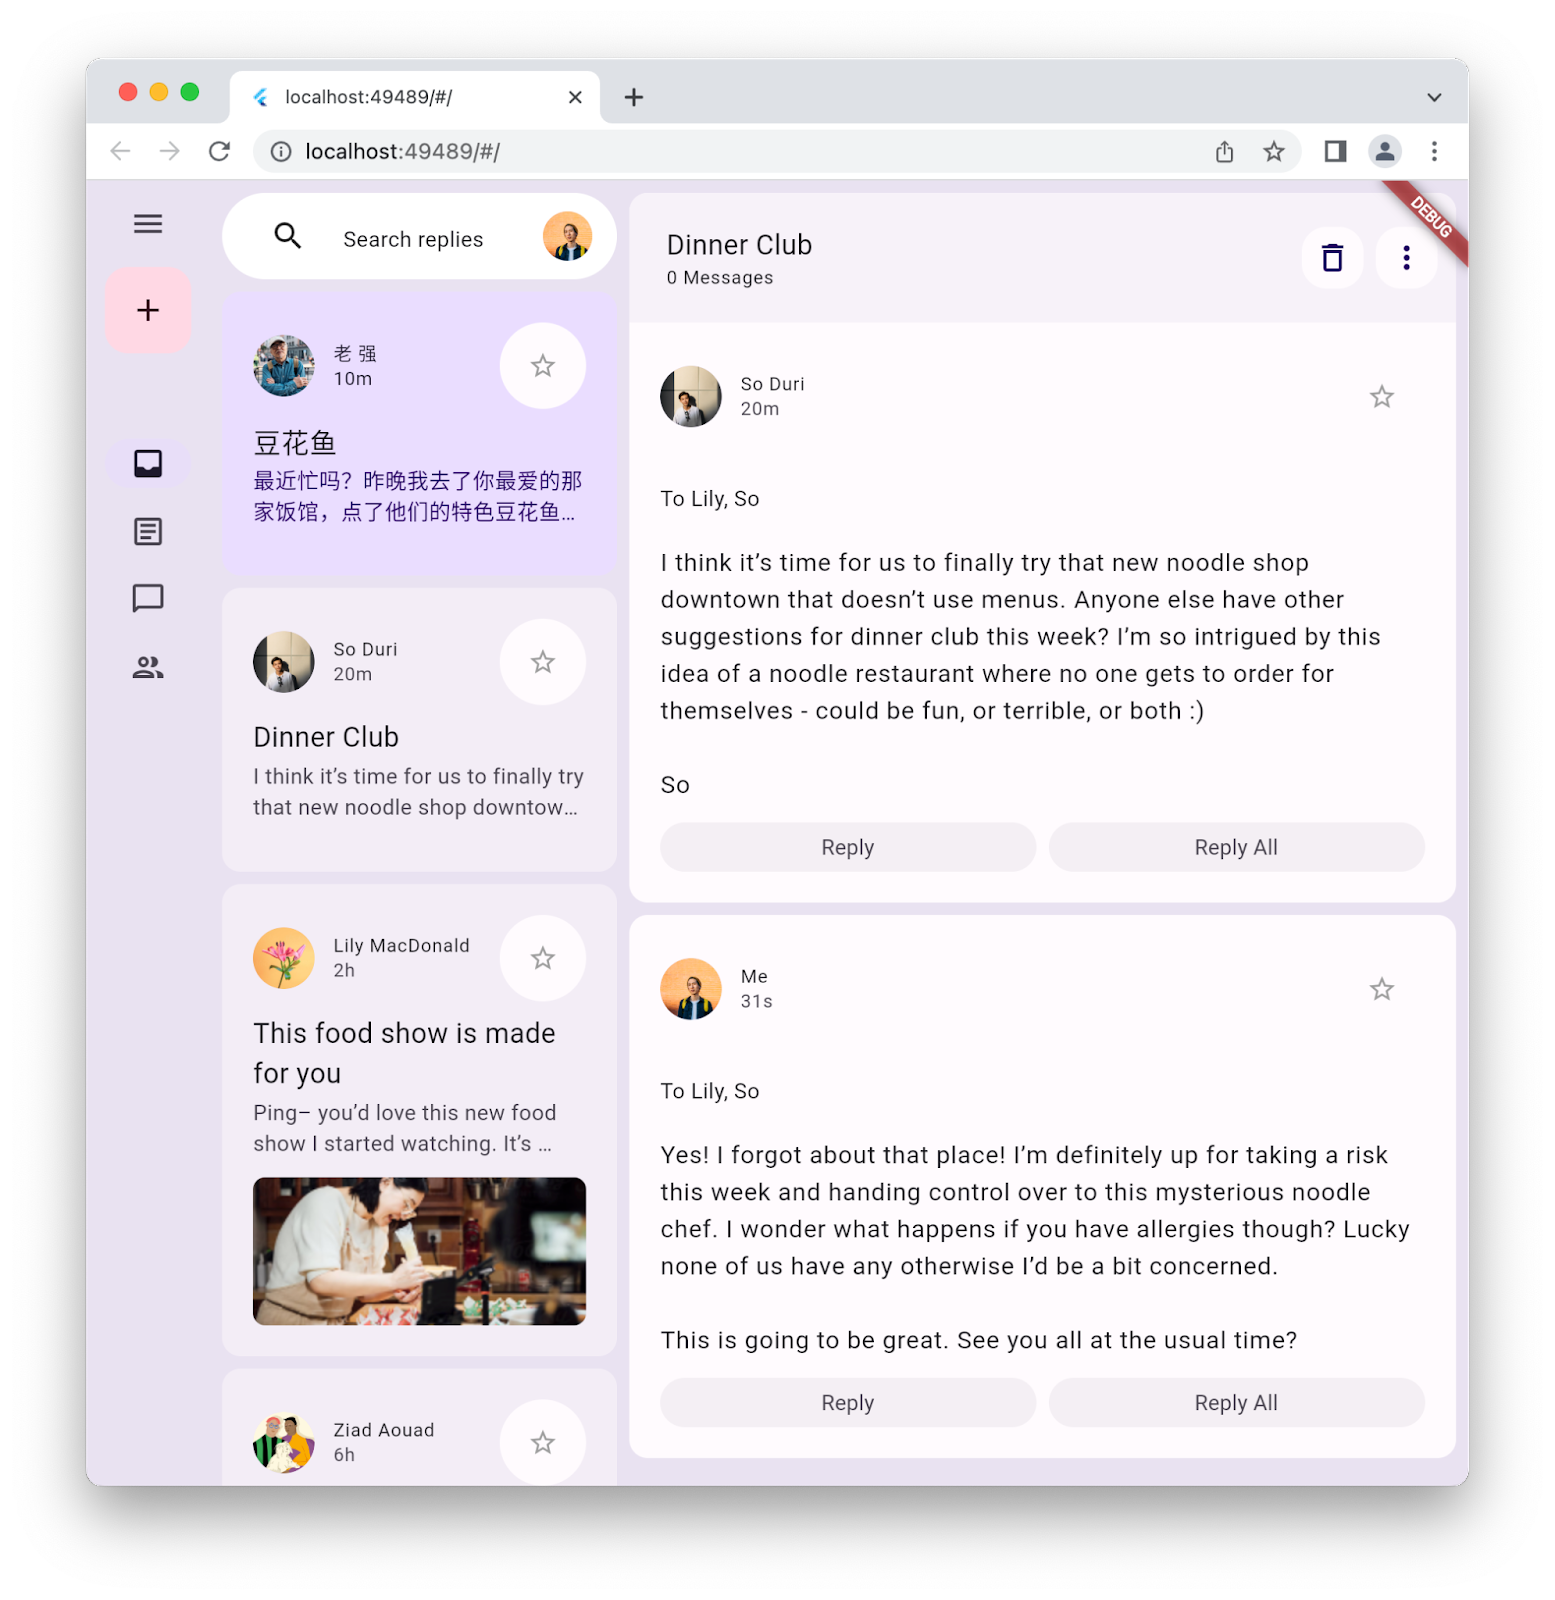
8. إضافة قائمة تتضمّن عرضًا تفصيليًا
بالإضافة إلى ذلك، يُعد تطبيق المراسلة مكانًا رائعًا لعرض قائمة بتنسيق تفصيلي، ولكن فقط إذا كانت الشاشة عريضة بما يكفي. ابدأ بإضافة ملف في lib/widgets باسم reply_list_view.dart واملأ هذا الملف بالرمز البرمجي التالي:
lib/widgets/reply_list_view.dart
import 'package:flutter/material.dart';

import '../models/data.dart' as data;
import 'email_widget.dart';

class ReplyListView extends StatelessWidget {
  const ReplyListView({super.key});

  @override
  Widget build(BuildContext context) {
    return Padding(
      padding: const EdgeInsets.only(right: 8.0),
      child: ListView(
        children: [
          const SizedBox(height: 8),
          ...List.generate(data.replies.length, (index) {
            return Padding(
              padding: const EdgeInsets.only(bottom: 8.0),
              child: EmailWidget(
                email: data.replies[index],
                isPreview: false,
                isThreaded: true,
                showHeadline: index == 0,
              ),
            );
          }),
        ],
      ),
    );
  }
}
بعد ذلك، أضِف list_detail_transition.dart في lib/transitions واملأها بالرمز التالي:
lib/transitions/list_detail_transition.dart
import 'dart:ui';

import 'package:flutter/material.dart';
import '../animations.dart';

class ListDetailTransition extends StatefulWidget {
  const ListDetailTransition({
    super.key,
    required this.animation,
    required this.one,
    required this.two,
  });

  final Animation<double> animation;
  final Widget one;
  final Widget two;

  @override
  State<ListDetailTransition> createState() => _ListDetailTransitionState();
}

class _ListDetailTransitionState extends State<ListDetailTransition> {
  Animation<double> widthAnimation = const AlwaysStoppedAnimation(0);
  late final Animation<double> sizeAnimation = SizeAnimation(
    parent: widget.animation,
  );
  late final Animation<Offset> offsetAnimation = Tween<Offset>(
    begin: const Offset(1, 0),
    end: Offset.zero,
  ).animate(OffsetAnimation(parent: sizeAnimation));
  double currentFlexFactor = 0;

  @override
  void didChangeDependencies() {
    super.didChangeDependencies();

    final double width = MediaQuery.of(context).size.width;
    double nextFlexFactor = switch (width) {
      >= 800 && < 1200 => lerpDouble(1000, 2000, (width - 800) / 400)!,
      >= 1200 && < 1600 => lerpDouble(2000, 3000, (width - 1200) / 400)!,
      >= 1600 => 3000,
      _ => 1000,
    };

    if (nextFlexFactor == currentFlexFactor) {
      return;
    }

    if (currentFlexFactor == 0) {
      widthAnimation = Tween<double>(
        begin: 0,
        end: nextFlexFactor,
      ).animate(sizeAnimation);
    } else {
      final TweenSequence<double> sequence = TweenSequence([
        if (sizeAnimation.value > 0) ...[
          TweenSequenceItem(
            tween: Tween(begin: 0, end: widthAnimation.value),
            weight: sizeAnimation.value,
          ),
        ],
        if (sizeAnimation.value < 1) ...[
          TweenSequenceItem(
            tween: Tween(begin: widthAnimation.value, end: nextFlexFactor),
            weight: 1 - sizeAnimation.value,
          ),
        ],
      ]);

      widthAnimation = sequence.animate(sizeAnimation);
    }

    currentFlexFactor = nextFlexFactor;
  }

  @override
  Widget build(BuildContext context) {
    return widthAnimation.value.toInt() == 0
        ? widget.one
        : Row(
            children: [
              Flexible(flex: 1000, child: widget.one),
              Flexible(
                flex: widthAnimation.value.toInt(),
                child: FractionalTranslation(
                  translation: offsetAnimation.value,
                  child: widget.two,
                ),
              ),
            ],
          );
  }
}
يمكنك دمج هذا المحتوى في التطبيق من خلال تعديل lib/main.dart على النحو التالي:
lib/main.dart
import 'package:flutter/material.dart';

import 'animations.dart';
import 'models/data.dart' as data;
import 'models/models.dart';
import 'transitions/list_detail_transition.dart';          // Add import
import 'widgets/animated_floating_action_button.dart';
import 'widgets/disappearing_bottom_navigation_bar.dart';
import 'widgets/disappearing_navigation_rail.dart';
import 'widgets/email_list_view.dart';
import 'widgets/reply_list_view.dart';                     // Add import

void main() {
  runApp(const MainApp());
}

class MainApp extends StatelessWidget {
  const MainApp({super.key});

  @override
  Widget build(BuildContext context) {
    return MaterialApp(
      theme: ThemeData.light(),
      home: Feed(currentUser: data.user_0),
    );
  }
}

class Feed extends StatefulWidget {
  const Feed({super.key, required this.currentUser});

  final User currentUser;

  @override
  State<Feed> createState() => _FeedState();
}

class _FeedState extends State<Feed> with SingleTickerProviderStateMixin {
  late final _colorScheme = Theme.of(context).colorScheme;
  late final _backgroundColor = Color.alphaBlend(
    _colorScheme.primary.withAlpha(36),
    _colorScheme.surface,
  );
  late final _controller = AnimationController(
    duration: const Duration(milliseconds: 1000),
    reverseDuration: const Duration(milliseconds: 1250),
    value: 0,
    vsync: this,
  );
  late final _railAnimation = RailAnimation(parent: _controller);
  late final _railFabAnimation = RailFabAnimation(parent: _controller);
  late final _barAnimation = BarAnimation(parent: _controller);

  int selectedIndex = 0;
  bool controllerInitialized = false;

  @override
  void didChangeDependencies() {
    super.didChangeDependencies();

    final double width = MediaQuery.of(context).size.width;
    final AnimationStatus status = _controller.status;
    if (width > 600) {
      if (status != AnimationStatus.forward &&
          status != AnimationStatus.completed) {
        _controller.forward();
      }
    } else {
      if (status != AnimationStatus.reverse &&
          status != AnimationStatus.dismissed) {
        _controller.reverse();
      }
    }
    if (!controllerInitialized) {
      controllerInitialized = true;
      _controller.value = width > 600 ? 1 : 0;
    }
  }

  @override
  void dispose() {
    _controller.dispose();
    super.dispose();
  }

  @override
  Widget build(BuildContext context) {
    return AnimatedBuilder(
      animation: _controller,
      builder: (context, _) {
        return Scaffold(
          body: Row(
            children: [
              DisappearingNavigationRail(
                railAnimation: _railAnimation,
                railFabAnimation: _railFabAnimation,
                selectedIndex: selectedIndex,
                backgroundColor: _backgroundColor,
                onDestinationSelected: (index) {
                  setState(() {
                    selectedIndex = index;
                  });
                },
              ),
              Expanded(
                child: Container(
                  color: _backgroundColor,
                                                // Update from here ...
                  child: ListDetailTransition(
                    animation: _railAnimation,
                    one: EmailListView(
                      selectedIndex: selectedIndex,
                      onSelected: (index) {
                        setState(() {
                          selectedIndex = index;
                        });
                      },
                      currentUser: widget.currentUser,
                    ),
                    two: const ReplyListView(),
                  ),
                                                // ... to here.
                ),
              ),
            ],
          ),
          floatingActionButton: AnimatedFloatingActionButton(
            animation: _barAnimation,
            onPressed: () {},
            child: const Icon(Icons.add),
          ),
          bottomNavigationBar: DisappearingBottomNavigationBar(
            barAnimation: _barAnimation,
            selectedIndex: selectedIndex,
            onDestinationSelected: (index) {
              setState(() {
                selectedIndex = index;
              });
            },
          ),
        );
      },
    );
  }
}
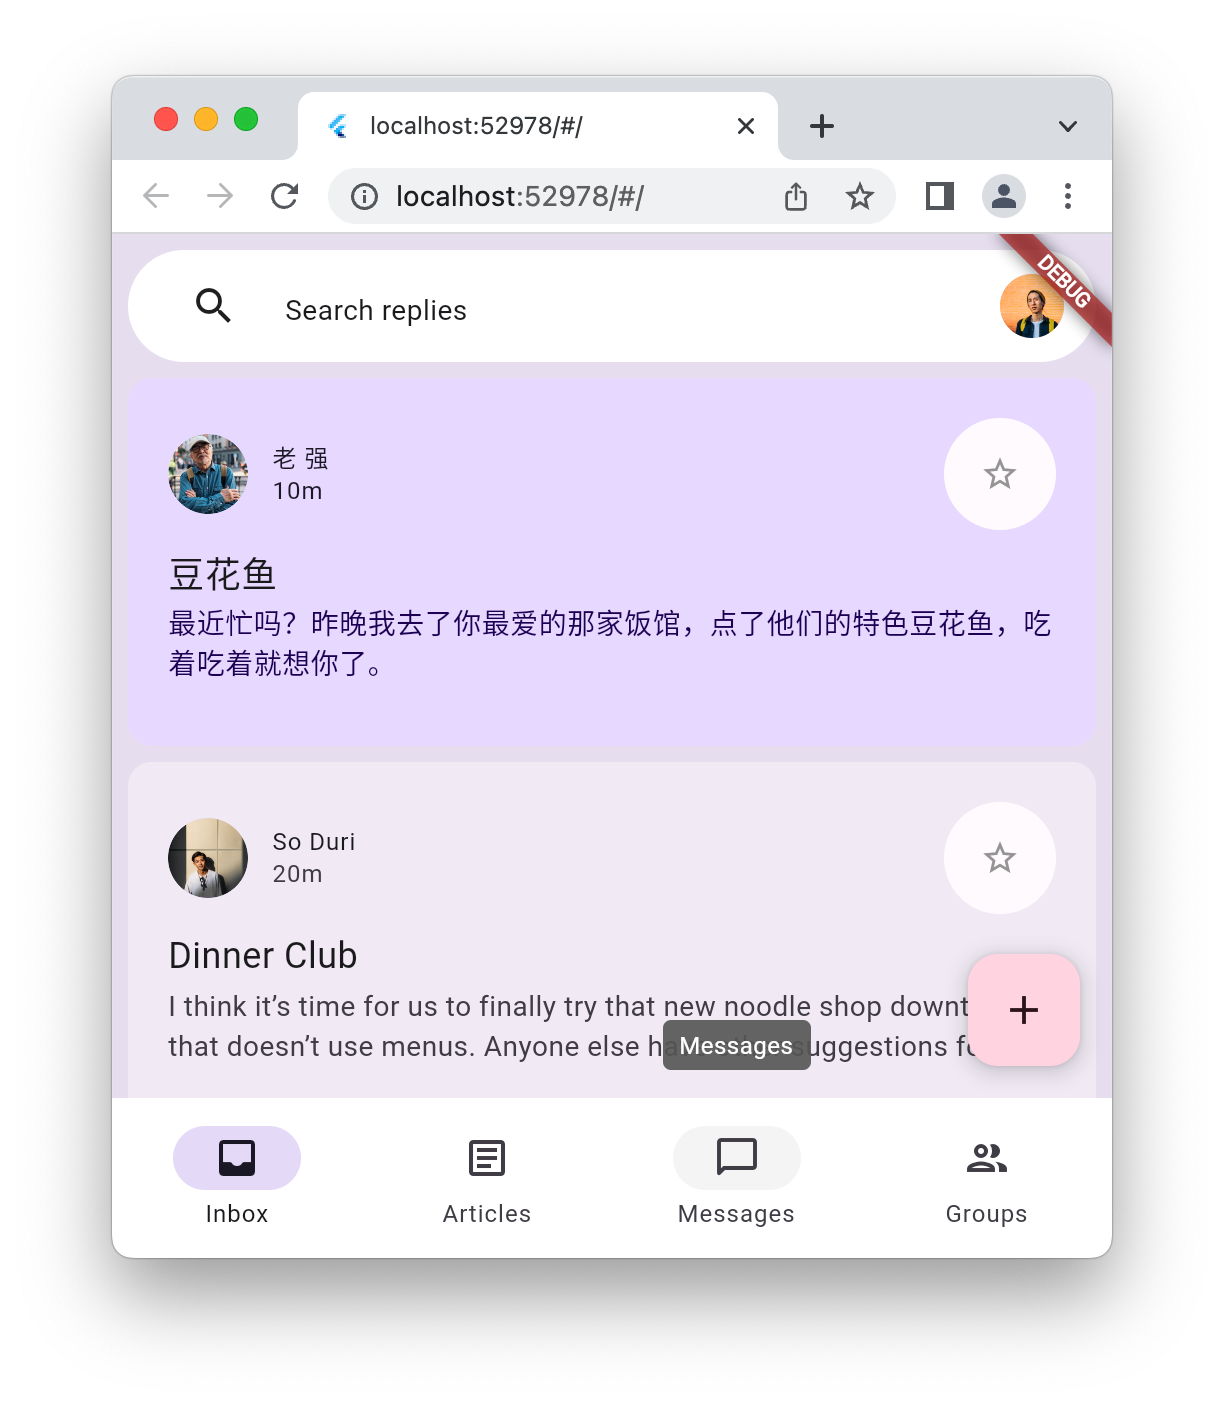
شغِّل التطبيق للاطّلاع على كل البيانات معًا. يتضمّن التطبيق تصميم Material 3 وتأثيرات متحركة بين التنسيقات المختلفة، وهو يمثّل تطبيقًا حقيقيًا. من المفترض أن يظهر الرمز على النحو التالي:
9. تهانينا
تهانينا، لقد نجحت في إنشاء أول تطبيق لك باستخدام Material 3 وFlutter.
لمراجعة جميع خطوات هذا الدليل التعليمي للترميز، يمكنك الاطّلاع عليها في مستودع GitHub الخاص بدليل Flutter التعليمي للترميز.
ما هي الخطوات التالية؟
اطّلِع على بعض هذه الدروس التطبيقية حول الترميز...
- إنشاء لعبة باستخدام Flutter وFlame
- تحويل تطبيقك المطوَّر باستخدام Flutter من تطبيق ممل إلى تطبيق جميل
- استخدام واجهة برمجة التطبيقات الأجنبية (FFI) في مكوّن إضافي في Flutter
مراجع إضافية
- يمكنك الاطّلاع على مزيد من المعلومات حول تعديلات Material 3 في Flutter.
- اطّلِع على مستندات Flutter Material 3.
- راجِع جميع مراجع Material 3.