
1. 簡介
歡迎參加具備進階流量管理功能的外部 HTTPs 負載平衡器 (Envoy) Codelab!
最新版具備進階流量管理功能的 HTTP(S) 外部負載平衡器,包含現有傳統版全域外部 HTTP(S) 負載平衡器的所有功能,以及不斷擴充的進階流量管理功能。其中部分功能是負載平衡器的新功能,部分則是現有功能的強化版。這些功能包括:
- 加權流量拆分
- 要求鏡像
- 離群值偵測
- 重試要求
- 錯誤植入
- 其他後端工作階段相依性選項
- 其他標頭轉換選項
- 跨源資源共享 (CORS)
- 新的負載平衡演算法
課程內容
- 如何設定受管理執行個體群組,以及相關聯的虛擬私有雲和防火牆規則
- 如何使用新版負載平衡器的進階流量管理功能
- 如何驗證進階流量管理功能是否正常運作。
軟硬體需求
- 具備基本網路和 HTTP 知識
- 基本的 Unix/Linux 指令列知識
程式碼研究室拓撲和用途
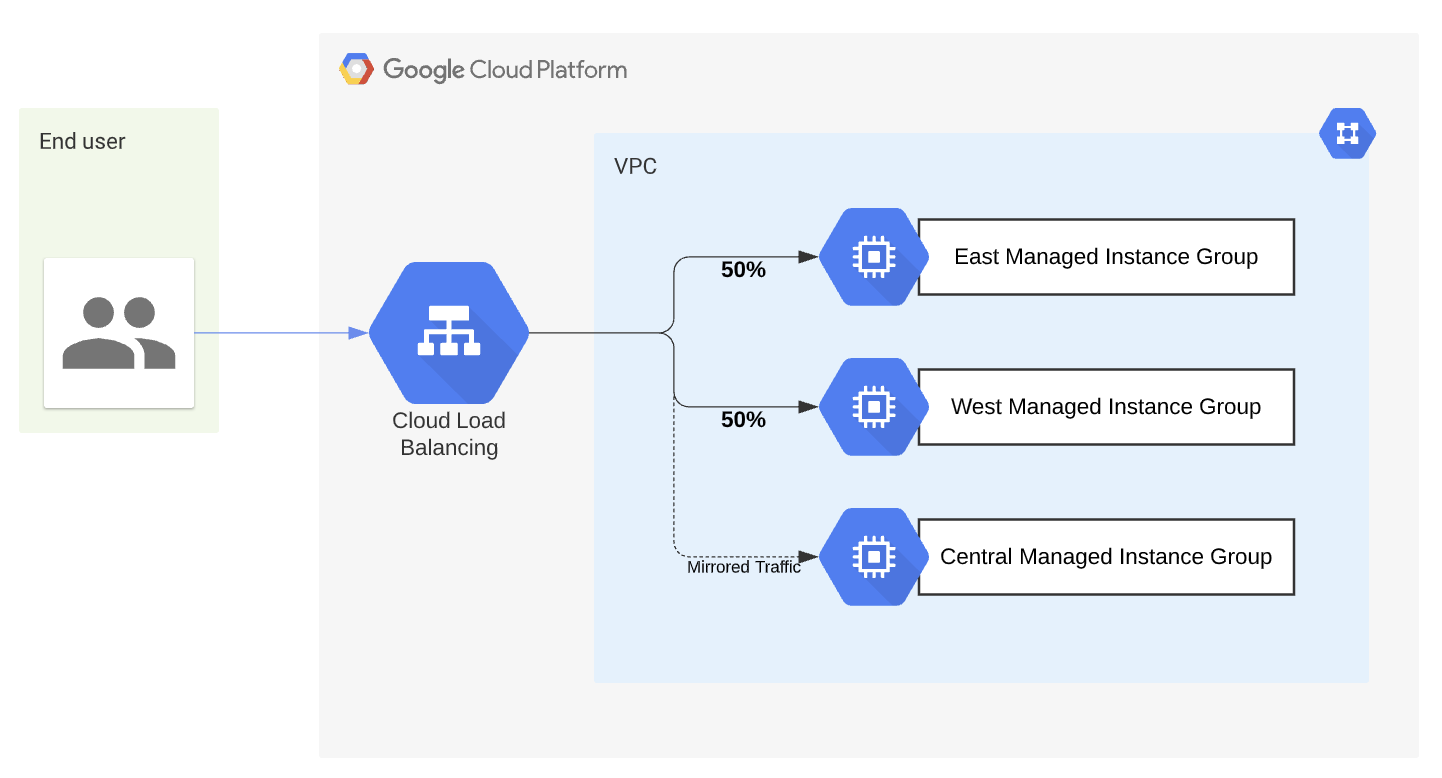
圖 1 - HTTP 負載平衡器路由拓撲
在本程式碼研究室中,您將設定三個代管執行個體群組,分別位於東部、西部和中部。您將建立全域外部 HTTPS 負載平衡器。負載平衡器會運用 Envoy 負載平衡器支援的進階功能清單中的多項功能。部署完成後,請產生一些模擬負載,並確認您設定的設定是否正常運作。
2. 設定和需求
自行設定環境
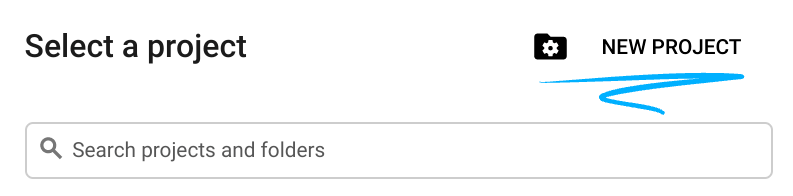
- 登入 Google Cloud 控制台,然後建立新專案或重複使用現有專案。如果沒有 Gmail 或 Google Workspace 帳戶,請建立帳戶。


- 專案名稱是這個專案參與者的顯示名稱。這是 Google API 未使用的字元字串。你隨時可以更新。
- 專案 ID 在所有 Google Cloud 專案中都是不重複的,而且設定後即無法變更。Cloud 控制台會自動產生專屬字串,通常您不需要理會該字串。在大多數程式碼研究室中,您需要參照專案 ID (通常標示為
PROJECT_ID)。如果您不喜歡產生的 ID,可以產生另一個隨機 ID。你也可以嘗試使用自己的名稱,看看是否可用。完成這個步驟後就無法變更,且專案期間都會維持這個設定。 - 請注意,有些 API 會使用第三個值,也就是「專案編號」。如要進一步瞭解這三種值,請參閱說明文件。
- 接著,您需要在 Cloud 控制台中啟用帳單,才能使用 Cloud 資源/API。完成這個程式碼研究室的費用不高,甚至可能完全免費。如要關閉資源,避免在本教學課程結束後繼續產生費用,您可以刪除建立的資源或專案。Google Cloud 新使用者可參加價值$300 美元的免費試用計畫。
啟動 Cloud Shell
雖然您可以透過筆電遠端操作 Google Cloud,但在本程式碼研究室中,您將使用 Google Cloud Shell,這是可在雲端執行的指令列環境。
在 Google Cloud 控制台中,點選右上工具列的 Cloud Shell 圖示:

佈建並連線至環境的作業只需幾分鐘即可完成。完成後,您應該會看到如下的內容:

這部虛擬機器搭載各種您需要的開發工具,提供永久的 5 GB 主目錄,而且在 Google Cloud 中運作,可大幅提升網路效能和驗證。您可以在瀏覽器中完成本程式碼研究室的所有作業。您不需要安裝任何軟體。
事前準備
在 Cloud Shell 中,確認專案 ID 已設定完畢
gcloud config list project
gcloud config set project [YOUR-PROJECT-NAME]
PROJECT_ID=[YOUR-PROJECT-NAME]
echo $PROJECT_ID
啟用 API
啟用所有必要服務
gcloud services enable compute.googleapis.com
gcloud services enable logging.googleapis.com
gcloud services enable monitoring.googleapis.com
3. 建立虛擬私有雲網路
建立虛擬私有雲網路
從 Cloud Shell
gcloud compute networks create httplbs --subnet-mode=auto
輸出
Created [https://www.googleapis.com/compute/v1/projects/PROJECT_ID/global/networks/httplbs].
NAME: httplbs
SUBNET_MODE: AUTO
BGP_ROUTING_MODE: REGIONAL
IPV4_RANGE:
GATEWAY_IPV4:
建立虛擬私有雲防火牆規則
建立虛擬私有雲後,現在要建立防火牆規則。防火牆規則會允許所有 IP 透過通訊埠 80 存取測試應用程式網站的外部 IP,以傳送 HTTP 流量。
從 Cloud Shell
gcloud compute firewall-rules create httplb-allow-http-rule \
--allow tcp:80 \
--network httplbs \
--source-ranges 0.0.0.0/0 \
--priority 700
輸出
Creating firewall...working..Created [https://www.googleapis.com/compute/v1/projects/PROJECT_ID/global/firewalls/httplb-allow-http-rule].
Creating firewall...done.
NAME: httplb-allow-http-rule
NETWORK: httplbs
DIRECTION: INGRESS
PRIORITY: 700
ALLOW: tcp:80
DENY:
DISABLED: False
4. 設定代管執行個體群組
您需要設定代管執行個體群組,其中包含 HTTP 負載平衡器使用的後端資源模式。首先,我們會建立執行個體範本,為每個區域要建立的 VM 定義相關設定。接下來,我們會為每個區域的後端建立代管執行個體群組,並參照執行個體範本。
代管執行個體群組的範圍可以是區域性或地區性。在本實驗室練習中,我們將建立三個地區代管執行個體群組,分別位於 us-east1、us-west1 和 us-central1。
在本節中,您會看到預先建立的啟動指令碼,在建立執行個體時會參照該指令碼。這個開機指令碼會安裝並啟用網路伺服器功能,我們將使用這項功能模擬網路應用程式。歡迎查看這個指令碼。
建立 East、West 和 Central 執行個體範本
第一步是建立 us-east-1 執行個體範本。
從 Cloud Shell
gcloud compute instance-templates create us-east1-template \
   --region=us-east1 \
   --network=httplbs \
   --tags=http-server, \
   --image-family=debian-12 \
   --image-project=debian-cloud \
   --metadata=startup-script='#! /bin/bash
     apt-get update
     apt-get install apache2 -y
     a2ensite default-ssl
     a2enmod ssl
     vm_hostname="$(curl -H "Metadata-Flavor:Google" \
     http://169.254.169.254/computeMetadata/v1/instance/name)"
     echo "Page served from: $vm_hostname" | \
     tee /var/www/html/index.html
     systemctl restart apache2'
輸出
Created [https://www.googleapis.com/compute/v1/projects/PROJECT_ID/global/instanceTemplates/us-east1-template].
NAME: us-east1-template
MACHINE_TYPE: n1-standard-1
PREEMPTIBLE:
CREATION_TIMESTAMP: 2021-11-11T11:02:37.511-08:00
下一步是建立 us-west-1 執行個體範本。
從 Cloud Shell
gcloud compute instance-templates create us-west1-template \
   --region=us-west1 \
   --network=httplbs \
   --tags=http-server, \
   --image-family=debian-12 \
   --image-project=debian-cloud \
   --metadata=startup-script='#! /bin/bash
     apt-get update
     apt-get install apache2 -y
     a2ensite default-ssl
     a2enmod ssl
     vm_hostname="$(curl -H "Metadata-Flavor:Google" \
     http://169.254.169.254/computeMetadata/v1/instance/name)"
     echo "Page served from: $vm_hostname" | \
     tee /var/www/html/index.html
     systemctl restart apache2'
輸出
Created [https://www.googleapis.com/compute/v1/projects/PROJECT_ID/global/instanceTemplates/us-west1-template].
NAME: us-west1-template
MACHINE_TYPE: n1-standard-1
PREEMPTIBLE:
CREATION_TIMESTAMP: 2021-11-11T11:03:08.577-08:00
下一步是建立 us-central-1 執行個體範本。
從 Cloud Shell
gcloud compute instance-templates create us-central1-template \
   --region=us-central1 \
   --network=httplbs \
   --tags=http-server, \
   --image-family=debian-12 \
   --image-project=debian-cloud \
   --metadata=startup-script='#! /bin/bash
     apt-get update
     apt-get install apache2 -y
     a2ensite default-ssl
     a2enmod ssl
     vm_hostname="$(curl -H "Metadata-Flavor:Google" \
     http://169.254.169.254/computeMetadata/v1/instance/name)"
     echo "Page served from: $vm_hostname" | \
     tee /var/www/html/index.html
     systemctl restart apache2'
輸出
Created [https://www.googleapis.com/compute/v1/projects/PROJECT_ID/global/instanceTemplates/us-central1-template].
NAME: us-central1-template
MACHINE_TYPE: n1-standard-1
PREEMPTIBLE:
CREATION_TIMESTAMP: 2021-11-11T11:03:44.179-08:00
現在可以使用下列 gcloud 指令,確認執行個體範本是否已成功建立:
從 Cloud Shell
gcloud compute instance-templates list
輸出
NAME                  MACHINE_TYPE   PREEMPTIBLE  CREATION_TIMESTAMP
us-central1-template   n1-standard-1         2021-11-09T09:25:37.263-08:00
us-east1-template      n1-standard-1         2021-11-09T09:24:35.275-08:00
us-west1-template      n1-standard-1         2021-11-09T09:25:08.016-08:00
建立 East、West 和 Central 代管執行個體群組
現在必須從先前建立的執行個體範本建立代管執行個體群組。
從 Cloud Shell
gcloud compute instance-groups managed create us-east1-mig \
--base-instance-name=us-east1-mig \
--size=1 \
--template=us-east1-template \
--zone=us-east1-b
輸出
Created [https://www.googleapis.com/compute/v1/projects/PROJECT_ID/zones/us-east1-b/instanceGroupManagers/us-east1-mig].
NAME: us-east1-mig
LOCATION: us-east1-b
SCOPE: zone
BASE_INSTANCE_NAME: us-east1-mig
SIZE: 0
TARGET_SIZE: 1
INSTANCE_TEMPLATE: us-east1-template
AUTOSCALED: no
從 Cloud Shell
gcloud compute instance-groups managed create us-west1-mig \
--base-instance-name=us-west1-mig \
--size=1 \
--template=us-west1-template \
--zone=us-west1-a
輸出
Created [https://www.googleapis.com/compute/v1/projects/PROJECT_ID/zones/us-west1-a/instanceGroupManagers/us-west1-mig].
NAME: us-west1-mig
LOCATION: us-west1-a
SCOPE: zone
BASE_INSTANCE_NAME: us-west1-mig
SIZE: 0
TARGET_SIZE: 1
INSTANCE_TEMPLATE: us-west1-template
AUTOSCALED: no
從 Cloud Shell
gcloud compute instance-groups managed create us-central1-mig \
--base-instance-name=us-central1-mig \
--size=1 \
--template=us-central1-template \
--zone=us-central1-a
輸出
Created [https://www.googleapis.com/compute/v1/projects/PROJECT_ID/zones/us-central1-a/instanceGroupManagers/us-central1-mig].
NAME: us-central1-mig
LOCATION: us-central1-a
SCOPE: zone
BASE_INSTANCE_NAME: us-central1-mig
SIZE: 0
TARGET_SIZE: 1
INSTANCE_TEMPLATE: us-central1-template
AUTOSCALED: no
我們可以透過下列 gcloud 指令,確認執行個體群組是否已成功建立:
從 Cloud Shell
gcloud compute instance-groups list
輸出
NAME                  LOCATION      SCOPE   NETWORK         MANAGED INSTANCES
us-central1-mig       us-central1   zone    httplbs          Yes      1
us-west1-mig          us-west1      zone    httplbs          Yes      1
us-east1-mig          us-east1      zone    httplbs          Yes      1
驗證網路伺服器功能
每個執行個體都會設定為執行 Apache 網路伺服器,並使用簡單的 PHP 指令碼來算繪:

如要確保網路伺服器運作正常,請前往「Compute Engine」->「VM 執行個體」。確認新執行個體 (例如 us-east1-mig-xxx) 已根據執行個體群組定義建立。
現在,請在瀏覽器中向該伺服器發出網路要求,確保網路伺服器正在執行 (啟動可能需要一分鐘)。在 Compute Engine 的「VM instances」(VM 執行個體) 頁面中,選取執行個體群組建立的執行個體,然後按一下其「External (public) IP」(外部 (公開) IP)。
或者在瀏覽器中前往 http://<IP_Address>
5. 設定負載平衡器
建立健康狀態檢查
首先,我們必須建立基本健康狀態檢查,確保服務正常運作。我們將建立基本健康狀態檢查,但您也可以進行更多進階自訂。
從 Cloud Shell
gcloud compute health-checks create http http-basic-check \
    --port 80
保留外部 IP 位址
在這個步驟中,您需要預留全域可用的靜態 IP 位址,稍後會附加至負載平衡器。
從 Cloud Shell
gcloud compute addresses create lb-ipv4-2 \
    --ip-version=IPV4 \
    --global
請務必記下預留的 IP 位址。
gcloud compute addresses describe lb-ipv4-2 \
    --format="get(address)" \
    --global
建立後端服務
現在,我們必須為先前建立的每個代管執行個體群組建立後端服務。分別是東部、西部和中部。
為東部代管執行個體群組建立後端服務。
從 Cloud Shell
gcloud compute backend-services create east-backend-service \
    --load-balancing-scheme=EXTERNAL_MANAGED \
    --protocol=HTTP \
    --port-name=http \
    --health-checks=http-basic-check \
    --global
為西區代管執行個體群組建立後端服務。
從 Cloud Shell
gcloud compute backend-services create west-backend-service \
    --load-balancing-scheme=EXTERNAL_MANAGED \
    --protocol=HTTP \
    --port-name=http \
    --health-checks=http-basic-check \
    --global
為 Central 代管執行個體群組建立後端服務。
從 Cloud Shell
gcloud compute backend-services create central-backend-service \
    --load-balancing-scheme=EXTERNAL_MANAGED \
    --protocol=HTTP \
    --port-name=http \
    --health-checks=http-basic-check \
    --global
將 MIG 新增至後端服務
我們已為每個應用程式叢集建立對應的後端服務,現在必須將先前建立的代管執行個體群組新增至每個後端服務。
將 East MIG 新增至後端服務。
從 Cloud Shell
gcloud compute backend-services add-backend east-backend-service \
    --balancing-mode='UTILIZATION' \
    --instance-group=us-east1-mig \
    --instance-group-zone=us-east1-b \
    --global
將 West MIG 新增至後端服務。
從 Cloud Shell
gcloud compute backend-services add-backend west-backend-service \
    --balancing-mode='UTILIZATION' \
    --instance-group=us-west1-mig \
    --instance-group-zone=us-west1-a \
    --global
將 Central MIG 新增至後端服務。
從 Cloud Shell
gcloud compute backend-services add-backend central-backend-service \
    --balancing-mode='UTILIZATION' \
    --instance-group=us-central1-mig \
    --instance-group-zone=us-central1-a \
    --global
建立網址對應
這個實驗室的進階流量管理功能會位於網址對應中。我們必須建立 .yaml 檔案,其中包含設定。在我們建立的 .yaml 檔案中,我們對 /roundrobbin 建立前置字元相符項目,因此只有符合 /roundrobbin 的流量會受到這些設定影響。我們已指定 50% 的流量應前往 east-backend-service,50% 的流量應前往 west-backend-service。我們另外新增了回應標頭值:{test},這個值會出現在所有回應中。最後,我們新增了所有流量都應鏡像至 central-backend-service 的規定。系統會複製流量並傳送至此處,僅供測試之用。
將範例儲存為電腦上的 .yaml 檔案。
defaultService: https://www.googleapis.com/compute/v1/projects/[project_id]/global/backendServices/east-backend-service
kind: compute #urlMap
name: web-map-http
hostRules:
- hosts:
  - '*'
  pathMatcher: matcher1
pathMatchers:
- defaultService: https://www.googleapis.com/compute/v1/projects/[project_id]/global/backendServices/east-backend-service
  name: matcher1
  routeRules:
  - matchRules:
    - prefixMatch: /roundrobbin
    priority: 2
    headerAction:
        responseHeadersToAdd:
          - headerName: test
            headerValue: value
            replace: True
    routeAction:
        weightedBackendServices:
        - backendService: https://www.googleapis.com/compute/v1/projects/[project_id]/global/backendServices/east-backend-service
          weight: 50
        - backendService: https://www.googleapis.com/compute/v1/projects/[project_id]/global/backendServices/west-backend-service
          weight: 50
        retryPolicy:
            retryConditions: ['502', '504']
            numRetries: 3
            perTryTimeout:
                seconds: 1
                nanos: 50
        requestMirrorPolicy:
          backendService: https://www.googleapis.com/compute/v1/projects/[project_id]/global/backendServices/central-backend-service
從電腦匯入文件,建立網址對應。請注意,來源路徑會因您儲存 .yaml 檔案的位置而有所不同。
從 Cloud Shell
gcloud compute url-maps import web-map-http \
   --source /Users/[USERNAME]/Documents/Codelab/lbconfig.yaml \
   --global
建立 HTTP 前端
建立前端是建立負載平衡器的最後一個步驟。這會將您先前預留的 IP 位址對應至您建立的負載平衡器網址對應。
從 Cloud Shell
gcloud compute target-http-proxies create http-lb-proxy-adv \
    --url-map=web-map-http
接著,您需要建立通用轉送規則,將先前保留的 IP 位址對應至 HTTP Proxy。
從 Cloud Shell
gcloud compute forwarding-rules create http-content-rule \
    --load-balancing-scheme EXTERNAL_MANAGED \
    --address=lb-ipv4-2 \
    --global \
    --target-http-proxy=http-lb-proxy-adv \
    --ports=80
6. 確認進階交通資訊功能是否正常運作
如要驗證實作的流量分割功能是否正常運作,您需要產生一些負載。為此,我們將建立新的 VM 來模擬負載。
建立允許 SSH 的防火牆規則
如要透過 SSH 登入 VM (我們將從中產生流量),您必須先建立防火牆規則,允許 SSH 流量進入 VM。
從 Cloud Shell
gcloud compute firewall-rules create fw-allow-ssh \
    --network=httplbs \
    --action=allow \
    --direction=ingress \
    --target-tags=allow-ssh \
    --rules=tcp:22
輸出
NAME          NETWORK  DIRECTION  PRIORITY  ALLOW   DENY  DISABLED
fw-allow-ssh  httplbs  INGRESS    1000      tcp:22        False
建立 Siege-vm
現在要建立 siege-vm,用來產生負載
從 Cloud Shell
gcloud compute instances create siege-vm \
    --network=httplbs \
    --zone=us-east4-c \
    --machine-type=e2-medium \
    --tags=allow-ssh,http-server \
    --metadata=startup-script='sudo apt-get -y install siege'
輸出
NAME     ZONE        MACHINE_TYPE INTERNAL_IP  EXTERNAL_IP    STATUS
siege-vm us-east4-c  e2-medium    10.150.0.3   34.85.218.119  RUNNING
接著,您可以透過 SSH 連線至建立的 VM。建立完成後,點選「SSH」SSH啟動終端機並連線。
連線後,請執行下列指令來產生負載。使用您先前為外部 HTTP 負載平衡器保留的 IP 位址。
從 Cloud Shell
siege -c 250 http://[$lb-ipv4-2]/roundrobbin
輸出
New configuration template added to /home/cloudcurriculumdeveloper/.siege
Run siege -C to view the current settings in that file
[alert] Zip encoding disabled; siege requires zlib support to enable it: No such file or directory
** SIEGE 4.0.2
** Preparing 250 concurrent users for battle.
The server is now under siege...
檢查負載分配情形
Siege 正在執行,現在請檢查流量是否平均分配到東部和西部代管執行個體群組,此外,您也可以檢查流量鏡像是否正常運作,以及流量是否傳送到中央代管執行個體群組。
在 Cloud 控制台的導覽選單中,依序點選「網路服務」>「負載平衡」。選取負載平衡器 web-map-http。前往「監控」分頁,即可查看下方的圖表。

您可以即時查看這個 MIG 的流量分配情形。由於您設定了 50/50 的循環分配,因此流量會平均分配。
如要確認您建立的流量鏡像政策是否正常運作,請檢查 central-backend-service 代管執行個體群組的用量。如要這麼做,請依序前往「Compute」、「Compute Engine」、「執行個體群組」,然後選取 us-central1-mig。接著前往「監控」分頁。

您會看到圖表顯示流量已鏡像到這個代管執行個體群組。
停止圍城
您已證明進階流量分配功能正常運作,現在可以停止 Siege。如要這麼做,請返回 siege-vm 的 SSH 終端機,然後按下 CTRL+C 鍵停止執行 siege。
驗證傳送的回應標頭
在清除之前,您可以快速驗證 HTTP 負載平衡器是否傳送適當的回應標頭。您已將其設定為傳送含有內容值的標頭測試。從 Cloud Shell 執行 curl 指令會得到預期回應。
從 Cloud Shell
curl -svo /dev/null http://lb-ipv4-2/roundrobbin
輸出
*   Trying lb-ipv4-2..
* TCP_NODELAY set
* Connected to  lb-ipv4-2 ( lb-ipv4-2) port 80 (#0)
> GET /roundrobbin HTTP/1.1
> Host:  lb-ipv4-2
> User-Agent: curl/7.64.1
> Accept: */*
>
< HTTP/1.1 404 Not Found
< date: Wed, 10 Nov 2021 17:05:27 GMT
< server: envoy
< Content-Length: 273
< content-type: text/html; charset=iso-8859-1
< via: 1.1 google
< test: value
<
{ [273 bytes data]
* Connection #0 to host 34.149.2.26 left intact
* Closing connection 0
7. 實驗室清潔
我們已完成實驗室環境,現在要拆除環境。請執行下列指令刪除測試環境。
從 Cloud Shell
gcloud compute instances delete siege-vm --zone=us-east4-c

gcloud compute forwarding-rules delete http-content-rule --global
gcloud compute target-http-proxies delete http-lb-proxy-adv
gcloud compute url-maps delete web-map-http
gcloud compute backend-services delete east-backend-service --global
gcloud compute backend-services delete west-backend-service --global
gcloud compute backend-services delete central-backend-service --global

gcloud compute addresses delete lb-ipv4-2 --global
gcloud compute health-checks delete http-basic-check

gcloud compute instance-groups managed delete us-east1-mig --zone us-east1-b
gcloud compute instance-groups managed delete us-west1-mig --zone us-west1-a
gcloud compute instance-groups managed delete us-central1-mig --zone us-central1-a

gcloud compute instance-templates delete "us-east1-template"
gcloud compute instance-templates delete "us-west1-template"
gcloud compute instance-templates delete "us-central1-template"

gcloud compute firewall-rules delete httplb-allow-http-rule
gcloud compute firewall-rules delete fw-allow-ssh

gcloud compute networks delete httplbs
8. 恭喜!
您已完成「具備進階流量管理的外部 HTTPs 負載平衡器 (Envoy)」程式碼研究室!
涵蓋內容
- 如何設定受管理執行個體群組,以及相關聯的虛擬私有雲和防火牆規則
- 如何使用新版負載平衡器的進階流量管理功能
- 如何驗證進階流量管理功能是否正常運作。
後續步驟
- 嘗試使用其他進階路由功能,例如網址重寫、新增 CORS 標頭等 ( 連結)