
1. 總覽

什麼是 Document AI?
Document AI 是可從文件中擷取洞察資料的平台,本質上,它提供日益龐大的文件處理器清單 (視功能而定,也稱為剖析器或拆分器)。
您可以透過兩種方式管理 Document AI 處理器:
- 透過網頁控制台手動設定
- 使用 Document AI API 透過程式處理。
以下是顯示處理器清單的螢幕截圖範例,包括網頁控制台和 Python 程式碼:
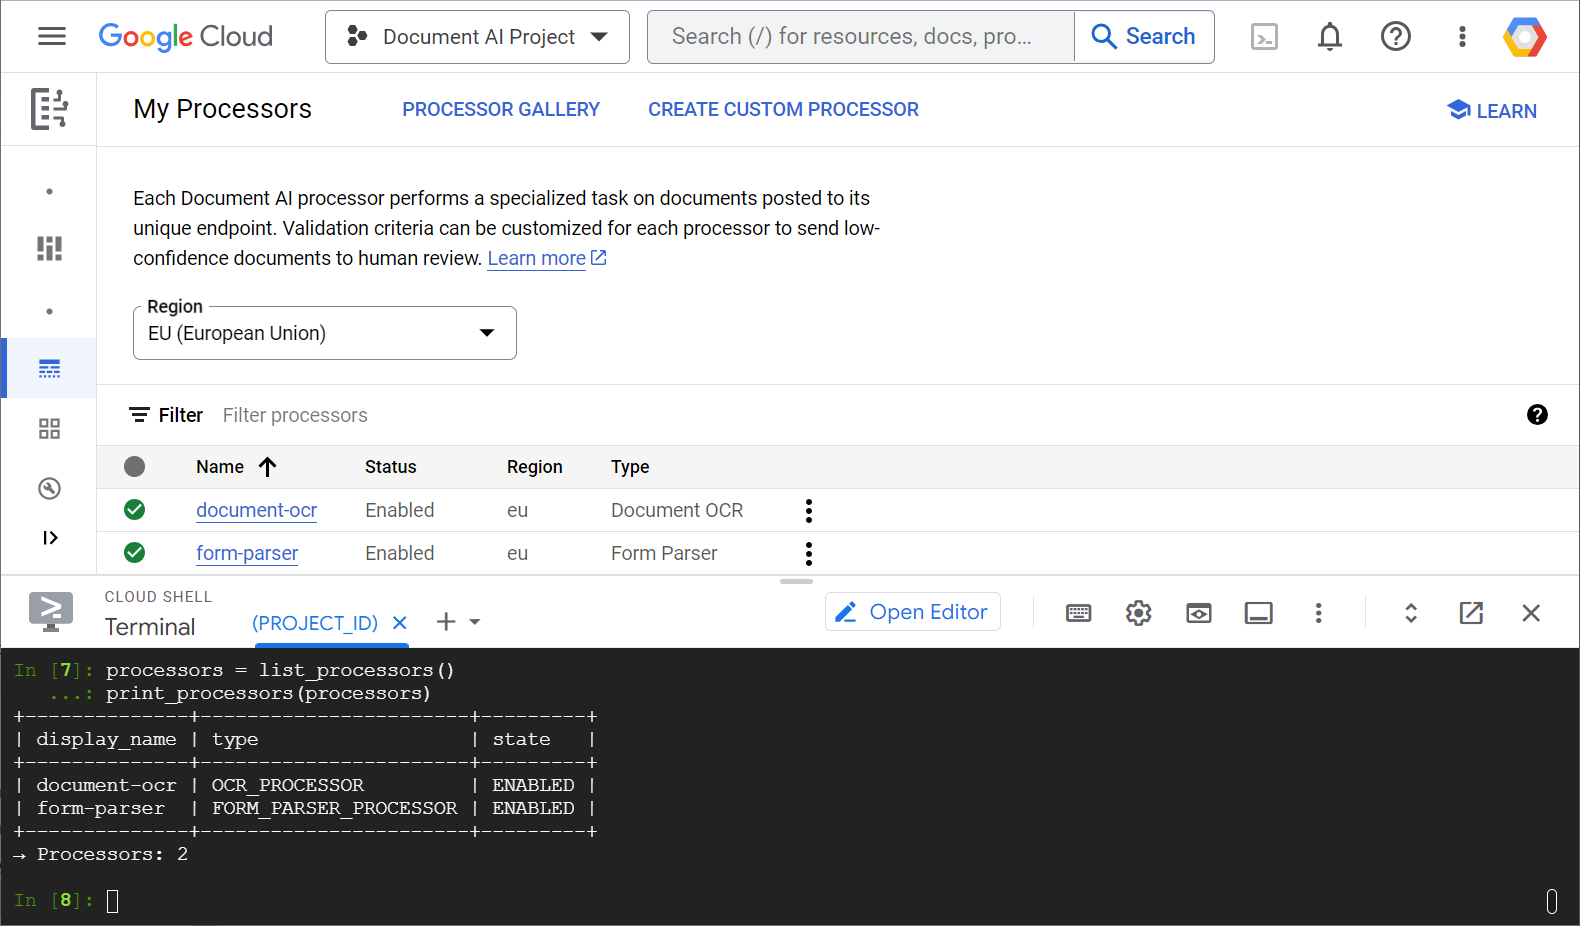
在本實驗室中,您將著重於透過程式設計使用 Python 用戶端程式庫管理 Document AI 處理器。
您會看到的畫面
- 如何設定環境
- 如何擷取處理器類型
- 如何建立處理器
- 如何列出專案處理器
- 如何使用處理器
- 如何啟用/停用處理器
- 如何管理處理器版本
- 如何刪除處理器
軟硬體需求
問卷調查
您要如何使用這個教學課程?
請評估您使用 Python 的體驗。
請評分你使用 Google Cloud 服務的體驗。
2. 設定和需求
自助式環境設定
- 登入 Google Cloud 控制台,然後建立新專案或重複使用現有專案。如果您還沒有 Gmail 或 Google Workspace 帳戶,請務必建立帳戶。


- 「Project name」是這個專案參與者的顯示名稱。這是 Google API 不會使用的字元字串。您隨時可以更新。
- 專案 ID 在所有 Google Cloud 專案中都是不重複的值,且無法變更 (設定後即無法變更)。Cloud 控制台會自動產生唯一字串,您通常不需要理會這個字串。在大多數程式碼研究室中,您需要參照專案 ID (通常會標示為
PROJECT_ID)。如果您不喜歡產生的 ID,可以產生另一個隨機 ID。或者,您也可以自行嘗試,看看是否可用。在這個步驟後就無法變更,且會在專案期間維持不變。 - 提醒您,有些 API 會使用第三個值「專案編號」。如要進一步瞭解這三個值,請參閱說明文件。
- 接下來,您需要在 Cloud 控制台中啟用帳單功能,才能使用 Cloud 資源/API。執行這個程式碼研究室不會產生任何費用,如要關閉資源,避免在本教學課程結束後繼續產生費用,您可以刪除建立的資源或專案。Google Cloud 新使用者可享有 $300 美元的免費試用期。
啟動 Cloud Shell
雖然 Google Cloud 可透過筆記型電腦遠端操作,但在本實驗室中,您將使用 Cloud Shell,這是在雲端運作的指令列環境。
啟用 Cloud Shell
- 在 Cloud 控制台中,按一下「啟用 Cloud Shell」 圖示
 。
。

如果這是您首次啟動 Cloud Shell,系統會顯示中介畫面,說明 Cloud Shell 的功能。如果您看到中介畫面,請按一下「繼續」。

佈建並連線至 Cloud Shell 的作業只需幾分鐘的時間。

這個虛擬機器會載入所有必要的開發工具。提供永久的 5 GB 主目錄,而且在 Google Cloud 中運作,大幅提升網路效能和驗證功能。您可以在瀏覽器中完成本程式碼研究室的大部分工作,甚至是全部工作。
連線至 Cloud Shell 後,您應會發現自己通過驗證,且專案已設為您的專案 ID。
- 在 Cloud Shell 中執行下列指令,確認您已通過驗證:
gcloud auth list
指令輸出
 Credentialed Accounts
ACTIVE  ACCOUNT
*       <my_account>@<my_domain.com>

To set the active account, run:
    $ gcloud config set account `ACCOUNT`
- 在 Cloud Shell 中執行下列指令,確認 gcloud 指令知道您的專案:
gcloud config list project
指令輸出
[core]
project = <PROJECT_ID>
如未設定,請輸入下列指令設定專案:
gcloud config set project <PROJECT_ID>
指令輸出
Updated property [core/project].
3. 環境設定
您必須先在 Cloud Shell 中執行下列指令,啟用 Document AI API,才能開始使用 Document AI:
gcloud services enable documentai.googleapis.com
畫面應如下所示:
Operation "operations/..." finished successfully.
你現在可以使用 Document AI 了!
前往主目錄:
cd ~
建立 Python 虛擬環境,以便隔離依附元件:
virtualenv venv-docai
啟用虛擬環境:
source venv-docai/bin/activate
安裝 IPython、Document AI 用戶端程式庫和 python-tabulate (用於以美觀格式顯示要求結果):
pip install ipython google-cloud-documentai tabulate
畫面應如下所示:
...
Installing collected packages: ..., tabulate, ipython, google-cloud-documentai
Successfully installed ... google-cloud-documentai-2.15.0 ...
您現在可以使用 Document AI 用戶端程式庫了!
設定下列環境變數:
export PROJECT_ID=$(gcloud config get-value core/project)
# Choose "us" or "eu"
export API_LOCATION="us"
從現在起,所有步驟都應在同一個工作階段中完成。
確認環境變數已正確定義:
echo $PROJECT_ID
echo $API_LOCATION
在後續步驟中,您將使用剛安裝的互動式 Python 解譯器 IPython。在 Cloud Shell 中執行 ipython,啟動工作階段:
ipython
畫面應如下所示:
Python 3.12.3 (main, Feb  4 2025, 14:48:35) [GCC 13.3.0]
Type 'copyright', 'credits' or 'license' for more information
IPython 9.1.0 -- An enhanced Interactive Python. Type '?' for help.

In [1]:
將下列程式碼複製到 IPython 工作階段:
import os
from typing import Iterator, MutableSequence, Optional, Sequence, Tuple

import google.cloud.documentai_v1 as docai
from tabulate import tabulate

PROJECT_ID = os.getenv("PROJECT_ID", "")
API_LOCATION = os.getenv("API_LOCATION", "")

assert PROJECT_ID, "PROJECT_ID is undefined"
assert API_LOCATION in ("us", "eu"), "API_LOCATION is incorrect"

# Test processors
document_ocr_display_name = "document-ocr"
form_parser_display_name = "form-parser"

test_processor_display_names_and_types = (
    (document_ocr_display_name, "OCR_PROCESSOR"),
    (form_parser_display_name, "FORM_PARSER_PROCESSOR"),
)

def get_client() -> docai.DocumentProcessorServiceClient:
    client_options = {"api_endpoint": f"{API_LOCATION}-documentai.googleapis.com"}
    return docai.DocumentProcessorServiceClient(client_options=client_options)

def get_parent(client: docai.DocumentProcessorServiceClient) -> str:
    return client.common_location_path(PROJECT_ID, API_LOCATION)

def get_client_and_parent() -> Tuple[docai.DocumentProcessorServiceClient, str]:
    client = get_client()
    parent = get_parent(client)
    return client, parent
您已準備好提出第一個要求,並擷取處理器類型。
4. 擷取處理器類型
在下一個步驟中建立處理器前,請先擷取可用的處理器類型。您可以使用 fetch_processor_types 擷取這份清單。
將下列函式新增至 IPython 工作階段:
def fetch_processor_types() -> MutableSequence[docai.ProcessorType]:
    client, parent = get_client_and_parent()
    response = client.fetch_processor_types(parent=parent)

    return response.processor_types

def print_processor_types(processor_types: Sequence[docai.ProcessorType]):
    def sort_key(pt):
        return (not pt.allow_creation, pt.category, pt.type_)

    sorted_processor_types = sorted(processor_types, key=sort_key)
    data = processor_type_tabular_data(sorted_processor_types)
    headers = next(data)
    colalign = next(data)

    print(tabulate(data, headers, tablefmt="pretty", colalign=colalign))
    print(f"→ Processor types: {len(sorted_processor_types)}")

def processor_type_tabular_data(
    processor_types: Sequence[docai.ProcessorType],
) -> Iterator[Tuple[str, str, str, str]]:
    def locations(pt):
        return ", ".join(sorted(loc.location_id for loc in pt.available_locations))

    yield ("type", "category", "allow_creation", "locations")
    yield ("left", "left", "left", "left")
    if not processor_types:
        yield ("-", "-", "-", "-")
        return
    for pt in processor_types:
        yield (pt.type_, pt.category, f"{pt.allow_creation}", locations(pt))
列出處理器類型:
processor_types = fetch_processor_types()
print_processor_types(processor_types)
您應該會看到類似下列的內容:
+--------------------------------------+-------------+----------------+-----------+
| type                                 | category    | allow_creation | locations |
+--------------------------------------+-------------+----------------+-----------+
| CUSTOM_CLASSIFICATION_PROCESSOR      | CUSTOM      | True           | eu, us    |
...
| FORM_PARSER_PROCESSOR                | GENERAL     | True           | eu, us    |
| LAYOUT_PARSER_PROCESSOR              | GENERAL     | True           | eu, us    |
| OCR_PROCESSOR                        | GENERAL     | True           | eu, us    |
| BANK_STATEMENT_PROCESSOR             | SPECIALIZED | True           | eu, us    |
| EXPENSE_PROCESSOR                    | SPECIALIZED | True           | eu, us    |
...
+--------------------------------------+-------------+----------------+-----------+
→ Processor types: 19
您現在已取得在下一個步驟中建立處理器所需的所有資訊。
5. 建立處理器
如要建立處理器,請呼叫 create_processor,並提供顯示名稱和處理器類型。
新增下列函式:
def create_processor(display_name: str, type: str) -> docai.Processor:
    client, parent = get_client_and_parent()
    processor = docai.Processor(display_name=display_name, type_=type)

    return client.create_processor(parent=parent, processor=processor)
建立測試處理器:
separator = "=" * 80
for display_name, type in test_processor_display_names_and_types:
    print(separator)
    print(f"Creating {display_name} ({type})...")
    try:
        create_processor(display_name, type)
    except Exception as err:
        print(err)
print(separator)
print("Done")
您應該會看到以下內容:
================================================================================
Creating document-ocr (OCR_PROCESSOR)...
================================================================================
Creating form-parser (FORM_PARSER_PROCESSOR)...
================================================================================
Done
您已建立新的處理器!
接著,請瞭解如何列出處理器。
6. 列出專案處理器
list_processors 會傳回屬於專案的所有處理器清單。
新增下列函式:
def list_processors() -> MutableSequence[docai.Processor]:
    client, parent = get_client_and_parent()
    response = client.list_processors(parent=parent)

    return list(response.processors)

def print_processors(processors: Optional[Sequence[docai.Processor]] = None):
    def sort_key(processor):
        return processor.display_name

    if processors is None:
        processors = list_processors()
    sorted_processors = sorted(processors, key=sort_key)
    data = processor_tabular_data(sorted_processors)
    headers = next(data)
    colalign = next(data)

    print(tabulate(data, headers, tablefmt="pretty", colalign=colalign))
    print(f"→ Processors: {len(sorted_processors)}")

def processor_tabular_data(
    processors: Sequence[docai.Processor],
) -> Iterator[Tuple[str, str, str]]:
    yield ("display_name", "type", "state")
    yield ("left", "left", "left")
    if not processors:
        yield ("-", "-", "-")
        return
    for processor in processors:
        yield (processor.display_name, processor.type_, processor.state.name)
呼叫函式:
processors = list_processors()
print_processors(processors)
您應該會看到以下內容:
+--------------+-----------------------+---------+
| display_name | type                  | state   |
+--------------+-----------------------+---------+
| document-ocr | OCR_PROCESSOR         | ENABLED |
| form-parser  | FORM_PARSER_PROCESSOR | ENABLED |
+--------------+-----------------------+---------+
→ Processors: 2
如要依顯示名稱擷取處理器,請新增下列函式:
def get_processor(
    display_name: str,
    processors: Optional[Sequence[docai.Processor]] = None,
) -> Optional[docai.Processor]:
    if processors is None:
        processors = list_processors()
    for processor in processors:
        if processor.display_name == display_name:
            return processor
    return None
測試函式:
processor = get_processor(document_ocr_display_name, processors)

assert processor is not None
print(processor)
畫面應如下所示:
name: "projects/PROJECT_NUM/locations/LOCATION/processors/PROCESSOR_ID"
type_: "OCR_PROCESSOR"
display_name: "document-ocr"
state: ENABLED
...
您現在已瞭解如何列出專案處理器,並根據顯示名稱擷取這些處理器。接下來,請參閱如何使用處理器。
7. 使用處理器
文件處理方式有兩種:
- 同步:呼叫
process_document來分析單一文件,並直接使用結果。 - 非同步:呼叫
batch_process_documents即可針對多個或大型文件啟動批次處理作業。
您的測試文件 ( PDF) 是已完成的掃描問卷,其中包含手寫答案。直接從 IPython 工作階段下載至工作目錄:
!gsutil cp gs://cloud-samples-data/documentai/form.pdf .
檢查工作目錄的內容:
!ls
你應該具備以下條件:
... form.pdf ... venv-docai ...
您可以使用同步 process_document 方法分析本機檔案。新增下列函式:
def process_file(
    processor: docai.Processor,
    file_path: str,
    mime_type: str,
) -> docai.Document:
    client = get_client()
    with open(file_path, "rb") as document_file:
        document_content = document_file.read()
    document = docai.RawDocument(content=document_content, mime_type=mime_type)
    request = docai.ProcessRequest(raw_document=document, name=processor.name)

    response = client.process_document(request)

    return response.document
由於您的文件是問卷,請選擇表單剖析器。除了擷取文字 (印刷和手寫) 之外,這個一般處理器還會偵測表單欄位。
分析文件:
processor = get_processor(form_parser_display_name)
assert processor is not None

file_path = "./form.pdf"
mime_type = "application/pdf"

document = process_file(processor, file_path, mime_type)
所有處理器都會在文件上執行光學字元辨識 (OCR) 第一階段。查看 OCR 檢查作業偵測到的文字:
document.text.split("\n")
畫面應如下所示:
['FakeDoc M.D.',
 'HEALTH INTAKE FORM',
 'Please fill out the questionnaire carefully. The information you provide will be used to complete',
 'your health profile and will be kept confidential.',
 'Date:',
 '9/14/19',
 'Name:',
 'Sally Walker',
 'DOB: 09/04/1986',
 'Address: 24 Barney Lane',
 'City: Towaco',
 'State: NJ Zip: 07082',
 'Email: Sally, walker@cmail.com',
 '_Phone #: (906) 917-3486',
 'Gender: F',
 'Marital Status:',
  ...
]
新增下列函式,以便列印偵測到的單一表單欄位:
def print_form_fields(document: docai.Document):
    sorted_form_fields = form_fields_sorted_by_ocr_order(document)
    data = form_field_tabular_data(sorted_form_fields, document)
    headers = next(data)
    colalign = next(data)

    print(tabulate(data, headers, tablefmt="pretty", colalign=colalign))
    print(f"→ Form fields: {len(sorted_form_fields)}")

def form_field_tabular_data(
    form_fields: Sequence[docai.Document.Page.FormField],
    document: docai.Document,
) -> Iterator[Tuple[str, str, str]]:
    yield ("name", "value", "confidence")
    yield ("right", "left", "right")
    if not form_fields:
        yield ("-", "-", "-")
        return
    for form_field in form_fields:
        name_layout = form_field.field_name
        value_layout = form_field.field_value
        name = text_from_layout(name_layout, document)
        value = text_from_layout(value_layout, document)
        confidence = value_layout.confidence
        yield (name, value, f"{confidence:.1%}")
並新增下列公用函式:
def form_fields_sorted_by_ocr_order(
    document: docai.Document,
) -> MutableSequence[docai.Document.Page.FormField]:
    def sort_key(form_field):
        # Sort according to the field name detected position
        text_anchor = form_field.field_name.text_anchor
        return text_anchor.text_segments[0].start_index if text_anchor else 0

    fields = (field for page in document.pages for field in page.form_fields)

    return sorted(fields, key=sort_key)


def text_from_layout(
    layout: docai.Document.Page.Layout,
    document: docai.Document,
) -> str:
    full_text = document.text
    segs = layout.text_anchor.text_segments
    text = "".join(full_text[seg.start_index : seg.end_index] for seg in segs)
    if text.endswith("\n"):
        text = text[:-1]

    return text
列印偵測到的表單欄位:
print_form_fields(document)
您應該會看到類似以下的列印內容:
+-----------------+-------------------------+------------+
|            name | value                   | confidence |
+-----------------+-------------------------+------------+
|           Date: | 9/14/19                 |      83.0% |
|           Name: | Sally Walker            |      87.3% |
|            DOB: | 09/04/1986              |      88.5% |
|        Address: | 24 Barney Lane          |      82.4% |
|           City: | Towaco                  |      90.0% |
|          State: | NJ                      |      89.4% |
|            Zip: | 07082                   |      91.4% |
|          Email: | Sally, walker@cmail.com |      79.7% |
|       _Phone #: | walker@cmail.com        |      93.2% |
|                 | (906                    |            |
|         Gender: | F                       |      88.2% |
| Marital Status: | Single                  |      85.2% |
|     Occupation: | Software Engineer       |      81.5% |
|    Referred By: | None                    |      76.9% |
...
+-----------------+-------------------------+------------+
→ Form fields: 17
查看系統偵測到的欄位名稱和值 ( PDF)。以下是問卷上半部:
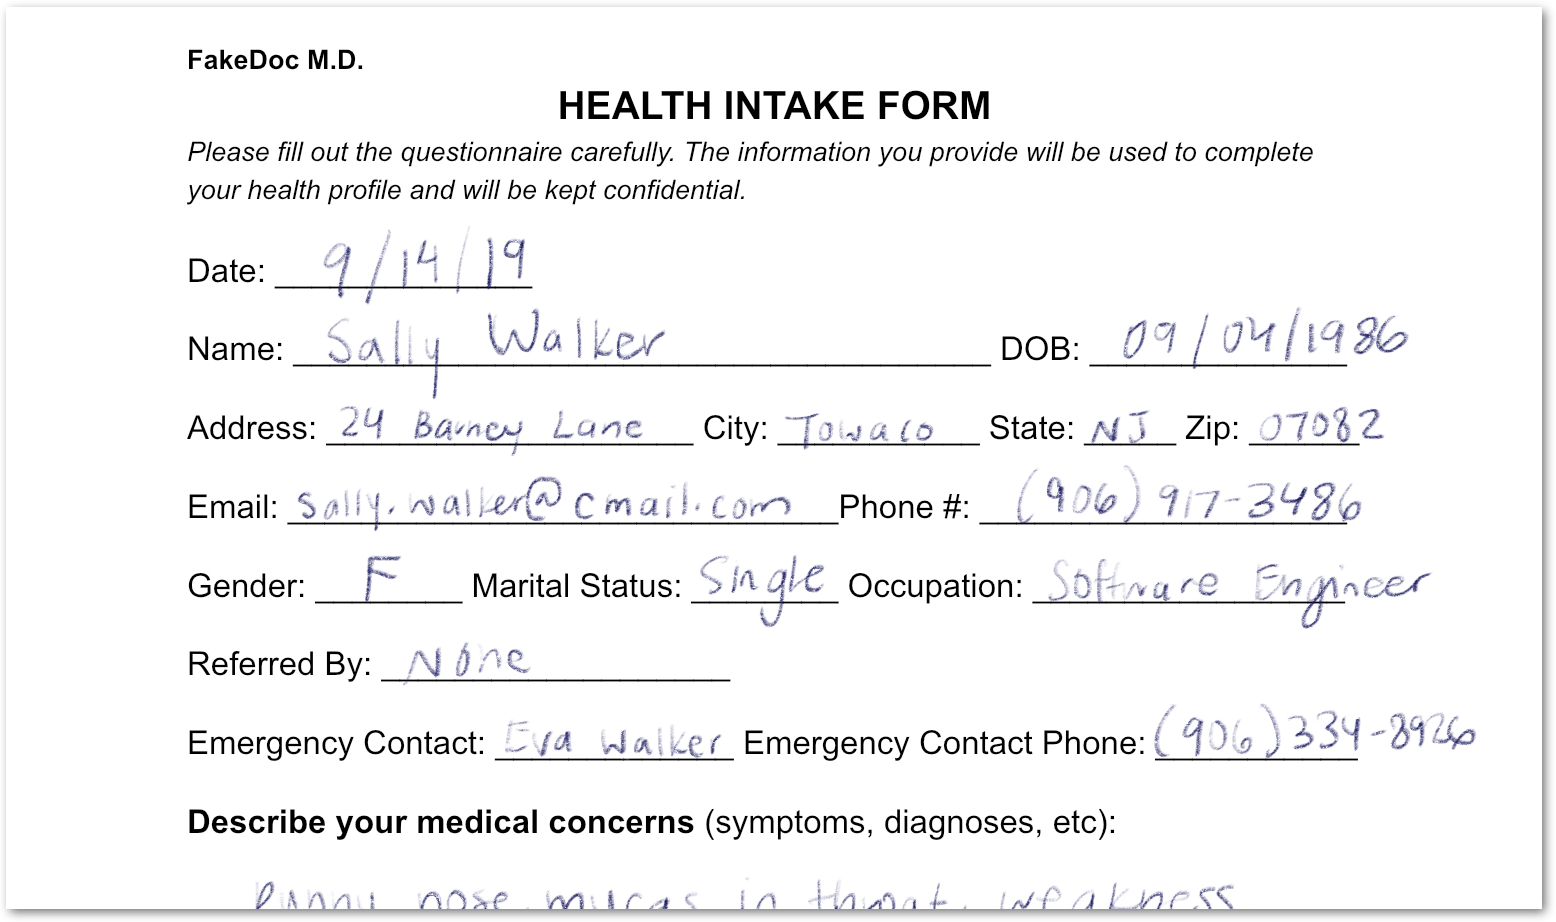
您分析的表單含有印刷文字和手寫文字。您也已以高可信度偵測到該表單的欄位。結果是,您的像素已轉換為結構化資料!
8. 啟用及停用處理器
您可以使用 disable_processor 和 enable_processor 控管是否可以使用處理器。
新增下列函式:
def update_processor_state(processor: docai.Processor, enable_processor: bool):
    client = get_client()
    if enable_processor:
        request = docai.EnableProcessorRequest(name=processor.name)
        operation = client.enable_processor(request)
    else:
        request = docai.DisableProcessorRequest(name=processor.name)
        operation = client.disable_processor(request)
    operation.result()  # Wait for operation to complete

def enable_processor(processor: docai.Processor):
    update_processor_state(processor, True)

def disable_processor(processor: docai.Processor):
    update_processor_state(processor, False)
停用表單剖析器處理器,並檢查處理器的狀態:
processor = get_processor(form_parser_display_name)
assert processor is not None

disable_processor(processor)
print_processors()
您應該會看到以下內容:
+--------------+-----------------------+----------+
| display_name | type                  | state    |
+--------------+-----------------------+----------+
| document-ocr | OCR_PROCESSOR         | ENABLED  |
| form-parser  | FORM_PARSER_PROCESSOR | DISABLED |
+--------------+-----------------------+----------+
→ Processors: 2
重新啟用表單剖析器處理器:
enable_processor(processor)
print_processors()
您應該會看到以下內容:
+--------------+-----------------------+---------+
| display_name | type                  | state   |
+--------------+-----------------------+---------+
| document-ocr | OCR_PROCESSOR         | ENABLED |
| form-parser  | FORM_PARSER_PROCESSOR | ENABLED |
+--------------+-----------------------+---------+
→ Processors: 2
接下來,我們將說明如何管理處理器版本。
9. 管理處理器版本
處理器可提供多個版本。瞭解如何使用 list_processor_versions 和 set_default_processor_version 方法。
新增下列函式:
def list_processor_versions(
    processor: docai.Processor,
) -> MutableSequence[docai.ProcessorVersion]:
    client = get_client()
    response = client.list_processor_versions(parent=processor.name)

    return list(response)


def get_sorted_processor_versions(
    processor: docai.Processor,
) -> MutableSequence[docai.ProcessorVersion]:
    def sort_key(processor_version: docai.ProcessorVersion):
        return processor_version.name

    versions = list_processor_versions(processor)

    return sorted(versions, key=sort_key)


def print_processor_versions(processor: docai.Processor):
    versions = get_sorted_processor_versions(processor)
    default_version_name = processor.default_processor_version
    data = processor_versions_tabular_data(versions, default_version_name)
    headers = next(data)
    colalign = next(data)

    print(tabulate(data, headers, tablefmt="pretty", colalign=colalign))
    print(f"→ Processor versions: {len(versions)}")


def processor_versions_tabular_data(
    versions: Sequence[docai.ProcessorVersion],
    default_version_name: str,
) -> Iterator[Tuple[str, str, str]]:
    yield ("version", "display name", "default")
    yield ("left", "left", "left")
    if not versions:
        yield ("-", "-", "-")
        return
    for version in versions:
        mapping = docai.DocumentProcessorServiceClient.parse_processor_version_path(
            version.name
        )
        processor_version = mapping["processor_version"]
        is_default = "Y" if version.name == default_version_name else ""
        yield (processor_version, version.display_name, is_default)
列出 OCR 處理器的可用版本:
processor = get_processor(document_ocr_display_name)
assert processor is not None
print_processor_versions(processor)
您會取得以下處理器版本:
+--------------------------------+--------------------------+---------+
| version                        | display name             | default |
+--------------------------------+--------------------------+---------+
| pretrained-ocr-v1.0-2020-09-23 | Google Stable            |         |
| pretrained-ocr-v1.1-2022-09-12 | Google Release Candidate |         |
| pretrained-ocr-v1.2-2022-11-10 | Google Release Candidate |         |
| pretrained-ocr-v2.0-2023-06-02 | Google Stable            | Y       |
| pretrained-ocr-v2.1-2024-08-07 | Google Release Candidate |         |
+--------------------------------+--------------------------+---------+
→ Processor versions: 5
接著,新增函式來變更預設處理器版本:
def set_default_processor_version(processor: docai.Processor, version_name: str):
    client = get_client()
    request = docai.SetDefaultProcessorVersionRequest(
        processor=processor.name,
        default_processor_version=version_name,
    )

    operation = client.set_default_processor_version(request)
    operation.result()  # Wait for operation to complete
切換至最新的處理器版本:
processor = get_processor(document_ocr_display_name)
assert processor is not None
versions = get_sorted_processor_versions(processor)

new_version = versions[-1]  # Latest version
set_default_processor_version(processor, new_version.name)

# Update the processor info
processor = get_processor(document_ocr_display_name)
assert processor is not None
print_processor_versions(processor)
您會取得新版設定:
+--------------------------------+--------------------------+---------+
| version                        | display name             | default |
+--------------------------------+--------------------------+---------+
| pretrained-ocr-v1.0-2020-09-23 | Google Stable            |         |
| pretrained-ocr-v1.1-2022-09-12 | Google Release Candidate |         |
| pretrained-ocr-v1.2-2022-11-10 | Google Release Candidate |         |
| pretrained-ocr-v2.0-2023-06-02 | Google Stable            |         |
| pretrained-ocr-v2.1-2024-08-07 | Google Release Candidate | Y       |
+--------------------------------+--------------------------+---------+
→ Processor versions: 5
接下來,是最終的處理器管理方法 (刪除)。
10. 刪除處理器
最後,請查看如何使用 delete_processor 方法。
新增下列函式:
def delete_processor(processor: docai.Processor):
    client = get_client()
    operation = client.delete_processor(name=processor.name)
    operation.result()  # Wait for operation to complete
刪除測試處理器:
processors_to_delete = [dn for dn, _ in test_processor_display_names_and_types]
print("Deleting processors...")

for processor in list_processors():
    if processor.display_name not in processors_to_delete:
        continue
    print(f"  Deleting {processor.display_name}...")
    delete_processor(processor)

print("Done\n")
print_processors()
您應該會看到以下內容:
Deleting processors...
  Deleting form-parser...
  Deleting document-ocr...
Done

+--------------+------+-------+
| display_name | type | state |
+--------------+------+-------+
| -            | -    | -     |
+--------------+------+-------+
→ Processors: 0
您已瞭解所有處理器管理方法!就快完成了...
11. 恭喜!
您已瞭解如何使用 Python 管理 Document AI 處理器!
清除所用資源
如要清理開發環境,請透過 Cloud Shell 執行下列操作:
- 如果您仍在 IPython 工作階段中,請返回 Shell:
exit - 停止使用 Python 虛擬環境:
deactivate - 刪除虛擬環境資料夾:
cd ~ ; rm -rf ./venv-docai
如要刪除 Google Cloud 專案,請在 Cloud Shell 中執行下列操作:
- 擷取目前的專案 ID:
PROJECT_ID=$(gcloud config get-value core/project) - 請確認這是您要刪除的專案:
echo $PROJECT_ID - 刪除專案:
gcloud projects delete $PROJECT_ID
瞭解詳情
- 在瀏覽器中試用 Document AI:https://cloud.google.com/document-ai/docs/drag-and-drop
- Document AI 處理器詳細資訊:https://cloud.google.com/document-ai/docs/processors-list
- Google Cloud 上的 Python:https://cloud.google.com/python
- Python 適用的 Cloud 用戶端程式庫:https://github.com/googleapis/google-cloud-python
授權
這項內容採用的授權為 Creative Commons 姓名標示 2.0 通用授權。