
使用 Node.js Admin SDK,將完整堆疊 Angular 應用程式部署至 Cloud Run 與 Firestore
程式碼研究室簡介
subject上次更新時間:4月 11, 2025
2. 必要條件
- 如果您還沒有 Google 帳戶,請務必建立 Google 帳戶。
- 請改用個人帳戶,而非公司或學校帳戶。工作和學校帳戶可能有限制,導致您無法啟用本實驗室所需的 API。
3. 專案設定
- 登入 Google Cloud 控制台。
- 在 Cloud 控制台中啟用帳單。
- 完成本研究室所需的 Cloud 資源費用應低於 $1 美元。
- 您可以按照本實驗室課程結尾的步驟刪除資源,避免系統繼續向您收費。
- 新使用者可享有價值 $300 美元的免費試用期。
- 建立新專案或選擇重複使用現有專案。
4. 開啟 Cloud Shell 編輯器
- 前往 Cloud Shell 編輯器
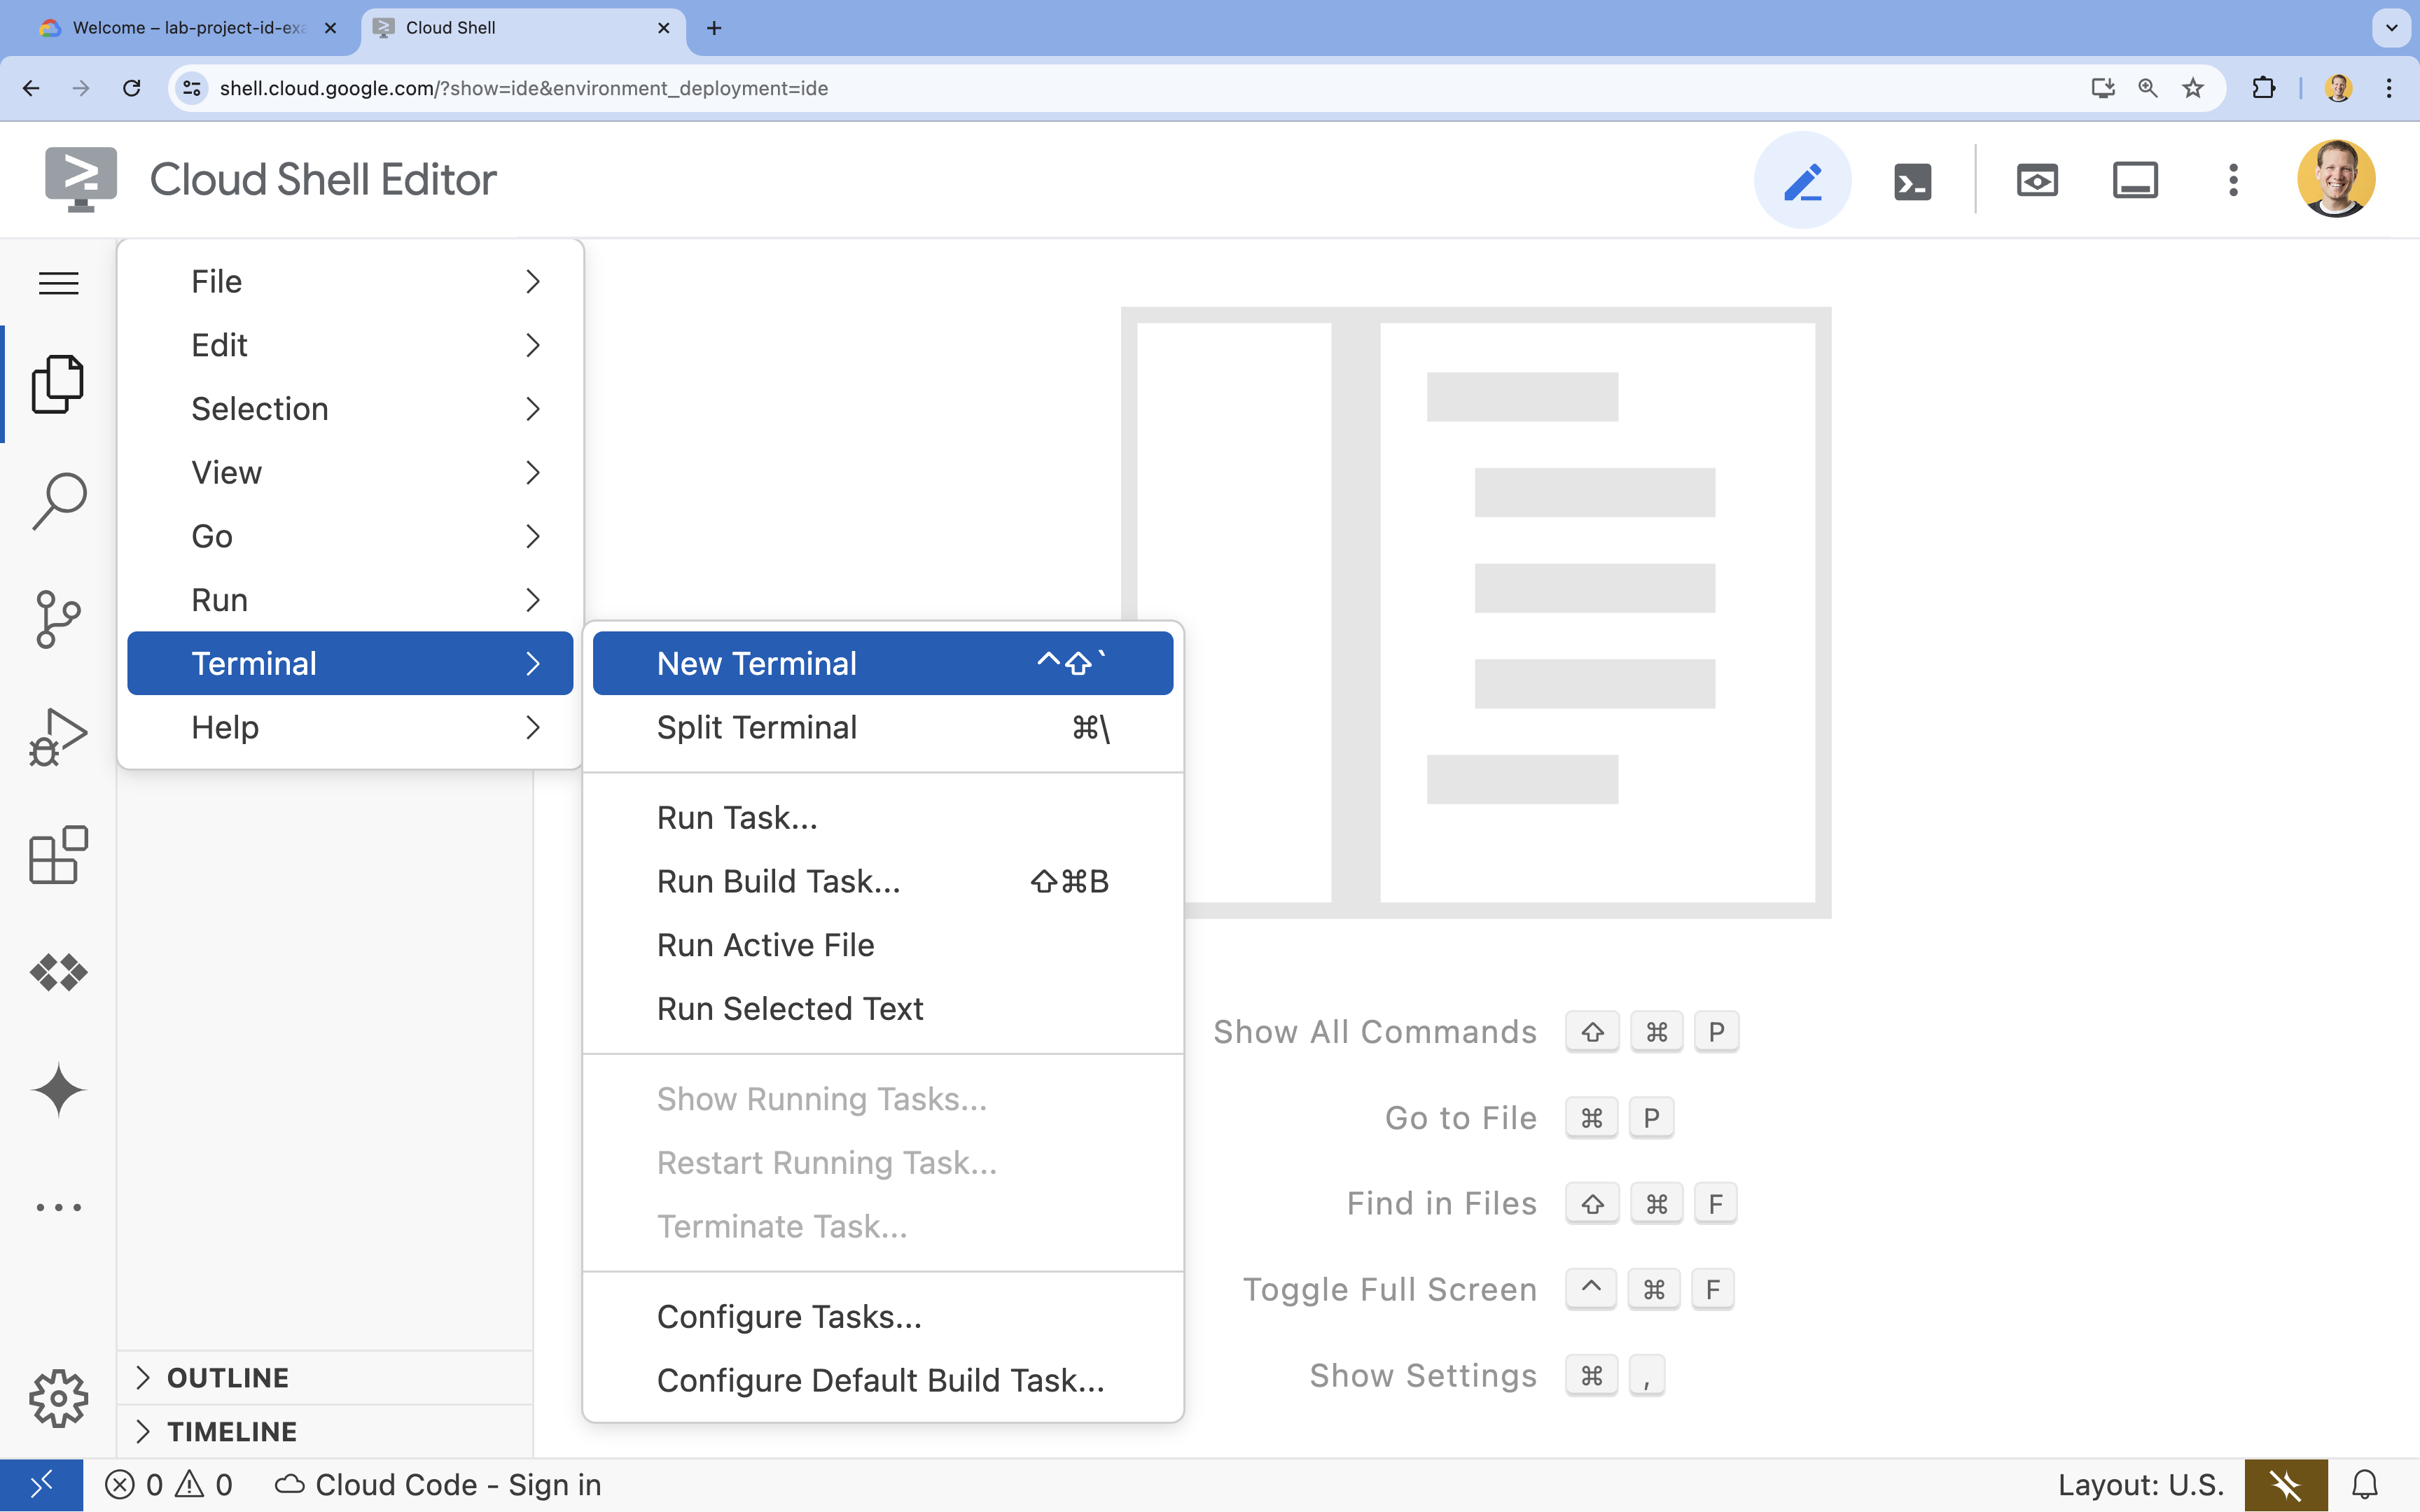
- 如果終端機未顯示在畫面底部,請按照下列步驟開啟:
- 按一下漢堡選單

- 按一下「Terminal」
- 按一下「New Terminal」
- 按一下漢堡選單
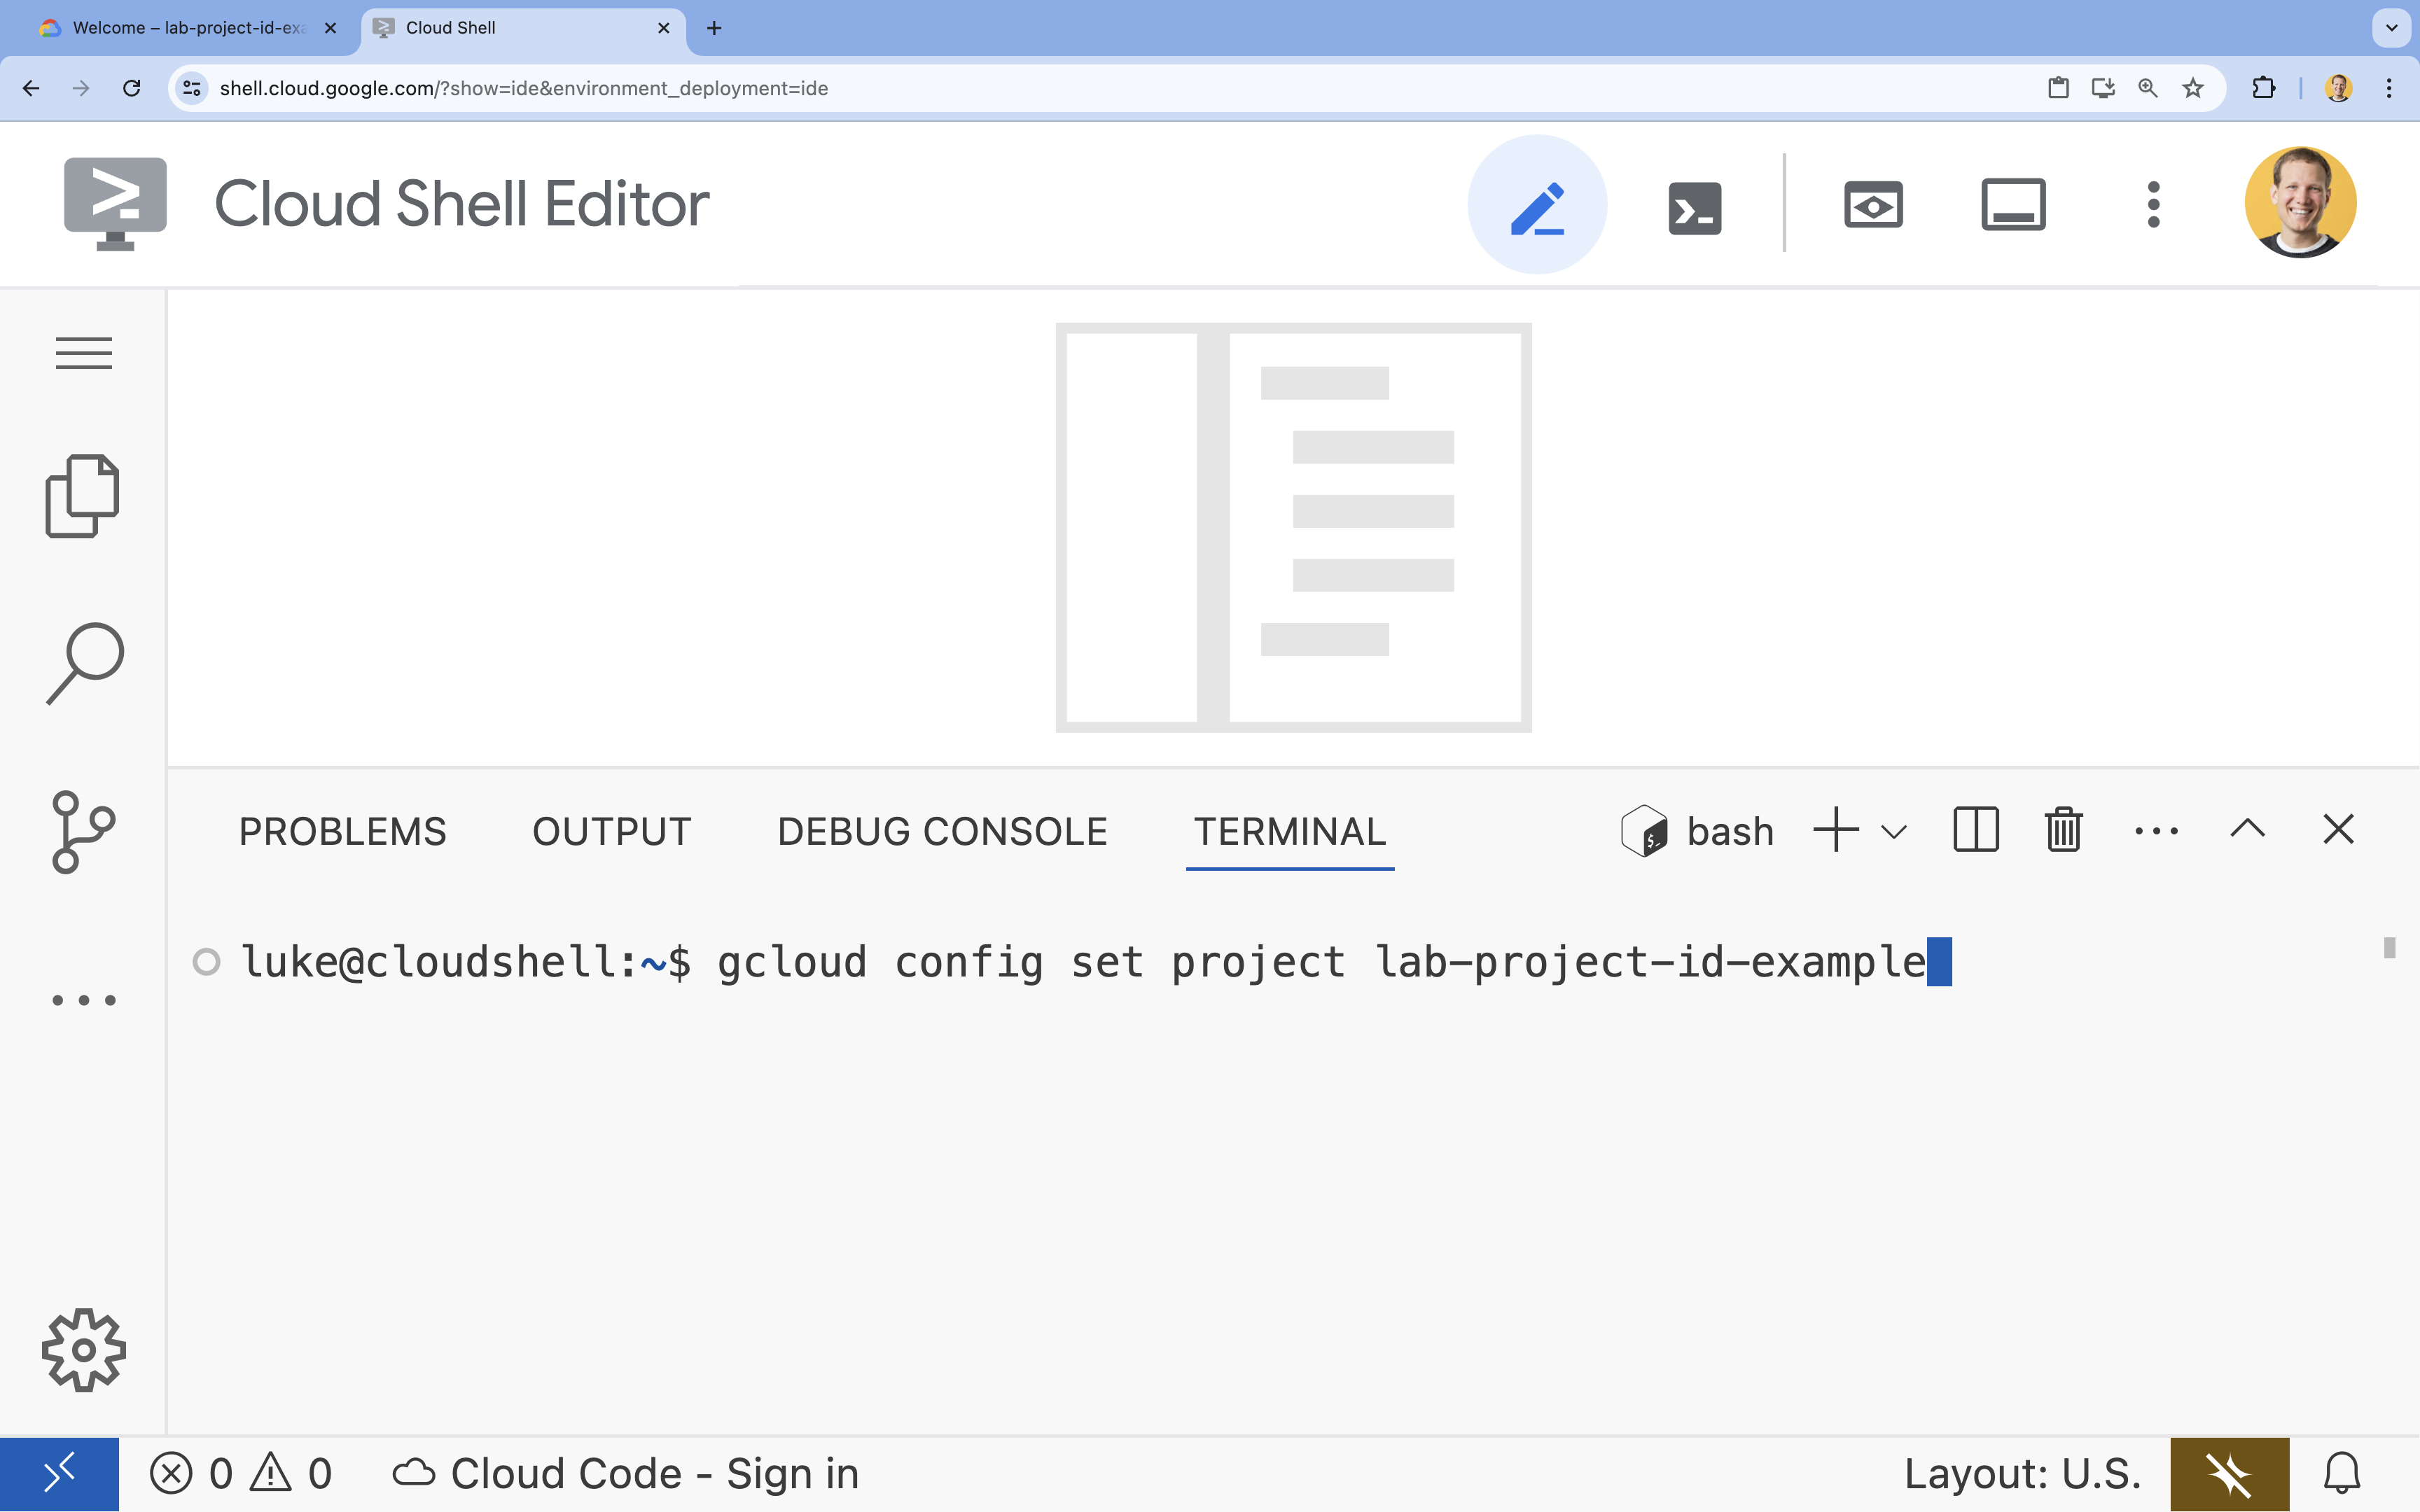
- 在終端機中,使用以下指令設定專案:
- 格式:
gcloud config set project [PROJECT_ID] - 範例:
gcloud config set project lab-project-id-example - 如果忘記專案 ID,請按照下列步驟操作:
- 您可以使用下列指令列出所有專案 ID:
gcloud projects list | awk '/PROJECT_ID/{print $2}'
- 您可以使用下列指令列出所有專案 ID:
- 格式:
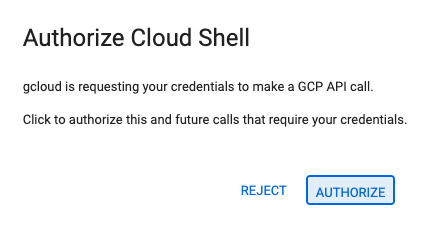
- 如果出現授權提示訊息,請點選「授權」繼續操作。
- 您應該會看到下列訊息:
Updated property [core/project].
WARNING並收到Do you want to continue (Y/N)?要求,表示您可能輸入的專案 ID 有誤。按下N和Enter鍵,然後再次嘗試執行gcloud config set project指令。
5. 啟用 API
在終端機中啟用 API:
gcloud services enable \
  firestore.googleapis.com \
  run.googleapis.com \
  artifactregistry.googleapis.com \
  cloudbuild.googleapis.com
如果出現授權提示訊息,請點選「授權」繼續操作。
這個指令可能需要幾分鐘才能完成,但最終應該會顯示類似以下的成功訊息:
Operation "operations/acf.p2-73d90d00-47ee-447a-b600" finished successfully.
6. 建立 Firestore 資料庫
- 執行
gcloud firestore databases create指令,建立 Firestore 資料庫gcloud firestore databases create --location=nam5
7. 準備申請
準備可回應 HTTP 要求的 Next.js 應用程式。
- 如要建立名為
task-app的新 Next.js 專案,請使用下列指令:npx --yes @angular/cli@19.2.5 new task-app \
--minimal \
--inline-template \
--inline-style \
--ssr \
--server-routing \
--defaults - 將目錄變更為
task-app:cd task-app
- 安裝
firebase-admin以與 Firestore 資料庫互動。npm install firebase-admin
- 在 Cloud Shell 編輯器中開啟
server.ts檔案:cloudshell edit src/server.tsserver.ts檔案。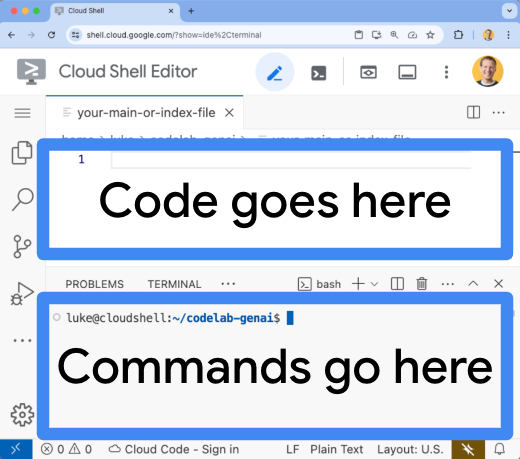
- 刪除
server.ts檔案的現有內容。 - 複製下列程式碼,並貼到已開啟的
server.ts檔案中:import {
AngularNodeAppEngine,
createNodeRequestHandler,
isMainModule,
writeResponseToNodeResponse,
} from '@angular/ssr/node';
import express from 'express';
import { dirname, resolve } from 'node:path';
import { fileURLToPath } from 'node:url';
import { initializeApp, applicationDefault, getApps } from 'firebase-admin/app';
import { getFirestore } from 'firebase-admin/firestore';
type Task = {
id: string;
title: string;
status: 'IN_PROGRESS' | 'COMPLETE';
createdAt: number;
};
const credential = applicationDefault();
// Only initialize app if it does not already exist
if (getApps().length === 0) {
initializeApp({ credential });
}
const db = getFirestore();
const tasksRef = db.collection('tasks');
const serverDistFolder = dirname(fileURLToPath(import.meta.url));
const browserDistFolder = resolve(serverDistFolder, '../browser');
const app = express();
const angularApp = new AngularNodeAppEngine();
app.use(express.json());
app.get('/api/tasks', async (req, res) => {
const snapshot = await tasksRef.orderBy('createdAt', 'desc').limit(100).get();
const tasks: Task[] = snapshot.docs.map(doc => ({
id: doc.id,
title: doc.data()['title'],
status: doc.data()['status'],
createdAt: doc.data()['createdAt'],
}));
res.send(tasks);
});
app.post('/api/tasks', async (req, res) => {
const newTaskTitle = req.body.title;
if(!newTaskTitle){
res.status(400).send("Title is required");
return;
}
await tasksRef.doc().create({
title: newTaskTitle,
status: 'IN_PROGRESS',
createdAt: Date.now(),
});
res.sendStatus(200);
});
app.put('/api/tasks', async (req, res) => {
const task: Task = req.body;
if (!task || !task.id || !task.title || !task.status) {
res.status(400).send("Invalid task data");
return;
}
await tasksRef.doc(task.id).set(task);
res.sendStatus(200);
});
app.delete('/api/tasks', async (req, res) => {
const task: Task = req.body;
if(!task || !task.id){
res.status(400).send("Task ID is required");
return;
}
await tasksRef.doc(task.id).delete();
res.sendStatus(200);
});
/**
* Serve static files from /browser
*/
app.use(
express.static(browserDistFolder, {
maxAge: '1y',
index: false,
redirect: false,
}),
);
/**
* Handle all other requests by rendering the Angular application.
*/
app.use('/**', (req, res, next) => {
angularApp
.handle(req)
.then((response) =>
response ? writeResponseToNodeResponse(response, res) : next(),
)
.catch(next);
});
/**
* Start the server if this module is the main entry point.
* The server listens on the port defined by the `PORT` environment variable, or defaults to 4000.
*/
if (isMainModule(import.meta.url)) {
const port = process.env['PORT'] || 4000;
app.listen(port, () => {
console.log(`Node Express server listening on http://localhost:${port}`);
});
}
/**
* Request handler used by the Angular CLI (for dev-server and during build) or Firebase Cloud Functions.
*/
export const reqHandler = createNodeRequestHandler(app); - 在 Cloud Shell 編輯器中開啟
angular.json檔案:cloudshell edit angular.json"externalDependencies": ["firebase-admin"]行新增至angular.json檔案。 - 刪除
angular.json檔案的現有內容。 - 複製下列程式碼,並貼到已開啟的
angular.json檔案中:{
"$schema": "./node_modules/@angular/cli/lib/config/schema.json",
"version": 1,
"newProjectRoot": "projects",
"projects": {
"task-app": {
"projectType": "application",
"schematics": {
"@schematics/angular:component": {
"inlineTemplate": true,
"inlineStyle": true,
"skipTests": true
},
"@schematics/angular:class": {
"skipTests": true
},
"@schematics/angular:directive": {
"skipTests": true
},
"@schematics/angular:guard": {
"skipTests": true
},
"@schematics/angular:interceptor": {
"skipTests": true
},
"@schematics/angular:pipe": {
"skipTests": true
},
"@schematics/angular:resolver": {
"skipTests": true
},
"@schematics/angular:service": {
"skipTests": true
}
},
"root": "",
"sourceRoot": "src",
"prefix": "app",
"architect": {
"build": {
"builder": "@angular-devkit/build-angular:application",
"options": {
"outputPath": "dist/task-app",
"index": "src/index.html",
"browser": "src/main.ts",
"polyfills": [
"zone.js"
],
"tsConfig": "tsconfig.app.json",
"assets": [
{
"glob": "**/*",
"input": "public"
}
],
"styles": [
"src/styles.css"
],
"scripts": [],
"server": "src/main.server.ts",
"outputMode": "server",
"ssr": {
"entry": "src/server.ts"
},
"externalDependencies": ["firebase-admin"]
},
"configurations": {
"production": {
"budgets": [
{
"type": "initial",
"maximumWarning": "500kB",
"maximumError": "1MB"
},
{
"type": "anyComponentStyle",
"maximumWarning": "4kB",
"maximumError": "8kB"
}
],
"outputHashing": "all"
},
"development": {
"optimization": false,
"extractLicenses": false,
"sourceMap": true
}
},
"defaultConfiguration": "production"
},
"serve": {
"builder": "@angular-devkit/build-angular:dev-server",
"configurations": {
"production": {
"buildTarget": "task-app:build:production"
},
"development": {
"buildTarget": "task-app:build:development"
}
},
"defaultConfiguration": "development"
},
"extract-i18n": {
"builder": "@angular-devkit/build-angular:extract-i18n"
}
}
}
}
}
"externalDependencies": ["firebase-admin"]
- 在 Cloud Shell 編輯器中開啟
app.component.ts檔案:cloudshell edit src/app/app.component.tsapp.component.ts檔案。 - 刪除
app.component.ts檔案的現有內容。 - 複製下列程式碼,並貼到已開啟的
app.component.ts檔案中:import { afterNextRender, Component, signal } from '@angular/core';
import { FormsModule } from '@angular/forms';
type Task = {
id: string;
title: string;
status: 'IN_PROGRESS' | 'COMPLETE';
createdAt: number;
};
@Component({
selector: 'app-root',
standalone: true,
imports: [FormsModule],
template: `
<section>
<input
type="text"
placeholder="New Task Title"
[(ngModel)]="newTaskTitle"
class="text-black border-2 p-2 m-2 rounded"
/>
<button (click)="addTask()">Add new task</button>
<table>
<tbody>
@for (task of tasks(); track task) {
@let isComplete = task.status === 'COMPLETE';
<tr>
<td>
<input
(click)="updateTask(task, { status: isComplete ? 'IN_PROGRESS' : 'COMPLETE' })"
type="checkbox"
[checked]="isComplete"
/>
</td>
<td>{{ task.title }}</td>
<td>{{ task.status }}</td>
<td>
<button (click)="deleteTask(task)">Delete</button>
</td>
</tr>
}
</tbody>
</table>
</section>
`,
styles: '',
})
export class AppComponent {
newTaskTitle = '';
tasks = signal<Task[]>([]);
constructor() {
afterNextRender({
earlyRead: () => this.getTasks()
});
}
async getTasks() {
const response = await fetch(`/api/tasks`);
const tasks = await response.json();
this.tasks.set(tasks);
}
async addTask() {
await fetch(`/api/tasks`, {
method: 'POST',
headers: { 'Content-Type': 'application/json' },
body: JSON.stringify({
title: this.newTaskTitle,
status: 'IN_PROGRESS',
createdAt: Date.now(),
}),
});
this.newTaskTitle = '';
await this.getTasks();
}
async updateTask(task: Task, newTaskValues: Partial<Task>) {
await fetch(`/api/tasks`, {
method: 'PUT',
headers: { 'Content-Type': 'application/json' },
body: JSON.stringify({ ...task, ...newTaskValues }),
});
await this.getTasks();
}
async deleteTask(task: any) {
await fetch('/api/tasks', {
method: 'DELETE',
headers: { 'Content-Type': 'application/json' },
body: JSON.stringify(task),
});
await this.getTasks();
}
}
應用程式現在已可部署。
8. 將應用程式部署至 Cloud Run
- 執行下列指令,將應用程式部署至 Cloud Run:
gcloud run deploy helloworld \
  --region=us-central1 \
--source=. - 如有提示,請按下
Y和Enter鍵,確認要繼續操作:Do you want to continue (Y/n)? Y
幾分鐘後,應用程式應會提供網址供您造訪。
前往該網址,查看應用程式的運作情形。每次造訪網址或重新整理網頁時,都會看到工作應用程式。
9. 恭喜
在本實驗室中,您已學習到如何執行下列作業:
- 建立 PostgreSQL 適用的 Cloud SQL 執行個體
- 將可連線至 Cloud SQL 資料庫的應用程式部署至 Cloud Run
清除所用資源
Cloud SQL 沒有免費方案,如果您繼續使用,我們會向您收費。您可以刪除 Cloud 專案,避免產生額外費用。
不使用服務時,Cloud Run 不會收費,但您可能仍須支付儲存容器映像檔至 Artifact Registry 的費用。刪除 Cloud 專案後,系統就會停止對專案使用的所有資源收取費用。
如有需要,請刪除專案:
gcloud projects delete $GOOGLE_CLOUD_PROJECT
您也可以從雲端磁碟中刪除不必要的資源。您可以:
- 刪除 Codelab 專案目錄:
rm -rf ~/task-app - 警告!這項操作無法復原!如要刪除 Cloud Shell 中的所有內容來釋出空間,您可以刪除整個主目錄。請務必將所有要保留的內容儲存在其他位置。
sudo rm -rf $HOME
持續掌握情況
- 使用 Cloud SQL Node.js 連接器,將完整堆疊 Next.js 應用程式部署至 Cloud Run 與 PostgreSQL 適用的 Cloud SQL
- 使用 Cloud SQL Node.js 連接器,透過 PostgreSQL 適用的 Cloud SQL 將完整堆疊 Angular 應用程式部署至 Cloud Run
- 使用 Node.js Admin SDK,將全端 Angular 應用程式部署至 Cloud Run 並搭配使用 Firestore
- 使用 Node.js Admin SDK 將完整堆疊 Next.js 應用程式部署至 Cloud Run 並搭配使用 Firestore