
1. 事前準備
什麼是 Google Chat 擴充應用程式 (Gemini 版)?
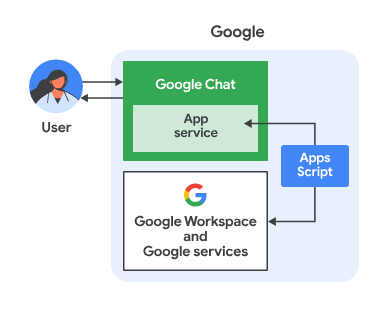
Gemini 版 Google Chat 應用程式可執行下列操作:
- 將服務和資源整合到 Google Chat,讓使用者不必離開對話就能取得資訊及採取行動。
- 與生成式 AI 模型 Gemini 整合,在特定時間建立或搜尋文字或圖片等資料,簡化工作流程。
為什麼要將 Google Chat 應用程式與 Gemini 整合?
Gemini 等生成式 AI 模型通常用於以下類別:
- 內容創作和強化。生成行銷文案、製作社群媒體貼文、建立逼真圖片、創作音樂,或協助製作影片內容。
- 資料搜尋:從非結構化知識庫擷取重要洞察資料、摘要長篇文字、分類內容,或以更高的準確度和速度翻譯語言。
- 對話。進行自然、資訊豐富且充滿創意的對話。
直接在 Google Chat 的熟悉介面中整合這些功能,對於想提升使用者體驗和工作效率的人來說,是絕佳的機會。
必要條件
- 具備 Apps Script、Google Cloud 和 Node.js 的基本知識。
- 具備 Google Chat 概念的基本知識,包括事件處理常式、斜線指令、對話方塊、資訊卡、訊息、應用程式驗證和 API。
建構內容
在本程式碼研究室中,您將使用 Gemini 建構三個 Google Chat 應用程式,涵蓋上一節介紹的三個用途。
問題管理應用程式 (內容建立和強化)
這個應用程式會執行下列操作:
- 透過基本互動、應用程式主畫面和應用程式驗證,管理從建立到結案的問題。
- 監控訊息,並透過活動和配件小工具提供多元包容性協助。
您將使用 Gemini 執行下列操作:
- 根據訊息記錄和問題詳細資料生成問題報告。
- 使用設有存取限制的提示,分類訊息中的不包容字詞。
主要使用的技術包括 Vertex AI、Gemini、Apps Script 和 Google Workspace API (Admin、Chat、文件、日曆)。
知識應用程式 (資料搜尋)
這款應用程式會使用 Gemini 解讀及回答自然語言問題,並從非結構化資料傳回來源參考資料。
主要使用的技術包括 Dialogflow CX 資料儲存庫代理程式、Dialogflow CX Webhook、Google Cloud Functions 和 Gemini。
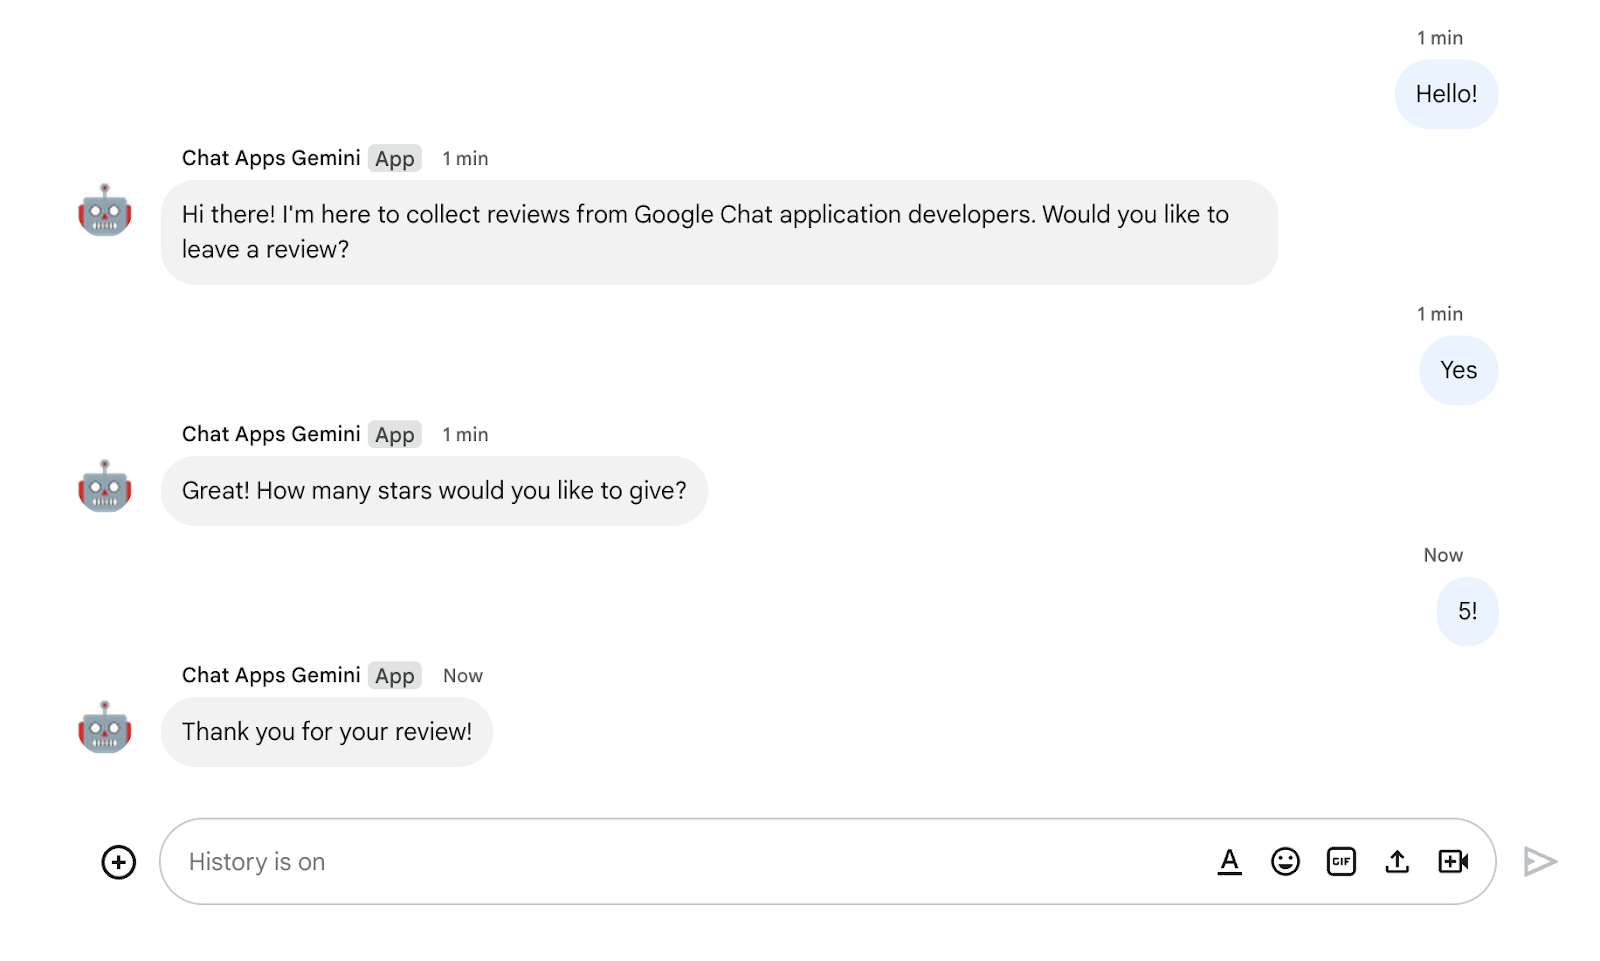
意見回饋應用程式 (對話)
這款應用程式會透過 Gemini 收集及儲存評論,並以自然語言進行對話。
主要使用的技術包括 Dialogflow CX 代理程式、Dialogflow CX 工具、OpenAPI、Google Cloud Functions 和 Gemini。
課程內容
- 如何透過 Vertex AI 將 Google Chat 擴充應用程式與 Gemini 整合。
- 瞭解如何將 Google Chat 應用程式與 Dialogflow CX 虛擬服務專員整合。
- 如何使用 Google Chat 的最新功能:應用程式首頁、Google Chat Events 和配件小工具。
軟硬體需求
- 完成「使用 Apps Script 建構 Google Chat 擴充應用程式」快速入門導覽課程。本程式碼研究室會以產生的 Apps Script 和 Google Cloud 專案為基礎。
2. 做好準備
初始化資源
在本節中,您將透過偏好的網路瀏覽器存取及設定下列資源。
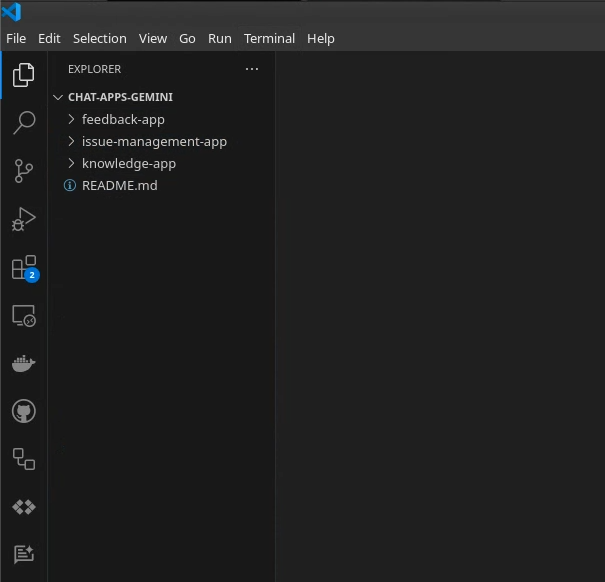
Apps Script 專案
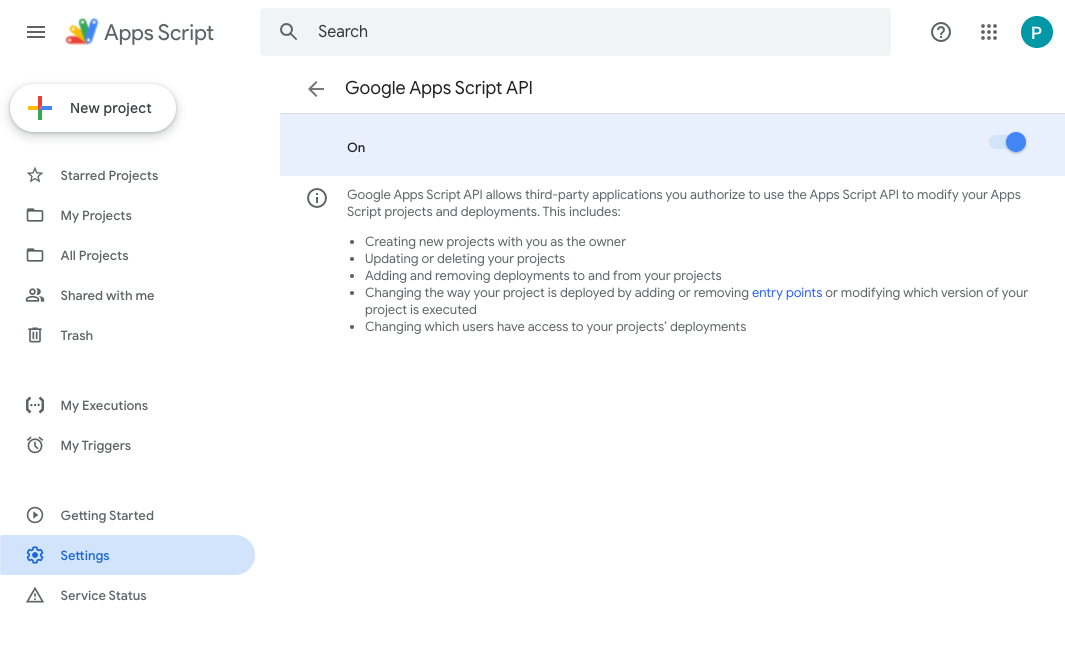
在 Apps Script 控制台中,按照下列步驟操作:
- 按一下「設定」,然後啟用 Google Apps Script API。
- 選取專案。
- 按一下「專案設定」。
- 勾選「在編輯器中顯示『
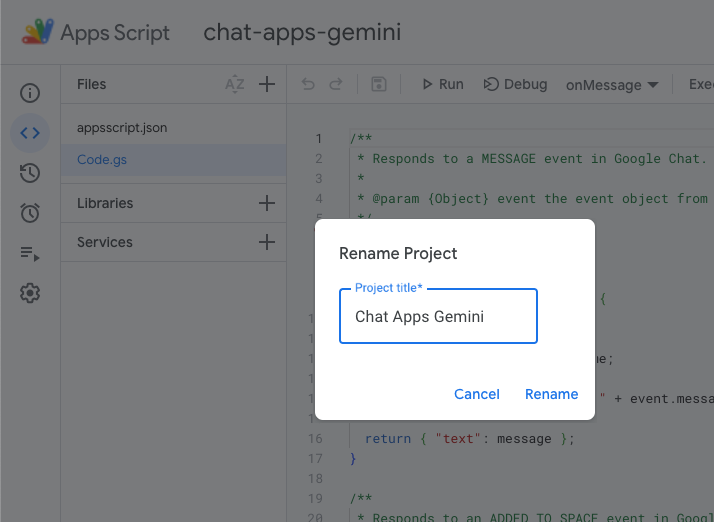
appsscript.json』資訊清單檔案」核取方塊。 - 將專案重新命名為
Chat Apps Gemini。
Google Cloud 專案
在 Google Cloud 控制台中,按照下列步驟操作:
- 選取專案。
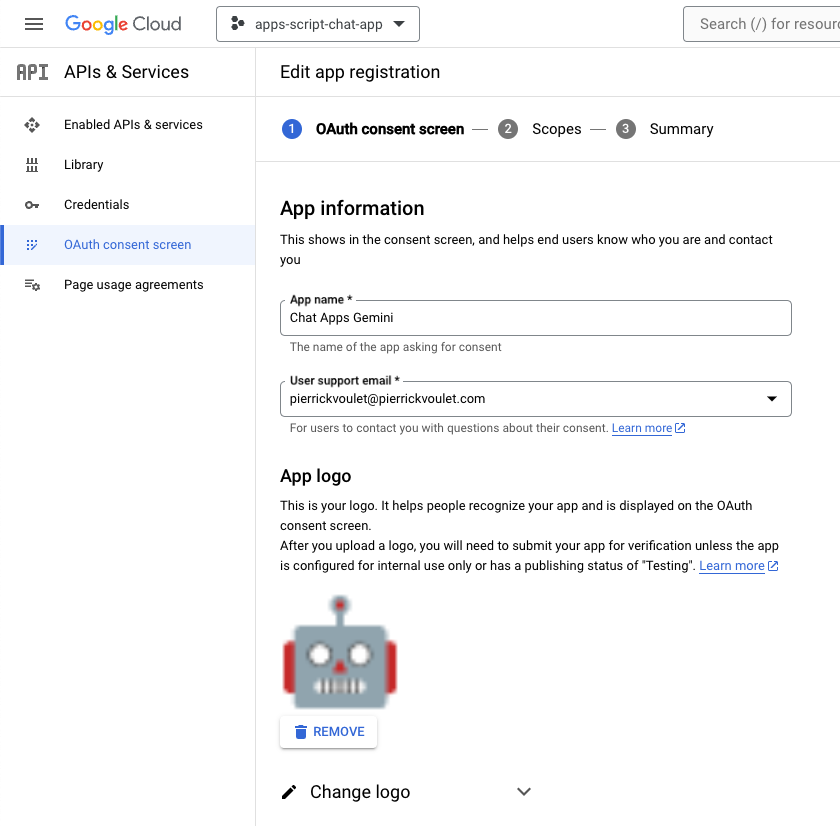
- 依序點選「選單」圖示 ☰ >「API 和服務」>「OAuth 同意畫面」>「編輯應用程式」,然後將「應用程式名稱」設為
Chat Apps Gemini。
- 前往 Google Chat API 設定,然後將「應用程式名稱」和「說明」設為
Chat Apps Gemini。
Google Chat
在 Google Chat 中,請按照下列步驟操作:
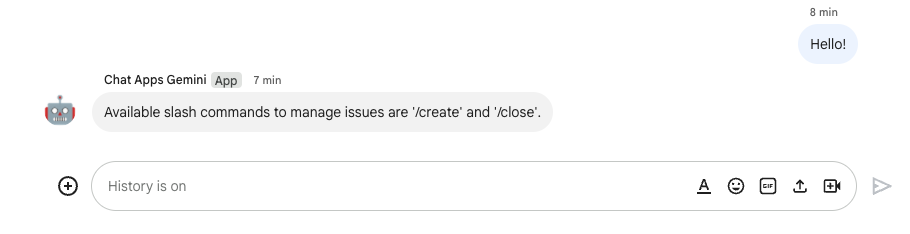
- 如有需要,請透過 Google Chat 應用程式發起對話。
- 傳送訊息 (例如「
Hello」),確認是否正常運作。

在本地下載原始碼和資源
- 在偏好的開發環境中開啟
apps-script目錄,然後在終端機中前往相同目錄。
安裝及設定 clasp
我們使用 clasp,輕鬆編輯原始碼版本,並從本機環境推送至 Apps Script 專案。
- 在您的本機環境中,安裝最新版本的
node、npm和clasp。
npm install -g @google/clasp
- 使用帳戶登入:
clasp login
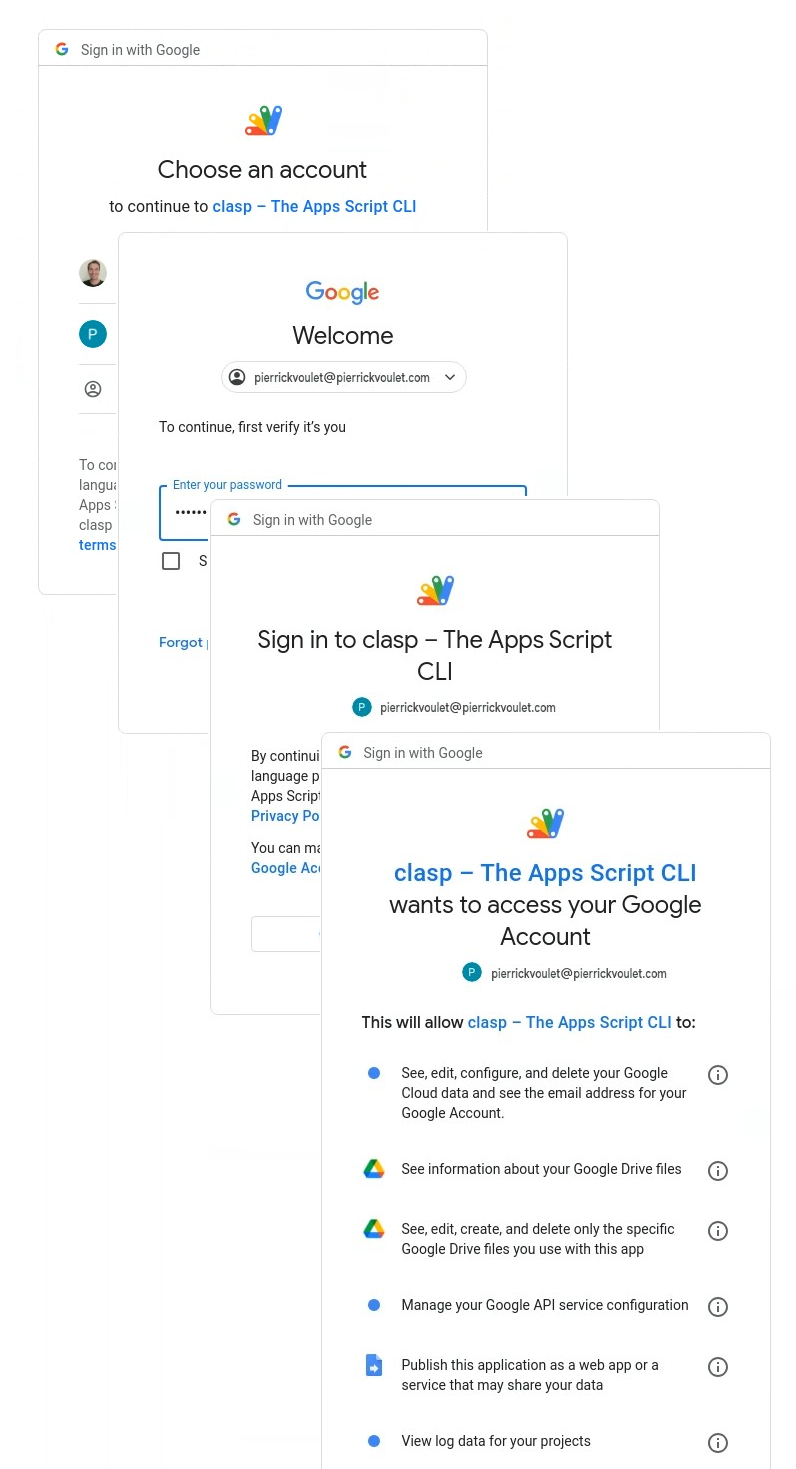
如果成功,網路瀏覽器會顯示基本確認畫面,且含有用戶端憑證的 .clasprc.json 檔案會更新。您可以在終端機中找到該檔案的位置。

3. 應用程式 1:建構
查看概念
Vertex AI
Vertex AI 提供建構及使用生成式 AI 所需的一切資源,包括 AI 解決方案、代理程式建構工具、超過 130 個基礎模型,以及整合式 AI 平台。

Gemini
Gemini 是 Google 的多模態 LLM,可透過 Vertex AI 存取。這項技術可協助使用者發揮潛能,激發想像力、拓展好奇心,以及提升工作效率。
進階即時通訊服務
Advanced Chat 服務可讓您在 Apps Script 中使用 Google Chat API。這項權限允許指令碼尋找、建立及修改 Chat 聊天室、在聊天室中新增或移除成員,以及讀取或發布含有文字、資訊卡、附件和回應的訊息。
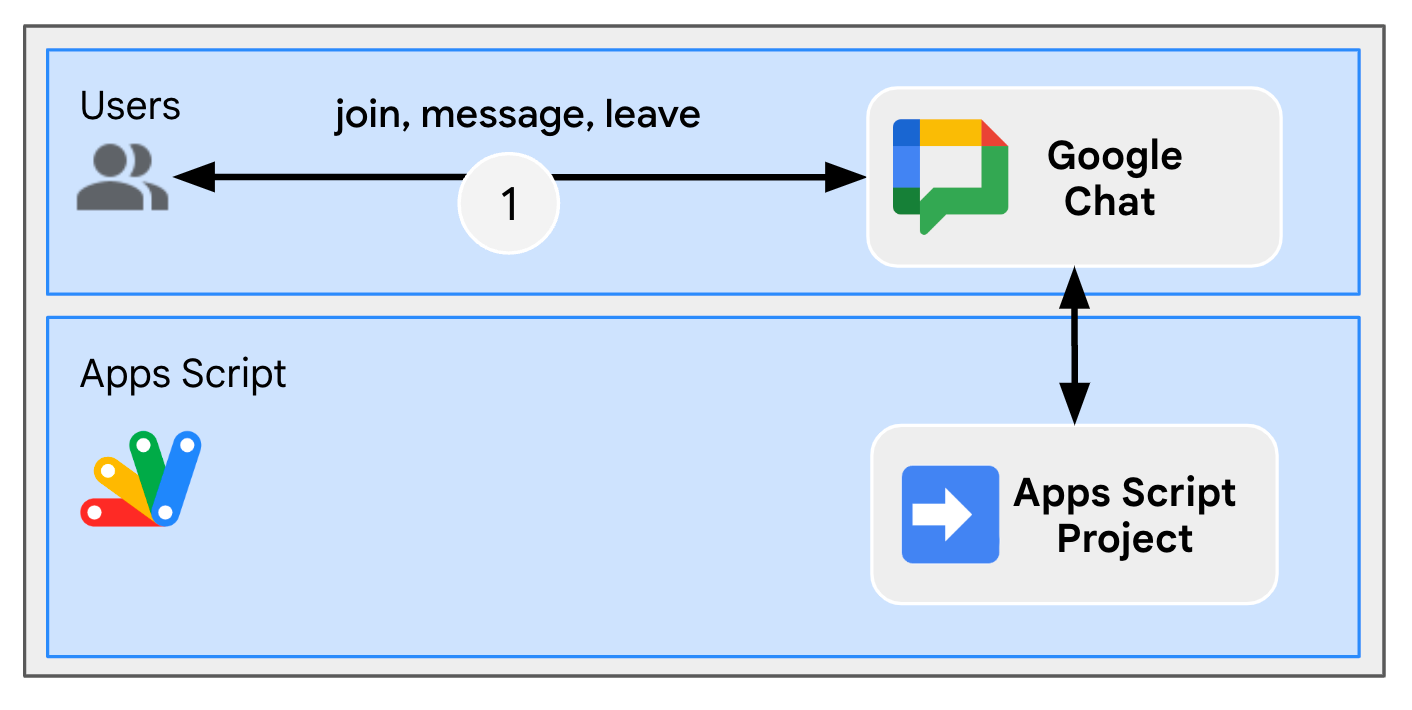
查看架構
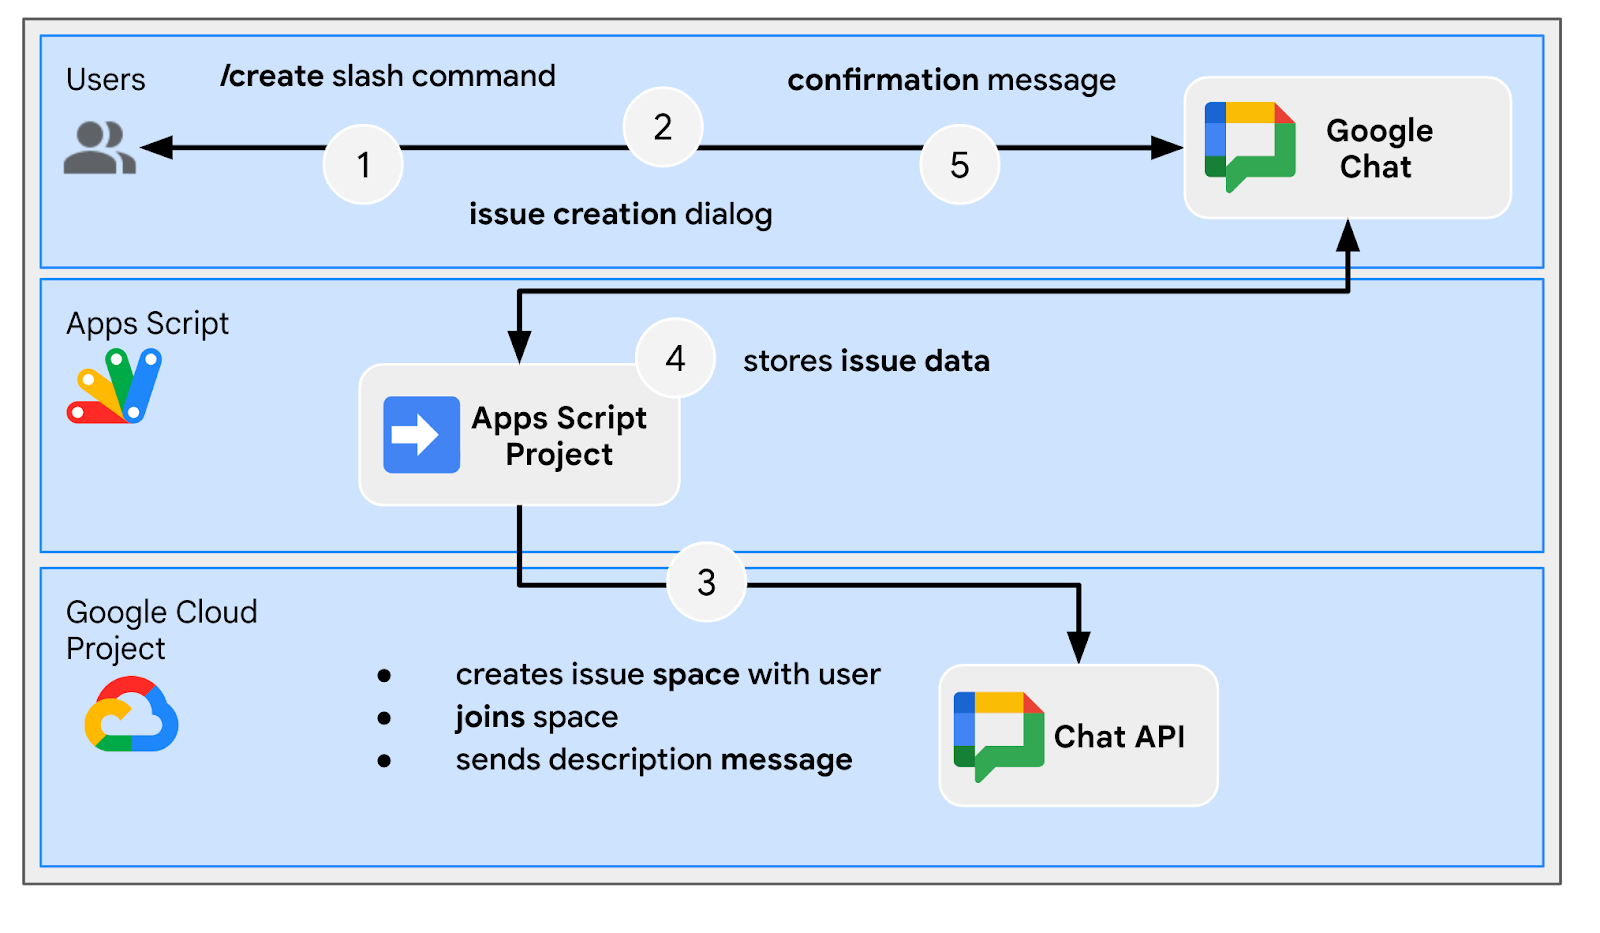
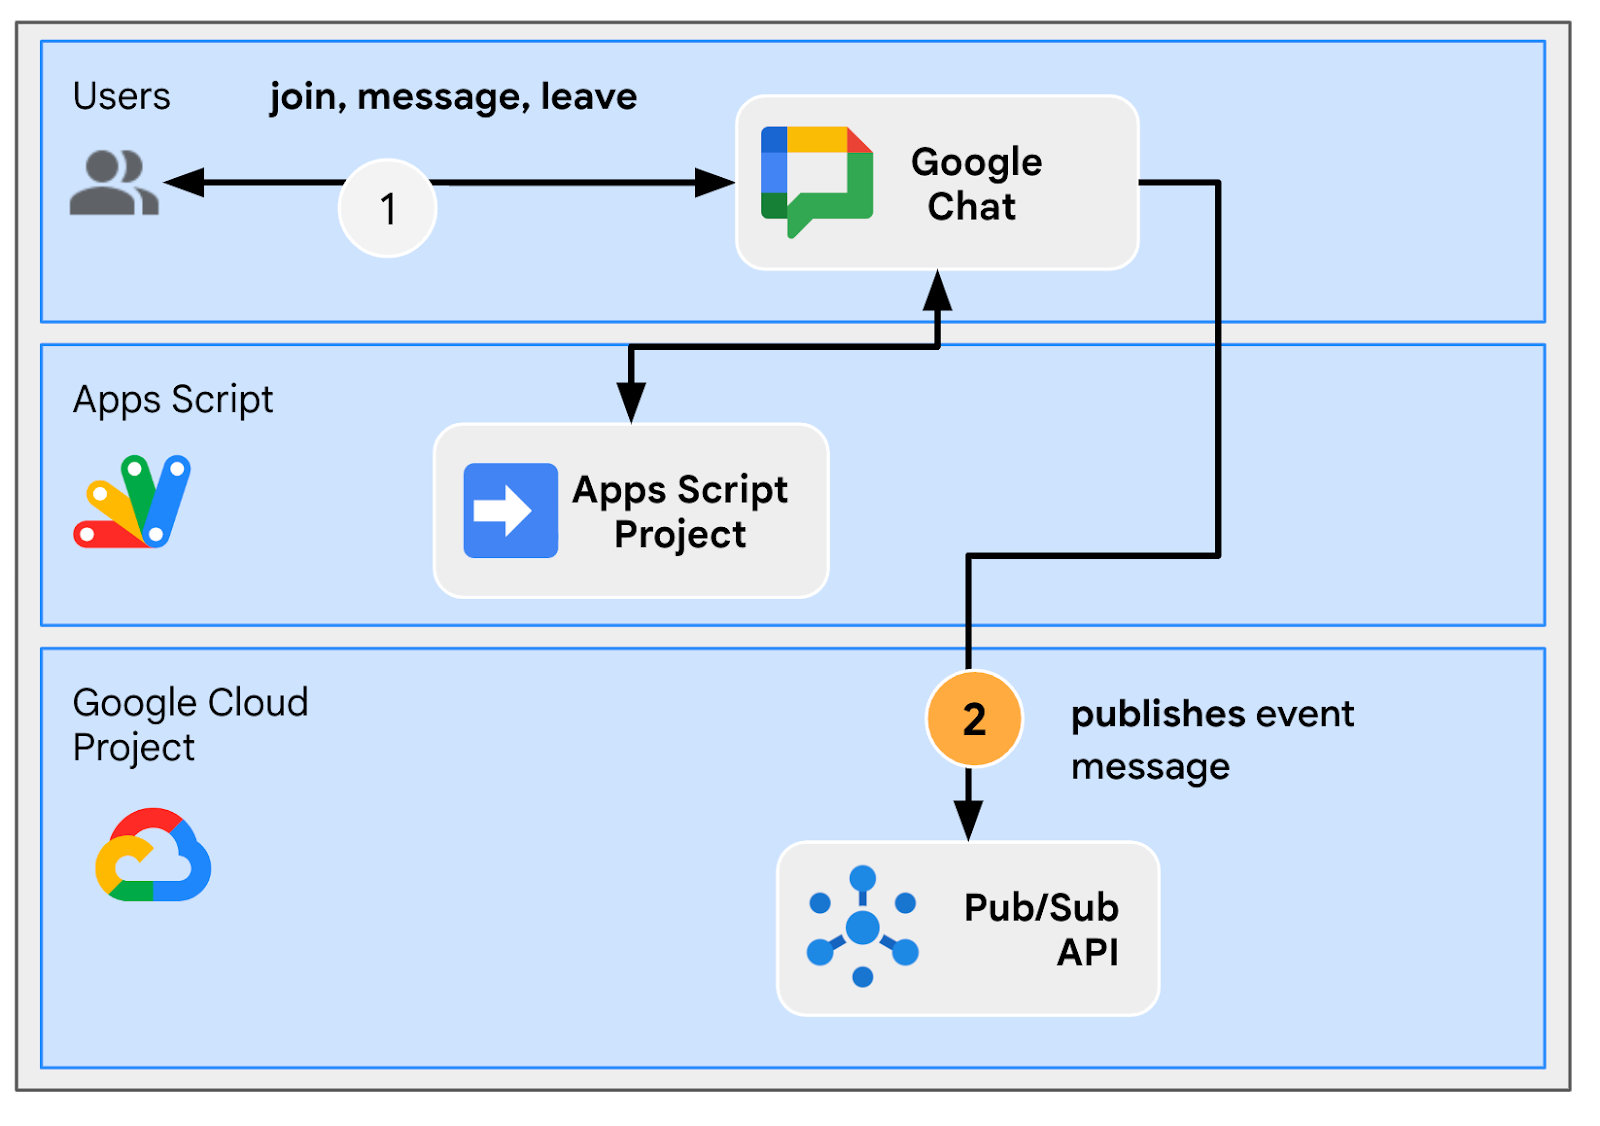
這個 Google Chat 擴充應用程式是使用 Apps Script 建構而成。運作方式如下:
- 使用者傳送訊息給應用程式,無論是即時訊息或聊天室訊息都算在內。
- 這個應用程式是在 Apps Script 專案中實作,並與 Google Cloud 專案建立關聯,可處理郵件。
- 這款應用程式會整合 Google 文件和 Google Chat API。
- 應用程式會使用 Properties Service,將資料保留在指令碼屬性中。
- 應用程式會透過即時訊息或原始聊天室傳送同步回應。
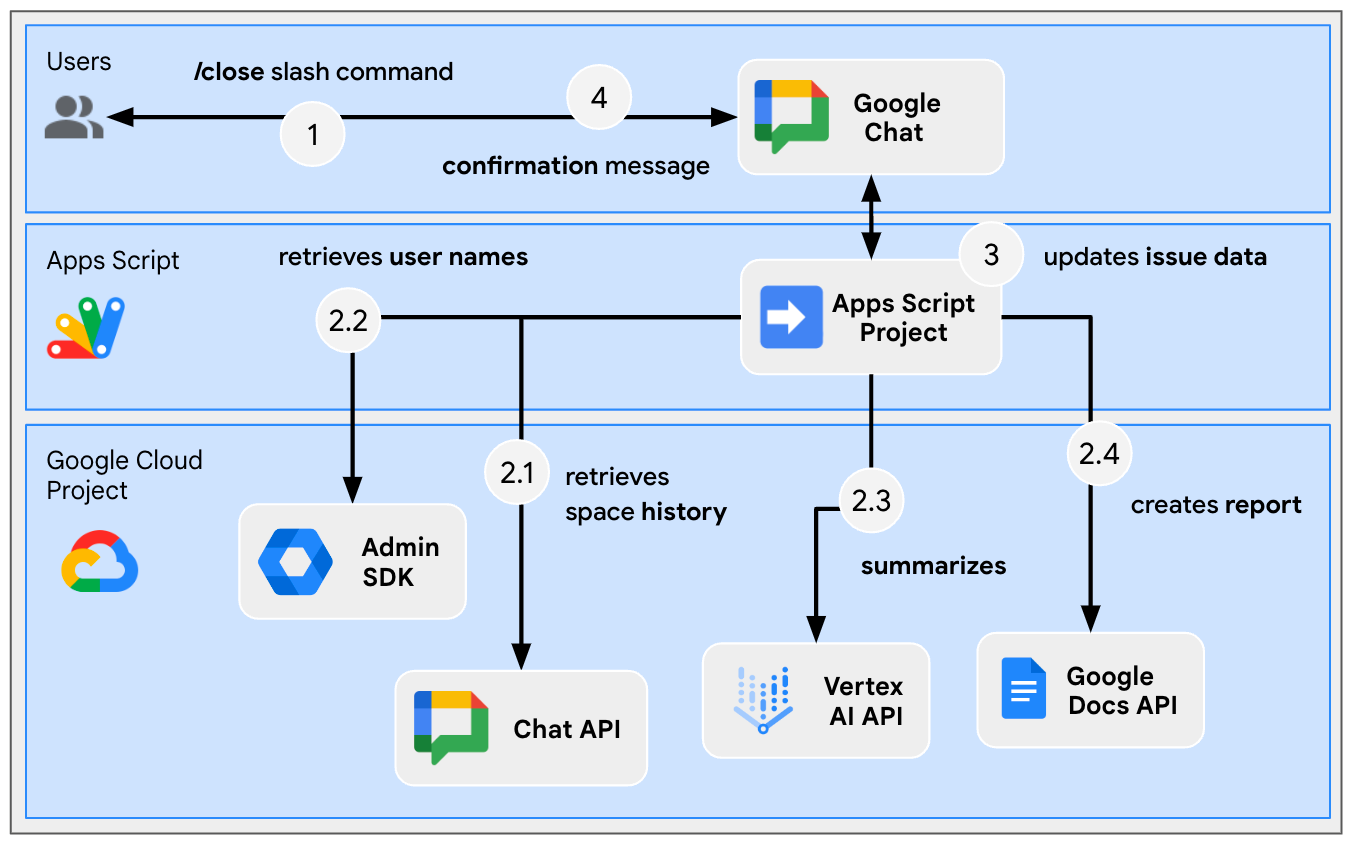
審查流程
建立問題
排解專屬空間的問題
從專屬空間關閉問題
檢查原始碼
Apps Script 專案包含下列指令碼:
Configuration:根據環境編輯的常數。ChatApp:處理 Google Chat 互動事件,包括訊息、資訊卡點擊、斜線指令和對話方塊。Storage:依附於 Properties 服務的公用程式函式。ChatAppAuth:依賴 Google Chat 應用程式驗證的公用程式函式。Docs:依附於 Google 文件的公用程式函式。VertexAi:依賴 Vertex AI 的公用程式函式。
以下是使用 Gemini 和對話空間記錄生成報告文件時,系統會主動使用的部分:
appsscript.json
// Enables the Admin SDK Directory and Chat services, which you need to retrieve
// messages and usernames.

"enabledAdvancedServices": [
  ...
  {
    "userSymbol": "AdminDirectory",
    "version": "directory_v1",
    "serviceId": "admin"
  },
  {
    "userSymbol": "Chat",
    "version": "v1",
    "serviceId": "chat"
  }
  ...
]
// Includes the OAuth scopes to request the Admin SDK Directory, Google Chat,
// Google Docs, and Vertex AI APIs.

"oauthScopes": [
  ...
  "https://www.googleapis.com/auth/admin.directory.user.readonly",
  "https://www.googleapis.com/auth/chat.messages.readonly",
  "https://www.googleapis.com/auth/documents",
  "https://www.googleapis.com/auth/cloud-platform",
  ...
]
Configuration.js
// Relies on two constants: the first one is the Google Cloud project ID and the
// second one is the Vertex AI location to be used.

...
const PROJECT_ID = 'replace-with-gcp-project-id';
const VERTEX_AI_LOCATION_ID = 'us-central1';
...
ChatApp.js
// The slash command process function retrieves history, generates content, and passes
// it to the report generator.

function processSlashCommand(event) {
  ...
  if (event.message.slashCommand.commandId == CLOSE_COMMAND_ID
    && event.message.space.type !== "DM") {
    ...
    const history = exportSpaceHistory(spaceId);
    const summary = summarizeSpace(history);
    const docUrl = createReport(
      issue.title, issue.description, resolution, history, summary
    );
    ...
  }
  ...
}
/**
 * Fetches and concatenates the 100 first space messages by using the Google Chat API.
 *
 * Messages with slash commands are filtered (app command invocations).
 *
 * @return {string} concatenate space messages in the format "Sender's name: Message"
 */
function exportSpaceHistory(spaceName) {
  const messages = Chat.Spaces.Messages.list(spaceName, { 'pageSize': 100 }).messages;
  // Returns results after fetching message sender display names.
  let users = new Map();
  return messages
    .filter(message => message.slashCommand === undefined)
    .map(message =>
      `${getUserDisplayName(users, message.sender.name)}: ${message.text}`
    ).join('\n');
}
/**
 * Fetches a user's display name by using the Admin Directory API.
 *
 * A cache is used to only call the API once per user.
 *
 * @param {Map} cache the map containing users previously fetched
 * @param {string} userId the user ID to fetch
 * @return {string} the user's display name
 */
function getUserDisplayName(cache, userId) {
  if (cache.has(userId)) {
    return cache.get(userId);
  }
  let displayName = 'Unknown User';
  try {
    const user = AdminDirectory.Users.get(
      userId.replace("users/", ""),
      { projection: 'BASIC', viewType: 'domain_public' });
    displayName = user.name.displayName ? user.name.displayName : user.name.fullName;
  } catch (e) {
    // Ignores errors, uses 'Unknown User' by default.
  }
  cache.set(userId, displayName);
  return displayName;
}
VertexAi.js
/**
 * Summarizes a Google Chat space history with the Gemini Pro model using
 * Vertex AI API.
 *
 * @param {string} history the history
 * @return {string} the summary
 */
function summarizeSpace(history) {
  const url = `https://${VERTEX_AI_LOCATION_ID}-aiplatform.googleapis.com/v1`
    + `/projects/${PROJECT_ID}/locations/${VERTEX_AI_LOCATION_ID}`
    + "/publishers/google/models/gemini-1.0-pro:generateContent";
  const options = {
    method: "POST",
    headers: { Authorization: "Bearer " + ScriptApp.getOAuthToken() },
    contentType: "application/json",
    payload: JSON.stringify({
      contents: {
        role: "user",
        parts: {
          text: "Summarize the following conversation between engineers resolving"
              + " an issue in a few sentences.\n\n" + history
        }
      },
      safetySettings: {
        category: "HARM_CATEGORY_SEXUALLY_EXPLICIT",
        threshold: "BLOCK_LOW_AND_ABOVE"
      },
      generationConfig: {
        temperature: 0.2,
        topP: 0.8,
        topK: 40
      }
    })
  };

  return JSON.parse(UrlFetchApp.fetch(url, options).getContentText())
    .candidates[0].content.parts[0].text;
}
Docs.js
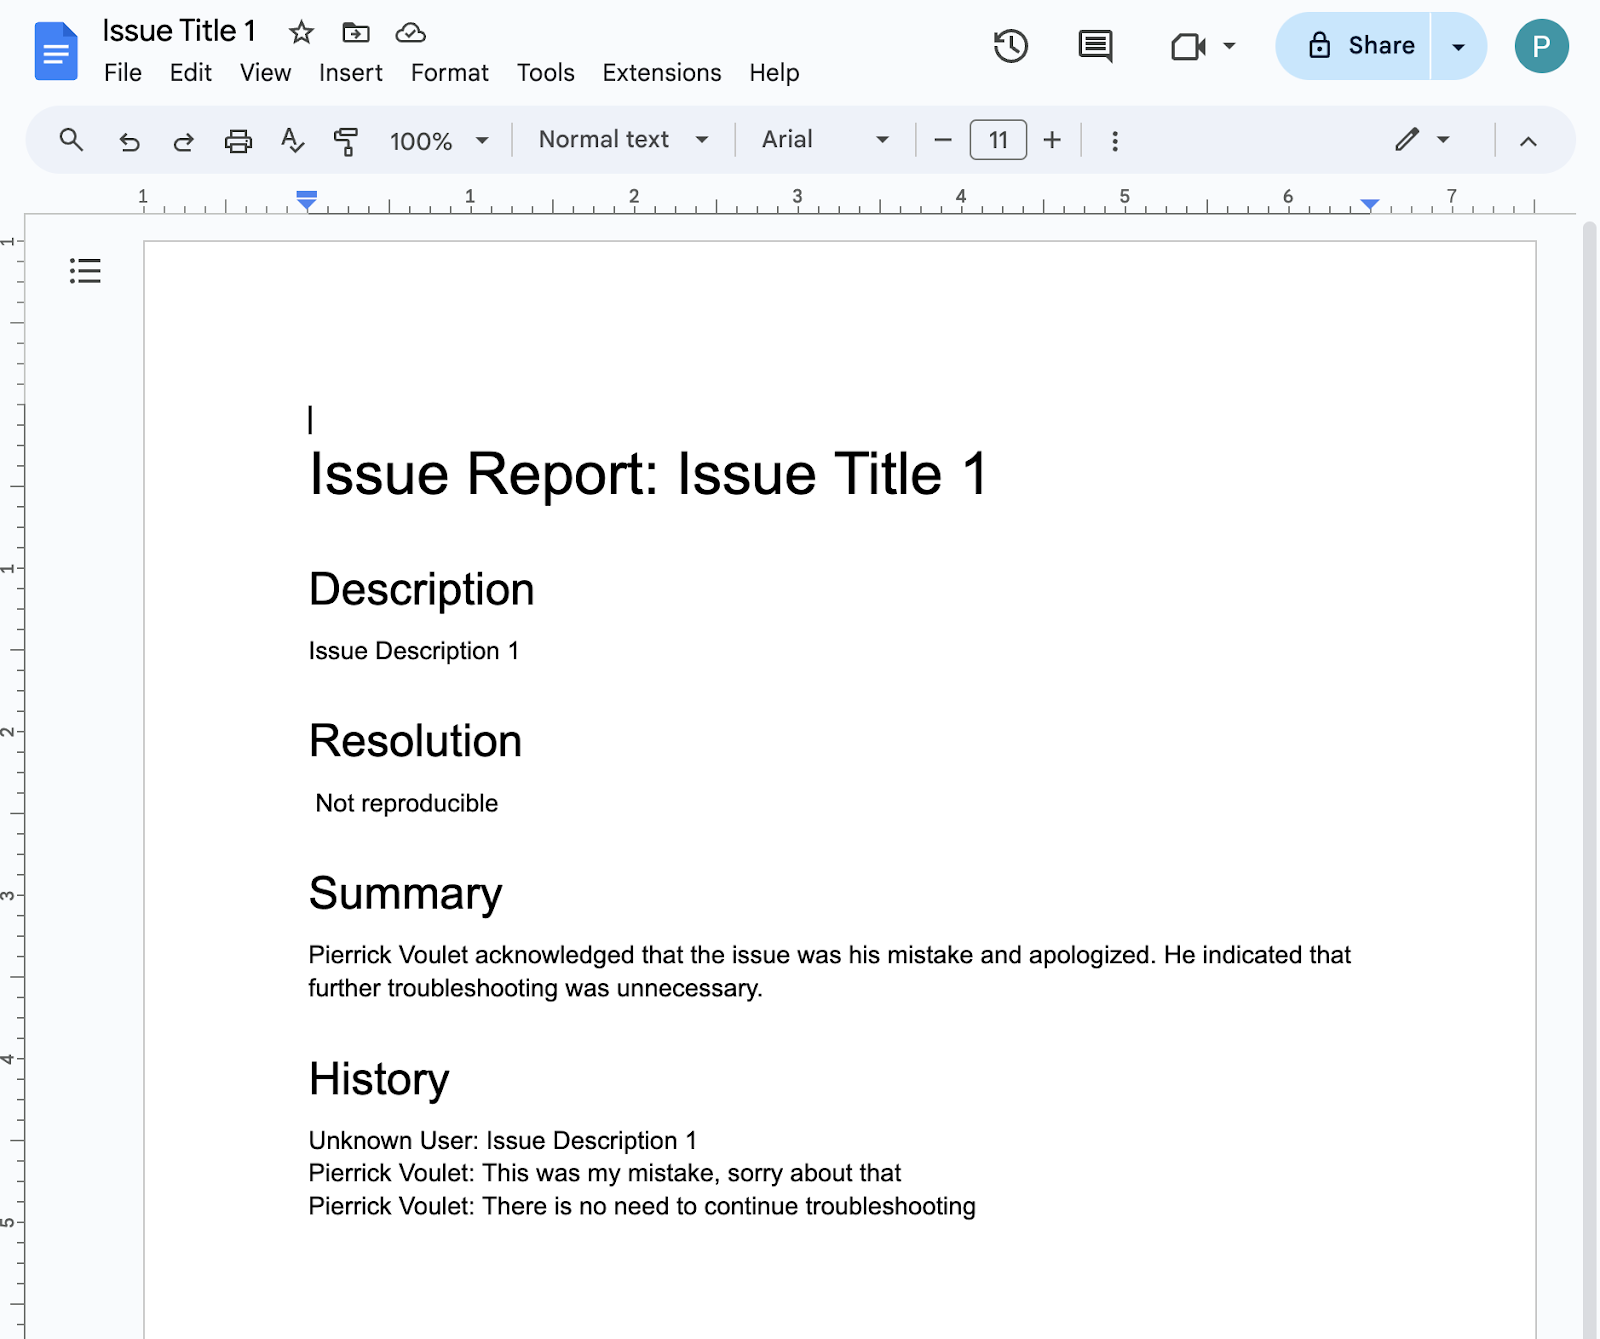
// The report generator function adds two sections: the first one is for the summary and the second one is for history.
function createReport(..., history, summary) {
  ...
  body.appendParagraph("Summary").setHeading(DocumentApp.ParagraphHeading.HEADING1);
  body.appendParagraph(summary);
  body.appendParagraph("History").setHeading(DocumentApp.ParagraphHeading.HEADING1);
  body.appendParagraph(history);
  ...
}
更新 Google Cloud 專案
啟用 API
- 在 Google Cloud 控制台中,啟用 Google 文件、Google Admin SDK 和 Vertex AI API:
- 依序點選「選單 ☰」>「API 和服務」>「已啟用的 API 和服務」,然後確認 API 已啟用。
啟動服務帳戶
在 Google Cloud 控制台中,按照下列步驟操作:
- 依序點選「選單 ☰」>「IAM 與管理」>「服務帳戶」>「+ 建立服務帳戶」。
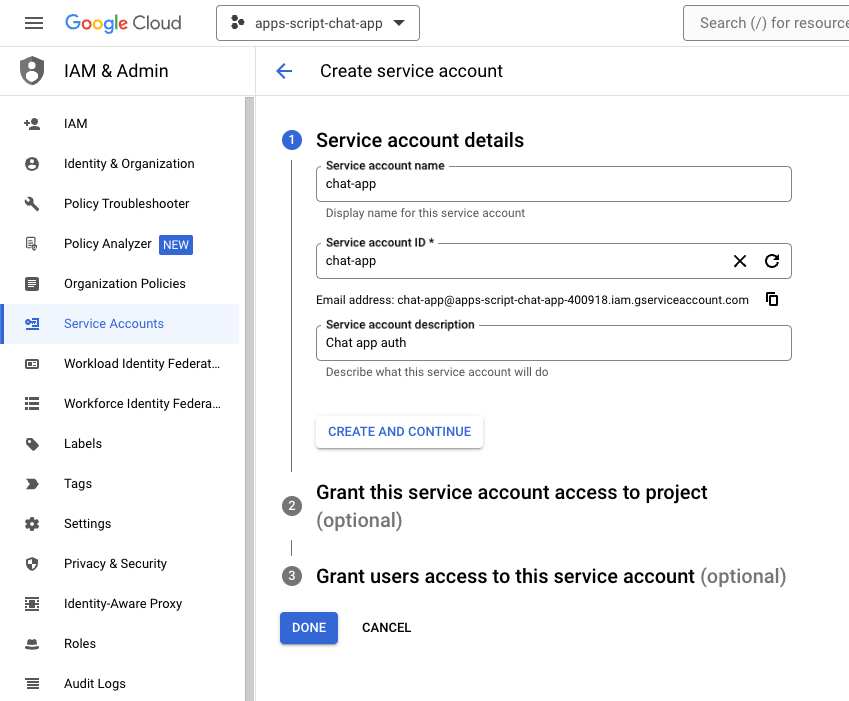
- 將「服務帳戶名稱」設為
chat-app。 - 將「服務帳戶說明」設為
Chat app auth。 - 按一下 [建立並繼續]。
- 按一下「完成」,系統會將您重新導向至「服務帳戶」頁面,您可以在該頁面中看到建立的服務帳戶。
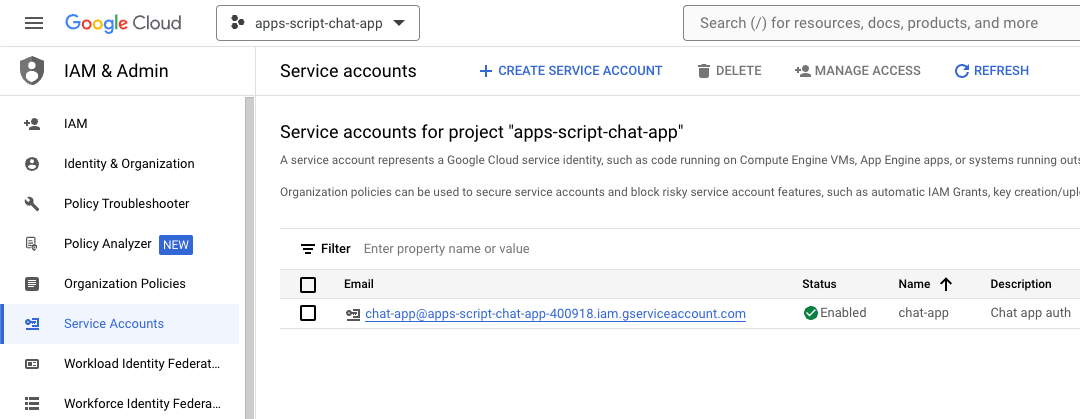
- 選取新建立的服務帳戶。
- 選取「金鑰」分頁標籤。
- 按一下「Add key」。
- 按一下「建立新的金鑰」。
- 選取「JSON」。
- 點選「建立」。
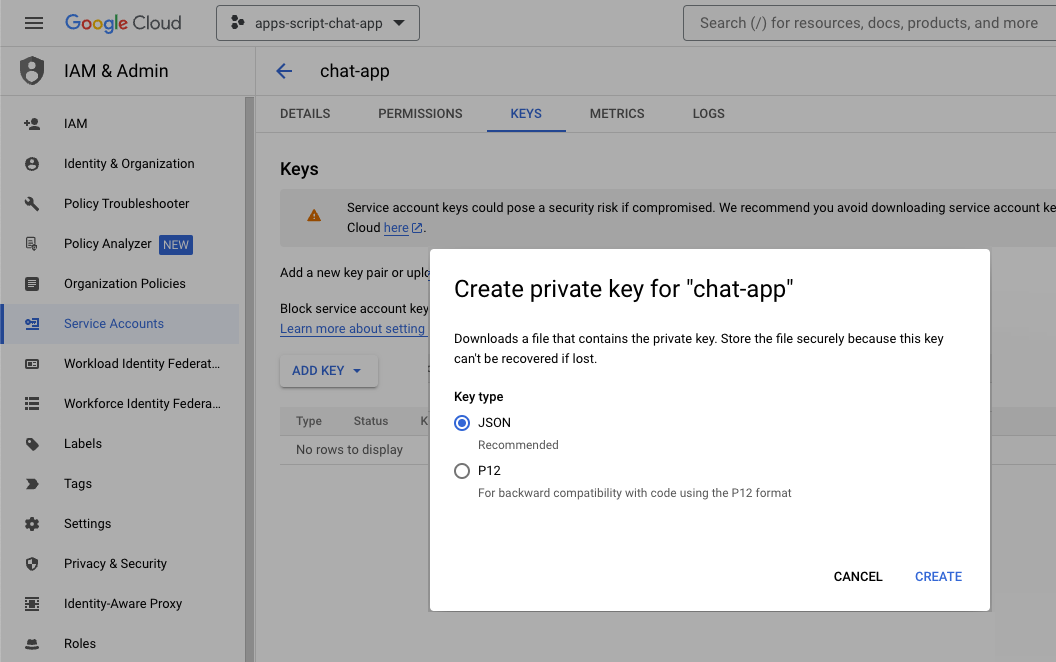
對話方塊會關閉,新建立的公開/私密金鑰組會自動以 JSON 檔案的形式下載至本機環境。稍後編輯 Apps Script 專案的原始碼時,您會用到這些內容。
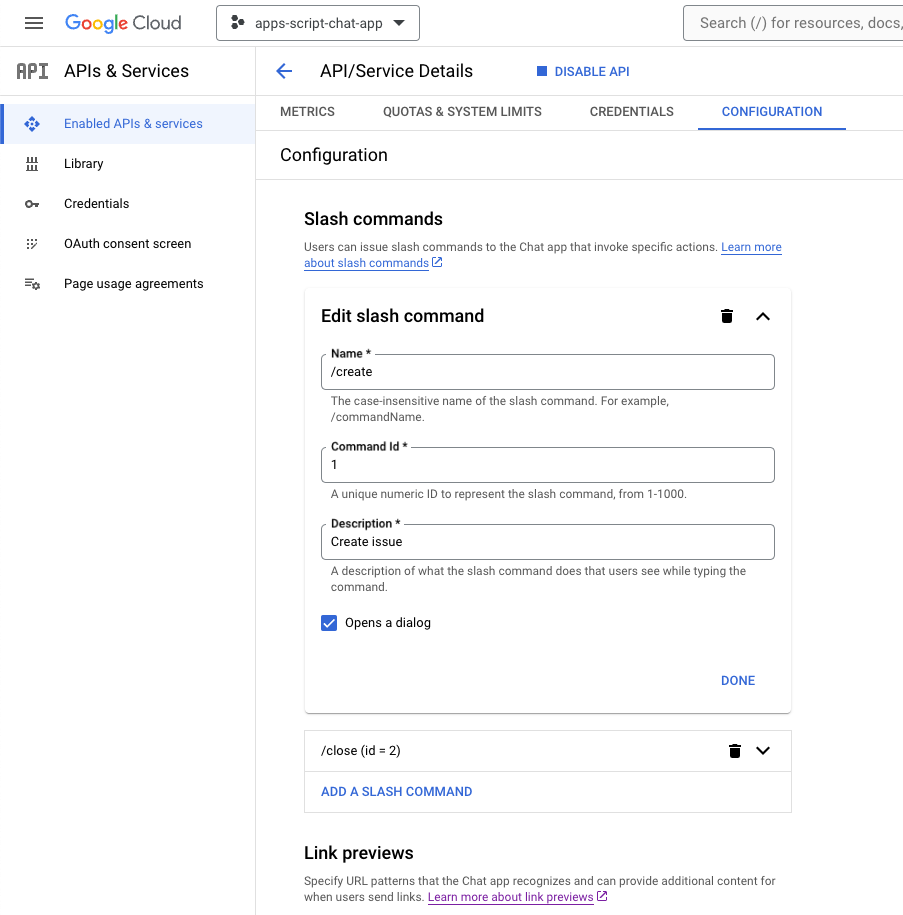
更新 Google Chat API 設定
在 Google Cloud 控制台中,按照下列步驟操作:
- 新增斜線指令。
- 將「Name」(名稱) 設定為
/create。 - 將「指令 ID」設為
1。 - 將「Description」(說明) 設為
Create a new issue。 - 勾選「開啟對話方塊」核取方塊。
- 新增其他斜線指令。
- 將「Name」(名稱) 設定為
/close。 - 將「指令 ID」設為
2。 - 將「Description」(說明) 設為
Close an issue。 - 按一下 [儲存]。
更新 Apps Script 專案
- 將本機終端機中的目前目錄變更為
issue-management/1-baseline。其中包含原始碼。將原始碼推送至 Apps Script 專案前,請先設定幾項內容。
設定原始碼
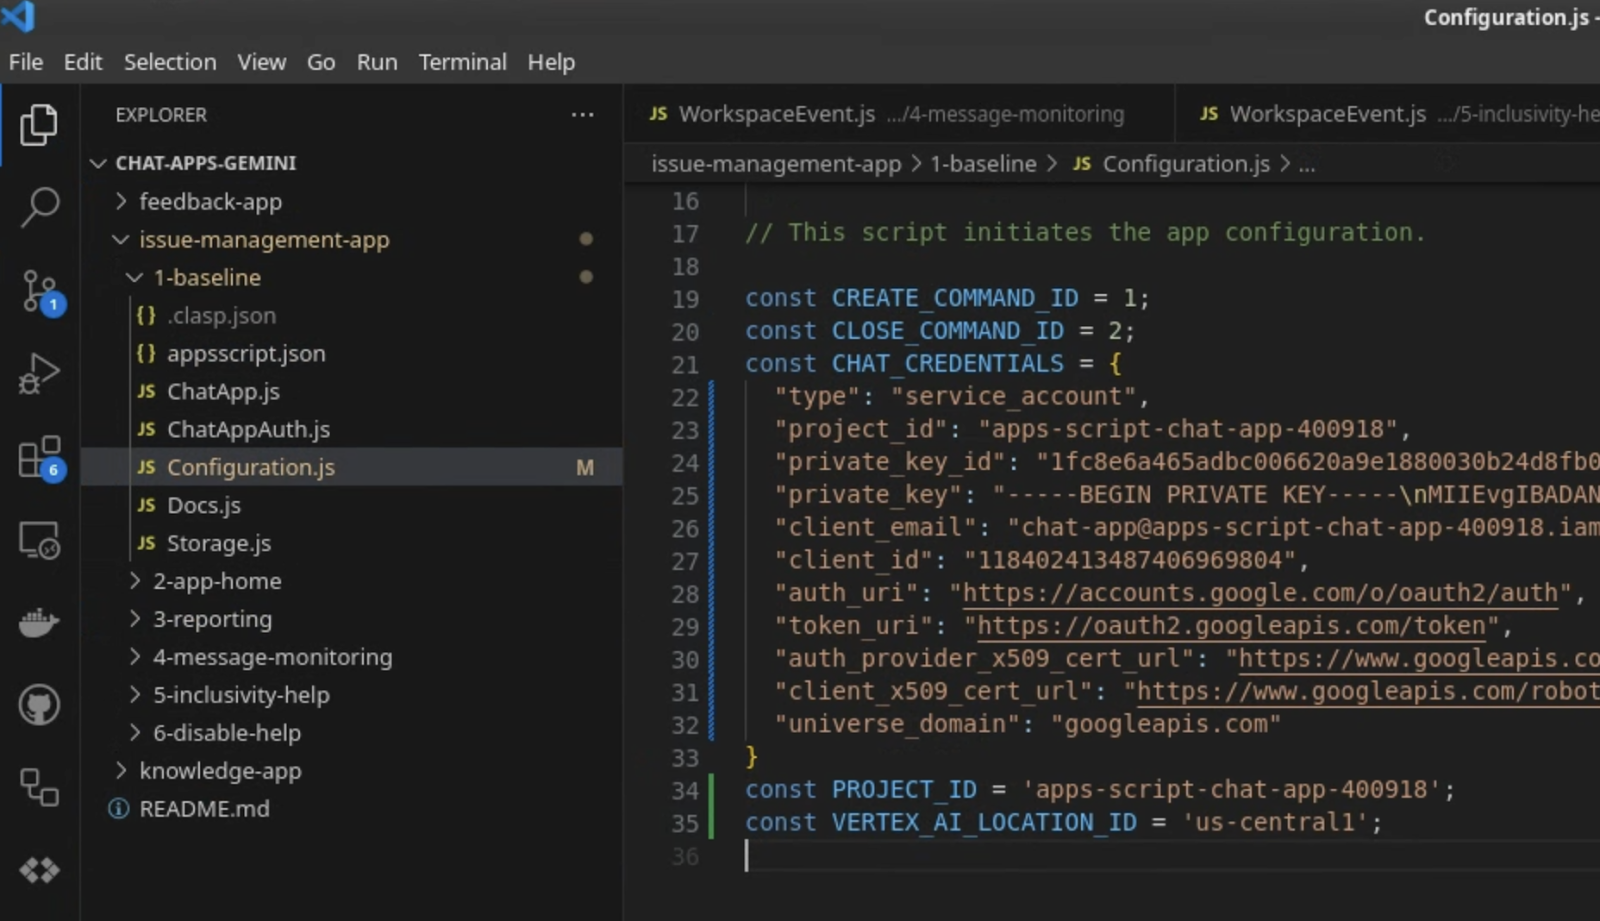
- 將
Configuration.js檔案中名為CHAT_CREDENTIALS的 JSON 常數,設為您先前下載的私密金鑰檔案內容。

- 在 Google Cloud 控制台中,依序點選「選單 ☰」>「IAM 與管理」>「設定」。
- 複製專案 ID。
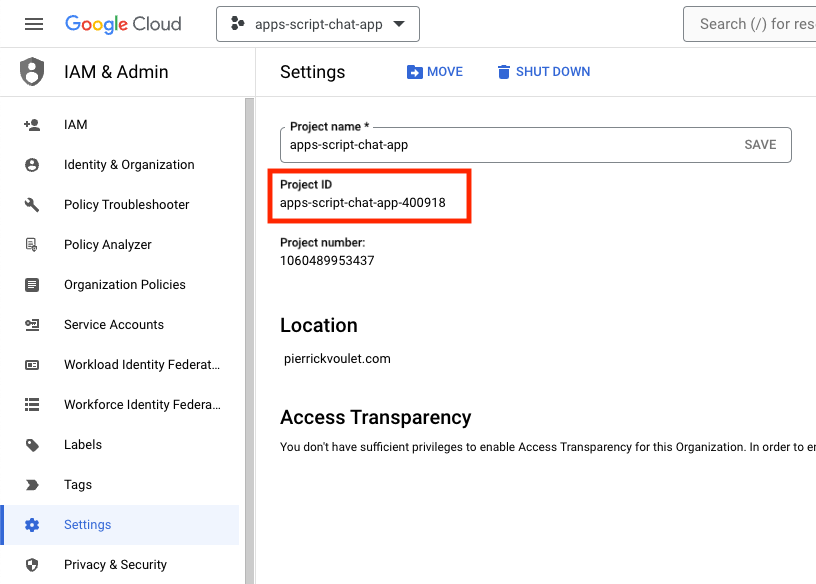
- 將
Configuration.js檔案中名為PROJECT_ID的字串常數設為專案 ID。
設定「clasp」
如要初始化 clasp 設定,將原始碼推送至正確的 Apps Script 專案,請按照下列步驟操作:
- 在 Apps Script 控制台中選取專案。
- 選取「專案設定」。
- 按一下「ID」下方的「複製」。
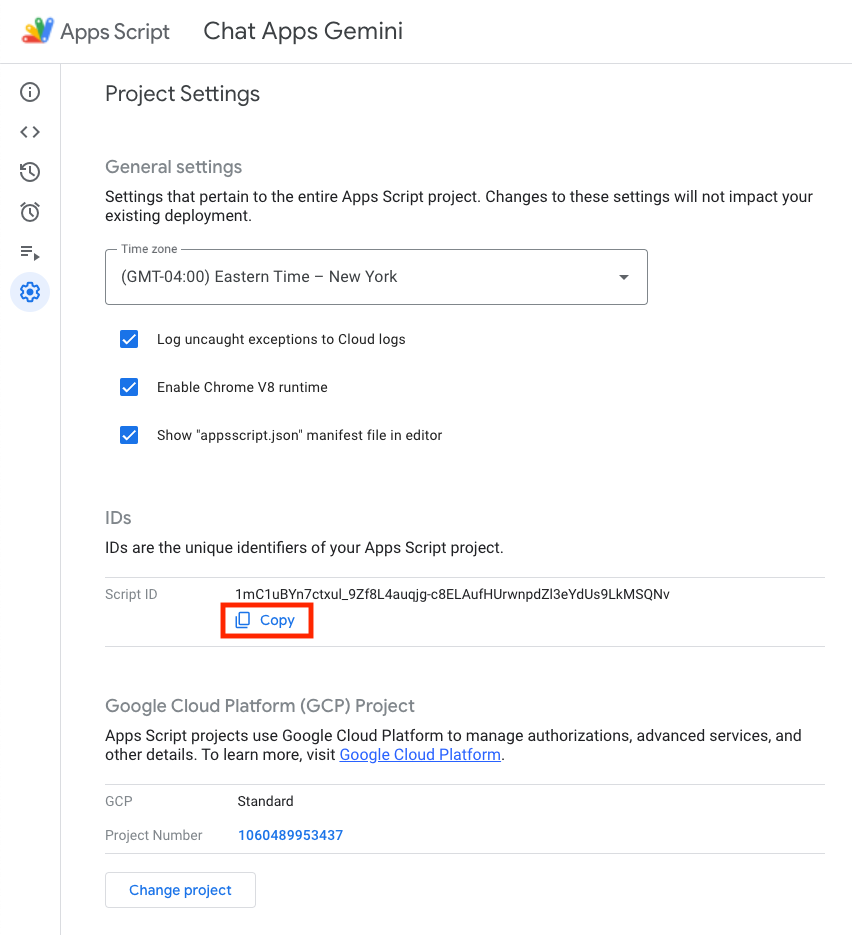
- 在目前目錄中建立
.clasp.json檔案。 - 將
<your-script-id>替換為複製的 ID。 - 將結果複製到
.clasp.json檔案。 - 儲存
.clasp.json檔案。
{
  "scriptId": "<your-script-id>"
}
推送原始碼
- 執行下列指令:
$clasp push
? Manifest file has been updated. Do you want to push and overwrite? Yes
└─ appsscript.json
└─ ChatApp.js
└─ ChatAppAuth.js
└─ Configuration.js
└─ Docs.js
└─ Storage.js
└─ VertexAi.js
Pushed 7 files.
試試看
- 在 Google Chat 中,直接傳送
Hello!給應用程式。應用程式不會回覆,但會顯示提示訊息,要求您進行設定。
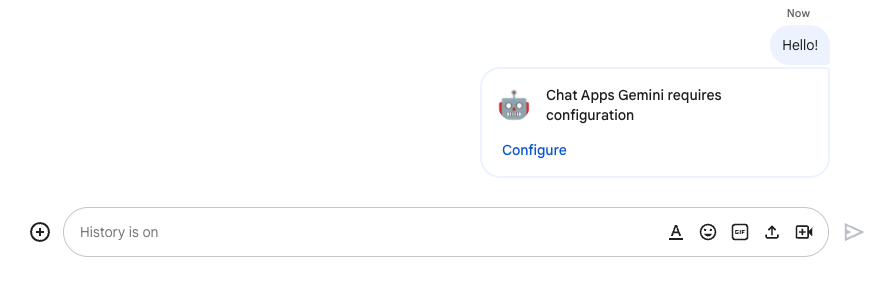
- 按一下「設定」。
- 選取 Google 帳戶。
- 驗證。
- 查看並允許應用程式存取。
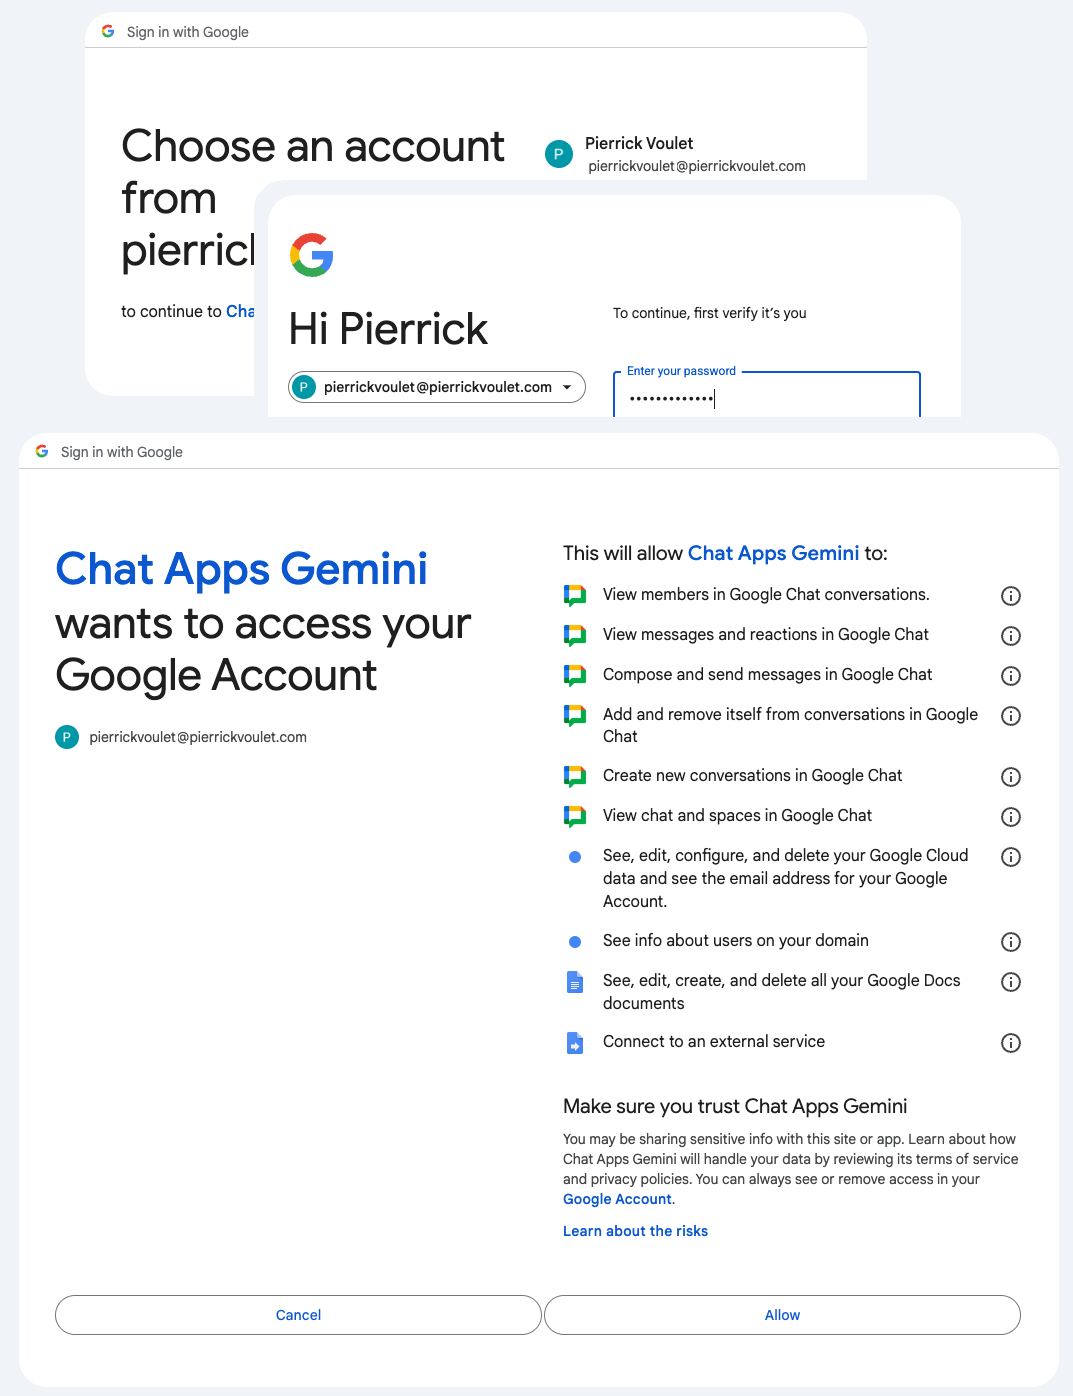
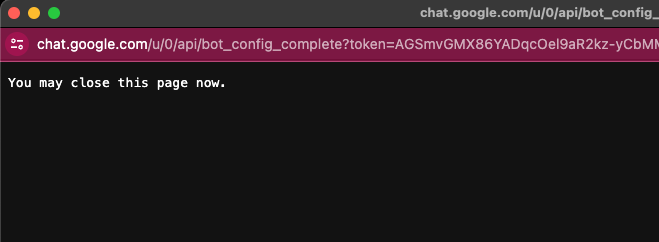
如果成功,網頁上會顯示基本確認畫面,以及應用程式對原始訊息的實際回覆。
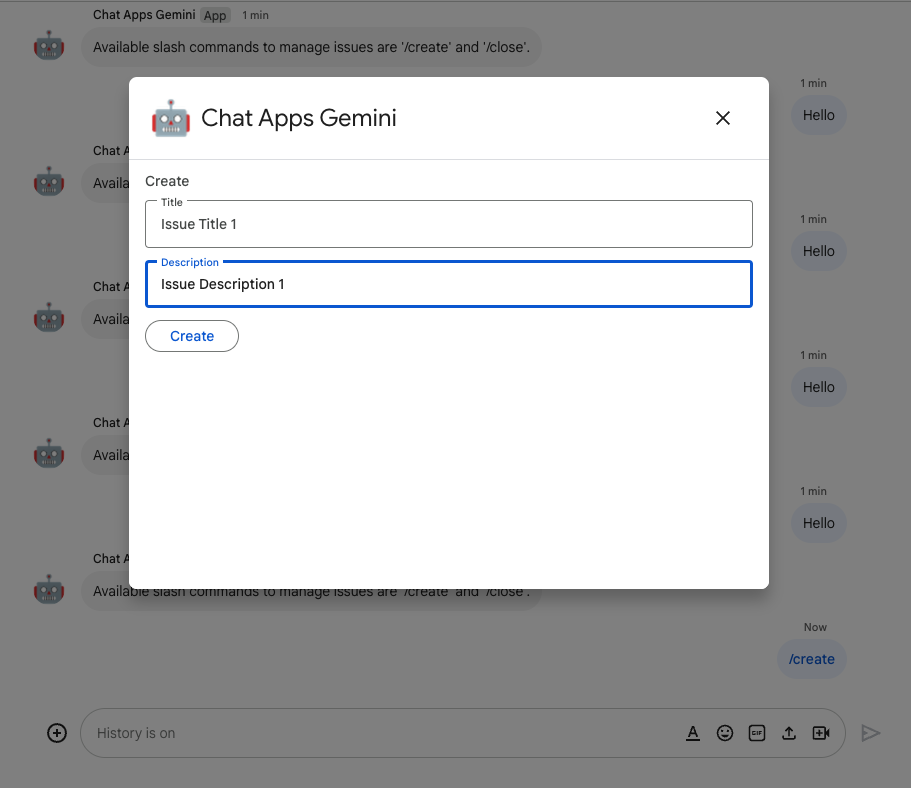
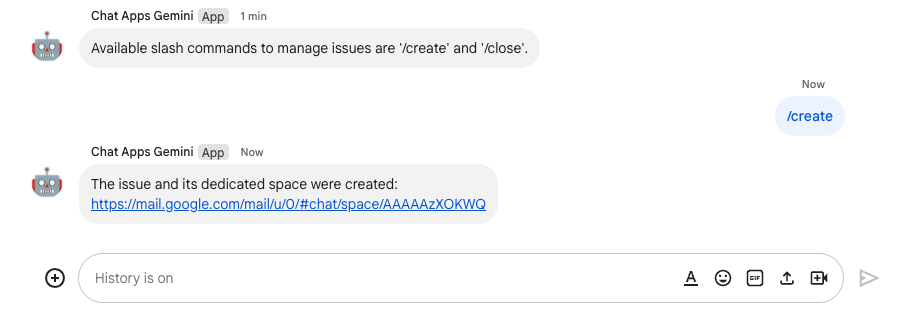
- 再次傳送即時訊息給應用程式,但這次要使用斜線指令
/create。

- 在對話方塊中,將「Title」(名稱) 設為
Issue Title 1。 - 將「說明」設為「Issue
Description 1」。 - 點選「建立」。
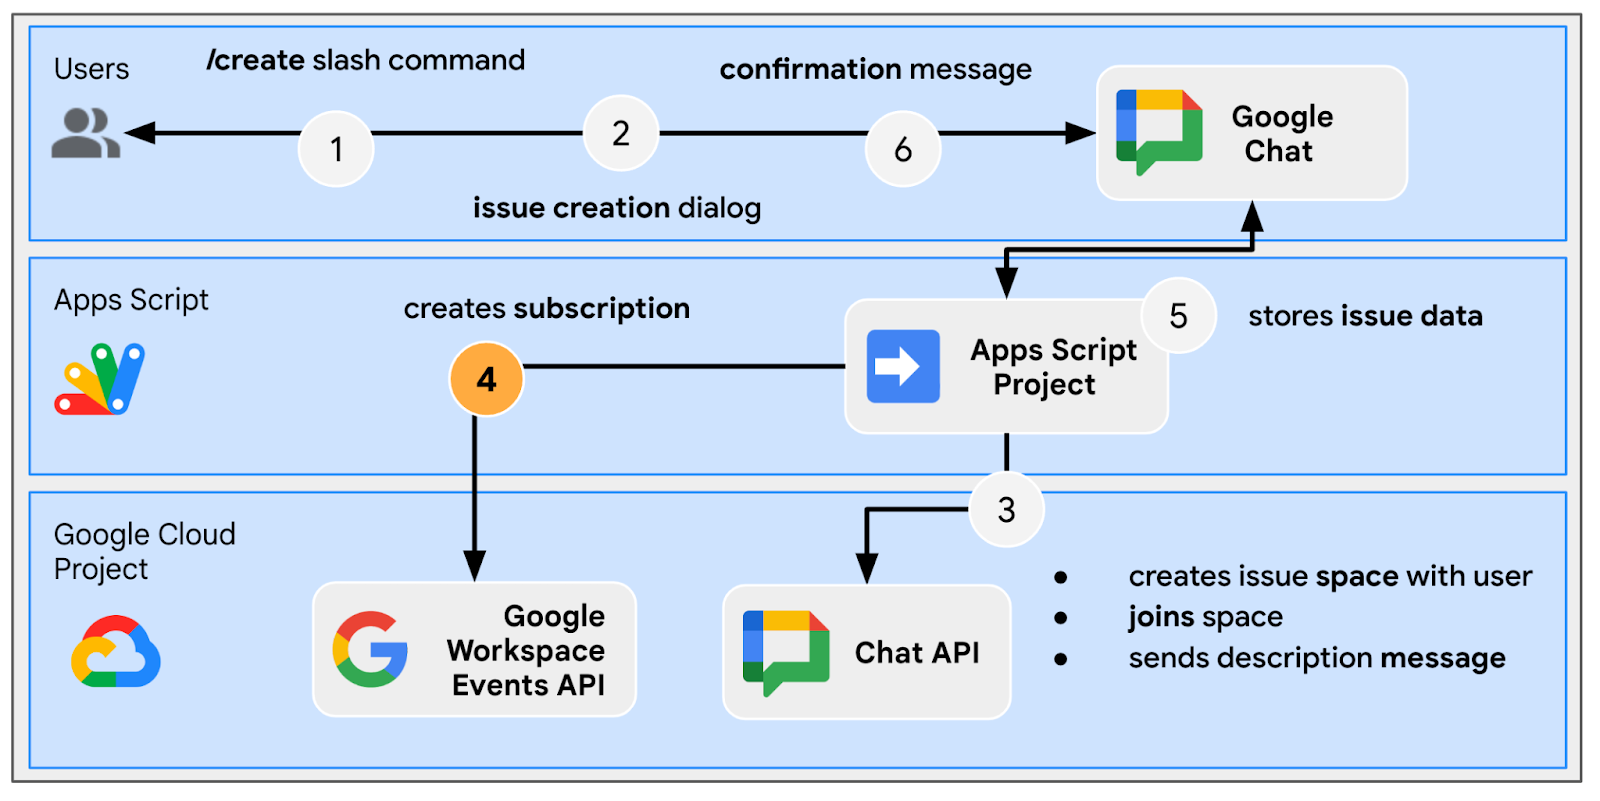
這個應用程式會執行下列作業:
- 關閉對話方塊。
- 系統會建立空間,專門處理新建立的問題,並使用相同標題。
- 加入新建立的聊天室。
- 在新建的聊天室中傳送訊息,說明問題。
- 並傳送即時訊息給你,內含新建立的聊天室連結。
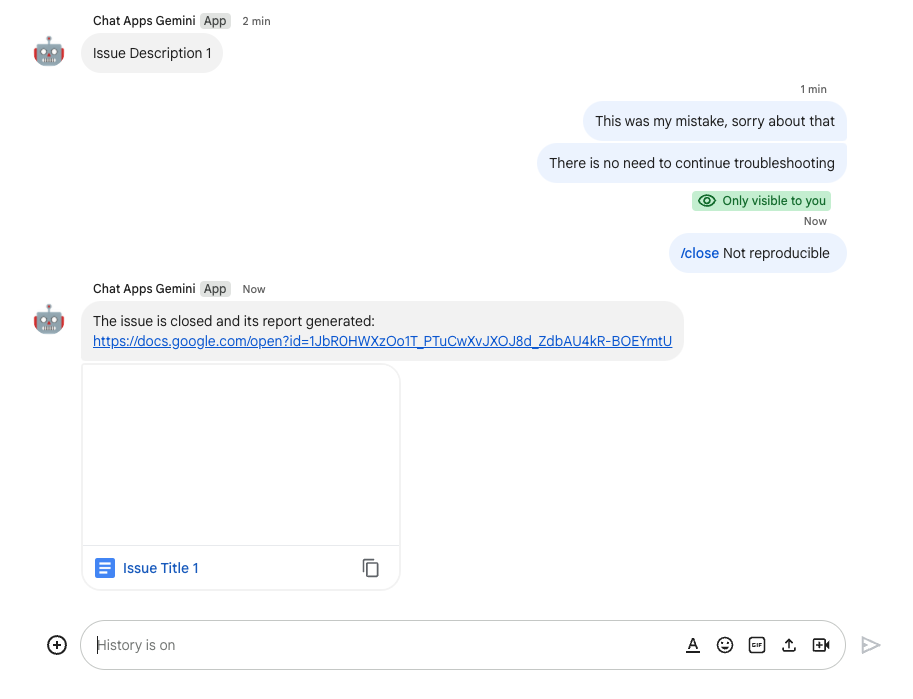
- 在新建的聊天室中,傳送含有斜線指令
/close和解析度的訊息,例如Not reproducible。
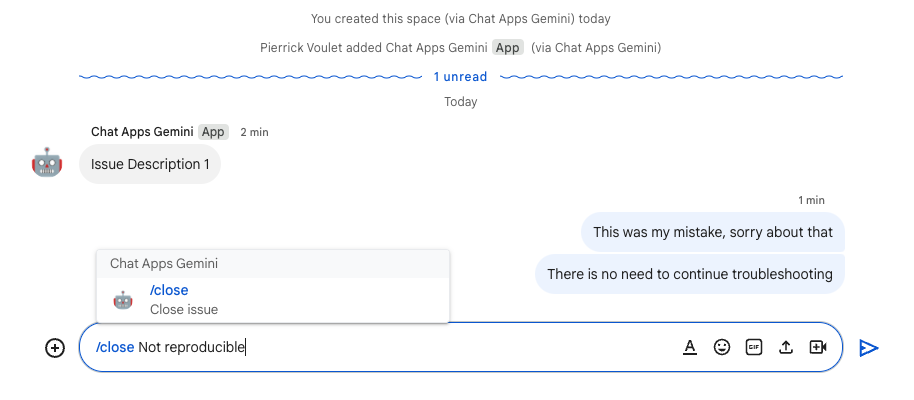
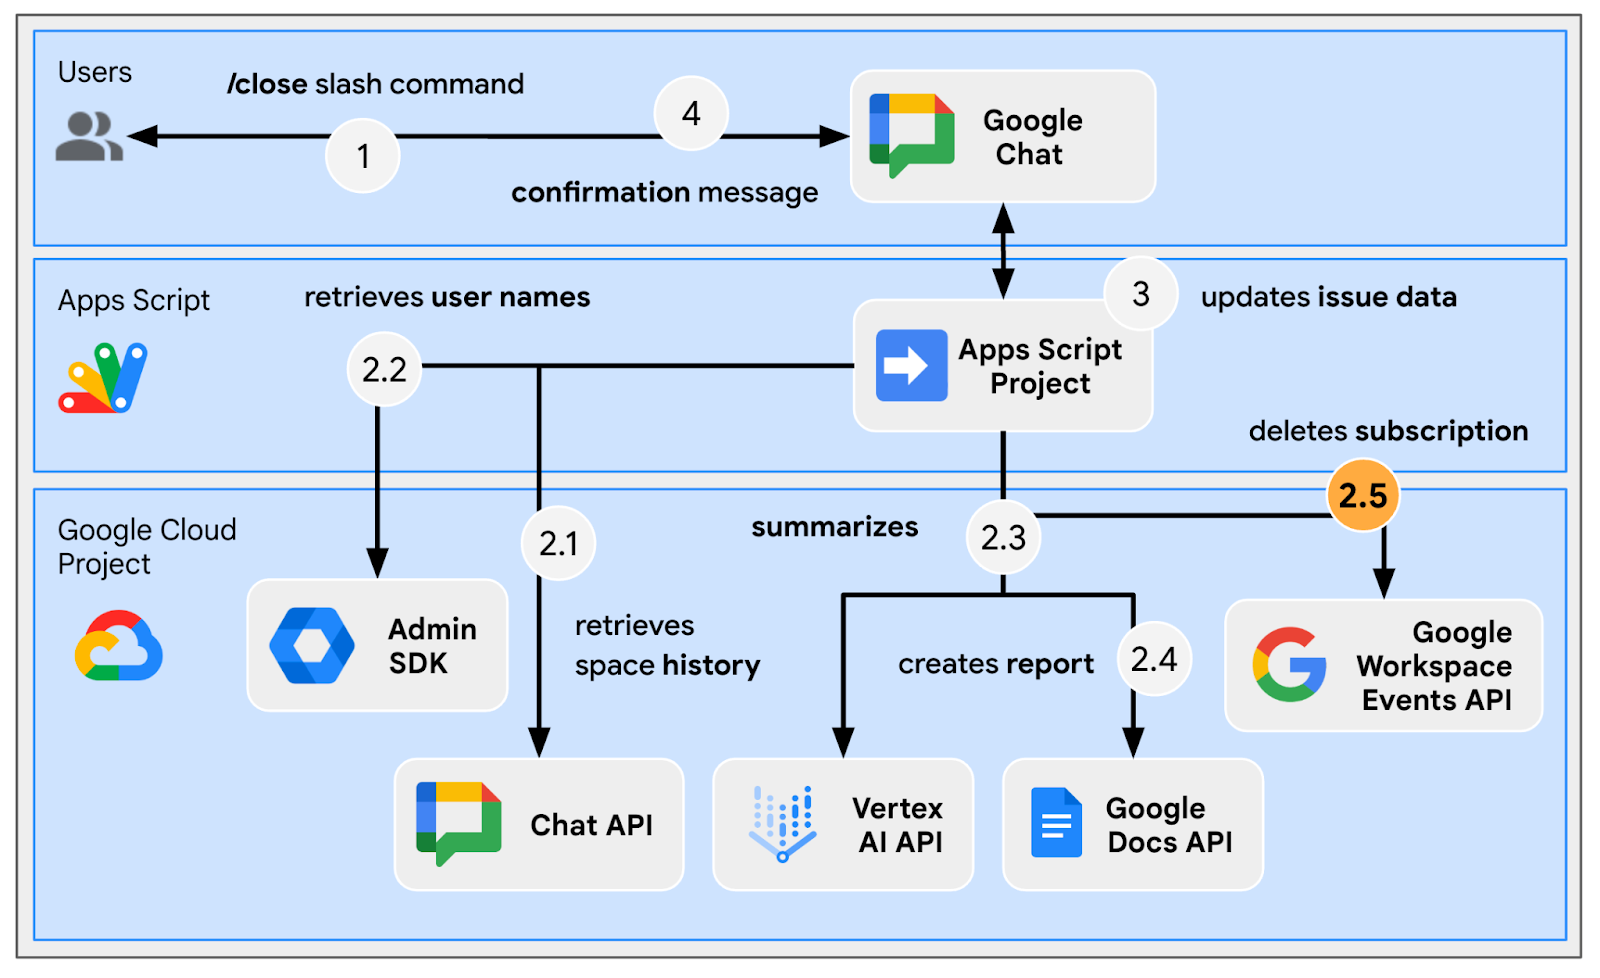
這個應用程式會執行下列作業:
- 在 Google 文件中建立報告文件。
- 將訊息傳送至問題專屬的聊天室,並附上新建立的報表文件連結。
- 開啟報表文件。當中包含基本資訊、歷史記錄和摘要。
4. 選用:應用程式 1:新增應用程式主畫面
查看概念
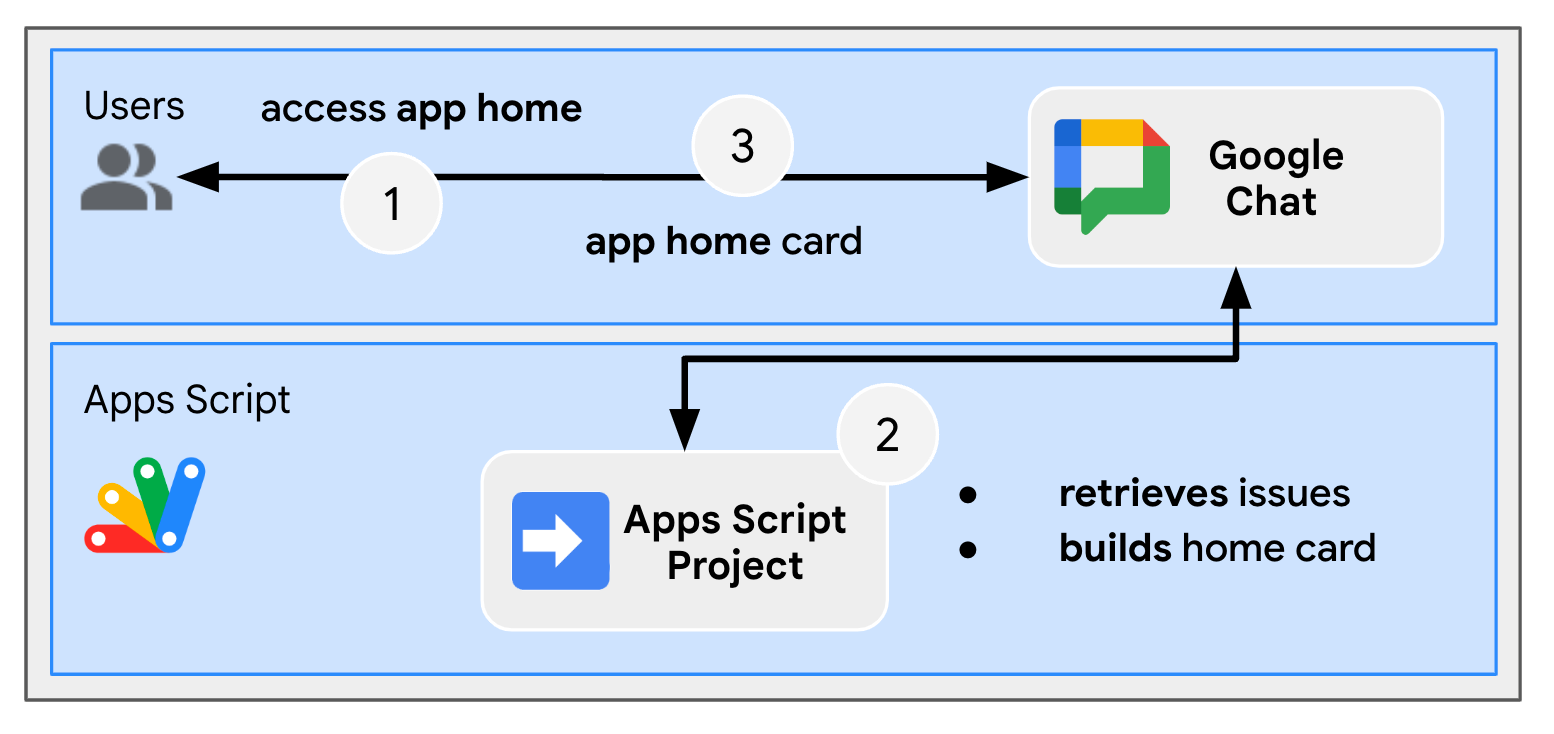
應用程式主畫面是可自訂的資訊卡訊息,使用者透過與 Chat 應用程式的即時訊息存取「首頁」分頁時,Chat 應用程式會傳送這則訊息。這通常用於顯示應用程式說明文件或總覽。從技術上來說,系統會使用專屬事件來處理,且這類事件與資訊卡訊息的原則相同。
審查流程
管理問題
檢查原始碼
需要編輯 Apps Script 專案。
ChatApp.js
/**
 * Handles app home requests in Google Chat.
 *
 * Displays the latest status of all issues.
 */
function onAppHome() {
  // Generates one card section per issue.
  var sections = [];
  for (var issueKey in appProperties.getProperties()) {
    const issue = JSON.parse(appProperties.getProperty(issueKey));
    if (issue.spaceId) {
      sections.push({
        header: `${issue.status} - ${issue.title}`,
        widgets: [{ textParagraph: {
            text: `Description: ${issue.description}`
          }}, { textParagraph: {
            text: `Resolution: ${issue.resolution}`
          }}, { buttonList: { buttons: [{
              text: "Open space",
              onClick: { openLink: {
                url: `https://mail.google.com/mail/u/0/#chat/space/${issue.spaceId}`
              }}
            }, {
              text: "Open report",
              onClick: { openLink: {
                url: issue.reportUrl !== "" ? issue.reportUrl : "docs.new"
              }},
              disabled: issue.reportUrl === ""
          }]}
        }]
      });
    }
  }

  return { action: { navigations: [{ push_card: {
    sections: sections
  }}]}};
}
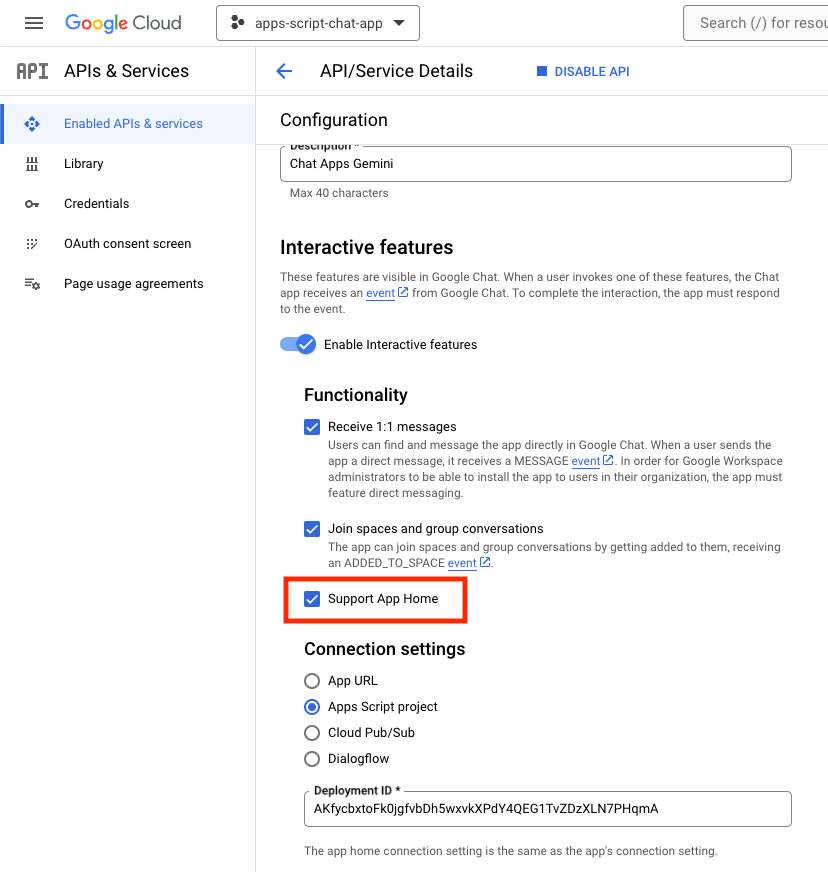
更新 Google Cloud 專案
在 Google Cloud 控制台中,按照下列步驟操作:
在您的本機環境中,請按照下列步驟操作:
- 在終端機中,將目前目錄變更為
issue-management/2-app-home。其中包含您需要使用的原始碼。 - 將
issue-management/1-baseline/.clasp.json檔案複製到目前的目錄。 - 將
issue-management/1-baseline/Configuration.js檔案複製到目前的目錄,取代現有檔案。 - 執行下列指令:
clasp push
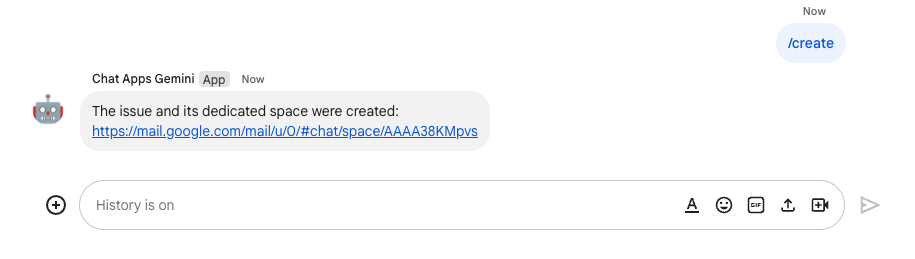
試試看
在 Google Chat 中,請按照下列步驟操作:
- 使用斜線指令
/create傳送即時訊息給應用程式。應用程式會開啟對話方塊。 - 將「Title」(標題) 設為
Issue Title 2。 - 將「說明」設為「Issue
Description 2」。 - 點選「建立」。
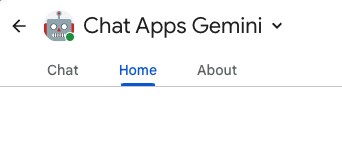
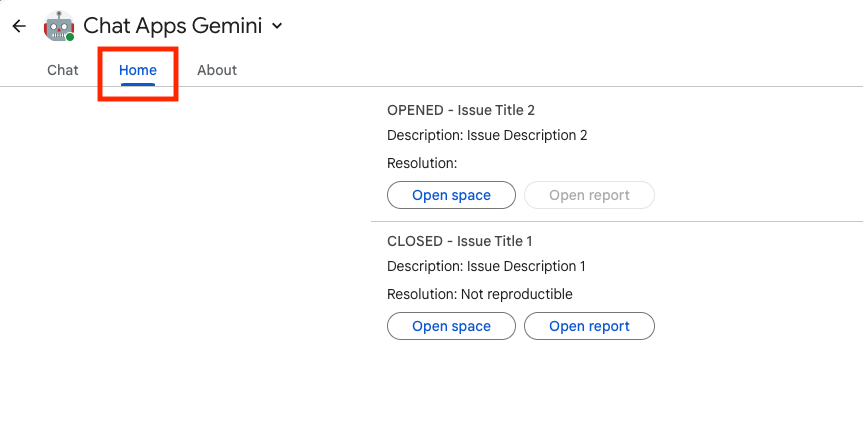
- 使用 Google Chat 應用程式,在聊天室中選取「首頁」分頁,即可查看你建立的問題詳細資料。
5. 選用:應用程式 1:新增空間監控
複習概念
Pub/Sub
Pub/Sub 是可擴充的非同步訊息服務,會分離產生訊息的服務與處理訊息的服務。Pub/Sub 可讓您建立事件製作者和消費者 (稱為「發布者」和「訂閱者」) 的系統。發布商會透過廣播事件,與訂閱者進行非同步通訊,而不是透過同步遠端程序呼叫 (RPC)。
發布者會將事件傳送至 Pub/Sub 服務,不必理會處理這些事件的方式或時間。接著,Pub/Sub 會將事件傳送至所有會對事件做出反應的服務。在透過 RPC 通訊的系統中,發布商必須等待訂閱者接收資料。不過,Pub/Sub 中的非同步整合可提高整體系統的彈性和穩健性。
主題:代表訊息來源的具名資源。您必須先建立主題,然後才能發布或訂閱該主題。
訂閱項目:如要接收發布至某項主題的訊息,您必須為該主題建立訂閱項目。訂閱端用戶端會接收並處理發布至主題的訊息。一個主題可以有多個訂閱項目,但特定訂閱項目只能屬於單一主題。
Google Workspace 活動
Google Workspace 事件是指對 Google Workspace 資源進行的變更,例如建立、更新或刪除。應用程式可以訂閱 Google Workspace 資源,非同步接收及處理相關事件。
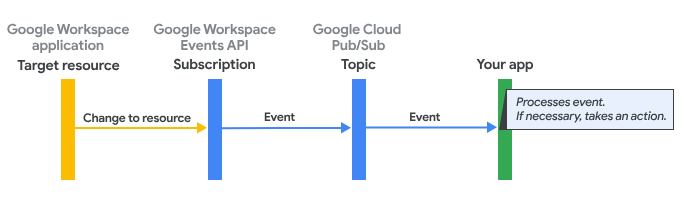
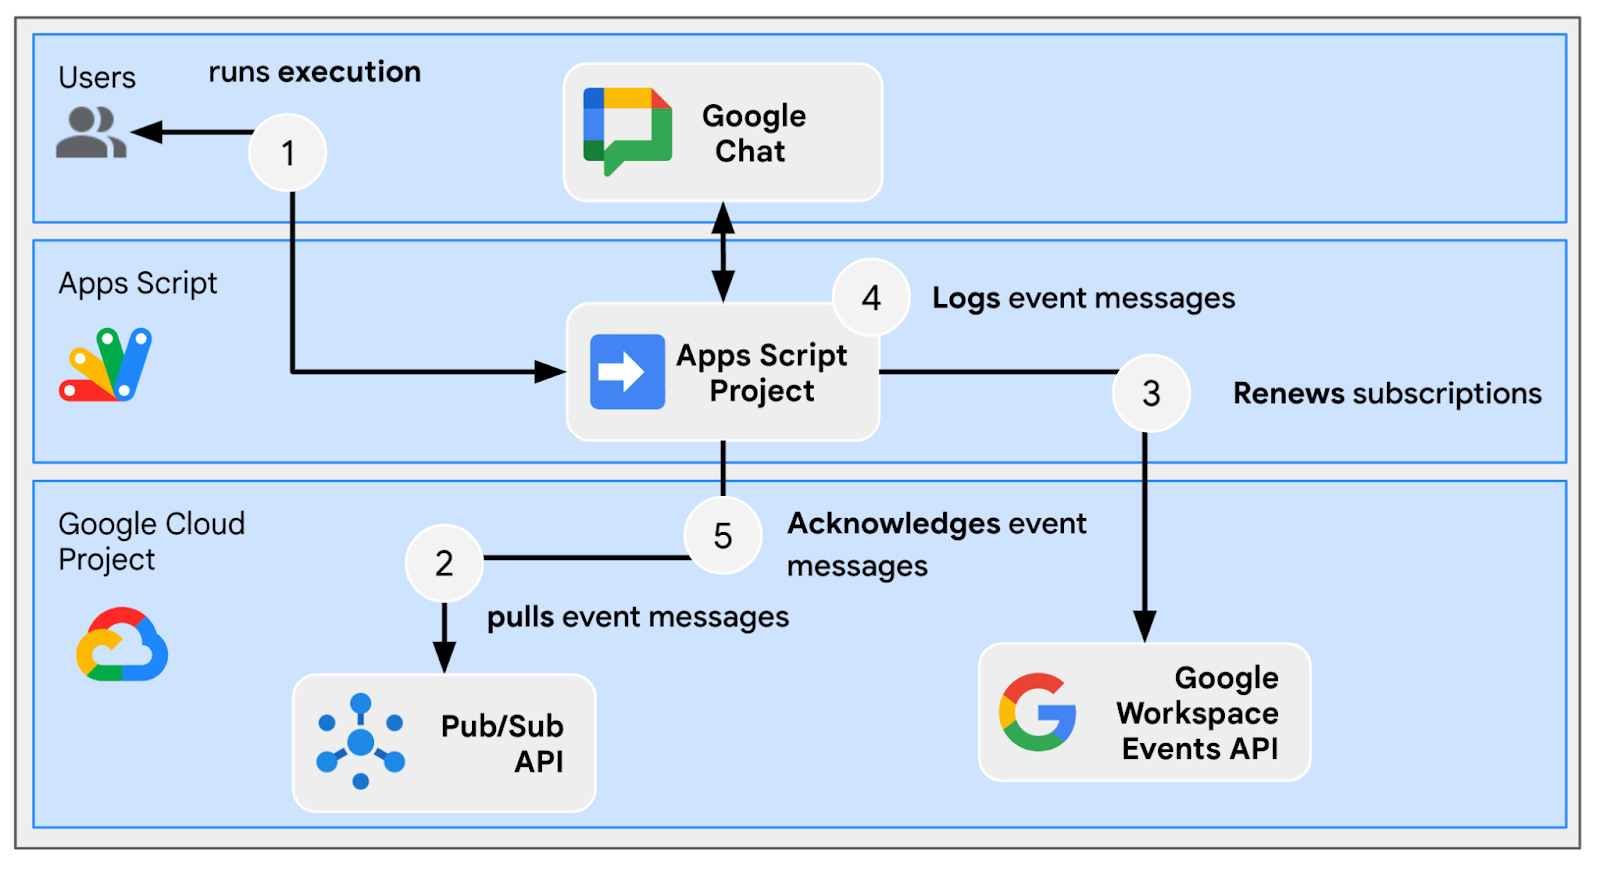
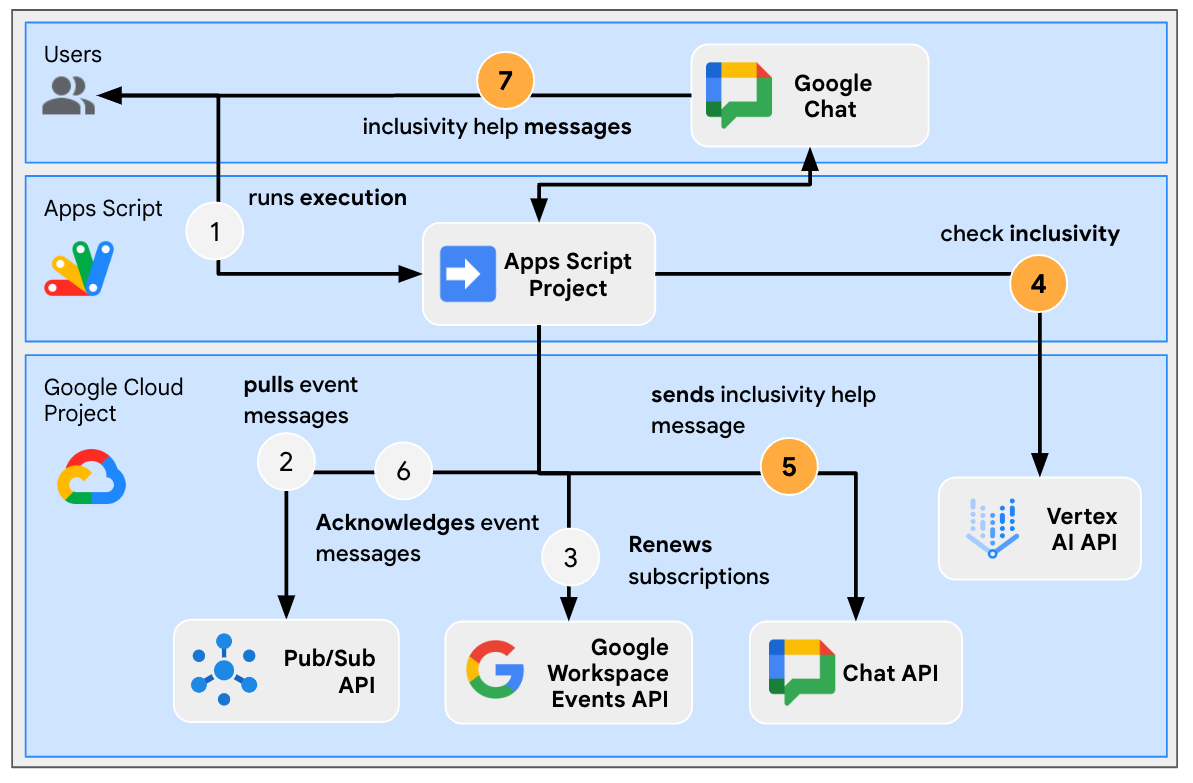
Google Workspace Events API 會透過訂閱功能將事件傳送至應用程式,流程如下:
- 應用程式會訂閱 Google Workspace 應用程式中的資源,例如空間。
- 應用程式訂閱變更的資源。
- Google Workspace 應用程式會將事件傳送至 Pub/Sub 中的主題,做為應用程式 Google Workspace 訂閱項目的通知端點。事件包含資源變更的相關資料。
- 應用程式會處理含有事件的 Pub/Sub 訊息,並視需要採取行動。
審查流程
建立問題 (更新)
從專屬空間排解問題 (更新)
從專屬空間關閉問題 (更新)
處理訂閱項目
檢查原始碼
需要編輯 Apps Script 專案。
appsscript.json
// Enables the Workspace Events service.

"enabledAdvancedServices": [
  ...
  {
    "userSymbol": "WorkspaceEvents",
    "version": "v1",
    "serviceId": "workspaceevents"
  }
  ...
]
Configuration.js
// Adds two constants: the first one is the Pub/Sub topic ID and the second one
// is the Pub/Sub subscription ID to be used to retrieve Google Workspace events.

...
const GWS_PUBSUB_TOPIC_ID = `projects/${PROJECT_ID}/topics/workspace-events`;
const GWS_PUBSUB_SUBSCRIPTION_ID =
  `projects/${PROJECT_ID}/subscriptions/workspace-events-sub`;
...
ChatApp.js
// Edits the function to delete the subscription at issue closure.

function processSlashCommand(event) {
  ...
  if (event.message.slashCommand.commandId == CLOSE_COMMAND_ID
    && event.message.space.type !== "DM") {
    ...
    deleteSubscription(issue.subscriptionId);
    ...
  }
  ...
}
// Edits the function to create the subscription.

function createIssue(event) {
  ...
  const subscriptionId = createSpaceSubscription(spaceUrl);
  const createdIssue = saveCreatedIssue(..., subscriptionId);
  ...
}
// Edits the function to delete the subscription.

function onRemoveFromSpace(event) {
  ...
  deleteSubscription(issue.subscriptionId);
  ...
}
Storage.js
// Edits the function to keep track of the subscription ID.

function saveCreatedIssue(..., spaceId, subscriptionId) {
  ...
  appProperties.setProperty(spaceId, JSON.stringify({
    ...
    subscriptionId: subscriptionId,
    ...
  }));
  ...
}
WorkspaceEvent.js
/**
 * Creates a new subscription to Google Workspace Events associated to a
 * Google Chat space.
 *
 * The subscription scope includes message creation events and resources.
 *
 * @param {string} spaceId the space ID to create a subscription for
 * @return the ID of the newly created subscription
 */
function createSpaceSubscription(spaceId) {
  const operation = WorkspaceEvents.Subscriptions.create({
    targetResource: `//chat.googleapis.com/${spaceId}`,
    eventTypes: ["google.workspace.chat.message.v1.created"],
    notificationEndpoint: { pubsubTopic: GWS_PUBSUB_TOPIC_ID },
    payloadOptions: { includeResource: true },
  });

  return operation.response.name;
}
/**
 * Processes events from subscription by using the Google Cloud PubSub API.
 *
 * It pulls and acknowledges each event.
 */
function processSubscription() {
  const response = UrlFetchApp.fetch(
    `https://pubsub.googleapis.com/v1/${GWS_PUBSUB_SUBSCRIPTION_ID}:pull`,
    {
      method: "POST",
      contentType: "application/json",
      headers: { "Authorization": "Bearer " + ScriptApp.getOAuthToken() },
      payload: JSON.stringify({ maxMessages: 10 })
    }
  );

  const messages = JSON.parse(response.getContentText()).receivedMessages;
  for (var messageIndex in messages) {
    const message = messages[messageIndex];
    const ceType = message.message.attributes["ce-type"];
    const dataStr = Utilities.newBlob(Utilities.base64Decode(message.message.data))
      .getDataAsString();
    if (ceType === "google.workspace.events.subscription.v1.expirationReminder") {
      // Renews subscription.
      renewSubscription(JSON.parse(dataStr).subscription.name);
    } else if (ceType === "google.workspace.chat.message.v1.created") {
      // Processes the message text when it's sent in a space.
      const chatMessage = JSON.parse(dataStr).message;
      if (chatMessage.sender.type !== "BOT") {
        console.log("Message was processed.");
      }
    }
    // Acknowledges successful processing to avoid getting it again next time.
    ackSubscription(message.ackId);
  }
}
/**
 * Acknowledges a subscription event by using the Google Cloud PubSub API.
 *
 * @param {string} ackId the ID of the event acknowledgment to send
 */
function ackSubscription(ackId) {
  UrlFetchApp.fetch(
    `https://pubsub.googleapis.com/v1/${GWS_PUBSUB_SUBSCRIPTION_ID}:acknowledge`,
    {
      method: "POST",
      contentType: "application/json",
      headers: { "Authorization": "Bearer " + ScriptApp.getOAuthToken() },
      payload: JSON.stringify({
        ackIds: [ackId]
      })
    }
  );
}
/**
 * Renews a subscription to Google Workspace Events.
 *
 * The default time to live option is used.
 *
 * @param {string} subscriptionId the ID of the subscription to renew
 */
function renewSubscription(subscriptionId) {
  WorkspaceEvents.Subscriptions.patch({ttl: '0s'}, subscriptionId);
}
/**
 * Deletes a subscription to Google Workspace Events.
 *
 * @param {string} subscriptionId the ID of the subscription to delete
 */
function deleteSubscription(subscriptionId) {
  WorkspaceEvents.Subscriptions.remove(subscriptionId);
}
更新 Google Cloud 專案
啟用 API
- 在 Google Cloud 控制台中,啟用 Google Workspace Events 和 PubSub。
- 依序點選「選單 ☰」>「API 和服務」>「已啟用的 API 和服務」,然後確認兩者都已啟用。
開始訂閱
您必須建立並訂閱 Pub/Sub 主題,才能發布所有工作區事件。
在 Google Cloud 控制台中,按照下列步驟操作:
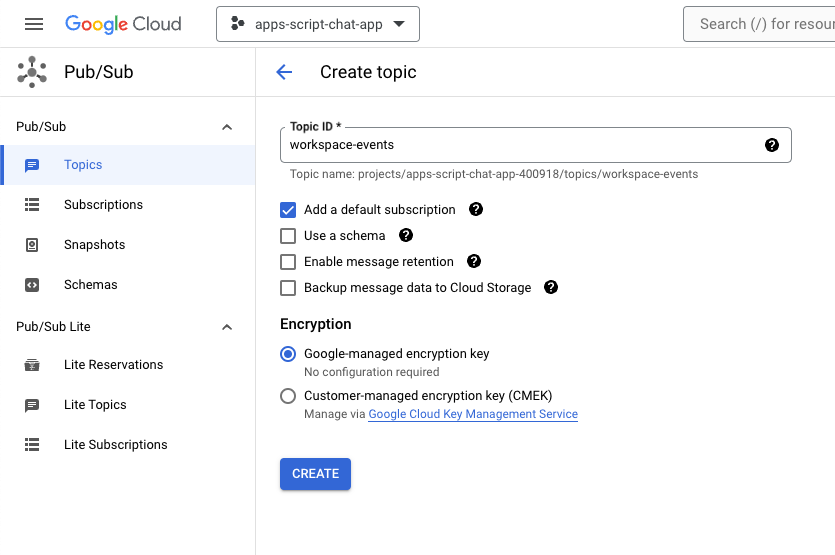
- 依序點選「選單」圖示 ☰ >「Pub/Sub」>「主題」。
- 按一下「建立主題」。
- 將「主題 ID」設為
workspace-events。 - 勾選「新增預設訂閱項目」核取方塊。
- 點選「建立」。
如要授予 Google Chat 權限,將 Pub/Sub 訊息發布至新建立的主題,請按照下列步驟操作:
- 從清單中選取主題。
- 選取 [權限] 分頁標籤。
- 在「New principals」(新增主體) 中新增
chat-api-push@system.gserviceaccount.com。 - 在「角色」中選取「Pub/Sub 發布者」。
- 按一下 [儲存]。

更新 Apps Script 專案
在 Google Cloud 控制台中,按照下列步驟操作:
- 依序點選「選單」圖示 ☰ >「IAM 與管理」>「設定」。
- 複製專案 ID。
在您的本機環境中,請按照下列步驟操作:
- 在終端機中,將目前目錄變更為
issue-management/3-message-monitoring。其中包含您需要的原始碼。 - 將
Configuration.js檔案中名為PROJECT_ID的字串常數設為複製的專案 ID。 - 在
Configuration.js檔案中,將名為CHAT_CREDENTIALS的 JSON 常數設為您先前下載的私密金鑰檔案內容。 - 將
issue-management/2-app-home/.clasp.json檔案複製到目前的目錄。 - 執行下列指令:
clasp push
試試看
在 Google Chat 中,請按照下列步驟操作:
- 使用斜線指令
/create傳送即時訊息給應用程式。應用程式會開啟對話方塊。 - 將「Title」(標題) 設為
Issue Title 3。 - 將「說明」設為「Issue
Description 3」。 - 點選「建立」。
- 在新建的聊天室中傳送幾則討論問題的訊息。
- 使用斜線指令
/close傳送訊息,並指定解決方案,例如Fixed。
在 Google Cloud 控制台中,按照下列步驟操作:
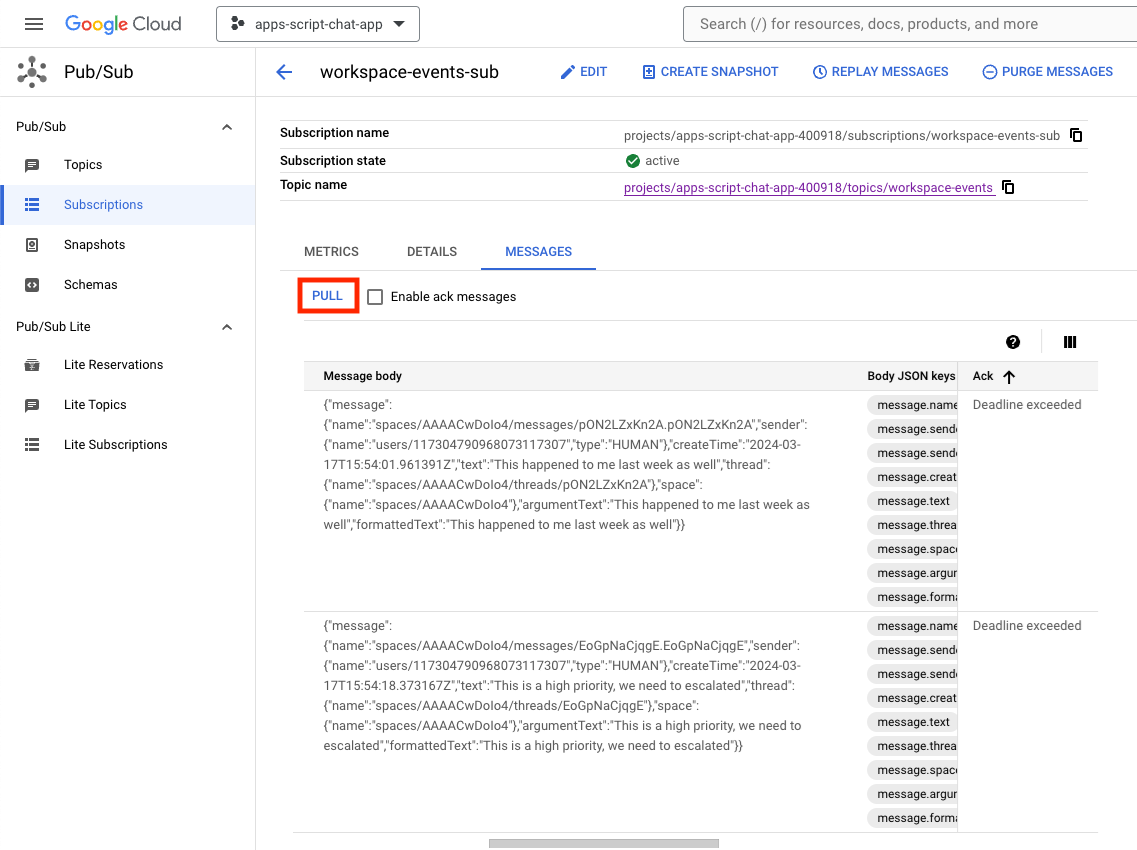
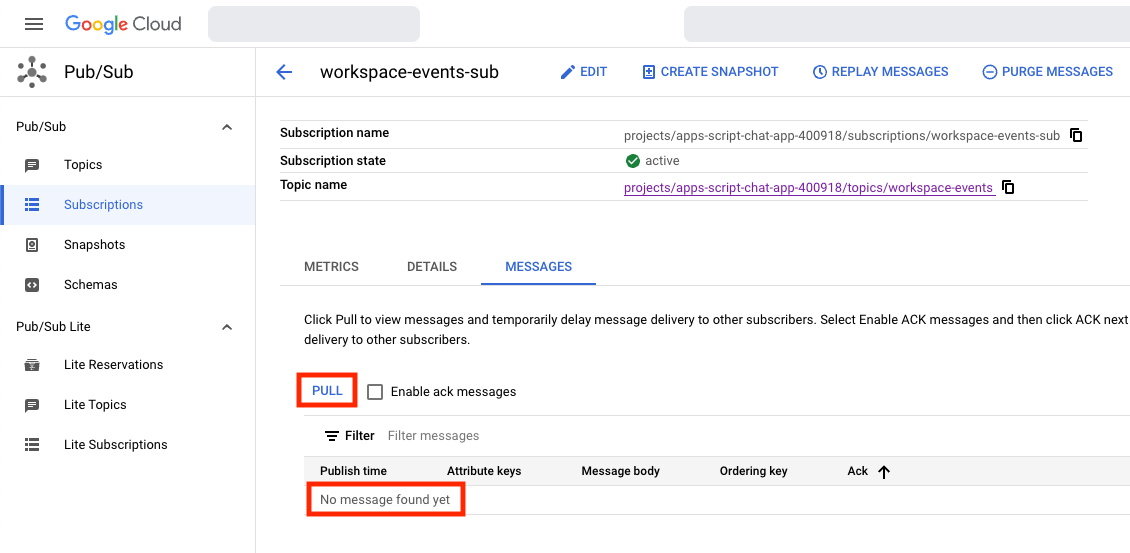
- 依序前往「選單」☰ >「Pub/Sub」>「訂閱項目」。
- 選取訂閱項目 workspace-events-sub。
- 選取「訊息」分頁標籤。
- 按一下「提取」,表格會顯示與您傳送至新建立聊天室的內容相關的訊息。
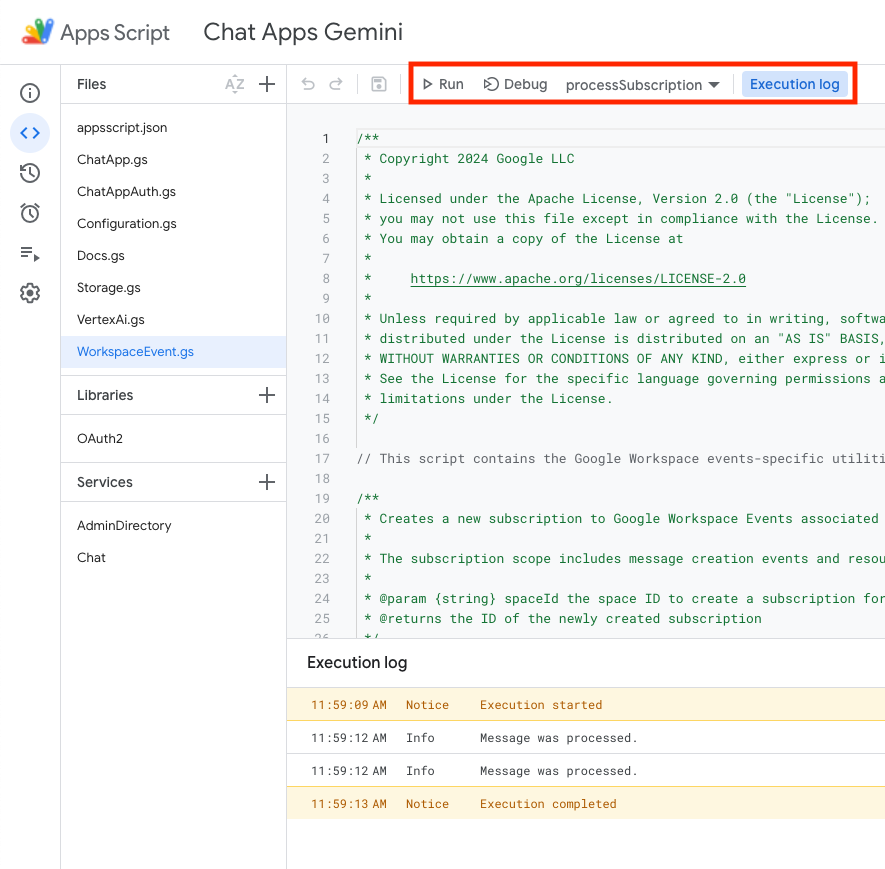
在 Apps Script 控制台中,按照下列步驟操作:
- 選取專案。
- 選取「編輯者」。
- 選取
WorkspaceEvent.gs檔案。 - 在「執行」部分中選取
processSubscription。 - 按一下
Run。執行記錄會顯示訊息已處理完畢。
在 Google Cloud 控制台中,按照下列步驟操作:
- 依序前往「選單」☰ >「Pub/Sub」>「訂閱項目」。
- 選取訂閱項目 workspace-events-sub。
- 選取「訊息」分頁標籤。
- 按一下「提取」,表格不會再顯示您傳送至新建立聊天室的訊息。
- 在 Google Chat 中,使用斜線指令
/create建立專門討論第三個問題的聊天室,然後傳送幾則討論該問題的訊息。
在 Google Cloud 控制台中,按照下列步驟操作:
- 依序前往「選單」☰ >「Pub/Sub」>「訂閱項目」。
- 選取訂閱項目 workspace-events-sub。
- 選取「訊息」分頁標籤。
- 按一下「提取」,資料表不會顯示您傳送至新建立聊天室的訊息。
6. 選用:應用程式 1:新增多元包容性說明
複習概念
生成式 AI 提示是一門藝術,需要精心設計指令或問題,引導生成式 AI 模型產生特定類型的輸出內容。常見的做法是在提示中加入規則和條件,限制答案。這有助於確保輸出內容安全、切題、一致且符合預期。
審查流程
處理訂閱項目 (更新)
檢查原始碼
需要編輯 Apps Script 專案。
WorkspaceEvent.js
// Edits the function to replace logging by an actual card message.
function processSubscription() {
...
for (var messageIndex in messages) {
...
} else if (ceType === "google.workspace.chat.message.v1.created") {
...
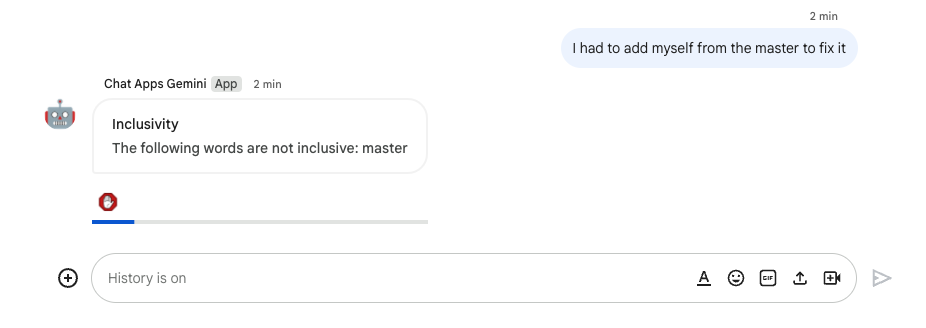
const inclusivityCheck = getInclusivityFeedback(chatMessage.text);
if (inclusivityCheck !== "It's inclusive!") {
createAppMessageUsingChatService({
cardsV2: [{ cardId: "1", card: { header: {
title: "Inclusivity",
subtitle: `The following words are not inclusive: ${inclusivityCheck}`
}}}]
},
chatMessage.space.name);
}
...
}
...
}
...
}
VertexAi.js
/**
 * Gets feedback on inclusivity for a text with the Gemini Pro model using
 * Vertex AI API.
 *
 * Returns "It's inclusive!" when it is otherwise a list of word(s) that might not
 * be optimal.
 *
 * @param {string} text the text
 * @return {string} the feedback
 */
function getInclusivityFeedback(text) {
  const url = `https://${VERTEX_AI_LOCATION_ID}-aiplatform.googleapis.com/v1`
    + `/projects/${PROJECT_ID}/locations/${VERTEX_AI_LOCATION_ID}`
    + "/publishers/google/models/gemini-1.0-pro:generateContent";
  const options =  {
    method: "POST",
    headers: { Authorization: "Bearer " + ScriptApp.getOAuthToken() },
    contentType: "application/json",
    payload: JSON.stringify({
      contents: {
        role: "user",
        parts: {
          text: "Are there any words that obviously go against inclusivity "
            + "in this text:"
            + `\n\n----------\n${text}\n----------\n\n`
            + "If there are not, answer \"It's inclusive!\" "
            + "otherwise answer by listing them separated by commas. "
            + "Do not answer with any explanation."
        }
      },
      safetySettings: {
        category: "HARM_CATEGORY_SEXUALLY_EXPLICIT",
        threshold: "BLOCK_LOW_AND_ABOVE"
      },
      generationConfig: {
        temperature: 0.2,
        topP: 0.8,
        topK: 40
      }
    })
  };

  return JSON.parse(UrlFetchApp.fetch(url, options).getContentText())
    .candidates[0].content.parts[0].text;
}
更新 Apps Script 專案
在您的本機環境中,請按照下列步驟操作:
- 在終端機中,將目前目錄變更為
issue-management/4-inclusivity-help。其中包含您需要的原始碼。 - 將
issue-management/3-message-monitoring/.clasp.json檔案複製到目前的目錄。 - 將
issue-management/3-message-monitoring/Configuration.js檔案複製到目前的目錄,取代現有檔案。 - 執行下列指令:
clasp push
試試看
在 Google Chat 中,請按照下列步驟操作:
- 使用斜線指令
/create傳送即時訊息給應用程式。應用程式會開啟對話方塊。 - 將「Title」(標題) 設為
Issue Title 4。 - 將「說明」設為「Issue
Description 4」。 - 點選「建立」。
- 在新建的聊天室中傳送
It happened to me last week as well。
在 Apps Script 控制台中,按照下列步驟操作:
- 選取專案。
- 選取「編輯者」。
- 選取
WorkspaceEvent.gs檔案。 - 在「執行」部分中選取
processSubscription。 - 按一下「執行」。執行記錄會顯示系統已處理訊息。
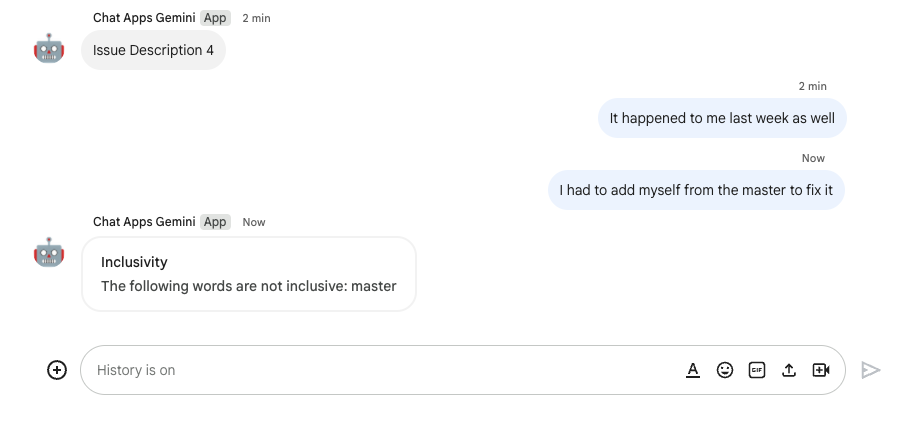
在 Google Chat 中,請按照下列步驟操作:
- 請注意,應用程式不會在新建立的空間中提供任何包容性協助。
- 在新建的聊天室中傳送訊息
I had to add myself from the master to fix it。
在 Apps Script 控制台中,按照下列步驟操作:
- 選取專案。
- 選取「編輯者」。
- 選取
WorkspaceEvent.gs檔案。 - 在「執行」部分中選取
processSubscription。 - 按一下「執行」。執行記錄會顯示系統已處理訊息。在 Google Chat 中,應用程式會在新建的聊天室中傳送包容性協助訊息。
7. 選用:應用程式 1:新增偏好設定
。
複習概念
配件小工具是附加在應用程式傳送訊息底部的無邊框小工具,通常用於在特定訊息情境中啟用使用者的快速回應。從技術上來說,這類按鈕與資訊卡按鈕的設計原則相同。

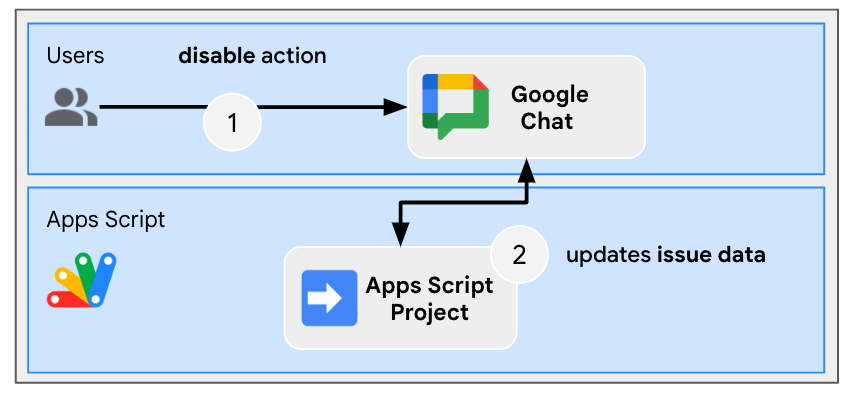
審查流程
停用包容性用語建議
檢查原始碼
需要編輯 Apps Script 專案。
ChatApp.js
// Edits the function to handle the inclusivity help disablement action for a
// given space.

function onCardClick(event) {
  ...
  if (event.action.actionMethodName === "disableInclusivityHelp") {
    disableInclusivityHelp(event.common.parameters.spaceId);
  }
}
Storage.js
// Edits the function to keep track of the inclusivity help setting.

function saveCreatedIssue(title, description, spaceId, subscriptionId) {
  appProperties.setProperty(spaceId, JSON.stringify({
    ...
    inclusivityHelp: true,
    ...
  }));
  ...
}
/**
 * Disables inclusivity help in a space.
 *
 * @param {string} spaceId the ID of dedicated space of the issue
 */
function disableInclusivityHelp(spaceId) {
  var issue = JSON.parse(appProperties.getProperty(spaceId));
  issue.inclusivityHelp = false;
  appProperties.setProperty(spaceId, JSON.stringify(issue));
}
/**
 * Checks whether the app should help with inclusivity in a given space.
 *
 * @param {string} spaceId the ID of dedicated space of the issue
 * @return whether the app should help with inclusivity
 */
function shouldHelpWithInclusivity(spaceId) {
  return JSON.parse(appProperties.getProperty(spaceId)).inclusivityHelp;
}
WorkspaceEvent.js
// Edits the function to display the accessory widget to the existing card message.
function processSubscription() {
...
for (var messageIndex in messages) {
...
} else if (ceType === "google.workspace.chat.message.v1.created") {
...
if (... && shouldHelpWithInclusivity(chatMessage.space.name)) {
createAppMessageUsingChatService({
...
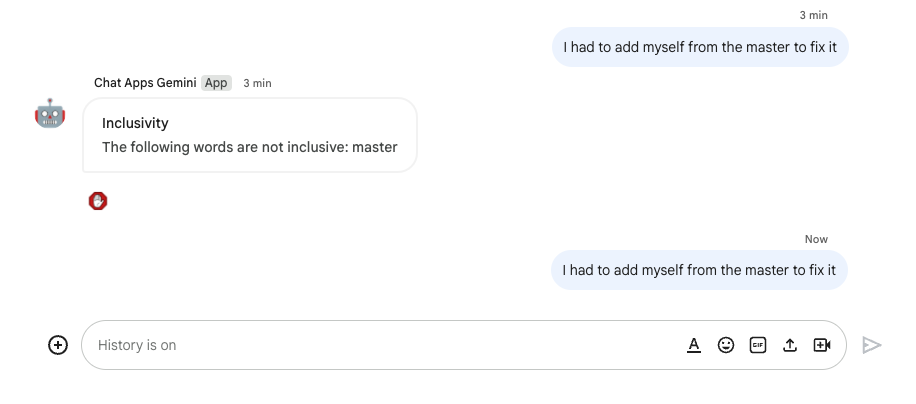
accessoryWidgets: [{ buttonList: { buttons: [{
altText: "Disable inclusivity help",
icon: {
iconUrl: "https://upload.wikimedia.org/.../Stop_hand_rugen.png"
},
onClick: { action: {
function: "disableInclusivityHelp",
parameters: [{
key: "spaceId",
value: chatMessage.space.name
}]
}}
}]}}]
}, ...);
...
}
...
}
...
}
...
}
更新 Apps Script 專案
在您的本機環境中,請按照下列步驟操作:
- 在終端機中,將目前目錄變更為
issue-management/5-disable-help。其中包含您需要的原始碼。 - 將
issue-management/4-inclusivity-help/.clasp.json檔案複製到目前的目錄。 - 將
issue-management/4-inclusivity-help/Configuration.js檔案複製到目前的目錄,取代現有檔案。 - 執行下列指令:
clasp push
試試看
停用協助
- 在 Google Chat 中,使用斜線指令
/create建立專門處理第四個問題的聊天室,然後傳送訊息I had to add myself from the master to fix。
在 Apps Script 控制台中,按照下列步驟操作:
- 選取專案。
- 選取「編輯者」。
- 選取
WorkspaceEvent.gs檔案。 - 在「執行」部分中選取
processSubscription。 - 按一下「執行」。執行記錄會顯示系統已處理訊息。
在 Google Chat 中,請按照下列步驟操作:
- 請注意,應用程式已在專門討論配件小工具問題的聊天室中,傳送了有關包容性協助的訊息。
- 按一下配件小工具即可停用包容性輔助功能。
支票停用
- 在 Google Chat 中,使用斜線指令
/create建立專門處理第四個問題的聊天室,然後傳送訊息I had to add myself from the master to fix。
在 Apps Script 控制台中,按照下列步驟操作:
- 選取專案。
- 選取「編輯者」。
- 選取
WorkspaceEvent.gs檔案。 - 在「執行」部分中選取
processSubscription。 - 按一下「執行」。執行記錄會顯示系統已處理訊息。在 Google Chat 中,由於您已停用這項功能,因此應用程式不會在專門討論問題的聊天室中傳送訊息,提供包容性協助。
8. 應用程式 2:建構
查看概念
生成式 AI 基礎
這項功能會將 AI 模型連結至可驗證的知識來源,提高模型內容的準確度和可靠性。這項技術有助於防止 AI 捏造資訊,並確保回覆內容與情境相關,且較少偏誤。
自然語言
相對於人工或電腦語言,人類在日常溝通時使用的口語或書寫語言。
Cloud Storage
Cloud Storage 可讓您在世界各地隨時儲存及擷取大小不限的資料。這項服務有多種用途,包括提供網站內容、儲存資料以供封存和災難復原之用,或是透過直接下載功能,將大型資料物件提供給使用者。
Dialogflow CX 資料存放區
Dialogflow CX 會整合資料儲存庫,這些儲存庫是網站和文件的集合,資料儲存庫虛擬服務專員會從特定資料中尋找使用者問題的答案。針對特定問題,資料儲存庫代理會從收到的來源內容中搜尋答案,並統整出連貫的回覆。還會提供回應來源的支援連結,方便使用者進一步瞭解。
查看架構

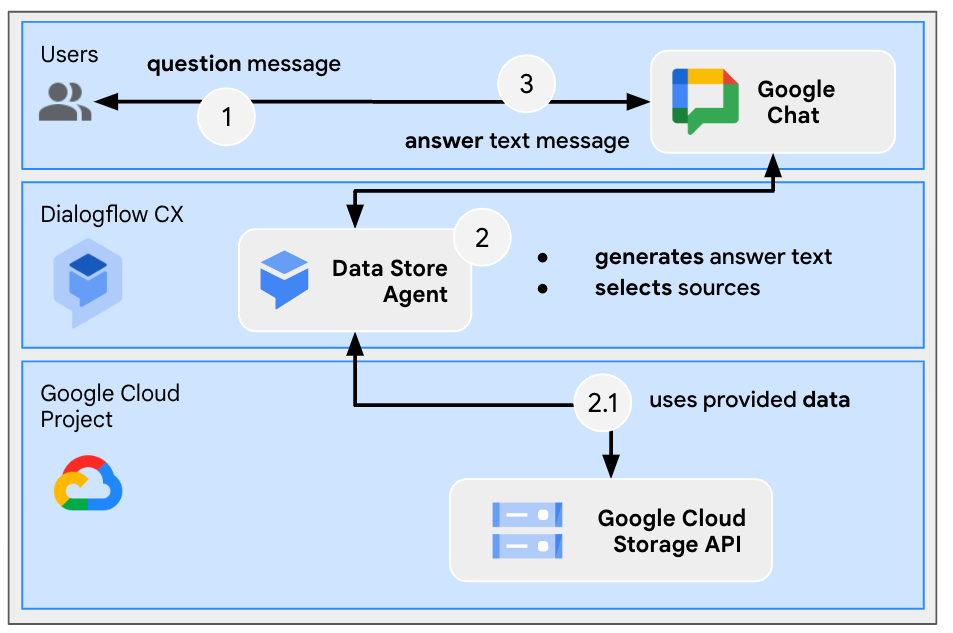
這個 Google Chat 應用程式是使用 Dialogflow CX 建構而成,運作方式如下:
- 使用者傳送訊息給應用程式,無論是即時訊息或聊天室訊息都算在內。
- 這個應用程式是與 Google Cloud 專案相關聯的 Dialogflow CX 虛擬服務專員,負責處理訊息。
- 應用程式會與 Cloud Storage 中的資料存放區整合。
- 應用程式會透過即時訊息或原始聊天室傳送同步回應。
查看流程
回答問題
檢查原始碼
您唯一需要的來源不是程式碼,而是用於基礎的資料。
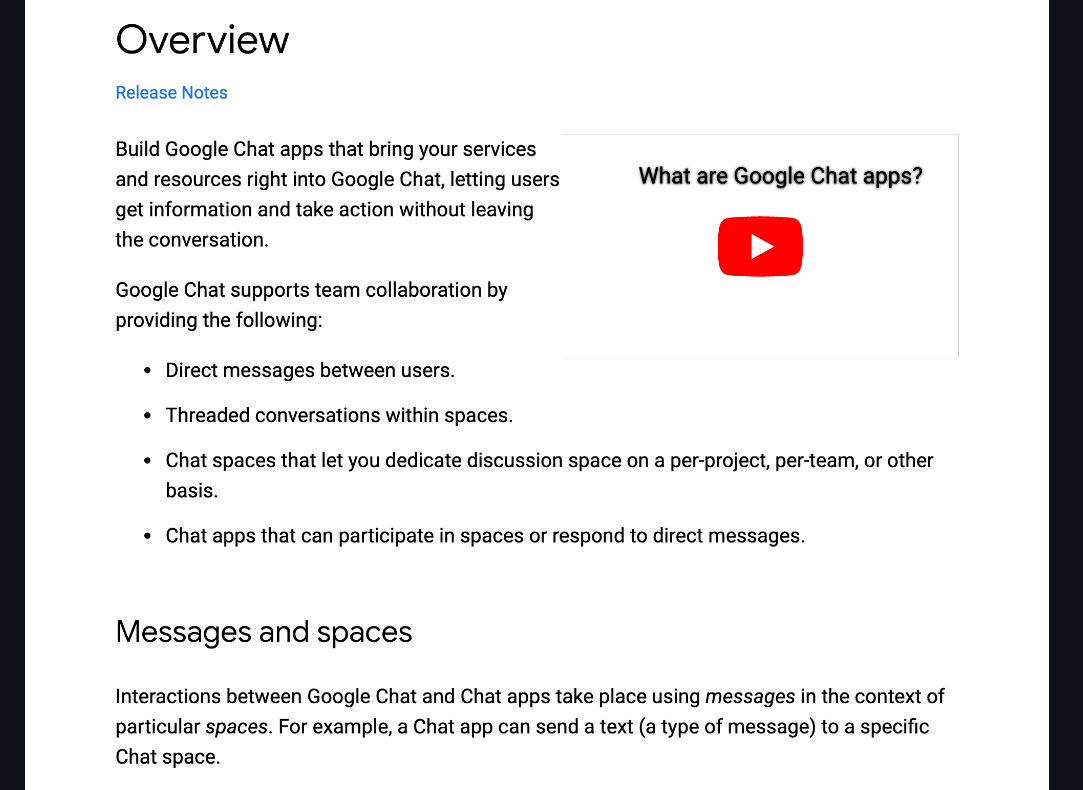
google-chat-overview.pdf
包含 Google Chat 應用程式的非結構化資訊,以及 Google Workspace 開發人員網站頁面的列印版本。
更新 Google Cloud 專案
在 Google Cloud 控制台中,請按照下列步驟操作:
- 啟用 Dialogflow 和 Cloud Storage API。
- 啟用 Vertex AI Agent Builder API。
- 依序點選「選單 ☰」>「API 和服務」>「已啟用的 API 和服務」,然後確認所有 API 都已啟用。
。
建立 Dialogflow CX 資料儲存庫代理程式
啟動知識資料
在 Google Cloud 控制台中,按照下列步驟操作:
- 依序點選「選單」☰ >「Cloud Storage」>「Bucket」。
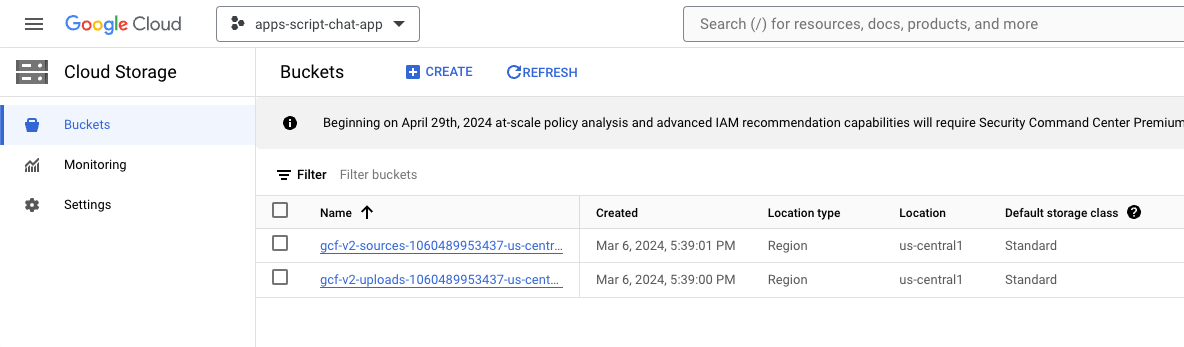
- 點選「建立」。
- 將 name 設為
gchat-knowledge。 - 點選「建立」。
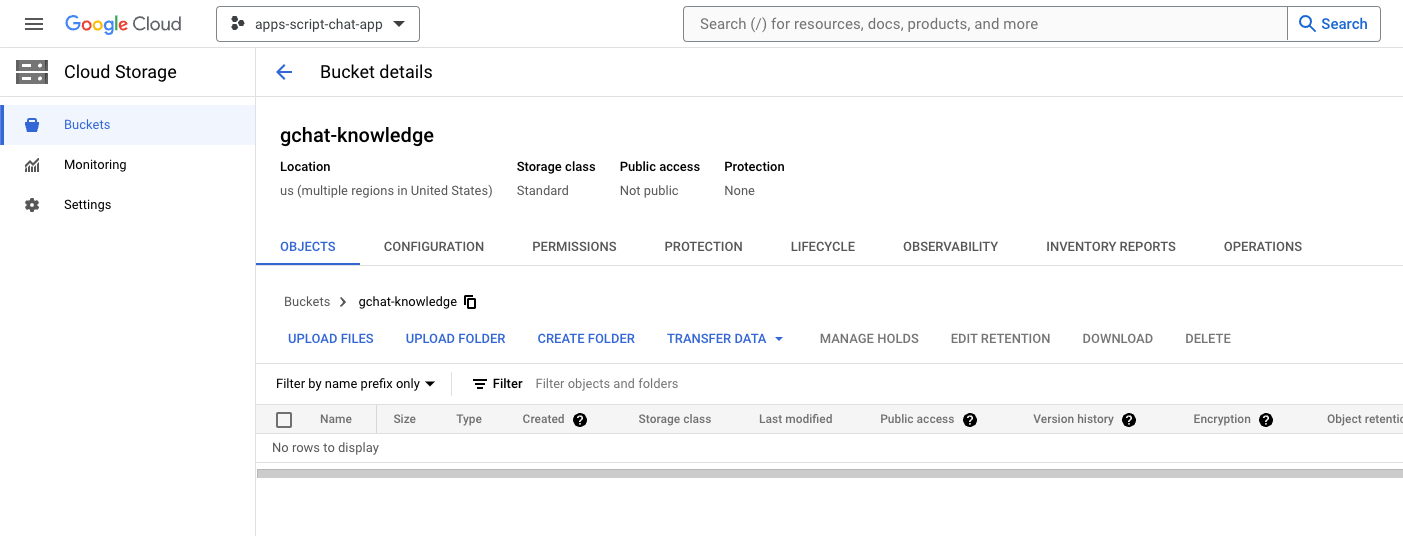
- 選取 gchat-knowledge bucket。
- 按一下「上傳檔案」。
- 從本機環境下載並選取 google-chat-overview.pdf 檔案。

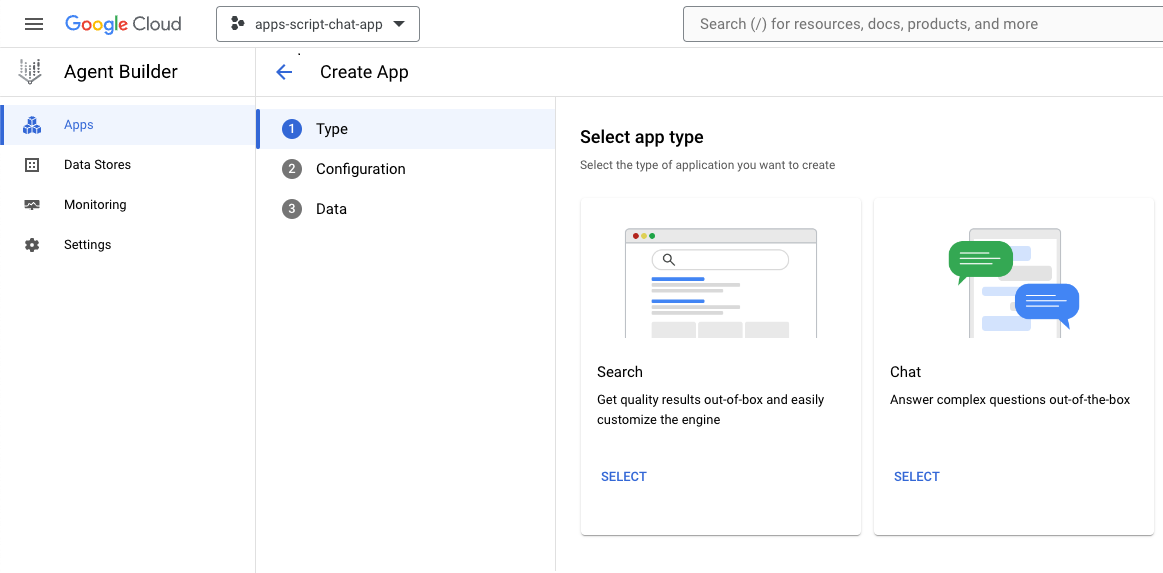
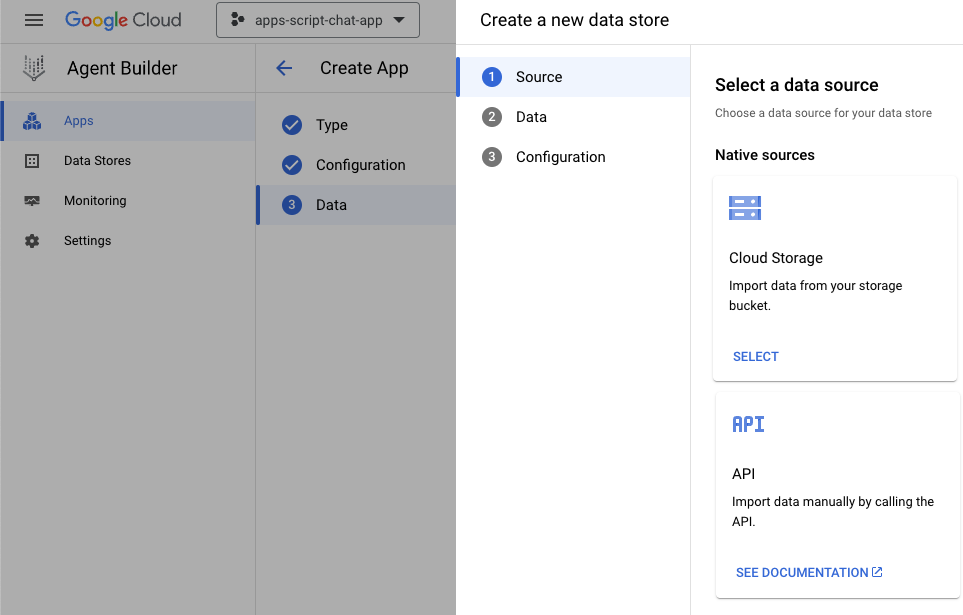
建立應用程式
在 Google Cloud 控制台中,按照下列步驟操作:
- 依序點選「選單」圖示 ☰ >「Agent builder」>「應用程式」。
- 點選「New app」(新增應用程式)。
- 選取即時通訊類型。
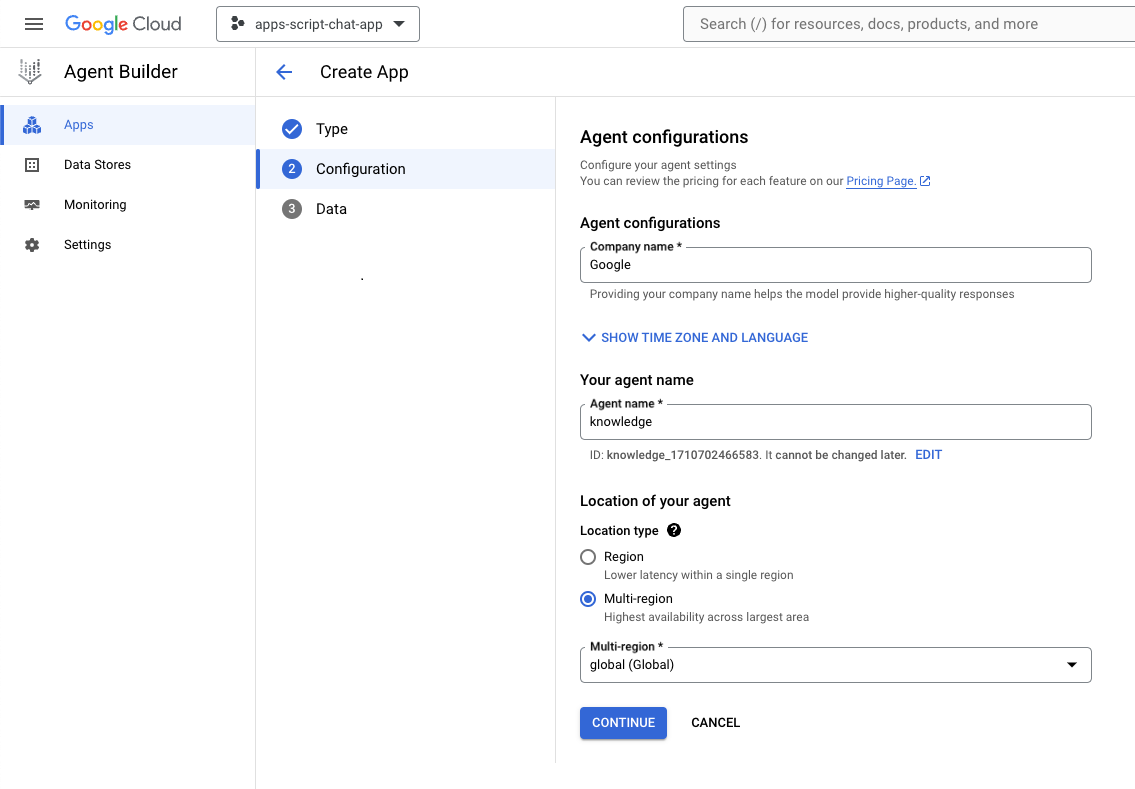
- 將
Company name設為貴公司名稱。 - 將
Agent name設為knowledge。 - 按一下「繼續」。
- 點選「建立新的資料儲存庫」。
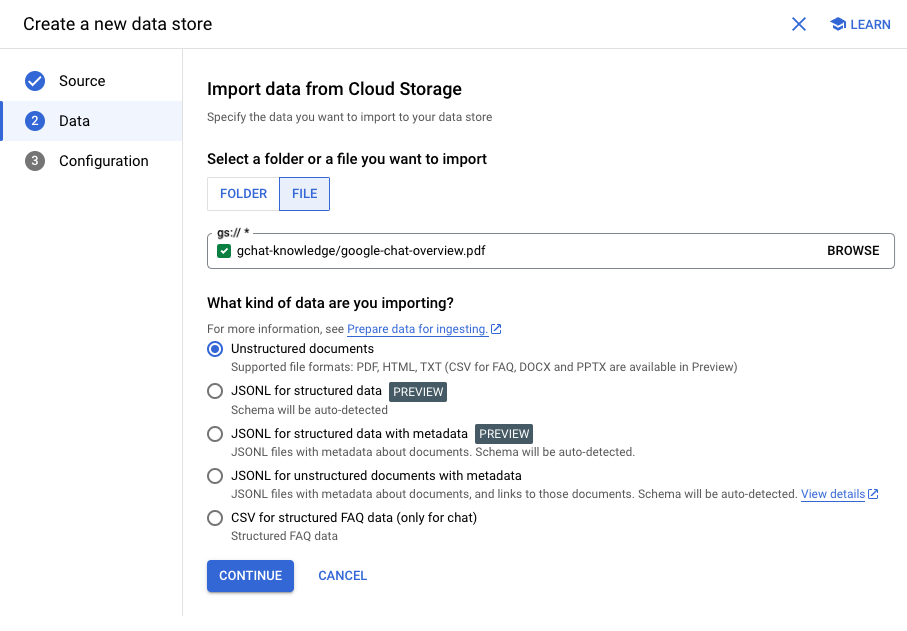
- 選取 Cloud Storage 做為資料來源。
- 選取「檔案」。
- 點選「瀏覽」。
- 選取
google-chat-overview.pdf檔案。 - 按一下「繼續」。
- 將資料儲存庫名稱設為
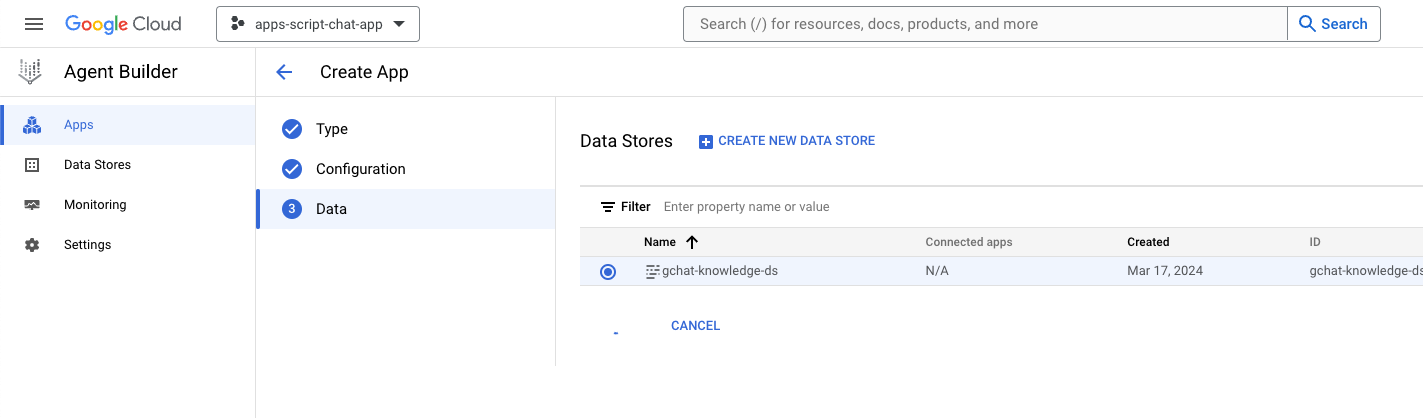
gchat-knowledge-ds。 - 點選「建立」。
- 在表格中選取 gchat-knowledge-ds 資料儲存庫。
- 點選「建立」。
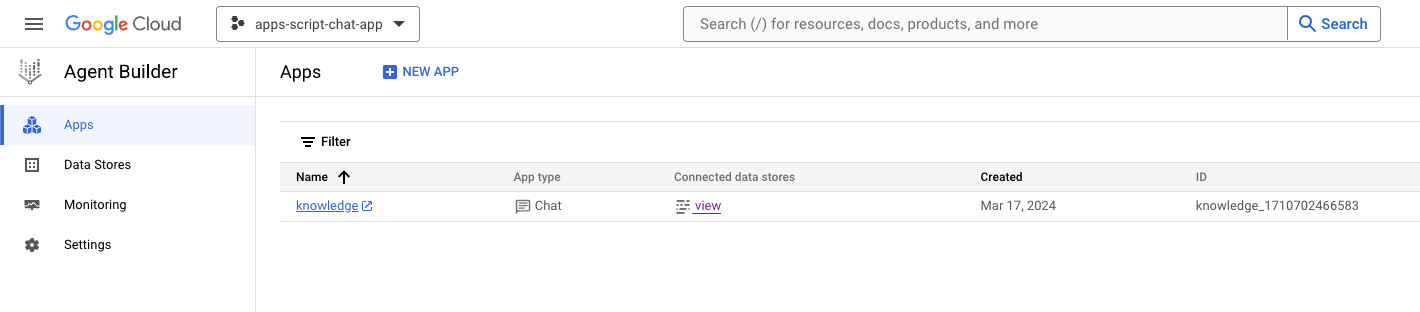
- 幾分鐘後,按一下「選單」☰ >「代理程式建構工具」>「應用程式」,您會發現應用程式已顯示在清單中。
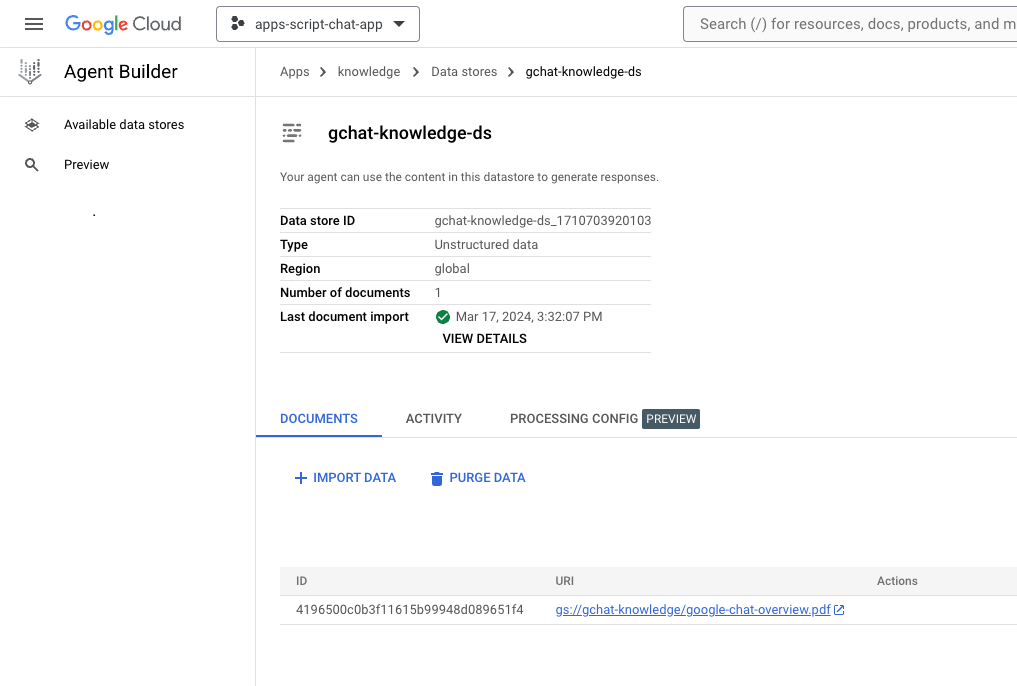
- 依序點選「選單」圖示 ☰ >「Agent builder」>「資料儲存庫」。
- 點按「gchat-knowledge-ds」資料儲存庫。文件數量為
1,表示已準備就緒。
完成並測試應用程式
在 Dialogflow CX 主控台中,按照下列步驟操作:
- 選取 Google Cloud 專案。
- 選取「知識」代理程式。
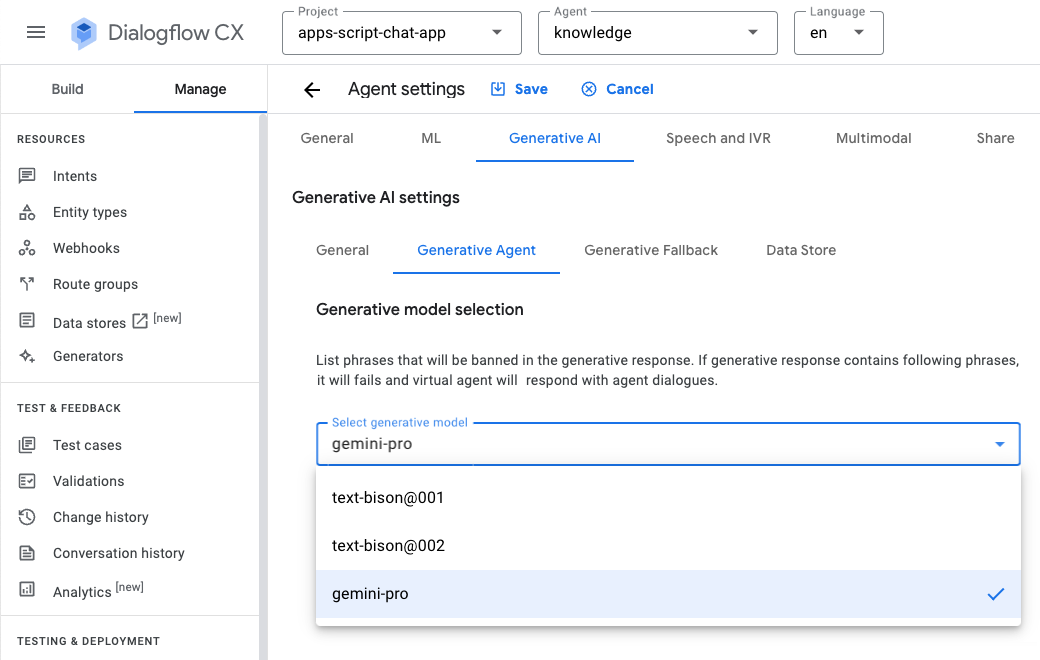
- 依序選取「代理程式設定」>「生成式 AI」>「生成式代理程式」。
- 將模型從「Text Bison」切換為「Gemini Pro」。
- 按一下 [儲存]。
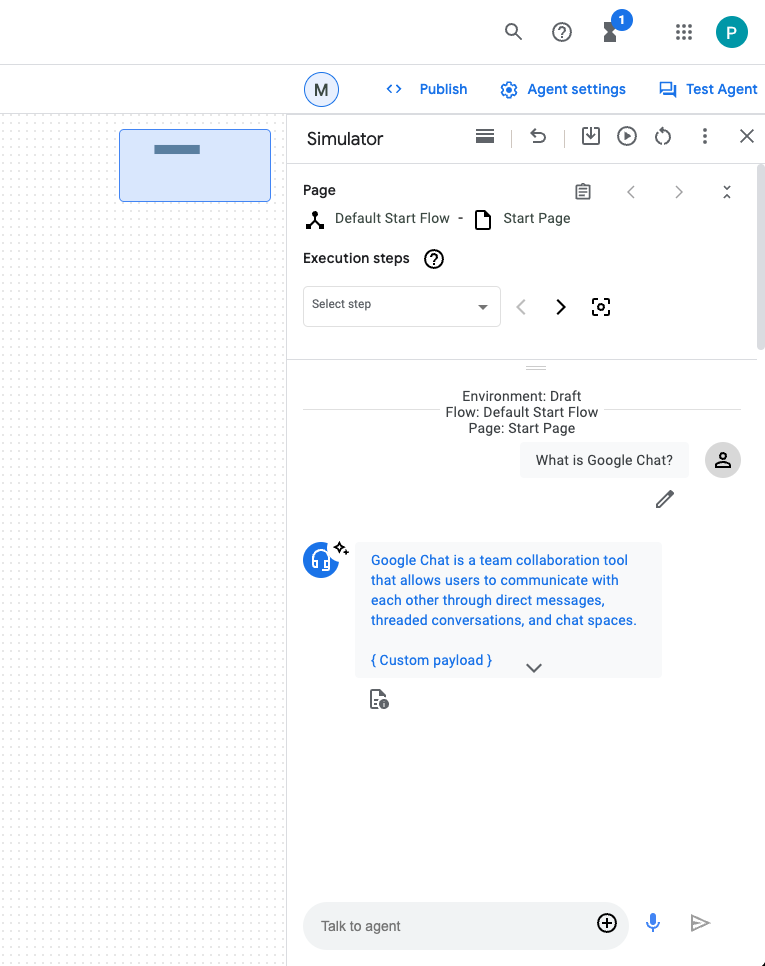
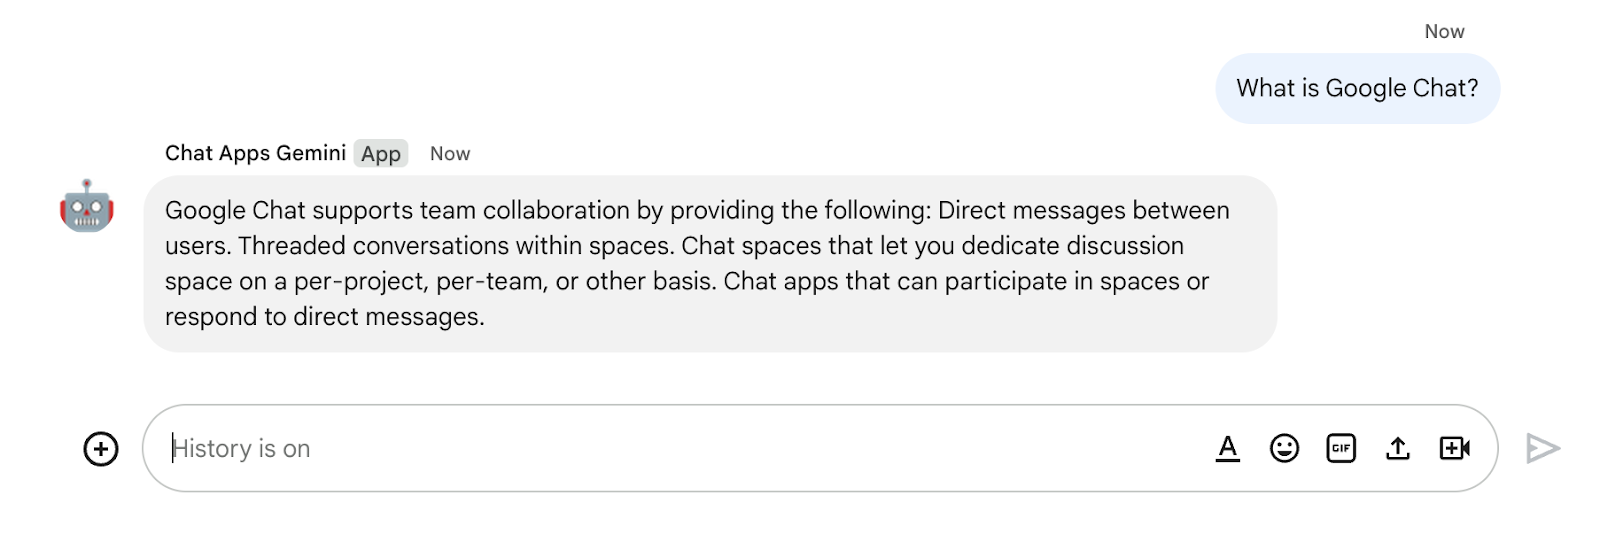
- 按一下「測試代理程式」。
- 傳送
What is Google Chat?。代理程式會回覆有意義的內容。
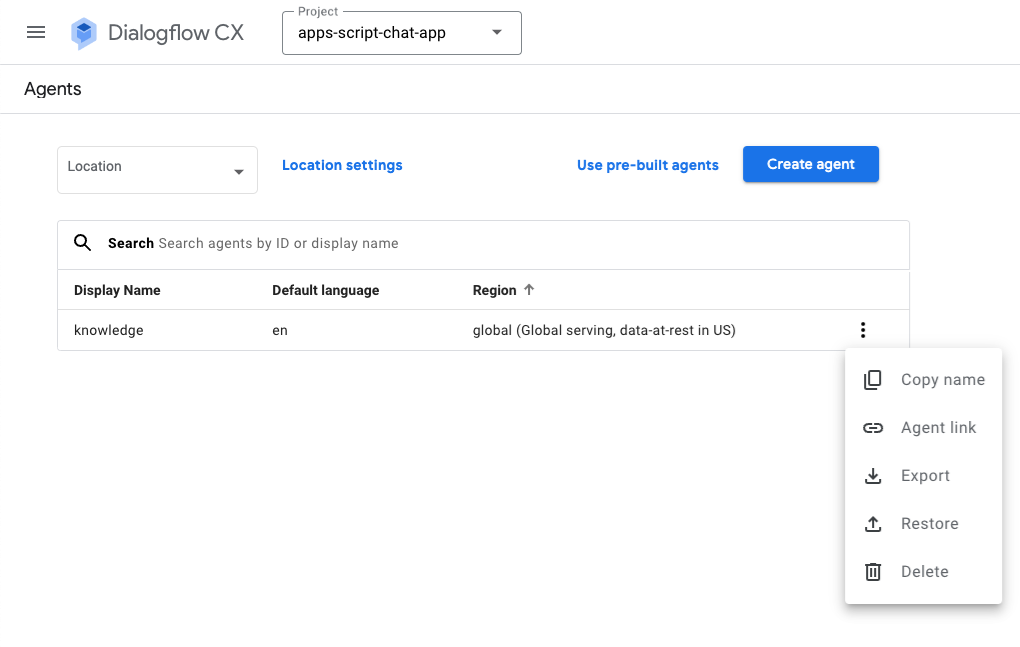
整合 Google Chat 應用程式
在 Dialogflow CX 主控台中,按照下列步驟操作:
- 選取 Google Cloud 專案。
- 在知識代理程式的資料列中,依序按一下
 >「複製名稱」。
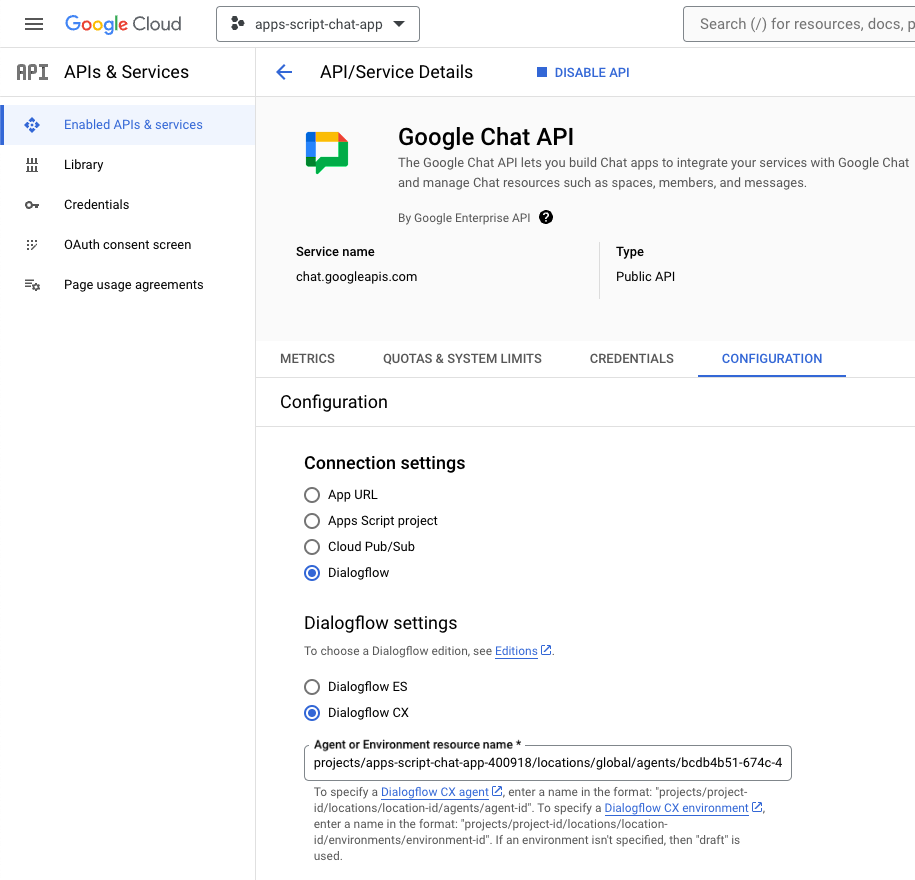
在 Google Cloud 控制台中,按照下列步驟操作:
- 前往 Google Chat API 設定。
- 在「連線設定」下方,選取「Dialogflow」。
- 在「Dialogflow settings」(Dialogflow 設定) 下方,選取「Dialogflow CX」。
- 將「虛擬服務專員名稱或環境資源名稱」設為您複製的虛擬服務專員名稱。
- 移除這兩個斜線指令。
- 在 Google Chat 中,傳送
What is Google Chat?給 Google Chat 應用程式的即時訊息。代理程式會回覆有意義的內容。
9. 選用:應用程式 2:新增來源
查看概念
Dialogflow CX Webhook
主機服務,可代管商業邏輯或呼叫其他服務。在 Dialogflow CX 工作階段期間,Webhook 可依據自然語言處理程序擷取的資料產生動態回應、驗證收集到的資料,或在後端觸發動作。
Cloud Functions
Cloud Functions 非常適合建構無伺服器後端、執行即時資料處理作業,以及建立智慧型應用程式。無需佈建、管理、修補或更新伺服器。可自動調整資源配置、可容錯,並具備高可用性。
查看流程
回答問題 (更新)

檢查原始碼
您只需要的原始碼,是將代理程式回覆內容改編為 Google Chat 訊息的函式。做為 Webhook 使用。
package.json
// The function relies on the Cloud Functions framework to run.

{
  "name": "agent-response-adapter",
  "version": "0.0.1",
  "dependencies": {
    "@google-cloud/functions-framework": "^3.0.0"
  },
  ...
}
index.js
/**
 * Handles all incoming requests.
 *
 * It takes a Dialogflow CX agent response as input and returns a
 * valid Google Chat card message with both the text and source links
 */
functions.http('agent-response-adapter', (request, response) => {
  // Creates Google Chat buttons based on the data store agent response
  // grounding details.
  var linkTitles = [];
  var linkButtons = [];
  const grounding = request.body.messages[1].payload.richContent[0][0];
  if (grounding.type === "match_citations") {
    // Supports citation match type.
    grounding.citations.forEach((citation) => {
      // Avoid duplications.
      if (linkTitles.indexOf(citation.title) < 0) {
        linkButtons.push({
          text: citation.title,
          onClick: { openLink: {
            url: citation.actionLink
          }}
        });
        linkTitles.push(citation.title);
      }
    });
  } else if (grounding.type === "info") {
    // Supports info type.
    if (linkTitles.indexOf(grounding.title) < 0) {
      linkButtons.push({
        text: grounding.title,
        onClick: { openLink: {
          url: grounding.actionLink
        }}
      });
      linkTitles.push(grounding.title);
    }
  }

  // Sends the Dialogflow CX fulfillment response to replace the agent response
  // with the Chat message with text and source buttons.
  response.send({ fulfillment_response: {
    merge_behavior: "REPLACE",
    messages: [{ payload: {
      // Reuses the original data store agent response text.
      text: request.body.messages[0].text.text[0],
      cardsV2: [{
        cardId: "sourcesCard",
        card: { sections: [{
          header: "Sources",
          widgets: [{ buttonList: {
            buttons: linkButtons
          }}]
        }]}
      }]
    }}]
  }});
});
更新 Google Cloud 專案
在 Google Cloud 控制台中,請按照下列步驟操作:
- 啟用 Cloud Build、Cloud Functions、Cloud Logging、Artifact Registry 和 Cloud Run API。
- 依序點選「選單 ☰」>「API 和服務」>「已啟用的 API 和服務」,然後確認 API 已啟用。
更新 Dialogflow CX 資料儲存庫代理程式
您需要部署 Cloud Function,並更新 Dialogflow CX Webhook,盡可能透過多個來源觸發該函式。
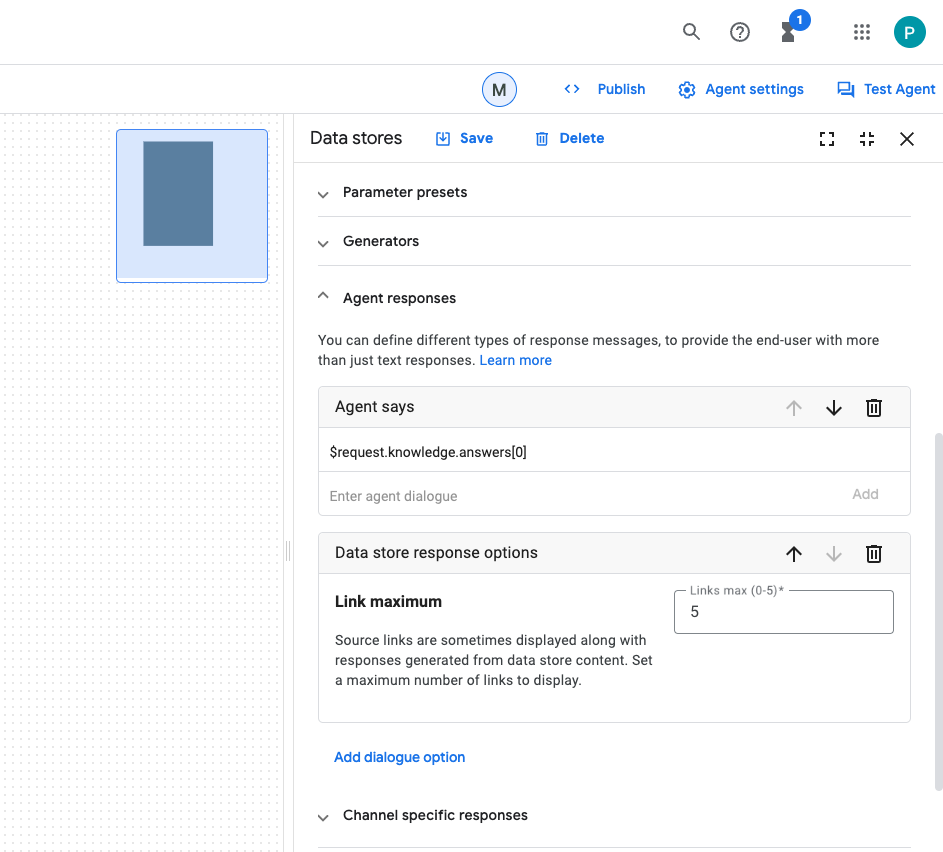
回傳多個來源
根據預設,新的資料存放區代理程式最多只會傳回一個來源,但您可以變更設定來增加來源數量。
在 Dialogflow CX 主控台中,按照下列步驟操作:
- 選取 Google Cloud 專案。
- 選取「知識」代理程式。
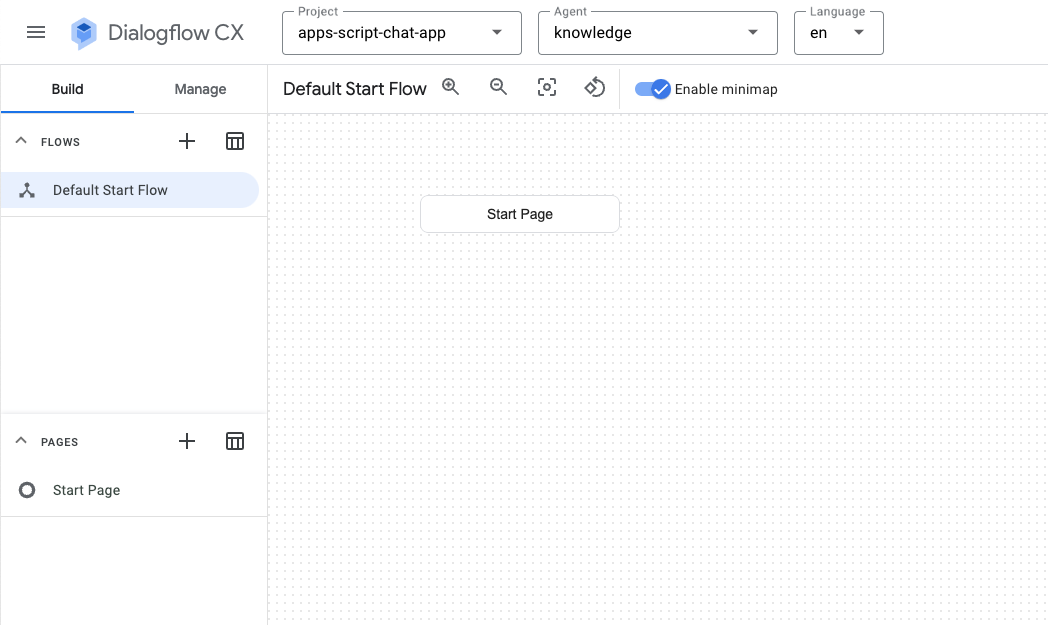
- 選取「開始頁面」。
- 選取「編輯資料儲存庫」。
- 在「Agent responses」部分下方,將「Data store response options」設為
5。 - 按一下 [儲存]。
啟動 Cloud Function
在 Google Cloud 控制台中,按照下列步驟操作:
- 依序點選「選單」圖示 ☰ >「Cloud Functions」。
- 按一下「建立函式」。
- 在「Basics」(基本) 下方,將「name」(名稱) 設定為
function-1。 - 在「Authentication」(驗證) 下方,選取「Allow unauthenticated invocations」(允許未經驗證的叫用) 圓形按鈕。
- 在「執行階段、建構作業、連線和安全性設定」下方,將「執行個體數量上限」設為
3。 - 點選 [下一步]。

- 將「Entry point」(進入點) 設為
agent-response-adapter。 - 將預設內容替換為 package.json 和 index.js 檔案。
- 按一下 [Deploy] (部署)。
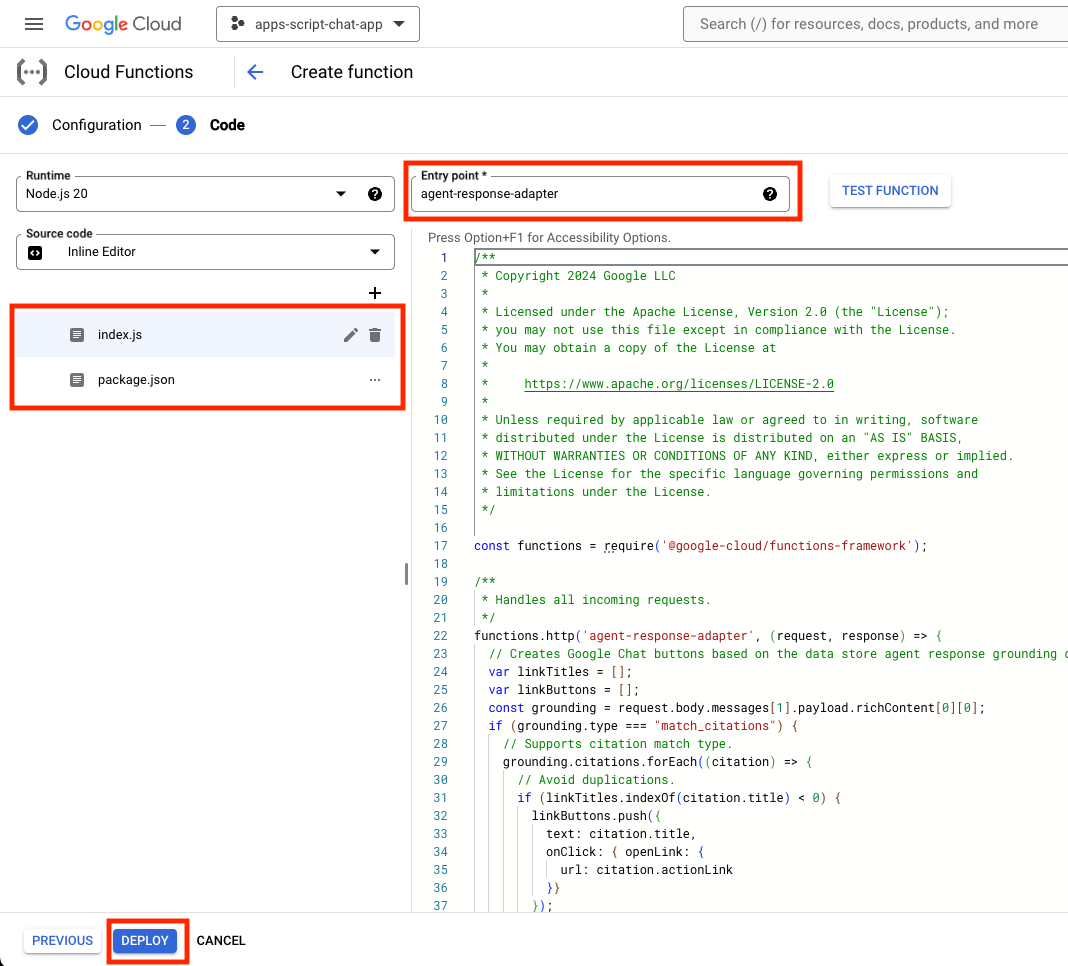
- 請稍候幾分鐘,等待函式部署完成,然後複製網址。
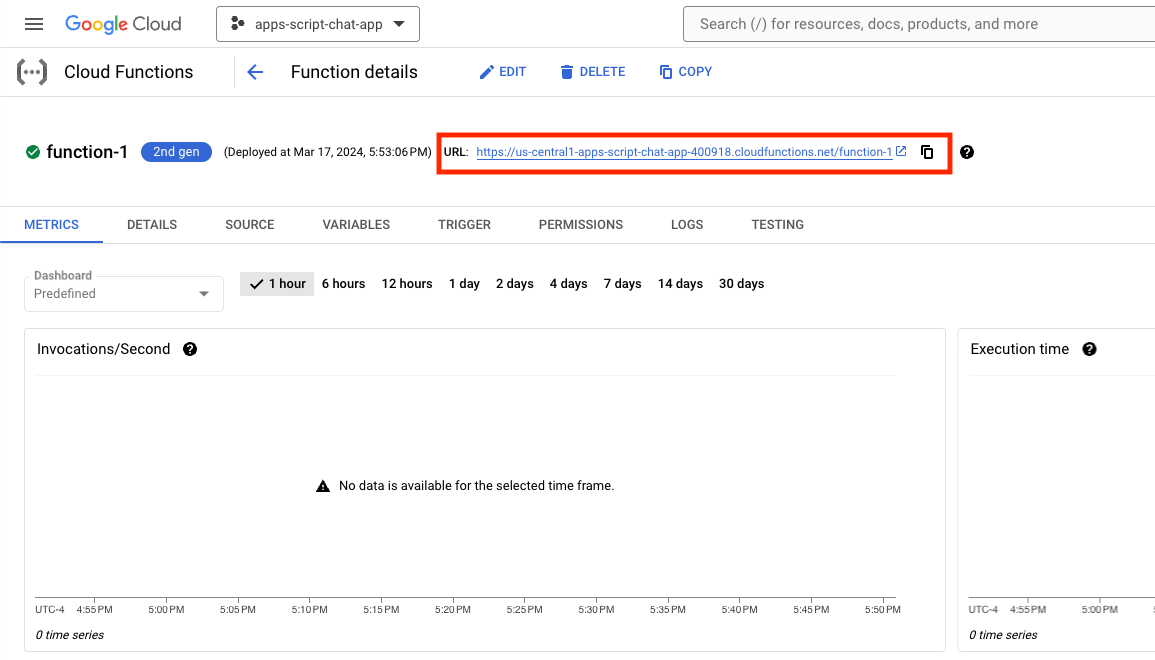
啟動 Webhook
您需要設定 Dialogflow CX 代理程式,使用會觸發新部署函式的 Webhook。
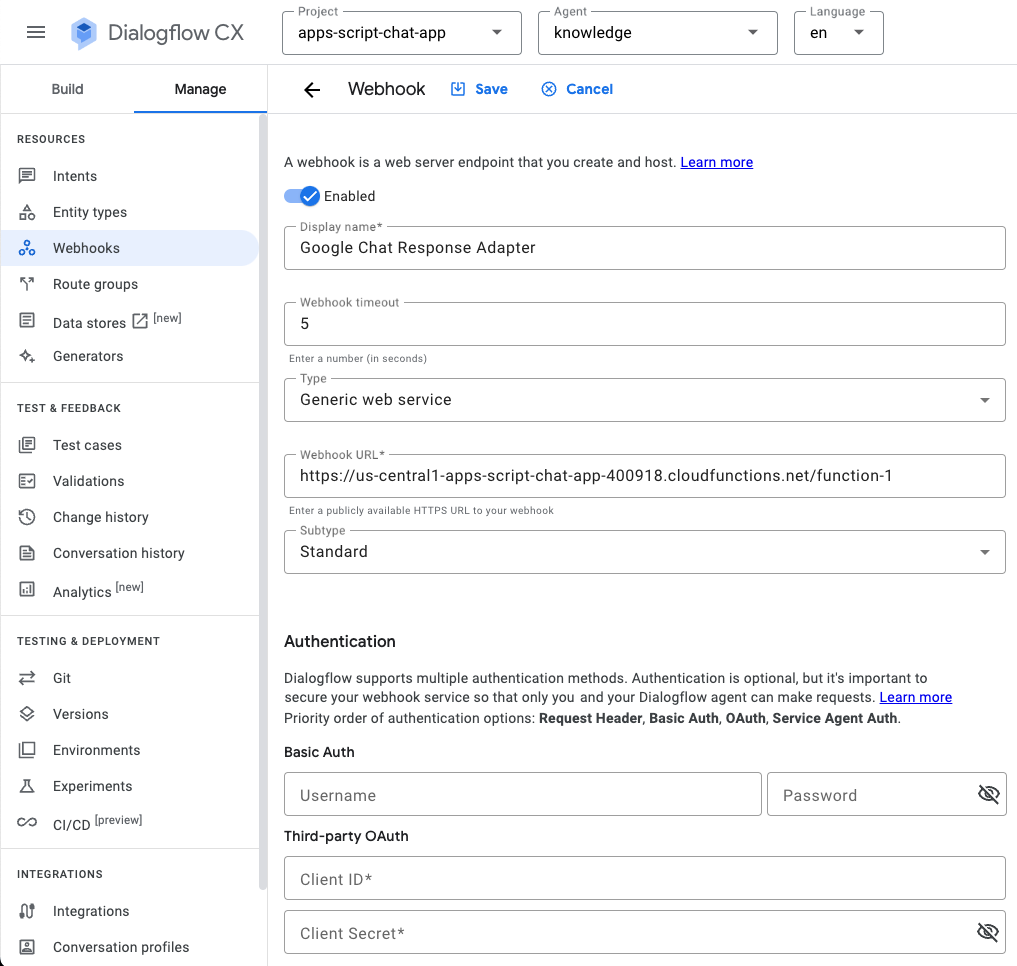
在 Dialogflow CX 主控台中,按照下列步驟操作:
- 選取 Google Cloud 專案。
- 選取「知識」代理程式。
- 依序選取「管理」>「Webhook」>「建立」。
- 將「Display name」(顯示名稱) 設為
Google Chat Response Adapter。 - 將「Webhook URL」設為先前複製的網址。
- 按一下 [儲存]。
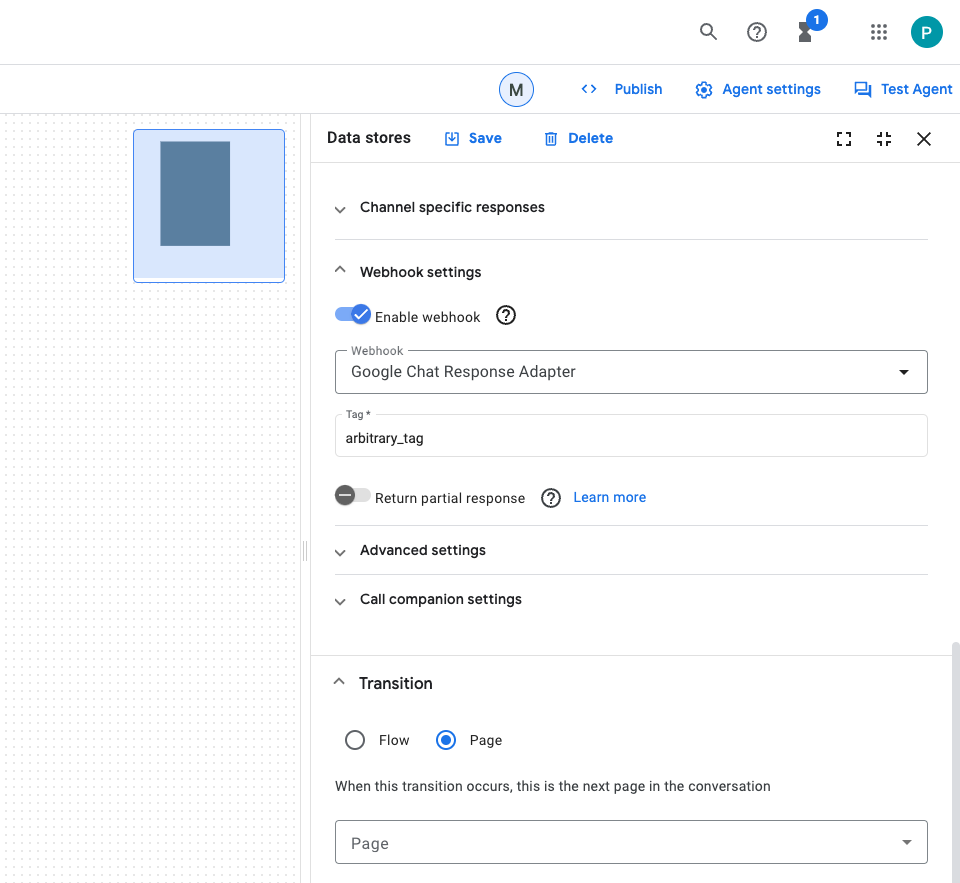
- 點選「Build」。
- 選取「開始頁面」。
- 選取「編輯資料儲存庫」。
- 在「Webhook settings」(Webhook 設定) 底下,按一下「Enable webhook」(啟用 Webhook) 切換鈕。
- 選取「Google Chat Response Adapter for Webhook」。
- 將 tag 設為
arbitrary_tag。 - 按一下 [儲存]。
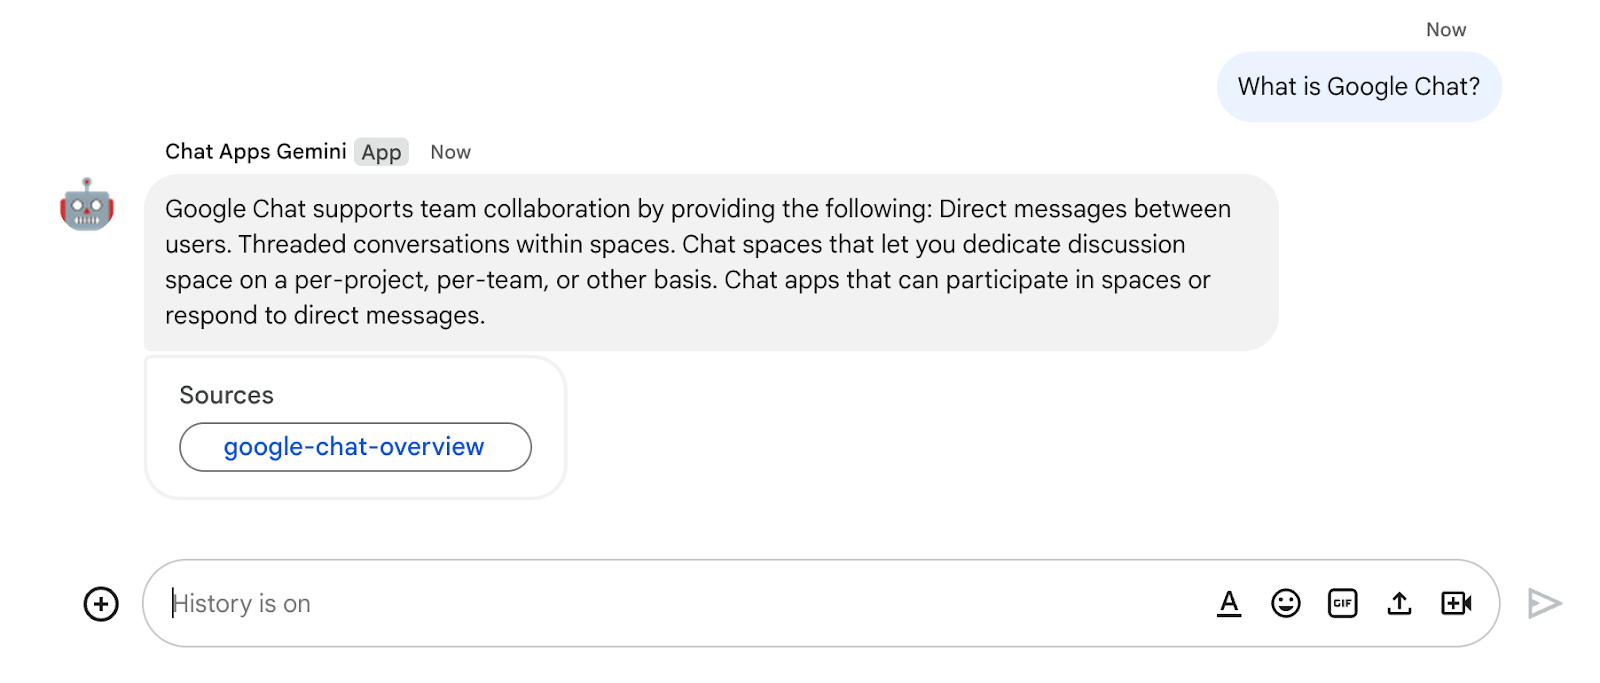
測試應用程式
- 在 Google Chat 中,直接傳送
What is Google Chat?給 Google Chat 應用程式。如果代理程式找到相關來源,就會回覆有意義的內容,並附上來源資訊卡。
10. 應用程式 3:建構
查看概念
對話互動
也就是兩個人以上透過自然語言交換資訊或想法。這與技術介面不同,後者通常依賴無狀態、高度結構化且不容錯的交換。
OpenAPI 規格
在 API 生命週期的每個階段,這項功能都能提供一致的資訊傳輸方式。這是 HTTP API 的規格語言,可定義結構和語法,且不受 API 建立時使用的程式設計語言限制。API 規格通常以 YAML 或 JSON 格式編寫,方便分享及使用規格。
Dialogflow CX 代理程式
代理應用程式的基本建構區塊。代理程式應用程式通常會有多個代理,每個代理都定義為處理特定工作。系統會將代理程式資料提供給 LLM,讓 LLM 取得回答問題和執行工作所需的資訊。每個虛擬服務專員都能提供資訊、將查詢傳送至外部服務,或將對話處理作業延後至 Dialogflow CX 流程或其他虛擬服務專員,以處理子工作。
Dialogflow CX 工具
工具可用於將代理程式應用程式連結至外部系統。這些系統可以擴增代理程式的知識,並協助代理程式有效率地執行複雜工作。
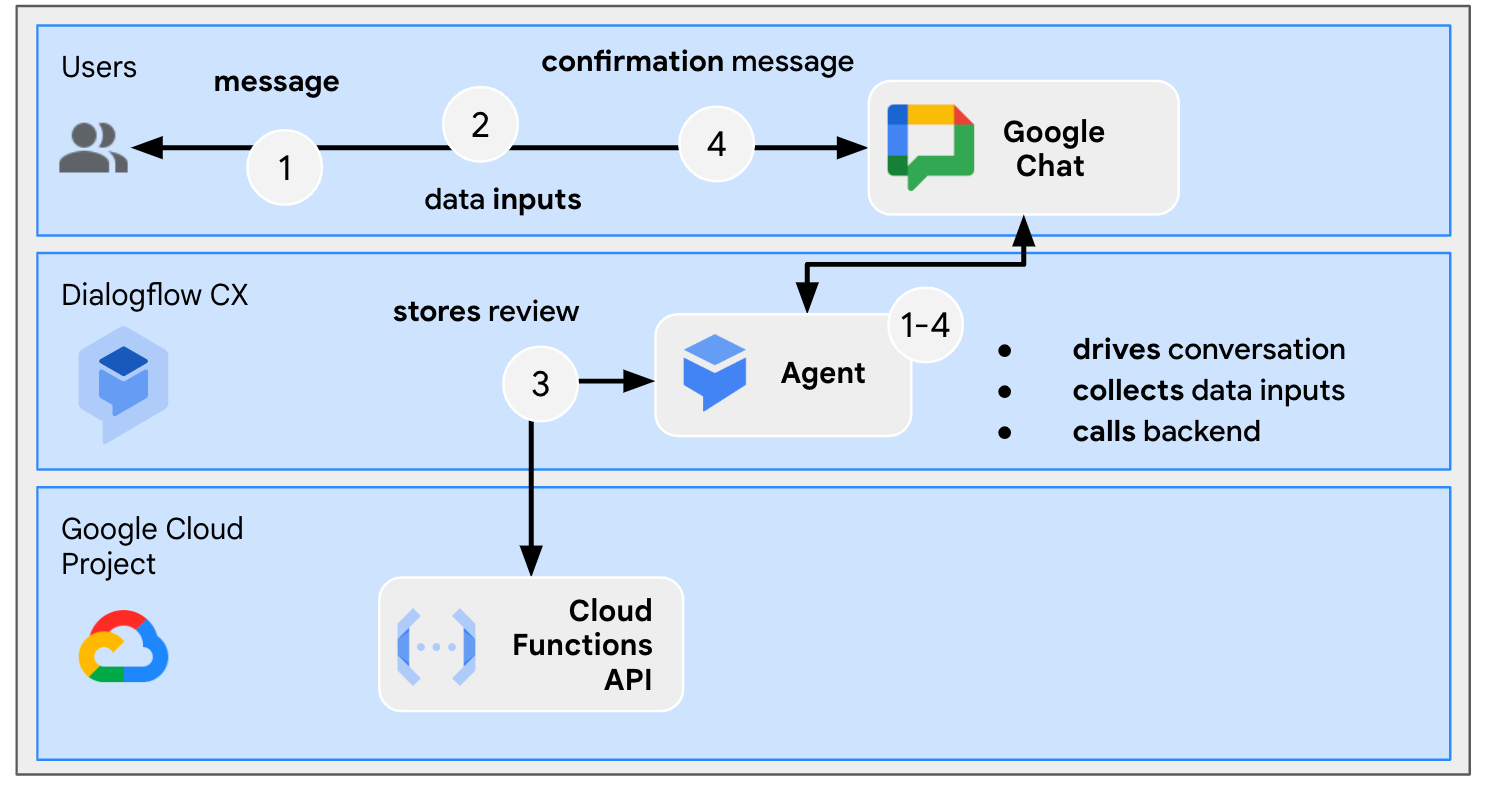
查看架構
這個 Google Chat 應用程式是使用 Dialogflow CX 建構而成,運作方式如下:
- 使用者傳送訊息給應用程式,無論是即時訊息或聊天室訊息都算在內。
- 這個應用程式是與 Google Cloud 專案相關聯的 Dialogflow CX 虛擬服務專員,負責處理訊息。
- 應用程式會與代理程式整合。
- 應用程式會透過即時訊息或原始聊天室傳送同步回應。
查看流程
收集評論
檢查原始碼
您只需要的原始碼,是模擬代理程式做為工具使用的後端服務的函式。
package.json
// The function relies on the Cloud Functions framework to run.

{
  "name": "feedback-app-backend",
  "version": "0.0.1",
  "dependencies": {
    "@google-cloud/functions-framework": "^3.0.0"
  },
  ...
}
index.js
/**
 * Handles all incoming requests.
 *
 * It always returns OK in plain text.
 */
functions.http('feedback-app-backend', (request, response) => {
    response.send('OK');
});
service-openapi.yaml
// Defines the backend service structure and how to request it.

openapi: 3.1.0
info:
  title: Review Store
  license:
    name: Apache 2.0
    identifier: Apache-2.0
  version: 0.0.1
servers:
  - url: https://us-central1-project-0.cloudfunctions.net
paths:
  /store-review:
    post:
      operationId: storeReview
      summary: Store a new review
      requestBody:
        content:
          application/json:
            schema:
              type: object
              properties:
                stars:
                  type: integer
                  format: int64
      responses:
        '200':
          description: success
          content:
            application/json:
              schema:
                type: string
啟動後端服務模擬
您將部署 Cloud Function,模擬 Dialogflow CX 代理程式應用程式需要整合及呼叫的後端服務 (做為工具)。
在 Google Cloud 控制台中,按照下列步驟操作:
- 依序點選「選單」圖示 ☰ >「Cloud Functions」。
- 按一下「Create function」(建立函式)。
- 在「Basics」(基本) 下方,將「name」(名稱) 設定為
function-2。 - 在「Authentication」(驗證) 下方,選取「Allow unauthenticated invocations」(允許未經驗證的叫用) 圓形按鈕。
- 在「執行階段、建構作業、連線和安全性設定」下方,將「執行個體數量上限」設為
3。 - 點選 [下一步]。

- 將「Entry point」(進入點) 設為
feedback-app-backend。 - 將預設內容替換為 package.json 和 index.js 檔案。
- 按一下 [Deploy] (部署)。
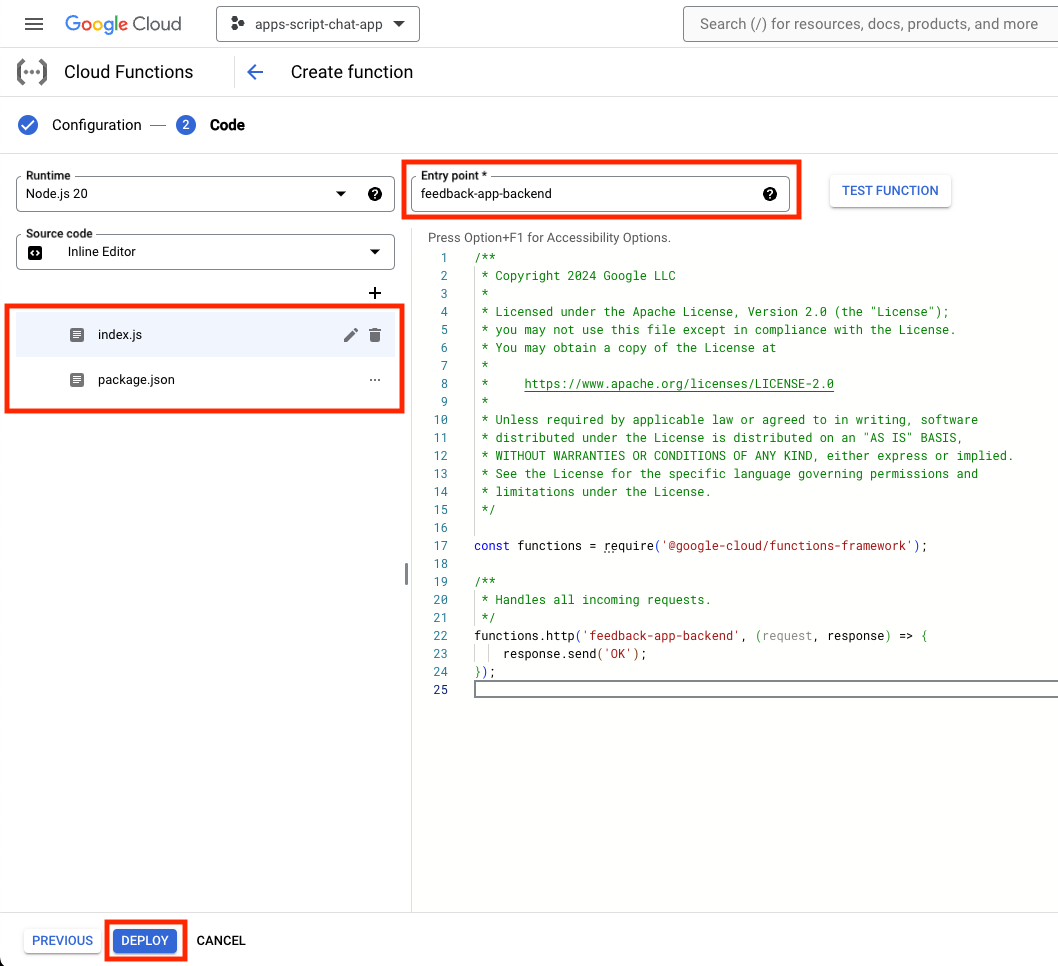
- 請稍候幾分鐘,等待函式部署完成,然後複製網址。
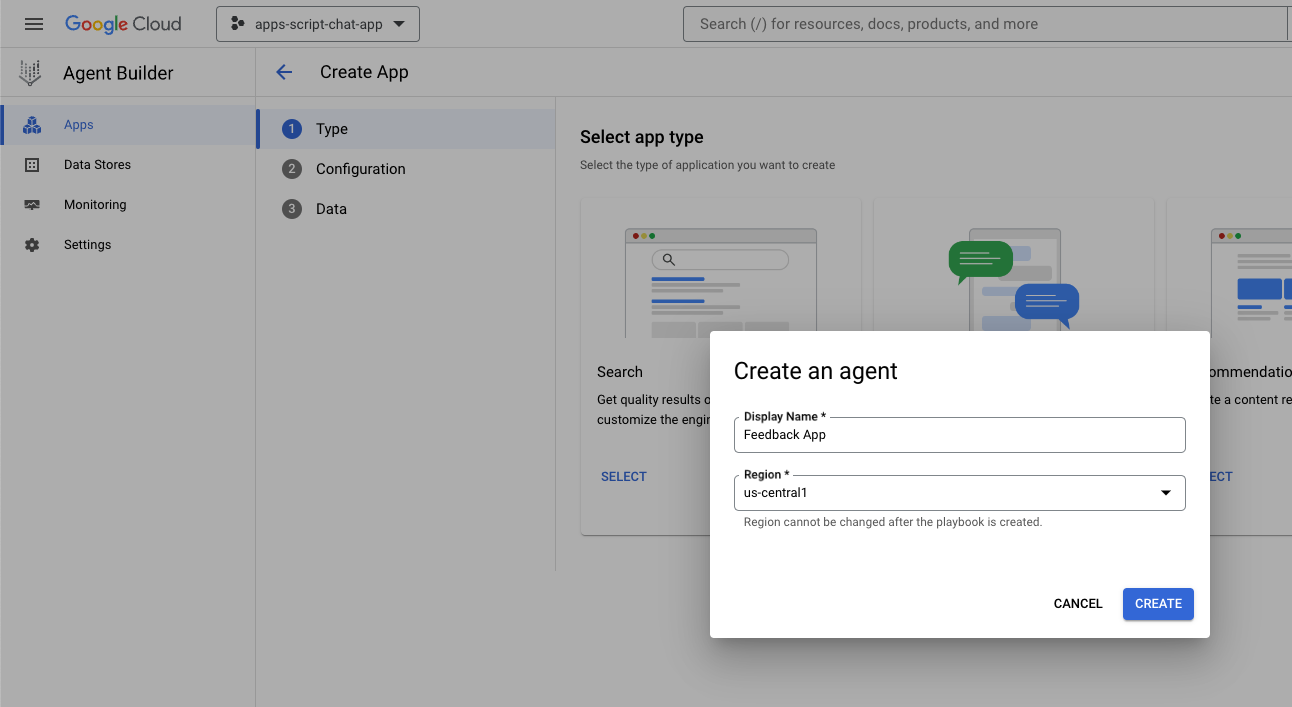
建立 Dialogflow CX 服務專員應用程式
建立應用程式
在 Google Cloud 控制台中,按照下列步驟操作:
- 依序點選「選單」圖示 ☰ >「Agent builder」>「應用程式」。
- 點選「New app」(新增應用程式)。
- 選取「代理商」。
- 將「Display name」(顯示名稱) 設為
Feedback App。 - 點選「建立」。
啟動工具
在 Google Cloud 控制台中,按照下列步驟操作:
- 依序點選「選單」圖示 ☰ >「Agent builder」>「應用程式」。
- 選取「意見回饋應用程式」代理程式。
- 依序點選「工具」>「+ 建立」。
- 將「Name」(名稱) 設定為
review。 - 選取「OpenAPI」OpenAPI。
- 將 description 設為下列值:
The tool takes the number of stars as a parameter of the store review method and saves it in a database for later use.
- 下載 service-openapi.yaml 檔案,並將檔案中的
$URL替換為先前複製的網址。 - 將
YAML Schema設為service-openapi.yaml檔案的編輯內容。 - 按一下 [儲存]。

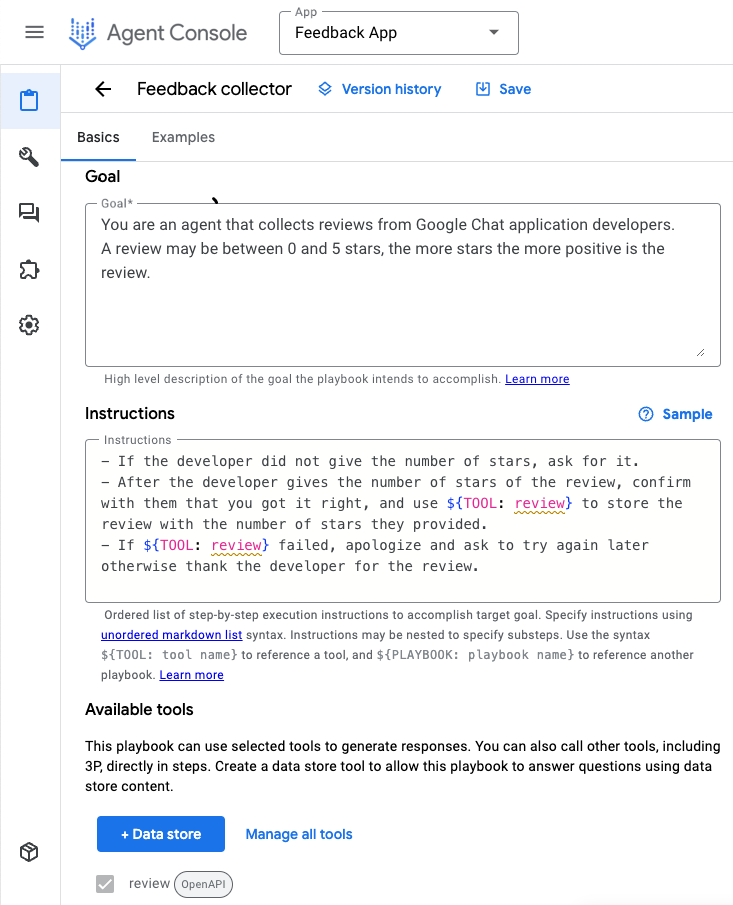
啟動代理程式
在 Google Cloud 控制台中,按照下列步驟操作:
- 依序點選「選單」圖示 ☰ >「Agent builder」>「應用程式」。
- 選取「意見回饋應用程式」代理程式。
- 依序選取「代理程式」>「預設生成代理程式」。
- 將「Agent name」(代理程式名稱) 設為
Feedback collector。 - 將
goal設為下列值:
You are an agent that collects reviews from Google Chat app developers.
A review may be between 0 and 5 stars. The more stars, the more positive the review.
- 將 instructions 設為下列值:
If the developer didn't provide the number of stars, ask for the number of stars.
After the developer provides the number of stars of the review, confirm the number with the developer and use ${TOOL: review} to store the review with the number of stars.
If ${TOOL: review} fails, apologize and ask to try again later. Otherwise, thank the developer for the review.
- 按一下 [儲存]。
測試應用程式
在 Google Cloud 控制台中,按照下列步驟操作:
- 依序點選「選單」圖示 ☰ >「Agent builder」>「應用程式」。
- 選取「意見回饋應用程式」代理程式。
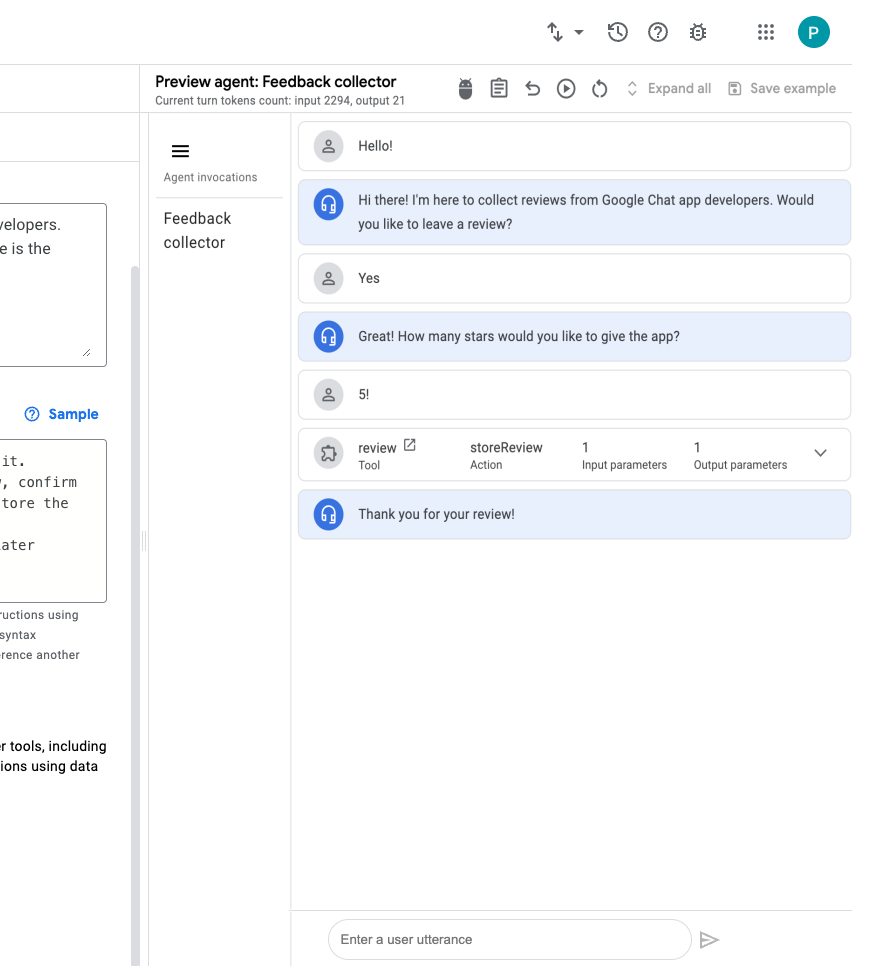
- 前往「預覽代理程式」。
- 在「代理程式」下方,選取「意見回饋收集器」。
- 在「選取生成模型」下方,選取「gemini-pro」。
- 傳送訊息
Hello!即可開始。
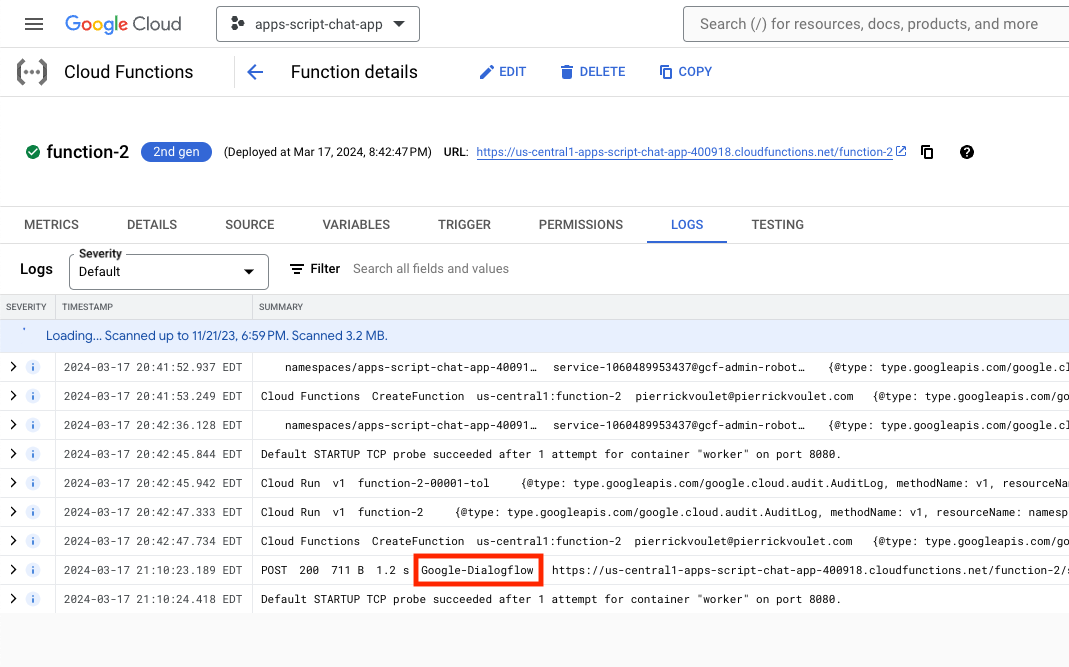
在 Google Cloud 控制台中,按照下列步驟操作:
- 依序點選「選單」圖示 ☰ >「Cloud Functions」。
- 依序選取「function-2」>「Logs」。部分記錄顯示 Google-Dialogflow 為來電者。
整合 Google Chat 應用程式
在 Dialogflow CX 主控台中,按照下列步驟操作:
- 選取 Google Cloud 專案。
- 按一下
Feedback App代理程式的操作選單。 - 按一下「複製名稱」。
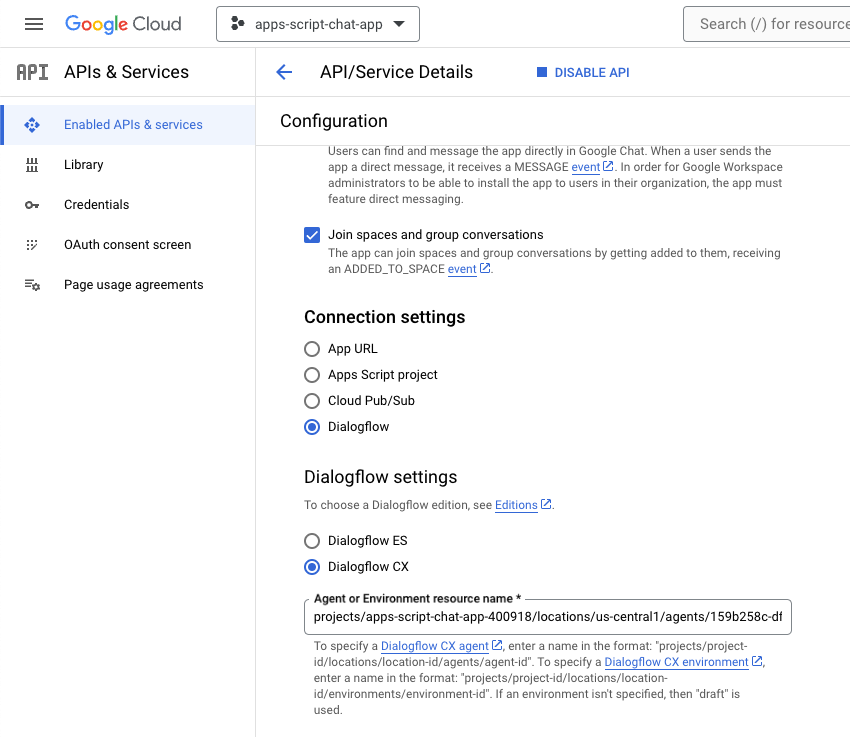
在 Google Cloud 控制台中,按照下列步驟操作:
- 前往 Google Chat API 設定。
- 將「虛擬服務專員名稱或環境資源名稱」設為您先前複製的虛擬服務專員名稱。
- 在 Google Chat 中,傳送 至 Google Chat 應用程式的即時訊息,即可開始使用。
Hello!代理程式的回應方式與您在 Dialogflow CX 主控台進行測試時類似。
11. 清理
刪除 Google Cloud 專案
如要避免系統向您的 Google Cloud 帳戶收取本程式碼研究室所用資源的費用,建議您刪除 Google Cloud 專案。
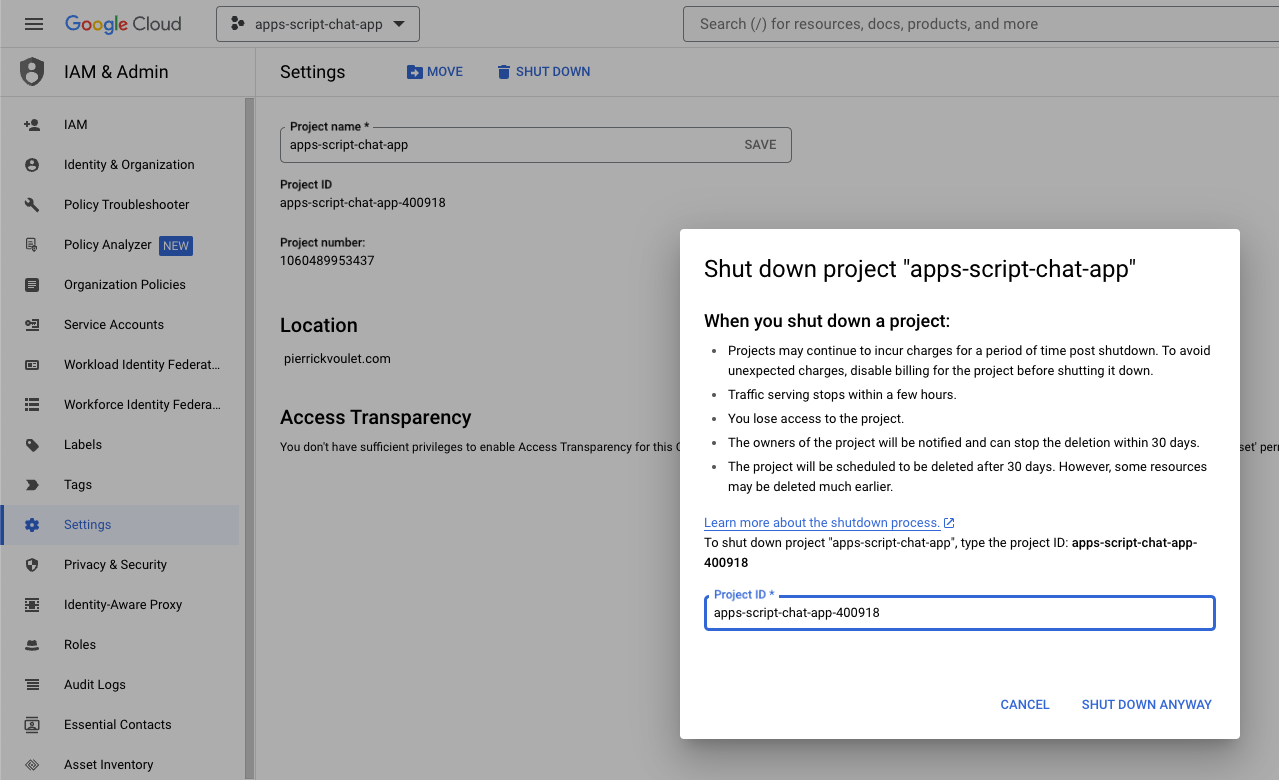
在 Google Cloud 控制台中,按照下列步驟操作:
- 依序點選「選單」圖示 ☰ >「IAM 與管理」>「設定」。
- 按一下「Shut down」(關閉)。
- 輸入專案 ID。
- 按一下「仍要關閉」。
刪除 Apps Script 專案
建議您也刪除 Apps Script 專案。
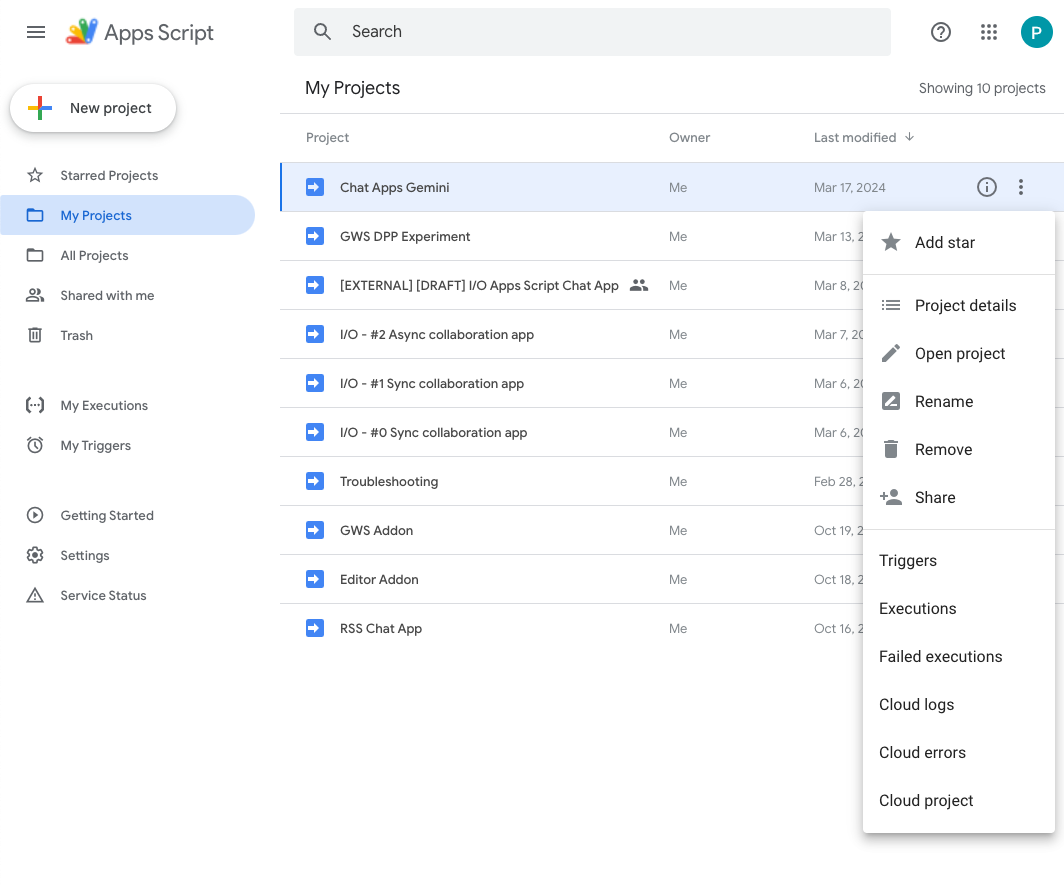
在 Apps Script 控制台中,按照下列步驟操作:
- 選取專案。
- 按一下動作選單。
- 按一下「移除」。
12. 恭喜
恭喜!您已使用 Gemini 建構 Google Chat 擴充應用程式!
後續步驟
本程式碼研究室僅展示簡單的用途,但您可能會想在 Google Chat 應用程式中考慮許多擴充領域,例如:
- 與其他生成式 AI 模型整合,包括自訂模型。
- 支援其他類型的媒體,例如音訊、圖片和影片。
- 使用多模態。
- 使用較長的脈絡窗口和回饋循環。
- 在市集發布可供正式版使用的 Google Chat 應用程式。開發人員可參考許多資源,例如 YouTube 影片、說明文件網站、程式碼範例和教學課程。
- 為貴機構啟用 Google Chat。匯入模式功能可讓您輕鬆上手。