
1. 簡介

「金魚」問題
假設你聘請旅行社代為規劃東京夢幻假期。使用工作階段代理程式,即可查看「金魚問題」的實際運作情形。
你走進辦公室,對他們說:
「你好,我想規劃東京 2 日遊,我對古蹟和壽司有興趣。」
代理程式熱情地回覆:
「Great! 我已安排參觀皇居,並在 Sukiyabashi Jiro 享用壽司晚餐。」
你微笑著說:
「聽起來很棒!可以傳送行程給我嗎?」
服務人員茫然地看著你,然後問道:
「你好,請問你今天需要哪方面的協助?
這就是所謂的「金魚問題」。如果沒有記憶功能,每次互動都會從頭開始。智慧功能已到位 (服務專員知道如何規劃行程),但缺少連續性。AI 代理程式必須具備記憶能力,才能真正發揮效用。
今天的任務
在本研討會中,您將建構可記憶、學習及適應的旅遊服務專員,解決金魚問題。您將逐步完成6 個等級的代理程式記憶體,建立的系統行為將更像專屬個人助理,而非聊天機器人。
等級 | 概念 | 「超能力」 |
第 1 關 | 工作階段和狀態 | 進行對話時不會忘記內容 |
第 2 關 | 多代理程式狀態 | 與團隊成員共用記事 |
第 3 關 | 持續性 | 即使系統重新啟動,仍會記住你的設定 |
第 4 關 | 回呼 | 完全自主更新記憶體 |
第 5 關 | 自訂工具 | 讀取及寫入結構化使用者設定檔 |
第 6 級 | 多模態記憶體 | 「看見」並記住相片和影片 |
ADK 記憶體堆疊
撰寫程式碼前,請先瞭解我們使用的工具。Google Agent Development Kit (ADK) 提供結構化的記憶體處理方式:
- 工作階段:對話的容器。當中會記錄對話內容。
- 狀態:附加至工作階段的鍵/值「暫存區」。服務專員會使用這項功能儲存特定事實 (例如
destination="Tokyo")。 - MemoryService:長期儲存空間。我們會將使用者偏好設定或分析的文件等內容永久儲存在這裡。
2. 設定
如要為 AI 代理提供支援,我們需要兩項要素:Google Cloud 專案做為基礎。
第一部分:啟用帳單帳戶
- 請先申請帳單帳戶,並取得 5 美元抵免額,以利後續部署。請務必使用 Gmail 帳戶。
第二部分:開放式環境
- 👉 按一下這個連結,直接前往 Cloud Shell 編輯器
- 👉 如果系統在今天任何時間提示您授權,請點選「授權」繼續操作。
- 👉 如果畫面底部未顯示終端機,請開啟終端機:
- 按一下「查看」
- 按一下「終端機」

- 👉💻 在終端機中,使用下列指令驗證您是否已通過驗證,以及專案是否已設為您的專案 ID:
gcloud auth list - 👉💻 從 GitHub 複製啟動程序專案:
git clone https://github.com/cuppibla/memory_agent_starter - 👉💻 從專案目錄執行設定指令碼。
cd ~/memory_agent_starter ./init.sh - 👉💻 設定所需的專案 ID:
gcloud config set project $(cat ~/project_id.txt) --quiet
第三部分:設定權限
- 👉💻 使用下列指令啟用必要的 API。這項作業可能需要幾分鐘才能完成。
gcloud services enable \ cloudresourcemanager.googleapis.com \ servicenetworking.googleapis.com \ run.googleapis.com \ aiplatform.googleapis.com \ compute.googleapis.com - 👉💻 在終端機中執行下列指令,授予必要權限:
. ~/memory_agent_starter/set_env.sh
請注意,系統會為您建立 .env 檔案。顯示專案資訊。
3. 基礎 - 工作階段和狀態

概念:內容的背景資訊是關鍵所在
最基本的記憶體形式是「工作階段記憶體」。這就是代理程式如何得知「我想買這個」這句話中的「這個」,是指你 10 秒前談論的鞋子。
在 ADK 中,我們使用 Session 物件管理這項設定。
- 無狀態方法:為每則訊息建立新工作階段。
- 有狀態方法:建立一個工作階段,並重複使用於整段對話。
步驟 1:檢查代理程式
👉💻 在 Cloud Shell 終端機中執行下列指令,在 Cloud Shell 編輯器中開啟檔案:
cloudshell edit ~/memory_agent_starter/01_session_agent/agent.py
開啟 ~/memory_agent_starter/01_session_agent/agent.py。
👉 在 agent.py 函式中找出 # TODO: Create a root agent 註解。
將整行內容替換為下列程式碼:
root_agent = LlmAgent(
    name="multi_day_trip_agent",
    model="gemini-2.5-flash",
    description="Agent that progressively plans a multi-day trip, remembering previous days and adapting to user feedback.",
    instruction="""
    You are the "Adaptive Trip Planner" 🗺️ - an AI assistant that builds multi-day travel itineraries step-by-step.

    Your Defining Feature:
    You have short-term memory. You MUST refer back to our conversation to understand the trip's context, what has already been planned, and the user's preferences. If the user asks for a change, you must adapt the plan while keeping the unchanged parts consistent.

    Your Mission:
    1.  **Initiate**: Start by asking for the destination, trip duration, and interests.
    2.  **Plan Progressively**: Plan ONLY ONE DAY at a time. After presenting a plan, ask for confirmation.
    3.  **Handle Feedback**: If a user dislikes a suggestion (e.g., "I don't like museums"), acknowledge their feedback, and provide a *new, alternative* suggestion for that time slot that still fits the overall theme.
    4.  **Maintain Context**: For each new day, ensure the activities are unique and build logically on the previous days. Do not suggest the same things repeatedly.
    5.  **Final Output**: Return each day's itinerary in MARKDOWN format.
    """,
    tools=[google_search]
)
指令會要求 LLM 記住,但程式碼必須提供記住的功能。
步驟 2:兩種情境
開啟 ~/memory_agent_starter/01_session_agent/main.py。
👉 在 Cloud Shell 終端機中執行下列指令,在 Cloud Shell 編輯器中開啟檔案:
cloudshell edit ~/memory_agent_starter/01_session_agent/main.py
開啟 ~/memory_agent_starter/01_session_agent/main.py,在 main.py 函式中找出註解 # TODO: Create a runner with in memorysession service。
將整行內容替換為下列程式碼:
    runner = Runner(
        agent=agent,
        session_service=session_service,
        app_name=agent.name
    )
👉 在 main.py 函式中找出 # TODO: create a different session to test 註解。
將整行內容替換為下列程式碼:
    tokyo_session_2 = await session_service.create_session(
        app_name=multi_day_agent.name,
        user_id=user_id
    )
測試
我們有兩個函式,可說明「金魚」和「大象」記憶體之間的差異。
情境 1:具狀態 (共用工作階段)
async def run_trip_same_session_scenario(session_service, user_id):
    # 1. Create ONE session
    trip_session = await session_service.create_session(...)

    # 2. Turn 1
    await run_agent_query(..., trip_session, ...)

    # 3. Turn 2 - REUSING the same session!
    # The agent can "see" Turn 1 because it's in the session history.
    await run_agent_query(..., trip_session, ...)
情境 2:無狀態 (每次都是新工作階段)
async def run_trip_different_session_scenario(session_service, user_id):
    # Turn 1
    tokyo_session = await session_service.create_session(...)
    await run_agent_query(..., tokyo_session, ...)

    # Turn 2 - Creating a FREASH session
    # The agent has NO IDEA what happened in Turn 1.
    tokyo_session_2 = await session_service.create_session(...)
    await run_agent_query(..., tokyo_session_2, ...)
步驟 3:執行代理程式
讓我們看看實際的差異。執行指令碼:
👉💻 在指令列中,執行下列指令列:
cd ~/memory_agent_starter
uv run python ~/memory_agent_starter/01_session_agent/main.py
觀察情境 1:代理程式會記住您在第一則訊息中的偏好設定,並在第二則訊息中調整行程。
觀察情境 2:在第二輪對話 (「你還記得我喜歡這道菜的哪些地方嗎?」) 中,由於這是新的工作階段,因此服務專員完全無法回答。這等於是說:「我不知道你在說什麼。」
重點摘要
記憶體規則 #1:一律重複使用 session.id,以維持對話背景資訊。Session 物件是代理的短期記憶體緩衝區。
4. 團隊 - 多代理狀態

概念:「電話遊戲」
多個代理程式共同運作時,就像同事之間來回傳遞檔案夾。如果某位服務專員在資料夾中撰寫附註,下一位服務專員應該可以讀取該附註。
在 ADK 中,這個「資料夾」是「狀態」。
- State 是位於 Session 內的字典 (
{"key": "value"})。 - 工作階段中的任何代理程式都能讀取或寫入。
步驟 1:檢查工作流程
👉💻 在 Cloud Shell 終端機中執行下列指令,在 Cloud Shell 編輯器中開啟檔案:
cloudshell edit ~/memory_agent_starter/02_multi_agent/agent.py
👉在 ~/memory_agent_starter/02_multi_agent/agent.py 檔案中,找出 # TODO: foodie agent 註解。
將整行內容替換為下列程式碼:
foodie_agent = LlmAgent(
    name="foodie_agent",
    model="gemini-2.5-flash",
    tools=[google_search],
    instruction="""You are an expert food critic. Your goal is to find the best restaurant based on a user's request.

    When you recommend a place, you must output *only* the name of the establishment and nothing else.
    For example, if the best sushi is at 'Jin Sho', you should output only: Jin Sho
    """,
    output_key="destination"  # ADK will save the agent's final response to state['destination']
)
👉 在 agent.py 函式中找出 # TODO: transportation agent 註解。
將整行內容替換為下列程式碼:
transportation_agent = LlmAgent(
    name="transportation_agent",
    model="gemini-2.5-flash",
    tools=[google_search],
    instruction="""You are a navigation assistant. Given a destination, provide clear directions.
    The user wants to go to: {destination}.

    Analyze the user's full original query to find their starting point.
    Then, provide clear directions from that starting point to {destination}.
    """,
)
👉 在 agent.py 函式中找出 # TODO: root_agent 註解。
將整行內容替換為下列程式碼:
root_agent = SequentialAgent(
    name="find_and_navigate_agent",
    sub_agents=[foodie_agent, transportation_agent],
    description="A workflow that first finds a location and then provides directions to it."
)
現在,我們有兩個依序執行的代理程式:
- 美食代理程式:尋找餐廳。
- 交通服務專員:提供前往該餐廳的路線。
魔術交接:請注意 foodie_agent 如何將接力棒交給 transportation_agent。
foodie_agent = LlmAgent(
    # ...
    # CRITICAL: This tells ADK to save the agent's output to state['destination']
    output_key="destination"
)

transportation_agent = LlmAgent(
    # ...
    # CRITICAL: This injects state['destination'] into the prompt
    instruction="""
    The user wants to go to: {destination}.
    Provide clear directions...
    """,
)
output_key="destination":Foodie Agent 的回覆會有效率地儲存。{destination}:運輸服務專員會自動讀取該答案。
(不須採取行動) 步驟 2:協調器
開啟 02_multi_agent/main.py。
我們會使用 SequentialAgent 依序執行這些作業。
# 1. Create a single session for the sequential agent
session = await session_service.create_session(...)

# 2. Run the query
# The SequentialAgent manages the state flow:
# Query -> Foodie -> state['destination'] -> Transportation -> Final Answer
await run_agent_query(root_agent, query, ...)
使用者傳送一則提示:
"Find best sushi in Palo Alto and then tell me how to get there."
代理程式會共同回答問題。
步驟 3:執行 Team
👉💻 在 Cloud Shell 終端機中,執行多代理工作流程:
cd ~/memory_agent_starter
uv run python ~/memory_agent_starter/02_multi_agent/main.py
會發生什麼情況?
- 美食家代理人:尋找「金翔」(或類似名稱)。
- ADK:將「Jin Sho」儲存至
state['destination']。 - 運輸代理商:在指示中收到「Jin Sho」。
- 結果:「如要從加州火車 (Caltrain) 站前往 Jin Sho,請沿著 University Ave 步行...」
重點摘要
記憶體規則 #2:使用狀態在代理之間傳遞結構化資訊。使用 output_key 寫入,並使用 {placeholders} 讀取。
5. 重新啟動 - 持續性

概念:「重新啟動問題」
到目前為止,我們的記憶體是 InMemory。如果停止指令碼並重新啟動,代理程式會忘記所有內容。就像電腦每次關機時都會清除硬碟資料。
如要修正這個問題,我們需要持續性。我們將 InMemorySessionService 換成 DatabaseSessionService。
步驟 1:資料庫切換
👉💻 在 Cloud Shell 終端機中執行下列指令,在 Cloud Shell 編輯器中開啟檔案:
cloudshell edit ~/memory_agent_starter/03_persistent_agent/main.py
👉 在 ~/memory_agent_starter/03_persistent_agent/main.py 檔案中,找出 # TODO: Configuration for Persistent Sessions 註解。
將整行內容替換為下列程式碼:
SESSIONS_DIR = Path(os.path.expanduser("~")) / ".adk_codelab" / "sessions"
os.makedirs(SESSIONS_DIR, exist_ok=True)
SESSION_DB_FILE = SESSIONS_DIR / "trip_planner.db"
SESSION_URL = f"sqlite:///{SESSION_DB_FILE}"
現在,每個工作階段和事件都會儲存到 SQLite 檔案。
步驟 2:跨工作階段擷取
持續性不僅可繼續對話,還能從先前的對話中學習。
在同一個檔案~/memory_agent_starter/03_persistent_agent/main.py中,查看「測試案例 3:跨工作階段擷取」。
👉 找到留言 # TODO: retrieve the previous session manually
將整行內容替換為下列程式碼:
    old_session = await session_service.get_session(
        app_name=root_agent.name, user_id="user_01", session_id=session_id
    )
👉 在 main.py 函式中找出 # TODO: Extract content from the OLD session 註解。
將整行內容替換為下列程式碼:
previous_context += f"- {role}: {text}\n"
👉 在 main.py 函式中找出 # TODO: Manually inject the context to the query 註解。
將整行內容替換為下列程式碼:
    query_3 = f"""
    {previous_context}

    I'm planning a new trip to Osaka this time.
    Based on my previous preferences (above), what should I eat?
    """
這會模擬使用者在幾個月後回訪的情況。只有透過資料庫,您才能擷取舊記錄。
步驟 3:重新啟動後繼續操作
👉💻 在終端機中執行指令碼:
cd ~/memory_agent_starter
uv run python ~/memory_agent_starter/03_persistent_agent/main.py
這會建立 ~/memory_agent_starter/trip_planner.db 檔案。請嘗試:執行指令碼「兩次」。
- 在第二次執行時,尋找「Resumed existing session」。
- 由於代理程式會從資料庫檔案載入,因此會記住第一次執行的脈絡!
重點摘要
記憶體規則 #3:在正式環境中使用 DatabaseSessionService。確保使用者對話在伺服器重新啟動後仍可繼續,並支援長期記錄分析。
6. The Spy - Callbacks

有時,您需要根據代理程式的實際行為自動更新記憶體,而不只是根據代理程式的說詞。您希望有「間諜」監視代理程式並做筆記。
在 ADK 中,這個間諜是 Callback。
after_tool_callback:代理程式每次運作時都會執行的函式。ToolContext:從該函式內部寫入 State 的方式。
步驟 1:邏輯
👉💻 在 Cloud Shell 終端機中執行下列指令,在 Cloud Shell 編輯器中開啟檔案:
cloudshell edit ~/memory_agent_starter/04_stateful_agent/agent.py
👉 在 ~/memory_agent_starter/04_stateful_agent/agent.py 檔案中,找出註解 # TODO: Implement call back logic
將整行內容替換為下列程式碼:
def save_activity_type_callback(
    tool,
    args: Dict[str, Any],
    tool_context: ToolContext,
    tool_response: Dict[str, Any],
) -> Optional[Dict[str, Any]]:
    """
    Callback to save the TYPE of activity just planned into the session state.
    """
    # 1. Get the actual agent name.
    if tool.name == "transfer_to_agent":
         agent_name = args.get("agent_name")
    else:
         agent_name = tool.name

    activity_type = "unknown"

    # 2. Determine the type based on which agent was actually used
    if agent_name == "museum_expert":
        activity_type = "CULTURAL"
    elif agent_name == "restaurant_expert":
        activity_type = "FOOD"
    elif agent_name == "outdoor_expert":
        activity_type = "OUTDOOR"

    print(f"\n🔔 [CALLBACK] The planner transferred to '{agent_name}'.")

    # 3. Update the state directly
    tool_context.state["last_activity_type"] = activity_type
    print(f"💾 [STATE UPDATE] 'last_activity_type' is now set to: {activity_type}\n")

    return tool_response
👉 在同一個檔案中,找出 04_stateful_agent/agent.py 函式內的 # TODO: add callback to root agent 註解。
將整行內容替換為下列程式碼:
after_tool_callback=save_activity_type_callback,
動態指令:現在,代理程式的指令是「函式」,而非字串。會根據狀態而變更!
def get_planner_instruction(context):
    last_activity = context.state.get("last_activity_type", "None")

    return f"""
    The last activity was: {last_activity}

    If last_activity is 'CULTURAL' -> `museum_expert` is BANNED.
    """
步驟 3:測試 Spy
👉💻 在終端機中,複製並貼上下列指令,然後執行指令碼:
cd ~/memory_agent_starter
uv run python ~/memory_agent_starter/04_stateful_agent/main.py
執行這個代理程式時,你會看到迴圈。
- 第 1 輪:你要求尋找博物館。間諜套裝
last_activity="CULTURAL"。 - 第 2 輪:你要求其他博物館。
- 代理程式指令更新:「CULTURAL is BANNED」。
- 代理程式說:「我無法再參觀其他博物館。要不要去公園?
查看控制台記錄中的 [CALLBACK] 和 [STATE UPDATE]。你可以即時查看記憶體變化情形。
重點摘要
記憶體規則 #4:使用回呼自動管理狀態。代理程式只要執行工作,就會自行建立情境。
7. 檔案櫃 - 自訂工具
概念:「結構化記憶體」

目前「記憶」功能會儲存對話記錄或簡單的鍵/值組合。但如果需要記住複雜的使用者設定檔,該怎麼辦?例如:diet: vegan, budget: high, pets: [cat, dog]。
為此,我們將記憶體視為工具。代理程式會明確決定何時開啟檔案櫃 (讀取),以及何時提交報告 (寫入)。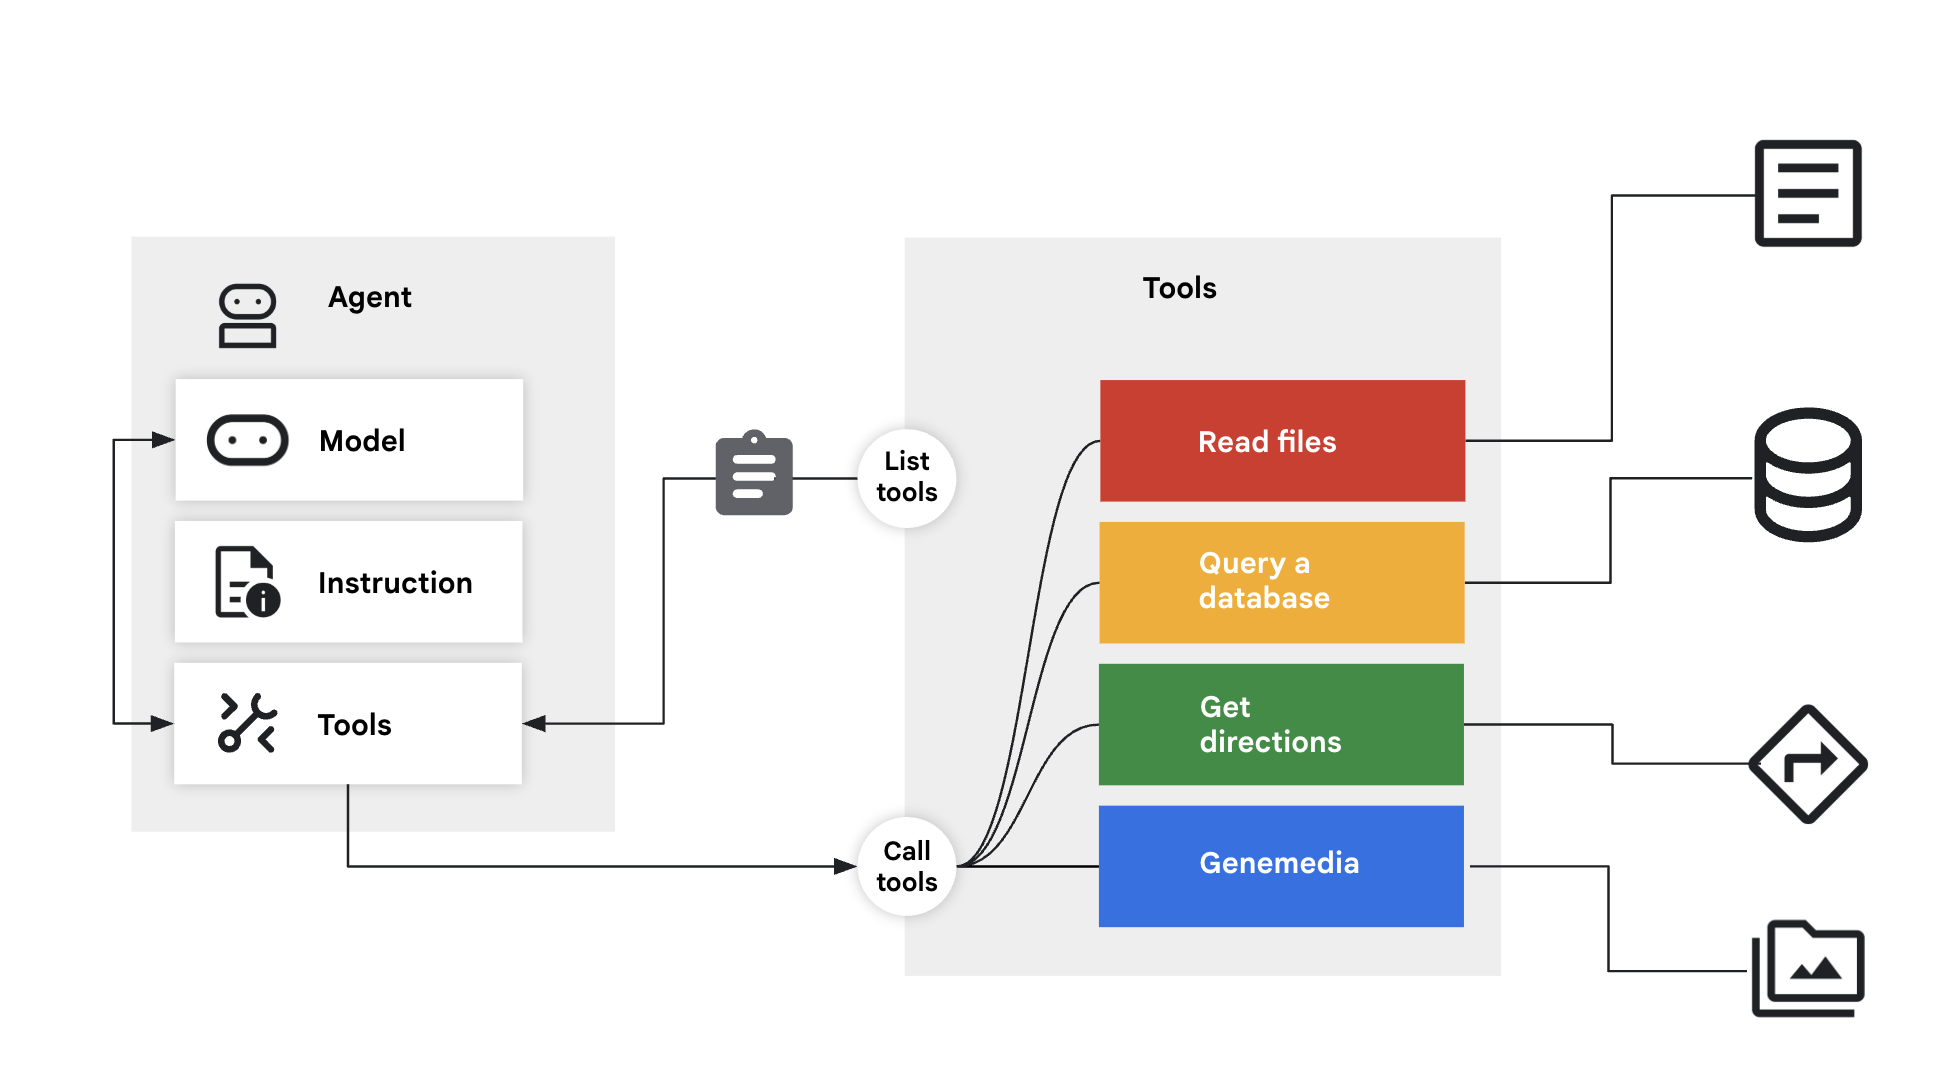
步驟 1:工具
👉💻 在 Cloud Shell 終端機中執行下列指令,在 Cloud Shell 編輯器中開啟檔案:
cloudshell edit ~/memory_agent_starter/05_profile_agent/tools.py
👉 在這個檔案中:~/memory_agent_starter/05_profile_agent/tools.py。
我們需要實作這兩項特定工具:
save_user_preferences:寫入資料庫。recall_user_preferences:從資料庫讀取資料。
在 ~/memory_agent_starter/05_profile_agent/tools.py 函式中找出 # TODO: implement save_user_preferences tools 註解。
將整行內容替換為下列程式碼:
def save_user_preferences(tool_context: ToolContext, new_preferences: Dict[str, Any]) -> str:
    user_id = tool_context.session.user_id
    with sqlite3.connect(USER_DB_FILE) as conn:
        for key, value in new_preferences.items():
            conn.execute("INSERT INTO user_preferences (user_id, pref_key, pref_value) VALUES (?, ?, ?) ON CONFLICT(user_id, pref_key) DO UPDATE SET pref_value = excluded.pref_value;",
                         (user_id, key, json.dumps(value)))
    return f"Preferences updated: {list(new_preferences.keys())}"
👉 在 05/tools.py 函式中找出 # TODO: implement recall_user_preferences tools 註解。
將整行內容替換為下列程式碼:
def recall_user_preferences(tool_context: ToolContext) -> Dict[str, Any]:
    user_id = tool_context.session.user_id
    preferences = {}
    with sqlite3.connect(USER_DB_FILE) as conn:
        rows = conn.execute("SELECT pref_key, pref_value FROM user_preferences WHERE user_id = ?", (user_id,)).fetchall()
        if not rows: return {"message": "No preferences found."}
        for key, value_str in rows: preferences[key] = json.loads(value_str)
    return preferences
這項指令會強制執行工作流程:
instruction="""
1. RECALL FIRST: First action MUST be `recall_user_preferences`.
3. LEARN: If a user states a new preference, use `save_user_preferences`.
"""
步驟 2:執行
👉💻 在 Cloud Shell 終端機中執行下列指令,在 Cloud Shell 編輯器中開啟檔案:
cloudshell edit ~/memory_agent_starter/05_profile_agent/main.py
開啟 ~/memory_agent_starter/05_profile_agent/main.py。
與 ADK 自動處理狀態的先前模組不同,這裡是由 Agent 控制。
- 它選擇在開頭呼叫
recall_user_preferences。 - 當你說出「我是素食者」時,系統會選擇呼叫
save_user_preferences。
步驟 3:建立設定檔
👉💻 執行指令碼:
cd ~/memory_agent_starter
uv run python ~/memory_agent_starter/05_profile_agent/main.py
建議的對話流程如下:
- 「Hi,幫我規劃晚餐。」-> 代理程式檢查資料庫,但找不到任何內容。詢問偏好設定。
- 「我吃全素」-> 代理程式將「vegan」儲存至資料庫。
- 重新啟動指令碼。
- 「Hi,幫我規劃晚餐。」-> 服務專員查看資料庫,看到「純素」後,立即建議純素餐廳。
重點摘要
記憶體規則 #5:對於複雜的結構化資料,請提供讀取/寫入工具給代理程式。讓大型語言模型管理自己的長期儲存空間。
8. 大腦 - 多模態記憶體
概念:「The Human Experience」(人類體驗)
人類的記憶力比文字更強大。我們會記住相片的氛圍、語音的聲音、影片的感覺。
Vertex AI Memory Bank 可讓代理處理多模態記憶體。這項技術可擷取圖片、影片和音訊,並「瞭解」這些內容,以便日後擷取。
步驟 1:設定
👉💻 在 Cloud Shell 終端機中執行下列指令,在 Cloud Shell 編輯器中開啟檔案:
cloudshell edit ~/memory_agent_starter/06_multimodal_agent/main.py
👉 開啟 06_multimodal_agent/main.py。找出註解 # TODO: Configure Memory Bank Topic。
將整行內容替換為下列程式碼:
travel_topics = [
    MemoryTopic(
        managed_memory_topic=ManagedMemoryTopic(
            managed_topic_enum=ManagedTopicEnum.USER_PREFERENCES
        )
    ),
    MemoryTopic(
        managed_memory_topic=ManagedMemoryTopic(
            managed_topic_enum=ManagedTopicEnum.USER_PERSONAL_INFO
        )
    ),
    MemoryTopic(
        custom_memory_topic=CustomMemoryTopic(
            label="travel_experiences",
            description="""Memorable travel experiences including:
                - Places visited and impressions
                - Favorite restaurants, cafes, and food experiences
                - Preferred accommodation types and locations
                - Activities enjoyed (museums, hiking, beaches, etc.)
                - Travel companions and social preferences
                - Photos and videos from trips with location context""",
        )
    ),
    MemoryTopic(
        custom_memory_topic=CustomMemoryTopic(
            label="travel_preferences",
            description="""Travel style and preferences:
                - Budget preferences (luxury, mid-range, budget)
                - Transportation preferences (flying, trains, driving)
                - Trip duration preferences
                - Season and weather preferences
                - Cultural interests and language abilities
                - Dietary restrictions and food preferences""",
        )
    ),
    MemoryTopic(
        custom_memory_topic=CustomMemoryTopic(
            label="travel_logistics",
            description="""Practical travel information:
                - Passport and visa information
                - Frequent flyer numbers and hotel loyalty programs
                - Emergency contacts
                - Medical considerations and insurance
                - Packing preferences and essentials
                - Time zone preferences and jet lag strategies""",
        )
    ),
]
找出留言 # TODO: Configure Memory Bank Customization
將整行內容替換為下列程式碼:
memory_bank_config = {
    "customization_configs": [
        {
            "memory_topics": travel_topics,
        }
    ],
    "similarity_search_config": {
        "embedding_model": f"projects/{PROJECT_ID}/locations/{LOCATION}/publishers/google/models/gemini-embedding-001"
    },
    "generation_config": {
        "model": f"projects/{PROJECT_ID}/locations/{LOCATION}/publishers/google/models/gemini-2.5-flash"
    },
}
步驟 2:擷取世界
在 test_trip_planner 中,我們會傳送:
- 簡訊 (「Hello」)
- 圖片 (地標)
- 影片 (地中海)
- 音訊片段 (關於蓋塔的語音記事)
在 6_multimodal_agent/main.py 函式中找出 # TODO create session service and memory service 註解。
將整行內容替換為下列程式碼:
session_service = VertexAiSessionService(
    project=PROJECT_ID, location=LOCATION, agent_engine_id=agent_engine_id
)
memory_service = VertexAiMemoryBankService(
    project=PROJECT_ID, location=LOCATION, agent_engine_id=agent_engine_id
)
👉 在同一個檔案 06_multimodal_agent/main.py 中,找出註解 # TODO: create memory from session
將整行內容替換為下列程式碼:
await memory_service.add_session_to_memory(final_session_state)
這就是魔法線。然後將所有多媒體內容傳送至 Vertex AI 進行處理和建立索引。
步驟 3:擷取
👉💻 在 Cloud Shell 終端機中執行下列指令,在 Cloud Shell 編輯器中開啟檔案:
cloudshell edit ~/memory_agent_starter/06_multimodal_agent/agent.py
代理程式有 PreloadMemoryTool。
tools=[PreloadMemoryTool(), budget_tool]
新工作階段開始時,這項工具會自動在記憶體庫中搜尋相關的過往體驗,並將這些體驗注入脈絡。
步驟 4:執行 Brain
👉💻 在 Cloud Shell 終端機中執行指令碼 (注意:這需要啟用 Vertex AI 的 Google Cloud 專案):
cd ~/memory_agent_starter
uv run python ~/memory_agent_starter/06_multimodal_agent/main.py
觀看最終驗證步驟:
「根據我先前與你分享的圖片、影片和音訊...」
代理程式會回覆:
「你應該去 Gaeta 看看!你給我看地中海的影片,還說你很喜歡蓋塔的音訊片段。」
並將過去不同媒體類型之間的點連線起來。
重點摘要
記憶體規則 #6:使用 Vertex AI Memory Bank,享受極致的記憶體體驗。將文字、圖片和影片整合到單一可搜尋的腦中。
9. 結語
你從健忘的金魚,一路進化成多模態大象。
您建構的項目 | 功能 |
工作階段代理程式 | 短期對話記憶 |
Multi-Agent | 團隊共用記憶體 |
持續性代理程式 | 長期記錄 |
有狀態代理程式 | 動態更新的記憶體 |
個人資料代理程式 | 結構化資料記憶體 |
多模態代理程式 | 類似人類的感覺記憶 |
信任是建立在記憶的基礎上。實作這些模式後,您就能建立尊重使用者時間和記錄的代理程式,進而進行更深入、更有效的互動。
立即開始建構個人專屬代理程式!