关于此 Codelab
1. Welcome
Introduction
When you implemented the first feature of your first app, you likely ran the code to verify that it worked as expected. You performed a test, albeit a manual test. As you continued to add and update features, you probably also continued to run your code and verify it works. But doing this manually every time is tiring, prone to mistakes, and does not scale.
Computers are great at scaling and automation! So developers at companies large and small write automated tests, which are tests that are run by software and do not require you to manually operate the app to verify the code works.
What you'll learn in this series of codelabs is how to create a collection of tests (known as a testing suite) for a real-world app.
This first codelab covers the basics of testing on Android, you'll write your first tests and learn how to test LiveData and ViewModels.
What you should already know
You should be familiar with:
- The following core Android Jetpack libraries:
ViewModelandLiveData - Application architecture, following the pattern from the Guide to app architecture and Android Fundamentals codelabs
What you'll learn
You'll learn about the following topics:
- How to write and run unit tests on Android
- How to use Test Driven Development
- How to choose instrumented tests and local tests
You'll learn about the following libraries and code concepts:
What you'll do
- Set up, run, and interpret both local and instrumented tests in Android.
- Write unit tests in Android using JUnit4 and Hamcrest.
- Write simple
LiveDataandViewModeltests.
2. App overview
In this series of codelabs, you'll be working with the TO-DO Notes app. The app allows you to write down tasks to complete and displays them in a list. You can then mark them as completed or not, filter them, or delete them.

This app is written in Kotlin, has several screens, uses Jetpack components, and follows the architecture from a Guide to app architecture. By learning how to test this app, you'll be able to test apps that use the same libraries and architecture.
3. Getting Started
To get started, download the code:
Alternatively, you can clone the Github repository for the code:
$ git clone https://github.com/google-developer-training/advanced-android-testing.git
$ cd android-testing
$ git checkout starter_code
You can browse the code in the android-testing Github repository.
4. Task: Familiarizing yourself with the code
In this task you'll run the app and explore the code base.
Step 1: Run the sample app
Once you've downloaded the TO-DO app, open it in Android Studio and run it. It should compile. Explore the app by doing the following:
- Create a new task with the plus floating action button. Enter a title first, then enter additional information about the task. Save it with the green check FAB.
- In the list of tasks, click on the title of the task you just completed and look at the detail screen for that task to see the rest of the description.
- In the list or on the detail screen, check the checkbox of that task to set its status to Completed.
- Go back to the tasks screen, open the filter menu, and filter the tasks by Active and Completed status.
- Open the navigation drawer and click Statistics.
- Got back to the overview screen, and from the navigation drawer menu, select Clear completed to delete all tasks with the Completed status
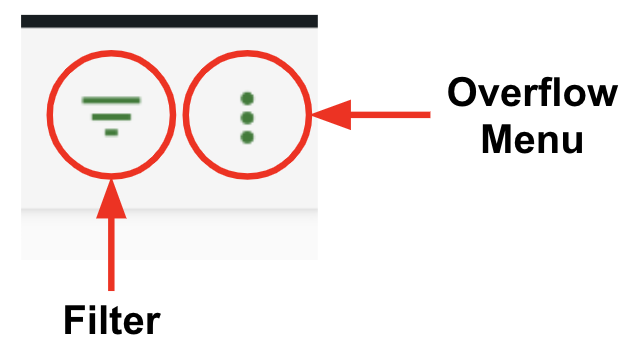
Step 2: Explore the sample app code
The TO-DO app is based off of the Architecture Blueprints testing and architecture sample. The app follows the architecture from a Guide to app architecture. It uses ViewModels with Fragments, a repository, and Room. If you're familiar with any of the below examples, this app has a similar architecture:
- Android Kotlin Fundamentals training codelabs
- Advanced Android training codelabs
- Room with a View Codelab
- Android Sunflower Sample
- Developing Android Apps with Kotlin Udacity training course
It is more important that you understand the general architecture of the app than have a deep understanding of the logic at any one layer.
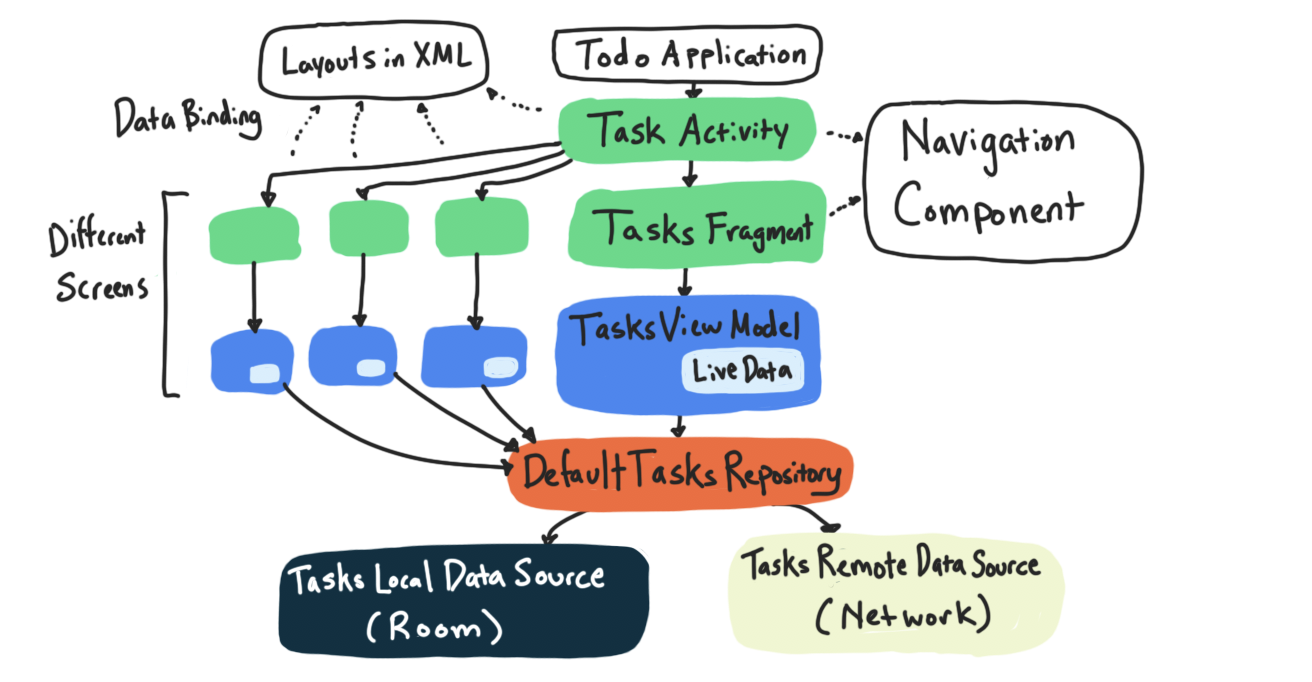
Here's the summary of packages you'll find:
Package: | ||
| The add or edit a task screen: UI layer code for adding or editing a task. | |
| The data layer: This deals with the data layer of the tasks. It contains the database, network, and repository code. | |
| The statistics screen: UI layer code for the statistics screen. | |
| The task detail screen: UI layer code for a single task. | |
| The tasks screen: UI layer code for the list of all tasks. | |
| Utility classes: Shared classes used in various parts of the app, e.g. for the swipe refresh layout used on multiple screens. | |
Data layer (.data)
This app includes a simulated networking layer, in the remote package, and a database layer, in the local package. For simplicity, in this project the networking layer is simulated with just a HashMap with a delay, rather than making real network requests.
The DefaultTasksRepository coordinates or mediates between the networking layer and the database layer and is what returns data to the UI layer.
UI layer ( .addedittask, .statistics, .taskdetail, .tasks)
Each of the UI layer packages contains a fragment and a view model, along with any other classes that are required for the UI (such as an adapter for the task list). The TaskActivity is the activity that contains all of the fragments.
Navigation
Navigation for the app is controlled by the Navigation component. It is defined in the nav_graph.xml file. Navigation is triggered in the view models using the Event class; the view models also determine what arguments to pass. The fragments observe the Events and do the actual navigation between screens.
5. Task: Running tests
In this task, you'll run your first tests.
- In Android Studio, open up the Project pane and find these three folders:
com.example.android.architecture.blueprints.todoappcom.example.android.architecture.blueprints.todoapp (androidTest)com.example.android.architecture.blueprints.todoapp (test)
These folders are known as source sets. Source sets are folders containing source code for your app. The source sets, which are colored green (androidTest and test) contain your tests. When you create a new Android project, you get the following three source sets by default. They are:
main: Contains your app code. This code is shared amongst all different versions of the app you can build (known as build variants)androidTest: Contains tests known as instrumented tests.test: Contains tests known as local tests.
The difference between local tests and instrumented tests is in the way they are run.
Local tests (test source set)
These tests are run locally on your development machine's JVM and do not require an emulator or physical device. Because of this, they run fast, but their fidelity is lower, meaning they act less like they would in the real world.
In Android Studio local tests are represented by a green and red triangle icon.

Instrumented tests (androidTest source set)
These tests run on real or emulated Android devices, so they reflect what will happen in the real world, but are also much slower.
In Android Studio instrumented tests are represented by an Android with a green and red triangle icon.

Step 1: Run a local test
- Open the
testfolder until you find the ExampleUnitTest.kt file. - Right-click on it and select Run ExampleUnitTest.
You should see the following output in the Run window at the bottom of the screen:

- Notice the green checkmarks and expand the test results to confirm that one test called
addition_isCorrectpassed. It's good to know that addition works as expected!
Step 2: Make the test fail
Below is the test that you just ran.
ExampleUnitTest.kt
// A test class is just a normal class
class ExampleUnitTest {

   // Each test is annotated with @Test (this is a Junit annotation)
   @Test
   fun addition_isCorrect() {
       // Here you are checking that 4 is the same as 2+2
       assertEquals(4, 2 + 2)
   }
}
Notice that tests
- are a class in one of the test source sets.
- contain functions that start with the
@Testannotation (each function is a single test). - usually contain assertion statements.
Android uses the testing library JUnit for testing (in this codelab JUnit4). Both assertions and the @Test annotation come from JUnit.
An assertion is the core of your test. It's a code statement that checks that your code or app behaved as expected. In this case, the assertion is assertEquals(4, 2 + 2) which checks that 4 is equal to 2 + 2.
To see what a failed test looks like add an assertion that you can easily see should fail. It'll check that 3 equals 1+1.
- Add
assertEquals(3, 1 + 1)to theaddition_isCorrecttest.
ExampleUnitTest.kt
class ExampleUnitTest {

   // Each test is annotated with @Test (this is a Junit annotation)
   @Test
   fun addition_isCorrect() {
       assertEquals(4, 2 + 2)
       assertEquals(3, 1 + 1) // This should fail
   }
}
- Run the test.
- In the test results, notice an X next to the test.
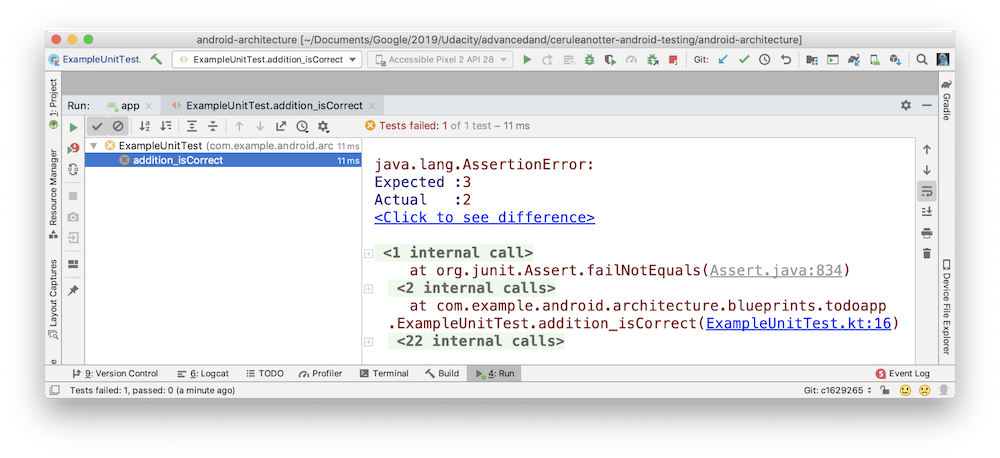
- Also notice:
- A single failed assertion fails the entire test.
- You are told the expected value (3) versus the value that was actually calculated (2).
- You are directed to the line of the failed assertion
(ExampleUnitTest.kt:16).
Step 3: Run an instrumented test
Instrumented tests are in the androidTest source set.
- Open the
androidTestsource set. - Run the test called
ExampleInstrumentedTest.
ExampleInstrumentedTest
@RunWith(AndroidJUnit4::class)
class ExampleInstrumentedTest {
    @Test
    fun useAppContext() {
        // Context of the app under test.
        val appContext = InstrumentationRegistry.getInstrumentation().targetContext
        assertEquals("com.example.android.architecture.blueprints.reactive",
            appContext.packageName)
    }
}
Unlike the local test, this test runs on a device (in the example below an emulated Pixel 2 phone):

If you have a device attached or an emulator running, you should see the test run on the emulator.
6. Task: Writing your first test
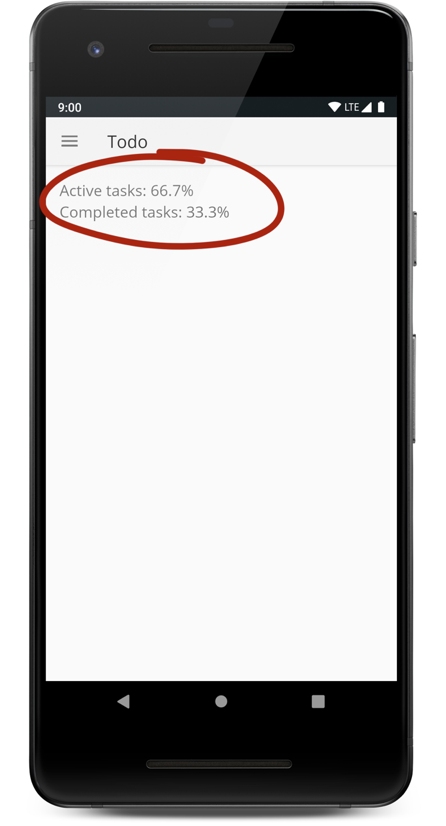
In this task, you'll write tests for getActiveAndCompleteStats, which calculates the percentage of active and complete task stats for your app. You can see these numbers on the statistics screen of the app.
Step 1: Create a test class
- In the
mainsource set, intodoapp.statistics, openStatisticsUtils.kt. - Find the
getActiveAndCompletedStatsfunction.
StatisticsUtils.kt
internal fun getActiveAndCompletedStats(tasks: List<Task>?): StatsResult {

   val totalTasks = tasks!!.size
   val numberOfActiveTasks = tasks.count { it.isActive }
   val activePercent = 100 * numberOfActiveTasks / totalTasks
   val completePercent = 100 * (totalTasks - numberOfActiveTasks) / totalTasks

   return StatsResult(
       activeTasksPercent = activePercent.toFloat(),
       completedTasksPercent = completePercent.toFloat()
   )

}

data class StatsResult(val activeTasksPercent: Float, val completedTasksPercent: Float)
The getActiveAndCompletedStats function accepts a list of tasks and returns a StatsResult. StatsResult is a data class that contains two numbers, the percentage of tasks that are completed, and the percentage that are active.
Android Studio gives you tools to generate test stubs to help you implement the tests for this function.
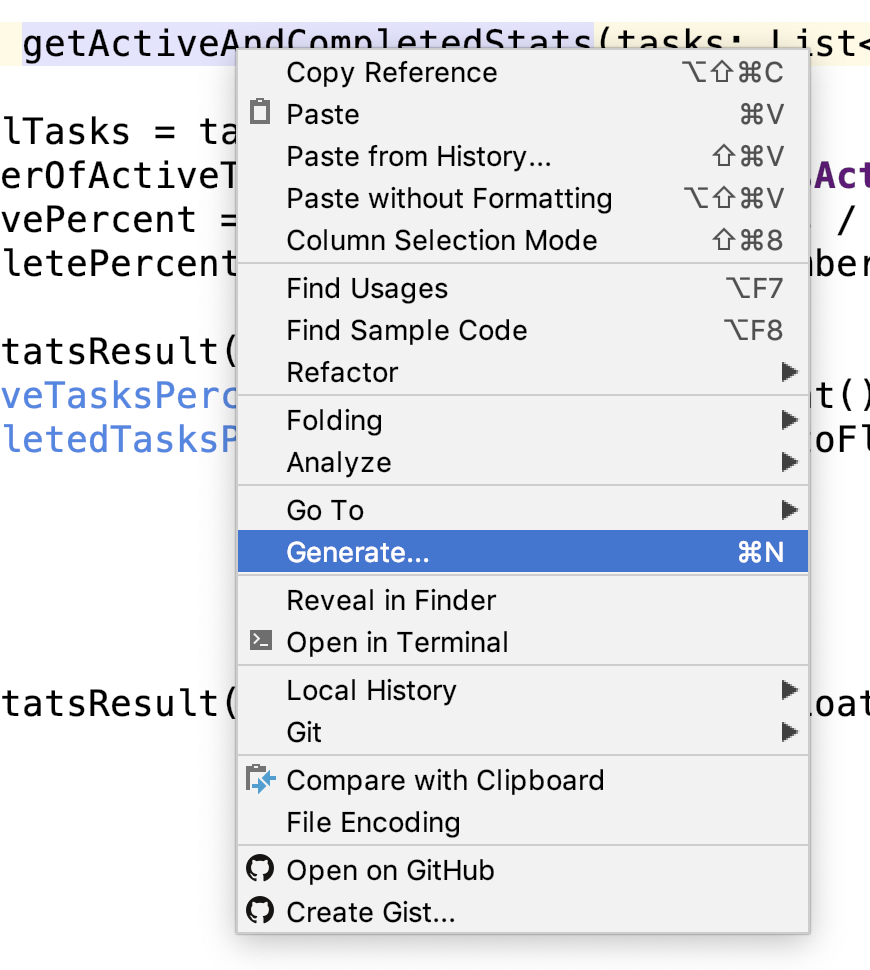
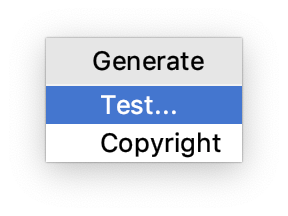
- Right click
getActiveAndCompletedStatsand select Generate > Test.
|
|
The Create Test dialog opens:
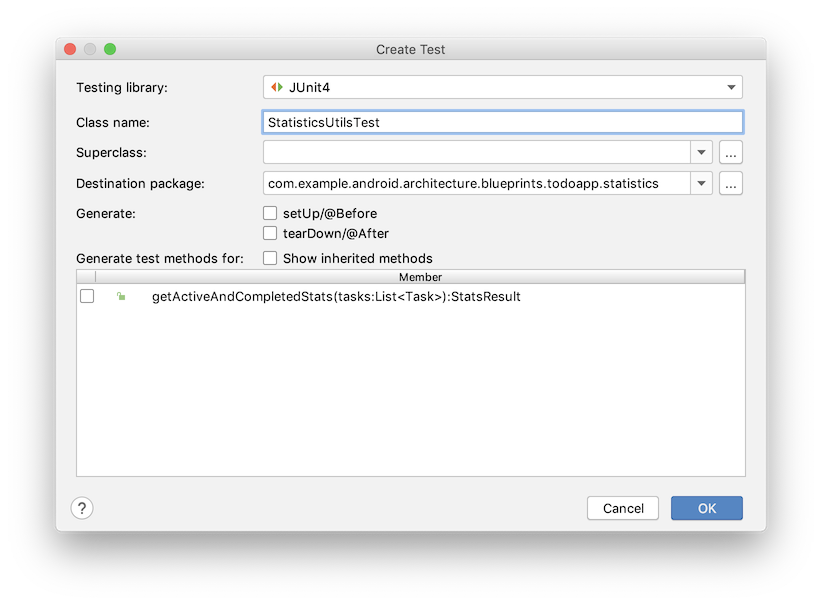
- Change the Class name: to
StatisticsUtilsTest(instead ofStatisticsUtilsKtTest; it's slightly nicer not to have KT in the test class name). - Keep the rest of the defaults. JUnit 4 is the appropriate testing library. The destination package is correct (it mirrors the location of the
StatisticsUtilsclass) and you don't need to check any of the check boxes (this just generates extra code, but you'll write your test from scratch). - Press OK.
The Choose Destination Directory dialog opens: 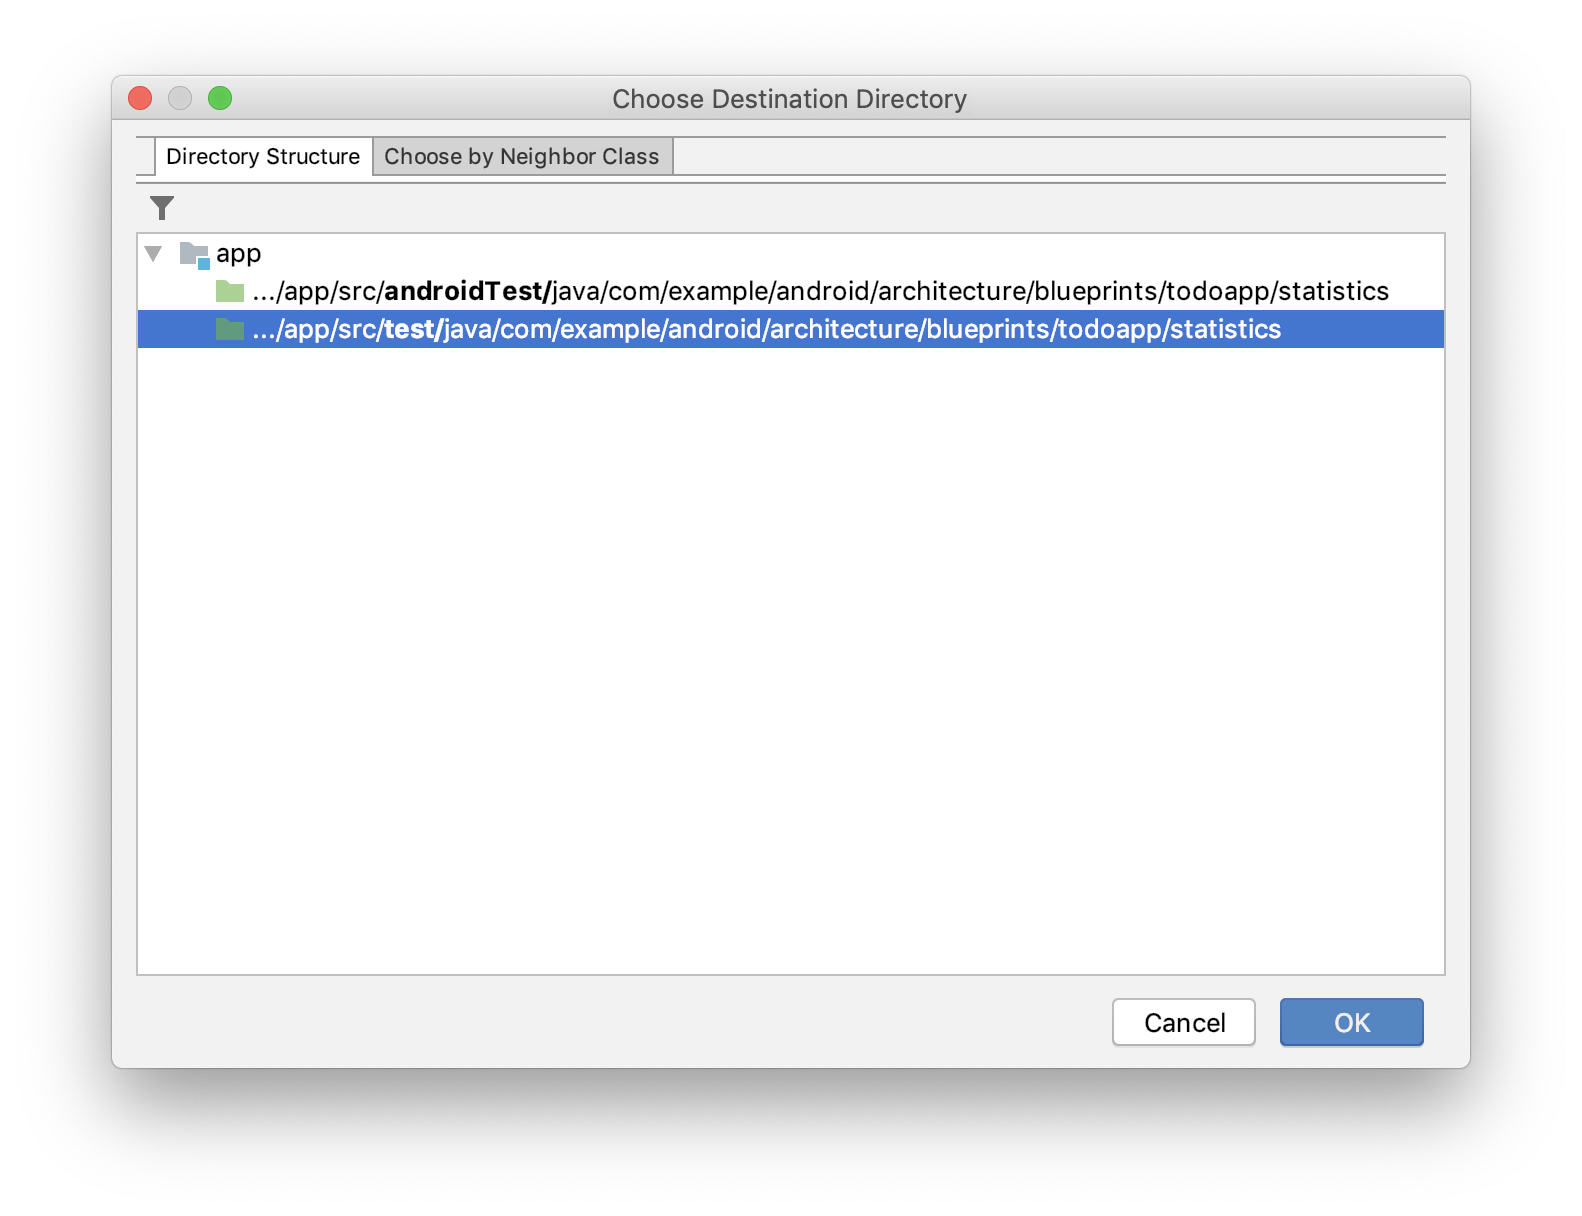
You'll be making a local test because your function is doing math calculations and won't include any Android specific code. So, there's no need to run it on a real or emulated device.
- Select the
testdirectory (notandroidTest) because you'll be writing local tests. - Click OK.
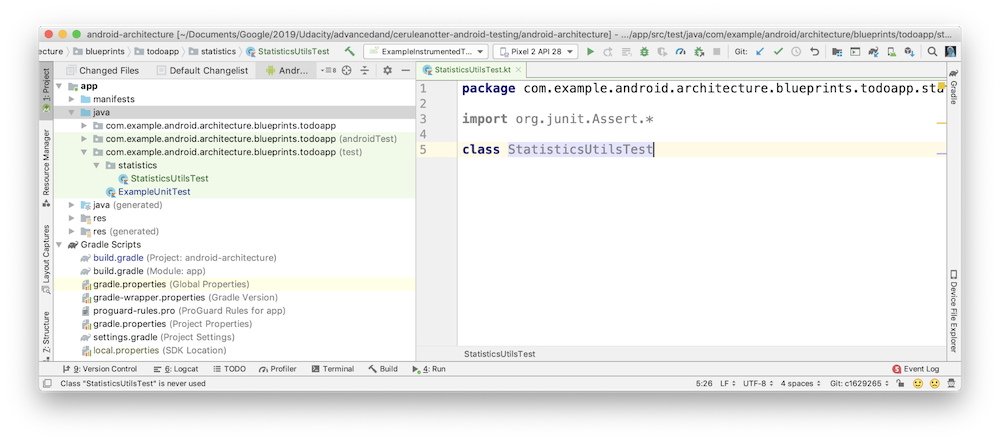
- Notice the generated the
StatisticsUtilsTestclass intest/statistics/.
Step 2: Write your first test function
You're going to write a test that checks:
- if there are no completed tasks and one active task,
- that the percentage of active tests is 100%,
- and the percentage of completed tasks is 0%.
- Open
StatisticsUtilsTest. - Create a function named
getActiveAndCompletedStats_noCompleted_returnsHundredZero.
StatisticsUtilsTest.kt
class StatisticsUtilsTest {

    fun getActiveAndCompletedStats_noCompleted_returnsHundredZero() {
        // Create an active task

        // Call your function

        // Check the result
    }
}
- Add the
@Testannotation above the function name to indicate it's a test. - Create a list of tasks.
// Create an active task
val tasks = listOf<Task>(
            Task("title", "desc", isCompleted = false)
        )
- Call
getActiveAndCompletedStatswith these tasks.
// Call your function
val result = getActiveAndCompletedStats(tasks)
- Check that
resultis what you expected, using assertions.
// Check the result
assertEquals(result.completedTasksPercent, 0f)
assertEquals(result.activeTasksPercent, 100f)
Here is the complete code.
StatisticsUtilsTest.kt
class StatisticsUtilsTest {

    @Test
    fun getActiveAndCompletedStats_noCompleted_returnsHundredZero() {

        // Create an active task (the false makes this active)
        val tasks = listOf<Task>(
            Task("title", "desc", isCompleted = false)
        )
        // Call your function
        val result = getActiveAndCompletedStats(tasks)

        // Check the result
        assertEquals(result.completedTasksPercent, 0f)
        assertEquals(result.activeTasksPercent, 100f)
    }
}
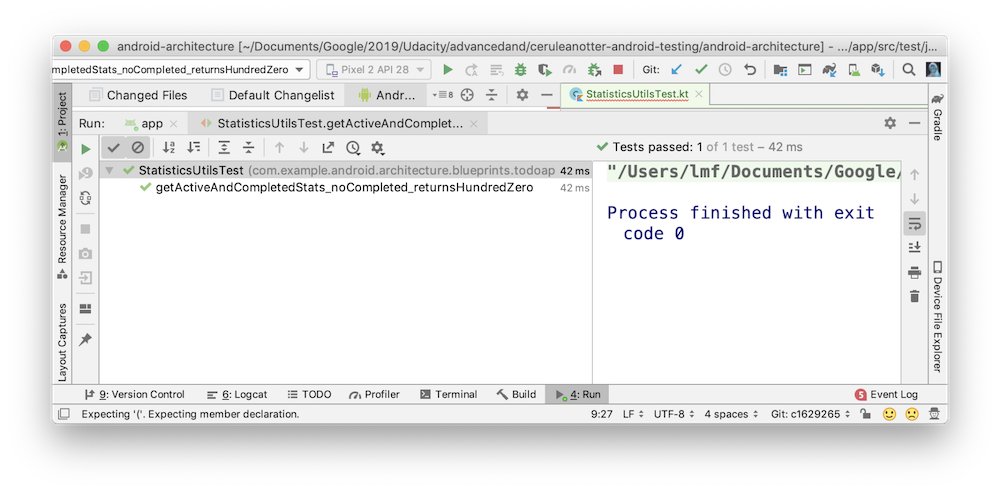
- Run the test (Right click
StatisticsUtilsTestand select Run).
It should pass:
Step 3: Add the Hamcrest dependency
Because your tests act as documentation of what your code does, it's nice when they are human readable. Compare the following two assertions:
assertEquals(result.completedTasksPercent, 0f)

// versus

assertThat(result.completedTasksPercent, `is`(0f))
The second assertion reads much more like a human sentence. It is written using an assertion framework called Hamcrest. Another good tool for writing readable assertions is the Truth library. You'll be using Hamcrest in this codelab to write assertions.
- Open
build.grade (Module: app)and add the following dependency.
app/build.gradle
dependencies {
    // Other dependencies
    testImplementation "org.hamcrest:hamcrest-all:$hamcrestVersion"
}
Usually, you use implementation when adding a dependency, yet here you're using testImplementation. When you're ready to share your app with the world, it is best not to bloat the size of your APK with any of the test code or dependencies in your app. You can designate whether a library should be included in the main or test code by using gradle configurations. The most common configurations are:
implementation—The dependency is available in all source sets, including the test source sets.testImplementation—The dependency is only available in the test source set.androidTestImplementation—The dependency is only available in theandroidTestsource set.
Which configuration you use, defines where the dependency can be used. If you write:
testImplementation "org.hamcrest:hamcrest-all:$hamcrestVersion"
This means that Hamcrest will only be available in the test source set. It also ensures that Hamcrest will not be included in your final app.
Step 4: Use Hamcrest to write assertions
- Update the
getActiveAndCompletedStats_noCompleted_returnsHundredZero()test to use Hamcrest'sassertThatinstead ofassertEquals.
// REPLACE
assertEquals(result.completedTasksPercent, 0f)
assertEquals(result.activeTasksPercent, 100f)

// WITH
assertThat(result.activeTasksPercent, `is`(100f))
assertThat(result.completedTasksPercent, `is`(0f))
Note you can use the import import org.hamcrest.Matchers.is`` if prompted.
The final test will look like the code below.
StatisticsUtilsTest.kt
import com.example.android.architecture.blueprints.todoapp.data.Task
import org.hamcrest.MatcherAssert.assertThat
import org.hamcrest.Matchers.`is`
import org.junit.Test

class StatisticsUtilsTest {

    @Test
    fun getActiveAndCompletedStats_noCompleted_returnsHundredZero() {

        // Create an active tasks (the false makes this active)
        val tasks = listOf<Task>(
            Task("title", "desc", isCompleted = false)
        )
        // Call your function
        val result = getActiveAndCompletedStats(tasks)

        // Check the result
        assertThat(result.activeTasksPercent, `is`(100f))
        assertThat(result.completedTasksPercent, `is`(0f))

    }
}
- Run your updated test to confirm it still works!
This codelab will not teach you all the ins and outs of Hamcrest, so if you'd like to learn more check out the official tutorial.
subjectUnderTest_actionOrInput_resultState
- Subject under test is the method or class that is being tested (
getActiveAndCompletedStats). - Next is the action or input (
noCompleted). - Finally you have the expected result (
returnsHundredZero).
7. Task: Writing more tests
This is an optional task for practice.
In this task, you'll write more tests using JUnit and Hamcrest. You'll also write tests using a strategy derived from the program practice of Test Driven Development. Test Driven Development or TDD is a school of programming thought that says instead of writing your feature code first, you write your tests first. Then you write your feature code with the goal of passing your tests.
Step 1. Write the tests
Write tests for when you have a normal task list:
- If there is one completed task and no active tasks, the
activeTaskspercentage should be0f, and the completed tasks percentage should be100f. - If there are two completed tasks and three active tasks, the completed percentage should be
40fand the active percentage should be60f.
Step 2. Write a test for a bug
The code for the getActiveAndCompletedStats as written has a bug. Notice how it does not properly handle what happens if the list is empty or null. In both of these cases, both percentages should be zero.
internal fun getActiveAndCompletedStats(tasks: List<Task>?): StatsResult {

   val totalTasks = tasks!!.size
   val numberOfActiveTasks = tasks.count { it.isActive }
   val activePercent = 100 * numberOfActiveTasks / totalTasks
   val completePercent = 100 * (totalTasks - numberOfActiveTasks) / totalTasks

   return StatsResult(
       activeTasksPercent = activePercent.toFloat(),
       completedTasksPercent = completePercent.toFloat()
   )

}
To fix the code and write tests, you'll use test driven development. Test Driven Development follows these steps.
- Write the test, using the Given, When, Then structure, and with a name that follows the convention.
- Confirm the test fails.
- Write the minimal code to get the test to pass.
- Repeat for all tests!
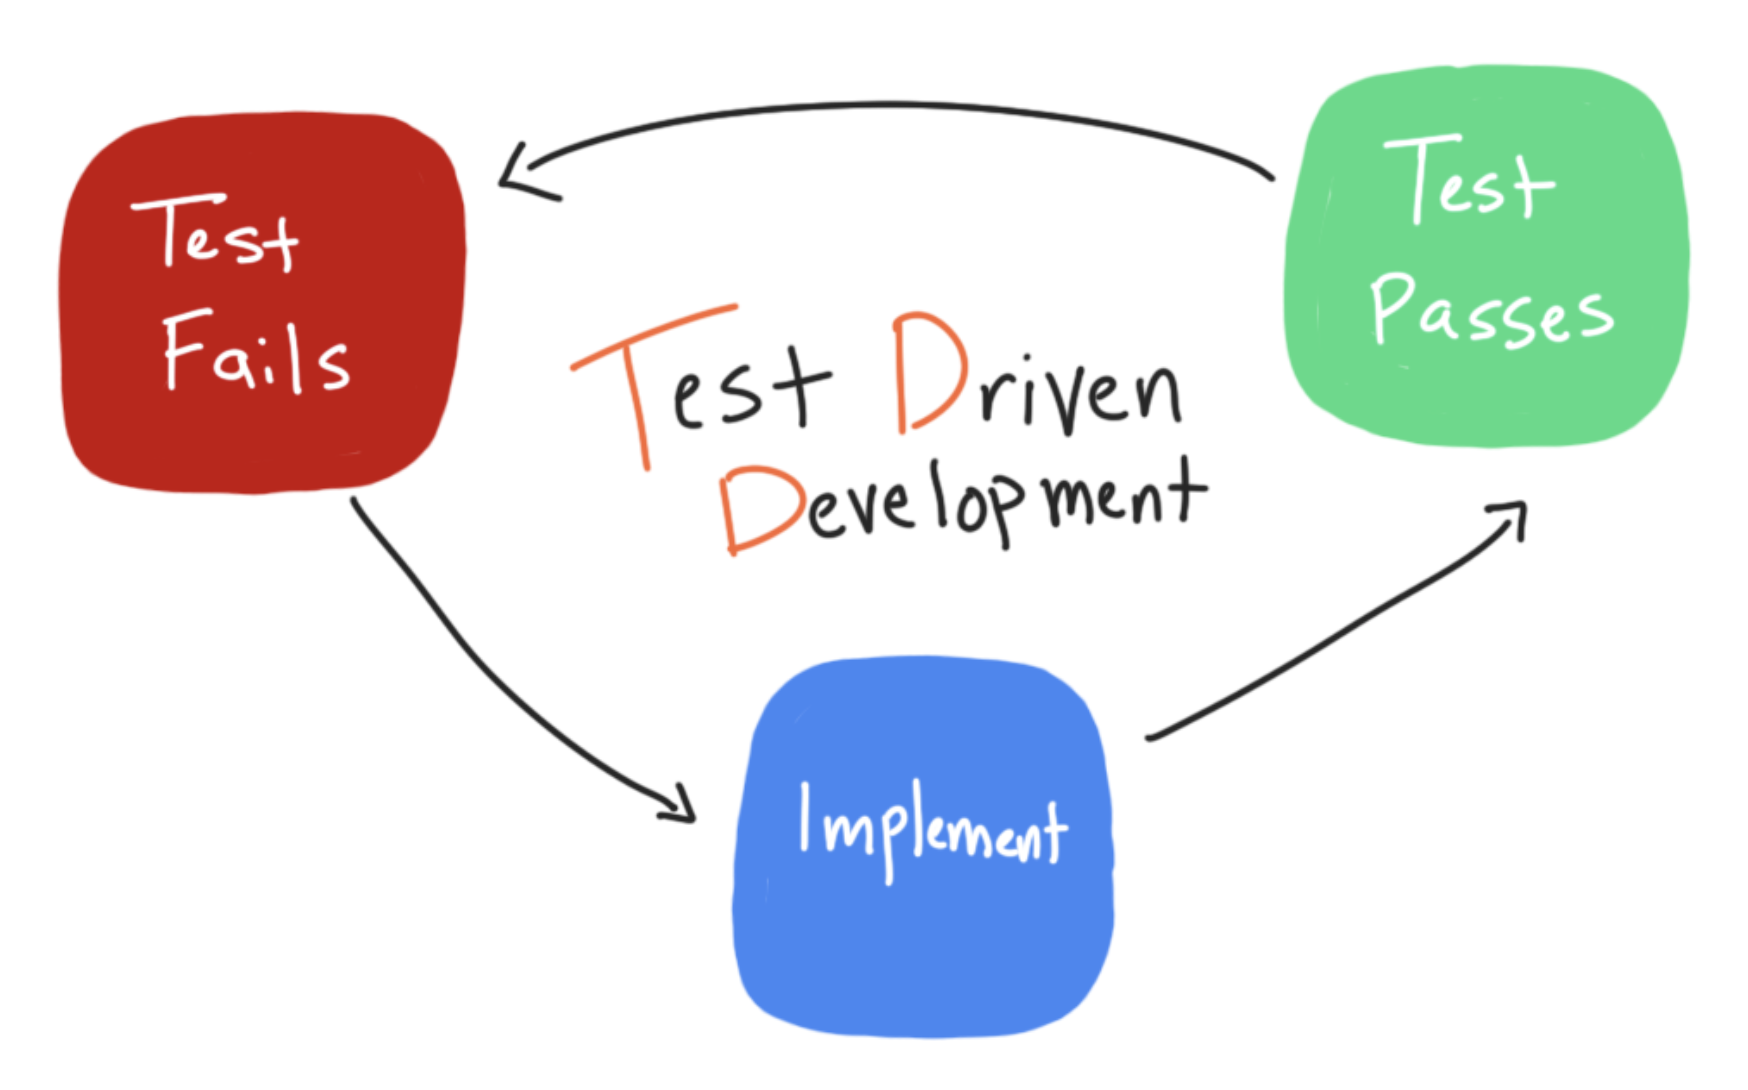
Instead of starting by fixing the bug, you'll start by writing the tests first. Then you can confirm that you have tests protecting you from ever accidentally reintroducing these bugs in the future.
- If there is an empty list (
emptyList()), then both percentages should be 0f. - If there was an error loading the tasks, the list will be
null, and both percentages should be 0f. - Run your tests and confirm that they fail:

Step 3. Fix the bug
Now that you have your tests, fix the bug.
- Fix the bug in
getActiveAndCompletedStatsby returning0fiftasksisnullor empty:
internal fun getActiveAndCompletedStats(tasks: List<Task>?): StatsResult {

    return if (tasks == null || tasks.isEmpty()) {
        StatsResult(0f, 0f)
    } else {
        val totalTasks = tasks.size
        val numberOfActiveTasks = tasks.count { it.isActive }
        StatsResult(
            activeTasksPercent = 100f * numberOfActiveTasks / tasks.size,
            completedTasksPercent = 100f * (totalTasks - numberOfActiveTasks) / tasks.size
        )
    }
}
- Run your tests again and confirm that all tests now pass!

By following TDD and writing the tests first, you've helped ensure that:
- New functionality always has associated tests; thus your tests act as documentation of what your code does.
- Your tests check for the correct results and protect against bugs you've already seen.
Solution: Writing more tests
Here are all the tests and the corresponding feature code.
StatisticsUtilsTest.kt
class StatisticsUtilsTest {

    @Test
    fun getActiveAndCompletedStats_noCompleted_returnsHundredZero {
        val tasks = listOf(
            Task("title", "desc", isCompleted = false)
        )
        // When the list of tasks is computed with an active task
        val result = getActiveAndCompletedStats(tasks)

        // Then the percentages are 100 and 0
        assertThat(result.activeTasksPercent, `is`(100f))
        assertThat(result.completedTasksPercent, `is`(0f))
    }

    @Test
    fun getActiveAndCompletedStats_noActive_returnsZeroHundred() {
        val tasks = listOf(
            Task("title", "desc", isCompleted = true)
        )
        // When the list of tasks is computed with a completed task
        val result = getActiveAndCompletedStats(tasks)

        // Then the percentages are 0 and 100
        assertThat(result.activeTasksPercent, `is`(0f))
        assertThat(result.completedTasksPercent, `is`(100f))
    }

    @Test
    fun getActiveAndCompletedStats_both_returnsFortySixty() {
        // Given 3 completed tasks and 2 active tasks
        val tasks = listOf(
            Task("title", "desc", isCompleted = true),
            Task("title", "desc", isCompleted = true),
            Task("title", "desc", isCompleted = true),
            Task("title", "desc", isCompleted = false),
            Task("title", "desc", isCompleted = false)
        )
        // When the list of tasks is computed
        val result = getActiveAndCompletedStats(tasks)

        // Then the result is 40-60
        assertThat(result.activeTasksPercent, `is`(40f))
        assertThat(result.completedTasksPercent, `is`(60f))
    }

    @Test
    fun getActiveAndCompletedStats_error_returnsZeros() {
        // When there's an error loading stats
        val result = getActiveAndCompletedStats(null)

        // Both active and completed tasks are 0
        assertThat(result.activeTasksPercent, `is`(0f))
        assertThat(result.completedTasksPercent, `is`(0f))
    }

    @Test
    fun getActiveAndCompletedStats_empty_returnsZeros() {
        // When there are no tasks
        val result = getActiveAndCompletedStats(emptyList())

        // Both active and completed tasks are 0
        assertThat(result.activeTasksPercent, `is`(0f))
        assertThat(result.completedTasksPercent, `is`(0f))
    }
}
StatisticsUtils.kt
internal fun getActiveAndCompletedStats(tasks: List<Task>?): StatsResult {

    return if (tasks == null || tasks.isEmpty()) {
        StatsResult(0f, 0f)
    } else {
        val totalTasks = tasks.size
        val numberOfActiveTasks = tasks.count { it.isActive }
        StatsResult(
            activeTasksPercent = 100f * numberOfActiveTasks / tasks.size,
            completedTasksPercent = 100f * (totalTasks - numberOfActiveTasks) / tasks.size
        )
    }
}
Great job with the basics of writing and running tests! Next you'll learn how to write basic ViewModel and LiveData tests.
8. Task: Setting up a ViewModel Test with AndroidX Test
In the rest of the codelab, you'll learn how to write tests for two Android classes that are common across most apps - ViewModel and LiveData.
You start by writing tests for the TasksViewModel.
You are going to focus on tests that have all their logic in the view model and do not rely on repository code. Repository code involves asynchronous code, databases, and network calls, which all add test complexity. You're going to avoid that for now and focus on writing tests for ViewModel functionality that doesn't directly test any thing in the repository.
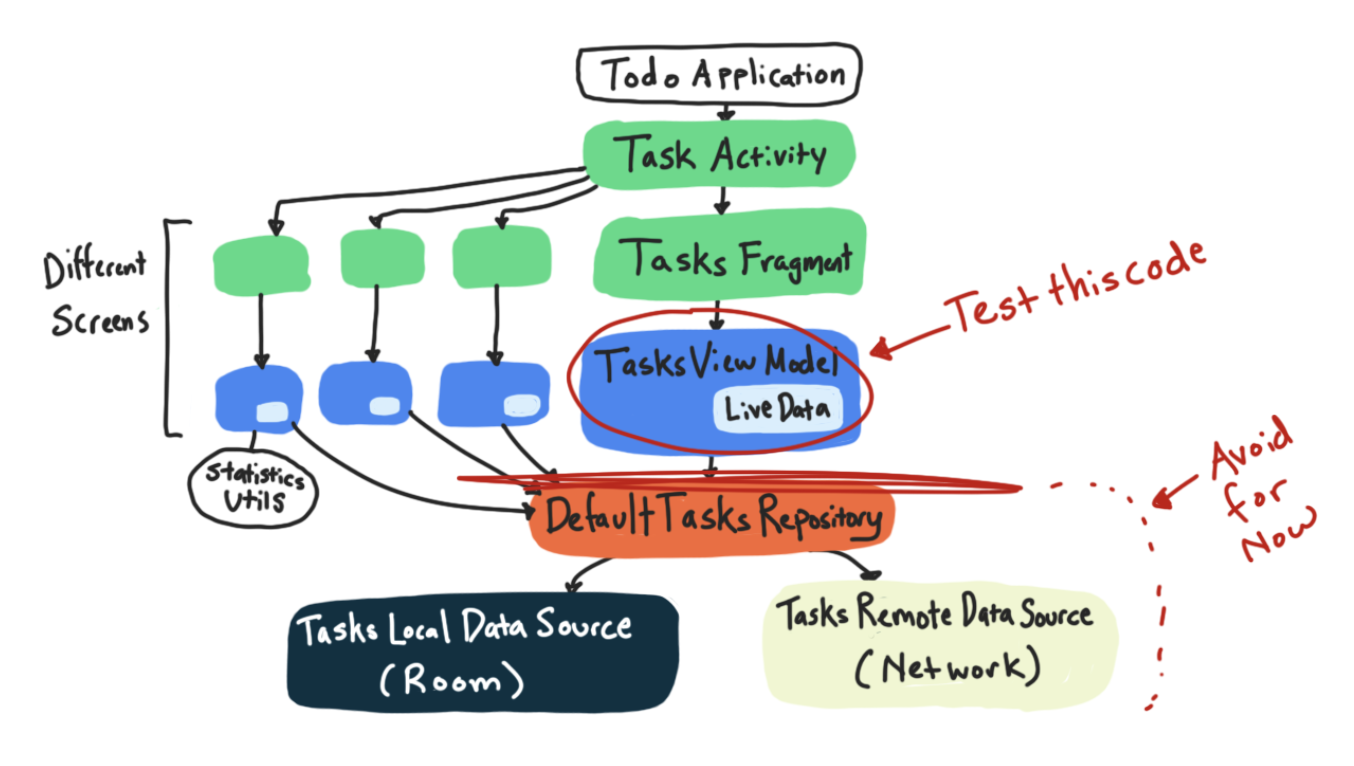
The test you'll write will check that when you call the addNewTask method, the Event for opening the new task window is fired. Here's the app code you'll be testing.
TasksViewModel.kt
fun addNewTask() {
   _newTaskEvent.value = Event(Unit)
}
In this case, the newTaskEvent represents that the plus FAB has been pressed, and you should go to the AddEditTaskFragment. You can learn more about events here and here.
Step 1. Make a TasksViewModelTest class
Following the same steps you did for StatisticsUtilTest, in this step, you create a test file for TasksViewModelTest.
- Open the class you wish to test, in the
taskspackage,TasksViewModel. - In the code, right-click on the class name
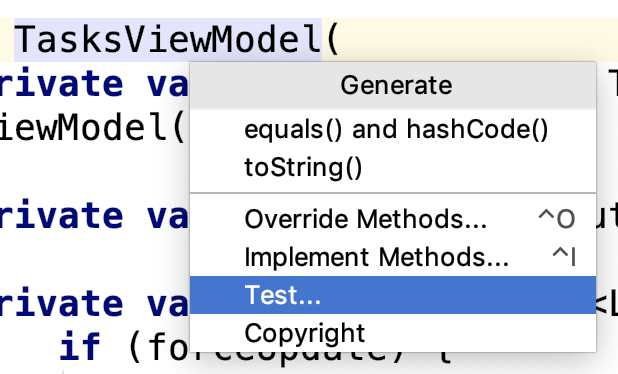
TasksViewModel-> Generate -> Test.
- On the Create Test screen, click OK to accept (no need to change any of the default settings).
- On the Choose Destination Directory dialog, choose the test directory.
Step 2. Start Writing your ViewModel Test
In this step you add a view model test to test that when you call the addNewTask method, the Event for opening the new task window is fired.
- Create a new test called
addNewTask_setsNewTaskEvent.
TasksViewModelTest.kt
class TasksViewModelTest {

    @Test
    fun addNewTask_setsNewTaskEvent() {

        // Given a fresh TasksViewModel


        // When adding a new task


        // Then the new task event is triggered

    }

}
What about application context?
When you create an instance of TasksViewModel to test, its constructor requires an Application Context. But in this test, you aren't creating a full application with activities and UI and fragments, so how do you get an application context?
TasksViewModelTest.kt
// Given a fresh ViewModel
        val tasksViewModel = TasksViewModel(???)
The AndroidX Test libraries include classes and methods that provide you with versions of components like Applications and Activities that are meant for tests. When you have a local test where you need simulated Android framework classes (such as an Application Context), follow these steps to properly set up AndroidX Test:
- Add the AndroidX Test core and ext dependencies
- Add the Robolectric Testing library dependency
- Annotate the class with the AndroidJunit4 test runner
- Write AndroidX Test code
You are going to complete these steps and then understand what they do together.
Step 3. Add the gradle dependencies
- Copy these dependencies into your app module's
build.gradlefile to add the core AndroidX Test core and ext dependencies, as well as the Robolectric testing dependency.
app/build.gradle
    // AndroidX Test - JVM testing
testImplementation "androidx.test.ext:junit-ktx:$androidXTestExtKotlinRunnerVersion"

testImplementation "androidx.test:core-ktx:$androidXTestCoreVersion"

testImplementation "org.robolectric:robolectric:$robolectricVersion"
Step 4. Add JUnit Test Runner
- Add
@RunWith(AndroidJUnit4::class)above your test class.
TasksViewModelTest.kt
@Config(sdk = [30]) // Remove when Robolectric supports SDK 31
@RunWith(AndroidJUnit4::class)
class TasksViewModelTest {
    // Test code
}
Step 5. Use AndroidX Test
At this point, you can use the AndroidX Test library. This includes the method ApplicationProvider.getApplicationContext, which gets an Application Context.
- Create a
TasksViewModelusingApplicationProvider.getApplicationContext()from the AndroidX test library.
TasksViewModelTest.kt
// Given a fresh ViewModel
val tasksViewModel = TasksViewModel(ApplicationProvider.getApplicationContext())
- Call
addNewTaskontasksViewModel.
TasksViewModelTest.kt
tasksViewModel.addNewTask()
At this point your test should look like the code below.
TasksViewModelTest.kt
    @Test
    fun addNewTask_setsNewTaskEvent() {

        // Given a fresh ViewModel
        val tasksViewModel = TasksViewModel(ApplicationProvider.getApplicationContext())

        // When adding a new task
        tasksViewModel.addNewTask()

        // Then the new task event is triggered
        // TODO test LiveData
    }
- Run your test to confirm it works.
Concept: How does AndroidX Test work?
What is AndroidX Test?
AndroidX Test is a collection of libraries for testing. It includes classes and methods that give you versions of components like Applications and Activities, that are meant for tests. As an example, this code you wrote is an example of an AndroidX Test function for getting an application context.
ApplicationProvider.getApplicationContext()
One of the benefits of the AndroidX Test APIs is that they are built to work both for local tests and instrumented tests. This is nice because:
- You can run the same test as a local test or an instrumented test.
- You don't need to learn different testing APIs for local vs. instrumented tests.
For example, because you wrote your code using AndroidX Test libraries, you can move your TasksViewModelTest class from the test folder to the androidTest folder and the tests will still run. The getApplicationContext() works slightly differently depending on whether it's being run as a local or instrumented test:
- If it's an instrumented test, it will get the actual Application context provided when it boots up an emulator or connects to a real device.
- If it's a local test, it uses a simulated Android environment.
What is Robolectric?
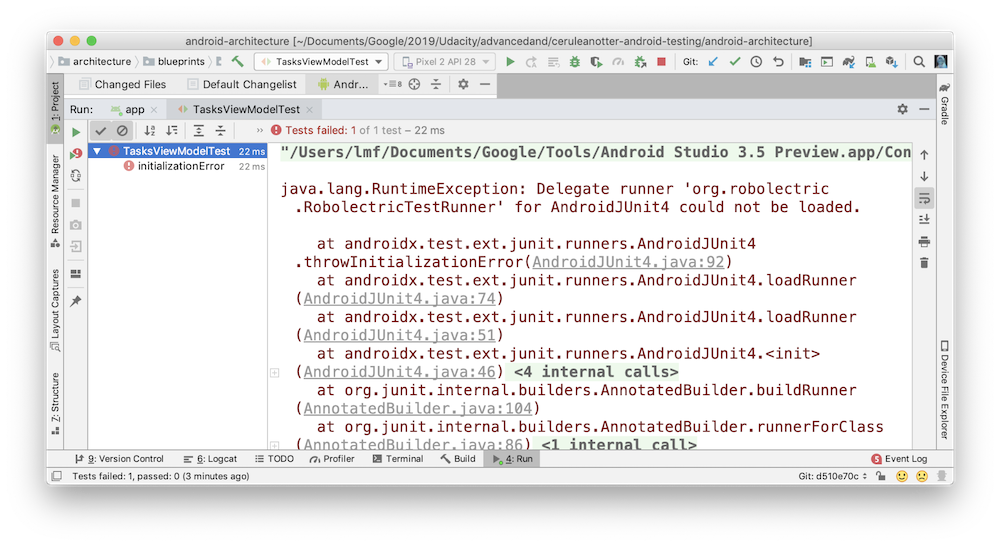
The simulated Android environment that AndroidX Test uses for local tests is provided by Robolectric. Robolectric is a library that creates a simulated Android environment for tests and runs faster than booting up an emulator or running on a device. Without the Robolectric dependency, you'll get this error:
What does @RunWith(AndroidJUnit4::class) do?
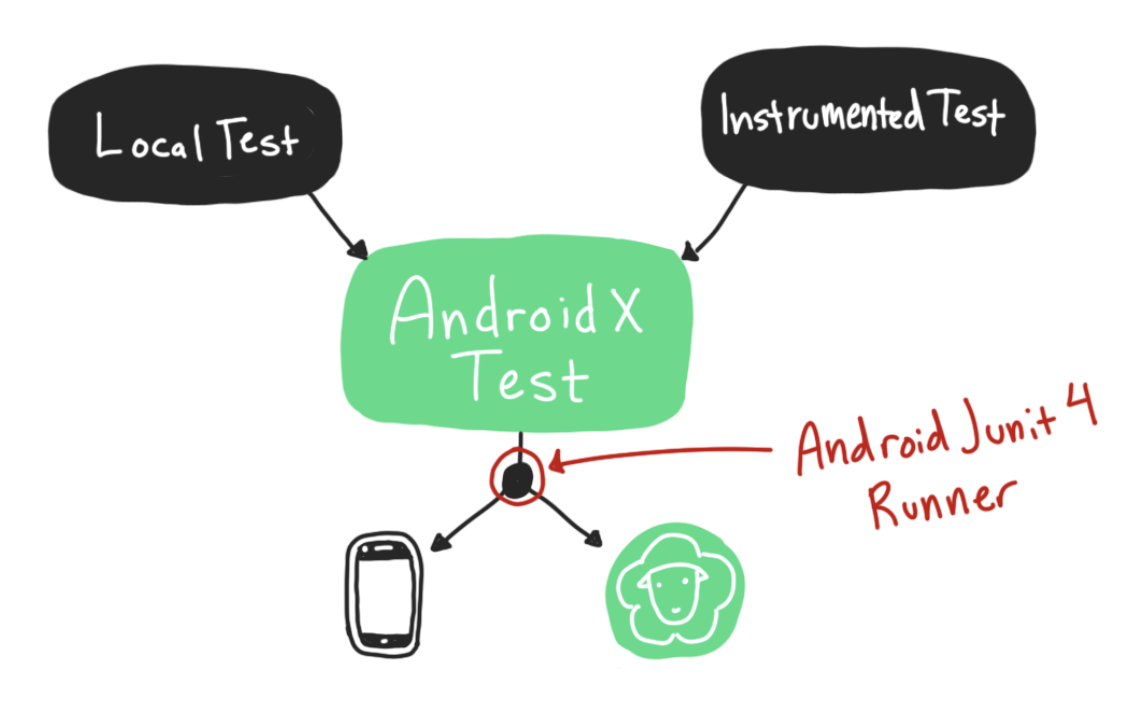
A test runner is a JUnit component that runs tests. Without a test runner, your tests would not run. There's a default test runner provided by JUnit that you get automatically. @RunWith swaps out that default test runner.
The AndroidJUnit4 test runner allows for AndroidX Test to run your test differently depending on whether they are instrumented or local tests.
Step 6. Fix Robolectric Warnings
When you run the code, notice that Robolectric is used.
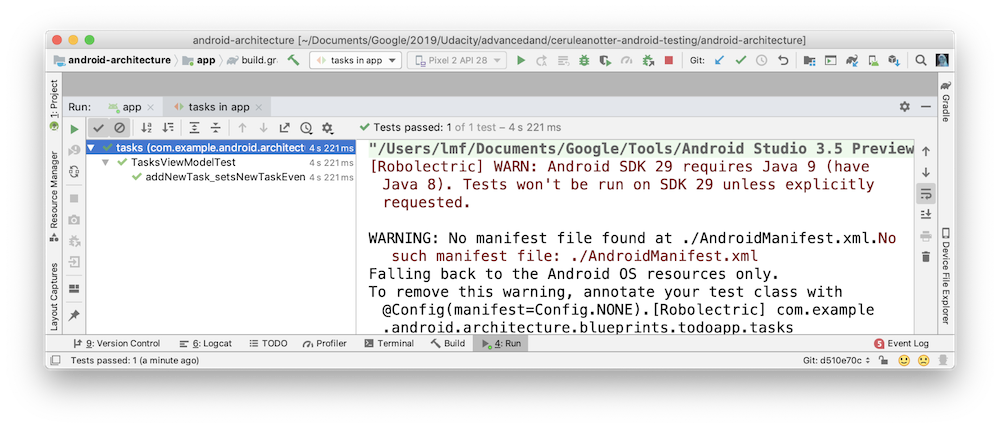
Because of AndroidX Test and the AndroidJunit4 test runner, this is done without you directly writing a single line of Robolectric code!
You might notice two warnings.
No such manifest file: ./AndroidManifest.xml"WARN: Android SDK 29 requires Java 9..."
You can fix the No such manifest file: ./AndroidManifest.xml warning, by updating your gradle file.
- Add the following line to your gradle file so that the correct Android manifest is used. The includeAndroidResources option allows you to access android resources in your unit tests, including your AndroidManifest file.
app/build.gradle
    // Always show the result of every unit test when running via command line, even if it passes.
    testOptions.unitTests {
        includeAndroidResources = true

        // ...
    }
The warning "WARN: Android SDK 29 requires Java 9..." is more complicated. Running tests on Android Q requires Java 9. Instead of trying to configure Android Studio to use Java 9, for this codelab, keep your target and compile SDK at 28.
In summary:
- Pure view model tests can usually go in the
testsource set because their code doesn't usually require Android. - You can use the AndroidX test library to get test versions of components like Applications and Activities.
- If you need to run simulated Android code in your
testsource set, you can add the Robolectric dependency and the@RunWith(AndroidJUnit4::class)annotation.
Congratulations, you're using both the AndroidX testing library and Robolectric to run a test. Your test is not finished (you haven't written an assert statement yet, it just says // TODO test LiveData). You'll learn to write assert statements with LiveData next.
9. Task: Writing Assertions for LiveData
In this task, you'll learn how to correctly assert LiveData value.
Here's where you left off without addNewTask_setsNewTaskEvent view model test.
TasksViewModelTest.kt
    @Test
    fun addNewTask_setsNewTaskEvent() {

        // Given a fresh ViewModel
        val tasksViewModel = TasksViewModel(ApplicationProvider.getApplicationContext())

        // When adding a new task
        tasksViewModel.addNewTask()

        // Then the new task event is triggered
        // TODO test LiveData
    }
To test LiveData it's recommended you do two things:
- Use
InstantTaskExecutorRule - Ensure
LiveDataobservation
Step 1. Use InstantTaskExecutorRule
InstantTaskExecutorRule is a JUnit Rule. When you use it with the @get:Rule annotation, it causes some code in the InstantTaskExecutorRule class to be run before and after the tests (to see the exact code, you can use the keyboard shortcut Command+B to view the file).
This rule runs all Architecture Components-related background jobs in the same thread so that the test results happen synchronously, and in a repeatable order. When you write tests that include testing LiveData, use this rule!
- Add the gradle dependency for the Architecture Components core testing library (which contains this rule).
app/build.gradle
testImplementation "androidx.arch.core:core-testing:$archTestingVersion"
- Open
TasksViewModelTest.kt - Add the
InstantTaskExecutorRuleinside theTasksViewModelTestclass.
TasksViewModelTest.kt
class TasksViewModelTest {
    @get:Rule
    var instantExecutorRule = InstantTaskExecutorRule()

    // Other code...
}
Step 2. Add the LiveDataTestUtil.kt Class
Your next step is to make sure the LiveData you're testing is observed.
When you use LiveData, you commonly have an activity or fragment ( LifecycleOwner) observe the LiveData.
viewModel.resultLiveData.observe(fragment, Observer {
    // Observer code here
})
This observation is important. You need active observers on LiveData to
- trigger any
onChangedevents. - trigger any Transformations.
To get the expected LiveData behavior for your view model's LiveData, you need to observe the LiveData with a LifecycleOwner.
This poses a problem: in your TasksViewModel test, you don't have an activity or fragment to observe your LiveData. To get around this, you can use the observeForever method, which ensures the LiveData is constantly observed, without needing a LifecycleOwner. When you observeForever, you need to remember to remove your observer or risk an observer leak.
This looks something like the code below. Examine it:
@Test
fun addNewTask_setsNewTaskEvent() {

    // Given a fresh ViewModel
    val tasksViewModel = TasksViewModel(ApplicationProvider.getApplicationContext())


    // Create observer - no need for it to do anything!
    val observer = Observer<Event<Unit>> {}
    try {

        // Observe the LiveData forever
        tasksViewModel.newTaskEvent.observeForever(observer)

        // When adding a new task
        tasksViewModel.addNewTask()

        // Then the new task event is triggered
        val value = tasksViewModel.newTaskEvent.value
        assertThat(value?.getContentIfNotHandled(), (not(nullValue())))

    } finally {
        // Whatever happens, don't forget to remove the observer!
        tasksViewModel.newTaskEvent.removeObserver(observer)
    }
}
That's a lot of boilerplate code to observe a single LiveData in a test! There are a few ways to get rid of this boilerplate. You're going to create an extension function called LiveDataTestUtil to make adding observers simpler.
- Make a new Kotlin file called
LiveDataTestUtil.ktin yourtestsource set.

- Copy and paste the code below.
LiveDataTestUtil.kt
import androidx.annotation.VisibleForTesting
import androidx.lifecycle.LiveData
import androidx.lifecycle.Observer
import java.util.concurrent.CountDownLatch
import java.util.concurrent.TimeUnit
import java.util.concurrent.TimeoutException


@VisibleForTesting(otherwise = VisibleForTesting.NONE)
fun <T> LiveData<T>.getOrAwaitValue(
    time: Long = 2,
    timeUnit: TimeUnit = TimeUnit.SECONDS,
    afterObserve: () -> Unit = {}
): T {
    var data: T? = null
    val latch = CountDownLatch(1)
    val observer = object : Observer<T> {
        override fun onChanged(o: T?) {
            data = o
            latch.countDown()
            this@getOrAwaitValue.removeObserver(this)
        }
    }
    this.observeForever(observer)

    try {
        afterObserve.invoke()

        // Don't wait indefinitely if the LiveData is not set.
        if (!latch.await(time, timeUnit)) {
            throw TimeoutException("LiveData value was never set.")
        }

    } finally {
        this.removeObserver(observer)
    }

    @Suppress("UNCHECKED_CAST")
    return data as T
}
This is a fairly complicated method. It creates a Kotlin extension function called getOrAwaitValue which adds an observer, gets the LiveData value, and then cleans up the observer—basically a short, reusable version of the observeForever code shown above. For a full explanation of this class, check out this blog post.
Step 3. Use getOrAwaitValue to write the assertion
In this step, you use the getOrAwaitValue method and write an assert statement that checks that the newTaskEvent was triggered.
- Get the
LiveDatavalue fornewTaskEventusinggetOrAwaitValue.
val value = tasksViewModel.newTaskEvent.getOrAwaitValue()
- Assert that the value is not null.
assertThat(value.getContentIfNotHandled(), (not(nullValue())))
The complete test should look like the code below.
import androidx.arch.core.executor.testing.InstantTaskExecutorRule
import androidx.test.core.app.ApplicationProvider
import androidx.test.ext.junit.runners.AndroidJUnit4
import com.example.android.architecture.blueprints.todoapp.getOrAwaitValue
import org.hamcrest.MatcherAssert.assertThat
import org.hamcrest.Matchers.not
import org.hamcrest.Matchers.nullValue
import org.junit.Rule
import org.junit.Test
import org.junit.runner.RunWith

@RunWith(AndroidJUnit4::class)
class TasksViewModelTest {

    @get:Rule
    var instantExecutorRule = InstantTaskExecutorRule()


    @Test
    fun addNewTask_setsNewTaskEvent() {
        // Given a fresh ViewModel
        val tasksViewModel = TasksViewModel(ApplicationProvider.getApplicationContext())

        // When adding a new task
        tasksViewModel.addNewTask()

        // Then the new task event is triggered
        val value = tasksViewModel.newTaskEvent.getOrAwaitValue()

        assertThat(value.getContentIfNotHandled(), not(nullValue()))


    }

}
- Run your code and watch the test pass!
10. Task: Writing multiple ViewModel tests
Now that you've seen how to write a test, write one on your own. In this step, using the skills you've learned, practice writing another TasksViewModel test.
Step 1. Write your own ViewModel test
You'll write setFilterAllTasks_tasksAddViewVisible(). This test should check that if you've set your filter type to show all tasks, that the Add task button is visible.
- Using
addNewTask_setsNewTaskEvent()for reference, write a test inTasksViewModelTestcalledsetFilterAllTasks_tasksAddViewVisible()that sets the filtering mode toALL_TASKSand asserts that thetasksAddViewVisibleLiveData istrue.
Use the code below to get started.
TasksViewModelTest
    @Test
    fun setFilterAllTasks_tasksAddViewVisible() {

        // Given a fresh ViewModel

        // When the filter type is ALL_TASKS

        // Then the "Add task" action is visible

    }
Note:
- The
TasksFilterTypeenum for all tasks isALL_TASKS. - The visibility of the button to add a task is controlled by the
LiveDatatasksAddViewVisible.
- Run your test.
Step 2. Compare your test to the solution
Compare your solution to the solution below.
TasksViewModelTest
    @Test
    fun setFilterAllTasks_tasksAddViewVisible() {

        // Given a fresh ViewModel
        val tasksViewModel = TasksViewModel(ApplicationProvider.getApplicationContext())

        // When the filter type is ALL_TASKS
        tasksViewModel.setFiltering(TasksFilterType.ALL_TASKS)

        // Then the "Add task" action is visible
        assertThat(tasksViewModel.tasksAddViewVisible.getOrAwaitValue(), `is`(true))
    }
Check whether you do the following:
- You create your
tasksViewModelusing the same AndroidXApplicationProvider.getApplicationContext()statement. - You call the
setFilteringmethod, passing in theALL_TASKSfilter type enum. - You check that the
tasksAddViewVisibleis true, using thegetOrAwaitValuemethod.
Step 3. Add a @Before rule
Notice how at the start of both of your tests, you define a TasksViewModel.
TasksViewModelTest
        // Given a fresh ViewModel
        val tasksViewModel = TasksViewModel(ApplicationProvider.getApplicationContext())
When you have repeated setup code for multiple tests, you can use the @Before annotation to create a setup method and remove repeated code. Since all of these tests are going to test the TasksViewModel, and need a view model, move this code to a @Before block.
- Create a
lateinitinstance variable calledtasksViewModel|. - Create a method called
setupViewModel. - Annotate it with
@Before. - Move the view model instantiation code to
setupViewModel.
TasksViewModelTest
    // Subject under test
    private lateinit var tasksViewModel: TasksViewModel

    @Before
    fun setupViewModel() {
        tasksViewModel = TasksViewModel(ApplicationProvider.getApplicationContext())
    }
- Run your code!
Your final code for TasksViewModelTest should look like the code below.
TasksViewModelTest
@RunWith(AndroidJUnit4::class)
class TasksViewModelTest {

    // Subject under test
    private lateinit var tasksViewModel: TasksViewModel

    // Executes each task synchronously using Architecture Components.
    @get:Rule
    var instantExecutorRule = InstantTaskExecutorRule()

    @Before
    fun setupViewModel() {
        tasksViewModel = TasksViewModel(ApplicationProvider.getApplicationContext())
    }


    @Test
    fun addNewTask_setsNewTaskEvent() {

        // When adding a new task
        tasksViewModel.addNewTask()

        // Then the new task event is triggered
        val value = tasksViewModel.newTaskEvent.getOrAwaitValue()
        assertThat(
            value?.getContentIfNotHandled(), (not(nullValue()))
        )
    }

    @Test
    fun getTasksAddViewVisible() {

        // When the filter type is ALL_TASKS
        tasksViewModel.setFiltering(TasksFilterType.ALL_TASKS)

        // Then the "Add task" action is visible
        assertThat(tasksViewModel.tasksAddViewVisible.getOrAwaitValue(), `is`(true))
    }

}
11. Solution code
Click here to see a diff between the code you started and the final code.
To download the code for the finished codelab, you can use the git command below:
$ git clone https://github.com/google-developer-training/advanced-android-testing.git
$ cd android-testing
$ git checkout end_codelab_1
Alternatively you can download the repository as a Zip file, unzip it, and open it in Android Studio.
12. Summary
This codelab covered:
- How to run tests from Android Studio.
- The difference between local (
test) and instrumentation tests (androidTest). - How to write local unit tests using JUnit and Hamcrest.
- Setting up ViewModel tests with the AndroidX Test Library.
13. Learn more
Samples:
- Official Architecture Sample - This is the official architecture sample, which is based off of the same TO-DO Notes app used here. Concepts in this sample go beyond what is covered in the three testing codelabs.
- Sunflower demo - This is the main Android Jetpack sample which also makes use of the Android testing libraries
Udacity course:
Android developer documentation:
- Guide to app architecture
- JUnit4
- Hamcrest
- Robolectric Testing library
- AndroidX Test Library
- AndroidX Architecture Components Core Test Library
- source sets
- Test from the command line
Videos:
- Test-Driven Development on Android with the Android Testing Support Library (Google I/O'17).
- Build Testable Apps for Android (Google I/O'19)
Other:

