
1. CFT 101 简介

上次更新日期:2022 年 2 月 11 日
什么是 Cloud Foundation Toolkit?
从本质上讲,CFT 提供最佳实践模板,可帮助您快速上手使用 Google Cloud Platform。在本教程中,您将学习如何为 Cloud Foundation Toolkit 做出贡献。
所需条件
- GitHub 账号。
- 在您的机器上安装 Docker 或使用 Cloud Shell(Mac 安装、Windows 安装)
- 用于修改代码的代码编辑器(示例:Visual Studio Code)
- 基本熟悉 Git 和 GitHub
- 具备一定的 Terraform 和基础设施即代码经验
- 向服务账号授予 Project Creator 角色的权限
- Google Cloud 组织、测试文件夹和结算账号
构建内容
在此 Codelab 中,您将学习如何为 Cloud Foundation Toolkit (CFT) 做出贡献。
您将学习以下内容:
- 设置开发环境以贡献于 CFT
- 向 CFT 模块添加功能
- 为添加的功能添加测试
- 在 CFT 中执行集成测试
- 执行 lint 测试
- 将代码提交到 GitHub 并提交拉取请求 (PR)
您将通过向 Google Cloud Storage CFT 模块添加新功能来执行上述所有步骤。您将添加一个名为 "silly_label" 的标签,该标签将自动添加到通过 GCS CFT 模块创建的所有存储分区。您还可以编写测试来验证功能并确保端到端集成。
2. 设置开发环境
如果您愿意,可以使用 Cloud Shell 进行开发。如果您不想使用 Cloud Shell 来为 CFT 做贡献,可以在自己的机器上设置开发环境。
设置 Git
GitHub 基于名为 Git 的开源版本控制系统 (VCS)。Git 负责处理在您的计算机或 Cloud Shell 上发生的与 GitHub 相关的所有操作。
- 使用 Cloud Shell 时,您无需安装 Git,因为系统已预安装该工具。
$ git --version
# This will display the git version on the Cloud Shell.
如果您要在自己的机器上设置开发环境,则需要安装 Git。
在 Git 中设置用户名和电子邮件地址
Git 使用用户名将提交与身份相关联。Git 用户名与 GitHub 用户名不同。
您可以使用 git config 命令更改与 Git 提交关联的名称。使用 git config 更改与 Git 提交关联的名称只会影响未来的提交,不会更改过去提交所用的名称。
您已成功设置 Git,现在应该能够派生、创建和克隆分支了。我们将在本 Codelab 中广泛使用 Git。
3. 派生 CFT 的 GCS 代码库
创建 CFT 代码库的分支
您已在之前的步骤中在本地机器或 Cloud Shell 上设置了 Git。现在,您需要派生 Google Cloud Storage CFT 代码库,才能开始贡献代码。
fork 是代码库的副本。通过派生仓库,您可以随意尝试更改,而不会影响原始项目。
最常见的情况是,派生用于提议更改他人的项目,或将他人的项目用作自己想法的起点。
例如,您可以使用分支来提议与修复 bug 相关的更改。如需修复 bug,您可以:
- 创建代码库分支。
- 进行修正。
- 向项目所有者提交拉取请求。
派生 CFT 代码库的步骤:
- 打开网络浏览器,然后前往 terraform-google-modules/terraform-google-cloud-storage 代码库。我们将在整个 Codelab 中使用此代码库。
- 在页面的右上角,点击创建分支。

- 系统会显示一个选项,询问您要将分叉放在哪里,选择您的个人资料,然后系统会分叉该代码库。
在本地克隆您的分支
您创建的 fork 是 GCS 模块代码库的副本。现在,您需要将此代码库克隆到本地环境,以添加新功能。
克隆分支的步骤:
- 打开网络浏览器,然后前往 terraform-google-modules/terraform-google-cloud-storage 中的 fork。
- 在右上角,您会看到“代码”按钮,点击该按钮。

- 点击“代码”按钮后,点击“复制”图标以复制 Fork 的网址。您将使用此网址将您的分支克隆到本地环境。

- 前往 VSCode 或您机器上的终端,然后克隆分支。
$ git clone <url>
# This command will clone your fork locally.
# Paste the copied URL from the previous step.
- 现在,您已在本地克隆了派生版本,接下来应进入您的代码库,从派生版本中创建一个新分支,并对临时分支进行代码更改。
按照惯例,您可以按如下方式命名分支:
- 对于功能请求:
feature/feature-name - 对于内部更新,
internal/change-name - 如需了解 bug 修复:
bugfix/issue-name
由于您要添加新功能,因此可以将临时分支命名为 feature/silly_label
$ cd terraform-google-cloud-storage
# This command takes you into the cloned directory on your local machine.

$ git branch
# This command tells your current branch
# When you run this for the first time after you have cloned, your
# output should say "master", that is your fork.

$ git checkout -b feature/silly_label
# This command creates a new branch on your fork and switches your
# branch to the newly created branch.

$ git branch
# This command will confirm your current branch to be "feature/silly_label"
您现在已完成所有设置,可以开始使用 Cloud Foundation Toolkit 了!
4. 创建测试环境
标准 CFT 开发流程基于使用隔离的测试项目进行测试。此步骤将引导您通过服务账号创建测试项目(基于标准配置)。
0. 安装 Docker Engine
如果您将机器用于开发目的,则需要安装 Docker Engine。
1. 安装 Google Cloud SDK
如果您使用的是 GCP Cloud Shell,则无需安装 Google Cloud SDK。
前往 Google Cloud SDK,然后下载适用于您平台的交互式安装程序。
2. 设置配置
如需创建测试环境,您需要拥有 Google Cloud 组织、测试文件夹和结算账号。这些值需要通过环境变量进行设置:
export TF_VAR_org_id="your_org_id"
export TF_VAR_folder_id="your_folder_id"
export TF_VAR_billing_account="your_billing_account_id"
3. 设置服务账号
在创建测试环境之前,您需要将服务账号密钥下载到测试环境中。此服务账号需要 Project Creator、Billing Account User 和 Organization Viewer 角色。这些步骤可帮助您创建新的服务账号,但您也可以重复使用现有账号。
3.1 创建或选择初始 GCP 项目
在创建服务账号之前,您需要选择一个项目来托管该账号。您还可以创建新项目。
gcloud config set core/project YOUR_PROJECT_ID
3.2 启用 Google Cloud API
在您的初始项目中启用以下 Google Cloud API:
gcloud services enable cloudresourcemanager.googleapis.com
gcloud services enable iam.googleapis.com
gcloud services enable cloudbilling.googleapis.com
3.3 创建服务账号
创建新的服务账号以管理测试环境:
# Creating a service account for CFT.
gcloud iam service-accounts create cft-onboarding \
  --description="CFT Onboarding Terraform Service Account" \
  --display-name="CFT Onboarding"

# Assign SERVICE_ACCOUNT environment variable for later steps
export SERVICE_ACCOUNT=cft-onboarding@$(gcloud config get-value core/project).iam.gserviceaccount.com
验证服务账号是否已创建:
gcloud iam service-accounts list --filter="EMAIL=${SERVICE_ACCOUNT}"
3.4 向服务账号授予 Project Creator、Billing Account User 和 Organization Viewer 角色:
gcloud resource-manager folders add-iam-policy-binding ${TF_VAR_folder_id} \
  --member="serviceAccount:${SERVICE_ACCOUNT}" \
  --role="roles/resourcemanager.projectCreator"
gcloud organizations add-iam-policy-binding ${TF_VAR_org_id} \
  --member="serviceAccount:${SERVICE_ACCOUNT}" \
  --role="roles/billing.user"
gcloud beta billing accounts add-iam-policy-binding ${TF_VAR_billing_account} \
  --member="serviceAccount:${SERVICE_ACCOUNT}" \
  --role="roles/billing.user"
gcloud organizations add-iam-policy-binding ${TF_VAR_org_id} \
  --member="serviceAccount:${SERVICE_ACCOUNT}" \
  --role="roles/resourcemanager.organizationViewer"
现在,您已拥有一个可用于管理测试环境的服务账号。
4. 准备 Terraform 凭据
为了创建测试环境,您需要将服务账号密钥下载到 shell 中。
4.1 服务账号密钥
为 Terraform 创建并下载服务账号密钥
gcloud iam service-accounts keys create cft.json --iam-account=${SERVICE_ACCOUNT}
4.2 设置 Terraform 凭据
使用环境变量 SERVICE_ACCOUNT_JSON 将密钥提供给 Terraform,并将该变量的值设置为服务账号密钥的内容。
export SERVICE_ACCOUNT_JSON=$(< cft.json)
将凭据信息存储在环境变量中后,移除密钥文件。如果需要,您可以使用上述相同命令稍后重新创建密钥。
rm -rf cft.json
5. 为 Terraform 部署创建测试项目
现在,一切都已准备就绪,您可以使用一条命令创建测试项目。从 terraform-google-cloud-storage 目录根目录运行以下命令:
make docker_test_prepare
运行 make docker_test_prepare 时,您将看到以下输出。最后,您将收到已创建的测试 project_id,您将在此处部署并测试包含新功能的 Cloud Storage 模块。如果您在关联结算账号时遇到问题,请参阅问题排查步骤。
macbookpro3:terraform-google-cloud-storage user$ make docker_test_prepare
docker run --rm -it \
                -e SERVICE_ACCOUNT_JSON \
                -e TF_VAR_org_id \
                -e TF_VAR_folder_id \
                -e TF_VAR_billing_account \
                -v /Users/cft/terraform-google-cloud-storage:/workspace \
                gcr.io/cloud-foundation-cicd/cft/developer-tools:0.8.0 \
                /usr/local/bin/execute_with_credentials.sh prepare_environment
Activated service account credentials for: [cft-onboarding@<project_id>.iam.gserviceaccount.com]
Activated service account credentials for: [cft-onboarding@<project_id>.iam.gserviceaccount.com]
Initializing modules...

Initializing the backend...

Initializing provider plugins...

The following providers do not have any version constraints in configuration,
so the latest version was installed.

To prevent automatic upgrades to new major versions that may contain breaking
changes, it is recommended to add version = "..." constraints to the
corresponding provider blocks in configuration, with the constraint strings
suggested below.

* provider.google-beta: ve>rsion = "~ 3.9"
* provide>r.null: version = "~ 2.1"
*> provider.random: version = "~ 2.2"

Terraform has been successfully initialized!

You may now begin working with Terraform. Try running "terraform plan" to see
any changes that are required for your infrastructure. All Terraform commands
should now work.

If you ever set or change modules or backend configuration for Terraform,
rerun this command to reinitialize your working directory. If you forget, other
commands will detect it and remind you to do so if necessary.
module.project.module.project-factory.null_resource.preconditions: Refreshing state... [id=8723188031607443970]
module.project.module.project-factory.null_resource.shared_vpc_subnet_invalid_name[0]: Refreshing state... [id=5109975723938185892]
module.project.module.gsuite_group.data.google_organization.org[0]: Refreshing state...
module.project.module.project-factory.random_id.random_project_id_suffix: Refreshing state... [id=rnk]
module.project.module.project-fac<tory.googl>e_project.main: Refreshing state... [id=project-id]
module.project.module.project-factory.google_project_ser<vice.proje>ct_services[0]: Refreshing state... [id=project-id/storage-api.googleapis.com]
module.project.module.project-factory.google_project_ser<vice.proje>ct_services[1]: Refreshing state... [id=project-id/cloudresourcemanager.googleapis.com]
module.project.module.project-factory.google_project_ser<vice.proje>ct_services[2]: Refreshing state... [id=project-id/compute.googleapis.com]
module.project.module.project-factory.data.null_data_source.default_service_account: Refreshing state...
module.project.module.project-factory.google_service_account.default_service_account: Refreshing state... [id=projects/ci-cloud-sto<rage-ae79/>serviceAccounts/project-service-account@project-id.iam.gserv
iceaccount.com]
module.project.module.project-factory.google_project_ser<vice.proje>ct_services[3]: Refreshing state... [id=project-id/serviceusage.googleapis.com]
module.project.module.project-factory.null_resource.delete_default_compute_service_account[0]: Refreshing state... [id=3576396874950891283]
google_service_a<ccount.int>_test: Refreshing state... [id=p<rojects/pr>oject-id/serviceAccounts/cft-onboarding@project-id.iam.gserviceaccount.com]
google_service_accou<nt_key.int>_test: Refreshing state... [id=p<rojects/pr>oject-id/serviceAccounts/cft-onboarding@project-id.iam.gserviceaccount.com/keys/351009a1e011e88049ab2097994d1c627a61
6961]
google_projec<t_iam_memb>er.int_test[1]: Refreshing state... [id=project-id/roles/iam<.serviceAc>countUser/serviceaccount:cft-onboarding@project-id.iam.gserviceaccount.com]
google_projec<t_iam_memb>er.int_test[0]: Refreshing state... [id=project-id/<roles/stor>age.admin/serviceaccount:cft-onboarding@project-id.iam.gserviceaccount.com]

Apply complete! Resources: 0 added<, 0 changed, 0 >destroyed.<

Outputs>:

project_id = test-project-id
sa_key = sensitive
Found test/setup/make_source.sh. Using it for additional explicit environment configuration.
您现在已创建了一个测试项目,该项目由 project_id 引用,如控制台输出所示。您的开发和测试环境已设置完毕。
5. 向 CFT 模块添加新功能
现在,您的开发和测试环境已设置完毕,接下来我们开始向 google-cloud-storage CFT 模块添加“silly_label”功能。
确保您位于 terraform-google-cloud-storage 中,并打开 main.tf 文件,如下面的文件夹结构所示。

由于“silly_label”是一个标签,您将在 main.tf 中第 27 行的“labels”变量中添加该功能,如下所示:
terraform-google-cloud-storage/main.tf
resource "google_storage_bucket" &qu<ot;>buckets" {
 ...
 storage_class = var.storage_class
 // CODELAB:Add silly label in labels variable
 labels        = merge(var.labels, { name = replace("${local.prefix}${lower(each.value)}", ".", "-") }, { "<;si>lly" = var.silly_label })
 force_destroy = lookup(
 ...
}
现在,您将在上述文件夹结构中看到的 variables.tf 中添加 silly_label 变量。
复制并粘贴以下代码,将其添加到 variables.tf 中的第 31 行,并确保您添加的变量块上方和下方都有换行符。
terraform-google-cloud-storage/variables.tf
variable "names" {
 description = "Bucket name suffixes."
 type        = list(string)
}

// CODELAB: Add "silly_label" variable to variables.tf between "names" and "location"
variable "silly_label" {
 description = "Sample label for bucket."
 type        = string
}

variable "location" {
 description = "Bucket location."
 default     = "EU"
}
6. 向存储分区示例添加新功能
您已将功能添加到模块的 main.tf 中,现在将通过示例测试添加的功能。
需要将“silly_label”添加到 examples/multiple-buckets/main.tf 中
此示例将在下一步中用于执行集成测试。
将以下变量 silly_label 行复制粘贴到 terraform-google-cloud-storage/examples/multiple-buckets/ 中的 main.tf 的第 27 行,如文件夹结构中所示:

terraform-google-cloud-storage/examples/multiple-buckets/main.tf
module "cloud_storage<&qu>ot; {
 ...
 // CODELAB: Add "silly_label" as an example to main.tf.
 silly_label  <  >    = "awesome"

 ..
}
7. 更新了蓝图测试以检查功能
您已将功能添加到模块的 main.tf 中,然后将该功能添加到 multiple_buckets 示例中。现在,您需要通过使用 Golang 编写的蓝图集成测试来测试您的功能。
您将在以下文件夹结构中的 multiple_buckets_test.go 文件中添加新测试:

您已通过 multiple_buckets 模块在创建的所有分桶中添加了“silly_label”,现在需要编写测试来测试新功能。
在下面的代码中,您将通过 gcloud alpha storage 命令获取每个存储分区的标签,然后检查该命令返回的输出。
test/integration/multiple_buckets/multiple_buckets_test.go
func TestMultipleBuckets(t *testing.T) {
<..>
op := gcloud.Run(t, fmt.Sprintf("alpha storage ls --buckets gs://%s", bucketName), gcloudArgs).Array()[0]
// verify silly label on each bucket
assert.Equal("awesome", op.Get("metadata.labels.silly").String(), "should have silly label set to awesome")
// verify lifecycle rules
...
}
8. 在 CFT 中执行集成测试
集成测试
集成测试用于验证根模块、子模块和示例的行为。添加、更改和修复应附带测试。
集成测试使用 blueprint 测试框架编写,并使用 CFT CLI 运行。为方便起见,这些工具已打包到 Docker 映像中。
这些测试的一般策略是验证示例模块的行为,从而确保根模块、子模块和示例模块在功能上均正确无误。
在交互式执行中,您可以通过多个命令执行每个步骤。
- 运行
make docker_run以在交互模式下启动测试 Docker 容器。
Make 是一种构建自动化工具,可通过读取名为 Makefile 的文件(其中指定了如何派生目标程序)自动从源代码构建可执行程序和库。当您更改文件时,Docker 容器必须自动更新。
运行 make docker_run 时,您会在 Docker 容器中创建一个工作区,并激活服务账号的凭据。在后续步骤中,我们将使用此工作区运行测试。
您将在终端中看到以下输出内容:
Activated service account credentials for: [cft@<PROJECT_ID>.iam.gserviceaccount.com]
- 运行
module-swapper -registry-prefix=terraform-google-modules以调整示例main.tf文件,从而从本地文件导入模块,而不是从已发布的模块导入。
您应该会在终端中看到如下所示的输出:
[root@<CONTAINER_ID> workspace]# module-swapper -registry-prefix=terraform-google-modules
2025/08/04 19:26:29 Module name set from remote to cloud-storage
2025/08/04 19:26:29 Modifications made to file /workspace/examples/multiple_buckets/main.tf
2025/08/04 19:26:29 --- Original
+++ Modified
@@ -21,7 +21,7 @@
 }

 module "cloud_storage" {
-  source = "terraform-google-modules/cloud-storage/google"
+  source = "../.."
   # [>restore-marker]   version = "~ 10.0"

   project_id = var.project_id
- 运行
cft test list以列出工作区中的所有蓝图测试。
您将在终端中看到以下输出内容:
[root@CONTAINER_ID workspace]# cft test list
 NAME                           | CONFIG                    | LOCATION
--------------------------------+---------------------------+------------------------------------------------------------
 TestAll/examples/simple_bucket | examples/simple_bucket    | test/integration/discover_test.go
 TestMultipleBuckets            | examples/multiple_buckets | test/integration/multiple_buckets/multiple_buckets_test.go
- 运行
cft test run <EXAMPLE_NAME> --stage init以初始化示例。在此示例中,如需初始化TestMultipleBuckets测试运行,请使用cft test run TestMultipleBuckets --stage init。此外,您还可以在运行测试时使用--verbose标志来获取更多信息。
此初始化阶段用于初始化 Terraform 示例。
您将在终端中看到以下输出。
[root@<CONTAINER_ID> workspace]# cft test run TestMultipleBuckets --stage init --verbose
INFO[02-09|08:24:31] using test-dir: test/integration
...
TestMultipleBuckets 2022-02-09T08:24:35Z command.go:179: Terraform has been successfully initialized!
...
TestMultipleBuckets 2022-02-09T08:24:35Z command.go:100: Running command terraform with args [validate]
TestMultipleBuckets 2022-02-09T08:24:36Z command.go:179: Success! The configuration is valid.
...
--- PASS: TestMultipleBuckets (4.05s)
- 运行
cft test run <EXAMPLE_NAME> --stage apply以应用示例模块。
此步骤会将上一个阶段中初始化的示例应用到 Codelab 中之前创建的 GCP 项目。
您将在终端中看到以下输出。
[root@<CONTAINER_ID> workspace]# cft test run TestMultipleBuckets --stage apply --verbose
INFO[02-09|08:28:11] using test-dir: test/integration
...
TestMultipleBuckets 2022-02-09T08:28:19Z command.go:179: Apply complete! Resources: 6 added, 0 changed, 0 destroyed.
TestMultipleBuckets 2022-02-09T08:28:19Z command.go:179:
TestMultipleBuckets 2022-02-09T08:28:19Z command.go:179: Outputs:
TestMultipleBuckets 2022-02-09T08:28:19Z command.go:179:
TestMultipleBuckets 2022-02-09T08:28:19Z command.go:179: names = {
TestMultipleBuckets 2022-02-09T08:28:19Z command.go:179:   "one" = "multiple-buckets-erp1-eu-one"
...
--- PASS: TestMultipleBuckets (6.51s)
PASS
ok      github.com/terraform-google-modules/terraform-google-cloud-storage/test/integration/multiple_buckets    6.548s
- 运行
cft test run <EXAMPLE_NAME> --stage verify以验证示例是否创建了预期基础设施。
此步骤将运行 TestMultipleBuckets 中的验证函数。通常,验证是通过执行 gcloud 命令来检索资源的当前状态的 JSON 输出,并断言当前状态与示例中声明的状态一致。
如果您收到任何错误,系统会显示测试的预期结果和命令收到的结果。
您将在终端中看到以下输出。
[root@<CONTAINER_ID> workspace]# cft test run TestMultipleBuckets --stage verify --verbose
INFO[02-09|08:30:19] using test-dir: test/integration
...
TestMultipleBuckets 2022-02-09T08:30:27Z command.go:100: Running command terraform with args [output -no-color -json names_list]
TestMultipleBuckets 2022-02-09T08:30:27Z command.go:179: ["multiple-buckets-erp1-eu-one","multiple-buckets-erp1-eu-two"]
TestMultipleBuckets 2022-02-09T08:30:27Z command.go:100: Running command gcloud with args [alpha storage ls --buckets gs://multiple-buckets-erp1-eu-one --project ci-cloud-storage-8ce9 --json]
TestMultipleBuckets 2022-02-09T08:30:28Z command.go:179: [
TestMultipleBuckets 2022-02-09T08:30:28Z command.go:179: {
TestMultipleBuckets 2022-02-09T08:30:28Z command.go:179:   "url": "gs://multiple-buckets-erp1-eu-one/",
...
TestMultipleBuckets 2022-02-09T08:30:33Z command.go:179: ]
2022/02/09 08:30:33 RUN_STAGE env var set to verify
2022/02/09 08:30:33 Skipping stage teardown
--- PASS: TestMultipleBuckets (12.32s)
PASS
ok      github.com/terraform-google-modules/terraform-google-cloud-storage/test/integration/multiple_buckets    12.359s
- 运行
cft test run <EXAMPLE_NAME> --stage teardown以拆解示例。
此步骤会销毁您在上述步骤中创建的基础设施。此步骤还会销毁项目中创建的 GCS 存储分区以及您添加到 GCS 模块的标签。
您可以在终端中查看以下输出。
[root@<CONTAINER_ID> workspace]# cft test run TestMultipleBuckets --stage teardown --verbose
INFO[02-09|08:36:02] using test-dir: test/integration
...
TestMultipleBuckets 2022-02-09T08:36:06Z command.go:100: Running command terraform with args [destroy -auto-approve -input=false -lock=false]
TestMultipleBuckets 2022-02-09T08:36:07Z command.go:179: module.cloud_storage.random_id.bucket_suffix: Refreshing state... [id=mNA]
TestMultipleBuckets 2022-02-09T08:36:07Z command.go:179: random_string.prefix: Refreshing state... [id=erp1]
TestMultipleBuckets 2022-02-09T08:36:08Z command.go:179: module.cloud_storage.google_storage_bucket.buckets["two"]: Refreshing state... [id=multiple-buckets-erp1-eu-two]
...
TestMultipleBuckets 2022-02-09T08:36:10Z command.go:179: Destroy complete! Resources: 6 destroyed.
TestMultipleBuckets 2022-02-09T08:36:10Z command.go:179:
--- PASS: TestMultipleBuckets (6.62s)
PASS
ok      github.com/terraform-google-modules/terraform-google-cloud-storage/test/integration/multiple_buckets    6.654s
- 运行
module-swapper -registry-prefix=terraform-google-modules -restore可撤消上次运行module-swapper时对示例main.tf文件所做的调整。
[root@<CONTAINER_ID> workspace]# module-swapper -registry-prefix=terraform-google-modules -restore
2025/08/04 19:30:41 Module name set from remote to cloud-storage
2025/08/04 19:36:32 Modifications made to file /workspace/examples/multiple_buckets/main.tf
2025/08/04 19:36:32 --- Original
+++ Modified
@@ -21,8 +21,8 @@
}
module "cloud_storage" {
- source = "../..&qu>ot;
- version = "~ 10.0"
+ source = "terraform-google-modules/cl>oud-storage/google"
+ version = "~ 10.0"
project_id = var.project_id
- 运行
exit以退出测试容器。
9. 为输入和输出生成文档
根模块、子模块和示例模块的 README 中的“输入”和“输出”表格是根据相应模块的 variables 和 outputs 自动生成的。如果模块接口发生更改,则必须刷新这些表。
运行以下命令:
make generate_docs
# This will generate new Inputs and Outputs tables
10. 在 CFT 中执行 lint 测试
linter 是一种分析源代码以标记编程错误、bug、格式错误和可疑结构的工具。
代码库中的许多文件都可以进行 lint 或格式化,以保持质量标准。为了确保 CFT 的质量,您将使用 lint 测试。
运行以下命令:
make docker_test_lint
# This will run all lint tests on your repo
11. 在 GitHub 上提交拉取请求
现在,您已在本地更改了代码,并通过集成测试对其进行了测试,接下来您需要将此代码发布到主代码库。
如需在主代码库中提供您的代码,您需要将代码更改提交到您的分支,并将其推送到主代码库。如需将您的代码添加到您在 Codelab 开始时派生的主代码库,您需要在将代码提交到您的代码库后,在主代码库上提出拉取请求 (PR)。
当您提交 PR 时,代码库管理员会收到通知,以便审核建议的代码更改。此外,您还可以添加其他用户作为审核者,以获取有关代码更改的反馈。PR 将触发 Cloud Build,后者将在代码库上运行测试。
代码审核者会根据您的代码更改提供代码注释,并根据最佳实践和文档要求您进行修改。管理员会审核您的代码更改,确保您的代码符合代码库的要求,并可能会再次要求您进行一些更改,然后才能将您的代码合并到主代码库中。
执行以下步骤,将代码提交到您的派生分支,并将代码推送到您的派生分支:
- 第一步是将更改的文件添加到本地代码库中。
$ git add main.tf
$ git add README.md
$ git add variables.tf
$ git add examples/multiple-buckets/main.tf
$ git add test/integration/multiple_buckets/multiple_buckets_test.go
# The ‘git add' command adds the file in the local repository and
# stages the file for commit. To unstage a file, use git reset HEAD YOUR-FILE
- 您的文件现在已暂存,接下来您将提交更改。
$ git commit -m "First CFT commit"
# This will commit the staged changes and prepares them to be pushed
# to a remote repository. To remove this commit and modify the file,
# use 'git reset --soft HEAD~1' and commit and add the file again.
- 将本地代码库中已提交的更改推送到 GitHub,以创建拉取请求 (PR)。
$ git push -u origin feature/silly_label
# Pushes the changes in your local repository up to the remote
# repository you specified as the origin
您的代码更改现已准备好进行拉取请求!
执行以下步骤,为 terraform-google-modules/terraform-google-cloud-storage 代码库创建 PR:
- 在网络浏览器中,前往 代码库的主页。
- 您会看到一条横幅建议,提示您从自己的 Fork 中打开 PR。点击“比较和拉取请求”。

- 为拉取请求输入标题和说明,以描述您的代码更改。在保持简洁的同时,尽可能具体地说明。
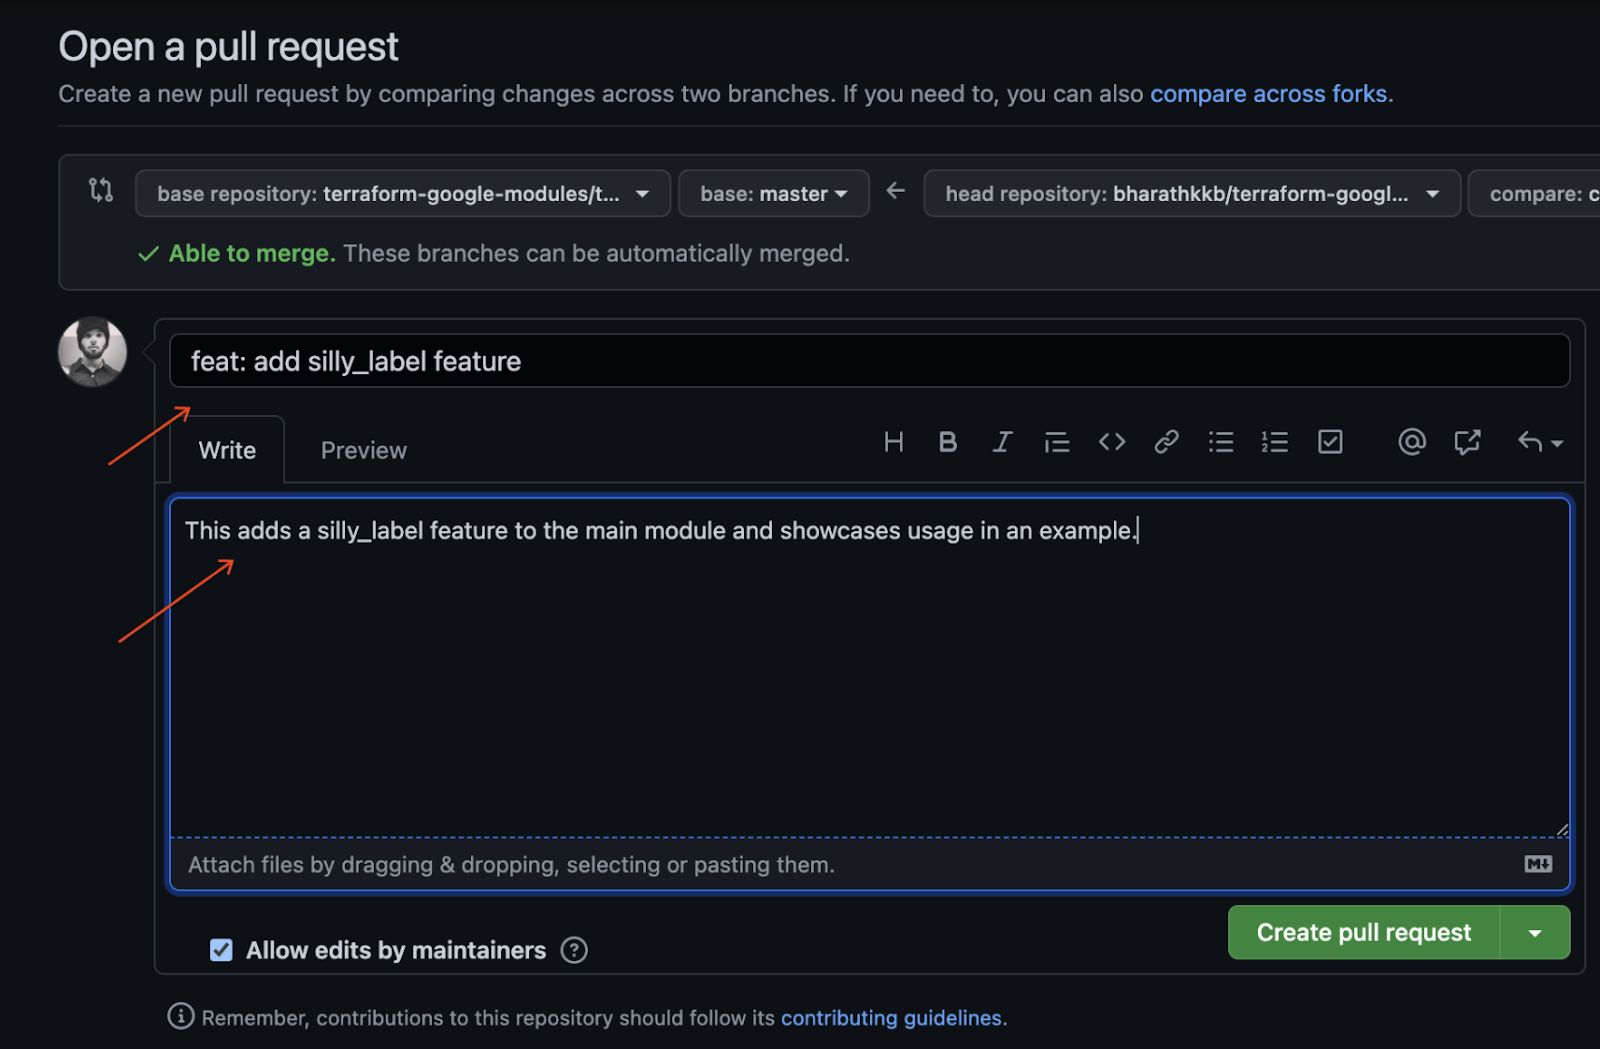
- 如需创建可供审核的拉取请求,请点击“创建拉取请求”。
- 您将看到因 PR 而触发的 Cloud Build 触发器正在运行。
- 如果您遇到任何问题,请参阅有关从派生版本打开拉取请求的官方 GitHub 文档。
您已成功将第一个代码更改推送到派生分支,并针对主分支提出了第一个 CFT PR!
12. 恭喜
恭喜,您已成功向 CFT 模块添加了一项功能,并提交了 PR 以供审核!
您向 CFT 模块添加了一项功能,通过示例在本地对其进行了测试,并在将代码提交到 GitHub 之前执行了测试。最后,您提出了 PR 以供审核,并最终将其合并到 CFT 中。
您现在已了解开始使用 Cloud Foundation Toolkit 的重要步骤。