
1. ข้อมูลเบื้องต้นเกี่ยวกับ CFT 101

อัปเดตล่าสุด: 11-02-2022
Cloud Foundation Toolkit คืออะไร
โดยพื้นฐานแล้ว CFT มีเทมเพลตแนวทางปฏิบัติแนะนำเพื่อให้เริ่มต้นใช้งาน Google Cloud Platform ได้อย่างรวดเร็ว ในบทแนะนำนี้ คุณจะได้เรียนรู้วิธีมีส่วนร่วมใน Cloud Foundation Toolkit
สิ่งที่คุณต้องมี
- บัญชี GitHub
- ติดตั้ง Docker ในเครื่องของคุณหรือใช้ Cloud Shell ( การติดตั้งใน Mac, การติดตั้งใน Windows)
- โปรแกรมแก้ไขโค้ดสำหรับการแก้ไขโค้ด (ตัวอย่าง: Visual Studio Code)
- มีความคุ้นเคยกับ Git และ GitHub ในระดับพื้นฐาน
- มีประสบการณ์ในการใช้ Terraform และโครงสร้างพื้นฐานเป็นโค้ด
- สิทธิ์ในการมอบบทบาทผู้สร้างโปรเจ็กต์ให้กับบัญชีบริการ
- องค์กร Google Cloud, โฟลเดอร์ทดสอบ และบัญชีสำหรับการเรียกเก็บเงิน
สิ่งที่คุณจะสร้าง
ใน Codelab นี้ คุณจะได้เรียนรู้วิธีมีส่วนร่วมใน Cloud Foundation Toolkit (CFT)
คุณจะได้รับสิ่งต่อไปนี้
- ตั้งค่าสภาพแวดล้อมการพัฒนาเพื่อมีส่วนร่วมใน CFT
- เพิ่มฟีเจอร์ลงในโมดูล CFT
- เพิ่มการทดสอบสำหรับฟีเจอร์ที่เพิ่ม
- เรียกใช้การทดสอบการผสานรวมใน CFT
- เรียกใช้การทดสอบ Lint
- คอมมิตโค้ดไปยัง GitHub และส่ง Pull Request (PR)
คุณจะดำเนินการตามขั้นตอนข้างต้นทั้งหมดได้โดยการเพิ่มฟีเจอร์ใหม่ลงในโมดูล CFT ของ Google Cloud Storage คุณจะเพิ่มป้ายกำกับที่ชื่อ "silly_label" ซึ่งจะเพิ่มลงในที่เก็บข้อมูลทั้งหมดที่สร้างผ่านโมดูล CFT ของ GCS โดยอัตโนมัติ นอกจากนี้ คุณยังจะได้เขียนการทดสอบเพื่อตรวจสอบฟีเจอร์และตรวจสอบการผสานรวมตั้งแต่ต้นทางจนถึงปลายทางด้วย
2. ตั้งค่าสภาพแวดล้อมการพัฒนา
หากต้องการ คุณสามารถใช้ Cloud Shell เพื่อวัตถุประสงค์ในการพัฒนาได้ หากไม่ต้องการใช้ Cloud Shell เพื่อมีส่วนร่วมใน CFT คุณสามารถตั้งค่าสภาพแวดล้อมการพัฒนาในเครื่องได้
ตั้งค่า Git
GitHub ใช้ระบบควบคุมเวอร์ชัน (VCS) แบบโอเพนซอร์สที่เรียกว่า Git Git มีหน้าที่รับผิดชอบทุกอย่างที่เกี่ยวข้องกับ GitHub ซึ่งเกิดขึ้นในเครื่องหรือ Cloud Shell ของคุณ
- เมื่อใช้ Cloud Shell คุณไม่จำเป็นต้องติดตั้ง Git เนื่องจากมีการติดตั้งไว้ล่วงหน้าแล้ว
$ git --version
# This will display the git version on the Cloud Shell.
หากตั้งค่าสภาพแวดล้อมการพัฒนาในเครื่อง คุณต้องติดตั้ง Git
การตั้งค่าชื่อผู้ใช้และอีเมลใน Git
Git ใช้ชื่อผู้ใช้เพื่อเชื่อมโยงคอมมิตกับข้อมูลประจำตัว ชื่อผู้ใช้ Git ไม่เหมือนกับชื่อผู้ใช้ GitHub
คุณเปลี่ยนชื่อที่เชื่อมโยงกับ Git Commit ได้โดยใช้คำสั่ง git config การเปลี่ยนชื่อที่เชื่อมโยงกับการคอมมิต Git โดยใช้ git config จะมีผลกับการคอมมิตในอนาคตเท่านั้น และจะไม่เปลี่ยนชื่อที่ใช้กับการคอมมิตที่ผ่านมา
คุณตั้งค่า Git เรียบร้อยแล้ว และควรจะสามารถ Fork, สร้าง และโคลนสาขาได้ เราจะใช้ Git อย่างกว้างขวางใน Codelab นี้
3. Fork ที่เก็บ GCS ของ CFT
แยกที่เก็บ CFT
คุณตั้งค่า Git ในเครื่องหรือ Cloud Shell ในขั้นตอนก่อนหน้า ตอนนี้คุณต้อง Fork ที่เก็บ CFT ของ Google Cloud Storage เพื่อเริ่มมีส่วนร่วม
Fork คือสำเนาของที่เก็บ การแยกที่เก็บช่วยให้คุณทดลองการเปลี่ยนแปลงได้อย่างอิสระโดยไม่ส่งผลกระทบต่อโปรเจ็กต์เดิม
โดยส่วนใหญ่แล้ว Fork จะใช้เพื่อเสนอการเปลี่ยนแปลงโปรเจ็กต์ของผู้อื่น หรือใช้โปรเจ็กต์ของผู้อื่นเป็นจุดเริ่มต้นสำหรับไอเดียของคุณเอง
เช่น คุณสามารถใช้ Fork เพื่อเสนอการเปลี่ยนแปลงที่เกี่ยวข้องกับการแก้ไขข้อบกพร่อง หากต้องการแก้ไขข้อบกพร่อง คุณสามารถทำดังนี้
- Fork ที่เก็บ
- ทำการแก้ไข
- ส่งคำขอ Pull ไปยังเจ้าของโปรเจ็กต์
ขั้นตอนการ Fork ที่เก็บ CFT
- เปิดเว็บเบราว์เซอร์แล้วไปที่ที่เก็บ terraform-google-modules/terraform-google-cloud-storage เราจะใช้ที่เก็บนี้สำหรับ Codelab ทั้งหมด
- คลิกแยกที่มุมขวาบนของหน้า

- คุณจะเห็นตัวเลือกตำแหน่งที่ต้องการ Fork ให้เลือกโปรไฟล์ของคุณ แล้วระบบจะ Fork ที่เก็บ
โคลน Fork ในเครื่อง
Fork ที่คุณสร้างคือสำเนาของที่เก็บโมดูล GCS ตอนนี้คุณจะโคลนที่เก็บนี้ไปยังสภาพแวดล้อมในเครื่องเพื่อเพิ่มฟีเจอร์ใหม่
ขั้นตอนการโคลน Fork มีดังนี้
- เปิดเว็บเบราว์เซอร์แล้วไปที่ Fork ใน terraform-google-modules/terraform-google-cloud-storage
- ที่มุมขวาบน คุณจะเห็นปุ่ม "โค้ด" ให้คลิกปุ่มนี้

- หลังจากคลิกปุ่ม "Code" แล้ว ให้คลิกไอคอน "คัดลอก" เพื่อคัดลอก URL ของ Fork คุณจะใช้ URL นี้เพื่อโคลน Fork ไปยังสภาพแวดล้อมในเครื่อง

- ไปที่เทอร์มินัลใน VSCode หรือเครื่องของคุณ แล้วโคลน Fork
$ git clone <url>
# This command will clone your fork locally.
# Paste the copied URL from the previous step.
- ตอนนี้คุณได้โคลน Fork ในเครื่องแล้ว คุณควรไปที่รีโป สร้างกิ่งใหม่จาก Fork และทำการเปลี่ยนแปลงโค้ดในกิ่งชั่วคราว
ตามธรรมเนียม คุณตั้งชื่อสาขาได้ดังนี้
- สำหรับคำขอฟีเจอร์ ให้ทำดังนี้
feature/feature-name - สำหรับการอัปเดตภายใน
internal/change-name - สำหรับการแก้ไขข้อบกพร่อง
bugfix/issue-name
เนื่องจากคุณกำลังเพิ่มฟีเจอร์ใหม่ คุณจึงเรียกสาขาชั่วคราวว่า feature/silly_label
$ cd terraform-google-cloud-storage
# This command takes you into the cloned directory on your local machine.

$ git branch
# This command tells your current branch
# When you run this for the first time after you have cloned, your
# output should say "master", that is your fork.

$ git checkout -b feature/silly_label
# This command creates a new branch on your fork and switches your
# branch to the newly created branch.

$ git branch
# This command will confirm your current branch to be "feature/silly_label"
ตอนนี้คุณพร้อมที่จะเริ่มทำงานใน Cloud Foundation Toolkit แล้ว
4. สร้างสภาพแวดล้อมการทดสอบ
กระบวนการพัฒนา CFT มาตรฐานจะอิงตามการใช้โปรเจ็กต์ทดสอบที่แยกต่างหากสำหรับการทดสอบ ขั้นตอนนี้จะแนะนำวิธีสร้างโปรเจ็กต์ทดสอบ (อิงตามการกำหนดค่ามาตรฐาน) ผ่านบัญชีบริการ
0. ติดตั้ง Docker Engine
หากใช้เครื่องเพื่อวัตถุประสงค์ในการพัฒนา คุณต้องติดตั้ง Docker Engine
1. ติดตั้ง Google Cloud SDK
คุณไม่จำเป็นต้องติดตั้ง Google Cloud SDK หากใช้ Cloud Shell ของ GCP
ไปที่ Google Cloud SDK แล้วดาวน์โหลดโปรแกรมติดตั้งแบบอินเทอร์แอกทีฟสำหรับแพลตฟอร์มของคุณ
2. ตั้งค่า
หากต้องการสร้างสภาพแวดล้อมการทดสอบ คุณจะต้องมีองค์กร Google Cloud, โฟลเดอร์ทดสอบ และบัญชีสำหรับการเรียกเก็บเงิน คุณต้องตั้งค่าเหล่านี้ผ่านตัวแปรสภาพแวดล้อม
export TF_VAR_org_id="your_org_id"
export TF_VAR_folder_id="your_folder_id"
export TF_VAR_billing_account="your_billing_account_id"
3. ตั้งค่าบัญชีบริการ
ก่อนสร้างสภาพแวดล้อมการทดสอบ คุณต้องดาวน์โหลดคีย์บัญชีบริการไปยังสภาพแวดล้อมการทดสอบ บัญชีบริการนี้จะต้องมีบทบาทผู้สร้างโปรเจ็กต์ ผู้ใช้บัญชีสำหรับการเรียกเก็บเงิน และผู้ดูองค์กร ขั้นตอนเหล่านี้จะช่วยให้คุณสร้างบัญชีบริการใหม่ได้ แต่คุณจะใช้บัญชีที่มีอยู่ซ้ำก็ได้
3.1 สร้างหรือเลือกโปรเจ็กต์ GCP เริ่มต้น
ก่อนสร้างบัญชีบริการ คุณต้องเลือกโปรเจ็กต์ที่จะโฮสต์บัญชีบริการ นอกจากนี้ คุณยังสร้างโปรเจ็กต์ใหม่ได้ด้วย
gcloud config set core/project YOUR_PROJECT_ID
3.2 เปิดใช้ Google Cloud APIs
เปิดใช้ Google Cloud APIs ต่อไปนี้ในโปรเจ็กต์เริ่มต้น
gcloud services enable cloudresourcemanager.googleapis.com
gcloud services enable iam.googleapis.com
gcloud services enable cloudbilling.googleapis.com
3.3 สร้างบัญชีบริการ
สร้างบัญชีบริการใหม่เพื่อจัดการสภาพแวดล้อมการทดสอบ
# Creating a service account for CFT.
gcloud iam service-accounts create cft-onboarding \
  --description="CFT Onboarding Terraform Service Account" \
  --display-name="CFT Onboarding"

# Assign SERVICE_ACCOUNT environment variable for later steps
export SERVICE_ACCOUNT=cft-onboarding@$(gcloud config get-value core/project).iam.gserviceaccount.com
วิธียืนยันว่าสร้างบัญชีบริการแล้ว
gcloud iam service-accounts list --filter="EMAIL=${SERVICE_ACCOUNT}"
3.4 มอบหมายบทบาทผู้สร้างโปรเจ็กต์ ผู้ใช้บัญชีสำหรับการเรียกเก็บเงิน และผู้ดูองค์กรให้กับบัญชีบริการ:
gcloud resource-manager folders add-iam-policy-binding ${TF_VAR_folder_id} \
  --member="serviceAccount:${SERVICE_ACCOUNT}" \
  --role="roles/resourcemanager.projectCreator"
gcloud organizations add-iam-policy-binding ${TF_VAR_org_id} \
  --member="serviceAccount:${SERVICE_ACCOUNT}" \
  --role="roles/billing.user"
gcloud beta billing accounts add-iam-policy-binding ${TF_VAR_billing_account} \
  --member="serviceAccount:${SERVICE_ACCOUNT}" \
  --role="roles/billing.user"
gcloud organizations add-iam-policy-binding ${TF_VAR_org_id} \
  --member="serviceAccount:${SERVICE_ACCOUNT}" \
  --role="roles/resourcemanager.organizationViewer"
ตอนนี้คุณมีบัญชีบริการที่ใช้จัดการสภาพแวดล้อมการทดสอบได้แล้ว
4. เตรียมข้อมูลเข้าสู่ระบบ Terraform
หากต้องการสร้างสภาพแวดล้อมการทดสอบ คุณต้องดาวน์โหลดคีย์บัญชีบริการลงในเชลล์
4.1 คีย์บัญชีบริการ
สร้างและดาวน์โหลดคีย์บัญชีบริการสำหรับ Terraform
gcloud iam service-accounts keys create cft.json --iam-account=${SERVICE_ACCOUNT}
4.2 ตั้งค่าข้อมูลเข้าสู่ระบบ Terraform
ระบุคีย์ให้กับ Terraform โดยใช้ตัวแปรสภาพแวดล้อม SERVICE_ACCOUNT_JSON และตั้งค่าเป็นเนื้อหาของคีย์บัญชีบริการ
export SERVICE_ACCOUNT_JSON=$(< cft.json)
หลังจากจัดเก็บข้อมูลเข้าสู่ระบบในตัวแปรสภาพแวดล้อมแล้ว ให้นำไฟล์คีย์ออก คุณสร้างคีย์ใหม่ได้ในภายหลังหากจำเป็นโดยใช้คำสั่งเดียวกันกับด้านบน
rm -rf cft.json
5. สร้างโปรเจ็กต์ทดสอบสำหรับการทำให้ Terraform ใช้งานได้
เมื่อเตรียมทุกอย่างพร้อมแล้ว คุณก็สร้างโปรเจ็กต์ทดสอบได้ด้วยคำสั่งเดียว เรียกใช้คำสั่งนี้จากรูทไดเรกทอรีของ terraform-google-cloud-storage
make docker_test_prepare
คุณจะเห็นเอาต์พุตด้านล่างเมื่อเรียกใช้ make docker_test_prepare และในตอนท้ายคุณจะได้รับ test_project_id ที่สร้างขึ้น ซึ่งคุณจะใช้เพื่อทดสอบและติดตั้งใช้งานโมดูล Cloud Storage ด้วยฟีเจอร์ใหม่ หากพบปัญหาในการลิงก์บัญชีสำหรับการเรียกเก็บเงิน โปรดดูขั้นตอนการแก้ปัญหา
macbookpro3:terraform-google-cloud-storage user$ make docker_test_prepare
docker run --rm -it \
                -e SERVICE_ACCOUNT_JSON \
                -e TF_VAR_org_id \
                -e TF_VAR_folder_id \
                -e TF_VAR_billing_account \
                -v /Users/cft/terraform-google-cloud-storage:/workspace \
                gcr.io/cloud-foundation-cicd/cft/developer-tools:0.8.0 \
                /usr/local/bin/execute_with_credentials.sh prepare_environment
Activated service account credentials for: [cft-onboarding@<project_id>.iam.gserviceaccount.com]
Activated service account credentials for: [cft-onboarding@<project_id>.iam.gserviceaccount.com]
Initializing modules...

Initializing the backend...

Initializing provider plugins...

The following providers do not have any version constraints in configuration,
so the latest version was installed.

To prevent automatic upgrades to new major versions that may contain breaking
changes, it is recommended to add version = "..." constraints to the
corresponding provider blocks in configuration, with the constraint strings
suggested below.

* provider.google-beta: ve>rsion = "~ 3.9"
* provide>r.null: version = "~ 2.1"
*> provider.random: version = "~ 2.2"

Terraform has been successfully initialized!

You may now begin working with Terraform. Try running "terraform plan" to see
any changes that are required for your infrastructure. All Terraform commands
should now work.

If you ever set or change modules or backend configuration for Terraform,
rerun this command to reinitialize your working directory. If you forget, other
commands will detect it and remind you to do so if necessary.
module.project.module.project-factory.null_resource.preconditions: Refreshing state... [id=8723188031607443970]
module.project.module.project-factory.null_resource.shared_vpc_subnet_invalid_name[0]: Refreshing state... [id=5109975723938185892]
module.project.module.gsuite_group.data.google_organization.org[0]: Refreshing state...
module.project.module.project-factory.random_id.random_project_id_suffix: Refreshing state... [id=rnk]
module.project.module.project-fac<tory.googl>e_project.main: Refreshing state... [id=project-id]
module.project.module.project-factory.google_project_ser<vice.proje>ct_services[0]: Refreshing state... [id=project-id/storage-api.googleapis.com]
module.project.module.project-factory.google_project_ser<vice.proje>ct_services[1]: Refreshing state... [id=project-id/cloudresourcemanager.googleapis.com]
module.project.module.project-factory.google_project_ser<vice.proje>ct_services[2]: Refreshing state... [id=project-id/compute.googleapis.com]
module.project.module.project-factory.data.null_data_source.default_service_account: Refreshing state...
module.project.module.project-factory.google_service_account.default_service_account: Refreshing state... [id=projects/ci-cloud-sto<rage-ae79/>serviceAccounts/project-service-account@project-id.iam.gserv
iceaccount.com]
module.project.module.project-factory.google_project_ser<vice.proje>ct_services[3]: Refreshing state... [id=project-id/serviceusage.googleapis.com]
module.project.module.project-factory.null_resource.delete_default_compute_service_account[0]: Refreshing state... [id=3576396874950891283]
google_service_a<ccount.int>_test: Refreshing state... [id=p<rojects/pr>oject-id/serviceAccounts/cft-onboarding@project-id.iam.gserviceaccount.com]
google_service_accou<nt_key.int>_test: Refreshing state... [id=p<rojects/pr>oject-id/serviceAccounts/cft-onboarding@project-id.iam.gserviceaccount.com/keys/351009a1e011e88049ab2097994d1c627a61
6961]
google_projec<t_iam_memb>er.int_test[1]: Refreshing state... [id=project-id/roles/iam<.serviceAc>countUser/serviceaccount:cft-onboarding@project-id.iam.gserviceaccount.com]
google_projec<t_iam_memb>er.int_test[0]: Refreshing state... [id=project-id/<roles/stor>age.admin/serviceaccount:cft-onboarding@project-id.iam.gserviceaccount.com]

Apply complete! Resources: 0 added<, 0 changed, 0 >destroyed.<

Outputs>:

project_id = test-project-id
sa_key = sensitive
Found test/setup/make_source.sh. Using it for additional explicit environment configuration.
ตอนนี้คุณได้สร้างโปรเจ็กต์ทดสอบแล้ว ซึ่งอ้างอิงโดย project_id ดังที่คุณเห็นในเอาต์พุตของคอนโซล ตั้งค่าสภาพแวดล้อมการพัฒนาและการทดสอบแล้ว
5. เพิ่มฟีเจอร์ใหม่ลงในโมดูล CFT
เมื่อตั้งค่าสภาพแวดล้อมการพัฒนาและการทดสอบแล้ว เรามาเริ่มเพิ่มฟีเจอร์ "silly_label" ลงในโมดูล CFT ของ google-cloud-storage กัน
ตรวจสอบว่าคุณอยู่ใน terraform-google-cloud-storage และเปิดไฟล์ main.tf ตามที่เห็นด้านล่างในโครงสร้างโฟลเดอร์

เนื่องจาก "silly_label" เป็นป้ายกำกับ คุณจึงต้องเพิ่มฟีเจอร์ในบรรทัดที่ 27 ในตัวแปร "labels" ใน main.tf ดังที่เห็นด้านล่าง
terraform-google-cloud-storage/main.tf
resource "google_storage_bucket" &qu<ot;>buckets" {
 ...
 storage_class = var.storage_class
 // CODELAB:Add silly label in labels variable
 labels        = merge(var.labels, { name = replace("${local.prefix}${lower(each.value)}", ".", "-") }, { "<;si>lly" = var.silly_label })
 force_destroy = lookup(
 ...
}
ตอนนี้คุณจะเพิ่มตัวแปร silly_label ใน variables.tf ที่เห็นในโครงสร้างโฟลเดอร์ด้านบน
คัดลอกโค้ดด้านล่างและเพิ่มลงในบรรทัดที่ 31 ใน variables.tf และตรวจสอบว่าคุณมีอักขระขึ้นบรรทัดใหม่เหนือและใต้บล็อกตัวแปรที่คุณเพิ่ม
terraform-google-cloud-storage/variables.tf
variable "names" {
 description = "Bucket name suffixes."
 type        = list(string)
}

// CODELAB: Add "silly_label" variable to variables.tf between "names" and "location"
variable "silly_label" {
 description = "Sample label for bucket."
 type        = string
}

variable "location" {
 description = "Bucket location."
 default     = "EU"
}
6. เพิ่มฟีเจอร์ใหม่ลงในตัวอย่างของที่เก็บข้อมูล
คุณได้เพิ่มฟีเจอร์ลงใน main.tf ของโมดูลแล้ว ตอนนี้คุณจะทดสอบฟีเจอร์ที่เพิ่มผ่านตัวอย่าง
คุณจะต้องเพิ่ม "silly_label" ลงใน examples/multiple-buckets/main.tf
เราจะใช้ตัวอย่างนี้ในขั้นตอนถัดไปเพื่อทำการทดสอบการผสานรวม
คัดลอกและวางบรรทัดตัวแปร silly_label ด้านล่างไปยังบรรทัดที่ 27 ใน main.tf ที่ terraform-google-cloud-storage/examples/multiple-buckets/ ตามที่เห็นในโครงสร้างโฟลเดอร์

terraform-google-cloud-storage/examples/multiple-buckets/main.tf
module "cloud_storage<&qu>ot; {
 ...
 // CODELAB: Add "silly_label" as an example to main.tf.
 silly_label  <  >    = "awesome"

 ..
}
7. อัปเดตการทดสอบพิมพ์เขียวเพื่อตรวจสอบฟีเจอร์
คุณได้เพิ่มฟีเจอร์ลงใน main.tf ของโมดูลแล้ว จากนั้นจึงเพิ่มฟีเจอร์ลงในตัวอย่าง multiple_buckets ตอนนี้คุณต้องทดสอบฟีเจอร์ผ่านการทดสอบการผสานรวมพิมพ์เขียวที่เขียนด้วย Golang
คุณจะเพิ่มการทดสอบใหม่ในไฟล์ multiple_buckets_test.go ซึ่งอยู่ในโครงสร้างโฟลเดอร์ด้านล่าง

คุณเพิ่ม "silly_label" ในที่เก็บข้อมูลทั้งหมดที่สร้างผ่านโมดูล multiple_buckets และตอนนี้คุณต้องเขียนการทดสอบเพื่อทดสอบฟีเจอร์ใหม่
ในโค้ดด้านล่าง คุณจะได้รับป้ายกำกับของแต่ละที่เก็บข้อมูลผ่านคำสั่ง gcloud alpha storage จากนั้นตรวจสอบเอาต์พุตที่ส่งคืนจากคำสั่ง
test/integration/multiple_buckets/multiple_buckets_test.go
func TestMultipleBuckets(t *testing.T) {
<..>
op := gcloud.Run(t, fmt.Sprintf("alpha storage ls --buckets gs://%s", bucketName), gcloudArgs).Array()[0]
// verify silly label on each bucket
assert.Equal("awesome", op.Get("metadata.labels.silly").String(), "should have silly label set to awesome")
// verify lifecycle rules
...
}
8. เรียกใช้การทดสอบการผสานรวมใน CFT
การทดสอบการผสานรวม
การทดสอบการผสานรวมใช้เพื่อยืนยันลักษณะการทำงานของโมดูลราก โมดูลย่อย และตัวอย่าง การเพิ่ม การเปลี่ยนแปลง และการแก้ไขควรมาพร้อมกับการทดสอบ
การทดสอบการผสานรวมเขียนขึ้นโดยใช้เฟรมเวิร์กการทดสอบ Blueprint และเรียกใช้โดยใช้ CFT CLI เครื่องมือเหล่านี้รวมอยู่ในอิมเมจ Docker เพื่อความสะดวก
กลยุทธ์ทั่วไปสำหรับการทดสอบเหล่านี้คือการยืนยันลักษณะการทำงานของโมดูลตัวอย่าง เพื่อให้มั่นใจว่าโมดูลรูท โมดูลย่อย และโมดูลตัวอย่างทั้งหมดทำงานได้อย่างถูกต้อง
ในการดำเนินการแบบอินเทอร์แอกทีฟ คุณจะดำเนินการแต่ละขั้นตอนผ่านคำสั่งหลายรายการ
- เรียกใช้
make docker_runเพื่อเริ่มคอนเทนเนอร์ Docker สำหรับการทดสอบในโหมดอินเทอร์แอกทีฟ
Make เป็นเครื่องมือสร้างอัตโนมัติที่สร้างโปรแกรมและไลบรารีที่เรียกใช้งานได้จากซอร์สโค้ดโดยอัตโนมัติด้วยการอ่านไฟล์ที่ชื่อ Makefile ซึ่งระบุวิธีสร้างโปรแกรมเป้าหมาย เมื่อคุณทำการเปลี่ยนแปลงไฟล์ ระบบจะต้องอัปเดตคอนเทนเนอร์ Docker โดยอัตโนมัติ
เมื่อเรียกใช้ make docker_run คุณจะสร้างพื้นที่ทํางานในคอนเทนเนอร์ Docker และเปิดใช้งานข้อมูลเข้าสู่ระบบสําหรับบัญชีบริการ ระบบจะใช้พื้นที่ทำงานในขั้นตอนถัดไปเพื่อเรียกใช้การทดสอบ
คุณจะเห็นเอาต์พุตด้านล่างในเทอร์มินัล
Activated service account credentials for: [cft@<PROJECT_ID>.iam.gserviceaccount.com]
- เรียกใช้
module-swapper -registry-prefix=terraform-google-modulesเพื่อปรับไฟล์ตัวอย่างmain.tfเพื่อนำเข้าโมดูลจากไฟล์ในเครื่องแทนโมดูลที่เผยแพร่
คุณควรเห็นเอาต์พุตในลักษณะต่อไปนี้ในเทอร์มินัล
[root@<CONTAINER_ID> workspace]# module-swapper -registry-prefix=terraform-google-modules
2025/08/04 19:26:29 Module name set from remote to cloud-storage
2025/08/04 19:26:29 Modifications made to file /workspace/examples/multiple_buckets/main.tf
2025/08/04 19:26:29 --- Original
+++ Modified
@@ -21,7 +21,7 @@
 }

 module "cloud_storage" {
-  source = "terraform-google-modules/cloud-storage/google"
+  source = "../.."
   # [>restore-marker]   version = "~ 10.0"

   project_id = var.project_id
- เรียกใช้
cft test listเพื่อแสดงรายการการทดสอบ Blueprint ทั้งหมดในพื้นที่ทำงาน
คุณจะเห็นเอาต์พุตด้านล่างในเทอร์มินัล
[root@CONTAINER_ID workspace]# cft test list
 NAME                           | CONFIG                    | LOCATION
--------------------------------+---------------------------+------------------------------------------------------------
 TestAll/examples/simple_bucket | examples/simple_bucket    | test/integration/discover_test.go
 TestMultipleBuckets            | examples/multiple_buckets | test/integration/multiple_buckets/multiple_buckets_test.go
- เรียกใช้
cft test run <EXAMPLE_NAME> --stage initเพื่อเริ่มต้นตัวอย่าง ในกรณีนี้ ให้เริ่มต้นTestMultipleBucketsการทดสอบcft test run TestMultipleBuckets --stage initนอกจากนี้ คุณยังใช้แฟล็ก--verboseเพื่อรับข้อมูลเพิ่มเติมเมื่อทำการทดสอบได้ด้วย
ระยะเริ่มต้นนี้จะเริ่มต้นตัวอย่าง Terraform
คุณจะเห็นเอาต์พุตด้านล่างในเทอร์มินัล
[root@<CONTAINER_ID> workspace]# cft test run TestMultipleBuckets --stage init --verbose
INFO[02-09|08:24:31] using test-dir: test/integration
...
TestMultipleBuckets 2022-02-09T08:24:35Z command.go:179: Terraform has been successfully initialized!
...
TestMultipleBuckets 2022-02-09T08:24:35Z command.go:100: Running command terraform with args [validate]
TestMultipleBuckets 2022-02-09T08:24:36Z command.go:179: Success! The configuration is valid.
...
--- PASS: TestMultipleBuckets (4.05s)
- เรียกใช้
cft test run <EXAMPLE_NAME> --stage applyเพื่อใช้โมดูลตัวอย่าง
ขั้นตอนนี้จะใช้ตัวอย่างที่เริ่มต้นในระยะก่อนหน้ากับโปรเจ็กต์ GCP ที่สร้างไว้ก่อนหน้านี้ใน Codelab
คุณจะเห็นเอาต์พุตด้านล่างในเทอร์มินัล
[root@<CONTAINER_ID> workspace]# cft test run TestMultipleBuckets --stage apply --verbose
INFO[02-09|08:28:11] using test-dir: test/integration
...
TestMultipleBuckets 2022-02-09T08:28:19Z command.go:179: Apply complete! Resources: 6 added, 0 changed, 0 destroyed.
TestMultipleBuckets 2022-02-09T08:28:19Z command.go:179:
TestMultipleBuckets 2022-02-09T08:28:19Z command.go:179: Outputs:
TestMultipleBuckets 2022-02-09T08:28:19Z command.go:179:
TestMultipleBuckets 2022-02-09T08:28:19Z command.go:179: names = {
TestMultipleBuckets 2022-02-09T08:28:19Z command.go:179:   "one" = "multiple-buckets-erp1-eu-one"
...
--- PASS: TestMultipleBuckets (6.51s)
PASS
ok      github.com/terraform-google-modules/terraform-google-cloud-storage/test/integration/multiple_buckets    6.548s
- เรียกใช้
cft test run <EXAMPLE_NAME> --stage verifyเพื่อยืนยันว่าตัวอย่างที่สร้างขึ้นมีโครงสร้างพื้นฐานตามที่คาดไว้
ขั้นตอนนี้จะเรียกใช้ฟังก์ชันยืนยันใน TestMultipleBuckets โดยปกติแล้ว การยืนยันจะทำผ่านการเรียกใช้คำสั่ง gcloud เพื่อดึงข้อมูลเอาต์พุต JSON สำหรับสถานะปัจจุบันของทรัพยากร และยืนยันว่าสถานะปัจจุบันเป็นไปตามที่ประกาศไว้ในตัวอย่าง
หากได้รับข้อผิดพลาด คุณจะเห็นสิ่งที่คาดไว้และสิ่งที่คำสั่งได้รับสำหรับการทดสอบ
คุณจะเห็นเอาต์พุตด้านล่างในเทอร์มินัล
[root@<CONTAINER_ID> workspace]# cft test run TestMultipleBuckets --stage verify --verbose
INFO[02-09|08:30:19] using test-dir: test/integration
...
TestMultipleBuckets 2022-02-09T08:30:27Z command.go:100: Running command terraform with args [output -no-color -json names_list]
TestMultipleBuckets 2022-02-09T08:30:27Z command.go:179: ["multiple-buckets-erp1-eu-one","multiple-buckets-erp1-eu-two"]
TestMultipleBuckets 2022-02-09T08:30:27Z command.go:100: Running command gcloud with args [alpha storage ls --buckets gs://multiple-buckets-erp1-eu-one --project ci-cloud-storage-8ce9 --json]
TestMultipleBuckets 2022-02-09T08:30:28Z command.go:179: [
TestMultipleBuckets 2022-02-09T08:30:28Z command.go:179: {
TestMultipleBuckets 2022-02-09T08:30:28Z command.go:179:   "url": "gs://multiple-buckets-erp1-eu-one/",
...
TestMultipleBuckets 2022-02-09T08:30:33Z command.go:179: ]
2022/02/09 08:30:33 RUN_STAGE env var set to verify
2022/02/09 08:30:33 Skipping stage teardown
--- PASS: TestMultipleBuckets (12.32s)
PASS
ok      github.com/terraform-google-modules/terraform-google-cloud-storage/test/integration/multiple_buckets    12.359s
- เรียกใช้
cft test run <EXAMPLE_NAME> --stage teardownเพื่อแยกตัวอย่าง
ขั้นตอนนี้จะทำลายโครงสร้างพื้นฐานที่คุณสร้างขึ้นในขั้นตอนข้างต้น ขั้นตอนนี้จะทำลาย Bucket ของ GCS ที่สร้างขึ้นในโปรเจ็กต์พร้อมกับป้ายกำกับที่คุณเพิ่มลงในโมดูล GCS ด้วย
คุณดูเอาต์พุตด้านล่างได้ในเทอร์มินัล
[root@<CONTAINER_ID> workspace]# cft test run TestMultipleBuckets --stage teardown --verbose
INFO[02-09|08:36:02] using test-dir: test/integration
...
TestMultipleBuckets 2022-02-09T08:36:06Z command.go:100: Running command terraform with args [destroy -auto-approve -input=false -lock=false]
TestMultipleBuckets 2022-02-09T08:36:07Z command.go:179: module.cloud_storage.random_id.bucket_suffix: Refreshing state... [id=mNA]
TestMultipleBuckets 2022-02-09T08:36:07Z command.go:179: random_string.prefix: Refreshing state... [id=erp1]
TestMultipleBuckets 2022-02-09T08:36:08Z command.go:179: module.cloud_storage.google_storage_bucket.buckets["two"]: Refreshing state... [id=multiple-buckets-erp1-eu-two]
...
TestMultipleBuckets 2022-02-09T08:36:10Z command.go:179: Destroy complete! Resources: 6 destroyed.
TestMultipleBuckets 2022-02-09T08:36:10Z command.go:179:
--- PASS: TestMultipleBuckets (6.62s)
PASS
ok      github.com/terraform-google-modules/terraform-google-cloud-storage/test/integration/multiple_buckets    6.654s
- เรียกใช้
module-swapper -registry-prefix=terraform-google-modules -restoreเพื่อเลิกทำการปรับไฟล์ตัวอย่างmain.tfจากครั้งล่าสุดที่คุณเรียกใช้module-swapper
[root@<CONTAINER_ID> workspace]# module-swapper -registry-prefix=terraform-google-modules -restore
2025/08/04 19:30:41 Module name set from remote to cloud-storage
2025/08/04 19:36:32 Modifications made to file /workspace/examples/multiple_buckets/main.tf
2025/08/04 19:36:32 --- Original
+++ Modified
@@ -21,8 +21,8 @@
}
module "cloud_storage" {
- source = "../..&qu>ot;
- version = "~ 10.0"
+ source = "terraform-google-modules/cl>oud-storage/google"
+ version = "~ 10.0"
project_id = var.project_id
- เรียกใช้
exitเพื่อออกจากคอนเทนเนอร์ทดสอบ
9. การสร้างเอกสารประกอบสำหรับอินพุตและเอาต์พุต
ระบบจะสร้างตารางอินพุตและเอาต์พุตในไฟล์ README ของโมดูลราก โมดูลย่อย และโมดูลตัวอย่างโดยอัตโนมัติตาม variables และ outputs ของโมดูลที่เกี่ยวข้อง คุณต้องรีเฟรชตารางเหล่านี้หากมีการเปลี่ยนแปลงอินเทอร์เฟซของโมดูล
เรียกใช้
make generate_docs
# This will generate new Inputs and Outputs tables
10. เรียกใช้การทดสอบ Lint ใน CFT
Linter เป็นเครื่องมือที่วิเคราะห์ซอร์สโค้ดเพื่อแจ้งข้อผิดพลาดในการเขียนโปรแกรม บั๊ก ข้อผิดพลาดด้านรูปแบบ และโครงสร้างที่น่าสงสัย
ไฟล์จำนวนมากในที่เก็บสามารถตรวจสอบหรือจัดรูปแบบเพื่อรักษามาตรฐานคุณภาพได้ คุณจะใช้การทดสอบ Lint เพื่อให้มั่นใจในคุณภาพของ CFT
เรียกใช้
make docker_test_lint
# This will run all lint tests on your repo
11. การส่งคำขอ Pull ใน GitHub
ตอนนี้คุณได้เปลี่ยนโค้ดในเครื่องและทดสอบผ่านการทดสอบการผสานรวมแล้ว คุณอาจต้องการเผยแพร่โค้ดนี้ไปยังที่เก็บข้อมูลหลัก
หากต้องการทำให้โค้ดพร้อมใช้งานในที่เก็บหลัก คุณจะต้องคอมมิตการเปลี่ยนแปลงโค้ดไปยังสาขาของคุณและพุชไปยังที่เก็บหลัก หากต้องการเพิ่มโค้ดลงในที่เก็บหลักที่คุณ Fork ไว้ตอนต้นของ Codelab คุณจะต้องส่งคำขอ Pull (PR) ในที่เก็บหลักหลังจากคอมมิตโค้ดลงในที่เก็บของคุณ
เมื่อคุณสร้างคำขอส่งโค้ด ผู้ดูแลระบบของที่เก็บจะได้รับการแจ้งเตือนให้ตรวจสอบการเปลี่ยนแปลงโค้ดที่เสนอ นอกจากนี้ คุณยังเพิ่มผู้ใช้คนอื่นๆ เป็นผู้ตรวจสอบเพื่อรับความคิดเห็นเกี่ยวกับการเปลี่ยนแปลงโค้ดได้ด้วย PR จะทริกเกอร์ Cloud Build ซึ่งจะเรียกใช้การทดสอบในที่เก็บ
โดยอิงตามการเปลี่ยนแปลงโค้ดของคุณ ผู้ตรวจสอบโค้ดจะแสดงความคิดเห็นเกี่ยวกับโค้ดและขอให้แก้ไขหากจำเป็นต้องเปลี่ยนแปลงตามแนวทางปฏิบัติแนะนำและเอกสารประกอบ ผู้ดูแลระบบจะตรวจสอบการเปลี่ยนแปลงโค้ดของคุณ เพื่อให้มั่นใจว่าโค้ดเป็นไปตามข้อกำหนดของที่เก็บ และอาจขอให้คุณทำการเปลี่ยนแปลงบางอย่างอีกครั้งก่อนที่จะผสานโค้ดลงในที่เก็บหลัก
ทำตามขั้นตอนต่อไปนี้เพื่อคอมมิตโค้ดไปยังกิ่งที่แยกออกมาและพุชโค้ดไปยังกิ่งที่แยกออกมา
- ขั้นตอนแรกคือการเพิ่มไฟล์ที่เปลี่ยนแปลงลงในที่เก็บในเครื่อง
$ git add main.tf
$ git add README.md
$ git add variables.tf
$ git add examples/multiple-buckets/main.tf
$ git add test/integration/multiple_buckets/multiple_buckets_test.go
# The ‘git add' command adds the file in the local repository and
# stages the file for commit. To unstage a file, use git reset HEAD YOUR-FILE
- ตอนนี้ระบบได้จัดเตรียมไฟล์ของคุณแล้ว ขั้นตอนถัดไปคือการคอมมิตการเปลี่ยนแปลง
$ git commit -m "First CFT commit"
# This will commit the staged changes and prepares them to be pushed
# to a remote repository. To remove this commit and modify the file,
# use 'git reset --soft HEAD~1' and commit and add the file again.
- พุชการเปลี่ยนแปลงที่คอมมิตในที่เก็บในเครื่องไปยัง GitHub เพื่อสร้างคำขอ Pull (PR)
$ git push -u origin feature/silly_label
# Pushes the changes in your local repository up to the remote
# repository you specified as the origin
ตอนนี้การเปลี่ยนแปลงโค้ดของคุณพร้อมสำหรับคำขอ Pull แล้ว
ทำตามขั้นตอนต่อไปนี้เพื่อสร้างคำขอส่งการเปลี่ยนแปลงไปยังterraform-google-modules/terraform-google-cloud-storage ที่เก็บ:
- ในเว็บเบราว์เซอร์ ให้ไปที่หน้าหลักของ repo
- คุณจะเห็นคำแนะนำผ่านแบนเนอร์ให้เปิดคำขอ Pull จาก Fork ของคุณ คลิก "เปรียบเทียบและคำขอพุล"

- ป้อนชื่อและคำอธิบายสำหรับคำขอพุลเพื่ออธิบายการเปลี่ยนแปลงโค้ด โปรดระบุให้เฉพาะเจาะจงที่สุดในขณะที่กระชับ
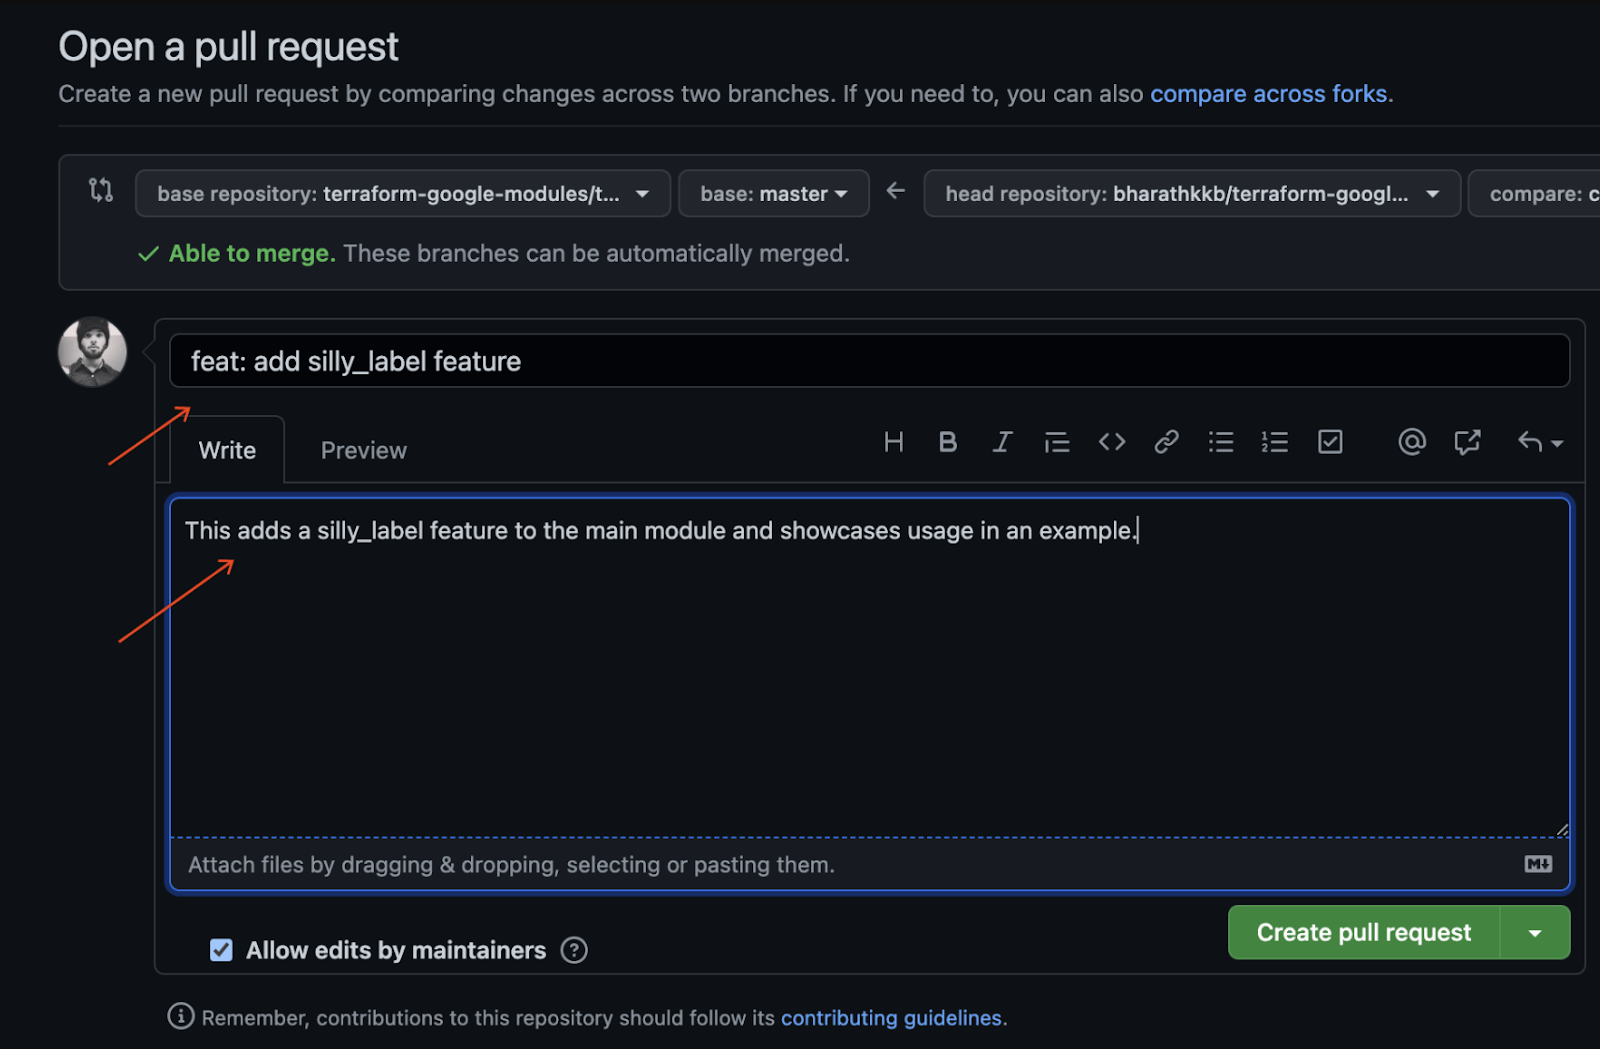
- หากต้องการสร้างคำขอผสานรวมที่พร้อมรับการตรวจสอบ ให้คลิก "สร้างคำขอผสานรวม"
- คุณจะเห็นทริกเกอร์ Cloud Build ที่ทำงานซึ่งทริกเกอร์เนื่องจาก PR
- โปรดดูเอกสารอย่างเป็นทางการของ GitHub เกี่ยวกับการเปิด Pull Request จาก Fork หากพบปัญหา
คุณได้พุชการเปลี่ยนแปลงโค้ดครั้งแรกไปยังกิ่งที่แยกออกมาและสร้าง PR ของ CFT ครั้งแรกกับกิ่งหลักเรียบร้อยแล้ว
12. ขอแสดงความยินดี
ขอแสดงความยินดี คุณเพิ่มฟีเจอร์ลงในโมดูล CFT และส่ง PR เพื่อรับการตรวจสอบเรียบร้อยแล้ว
คุณได้เพิ่มฟีเจอร์ลงในโมดูล CFT ทดสอบฟีเจอร์ดังกล่าวในเครื่องผ่านตัวอย่าง และทำการทดสอบก่อนที่จะคอมมิตโค้ดไปยัง GitHub สุดท้าย คุณได้สร้างคำขอให้ผสานรวม (PR) เพื่อรับการตรวจสอบและผสานรวมขั้นสุดท้ายเข้ากับ CFT
ตอนนี้คุณทราบขั้นตอนสำคัญในการเริ่มต้นใช้งาน Cloud Foundation Toolkit แล้ว