
1. Introduction
Getting insights from data often requires significant time, effort, and deep SQL expertise. In this codelab, you will explore BigQuery's Agent Catalog, a new platform that delivers instant, AI-driven insights through conversational data agents.
You will move beyond simple text-to-SQL conversion by creating a curated data agent. You will learn how to enrich the agent with business context, system instructions, and verified queries to ensure highly accurate results. Finally, you will publish this agent for use by others in your organization.
Prerequisites
- A basic understanding of Google Cloud
What you'll learn
- How to navigate the BigQuery Agent Catalog
- How to create a Custom Agent and define knowledge sources
- How to use Gemini to generate semantic metadata
- How to add System Instructions and Verified Queries to guide the agent
- How to publish and share agents
What you'll need
- A Google Cloud Account and Google Cloud project
- Basic knowledge of BigQuery and SQL
- A web browser such as Chrome
2. Setup and requirements
Choose a project
- Sign-in to the Google Cloud Console and create a new project or reuse an existing one. If you don't already have a Gmail or Google Workspace account, you must create one.


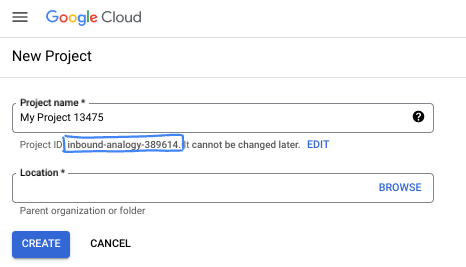
- The Project name is the display name for this project's participants. It is a character string not used by Google APIs. You can always update it.
- The Project ID is unique across all Google Cloud projects and is immutable (cannot be changed after it has been set). The Cloud Console auto-generates a unique string; usually you don't care what it is. In most codelabs, you'll need to reference your Project ID (typically identified as
PROJECT_ID). If you don't like the generated ID, you might generate another random one. Alternatively, you can try your own, and see if it's available. It can't be changed after this step and remains for the duration of the project. - For your information, there is a third value, a Project Number, which some APIs use. Learn more about all three of these values in the documentation.
- Next, you'll need to enable billing in the Cloud Console to use Cloud resources/APIs. Running through this codelab won't cost much, if anything at all. To shut down resources to avoid incurring billing beyond this tutorial, you can delete the resources you created or delete the project. New Google Cloud users are eligible for the $300 USD Free Trial program.
3. Before you begin
Grant yourself required roles
Navigate to the project's IAM page and grant yourself the Gemini Data Analytics Data Agent Owner role:

This role grants you permission to create, edit, share, and delete all data agents in the project.
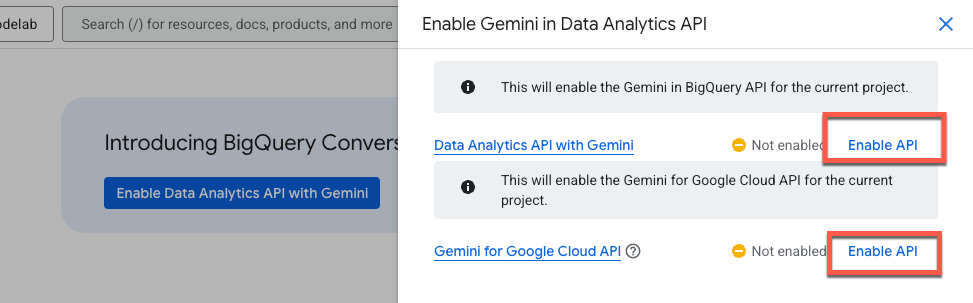
Enable the required APIs
Use the sidebar navigation menu or search menu at the top of the page to navigate to BigQuery > Agents.
Click Enable the Data Analytics API with Gemini:

Enable both the Gemini in BigQuery API and the Gemini for Google Cloud API:
You should now see the new agent page:

4. Create an agent
Let's create your first data agent using the Google Trends International Public dataset. This dataset is useful for asking questions about what search terms are trending internationally, and how those interests compare historically.
Let's start by giving your agent a name and brief description. This description is purely used for other users to understand the agent's purpose.
Agent Name
Google Trends Agent
Agent Description
Data agent for the Google Trends International Top Terms public dataset
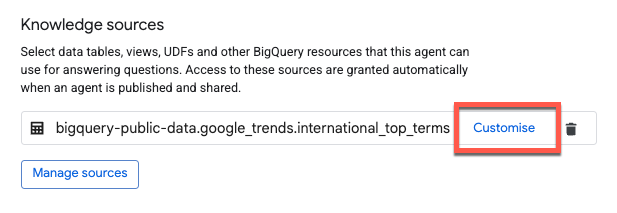
Knowledge Sources
Now add the knowledge sources. A knowledge source is a BigQuery table, view, or UDF that the agent can use to answer questions.
For this demo, add only one table to keep things simple. However, keep in mind that you can add up to 50 knowledge sources per agent to handle more complex data scenarios.
Enter the following table in the search box, check the box, and click Add:
bigquery-public-data.google_trends.international_top_terms

Structured Context
To improve the data agent's accuracy, add structured context to the table and columns. Click Customise:
Gemini automatically generates suggestions for descriptions. Click Accept next to the Table description:

To apply descriptions to all columns, check Select all rows and then click Accept suggestions:

Click Update at the bottom of the page to save changes and return to the Agent Editor.
Instructions
The agent instructions dialog is where you can give the agent additional guidance for it to interpret and query the data sources. This includes:
- Synonyms: Alternative terms for key fields.
- Key fields: The most important fields for analysis.
- Excluded fields: Fields that the data agent should avoid.
- Filtering and grouping: Fields that the agent should use to filter and group data.
- Join relationships: How two or more tables are combined based on common fields.
Copy and paste the following instructions:
### System Instruction

* You are an expert data analyst for the Google Trends International public dataset.
* Always filter on yesterday's refresh_date = DATE_SUB(CURRENT_DATE(), INTERVAL 1 DAY).
* If yesterday returns no data, filter on 2 days ago's refresh_date = DATE_SUB(CURRENT_DATE(), INTERVAL 2 DAY).
* Default to country-level results (one row per term).
* "Top" queries must deduplicate snapshot rows.
* Only include week or score when the user explicitly asks for trends over time.
* This is an international dataset and does not include any data for the United States.

### Additional Descriptions

#### 1. Core model:

* refresh_date selects the daily Top-25 term set.
* week + score are historical weekly values attached to those terms.
* Filtering week does not change which terms appear.

#### 2. Deduplication rule (critical):

* Snapshot rows repeat across weeks and regions.
* For "top" queries, always GROUP BY term (country-level) and compute rank as MIN(rank).

#### 3. Defaults:

* Country-level results only.
* Use region_code only if the user explicitly asks for regions.
* Limit results unless the user asks otherwise.

#### 4. Time series usage:

* Only include week or score when the user asks for trends over time, historical context, or week-over-week score changes.

#### 5. Field guidance:

* Prefer country_code or region_code for filters.
* country_name / region_name are for display only.
* score is normalized; compare trends within a term, not across terms.
Verified Queries
Verified queries, previously known as golden queries, are used as a reference for the agent to improve response accuracy. They shape an agent's response structure and help teach the agent the business logic that your organization uses.
Let's add two examples for your agent. Click Add query, and copy / paste the following question and query:
Question 1:
What are the top search terms in the UK right now?
Query 1:
SELECT term, MIN(rank) AS rank
FROM `bigquery-public-data.google_trends.international_top_terms`
WHERE refresh_date = DATE_SUB(CURRENT_DATE(), INTERVAL 1 DAY)
  AND country_code = 'GB'
GROUP BY term
ORDER BY rank
LIMIT 25;
Before saving this query, let's run it to make sure that it's valid.

Looks good to me! Click Add to save the verified query.
Let's add one more example for a more complex use case. Click Manage queries and add:
Question 2:
Show the last 12 weeks of interest for the current top 5 terms in Auckland.
Answer 2:
WITH top5 AS (
  SELECT term, MIN(rank) AS rank
  FROM `bigquery-public-data.google_trends.international_top_terms`
  WHERE refresh_date = DATE_SUB(CURRENT_DATE(), INTERVAL 1 DAY)
    AND country_code = 'NZ'
    AND region_code = 'NZ-AUK'
  GROUP BY 1
  ORDER BY 2
  LIMIT 5
),
series AS (
  SELECT term, week, score,
    ROW_NUMBER() OVER (PARTITION BY term ORDER BY week DESC) AS rn
  FROM `bigquery-public-data.google_trends.international_top_terms`
  WHERE refresh_date = DATE_SUB(CURRENT_DATE(), INTERVAL 1 DAY)
    AND country_code = 'NZ'
    AND region_code = 'NZ-AUK'
    AND term IN (SELECT term FROM top5)
)
SELECT week, term, score
FROM series
WHERE rn <= 12
ORDER BY 1 DESC, 3
Before moving on to the next section, let's look at the Gemini-generated suggestions:

Here you can see some suggested verified queries. When creating a new agent in the future, this is a great starting point. Just make sure to validate any query that you add!
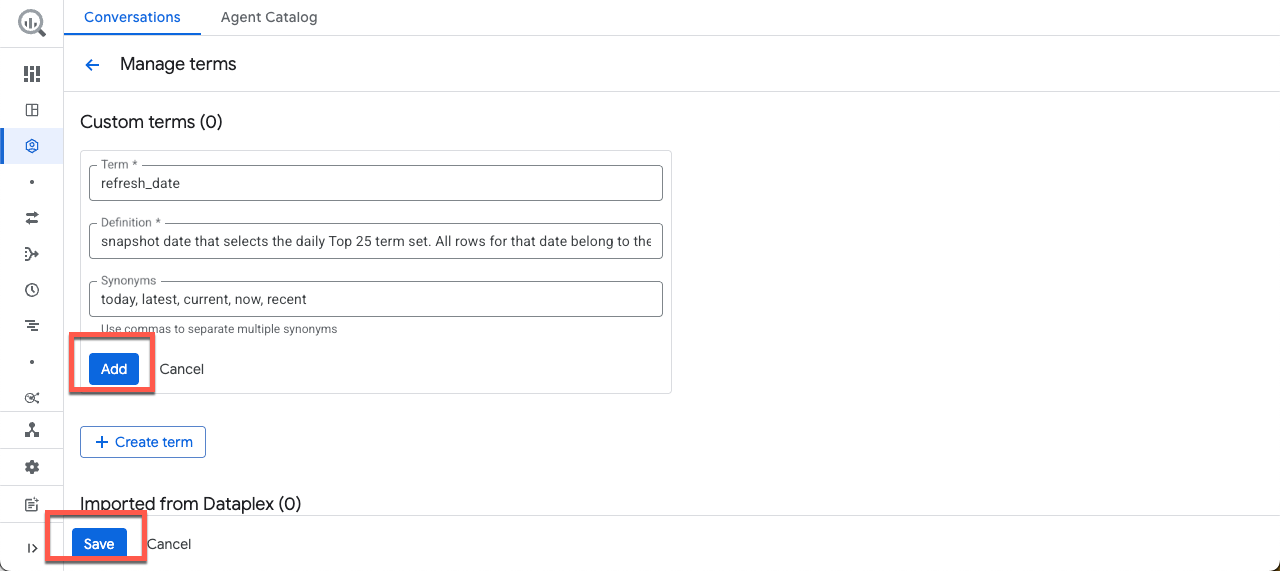
Glossary
Let's add a term to the glossary. If your business uses Dataplex, these terms are imported directly from the business glossary in the Dataplex Universal Catalog.
Click Add term, and copy / paste the following example:
Term:
refresh_date
Definition:
Snapshot date that selects the daily Top 25 term set. All rows for that date belong to the same "what's trending now" snapshot. Attach Historical week and score values after this selection.
Synonyms:
today, latest, current, now, recent
Then click Add, then Save.
Agent settings
In the Settings section, you can configure Labels and the Maximum Bytes Billed.
Labels
Labels are key-value pairs used to organize Google Cloud resources into logical groups. To keep this lab focused, leave the labels blank.
Maximum Bytes Billed
To ensure you don't accidentally generate any expensive queries, let's set a limit for the maximum bytes billed per query. If the agent's query processes bytes above this limit, the query fails without incurring a charge. Input the following value:
10000000000
10,000,000,000 bytes is approximately 9.3 GB. If you don't specify a value, the maximum bytes billed defaults to the project's query usage per day quota.
5. Saving and sharing your agent
Preview
We're all set! Let's test your agent before moving on. On the right side of the screen you can dynamically test the agent while making edits to the configuration. The preview automatically uses the new metadata you provide without saving or publishing the changes.
Let's ask what data the agent has access to. Feel free to ask a few questions in your own words:

Save
After testing a few prompts, Save, and then Publish the agent:

Publishing the agent will make it available in BigQuery Studio, the Conversational Analytics API, and Looker Studio Pro (subject to licensing):
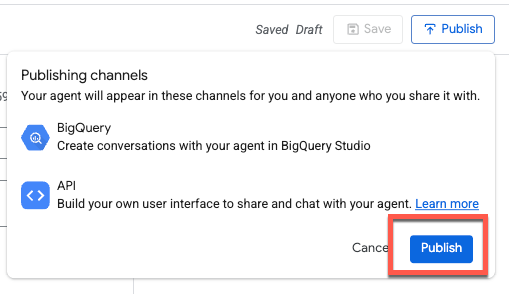
Support for additional surfaces and integrations is planned for future releases.
Share
You should see a confirmation message that the agent has been published. You can now share this agent with other users.

When you share an agent with other users, you control their level of access by assigning them a specific role. These roles determine whether a collaborator can simply view your agent, or if they have the power to edit and manage its configuration.
It's important to note that these roles can be applied at two different levels:
- Project Level: Granting a role at the project level provides the user with those permissions for all agents within that Google Cloud project.
- Agent Level: For more granular control, you can grant roles for a specific agent. This is useful when you want a user to have access to one particular data agent without seeing others in the project.
The predefined roles for Conversational Analytics are as follows:
- Gemini Data Analytics Data Agent Owner (roles/geminidataanalytics.dataAgentOwner) - Create, Edit, Share, and Delete all data agents
- Gemini Data Analytics Data Agent Creator (roles/geminidataanalytics.dataAgentCreator) - Create, Edit, Share, and Delete your own data agents
- Gemini Data Analytics Data Agent Editor (roles/geminidataanalytics.dataAgentEditor) - Chat and Edit access to data agents
- Data Analytics Data Agent User (roles/geminidataanalytics.dataAgentUser) - Chat and View access to data agents
- Gemini Data Analytics Data Agent Viewer (roles/geminidataanalytics.dataAgentViewer) - View (read only) access to data agents
6. Create conversation with an agent
Let's exit out of the Share tab and create a new conversation:
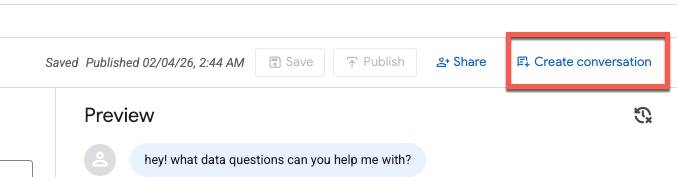
When you click Create conversation, a new untitled conversation is generated.
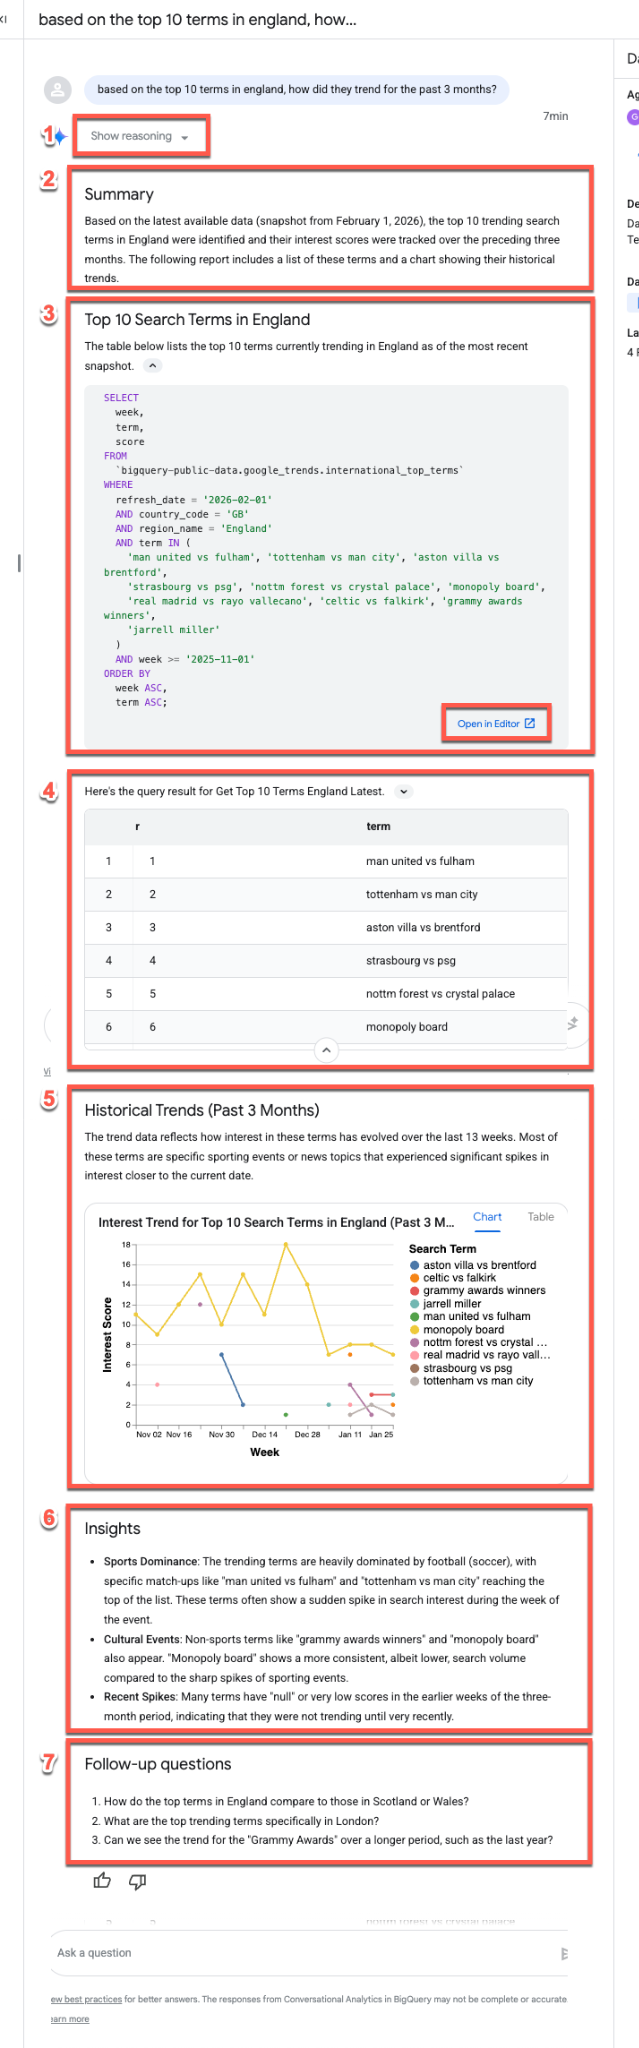
Let's ask about what terms are trending in England (feel free to replace with a location of your choice!):
Based on the top 10 terms in England, how did they trend for the past 3 months?
Unpacking the response stream
The data agent typically follows the same response stream when answering questions:
- Reasoning: The agent first "thinks" through the prompt. Expand the Show reasoning button to view step-by-step insights into the agent's decision-making process.
- Summary: The agent generates a high-level summary of the query, the resulting report, and the visualization.
- Generated SQL: Expand the Here's the query... section to inspect the SQL. Click Open in Editor to fine-tune the query manually in BigQuery Studio.
- Data Results: The agent presents the query results in a clear, tabular format.
- Visualization: A chart appears alongside a brief description. The agent automatically infers the best visualization type (e.g., a multi-series line chart) for your data.
- Data Insights: The agent summarizes key trends and takeaways found within the results.
- Follow-up Questions: Finally, the agent suggests relevant follow-up questions to help you continue your analysis.
BigQuery ML support
Let's follow up and ask if the data agent can run some forecasting based on these results. This leverages BigQuery ML functions to predict future points.
Enter the following prompt (make sure to replace "monopoly board" with a term that's relevant for your query!):
Can you predict and visualize how monopoly board will trend in the next 4 weeks?
You can see AI_FORECAST was used to forecast a time series. No surprises, though it is interesting that you can see a major spike in August 2021, which coincides with the grand opening of the Monopoly Lifesized attraction in London!

7. Explore the Agent Catalog
Let's explore the Agent Catalog before wrapping up. Click on Agent Catalog at the top of the window:

This page serves as your central hub for data agent management, organized into the following sections:
- My agents: Your currently published agents.
- My draft agents: Configurations you have saved but not yet published.
- Shared by others in your organization: Agents created by colleagues that you have permission to access.
- Sample agents by Google: Pre-configured examples to help you get started.
For any agent you manage, you can edit configurations, duplicate agents, and manage sharing permissions.
8. Conclusion
Congratulations, you've successfully built a Conversational Analytics data agent. Check out the reference materials to learn more!