
この Codelab について
1. はじめに
アニメーションは、アプリのユーザー エクスペリエンスを向上させ、重要な情報をユーザーに伝え、アプリをより洗練されたものにし、使いやすくするための優れた方法です。
Flutter のアニメーション フレームワークの概要
Flutter は、フレームごとにウィジェット ツリーの一部を再ビルドすることでアニメーション エフェクトを表示します。事前構築されたアニメーション効果やその他の API が用意されており、アニメーションの作成と合成が容易になります。
- 暗黙的なアニメーションは、アニメーション全体を自動的に実行する事前ビルドされたアニメーション エフェクトです。アニメーションのターゲット値が変更されると、現在の値からターゲット値へのアニメーションが実行され、その間の各値が表示されるため、ウィジェットがスムーズにアニメーション化されます。暗黙的なアニメーションの例としては、
AnimatedSize、AnimatedScale、AnimatedPositionedなどがあります。 - 明示的アニメーションも事前ビルドされたアニメーション効果ですが、動作させるには
Animationオブジェクトが必要です。たとえば、SizeTransition、ScaleTransition、PositionedTransitionなどです。 - Animation は、実行中または停止中のアニメーションを表すクラスです。アニメーションが実行するターゲット値を表す値と、アニメーションが特定の時点で画面に表示する現在の値を表すステータスで構成されています。これは
Listenableのサブクラスであり、アニメーションの実行中にステータスが変更されたときにリスナーに通知します。 - AnimationController は、アニメーションを作成してその状態を制御する方法です。
forward()、reset()、stop()、repeat()などのメソッドを使用して、表示されるアニメーション効果(スケール、サイズ、位置など)を定義しなくてもアニメーションを制御できます。 - Tween は、開始値と終了値の間の値を補間するために使用され、double、
Offset、Colorなど、任意の型を表すことができます。 - カーブは、時間の経過に伴うパラメータの変化率を調整するために使用します。アニメーションを実行する際に、イージング カーブを適用して、アニメーションの開始時または終了時に変化率を速めたり遅くしたりするのが一般的です。カーブは 0.0 ~ 1.0 の入力値を受け取り、0.0 ~ 1.0 の出力値を返します。
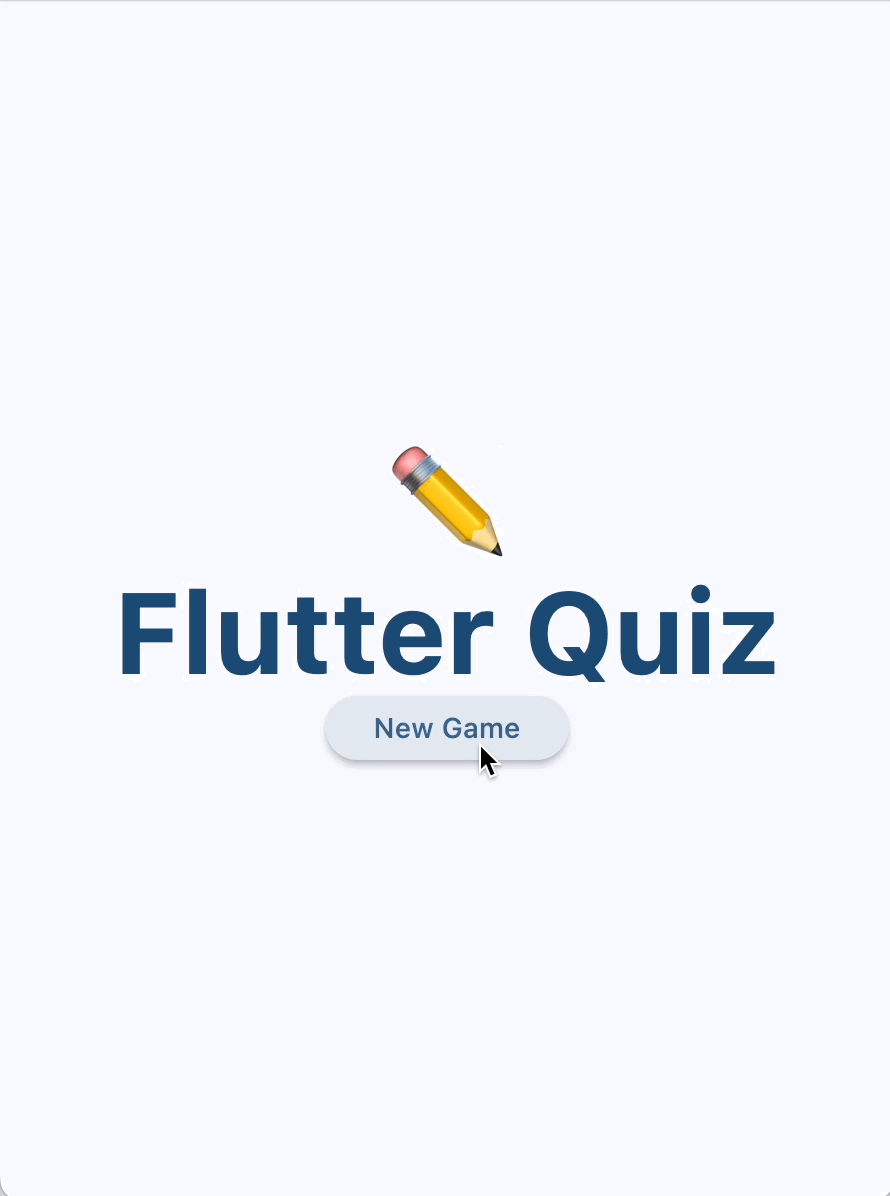
作成するアプリの概要
この Codelab では、さまざまなアニメーション エフェクトと手法を取り入れた多肢選択式のクイズゲームを作成します。
以下について学びます。
- サイズと色をアニメーション化するウィジェットを作成する
- 3D カードフリップ エフェクトを作成する
- アニメーション パッケージの便利な事前ビルド済みアニメーション エフェクトを使用する
- Android の最新バージョンで利用可能な予測型「戻る」ジェスチャーのサポートを追加する
学習内容
この Codelab では、以下について学びます。
- 暗黙的にアニメーション化されたエフェクトを使用して、多くのコードを必要とせずに美しいアニメーションを実現する方法。
- 明示的にアニメーション化された効果を使用して、
AnimatedSwitcherやAnimationControllerなどのビルド済みのアニメーション ウィジェットを使用して独自の効果を設定する方法を学びます。 AnimationControllerを使用して、3D 効果を表示する独自のウィジェットを定義する方法。animationsパッケージを使用して、最小限の設定で凝ったアニメーション エフェクトを表示する方法。
必要なもの
- Flutter SDK
- IDE(VSCode、Android Studio / IntelliJ など)
2. Flutter の開発環境をセットアップする
このラボを完了するには、Flutter SDK とエディタの 2 つのソフトウェアが必要です。
この Codelab は、次のいずれかのデバイスを使って実行できます。
- パソコンに接続され、デベロッパー モードに設定された物理デバイス(Android(ステップ 7 の予測型「戻る」の実装に推奨)または iOS)。
- iOS シミュレータ(Xcode ツールのインストールが必要)
- Android Emulator(Android Studio でセットアップが必要)
- ブラウザ(デバッグには Chrome が必要)
- Windows、Linux、macOS のデスクトップ パソコン。開発はデプロイする予定のプラットフォームで行う必要があります。たとえば、Windows のデスクトップ アプリを開発する場合は、適切なビルドチェーンにアクセスできるように Windows で開発する必要があります。オペレーティング システム固有の要件については、docs.flutter.dev/desktop に詳しい説明があります。
インストールを確認する
Flutter SDK が正しく構成され、上記のターゲット プラットフォームの 1 つ以上がインストールされていることを確認するには、Flutter Doctor ツールを使用します。
$ flutter doctor

Doctor summary (to see all details, run flutter doctor -v):
[✓] Flutter (Channel stable, 3.24.2, on macOS 14.6.1 23G93 darwin-arm64, locale
    en)
[✓] Android toolchain - develop for Android devices
[✓] Xcode - develop for iOS and macOS
[✓] Chrome - develop for the web
[✓] Android Studio
[✓] IntelliJ IDEA Ultimate Edition
[✓] VS Code
[✓] Connected device (4 available)
[✓] Network resources

• No issues found!
3. スターター アプリを実行する
スターター アプリをダウンロードする
git を使用して、GitHub の flutter/samples リポジトリから起動アプリのクローンを作成します。
git clone https://github.com/flutter/codelabs.git
cd codelabs/animations/step_01/
または、ソースコードを ZIP ファイルとしてダウンロードすることもできます。
アプリを実行する
アプリを実行するには、flutter run コマンドを使用して、ターゲット デバイス(android、ios、chrome など)を指定します。サポートされているプラットフォームの一覧については、サポートされているプラットフォームのページをご覧ください。
flutter run -d android
任意の IDE を使用してアプリを実行してデバッグすることもできます。詳しくは、公式の Flutter ドキュメントをご覧ください。
コードについて
スターターアプリは、モデルビュービューモデル(MVVM)設計パターンに沿って 2 つの画面で構成される、多肢選択式のクイズゲームです。QuestionScreen(ビュー)は、QuizViewModel(ビューモデル)クラスを使用して、QuestionBank(モデル)クラスの多肢選択式の質問をユーザーに提示します。
- home_screen.dart - [New Game] ボタンのある画面を表示します。
- main.dart - マテリアル 3 を使用してホーム画面を表示するように
MaterialAppを構成します。 - model.dart - アプリ全体で使用されるコアクラスを定義します。
- question_screen.dart - クイズゲームの UI を表示します。
- view_model.dart -
QuestionScreenによって表示されるクイズゲームの状態とロジックを格納します。

アプリは、ユーザーが [New Game] ボタンを押した際に Flutter の Navigator クラスによって表示されるデフォルトのビュー遷移を除き、アニメーション エフェクトをまだサポートしていません。
4. 暗黙的なアニメーション効果を使用する
暗黙的なアニメーションは、特別な構成を必要としないため、多くの状況で最適な選択肢です。このセクションでは、アニメーション化されたスコアボードを表示するように StatusBar ウィジェットを更新します。一般的な暗黙的なアニメーション エフェクトについては、ImplicitlyAnimatedWidget API のドキュメントをご覧ください。

アニメーションなしのスコアボード ウィジェットを作成する
次のコードを使用して、新しいファイル lib/scoreboard.dart を作成します。
lib/scoreboard.dart
import 'package:flutter/material.dart';

class Scoreboard extends StatelessWidget {
  final int score;
  final int totalQuestions;

  const Scoreboard({
    super.key,
    required this.score,
    required this.totalQuestions,
  });

  @override
  Widget build(BuildContext context) {
    return Padding(
      padding: const EdgeInsets.all(8.0),
      child: Row(
        mainAxisAlignment: MainAxisAlignment.center,
        children: [
          for (var i = 0; i < totalQuestions; i++)
            Icon(
              Icons.star,
              size: 50,
              color: score < i + 1
                  ? Colors.grey.shade400
                  : Colors.yellow.shade700,
            ),
        ],
      ),
    );
  }
}
次に、StatusBar ウィジェットの子に Scoreboard ウィジェットを追加し、以前はスコアと合計問題数を表示していた Text ウィジェットを置き換えます。エディタによって、必要な import "scoreboard.dart" がファイルの上部に自動的に追加されます。
lib/question_screen.dart
class StatusBar extends StatelessWidget {
  final QuizViewModel viewModel;

  const StatusBar({required this.viewModel, super.key});

  @override
  Widget build(BuildContext context) {
    return Card(
      elevation: 4,
      child: Padding(
        padding: EdgeInsets.all(8.0),
        child: Row(
          mainAxisAlignment: MainAxisAlignment.spaceAround,
          children: [
            Scoreboard(                                        // NEW
              score: viewModel.score,                          // NEW
              totalQuestions: viewModel.totalQuestions,        // NEW
            ),
          ],
        ),
      ),
    );
  }
}
このウィジェットには、質問ごとにスターアイコンが表示されます。質問に正解すると、アニメーションなしですぐに別の星が光ります。次のステップでは、スコアのサイズと色をアニメーション化して、スコアが変更されたことをユーザーに通知します。
暗黙的なアニメーション効果を使用する
AnimatedStar という新しいウィジェットを作成します。このウィジェットは、AnimatedScale ウィジェットを使用して、星が有効になったときに scale の値を 0.5 から 1.0 に変更します。
lib/scoreboard.dart
import 'package:flutter/material.dart';

class Scoreboard extends StatelessWidget {
  final int score;
  final int totalQuestions;

  const Scoreboard({
    super.key,
    required this.score,
    required this.totalQuestions,
  });

  @override
  Widget build(BuildContext context) {
    return Padding(
      padding: const EdgeInsets.all(8.0),
      child: Row(
        mainAxisAlignment: MainAxisAlignment.center,
        children: [
          for (var i = 0; i < totalQuestions; i++)
            AnimatedStar(isActive: score > i),                 // Edit this line.
        ],
      ),
    );
  }
}

class AnimatedStar extends StatelessWidget {                   // Add from here...
  final bool isActive;
  final Duration _duration = const Duration(milliseconds: 1000);
  final Color _deactivatedColor = Colors.grey.shade400;
  final Color _activatedColor = Colors.yellow.shade700;

  AnimatedStar({super.key, required this.isActive});

  @override
  Widget build(BuildContext context) {
    return AnimatedScale(
      scale: isActive ? 1.0 : 0.5,
      duration: _duration,
      child: Icon(
        Icons.star,
        size: 50,
        color: isActive ? _activatedColor : _deactivatedColor,
      ),
    );
  }
}                                                              // To here.
これで、ユーザーが質問に正しく回答すると、AnimatedStar ウィジェットは暗黙的なアニメーションを使用してサイズを更新します。ここでは、Icon の color はアニメーション化されず、scale のみがアニメーション化されます。これは AnimatedScale ウィジェットによって行われます。

Tween を使用して 2 つの値を補間する
isActive フィールドが true に変更された直後に、AnimatedStar ウィジェットの色が変更されていることに注目してください。
アニメーション化された色効果を実現するには、AnimatedContainer ウィジェット(ImplicitlyAnimatedWidget の別のサブクラス)を使用することをおすすめします。このウィジェットでは、色を含むすべての属性を自動的にアニメーション化できます。申し訳ございませんが、ウィジェットにはコンテナではなくアイコンを表示する必要があります。
AnimatedIcon を試すこともできます。これは、アイコンの形状間の遷移効果を実装します。ただし、AnimatedIcons クラスには星形アイコンのデフォルト実装はありません。
代わりに、ImplicitlyAnimatedWidget の別のサブクラスである TweenAnimationBuilder を使用します。これは、Tween をパラメータとして受け取ります。トゥイーンとは、2 つの値(begin と end)を受け取り、アニメーションで表示できるように中間値を計算するクラスです。この例では、アニメーション エフェクトの作成に必要な Tween インターフェースを満たす ColorTween を使用します。
Icon ウィジェットを選択し、IDE で [Wrap with Builder] クイック アクションを使用して、名前を TweenAnimationBuilder に変更します。次に、時間と ColorTween を指定します。
lib/scoreboard.dart
class AnimatedStar extends StatelessWidget {
  final bool isActive;
  final Duration _duration = const Duration(milliseconds: 1000);
  final Color _deactivatedColor = Colors.grey.shade400;
  final Color _activatedColor = Colors.yellow.shade700;

  AnimatedStar({super.key, required this.isActive});

  @override
  Widget build(BuildContext context) {
    return AnimatedScale(
      scale: isActive ? 1.0 : 0.5,
      duration: _duration,
      child: TweenAnimationBuilder(                            // Add from here...
        duration: _duration,
        tween: ColorTween(
          begin: _deactivatedColor,
          end: isActive ? _activatedColor : _deactivatedColor,
        ),
        builder: (context, value, child) {                     // To here.
          return Icon(Icons.star, size: 50, color: value);     // And modify this line.
        },
      ),
    );
  }
}
アプリをホットリロードして、新しいアニメーションを確認します。

ColorTween の end 値は、isActive パラメータの値に基づいて変化します。これは、TweenAnimationBuilder が Tween.end 値が変更されるたびにアニメーションを再実行するためです。この場合、新しいアニメーションは現在のアニメーション値から新しい終了値まで実行されます。これにより、(アニメーションの実行中でも)いつでも色を変更でき、正しい中間値でスムーズなアニメーション効果を表示できます。
カーブを適用する
どちらのアニメーション効果も一定の速度で実行されますが、アニメーションは速度を上げたり下げたりすることで、視覚的に興味深く、有益なものになることがあります。
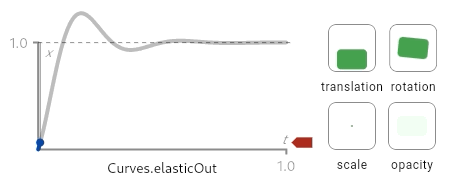
Curve は、時間の経過に伴うパラメータの変化率を定義する減衰関数を適用します。Flutter には、easeIn や easeOut など、Curves クラスに事前ビルドされたイージング カーブのコレクションが付属しています。


これらの図(Curves API のドキュメント ページで入手可能)は、カーブの仕組みを理解するうえで役立ちます。カーブは、0.0 ~ 1.0 の入力値(X 軸に表示)を 0.0 ~ 1.0 の出力値(Y 軸に表示)に変換します。これらの図には、イージング カーブを使用した場合のさまざまなアニメーション効果のプレビューも示されています。
AnimatedStar に _curve という新しいフィールドを作成し、それをパラメータとして AnimatedScale ウィジェットと TweenAnimationBuilder ウィジェットに渡します。
lib/scoreboard.dart
class AnimatedStar extends StatelessWidget {
  final bool isActive;
  final Duration _duration = const Duration(milliseconds: 1000);
  final Color _deactivatedColor = Colors.grey.shade400;
  final Color _activatedColor = Colors.yellow.shade700;
  final Curve _curve = Curves.elasticOut;                       // NEW

  AnimatedStar({super.key, required this.isActive});

  @override
  Widget build(BuildContext context) {
    return AnimatedScale(
      scale: isActive ? 1.0 : 0.5,
      curve: _curve,                                           // NEW
      duration: _duration,
      child: TweenAnimationBuilder(
        curve: _curve,                                         // NEW
        duration: _duration,
        tween: ColorTween(
          begin: _deactivatedColor,
          end: isActive ? _activatedColor : _deactivatedColor,
        ),
        builder: (context, value, child) {
          return Icon(Icons.star, size: 50, color: value);
        },
      ),
    );
  }
}
この例では、elasticOut カーブにより、ばねの動きから始まり、最後に向かってバランスが取れる、誇張されたばね効果が得られます。
アプリをホットリロードすると、このカーブが AnimatedSize と TweenAnimationBuilder に適用されます。
DevTools を使用してアニメーションを遅くする
アニメーション効果をデバッグするために、Flutter DevTools にはアプリ内のすべてのアニメーションを遅くしてアニメーションをより鮮明に表示する方法が用意されています。
DevTools を開くには、アプリがデバッグモードで実行されていることを確認します。次に、VSCode のデバッグ ツールバーで Widget Inspector を選択するか、IntelliJ / Android Studio のデバッグ ツール ウィンドウで [Open Flutter DevTools] ボタンを選択して Widget Inspector を開きます。


ウィジェット インスペクタが開いたら、ツールバーの [アニメーションを遅くする] ボタンをクリックします。

5. 明示的なアニメーション効果を使用する
明示的アニメーションは、暗黙的アニメーションと同様に、事前ビルドされたアニメーション効果ですが、目標値ではなく Animation オブジェクトをパラメータとして受け取ります。そのため、アニメーションがナビゲーション遷移(AnimatedSwitcher や AnimationController など)によってすでに定義されている場合に便利です。
明示的なアニメーション効果を使用する
明示的なアニメーション効果を開始するには、Card ウィジェットを AnimatedSwitcher でラップします。
lib/question_screen.dart
class QuestionCard extends StatelessWidget {
  final String? question;

  const QuestionCard({required this.question, super.key});

  @override
  Widget build(BuildContext context) {
    return AnimatedSwitcher(                                 // NEW
      duration: const Duration(milliseconds: 300),           // NEW
      child: Card(
        key: ValueKey(question),
        elevation: 4,
        child: Padding(
          padding: const EdgeInsets.all(16.0),
          child: Text(
            question ?? '',
            style: Theme.of(context).textTheme.displaySmall,
          ),
        ),
      ),                                                     // NEW
    );
  }
}
AnimatedSwitcher はデフォルトでクロスフェード エフェクトを使用しますが、transitionBuilder パラメータを使用してオーバーライドできます。遷移ビルダーは、AnimatedSwitcher に渡された子ウィジェットと Animation オブジェクトを提供します。これは、明示的なアニメーションを使用する絶好の機会です。
この Codelab で最初に使用する明示的なアニメーションは SlideTransition です。これは、受信側と送信側のウィジェットが移動する開始オフセットと終了オフセットを定義する Animation<Offset> を受け取ります。
Tween には、任意の Animation を Tween が適用された別の Animation に変換するヘルパー関数 animate() があります。つまり、Tween を使用して、AnimatedSwitcher から提供された Animation を Animation に変換し、SlideTransition ウィジェットに提供できます。
lib/question_screen.dart
class QuestionCard extends StatelessWidget {
  final String? question;

  const QuestionCard({required this.question, super.key});

  @override
  Widget build(BuildContext context) {
    return AnimatedSwitcher(
      transitionBuilder: (child, animation) {               // Add from here...
        final curveAnimation = CurveTween(
          curve: Curves.easeInCubic,
        ).animate(animation);
        final offsetAnimation = Tween<Offset>(
          begin: Offset(-0.1, 0.0),
          end: Offset.zero,
        ).animate(curveAnimation);
        return SlideTransition(position: offsetAnimation, child: child);
      },                                                    // To here.
      duration: const Duration(milliseconds: 300),
      child: Card(
        key: ValueKey(question),
        elevation: 4,
        child: Padding(
          padding: const EdgeInsets.all(16.0),
          child: Text(
            question ?? '',
            style: Theme.of(context).textTheme.displaySmall,
          ),
        ),
      ),
    );
  }
}
ここでは、Tween.animate を使用して Curve を Animation に適用し、0.0 ~ 1.0 の範囲の Tween を、x 軸で -0.1 ~ 0.0 に遷移する Tween に変換しています。
または、Animation クラスには、任意の Tween(または Animatable)を受け取って新しい Animation に変換する drive() 関数があります。これにより、トゥイーンを「連結」して、コードを簡潔にできます。
lib/question_screen.dart
transitionBuilder: (child, animation) {
  var offsetAnimation = animation
      .drive(CurveTween(curve: Curves.easeInCubic))
      .drive(Tween<Offset>(begin: Offset(-0.1, 0.0), end: Offset.zero));
  return SlideTransition(position: offsetAnimation, child: child);
},
明示的なアニメーションを使用するもう 1 つの利点は、アニメーションを組み合わせることができることです。SlideTransition ウィジェットをラップして、同じカーブ アニメーションを使用する別の明示的なアニメーション FadeTransition を追加します。
lib/question_screen.dart
return AnimatedSwitcher(
  transitionBuilder: (child, animation) {
    final curveAnimation = CurveTween(
      curve: Curves.easeInCubic,
    ).animate(animation);
    final offsetAnimation = Tween<Offset>(
      begin: Offset(-0.1, 0.0),
      end: Offset.zero,
    ).animate(curveAnimation);
    final fadeInAnimation = curveAnimation;                            // NEW
    return FadeTransition(                                             // NEW
      opacity: fadeInAnimation,                                        // NEW
      child: SlideTransition(position: offsetAnimation, child: child), // NEW
    );                                                                 // NEW
  },
layoutBuilder をカスタマイズする
AnimationSwitcher に小さな問題がある可能性があります。QuestionCard が新しい質問に切り替わると、アニメーションの実行中は使用可能なスペースの中央に配置されますが、アニメーションが停止すると、ウィジェットは画面上部にスナップされます。これにより、質問カードの最終的な位置がアニメーションの実行中の位置と一致しないため、アニメーションがぎくしゃくします。

この問題を解決するために、AnimatedSwitcher にはレイアウトの定義に使用できる layoutBuilder パラメータもあります。この関数を使用すると、カードを画面の上部に配置するようにレイアウト ビルダーを構成できます。
lib/question_screen.dart
@override
Widget build(BuildContext context) {
  return AnimatedSwitcher(
    layoutBuilder: (currentChild, previousChildren) {
      return Stack(
        alignment: Alignment.topCenter,
        children: <Widget>[
          ...previousChildren,
          if (currentChild != null) currentChild,
        ],
      );
    },
このコードは、AnimatedSwitcher クラスの defaultLayoutBuilder を変更したものですが、Alignment.center ではなく Alignment.topCenter を使用しています。
概要
- 明示的なアニメーションは、
Animationオブジェクトを受け取るアニメーション効果です(ターゲットvalueとdurationを受け取るImplicitlyAnimatedWidgetsとは対照的です)。 Animationクラスは実行中のアニメーションを表しますが、特定の効果は定義しません。Tween().animateまたはAnimation.drive()を使用して、TweensとCurves(CurveTweenを使用)をアニメーションに適用します。AnimatedSwitcherのlayoutBuilderパラメータを使用して、子のレイアウト方法を調整します。
6. アニメーションの状態を制御する
これまで、すべてのアニメーションはフレームワークによって自動的に実行されていました。暗黙的なアニメーションは自動的に実行されますが、明示的なアニメーション エフェクトが正しく動作するには Animation が必要です。このセクションでは、AnimationController を使用して独自の Animation オブジェクトを作成し、TweenSequence を使用して Tween を結合する方法について説明します。
AnimationController を使用してアニメーションを実行する
AnimationController を使用してアニメーションを作成する手順は次のとおりです。
StatefulWidgetを作成するStateクラスのSingleTickerProviderStateMixinミックスインを使用して、AnimationControllerにTickerを指定します。initStateライフサイクル メソッドでAnimationControllerを初期化し、現在のStateオブジェクトをvsync(TickerProvider)パラメータに渡します。AnimationControllerがリスナーに通知するたびに、AnimatedBuilderを使用するか、listen()とsetStateを手動で呼び出して、ウィジェットが再ビルドされるようにします。
新しいファイル flip_effect.dart を作成し、次のコードをコピーして貼り付けます。
lib/flip_effect.dart
import 'dart:math' as math;

import 'package:flutter/widgets.dart';

class CardFlipEffect extends StatefulWidget {
  final Widget child;
  final Duration duration;

  const CardFlipEffect({
    super.key,
    required this.child,
    required this.duration,
  });

  @override
  State<CardFlipEffect> createState() => _CardFlipEffectState();
}

class _CardFlipEffectState extends State<CardFlipEffect>
    with SingleTickerProviderStateMixin {
  late final AnimationController _animationController;
  Widget? _previousChild;

  @override
  void initState() {
    super.initState();

    _animationController = AnimationController(
      vsync: this,
      duration: widget.duration,
    );

    _animationController.addListener(() {
      if (_animationController.value == 1) {
        _animationController.reset();
      }
    });
  }

  @override
  void didUpdateWidget(covariant CardFlipEffect oldWidget) {
    super.didUpdateWidget(oldWidget);

    if (widget.child.key != oldWidget.child.key) {
      _handleChildChanged(widget.child, oldWidget.child);
    }
  }

  void _handleChildChanged(Widget newChild, Widget previousChild) {
    _previousChild = previousChild;
    _animationController.forward();
  }

  @override
  Widget build(BuildContext context) {
    return AnimatedBuilder(
      animation: _animationController,
      builder: (context, child) {
        return Transform(
          alignment: Alignment.center,
          transform: Matrix4.identity()
            ..rotateX(_animationController.value * math.pi),
          child: _animationController.isAnimating
              ? _animationController.value < 0.5
                    ? _previousChild
                    : Transform.flip(flipY: true, child: child)
              : child,
        );
      },
      child: widget.child,
    );
  }
}
このクラスは AnimationController を設定し、フレームワークが didUpdateWidget を呼び出して、ウィジェットの構成が変更され、新しい子ウィジェットがある可能性があることを通知するたびにアニメーションを再実行します。
AnimatedBuilder により、AnimationController がリスナーに通知するたびにウィジェット ツリーが再ビルドされます。Transform ウィジェットは、3D 回転効果を適用してカードの裏返しをシミュレートするために使用されます。
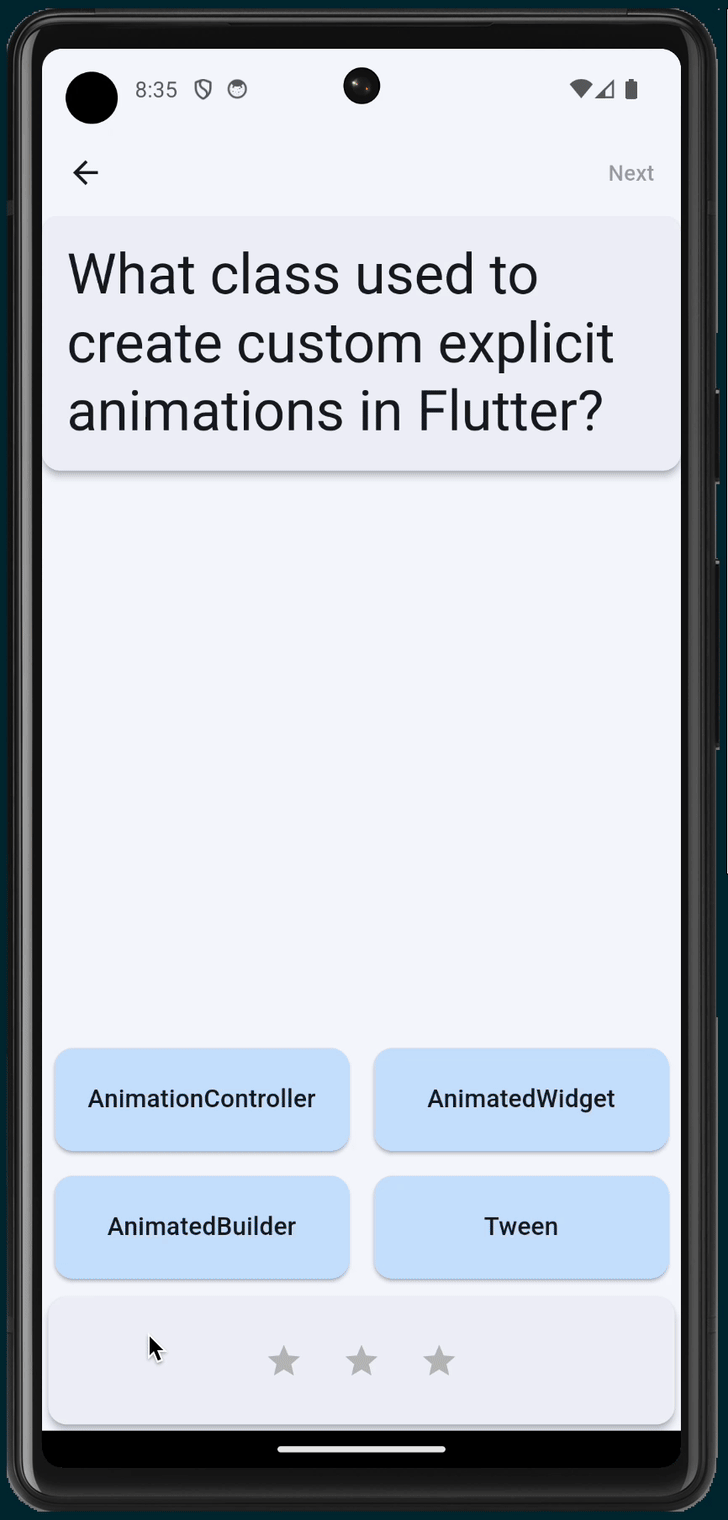
このウィジェットを使用するには、各回答カードを CardFlipEffect ウィジェットでラップします。Card ウィジェットに key を指定します。
lib/question_screen.dart
@override
Widget build(BuildContext context) {
  return GridView.count(
    shrinkWrap: true,
    crossAxisCount: 2,
    childAspectRatio: 5 / 2,
    children: List.generate(answers.length, (index) {
      var color = Theme.of(context).colorScheme.primaryContainer;
      if (correctAnswer == index) {
        color = Theme.of(context).colorScheme.tertiaryContainer;
      }
      return CardFlipEffect(                                    // NEW
        duration: const Duration(milliseconds: 300),            // NEW
        child: Card.filled(                                     // NEW
          key: ValueKey(answers[index]),                        // NEW
          color: color,
          elevation: 2,
          margin: EdgeInsets.all(8),
          clipBehavior: Clip.hardEdge,
          child: InkWell(
            onTap: () => onTapped(index),
            child: Padding(
              padding: EdgeInsets.all(16.0),
              child: Center(
                child: Text(
                  answers.length > index ? answers[index] : '',
                  style: Theme.of(context).textTheme.titleMedium,
                  overflow: TextOverflow.clip,
                ),
              ),
            ),
          ),
        ),                                                      // NEW
      );
    }),
  );
}
アプリをホットリロードすると、CardFlipEffect ウィジェットを使用して回答カードが裏返ります。
このクラスは、明示的なアニメーション効果によく似ています。実際、多くの場合、AnimatedWidget クラスを直接拡張して独自のバージョンを実装することをおすすめします。残念ながら、このクラスは前のウィジェットを State に保存する必要があるため、StatefulWidget を使用する必要があります。独自の明示的なアニメーション エフェクトを作成する方法については、AnimatedWidget の API ドキュメントをご覧ください。
TweenSequence を使用して遅延を追加する
このセクションでは、CardFlipEffect ウィジェットに遅延を追加して、各カードが 1 枚ずつめくられるようにします。まず、delayAmount という新しいフィールドを追加します。
lib/flip_effect.dart
class CardFlipEffect extends StatefulWidget {
  final Widget child;
  final Duration duration;
  final double delayAmount;                      // NEW

  const CardFlipEffect({
    super.key,
    required this.child,
    required this.duration,
    required this.delayAmount,                   // NEW
  });

  @override
  State<CardFlipEffect> createState() => _CardFlipEffectState();
}
次に、delayAmount を AnswerCards ビルドメソッドに追加します。
lib/question_screen.dart
@override
Widget build(BuildContext context) {
  return GridView.count(
    shrinkWrap: true,
    crossAxisCount: 2,
    childAspectRatio: 5 / 2,
    children: List.generate(answers.length, (index) {
      var color = Theme.of(context).colorScheme.primaryContainer;
      if (correctAnswer == index) {
        color = Theme.of(context).colorScheme.tertiaryContainer;
      }
      return CardFlipEffect(
        delayAmount: index.toDouble() / 2,                     // NEW
        duration: const Duration(milliseconds: 300),
        child: Card.filled(
          key: ValueKey(answers[index]),
次に、_CardFlipEffectState で、TweenSequence を使用して遅延を適用する新しい Animation を作成します。Future.delayed など、dart:async ライブラリのユーティリティは使用されません。これは、遅延がアニメーションの一部であり、ウィジェットが AnimationController を使用するときに明示的に制御するものではないためです。同じ TickerProvider を使用するため、DevTools で遅いアニメーションを有効にしたときに、アニメーション効果を簡単にデバッグできます。
TweenSequence を使用するには、2 つの TweenSequenceItem を作成します。1 つは、アニメーションを相対的な時間だけ 0 に保つ ConstantTween と、0.0 から 1.0 に移動する通常の Tween を含む TweenSequenceItem です。
lib/flip_effect.dart
class _CardFlipEffectState extends State<CardFlipEffect>
    with SingleTickerProviderStateMixin {
  late final AnimationController _animationController;
  Widget? _previousChild;
  late final Animation<double> _animationWithDelay;            // NEW

  @override
  void initState() {
    super.initState();

    _animationController = AnimationController(
      vsync: this,
      duration: widget.duration * (widget.delayAmount + 1),
    );

    _animationController.addListener(() {
      if (_animationController.value == 1) {
        _animationController.reset();
      }
    });

    _animationWithDelay = TweenSequence<double>([              // Add from here...
      if (widget.delayAmount > 0)
        TweenSequenceItem(
          tween: ConstantTween<double>(0.0),
          weight: widget.delayAmount,
        ),
      TweenSequenceItem(tween: Tween(begin: 0.0, end: 1.0), weight: 1.0),
    ]).animate(_animationController);                          // To here.
  }
最後に、build メソッドで AnimationController のアニメーションを新しい遅延アニメーションに置き換えます。
lib/flip_effect.dart
@override
Widget build(BuildContext context) {
  return AnimatedBuilder(
    animation: _animationWithDelay,                            // Modify this line
    builder: (context, child) {
      return Transform(
        alignment: Alignment.center,
        transform: Matrix4.identity()
          ..rotateX(_animationWithDelay.value * math.pi),      // And this line
        child: _animationController.isAnimating
            ? _animationWithDelay.value < 0.5                  // And this one.
                  ? _previousChild
                  : Transform.flip(flipY: true, child: child)
            : child,
      );
    },
    child: widget.child,
  );
}
アプリをホットリロードして、カードが 1 枚ずつめくられるのを確認します。チャレンジとして、Transform ウィジェットによって提供される 3D 効果の視点の変更を試してみてください。

7. カスタム ナビゲーション遷移を使用する
ここまでは、1 つの画面でエフェクトをカスタマイズする方法について説明してきましたが、アニメーションを使用するもう 1 つの方法として、画面間の遷移にアニメーションを使用する方法があります。このセクションでは、組み込みのアニメーション効果と、pub.dev の公式の アニメーション パッケージで提供される魅力的なビルド済みアニメーション効果を使用して、画面遷移にアニメーション効果を適用する方法を学習します。
ナビゲーション遷移をアニメーション化する
PageRouteBuilder クラスは、遷移アニメーションをカスタマイズできる Route です。これにより、transitionBuilder コールバックをオーバーライドできます。このコールバックは、Navigator によって実行される受信アニメーションと送信アニメーションを表す 2 つの Animation オブジェクトを提供します。
遷移アニメーションをカスタマイズするには、MaterialPageRoute を PageRouteBuilder に置き換えます。ユーザーが HomeScreen から QuestionScreen に移動する際の遷移アニメーションをカスタマイズするには、FadeTransition(明示的にアニメーション化されたウィジェット)を使用して、新しい画面を前の画面の上にフェードインさせます。
lib/home_screen.dart
ElevatedButton(
  onPressed: () {
    // Show the question screen to start the game
    Navigator.push(
      context,
      PageRouteBuilder(                                         // Add from here...
        pageBuilder: (context, animation, secondaryAnimation) {
          return const QuestionScreen();
        },
        transitionsBuilder:
            (context, animation, secondaryAnimation, child) {
              return FadeTransition(
                opacity: animation,
                child: child,
              );
            },
      ),                                                        // To here.
    );
  },
  child: Text('New Game'),
),
animations パッケージには、FadeThroughTransition などの事前ビルドされたアニメーション効果が用意されています。アニメーション パッケージをインポートし、FadeTransition を FadeThroughTransition ウィジェットに置き換えます。
lib/home_screen.dart
import 'package;animations/animations.dart';

ElevatedButton(
  onPressed: () {
    // Show the question screen to start the game
    Navigator.push(
      context,
      PageRouteBuilder(
        pageBuilder: (context, animation, secondaryAnimation) {
          return const QuestionScreen();
        },
        transitionsBuilder:
            (context, animation, secondaryAnimation, child) {
              return FadeThroughTransition(                     // Add from here...
                animation: animation,
                secondaryAnimation: secondaryAnimation,
                child: child,
              );                                                // To here.
            },
      ),
    );
  },
  child: Text('New Game'),
),
予測型「戻る」アニメーションをカスタマイズする
予測型「戻る」は、現在のルートやアプリの背後を覗き込んで、ナビゲートする前に背後にあるものを確認できる Android の新しい機能です。ピーク アニメーションは、ユーザーが画面をドラッグして戻す際の指の位置によって決まります。
Flutter は、Flutter にナビゲーション スタックにポップするルートがないとき、つまり「戻る」操作でアプリが終了するときに、システムレベルでこの機能を有効にして、システムの予測型「戻る」をサポートします。このアニメーションは、Flutter 自体ではなく、システムによって処理されます。
Flutter は、Flutter アプリ内のルートを移動する際の予測型「戻る」もサポートしています。PredictiveBackPageTransitionsBuilder という特別な PageTransitionsBuilder がシステムの予測型「戻る」ジェスチャーをリッスンし、ジェスチャーの進行状況に応じてページ遷移を開始します。
予測型「戻る」は Android U 以降でのみサポートされていますが、Flutter は元の「戻る」ジェスチャーの動作と ZoomPageTransitionBuilder に正常にフォールバックします。詳しくは、ブログ投稿をご覧ください。独自のアプリで設定する方法に関するセクションも掲載されています。
アプリの ThemeData 構成で、Android では PredictiveBack を使用し、他のプラットフォームではアニメーション パッケージのフェード スルー遷移効果を使用するように PageTransitionsTheme を構成します。
lib/main.dart
import 'package:animations/animations.dart';                                 // NEW
import 'package:flutter/material.dart';

import 'home_screen.dart';

void main() {
  runApp(MainApp());
}

class MainApp extends StatelessWidget {
  const MainApp({super.key});

  @override
  Widget build(BuildContext context) {
    return MaterialApp(
      debugShowCheckedModeBanner: false,
      theme: ThemeData(
        colorScheme: ColorScheme.fromSeed(seedColor: Colors.blue),
        pageTransitionsTheme: PageTransitionsTheme(
          builders: {
            TargetPlatform.android: PredictiveBackPageTransitionsBuilder(),  // NEW
            TargetPlatform.iOS: FadeThroughPageTransitionsBuilder(),         // NEW
            TargetPlatform.macOS: FadeThroughPageTransitionsBuilder(),       // NEW
            TargetPlatform.windows: FadeThroughPageTransitionsBuilder(),     // NEW
            TargetPlatform.linux: FadeThroughPageTransitionsBuilder(),       // NEW
          },
        ),
      ),
      home: HomeScreen(),
    );
  }
}
これで、Navigator.push() コールバックを MaterialPageRoute に変更できます。
lib/home_screen.dart
ElevatedButton(
  onPressed: () {
    // Show the question screen to start the game
    Navigator.push(
      context,
      MaterialPageRoute(                                        // Add from here...
        builder: (context) {
          return const QuestionScreen();
        },
      ),                                                        // To here.
    );
  },
  child: Text('New Game'),
),
FadeThroughTransition を使用して現在の質問を変更する
AnimatedSwitcher ウィジェットは、ビルダー コールバックで 1 つの Animation のみを提供します。これに対処するため、animations パッケージには PageTransitionSwitcher が用意されています。
lib/question_screen.dart
class QuestionCard extends StatelessWidget {
  final String? question;

  const QuestionCard({required this.question, super.key});

  @override
  Widget build(BuildContext context) {
    return PageTransitionSwitcher(                              // Add from here...
      layoutBuilder: (entries) {
        return Stack(alignment: Alignment.topCenter, children: entries);
      },
      transitionBuilder: (child, animation, secondaryAnimation) {
        return FadeThroughTransition(
          animation: animation,
          secondaryAnimation: secondaryAnimation,
          child: child,
        );
      },                                                        // To here.
      duration: const Duration(milliseconds: 300),
      child: Card(
        key: ValueKey(question),
        elevation: 4,
        child: Padding(
          padding: const EdgeInsets.all(16.0),
          child: Text(
            question ?? '',
            style: Theme.of(context).textTheme.displaySmall,
          ),
        ),
      ),
    );
  }
}
OpenContainer を使用する

animations パッケージの OpenContainer ウィジェットは、2 つのウィジェットを視覚的に接続するために展開するコンテナ変換アニメーション エフェクトを提供します。
最初に closedBuilder によって返されたウィジェットが表示され、コンテナがタップされたとき、または openContainer コールバックが呼び出されたときに、openBuilder によって返されたウィジェットに拡大されます。
openContainer コールバックをビューモデルに接続するには、viewModel を QuestionCard ウィジェットに渡す新しいパスを追加し、「ゲームオーバー」画面の表示に使用するコールバックを保存します。
lib/question_screen.dart
class QuestionScreen extends StatefulWidget {
  const QuestionScreen({super.key});

  @override
  State<QuestionScreen> createState() => _QuestionScreenState();
}

class _QuestionScreenState extends State<QuestionScreen> {
  late final QuizViewModel viewModel = QuizViewModel(
    onGameOver: _handleGameOver,
  );
  VoidCallback? _showGameOverScreen;                                    // NEW

  @override
  Widget build(BuildContext context) {
    return ListenableBuilder(
      listenable: viewModel,
      builder: (context, child) {
        return Scaffold(
          appBar: AppBar(
            actions: [
              TextButton(
                onPressed:
                    viewModel.hasNextQuestion && viewModel.didAnswerQuestion
                    ? () {
                        viewModel.getNextQuestion();
                      }
                    : null,
                child: const Text('Next'),
              ),
            ],
          ),
          body: Center(
            child: Column(
              children: [
                QuestionCard(                                           // NEW
                  onChangeOpenContainer: _handleChangeOpenContainer,    // NEW
                  question: viewModel.currentQuestion?.question,        // NEW
                  viewModel: viewModel,                                 // NEW
                ),                                                      // NEW
                Spacer(),
                AnswerCards(
                  onTapped: (index) {
                    viewModel.checkAnswer(index);
                  },
                  answers: viewModel.currentQuestion?.possibleAnswers ?? [],
                  correctAnswer: viewModel.didAnswerQuestion
                      ? viewModel.currentQuestion?.correctAnswer
                      : null,
                ),
                StatusBar(viewModel: viewModel),
              ],
            ),
          ),
        );
      },
    );
  }

  void _handleChangeOpenContainer(VoidCallback openContainer) {        // NEW
    _showGameOverScreen = openContainer;                               // NEW
  }                                                                    // NEW

  void _handleGameOver() {                                             // NEW
    if (_showGameOverScreen != null) {                                 // NEW
      _showGameOverScreen!();                                          // NEW
    }                                                                  // NEW
  }                                                                    // NEW
}
新しいウィジェット GameOverScreen を追加します。
lib/question_screen.dart
class GameOverScreen extends StatelessWidget {
  final QuizViewModel viewModel;
  const GameOverScreen({required this.viewModel, super.key});

  @override
  Widget build(BuildContext context) {
    return Scaffold(
      appBar: AppBar(automaticallyImplyLeading: false),
      body: Center(
        child: Column(
          mainAxisAlignment: MainAxisAlignment.center,
          children: [
            Scoreboard(
              score: viewModel.score,
              totalQuestions: viewModel.totalQuestions,
            ),
            Text('You Win!', style: Theme.of(context).textTheme.displayLarge),
            Text(
              'Score: ${viewModel.score} / ${viewModel.totalQuestions}',
              style: Theme.of(context).textTheme.displaySmall,
            ),
            ElevatedButton(
              child: Text('OK'),
              onPressed: () {
                Navigator.popUntil(context, (route) => route.isFirst);
              },
            ),
          ],
        ),
      ),
    );
  }
}
QuestionCard ウィジェットで、Card を animations パッケージの OpenContainer ウィジェットに置き換え、viewModel とオープン コンテナ コールバックの 2 つの新しいフィールドを追加します。
lib/question_screen.dart
class QuestionCard extends StatelessWidget {
  final String? question;

  const QuestionCard({
    required this.onChangeOpenContainer,
    required this.question,
    required this.viewModel,
    super.key,
  });

  final ValueChanged<VoidCallback> onChangeOpenContainer;
  final QuizViewModel viewModel;

  static const _backgroundColor = Color(0xfff2f3fa);

  @override
  Widget build(BuildContext context) {
    return PageTransitionSwitcher(
      duration: const Duration(milliseconds: 200),
      transitionBuilder: (child, animation, secondaryAnimation) {
        return FadeThroughTransition(
          animation: animation,
          secondaryAnimation: secondaryAnimation,
          child: child,
        );
      },
      child: OpenContainer(                                         // NEW
        key: ValueKey(question),                                    // NEW
        tappable: false,                                            // NEW
        closedColor: _backgroundColor,                              // NEW
        closedShape: const RoundedRectangleBorder(                  // NEW
          borderRadius: BorderRadius.all(Radius.circular(12.0)),    // NEW
        ),                                                          // NEW
        closedElevation: 4,                                         // NEW
        closedBuilder: (context, openContainer) {                   // NEW
          onChangeOpenContainer(openContainer);                     // NEW
          return ColoredBox(                                        // NEW
            color: _backgroundColor,                                // NEW
            child: Padding(                                         // NEW
              padding: const EdgeInsets.all(16.0),                  // NEW
              child: Text(
                question ?? '',
                style: Theme.of(context).textTheme.displaySmall,
              ),
            ),
          );
        },
        openBuilder: (context, closeContainer) {                    // NEW
          return GameOverScreen(viewModel: viewModel);              // NEW
        },                                                          // NEW
      ),
    );
  }
}

8. 完了
これで、Flutter アプリにアニメーション効果を追加し、Flutter のアニメーション システムのコア コンポーネントについて学習しました。具体的には、次の方法について学びました。
ImplicitlyAnimatedWidgetの使用方法ExplicitlyAnimatedWidgetの使用方法CurvesとTweensをアニメーションに適用する方法AnimatedSwitcherやPageRouteBuilderなどのビルド済みの遷移ウィジェットを使用する方法animationsパッケージのFadeThroughTransitionやOpenContainerなどの、事前ビルドされた凝ったアニメーション エフェクトを使用する方法- Android で予測型「戻る」のサポートを追加するなど、デフォルトの遷移アニメーションをカスタマイズする方法。
次のステップ
以下の Codelab をご覧ください。
- マテリアル 3 でアニメーション化されたレスポンシブ アプリ レイアウトを作成する
- Flutter 用マテリアル モーションで美しい遷移を作成する
- Flutter アプリを「退屈なアプリ」から「見栄えの良いアプリ」に変える
または、さまざまなアニメーション手法を紹介するアニメーション サンプルアプリをダウンロードしてください。
関連情報
アニメーションに関するその他のリソースは、flutter.dev にあります。
- アニメーションの概要
- アニメーション チュートリアル(チュートリアル)
- 暗黙的アニメーション(チュートリアル)
- コンテナのプロパティをアニメーション化する(cookbook)
- ウィジェットのフェードインとフェードアウト(クックブック)
- ヒーロー アニメーション
- ページルートの遷移をアニメーション化する(クックブック)
- 物理シミュレーションを使用してウィジェットをアニメーション化する(クックブック)
- アニメーションのずらし
- アニメーションとモーションのウィジェット(ウィジェット カタログ)
Medium の記事もご覧ください。
- アニメーションの詳細
- Flutter のカスタム暗黙的アニメーション
- Flutter と Flux / Redux によるアニメーション管理
- 適切な Flutter アニメーション ウィジェットを選択する方法
- 明示的なアニメーションが組み込まれた方向アニメーション
- 暗黙的アニメーションを使用した Flutter アニメーションの基本
- AnimatedBuilder と AnimatedWidget はどのような場合に使用すればよいですか?